owner’s manual - lg electronicspopoguide.lge.com/download/pd239_eng_web.pdf · owner’s manual...
TRANSCRIPT

Owner’s manual
Please read this manual carefully before operating your device.
MODEL : PD239W/ PD239P/ PD239Y/ PD239TW/ PD239TP/ PD239TY/ PD239SP/ PD239SL/ PD239SA/ PD239G/ PD239PH/ PD239BH/ PD239YH/ PD239SF
Bluetooth®
ENGLIS
H
The actual device may differ from the image.
2
Safety information
CAUTION: TO REDUCE THE RISK OF ELECTRIC SHOCK DO NOT REMOVE COVER (OR BACK) NO USER-SERVICEABLE PARTS INSIDE REFER SERVICING TO QUALIFIED SERVICE PERSONNEL.
This lightning flash with arrowhead symbol within an equilateral triangle is intended to alert the user to the presence of uninsulated dangerous voltage within
the product’s enclosure that may be of sufficient magnitude to constitute a risk of electric shock to persons.
The exclamation point within an equilateral triangle is intended to alert the user to the presence of important operating and maintenance (servicing)
instructions in the literature accompanying the product.
WARNING: TO PREVENT FIRE OR ELECTRIC SHOCK HAZARD, DO NOT EXPOSE THIS PRODUCT TO RAIN OR MOISTURE.
WARNING: Do not install this equipment in a confined space such as a book case or similar unit.
CAUTION: Do not block any ventilation openings. Install in accordance with the manufacturer’s instructions. Slots and openings in the cabinet are provided for ventilation and to ensure reliable operation of the product and to protect it from over heating. The openings shall never be blocked by placing the product on a bed, sofa, rug or other similar surface. This product shall not be placed in a built-in installation such as a bookcase or rack unless proper ventilation is provided or the manufacturer’s instruction has been adhered to.
CAUTIONRISK OF ELECTRIC SHOCK
DO NOT OPEN

3
CAUTION concerning the Power Cord
Most appliances recommend they be placed upon a dedicated circuit;
That is, a single outlet circuit which powers only that appliance and has no additional outlets or branch circuits. Check the specification page of this owner’s manual to be certain. Do not overload wall outlets. Overloaded wall outlets, loose or damaged wall outlets, extension cords, frayed power cords, or damaged or cracked wire insulation are dangerous. Any of these conditions could result in electric shock or fire. Periodically examine the cord of your appliance, and if its appearance indicates damage or deterioration, unplug it, discontinue use of the appliance, and have the cord replaced with an exact replacement part by an authorized service center. Protect the power cord from physical or mechanical abuse, such as being twisted, kinked, pinched, closed in a door, or walked upon. Pay particular attention to plugs, wall outlets, and the point where the cord exits the appliance. To disconnect power from the mains, pull out the mains cord plug. When installing the product, ensure that the plug is easily accessible.
This device is equipped with a portable battery or accumulator.
Safety way to remove the battery or the battery from the equipment: Remove the old battery or battery pack, follow the steps in reverse order than the assembly. To prevent contamination of the environment and bring on possible threat to human and animal health, the old battery or the battery put it in the appropriate container at designated collection points. Do not dispose of batteries or battery together with other waste. It is recommended that you use local, free reimbursement systems for batteries and accumulators. The battery shall not be exposed to excessive heat such as sunshine, fire or the like.
NOTICE: For safety making information including product identification and supply ratings, please refer to the main label inside the apparatus.
NOTICE: Only use the AC adaptor supplied with this device. Do not use a power supply from another device or another manufacturer. Using any other power cable or power supply may cause damage to the device and void your warranty.
4
CAUTION: y The apparatus should not be exposed to water
(dripping or splashing) and objects filled with liquids, such as vases, shouldn’t be placed on the apparatus.
y Minimum distance around the apparatus for sufficient ventilation, no less than 5 cm.
y The ventilation should not be impeded by covering the ventilation openings with items, such as newspapers, table-cloth, curtains etc.
y No naked flame sources, such as lighted candles, should be placed on the apparatus.
y The unit’s internal lithium battery should only be serviced by an authorised service centre.
Device operating temperature
When operating in cold weather, the device shall not print. Bring it inside from the cold and give about 10 min to adjust to the specified operating temperature (5 °C - 40 °C). Then try printing again. (For the appropriate use, it is recommended not to operate it outdoors in winter.)
, Note
CAUTION when using this product in environments of low humidity
y It may cause static electricity in environments of low humidity.
y It is recommended to use this product after touching any metal object which conducts electricity.
> Caution

5
Contents
Safety information . . . . . . . . . . . . . . . . . . . . . .2
STEP 1 Getting Started . . . . . . . . . . . . . . . . . .6Supplied items. . . . . . . . . . . . . . . . . . . . . . . . . . . . 6Product Overview. . . . . . . . . . . . . . . . . . . . . . . . . 6Power On / Off . . . . . . . . . . . . . . . . . . . . . . . . . . . . 7
STEP 2 Charging Battery . . . . . . . . . . . . . . . . .7
STEP 3 Inserting Photo Paper . . . . . . . . . . . .9Cleaning printer head using Smart Sheet 10About photo paper . . . . . . . . . . . . . . . . . . . . . .10Paper Jam Solution . . . . . . . . . . . . . . . . . . . . . .12
STEP 4 Installing App . . . . . . . . . . . . . . . . . 12Installing App for Android phone . . . . . . . .12App Setting . . . . . . . . . . . . . . . . . . . . . . . . . . . . .13Installing App for iPhone . . . . . . . . . . . . . . . .14Setting Bluetooth of iPhone . . . . . . . . . . . . .14
Installing App for Windows phone . . . . . . .15Setting Bluetooth of Windows phone . . . .15
STEP 5 Printing Photo . . . . . . . . . . . . . . . . . 16Printing using Android phone . . . . . . . . . . .16Printing using iPhone . . . . . . . . . . . . . . . . . . . .20Printing using Windows phone . . . . . . . . . .22Using the edit mode . . . . . . . . . . . . . . . . . . . . .24Notes on the printing . . . . . . . . . . . . . . . . . . . .24Checking where to buy paper . . . . . . . . . . .26Updating the device . . . . . . . . . . . . . . . . . . . . .26
Checking Label . . . . . . . . . . . . . . . . . . . . . . . . 27
About LED Indicator . . . . . . . . . . . . . . . . . . . 28
Specifications . . . . . . . . . . . . . . . . . . . . . . . . . 30
Troubleshooting . . . . . . . . . . . . . . . . . . . . . . 31

6
STEP 1 Getting StartedSupplied items
USB cable Charger
LG Pocket Photo Printer
ZINK Photo Paper Simple manual
y Depending on the model, supplied items may differ . (ex . Charger, Photo Paper etc .)
Product Overview
Micro USB port (for recharging) Reset hole
Paper exit slotSwitch (Power)
LED indicator
Upper cover buttonPaper tray

7
Power On / Off
On: Slide the switch to direction of the arrow.
Off: Slide the switch to the opposite direction.
y When turning the device on, LED indicator flashes for 5 sec. Then printing is
available.
y For more information, see “About LED indicator”.
, Note
STEP 2 Charging BatteryThis device uses built-in battery. Before using it, charge the battery in full. (Refer to below)
Battery charging time : 1.5 hours
Checking the charging status with LED indicators y Power-off : Charging : Full charge :
y 0 % : flashes for about 30 sec. and turns off. y LG Pocket Photo is always charged when
connected to the power supply except for being printed.

8
Charger (AC Adapter) y Model : ADS-5MA-06A 05050GPG/ ADS-5MA-06A
05050GPCU/ ADS-5MA-06A 05050GPB/ ADS-5MA-06A 05050GPI/ ADS-5MA-06A 05050GPSA
y Manufacturer : SHENZHEN HONOR ELECTRONIC CO. ,LTD.
y Input : 100 - 240 V ~, 50 / 60 Hz Max. 0.3 A y Output : 5 V 0 1.0 A
y Depending on the model, the adapter may not be included in supplied items.
y When buying an adapter, refer to the recommended specifications above.
y If you do not use recommended adapter, charging time may differ.
, Note
y Handle with care during charging to prevent electric shock.
y Do not place near heating appliance.
y Do not disassemble or deform.
y Do not give shock on.
y Avoid too high or low temperature or humidity.
> Caution
y You can connect the device to PC using the supplied USB cable, but charging time can be longer.
y The operating time on battery may vary depending on the battery status, operational status and environment conditions.
y When the battery is discharged, printing is available after charging it for more than 10 min. (Charge in full to print in a row.)
, Note

9
STEP 3 Inserting Photo Paper1. Open the upper cover.
2. Unwrap the pack of the photo papers.
3. Slide Smart Sheet (Blue) and photo papers together into the Paper insert slot. Smart Sheet will be ejected automatically before first printing.
y Do not insert more than 10 Photo papers and 1 Smart Sheet. Otherwise 2 papers may be ejected at once or paper jam may occur.
y Once the pack is unwrap, keep the remaining papers after using in an airtight plastic bag.
y When power is turned on, you cannot open the upper cover. To open it, turn off the power.
Smart Sheet with Barcode side down
Photo Paper with White side up
10
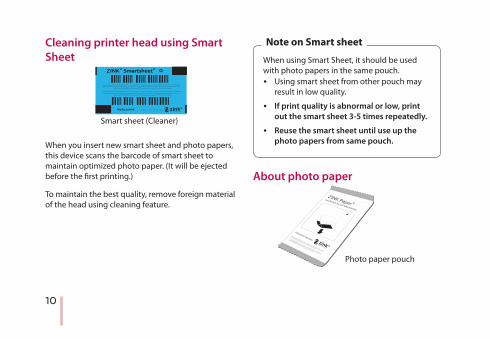
Cleaning printer head using Smart Sheet
Smart sheet (Cleaner)
When you insert new smart sheet and photo papers, this device scans the barcode of smart sheet to maintain optimized photo paper. (It will be ejected before the first printing.)
To maintain the best quality, remove foreign material of the head using cleaning feature.
When using Smart Sheet, it should be used with photo papers in the same pouch.
y Using smart sheet from other pouch may result in low quality.
y If print quality is abnormal or low, print out the smart sheet 3-5 times repeatedly .
y Reuse the smart sheet until use up the photo papers from same pouch .
Note on Smart sheet
About photo paper
Photo paper pouch
11
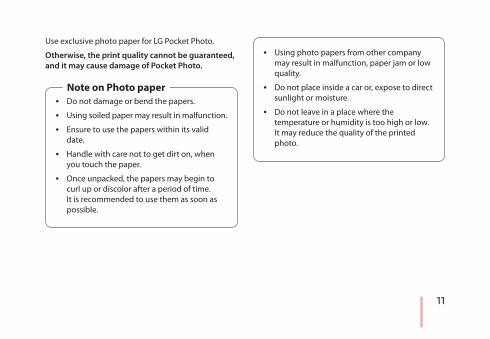
Use exclusive photo paper for LG Pocket Photo.
Otherwise, the print quality cannot be guaranteed, and it may cause damage of Pocket Photo .
y Do not damage or bend the papers.
y Using soiled paper may result in malfunction.
y Ensure to use the papers within its valid date.
y Handle with care not to get dirt on, when you touch the paper.
y Once unpacked, the papers may begin to curl up or discolor after a period of time. It is recommended to use them as soon as possible.
Note on Photo paper
y Using photo papers from other company may result in malfunction, paper jam or low quality.
y Do not place inside a car or, expose to direct sunlight or moisture.
y Do not leave in a place where the temperature or humidity is too high or low. It may reduce the quality of the printed photo.
12
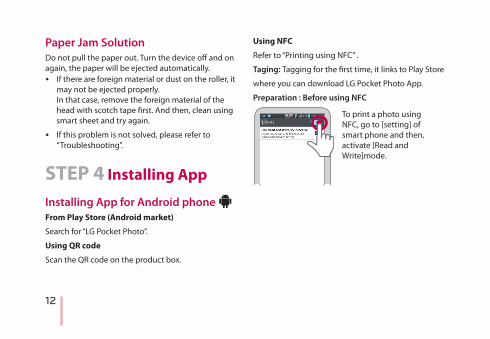
Paper Jam SolutionDo not pull the paper out. Turn the device off and on again, the paper will be ejected automatically.
y If there are foreign material or dust on the roller, it may not be ejected properly. In that case, remove the foreign material of the head with scotch tape first. And then, clean using smart sheet and try again.
y If this problem is not solved, please refer to “Troubleshooting”.
STEP 4 Installing App Installing App for Android phone
Bluetooth®
From Play Store (Android market)
Search for “LG Pocket Photo”.
Using QR code
Scan the QR code on the product box.
Using NFC
Refer to “Printing using NFC” .
Taging: Tagging for the first time, it links to Play Store
where you can download LG Pocket Photo App.
Preparation : Before using NFC
To print a photo using NFC, go to [setting] of smart phone and then, activate [Read and Write]mode.
13
App Setting Bluetooth®
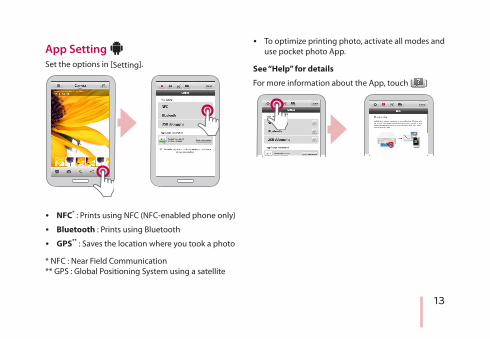
Set the options in [Setting].
y NFC* : Prints using NFC (NFC-enabled phone only)
y Bluetooth : Prints using Bluetooth
y GPS** : Saves the location where you took a photo
* NFC : Near Field Communication** GPS : Global Positioning System using a satellite
y To optimize printing photo, activate all modes and use pocket photo App.
See “Help” for details
For more information about the App, touch [ ]
14
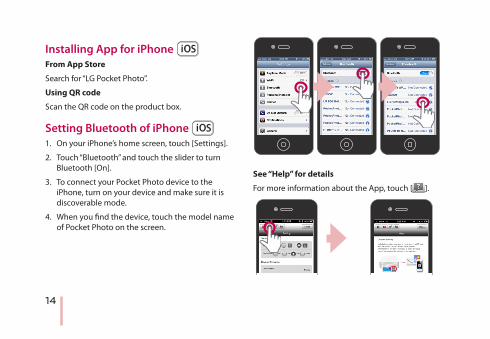
Installing App for iPhone From App Store
Search for “LG Pocket Photo”.
Using QR code
Scan the QR code on the product box.
Setting Bluetooth of iPhone 1. On your iPhone’s home screen, touch [Settings].
2. Touch “Bluetooth” and touch the slider to turn Bluetooth [On].
3. To connect your Pocket Photo device to the iPhone, turn on your device and make sure it is discoverable mode.
4. When you find the device, touch the model name of Pocket Photo on the screen.
See “Help” for details
For more information about the App, touch [ ].
15
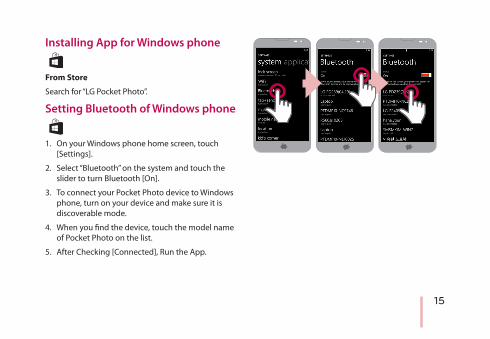
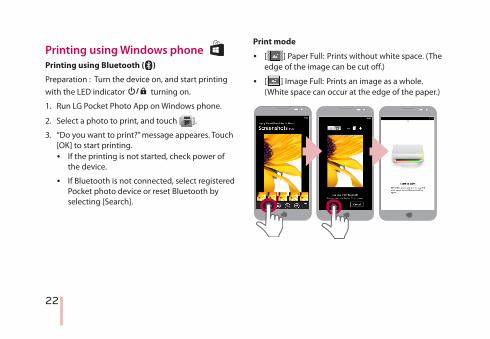
Installing App for Windows phone
From Store
Search for “LG Pocket Photo”.
Setting Bluetooth of Windows phone
1. On your Windows phone home screen, touch [Settings].
2. Select “Bluetooth” on the system and touch the slider to turn Bluetooth [On].
3. To connect your Pocket Photo device to Windows phone, turn on your device and make sure it is discoverable mode.
4. When you find the device, touch the model name of Pocket Photo on the list.
5. After Checking [Connected], Run the App.
16
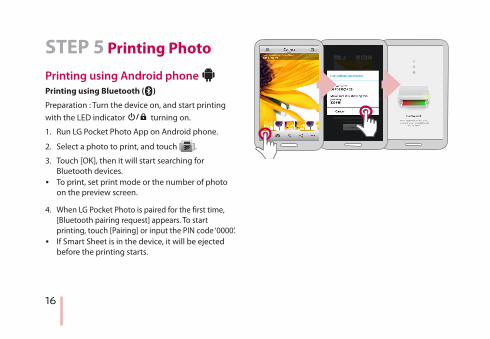
STEP 5 Printing Photo
Printing using Android phone Bluetooth®
Printing using Bluetooth (Bluetooth®
)
Preparation : Turn the device on, and start printing with the LED indicator turning on.
1. Run LG Pocket Photo App on Android phone.
2. Select a photo to print, and touch [ ].
3. Touch [OK], then it will start searching for Bluetooth devices.
y To print, set print mode or the number of photo on the preview screen.
4. When LG Pocket Photo is paired for the first time, [Bluetooth pairing request] appears. To start printing, touch [Pairing] or input the PIN code ‘0000’.
y If Smart Sheet is in the device, it will be ejected before the printing starts.
17
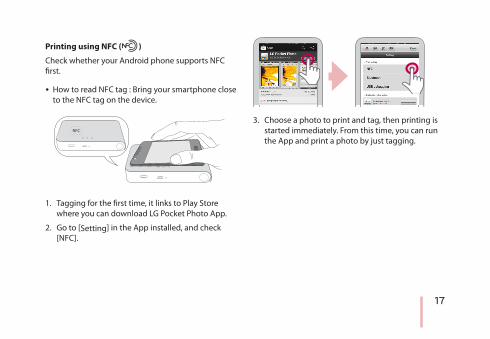
Printing using NFC (
Bluetooth®
)
Check whether your Android phone supports NFC first.
y How to read NFC tag : Bring your smartphone close to the NFC tag on the device.
NFC
1. Tagging for the first time, it links to Play Store where you can download LG Pocket Photo App.
2. Go to [Setting] in the App installed, and check [NFC].
3. Choose a photo to print and tag, then printing is started immediately. From this time, you can run the App and print a photo by just tagging.
18
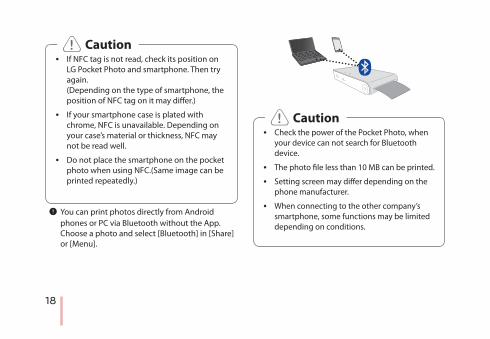
y If NFC tag is not read, check its position on LG Pocket Photo and smartphone. Then try again. (Depending on the type of smartphone, the position of NFC tag on it may differ.)
y If your smartphone case is plated with chrome, NFC is unavailable. Depending on your case’s material or thickness, NFC may not be read well.
y Do not place the smartphone on the pocket photo when using NFC.(Same image can be printed repeatedly.)
> Caution
, You can print photos directly from Android phones or PC via Bluetooth without the App. Choose a photo and select [Bluetooth] in [Share] or [Menu].
y Check the power of the Pocket Photo, when your device can not search for Bluetooth device.
y The photo file less than 10 MB can be printed.
y Setting screen may differ depending on the phone manufacturer.
y When connecting to the other company’s smartphone, some functions may be limited depending on conditions.
> Caution

19
Setting Pocket Photo App of Android phone
You can check remaining battery, the number of photos printed, Help, Where to buy paper, device version, update, MAC address, and setting of print mode, etc.
1. Run LG Pocket Photo App on Android phone. (To check [Device information], set to [On] the Bluetooth of smartphone.)
2. Go to Setting.
3. Touch [Device Information].
[ ] Paper Full Prints without white space. (The edge of the image can be cut off.)
[ ] Image Full Prints an image as a whole. (White space can occur at the edge of the paper.)
Auto Power Off Set a time so that the device turns itself off. (Default is [5 min]. If you set to [Off], the device can be on for up to 2.5 hours when fully charged.)
y The longer time you set [ Auto Power Off] to, the more the battery consumption is. The number of maximum prints may differ.
y It is recommended to keep default setting of the device.
, Note

20
Printing using iPhone Printing using Bluetooth (
Bluetooth®
)
Preparation : Turn the device on, and start printing with the LED indicator turning on.
1. Run LG Pocket Photo App on iPhone.
2. Select a photo to print, and touch [ ].
3. “Do you want to print?” message appeares. Touch [OK] to start printing.
y To print, set print mode or the number of photo on the preview screen.
y If Bluetooth is not connected, “ Paired device not found” message is appeared. (refer to the Bluetooth setting for iPhone.)
y If Smart Sheet is in the device, it will be ejected before starting printing.

21
Setting iPhone Pocket Photo App
You can check remaining battery, the number of the photos printed, Help, Where to buy paper, device version, update, MAC address, and setting of print mode, etc.
1. Run LG Pocket Photo App on iPhone. (To check [Device information], set to [On] the Bluetooth of iPhone.)
2. Go to Setting.
3. Touch Setting options to change.
[ ] Paper Full Prints without white space. (The edge of the image can be cut off.)
[ ] Image Full Prints an image as a whole. (White space can occur at the edge of the paper.)
Auto Power Off Set a time so that the device turns itself off. (Default is [5 min]. If you set to [Off], the device can be on for up to 2.5 hours when fully charged.)
y The longer time you set [ Auto Power Off] to, the more the battery consumption is. The number of maximum prints may differ.
y It is recommended to keep default setting of the device.
, Note
22
Printing using Windows phone Printing using Bluetooth (
Bluetooth®
)
Preparation : Turn the device on, and start printing with the LED indicator turning on.
1. Run LG Pocket Photo App on Windows phone.
2. Select a photo to print, and touch [ ].
3. “Do you want to print?” message appeares. Touch [OK] to start printing.
y If the printing is not started, check power of the device.
y If Bluetooth is not connected, select registered Pocket photo device or reset Bluetooth by selecting [Search].
Print mode
y [ ] Paper Full: Prints without white space. (The edge of the image can be cut off.)
y [ ] Image Full: Prints an image as a whole. (White space can occur at the edge of the paper.)
23
y If Smart Sheet is in the device, it will be ejected before starting printing.
y To print, set print mode or the number of photo on the preview screen. Setting of print mode and the number of photo printed is supported only for PD239 model.
, Note
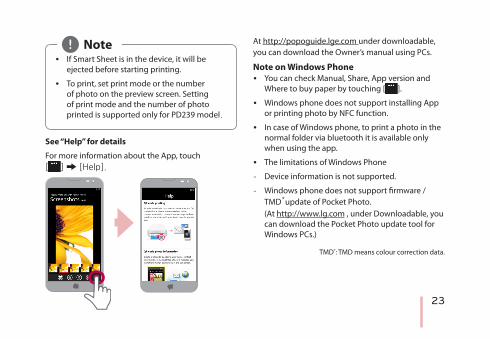
See “Help” for details
For more information about the App, touch [ ] / [Help].
At http://popoguide.lge.com under downloadable, you can download the Owner’s manual using PCs.
Note on Windows Phone y You can check Manual, Share, App version and
Where to buy paper by touching [ ].
y Windows phone does not support installing App or printing photo by NFC function.
y In case of Windows phone, to print a photo in the normal folder via bluetooth it is available only when using the app.
y The limitations of Windows Phone
- Device information is not supported.
- Windows phone does not support firmware /TMD*update of Pocket Photo. (At http://www.lg.com , under Downloadable, you can download the Pocket Photo update tool for Windows PCs.)
TMD*: TMD means colour correction data.

24
Using the edit modeYou can edit a photo quality, color or size using edition tool on the menu.
Use the edit function with a variety of image correction filter
Notes on the printing y The printed image may differ from the orginal
image due to the printing method (thermal transfer printing).
y Use the lastest App of LG Pocket Photo ( when printing a photo, it makes optimized image.)
y The higher resolution the image has, the higher quality the printed photo has. (The proper resolution is more than 1280 x 2448 pixel.)
y Once the battery is fully charged, you can print up to 30 papers in a row.
y The maximum prints are based on ISO 24712 Colour image standard and the number of photos printed may vary depending on user enviromental conditions (time, temperture,humidity or printing method).
y If there are more than a LG Pocket Photo device, check MAC address on the label to choose one you want to use. (Refer to “Checking Label”.)

25
y The Bluetooth searching and transferring may fail depending on its environment. Check the Bluetooth condition on your phone and try again.
y If pairing multiple smartphone, re-pairing may occur.
y Do not pull paper out by force during printing.
y Do not open the upper cover during printing.
y Do not place an object in front of the Paper exit slot.
y If the device is vibrated or given shock, the quality of the printed photo may be reduced.
y Printing for Passport / VISA image may be unsuitable as the case may be. Printing the image taken in studio is recommended.
y The printing quality may differ depending on the original image (When too dark or dim). Use the image after correcting it using Pocket photo App.
y Pocket photo APP’s resolution is optimized in 800x480 fixel.
> Caution

26
Checking where to buy paper 1. To check where to buy paper, go to setting or
menu screen.
2. After touching [ ], select a country.
Updating the deviceYou can update the device by pairing smart phone to the latest software to enhance the products operation and /or add new features.
1. Connect the device and smart phone via Bluetooth.
2. Run the Pocket Photo App and then, touch [Setting] menu.
3. The current version and higher version are shown if new version is existed.
4. Touch [Update]button to update the device.
y During the device update procedure, do not turn off the power or press Reset button.
y This device cannot be updated to previous version.
y If there is no higher version, the Message [This is the lastest version.] appears.
y At http://www.lg.com , under Downloadable, you can download the Pocket Photo update tool for Windows PCs.
, Note
27
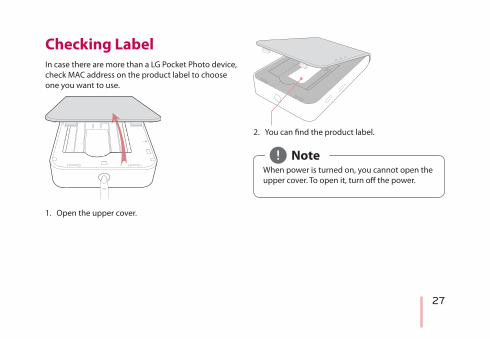
Checking LabelIn case there are more than a LG Pocket Photo device, check MAC address on the product label to choose one you want to use.
1. Open the upper cover.
2. You can find the product label.
When power is turned on, you cannot open the upper cover. To open it, turn off the power.
, Note
28
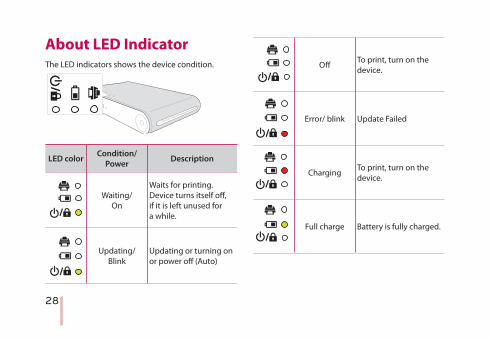
About LED IndicatorThe LED indicators shows the device condition.
LED color Condition/Power Description
Waiting/ On
Waits for printing. Device turns itself off, if it is left unused for a while.
Updating/ Blink
Updating or turning on or power off (Auto)
Off To print, turn on the device.
Error/ blink Update Failed
Charging To print, turn on the device.
Full charge Battery is fully charged.
29
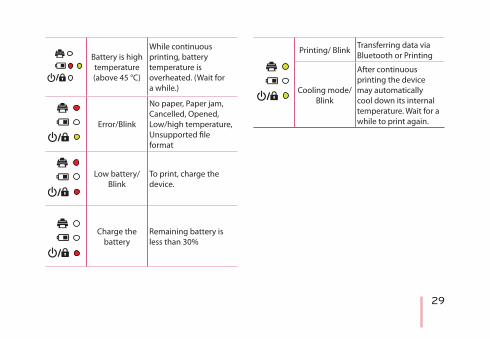
Battery is high temperature (above 45 °C)
While continuous printing, battery temperature is overheated. (Wait for a while.)
Error/Blink
No paper, Paper jam, Cancelled, Opened, Low/high temperature, Unsupported file format
Low battery/ Blink
To print, charge the device.
Charge the battery
Remaining battery is less than 30%
Printing/ Blink Transferring data via Bluetooth or Printing
Cooling mode/ Blink
After continuous printing the device may automatically cool down its internal temperature. Wait for a while to print again.
30
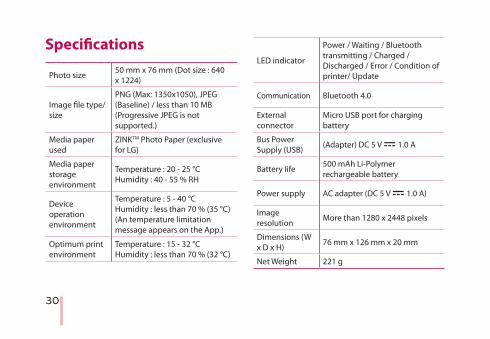
Specifications
Photo size 50 mm x 76 mm (Dot size : 640 x 1224)
Image file type/size
PNG (Max: 1350x1050), JPEG (Baseline) / less than 10 MB (Progressive JPEG is not supported.)
Media paper used
ZINKTM Photo Paper (exclusive for LG)
Media paper storage environment
Temperature : 20 - 25 °C Humidity : 40 - 55 % RH
Device operation environment
Temperature : 5 - 40 °C Humidity : less than 70 % (35 °C) (An temperature limitation message appears on the App.)
Optimum print environment
Temperature : 15 - 32 °C Humidity : less than 70 % (32 °C)
LED indicator
Power / Waiting / Bluetooth transmitting / Charged / Discharged / Error / Condition of printer/ Update
Communication Bluetooth 4.0
External connector
Micro USB port for charging battery
Bus Power Supply (USB) (Adapter) DC 5 V 0 1.0 A
Battery life 500 mAh Li-Polymer rechargeable battery
Power supply AC adapter (DC 5 V 0 1.0 A)
Image resolution More than 1280 x 2448 pixels
Dimensions (W x D x H) 76 mm x 126 mm x 20 mm
Net Weight 221 g
31
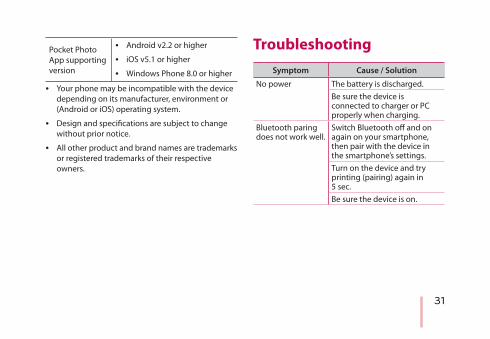
Pocket Photo App supporting version
y Android v2.2 or higher
y iOS v5.1 or higher
y Windows Phone 8.0 or higher
y Your phone may be incompatible with the device depending on its manufacturer, environment or (Android or iOS) operating system.
y Design and specifications are subject to change without prior notice.
y All other product and brand names are trademarks or registered trademarks of their respective owners.
TroubleshootingSymptom Cause / Solution
No power The battery is discharged.Be sure the device is connected to charger or PC properly when charging.
Bluetooth paring does not work well.
Switch Bluetooth off and on again on your smartphone, then pair with the device in the smartphone’s settings.Turn on the device and try printing (pairing) again in 5 sec.Be sure the device is on.
32
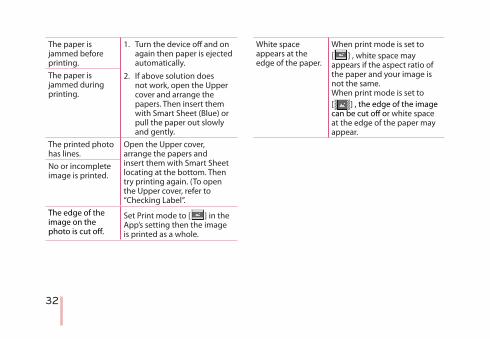
The paper is jammed before printing.
1. Turn the device off and on again then paper is ejected automatically.
2. If above solution does not work, open the Upper cover and arrange the papers. Then insert them with Smart Sheet (Blue) or pull the paper out slowly and gently.
The paper is jammed during printing.
The printed photo has lines.
Open the Upper cover, arrange the papers and insert them with Smart Sheet locating at the bottom. Then try printing again. (To open the Upper cover, refer to “Checking Label”.
No or incomplete image is printed.
The edge of the image on the photo is cut off.
Set Print mode to [ ] in the App’s setting then the image is printed as a whole.
White space appears at the edge of the paper.
When print mode is set to [ ] , white space may appears if the aspect ratio of the paper and your image is not the same. When print mode is set to [ ] , the edge of the image can be cut off or white space at the edge of the paper may appear.

33
Quality of printed photo is too low.
In case you magnify an image using [ ] menu in the App, the quality of the printed photo may be reduced.Turn off the device and insert Smart Sheet locating at the bottom of the papers. Then try printing again.Be sure the photo size is bigger than the proper resolution.(1280 x 2448 pixels)When using Smart Sheet, it should be used with photo papers in the same pouch.If you use other company’s photo paper, it cannot be guaranteed for print quality or damage of pocket photo.
Device does not print.
Preheating is needed. Wait for about 2 min.Be sure there are papers in the device.It may take time to print after Smart Sheet is ejected.Be sure the photo file is less than 10 MB. Only baseline JPEG, PNG (Max: 1350x1050) format is supported.
Device is turned off automatically.
Check [Auto Power Off] time in the App’s setting.
Above solutions do not work.
Press Reset hole with a pointed thing like mechanical pencil to initialize.