owner’s manual model no. 79120 - replacement parts 2000 owners manual.pdf · owner’s manual...
TRANSCRIPT

OWNER’S MANUALModel No. 79120
Serial Number:Date of Purchase:
Place of Purchase: Revised 4.26.04

2
Please contact Universal® Gym Equipment/FFA Corp. for missing or defective parts at one of the following: Phone 1-800-472-9856 or Fax 1-662-495-5038 or E-mail at [email protected]. Mailing address: Universal® Gym Equipment/FFA Corp. - 100 Tubb Ave. West Point, MS 39773.Website www.universalgymequipment.com
Congratulations on purchasing yourUniversal® Gym Equipment PowerPak® 2000
With this product in your home, you have everything you need to start your own workout program to tone and firm the muscle groups of your upper and lower body. This is vital for all of us, regardless of age, sex, or fitness level, and regardless of whether your primary goal is toning, health maintenance, or more energy for daily activities.
Proper exercise, including a low fat diet, strength training and aerobic exercise, tones and conditions the muscles we use every day to stand, walk, lift, and turn. It can actually transform our body composition by reducing body fat and increasing the proportion of lean muscle in our bodies.
Be sure to read through this owner’s manual carefully.It is the authoritative source of information about your Universal® Gym Equipment PowerPak® 2000.
Universal® Gym Equipment assumes no responsibility for personal injury or property damage sustained by or through the use of this product.
Retain this manual for future reference.
Table of Contents:
Important Safety Instructions and General Maintenance……………..… 3 Comments or Questions;Before You Begin ………......…………………. 4 Parts List…………………………………………..…….......….....…….. 5 - 6 Assembly Instructions……………………………………......….…...…8 - 25 Warranty …………………………………………………….…………...…..27 Owner’s Purchase Record…………………………...…….……Back Cover

3
Please contact Universal® Gym Equipment/FFA Corp. for missing or defective parts at one of the following: Phone 1-800-472-9856 or Fax 1-662-495-5038 or E-mail at [email protected]. Mailing address: Universal® Gym Equipment/FFA Corp. - 100 Tubb Ave. West Point, MS 39773.Website www.universalgymequipment.com
Know your heart rate and / or pulse, and your physician recommended target heart rate training zone.Proper medical clearance is recommended for anyone beginning an exercise program, especially if you are over 35 years of age or suffer from heart or respiratory problems.Warm up before any exercise program with 8 minutes of aerobic activity.Wear comfortable clothes that allow freedom of movement and that are not tight or restricting.Wear comfortable shoes with good support and nonslip soles.Breathe naturally, never holding your breath during an exercise.Perform exercises consistently with proper technique and pass through a full range of motion.Avoid over training. You should be able to carry on a conversation while exercising.After an exercise session, cool down with slow stretching, cycling or walking.This machine should not be used by or near children.Handicapped or disabled people must have medical approval before using this machine and should be under close supervision when using any exercise equipment.Use this machine only for its intended use as described in this manual. Do not use attachments not recommended by the manufacturer.Only one person at a time should use this machine.Do not put hands, feet or any foreign objects on or near this machine when in use by others.Always use this machine on a level surface.Never operate the machine if the machine is not functioning properly.Start exercise slowly and gradually increase the amount of resistance.If you experience dizziness, nausea, chest pain or any other abnormal symptoms, stop exercising at once and consult a physician immediately.Use caution not to pinch fingers or hands in moving parts when using this unit.
1.
2.
3.4.5.6.7.8.9.
10.11.
12.
13.14.15.16.17.18.
19.
IMPORTANT SAFETY INSTRUCTIONSRead all instructions before using this machine.
KEEP THESE INSTRUCTIONS
CAUTION: Exercise of a strenuous nature, as is customarily done on this equipment, should not be undertaken without first consulting a physician. No specific health claims are made or implied as they relate to the equipment.
Keep cables, pulleys and guide rods free of dirt, dust or any build-up to prevent drag or binding.
Wipe cushions clean after each workout.
Tighten hardware once every six months.
1.
2.
3.
General Maintenance

4
Please contact Universal® Gym Equipment/FFA Corp. for missing or defective parts at one of the following: Phone 1-800-472-9856 or Fax 1-662-495-5038 or E-mail at [email protected]. Mailing address: Universal® Gym Equipment/FFA Corp. - 100 Tubb Ave. West Point, MS 39773.Website www.universalgymequipment.com
Comments or Questions?Dear customer,Congratulations on your purchase of the Universal® Gym Equipment PowerPak® 2000.
We’re sure that you will be completely satisfied with the product and we invite your comments so that we can hear about your success.
Please write or call at the address or phone numbers listed below, with any comments or questions you may have.
Service and Parts - Toll free number: 1-800-472-9856 Monday through Friday-8:00 am to 5:00 PM CST Fax: 1-662-495-5038 E-mail: [email protected]: www.universalgymequipment.comUniversal® Gym EquipmentA Division of FFA Corp.Customer Service Department100 Tubb Ave.West Point, MS 39773
Ordering Missing or Defective PartsWhen ordering parts, always provide the following information:
1. NAME, MAILING ADDRESS AND TELEPHONE NUMBER2. DATE OF PURCHASE3. WHERE PRODUCT WAS PURCHASED (NAME OF RETAIL STORE, CITY)4. MODEL NUMBER (79120)5. PART ORDER NUMBER AND DESCRIPTION
All details depicted in this owner’s manual, and of the product itself, are subject to change without notice.
Before you begin
E-mail: [email protected]
FIND YOUR TOOLS: You need two adjustable crescent wrenchs, one set of allen wrenches and one rub-ber mallet. These tools are NOT included in the carton.LOCATE YOUR WORK OUT AREA: For your safety and convenience, you must assemble the unit exactly where it is to be used so that you will not have to move it once the assembly is complete. Allow ample space for the unit and space for the spotter to stand. The area must have adequate lighting and ventilation. If the area is within living quarters, protect the carpet or floor with a large mat prior to assembly.GET A HELPER: It is recommended that two adults assemble the product. All persons involved in the as-sembly should be in good health and exercise great caution while manipulating heavy metal objects. Keep children away during assembly.IDENTIFY YOUR HARDWARE: To identify a piece of hardware by physical size, use the rule provided on page 6.TIGHTEN ALL BOLTS BY HAND FIRST: Do not tighten any bolts until the entire unit is assembled. Initially, all bolts should only be hand-tightened. Once all parts are in place, begin tightening the bolts at the top of the unit first, and work your way down to the floor.INSTALLING FOAM ROLLS: Liquid soap applied to inside of foam rolls and outside of tubes will help foam pads slide on easier. When soap dries, the foam pads will stay in place.
1.
2.
3.
4.
5.
6.

5
Please contact Universal® Gym Equipment/FFA Corp. for missing or defective parts at one of the following: Phone 1-800-472-9856 or Fax 1-662-495-5038 or E-mail at [email protected]. Mailing address: Universal® Gym Equipment/FFA Corp. - 100 Tubb Ave. West Point, MS 39773.Website www.universalgymequipment.com
PARTS LIST
44
5049
484746
43 45
32A
11
76
36
40
39
32
31
3837
33 35
34
30292827
262524232221
20191817
1514
16
1312
9 108
5
13
2
4
No. Description Part No. Qty.1 Base Frame 12 Front Upright 13 Top Frame 14 Rear Upright 15 Weight Top Frame 16 Weight Base 17 Press Support 18 Press Arm 19 1” x 225mm Press Arm Axle 110 Rear Stabilizer 111 Adjustable Tube 112 Leg Extension 113 Adjustable Back Arm 114 Left Pec Dec Arm 115 Right Pec Dec Arm 116 Roller Handle Bar 217 Seat Arm 118 Adjustable Seat Tube 119 Floating Pulley Block 120 Back Support 121 Roller Bracket 122 Left Pivot Pulley Bracket 123 Right Pivot Pulley Bracket 124 Single Pulley Bracket 225 Roller Brace 226 Bolster 227 Lat Bar 128 Selector Rod 129 Curl Bar 130 Ab Strap 131 Handle 232 Ankle Strap 132A Handle Strap 233 Bearing Housing 634 Guide Rod 235 Weight Shroud 236 Link Chain 337 Weight Plate -- - Box of (4) 10lb Weights 79004 1- - Box of (5) 10lb Weights 79005 3- - Weight Label Set 05244 138 Top Plate 139 Selector Pin 140 Snap Hook 543 Back Pad 144 Seat Pad 145 Foam Pad 446 Binding of Weight Shroud 447 Top Cable 148 Connect Cable 149 Ab Cable 150 Pec Dec Cable 1
03165 05350 05351 05352 05353 05354 05355 05356 05357 05358 05359 05360 05361 05430 05435 05362 05363 05364 05365 05366 05367 03172 05451 05463 05464 05368 05369 05370 05371 05372 05482 0537405373 05377 05375 05806 05382 05378
05379 05515 05381 05383 05384 05385 05386 03168 05465 0317103173

6
Please contact Universal® Gym Equipment/FFA Corp. for missing or defective parts at one of the following: Phone 1-800-472-9856 or Fax 1-662-495-5038 or E-mail at [email protected]. Mailing address: Universal® Gym Equipment/FFA Corp. - 100 Tubb Ave. West Point, MS 39773.Website www.universalgymequipment.com
PARTS LISTNo. Description Part No. Qty.51 1/2” Axle 152 Pec Dec Stopper 253 1” x 150L Hand Grip 855 1” x 360L Foam Tube 257 Spacer 458 Rubber Donut 259 Leg Extension Stopper 160 Bearing 261 Pulley 2262 Small Pulley 263 50mm x 75mm End Plug 964 25mm x 50mm End Plug 165 45mm Square Plug 366 2” Round End Plug 267 1/2” Cap for Nut 468 Cap for Bolster 469 Plastic Guide Rod Holder 470 3/8” Bushing 2271 1/2” Steel Bushing 872 3/8” Steel Bushing 473 Spring Knob 274 Pop Pin 275 Adjustable Stopper 176 Top Plate Bolt 177 5/16” x 1/2” Inner Hex Head Bolt 478 1/2” x 4-3/4” Hex Head Bolt 479 1/2” x 4-1/4” Hex Head Bolt 280 1/2” x 3-1/2” Hex Head Bolt 481 1/2” x 3-1/4” Hex Head Bolt 182 1/2” x 1-3/4” Hex Head Bolt 1283 3/8” x 3-1/2” Hex Head Bolt 285 3/8” x 3” Hex Head Bolt 1586 3/8” x 2-1/2” Hex Head Bolt 187 3/8” x 1-3/4” Hex Head Bolt 1088 1/2” x 1” Hex Head Bolt (All) 289 3/8” x 1-3/4” Hex Head Bolt (All) 290 3/8” x 1” Hex Head Bolt (All) 291 5/16” x 1/2” Hex Head Bolt (All) 492 5/16” x 5/8” Inner Hex Bolt 293 3/8” x 5/8” Inner Hex Bolt 195 5/6” x 1/4” Inner Hex Bolt 396 1/2” Washer 5697 3/8” Washer 4098 5/16” Washer 699 “C” Pin 4100 5/16” Spring Washer 2101 1/2” Nylon Nut 31102 3/8” Nylon Nut 28103 5/16” Nut 4104 Marque Logo Plate 2
No. Description Part No. Qty.105 5/16” Washer (Larger) 05612 4106 Handle Strap 05373 2
0539205467 05390 05468 05453 05396 05397 05469 05398 05470 05399 05415 05416 05417 05418 05419 05420 05479 05423 05422 05424 05425 05426 05427 05428 05480 0548105432 04532 05434 0547002262 05436 05478 05471 05472 05439 05440 05442 054410544401300129005448 05449 05473 05446 05450 0227005445

7
Please contact Universal® Gym Equipment/FFA Corp. for missing or defective parts at one of the following: Phone 1-800-472-9856 or Fax 1-662-495-5038 or E-mail at [email protected]. Mailing address: Universal® Gym Equipment/FFA Corp. - 100 Tubb Ave. West Point, MS 39773.Website www.universalgymequipment.com
BLANK PAGE

8
Please contact Universal® Gym Equipment/FFA Corp. for missing or defective parts at one of the following: Phone 1-800-472-9856 or Fax 1-662-495-5038 or E-mail at [email protected]. Mailing address: Universal® Gym Equipment/FFA Corp. - 100 Tubb Ave. West Point, MS 39773.Website www.universalgymequipment.com
IMPORTANTPLEASE READ ALL INSTRUCTIONS CAREFULLY BEFORE ASSEMBLING
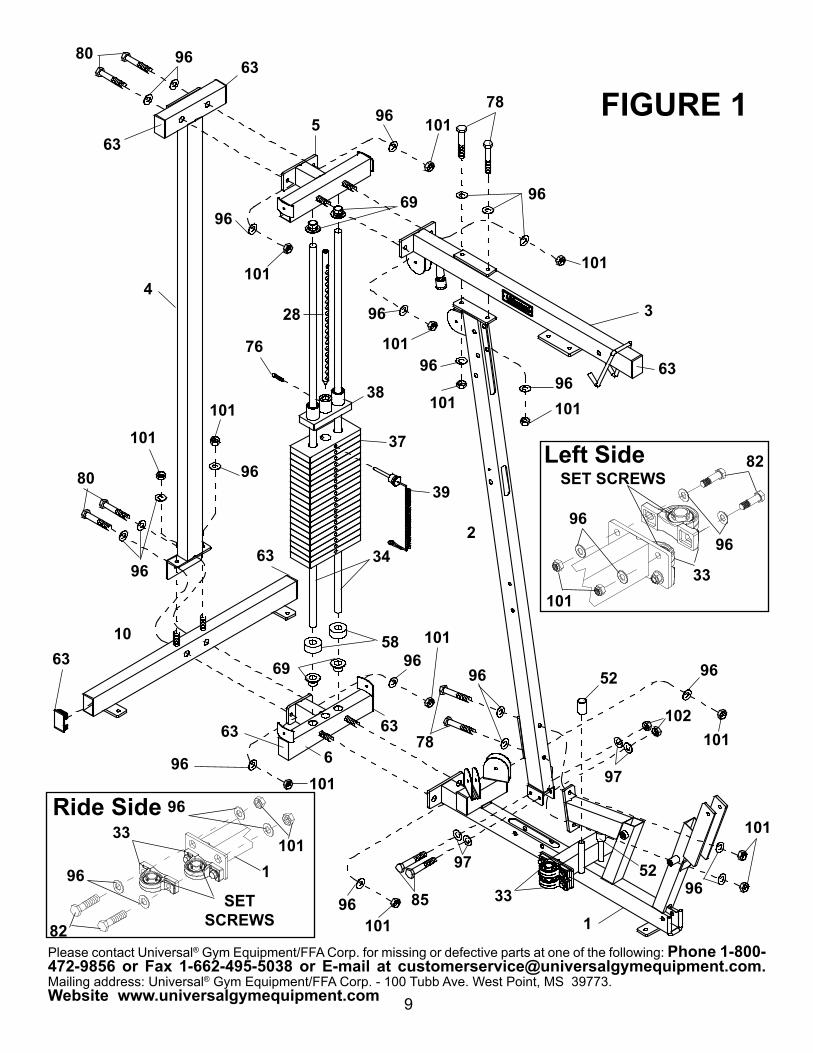
FIGURE 1Step 1.
Step 2.
Step 3.
Step 4.
Step 5.
Step 6.
Step 7.
Step 8.
Step 9.
Step 10.
Step 11.
Step 12.
Step 13.
Step 14.
Push 50mm x 75mm END PLUGS (63) into ends of TOP FRAME (3), REAR UPRIGHT (4), WEIGHT BASE (6) and REAR STABILIZER (10).
Attach REAR UPRIGHT (4) and WEIGHT BASE (6) to REAR STABILIZER (10) with 1/2” x 3-1/2” HEX HEAD BOLTS (80), 1/2” WASHERS (96) and 1/2” NYLON NUTS (101).
Attach BASE FRAME (1) to WEIGHT BASE (6) with 1/2” WASHERS (96) and 1/2” NYLON NUTS (101).
Push two PLASTIC GUIDE ROD HOLDERS (69) into outer holes in WEIGHT BASE (6) and WEIGHT TOP FRAME (5).
Slide a RUBBER DOUGHNUT (58) about 3” onto one end of each GUIDE ROD (34) and insert into WEIGHT BASE (6).
Slide the WEIGHTS (37), one at a time, down the GUIDE RODS (34).
Insert the SELECTOR ROD (28) through the center hole of the TOP WEIGHT (38) and fasten through top hole of SELECTOR ROD with TOP PLATE BOLT (76).
Slide TOP WEIGHT (38) down GUIDE RODS (34) and insert SELECTOR PIN (39) through desired WEIGHT (37) and SELECTOR ROD (28).
Slide WEIGHT TOP FRAME (5) down onto GUIDE RODS (34) and attach to REAR UPRIGHT (4) with 1/2” x 3-1/2” HEX HEAD BOLTS (80), 1/2” WASHERS (96) and 1/2” NYLON NUTS (101).
Attach FRONT UPRIGHT (2) to BASE FRAME (1) at two locations. Fasten at upper location with 1/2” x 4-1/4” HEX HEAD BOLTS (78), 1/2” WASHERS (96) and 1/2” NYLON NUTS (101). Fasten at lower location with 3/8” x 3” HEX HEAD BOLTS (85), 3/8” WASHERS (97) and 3/8” NYLON NUTS (102).
Push PEC DEC STOPPERS (52) onto stop pins of BASE FRAME (1).
Attach two BEARING HOUSINGS (33) on each side of BASE FRAME (1) with 1/2” x 1-3/4” HEX HEAD BOLTS (82), 1/2” WASHERS (96) and 1/2” NYLON NUTS (101). See Right Side and Left Side Details.
Attach TOP FRAME (3) to WEIGHT TOP FRAME (5) with 1/2” WASHERS (96) and 1/2” NYLON NUTS (101).
Attach TOP FRAME (3) to FRONT SUPPORT (2) with 1/2” x 4-1/4” HEX HEAD BOLTS (78), 1/2” WASHERS (96) and 1/2” NYLON NUTS (101).
IMPORTANT: Loading the WEIGHT PLATES (37) will require two people. One to hold the GUIDE RODS (34) steady while the other person slides the WEIGHT PLATES down the GUIDE RODS.
IMPORTANT: The BEARING HOUSINGS (33) have SET SCREWS on one side. The BEARING HOUSINGS must be mounted with the SET SCREWS on top as shown in Right Side and Left Side Details.
9
Please contact Universal® Gym Equipment/FFA Corp. for missing or defective parts at one of the following: Phone 1-800-472-9856 or Fax 1-662-495-5038 or E-mail at [email protected]. Mailing address: Universal® Gym Equipment/FFA Corp. - 100 Tubb Ave. West Point, MS 39773.Website www.universalgymequipment.com
FIGURE 1
80 96 63
5
69
101
10 58
34
37
38
63
101 101
101
101 101101101
96
96
96
96
96
96
96
80
63
63 69
39
76
284
3
2
851
33
52
6396
96
9696 96
96
97
97
10278
101
1016
52
101
101
63 63
96
101
78
Ride Side33
82
96
96
1011
SETSCREWS
101
96
33
96
SET SCREWSLeft Side 82

10
Please contact Universal® Gym Equipment/FFA Corp. for missing or defective parts at one of the following: Phone 1-800-472-9856 or Fax 1-662-495-5038 or E-mail at [email protected]. Mailing address: Universal® Gym Equipment/FFA Corp. - 100 Tubb Ave. West Point, MS 39773.Website www.universalgymequipment.com
FIGURE 2Step 15.
Step 16.
Push 1/2” CAP (67) into ends of PEC DEC ARM (14 LEFT & 15 RIGHT).
Slide SPACER (57) onto PEC DEC ARM (14 LEFT & 15 RIGHT) and insert through both BEARING HOUSINGS (33) on each side. Using an allen wrench, tighten SET SCREWS in all four BEARING HOUSINGS.
FIGURE 2
67
1415
57
33
1
67
SETSCREWS

11
Please contact Universal® Gym Equipment/FFA Corp. for missing or defective parts at one of the following: Phone 1-800-472-9856 or Fax 1-662-495-5038 or E-mail at [email protected]. Mailing address: Universal® Gym Equipment/FFA Corp. - 100 Tubb Ave. West Point, MS 39773.Website www.universalgymequipment.com
37
38
WEIGHT LABEL
FIGURE 3Step 17.
Step 18.
Step 19.
Peal backing from WEIGHT LABEL “2” and apply to first WEIGHT PLATE (38) 1/2” to left of hole as shown.
Peal backing from WEIGHT LABEL “1” and apply to TOP PLATE (37) directly above WEIGHT LABEL “1” as shown.
Continue appling WEIGHT LABELS “3” through “19” to WEIGHT PLATES (38) 1/2” to left of hole as shown.
FIGURE 3
1/2”

12
Please contact Universal® Gym Equipment/FFA Corp. for missing or defective parts at one of the following: Phone 1-800-472-9856 or Fax 1-662-495-5038 or E-mail at [email protected]. Mailing address: Universal® Gym Equipment/FFA Corp. - 100 Tubb Ave. West Point, MS 39773.Website www.universalgymequipment.com
FIGURE 4Step 20.
Step 21.
Step 22.
Step 23.
Step 24.
Step 25.
Step 26.
Step 27.
Step 28.
Step 29.
Step 30.
Step 31.
Step 32.
Step 33.
Step 34.
Step 35.
Push 45mm SQUARE PLUGS (65) into ends of BACK SUPPORT (20) and ADJUSTABLE BACK ARM (13).
Thread SPRING KNOB (73) and POP PIN (74) into BASE FRAME (1) as shown.
Slide one FOAM PAD (45) onto end of each BOLSTER (26) and lock in place with 5/16” WASHER (LARGER) (105), CAP FOR BOLSTER (68) and 5/16” x 1/2” INNER HEX HEAD BOLT (77).
Insert one BOLSTER (26) through ADJUSTABLE TUBE (11) and slide on other FOAM PAD and lock in place with 5/16” WASHER (LARGER) (105), CAP FOR BOLSTER (68) and 5/16” x 1/2” INNER HEX HEAD BOLT (77).
Pull out on POP PIN (74) and insert ADJUSTABLE TUBE (11) into BASE FRAME (1) and release POP PIN at de-sired position to lock in place.
Attach LEG EXTENSION (12) to BASE FRAME (1) with 5/16” x 5/8” INNER HEX BOLTS (92), 5/16” SPRING WASHERS (100), 5/16” WASHERS (98) and 1/2” AXLE (51).
Attach ROLLER BRACKET (21) to LEG EXTENSION (12) with 1/2” x 3-1/4” HEX HEAD BOLT (81), 1/2” WASHER (96) and 1/2” NYLON NUT (101).
Insert BOLSTER (26) through ROLLER BRACKET (21) and slide on other FOAM PAD and lock in place with 5/16” WASHER (LARGER) (105), CAP FOR BOLSTER (68) and 5/16” x 1/2” INNER HEX HEAD BOLT (77).
Push 25mm x 50mm END PLUG (64) into SEAT ARM (17).
Attach SEAT PAD (44) to SEAT ARM (17) with 3/8” x 1-3/4” HEX HEAD BOLT (89) and 3/8” WASHERS (97).
Attach ADJUSTABLE SEAT TUBE (18) to SEAT ARM (17) with 3/8” x 3” HEX HEAD BOLT (85), 3/8” WASHERS (97) and 3/8” NYLON NUTS (102).
Pull out on SPRING KNOB (73), insert ADJUSTABLE SEAT TUBE (18) and release SPRING KNOB at desired height to lock in place.
Attach BACK SUPPORT (20) to FRONT UPRIGHT (2) with 1/2” x 4-3/4” HEX HEAD BOLTS (78),1/2” WASHERS (96) and 1/2” NYLON NUTS (101).
Thread SPRING KNOB (73) into BACK SUPPORT (20) as shown.
Attach BACK PAD (42) to ADJUSTABLE BACK ARM (13) with 3/8” x 1” HEX HEAD BOLTS (90) and 3/8” WASH-ERS (97).
Pull out on SPRING KNOB (73) in BACK SUPPORT (20) and insert ADJUSTABLE BACK ARM (13) into BACK SUPPORT and release SPRING KNOB at desired position to lock in place.

13
Please contact Universal® Gym Equipment/FFA Corp. for missing or defective parts at one of the following: Phone 1-800-472-9856 or Fax 1-662-495-5038 or E-mail at [email protected]. Mailing address: Universal® Gym Equipment/FFA Corp. - 100 Tubb Ave. West Point, MS 39773.Website www.universalgymequipment.com
FIGURE 4
44
17
64
1029789
45
11
26
92100
9851
12
68
1897
45
45
45
26
98100
92
2
17473
81 21
77
8596
101
101
97
6877
96
96
73
65
90
13
43
78
96
65
90
97
97
20
105
105

14
Please contact Universal® Gym Equipment/FFA Corp. for missing or defective parts at one of the following: Phone 1-800-472-9856 or Fax 1-662-495-5038 or E-mail at [email protected]. Mailing address: Universal® Gym Equipment/FFA Corp. - 100 Tubb Ave. West Point, MS 39773.Website www.universalgymequipment.com
FIGURE 5Step 36.
Step 37.
Step 38.
Step 39.
Step 40.
Step 41.
Step 42.
Thread POP PIN (74) into PRESS ARM (8).
Push 2” ROUND END PLUGS (66) into ends of PRESS ARM (8).
Insert ROLLER HANDLE BARS (16) into PRESS ARM (8) and fasten with 1/2” NYLON NUT (101), 1/2” WASHER (96) and 1/2” CAP FOR NUT (67).
Attach one BEARING HOUSING (33) to TOP FRAME (3) with 1/2” x 1-3/4” HEX HEAD BOLTS (82), 1/2” WASH-ERS (96) and 1/2” NYLON NUTS (101). See DETAIL.
With PINS to rear insert axle of PRESS SUPPORT (7) into mounted BEARING HOUSING (33). Slide other BEAR-ING HOUSING onto axle and attach to TOP FRAME (3) with 1/2” x 1-3/4” HEX HEAD BOLTS (82), 1/2” WASHERS (96) and 1/2” NYLON NUTS (101). Using an allen wrench, tighten SET SCREWS in both BEARING HOUSINGS.
Attach PRESS ARM (8) to PRESS SUPPORT (7) with 1” PRESS ARM AXLE (9) and SPACERS (57).
Pull out on POP PIN (74), swing PRESS ARM (8) to desired position and release POP PIN to lock in place.
IMPORTANT: The BEARING HOUSINGS (33) have SET SCREWS on one side. The BEARINGHOUSINGS must be mounted with the SET SCREWS to the outside as shown in DETAIL.

15
Please contact Universal® Gym Equipment/FFA Corp. for missing or defective parts at one of the following: Phone 1-800-472-9856 or Fax 1-662-495-5038 or E-mail at [email protected]. Mailing address: Universal® Gym Equipment/FFA Corp. - 100 Tubb Ave. West Point, MS 39773.Website www.universalgymequipment.com
8
9
74
3
PIN
7
5782
96
101
96
101
96
6766
16
16
66 67
33
FIGURE 5
DETAIL
33
96
96
101
82
SETSCREWS

16
Please contact Universal® Gym Equipment/FFA Corp. for missing or defective parts at one of the following: Phone 1-800-472-9856 or Fax 1-662-495-5038 or E-mail at [email protected]. Mailing address: Universal® Gym Equipment/FFA Corp. - 100 Tubb Ave. West Point, MS 39773.Website www.universalgymequipment.com
FIGURE 6
Step 43.
Step 44.
Step 45.
Step 46.
Step 47.
Step 48.
Step 49.
Step 50.
Step 51.
Step 52.
Step 53.
Step 54.
NOTE: The TOP CABLE (47) has an adjustment bolt at one end.T1Place TOP CABLE (47) in groove of PULLEY (61), with HOOK end facing front, insert into bottom of TOP FRAME (3) and fasten with 3/8” x 3” HEX HEAD BOLT (85), 3/8” WASHER (97), 3/8” BUSHINGS (70) and 3/8” NYLON NUT (102).
Insert adjustment bolt of TOP CABLE (47) through slot in PRESS SUPPORT (7) and slot in FRONT SUPPORT (2).
T2Place TOP CABLE (47) in groove of PULLEY (61) and attach at top hole in PRESS SUPPORT (7) with 3/8” x 3” HEX HEAD BOLT (85), 3/8” WASHER (97), 3/8” BUSHINGS (70) and 3/8” NYLON NUT (102).
T3Place TOP CABLE (47) in groove of PULLEY (61) and attach at top hole in FRONT SUPPORT (2) with 3/8” x 3” HEX HEAD BOLT (85), 3/8” WASHER (97), 3/8” BUSHINGS (70) and 3/8” NYLON NUT (102).
T4Place TOP CABLE (47) in groove of PULLEY (61) and attach at center hole in PRESS SUPPORT (7) with 3/8” x 3” HEX HEAD BOLT (85), 3/8” WASHER (97), 3/8” BUSHINGS (70) and 3/8” NYLON NUT (102).
T5Place TOP CABLE (47) in groove of PULLEY (61) and attach at center hole in FRONT SUPPORT (2) with 3/8” x 3” HEX HEAD BOLT (85), 3/8” WASHER (97), 3/8” BUSHINGS (70) and 3/8” NYLON NUT (102).
T6Place TOP CABLE (47) in groove of PULLEY (61) and attach at bottom hole in PRESS SUPPORT (7) with 3/8” x 3” HEX HEAD BOLT (85), 3/8” WASHER (97), 3/8” BUSHINGS (70) and 3/8” NYLON NUT (102).
T7Place TOP CABLE (47) in groove of PULLEY (61) and attach at bottom hole in FRONT SUPPORT (2) with 3/8” x 3” HEX HEAD BOLT (85), 3/8” WASHER (97), 3/8” BUSHINGS (70) and 3/8” NYLON NUT (102).
T8Place TOP CABLE (47) in groove of PULLEY (61) and attach at bracket on FRONT SUPPORT (2) with 3/8” x 1-3/4” HEX HEAD BOLT (87) and 3/8” NYLON NUT (102).
T9Place TOP CABLE (47) in groove of PULLEY (61) and attach to FLOATING PULLEY BLOCK (19) with 3/8” x 1-3/4” HEX HEAD BOLT (87) and 3/8” NYLON NUT (102).
T10Place TOP CABLE (47) in groove of PULLEY (61) and attach at bracket on WEIGHT TOP FRAME (5) with 3/8” x 1-3/4” HEX HEAD BOLT (87) and 3/8” NYLON NUT (102).
T11Slip RING of SELECTOR PIN (39) over end of adjustment bolt on TOP CABLE (47)and thread adjustment bolt into SELECTOR ROD (28) about 3 or 4 turns and lock by tightening nut against SELECTOR ROD.

17
Please contact Universal® Gym Equipment/FFA Corp. for missing or defective parts at one of the following: Phone 1-800-472-9856 or Fax 1-662-495-5038 or E-mail at [email protected]. Mailing address: Universal® Gym Equipment/FFA Corp. - 100 Tubb Ave. West Point, MS 39773.Website www.universalgymequipment.com
FIGURE 6
T13
102
97
70
85
47
61
10287
61
T1 3
70
97
102
97
70
8570
9761
61102
97
70
8570
97
19
102
87
61
47
38
28
T11
T11T9 T8, T10
T3, T4, T5, T6
T2, T7
T2T4
T6
T3T5T7
T8T10
T9
7
219
5 ADJUSTMENTBOLT
39
RING

18
Please contact Universal® Gym Equipment/FFA Corp. for missing or defective parts at one of the following: Phone 1-800-472-9856 or Fax 1-662-495-5038 or E-mail at [email protected]. Mailing address: Universal® Gym Equipment/FFA Corp. - 100 Tubb Ave. West Point, MS 39773.Website www.universalgymequipment.com
FIGURE 7
Step 55.
Step 56.
Step 57.
NOTE: The CONNECT CABLE (48) has a ball on each end.C1Insert ball of CONNECT CABLE (48) into slot in SINGLE PULLEY BRACKET (24).
C2Place CONNECT CABLE (48) in groove of PULLEY (61) and attach at desired location in FLOATING PULLEY BLOCK (19) with 3/8” x 1-3/4” HEX HEAD BOLT (87) and 3/8” NYLON NUT (102).
C3Insert ball of CONNECT CABLE (48) into slot in other SINGLE PULLEY BRACKET (24).

19
Please contact Universal® Gym Equipment/FFA Corp. for missing or defective parts at one of the following: Phone 1-800-472-9856 or Fax 1-662-495-5038 or E-mail at [email protected]. Mailing address: Universal® Gym Equipment/FFA Corp. - 100 Tubb Ave. West Point, MS 39773.Website www.universalgymequipment.com
48
19102
48
24
48
61 87
48
24
C1
C3C2
C3
C2
C1
19
FIGURE 7

20
Please contact Universal® Gym Equipment/FFA Corp. for missing or defective parts at one of the following: Phone 1-800-472-9856 or Fax 1-662-495-5038 or E-mail at [email protected]. Mailing address: Universal® Gym Equipment/FFA Corp. - 100 Tubb Ave. West Point, MS 39773.Website www.universalgymequipment.com
FIGURE 8
Step 58.
Step 59.
Step 60.
Step 61.
Step 62.
Step 63.
NOTE: The AB CABLE (49) is the longer cable with a hook on each end.A1Insert AB CABLE (49) through slot in LEG EXTENSION (12). With AB CABLE in groove on bottom of PULLEY (61), attach PULLEY to LEG EXTENSION with 3/8” x 2-1/2” HEX HEAD BOLT (86), 3/8” WASHERS (97) and 3/8” NYLON NUT (102).
A2Insert AB CABLE (49) into front of BASE FRAME (1), push until you can pull it up through slot in BASE FRAME. With AB CABLE in groove on bottom of PULLEY (61), attach PULLEY to BASE FRAME with 3/8” x 3” HEX HEAD BOLT (85), 3/8” WASHERS (97), 3/8” BUSHINGS (70) and 3/8” NYLON NUT (102).
A3With AB CABLE (49) in groove on bottom of PULLEY (61), attach PULLEY to rear hole of slot in BASE FRAME with 3/8” x 3” HEX HEAD BOLT (85), 3/8” WASHERS (97), 3/8” BUSHINGS (70) and 3/8” NYLON NUT (102).
A4Place AB CABLE (49) in groove of PULLEY (61) and attach to SINGLE PULLEY BRACKET (24) with 3/8” x 1-3/4” HEX HEAD BOLT (87) and 3/8” NYLON NUT (102).
A5With AB CABLE (49) in groove on bottom of PULLEY (61), attach PULLEY to front hole of slot in BASE FRAME (1) with 3/8” x 3” HEX HEAD BOLT (85), 3/8” WASHERS (97), 3/8” BUSHINGS (70) and 3/8” NYLON NUT (102).
A6Insert AB CABLE (49) through slot in FRONT SUPPORT (2). With AB CABLE in groove on top of PULLEY (61) at-tach PULLEY to FRONT SUPPORT (2) with 3/8” x 3” HEX HEAD BOLT (85), 3/8” WASHERS (97), 3/8” BUSHINGS (70) and 3/8” NYLON NUT (102).

21
Please contact Universal® Gym Equipment/FFA Corp. for missing or defective parts at one of the following: Phone 1-800-472-9856 or Fax 1-662-495-5038 or E-mail at [email protected]. Mailing address: Universal® Gym Equipment/FFA Corp. - 100 Tubb Ave. West Point, MS 39773.Website www.universalgymequipment.com
FIGURE 8
12A1 61
102
97
86
70
85
2
24
12
1
A2
A3
A4A5A6
97
70
97
97
61102
7070
97
9785
61 102
7097
85 61
10297
70
70
97
85
61102
97
70
49
87
61
24
A1A2A3
A4
A5
A6
102

22
Please contact Universal® Gym Equipment/FFA Corp. for missing or defective parts at one of the following: Phone 1-800-472-9856 or Fax 1-662-495-5038 or E-mail at [email protected]. Mailing address: Universal® Gym Equipment/FFA Corp. - 100 Tubb Ave. West Point, MS 39773.Website www.universalgymequipment.com
FIGURE 9
Step 64.
Step 65.
Step 66.
Step 67.
Step 68.
Step 69.
Step 70.
NOTE: The PEC DECK CABLE (50) is the shorter cable with a hook on each end.P1Place the PEC DECK CABLE (50) into RIGHT PIVOT PULLEY BRACKET (23) and attach PULLEY (61) with 3/8” x 1-3/4” HEX HEAD BOLT (87) and 3/8” NYLON NUT (102).
P2Attach RIGHT PIVOT PULLEY BRACKET (23) and SMALL PULLEY (62) to RIGHT PEC DECK ARM (15) with 3/8” x 3-1/2” HEX HEAD BOLT (83), 3/8” WASHER (97) and 3/8” NYLON NUT (102).
P3Place PEC DECK CABLE (50) in groove of PULLEY (61) and attach to bracket on BASE FRAME (1) with 3/8” x 1-3/4” HEX HEAD BOLT (87) and 3/8” NYLON NUT (102).
P4Place PEC DECK CABLE (50) in groove of PULLEY (61) and attach to SINGLE PULLEY BRACKET (24) with 3/8” x 1-3/4” HEX HEAD BOLT (87) and 3/8” NYLON NUT (102).
P5Place PEC DECK CABLE (50) in groove of PULLEY (61) and attach to bracket on BASE FRAME (1) with 3/8” x 1-3/4” HEX HEAD BOLT (87) and 3/8” NYLON NUT (102).
P6Attach LEFT PIVOT PULLEY BRACKET (22) and SMALL PULLEY (62) to LEFT PEC DECK ARM (14) with 3/8” x 3-1/2” HEX HEAD BOLT (83), 3/8” WASHER (97) and 3/8” NYLON NUT (102).
P7Place the PEC DECK CABLE (50) into LEFT PIVOT PULLEY BRACKET (22) and attach PULLEY (61) with 3/8” x 1-3/4” HEX HEAD BOLT (87) and 3/8” NYLON NUT (102).

23
Please contact Universal® Gym Equipment/FFA Corp. for missing or defective parts at one of the following: Phone 1-800-472-9856 or Fax 1-662-495-5038 or E-mail at [email protected]. Mailing address: Universal® Gym Equipment/FFA Corp. - 100 Tubb Ave. West Point, MS 39773.Website www.universalgymequipment.com
50
P1 61
102
8723
15
83
97
23102 97
P2
P3, P5
P4
P6P7
62
61
87
102
87
10224
61
83
97
97102
2262
14
87
102
14
61
P1
P2
P3
P5P6
P7
P4
FIGURE 9

24
Please contact Universal® Gym Equipment/FFA Corp. for missing or defective parts at one of the following: Phone 1-800-472-9856 or Fax 1-662-495-5038 or E-mail at [email protected]. Mailing address: Universal® Gym Equipment/FFA Corp. - 100 Tubb Ave. West Point, MS 39773.Website www.universalgymequipment.com
FIGURE 10Step 71.
Step 72.
Step 73.
Step 74.
Step 75.
Step 76.
Step 77.
Step 78.
Push BINDING OF WEIGHT SHROUD (46) completely onto edges of WEIGHT SHROUDS (35).
Attach WEIGHT SHROUDS (35) to WEIGHT TOP FRAME (5) and WEIGHT BASE (6) with 5/16” x 1/2” HEX HEAD BOLTS (91) and 5/16” WASHERS (98).
NOTE: The following accessories can be used at different locations on the unit. The locations shown are the most common. See your exercise chart for further information.
Attach the LAT BAR (27) to the hook on the TOP CABLE (47).
Attach the AB STRAP (30) to the hook on the upper end of the AB CABLE (49).
Attach either the ANKLE STRAP (32) or CURL BAR (29) to the hook at the lower end of the AB CABLE (49) with SNAP HOOK (40) and LINK CHAIN (36).
Attach HANDLES (31) to hook at each end of PEC DEC CABLE (50) with SNAP HOOK (40) and LINK CHAIN (36).
Attach HANDLE STRAP (32A) to each PEC DEC ARM (14 LEFT & 15 RIGHT) with SNAP HOOK (40).
NOTE: Over time the cables will need to be adjusted to remove excess slack. This can be done by first adjusting location of PULLEY (61) in FLOATING PULLEY BLOCK (19). Then if only a slight amount of adjustment is needed thread the cable adjustment bolt into the SELECTION ROD (28) until the slack has been removed and then tighten locking nut against SELECTION ROD.

25
Please contact Universal® Gym Equipment/FFA Corp. for missing or defective parts at one of the following: Phone 1-800-472-9856 or Fax 1-662-495-5038 or E-mail at [email protected]. Mailing address: Universal® Gym Equipment/FFA Corp. - 100 Tubb Ave. West Point, MS 39773.Website www.universalgymequipment.com
5
6
4635
98
9149
47 27
30
31
98
91
35
40
36
49 32
29
50
31
40
3636
40
FIGURE 10
19
61
40
32A
15 14

26
Please contact Universal® Gym Equipment/FFA Corp. for missing or defective parts at one of the following: Phone 1-800-472-9856 or Fax 1-662-495-5038 or E-mail at [email protected]. Mailing address: Universal® Gym Equipment/FFA Corp. - 100 Tubb Ave. West Point, MS 39773.Website www.universalgymequipment.com
Universal® Gym Equipment Lifetime Limited WarrantyUniversal® Gym Equipment (a division of FF Acquisition Corp.) warrants to the original owner of this Universal® Gym Equipment PowerPak® 2000, the following components to be free from defects in material and workmanship for the period specified.To establish warranty rights, the purchaser must retain the bill of sale. This warranty is only valid if the equipment is purchased from an authorized Universal® Gym Equipment dealer. Defective parts will be repaired or replaced at the option of Universal® Gym Equipment. All labor is the responsibility of the owner.
Warranty Period (begins at date of purchase) COMPONENT PERIOD COMPONENT PERIOD Frame Lifetime Bushing/Bearings Lifetime Weight Plates Lifetime Cable/Pulleys Lifetime Foam Rolls Lifetime Seats and Back Cushions Lifetime All other Lifetime
EXCEPTIONS AND CONDITIONSFailures due to improper assembly, neglect, alteration or modification, damage, misuse, repairs other than by an Universal Authorized Service Center or lack of maintenance (see Owners Manual) are not covered by this warranty. This warranty does not cover damages sustained during shipment or transportation of equipment. Any damage in transit should be filed with the carrier.
Please note that it is our policy to replace components and not entire machines or assemblies. We may also first attempt to repair structural components to make them functional as designed, the result of which may be visible. Repair of the products as provided under this warranty is the exclusive remedy of the customer.
The coated steel frame is rust-resistant in most settings. However, rusting/corrosion is outside the scope of the warranty. We recommend that if this machine is to be installed in high humidity areas (like outdoors, near a pool or by a hot tub, etc.), the owner apply an automotive wax to delay the onset of corrosion. Sweat, cleaner, body lotions and sunlight can be corrosive and are the responsibility of the owner.
Universal® Gym Equipment shall not be responsible for injury, loss of use of the Universal® Gym Equipment product, or any inconvenience, loss of damage to personal property, whether direct or indirect, and incidental or consequential damages. This warranty and all warranties that may be implied under state law, including but not limited to warranties of merchantability and warranties of fitness for any purpose, expire with transfer of ownership from the original owner. Any implied warranty of merchantability or fitness for any particular purpose shall be limited for one year.
Replacement and Repair ExpensesUniversal® Gym Equipment will prepay for shipment of replacement /repair parts to owner by standard ground transportation as long as it falls under the “warranty of the product”. All other cost are the responsibility of the owner of the machine (for example: labor charges for service, removal, reinstallation or shipping/handling/delivery charges for returning component to Universal® Gym Equipment).
How To Make A Warranty-Covered ClaimShould your machine require warranty service, please first contact the Universal® Gym Equipment Authorized Dealer from which you purchased this machine. Your dealer may offer you assistance in making the warranty claim or may be a Univer-sal® Gym Equipment Authorized Service Center. Before contacting either your dealer or Universal® Gym Equipment, please do the following:
1.Refer to the parts list in your owners manual to help identify the part numbers of the part/component in question.2.Write down the serial number (located on the frame).3.Have available a copy of your dealer’s bill of sale (with date of purchase indicated).
If your dealer is unable to help you, please use the following number to contact Universal® Gym Equipment about your war-ranty claim: 1-800-476-9856 (US) between the hours of 8:00 am and 5:00 pm (CST). Or write to Universal® Gym Equipment (a Division of FF Acquisition Corp.), Attn.: Customer Service-Parts P O Box 1296 West Point, MS 39773.

27
Please contact Universal® Gym Equipment/FFA Corp. for missing or defective parts at one of the following: Phone 1-800-472-9856 or Fax 1-662-495-5038 or E-mail at [email protected]. Mailing address: Universal® Gym Equipment/FFA Corp. - 100 Tubb Ave. West Point, MS 39773.Website www.universalgymequipment.com
BLANK PAGE

�������� ��������������������������� �� ���������� � ��� ������� ��������� ��� ��������� �������� �� ������������ �������� ������ �������� ��� ������ ���� ���� ���
��������� ��� �������������� �������� ������������������� �������
��� ���� ���������� ������ �� �����
���� �������� ������������ ���� �� ���� �� ����� �������� �� �� ����� ��� �� ��� ����� �� ����������������� ��� ��� ���� ������� ��� �������� ������� ��� ����� ������������������������������������������� �� ��� ����� �� ������������������� ���� ������������������������������������������������� ���� ������������������������������������������� ������������������������������������������ �������������������������������������������� ������� ������������������������������������������ ������������������������������������������ ���������������������������������������� ���� ������������������������������������������� �������������������������������������������� ������ ���������������������������������������������� ���� ������������������������������������������� �� �������� ���������������������������������������� ��������� ��� ��������� ����� ���������� �������� �� �������� ���� �������� �� ��������� ���� ��� �� ������ �������� �� ��� ���� ��� ������ ��� ��������� ��������� ��������� ������������� ��� ��������� ��������� ��� �� � ��� �� ������ ����� ��� ��� ���� ��������� �� ��������� �� ��������� ��������� ��� ��������� ������� �� ��� ���� �� ���������� ��� ��� ������ ���� ��������� ��� ��������� �������� ������ ��� ���� �������� ������ � ���������� �� ������� �� ���������� ����� �� ����� �� ����� ������������ �������� �� ��� ������ ������ ���������� �� ����� �
���� ����� ������ ��� ��� �������� �����������
��� ���� ��� ��� �������� ��� ��������� ����� �� ������ ���� �������� ����������� ���� ���� � ����� �� � � � ����� �� � � � ����� �� ���� � �����
��� ��� ��� �������� ��� ��������� ����� �� ������ ���� ��������� ������ ��� ���� �������� �������� �� �������� ������ �� ���������� �� ���������� �� ������� ���������
������ �������� ���� ����� ����� ����� � � ��� � � ����� � � ������� � � �� ����� � ���� ��� ���� ����� ���������� �������� ��� ������ ���� � �������� � ���������
��
��