owner’s manual truck bed tent - kodiak canvas manual truck tents.pdf · owner’s manual •...
TRANSCRIPT
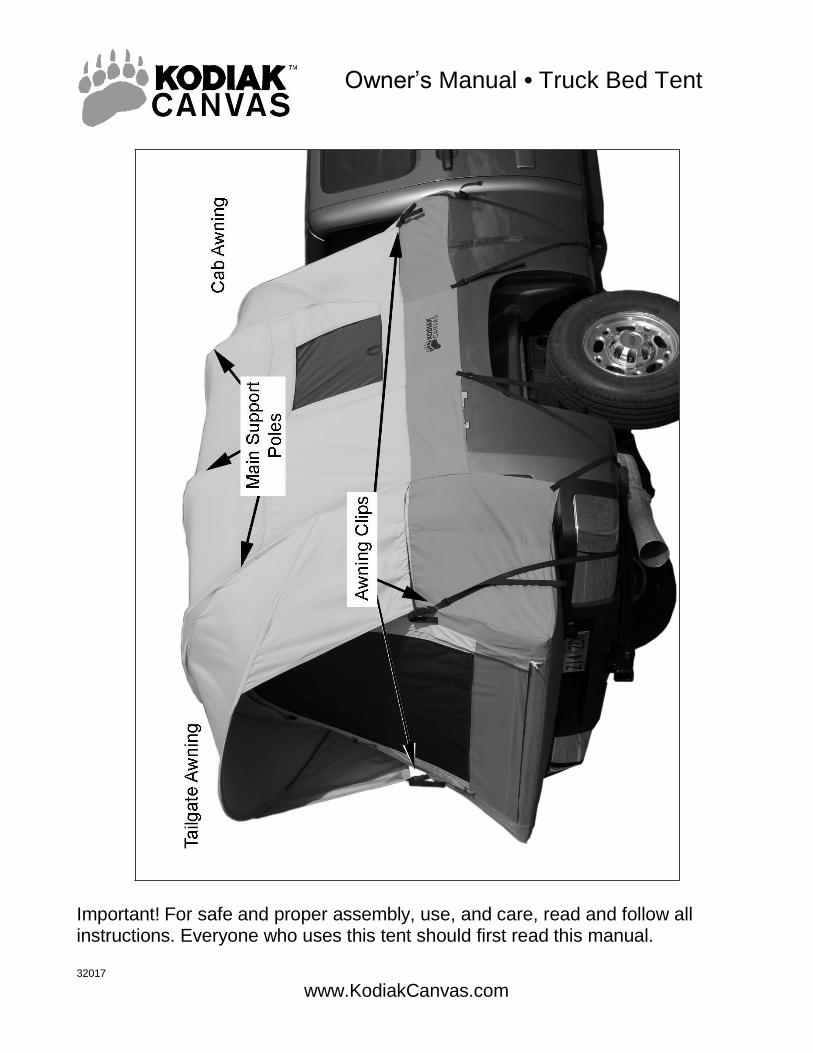
Owner’s Manual • Truck Bed Tent
Important! For safe and proper assembly, use, and care, read and follow all instructions. Everyone who uses this tent should first read this manual.
32017
www.KodiakCanvas.com
2
No Fire This tent is flammable. Keep all flame and heat sources away from the tent fabric. Never place a stove, campfire, or any other flame source in or near your tent. Never use, light, or refuel a stove, lantern, heater, or any other heat source inside your tent. Death by carbon monoxide poisoning and/or serious burns are possible.
Ventilation Maintain adequate ventilation inside your tent at all times. Death by suffocation is possible.
Shut Engine Off To prevent engine exhaust from entering the tent, never assemble, or use the tent while the engine is running. Death by carbon monoxide poisoning is possible.
Do not Drive with Tent Erected Do not drive your truck with the tent erected. It could cause damage to your truck, your tent, and others. Do not drive with the Mounting Rails attached. Vibration could cause them to come loose.
Campsite Choice Carefully consider the possibility of falling rocks or tree limbs, lightning strikes, flash floods, avalanches, strong winds, and other objective hazards when choosing a campsite to reduce the risk of loss or injury to the tent or occupants.
Children Do not leave children unattended inside a tent or camp. Do not allow children to assemble or disassemble the tent. Do not allow children to remain closed-up in a tent on hot days. Do not allow children to swing on or hang from any part of this tent, organizers, or guylines. Failure to follow these warnings may result in injury and/or death.
CAUTION Before you set up your tent make sure there are no sharp edges on your truck that could cut or damage your tent. Pay careful attention to areas like corners and tailgates. If you do have a sharp edge, file it down or cover it with duct tape.
3
Component Checklist
● Identify all components and make sure they are in good condition and working order.
Qty Item
1 Tent Body
2 Mounting Rails
4 C-Clamps
3 Poles Main Support
1 Pole—Cab Awning (shorter pole)
1 Pole—Tailgate Awning (longer pole)
1 Pole Bag
1 Tent Bag
Before You Set Out
● It is recommended that you assemble this tent at home at least once before your trip to familiarize yourself with the process, and make sure your tent is in good order. ● After initial set-up, it is recommended that you spray the tent lightly with water and allow it to dry completely. This “seasons” the canvas. The water causes the canvas to shrink slightly, closing needle holes where the canvas was stitched. This process is only required once.
Assembly
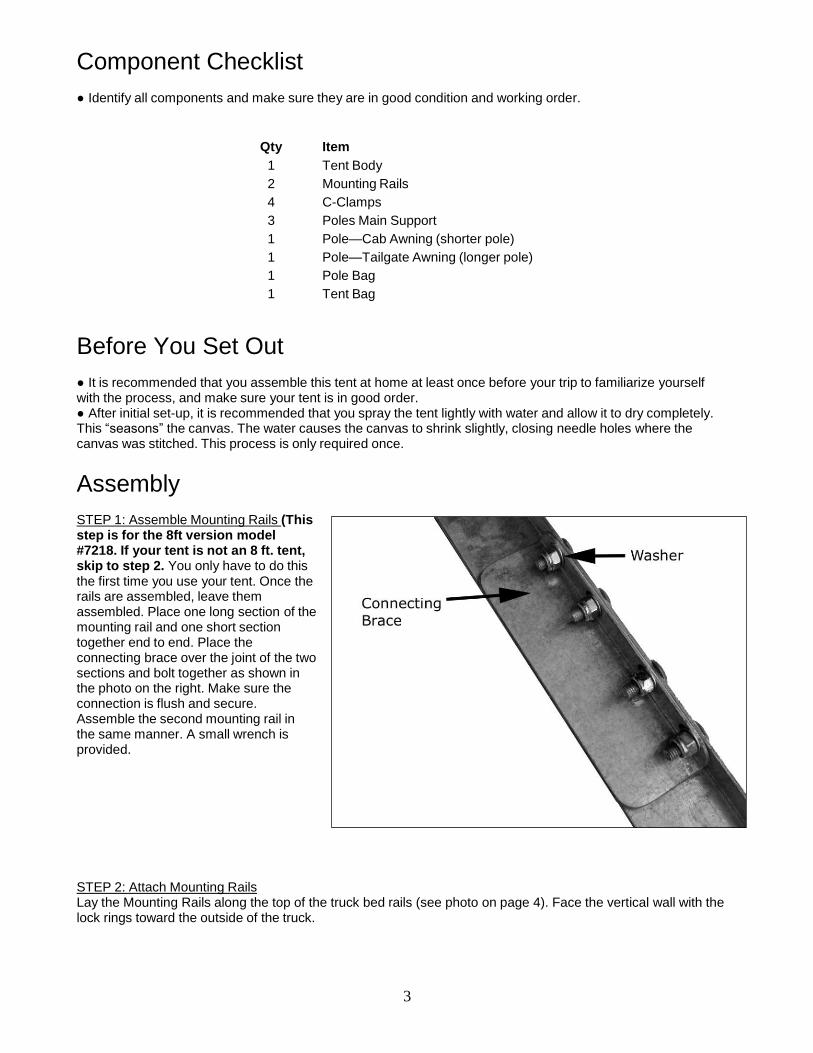
STEP 1: Assemble Mounting Rails (This step is for the 8ft version model #7218. If your tent is not an 8 ft. tent, skip to step 2. You only have to do this the first time you use your tent. Once the rails are assembled, leave them assembled. Place one long section of the mounting rail and one short section together end to end. Place the connecting brace over the joint of the two sections and bolt together as shown in the photo on the right. Make sure the connection is flush and secure. Assemble the second mounting rail in the same manner. A small wrench is provided.
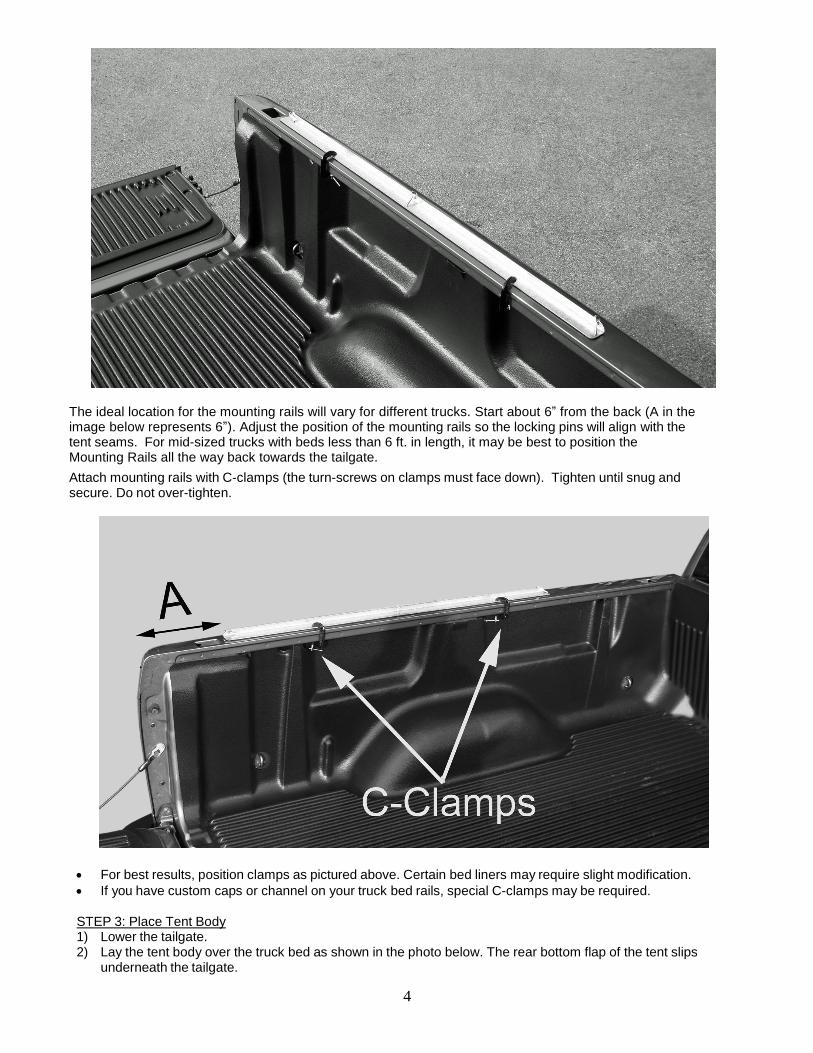
STEP 2: Attach Mounting Rails Lay the Mounting Rails along the top of the truck bed rails (see photo on page 4). Face the vertical wall with the lock rings toward the outside of the truck.
4
The ideal location for the mounting rails will vary for different trucks. Start about 6” from the back (A in the image below represents 6”). Adjust the position of the mounting rails so the locking pins will align with the tent seams. For mid-sized trucks with beds less than 6 ft. in length, it may be best to position the Mounting Rails all the way back towards the tailgate.
Attach mounting rails with C-clamps (the turn-screws on clamps must face down). Tighten until snug and secure. Do not over-tighten.
For best results, position clamps as pictured above. Certain bed liners may require slight modification.
If you have custom caps or channel on your truck bed rails, special C-clamps may be required.
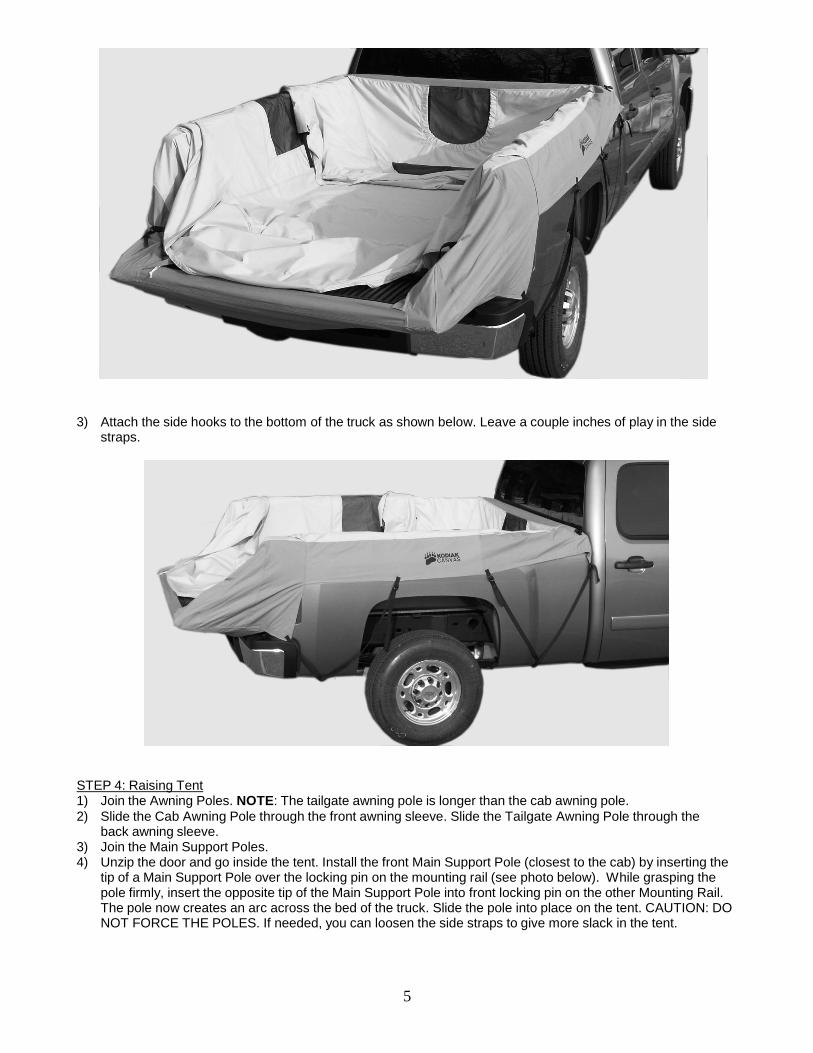
STEP 3: Place Tent Body 1) Lower the tailgate. 2) Lay the tent body over the truck bed as shown in the photo below. The rear bottom flap of the tent slips
underneath the tailgate.
5
3) Attach the side hooks to the bottom of the truck as shown below. Leave a couple inches of play in the side straps.
STEP 4: Raising Tent 1) Join the Awning Poles. NOTE: The tailgate awning pole is longer than the cab awning pole.
2) Slide the Cab Awning Pole through the front awning sleeve. Slide the Tailgate Awning Pole through the back awning sleeve.
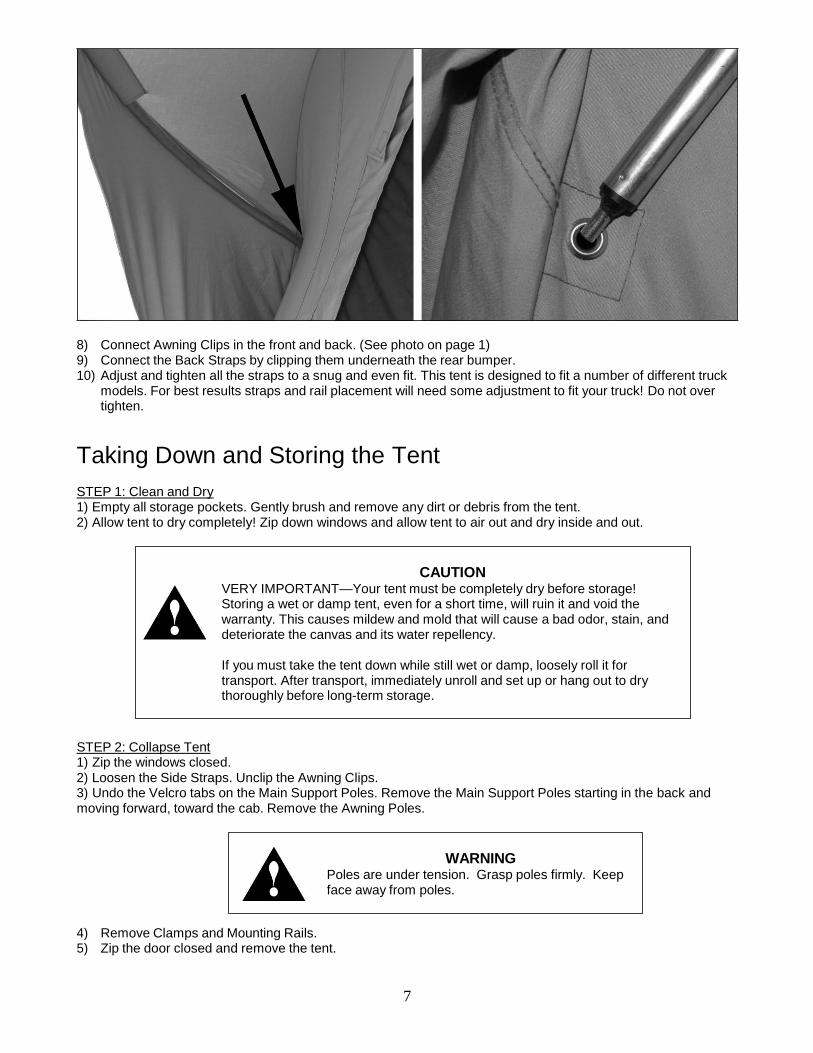
3) Join the Main Support Poles. 4) Unzip the door and go inside the tent. Install the front Main Support Pole (closest to the cab) by inserting the
tip of a Main Support Pole over the locking pin on the mounting rail (see photo below). While grasping the pole firmly, insert the opposite tip of the Main Support Pole into front locking pin on the other Mounting Rail. The pole now creates an arc across the bed of the truck. Slide the pole into place on the tent. CAUTION: DO NOT FORCE THE POLES. If needed, you can loosen the side straps to give more slack in the tent.

6
5) Repeat #4 for the Middle Support Pole, and then the Back Support Pole. Tip: Complete in order, starting at the front (towards the truck cab), and then work back (towards the tailgate).
6) Secure the poles in place with the Velcro tabs located on the tent ceiling and walls. 7) Insert the tips of the Tailgate and Cab Awning Poles into the grommet holes just below the awning (See
photo on top of page 7).
7
8) Connect Awning Clips in the front and back. (See photo on page 1) 9) Connect the Back Straps by clipping them underneath the rear bumper. 10) Adjust and tighten all the straps to a snug and even fit. This tent is designed to fit a number of different truck
models. For best results straps and rail placement will need some adjustment to fit your truck! Do not over tighten.
Taking Down and Storing the Tent
STEP 1: Clean and Dry 1) Empty all storage pockets. Gently brush and remove any dirt or debris from the tent. 2) Allow tent to dry completely! Zip down windows and allow tent to air out and dry inside and out.
STEP 2: Collapse Tent 1) Zip the windows closed. 2) Loosen the Side Straps. Unclip the Awning Clips. 3) Undo the Velcro tabs on the Main Support Poles. Remove the Main Support Poles starting in the back and moving forward, toward the cab. Remove the Awning Poles.
4) Remove Clamps and Mounting Rails. 5) Zip the door closed and remove the tent.
WARNING Poles are under tension. Grasp poles firmly. Keep face away from poles.
CAUTION VERY IMPORTANT—Your tent must be completely dry before storage! Storing a wet or damp tent, even for a short time, will ruin it and void the warranty. This causes mildew and mold that will cause a bad odor, stain, and deteriorate the canvas and its water repellency.
If you must take the tent down while still wet or damp, loosely roll it for transport. After transport, immediately unroll and set up or hang out to dry thoroughly before long-term storage.
8
STEP 3: Storage 1) Fold the Side Straps up over the tent. 2) Fold and roll the tent. Store in tent bag. 3) Place Mounting Rails, poles, and clamps in pole bag.
Care ● VERY IMPORTANT—Your tent must be completely dry before storage! STORING A WET OR DAMP TENT, EVEN FOR A SHORT TIME, WILL RUIN IT AND VOID THE WARRANTY. ● To clean tent, hose down with water and wipe with a cloth. Soaps and detergents can damage the water- repellant treatment of the canvas. Never put your tent in a washing machine. ● Do not spray insecticides or bug repellant directly on the canvas. This may damage the water-repellant treatment. ● For long-term storage, store in a cool, dry location that is not exposed to direct sunlight. ● This tent is equipped with top-quality YKK zippers. To prolong zipper life, do not “grind” zippers around corners. If needed pull the canvas, windows or doors to help zippers glide smoothly. Keep them clean from dirt. When getting in and out of the tent step over, not on, the zipper on the tailgate. ● The canvas on your tent has a special Hydra-Shield™ treatment that is watertight and breathable. You should rarely, if ever, have to retreat the canvas. If you do need to spot treat the canvas for water repellency, use a silicone-based repellent such as Camp Dry® by Kiwi®. Other treatments will clog the tiny holes in the canvas eliminating its breathability. ● Winter camping can be an enjoyable experience in a Kodiak Canvas tent. However, it is not designed for
heavy snow accumulations.
Other Notes ● Condensation inside the tent is affected by the difference between inside and outside temperatures, and humidity. Condensation can be reduced by venting your tent. ● Some slight irregularities are normal with 100% cotton canvas and will not affect the performance of your tent.
We appreciate your business. Thank you for purchasing a Kodiak Canvas™ tent. We put our pride into the design and manufacturing of this product. It is the best of its kind available. We wish you safe and happy camping. Please tell your friends about us. See more fine Kodiak Canvas tents at www.KodiakCanvas.com.
© Kodiak Canvas. Layton, UT USA Made in China
Kodiak Canvas
Limited Lifetime Warranty
This product is warranted, to the original purchaser, to be free of defects in materials and workmanship
for as long as you own the product. This product is made with quality materials and expert workmanship, but is not indestructible. This warranty does not cover damage attributed to or resulting from normal wear and tear (e.g. exhausted zippers), natural hazards (e.g. weather, animals), abuse (e.g. mold, mildew, burns, ultraviolet), or alterations or modifications of any kind. The warranty does not cover damage to your truck. If your product is found defective, we will repair or replace it free of charge. Charges for shipping your product to Kodiak Canvas will be your responsibility. We reserve the right to make substitutions if parts are unavailable or obsolete. If your product needs repair beyond what is covered under warranty, we will provide parts and service at a reasonable charge.
This warranty gives you, the original purchaser, specific legal rights. You may also have other rights which vary from state to state. Do not return your product until you have received authorization and instruction to do so.
To obtain service, contact us at www.KodiakCanvas.com, or write to:
Kodiak Canvas Customer Service PO Box 762
Layton, UT 84041