owner’s...
TRANSCRIPT

Network SD/USB Recorder
DN-700ROwner’s Manual
Part names and
FunctionsSetting defaults
ConnectionsPlayback
Selecting Files and Folders
Control Function
Information
I
Selecting M
ediaRecording
Edit FunctionG
etting Started
IMPORTANT TO SAFETYWARNING:
To reduce the risk of fire and electric shock, this apparatus should not be exposed to rain or moisture and objects filled with liquids, such as vases, should not be placed on this apparatus
CAUTION1. Handle the power supply cord carefully
Do not damage or deform the power supply cord. If it is damaged or deformed, it may cause electric shock or malfunction when used. When removing from wall outlet, be sure to remove by holding the plug attachment and not by pulling the cord.
2. Do not open the rear coverIn order to prevent electric shock, do not open the top cover.If problems occur, contact your DENON DEALER.
3. Do not place anything insideDo not place metal objects or spill liquid inside the system.Electric shock or malfunction may result.
Please, record and retain the Model name and serial number of your set shown on the rating label.Model No. DN-700RSerial No.
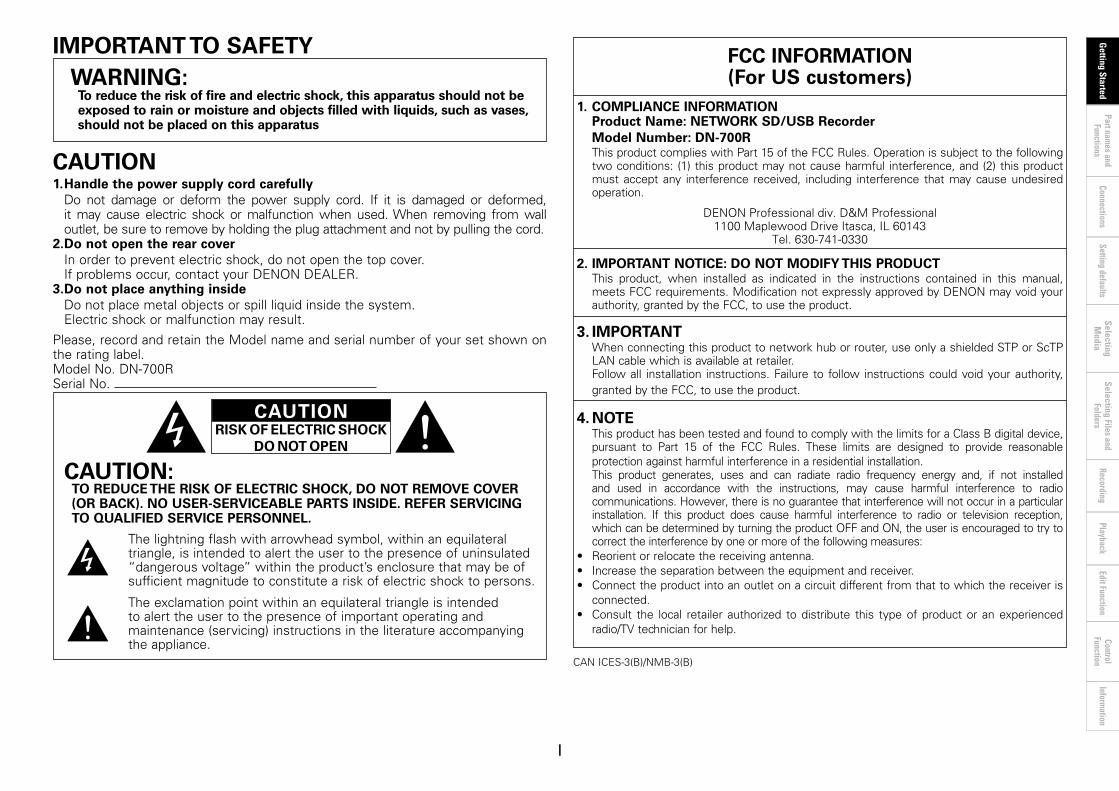
CAUTIONRISK OF ELECTRIC SHOCK
DO NOT OPEN
CAUTION: TO REDUCE THE RISK OF ELECTRIC SHOCK, DO NOT REMOVE COVER (OR BACK). NO USER-SERVICEABLE PARTS INSIDE. REFER SERVICING TO QUALIFIED SERVICE PERSONNEL.
The lightning flash with arrowhead symbol, within an equilateral triangle, is intended to alert the user to the presence of uninsulated “dangerous voltage” within the product’s enclosure that may be of sufficient magnitude to constitute a risk of electric shock to persons.
The exclamation point within an equilateral triangle is intended to alert the user to the presence of important operating and maintenance (servicing) instructions in the literature accompanying the appliance.
FCC INFORMATION (For US customers)
1. COMPLIANCE INFORMATIONProduct Name: NETWORK SD/USB RecorderModel Number: DN-700RThis product complies with Part 15 of the FCC Rules. Operation is subject to the following two conditions: (1) this product may not cause harmful interference, and (2) this product must accept any interference received, including interference that may cause undesired operation.
DENON Professional div. D&M Professional1100 Maplewood Drive Itasca, IL 60143
Tel. 630-741-0330
2. IMPORTANT NOTICE: DO NOT MODIFY THIS PRODUCT This product, when installed as indicated in the instructions contained in this manual, meets FCC requirements. Modification not expressly approved by DENON may void your authority, granted by the FCC, to use the product.
3. IMPORTANTWhen connecting this product to network hub or router, use only a shielded STP or ScTP LAN cable which is available at retailer.Follow all installation instructions. Failure to follow instructions could void your authority, granted by the FCC, to use the product.
4. NOTEThis product has been tested and found to comply with the limits for a Class B digital device, pursuant to Part 15 of the FCC Rules. These limits are designed to provide reasonable protection against harmful interference in a residential installation.This product generates, uses and can radiate radio frequency energy and, if not installed and used in accordance with the instructions, may cause harmful interference to radio communications. However, there is no guarantee that interference will not occur in a particular installation. If this product does cause harmful interference to radio or television reception, which can be determined by turning the product OFF and ON, the user is encouraged to try to correct the interference by one or more of the following measures:
• Reorientorrelocatethereceivingantenna.• Increasetheseparationbetweentheequipmentandreceiver.• Connecttheproductintoanoutletonacircuitdifferentfromthattowhichthereceiveris
connected.• Consult the local retailer authorized todistribute this typeofproductor anexperienced
radio/TV technician for help.
CAN ICES-3(B)/NMB-3(B)
Part names and
FunctionsSetting defaults
ConnectionsPlayback
Selecting Files and Folders
Control Function
Information
II
Selecting M
ediaRecording
Edit FunctionG
etting Started
1. Read these instructions.
2. Keep these instructions.
3. Heed all warnings.
4. Follow all instructions.
5. Do not use this apparatus near water.
6. Clean only with dry cloth.
7. Do not block any ventilation openings. Install in accordance with the manufacturer’s
instructions.
8. Do not install near any heat sources such as radiators, heat registers, stoves, or other apparatus (including amplifiers) that produce heat.
9. Donotdefeatthesafetypurposeofthepolarizedorgrounding-typeplug.Apolarizedplughastwoblades with one wider than the other. A grounding type plug has two blades and a third grounding prong. The wide blade or the third prong are provided for your safety. If the provided plug does not fit into your outlet, consult an electrician for replacement of the obsolete outlet.
10. Protect the power cord from being walked on or pinched particularly at plugs, convenience receptacles, and the point where they exit from the apparatus.
11. Only use attachments/accessories specified by the manufacturer.
12. Use only with the cart, stand, tripod, bracket, or table specified by the manufacturer, or sold with the apparatus. When a cart is used, use caution when moving the cart/apparatus combination to avoid injury from tip-over.
13. Unplug this apparatus during lightning storms or when unused for long periods of time.
14. Refer all servicing to qualified service personnel. Servicing is required when the apparatus has been damaged in any way, such as power-supply cord or plug is damaged, liquid has been spilled or objects have fallen into the apparatus, the apparatus has been exposed to rain or moisture, does not operate normally, or has been dropped.
15. Batteries shall not be exposed to excessive heat such as sunshine, fire or the like.
Additional Safety Information!
16. This product is equipped with a three-wire grounding type plug, a plug having a third (grounding) pin.
This plug will only fit into a grounding-type power outlet. If you are unable to insert the plug into the outlet, contact your electrician to replace your obsolete
outlet. Do not defeat the safety purpose of the grounding-type plug.
IMPORTANT SAFETY INSTRUCTIONS
READ BEFORE OPERATING EQUIPMENT
This product was designed and manufactured to meet strict quality and safety standards. There are, however, some installation and operation precautions which you should be particularly aware of.

Part names and
FunctionsSetting defaults
ConnectionsPlayback
Selecting Files and Folders
Control Function
Information
III
Selecting M
ediaRecording
Edit FunctionG
etting Started
CAUTION: (English)To completely disconnect this product from the mains, disconnect the plug from the wall socket outlet.The mains plug is used to completely interrupt the power supply to the unit and must be within easy access by the user.Do not expose batteries to excessive heat such as sunshine, fire or the like.
VORSICHT: (Deutsch)Um dieses Gerät vollständig von der Stromversorgung abzutrennen, trennenSie bitte denNetzstecker von derWandsteckdose ab.Die Hauptstecker werden ver wendet, um die Stromversorgung zum Gerät völlig zu unterbrechen; ermussfürdenBenutzergutundeinfachzuerreichensein.SetzenSieBatteriennichtübermäßigerWärmeaus,z.B.Sonnenstrahlung, Feuer oder dergleichen.
PRECAUTION: (Français)Pour déconnecter complètement ce produit du courant secteur,débranchezlaprisedelaprisemurale.La prise secteur est utilisée pour couper complètement l’alimentation de l’appareil et l’utilisateur doit pouvoir y accéder facilement.N’exposezpaslesbatteriesàunechaleurexcessivetelleque le soleil, le feu ou autre.
ATTENZIONE: (Italiano)Per scollegare definitivamente questo prodotto dalla rete di alimentazione elettrica, togliere la spina dalla relativapresa.La spina di rete viene utilizzata per interromperecompletamente l’alimentazione all’unità e deve esserefacilmente accessibile all’utente.Non esporre le batterie a un calore eccessivo, per esempio al sole, al fuoco o altre fonti.
PRECAUCIÓN: (Español)Para desconectar completamente este producto de la alimentación eléctrica, desconecte el enchufe del enchufe de la pared.El enchufe de la alimentación se utiliza para interrumpirpor completo el suministro de alimentación a la unidad y debe de encontrarse en un lugar al que el usuario tenga fácil acceso.Noexpongalaspilasacalorexcesivo,comoalaluzsolar,el fuego, etc.
VOORZICHTIGHEID: (Nederlands)Om de voeding van dit product volledig te onderbreken moet de stekker uit het stopcontact worden getrokken.De netstekker wordt gebruikt om de stroomtoevoer naar het toestel volledig te onderbreken en moet voor de gebruikergemakkelijkbereikbaarzijn.Steldebatterijennietblootaanfellezonneschijn,brand,enzovoorts.
FÖRSIKTIHETSMÅTT: (Svenska)Koppla loss stickproppen fråneluttaget för att helt skiljaprodukten från nätet.Stickproppenanvändsförattheltbrytaströmförsörjningentillapparaten,ochdenmåstevaralättillgängligföranvändaren.Utsättintebatteriernaförstarkhettasåsomsolsken,eldeller liknande.
ATENÇÃO: (Português)Para desligar completamente este produto da corrente, desligue a ficha da tomada eléctrica.A ficha eléctrica é uti l izada para interrompercompletamente a alimentação da unidade e deve estar numlocalondeoutilizadorlhepossaacederfacilmente.Não exponha as pilhas a fontes de calor excessivo, como luzsolar,fogoousemelhantes.
WARNINGS WARNHINWEISE•Avoid high temperatures.
Allow for sufficient heat dispersion when installed in a rack.
•Handle the power cord carefully.Hold the plug when unplugging the cord.
•Keep the unit free from moisture, water, and dust.
•Unplug the power cord when not using the unit for long periods of time.
•Do not obstruct the ventilation holes.
•Do not let foreign objects into the unit.
•Do not let insecticides, benzene,andthinnercomeincontact with the unit.
•Never disassemble or modify the unit in any way.
•Ventilation should not be impeded by covering the ventilation openings with items, such as newspapers, tablecloths or curtains.
•Naked flame sources such as lighted candles should not be placed on the unit.
•Observe and follow local regulations regarding battery disposal.
•Do not expose the unit to dripping or splashing fluids.
•Do not place objects filled with liquids, such as vases, on the unit.
•Do not handle the mains cord with wet hands.
•When the switch is in the OFF (STANDBY) position, the equipment is not completely switched off from MAINS.
•The equipment shall be installed near the power supply so that the power supply is easily accessible.
•Do not keep the battery in a place exposed to direct sunlight or in places with extremely high temperatures, such as near a heater.
•Vermeiden Sie hohe Temperaturen.Beachten Sie, dass eine ausreichende Belüftung gewährleistet wird, wenn das Gerät auf ein Regal gestellt wird.
•Gehen Sie vorsichtig mit dem Netzkabelum.Halten Sie das Kabel am Stecker, wenn Sie den Stecker herausziehen.
•Halten Sie das Gerät von Feuchtigkeit, Wasser und Staub fern.
•Wenn das Gerät längere Zeit nicht verwendet werden soll, trennen Sie dasNetzkabelvomNetzstecker.
•Decken Sie den Lüftungsbereich nicht ab.
•Lassen Sie keine fremden Gegenstände in das Gerät kommen.
•Lassen Sie das Gerät nicht mitInsektiziden,BenzinoderVerdünnungsmitteln in Berührung kommen.
•Versuchen Sie niemals das Gerät auseinanderzunehmenoderzuverändern.
•Die Belüftung sollte auf keinen Fall durch das Abdecken der BelüftungsöffnungendurchGegenstände wie beispielsweise Zeitungen, Tischtücher, Vorhänge o. Ä. behindert werden.
•Auf dem Gerät sollten keinerlei direkte Feuerquellen wie beispielsweiseangezündeteKerzenaufgestellt werden.
•Bitte beachten Sie bei der EntsorgungderBatteriendieörtlichgeltenden Umweltbestimmungen.
•Das Gerät sollte keiner tropfenden oderspritzendenFlüssigkeitausgesetztwerden.
•Auf dem Gerät sollten keine mit Flüssigkeit gefüllten Behälter wie beispielsweise Vasen aufgestellt werden.
•DasNetzkabelnichtmitfeuchtenoder nassen Händen anfassen.
•Wenn der Schalter ausgeschaltet ist (OFF (STANDBY)-Position), ist das Gerät nicht vollständig vom Stromnetz(MAINS)abgetrennt.
•Das Gerät sollte in der Nähe einer Netzsteckdoseaufgestelltwerden,damitesleichtandasStromnetzangeschlossen werden kann.
•Lagern Sie die Batterie nicht an einem Ort, an dem sie direktem Sonnenlicht oder extrem hohen Temperaturen ausgesetztist,wiez.B.inderNäheeinesHeizgeräts.
n NOTE ON USE / HINWEISE ZUM GEBRAUCH

Part names and
FunctionsSetting defaults
ConnectionsPlayback
Selecting Files and Folders
Control Function
Information
IV
Selecting M
ediaRecording
Edit FunctionG
etting Started
n OBSERVATIONS RELATIVES A L’UTILISATION / NOTE SULL’USO / NOTAS SOBRE EL USO / ALVORENS TE GEBRUIKEN / OBSERVERA / NOTA SOBRE UTILIZAÇÃO
AVERTISSEMENTS AVVERTENZE ADVERTENCIAS WAARSCHUWINGEN VARNINGAR AVISOS•Eviter des températures
élevées. Tenir compte d’une dispersion de chaleur suffisante lors de l’installation sur une étagère.
•Manipuler le cordon d’alimentation avec précaution.Tenir la prise lors du débranchement du cordon.
•Protéger l’appareil contre l’humidité, l’eau et la poussière.
•Débrancher le cordon d’alimentation lorsque l’appareil n’est pas utilisé pendant de longues périodes.
•Ne pas obstruer les trous d’aération.
•Ne pas laisser des objets étrangers dans l’appareil.
•Ne pas mettre en contact des insecticides,dubenzèneetundiluant avec l’appareil.
•Ne jamais démonter ou modifier l’appareil d’une manière ou d’une autre.
•Ne pas recouvrir les orifices de ventilation avec des objets tels que des journaux, nappes ou rideaux. Cela entraverait la ventilation.
•Ne jamais placer de flamme nue sur l'appareil, notamment des bougies allumées.
•Veillezàrespecterlesloisenvigueurlorsquevousjetezlespiles usagées.
•L’appareil ne doit pas être exposéàl’eauouàl’humidité.
•Ne pas poser d’objet contenant du liquide, par exemple un vase, sur l’appareil.
•Ne pas manipuler le cordon d’alimentation avec les mains mouillées.
•Lorsque l’interrupteur est sur la position OFF (STANDBY), l’appareil n’est pas complètement déconnecté du SECTEUR (MAINS).
•L’appareil sera installé près de la source d’alimentation, de sorte que cette dernière soit facilement accessible.
•Neplacezpaslapiledansunendroitexposéàlalumièredirecte du soleil ou dans des endroits présentant des températures extrêmement élevées, par exemple près d’un radiateur.
•Evitatediesporrel’unitàatemperature elevate.Assicuratevi che vi sia un’adeguata dispersione del calorequandoinstallatel’unitàinun mobile per componenti audio.
•Manneggiate il cavo di alimentazioneconattenzione.Tenete ferma la spina quando scollegate il cavo dalla presa.
•Tenetel’unitàlontanadall’umidità,dall’acquaedallapolvere.
•Scollegate il cavo di alimentazionequandoprevedetedinonutilizzarel’unitàperunlungo periodo di tempo.
•Noncopriteiforidiventilazione.•Non inserite corpi estranei all’internodell’unità.
•Assicuratevichel’unitànonentri in contatto con insetticidi, benzoloosolventi.
•Non smontate né modificate l’unitàinalcunmodo.
•Leaperturediventilazionenon devono essere ostruite coprendole con oggetti, quali giornali, tovaglie, tende e così via.
•Nonposizionatesull’unitàfiamme libere, come ad esempio candele accese.
•Prestateattenzioneagliaspettilegati alla tutela dell’ambiente nello smaltimento delle batterie.
•L’apparecchiatura non deve essere esposta a gocciolii o spruzzi.
•Nonposizionatesull’unitàalcunoggetto contenente liquidi, come ad esempio i vasi.
•Non toccare il cavo di alimentazioneconlemanibagnate.
•Quando l’interruttore è nella posizioneOFF(STANDBY),l’apparecchiatura non è completamente scollegata da MAINS.
•L’apparecchio va installato inprossimitàdellafontedialimentazione,inmodochequest’ultima sia facilmente accessibile.
•Non tenere la batteria in luoghi esposti alla luce solare diretta o con temperature estremamente elevate, ad esempioinprossimitàdidispositivi di riscaldamento.
•Evite altas temperaturas.Permite la suficiente dispersión del calor cuando está instalado en la consola.
•Maneje el cordón de energía con cuidado.Sostenga el enchufe cuando desconecte el cordón de energía.
•Mantenga el equipo libre de humedad, agua y polvo.
•Desconecte el cordón de energía cuando no utilice el equipo por mucho tiempo.
•No obstruya los orificios de ventilación.
•No deje objetos extraños dentro del equipo.
•No permita el contacto de insecticidas, gasolina y diluyentes con el equipo.
•Nunca desarme o modifique el equipo de ninguna manera.
•La ventilación no debe quedar obstruida por haberse cubierto las aperturas con objetos como periódicos, manteles o cortinas.
•No deberán colocarse sobre el aparato fuentes inflamables sin protección, como velas encendidas.
•A la hora de deshacerse de las pilas, respete la normativa para el cuidado del medio ambiente.
•No exponer el aparato al goteo o salpicaduras cuando se utilice.
•No colocar sobre el aparato objetos llenos de líquido, como jarros.
•No maneje el cable de alimentación con las manos mojadas.
•Cuando el interruptor está en la posición OFF (STANDBY), el equipo no está completamente desconectado de la alimentación MAINS.
•El equipo se instalará cerca de la fuente de alimentación de manera que resulte fácil acceder a ella.
•No coloque las pilas en un lugar expuestoalaluzdirectadelsol o donde la temperatura sea extremadamente alta, como cerca de una calefacción.
•Vermijd hoge temperaturen.Zorg er bij installatie in een audiorack voor, dat de door het toestel geproduceerde warmte goed kan worden afgevoerd.
•Hanteer het netsnoer voorzichtig.Houd het snoer bij de stekker vastwanneerdezemoetworden aan- of losgekoppeld.
•Laat geen vochtigheid, water of stof in het apparaat binnendringen.
•Neem altijd het netsnoer uit het stopkontakt wanneer het apparaat gedurende een lange periode niet wordt gebruikt.
•De ventilatieopeningen mogen niet worden beblokkeerd.
•Laat geen vreemde voorwerpen in dit apparaat vallen.
•Voorkom dat insecticiden, benzeenofverfverdunnermetdit toestel in contact komen.
•Dit toestel mag niet gedemonteerd of aangepast worden.
•De ventilatie mag niet worden belemmerd door de ventilatieopeningen af te dekken met bijvoorbeeld kranten, een tafelkleed of gordijnen.
•Plaats geen open vlammen, bijvoorbeeld een brandende kaars, op het apparaat.
•Houd u steeds aan de milieuvoorschriften wanneer u gebruikte batterijen wegdoet.
•Stel het apparaat niet bloot aan druppels of spatten.
•Plaats geen voorwerpen gevuld met water, bijvoorbeeld een vaas, op het apparaat.
•Raak het netsnoer niet met natte handen aan.
•Als de schakelaar op OFF (STANDBY) staat, is het apparaat niet volledig losgekoppeld van de netspanning (MAINS).
•De apparatuur wordt in de buurt van het stopcontact geïnstalleerd,zodatditaltijdgemakkelijk toegankelijk is.
•Bewaar de batterijen niet op een plaatswaardezeblootstaanaandirectzonlichtofopplaatsenwaarzeerhogetemperaturenheersen,zoalsindebuurtvaneen kachel.
•Undvikhögatemperaturer.Setillattdetfinnsmöjlighettill god värmeavledning vid montering i ett rack.
•Hantera nätkabeln varsamt.Håll i kabeln när den kopplas från el-uttaget.
•Utsättinteapparatenförfukt,vatten och damm.
•Koppla loss nätkabeln om apparaten inte kommer att användas i lång tid.
•Täpp inte till ventilationsöppningarna.
•Setillattfrämmandeföremålinte tränger in i apparaten.
•Se till att inte insektsmedel på spraybruk, bensen och thinner kommer i kontakt med apparatenshölje.
•Ta inte isär apparaten och försökintebyggaomden.
•Ventilationenbörinteförhindrasgenomatttäckaförventilationsöppningarnamedföremålsåsomtidningar,bordsdukar eller gardiner.
•Placerainteöppeneld,t.ex.tända ljus, på apparaten.
•Tänkpåmiljöaspekternanärdubortskaffar batterier.
•Apparatenfårinteutsättasförvätska.
•Placerainteföremålfylldamed vätska, t.ex. vaser, på apparaten.
•Hantera inte nätsladden med våta händer.
•Ävenomströmbrytarenståri det avstängda läget OFF (STANDBY), så är utrustningen inte helt bortkopplad från det elektriska nätet (MAINS).
•Utrustningen ska vara installeradnäraströmuttagetsåattströmförsörjningenärlättatt tillgå.
•Förvaraintebatterietpåenplatssomutsättsfördirektsolljus eller på platser med extremthögatemperaturer,som nära ett värmeelement.
•Evite temperaturas altas.Assegure uma suficiente dispersãodo calor quando a unidade forinstalada numa prateleira.
•Manuseie o cabo de alimentaçãocom cuidado.Puxe pela ficha quando desligar ocabo de alimentação.
•Mantenha a unidade afastada dahumidade, da água e do pó.
•Desligue o cabo de alimentaçãoquando não estiver autilizaraunidadeporlongosperíodos detempo.
•Não obstrua os orifícios deventilação.
•Não deixe objectos estranhos dentro da unidade.
•Não permita que insecticidas, benzinaediluenteentrememcontacto com a unidade.
•Nunca desmonte ou modifique dealguma forma a unidade.
•A ventilação não deve ser obstruída, tapando as aberturas de ventilação com objectos, como jornais, toalhas ou cortinas.
•Não devem ser colocadas juntoàunidadefontesdechama aberta, como velas acesas.
•Respeite as regulamentações locaisrelativasàeliminaçãode pilhas.
•Não exponha a unidade a gotejamento ou salpicos de líquidos.
•Não coloque objectos com líquidos, como jarras, em cima da unidade.
•Não manuseie o cabo de alimentação com as mãos molhadas.
•Quando o interruptor se encontra na posição OFF (STANDBY), o equipamento não está completamente desligado da REDE ELÉCTRICA.
•O equipamento deve ser instalado junto da fonte de alimentação, para que a fonte de alimentação esteja facilmente acessível.
•Não deixe a pilha num local expostoàluzsolardirectaou em locais sujeitos a temperaturas extremamente elevadas, como, por exemplo, junto de um aquecedor.

Part names and
FunctionsSetting defaults
ConnectionsPlayback
Selecting Files and Folders
Control Function
Information
V
Selecting M
ediaRecording
Edit FunctionG
etting Started
A NOTE ABOUT RECYCLING:This product’s packaging materials are recyclable and can be reused. Please dispose of any materials in accordance with the local recycling regulations.When discarding the unit, comply with local rules or regulations.Batteries should never be thrown away or incinerated but disposed of in accordance with the local regulations concerning battery disposal.This product and the supplied accessories, excluding the batteries, constitute the applicable product according to the WEEE directive.
HINWEIS ZUM RECYCLING:Das Verpackungsmaterial dieses Produktes ist zum Recyceln geeignet und kann wiederverwendetwerden.BitteentsorgenSiealleMaterialienentsprechendderörtlichenRecycling-Vorschriften. BeachtenSiebeiderEntsorgungdesGerätesdieörtlichenVorschriftenundBestimmungen.DieBatteriendürfennichtindenHausmüllgeworfenoderverbranntwerden;bitteentsorgenSiedieBatteriengemäßderörtlichenVorschriften.Dieses Produkt und das im Lieferumfang enthaltene Zubehör (mit Ausnahme der Batterien!)entsprechen der WEEE-Direktive.
UNE REMARQUE CONCERNANT LE RECYCLAGE:Lesmatériauxd’emballagedeceproduitsontrecyclablesetpeuventêtreréutilisés.Veuillezdisposerdes matériaux conformément aux lois sur le recyclage en vigueur.Lorsquevousmettezcetappareilaurebut,respectezlesloisouréglementationsenvigueur.Les piles ne doivent jamais être jetées ou incinérées, mais mises au rebut conformément aux lois en vigueur sur la mise au rebut des piles.Ceproduitetlesaccessoiresinclus,àl’exceptiondespiles,sontdesproduitsconformesàladirectiveDEEE.
NOTA RELATIVA AL RICICLAGGIO:Imateriali di imballaggio di questoprodotto sono riutilizzabili e riciclabili. Smaltire imateriali conformemente allenormative locali sul riciclaggio.Perlosmaltimentodell’unità,osservarelenormativeoleleggilocaliinvigore.Non gettare le batterie, né incenerirle, ma smaltirle conformemente alla normativa locale sui rifiuti chimici.Questoprodottoegliaccessoriinclusinell’imballaggiosonoapplicabilialladirettivaRAEE,adeccezionedellebatterie.
ACERCA DEL RECICLAJE:Losmateriales de embalaje de este producto son reciclables y se pueden volver a utilizar. Disponga de estosmateriales siguiendo los reglamentos de reciclaje de su localidad. Cuando se deshaga de la unidad, cumpla con las reglas o reglamentos locales. Las pilas nunca deberán tirarse ni incinerarse. Deberá disponer de ellas siguiendo los reglamentos de su localidad relacionados con los desperdicios químicos.Este producto junto con los accesorios empaquetados es el producto aplicable a la directiva RAEE excepto pilas.
EEN AANTEKENING MET BETREKKING TOT DE RECYCLING:Hetinpakmateriaalvanditproductisrecycleerbaarenkanopnieuwgebruiktworden.Erwordtverzochtomzichvanelk afvalmateriaal te ontdoen volgens de plaatselijke voorschriften. Volg voor het wegdoen van de speler de voorschriften voor de verwijdering van wit- en bruingoed op. Batterijen mogen nooit worden weggegooid of verbrand, maar moeten volgens de plaatselijke voorschriften betreffende chemisch afval worden verwijderd.Op dit product en de meegeleverde accessoires, m.u.v. de batterijen is de richtlijn voor afgedankte elektrische en elektronische apparaten (WEEE) van toepassing.
OBSERVERA ANGÅENDE ÅTERVINNING:Produktens emballage är återvinningsbart och kan återanvändas. Kassera det enligt lokala återvinningsbestämmelser.Närdukasserarenhetenskadugöradetiöverensstämmelsemedlokalareglerochbestämmelser.Batterierfårabsolutintekastasisopornaellerbrännas.Kasserademenligtlokalabestämmelserförkemisktavfall.DennaapparatochdetillbehörsomlevererasmeddenuppfyllergällandeWEEE-direktiv,medundantagavbatterierna.
UMA NOTA SOBRE A RECICLAGEM:Osmateriaisdeembalagemdesteprodutosãorecicláveisepodemserreutilizados.Eliminequaisquermateriaisdeacordo com as normas de reciclagem locais.Quandoeliminaraunidade,obedeçaàsregrasounormaslocais.As pilhas nunca devem ser deitadas fora ou incineradas, mas sim eliminadas de acordo com as normais locais relativas aos resíduos químicos.Este produto e os respectivos acessórios embalados em conjunto constituem o produto aplicável de acordo com a directiva WEEE, excepto as pilhas.
•DECLARATIONOFCONFORMITY Our products following the provisions of EC/EU directives, that as follows; LV: 2006/95/EC EMC: 2004/108/EC RoHS: 2011/65/EU ErP: EC regulation 1275/2008 and its frame work directive 2009/125/EC•ÜBEREINSTIMMUNGSERKLÄRUNG Unsere Produkte unterliegen den Bestimmungen der folgenden EG/EU-Richtlinien: LV: 2006/95/EC EMC: 2004/108/EC RoHS: 2011/65/EU ErP: EG-Vorschrift 1275/2008 und deren Rahmenrichtlinie 2009/125/EC•DECLARATIONDECONFORMITE Nos produits sont conformes aux dispositions des directives CE/UE comme suit ; LV: 2006/95/EC EMC: 2004/108/EC RoHS: 2011/65/EU ErP: Réglementation CE 1275/2008 et sa directive cadre 2009/125/CE•DICHIARAZIONEDICONFORMITÀ InostriprodottisonoconformiaquantoprevistodalledirettiveEC/EU,comespecificatodiseguito: LV: 2006/95/EC EMC: 2004/108/EC RoHS: 2011/65/EU ErP: Norma EC 1275/2008 e relativa legge quadro 2009/125/EC•DECLARACIÓNDECONFORMIDAD Nuestros productos cumplen las disposiciones de las directivas de la CE/UE siguientes: LV: 2006/95/EC EMC: 2004/108/EC RoHS: 2011/65/EU ErP: Normativa de la CE 1275/2008 y su directiva marco 2009/125/CE•EENVORMIGHEIDSVERKLARING Onze producten volgen de voorwaarden van de EG/EU-richtlijnen zoals volgt; LV: 2006/95/EC EMC: 2004/108/EC RoHS: 2011/65/EU ErP: EG-verordening 1275/2008 en zijn kaderrichtlijn 2009/125/EG•ÖVERENSSTÄMMELSESINTYG Våra produkter uppfyller följande föreskrifter i EC/EU-direktiv: LV: 2006/95/EC EMC: 2004/108/EC RoHS: 2011/65/EU ErP: EU-direktiv 1275/2008 och dess ramdirektiv 2009/125/EC•DECLARAÇÃODECONFORMIDADE Nossos produtos seguem as disposições da CE / UE directivas, que, como se segue; LV: 2006/95/EC EMC: 2004/108/EC RoHS: 2011/65/EU ErP: Regulamento (CE) 1275/2008 e a respectiva Directiva-Quadro 2009/125/CE
D&M Professional EuropeA division of D&M Europe B.VBeemdstraat 115653 MA EindhovenThe Netherlands

Part names and
FunctionsSetting defaults
ConnectionsPlayback
Selecting Files and Folders
Control Function
Information
1
Selecting M
ediaRecording
Edit FunctionG
etting Started
Main Features ················································································3Accessories ····················································································4Cautions on handling ····································································4
Contents
Part names and functions ·················································5
Front Panel ·····················································································5Rear Panel ······················································································7Display ····························································································8
Switching the display ····································································8Playback/pause/search/stop display ··············································8Properties display (Playback/pause/search/stop) ··························9Display during recording and when recording is paused ············10
Preparations ················································································11Cables used for audio connection···············································11
Audio connections ······································································11Analog connection (unbalanced connection) ······························11Analog connection (balanced connection) ··································11Digital connection (COAXIAL) ·····················································11Digital connection (AES/EBU) ·····················································11
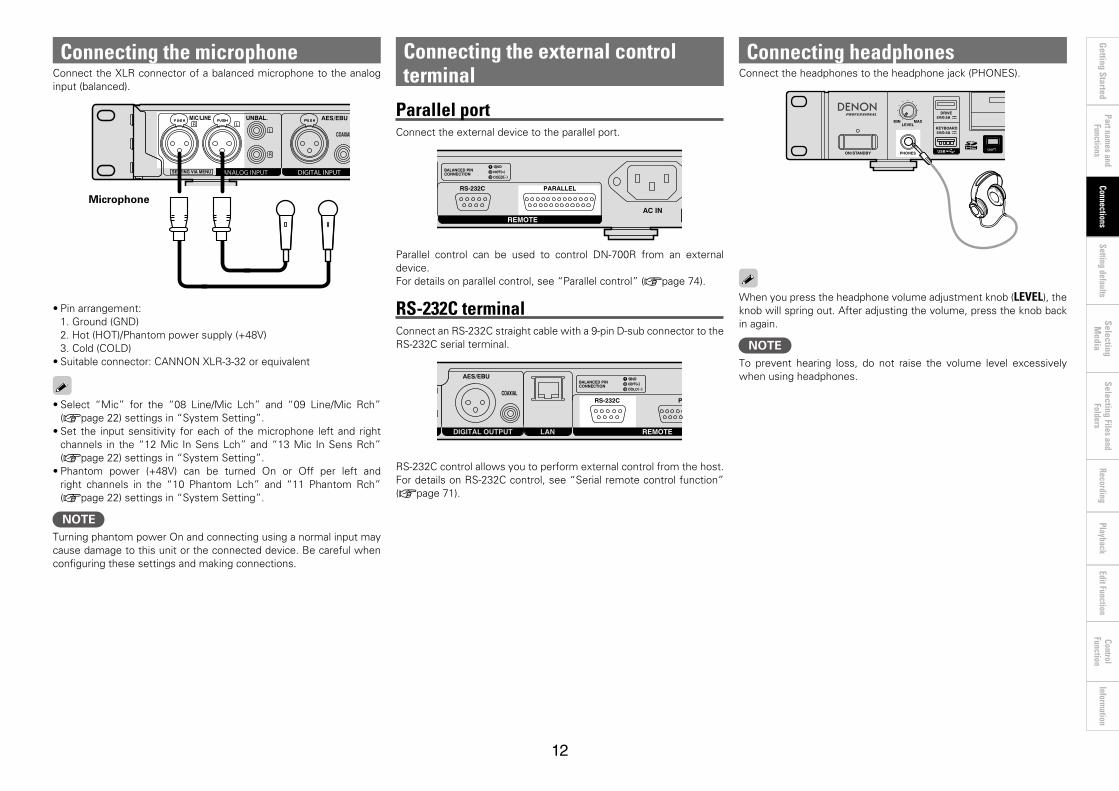
Connecting the microphone·······················································12Connecting the external control terminal·································12
Parallel port ·················································································12RS-232C terminal ········································································12
Connecting headphones ·····························································12Connecting the power cord························································13Mounting recording media·························································13
SD card ·······················································································13Connecting a USB device ···························································14Cautions when recording media is mounted ······························14
Setting defaults ····································································15
Selecting Media····································································27
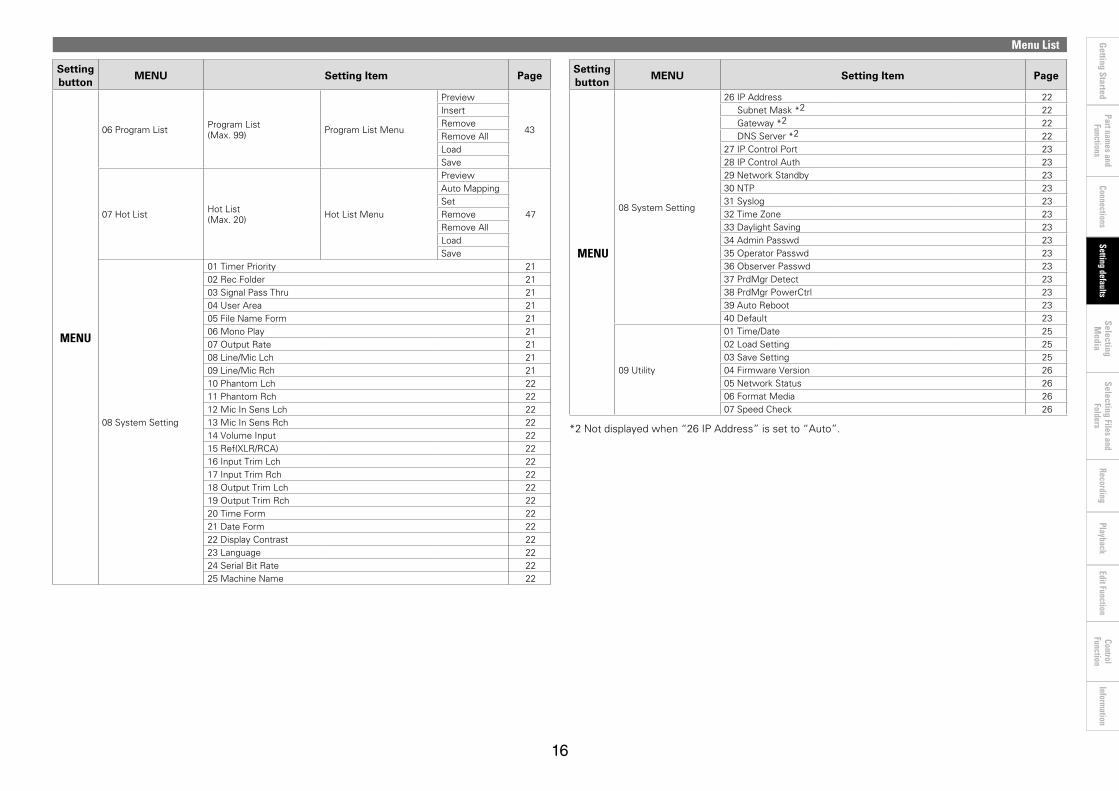
Menu List ·····················································································15Setting defaults ···········································································17
Menu operations (Preset selection/Preset setting/System setting) ·······················17Menu Operations (Utility) ····························································24
Media List ····················································································27Media Server List ········································································27
Getting started ·······································································1
Connections ···········································································11 Selecting Files and Folders ·············································28
File List ·························································································28File List Menu ·············································································28Playing back files (01 Preview) ···················································29Selecting all files for copying/moving/deleting (02 Select All) ·····29Changing the file name or folder name (03 Rename) ·················29Deleting Files and Folders (04 Delete) ········································29Copying Files and Folders (05 Copy)···········································30Moving files (06 Move) ·······························································30Creating folders (07 Make Folder) ··············································30Deleting marks (08 Delete Mark) ················································31File information (09 Property) ·····················································31
Other functions ···········································································31Locking operation buttons (Key lock) ··········································31
Recording ················································································32
Selecting the recording media or folder for storing the recorded files ········································································32Recording ·····················································································32Recording Monitor ······································································34Dual recording ·············································································34Relay recording ···········································································34Timer Recording ··········································································35
Timer recording start time and recording time settings ·············35Turning timer recording on/off ····················································36Editing timer recording information ············································37Using timer recording ·································································37Add a file during recording (Manual track) ··································38Adding marks (Marking) ······························································38Silent skip recording ···································································38
Operations during recording ······················································38Recording time chart ··································································39
Thank you for purchasing this DENON Professional product. To ensure proper operation, please read this owner’s manual carefully before using the product.After reading, be sure to keep for future reference.
Getting started

Part names and
FunctionsSetting defaults
ConnectionsPlayback
Selecting Files and Folders
Control Function
Information
2
Selecting M
ediaRecording
Edit FunctionG
etting Started
Selecting files to playback ·························································40Playback ·······················································································40Operations during playback ·······················································41
Changing files ·············································································41Fast forward and fast rewind (Search) ········································41Jumping by frames (Frame jump) ···············································41Rewind a specified amount of time and playback (Skip back) ····41Playback pitch adjustment (Pitch control) ···································42Add marks (marking) ···································································42Searching for Marks ····································································42
Random playback ········································································42Program playback ·······································································43
Create program ···········································································43Program playback ·······································································44Editing the program ····································································44Saving/reading program data ······················································44
Timer playback ············································································45Timer playback start time and playback file settings ··················45Turning timer playback on/off ·····················································45Editing timer playback information ·············································46Using timer playback ··································································46
Hot Start ······················································································47Registering tracks to a hot list ····················································47Deleting a hot list file ··································································47Saving/reading hot list data ·························································47
Playback ···················································································40
EDIT ······························································································48COMBINE ···················································································48DIVIDE ························································································48COPY ··························································································49MOVE ·························································································49UNDO ·························································································49
Edit Function··········································································48
Control Function ··································································50
USB Keyboard ·············································································50Connecting to a network (LAN) ·················································51
Required system·········································································51Network Settings ········································································52
LAN Connection··········································································52Archive ·························································································53
Menu operations (archive) ··························································53Other Functions (Product Manager) ··········································55
Installation of Product Manager ··················································55Product Manager window ··························································56Operations ··················································································57
Web Remote ················································································58Various playback functions with RC-F400S ······························65
Part names and functions ···························································65Connection··················································································67Hot Start playback ·······································································68Playback from the main screen ··················································70
Serial remote control function ···················································71RS-232C control ··········································································71IP control (Ethernet) ····································································71D&M RC communication format ················································72
Parallel control ············································································74
Information ·············································································76
Error messages ············································································76Troubleshooting ··········································································77Main specifications ·····································································79Appendix ······················································································81License ·······················································································106

Part names and
FunctionsSetting defaults
ConnectionsPlayback
Selecting Files and Folders
Control Function
Information
3
Selecting M
ediaRecording
Edit FunctionG
etting Started
Interface •Equipped with two SD/SDHC card slots (max 32 GB per card slot)
and one USB2.0 (high speed) compatible drive connector•Equipped with a USB2.0 (low speed) compatible keyboard connector
for file name editing and control using a keyboard•Equipped with a serial control connector (RS-232C) for connection to
an RC-F400S or command control•Equipped with a parallel remote connector (25Pin D-sub) for remote
control without a computer•Equipped with a LAN connector for network functions such as
compatibility with network streaming playback, file transfer, control and monitoring with Web Remote and IP control, etc.
Audio •Equipped with XLR (analog/digital) and RCA (analog/digital) input/
output connectors for ensuring high connectivity with various devices using the standard level setting function
•Equipped with a headphone jack with volume control knob to respond to a wide range of needs such as recording monitoring, etc.
•Equipped with a microphone pre amp with independent left and right phantom switches and gain control.
•Equipped with SRC (sampling rate converter) on the digital output section that automatically converts different sampling rates from the source playback to a digital output with a fixed output sampling rate
NOTEThe reproduction or use of materials such as music data or files may be restricted under the Copyright Act or other applicable laws, or under the terms of a license agreement between yourself and the material owner. Check that the conditions of use for all materials are thoroughly satisfied before reproduction etc., and use this equipment correctly. DENON Professional cannot accept any responsibility whatsoever for acts of copyright infringement undertaken by the user.
Functions•Equipped with a dual recording function that enables simultaneous
recording from two SD cards or USB devices, further improving backup capabilities
•Equipped with a relay recording function that continues recording on a different media when the remaining free space on the original recording media falls below 2MB, enabling long recording without the sound cutting out
•Equipped with a recording monitor function for simultaneous monitoring of recorded data, enabling reliable monitoring of the recording status
•Equipped with a timer recording/timer playback function that enables scheduled recording/playback for automatic recording or automatic playback of scheduled events
•Equipped with an editing function (merge/divide/copy/move/undo) and USB keyboard file name input function for editing files from a computer, etc.
•Equipped with a pitch control and master key function for fine adjustment of the playback speed
•In addition to mark editing/playback from the unit panel, the provided “DMP Mark Editor” can be used to effectively edit mark points from a computer
Network•File streaming playback and file backup can be done via the network•The unit can be configured as a DMP (Digital Media Player), a server
system can be constructed easily using NAS, and the unit can be controlled using a DLNA compatible device
•Compatible with various controls from sources such as Web Remote and IP control, enabling remote control and monitoring on a computer
•FTP (File Transfer Protocol) server support•Equipped with an archive function that transfers files to a server
automatically after the recording is finished or at a set time, ensuring continuous long recording and improving backup capabilities
•Compatible with NTP (Network Time Protocol) enabling automatic time adjustment
•Preset data can be uploaded or downloaded from the host computer
Main Features
Part names and
FunctionsSetting defaults
ConnectionsPlayback
Selecting Files and Folders
Control Function
Information
4
Selecting M
ediaRecording
Edit FunctionG
etting Started
AccessoriesCheck that the following parts are supplied with the product.
q Quick start guide (Book) .......................................................... 1w Power cords for each region (US,EU) ......................... 1 of eache CD-ROM .................................................................................. 1
•DN-700R Instruction manual •DMP Mark Editor Installer •DMP Mark Editor Instruction manual •DENON Professional Product Manager Installer•DENON Professional Product Manager Owner’s Manual
r Security Screw for SD card door ............................................. 4t Plastic pin and retainer ............................................... 2 of each
(plastic pin and retainer is attached to the SD card door at the time of purchase.)
trew
Cautions on handling•Before turning the power switch on•Check once again that all connections are correct and that there are
no problems with the connection cables.•Power is supplied to some of the circuitry even when the unit is set
to the standby mode. When not using the machine for long periods of time, be sure to unplug the power cord from the power outlet.
•About condensationIf there is a major difference in temperature between the inside of the unit and the surroundings, condensation may form on parts inside the unit, causing the unit to fail to operate properly.If this happens, let the unit sit for an hour or two with the power off and wait until there is little difference in temperature before using the unit.
•Cautions on using mobile phonesUsing a mobile phone near this unit may result in noise. If that occurs, move the mobile phone away from the unit when it is in use.
•Moving the unitTurn off the power and unplug the power cord from the power outlet.Next, disconnect the cables connected to other system units before moving the unit.
•Rack mount cautions (Required rack specifications for mounting the DN-700R on a rack )•EIA Standard 19 inch rack •1USizeinstallationcompatiblerack•Rack that has a guide rail or shelf board that can support this device

Setting defaultsConnections
PlaybackSelecting Files and
FoldersG
etting StartedControl
FunctionInform
ation
5
Selecting M
ediaRecording
Edit FunctionPart nam
es and Functions
Part names and functions
Front PanelFor buttons not explained here, see the page indicated in parentheses ( ).
LIST
REC
-LOCK PITCH
STOP PAUSE PLAY
MENU
MOVE COPY COMBINE DIVIDE UNDO
DIMMERSHIFT REC MON. MARK TEXT
DISPLAY
FRAME
MEDIA
q Q3 Q4ew iuytr o Q2Q1Q0
q Power switch (ON/STANDBY)•Turns the unit power on and off (standby).
w Power indicator•Power on: Off•Normal standby: Red•Network standby: Orange
e Headphone jack (PHONES) ························ (12)•Connect the headphones.
r Headphone Volume Adjustment Knob (LEVEL) ························································ (12)•Adjusts the volume of the headphones.•Press the knob to make it spring out. After
adjusting the volume, press the knob back in again.
t USB connector for keyboard (KEYBOARD) ·············································· (50)•Connect a USB keyboard.
y USB connector for USB device (DRIVE) ··· (14)•Connect a USB device.
u SHIFT button•Allows access to features indicated under
each button.•The shift mode is enabled when the SHIFT
button is lit (vpage 18 “02 Shift Mode”).
i MOVE/DIMMER button ······················· (20, 49)•Moves the file of the current track. •Press when the SHIFT button is lit to switch
the display brightness of the display and LED. •The brightness of the dimmer can be set in
“36 Display Dimmer” (vpage 20) and “37 LED Dimmer” (vpage 20) in the “Preset Setting”.
o COPY/REC MON. button ··············· (30, 34, 49)•Copies the file of the selected track.•Press when the SHIFT button is lit to switch
the recording monitor on or off. •The LED lights when the recording monitor is
on.
Q0 COMBINE/MARK button ··············· (38, 42, 48)•Combines the selected track with a different
track. •Press when the SHIFT button is lit to adds
a mark to the current playback or recording position.
Q1 DIVIDE/MARK – button ·················· (38, 42, 48)•Divides the currently selected track at the
current playback position. •Divides the recording track at the current
recording position.•Press when the SHIFT button is lit to jump to
the mark prior to the current playback position.
Q2 UNDO/MARK + button ························ (42, 49)•Undoes the prior edit.•Press when the SHIFT button is lit to jump to
the mark after the current playback position.
Q3 DISPLAY/TEXT button ····························· (8, 9)•Switches the display. •Press when the SHIFT button is lit to scroll the
text display.
Q4 Display ··························································· (8)

Setting defaultsConnections
PlaybackSelecting Files and
FoldersG
etting StartedControl
FunctionInform
ation
6
Selecting M
ediaRecording
Edit FunctionPart nam
es and Functions
Front Panel
LIST
REC
-LOCK PITCH
STOP PAUSE PLAY
MENU
MOVE COPY COMBINE DIVIDE UNDO
DIMMERSHIFT REC MON. MARK TEXT
DISPLAY
FRAME
MEDIA
W5 W4 W3 W2 W1 W0W6
W7
W6
Q9Q5 Q8Q6 Q7
W7
Q5 REC button (4) ············································ (32)•When “08 One Touch Rec” (vpage 18)
in “Preset Setting” is “Off”, press the button once to enter the record pause mode and press again to start recording.
•When “08 One Touch Rec” (vpage 18) in “Preset Setting” is “On”, press the button once to start recording.
•The REC button lights during recording.•The REC button flashes during recording is
paused.
Q6 STOP button (2) ··································· (17, 40)•Press the button during playback or when
playback is paused to stop playback. These operations can be set in “23 Finish Mode” (vpage 19) of “Preset Setting”.
•Press the button during recording or when recording is paused to stop recording and standby at the start of the last recorded file.
•The STOP button lights when a track is stopped or cued.
•Press when a track is cued to stop.
Q7 PAUSE button (3) ································ (33, 40)•Press the button during playback or recording
to pause playback or recording. •The PAUSE button lights when playback or
recording is paused.
Q8 Play button (1) ··········································· (40)•Starts playback.•The PLAY button lights during playback or
when playback is paused.
Q9 BACK button•Returns to the previous menu.•When the file list is displayed, press the SHIFT
button when it is lit to move the cursor to the top of the list.
W0 Jog Dial/PUSH ENTER button•Rotate the dial to skip tracks. •Used to adjust the recording level during
recording or when recording is paused. •Used to move the cursor or select setting
items when the menu is displayed. •Rotate the dial when the SHIFT button is lit to
adjust the recording level or recording balance during recording or when recording is paused.
•Press the button to enter the setting item or menu.
W1 Fast Forward/Pitch + button (7) ······················································ (41, 42)•Fast forwards the track. •In frame mode, this button jumps frame units
in the forward direction. •Press when the SHIFT button is lit to set the
pitch.
W2 Fast Rewind/Pitch - button (6) ······················································ (41, 42)•Fast rewinds the track.•In frame mode, this button jumps frame units
in the reverse direction.•Press when the SHIFT button is lit to set the
pitch.
W3 FRAME/PITCH button ·························· (41, 42)•Switches the functions of buttons 6 and 7 to frame mode or search mode.
•The FRAME button lights in frame mode. •Press when the SHIFT button is lit to switch
the pitch on or off. The PITCH button lights when Pitch is on.
W4 MENU/LOCK button ······················ (15, 17, 31)•Displays the menu. •Press when the SHIFT button is lit to lock
the operation buttons on the unit. The LOCK button lights when the key lock is on.
W5 LIST/MEDIA button ·················· (27, 28, 32, 40)•The “File List” is displayed.•Press when the SHIFT button is lit to display
the media list for switching media.
W6 SD Card Door ·············································· (13)
W7 SD Card Slot 1/2 ········································· (13)•Insert an SD/SDHC card (max. 32GB). SDXC
and UHS are not supported.

Setting defaultsConnections
PlaybackSelecting Files and
FoldersG
etting StartedControl
FunctionInform
ation
7
Selecting M
ediaRecording
Edit FunctionPart nam
es and Functions
Rear Panel
ANALOG INPUT DIGITAL INPUT ANALOG OUTPUT DIGITAL OUTPUT LAN REMOTE
RS-232C PARALLEL
e Q0 Q1 Q2t yrq w u i o
q Analog input (Balanced) terminal ·········································· (11)•XLR Type •Pin Arrangement: 1. GND / 2. Hot (w/ Phantom) / 3. Cold•The line input level can be changed using “14 Volume Input”
(vpage 22) in “System Setting”. •The input mode can be switched using “08 Line/Mic Lch”/“09
Line/Mic Rch” (vpage 22) in “System Setting”.
w Analog input (Unbalanced) terminal ····································· (11)•RCA Type
e Digital input (XLR) terminal ··················································· (11)•XLR Type •IEC60958 Type I•Pin Arrangement: 1. Common / 2. Hot / 3. Cold
r Digital input (RCA) terminal ··················································· (11)•IEC60958 Type II
t Analog output (balanced) terminal ······································· (11)•XLR Type•Pin Arrangement: 1. GND / 2. Hot / 3. Cold
y Analog output (unbalanced) terminal ··································· (11)•RCA Type
u Digital output (XLR) terminal ················································· (11)•IEC60958 Type I (AES/EBU)•Pin Arrangement: 1. Common / 2. Hot / 3. Cold
i Digital output (RCA) terminal ················································ (11)•IEC60958 Type II (COAXIAL)
o LAN Terminal ··········································································· (52)•IEEE 802.3u (3.3V I/O) / 10 / 100Base-T(X) / RJ-45
Q0 RS-232C Terminal ······························································ (12, 71)•9pin DSUB Connector (Female)
Q1 Parallel port (PARALLEL) ·················································· (12, 74)•25pin DSUB Connector (Female)
Q2 AC Inlet (AC IN) ········································································ (13)•Connect the supplied power cord.

Setting defaultsConnections
PlaybackSelecting Files and
FoldersG
etting StartedControl
FunctionInform
ation
8
Selecting M
ediaRecording
Edit FunctionPart nam
es and Functions
The playback status and information about various media is displayed on the DN-700R display.Details of the display differ depending on the operating status (stopped/recording/playing) of the DN-700R.
Switching the displayPress DISPLAY.•The display details change each time the button is
pressed. MOVE COPY COMBINE DIVIDE UNDO
DIMMERSHIFT REC MON. MARK TEXT
DISPLAY
Playback/pause/search/stop display•The properties display can also be switched using DISPLAY.
05/13/2013 11:44PMDATE
L
R
-61
-61dB20 12 6 0-60 40
trewq Q33Q4Q5Q6Q7y Q1 Q2iu Q0o
0000/0000
XXXXX.MP3
0.0%524MP USB TR
04:14:44REM
PITCH232OFF M
FLD
FolderXXX
CNTRPTRNDPRG
000 00: : 00 ARCTMREOM44K
LAN PLPR
Display
q Playback range display•Displays the current playback range.•Displays the settings configured in “19 Play
Range” (vpage 19) in “Preset Setting”. FLD: Current folder/ALL: All folders
w Playback mode display•Displays the settings configured in “20 Play
Mode” (vpage 19) in “Preset Setting”.CNT: Continuous playbackSGL: 1 track playback
e Repeat playback display•Displays the settings configured in “24
Repeat” (vpage 19) in “Preset Setting”.RPT: Displayed when repeat playback is on.
r Random playback display•Displays the settings configured in “21
Random” (vpage 19) in “Preset Setting”.RND: Displayed when random playback is
on.
t Programmed playback display•Displays the settings configured in “22
Program” (vpage 19) in “Preset Setting”.PRG: Displayed when programmed playback
is on.
y Status display•Displays the operating status.
STOP
CUE CUE
PAUSE
AUDIBLE PAUSE
SEARCH
PLAY
REC PAUSE
REC
u Folder name•Displays the path to the selected folder.
i Track name•Displays the selected track name.
o Remaining time display•Displays the remaining time of the current
track.•The display format can be set in “33 Time
Display” (vpage 20) in “Preset Setting”. •When the selected track is VBR (Variable Bit
Rate) format, the estimated remaining time is displayed.
Q0 Elapsed time display•The elapsed time of the currently selected
track is displayed. •The display format can be set in “33 Time
Display” (vpage 20) in “Preset Setting”.
Q1 Time/Date display•The current date and time are displayed when
playback is stopped. •During playback, the date and time when the
selected track was created are displayed. •The display format can be set in “20 Time
Form” and “21 Date Form” (vpage 22) in “Preset Setting”.
Q2 Playback level display•Displays the playback level. •With a three-second peak hold.
Q3 Recording monitor display•Displays the recording monitor status.
R.MON: Displayed when the recording monitor is on.
Q4 Sampling rate display•Displays the sampling rate of the audio output.
(44 K/48 K/96 K)•When a sampling rate is not applied when
Ext(AES) is used, “EXT” flashes in the display. Nothing is displayed when “Auto” is used.
Q5 End of track notification display•“EOM” is displayed when a setting other
than “Off” is set for “31 End Of Message” (vpage 20) in “Preset Setting”.
Q6 Timer Display•“TMR” is displayed when the “Timer
Recording” (vpage 35) or “Timer playback” (vpage 45) is set.
Q7 Archive Display•“ARC” is displayed when a setting other
than “Off” is set for “Archive Mode” (vpage 54) in “Archive Setting”.
•It flashes while archiving is being executed.
Setting defaultsConnections
PlaybackSelecting Files and
FoldersG
etting StartedControl
FunctionInform
ation
9
Selecting M
ediaRecording
Edit FunctionPart nam
es and Functions
Display
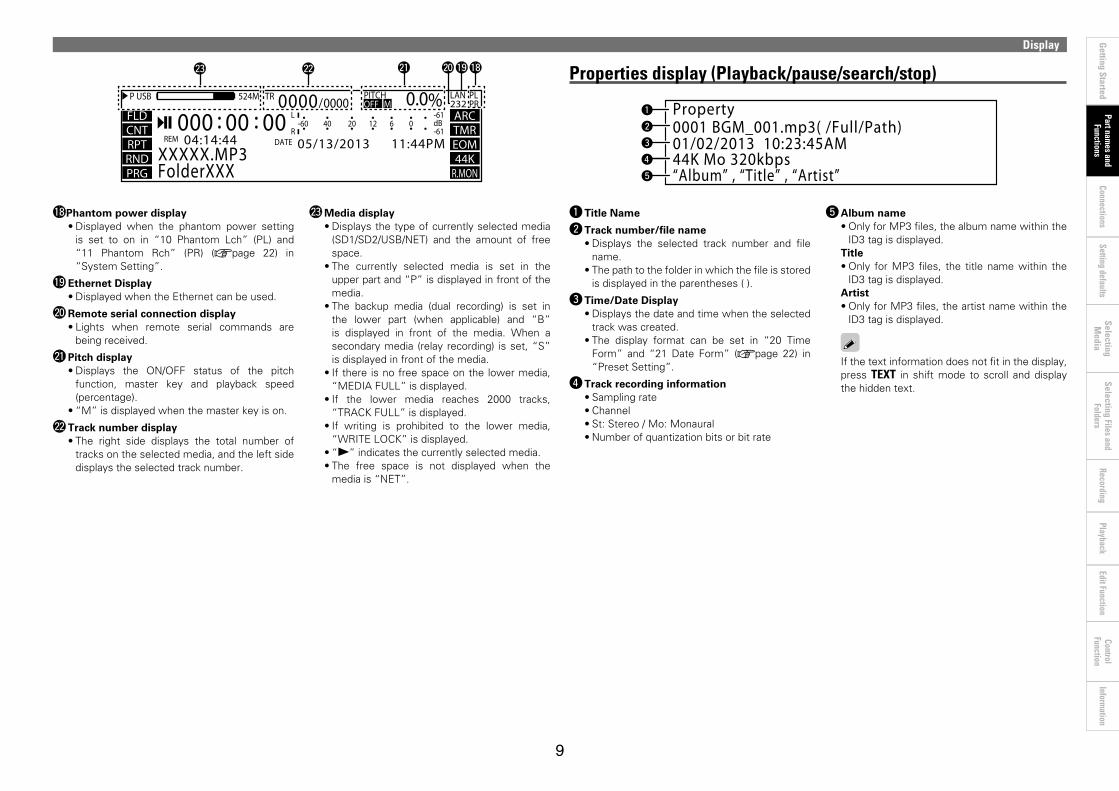
Properties display (Playback/pause/search/stop)
“Album” , “Title” , “Artist”44K Mo 320kbps01/02/2013 10:23:45AM0001 BGM_001.mp3( /Full/Path)Property
w
q
t
r
e
q Title Name
w Track number/file name•Displays the selected track number and file
name. •The path to the folder in which the file is stored
is displayed in the parentheses ( ).
e Time/Date Display•Displays the date and time when the selected
track was created.•The display format can be set in “20 Time
Form” and “21 Date Form” (vpage 22) in “Preset Setting”.
r Track recording information•Sampling rate •Channel •St: Stereo / Mo: Monaural •Numberofquantizationbitsorbitrate
t Album name•Only for MP3 files, the album name within the
ID3 tag is displayed. Title•Only for MP3 files, the title name within the
ID3 tag is displayed.Artist•Only for MP3 files, the artist name within the
ID3 tag is displayed.
If the text information does not fit in the display, press TEXT in shift mode to scroll and display the hidden text.
05/13/2013 11:44PMDATE
L
R
-61
-61dB20 12 6 0-60 40
W2 W1 Q8Q9W0W3
0000/0000
XXXXX.MP3
0.0%524MP USB TR
04:14:44REM
PITCH232OFF M
FLD
FolderXXX
CNTRPTRNDPRG
000 00: : 00 ARCTMREOM44K
LAN PLPR
Q8Phantom power display•Displayed when the phantom power setting
is set to on in “10 Phantom Lch” (PL) and “11 Phantom Rch” (PR) (vpage 22) in “System Setting”.
Q9 Ethernet Display•Displayed when the Ethernet can be used.
W0 Remote serial connection display•Lights when remote serial commands are
being received.
W1 Pitch display•Displays the ON/OFF status of the pitch
function, master key and playback speed (percentage).
•“M” is displayed when the master key is on.
W2 Track number display•The right side displays the total number of
tracks on the selected media, and the left side displays the selected track number.
W3 Media display•Displays the type of currently selected media
(SD1/SD2/USB/NET) and the amount of free space.
•The currently selected media is set in the upper part and “P” is displayed in front of the media.
•The backup media (dual recording) is set in the lower part (when applicable) and “B” is displayed in front of the media. When a secondary media (relay recording) is set, “S” is displayed in front of the media.
•If there is no free space on the lower media, “MEDIA FULL” is displayed.
•If the lower media reaches 2000 tracks, “TRACK FULL” is displayed.
•If writing is prohibited to the lower media, “WRITE LOCK” is displayed.
•“1” indicates the currently selected media. •The free space is not displayed when the
media is “NET”.

Setting defaultsConnections
PlaybackSelecting Files and
FoldersG
etting StartedControl
FunctionInform
ation
10
Selecting M
ediaRecording
Edit FunctionPart nam
es and Functions
Display
Display during recording and when recording is paused•Press DISPLAY to switch to an enlarged level meter display.
05/13/2013 11:44PMDATE
L
R
-61
-61dB20 12 6 0-60 40
trewq Q33Q4Q5Q6Q7y Q1 Q2iu Q0o
W2 W1 Q8Q9W0W3
0000/0000
XXXXX.MP3
0.0%524M030G
P USB TR
04:14:44REM
PITCH232OFF M
UBAL
FolderXXX
MP3320ST
ATK
000 00: : 00S SD2
LAN PLPR
ARCTMRS.S.48K
,
,
0001/0001 0.0%524MP SD1 TR
-20
-20dB
PITCHOFF
UBAL
000:00:00 XXXXX.MP3
MP3320ST
-20 -12 -6 0-60 -40
LAN PL232 PR
ATK
ARCTMRS.S.48K
q Recording input display•Displays “09 Audio Input” (vpage 18) of
the current “Preset Setting”. •UBAL: Unbalanced / BAL: Balanced /
AES: AES/EBU / COAX: Coaxial
w Recording file display•Displays “10 Rec Format” (vpage 18) of
“Preset Setting”.•MP3 / WAV
e Recording format display•Displays “10 Rec Format” (vpage 18) of
“Preset Setting”.•MP3:Bitrate/WAV:No.ofquantizationbits
r Recording channel display•Displays “11 Rec Channel” (vpage 18) of
the current “Preset Setting”.•ST: Stereo / MONO: Mono (Lch) /
MIX: Lch Rch Mix
t Auto track display•Displays “ATK” when “14 Auto Track”
(vpage 18) of the current “Preset Setting” is on.
y Status display•Displays the operating status.
STOP
CUE CUE
PAUSE
AUDIBLE PAUSE
SEARCH
PLAY
REC PAUSE
REC
u Folder name display•Displays the path to the selected folder.
i Track name display•Displays the progress bar when “14 Auto
Track” (vpage 18) of “Preset Setting” is set to anything other than off.
o Remaining time display•Displays the remaining recordable time on the
selected media. •The display format can be set in “33 Time
Display” (vpage 20) in “Preset Setting”.•“---:--:--” is displayed if the format cannot be
applied to the remaining time display.
Q0 Elapsed time display•Displays the elapsed recording time of the
current track.•The display format can be set in “33 Time
Display” (vpage 20) in “Preset Setting”.
Q1 Time/Date display•The recording start date and time are displayed
during the recording operation.
Q2 Recording level meter•Displays the recording level. With a three-
second peak hold.
Q3 Recording monitor display•Displays the recording monitor status.
R.MON: Displayed when the recording monitor is on.
Q4 Displays the recording sample rate.•Recording sampling rate.•Displays “12 Sample Rate” (vpage 18) of
“Preset Setting”.•When a sampling rate is not applied when
Ext(AES) is used, “EXT” flashes in the display.
Q5 Silent skip display•Displays “S.S.” when “16 Silent Skip”
(vpage 19) of “Preset Setting” is on.
Q6 Timer Display•“TMR” is displayed when the “Rec
Timer” (vpage 35) or “Play Timer” (vpage 45) is set.
Q7 Archive Display•“ARC” is displayed when a setting other
than “Off” is set for “Archive Mode” (vpage 54) in “Archive Setting”.
•It flashes while archiving is being executed.
Q8Phantom power display•Displayed when phantom power is on. •Displayed when “10 Phantom Lch” (PL) and
“11 Phantom Rch” (PR) (vpage 22) are on in “System Setting”.
Q9 Ethernet Display•Displayed when the Ethernet can be used.
W0 Remote serial connection display•Displayed when the remote serial command is
being received.
W1 Pitch display•Displays the ON/OFF status of the pitch
function, master key and playback speed (percentage).
•“M” is displayed when the master key is on.
W2 Track number display•The right side displays the total number of
tracks on the selected media, and the left side displays the selected track number.
W3 Media display•Displays the type of currently selected media
(SD1/SD2/USB/NET) and the amount of free space.
•The currently selected media is set in the upper part and “P” is displayed in front of the media.
•The backup media (dual recording) is set in the lower part (when applicable) and “B” is displayed in front of the media. When a secondary media (relay recording) is set, “S” is displayed in front of the media.
•If there is no free space on the lower media, “MEDIA FULL” is displayed.
•If the lower media reaches 2000 tracks, “TRACK FULL” is displayed.
•If writing is prohibited to the lower media, “WRITE LOCK” is displayed.
•“1” indicates the currently selected media.•The free space is not displayed when the
media is “NET”.

Part names and
FunctionsSetting defaults
PlaybackSelecting Files and
FoldersG
etting StartedControl
FunctionInform
ation
11
Selecting M
ediaRecording
Edit FunctionConnections
NOTE•Do not plug in the power cord until all connections have been
completed.•When making connections, also refer to the operating instructions of
the other components.•Insert the plugs securely. Loose connections will result in the
generation of noise.•Be sure to connect the left and right channels properly (left with left,
right with right).•Connect the cables to the correct input and output terminals.•Do not bundle power cords together with connection cables. Doing
so can result in humming or noise.
Preparations
Cables used for audio connectionSelect the cables according to the equipment being connected.
Audio cables
Analog Connection (RCA)
White
Red R
L
R
L
Stereo audio cable (Sold separately)
Digital Connection (RCA)
Coaxial digital cable (Sold separately)
Analog Connection (XLR), Digital Connection (XLR)
Balanced cable (Sold separately)
Connections
Audio connections
Analog connection (unbalanced connection)Connect line-level analog inputs/outputs to the analog (unbalanced) input/output terminals for playback or recording.
ANALOG INPUT DIGITAL INPUT ANALOG OUTPUT
AUDIO
RLIN
AUDIO
RLOUT
RLRL
RL RLCDR/CD
AmpMixer
Preamp
Analog connection (balanced connection)Connect line-level analog inputs/outputs to the analog (balanced) input/output terminals for playback or recording.
ANALOG INPUT DIGITAL INPUT ANALOG OUTPUT
AUDIO
RLOUT
AUDIO
RLIN
1:GND2:Hot3:Cold
CDR/CD
AmpMixer
Preamp
Digital connection (COAXIAL)Connect digital inputs/outputs to the digital input/output (COAXIAL) connectors for playback or recording.
DIGITAL INPUT ANALOG OUTPUT DIGITAL OUTPUT LAN
DIGITALOUT
DIGITALIN
CDR/CD
AmpMixer
Preamp
Digital connection (AES/EBU)Connect digital inputs/outputs to the digital input/output (AES/EBU) connectors for playback or recording.
ANALOG INPUT DIGITAL INPUT ANALOG OUTPUT DIGITAL OUTPUT
DIGITALOUT
DIGITALIN
CDR/CD
AmpMixer
Preamp
Part names and
FunctionsSetting defaults
PlaybackSelecting Files and
FoldersG
etting StartedControl
FunctionInform
ation
12
Selecting M
ediaRecording
Edit FunctionConnections
Connecting the microphoneConnect the XLR connector of a balanced microphone to the analog input (balanced).
ANALOG INPUT DIGITAL INPUT
•Pin arrangement:1. Ground (GND)2. Hot (HOT)/Phantom power supply (+48V)3. Cold (COLD)
•Suitable connector: CANNON XLR-3-32 or equivalent
•Select “Mic” for the “08 Line/Mic Lch” and “09 Line/Mic Rch” (vpage 22) settings in “System Setting”.
•Set the input sensitivity for each of the microphone left and right channels in the “12 Mic In Sens Lch” and “13 Mic In Sens Rch” (vpage 22) settings in “System Setting”.
•Phantom power (+48V) can be turned On or Off per left and right channels in the “10 Phantom Lch” and “11 Phantom Rch” (vpage 22) settings in “System Setting”.
NOTETurning phantom power On and connecting using a normal input may cause damage to this unit or the connected device. Be careful when configuring these settings and making connections.
Connecting the external control terminal
Parallel portConnect the external device to the parallel port.
REMOTE
RS-232C PARALLEL
Parallel control can be used to control DN-700R from an external device.For details on parallel control, see “Parallel control” (vpage 74).
RS-232C terminalConnect an RS-232C straight cable with a 9-pin D-sub connector to the RS-232C serial terminal.
DIGITAL OUTPUT LAN REMOTE
RS-232C PARALLEL
RS-232C control allows you to perform external control from the host. For details on RS-232C control, see “Serial remote control function” (vpage 71).
Connecting headphonesConnect the headphones to the headphone jack (PHONES).
SHIFT
When you press the headphone volume adjustment knob (LEVEL), the knob will spring out. After adjusting the volume, press the knob back in again.
NOTETo prevent hearing loss, do not raise the volume level excessively when using headphones.
Microphone

Part names and
FunctionsSetting defaults
PlaybackSelecting Files and
FoldersG
etting StartedControl
FunctionInform
ation
13
Selecting M
ediaRecording
Edit FunctionConnections
Connecting the power cordInsert the power cord when all other connections are completed.Be sure to connect the ground wire also.
To AC outlet (AC230V,50/60Hz)
European, UK and Asia/Pacific models
DIGITAL OUTPUT LAN REMOTE
RS-232C PARALLEL
To AC outlet (AC120V,60Hz)
U.S.A. and Canada models
Power cord (supplied)
NOTE•Be sure to insert the power plug firmly into the AC outlet. If the plug
is not properly inserted, it could cause a malfunction or noise.•Do not unplug the power cord while the unit is operating.•Do not use a power cord other than the cord supplied with this unit.
nRemoving the SD CardCheck beforehand that playback from or recording to the SD card is stopped.
1 Open the SD card door in the direction indicated with the arrow. The screen displays “SDz DOOR OPEN”.
•The operation in progress continues even while “DOOR OPEN” is displayed.
•To make “DOOR OPEN” disappear, close the SD card door or press the jog dial.
2 Press the SD card. The SD card springs out. Remove the card.
NOTERemoving the SD card during recording may result in incorrect writing of the recorded file. Do not remove the SD card during recording.
Mounting recording media
SD card
n Inserting an SD card
1 Open the SD card door in the direction indicated with the arrow. The screen displays “SDz DOOR OPEN”.(z is the selected SD card slot number.)
SD card door
2 Insert the SD card fully into the SD card slot until a “click” sound is heard.
SD card
3 Close the SD card door.
•If the SD card door does not close with a “click”, check that the SD card is fully inserted into the slot.

Part names and
FunctionsSetting defaults
PlaybackSelecting Files and
FoldersG
etting StartedControl
FunctionInform
ation
14
Selecting M
ediaRecording
Edit FunctionConnections
nSD card protection The DN-700R SD card door can be fixed in place using the SD card security screw included. (A small Phillips screwdriver is required for installation). Fixing the SD card door prevents the door from being opened easily, thus preventing accidental loss of the SD card.
1 Remove the plastic pin and retainer.
Retainer
Plastic pin
•Store the removed plastic pin and retainer in a safe place.
2 Attach the security screw to the screw hole from which the plastic pin was removed, and tighten it using a small Phillips screwdriver.
SD card security screw
Mounting recording media
About SD cardFor details of SD cards that have been confirmed as being compatible for use by DENON, see the DENON website (URL: http://www.d-mpro.com).
Connecting a USB deviceThe DN-700R supports USB flash memory and external USB device (mass storage class).
•USB-HUBs are not supported. •HFS+ is only supported for playback. •FAT16/FAT32 file systems are supported.
MOVE COPY COMBINE
DIMMERSHIFT REC MON. MARK
USB Device
NOTERemoving the USB drive during recording may result in incorrect writing of the recorded file. Do not remove the USB drive during recording.
Cautions when recording media is mounted•Do not used a cracked or warped SD card or USB drive, or one
that has been repaired with adhesive. •“Loading...” appears on the display when recording media is
mounted or loaded. Do not remove the recording media while this message is displayed.

Part names and
FunctionsConnections
PlaybackSelecting Files and
FoldersG
etting StartedControl
FunctionInform
ation
15
Selecting M
ediaRecording
Edit FunctionSetting defaults
Menu List
Setting defaults
Setting button
MENU Setting Item Page
MENU
01 User Preset Sel01 PRESET1
1802 PRESET203 PRESET3
02 Preset Setting X
01 Preset Title 1802 Shift Mode 1803 Power On 1804 Dual Rec 1805 Relay Rec 1806 Rec Level Type 1807 ALC 1808 One Touch Rec 1809 Audio Input 1810 Rec Format 1811 Rec Channel 1812 Sample Rate 1813 Pre Record 1814 Auto Track 1815 Auto Mark 1916 Silent Skip 1917 Silent Level 1918 Silent Time 1919 Play Range 1920 Play Mode 1921 Random 1922 Program 1923 Finish Mode 1924 Repeat 1925 Auto Cue 1926 Skip Back 1927 Search Mode 1928 Auto Fade In 1929 Auto Fade Out 1930 Start Delay 20
Setting button
MENU Setting Item Page
MENU
02 Preset Setting X
31 End Of Message 2032 Master Key 2033 Time Display 2034 File Sort 2035 Dimmer 2036 Display Dimmer 2037 LED Dimmer 2038 Screen Saver 2039 Fader Start 2040 Para Rem Mode 2041 Keyboard Type 2042 Default 20
03 Archive Setting
01 Archive Mode 5402 Schedule *1 54
03 Server
01 IP Address 5402 FTP User ID 5403 FTP User Password 5404 Folder 54
04 Clear After Arc 5405 Auto Deletion 5406 Connection Test 5407 Default 54
04 Rec Timer Rec Timer List (Max. 30) Rec Timer Menu
Edit
35
InsertClearAll ClearTimer OnTimer Off
05 Play Timer Play Timer List (Max. 30) Play Timer Menu
Edit
45
InsertClearAll ClearTimer OnTimer Off
*1 Not displayed when “Archive Mode” is set to “Auto”.
Part names and
FunctionsConnections
PlaybackSelecting Files and
FoldersG
etting StartedControl
FunctionInform
ation
16
Selecting M
ediaRecording
Edit FunctionSetting defaults
Menu List
Setting button
MENU Setting Item Page
MENU
06 Program List Program List (Max. 99) Program List Menu
Preview
43
InsertRemoveRemove AllLoadSave
07 Hot List Hot List (Max. 20) Hot List Menu
Preview
47
Auto MappingSetRemoveRemove AllLoadSave
08 System Setting
01 Timer Priority 2102 Rec Folder 2103 Signal Pass Thru 2104 User Area 2105 File Name Form 2106 Mono Play 2107 Output Rate 2108 Line/Mic Lch 2109 Line/Mic Rch 2110 Phantom Lch 2211 Phantom Rch 2212 Mic In Sens Lch 2213 Mic In Sens Rch 2214 Volume Input 2215 Ref(XLR/RCA) 2216 Input Trim Lch 2217 Input Trim Rch 2218 Output Trim Lch 2219 Output Trim Rch 2220 Time Form 2221 Date Form 2222 Display Contrast 2223 Language 2224 Serial Bit Rate 2225 Machine Name 22
Setting button
MENU Setting Item Page
MENU
08 System Setting
26 IP Address 22Subnet Mask *2 22Gateway *2 22DNS Server *2 22
27 IP Control Port 2328 IP Control Auth 2329 Network Standby 2330 NTP 2331 Syslog 2332 Time Zone 2333 Daylight Saving 2334 Admin Passwd 2335 Operator Passwd 2336 Observer Passwd 2337 PrdMgr Detect 2338 PrdMgr PowerCtrl 2339 Auto Reboot 2340 Default 23
09 Utility
01 Time/Date 2502 Load Setting 2503 Save Setting 2504 Firmware Version 2605 Network Status 2606 Format Media 2607 Speed Check 26
*2 Not displayed when “26 IP Address” is set to “Auto”.
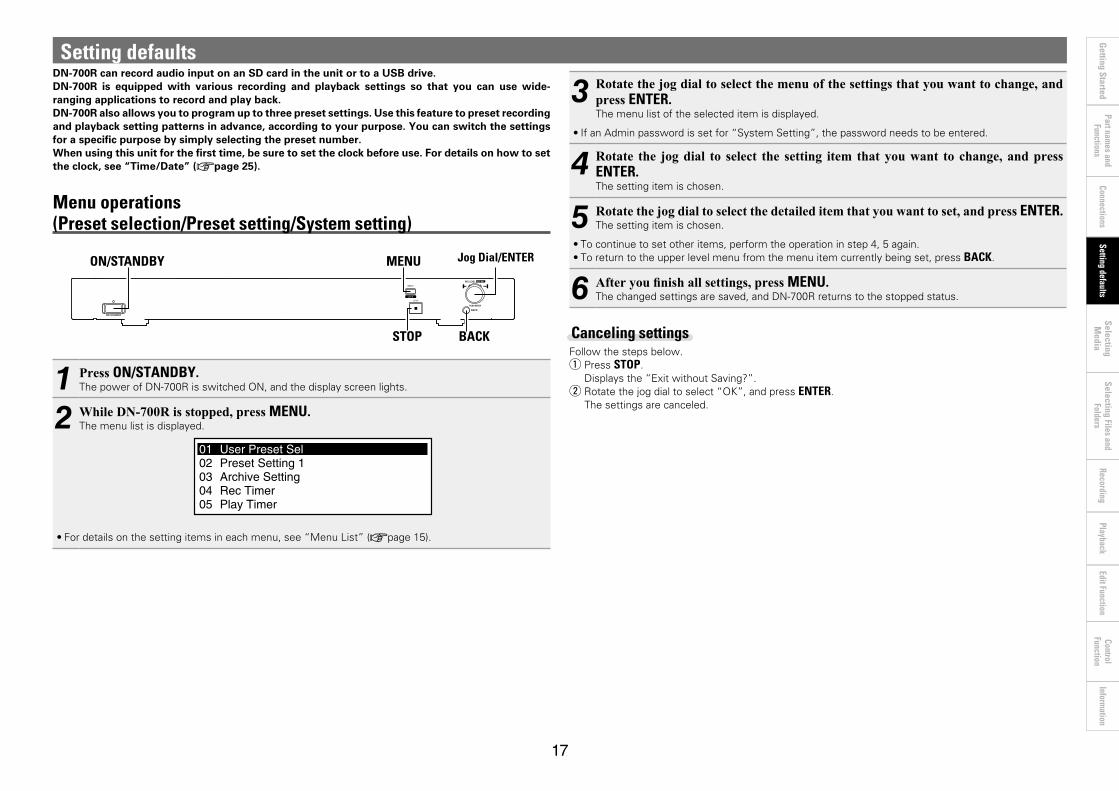
Part names and
FunctionsConnections
PlaybackSelecting Files and
FoldersG
etting StartedControl
FunctionInform
ation
17
Selecting M
ediaRecording
Edit FunctionSetting defaults
Setting defaultsDN-700R can record audio input on an SD card in the unit or to a USB drive. DN-700R is equipped with various recording and playback settings so that you can use wide-ranging applications to record and play back. DN-700R also allows you to program up to three preset settings. Use this feature to preset recording and playback setting patterns in advance, according to your purpose. You can switch the settings for a specific purpose by simply selecting the preset number.When using this unit for the first time, be sure to set the clock before use. For details on how to set the clock, see “Time/Date” (vpage 25).
Menu operations (Preset selection/Preset setting/System setting)
LIST
REC
PITCH
PAUSE PLAYMOVE COPY COMBINE DIVIDE UNDO
DIMMERSHIFT REC MON. MARK TEXT
DISPLAY
FRAME
MEDIA -LOCK
MENU
STOP
MENUON/STANDBY
BACKSTOP
Jog Dial/ENTER
1 Press ON/STANDBY.The power of DN-700R is switched ON, and the display screen lights.
2 While DN-700R is stopped, press MENU.The menu list is displayed.
0102030405
User Preset SelPreset Setting 1Archive SettingRec TimerPlay Timer
•For details on the setting items in each menu, see “Menu List” (vpage 15).
3 Rotate the jog dial to select the menu of the settings that you want to change, and press ENTER. The menu list of the selected item is displayed.
•If an Admin password is set for “System Setting”, the password needs to be entered.
4 Rotate the jog dial to select the setting item that you want to change, and press ENTER. The setting item is chosen.
5 Rotate the jog dial to select the detailed item that you want to set, and press ENTER.The setting item is chosen.
•To continue to set other items, perform the operation in step 4, 5 again. •To return to the upper level menu from the menu item currently being set, press BACK.
6 After you finish all settings, press MENU. The changed settings are saved, and DN-700R returns to the stopped status.
Canceling settingsFollow the steps below. q Press STOP.
Displays the “Exit without Saving?”.w Rotate the jog dial to select “OK”, and press ENTER.
The settings are canceled.

Part names and
FunctionsConnections
PlaybackSelecting Files and
FoldersG
etting StartedControl
FunctionInform
ation
18
Selecting M
ediaRecording
Edit FunctionSetting defaults
Setting defaults
nSelecting presets (User Preset Sel)Three presets (PRESET1/PRESET2/PRESET3) can be created. Select and use the presets according to how the unit is used.
nPreset SettingThese settings are performed independently for each of the 3 presets (Preset-1/Preset-2/ Preset-3). Firstly, select the preset number that you want to set from “01 Presets” in the menu. •There are preset items that have different initial values for PRESET 1, 2 and 3. In this case, the
PRESET number is recorded after the initial value.
Setting Items Setting details (Items in bold are factory default)
01 Preset TitleChanges the preset name.
Preset X (X=1 – 3)
For details, see “Renaming presets” (vpage 21).02 Shift ModeSets operations for the SHIFT button.
Momentary: Switches to the shift mode when holding down the SHIFT button when another button is pressed.
Lock: Switches to the shift mode when the SHIFT button is pressed. In this case, the SHIFT button lights.
03 Power OnSets the operation when the DN-700R power is switched on.
Stop: Stops when the power is switched on. Resume Play: Start playback from the track that was played last by the
previous operation. Play First: Playback starts from the first track in the folder that was played
last by the previous operation. Rec: Starts recording in the folder of the currently selected media.
Settings for the save folder can be configured in “02 Rec Folder” (vpage 21) in “System Setting”.
04 Dual RecSets the backup media for dual recording.
Off: Turns dual recording off. SD1: Selects SD1 as the backup media. SD2: Selects SD2 as the backup media.USB: Selects USB as the backup media.
05 Relay RecSets the media (secondary media) on which recording continues when relay recording is used.
Off: Turns relay recording off. SD1: Selects SD1 as the secondary media.SD2: Selects SD2 as the secondary media.USB: Selects USB as the secondary media.
06 Rec Level TypeSets the jog dial as the selection method for the recording level.
Master/Bal: Adjusts the input level and balance of the left and right channels.
Separate L/R: Adjusts the input level of the left and right channels individually.
Setting Items Setting details (Items in bold are factory default)
07 ALCSets ALC (Auto Level Control).
Off (PRESET1/2): Turns ALC off. Mix: Sets the same ALC for the left and right channels. Separate (PRESET3): Sets ALC for the left and right channels individually.
08 One Touch RecSets the REC button operation.
Off (PRESET1/2): Press the REC button once to pause recording, and again to start recording.
On (PRESET3): Press the REC button once to start recording. 09 Audio InputSelects the audio input source for recording.
Bal: Records the XLR analog input terminal source. UnBal: Records the RCA analog input terminal source. AES / EBU: Records the XLR digital input terminal source. Coaxial: Records the RCA digital input terminal source.
10 Rec FormatSelects the audio format (MP3 or PCM) for recording.
MP3-320 (PRESET2) / MP3-256 / MP3-192 / MP3-128 (PRESET1) / MP3-64 / PCM-16 / PCM-24 (PRESET3)•Indicated bitrate values are those when you record as a stereo file.•Select the bitrate for the MP3 format. •SelectthequantizedbitnumberforthePCMformat.•MP3 cannot be selected when the “12 Sample Rate” is 96k.
11 Rec ChannelSelect whether to record as a stereo file or a monaural file.
Stereo: Records as a stereo (2-channel) file. Mono(L): Records as a monaural (left channel) file. MonoMix: Mixes as stereo (2-channel) and records as a -3dB file.
12 Sample RateSelects the sampling frequency for recording.
44.1k (PRESET1/2):Recordsat44.1kHz.48k:Recordsat48kHz.96k (PRESET3):Recordsat96kHz.Ext (AES): Records with an external clock (AES/EBU).
NOTEThis is only enabled for recording analog input. •96k cannot be selected when the “10 Rec Format” is MP3.
13 Pre RecordWhen recording is started from the recording paused status, recording starts retroactively for this set amount of time.
Off: Turns pre recording off. 1sec / 2sec / 3sec / 4sec / 5sec
14 Auto TrackCreates a new file for each recording time set and continues recording.
Off: Record without creating a new file. 1min / 5min / 10min / 15min / 30min / 1hour / 2hour / 6hour / 8hour / 12hour / 24hour
NOTE•Whenthesizeofarecordedfilereaches2GB,recordingautomatically
switches to a new file and continues. •There could be sound cutoffs for a short period of time between files
depending on the capacity of a recorded file.
Part names and
FunctionsConnections
PlaybackSelecting Files and
FoldersG
etting StartedControl
FunctionInform
ation
19
Selecting M
ediaRecording
Edit FunctionSetting defaults
Setting defaults
Setting Items Setting details (Items in bold are factory default)
15 Auto MarkIf an input that is below the level set in “17 Silent Level” continues for longer than the time set in “18 Silent Time” (vpage 19), marking information is written in the file. This mark is useful when searching for a specific point during playback.
Off: Turns the auto mark function off. On: Turns the auto mark function on.
•A maximum of 30 marks can be written to one file. •Marking numbers are attached in numerical order starting from 1. •Marks can also be added manually. For details, see “Add marks
(marking)” (vpage 42). •Marks can be edited using the “DMP Mark Editor” software included.
For details, see the instruction manual on the included CD-ROM.
16 Silent SkipIf an input that is below the level set in “17 Silent Level” continues for longer than the time set in “18 Silent Time”, recording is paused. Recording is restarted when input above the set level is received again.
Off: Turns the silent skip function off. On: Turns the silent skip function on. The S.S icon is shown on the
display (vpage 38 “Silent skip recording”).
•If the recording is temporarily stopped because of the silent skip function,
“S.S” will flash on the display.•When “16 Silent Skip” is “On”, a maximum 0.5 second pre recording is
added before starting recording from the recording paused state. 17 Silent LevelSets the silent level when “15 Auto Mark” or “16 Silent Skip” is set to on.
–60dB / –54dB / –38dB / –20dB
18 Silent TimeSet the silence judgment time for silent skip recording.
1sec / 2sec / 3sec / 4sec / 5sec
19 Play RangeSets the track playback range.
All: Plays back all of the tracks in all folders. Folder: Plays back all of the tracks in the selected folder.
NOTE“All” is only enabled for SD card and USB device playback. If “All” is selected for NET playback, this operates with the “Folder” setting.
20 Play ModeSets the track playback mode.
Continuous: Continuously plays the tracks within the selected folder or within all folders (according to the “19 Play Range” setting).
Single: Plays back only 1 track.
Setting Items Setting details (Items in bold are factory default)
21 RandomSets random playback.
On: Random order playback is performed. Off: Random order playback is not performed.
22 ProgramSets programmed playback.
On: Plays back tracks in the set order (programmed playback). Off: Programmed playback is not performed.
23 Finish ModeSets the operation when playback is stopped.
Stop: Playback stops. Next: When playback is stopped, the next track is cued. Recue: Playback stops and returns to the cue point.
24 RepeatSets repeat playback.
On: Repeat playback is performed.Off: Repeat playback is not performed.
25 Auto CueSets the auto cue function.
Off: Turns the auto cue function off. -48dB/-42dB/-36dB: After the track has been selected, audio in the
beginning of the track that is below the set volume level is skipped and temporarily stops playback.
The auto cue function temporarily stops playback at the point where playback restarts after skipping the silent portion at the beginning of a file.
NOTEIf the silent portion cannot be detected at the beginning of a file even after 20 seconds, then temporarily stops playback at the beginning of the file.
26 Skip BackThe track skips back just the set amount of time during playback or when paused, and plays back or remains paused (vpage 41 “Skip back”).
0.5 – 2 – 60sec: Set the skip back time for a track that is currently being played back to 0.5 second intervals between 0.5 and 10 seconds, or 5 second intervals between 10 and 60 seconds.
27 Search ModeSets the search mode.
Normal: Plays back audio in 2 x speed search, but does not play back audio at faster playback speeds.
Silent: Audio is not played back during search. 28 Auto Fade InSets the fade in time at the start of playback.
Off: Does not function.0.5 sec/1.0 sec/3.0 sec: The volume gradually increases for the set time.
29 Auto Fade OutSets the fade out time when playback is stopped.
Off: Does not function.0.5 sec/1.0 sec/3.0 sec: The volume gradually decreases for the set time.
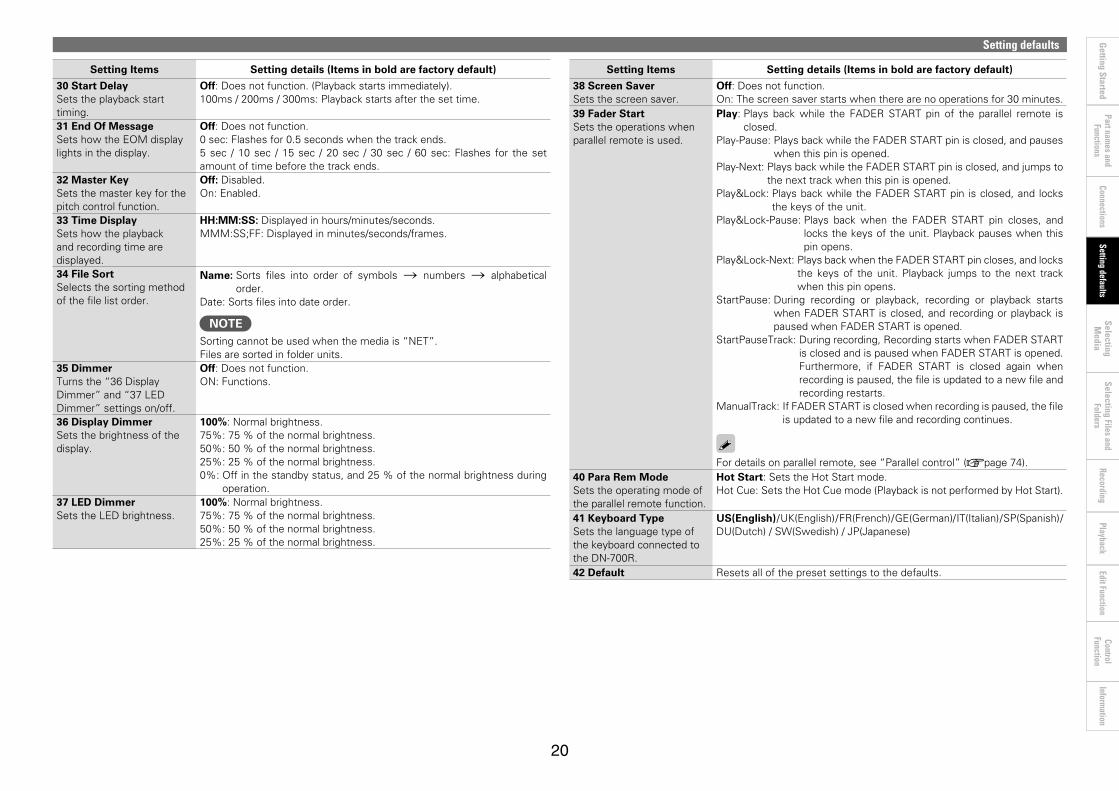
Part names and
FunctionsConnections
PlaybackSelecting Files and
FoldersG
etting StartedControl
FunctionInform
ation
20
Selecting M
ediaRecording
Edit FunctionSetting defaults
Setting defaults
Setting Items Setting details (Items in bold are factory default)
30 Start DelaySets the playback start timing.
Off: Does not function. (Playback starts immediately). 100ms / 200ms / 300ms: Playback starts after the set time.
31 End Of MessageSets how the EOM display lights in the display.
Off: Does not function.0 sec: Flashes for 0.5 seconds when the track ends. 5 sec / 10 sec / 15 sec / 20 sec / 30 sec / 60 sec: Flashes for the set amount of time before the track ends.
32 Master KeySets the master key for the pitch control function.
Off: Disabled. On: Enabled.
33 Time DisplaySets how the playback and recording time are displayed.
HH:MM:SS: Displayed in hours/minutes/seconds. MMM:SS;FF:Displayedinminutes/seconds/frames.
34 File SortSelects the sorting method of the file list order.
Name: Sorts files into order of symbols ! numbers ! alphabetical order.
Date: Sorts files into date order.
NOTESorting cannot be used when the media is “NET”.Files are sorted in folder units.
35 DimmerTurns the “36 Display Dimmer” and “37 LED Dimmer” settings on/off.
Off: Does not function.ON: Functions.
36 Display DimmerSets the brightness of the display.
100%: Normal brightness. 75%: 75 % of the normal brightness. 50%: 50 % of the normal brightness.25%: 25 % of the normal brightness.0%: Off in the standby status, and 25 % of the normal brightness during
operation. 37 LED DimmerSets the LED brightness.
100%: Normal brightness.75%: 75 % of the normal brightness.50%: 50 % of the normal brightness.25%: 25 % of the normal brightness.
Setting Items Setting details (Items in bold are factory default)
38 Screen SaverSets the screen saver.
Off: Does not function.On: The screen saver starts when there are no operations for 30 minutes.
39 Fader StartSets the operations when parallel remote is used.
Play: Plays back while the FADER START pin of the parallel remote is closed.
Play-Pause: Plays back while the FADER START pin is closed, and pauses when this pin is opened.
Play-Next: Plays back while the FADER START pin is closed, and jumps to the next track when this pin is opened.
Play&Lock: Plays back while the FADER START pin is closed, and locks the keys of the unit.
Play&Lock-Pause: Plays back when the FADER START pin closes, and locks the keys of the unit. Playback pauses when this pin opens.
Play&Lock-Next: Plays back when the FADER START pin closes, and locks the keys of the unit. Playback jumps to the next track when this pin opens.
StartPause: During recording or playback, recording or playback starts when FADER START is closed, and recording or playback is paused when FADER START is opened.
StartPauseTrack: During recording, Recording starts when FADER START is closed and is paused when FADER START is opened. Furthermore, if FADER START is closed again when recording is paused, the file is updated to a new file and recording restarts.
ManualTrack: If FADER START is closed when recording is paused, the file is updated to a new file and recording continues.
For details on parallel remote, see “Parallel control” (vpage 74). 40 Para Rem ModeSets the operating mode of the parallel remote function.
Hot Start: Sets the Hot Start mode. Hot Cue: Sets the Hot Cue mode (Playback is not performed by Hot Start).
41 Keyboard TypeSets the language type of the keyboard connected to the DN-700R.
US(English) / UK(English) / FR(French) / GE(German)/ IT(Italian) / SP(Spanish) / DU(Dutch) / SW(Swedish) / JP(Japanese)
42 Default Resets all of the preset settings to the defaults.

Part names and
FunctionsConnections
PlaybackSelecting Files and
FoldersG
etting StartedControl
FunctionInform
ation
21
Selecting M
ediaRecording
Edit FunctionSetting defaults
Setting defaults
nRenaming presetsPreset names can be renamed according to their use. A maximum of 32 characters can be input.
Entering CharactersFirst, select the preset number that you want to rename from “01 User Preset Sel” in the menu. Next, select “01 Preset Title” in “02 Preset Setting”.
q Place the cursor in the position where you want to insert characters using the 6, 7 buttons.
Preset Title
ABCD
</>:<</>> BKSP:FRAME IN:JOG
w Rotate the jog dial to select the character you want to enter, and press ENTER.e Repeat steps q and w or step w to enter all of the characters. r When you have finished entering the characters, press ENTER.
•Saves the entered characters.
Deleting Charactersq Place the cursor to the right of the character you want to delete the 6, 7 buttons. w Press FRAME.
•Deletes a character on the left of the cursor.
•By default, presets have a name that is eight characters long. To rename an existing name, delete the currently set characters first and then enter a new name.
•The following characters and symbols can be entered. ABCDEFGHIJKLMNOPQRSTUVWXYZabcdefghijklmnopqrstuvwxyz(space)!#$%&’()+,–;=@[]^_’{}~0123456789¡¢£¤¥¦§¨©ª”¬®¯°±²³´µ¶·¸¹º”¼½¾¿ÀÁÂÃÄÅÆÇÈÊËÌÍÎÏÔÕÖ×ØÙÚÛÜÝÞßåæçèééêëìíîïö÷øùúûüýþÿThecharactersontheaboveunderlinedpart, from¡toÿ,areLatinalphabets.Alphabetsareavailablewhen the display language is set to “Eng”, but not available when it is set to “Jpn”. For information about the display language, refer to “23 Language” (vpage 22).
•To cancel without saving the entered characters, press the BACK button before saving.•These characters can also be entered using a USB keyboard.
nSystem SettingSetting Items Setting details (Items in bold are factory default)
01 Timer PrioritySets the priority of timer playback.
Off: Timer playback only starts in the standby, stop or cue state. On: Timer playback starts any time other than when recording.
02 Rec FolderSets the folder where data is saved when recording.
Current: Recorded data is saved into the currently selected folder. Fixed: Recorded data is saved into a fixed folder directly below the root folder.
A folder is automatically created if there is no folder. Thefoldernameis“DMH_REC”.
When “19 Play Range” (vpage 44) in “Preset Setting” is set to “All”, data is saved to the root folder.
03 Signal Pass ThruSets the input signal to the rear audio terminals when recording or when recording is paused.
Off: The input signal is not passed through to the rear audio terminals.On: The input signal is passed through unchanged to the rear audio
terminals.
The input signal will always be present in the headphones regardless of the Signal Pass Thru setting.
04 User AreaSets the character string (user area) added to the recorded file name.
Off: User area is not used. On: User area is used.
For details on how to input the characters, see “Renaming presets” (vpage 21).
05 File Name FormSets the file name creation format when recording.
MN_DT_UA:“Machinename_recordingstarttime_userarea.zzz”MN_UA_DT:“Machinename_userarea_recordingstarttime.zzz”DT_MN_UA:“Recordingstarttime_machinename_userarea.zzz”DT_UA_MN:“Recordingstarttime_userarea_machinename.zzz”UA_MN_DT:“Userarea_machinename_recordingstarttime.zzz”UA_DT_MN:“Userarea_recordingstarttime_machinename.zzz”
(z is the extension.)06 Mono PlaySets monaural playback.
Off: Channels are output in accordance with the input source. On: Channels are summed and output as monaural
07 Output RateSets the sampling rate of output audio.
Auto: Audio output based on the rate of the input media or file. 44.1k:Audiooutputat44.1kHz.48k:Audiooutputat48kHz.Ext (AES): Uses an external clock (AES/EBU) to output audio.
When the external clock is 96kHz, audio is output according to thesampling rate of the playback file if the playback file has a sampling rate otherthan96kHz.

Part names and
FunctionsConnections
PlaybackSelecting Files and
FoldersG
etting StartedControl
FunctionInform
ation
22
Selecting M
ediaRecording
Edit FunctionSetting defaults
Setting defaults
Setting Items Setting details (Items in bold are factory default)
08 Line/Mic LchSets the mode of the XLR left channel.
Line: Sets to line input.Mic: Sets to microphone input.
09 Line/Mic RchSets the mode of the XLR right channel.
Line: Sets to line input.Mic: Sets to microphone input.
10 Phantom Lchz1
Sets phantom power (+48V) for “08 Line/Mic Lch”.
Off: Turns phantom power off for the left channel. On: Turns phantom power on for the left channel. However, when “08
Line/Mic Lch” is set to “Line”, turn phantom power off. 11 Phantom Rchz1
Sets phantom power (+48V) for “09 Line/Mic Rch”.
Off: Turns phantom power off for the right channel. On: Turns phantom power on for the right channel. However, when “08
Line/Mic Rch” is set to “Line”, turn phantom power off.12 Mic In Sens LchAdjusts the XLR microphone sensitivity for the left channel in 0.1dBu increments.
-16dBu – -40dBu – -60dBu
When adjusting it, the sound is output to the output terminal.
13 Mic In Sens RchAdjusts the XLR microphone sensitivity for the right channel in 0.1dBu increments.
-16dBu – -40dBu – -60dBu
When adjusting it, the sound is output to the output terminal.
14 Volume InputSets the analog recording input level.
Fixed (0dB): Fixed at 0dB.Variable: Mute can be adjusted from -60 – 0 – 10dBu in 0.1dB increments.
15 Ref (XLR/RCA)Sets the input/output standard level.
+24dBu/+10dBV:XLR=+24dBu/RCA=+10dBV+20dBu/+6dBV:XLR=+20dBu/RCA=+6dBV+18dBu/+4dBV:XLR=+18dBu/RCA=+4dBV
16 Input Trim LchAdjusts the analog input for the left channel in 0.1dB increments.
+2.0dB – 0dB – -2.0dB
When adjusting it, the sound is output to the output terminal.17 Input Trim RchAdjusts the analog input for the right channel in 0.1dB increments.
+2.0dB – 0dB – -2.0dB
When adjusting it, the sound is output to the output terminal.18 Output Trim LchAdjusts the analog output for the left channel in 0.1dB increments.
+2.0dB – 0dB – -2.0dB
19 Output Trim RchAdjusts the analog output for the right channel in 0.1dB increments.
+2.0dB – 0dB – -2.0dB
Setting Items Setting details (Items in bold are factory default)
20 Time FormSets the type of the current time display.
12h: Switches to the 12-hour display (AM/PM). 24h: Switches to the 24-hour display.
21 Date FormSets the display order of the date.
MDY: Displays the date in Month/Day/Year order. DMY: Displays the date in Day/Month/Year order. YMD: Displays the date in Year/Month/Day order.
22 Display ContrastSets the contrast of the display.
1 – 5 : 1 is the darkest, 5 is the brightest.
23 Languagez2
Selects the display language for the file names and folder names.
Eng: Displays the file names and folder names in English. Jpn: Displays the file names and folder names in Japanese.
24 Serial Bit RateSets the serial communication bitrate for RS-232C.
9600: 9600 bps38400: 38400 bps
25 Machine Namez2
Displays the UPnP device name. (maximum 12 characters)
DN-700R
26 IP Addressz2 Auto: DHCP is assigned automatically. Static: Specify a fixed IP address. When selected, the fixed address is
displayed. Subnet Maskz2 None: Not displayed when the “IP Address” is set to “Auto”. Can be set
for any setting other than “Auto”. Static: 0.0.0.0 to 255.255.255.255
(When “Auto” is set: 255.255.255.0)Gatewayz2 None: Not displayed when the “IP Address” is set to “Auto”. Can be set
for any setting other than “Auto”.Static: 0.0.0.0 to 255.255.255.255
(When “Auto” is set: 0.0.0.0)DNS Serverz2 None: Not displayed when the “IP Address” is set to “Auto”. Can be set
for any setting other than “Auto”.Static: 0.0.0.0 to 255.255.255.255
(When “Auto” is set: 0.0.0.0)
z1 Settings are saved, and it takes approximately 8 seconds to switch the circuits in order to enable the settings. During this time “Saving” is displayed.
z2 The DN-700R will automatically reboot (power off and then back on) to enable the settings.

Part names and
FunctionsConnections
PlaybackSelecting Files and
FoldersG
etting StartedControl
FunctionInform
ation
23
Selecting M
ediaRecording
Edit FunctionSetting defaults
Setting defaults
Setting Items Setting details (Items in bold are factory default)
27 IP Control Portz2 0 to 65535 (23): Sets the IP control port number. Please note that port numbers 'xx' and 'xx' are not available as they are reserved for Web Remote and DLNA.
28 IP Control Authz2 Off: Password authentication is not required for IP control.On: Password authentication is required for IP control.
29 Network Standby Off: Only Front Sub u-Con operates (low power operation). On: Power is supplied to the network related circuits even in standby
mode, and the unit can be controlled from the network. 30 NTP Off: NTP is not used.
On: NTP is used. Displays the NTP server address. Press ENTER to enter the address. Then select the cycle of NTP.
31 Syslog Off: Event information is not sent to the server. On: Event information is sent to the server. The Syslog server address is
displayed. Press ENTER to enter the address. 32 Time ZoneSet the offset time in 15-minute units.
–12:00 – +14:00 (00:00)
33 Daylight SavingSets daylight saving time.
Off: Daylight saving time is not applied. On: Daylight saving time is applied. Set the start and end date of daylight
saving time and the offset time of up to six hours in 15-minute increments.
34 Admin PasswdSets the Admin Password for when “Web Remote”, “IP Control” or “System Setting” are used.
****: Set the password between 6 to 12 characters.
For details on how to input the password, see “Renaming presets” (vpage 21).
35 Operator PasswdSets the Operator Password for when “Web Remote” or “IP Control” are used.
****: Set the password between 6 to 12 characters.
For details on how to input the password, see “Renaming presets” (vpage 21).
Setting Items Setting details (Items in bold are factory default)
36 Observer PasswdSets the Observer Password for when “Web Remote” or “IP Control” are used.
****: Set the password between 6 to 12 characters.
For details on how to input the password, see “Renaming presets” (vpage 21).
37 PrdMgr Detect On: Permits connection from Product Manager. Off: Does not permit connection from Product Manager.
NOTEWhen set to off, connection cannot be made from DMR of DLNA.
38 PrdMgr Power Ctrl On: Permits the unit power to be switched on/off from Product Manager. Off: Does not permit the unit power to be switched on/off from Product
Manager. 39 Auto Reboot Off: Does not automatically reboot.
On:Rebootsautomaticallyifthemainprocessorfreezes.40 Default Resets all of the system settings to the defaults.
z2 The DN-700R will automatically reboot (power off and then back on) to enable the settings.

Part names and
FunctionsConnections
PlaybackSelecting Files and
FoldersG
etting StartedControl
FunctionInform
ation
24
Selecting M
ediaRecording
Edit FunctionSetting defaults
Setting defaults
Menu Operations (Utility)
STOP
LIST
REC
PITCH
PAUSE PLAYMOVE COPY COMBINE DIVIDE UNDO
DIMMERSHIFT REC MON. MARK TEXT
DISPLAY
FRAME
MEDIA -LOCK
MENU
MENUON/STANDBY
BACK
Jog Dial/ENTER
nSelect Utility
1 Press ON/STANDBY.The power of DN-700R is switched ON, and the display screen lights.
2 While DN-700R is stopped, press MENU.The menu list is displayed.
3 Rotate the jog dial to select “Utility”, and press ENTER.
•Press BACK to return to the previous item. •Press MENU to exit the menu when the menu is displayed. The menu display turns off.
Saving the menu settings to an SD card or USB memoryThis unit has a function for saving the menu settings to an SD card or USB flash memory. This function is useful for transferring the settings from one DN-700R onto other DN-700R units.
•Data that can be saved•Preset settings: PRESET1, PRESET2, PRESET3 data, currently used preset number•System setting•Recording timer setting•Playback timer setting•Playback pitch information, recording input level, recording monitor•Archive settings
NOTEWhen “34 Admin Passwd” (vpage 23) is set in “System Setting”, the System Setting data is not applied if the password in the DN-700R is not the same.

Part names and
FunctionsConnections
PlaybackSelecting Files and
FoldersG
etting StartedControl
FunctionInform
ation
25
Selecting M
ediaRecording
Edit FunctionSetting defaults
Setting defaults
nTime/Date•Set the current time. The time must be set before using the unit because the set time is used as the
recorded file name. •If the unit is connected to a network and “30 NTP” (vpage 23) in “System Setting” is set to
“On”, the current time settings do not need to be configured.
1 Select “Utility” and rotate the jog dial to select “Date/Time”, then press ENTER.
2 Rotate the jog dial to select the input position (year/month/day/hour/minute), and press ENTER.
Date/Time
Time:11:54T</>:<</>> Change:JOG Push
Date:May/13/2013
3 Rotate the jog dial to select the setting item, and press ENTER.
•The current time display type (12-hour display/24-hour display) can be selected in “20 Time Form” (vpage 22) in “System Setting”.
•The display order of the date (year/month/date) can be selected in “21 Date Form” (vpage 22) in “System Setting”.
4 When all settings are entered they will be automatically saved and the utility menu will be displayed. If only some of the settings are changed, but not all, press BACK twice.“Fix” and “Discard” are displayed.
5 Rotate the jog dial to select “Fix”, and press ENTER.Confirm the settings.
•Select “Discard” to discard the changes.
NOTEThis unit is equipped with a clock function, but the time may become skewed due to the installation condition of the unit. When using the timer function, it is recommended to connect to a network and use NTP.
n Load SettingReads the preset setting file stored in the root directory of the currently used media (SD1/SD2/USB), and changes the settings of the unit accordingly.
1 Select “Utility” and rotate the jog dial to select “Load Setting”, then press ENTER. Displays the “Load Preset?”.
2 Select “OK” with the jog dial, and press ENTER. The “DN-700R.ini” file on the currently used media is read, and the unit's settings are updated. When the update is complete, “Completed” is displayed.
nSave SettingSaves the current preset settings in the root directory of the currently used media (SD1/SD2/USB).
1 Select “Utility” and rotate the jog dial to select “Save Setting”, then press ENTER.Displays the “Save Preset?”.
2 Select “OK” with the jog dial, and press ENTER.The “DN-700R.ini” file is saved in the root directory of the currently used media.When the update is complete, “Completed” is displayed.•The file uses UTF8.

Part names and
FunctionsConnections
PlaybackSelecting Files and
FoldersG
etting StartedControl
FunctionInform
ation
26
Selecting M
ediaRecording
Edit FunctionSetting defaults
n Firmware VersionDisplays the firmware version of the DN-700R.
Select “Utility” and rotate the jog dial to select “Firmware Version”, then press ENTER.Displays the firmware version of the DN-700R.
n Format MediaFormats the currently used media (SD1/SD2/USB).
1 Select “Utility” and rotate the jog dial to select “Format Media”, then press ENTER.The media list is displayed.
Media List
USB: CURRENT
SD1(None)SD2(None)
2 Rotate the jog dial to select the media, and press ENTER.
3 Select “OK” with the jog dial, and press ENTER.“Formatting” is displayed during formatting, and “Completed” is displayed when the formatting is complete.
nSpeed CheckChecks the read and write speed of the currently used media (SD1/SD2/USB). Always perform a speed check on media before using it.
1 Select “Utility” and rotate the jog dial to select “Speed Check”, then press ENTER.The media list is displayed.
Media List
USB: CURRENT
SD1(None)SD2(None)
2 Rotate the jog dial to select the media, and press ENTER.
3 Select “OK” with the jog dial, and press ENTER.Media check starts and “Check Speed ...” is displayed.
•The following results are displayed when the speed check is complete.“Good”: The checked media is suitable for use. “Good w/o Rec Mon”: The checked media is suitable for simple recording but is unsuitable for recording
monitoring. “Poor”: The checked media is unsuitable for use.
4 Select “OK” and press ENTER.
nNetwork StatusDisplays network setting information.
Select “Utility” and rotate the jog dial to select “Network Status”, then press ENTER.Network setting information (IP address/MAC address) is displayed.
Setting defaults
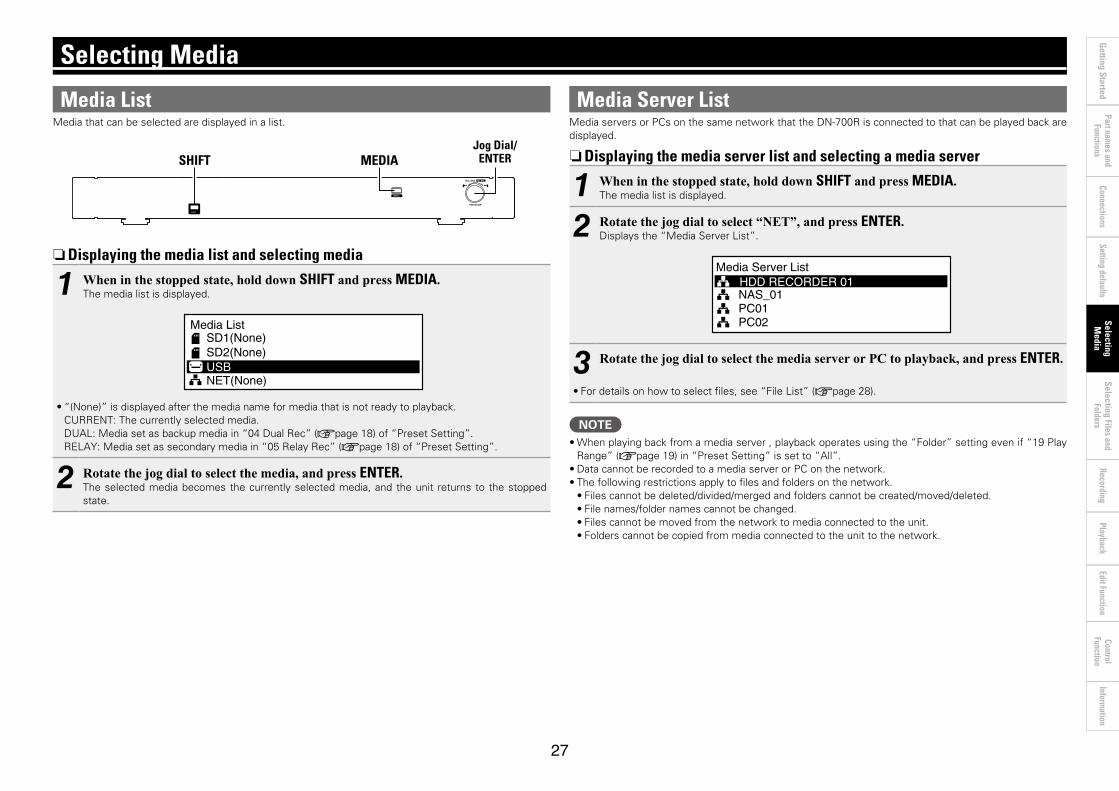
Part names and
FunctionsSetting defaults
ConnectionsPlayback
Selecting Files and Folders
Getting Started
Control Function
Information
27
RecordingEdit Function
Selecting M
edia
Media Server ListMedia servers or PCs on the same network that the DN-700R is connected to that can be played back are displayed.
nDisplaying the media server list and selecting a media server
1 When in the stopped state, hold down SHIFT and press MEDIA.The media list is displayed.
2 Rotate the jog dial to select “NET”, and press ENTER.Displays the “Media Server List”.
Media Server List
NAS_01HDD RECORDER 01
PC01PC02
3 Rotate the jog dial to select the media server or PC to playback, and press ENTER.
•For details on how to select files, see “File List” (vpage 28).
NOTE•When playing back from a media server , playback operates using the “Folder” setting even if “19 Play
Range” (vpage 19) in “Preset Setting” is set to “All”. •Data cannot be recorded to a media server or PC on the network. •The following restrictions apply to files and folders on the network. •Files cannot be deleted/divided/merged and folders cannot be created/moved/deleted. •File names/folder names cannot be changed.•Files cannot be moved from the network to media connected to the unit. •Folders cannot be copied from media connected to the unit to the network.
Media ListMedia that can be selected are displayed in a list.
-LOCK
MENU
STOP
LIST
REC
PITCH
PAUSE PLAYMOVE COPY COMBINE DIVIDE UNDO
DIMMER REC MON. MARK TEXT
DISPLAY
FRAME
MEDIA
SHIFT
MEDIASHIFTJog Dial/
ENTER
nDisplaying the media list and selecting media
1 When in the stopped state, hold down SHIFT and press MEDIA. The media list is displayed.
Media List
USB
SD1(None)SD2(None)
NET(None)
•“(None)” is displayed after the media name for media that is not ready to playback. CURRENT: The currently selected media. DUAL: Media set as backup media in “04 Dual Rec” (vpage 18) of “Preset Setting”. RELAY: Media set as secondary media in “05 Relay Rec” (vpage 18) of “Preset Setting”.
2 Rotate the jog dial to select the media, and press ENTER.The selected media becomes the currently selected media, and the unit returns to the stopped state.
Selecting Media

Part names and
FunctionsSetting defaults
ConnectionsPlayback
Getting Started
Control Function
Information
28
Selecting M
ediaRecording
Edit FunctionSelecting Files and
Folders
2 Rotate the jog dial to select the file or folder to operate, and press MENU. The File List Menu is displayed.
0003 track_003.wav
<USB>
0004 track_004.wav
0002 track_002.wav0001 track_001.wav
03 Rename04 Delete05 Copy
02 Select All01 Preview
•Press BACK in the file list menu display to return to the previous screen.
n File List MenuDisplay Explanation
01 Preview Previews just one track of the selected file.
02 Select All Selects all files in the list.
03 Rename* Changes the file name or folder name.
04 Delete Deletes selected files or folders.
05 Copy* Copies selected files or folders.
06 Move* Moves selected files or folders.
07 Make Folder Creates a new folder.
08 Delete Mark Deletes all marks from the selected file.
09 Property Displays information of the selected file.
z: Directly after editing, “UNDO” (vpage 49)can be used to return the edit to the previous state.
Selecting Files and Folders
File ListThe list of folders and files that can be selected is displayed.
MEDIA -LOCK
MENU
REC
PITCH
PAUSE PLAYMOVE COPY COMBINE DIVIDE UNDO
DIMMER REC MON. MARK TEXT
DISPLAY
FRAME
SHIFT
STOP
LIST
LISTSHIFT
STOP BACK
Jog Dial/ENTER
File List MenuPerform file management operations. You can check file information, change file names, and delete, copy and move files.
nSelecting folders and files and displaying the file list menu
1 Press LIST when the playback screen is displayed. The “File List” is displayed.
0003 track_003.wav
<USB>
0004 track_004.wav
0002 track_002.wav0001 track_001.wav
n Folder selection•Use the jog dial to select “<Up One Level>” for the parent folder and press ENTER to display the
file list in the folder one level above. •Use the jog dial to select the folder and press ENTER to display the file list in the selected folder.•Press LIST to exit folder selection and return to the stopped status.
n File selection•Use the jog dial to select a file and press ENTER to close the file list and cue the start of the selected
file.
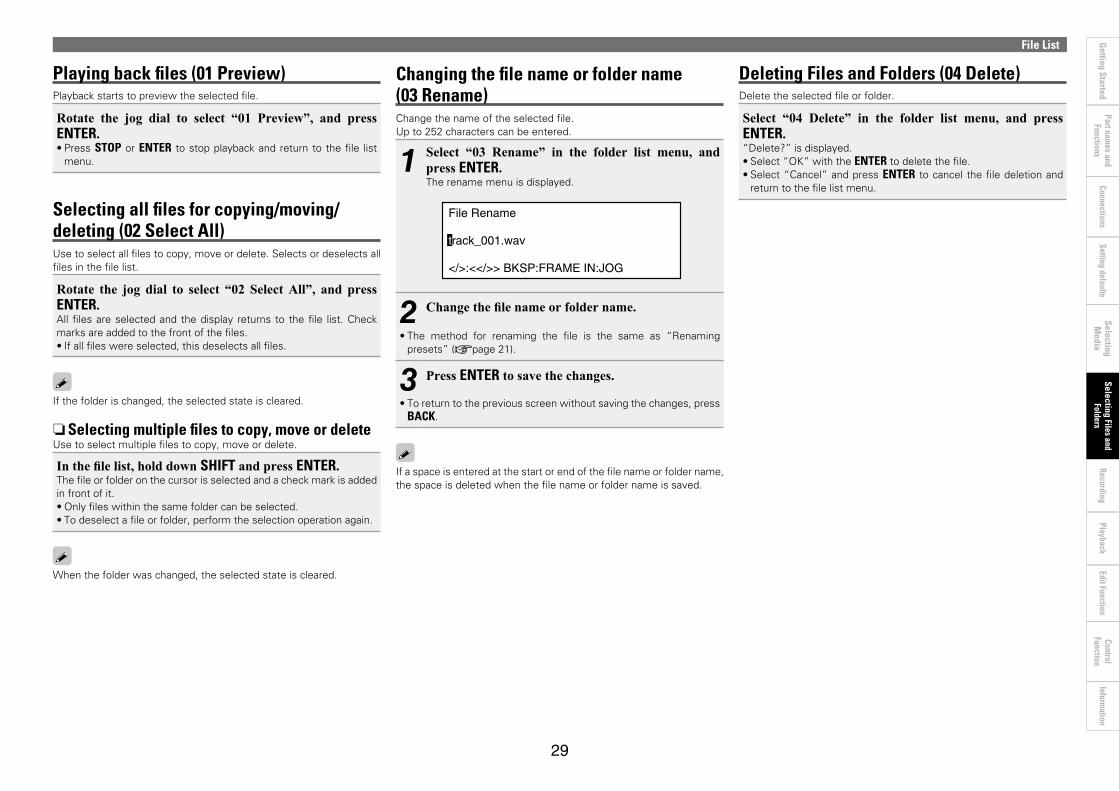
Part names and
FunctionsSetting defaults
ConnectionsPlayback
Getting Started
Control Function
Information
29
Selecting M
ediaRecording
Edit FunctionSelecting Files and
Folders
Deleting Files and Folders (04 Delete)Delete the selected file or folder.
Select “04 Delete” in the folder list menu, and press ENTER. “Delete?” is displayed. •Select “OK” with the ENTER to delete the file. •Select “Cancel” and press ENTER to cancel the file deletion and
return to the file list menu.
File List
Changing the file name or folder name (03 Rename)Change the name of the selected file. Up to 252 characters can be entered.
1 Select “03 Rename” in the folder list menu, and press ENTER. The rename menu is displayed.
File Rename
track_001.wav
</>:<</>> BKSP:FRAME IN:JOG
2 Change the file name or folder name.
•The method for renaming the file is the same as “Renaming presets” (vpage 21).
3 Press ENTER to save the changes.
•To return to the previous screen without saving the changes, press BACK.
If a space is entered at the start or end of the file name or folder name, the space is deleted when the file name or folder name is saved.
Playing back files (01 Preview)Playback starts to preview the selected file.
Rotate the jog dial to select “01 Preview”, and press ENTER.•Press STOP or ENTER to stop playback and return to the file list
menu.
Selecting all files for copying/moving/deleting (02 Select All)Use to select all files to copy, move or delete. Selects or deselects all files in the file list.
Rotate the jog dial to select “02 Select All”, and press ENTER.All files are selected and the display returns to the file list. Check marks are added to the front of the files. •If all files were selected, this deselects all files.
If the folder is changed, the selected state is cleared.
nSelecting multiple files to copy, move or deleteUse to select multiple files to copy, move or delete.
In the file list, hold down SHIFT and press ENTER. The file or folder on the cursor is selected and a check mark is added in front of it. •Only files within the same folder can be selected. •To deselect a file or folder, perform the selection operation again.
When the folder was changed, the selected state is cleared.
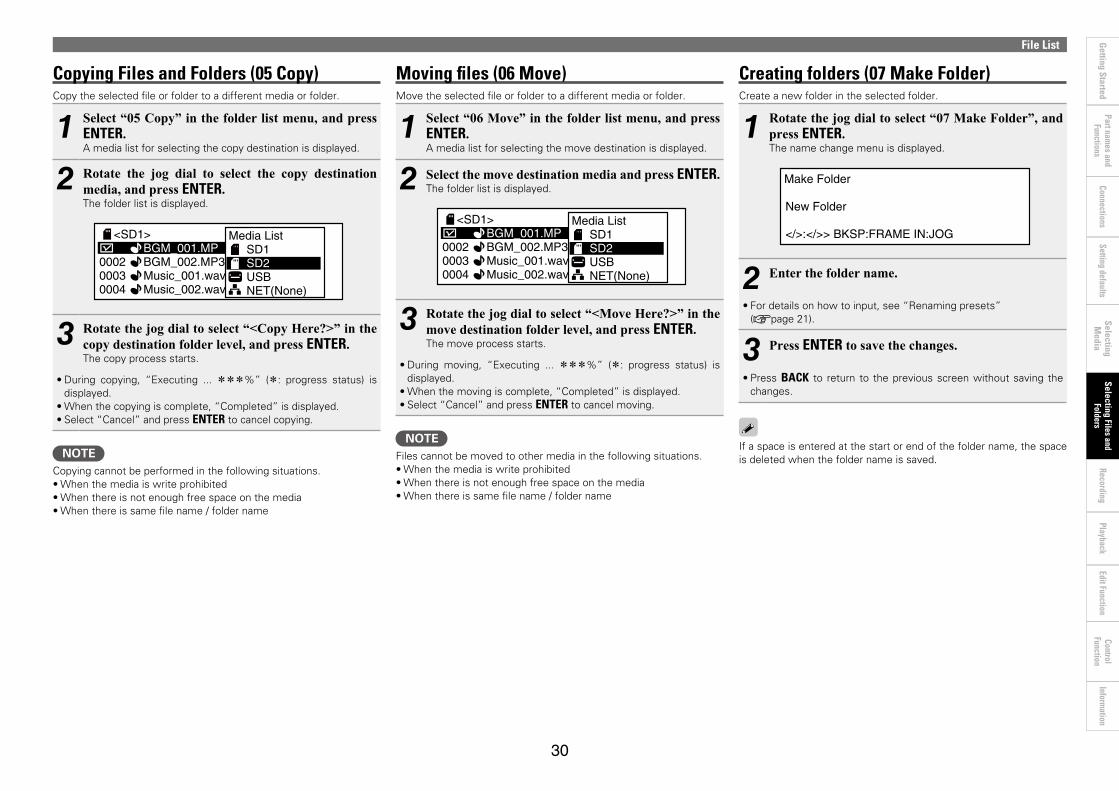
Part names and
FunctionsSetting defaults
ConnectionsPlayback
Getting Started
Control Function
Information
30
Selecting M
ediaRecording
Edit FunctionSelecting Files and
Folders
File List
Creating folders (07 Make Folder)Create a new folder in the selected folder.
1 Rotate the jog dial to select “07 Make Folder”, and press ENTER.The name change menu is displayed.
Make Folder
</>:</>> BKSP:FRAME IN:JOG
New Folder
2 Enter the folder name.
•For details on how to input, see “Renaming presets” (vpage 21).
3 Press ENTER to save the changes.
•Press BACK to return to the previous screen without saving the changes.
If a space is entered at the start or end of the folder name, the space is deleted when the folder name is saved.
Moving files (06 Move)Move the selected file or folder to a different media or folder.
1 Select “06 Move” in the folder list menu, and press ENTER. A media list for selecting the move destination is displayed.
2 Select the move destination media and press ENTER. The folder list is displayed.
0003 Music_001.wav
<SD1>
0004 Music_002.wav
0002 BGM_002.MP3BGM_001.MP
SD2USBNET(None)
SD1Media List
3 Rotate the jog dial to select “<Move Here?>” in the move destination folder level, and press ENTER.The move process starts.
•During moving, “Executing ... zzz%” (z: progress status) is displayed.
•When the moving is complete, “Completed” is displayed.•Select “Cancel” and press ENTER to cancel moving.
NOTEFiles cannot be moved to other media in the following situations.•When the media is write prohibited•When there is not enough free space on the media•When there is same file name / folder name
Copying Files and Folders (05 Copy)Copy the selected file or folder to a different media or folder.
1 Select “05 Copy” in the folder list menu, and press ENTER. A media list for selecting the copy destination is displayed.
2 Rotate the jog dial to select the copy destination media, and press ENTER.The folder list is displayed.
0003 Music_001.wav
<SD1>
0004 Music_002.wav
0002 BGM_002.MP3BGM_001.MP
SD2USBNET(None)
SD1Media List
3 Rotate the jog dial to select “<Copy Here?>” in the copy destination folder level, and press ENTER. The copy process starts.
•During copying, “Executing ... zzz%” (z: progress status) is displayed.
•When the copying is complete, “Completed” is displayed.•Select “Cancel” and press ENTER to cancel copying.
NOTECopying cannot be performed in the following situations. •When the media is write prohibited•When there is not enough free space on the media•When there is same file name / folder name
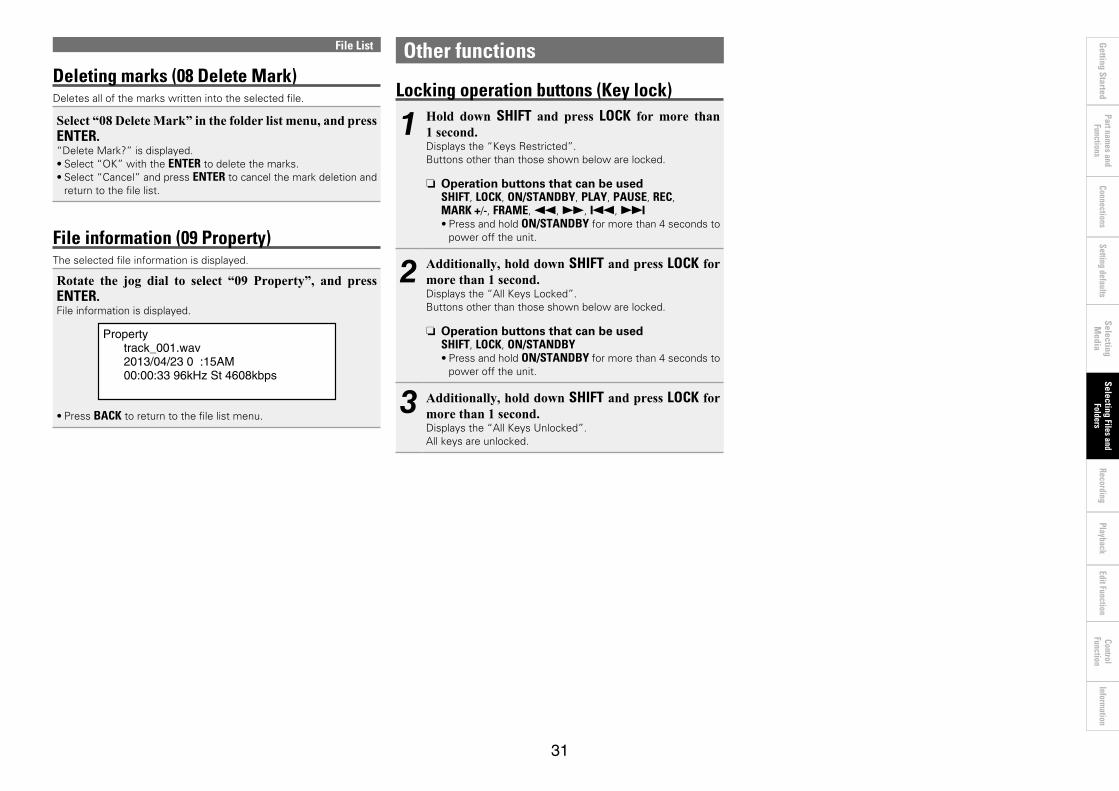
Part names and
FunctionsSetting defaults
ConnectionsPlayback
Getting Started
Control Function
Information
31
Selecting M
ediaRecording
Edit FunctionSelecting Files and
Folders
File List
Deleting marks (08 Delete Mark)Deletes all of the marks written into the selected file.
Select “08 Delete Mark” in the folder list menu, and press ENTER. “Delete Mark?” is displayed. •Select “OK” with the ENTER to delete the marks. •Select “Cancel” and press ENTER to cancel the mark deletion and
return to the file list.
File information (09 Property)The selected file information is displayed.
Rotate the jog dial to select “09 Property”, and press ENTER. File information is displayed.
Propertytrack_001.wav2013/04/23 0 :15AM00:00:33 96kHz St 4608kbps
•Press BACK to return to the file list menu.
Other functions
Locking operation buttons (Key lock)
1 Hold down SHIFT and press LOCK for more than 1 second. Displays the “Keys Restricted”. Buttons other than those shown below are locked.
n Operation buttons that can be usedSHIFT, LOCK, ON/STANDBY, PLAY, PAUSE, REC, MARK +/-, FRAME, 6, 7, 8, 9•Press and hold ON/STANDBY for more than 4 seconds to
power off the unit.
2 Additionally, hold down SHIFT and press LOCK for more than 1 second.Displays the “All Keys Locked”. Buttons other than those shown below are locked.
n Operation buttons that can be usedSHIFT, LOCK, ON/STANDBY•Press and hold ON/STANDBY for more than 4 seconds to
power off the unit.
3 Additionally, hold down SHIFT and press LOCK for more than 1 second.Displays the “All Keys Unlocked”. All keys are unlocked.

Part names and
FunctionsSetting defaults
ConnectionsPlayback
Selecting Files and Folders
Getting Started
Control Function
Information
32
Selecting M
ediaEdit Function
Recording
RecordingThis section explains how to specify a recording media folder for a recording file and to record into that folder. The procedure for recording to an SD card and a USB drive is the same. Before using an SD card or USB device, use “Speed Check” (vpage 26) in the utilities to check that the SD card or USB device is suitable to use with this unit.
Selecting the recording media or folder for storing the recorded files
1 Press ON/STANDBY.The power of DN-700R is switched ON, and the display screen lights.
2 When in the stopped state, hold down SHIFT and press MEDIA.The media list is displayed.
3 Select media.
•For details on selecting the media list, see “Displaying the media list and selecting media” (vpage 27).
4 While DN-700R is stopped, press LIST.The “File List” is displayed.
5 Select the folder.
•For details on selecting a folder, see “Selecting folders and files and displaying the file list menu” (vpage 28).
•When “Current” is selected in “02 Rec Folder” (vpage 21) in “System Setting”, the recorded file is stored in the selected folder. To store in a different folder, select a different folder. However, when “All” is selected in “19 Play Range” (vpage 19) in “Preset Setting”, files are stored in the root folder.
•When “Fix” is selected in “02 Rec Folder” in “System Setting” a fixed folder is automatically created directlybelowtherootfolder.Thedefaultfoldernameis“DMH_REC”.
NOTETo record on an SD card, be sure to format it on DN-700R before recording. If the SD card is formatted on a computer or is used for recording without formatting it, this could result in sound cutoffs during recording. For details on the formatting procedure, see “Format Media” (vpage 26).
Recording
1 Press REC.The unit switches to the recording paused state, and the REC buttons flashes and PAUSE buttons light. The display switches to the recording display.
•When “On” is selected in “08 One Touch Rec” (vpage 18) in “Preset Setting”, recording starts immediately when REC is pressed.
•The following results are displayed for media that cannot be recorded. •“No Format” for unformatted media or media with unsupported formatting•“Write Inhibited” for write protected media•“Media Full” if the recordable free space is less than 2MB•“Track Full” if the number of files exceeds 2000
2 Adjust the recording level and recording balance.
•To adjust the recording level and balance, select “Variable” in “14 Volume Input” (vpage 22) in “System Setting” in advance. Also, the input level can only be adjusted when “07 ALC” (vpage 18) is set to “OFF” and “09 Audio Input” (vpage 18) is set to “Bal” or “UnBal” in “Preset Setting”.
•There are two methods for level and balance adjustment. Select “06 Rec Level Type” (vpage 18) in “Preset Setting”. •Master/Bal
The input level can be adjusted using the jog dial. Also, hold down SHIFT to adjust the input level balance for the left and right channels using the jog dial.
•Separate L/RThe input level of the left channel can be adjusted using the jog dial. Also, hold down SHIFT to adjust the input level balance for the right channel using the jog dial.
MOVE
DIMMER TEXT
DISPLAY
LIST
MEDIA
SHIFT
REC PAUSE PLAY
-LOCK
MENU
COMBINE DIVIDE UNDO
MARK
PITCH
FRAME
STOPCOPY
REC MON.
PAUSE PLAYSTOPREC
LIST/MEDIASHIFTON/STANDBY REC MON. Jog Dial

Part names and
FunctionsSetting defaults
ConnectionsPlayback
Selecting Files and Folders
Getting Started
Control Function
Information
33
Selecting M
ediaEdit Function
Recording
To pause recordingPress PAUSE during recording. •Recording is paused, REC buttons flashes PAUSE lights. •Press REC again to resume recording on the same file. •When “15 Auto Mark” (vpage 19) in the preset menu is set to “On”, a mark is added at the point
where the recording is resumed from the paused status.
Cautions on recording capacityThe amount of recording capacity required differs depending on the set recording format, number of recording channels, and sampling frequency. To ensure that you do not run out of recording capacity during recording, check the recordable time in the “Recording time chart” (vpage 39) before starting recording.
Recording
3 Press REC.Recording starts.
0001/0001
R:\05132013134019_DN-700R.wav
0.0%0036P USB TR
10:26:61REM 05/13/2013 11:44PMDATE
-61
-61dB
PITCHOFF M
BAL
A:
WAV24BST 96K
20 12 6 0-60 4000:00:00 L
R
n Pre-recordingWhen the pre-recording time is set in “13 Pre Record” (vpage 18) in “Preset Setting”, when recording is started, the recording starts retroactively for the set amount of time. If there is not more recording paused time that the pre-record set time, pre-recording cannot be done for the set amount of time.
n File nameThe file name of the file in which recording is started is composed of the machine name, recording start time and user area data. The file creation formats can be selected in “05 File Name Form” (vpage 21) in “System Setting”. The file name can be inputted when “04 User Area” (vpage 21) in “System Setting” is “On”. (After recording has started, the recording start time in the file name continues to proceed until the recording start time is confirmed.)
•You can adjust the recording level and balance even during recording.•If the recordable space on the media falls below 2MB, recording stops.
4 Press STOP.Recording stops, and REC turn off.Recorded file information is displayed, and the display switches to the stop display. At this time, you can playback the recorded file by pressing PLAY.
If the directory in which the recording is saved is the root directly, the total number of folders and files is limited to 512 by FAT16 (8.3 file name) conditions.

Part names and
FunctionsSetting defaults
ConnectionsPlayback
Selecting Files and Folders
Getting Started
Control Function
Information
34
Selecting M
ediaEdit Function
Recording
Relay recordingData is recorded to the first selected media, and when the remaining space on that media falls below 2MB, recording stops on that media and starts on the secondary media (media for continual recording).
1 Select the media for current recording.
•For details on selecting the media list, see “Displaying the media list and selecting media” (vpage 27).
2 Select the secondary media.
•For details on selecting secondary media, see “05 Relay Rec” (vpage 18) in “Preset Setting”.
•Dual recording is given priority when both “04 Dual Rec” and “05 Relay Rec” are selected in “Preset Setting”.
3 Start recording using the same operation as normal recording.Recording starts first on the selected media. When recording is complete on the selected media, recording starts on the secondary media.
•When recording is complete on the secondary media, recording stops and relay recording is complete.
•When the selected media and backup media are the same media, relay recording is canceled and normal recording starts.
•The file of Relay Media is stored in the folder made with “21 Date Form” (vpage 22) in System Setting.
Recording MonitorThe Record Monitor feature allows you to monitor the audio that has been recorded to the media.
n Recording Monitor•Press REC MON. in shift mode to switch the Recording Monitor
on/off. •When the Recording Monitor is on, the Recording monitor
display (R.MON) lights. Data stored on the media is read from the media and monitored. You can preview the data to confirm it has recorded correctly onto the media.
n Signal path through monitor•This can monitor during recording pause and recording. •When “03 Signal Pass Thru” (vpage 21) is set to “On” in
“System Setting”, the input signal selected in “09 Audio Input” (vpage 18) in “Preset Setting” is output. Monitoring is performed irrespective of whether the headphones setting is “on” or “off”.
NOTE•A delay occurs in the monitor against the input signal because
recorded data is then read. •The monitor may stop due to the type or condition of the used media
because recording and playback are performed simultaneously. •The recording monitor cannot be used during dual recording.
Dual recordingThe selected media and backup media can be recorded simultaneously.
1 Select the media to record.
•For details on selecting the media, see “Displaying the media list and selecting media” (vpage 27).
2 Select the backup media.
•For details on selecting backup media, see “04 Dual Rec” (vpage 18) in “Preset Setting”.
•Dual recording is given priority when both “04 Dual Rec” and “05 Relay Rec” are selected in “Preset Setting”.
3 Start recording using the same operation as normal recording. Recording starts simultaneously for the selected media and backup media.
•The file of BackUp Media is stored in the folder made with “21 Date Form” (vpage 22) in System Setting.
•During recording, if the free space is fully used in the selected media first, recording to both the selected media and backup media stops.
•During recording, if the free space is fully used in the backup media first, recording to the backup media stops but continues to the selected media.
•When the selected media and backup media are the same media, dual recording is canceled and normal recording starts.
•When the recording monitor is on, normal recording starts only for the selected media.
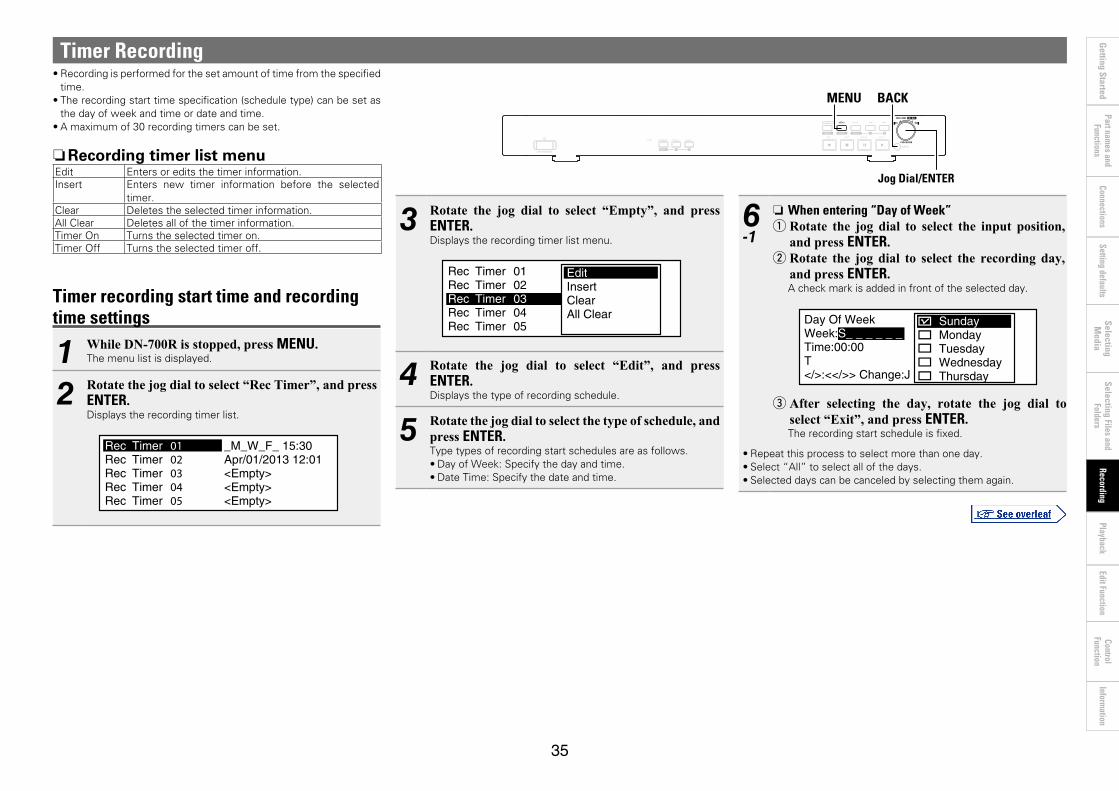
Part names and
FunctionsSetting defaults
ConnectionsPlayback
Selecting Files and Folders
Getting Started
Control Function
Information
35
Selecting M
ediaEdit Function
Recording
Timer Recording•Recording is performed for the set amount of time from the specified
time. •The recording start time specification (schedule type) can be set as
the day of week and time or date and time.•A maximum of 30 recording timers can be set.
nRecording timer list menuEdit Enters or edits the timer information. Insert Enters new timer information before the selected
timer. Clear Deletes the selected timer information. All Clear Deletes all of the timer information.Timer On Turns the selected timer on. Timer Off Turns the selected timer off.
Timer recording start time and recording time settings
1 While DN-700R is stopped, press MENU.The menu list is displayed.
2 Rotate the jog dial to select “Rec Timer”, and press ENTER.Displays the recording timer list.
RecRecRecRecRec
TimerTimerTimerTimerTimer
0102030405
_M_W_F_ 15:30Apr/01/2013 12:01<Empty><Empty><Empty>
3 Rotate the jog dial to select “Empty”, and press ENTER.Displays the recording timer list menu.
RecRecRecRecRec
TimerTimerTimerTimerTimer
0102030405
ClearAll Clear
InsertEdit
4 Rotate the jog dial to select “Edit”, and press ENTER.Displays the type of recording schedule.
5 Rotate the jog dial to select the type of schedule, and press ENTER.Type types of recording start schedules are as follows. •Day of Week: Specify the day and time. •Date Time: Specify the date and time.
6-1
n When entering “Day of Week”q Rotate the jog dial to select the input position,
and press ENTER.w Rotate the jog dial to select the recording day,
and press ENTER.A check mark is added in front of the selected day.
Day Of WeekWeek:S_ _ _ _ _ _Time:00:00T</>:<</>> Change:J
TuesdayWednesday
MondaySunday
Thursday
e After selecting the day, rotate the jog dial to select “Exit”, and press ENTER. The recording start schedule is fixed.
•Repeat this process to select more than one day. •Select “All” to select all of the days. •Selected days can be canceled by selecting them again.
SHIFT REC MON.
MOVE
DIMMER TEXT
DISPLAY
LIST
MEDIA
REC PAUSE PLAY
-LOCK
MENU
COMBINE DIVIDE UNDO
MARK
PITCH
FRAME
STOPCOPY
MENU BACK
Jog Dial/ENTER

Part names and
FunctionsSetting defaults
ConnectionsPlayback
Selecting Files and Folders
Getting Started
Control Function
Information
36
Selecting M
ediaEdit Function
Recording
6-2
n When entering “Date Time”
Date TimeDate:Jan/00/0000Time:00:00
</>:<</>> Change:JOG Push
q Rotate the jog dial to select the input position, and press ENTER.
w Rotate the jog dial to select the “year”, and press ENTER.
e Rotate the jog dial to select the “month”, and press ENTER.
r Rotate the jog dial to select the “date”, and press ENTER.The recording start schedule is fixed.
•The display order of the date (year/month/date) can be selected in “21 Date Form” (vpage 22) in “System Setting”.
7 Rotate the jog dial to select the recording start time (hour/minute), and press ENTER.The recording start time is fixed.
•The current time display type (12-hour display/24-hour display) setting can be selected in “20 Time Form” (vpage 22) in “System Setting”.
•When “EveryHour” is selected, recording is performed every hour.
8 Rotate the jog dial to select the recording time (hours/minutes) and press ENTER.The recording timer is displayed in the recording timer list when the recording timer input is completed.
•The recording timer can be set up to 99 hours 59 minutes. •The timer switches on when the timer settings are complete.
9 Enter information to be stored in the user area.
•For character input, see “Renaming presets” (vpage 21).
10 When all settings are entered they will be automatically saved and the utility menu will be displayed. If only some of the settings are changed, but not all, press BACK twice."Fix" and "Discard" are displayed.
11 Rotate the jog dial to select “Fix”, and press ENTER.Confirm the settings.
•Select “Discard” to discard the changes.
Turning timer recording on/off
1 In the recording timer list, rotate the jog dial to select the recording timer that you want to turn on or off, and press ENTER.Displays the recording timer list menu.
2 Rotate the jog dial to select “Timer On” or “Timer Off”, and press ENTER.Displays the recording timer list.
Timer Recording

Part names and
FunctionsSetting defaults
ConnectionsPlayback
Selecting Files and Folders
Getting Started
Control Function
Information
37
Selecting M
ediaEdit Function
Recording
Editing timer recording information
1 In the recording timer list, rotate the jog dial to select the recording timer that you want to edit, and press ENTER.Displays the recording timer list menu.
2 n Changing the start time or end time of a selected recording timer
Rotate the jog dial to select “Edit”, and press ENTER.•For details on how to configure, see “Timer recording start time
and recording time settings” (vpage 35).
3 n Inserting a new recording timer in front of the selected recording timer
Rotate the jog dial to select “Insert”, and press ENTER.
•For details on how to configure, see “Timer recording start time and recording time settings” (vpage 35).
•If the number of recording timers exceeds 30, the last timer data is deleted.
4 n Deleting the selected recording timerq Rotate the jog dial to select “Clear”, and press
ENTER.Displays the “Clear?”.
w Rotate the jog dial to select “OK”, and press ENTER.The selected recording timer is deleted and the recording timer list is displayed.
5 n Deleting all recording timersq Rotate the jog dial to select “All Clear”, and press
ENTER.Displays the “All Clear?”.
w Rotate the jog dial to select “OK”, and press ENTER.All recording timers are deleted and the recording timer list is displayed.
•Press BACK to cancel editing.
Using timer recording•Set the timer recording information and turn the timer on. •Load a recording media to the current recording media. •When the timer recording time is reached, recording starts with
highest priority irrespective of the condition of the devices. However, the timer does not operate when the menu or file list, etc., is displayed.
•If the timer recording time is reached during recording, the recording file up to that point is created and a new timer recording is started.
•When the unit is in standby, the power turns on and recording starts.
Timer Recording

Part names and
FunctionsSetting defaults
ConnectionsPlayback
Selecting Files and Folders
Getting Started
Control Function
Information
38
Selecting M
ediaEdit Function
Recording
Operations during recording
Add a file during recording (Manual track)The manual track function divides tracks at the desired place during recording. Recording continues as a new file.
Press DIVIDE or REC during recording.The file is cut at the point where the button is pressed, and recording continues in a new file.
Files can also be divided at a specified amount of time. For details, see “14 Auto Track” (vpage 18) in “Preset Setting”.
NOTE•There could be sound cutoffs for a short period of time between files
depending on the capacity of a recorded file.•If the size of a file being recorded reaches 2GB, recording is
continued by automatically switching to a new file.•The manual track function is not available for two seconds after
starting recording.
Adding marks (Marking)By writing marking information to files, during playback you can search for marks and start playback from specific locations. By using this method, you can create specific search points within files without splitting files. For details on how to search and playback from marks, see “Searching for Marks” (vpage 42).
Press MARK, in shift mode during recording. A mark is added at the point where the button was pressed.
•A maximum of 30 marks can be written to one file. •Marks can also be added automatically. For details on the settings,
see “15 Auto Mark” (vpage 19) in “Preset Setting”.•Marks can be edited using the “DMP Mark Editor” software included.
For details, see the instruction manual on the included CD-ROM.
Silent skip recordingWhen recording starts, silent sections during the recording can be detected and the recording paused during the silent sections.
1 Set “16 Silent Skip” (vpage 19) in “Preset Setting” to “On”. The S.S indicator lights.
2 Set the silence judgment level in “17 Silent Level” (vpage 19) in “Preset Setting”.
3 Set the silence judgment time in “18 Silent Time” (vpage 19) in “Preset Setting”.
•If the recording input level is at a level lower than that selected in “Silent Level” and continues for a length of time that exceeds the time selected in “Silent Time”, recording to the media is paused and the S.S indicator flashes. Subsequently, when a recording input level that exceeds the level selected in “Silent Level” is detected, recording starts again. If “13 Pre Record” in “Preset Setting” is set at this time, the pre-recording function operates.
•If “15 Auto Mark” in “Preset Setting” is “On”, a mark is recorded when the recording starts.
MOVE
DIMMER TEXT
DISPLAY
LIST
MEDIA
SHIFT
REC PAUSE PLAY
-LOCK
MENU
COMBINE DIVIDE UNDO
MARK
PITCH
FRAME
STOPCOPY
REC MON.
MARK DIVIDE

Part names and
FunctionsSetting defaults
ConnectionsPlayback
Selecting Files and Folders
Getting Started
Control Function
Information
39
Selecting M
ediaEdit Function
Recording
Operations during recording
Recording time chartAll of the recording times are approximate times. Differences occur between recording media made by different manufacturers.
nRecording time
Stereo file
Setting BitrateRecordable time (Hours: Minutes)
1GB 2GB 4GB 8GB 16GB 32GB
PCM-24(96kHz) 4608 kbps 0:30 0:59 1:59 3:57 7:54 15:48
PCM-24(48kHz) 2304 kbps 0:59 1:59 3:57 7:54 15:48 31:36
PCM-24(44.1kHz) 2117 kbps 1:04 2:09 4:18 8:36 17:12 34:24
PCM-16(96kHz) 3072 kbps 0:44 1:29 2:58 5:56 11:51 23:42
PCM-16(48kHz) 1536 kbps 1:29 2:58 5:56 11:51 23:42 47:24
PCM-16(44.1kHz) 1411 kbps 1:37 3:13 6:27 12:54 25:48 51:36
MP3-320 320 kbps 7:07 14:13 28:27 56:56 113:47 227:33
MP3-256 256 kbps 8:53 17:47 35:33 71:07 142:13 284:27
MP3-192 192 kbps 11:51 23:42 47:24 94:49 189:38 379:16
MP3-128 128 kbps 17:47 35:33 71:07 142:13 284:27 568:53
MP3-64 64 kbps 35:33 71:07 142:13 284:27 568:53 1136:07
Monaural file
Setting BitrateRecordable time (Hours: Minutes)
1GB 2GB 4GB 8GB 16GB 32GB
PCM-24(96kHz) 2304 kbps 0:59 1:59 3:57 7:54 15:48 31:36
PCM-24(48kHz) 1152 kbps 1:59 3:57 7:54 15:48 31:36 63:13
PCM-24(44.1kHz) 1058 kbps 2:09 4:18 8:36 17:12 34:24 68:48
PCM-16(96kHz) 1536 kbps 1:29 2:58 5:56 11:51 23:42 47:24
PCM-16(48kHz) 768 kbps 2:58 5:56 11:51 23:42 47:24 94:49
PCM-16(44.1kHz) 705 kbps 3:13 6:27 12:54 25:48 51:36 103:12
MP3-320 160 kbps 14:13 28:27 56:53 113:47 227:33 455:07
MP3-256 128 kbps 17:47 35:33 71:07 142:13 284:27 568:53
MP3-192 96 kbps 23:42 47:24 94:49 189:38 379:16 758:31
MP3-128 64 kbps 35:33 71:07 142:13 284:27 568:53 1137:47
MP3-64 32 kbps 71:07 142:13 284:27 568:53 1137:47 2275:33
If the recording conditions are the same, the recording time of a monaural file will be twice longer than the recording time of a stereo file.

Part names and
FunctionsSetting defaults
ConnectionsSelecting Files and
FoldersG
etting StartedControl
FunctionInform
ation
40
Selecting M
ediaRecording
Edit FunctionPlayback
Playback
MOVE
DIMMER TEXT
DISPLAY
LIST
MEDIA
SHIFT
REC PAUSE PLAY
-LOCK
MENU
COMBINE DIVIDE UNDO
MARK
PITCH
FRAME
STOPCOPY
REC MON.
PAUSE PLAYSTOP
LIST/MEDIASHIFTON/STANDBY
Selecting files to playback
1 Press ON/STANDBY.The power of DN-700R is switched ON, and the display screen lights.
2 When in the stopped state, hold down SHIFT and press MEDIA.The media list is displayed.
3 Select media.
•For details on selecting the media list, see “Displaying the media list and selecting media” (vpage 27).
4 While DN-700R is stopped, press LIST.The “File List” is displayed.
5 Select a file. The start of the selected track is cued.
•For details on selecting files, see “Selecting folders and files and displaying the file list menu” (vpage 28).
Playback
1 Press PLAY.PLAY lights and playback starts.
0000/0000
track_001.wav
0.0%0036P USB TR
00:26:28REM 05/13/2013 11:44PMDATE
-61
-61dB
PITCHOFF M
ALL
A:
CNT
96K
00:07:44 20 12 6 0-60 40L
R
•Playback is performed according to the “19 Play Range” and “20 Play Mode” (vpage 19) settings in “Preset Setting”.
•When playback is complete, the setting of “23 Finish Mode” (vpage 19) in “Preset Setting” is applied.
2 n To pause playbackPress PAUSE during playback. Playback is paused and PAUSE lights.
•When PLAY is pressed again, playback is restarted.
3 n To stop playbackPress STOP. Playback stops, and PLAY goes out.
•The playback position is moved to the playback start position set for “23 Finish Mode” (vpage 19) in the preset menu and stops playback.
•Press STOP again to switch to the stopped state. •The playback stop position varies as follows depending on the
setting for “23 Finish Mode” in the preset menu.When Next is set : When STOP is pressed during file playback,
playback is stopped at the head (point B) of the next file.
When Recue is set : When STOP is pressed during file playback, playback is stopped at point where playback was previously started (point A).
A B再生位置再生中
Recue設定時
PLAYを押す STOPを押す 次のファイルの先頭
Next設定時
Press PLAY Press STOP Head of the next file
Playback positionDuring
playback
When Recue is set When Next is set
•This unit can play back VBR (Variable Bit Rate) format files. •The remaining time display when VBR (Variable Bit Rate) format files
are played back is an estimate.
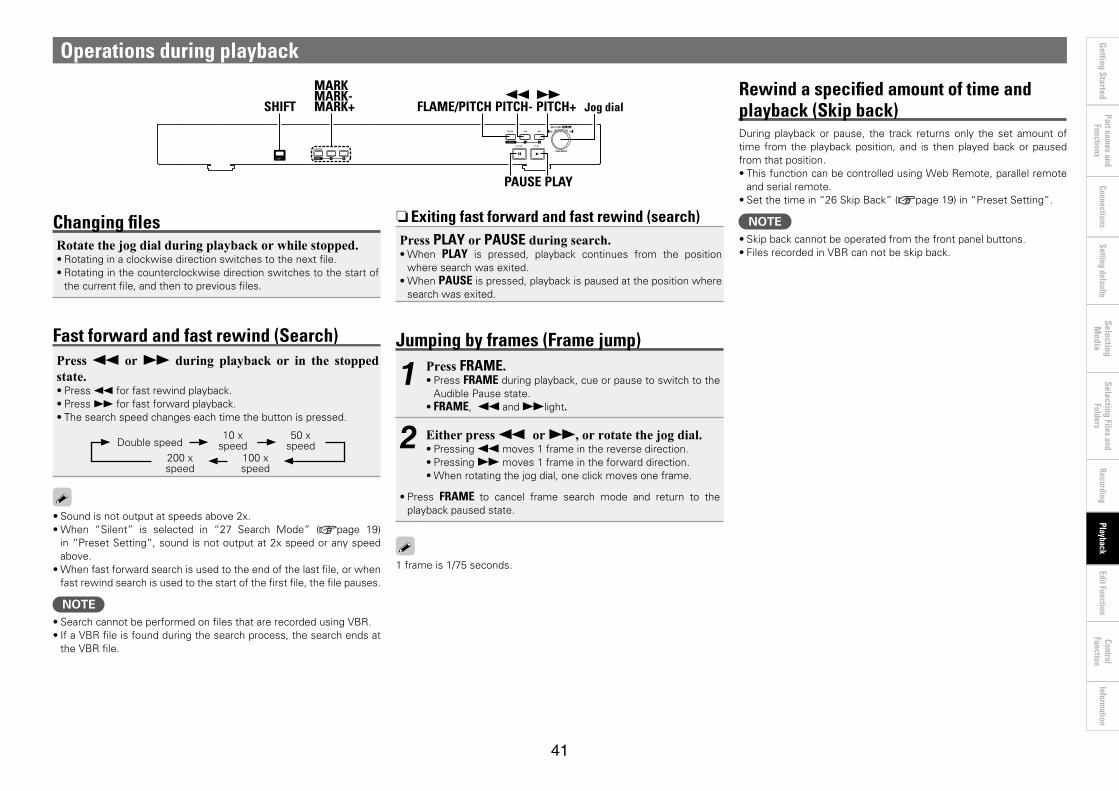
Part names and
FunctionsSetting defaults
ConnectionsSelecting Files and
FoldersG
etting StartedControl
FunctionInform
ation
41
Selecting M
ediaRecording
Edit FunctionPlayback
Rewind a specified amount of time and playback (Skip back)During playback or pause, the track returns only the set amount of time from the playback position, and is then played back or paused from that position. •This function can be controlled using Web Remote, parallel remote
and serial remote. •Set the time in “26 Skip Back” (vpage 19) in “Preset Setting”.
NOTE•Skip back cannot be operated from the front panel buttons.•Files recorded in VBR can not be skip back.
Operations during playback
Changing filesRotate the jog dial during playback or while stopped. •Rotating in a clockwise direction switches to the next file. •Rotating in the counterclockwise direction switches to the start of
the current file, and then to previous files.
Fast forward and fast rewind (Search)Press 6 or 7 during playback or in the stopped state. •Press 6 for fast rewind playback. •Press 7 for fast forward playback. •The search speed changes each time the button is pressed.
Double speed10 x
speed50 x
speed200 x speed
100 x speed
•Sound is not output at speeds above 2x. •When “Silent” is selected in “27 Search Mode” (vpage 19)
in “Preset Setting”, sound is not output at 2x speed or any speed above.
•When fast forward search is used to the end of the last file, or when fast rewind search is used to the start of the first file, the file pauses.
NOTE•Search cannot be performed on files that are recorded using VBR. •If a VBR file is found during the search process, the search ends at
the VBR file.
RECMOVE COPY DIVIDE UNDO
DIMMER REC MON. TEXT
DISPLAY
-LOCK
MENULIST
MEDIA
STOP PAUSE PLAY
PITCH
FRAME
COMBINE
MARKSHIFT
SHIFT MARK+ FLAME/PITCH PITCH- PITCH+6 7MARK-
PAUSE PLAY
MARK
Jog dial
nExiting fast forward and fast rewind (search)Press PLAY or PAUSE during search. •When PLAY is pressed, playback continues from the position
where search was exited. •When PAUSE is pressed, playback is paused at the position where
search was exited.
Jumping by frames (Frame jump)
1 Press FRAME.•Press FRAME during playback, cue or pause to switch to the
Audible Pause state.•FRAME, 6 and 7light.
2 Either press 6 or 7, or rotate the jog dial. •Pressing 6 moves 1 frame in the reverse direction.•Pressing 7 moves 1 frame in the forward direction.•When rotating the jog dial, one click moves one frame.
•Press FRAME to cancel frame search mode and return to the playback paused state.
1 frame is 1/75 seconds.

Part names and
FunctionsSetting defaults
ConnectionsSelecting Files and
FoldersG
etting StartedControl
FunctionInform
ation
42
Selecting M
ediaRecording
Edit FunctionPlayback
Playback pitch adjustment (Pitch control)The playback speed can be adjusted within a range of –16 % to +16 %. By adjusting the pitch, you can listen to recordings over a shorter time span, or listen more slowly to difficult to hear sections.
1 Press PITCH while holding down SHIFT during playback, cue or when stopped.The pitch LED lights and pitch adjustment is enabled.
2 Press PITCH + or PITCH – while holding down SHIFT.
•The pitch changes by 0.1% each time the button is pressed. •Press and hold the button to change the pitch continuously. •To cancel the pitch control, press PITCH again while holding down
the SHIFT button.
nTo change the pitch without altering the musical interval, use (master key).When the playback speed is adjusted using the pitch control, the musical interval changes according to the playback speed. When the master key function is on, the playback sound is played back without changing the musical interval even if the pitch is adjusted. •For details on the key control settings, see “32 Master Key”
(vpage 20) in “Preset Setting”. When “32 Master Key” is set to “On”, “J” appears in the display.
Operations during playback
Add marks (marking)By writing marking information in files, you can search for marks and play back from a certain point.
During playback or in the stopped state, hold down SHIFT and press MARK.A mark is added at the point when you press it.When a mark is added, “Mark z” (z: number of marks) is displayed.
•You can write up to 30 marks in a file.•You can edit marks with the supplied software “DMP Mark Editor”.
For more information, see the instruction manual for “DMP Mark Editor” on the supplied CD-ROM.
NOTE•You cannot add marks to MP3 files that are not recorded by DN-700R.•You cannot add marks when files are recorded in VBR.
Searching for MarksDuring playback, cue or in the stopped state, hold down SHIFT and press MARK + or MARK –. •When MARK + is pressed, the track is forwarded to the next
marked point and paused.•When MARK – is pressed, the system returns to the previous
marked point and is paused.
Marks can only be searched within the current file.
Random playback
1 Set “21 Random” (vpage 19) in “Preset Setting” to “On”.
2 Press PLAY.Tracks are selected at random and playback starts.

Part names and
FunctionsSetting defaults
ConnectionsSelecting Files and
FoldersG
etting StartedControl
FunctionInform
ation
43
Selecting M
ediaRecording
Edit FunctionPlayback
Program playback•A maximum of 99 tracks can be registered to a program. •The program can be saved to the media and can be read later.
nProgram list menuPreview Previews the selected file.Insert Enters a program. Or enters a new program in front of
the selected program. Remove Deletes the selected program. Remove All Deletes all programs.Load Reads the programs on the selected media.Save Saves the programs on the selected media.
Create program
1 While DN-700R is stopped or in cue, press MENU.The menu list is displayed.
2 Rotate the jog dial to select “Program List”, and press ENTER.“Program List” is displayed.
010203
Program ListBGM_002.MP3Music_001.wav<Empty>
3 Rotate the jog dial to select “<Empty>”, and press ENTER.The “Program List Menu” is displayed.
4 Rotate the jog dial to select “Insert”, and press ENTER.The “File List” is displayed.
0102
Program ListBGM_002.MP3Music_001.wav
03 <Empty> 0003 Music_001.wav0004 Music_002.wav
0002 BGM_002.MP30001 BGM_001.MP3
<SD1>
5 Rotate the jog dial to select the file you want to program, and press ENTER.•Displays the “Execute”.
•For details on selecting files, see “Selecting folders and files and displaying the file list menu” (vpage 28).
6 Rotate the jog dial to select “Execute”, and press ENTER.The program is entered.“Program List” is displayed.
n Previewing a file to be programmed Rotate the jog dial to select “Preview”, and press ENTER.•Preview playback of the selected file starts. •Press STOP to exit playback and return to step 6.
•Repeat steps 3 to 6 to create a program list.
nPreviewing programmed files
1 Place the cursor on the programmed file in the program list menu, and press ENTER. The “Program List Menu” is displayed.
2 Rotate the jog dial to select “Preview”, and press ENTER.Preview playback of the selected file starts.
•Press STOP to end playback and return to the program list menu.
SHIFT REC MON.
PAUSEREC
LIST
MEDIA
MOVE
DIMMER TEXT
DISPLAY PLAY
-LOCK
COMBINE DIVIDE UNDO
MARK
PITCH
FRAME
STOPCOPY
MENU
PLAYSTOP
MENU BACK Jog Dial/ENTER

Part names and
FunctionsSetting defaults
ConnectionsSelecting Files and
FoldersG
etting StartedControl
FunctionInform
ation
44
Selecting M
ediaRecording
Edit FunctionPlayback
Program playback
1 Set “22 Program” (vpage 19) in “Preset Setting” to “On”.
2 Press PLAY.Tracks are played back in the created program order.
•If there are no program settings, tracks are played in normal playback.
nRelationship between program, play range and random settings (vpage 44)
22 Program
21 Random
19 Play Range
Playback content
On Off –Program playback in the set track order.
On On –Random playback within the program.
Off Off All
Plays back all tracks in all sub folders from the root folder in the order set in “34 File Sort” (vpage 20) of “Preset Setting”.
Off On All Random playback within all files.
Off Off FolderPlays back all tracks in the selected folder.
Off On FolderPlays back all tracks in the selected folder in random order.
nRepeat playbackWhen “24 Repeat” (vpage 19) is set to “On” in “Preset Setting”, repeat playback is performed in accordance with the relationship of the “19 Play Range”, “20 Play Mode”, “21 Random” and “22 Program” settings in “Preset Setting”.
Editing the program
1 n Inserting a new program in front of the selected program
q Rotate the jog dial in the program list and place the cursor on the program immediately after where you want to insert the program, and press ENTER. The “Program List Menu” is displayed.
w Rotate the jog dial to select “Insert”, and press ENTER.The “File List” is displayed.
•When the number of programs exceeds 99, the last program is deleted.
2 n Deleting the selected program fileq Rotate the jog dial in the program list and place
the cursor on the program that you want to delete, and press ENTER.The “Program List Menu” is displayed.
w Rotate the jog dial to select “Remove”, and press ENTER.Displays the “Remove?”.
e Rotate the jog dial to select “OK”, and press ENTER.The selected program file is deleted, and the “Program List” is displayed.
3 n Deleting all program filesq Press ENTER on the program list.
The “Program List Menu” is displayed.w Rotate the jog dial to select “Remove All”, and
press ENTER.Displays the “Remove All?”.
e Rotate the jog dial to select “OK”, and press ENTER.All program files are deleted, and the program list is displayed.
•Press BACK to cancel editing.
Program playback
Saving/reading program data
1 n Saving the program to the selected media100 program lists can be saved. q Press ENTER on the program list.
The “Program List Menu” is displayed.w Rotate the jog dial to select “Save”, and press
ENTER.e Rotate the jog dial to select <Save Here?> on
the folder in which you want to save the file, and press ENTER. Displays the “Save?”.
r Rotate the jog dial to select “OK”, and press ENTER.Displays the text editor.
t Enter the file name of the program to be saved, and press ENTER. The program is saved in the specified folder, and the “Program List” is displayed. •The saved file uses UTF8.
•For details on how to input, see “Renaming presets” (vpage 21).
2 n Reading the program from the selected mediaq Press ENTER on the program list.
The “Program List Menu” is displayed.w Rotate the jog dial to select “Load”, and press
ENTER.Displays the “Misc List”.
e Rotate the jog dial to select the file to read, and press ENTER.Displays the “Load?”.
r Rotate the jog dial to select “OK”, and press ENTER.The read program is displayed in the program list.
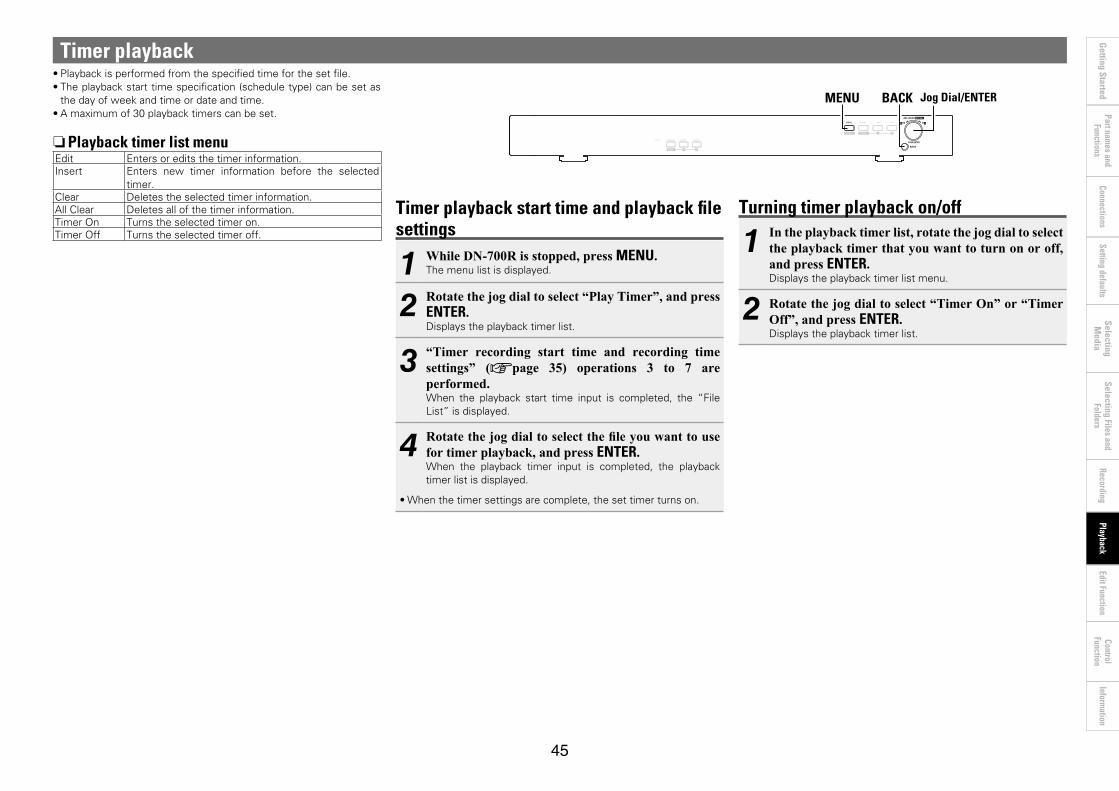
Part names and
FunctionsSetting defaults
ConnectionsSelecting Files and
FoldersG
etting StartedControl
FunctionInform
ation
45
Selecting M
ediaRecording
Edit FunctionPlayback
Timer playback start time and playback file settings
1 While DN-700R is stopped, press MENU.The menu list is displayed.
2 Rotate the jog dial to select “Play Timer”, and press ENTER.Displays the playback timer list.
3 “Timer recording start time and recording time settings” (vpage 35) operations 3 to 7 are performed. When the playback start time input is completed, the “File List” is displayed.
4 Rotate the jog dial to select the file you want to use for timer playback, and press ENTER.When the playback timer input is completed, the playback timer list is displayed.
•When the timer settings are complete, the set timer turns on.
Turning timer playback on/off
1 In the playback timer list, rotate the jog dial to select the playback timer that you want to turn on or off, and press ENTER.Displays the playback timer list menu.
2 Rotate the jog dial to select “Timer On” or “Timer Off”, and press ENTER.Displays the playback timer list.
Timer playback•Playback is performed from the specified time for the set file.•The playback start time specification (schedule type) can be set as
the day of week and time or date and time.•A maximum of 30 playback timers can be set.
nPlayback timer list menuEdit Enters or edits the timer information.Insert Enters new timer information before the selected
timer.Clear Deletes the selected timer information.All Clear Deletes all of the timer information.Timer On Turns the selected timer on.Timer Off Turns the selected timer off.
PLAYSTOP
SHIFT REC MON.
PAUSEREC
LIST
MEDIA
MOVE
DIMMER TEXT
DISPLAY
-LOCK
COMBINE DIVIDE UNDO
MARK
PITCH
FRAME
COPY
MENU
MENU BACK Jog Dial/ENTER

Part names and
FunctionsSetting defaults
ConnectionsSelecting Files and
FoldersG
etting StartedControl
FunctionInform
ation
46
Selecting M
ediaRecording
Edit FunctionPlayback
Editing timer playback information
1 In the playback timer list, rotate the jog dial to select the playback timer that you want to edit, and press ENTER.Displays the playback timer list menu.
2 n Changing the start time or end time of a selected playback timer
Rotate the jog dial to select “Edit”, and press ENTER.•For details on how to configure, see “Timer recording start time
and recording time settings” (vpage 35).
3 n Inserting a new playback timer in front of the selected playback timer
Rotate the jog dial to select “Insert”, and press ENTER.
•For details on how to configure, see “Timer recording start time and recording time settings” (vpage 35).
•The last timer data is deleted.
4 n Deleting the selected playback timerq Rotate the jog dial to select “Clear”, and press
ENTER.Displays the “Clear?”.
w Rotate the jog dial to select “OK”, and press ENTER.The selected playback timer is deleted and the playback timer list is displayed.
5 n Deleting all playback timersq Rotate the jog dial to select “All Clear”, and press
ENTER.Displays the “All Clear?”.
w Rotate the jog dial to select “OK”, and press ENTER.All playback timers are deleted and the playback timer list is displayed.
•Press BACK to cancel editing.
Using timer playback•Set the timer playback information and turn the timer on.•Load a timer playback media to the current playback media.•The timer playback priority for when the playback start time is
reached can be set in “01 Timer Priority” (vpage 21)in “System Setting”. However, the timer does not operate when the menu or file list, etc., is displayed or during recording.
•When the unit is in standby, the power turns on and playback starts.•If other operations are performed during timer playback, timer
playback is cancelled.
Timer playback

Part names and
FunctionsSetting defaults
ConnectionsSelecting Files and
FoldersG
etting StartedControl
FunctionInform
ation
47
Selecting M
ediaRecording
Edit FunctionPlayback
Hot Start•The unit can be controlled from other devices using Web Remote,
RC-F400S, parallel input and serial commands. •When a button is pressed, this function instantly starts playback of
a pre-selected file. •Hot start can be set for 20 tracks.
nHot list menuPreview Previews the selected file.Auto Mapping 20 tracks are automatically set to the hot list. Set Sets the hot list. Or re-sets the selected hot list.Remove Deletes the selected hot list.Remove All Deletes all hot lists.Load Reads the hot lists on the selected media.Save Saves the hot lists on the selected media.
Registering tracks to a hot list
1 While DN-700R is stopped or in cue, press MENU.The menu list is displayed.
2 Rotate the jog dial to select “Hot List”, and press ENTER.“Hot List” is displayed.
010203
Hot ListBGM_002.MP3Music_002.wav<Empty>
04 <Empty>
3 Rotate the jog dial to select “<Empty>”, and press ENTER.The “Hot List Menu” is displayed.
4 Rotate the jog dial to select “Set”, and press ENTER.The “File List” is displayed.
0102
Program ListBGM_002.MP3Music_001.wav
03 <Empty> 0003 Music_001.wav0004 Music_002.wav
0002 BGM_002.MP30001 BGM_001.MP3
<SD1>
5 Rotate the jog dial to select the file you want to select for hot start, and press ENTER.Displays "Preview" and “Execute”.
•For details on selecting files, see “Selecting folders and files and displaying the file list menu” (vpage 28).
6 Rotate the jog dial to select “Execute”, and press ENTER.Hot start is entered.“Hot List” is displayed.
n Previewing a hot start fileRotate the jog dial to select “Preview”, and press ENTER.•Preview playback of the selected file starts.•Press STOP to exit playback and return to step 6.
•Repeat steps 3 to 6 to create a hot list.
nAutomatically registering tracks to a hot list
1 Rotate the jog dial in the hot list menu to select “Auto Mapping”, and press ENTER. A 20-track hot list is automatically registered.
•Files are registered in order from the first file in accordance with the “19 Play Range” (vpage 19) settings in “Preset Setting”.
nPreviewing files registered in the hot start list
1 Place the cursor on a hot start file in the hot start list, and press ENTER. The “Hot List Menu” is displayed.
2 Rotate the jog dial to select “Preview”, and press ENTER.Preview playback of the selected file starts.
•Press STOP to end playback and return to the hot start list.
Deleting a hot list file
1 n Deleting the selected hot list file•The operating method is the same as operation 2 of “Editing
the program” (vpage 44).
2 n Deleting all hot list files•The operating method is the same as operation 3 of “Editing
the program” (vpage 44).
Saving/reading hot list data
1 n Saving the hot list to the selected media•The operating method is the same as operation 1 of “Saving/
reading program data” (vpage 44).•100 hot lists can be saved.
2 n Reading the hot list from the selected media•The operating method is the same as operation 2 of “Saving/
reading program data” (vpage 44).

Part names and
FunctionsSetting defaults
ConnectionsSelecting Files and
FoldersG
etting StartedControl
FunctionInform
ation
48
Selecting M
ediaRecording
Edit FunctionPlayback
EDITEdit files.
COMBINECombine the selected file with another file on the same media to create a new file.
1 Press COMBINE when the combine source files are cued or paused. The “File List” is displayed to select the combine target.
0003 track_003.wav
<USB>
0004 track_004.wav
0002 track_002.wav0001 track_001.wav
0003 track_003.wav
<USB>
0004 track_004.wav
0002 track_002.wav0001 track_001.wav
2 Rotate the jog dial to select the combine target file, and press ENTER.Combining starts.
•The file name of the file created by combining source files is created according to the same rules as recording. For details, see “File name” (vpage 33).
•Files stored on other media cannot be combined. •During combining, “Executing ... zzz%” (z: progress status) is
displayed.•When the combination is complete, “Completed” is displayed.•Select “Cancel” and press ENTER to cancel combining.
•The combined file is stored in the combination source folder. •The files used in the combination remain unchanged.
NOTECombining cannot be performed in the following situations.•When the selected media is write prohibited•When there is not enough free space on the selected media•Themaximumfilesizeis2GB•When the file format is a format other than WAV•When the total number of files reaches 2000•When the number of bits differs•When the number of channels differs•When the sampling rate differs
DIVIDEThe selected file is split into 2 files in the specified location.
1 Press DIVIDE during playback, cue or pause. Displays “Divide?”.
2 Rotate the jog dial to select “OK”, and press ENTER.Division starts.
•During the division, “Executing ... zzz%” (z: progress status) is displayed.
•When the division is complete, “Completed” is displayed.•Select “Cancel” and press ENTER to cancel the division.
•“_A” is added to the previous file name for the first part of thedividedfile.(Example:Whenaaa.mp3isdivided->aaa_A.mp3)
•“_B”isaddedtothepreviousfilenameforthesecondpartofthedividedfile.(Example:Whenaaa.mp3isdivided->aaa_B.mp3)
•The original file used in the division remains unchanged.
NOTEDividing cannot be performed in the following situations.•When the selected media is write prohibited•At the start point or end point of a file•When the file format is a format other than WAV or MP3•When the number of files reaches 1999•When there is not enough free space on the selected media•When the file name after division already exists
LIST FRAMEMENU
PLAYSTOP
SHIFT REC MON.
PAUSEREC
MEDIA
DIMMER TEXT
DISPLAY
-LOCK
MARK
PITCH
MOVE COMBINE DIVIDE UNDOCOPY
MOVE COMBINE UNDO
COPY DIVIDE
Jog Dial/ENTER
Edit Function

Part names and
FunctionsSetting defaults
ConnectionsSelecting Files and
FoldersG
etting StartedControl
FunctionInform
ation
49
Selecting M
ediaRecording
Edit FunctionPlayback
COPYCopies the selected file to a different folder or folder on a different media. To copy multiple files, use “05 Copy” in the file list.
1 Press COPY when the file that you want to copy is stopped, cued or paused. A media list for selecting the copy destination is displayed.
0003 Music_001.wav0004 Music_002.wav
0002 BGM_002.MP3BGM_001.MP
SD2USBNET(None)
SD1Media List
2 Rotate the jog dial to select the copy destination media, and press ENTER.The folder list is displayed.
0003 Music_001.wav0004 Music_002.wav
0002 BGM_002.MP3BGM_001.MP
USB<Copy Here?>
3 Rotate the jog dial to select “<Copy Here?>” in the copy destination folder level, and press ENTER.Copying starts.
•During copying, “Executing ... zzz%” (z: progress status) is displayed.
•When the copying is complete, “Completed” is displayed.•Select “Cancel” and press ENTER to cancel copying.
NOTECopying cannot be performed in the following situations.•When the media is write prohibited•When there is not enough free space on the media
MOVEMoves the selected file to a folder on the same or different media.To move multiple files, use “06 Move” in the file list.
1 Press MOVE when the file that you want to move is stopped, cued or paused.A media list for selecting the move destination is displayed.
2 Select the move destination media and press ENTER.•The folder list is displayed.
3 Rotate the jog dial to select “<Move Here?>” in the move destination folder level, and press ENTER.Moving starts.
•During moving, “Executing ... zzz%” (z: progress status) is displayed.
•When the moving is complete, “Completed” is displayed.•Select “Cancel” and press ENTER to cancel moving.
NOTEFiles cannot be moved to other media in the following situations.•When the media is write prohibited•When there is not enough free space on the media
EDIT
UNDOReturns the edit operation performed immediately prior to the previous state.“UNDO” can be used on COMBINE, DIVIDE, COPY, MOVE and file and folder renaming operations.
1 Press UNDO directly after the edit. Displays “Undo?”.
2 Rotate the jog dial to select “OK”, and press ENTER.When the operation is complete, “Completed” is displayed.
NOTEWhen the edit is cancelled using “UNDO”, the file cannot be returned to it's previous state.

Part names and
FunctionsSetting defaults
ConnectionsPlayback
Selecting Files and Folders
Getting Started
Information
50
Selecting M
ediaRecording
Edit FunctionControl
Function
USB KeyboardThis unit can be controlled using a keyboard by connecting a USB keyboard to the keyboard USB connector on this unit.
Keyboard key Unit operation buttonESC STOP (during Play, Rec etc.)
BACK (during MENUs)SHIFT + ESC STOP (during MENUs)
ENTER JOG ENTERARROW U /D /L /R L /R: TRACK SKIP (during STOP/CUE/PLAY/SEARCH/
AUDIBLE PAUSE)U /D: REC LEVEL (Master / Lch by PRESETRec Level Type) (during REC /REC PAUSE)U /D /L /R: JOG (Rotate) (during Not CUE)
SHIFT+ARROW U /D REC LEVEL (Balance / Rch by PRESETRec Level Type) (during REC /REC PAUSE)
PAGE UP /DOWN PAGE UP /DOWNBACK SPACE SKIP BACK (during Pause or Play)
HOME File list Top (During File list)DELETE DELETE CHARACTER
. FRAME/ PITCH
SPACE PLAY / PAUSE (Toggle) SPACE (during TEXT editing)
Keyboard key Unit operation buttonOther
PRINTABLE CHARCHARACTER
F1 DISPLAYF2 FILE LISTF3 PITCH –F4 PITCH +F5 LOCKF6 RWDF7 FWDF8 MARK –F9 MARK +F10 MARKF11 RECF12 MENU
SHIFT + F1 TEXTSHIFT + F2 RENAME CURRENT FILE (during CUE)SHIFT + F3 DELETE CURRENT FILE (during CUE)SHIFT + F4 COPYSHIFT + F5 MOVESHIFT + F6 DELETE MARKS FROM CURRENT FILE (during CUE)SHIFT + F7 COMBINESHIFT + F8 DIVIDESHIFT + F9 UNDOSHIFT + F10 DIMMERSHIFT + F11 REC MONSHIFT + F12 MEDIA
NOTE•Only keyboards that confirm to USB standards can be used with this unit. •Before using a USB keyboard, set the language type in “41 Keyboard Type” (vpage 20) in “Preset
Setting”.
Control Function

Part names and
FunctionsSetting defaults
ConnectionsPlayback
Selecting Files and Folders
Getting Started
Information
51
Selecting M
ediaRecording
Edit FunctionControl
Function
Required system
nEthernet cable (CAT-5 or greater recommended)•Use only a shielded STP or ScTP LAN cable which is available at retailer.•The normal shielded-type Ethernet cable is recommended. If a flat-type cable or unshielded-type cable
is used, other devices could be affected by noise.
•When using this unit connected to a network with no DHCP function, make the settings for the IP address, etc., at “System Setting” (vpage 21).
•When setting manually, check the setting contents with the network administrator.
NOTEDENON Professional assumes no responsibility whatsoever for any communication errors or troubles resulting from customer’s network environment or connected devices.
You can connect this unit to your network (LAN) to perform various types of playback and operations as follows. Make network connections for this unit by carefully reading information on this page.
•Streaming playback of tracks from a media server on the network•Control of the DN-700R via the network•Archive function that sends files to a server via the network (vpage 53)
When “29 Network Standby” (vpage 23) in “System Setting” is set to “On”, the network can be used to control the unit from the standby status.
Network settings need to be configured after the network (LAN) is connected. For details, see “Network Settings” (vpage 52).
ANALOG INPUT DIGITAL INPUT ANALOG OUTPUT DIGITAL OUTPUT LAN REMOTE
RS-232C PARALLEL
Internet
To WAN
Router
To LAN side port
To LAN side port
LAN port/Ethernet terminal
LAN port/Ethernet terminal
Computer Server (NAS/FTP)
Modem
Connecting to a network (LAN)

Part names and
FunctionsSetting defaults
ConnectionsPlayback
Selecting Files and Folders
Getting Started
Information
52
Selecting M
ediaRecording
Edit FunctionControl
Function
LAN ConnectionWhen connected to a network that has a DHCP function, settings for the DN-700R such as the IP address are configured automatically. When connected to a network that does not have a DHCP function, you need to configure settings such as the IP address and DNS server in “System Setting” (vpage 21) in the menu.
NOTEWhen configuring the network settings manually, contact your network administrator for the necessary setting details.
nNetwork connection (DHCP=Off)
1 Connect the Ethernet cable. (vpage 51 “Connecting to a network (LAN)”)
2 Turn the DN-700R power on. (vpage 17 “Setting defaults”)
3 Press MENU.The menu list is displayed.
4 Rotate the jog dial to select “System Setting”, and press ENTER.
5 Set the “IP Address” to “Static”. The currently set IP Address is displayed.
•Specify the appropriate IP address for your network.
Network Settings
6 Select the character using the jog dial and Search+, Search-, press ENTER.
•Use Search+, Search- to move the cursor.•Press FRAME to delete the previously entered number. •Press BACK to cancel the settings.
7 Press ENTER when you have finished entering the numbers.The screen returns to the “System Setting” screen.
8 In the same way, enter the “Subnet Mask”, “Gateway” and “DNS Server” addresses.
9 When the “IP Address”, “Subnet Mask”, “Gateway” and “DNS Server” settings are complete, press the MENU button. The DN-700R restarts automatically, and a pop up appears.

Part names and
FunctionsSetting defaults
ConnectionsPlayback
Selecting Files and Folders
Getting Started
Information
53
Selecting M
ediaRecording
Edit FunctionControl
Function
Backup function that sends recorded files of the current media to the FTP server. Also, long recording is possible by deleting recorded files from the current media automatically.
Menu operations (archive)
PLAYSTOP
SHIFT REC MON.
PAUSEREC
LIST
MEDIA
MOVE
DIMMER TEXT
DISPLAY
-LOCK
COMBINE DIVIDE UNDO
MARK
PITCH
FRAME
COPY
MENU
MENU BACK Jog dial/ENTER
1 While DN-700R is stopped, press MENU.The menu list is displayed.
2 Rotate the jog dial to select “Archive Setting”, and press ENTER.The archive setting items are displayed.
3 Rotate the jog dial to select the item that you want to change, and press ENTER.
•For details on how to set the menu, see steps 4 to 6 in “Menu operations (Preset selection/Preset setting/System setting)” (vpage 17).
•For details on how to set the “Schedule”, see steps 6 to 7 in “Timer recording start time and recording time settings” (vpage 35).
•For details on how to set the “Server”, see step 6 in “Network Settings” (vpage 52).
nArchive Operation•When archiving is started, “Now Archiving...” is displayed. •When archiving is complete, “Archive Completed” is displayed.
Parentheses “( )” are added to the musical note icon of the completed file list files. When “Clear After Arc.” is “On”, the files are deleted after being archived.
•Media that supports archiving: SD or USB•Archiving is not performed in the following conditions even if archive is set to “Auto” or “Timed”. •During playback•When the recording monitor is operating during recording•During dual recording•DuringWAVrecordingwitha96kHzsamplingrate•When the selected media is write prohibited•When the menu screen is being displayed
•The file name character code in the archive function supports shift JIS.
Archive
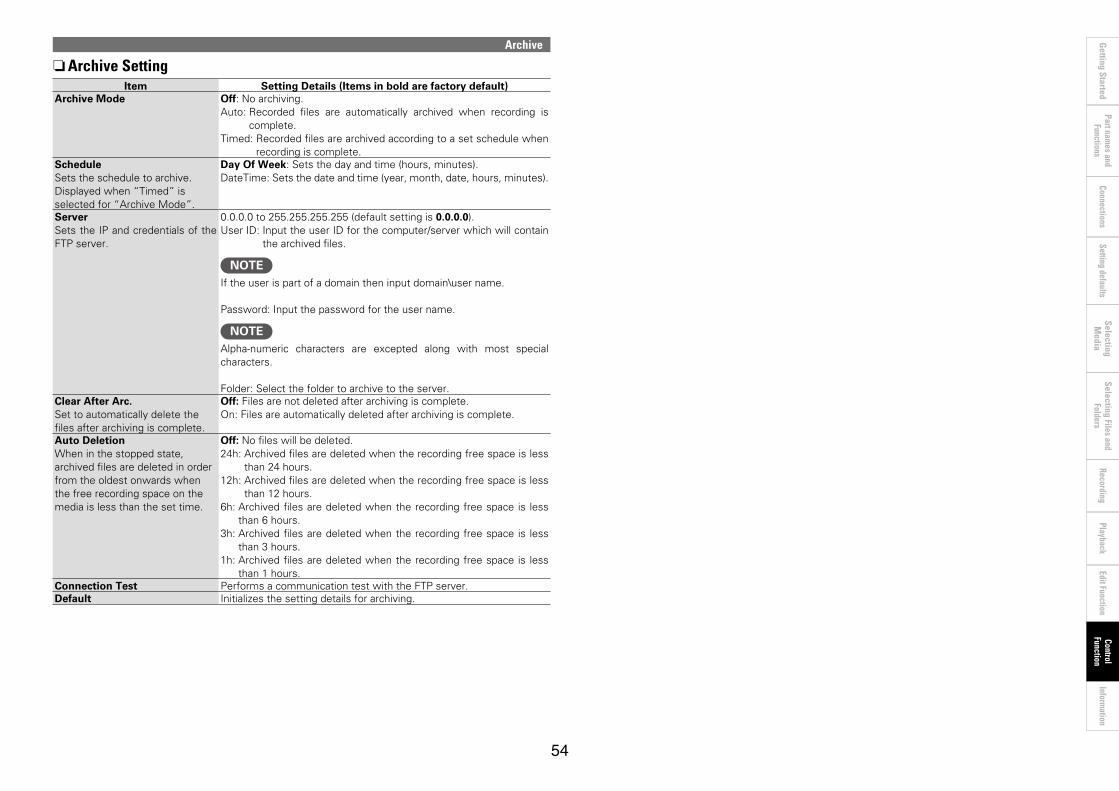
Part names and
FunctionsSetting defaults
ConnectionsPlayback
Selecting Files and Folders
Getting Started
Information
54
Selecting M
ediaRecording
Edit FunctionControl
Function
nArchive SettingItem Setting Details (Items in bold are factory default)
Archive Mode Off: No archiving.Auto: Recorded files are automatically archived when recording is
complete.Timed: Recorded files are archived according to a set schedule when
recording is complete.ScheduleSets the schedule to archive. Displayed when “Timed” is selected for “Archive Mode”.
Day Of Week: Sets the day and time (hours, minutes). DateTime: Sets the date and time (year, month, date, hours, minutes).
ServerSets the IP and credentials of the FTP server.
0.0.0.0 to 255.255.255.255 (default setting is 0.0.0.0). User ID: Input the user ID for the computer/server which will contain
the archived files.
NOTEIf the user is part of a domain then input domain\user name.
Password: Input the password for the user name.
NOTEAlpha-numeric characters are excepted along with most special characters.
Folder: Select the folder to archive to the server. Clear After Arc.Set to automatically delete the files after archiving is complete.
Off: Files are not deleted after archiving is complete.On: Files are automatically deleted after archiving is complete.
Auto DeletionWhen in the stopped state, archived files are deleted in order from the oldest onwards when the free recording space on the media is less than the set time.
Off: No files will be deleted.24h: Archived files are deleted when the recording free space is less
than 24 hours. 12h: Archived files are deleted when the recording free space is less
than 12 hours.6h: Archived files are deleted when the recording free space is less
than 6 hours.3h: Archived files are deleted when the recording free space is less
than 3 hours.1h: Archived files are deleted when the recording free space is less
than 1 hours.Connection Test Performs a communication test with the FTP server. Default Initializesthesettingdetailsforarchiving.
Archive
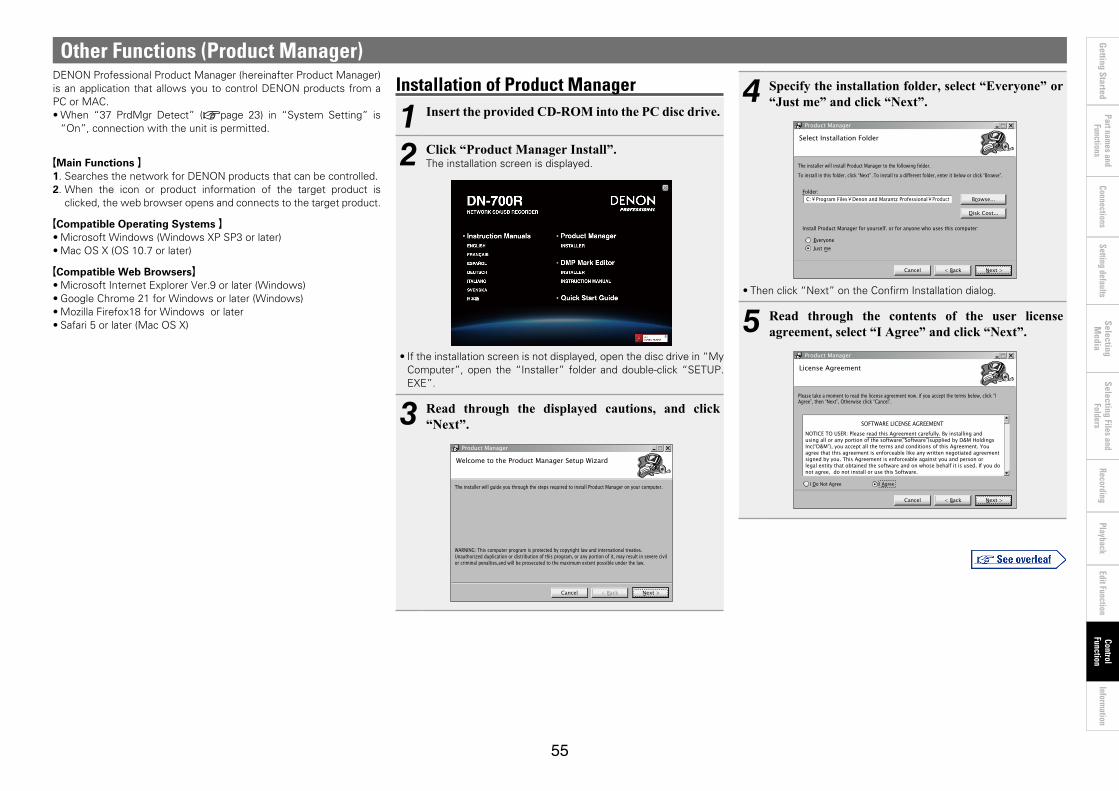
Part names and
FunctionsSetting defaults
ConnectionsPlayback
Selecting Files and Folders
Getting Started
Information
55
Selecting M
ediaRecording
Edit FunctionControl
Function
DENON Professional Product Manager (hereinafter Product Manager) is an application that allows you to control DENON products from a PC or MAC. •When “37 PrdMgr Detect” (vpage 23) in “System Setting” is
“On”, connection with the unit is permitted.
GMain Functions H1. Searches the network for DENON products that can be controlled.2. When the icon or product information of the target product is
clicked, the web browser opens and connects to the target product.
GCompatible Operating Systems H•Microsoft Windows (Windows XP SP3 or later)•Mac OS X (OS 10.7 or later)
GCompatible Web BrowsersH•Microsoft Internet Explorer Ver.9 or later (Windows) •Google Chrome 21 for Windows or later (Windows)•MozillaFirefox18forWindowsorlater•Safari 5 or later (Mac OS X)
Other Functions (Product Manager)
Installation of Product Manager
1 Insert the provided CD-ROM into the PC disc drive.
2 Click “Product Manager Install”. The installation screen is displayed.
•If the installation screen is not displayed, open the disc drive in “My Computer”, open the “Installer” folder and double-click “SETUP.EXE”.
3 Read through the displayed cautions, and click “Next”.
The installer will guide you through the steps required to install Product Manager on your computer.
Product Manager
Welcome to the Product Manager Setup Wizard
WARNING: This computer program is protected by copyright law and international treaties.Unauthorized duplication or distribution of this program, or any portion of it, may result in severe civilor criminal penalties,and will be prosecuted to the maximum extent possible under the law.
Next >< BackCancel
4 Specify the installation folder, select “Everyone” or “Just me” and click “Next”.
The installer will install Product Manager to the following folder.To install in this folder, click “Next” .To install to a different folder, enter it below or click “Browse”.
Product Manager
Select Installation Folder
Folder:
Install Product Manager for yourself. or for anyone who uses this computer:
EveryoneJust me
C:¥Program Files¥Denon and Marantz Professional¥Product
Next >< BackCancel
Browse...
Disk Cost...
•Then click “Next” on the Confirm Installation dialog.
5 Read through the contents of the user license agreement, select “I Agree” and click “Next”.
Product Manager
License Agreement
Please take a moment to read the license agreement now. if you accept the terms below, click “lAgree”, then “Next”, Otherwise click “Cancel”.
I Do Not Agree
SOFTWARE LICENSE AGREEMENTNOTICE TO USER: Please read this Agreement carefully. By installing andusing all or any portion of the software(“Software”)supplied by D&M HoldingsInc(“D&M”), you accept all the terms and conditions of this Agreement. Youagree that this agreement is enforceable like any written negotiated agreementsigned by you. This Agreement is enforceable against you and person orlegal entity that obtained the software and on whose behalf it is used. If you donot agree, do not install or use this Software.
I Agree
< BackCancel Next >

Part names and
FunctionsSetting defaults
ConnectionsPlayback
Selecting Files and Folders
Getting Started
Information
56
Selecting M
ediaRecording
Edit FunctionControl
Function
DENON Professional-...
All ON All OFF
File(F) Edit(E) View(V) Help(H)
DN-700RDN-700R_2192.168.0.1SD2
Click here to access interface
Properties OFF
Properties OFF
DN-700RDN-700R_2192.168.0.2USB1
Click here to access interface
STOP
STOP
t
r
e
y
w
q
q File menu, Edit menu, View menu, Help menu w Batch power ON/OFF button
The power can be switched ON/OFF for connected devices in the specified group units.
e Product Information DisplayDisplays the network name, IP address, power status and currently selected source.
r Transport Status Icon Displayed when the power of the connected device is ON.
t Individual power ON/OFF buttonThe power can be switched ON/OFF individually for connected devices.
y Properties button The window for configuring power control groups and batch power ON/OFF function settings is displayed.
Other Functions (Product Manager)
6 Installation starts.
Product Manager
Installing Product Manager
Product Manager is being installed.
Please wait...
< Back Next >Cancel
7 Click “Close” when the installation is completed.The installation window closes.
Product Manager
Installation Complete
Product Manager has been successfully installed.Click “Close” to exit.
< BackCancel Close
Product Manager window
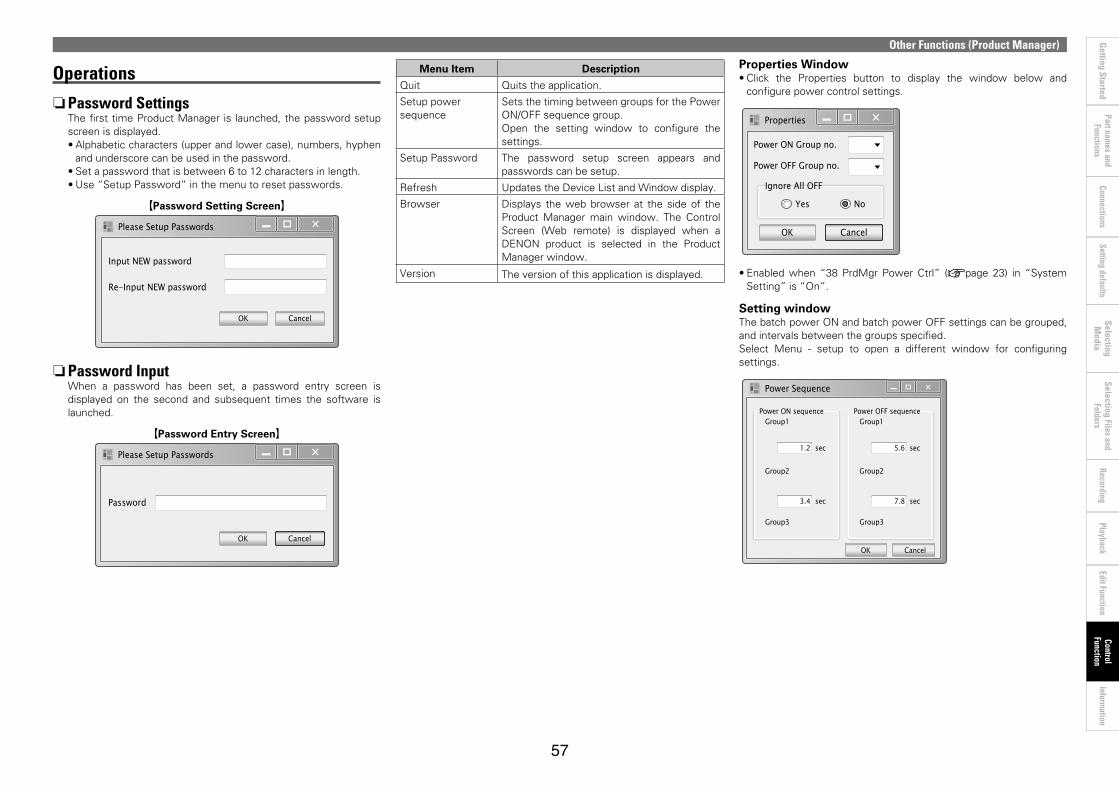
Part names and
FunctionsSetting defaults
ConnectionsPlayback
Selecting Files and Folders
Getting Started
Information
57
Selecting M
ediaRecording
Edit FunctionControl
Function
Other Functions (Product Manager)
Operations
nPassword SettingsThe first time Product Manager is launched, the password setup screen is displayed. •Alphabetic characters (upper and lower case), numbers, hyphen
and underscore can be used in the password. •Set a password that is between 6 to 12 characters in length. •Use “Setup Password” in the menu to reset passwords.
GPassword Setting ScreenH
Input NEW password
Re-Input NEW password
Please Setup Passwords
OK Cancel
nPassword InputWhen a password has been set, a password entry screen is displayed on the second and subsequent times the software is launched.
GPassword Entry ScreenH
Password
Please Setup Passwords
OK Cancel
Menu Item Description
Quit Quits the application.
Setup power sequence
Sets the timing between groups for the Power ON/OFF sequence group. Open the setting window to configure the settings.
Setup Password The password setup screen appears and passwords can be setup.
Refresh Updates the Device List and Window display.
Browser Displays the web browser at the side of the Product Manager main window. The Control Screen (Web remote) is displayed when a DENON product is selected in the Product Manager window.
Version The version of this application is displayed.
Properties Window•Click the Properties button to display the window below and
configure power control settings.
Ignore All OFF
Power OFF Group no.
Power ON Group no.
Properties
OK
Yes No
Cancel
•Enabled when “38 PrdMgr Power Ctrl” (vpage 23) in “System Setting” is “On”.
Setting window The batch power ON and batch power OFF settings can be grouped, and intervals between the groups specified. Select Menu - setup to open a different window for configuring settings.
Power ON sequenceGroup1
Group2
Group3
Power Sequence
OK Cancel
sec3.4
sec1.2
Power OFF sequenceGroup1
Group2
Group3
sec7.8
sec5.6
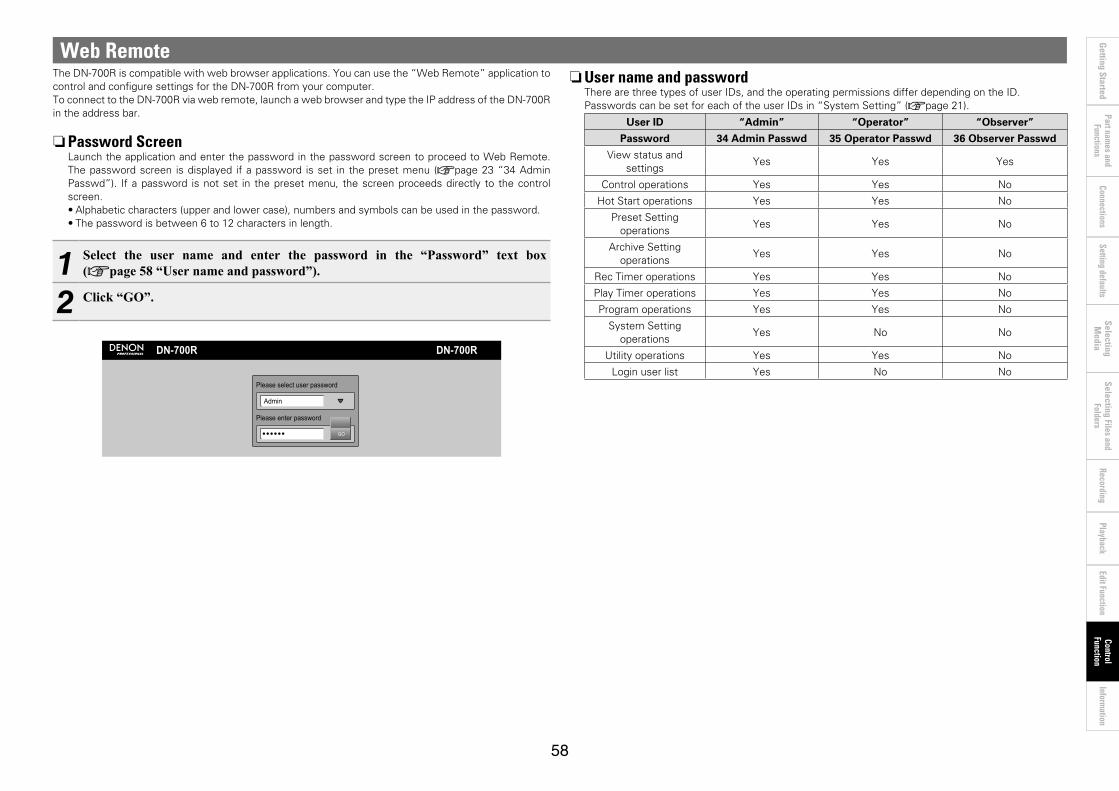
Part names and
FunctionsSetting defaults
ConnectionsPlayback
Selecting Files and Folders
Getting Started
Information
58
Selecting M
ediaRecording
Edit FunctionControl
Function
Web RemoteThe DN-700R is compatible with web browser applications. You can use the “Web Remote” application to control and configure settings for the DN-700R from your computer. To connect to the DN-700R via web remote, launch a web browser and type the IP address of the DN-700R in the address bar.
nPassword ScreenLaunch the application and enter the password in the password screen to proceed to Web Remote. The password screen is displayed if a password is set in the preset menu (vpage 23 “34 Admin Passwd”). If a password is not set in the preset menu, the screen proceeds directly to the control screen. •Alphabetic characters (upper and lower case), numbers and symbols can be used in the password.•The password is between 6 to 12 characters in length.
1 Select the user name and enter the password in the “Password” text box (vpage 58 “User name and password”).
2 Click “GO”.
Please select user password
Please enter password
Admin
DN-700RDN-700R
GO
nUser name and passwordThere are three types of user IDs, and the operating permissions differ depending on the ID. Passwords can be set for each of the user IDs in “System Setting” (vpage 21).
User ID “Admin” “Operator” “Observer”
Password 34 Admin Passwd 35 Operator Passwd 36 Observer Passwd
View status and settings
Yes Yes Yes
Control operations Yes Yes No
Hot Start operations Yes Yes No
Preset Setting operations
Yes Yes No
Archive Setting operations
Yes Yes No
Rec Timer operations Yes Yes No
Play Timer operations Yes Yes No
Program operations Yes Yes No
System Setting operations
Yes No No
Utility operations Yes Yes No
Login user list Yes No No
Part names and
FunctionsSetting defaults
ConnectionsPlayback
Selecting Files and Folders
Getting Started
Information
59
Selecting M
ediaRecording
Edit FunctionControl
Function
Web Remote
Control screen (CONTROL)•Displays the current track list. •The time code display is updated every 0.1 to 0.3 seconds •The Track List display periodically checks consistency with the DN-700R
DN-700R05/13/2013 11:29AMDN-700R_1
CONTROL
OPERATION SETTINGS OTHERS
Track Size(KB) Path#05132013110447_DN-7005132013110510_DN-7005132013111540_DN-70
7261 /1 /
1680 /
000100020003
PROGRAM TIMER PANEL UNLOCK
REC MON DUAL REC RELAY REC ARCHIVE
05132013110447_DN-700R-1.wa0001 000:00 Elapsed Time
SD1Media
Rec Setting
LOCKPanel Lock
L60
R
-99dB
-99dB-40 -20 -12 -6 0 0V
LOAD
ENTER
REC MON
BACK
RENAME
DELETE
DOWNLOAD
Rec Level-Master
MARKMMM.TRACK
Track List
Play Setting
CUE
Rec Level-Balance
0
0dB 0dB
Pitch0%
File Upload UPLOADBROWSE
0
0
PITCH M.KET
q e r tw uioy
Q2Q3Q4Q5Q9Q8W0 Q7 Q6
Q0Q1
nMain Frame ScreenThis is the first screen displayed when Web Remote is launched.
DN-700R05/13/2013 11:23AMDN-700R_1
CONTROL
OPERATION SETTINGS OTHERS
Track Size(KB) Path#05132013110447_DN-7005132013110510_DN-7005132013111540_DN-70
7261 /1 /
1680 /
000100020003
PROGRAM TIMER PANEL UNLOCK
REC MON DUAL REC RELAY REC ARCHIVE
05132013110447_DN-700R-1.wa0001 000:00 Elapsed Time
SD1Media
Rec Setting
L60
R
-99dB
-99dB-40 -20 -12 -6 0 0V
LOAD
ENTER
REC MON
BACK
RENAME
DELETE
Rec Level-Master
MARKMMM.TRACK
Track List
CUE
Rec Level-Balance
0
0dB 0dB
0
CONTROL PRESET SETTING UTILITY
HOT START ARCHIVE SETTING
REC TIMER
PLAY TIMER
PROGRAM
SYSTEM SETTING
wq e
q Screen Tab ListThis is the screen list. Click the screen that you want to see to open it.
w Time Information DisplayDisplays the current time originating from the device.
e Model Name

Part names and
FunctionsSetting defaults
ConnectionsPlayback
Selecting Files and Folders
Getting Started
Information
60
Selecting M
ediaRecording
Edit FunctionControl
Function
Web Remote
q Track ListTheDN-700Rfilelist.ThefilenameandsizeofMP3andWAVdataisdisplayed.
w Panel Lock buttonAll buttons are locked other than Power, Lock and Shift.
e Pitch adjustmentr UPLOAD button Uploads the folder selected as the sound file on the computer. When PlayRange in “Preset Setting”
is All, data is uploaded to the root directory. t, Q3, Q5 HIDE button Hides items on the screen. y DOWNLOAD button
Downloads the selected file to the computer.u DELETE button Deletes the file indicated by the cursor. i RENAME button Enables the name of the file indicated by the cursor to be changed. o BACK button Switches to the next higher level of the Track List Table. Q0 ENTER button Switches to the folder level of the Track List Table indicated by the cursor.Q1 LOAD button
The file selected in the track list is loaded in the DN-700R.Q2 Finder Files can be searched by entering the file name. Q4 REC MON Recording monitor buttonQ6 Recording and playback control buttonsQ7 File data display, time display, settings displayQ8 Level meterQ9 Recording input level settings, recording input Lch/Rch balance settingsW0 Media select
File list screenPressthe[MAPPING]buttononthehotstartscreen,[SELECTFILE]buttonontheplaybacktimerscreenor[INSERTFILE]buttonontheprogramscreentodisplaytheDN-700Rfilelistandselectfiles.
DN-700R-1
FILE LIST
DN-700R05/13/2013 11:34AM
OPERATION SETTINGS OTHERS
Track Size(KB) Path05132013110447_DN7-0005132013110510_DN-70005132013111540_DN-700
7261 /1 /
1680 /
000100020003
ENTER
BACK
SELECT FILE
CANCEL
File List
#
q w e r yt
q File Listw Cancels the file selection operation.e SELECT FILE button Returns to the program screen. The selected file is added to the program playback track list in the
program screen, timer playback track list in the playback timer screen or hot start list in the hot start screen.
r BACK button Switches to the next higher level of the Track List Table.t ENTER button Switches to the folder level of the Track List Table indicated by the cursor.y Finder Files can be searched by entering the file name.

Part names and
FunctionsSetting defaults
ConnectionsPlayback
Selecting Files and Folders
Getting Started
Information
61
Selecting M
ediaRecording
Edit FunctionControl
Function
Web Remote
Hot Start Screen (HOT START)•Starts playback for Hot Start (Maximum number of registered files: 20) •Pressanyofthebuttonsfrom[1]to[20]tostartplayback.•The time code display is updated every 0.1 to 0.3 seconds•For details, see “Hot Start” (vpage 47).
DN-700R-1
HOT START
DN-700R05/13/2013 00:01AM
OPERATION SETTINGS OTHERS
Track Size(KB) Path#000100020003000400050006000700080009
AUTO MAPPING
MAPPING
REMOVE
REMOVE AII
15
20
14
19
13
18
12
17
11
16
5
10
4
9
3
8
2
7
1
6
05132013110447_DN70005132013110510_DN70005132013111540_DN700
7261 /1 /
1680 /
PROGRAM TIMER PANEL UNLOCK
REC MON DUAL REC RELAY REC ARCHIVE
05132013110447_DN-700R-1.wa0001 000:00 Elapsed Time
L60
R
-99dB
-99dB-40 -20 -12 -6 0 0V
CUE
wq re yt
q Hot Start buttonsPlayback of the track assigned to the button starts.
w Hot Start track liste REMOVE All button Cancels all assigned Hot Start numbers. r REMOVE button
Cancels assignment of the selected Hot Start number.t MAPPING button
Individually assigns a file to the number selected in the Hot Start list.Press this button to display the file list and select a file you want to assign to Hot Start.
y AUTO MAPPING buttonAutomatically assigns up to 20 files to Hot Start from the top of the current file list.
Program Screen (PROGRAM)•Configure the program (List) settings (Maximum number of program files: 99)•Changes can only be made when in the STOP mode.•Files can be deleted and added to the program list •Pressthe[InsertFile]buttontodisplaytheFileListScreenandselecttrackstoinsert.•Thefilesselectedin[InsertFile]isinsertedonelineabovetheselectedline.(Toinsertafilelast,select
the EOL line.)•For details, see “Program playback” (vpage 43).
DN-700RDN-700R-1
PROGRAM
05/13/2013 11:33AM
OPERATION SETTINGS OTHERS
Track Size(KB) Path#05132013110447_DN-70005132013111540_DN-700
7261 /1680 /
00010002EOL
ON
INSERT FILE
REMOVE FILE
REMOVE ALL
Program Mode
Program List
wq e r
t
q Program playback track list w REMOVE ALL button
Removes all files in program.e REMOVE FILE button
Deletes the selected line. r INSERT FILE button
Switches to the file list. Files selected in the file list are inserted above the line selected in the program playback track list.
t Select program mode

Part names and
FunctionsSetting defaults
ConnectionsPlayback
Selecting Files and Folders
Getting Started
Information
62
Selecting M
ediaRecording
Edit FunctionControl
Function
Playback timer setting screen (PLAY TIMER)•Can only be operated in the stopped state. •For details, see “Timer playback start time and playback file settings” (vpage 45).
DN-700R-1
Play Timer
DN-700R05/13/2013 11:36AM
OPERATION SETTINGS OTHERS
Title SettingPlay Timer 01Play Timer 02Play Timer 03Play Timer 04Play Timer 05Play Timer 06Play Timer 07Play Timer 08Play Timer 09
_____F_**:15<empty>Off<empty>_____F_04:25PM<empty><empty><empty>
010203040506070809
EDIT
INSERT
CLEAR
ALL CLEAR
#
PLAY TIMER SETTING #01
OnTimer Mode
Day Of WeekSchedule Type
File Name
Date Sun Mon Tue Wed Thu Fri Sat
EveryHHTime 15:M
ALL
SELECT FILEP3(CBR44_160)Weight A M
SAVE
yu t
e rq w
q PLAY TIMER SETTING Sets the playback timer information (playback start time, playback file). w SAVE button Enters the PLAY TIMER SETTING information. e ALL CLEAR button Clears all timers. r CLEAR button Clears the timer indicated by the cursor.t INSERT button Inserts an EMPTY timer to the position above the cursor and shifts all subsequent items down one
level. The last item is deleted. y EDIT button Edits the timer settings indicated by the cursor.u Playback timer list
Recording timer setting screen (REC TIMER)•Can only be operated in the stopped state.•For details, see “Timer recording start time and recording time settings” (vpage 35).
DN-700R-1
Record Timer
DN-700R05/13/2013 11:37AM
OPERATION SETTINGS OTHERS
Title SettingRecord Timer 01Record Timer 02Record Timer 03Record Timer 04Record Timer 05Record Timer 06Record Timer 07Record Timer 08Record Timer 09
<empty>S_T____7667811:7340148PM<empty>S_T_T_S 6815831:3801088PMS_T_T_S 6619239:6488178PMS_T_T_S 96:3145786PMS_T_T_S 6815831:3801088PMOff
010203040506070809
EDIT
INSERT
CLEAR
ALL CLEAR
#
REC TIMER SETTINGS #04
OnTimer Mode
OffUser Area Mode
Day Of WeekSchedule Type
User Ares
Date Sun Mon Tue Wed Thu Fri Sat
EveryHHTime 00:M
01HDuration :M
ALL
SAVE
00
yu tio
e rwq
q REC TIMER SETTING Sets the recording timer information (recording start time, recording time). w SAVE button Enters the REC TIMER SETTING information.e ALL CLEAR button Clears all timers.r CLEAR button Clears the timer indicated by the cursor.t INSERT button Inserts an EMPTY timer to the position above the cursor and shifts all subsequent items down one
level. The last item is deleted.y EDIT button Edits the timer settings indicated by the cursor.u Recording timer listi User Area Mode button Selects whether or not to use the user area. o User Area Enters information to be added to the recorded file name.
Web Remote
Part names and
FunctionsSetting defaults
ConnectionsPlayback
Selecting Files and Folders
Getting Started
Information
63
Selecting M
ediaRecording
Edit FunctionControl
Function
Archive setting screen (Archive)•For details on the setting items, see “Archive Setting” (vpage 54).
DN-700R-1
ARCHIVE SETTING
DN-700R05/13/2013 11:39AM
OPERATION SETTINGS OTHERS
OPTION SETTINGS
OffClear After Arc
Auto Deletion Off
CANCEL DEFAULTSAVE CONNECTIONTEST
CANCEL DEFAULTSAVE CONNECTIONTEST
MODE SETTINGS
TimedArchive Mode
Day Of WeekSchedule Type
Date Sun Mon Tue Wed Thu Fri Sat
EveryHHTime 00:M
ALL
SCHEDULE SETTINGS
Server
User ID
Password
FTP SERVER SETTINGS
192
User
168 0 10
Folder SELECT FOLDER/
q w e r
q SAVE button Saves the changed settings.w CANCEL button Returns the settings being edited to the state before editing. e DEFAULT button Initializesthesettingdetailsforarchiving.r CONNECTION TEST button Performs a test access to the server based on the server settings.
Web Remote
Preset Setting Screen (PRESET)•Changes can only be made when in the STOP mode.•For details on the setting items, see “Preset Setting” (vpage 18).
DN-700R-1
PRESET
DN-700R05/13/2013 11:42AM
OPERATION SETTINGS OTHERS
RECORD SETTINGS
SAVE CANCEL DEFAULT
SAVE CANCEL DEFAULT
OffDual Rec
OffALC
OffRelay Rec
Off
Master/Bal
Bal
Rec LevelType
PCM-24Rec Format StereoRec Channel 96k
OffPre Record OffAuto Track Off
OffSilent Skip -38dBSilent Level
Audio Input
Sample Rete
Auto Mark
Silent Time 4sec
DISPLAY SETTINGS
HH:MM:SSTime Display
75%DisplayDimmer
ScreenSaver
NameFile Sort
75%
OffDimmer
OffLED Dimmer
REMOTE SETTINGS
PlayFader Start Hot Start
OTHER SETTINGS
USKeyboard
Type
CURRENT PRESET NO.
1:Preset 1Preset No.
GENERAL SETTINGS
Preset 1Preset Title MomentaryShift Mode StopPower On
One TouchRec
PLAYBACK SETTINGS
AllPlay Range
OnProgram
SinglePlay Mode Random
Next
On
On
Auto FadeOut
SearchModeOffAuto Cue 2.0secSkip Back
Finish Mode
Normal
OffAuto Fade In Off Off
Off OffMaster Key
Repeat
Start DelayEnd Of
Message
Para RemMode
Part names and
FunctionsSetting defaults
ConnectionsPlayback
Selecting Files and Folders
Getting Started
Information
64
Selecting M
ediaRecording
Edit FunctionControl
Function
Web Remote
System Setting Screen (SYSTEM)•Changes can only be made when in the STOP mode.•For details on the setting items, see “System Setting” (vpage 21).
DN-700RDN-700R-1
SYSTEM SETTING
05/13/2013 00:04PM
OPERATION SETTINGS OTHERS
SAVE CANCEL DEFAULT
SAVE CANCEL DEFAULT
GENERAL SETTINGS
Off
AUDIO I/O SETTINGS
LineLine/Mic Lch
Off
LineLine/Mic Rch
Phantom Rch Mic In Sens Lch 40dBu
OffPhantom Lch
Mic In Sens Rch 40dBu
VariableVolume Input Ref(XLR/RCA) +24dBu/+10dBV Input Trim Lch 0.0dB
0.0dBInput Trim Rch Out put Trim Lch 0.0dB Out put Trim Rch 0.0dB
DISPLAY SETTINGS
12HTime Form
Eng
MDYDate Form
Language
6Display Contrast
RECORD SETTINGS
Rec Folder
Signal Pass Thrn On
Rec Folder Name
User AreaUser Area Mode Off
UA_DT_MNFile Name Form
ADMINISTRATION SETTINGS
Play TimerPriority
PLAYBACK SETTINGS
Current
OffMono Play AutoOutput Rate
REMOTE SETTINGS
9600Sirial Bit Rate
NETWORK SETTINGS
Machine Name
Auto
OnNetwork Standby
IP Mode IP Address Subnet Mask
00:05:CD:C1:00:0DMAC Address Gateway DNS Server
IP Control Port IP Control Auth Off
OffNTP Mode NTP Server NTP Cycle 01H 00:M
OffSyslog Mode Syslog Server
23
DN-700R-1
10 30 19 124
10 30 19 1
0 0 0 0
0 0 0 0
255 255 255 128
10 30 3 37
TIME ZONE SETTINGS
Time Zone
DST Offset
Start Date
End Date
MH/DM
:M
H :M 0000-
:MH
H/DM
10
01
03
10
00
03
02
02
00
00
AM
OffDaylight Saving
AM
Off
Retype
Retype
ProdMgr Ctrl
Retype
Off Auto Reboot Off
AdminPasswordOperatorPasswordObserverPasswordProdMgr
Detectable
CLEAR
CLEAR
CLEAR
Utility Screen (UTILITY)•Changes can only be made when in the STOP mode.•For details, see “Menu Operations (Utility)” (vpage 24).
DN-700R-1
UTILITY
DN-700R05/13/2013 00:03PM
OPERATION SETTINGS OTHERS
Software Version A-0.45
Software Update UPDATEBROWSE
Log File DOWNLOAD
Power Control
Preset FileUPLOADBROWSE
DOWNLOAD
Operator
Observer
Log-off
Log-off DISCONNECT
DISCONNECT
Date
Time
ADJUST
/Y 2013
PM
/D
:M
13
03
M
H
05
00
STANDBY
uewq rty
q Firmware Version Information Display. w A firmware update file can be uploaded. Pressthe[BROWSE]buttontonavigateandselecttheupdatefile. Messages are displayed during the update, and the browser window needs to be closed before
reboot.e Uploads and downloads preset files. r Sets the DN-700R clock. Setthetimeandpressthe[ADJUST]button.t Downloads the log file.y Displays the login user list. Pressthe[DISCONNECT]buttontodisconnecttheconnectionwiththecurrentuser.uPressthe[STANDBY]buttontoturntheunitpoweroff.
A confirmation dialog appears when the POWER STANDBY button is pressed. OK: The screen switches to the Power Off screen. CANCEL: No screen transition.

Part names and
FunctionsSetting defaults
ConnectionsPlayback
Selecting Files and Folders
Getting Started
Information
65
Selecting M
ediaRecording
Edit FunctionControl
Function
Various playback functions with RC-F400SYou can perform Hot Start playback by using the hot start remote control RC-F400S (sold separately).
RC-F400S features•Quick file search with the jog dial.•Large 3.8” display (320X240 dots).•Stationary top panel operations.
q Display ························································· (66)
w Function buttons ········································ (66)Correspond to the function display.
e Fast rewind button (6) ··························· (68)
r Fast forward button (7) ························· (68)
t Jog dial (8/9) ···································· (69)•Rotate the jog dial to search for folders and
files.•Press the jog dial to play back the selected file.
y Play/Pause button (PLAY/PAUSE) ··········· (68)The green light is on during playback and the green light flashes during pause.
u Stop/Cue button (STOP/CUE) ·················· (68)Lights orange during stop or cuing.
i Hot start buttons (1-20) ····························· (68)Corresponds to the Hot Start list.
nRC-F400S rear panel
DC IN 5VPOWER RS232C
OFF
ON
q w e r
q Power switch ·············································· (68)
w RS-232C terminal ········································ (67)
e DC power input terminal ··························· (67)Connect the supplied power cord.
r DC power cord holder mounting holeThe supplied power cord holder will prevent the connected power cord from disconnecting from the terminal.
nRC-F400S top panel
1211
21
PLAY/PAUSESTOP/CUE
13
3
14
4
15
5
16
6
17
7
18
8
19
9
20
10
RC-F400SREMOTE CONTROLLERTIME
FRAME
FILELIST
HOTLIST
Fordidden ParTITLE
FILE INFORMATION
White Label RALBUM
256KBSIZE
STEREOCHANNELMP3 256kbps 44.1KHzFORMAT
2-TravelersARTIST
00 : 450005TRACK ELAPSED
TOTAL REMAIN
MUSIC \ abcdefg.MP3
02:350005
REPEAT SINGLE RECUE RANDOMq
w
e
r
t
yu
i
Part names and functions
With RC-F400S, you can only perform playback operations. You cannot set various menu modes (menu list/file list/file menu). When you are making changes in the menu, the RC-F400S will display “wait...”.
NOTEIf the firmware version of your RC-F400S is an earlier version than A-5.00 it will not work correctly with the DN-700R. Please visit our website (URL:http://www.d-mpro.com) for the latest firmware version. The RC-F400S version information is displayed under the startup screen that appears when it is turned on.
Part names and
FunctionsSetting defaults
ConnectionsPlayback
Selecting Files and Folders
Getting Started
Information
66
Selecting M
ediaRecording
Edit FunctionControl
Function
Various playback functions with RC-F400S
nRC-F400S displayMain screen display
TIME
FILELIST
HOTLIST
FRAME
Fordidden ParTITLE
FILE INFORMATION
White Label RALBUM
256KBSIZE
STEREOCHANNELMP3 256kbps 44.1KHzFORMAT
2-TravelersARTIST
00 : 450005TRACK ELAPSED
TOTAL REMAIN
\ MUSIC \ abcdefg.MP3
02:350005
REPEAT SINGLE RECUE RANDOM A.CUE
q
i
u
y
t
w e r
q File name display
w File number/total file count display
e Time display
r Operating Status Display
t Function Display•TIME: Press the function button to switch the time display.•FILE LIST: Press the function button to play back the file in the
file list mode.•HOT LIST: Press the function button to check the Hot Start list.[Special Feature of DN-700R]•FRAME: Press the FRAME button to start Audible pause from
that position, and switch to frame search mode.
y File information display
u Current playback mode display
i Playback elapsed position
File list display
0123456789012345678901234567abcdefg.MP3abcdefg(Remix).MP3Honey01.MP3
abcdefg05.MP3
FILE LIST
0003
abcdefg00.MP30004
abcdefg01.MP30005
abcdefg02.MP30006
abcdefg03.MP30007
abcdefg04.MP3----
0009
0002
0001
EXIT
LOAD
\ MPGLANG \q
e
w r
t
y
q Title displayDisplays “FILE LIST”.
w Folder displayDisplays the folder name.“PROGRAM PLAY” is displayed during program playback.
e File listDisplays file names.The mark is displayed for the file that is currently being played back or set to be played back.
r EXIT buttonEnters the main mode.
t buttonDisplays the list of folders in the selected media.
y LOAD buttonSets the selected file to one of the Hot Start buttons 1-20.
Hot Start list display
HOT START LIST
EXIT
STORE
NEXTPAGE
PAGE 1\ MPGLANG \ abcdefg.MP3\ MPGLANG \ Honey01.MP3\ MPGLANG \ abcdefg0.MP3
\ MPGLANG \ abcdefg7.MP3
03
\ MPGLANG \ abcdefg1.MP304
\ MPGLANG \ abcdefg3.MP306
\ MPGLANG \ abcdefg4.MP307
\ MPGLANG \ abcdefg6.MP309
\ MPGLANG \ abcdefg5.MP310
02
01
08
FILELIST
\ MPGLANG \ abcdefg2.MP305
q
e
w r
t
y
u
q Title displayDisplays “HOT START LIST”.
w PAGE displayDisplays the page.
e Hot Start listDisplays the set file name.The mark is displayed for the file that is being played back.
r EXIT buttonEnters the main mode.
t FILE LIST buttonMoves to the file list.
y STORE button When the media is set to USB, the set Hot Start list is saved as a file. The PPL file is saved in the root directory. •A PPL file is the file that saves the content of a Hot Start list.
u NEXT PAGE/PREV PAGE buttonsDisplay the list in the next/previous page.
Part names and
FunctionsSetting defaults
ConnectionsPlayback
Selecting Files and Folders
Getting Started
Information
67
Selecting M
ediaRecording
Edit FunctionControl
Function
Various playback functions with RC-F400S
ConnectionAs shown below, connect the RS-232C port on DN-700R to the RS-232C port on RC-F400S using the straight cable that is supplied with RC-F400S.•Once they are connected, turn the power switch on for the
respective devices.•Configure the following items in the DN-700R “System Setting”. •Serial bit Rate: 38400
•After connection, fix the cable by turning the cable terminal screws.
Notes on connecting the AC adapter•Always turn the power switch off before connecting/
disconnecting the AC adapter.•Do not touch the AC adapter with wet hands.•When disconnecting the AC adapter, make sure that you hold the
plug. Pulling or bending the cord may damage the cord or cause electric shock or fire.
DC IN 5VPOWER RS232C
OFF
ON
DIGITAL OUTPUT LAN REMOTE
RS-232C PARALLEL
RC-F400S
DN-700R
RS-232C Straight cable

Part names and
FunctionsSetting defaults
ConnectionsPlayback
Selecting Files and Folders
Getting Started
Information
68
Selecting M
ediaRecording
Edit FunctionControl
Function
Hot Start playbackYou can instantly start playing back a file that is registered with the Hot Start buttons 1-20 on RC-F400S by pressing the corresponding button.
nPerform Hot Start playback
1 After connecting DN-700R to RC-F400S, turn the power switch on for the respective devices.•In the RC-F400S display, the startup screen “DENON
PROFESSIONAL” appears.•When the startup is completed, the file information is shown
in the display.
2 Press HOT LIST on the main screen.The first 10 files in the Hot Start list are displayed.To display files 11 through 20 in the Hot Start list, press NEXT PAGE.
3 Press the Hot Start button for playback.Hot Start playback starts.
Hot Start can also be performed from the main screen and the file list screen.
nPause
During playback, press 1/3.•During pause, 1/3 flashes.•To resume playback, press 1/3.
nStop
Press 20.
n Fast forward and fast rewind (search)During playback, press 6 or 7.•Press 6 to perform fast rewind playback.•Press 7 to perform fast forward playback.•The fast forward/fast rewind speed changes in the order shown
below each time the button is pressed. • x2, x10, x50, x100, x200
nAudible PausePress FRAME on the main screen.•Press FRAME on the main screen during playback or pause to
switch to the Audible Pause state.
nJumping by frames (Frame Accurate Search)
Press 6 or 7 during Audible pause.•Pressing 6 moves 1 frame in the reverse direction.•Pressing 7 moves 1 frame in the forward direction.
Various playback functions with RC-F400S

Part names and
FunctionsSetting defaults
ConnectionsPlayback
Selecting Files and Folders
Getting Started
Information
69
Selecting M
ediaRecording
Edit FunctionControl
Function
Various playback functions with RC-F400S
nSet and allocate Hot Start pointsAssign the Hot Start button for the file or point that you would like to play back.
0123456789012345678901234567abcdefg.MP3abcdefg.MP3Honey01.MP3
abcdefg05.MP3
FILE LIST
0003
abcdefg00.MP30004
abcdefg01.MP30005
abcdefg02.MP30006
abcdefg03.MP30007
abcdefg04.MP3----
0009
0002
0001
EXIT
LOAD
\ MPGLANG \
Please selectHOTSTART button.
1 On the main screen, press FILE LIST.The “File List” is displayed.
2 Select the file you want to set with the jog dial. Or, pause at the point where you want to resume playback in the set file.Press the jog dial to play back the selected file.
3 Press LOAD.“Please select HOT START button” is displayed.To cancel, press 20.
4 Press the Hot Start button you want to allocate the setting to.“Completed” is displayed and the setting has changed.Press the set button to perform Hot Start playback.
Hot Starts can only be set in the stop or cue modes.
nSet and allocate the Hot Start folderThe first 20 files in the selected folder are automatically allocated to the Hot Start buttons.
010203
FILE LIST
0405
EXIT
LOAD
\
1 On the main screen, press FILE LIST.The “File List” is displayed.
2 Select the folder you would like to set with the jog dial.
3 Press LOAD. The first 20 files in the selected folder are automatically assigned to the hot start button. “Completed” is displayed, and the settings are completed.
These settings can only be configured during stop or pause modes.
nSave the Hot Start listConvert the allocated Hot Start list into a file and save it to a current media connected to the DN-700R. If this file exists in the media, the Hot Start list in this file is automatically used for allocation.
1 On the main screen, press HOT LIST.The Hot Start list is displayed.
2 Press STORE.•The Hot Start list is saved as “DN-700R.ppl” in the root
directory of the media connected to the DN-700R.•A saved PPL file can be re-read by operating the DN-700R.
NOTEWhen the Hot Start list is loaded and any audio file in the list is missing on the media, that file is removed from the Hot Start list.
Part names and
FunctionsSetting defaults
ConnectionsPlayback
Selecting Files and Folders
Getting Started
Information
70
Selecting M
ediaRecording
Edit FunctionControl
Function
Various playback functions with RC-F400S
Playback from the main screen
Jog DialPower Switch F1 - 4
nBefore playbackAfter connecting the DN-700R to the RC-F400S, turn the power switch on for the respective devices.•The RC-F400S display shows the startup screen “DENON
PROFESSIONAL”.•When the startup is completed, the file information is shown in
the display.
nPlay back
Press 1/3.The button lights green and file playback starts.
nPause
Press 1/3 during playback or search modes. •1/3 flashes during pause. •To restart playback, press 1/3.
nCUE
Press 20.
nSTOP
Press 20 during cue.
nRepeat playback (0.5 sec)Press FRAME.
nSwitching files (8/9)During playback, stop or cue, rotate the jog dial.•Rotate clockwise to switch to the next file.•Rotate counterclockwise to switch to the beginning of the current
file or the previous file.•To switch to the previous file, rotate the jog dial counterclockwise
within one second from the start of file playback.
n Fast forward or fast rewind (search)During playback, press 6 or 7.•Press 6 to perform fast rewind playback.•Press 7 to perform fast forward playback.•The fast forward/fast rewind speed changes in the order shown
below each time the button is pressed.•x2, x10, x50, x100, x200
•If the “Search Mode” settings in the “Preset Menu” of the DN-700R are set to “Normal”, sound is output when the search speed is 2x. Please note that sound is not output at search speeds above 2x.
•After you fast forward to the end of the last file or fast rewind to the beginning of the first file, the unit pauses.
•When you fast rewind to the beginning of the file, the fast rewind operation continues from the end point of the previous file.
NOTE•When you perform search on a short file, the indicated speed may
not be available.•You cannot perform search on files that are recorded in VBR.•If searched files contain a VBR file, the search stops at that VBR file.
nJump by frames (Frame Accurate Search)
Press 6 or 7 during Audible Pause.•Pressing 6 moves 1 frame in the reverse direction.•Pressing 7 moves 1 frame in the forward direction.
nAUTO CUEAUTO CUE automatically detects the audio level and performs the cue operation.•When AUTO CUE is enabled, the playback mode display in the
RC-F400S display shows .•The detected level is the set value for the preset menu “25 Auto
Cue” (vpage 19).•If the audio level is not detected for 20 seconds or more after the
playback for automatic detection of the audio level has started, the cue operation is performed at the beginning of the file.

Part names and
FunctionsSetting defaults
ConnectionsPlayback
Selecting Files and Folders
Getting Started
Information
71
Selecting M
ediaRecording
Edit FunctionControl
Function
Serial remote control functionIn the serial remote control function, a host such as a computer is connected to the unit. By sending control commands from the host to the unit, the unit can be operated, and the status information of the unit can be checked both on the unit and host. There are 2 methods for connecting the host and unit, RS-232C control and IP Control.
RS-232C controlYou will be able to perform the three control functions from the host by connecting an RS-232C straight cable to the RS-232C serial terminal (9-pin D-sub) connector.
GThree control functionsHq Controlling the DN-700R externally
w Sending the status information to the host when DN-700R receives a status request command from the host
e Automatically sending the status information to the host when there is a change to the DN-700R status
nAbout Connections•Transmission System: Asynchronous full duplex transmission •Compatible connector: 9-pin D-sub (male) •Communication speed: 9,600/38,400 bps selectable (System
Setting: Serial Bit Rate)•Data bit: 8 bit•Parity: None•Start bit: 1 bit•Stop bit: 1 bit•Flow control: None
Pin arrangementPin number Signal name
1 Ground
6 NC
2 TxD
7 RTSz
3 RxD
8 NC
4 NC
9 NC
5 S. Ground
z 4V/500mA power supply can be used for RTS.
nConnections
REMOTE
RS-232C PARALLEL
RS-232C Straight cable
IP control (Ethernet)You will be able to perform the three control functions from the host by connecting an Ethernet cable to the Ethernet connector. (Connector type:RJ-45 (10BASE-T/100BASE-TX)
nCommunication format•Communication system: A full duplex•Communication speed: 10 Mbps/100 Mbps•Communication port: TCP port 23 (telnet) •Communication data length: 135 bytes (maximum)
nConnectionsq Connecting the unit and host directly
DIGITAL OUTPUT LAN REMOTE
RS-232C PARALLEL
Host
Ethernet cross cable
w Connecting the unit and host via a Switch/Router
DIGITAL OUTPUT LAN REMOTE
RS-232C PARALLEL
Ethernet straight cable
Ethernet straight cable
Host
Switch/Router

Part names and
FunctionsSetting defaults
ConnectionsPlayback
Selecting Files and Folders
Getting Started
Information
72
Selecting M
ediaRecording
Edit FunctionControl
Function
Serial remote control function
D&M RC communication format
nConfiguration of control commandsThe packets of control commands start with the Start Character “@”,andendwiththeEndCharacter“0x0D”asshownbelow.
COMMANDID
0
Start Character
EndCharacter
\r (0x0D) @
nConfiguration of command codesItem Value (Hex value within parentheses)
Start Character ‘@’(0x40)
ID ‘0’ (0x30)
Command Indicates the command details.
End Character ‘\r’ (0x0D)
Response timeout is 100msec.
nACK (received successfully) and NACK (receive failed) command codes
ContentHex
valueTransmission conditions
ACK 0x06 –
NACK 0x15 •When an End Character (0x0D) is received withnoStartCharacter“@”
•When a command that does not exist is received
•When there is a space more than 5msec between command characters
•When a command is received, ACK or NACK is returned within 100 msec.
•If there is no response after 100 msec, the next command is permitted.
q External control and operation of the DN-700RWhen the DN-700R receives a control command from the host, the DN-700R sends ACK (received successfully) to the host and executes the command.
ACK
DN-700R Host device
However, if data other than a specified command or an End Character (0x0D)withnoStartCharacter‘@’isreceived,receivefailsandNACKis returned.
w Status information output for external status request commands
When a status request is received from the host, the DN-700R returns ACK and a response to the request details.
ACK
DN-700R Host device
Status request command
Status information command
Sequence diagram of status request command
However, if data other than a specified command or an End Character (0x0D)withnoStartCharacter(‘@’)isreceived,receivefailsandNACKis returned.
Control command
Part names and
FunctionsSetting defaults
ConnectionsPlayback
Selecting Files and Folders
Getting Started
Information
73
Selecting M
ediaRecording
Edit FunctionControl
Function
Serial remote control function
e Automatic output of status information when the DN-700R status changes
When the DN-700R status or recording or playback file changes, or when the storage status changes, the details of the change of status are sent to the host.
ACK
DN-700R Host device
Status command
The command sent at this time uses the same status information command as w.
About the command list see page “Appendix”.

Part names and
FunctionsSetting defaults
ConnectionsPlayback
Selecting Files and Folders
Getting Started
Information
74
Selecting M
ediaRecording
Edit FunctionControl
Function
Parallel control has two modes, normal mode and hot start mode. The MODE 1,2 pins are used to switch this mode.
nParallel remote mode switchingParallel remote mode is switched according to the status of parallel remote inputs #5 and #6.
MODE 1 HIGH LOW LOW HIGHMODE 2 HIGH HIGH LOW LOW
FUNCTION Normal modeHot start
Reservedq Mode w Mode
•Hot Start q: Hot list #1 - #10 can be played from the parallel remote. •Hot Start w: Hot list #11 - #20 can be played from the parallel remote.
•Hot start is a function that starts playback instantaneously from the preset point.Hot Start mode can be switched to Hot Cue using “40 Para Rem Mode” (vpage 20) in the “Preset setting”. If the mode is set to the Hot Cue mode, when Hot Start input is performed, playback does not start immediately and instead switches to the standby state at the start point.
•Operations for the FADER START terminals can be set in “39 Fader Start” (vpage 20) in “Preset Setting”.
nHot Start AssignmentIf one of the HOT START terminals is shorted when the RELOAD terminal is in the shorted state, the current track is assigned to the shorted Hot Start number (reload function). For details on assigning Hot Start, see “Hot Start playback” (vpage 68).
nAbout Connections
Normal ModeNO. DN-700R
I/O NAME1 - GND2 I PLAY3 I PAUSE4 I STOP5 I MODE 16 I MODE 27 I SEARCH 78 I SEARCH 6 9 I FADER START
10 - GND11 I SKIP BACK12 I MARK +13 I MARK –14 O PLAY TALLY15 O PAUSE TALLY16 O CUE TALLY17 I MARK18 I REC PAUSE19 I REC20 O STOP TALLY21 O REC TALLY22 - TALLY POWER SUPPLY23 - GND24 I TRACK +25 I TRACK –
Hot Start Mode
Hot Cue ModeNO. DN-700R
I/O NAME1 - GND2 I PLAY3 I PAUSE4 I STOP5 I MODE 16 I MODE 27 I RELOAD8 I HOT START 1(11)9 I HOT START 2(12)10 - GND11 I HOT START 3(13)12 I HOT START 4(14)13 I HOT START 5(15)14 O PLAY TALLY15 O PAUSE TALLY16 O CUE TALLY17 I HOT START 6(16)18 I HOT START 7(17)19 I HOT START 8(18)20 O STOP TALLY21 O REC TALLY22 - TALLY POWER SUPPLY23 - GND24 I HOT START 9(19)25 I HOT START 10(20)
•In Hot Cue mode, the status switches to standby for hot start input.
•The () contents indicate the assignment for Hot Start 2 mode.
Parallel control

Part names and
FunctionsSetting defaults
ConnectionsPlayback
Selecting Files and Folders
Getting Started
Information
75
Selecting M
ediaRecording
Edit FunctionControl
Function
nRemote Control Connection•Connection Example
23 11723823523623
2523 24239231323 12231723
1 2 3 4 5 6 7 8 9 1110 12 13
14 15 16 17 18 19 20 21 24 2522 23
1823 21192322 16 204232222 1532322 1422322
MODE2 MODE1 6 SEARCH 7 SKIP BACK
REC PAUSE REC CUE/STOP PAUSE PLAY
TRACK (–)FADER START
MARK +MARK –MARK TRACK (+)
It is assumed that the input pins and Tally output pins are used as follows.
IN(23pin)GND
入力ピン
IN(22pin)
VCC
Tally出力ピン
最大10mA
Input pin Tally output pin
Maximum 10 mA
Parallel Control
Normal Mode
523623
1823 2423 252319231723
823 923 1223 13231123723
1 2 3 4 5 6 7 8 9 1110 12 13
14 15 16 17 18 19 20 21 24 2522 23
1532322 1422322 21221642322 2022
•Tallyoutputpinisanopencollector.(Maximumcurrent:10mA,maximumvoltage;5.5V)•Input pin is 5 V for Vcc TTL specification. •The maximum current supplied by the Tally Power Supply (22 pin) is 100 mA.•The input/output logic is active low (negative logic).•The number indicated in the parentheses ( ) is the number assigned in Hot Start2 mode.
NOTEPower is supplied to the external remote controller from Pin No.22 (Tally Power Supply) from this terminal. However, as the maximum rating for this pin is +5 VDC 100 mA, select circuit and current controls (resistance values) so as not to exceed the rating. Using this equipment when the rated value is exceeded may cause damage to the equipment, which may also lead to fire or a similar unexpected accident.
Hot Start Mode
Hot Cue Mode
MODE2 MODE1 CUE/STOP PAUSE PLAY REC
RELOADHOT
START 1 (11)
HOT START 2
(12)
HOT START 3
(13)
HOT START 4
(14)
HOT START 5
(15)
HOT START 6
(16)
HOT START 7
(17)
HOT START 8
(18)
HOT START 9
(19)
HOT START 10
(20)
STOP
CUE
CUE
STOP

Part names and
FunctionsSetting defaults
ConnectionsPlayback
Selecting Files and Folders
Getting Started
Control Function
76
Selecting M
ediaRecording
Edit FunctionInform
ation
Information
Error messagesGDetails on procedure for handling error messagesH
Error message Cause/Solution Page
No Media •Cannot detect media. 70
Unformat •The media is formatted in an unsupported format. Format the media on DN-700R or set the format to FAT16 or FAT32. For details, see the operation instructions of the recording media.
–
Media Full •The remaining space on a media is running low. Replace the media with a new one or delete files that are no longer required.
–
Track Full •The number of files on the selected media exceeds 2000. Recording cannot be performed if the number of files exceeds 2000. Replace the media with a new media or delete unneeded files.
8, 10, 32
Write Inhibited •The selected media is write prohibited. Remove the write protection from the media.
32
File Not Found •Target file does not exist. Check the file. 28
Track Not Found •The target track does not exist. Check the media. –
Already Exists •A file with the same name already exists. •Copy, Move, Divide : Check the folder.•Rename : Change the file name before entering the name.
28
Err Media XX •Not supported on this unit. Replace the media. –
VBR •This error message appears when a VBR file search is performed. Search cannot be performed on VBR files. When the selected track is VBR format, the estimated remaining time is displayed.
41, 70
Not AllowedNot Available
•This appears when an invalid operation is performed. The operation may be disabled due to other setting items such as the preset menu, etc. Check the details of the operation.
15
No Mark •There are no marks for the mark jump. Set marks. 42
Some files are skipped
•There is a file with the same name in the copy or move location. Files with the same name cannot be copied or moved.
30
ALC •The Rec Level cannot be changed when the ALC settings are enabled. Turn the ALC settings off to change the Rec Level.
18, 32
Registered •The file that you are to a program, hot start or timer playback list. Files registered to these lists cannot be edited.
30, 43, 45, 47
GDual Recording Error DisplayHError message Cause/Solution Page
No Back Up Media (XXX)
•Back up media cannot be detected. 34
Media Write Inhibited (XXX)
•The back up media is write prohibited. Remove the write protection from the media.
34
Back Up Media Full (XXX)
•There is no free space on the back up media. Replace the media with a new media or delete unneeded files.
34
Dual Rec Canceled (W01)
•The selected media is the same as the back up media set in the preset settings. Dual recording is canceled and normal recording is performed.
34
Dual Rec Canceled (W02)
•The recording monitor is on. Dual recording is canceled and normal recording is performed.
34
z XXX: SD1, SD2, USB

Part names and
FunctionsSetting defaults
ConnectionsPlayback
Selecting Files and Folders
Getting Started
Control Function
77
Selecting M
ediaRecording
Edit FunctionInform
ation
GRelay Recording Error DisplayHError message Cause/Solution Page
No Secondary Media (XXX)
•The secondary media cannot be detected. 34
Secondary Media Write Inhibited (XXX)
•The secondary media is write prohibited. Remove the write protection from the media.
34
Secondary Media Full (XXX)
•There is no free space on the secondary media. Replace the media with a new media or delete unneeded files.
34
z XXX: SD1, SD2, USB
GNetwork Error DisplayHError message Cause/Solution Page
Server Not Found •The server is not connected. Or, the server cannot be found. 53
Account Error •Cannot log in to the server. 53
Folder Not Found •Cannot find the archive destination folder. 53
Err Media XXX •Cannot obtain information from the selected media. 53
Server Media Full •The server capacity is full. 53
Err Network •An error has occurred while transferring the data. 53
z XXX: SD1, SD2, USB
GRC-F400S error messagesHError message Cause/Solution Page
Not Connected •Check if it is properly connected to DN-700R. If this message persists, replace the cable.
–
Not Supported •A device that is not supported by RC-F400S is connected. Check the connected device.
–
No Media •The media inserted in DN-700R has not been detected. Eject and insert the media again.
70
Error messages
If a problem should arise, first check the following:1. Are the connections correct?2. Is the set being operated as described in the owner’s manual?3. Are the external devices (mixer and player) operating properly?If this unit does not operate properly, check the items listed in the table below. If the symptom is not covered on the check list, contact your dealer or service centers. Service centers are listed at http://www.d-mpro.com.
GGeneralHSymptom Cause/Solution Page
Does not power on. •Check whether the power cord is firmly connected to the AC outlet.
13
GRecordingHSymptom Cause/Solution Page
Cannot perform recording.
•The recording media could be the cause of this trouble. Replace the recording media with another one and retry.
32
Although the music has been recorded properly, no sound is reproduced when it is played back.
•Make sure that the recording level adjustment switch (REC LEVEL) is not set to Mute.
•Make sure that the recording settings (such as input source and selected recording media) and all connections with external devices are correct.(For example, if “UnBal” is set in “09 Audio Input” and an external device is not connected to the analog input RCA terminal, this unit will record in the silent state.)
32
18
There are sound cutoffs between files.
•There may be minor sound cutoffs between files depending on the capacity of a recorded file.
18, 32, 38
There are sound cutoffs during recording to an SD card.
•If an SD card is formatted on a computer, it may cause sound cutoffs during recording. When you use an SD card with this unit, make sure to format the card on this unit.
26, 32
There is a loud noise in the recorded file.
•Check the level meter and Level Over Display (LEVEL) to make sure that the recording level does not exceed 0dB.
•Make sure that the electrical contacts of the cable connections are not poor.
10
11
Troubleshooting

Part names and
FunctionsSetting defaults
ConnectionsPlayback
Selecting Files and Folders
Getting Started
Control Function
78
Selecting M
ediaRecording
Edit FunctionInform
ation
GPlaybackHSymptom Cause/Solution Page
Cannot perform playback or does not recognizeafile.
•The recording media could be a cause of this trouble. Copy a file to another recording media and retry playback.
•Check whether this unit supports the format of the playback file.
•Check whether the target folder is within the first 8 levels of the root directory.
•Check whether the number of folders does not exceed 1000. Thisunitrecognizesupto1000folders.
–
–
28
28
No sound is produced from the headphones.
•Make sure that the headphone volume level adjustment switch (LEVEL) is not set to MIN.
•Check whether sound is reproduced from the headphones by using another audio file or recording media.
12
–
Poor sound quality for playback on a computer.
•Check the software of your computer.•Check the frequency conversion program.•This unit can record audio files using sampling frequencies of 48kHzand96kHz.Someof thecomputerprogramsconvertthe frequency to44.1kHz (asample rateconverter isused).Use a higher quality sample rate converter.
––
Cannot read the files on a computer.
•Check the functions of the computer software. Some playback and editing programs may not support the recording format of thisunit(PCM24bits,96kHz,etc.).
–
Troubleshooting
GRecording mediaHSymptom Cause/Solution Page
The media is not shown in the display even though it is connected.
•Sometimes this unit cannot recognize media because of adefective connection. Check the connection of the media.
•This unit supports USB mass-storage class flash memory and USBexternalstorage.ItdoesnotrecognizeUSBdrivesotherthan the above.
•You cannot connect USB devices to this unit via a USB hub.•Make sure to supply external power to the type of USB hard
disk drives that can connect to the external power source via AC adapter, etc.
70
70
70–
The media icon is displayed, but the unit doesnotrecognizea file.
•Check the display and make sure that the currently selected media and the actual media that you want to use are the same. If they are not the same, display the media list to select the media to be used.
27
GOperationHSymptom Cause/Solution Page
Cannot add a character during renaming.
•If the maximum number of characters has been already entered, you cannot add any more characters. To add a character, delete characters before adding.
79
Part names and
FunctionsSetting defaults
ConnectionsPlayback
Selecting Files and Folders
Getting Started
Control Function
79
Selecting M
ediaRecording
Edit FunctionInform
ation
Main specifications•System Network SD/USB Recorder•Compatible media SD/USB memory/USB HDD•Playable formats, file systems SD, USB: FAT16/FAT32/HFS+•Playable WAV Format
Extension WAV, AIFF, AIFResolution 16 bit, 24 bit Sampling frequency 96,48,44.1kHz
•Playable MP3 FormatExtension MP3Bit rate 32 – 320 kbps and VBRSampling frequency 48,44.1kHz
•Playable AAC FormatExtension M4ACompression method AAC-LCBit rate 64 – 320 kbps and VBRSampling frequency 48,44.1kHz
•Number of channels 2 (stereo), 1 (mono) •Audio frequency characteristics LINE / MIC(–16 dBu)
20Hz–20kHz (+0.5 dB / –1 dB)
•S/N ratio More than 89 dB (A-Weighted)
•Total harmonic distortion Less than 0.01 %•Dynamic range More than 106 dB
(for 24 bit WAV playback) •Channel separation Less than –90 dB •Variable pitch width –16 % – +16 %•Variable trim adjustment width ±2.0 dB
n Input•BALANCED ANALOG IN L/R
Type XLR(1:GND, 2:Hot, 3:Cold)Line settingInput level +4 dBuMaximum input level +24 dBu/+20 dBu/+18 dBuInput impedance 20kΩ/kohmsMIC settingInput level –60 – 16dBuInput impedance 5 kΩ/kohmsEIN Less than–127 dBu
(Rs=150Ω/ohms)CMRR More than 80dB
•UNBALANCED ANALOG IN L/RType RCA terminalInput level –10 dBVMaximum input level +10 dBV/+6 dBV/4 dBVInput impedance 10 kΩ/kohms
•UNBALANCED DIGITAL INType RCA terminalInput impedance 75 Ω/ohmsStandard input level 0.5 Vp-pFormat IEC-60958(COAXIAL)
•BALANCED DIGITAL INType XLR(1:GND, 2:Hot, 3:Cold)Input impedance 110 Ω/ohmsStandard input level 3.5 Vp-pFormat IEC-60958(AES/EBU)
n Others•Maximum storage capacity Up to 2 TB•Maximum file size 2 GB•Maximum number of files 2000 files
(for 1 folder)•Maximum number of folders 1000 folders•Maximum number of folder
hierarchies 8 (under the root directory)
n Output 0dBu=0.775Vrms, 0dBV=1.0Vrms
•BALANCED ANALOG OUT L/RType XLR(1:GND, 2:Hot, 3:Cold)Load impedance Over 600 Ω/ohmsOutput level +4 dBu at 600 Ω/ohms loadMaximum Output level +24 dBu/+20 dBu/+18 dBu
•UNBALANCED ANALOG OUT L/RType RCA terminalLoad impedance Over 10 kΩ/kohmsOutput level –10 dBVMaximum Output level +10 dBV/+6 dBV/+4 dBV
•BALANCED DIGITAL OUTType XLR(1:GND, 2:Hot, 3:Cold)Output impedance 110 Ω/ohmsStandard output level 3.0 Vp-pFormat IEC-60958(AES/EBU)
•UNBALANCED DIGITAL OUTType RCA terminalOutput impedance 75 Ω/ohmsStandard output level 0.5 Vp-pFormat IEC-60958(COAXIAL)
•HEADPHONE OUT 20 mW/32 Ω/ohms
n General•Power supply AC120V,60Hz
(U.S.A and Canada models)AC230V,50/60Hz (European, U.K and Asia/ Pacific models)
•Power consumption 30 W0.4 W (standby) 3.4 W (Network standby)
•Environmental conditions Operating temperature 5 – 35 °COperating humidity 25 – 85 %, no condensation Storage temperature –20 – 60 °C
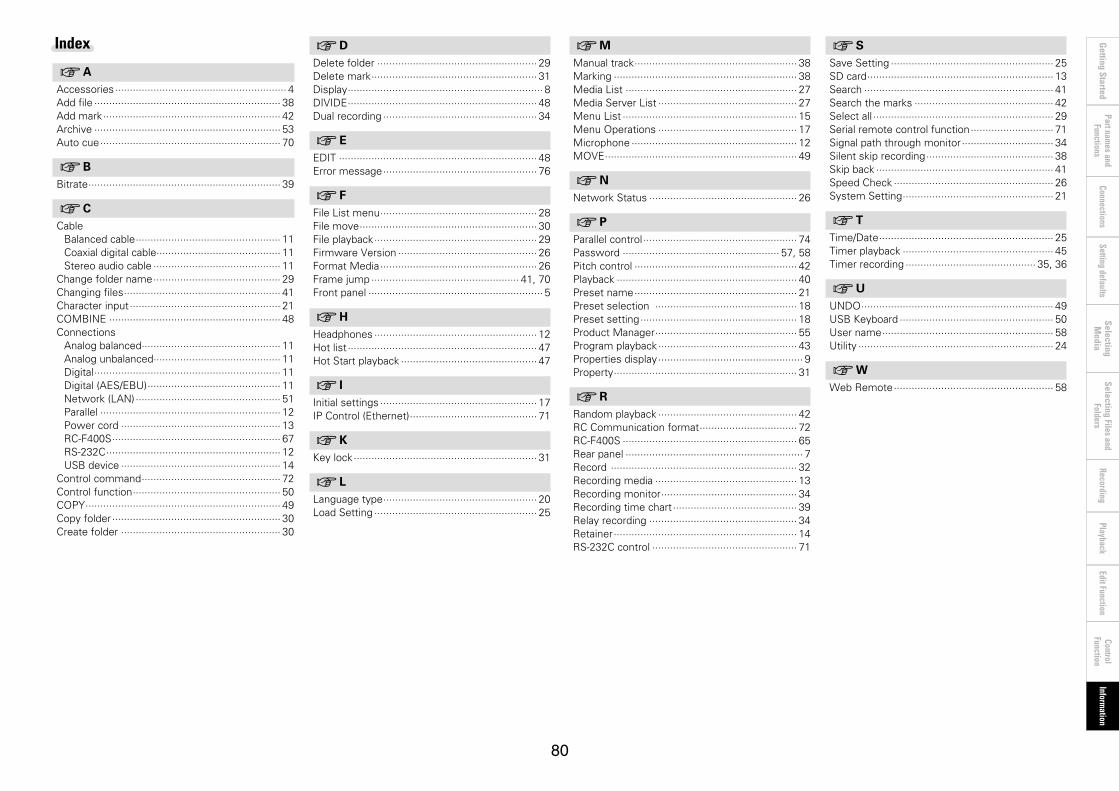
Part names and
FunctionsSetting defaults
ConnectionsPlayback
Selecting Files and Folders
Getting Started
Control Function
80
Selecting M
ediaRecording
Edit FunctionInform
ation
Index
v AAccessories ·························································· 4Add file ······························································· 38Add mark ···························································· 42Archive ······························································· 53Auto cue ····························································· 70
v BBitrate ································································· 39
v CCable
Balanced cable ················································· 11Coaxial digital cable·········································· 11Stereo audio cable ··········································· 11
Change folder name ··········································· 29Changing files ····················································· 41Character input ··················································· 21COMBINE ·························································· 48Connections
Analog balanced··············································· 11Analog unbalanced··········································· 11Digital ······························································· 11Digital (AES/EBU) ············································· 11Network (LAN) ················································· 51Parallel ····························································· 12Power cord ······················································ 13RC-F400S ························································· 67RS-232C ··························································· 12USB device ······················································ 14
Control command ··············································· 72Control function ·················································· 50COPY ·································································· 49Copy folder ························································· 30Create folder ······················································ 30
v DDelete folder ······················································ 29Delete mark ························································ 31Display ·································································· 8DIVIDE ································································ 48Dual recording ···················································· 34
v EEDIT ··································································· 48Error message ···················································· 76
v FFile List menu ····················································· 28File move ···························································· 30File playback ······················································· 29Firmware Version ··············································· 26Format Media ····················································· 26Frame jump ·················································· 41, 70Front panel ··························································· 5
v HHeadphones ······················································· 12Hot list ································································ 47Hot Start playback ·············································· 47
v IInitial settings ····················································· 17IP Control (Ethernet) ··········································· 71
v KKey lock ······························································ 31
v LLanguage type ···················································· 20Load Setting ······················································· 25
v MManual track ······················································· 38Marking ······························································ 38Media List ·························································· 27Media Server List ··············································· 27Menu List ··························································· 15Menu Operations ··············································· 17Microphone ························································ 12MOVE ································································· 49
v NNetwork Status ·················································· 26
v PParallel control ···················································· 74Password ····················································· 57, 58Pitch control ······················································· 42Playback ····························································· 40Preset name ······················································· 21Preset selection ················································ 18Preset setting ····················································· 18Product Manager ················································ 55Program playback ··············································· 43Properties display ················································· 9Property ······························································ 31
v RRandom playback ··············································· 42RC Communication format ································· 72RC-F400S ··························································· 65Rear panel ···························································· 7Record ······························································· 32Recording media ················································ 13Recording monitor ·············································· 34Recording time chart ·········································· 39Relay recording ·················································· 34Retainer ······························································ 14RS-232C control ················································· 71
v SSave Setting ······················································· 25SD card ······························································· 13Search ································································ 41Search the marks ··············································· 42Select all ····························································· 29Serial remote control function ···························· 71Signal path through monitor ······························· 34Silent skip recording ··········································· 38Skip back ···························································· 41Speed Check ······················································ 26System Setting ··················································· 21
v TTime/Date ··························································· 25Timer playback ··················································· 45Timer recording ············································ 35, 36
v UUNDO ································································· 49USB Keyboard ···················································· 50User name ·························································· 58Utility ·································································· 24
v WWeb Remote ······················································ 58

APPENDIX
Appendix shows the list of commands that control this unit externally through a host device.Normally, it is dealers such as installers that use the list of commands to make settings, so this section is only in English.
nD&M RC Communication format
Control Command ListDescription Command Remarks
KEY Standby @02312'\r'Control PowerON @023PW'\r'
STOP @02354'\r'PLAY @02353'\r'PLAY PAUSE @02348'\r'SKIP BACK @023SB'\r'CUE @023CU'\r'Frame ON @0frON'\r'
FWD @0fr00'\r'RWD @0fr01'\r'
FF ON @02352'\r' FRAME FWD while the FRAME ON.FWD while STOP, PLAY and PLAY PAUSEWhen this command is received in FWD, Speed gose up by one step.
Speed X @02352X'\r' FWD Speed XX=1:x2,X=2:10,X=3:50,X=4:x100,X=5:x200
RWD ON @02350'\r' FRAME RWD while the FRAME ON.RWD while STOP,PLAY and PLAY PAUSEWhen this command is received in RWD, Speed gose up by one step.
Speed X @02350X'\r' RWD Spead XX=1:x2,X=2:10,X=3:50,X=4:x100,X=5:x200
Track Jump nnnn @0Trnnnn'\r' nnnn:Track No (4 digits)nnn @0TRnnn'\r' nnn:Track No (3 digits)
Track Jump >>I @02332'\r'Track Jump I<< @02333'\r'REC @02355'\r'REC PAUSE @023Rp'\r'Rec Monitor ON @023RM00'\r'
OFF @023RM01'\r'Timer Record Off @023TO'\r'M.Track @023MT'\r' When recording, the file is divided at the position in which the button was
pushed. One addition to Track No. Mark @023121'\r'Mark FWD @023M+'\r' It jumps to the mark of forward.Mark RWD @023M-'\r' It jumps to the mark of reverse.
Appendix

APPENDIX
Description Command RemarksControl PITCH ON @02337ON'\r'
OFF @02337OF'\r'+ @02338'\r'- @02339'\r'Value @0PTSSXXXX'\r' SS:ON/OFF,ON:SS=ON,OFF:SS=OF
XXXX:Pitch Value FirstSign=0:Plus/1:MinusSecondPitch10(0~9)ThirdPitch1(0~9)FourthPitch0.1(0~9)Example)ON,:+16.0%:SSXXXX=ON0160+16.0~-16.0%Range:0.1%
A-B @02359'\r'Divide @023Dd'\r'Rec Volume + @023V+'\r'Rec Volume - @023V-'\r'Rec Vol Balanse Right @023BR'\r'Rec Vol Balanse Left @023BL'\r'Rec Vol Right + @023R+'\r'Rec Vol Right - @023R-'\r'Rec Vol Left + @023L+'\r'Rec Vol Left - @023L-'\r'Volume Up @02016'\r'Volume Down @02017'\r'EJECT @02345'\r'HOT START PLAY Hot Start No nn @0HPnn'\r' nn:HotStartNo(nn=01~20)HOT START CUE UP Hot Start No nn @0HCnn'\r' nn:HotStartNo(nn=01~20)Lock Panel's Key @023KL'\r'Unlock Panel's Key @023KU'\r'SemiLock Panel's Key @023KS'\r'Hot Start List Save @0HSSR'\r'Combine Track No nnnn @023CBnnnn'\r'UNDO @023UD'\r'
File List Storage SD1 @0MMS1'\r'SD2 @0MMS2'\r'USB @0MMUS'\r'NET @0MMNE'\r'
Select Folder xxxxxxxxx @0SfXXXX'\r' xxx… Select Folder NoMake Folder xxxxxxxxx @0MFxxxxxxxxxxx'\r' xxx… New Folder name (Max 255 words)Rename Folder xxxxxxxxx XXXXXXXXXXX @0RFxxxxxxxxxxx:XXXXXXXXXXXX'\r' xxxx… changing Folder name(Max 255 words) b4
':' SeparatorXXXX… New Folder name(Max 255 word) b4
Invalid, when the folder name to change does not exist Delete Folder xxxxxxxxx @0DRxxxxxxxxxxx'\r' xxxx… The folder name to delete (Max 255 words) b4
Invalid, when the folder name to delete does not exist
Appendix
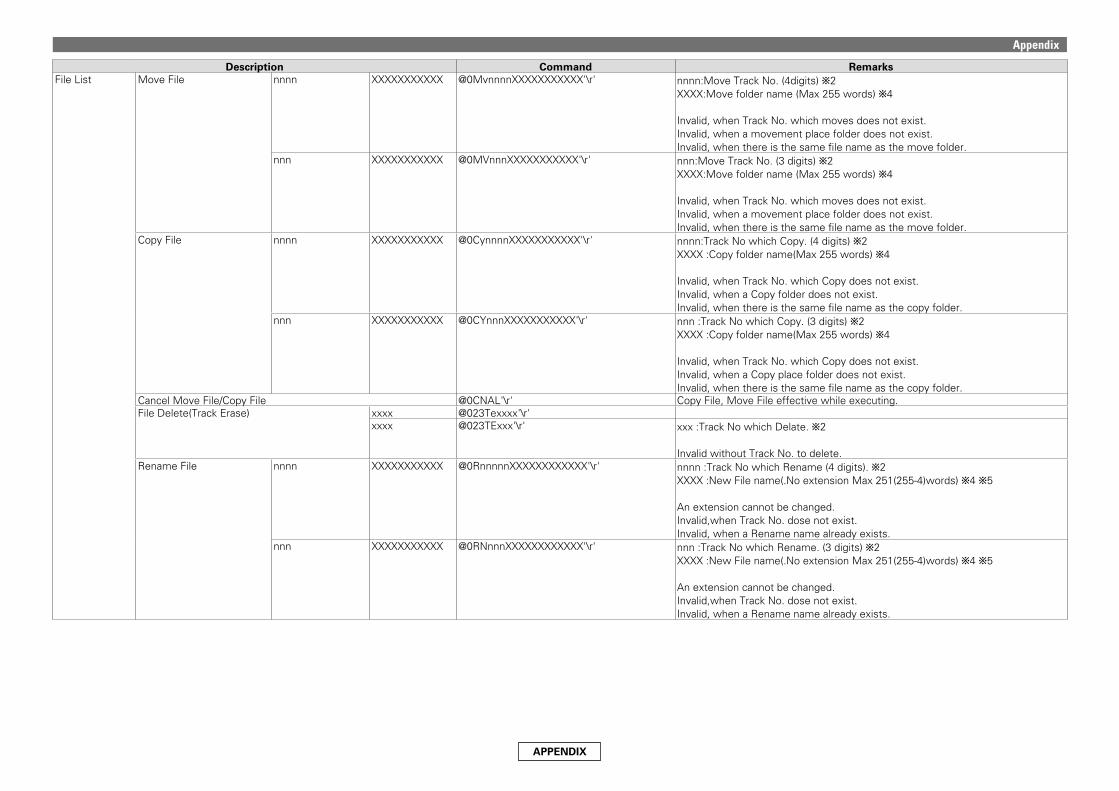
APPENDIX
Description Command RemarksFile List Move File nnnn XXXXXXXXXXX @0MvnnnnXXXXXXXXXXX'\r' nnnn:Move Track No. (4digits) b2
XXXX:Move folder name (Max 255 words) b4
Invalid, when Track No. which moves does not exist.Invalid, when a movement place folder does not exist.Invalid, when there is the same file name as the move folder.
nnn XXXXXXXXXXX @0MVnnnXXXXXXXXXXX'\r' nnn:Move Track No. (3 digits) b2XXXX:Move folder name (Max 255 words) b4
Invalid, when Track No. which moves does not exist.Invalid, when a movement place folder does not exist.Invalid, when there is the same file name as the move folder.
Copy File nnnn XXXXXXXXXXX @0CynnnnXXXXXXXXXXX'\r' nnnn:Track No which Copy. (4 digits) b2XXXX :Copy folder name(Max 255 words) b4
Invalid, when Track No. which Copy does not exist.Invalid, when a Copy folder does not exist.Invalid, when there is the same file name as the copy folder.
nnn XXXXXXXXXXX @0CYnnnXXXXXXXXXXX'\r' nnn :Track No which Copy. (3 digits) b2XXXX :Copy folder name(Max 255 words) b4
Invalid, when Track No. which Copy does not exist.Invalid, when a Copy place folder does not exist.Invalid, when there is the same file name as the copy folder.
Cancel Move File/Copy File @0CNAL'\r' Copy File, Move File effective while executing.File Delete(Track Erase) xxxx @023Texxxx'\r'
xxxx @023TExxx'\r' xxx :Track No which Delate. b2
Invalid without Track No. to delete.Rename File nnnn XXXXXXXXXXX @0RnnnnnXXXXXXXXXXXX'\r' nnnn :Track No which Rename (4 digits). b2
XXXX :New File name(.No extension Max 251(255-4)words) b4 b5
An extension cannot be changed.Invalid,when Track No. dose not exist.Invalid, when a Rename name already exists.
nnn XXXXXXXXXXX @0RNnnnXXXXXXXXXXXX'\r' nnn :Track No which Rename. (3 digits) b2XXXX :New File name(.No extension Max 251(255-4)words) b4 b5
An extension cannot be changed.Invalid,when Track No. dose not exist.Invalid, when a Rename name already exists.
Appendix
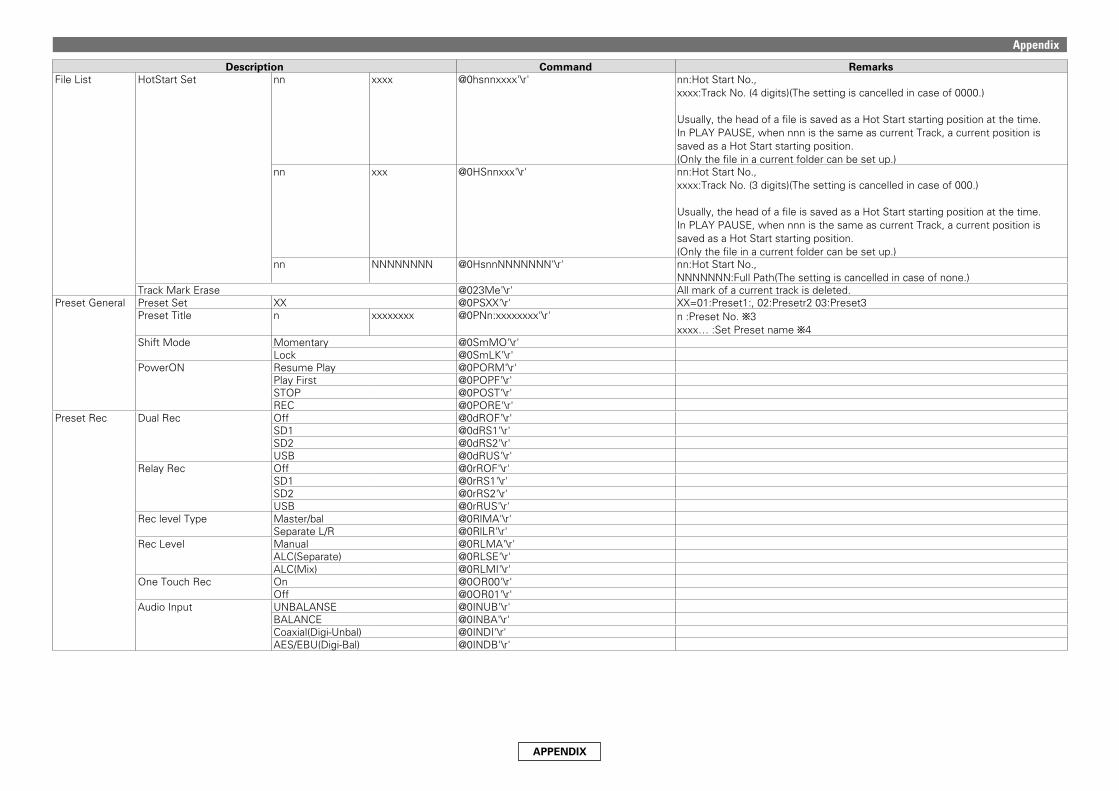
APPENDIX
Description Command RemarksFile List HotStart Set nn xxxx @0hsnnxxxx'\r' nn:Hot Start No.,
xxxx:Track No. (4 digits)(The setting is cancelled in case of 0000.)
Usually, the head of a file is saved as a Hot Start starting position at the time.In PLAY PAUSE, when nnn is the same as current Track, a current position is saved as a Hot Start starting position.(Only the file in a current folder can be set up.)
nn xxx @0HSnnxxx'\r' nn:Hot Start No., xxxx:Track No. (3 digits)(The setting is cancelled in case of 000.)
Usually, the head of a file is saved as a Hot Start starting position at the time.In PLAY PAUSE, when nnn is the same as current Track, a current position is saved as a Hot Start starting position.(Only the file in a current folder can be set up.)
nn NNNNNNNN @0HsnnNNNNNNN'\r' nn:Hot Start No., NNNNNNN:Full Path(The setting is cancelled in case of none.)
Track Mark Erase @023Me'\r' All mark of a current track is deleted.Preset General Preset Set XX @0PSXX'\r' XX=01:Preset1:,02:Presetr203:Preset3
Preset Title n xxxxxxxx @0PNn:xxxxxxxx'\r' n :Preset No. b3xxxx… :Set Preset name b4
Shift Mode Momentary @0SmMO'\r'Lock @0SmLK'\r'
PowerON Resume Play @0PORM'\r'Play First @0POPF'\r'STOP @0POST'\r'REC @0PORE'\r'
Preset Rec Dual Rec Off @0dROF'\r'SD1 @0dRS1'\r'SD2 @0dRS2'\r'USB @0dRUS'\r'
Relay Rec Off @0rROF'\r'SD1 @0rRS1'\r'SD2 @0rRS2'\r'USB @0rRUS'\r'
Rec level Type Master/bal @0RlMA'\r'Separate L/R @0RlLR'\r'
Rec Level Manual @0RLMA'\r'ALC(Separate) @0RLSE'\r'ALC(Mix) @0RLMI'\r'
One Touch Rec On @0OR00'\r'Off @0OR01'\r'
Audio Input UNBALANSE @0INUB'\r'BALANCE @0INBA'\r'Coaxial(Digi-Unbal) @0INDI'\r'AES/EBU(Digi-Bal) @0INDB'\r'
Appendix
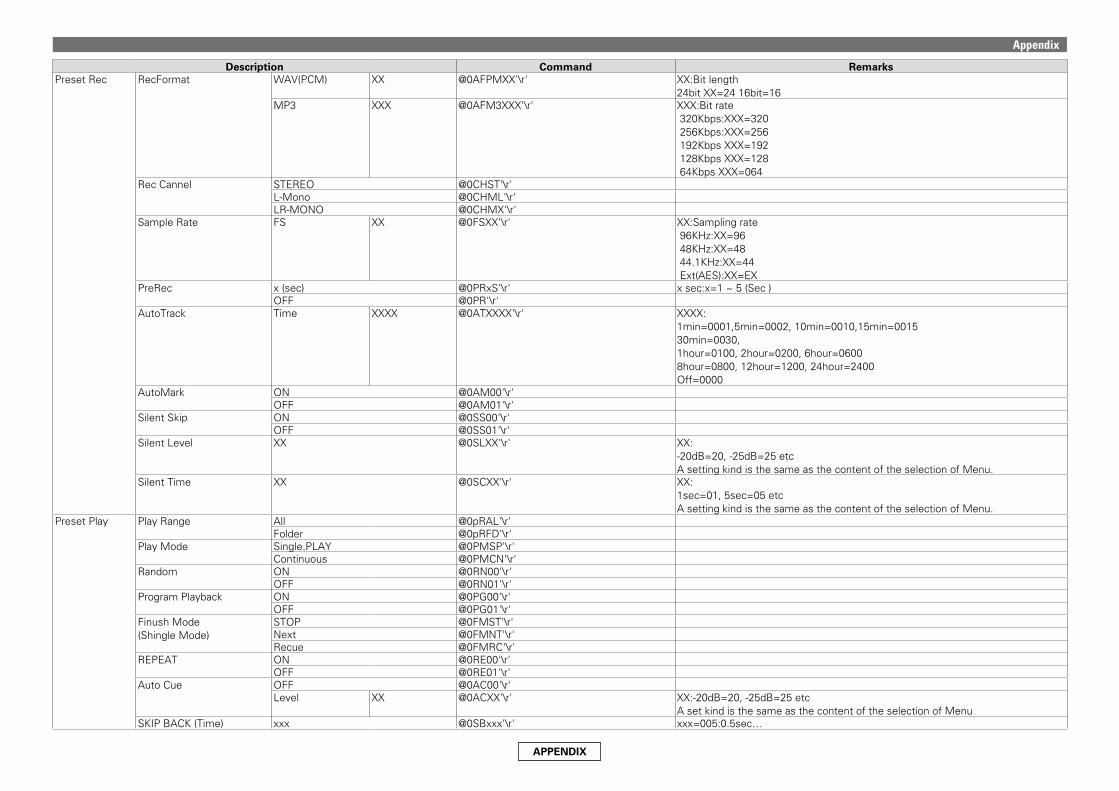
APPENDIX
Description Command RemarksPreset Rec RecFormat WAV(PCM) XX @0AFPMXX'\r' XX:Bit length
24bitXX=2416bit=16MP3 XXX @0AFM3XXX'\r' XXX:Bit rate
320Kbps:XXX=320256Kbps:XXX=256192KbpsXXX=192128KbpsXXX=12864KbpsXXX=064
Rec Cannel STEREO @0CHST'\r'L-Mono @0CHML'\r'LR-MONO @0CHMX'\r'
Sample Rate FS XX @0FSXX'\r' XX:Sampling rate96KHz:XX=9648KHz:XX=4844.1KHz:XX=44Ext(AES):XX=EX
PreRec x (sec) @0PRxS'\r' xsec:x=1~5(Sec)OFF @0PR'\r'
AutoTrack Time XXXX @0ATXXXX'\r' XXXX:1min=0001,5min=0002,10min=0010,15min=001530min=0030,1hour=0100,2hour=0200,6hour=06008hour=0800,12hour=1200,24hour=2400Off=0000
AutoMark ON @0AM00'\r'OFF @0AM01'\r'
Silent Skip ON @0SS00'\r'OFF @0SS01'\r'
Silent Level XX @0SLXX'\r' XX:-20dB=20,-25dB=25etcA setting kind is the same as the content of the selection of Menu.
Silent Time XX @0SCXX'\r' XX:1sec=01,5sec=05etcA setting kind is the same as the content of the selection of Menu.
Preset Play Play Range All @0pRAL'\r'Folder @0pRFD'\r'
Play Mode Single.PLAY @0PMSP'\r'Continuous @0PMCN'\r'
Random ON @0RN00'\r'OFF @0RN01'\r'
Program Playback ON @0PG00'\r'OFF @0PG01'\r'
Finush Mode(Shingle Mode)
STOP @0FMST'\r'Next @0FMNT'\r'Recue @0FMRC'\r'
REPEAT ON @0RE00'\r'OFF @0RE01'\r'
Auto Cue OFF @0AC00'\r'Level XX @0ACXX'\r' XX:-20dB=20,-25dB=25etc
A set kind is the same as the content of the selection of MenuSKIP BACK (Time) xxx @0SBxxx'\r' xxx=005:0.5sec…
Appendix
APPENDIX
Description Command RemarksPreset Play Search Mode Normal @0sMNO'\r'
Silent @0sMSL'\r'Auto Fade In xxx @0FIxxx'\r' xx:set Time
Off:xx=000.5sec:xx=05,1.0sec:xx=10,1.5sec:xx=15
Auto Fade Out xxx @0FOxxx'\r' xx:set TimeOff:xx=000.5sec:xx=05,1.0sec:xx=10,1.5sec:xx=15
Start Delay xxx @0sDxxx'\r' xxx:set Time(10msec)Off:xxx=000100msec:xxx=010200msec:xxx=020300msec:xxx=030
EOM(End Of Message) xx @0EDxx'\r' xx:set TimeOff:xx=OF0.5sec:xx=015sec:xx=05,10sec:xx=10,15sec:xx=15,20sec:xx=20,30sec:xx=30,60sec:xx=60
Master Key ON @0KY00'\r'(Pitch Control) OFF @0KY01'\r'
Preset Disp Time Display HH:MM:SS @0TDHMS'\r'MMM:SS:FF @0TDMSF'\r'
File Sort Alphabetical @0FRAL'\r'Date/Time @0FRDA'\r'
Dimmer ON @0DM00'\r'OFF @0DM01'\r'
Display Dimmer 100% @0DD00'\r'75% @0DD01'\r'50% @0DD02'\r'25% @0DD03'\r'0% @0DD04'\r'
LED Dimmer 100% @0LD00'\r'75% @0LD01'\r'50% @0LD02'\r'25% @0LD03'\r'
Screen Saver ON @0Ss00'\r'OFF @0Ss01'\r'
Preset Remote Fedar Start Play @0FDPL'\r'PlayPause @0FDPU'\r'PlayNext @0FDNE'\r'Play&Lock @0FDLO'\r'Play&LockPause @0FDLP'\r'Play&LockNext @0FDLN'\r'StartPause @0FDSP'\r'StartPauseTrack @0FDST'\r'Manual Track @0FDMT'\r'
Para Rem Mode Hot Start @0PAHT'\r'Hot Start Cue Up @0PAHC'\r'
Appendix

APPENDIX
Description Command RemarksPreset Other KeyBoard Englaish(US) @0KBUS'\r'
Englaish(UK) @0KBUK'\r'France @0KBFR'\r'German @0KBGE'\r'Italia @0KBIT'\r'Spanish @0KBSP'\r'Nederland @0KBNE'\r'Swedish @0KBSW'\r'Japanese @0KBJP'\r'
Preset Default PresetDefault Preset(all) @0DEFL'\r' Default processing to current PresetArchive Setting Archive Mode AUTO @0ARAT'\r'
Schedule @0ARSC'\r'OFF @0AR01'\r'
Schedule DayOfWeek @0asDWxxxxxxxxhhmm'\r' xxxxxxx:Day-of-the-week setupThe initial (“S”, “M”, “T”, “W”, “T”, “F”, “S”) of the day of the week to reserve isconnected,andthedayoftheweekwhichisnotreservedisconnectedby“_.”hhmm:Time setIf it is “Every time”, it is displayed by “**”.
Example) Every day 12:15 SMTWTFS1215Example) It starts in 15 minutes every hour except Wednesday and Friday.SMT_T_S**15
DateTime @0asDTYYMMDDhhmm'\r' YYMMDDhhmm:Set Time(Year,Month,Day,Hour,Minute) If it is “Every month” or “Every year”, it is displayed by “**”.
Example) 2012Y6M3D12:15 1206031215Example) 2012Y Every month3D12:15 12**031215
Server Archive Server IP xxx.xxx.xxx.xxx @0AIxxxxxxxxxxxx'\r'Server Account Archive User Name xxxxxxxxxxxx @0AUxxxxxxxxxxxx'\r' AtoZ,atoz,0to9Max12words
Archive Password xxxxxxxxxxxx @0APxxxxxxxxxxxx'\r' AtoZ,atoz,0to9Max12wordsArchive Folder xxxxxxxxxxxx @0AOxxxxxxxxxxxx'\r' Input the Path of Folder 12 words
•Unit can use 255 wordsAuto Deletion Off @0ADOF'\r'
XXh @0ADXX'\r' XXh(setTime1h=01)Clear After Archive ON @0CA00'\r'
OFF @0CA01'\r'Archive Default @0DEAC'\r'
Appendix
APPENDIX
Description Command RemarksRec Timer Timer Recording SET DayOfWeek @0ShDWXXxxxxxxxxHHMMhhmmXXXX'\r' XX:Reserve No! 01-30
xxxxxxx:Setting on a day of the weekThe initial (“S”, “M”, “T”, “W”, “T”, “F”, “S”) of the day of the week to reserve isconnected,andthedayoftheweekwhichisnotreservedisconnectedby“_.”hhmm:Time setIf it is “Every time”, it is displayed by “**”.
Example) Every day 12:15 SMTWTFS1215Example) It starts in 15 minutes every hour except Wednesday and Friday.SMT_T_S**15
hhmm:RecordingTime=houre,minuteXXXX:UserArea(Minwords=0,MaxWords=32Words)
DateTime @0ShDTXXYYMMDDHHMMhhmmXXXX'\r' XX:Reserve No! 01-30YYMMDDhhmm:Set Time(Year,Month,Day,Hour,Minute) If it is “Every month” or “Every year”, it is displayed by “**”.
Example) 2012Y6M3D12:15 1206031215Example) 2012Y Every month3D12:15 hhmm:RecordingTime=houre,minuteXXXX:UserArea(Minwords=0,MaxWords=32Words)
Delete @0ShDLXX'\r' XX:ReserveNo 01-30All Rec Timer Delete @0ShAD'\r'
Appendix

APPENDIX
Description Command RemarksPlay Timer Timer Playback SET DayOfWeek @0TPDWXXxxxxxxxxhhmmFFFFF'\r' XX:Reserve No! 01-30
xxxxxxx:Setting on a day of the weekThe initial (“S”, “M”, “T”, “W”, “T”, “F”, “S”) of the day of the week to reserve isconnected,andthedayoftheweekwhichisnotreservedisconnectedby“_.”hhmm:Time setIf it is “Every time”, it is displayed by “**”.
Example) Every day 12:15 SMTWTFS1215Example) It starts in 15 minutes every hour except Wednesday and Friday.SMT_T_S**15
FFFFFFFFF:File neme(Full Path)DateTime @0TPDTXXYYMMDDhhmmFFFFF'\r' XX:Reserve No! 01-30
YYMMDDhhmm:Set Time(Year,Month,Day,Hour,Minute) If it is “Every month” or “Every year”, it is displayed by “**”.
Example) 2012Y6M3D12:15 1206031215Example) 2012Y Every month3D12:15
FFFFFFFFF:File neme(Full Path)Delete @0TPDLXX'\r' XX:Reserve No 01-30All Play Timer Delete @0TPAD'\r'
Program List Program List Insert nn NNNNNNN @0PInnNNNNNNN'\r' nn:Insert Position No.NNNNNNN:Full Pat
Program List Remove nn @0Pmnn'\r' nn:Remove Position No.Program List Load NNNNNNN @0PlNNNNNNN'\r' NNNNNNN:Full Pat(m3u File)Program List Save NNNNNNN @0PsNNNNNNN'\r' NNNNNNN:Full Pat(m3u File)
Hot List HotStart Load NNNNNNN @0HLNNNNNNN'\r' NNNNNNN:Full PatSystem Setting Play Timer Priority ON @0tp00'\r'
OFF @0tp01'\r'Rec Folder Current @0RfCU'\r'
Fixed NNNNNNNN @0RfFXNNNNNNNN'\r' NNNNNNN:Full PatSignal Pass Thru ON @0Sp00'\r'
OFF @0Sp01'\r'User area ON @0US00'\r'
OFF @0US01'\r'xxxxxxxxxxxxxxxxx @0UAxxxxxxxxxxxxxxxx'\r' xxxxxxxxxxxxxxxxx:User Area name(0-32 words)
When 0 is set, it is deleted.File name form MN_DT_UA @0FfMDU'\r'
MN_UA_DT @0FfMUD'\r'DT_MN_UA @0FfDMU'\r'DT_UA_MN @0FfDUM'\r'UA_MN_DT @0FfUMD'\r'UA_DT_MN @0FfUDM'\r'
Mono ON @0MO00'\r'OFF @0MO01'\r'
Appendix

APPENDIX
Description Command RemarksSystem Setting Digital Out Fs AUTO @0dFAT'\r'
44.1KHz @0dF44'\r'48KHz @0dF48'\r'Ext(AES) @0dFEX'\r'
Line/Mic LCh Line @0LMLLN'\r'Mic @0LMLMC'\r'
Line/Mic RCh Line @0LMRLN'\r'Mic @0LMRMC'\r'
Phantom LCh ON @0PhL00'\r'OFF @0PhL01'\r'
Phantom RCh ON @0PhR00'\r'OFF @0PhR01'\r'
Mic In Sens L-Ch XX @0MsLXX'\r' XX:16~60(dBu)Mic In Sens R-Ch XX @0MsRXX'\r' XX:16~60(dBu)Volume Input Fixed @0VIFX'\r'
Variable @0VIVA'\r'Ref (XLR/RCA)(FS Reference)
XX @0FrXX'\r' XX:Set value(dBu)XX=24:XLR=+24dBu/RCA=+10dBVXX=20:XLR=+20dBu/RCA=+6dBVXX=18:XLR=+18dBu/RCA=+4dBV
Input Trim L XXX @0ItLXXX'\r' XXX:Trimsetvalue(+2.0dB~-2.0dB)XXX=+20:+2.0
Input Trim R XXX @0ItRXXX'\r' XXX:Trimsetvalue(+2.0dB~-2.0dB)XXX=+20:+2.0
Output Trim L XXX @0OtLXXX'\r' XXX:Trimsetvalue(+2.0dB~-2.0dB)XXX=+20:+2.0
Output Trim R XXX @0OtRXXX'\r' XXX:Trimsetvalue(+2.0dB~-2.0dB)XXX=+20:+2.0
Time Form 12h @0TF12'\r'24h @0TF24'\r'
DateForm MDY @0DFMD'\r'DMY @0DFDM'\r'YMD @0DFYM'\r'
Display Contrast(Brightness)
XX @0BNXX'\r' XX:01-10
Language English @0LNUS'\r'Japan @0LNJP'\r'
Machine Name xxxxxxxxxxxx @0MNxxxxxxxxxxxx'\r' xxxxxxxxxxxx:Machine NameAtoZ,atoz,0to9Max12words
IP Address xxx.xxx.xxx.xxx @0IPxxxxxxxxxxxx'\r' xxxxxxxxxxxx:IP AdressExample)IP=192.168.000.002.:xxxxxxxxxxxx=192168000002 Case of AUTO:AUTO00000000
Sub net mask xxxxxxxxxxxx @0SMxxxxxxxxxxxx'\r' xxxxxxxxxxxx:Sub net maskExample)Subnetmask=255.255.255.000.:xxxxxxxxxxxx=255255255000
Gateway xxxxxxxxxxxx @0GWxxxxxxxxxxxx'\r' xxxxxxxxxxxx:Gateway IPExample)IP=192.168.000.005.:xxxxxxxxxxxx=192168000005
DNS xxxxxxxxxxxx @@DNxxxxxxxxxxxx'\r' xxxxxxxxxxxx:DNSExample)IP=192.168.000.006.:xxxxxxxxxxxx=192168000006
IP Control Port XXXXX @0IpXXXXX'\r' XXXXX:PortNo.00000~65535
Appendix

APPENDIX
Description Command RemarksSystem Setting IP Control Auth ON @0Ia00'\r'
OFF @0Ia01'\r'Network Standby ON @0Ns00'\r'
OFF @0Ns01'\r'NTP Server xxx.xxx.xxx.xxx @0NPxxxxxxxxxxxx'\r' xxxxxxxxxxxx:NTP Server IP
Example)IP=192.168.000.007.:xxxxxxxxxxxx=192168000007 Case of OFF:DISABLE00000
NTP Cycle hhmm @0NChhmm'\r' hhmm:00:15~24:00Syslog xxx.xxx.xxx.xxx @0Slxxxxxxxxxxxx'\r' xxxxxxxxxxxx:IP Adress
Example)IP=192.168.000.007.:xxxxxxxxxxxx=192168000007 Case of OFF:DISABLE00000
Time Zone xxxxx @0TZxxxxx'\r' +13:00~-12:00xx=+0830:+8:30•Unit:+14:00~-12:00
Daylight Saving ON @0dS00'\r'OFF @0dS01'\r'
DST Offset hhmm @0dohhmm'\r'DST Start Date MMDDhhmm @0dsMMDDhhmm'\r'DST End Date MMDDhhmm @0deMMDDhhmm'\r'Admin Passwd xxxxxxxxxxxx @0PDxxxxxxxxxxxx'\r' xxxxxxxxxxxx:Password
AtoZ,atoz,0to9Max12wordsOperator Password xxxxxxxxxxxx @0OPxxxxxxxxxxxx'\r' xxxxxxxxxxxx:Password
AtoZ,atoz,0to9Max12wordsObserver Password xxxxxxxxxxxx @0Opxxxxxxxxxxxx'\r' xxxxxxxxxxxx:Password
AtoZ,atoz,0to9Max12wordsProdMgr Detectable ON @0Pd00'\r'
OFF @0Pd01'\r'ProdMgr Power Ctrl ON @0PP00'\r'
OFF @0PP01'\r'Auto Reboot ON @0Ar00'\r'
OFF @0Ar01'\r'System Setting Default @0DESY'\r' System sets All Default
Utility Set Time YYMMDDhhmm @0DtYYMMDDhhmm'\r' hhmm:hour,24HExample)2013Y06M03D 12:151306031215
Preset Load @0PVLD'\r'Preset Save @0PVSA'\r'Format @023FOMAT'\r'
IP Remote Authentication
Logout @0LO'\r' For IP Remote
Other MAC Address XXXXXXXXXXXX @0MAXXXXXXXXXXXX'\r' XXXXXXXXXXXX:MAC Address
NOTEb is State :When Stop, it is possible to set.
b1 Each command does working similar to the button of the unit.b2 “Track No.” is a number of the playback order. The file is managed by “Track No.” in serial communications. “Track No.” is changed by “File Sort”.b3 Preset is managed by not Preset Name but Preset No. (1-3) in serial communications.b4 Character-code:ISO/IEC 8859-1
Appendix

APPENDIX
Status Command ListStatus request command (Host ! This unit) Status message (this unit ! host)
Request Command Ans. Command RemarksStatus Power Status @0?PW'\r' Power Mode On @0PW00'\r'
Standby @0PW01'\r'Network Standby @0PW02'\r'
Card @0?CD'\r' Card No Card @0CDNC'\r'Card In @0CDCI'\r'Card Error @0CDCE'\r'Unformat @0CDUF'\r'Write Protect @0CDWP'\r'Door Open @0CDDO'\r'
Disc @0?CD'\r' Disc No Disc @0CDNC'\r'Disc In @0CDCI'\r'Disc Error @0CDCE'\r'
Status @0?ST'\r' Rec D-In Unlock @0STRU'\r'Recording @0STRE'\r'RecPause @0STRP'\r'
STOP STOP @0STST'\r'Cue @0STCU'\r'During AutoCue @0STAC'\r'Scheduled @0STSH'\r'
Play PLAY @0STPL'\r'PLAYPAUSE @0STPP'\r'REPEAT PLAY PAUSE
@0STPR'\r'
FF @0STFF'\r'RWD @0STRW'\r'A-B Repeat @0STAB'\r'Cue Execute @0STCE'\r' CUE running state
Other Loading @0STLD'\r'Busy @0STBY'\r'File List @0STFL'\r'TrackEdit/Preset @0STED'\r'Operation Error @0STER'\r'
Appendix

APPENDIX
Status request command (Host ! This unit) Status message (this unit ! host)Request Command Ans. Command Remarks
Status Time Mode(Display Mode) @0?TMOD'\r' Time Mode (Display Mode)
RecRemainTime @0TMRE'\r'TotalTrackNumber @0TMTN'\r'Total Mark Number
@0TMTM'\r'
Algo @0TMAG'\r'Current Date/Time @0TMND'\r'TrackTime(Elapsed Time)
@0TMTT'\r'
Current Date @0TMCD'\r'Current Time @0TMCT'\r'Recorded Time @0TMRT'\r'Recorded Data @0TMRD'\r'File name @0TMFN'\r'TrackRemainTime @0TMTR'\r'Disc Total Time @0TMTD'\r'Recorded Channel @0TMCH'\r'File information @0TMFI'\r'Level Meter @0TMLV'\r'File List @0TMFL'\r'OFF @0TMOF'\r'
Play Speed @0?SP'\r' Play Speed XXX @0SPXxxx'\r' X:Direction FWD=FRWD=RXXX:speed2x=002,10x=10,50x=050,100x=100,200x=200
Media @0?MM'\r' Media USB @0MMUS'\r'SD1 @0MMS1'\r'SD2 @0MMS2'\r'NET @0MMNE'\r'
Date Time @0?Dt'\r' Date Time YYMMDDhhmm @0DtYYMMDDhhmm'\r' YYMMDDhhmm:current dateRec Monitor @0?Rm'\r' Rec Monitor ON @0Rm00'\r'
OFF @0Rm01'\r'Lock Stat @0?LS'\r' Lock Stat Lock @0LSLK'\r'
Unlock @0LSUL'\r'SemiLock @0LSSL'\r'
Track Key select
Total Track Number @0?Tt'\r' XXXX @0TtXXXX'\r' XXXX (4 digits):Total Track Number@0?TT'\r' XXX @0TTXXX'\r' XXX(3 digits):Total Track Number
When the number of total tracks is 1000 or more, “FFF” is set (0TTFFF).
Track Number @0?Tr'\r' XXXX @0TrXXXX'\r' XXXX(4 digits):Track Number@0?TR'\r' XXX @0TRXXX'\r' XXX(3 digits):Track Number
When the number of tracks is 1000 or more, “FFF” is set (0TRFFF).
HOT START PLAY No. (xx:Hot Start No) @0?HP'\r' HOT START PLAY XX @0HPXX'\r' PLAY/PLAY of HOT START No.xxDuring PAUSE/FF/RWD/REPEAT PLAY PAUSE@0HPxx'\n'During normal PLAY, STOP etc@0HP00'\n'
Appendix

APPENDIX
Status request command (Host ! This unit) Status message (this unit ! host)Request Command Ans. Command Remarks
Track Key select
Elapse Time @0?ET'\r' Elapse Time hhmmss @0EThhhmmss'\r' hh:hour(24hdisplay0~23) mm:minute ss:second
Remain Time @0?RM'\r' Elapse Time hhmmss @0RMhhhmmss'\r' hh:hour(24hdisplay0~23) mm:minute ss:second
Rec Remain Time @0?RT'\r' Elapse Time hhmmss @0RThhhmmss'\r' hh:hour(24hdisplay0~23) mm:minute ss:second
Free SD1 @0?FE'\r' SD1 XXXXXX @0FES1XXXXXX'\r' XXXXXX:Capacity(With unit:B/KB/MB/GB/TB)
SD2 @0?FE'\r' SD2 XXXXXX @0FES2XXXXXX'\r' XXXXXX:Capacity(With unit:B/KB/MB/GB/TB)
USB @0?FE'\r' USB XXXXXX @0FEUSXXXXXX'\r' XXXXXX:Capacity(With unit:B/KB/MB/GB/TB)
Select Folder @0?SF'\r' Select Folder XXXXXXXXXXXX @0SFDXXXXXXXXXXXX'\r' D:MediaDN700R:USB=2,SD1=1,SD2=4,NET=5XXX…:Folder Name
Track Name (xxxx:TrackNo (4 digits))
@0?tnxxxx'\r' Track Name XXXXXX @0tnXXXXXX'\r' 4 digits
(xxx:TrackNo (3 digits))
@0?Tnxxx'\r' Track Name XXXXXX @0TnXXXXXX'\r' 4 digits
TrackSize (xxxx:TrackNo (4 digits))
@0?tsxxxx'\r' @0tsXXXXXX'\r' Track No 4 digitsXX…:FileSize(KByte)10KB->@0SZ10\r'(Decimalnumber)When there is no track or is no current Track or No Cardetc.XXXX=0001KB=1024byte
(xxx:TrackNo (3 digits))
@0?Tsxxx'\r' @0TsXXXXXX'\r' Track No 4 digitsXX…:FileSize(KByte)10KB->@0SZ10\r'(Decimalnumber)When there is no track or is no current Track or No Cardetc.XXXX=0001KB=1024byte
Current Track Len @0?tl'\r' Current Track Len MMMSSFF @0tlMMMSSFF'\r'Text Information:File @0?T1'\r' Text Information:File XXXX @0T1XXXX'\r' 0-255 characterText Information:Artist @0?T2'\r' Text Information:Artist XXXX @0T2XXXX'\r' 0-255 characterText Information:Album @0?T3'\r' Text Information:Album XXXX @0T3XXXX'\r' 0-255 characterTotal Folder Number @0?Tf'\r' Total Folder Number @0TfXXXX'\r'Folder Name @0?Fnxxxx'\r' Folder Name @0FnXXXXXX'\r' Four folder number digit specification
XXXXXX:Folder name 256 words
Appendix

APPENDIX
Status request command (Host ! This unit) Status message (this unit ! host)Request Command Ans. Command Remarks
Track Key select
Play Track Algo/File CH @0?ch'\r' CH STEREO @0chST'\r'MONO @0chMO'\r'
Algo @0?af'\r' Algo PCM @0afPMXX'\r' XX :Bit lengthMP3 @0afM3XXX'\r' XXX:bpsWAV @0afWVXX'\r' XX :Bit lengthAIFF @0afAIXX'\r' XX :Bit lengthAAC @0afAAXXX'\r' XXX:bps
FS @0?fs'\r' FS XX @0fsXX'\r' XX:96KHz=96,48KHz=48,44.10KHz=44The kind of the setting is the same as the selection of Menu.
Artist @0?at'\r' Artist XXX @0atxxx'\r' xxx:Artist Max 64 wordsTitle @0?ti'\r' Title XXX @0tixxx'\r' xxx:Title Max 64 wordsAlbum @0?al'\r' Album XXX @0alxxx'\r' xxx:Album Max 64 words
Hot Start Set nn:Hot Start No @0?Hsnn'\r' Hot Start Set @0Hsnnxxxxxxx:HHHmmss'\r' xxx:Fullpath of Track:SeparatorHHHmmss:Time
@0?HSnn'\r' Hot Start Set @0HSnnxxxHHHmmss'\r' XXX(3 digits):Total Track Number HHHmmss:TimeWhen the number of total tracks is 1000 or more, “FFF” is set (0HSnnFFFHHHmmss).
Rec Volume @0?RV'\r' Rec Volume LLRR @0RVLLRR'\r' LL:Left volume value, RR:Right volume value-60dB=60,MUTE=MU
Pitch @0?PT'\r' PITCH XXXX @0PTSSXXXX'\r' SS:ON/OFF,ON:SS=ON,OFF:SS=OFXXXX:Pitch Value FirstSign=0:Plus/1:MinusSecondPitch10(0~9)ThirdPitch1(0~9)FourthPitch0.1(0~9)Example)ON,:+16.0%:SSXXXX=ON0160+16.0~-16.0%Range:0.1%
Total Mark Number @0?Tm'\r' Total Mark Number XX @0TmXX'\r' XX:Total Mark numberMark Time nn:Mark No. @0?Mtnn'\r' Mark Time hhmmssff @0Mthhmmssff'\r' hh:hour(24hdisplay0~23)
mm:minute ss:second ff:frame
Total Program List Number @0?tP'\r' Total Program List Number
XX @0tPXX'\r' XX:Numberoftotalregistration(~99)
Program List File Name nn:List No. @0?plnn'\r' Program List File Name XXXXXXXXXXXX @0plXXXXXXXXXXXX'\r' XXXXXX:File nameUpdate List @0?UL'\r' Update List No change @0UL00'\r' When Folder List is changed.
Change @0UL01'\r' When Folder List is not changed.Preset General
Preset Setting @0?PS'\r' Preset Preset1 @0PS01'\r'Preset2 @0PS02'\r'Preset3 @0PS03'\r'
Preset Title (x:Preset No) @0?PNx'\r' Preset Name xxxxxxxx @0PNnxxxxxxx'\r' n:Preset Noxxxxxx:Preset Name
Shift Mode @0?Sm'\r' Shift Mode Momentary @0SmMO'\r'Lock @0SmLK'\r'
Appendix
APPENDIX
Status request command (Host ! This unit) Status message (this unit ! host)Request Command Ans. Command Remarks
Preset General
Power On Mode @0?PO'\r' Power On Mode Resume Play @0PORM'\r'Play First @0POPF'\r'STOP @0POST'\r'REC @0PORE'\r'
Preset Rec Dual Rec @0?dR'\r' Dual Rec Off @0dROF'\r'SD1 @0dRS1'\r'SD2 @0dRS2'\r'USB @0dRUS'\r'
Relay Rec @0?rR'\r' Relay Rec Off @0rROF'\r'SD1 @0rRS1'\r'SD2 @0rRS2'\r'USB @0rRUS'\r'
Rec level Type @0?Rl'\r' Rec level Type Master/bal @0RlMA'\r'Separate L/R @0RlLR'\r'
ALC(Rec level) @0?RL'\r' Rec level Manual @0RLMA'\r'ALC(Separate) @0RLSE'\r'ALC(Mix) @0RLMI'\r'
One Touch Rec @0?OR'\r' One Touch Rec On @0OR00'\r'Off @0OR01'\r'
InputSelect @0?IN'\r' InputSelect UNBALANSE @0INUB'\r'BALANCE @0INBA'\r'Coaxial(Digi-Unbal) @0INDI'\r'AES/EBU(Digi-Bal) @0INDB'\r'
Rec Format @0?AF'\r' Algo PCM-XX @0AFPMXX'\r' XX :Bit lengthMP3-XXX @0AFM3XXX'\r' XXX:bps
320Kbps=320,64Kbps=064etcThe kind of the setting is the same as the selection of Menu.
Rec Channel @0?CH'\r' CH STEREO @0CHST'\r'L-MONO @0CHML'\r'LR-MONO @0CHMX'\r'
Sample rate @0?FS'\r' FS XX @0FSXX'\r' XX:96KHz=96,48KHz=48,44.10KHz=44The kind of the setting is the same as the selection of Menu.
PreRec @0?PR'\r' PreRec OFF @0PR'\r'XX (sec) @0PRxS'\r' xsec:x=1~5(Sec)
A.Track Time @0?AT'\r' A.TrackTime HHMM @0ATHHMM'\r' HH:hour MM:minute Off=0000,1min=0001,5min=000530min=0030,1hour=0100The kind of the setting is the same as the selection of Menu.
AutoMark On/Off @0?AM'\r' AutoMark ON @0AM00'\r'OFF @0AM01'\r'
Silent Skip On/Off @0?SS'\r' S.SKIP ON @0SS00'\r'OFF @0SS01'\r'
Silent Time @0?SC'\r' Silent Time XX @0SCXX'\r' XX:sec
Appendix
APPENDIX
Status request command (Host ! This unit) Status message (this unit ! host)Request Command Ans. Command Remarks
Preset Rec Silent Level @0?SL'\r' Silent Level XX @0SLXX'\r' XX:-20dB=20,-25dB=25etcThe kind of the setting is the same as the selection of Menu.
Preset Play Play Range On/Off @0?pR'\r' Play Range All @0pRAL'\r'Folder @0pRFD'\r'
Play Mode @0?PM'\r' Play Mode Single Play @0PMSP'\r'Continuous @0PMCN'\r'
Random On/Off @0?RN'\r' Random ON @0RN00'\r'OFF @0RN01'\r'
Program Play/Normal Play @0?PG'\r' Program Play/Normal Play
Normal Play @0PG00'\r'Program Play @0PG01'\r'
Finish Mode(Shingle Mode)
@0?FM'\r' Finish Mode STOP @0FMST'\r'Next @0FMNT'\r'Recue @0FMRC'\r'
Repeat Mode @0?RE'\r' Repeat Mode ON @0RE00'\r'OFF @0RE01'\r'
Auto Cue ON/OFF @0?AC'\r' Auto Cue OFF @0AC00'\r'XX @0ACXX'\r' xx:Auto Cue Level
Example)-48dB:xx=48SKIP BACK @0?SB'\r' SKIP BACK XXX(time) @0SBXXX'\r' xxx=005:0.5sec…Search Mode @0?sM'\r' Search Mode Normal @0sMNO'\r'
Silent @0sMSL'\r'Auto Fade In @0?FI'\r' Fade In XXX(time) @0FIXXX'\r' xx:Set time
Off:xx=000.5sec:xx=05,1.0sec:xx=10,1.5sec:xx=15
Auto Fade Out @0?FO'\r' Fade Out XXX(time) @0FOXXX'\r' xx:Set timeOff:xx=000.5sec:xx=05,1.0sec:xx=10,1.5sec:xx=15
Start Delay @0?sD'\r' Start Delay xxx @0sDxxx'\r' xxx:set time(10msec)Off:xxx=000100msec:xxx=010,200msec:xxx=020,300msec:xxx=030
EOM(End Of Message) @0?ED'\r' EOM(End Of Message) XX(Time) @0EDXX'\r' xx=OF:Off,00:0sec,05:5sec•Unit : to 60sec.
Master Key(Key Con Pitch)
@0?KY'\r' Key Control ON @0KY00'\r'OFF @0KY01'\r'
Preset Display Time Display @0?TD'\r' Time Display HH:MM:SS @0TDHMS'\r'MMM:SS:FF @0TDMSF'\r'
File Sort @0?FR'\r' File Sort Date/Time @0FRDA'\r'Alphabetical @0FRAL'\r'
Dimmer @0?DM'\r' Dimmer ON @0DM00'\r'OFF @0DM01'\r'
Display Dimmer @0?DD'\r' Display Dimmer 100% @0DD00'\r'75% @0DD01'\r'50% @0DD02'\r'25% @0DD03'\r'0% @0DD04'\r'
Appendix
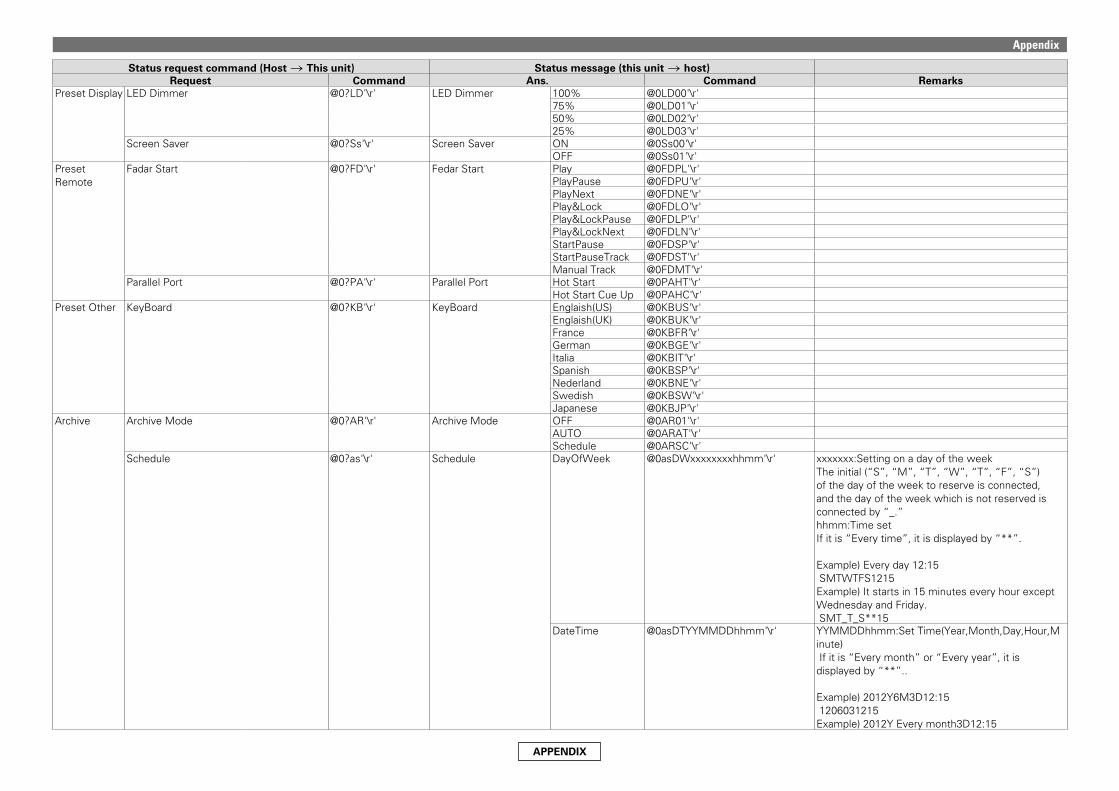
APPENDIX
Status request command (Host ! This unit) Status message (this unit ! host)Request Command Ans. Command Remarks
Preset Display LED Dimmer @0?LD'\r' LED Dimmer 100% @0LD00'\r'75% @0LD01'\r'50% @0LD02'\r'25% @0LD03'\r'
Screen Saver @0?Ss'\r' Screen Saver ON @0Ss00'\r'OFF @0Ss01'\r'
Preset Remote
Fadar Start @0?FD'\r' Fedar Start Play @0FDPL'\r'PlayPause @0FDPU'\r'PlayNext @0FDNE'\r'Play&Lock @0FDLO'\r'Play&LockPause @0FDLP'\r'Play&LockNext @0FDLN'\r'StartPause @0FDSP'\r'StartPauseTrack @0FDST'\r'Manual Track @0FDMT'\r'
Parallel Port @0?PA'\r' Parallel Port Hot Start @0PAHT'\r'Hot Start Cue Up @0PAHC'\r'
Preset Other KeyBoard @0?KB'\r' KeyBoard Englaish(US) @0KBUS'\r'Englaish(UK) @0KBUK'\r'France @0KBFR'\r'German @0KBGE'\r'Italia @0KBIT'\r'Spanish @0KBSP'\r'Nederland @0KBNE'\r'Swedish @0KBSW'\r'Japanese @0KBJP'\r'
Archive Archive Mode @0?AR'\r' Archive Mode OFF @0AR01'\r'AUTO @0ARAT'\r'Schedule @0ARSC'\r'
Schedule @0?as'\r' Schedule DayOfWeek @0asDWxxxxxxxxhhmm'\r' xxxxxxx:Setting on a day of the week The initial (“S”, “M”, “T”, “W”, “T”, “F”, “S”) of the day of the week to reserve is connected, and the day of the week which is not reserved is connectedby“_.”hhmm:Time setIf it is “Every time”, it is displayed by “**”.
Example) Every day 12:15 SMTWTFS1215Example) It starts in 15 minutes every hour except Wednesday and Friday.SMT_T_S**15
DateTime @0asDTYYMMDDhhmm'\r' YYMMDDhhmm:Set Time(Year,Month,Day,Hour,Minute) If it is “Every month” or “Every year”, it is displayed by “**”..
Example) 2012Y6M3D12:15 1206031215Example) 2012Y Every month3D12:15
Appendix

APPENDIX
Status request command (Host ! This unit) Status message (this unit ! host)Request Command Ans. Command Remarks
Archive Archive Server IP @0?AI'\r' Archive Server IP xxx.xxx.xxx.xxx @0AIxxxxxxxxxxxx'\r' xxxxxxxxxxxx:Archive Server IPExample)IP=192.168.000.007.:xxxxxxxxxxxx=192168000007
Archive Folder @0?AO'\r' Archive Folder XXXXXXXXXXXX @0AOXXXXXXXXXXXX'\r' XXXXXXXXXXXX:Archive Folder NameArchive User Name @0?AU'\r' Archive User Name XXXXXXXXXXXX @0AUXXXXXXXXXXXX'\r' XXXXXXXXXXXX:Archive User NameArchive Password @0?AP'\r' Archive Password XXXXXXXXXXXX @0APXXXXXXXXXXXX'\r' XXXXXXXXXXXX:Archive PasswordAuto Deletion @0?AD'\r' Auto Deletion OFF @0ADOF'\r'
XXh @0ADXX'\r' XXh(settime1h=01)1h, 3h, 6h, 12h, 24h
Clear After Archive @0?CA'\r' Clear After Archive ON @0CA00'\r'OFF @0CA01'\r'
Rec Timer Rec Timer Timer No:XX @0?ShXX'\r' Rec Timer DayOfWeek @0ShDWxxxxxxxxHHMMhhmmXXXX'\r' XX:Reserve No! 01-30xxxxxxx:Setting on a day of the week The initial (“S”, “M”, “T”, “W”, “T”, “F”, “S”) of the day of the week to reserve is connected, and the day of the week which is not reserved is connectedby“_.”hhmm:Time setIf it is “Every time”, it is displayed by “**”.
Example) Every day 12:15 SMTWTFS1215Example) It starts in 15 minutes every hour except Wednesday and Friday.SMT_T_S**15hhmm:Recordingtime=hour,minuteXXXX:UserArea(Minwordsnumber=0,Maxwordsnumber=32words)
DateTime @0ShDTYYMMDDHHMMhhmmXXXX'\r' XX:Reserve No! 01-30YYMMDDhhmm:Set Time(Year,Month,Day,Hour,Minute) If it is “Every month” or “Every year”, it is displayed by “**”..
Example) 2012Y6M3D12:15 1206031215Example) 2012Y Every month3D12:15 hhmm:RecordingTime=houre,minuteXXXX:UserArea(Minwords=0,MaxWords=32Words)
Appendix
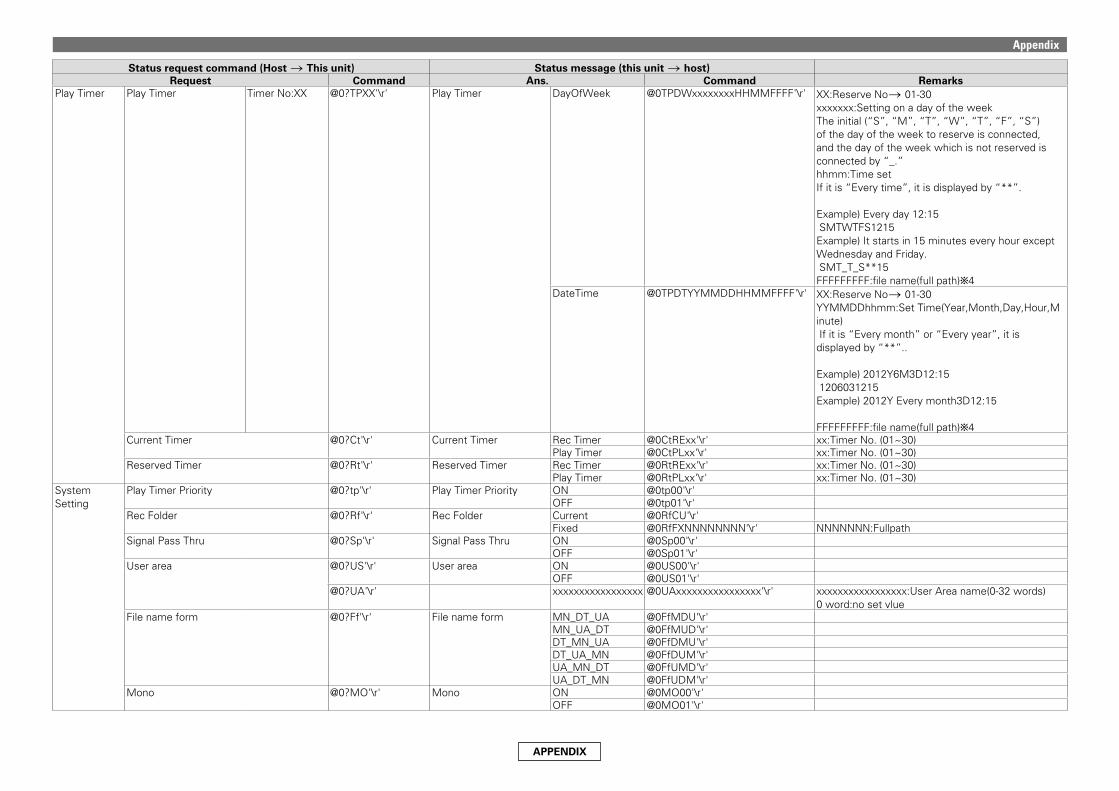
APPENDIX
Status request command (Host ! This unit) Status message (this unit ! host)Request Command Ans. Command Remarks
Play Timer Play Timer Timer No:XX @0?TPXX'\r' Play Timer DayOfWeek @0TPDWxxxxxxxxHHMMFFFF'\r' XX:Reserve No! 01-30xxxxxxx:Setting on a day of the weekThe initial (“S”, “M”, “T”, “W”, “T”, “F”, “S”) of the day of the week to reserve is connected, and the day of the week which is not reserved is connectedby“_.”hhmm:Time setIf it is “Every time”, it is displayed by “**”.
Example) Every day 12:15 SMTWTFS1215Example) It starts in 15 minutes every hour except Wednesday and Friday.SMT_T_S**15FFFFFFFFF:file name(full path)b4
DateTime @0TPDTYYMMDDHHMMFFFF'\r' XX:Reserve No! 01-30YYMMDDhhmm:Set Time(Year,Month,Day,Hour,Minute) If it is “Every month” or “Every year”, it is displayed by “**”..
Example) 2012Y6M3D12:15 1206031215Example) 2012Y Every month3D12:15 FFFFFFFFF:file name(full path)b4
Current Timer @0?Ct'\r' Current Timer Rec Timer @0CtRExx'\r' xx:TimerNo.(01~30)Play Timer @0CtPLxx'\r' xx:TimerNo.(01~30)
Reserved Timer @0?Rt'\r' Reserved Timer Rec Timer @0RtRExx'\r' xx:TimerNo.(01~30)Play Timer @0RtPLxx'\r' xx:TimerNo.(01~30)
System Setting
Play Timer Priority @0?tp'\r' Play Timer Priority ON @0tp00'\r'OFF @0tp01'\r'
Rec Folder @0?Rf'\r' Rec Folder Current @0RfCU'\r'Fixed @0RfFXNNNNNNNN'\r' NNNNNNN:Fullpath
Signal Pass Thru @0?Sp'\r' Signal Pass Thru ON @0Sp00'\r'OFF @0Sp01'\r'
User area @0?US'\r' User area ON @0US00'\r'OFF @0US01'\r'
@0?UA'\r' xxxxxxxxxxxxxxxxx @0UAxxxxxxxxxxxxxxxx'\r' xxxxxxxxxxxxxxxxx:User Area name(0-32 words)0 word:no set vlue
File name form @0?Ff'\r' File name form MN_DT_UA @0FfMDU'\r'MN_UA_DT @0FfMUD'\r'DT_MN_UA @0FfDMU'\r'DT_UA_MN @0FfDUM'\r'UA_MN_DT @0FfUMD'\r'UA_DT_MN @0FfUDM'\r'
Mono @0?MO'\r' Mono ON @0MO00'\r'OFF @0MO01'\r'
Appendix

APPENDIX
Status request command (Host ! This unit) Status message (this unit ! host)Request Command Ans. Command Remarks
System Setting
Digital Out Fs @0?dF'\r' Digital Out Fs AUTO @0dFAT'\r'44.1KHz @0dF44'\r'48KHz @0dF48'\r'Ext(AES) @0dFEX'\r'
Line/Mic LCh @0?LML'\r' Line/Mic LCh Line @0LMLLN'\r'Mic @0LMLMC'\r'
Line/Mic RCh @0?LMR'\r' Line/Mic RCh Line @0LMRLN'\r'Mic @0LMRMC'\r'
Phantom LCh @0?PhL'\r' Phantom LCh ON @0PhL00'\r'OFF @0PhL01'\r'
Phantom RCh @0?PhR'\r' Phantom RCh ON @0PhR00'\r'OFF @0PhR01'\r'
Mic In Sens L-Ch @0?MsL'\r' Mic In Sens L-Ch XX @0MsLXX'\r' XX:L-Ch Mic Senc value (XX:16-40)Mic In Sens R-Ch @0?MsR'\r' Mic In Sens R-Ch XX @0MsRXX'\r' XX:R-Ch Mic Senc value (XX:16-40)Volume Input @0?VI'\r' Volume Input Fixed @0VIFX'\r'
Variable @0VIVA'\r'Ref (XLR/RCA)(FS Reference)
@0?Fr'\r' Ref (XLR/RCA)(FS Reference)
XX @0FrXX'\r' XX:Set value(dBu)XX=24:XLR=+24dBu/RCA=+10dBVXX=20:XLR=+20dBu/RCA=+6dBVXX=18:XLR=+18dBu/RCA=+4dBV
Input Trim L @0?ItL'\r' Input Trim L XXX @0ItLXXX'\r' XXX:Trimsettingvalue(+2.0dB~-2.0dB)XXX=+20:+2.0
Input Trim R @0?ItR'\r' Input Trim R XXX @0ItRXXX'\r' XXX:Trimsettingvalue(+2.0dB~-2.0dB)XXX=+20:+2.0
Output Trim L @0?OtL'\r' Output Trim L XXX @0OtLXXX'\r' XXX:Trimsettingvalue(+2.0dB~-2.0dB)XXX=+20:+2.0
Output Trim R @0?OtR'\r' Output Trim R XXX @0OtRXXX'\r' XXX:Trimsettingvalue(+2.0dB~-2.0dB)XXX=+20:+2.0
Time Form @0?TF'\r' Time Form 12h @0TF12'\r'24h @0TF24'\r'
DateForm @0?DF'\r' DateForm MDY @0DFMD'\r'DMY @0DFDM'\r'YMD @0DFYM'\r'
Display Contrast(Brightness)
@0?BN'\r' Display Contrast(Brightness)
XX @0BNXX'\r' XX:01-10
Language @0?LN'\r' Language English @0LNUS'\r'Japan @0LNJP'\r'
Machine Name @0?MN'\r' Machine Name xxxxxxxxxxxx @0MNxxxxxxxxxxxx'\r' xxxxxxxxxxxx:Machine NameAtoZ,atoz,0to9Max12words
IP Address @0?IP'\r' IP Address xxx.xxx.xxx.xxx @0IPxxxxxxxxxxxx'\r' xxxxxxxxxxxx:IP AdressExample)IP=192.168.000.002.:xxxxxxxxxxxx=192168000002
Sub net mask @0?SM'\r' Sub net mask xxx.xxx.xxx.xxx @0SMxxxxxxxxxxxx'\r' xxxxxxxxxxxx:Sub net maskExample)Subnetmask=255.255.255.000.:xxxxxxxxxxxx=255255255000
Gateway @0?GW'\r' Gateway xxx.xxx.xxx.xxx @0GWxxxxxxxxxxxx'\r' xxxxxxxxxxxx:Gateway IPExample)IP=192.168.000.005.:xxxxxxxxxxxx=192168000005
Appendix

APPENDIX
Status request command (Host ! This unit) Status message (this unit ! host)Request Command Ans. Command Remarks
System Setting
DNS @0?DN'\r' DNS xxx.xxx.xxx.xxx @@DNxxxxxxxxxxxx'\r' xxxxxxxxxxxx:DNSExample)IP=192.168.000.006.:xxxxxxxxxxxx=192168000006
IP Control Port @0?Ip'\r' IP Control Port XXXXX @0IpXXXXX'\r' XXXXX:PortNo.00000~65535IP Control Auth @0?Ia'\r' IP Control Auth ON @0Ia00'\r'
OFF @0Ia01'\r'Network Standby @0?Ns'\r' Network Standby ON @0Ns00'\r'
OFF @0Ns01'\r'NTP Server @0?NP'\r' NTP Server xxx.xxx.xxx.xxx @0NPxxxxxxxxxxxx'\r' xxxxxxxxxxxx:NTP Server IP
Example)IP=192.168.000.007.:xxxxxxxxxxxx=192168000007 OFF:DISABLE00000
NTP Cycle @0?NC'\r' NTP Cycle hhmm @0NChhmm'\r' hhmm:00:15~24:00Syslog @0?Sl'\r' Syslog xxx.xxx.xxx.xxx @0Slxxxxxxxxxxxx'\r' xxxxxxxxxxxx:IP Address
Example)IP=192.168.000.007.:xxxxxxxxxxxx=192168000007 OFF:DISABLE00000
Time Zone @0?TZ'\r' Time Zone xxxxx @0TZxxxxx'\r' +13:00~-12:00xx=+0830:+8:30•Unit:+14:00~-12:00
Daylight Saving @0?dS'\r' Daylight Saving ON @0dS00'\r'OFF @0dS01'\r'
DST Offset @0?do'\r' DST Offset hhmm @0dohhmm'\r' hhmm:00:00~06:00(15minStep)DST Start Date @0?ds'\r' DST Start Date MMDDhhmm @0dsMMDDhhmm'\r'DST End Date @0?de'\r' DST End Date MMDDhhmm @0deMMDDhhmm'\r'ProdMgr Detectable @0?Pd'\r' ProdMgr Detectable ON @0Pd00'\r'
OFF @0Pd01'\r'ProdMgr Power Ctrl @0?PP'\r' ProdMgr Power Ctrl ON @0PP00'\r'
OFF @0PP01'\r'Auto Reboot @0?Ar'\r' Auto Reboot ON @0Ar00'\r'
OFF @0Ar01'\r'Card Cheak @0?CK'\r' Card Cheak XX.XXX (MB/S) @0CKXXXXX'\r' XX.XXX WriteSpeed(MB/S)
Version etc Version @0?VN'\r' Version xxxxxxxx:Version No(8 digits)mmmmmmmm: model name
@0VNxxxxxxxxmmmmmmm'\r' xxxxxxxx:Version No(8 digits)mmmmmmmm:model name(Case of DN-700R:DN-700R)(Case of DN-500R:DN-500R)
Appendix
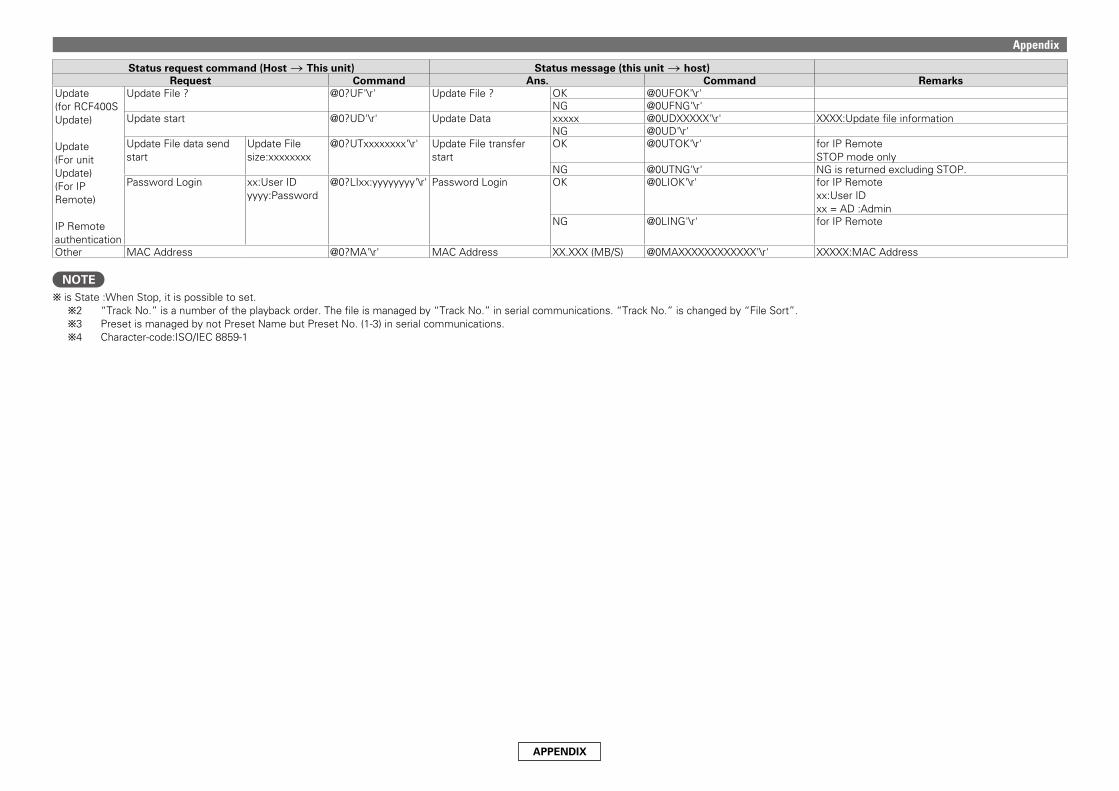
APPENDIX
Status request command (Host ! This unit) Status message (this unit ! host)Request Command Ans. Command Remarks
Update(for RCF400S Update)
Update(For unit Update)(For IP Remote)
IP Remote authentication
Update File ? @0?UF'\r' Update File ? OK @0UFOK'\r'NG @0UFNG'\r'
Update start @0?UD'\r' Update Data xxxxx @0UDXXXXX'\r' XXXX:Update file informationNG @0UD'\r'
Update File data send start
Update File size:xxxxxxxx
@0?UTxxxxxxxx'\r' Update File transfer start
OK @0UTOK'\r' for IP RemoteSTOP mode only
NG @0UTNG'\r' NG is returned excluding STOP.Password Login xx:User ID
yyyy:Password@0?LIxx:yyyyyyyy'\r' Password Login OK @0LIOK'\r' for IP Remote
xx:User IDxx=AD:Admin
NG @0LING'\r' for IP Remote
Other MAC Address @0?MA'\r' MAC Address XX.XXX (MB/S) @0MAXXXXXXXXXXXX'\r' XXXXX:MAC Address
NOTEb is State :When Stop, it is possible to set.
b2 “Track No.” is a number of the playback order. The file is managed by “Track No.” in serial communications. “Track No.” is changed by “File Sort”.b3 Preset is managed by not Preset Name but Preset No. (1-3) in serial communications.b4 Character-code:ISO/IEC 8859-1
Appendix
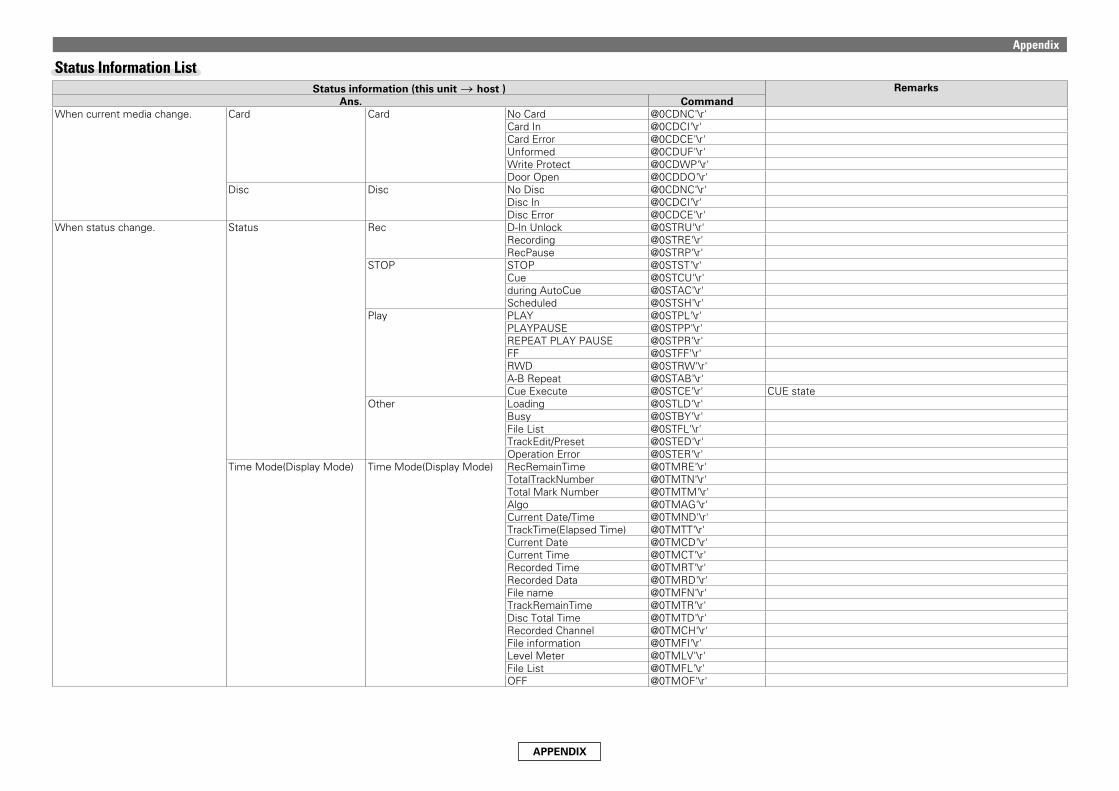
APPENDIX
Appendix
Status Information ListStatus information (this unit ! host ) Remarks
Ans. CommandWhen current media change. Card Card No Card @0CDNC'\r'
Card In @0CDCI'\r'Card Error @0CDCE'\r'Unformed @0CDUF'\r'Write Protect @0CDWP'\r'Door Open @0CDDO'\r'
Disc Disc No Disc @0CDNC'\r'Disc In @0CDCI'\r'Disc Error @0CDCE'\r'
When status change. Status Rec D-In Unlock @0STRU'\r'Recording @0STRE'\r'RecPause @0STRP'\r'
STOP STOP @0STST'\r'Cue @0STCU'\r'during AutoCue @0STAC'\r'Scheduled @0STSH'\r'
Play PLAY @0STPL'\r'PLAYPAUSE @0STPP'\r'REPEAT PLAY PAUSE @0STPR'\r'FF @0STFF'\r'RWD @0STRW'\r'A-B Repeat @0STAB'\r'Cue Execute @0STCE'\r' CUE state
Other Loading @0STLD'\r'Busy @0STBY'\r'File List @0STFL'\r'TrackEdit/Preset @0STED'\r'Operation Error @0STER'\r'
Time Mode(Display Mode) Time Mode(Display Mode) RecRemainTime @0TMRE'\r'TotalTrackNumber @0TMTN'\r'Total Mark Number @0TMTM'\r'Algo @0TMAG'\r'Current Date/Time @0TMND'\r'TrackTime(Elapsed Time) @0TMTT'\r'Current Date @0TMCD'\r'Current Time @0TMCT'\r'Recorded Time @0TMRT'\r'Recorded Data @0TMRD'\r'File name @0TMFN'\r'TrackRemainTime @0TMTR'\r'Disc Total Time @0TMTD'\r'Recorded Channel @0TMCH'\r'File information @0TMFI'\r'Level Meter @0TMLV'\r'File List @0TMFL'\r'OFF @0TMOF'\r'

APPENDIX
Status information (this unit ! host ) RemarksAns. Command
When current media change. Media Media USB @0MEUS'\r'SD1 @0MES1'\r'SD2 @0MES2'\r'NET @0MENE'\r'
When current track change. Cue Track No. XXXX @0CnXXXX'\r' XXXX:Track No.When total folder number change. Total Folder Number XXXX @0TfXXXX'\r' XXXX:Total Folder numberWhen folder change. Select Folder XXXXXXXXXXXX @0SFXXXXXXXXXXXX'\r' XXX…:Folder nameWhen total track number change. Total Track Number XXXX @0TtXXXX'\r' 4 digitsWhen error occurs Error @0ERnnxxxx'\r' "ss:displayTime(00~99)
00:Until Error of Status finish 01:1Second 02:2S 03:3Sxxx…:Message (In the number of words, 1-30 words and the codes are ISO/IEC 8859-1)"
Appendix

LICENSE
LicenseENGLISH
This section describes software license used for DN-700R/RC-F400S.To maintain the correct content, the original (English) is used.
FRANÇAISCette section concerne la licence du logiciel utilisé avec le lecteur DN-700R/RC-F400S.Le document d’origine (en anglais) est utilisé afin d’assurer l’exactitude du contenu.
ESPAÑOLEsta sección describe el contenido de la licencia del software para el DN-700R/RC-F400S.Paramantenerelcontenidocorrecto,seutilizaeloriginal(Inglés).
DEUTSCHDieser Abschnitt beschreibt die für den DN-700R/RC-F400S verwendeteSoftware-Lizenz.Um den korrekten Inhalt zu erhalten, wird das Original (Englisch)verwendet.
ITALIANOQuesta sezionedescrive la licenza softwareusataper ilDN-700R/RC-F400S.Per mantenere il giusto contenuto, viene usata la forma originale (in inglese).
SVENSKADenna sektion beskriver programvarulicenserna som används förDN-700R/RC-F400S.För att behålla det korrekta innehållet används originalspråket(engelska).
Copyright (c) 1990-2003Wada Laboratory, the University of Tokyo. All rights reserved.
Copyright (c) 2003-2004Electronic Font Open Laboratory (/efont/). All rights reserved.
Redistribution and use in source and binary forms, with or without modification, are permitted provided that the following conditions are met:1. Redistributions of source code must retain the above copyright notice, this list of conditions and the following
disclaimer.2. Redistributions in binary form must reproduce the above copyright notice, this list of conditions and the following
disclaimer in the documentation and/or other materials provided with the distribution.3. Neither the name of the Wada Laboratory, the University of Tokyo nor the names of its contributors may be used to
endorse or promote products derived from this software without specific prior written permission.
THIS SOFTWARE IS PROVIDED BY WADA LABORATORY, THE UNIVERSITY OF TOKYO AND CONTRIBUTORS “AS IS” AND ANY EXPRESS OR IMPLIED WARRANTIES, INCLUDING, BUT NOT LIMITED TO, THE IMPLIED WARRANTIES OF MERCHANTABILITY AND FITNESS FOR A PARTICULAR PURPOSE ARE DISCLAIMED. IN NO EVENT SHALL THE LABORATORY OR CONTRIBUTORS BE LIABLE FOR ANY DIRECT, INDIRECT, INCIDENTAL, SPECIAL, EXEMPLARY, OR CONSEQUENTIAL DAMAGES (INCLUDING, BUT NOT LIMITED TO, PROCUREMENT OF SUBSTITUTE GOODS OR SERVICES; LOSS OF USE, DATA, OR PROFITS; OR BUSINESS INTERRUPTION) HOWEVER CAUSED AND ON ANY THEORY OF LIABILITY, WHETHER IN CONTRACT, STRICT LIABILITY, OR TORT (INCLUDING NEGLIGENCE OR OTHERWISE) ARISING IN ANY WAY OUT OF THE USE OF THIS SOFTWARE, EVEN IF ADVISED OF THE POSSIBILITY OF SUCH DAMAGE.
SDHC Logo is a trademark of SD-3C, LLC.
LICENSE
[NFLC](1) This product is installed with “NetFront Living Connect” home network interconnection software made by ACCESS Co., Ltd. (2) Logos specified by ACCESS Co., Ltd. (ACCESS company logo and NetFront logo) (3) ACCESS and NetFront are the trademarks or registered trademarks of ACCESS Co., Ltd in Japan and other countries. (4) Copyright (c) 2012 ACCESS CO., LTD.
[GD]Portions copyright 1994, 1995, 1996, 1997, 1998, 1999, 2000, 2001, 2002, 2003, 2004 by Cold Spring Harbor Laboratory. Funded under Grant P41-RR02188 by the National Institutes of Health.
Portions copyright 1996, 1997, 1998, 1999, 2000, 2001, 2002, 2003, 2004 by Boutell.Com, Inc.
Portions relating to GD2 format copyright 1999, 2000, 2001, 2002, 2003, 2004 Philip Warner.
Portions relating to PNG copyright 1999, 2000, 2001, 2002, 2003, 2004 Greg Roelofs.
Portions relating to gdttf.c copyright 1999, 2000, 2001, 2002, 2003, 2004 John Ellson ([email protected]).
Portions relating to gdft.c copyright 2001, 2002, 2003, 2004 John Ellson ([email protected]).
PortionsrelatingtoJPEGandtocolorquantizationcopyright2000,2001,2002,2003,2004,DougBeckerandcopyright(C)1994,1995,1996,1997, 1998, 1999, 2000, 2001, 2002, 2003, 2004 Thomas G. Lane. This software is based in part on the work of the Independent JPEG Group. See the file README-JPEG.TXT for more information.
Portions relating toGIFcompressioncopyright1989byJefPoskanzerandDavidRowley,withmodifications for threadsafetybyThomasBoutell.
Portions relating to GIF decompression copyright 1990, 1991, 1993 by David Koblas, with modifications for thread safety by Thomas Boutell.
PortionsrelatingtoWBMPcopyright2000,2001,2002,2003,2004MauriceSzmurloandJohanVandenBrande.
Portions relating to GIF animations copyright 2004 Jaakko Hyvatti ([email protected])
Permission has been granted to copy, distribute and modify gd in any context without fee, including a commercial application, provided that this notice is present in user-accessible supporting documentation.
License

LICENSE
This does not affect your ownership of the derived work itself, and the intent is to assure proper credit for the authors of gd, not to interfere with your productive use of gd. If you have questions, ask. “Derived works” includesallprogramsthatutilizethelibrary.Creditmustbegiveninuser-accessibledocumentation.
This software is provided “AS IS.” The copyright holders disclaim all warranties, either express or implied, including but not limited to implied warranties of merchantability and fitness for a particular purpose, with respect to this code and accompanying documentation.
Although their code does not appear in the current release, the authors also wish to thank Hutchison Avenue Software Corporation for their prior contributions.
(1)“This product contains NetFront Living Connect of ACCESS CO., LTD.”(2)“ACCESS and NetFront are trademarks or registered trademarks of ACCESS CO., LTD. in Japan and in other countries.”(3)“Copyright (c) 2012 ACCESS CO., LTD.”
expatCopyright (c) 1998, 1999, 2000 Thai Open Source Software Center Ltd
Permission is hereby granted, free of charge, to any person obtaining a copy of this software and associated documentation files (the “Software”), to deal in the Software without restriction, including without limitation the rights to use, copy, modify, merge, publish, distribute, sublicense, and/or sell copies of the Software, and to permit persons to whom the Software is furnished to do so, subject to the following conditions:
The above copyright notice and this permission notice shall be included in all copies or substantial portions of the Software.
THE SOFTWARE IS PROVIDED “AS IS”, WITHOUT WARRANTY OF ANY KIND, EXPRESS OR IMPLIED, INCLUDING BUT NOT LIMITED TO THE WARRANTIES OFMERCHANTABILITY, FITNESS FOR A PARTICULAR PURPOSE AND NONINFRINGEMENT.IN NO EVENT SHALL THE AUTHORS OR COPYRIGHT HOLDERS BE LIABLE FOR ANY CLAIM, DAMAGES OR OTHER LIABILITY, WHETHER IN AN ACTION OF CONTRACT, TORT OR OTHERWISE, ARISING FROM, OUT OF OR IN CONNECTION WITH THE SOFTWARE OR THE USE OR OTHER DEALINGS IN THE SOFTWARE.
License

LICENSE
md5/* Copyright (C) 1991-2, RSA Data Security, Inc. Created 1991. All rights reserved.
License to copy and use this software is granted provided that it is identified as the “RSA Data Security, Inc. MD5 Message-Digest Algorithm” in all material mentioning or referencing this software or this function.
License is also granted to make and use derivative works provided that such works are identified as “derived from the RSA Data Security, Inc. MD5 Message-Digest Algorithm” in all material mentioning or referencing the derived work.
RSA Data Security, Inc. makes no representations concerning either the merchantability of this software or the suitability of this software for any particular purpose. It is provided “as is” without express or implied warranty of any kind.
These notices must be retained in any copies of any part of this documentation and/or software. */
zlib/*zlib.h--interfaceofthe‘zlib’generalpurposecompressionlibraryversion1.2.7,May2nd,2012
Copyright (C) 1995-2012 Jean-loup Gailly and Mark Adler
This software is provided ‘as-is’, without any express or implied warranty. In no event will the authors be held liable for any damages arising from the use of this software.
Permission is granted to anyone to use this software for any purpose, including commercial applications, and to alter it and redistribute it freely, subject to the following restrictions:
1. Theoriginofthissoftwaremustnotbemisrepresented;youmustnotclaimthatyouwrotetheoriginalsoftware.Ifyouusethissoftwareinaproduct,anacknowledgmentintheproductdocumentationwouldbeappreciated but is not required.
2. Altered source versions must be plainly marked as such, and must not be misrepresented as being the original software.3. This notice may not be removed or altered from any source distribution.
Jean-loup Gailly Mark [email protected]@alumni.caltech.edu
*/
License

LICENSE
libpngThis copy of the libpng notices is provided for your convenience. In case of any discrepancy between this copy and the notices in the file png.h that is included in the libpng distribution, the latter shall prevail.
COPYRIGHT NOTICE, DISCLAIMER, and LICENSE:
If you modify libpng you may insert additional notices immediately following this sentence.
libpng versions 1.2.6, August 15, 2004, through 1.2.29, May 8, 2008, are Copyright (c) 2004, 2006-2008 Glenn Randers-Pehrson, and are distributed according to the same disclaimer and license as libpng-1.2.5 with the following individual added to the list of Contributing Authors
Cosmin Truta
libpng versions 1.0.7, July 1, 2000, through 1.2.5 - October 3, 2002, are Copyright (c) 2000-2002 Glenn Randers-Pehrson, and are distributed according to the same disclaimer and license as libpng-1.0.6 with the following individuals added to the list of Contributing Authors
Simon-Pierre Cadieux Eric S. Raymond Gilles Vollant
and with the following additions to the disclaimer:
There is no warranty against interference with your enjoyment of the library or against infringement. There is no warranty that our efforts or the library will fulfill any of your particular purposes or needs. This library is provided with all faults, and the entire risk of satisfactory quality, performance, accuracy, and effort is with the user.
libpng versions 0.97, January 1998, through 1.0.6, March 20, 2000, are Copyright (c) 1998, 1999 Glenn Randers-Pehrson, and are distributed according to the same disclaimer and license as libpng-0.96, with the following individuals added to the list of Contributing Authors:
Tom Lane Glenn Randers-Pehrson Willem van Schaik
libpng versions 0.89, June 1996, through 0.96, May 1997, are Copyright (c) 1996, 1997 Andreas DilgerDistributed according to the same disclaimer and license as libpng-0.88, with the following individuals added to the list of Contributing Authors:
John Bowler Kevin Bracey Sam Bushell Magnus Holmgren Greg Roelofs Tom Tanner
License
LICENSE
libpng versions 0.5, May 1995, through 0.88, January 1996, are Copyright (c) 1995, 1996 Guy Eric Schalnat, Group 42, Inc.
For the purposes of this copyright and license, “Contributing Authors” is defined as the following set of individuals:
Andreas Dilger Dave Martindale Guy Eric Schalnat Paul Schmidt Tim Wegner
The PNG Reference Library is supplied “AS IS”. The Contributing Authors and Group 42, Inc. disclaim all warranties, expressed or implied, including, without limitation, the warranties of merchantability and of fitness for any purpose. The Contributing Authors and Group 42, Inc. assume no liability for direct, indirect, incidental, special, exemplary, or consequential damages, which may result from the use of the PNG Reference Library, even if advised of the possibility of such damage.
Permission is hereby granted to use, copy, modify, and distribute this source code, or portions hereof, for any purpose, without fee, subject to the following restrictions:
1. The origin of this source code must not be misrepresented.
2. Altered versions must be plainly marked as such and must not be misrepresented as being the original source.
3. This Copyright notice may not be removed or altered from any source or altered source distribution.
The Contributing Authors and Group 42, Inc. specifically permit, without fee, and encourage the use of this source code as a component to supporting the PNG file format in commercial products. If you use this source code in a product, acknowledgment is not required but would be appreciated.
A“png_get_copyright”functionisavailable,forconvenientusein“about”boxesandthelike:
printf(“%s”,png_get_copyright(NULL));
Also, the PNG logo (in PNG format, of course) is supplied in the files “pngbar.png” and “pngbar.jpg” (88x31) and “pngnow.png” (98x31).
Libpng is OSI Certified Open Source Software. OSI Certified Open Source is a certification mark of the Open Source Initiative.
Glenn Randers-Pehrsonglennrp at users.sourceforge.netMay 8, 2008
License

Dimensions
Unit: in. (mm)
19 (482.6)
13 35/64 (344.0)1 49/64 (45.0)
1 49/64 (45.0) 1
7/64
(6
.8)
7/32
(5
.6)
1 47
/64
(44.
0)29
/64
(11.
6)13
(3
30.3
)13
11/
16
(347
.5)
13 5
1/64
(3
50.4
)
37/6
4 (1
4.5)
Weight: 7 lbs 14.99 oz (3.6 kg)

3520 10271 00AP