ozeki ng - sms · pdf fileozeki sms client ... ozeki ng - sms gateway allows the installation...
TRANSCRIPT

OZEKI NG – SMS Gateway Product Guide
__________________ OZEKI INFORMATIKAI KFT________________________
© Copyright, Ozeki Informatics Ltd Page 1/188
OZEKI NG - SMS GATEWAY /Product Guide/
Product: Ozeki NG – SMS Gateway
Title: Ozeki NG – SMS Gateway
Product Guide
Editor: Mr. János Aranyász
Number of pages: 188

OZEKI NG – SMS Gateway Product Guide
__________________ OZEKI INFORMATIKAI KFT________________________
© Copyright, Ozeki Informatics Ltd Page 2/188
Table of Contents
Prerequisites ...................................................... 3 Minimum hardware requirements ...................................................................................... 3
Recommended hardware requirements .............................................................................. 3
Software requirements ........................................................................................................ 3
Download Information .............................................. 4 Installation Steps................................................... 5 Service Provider Connections ......................................... 8
GSM Modem Connectivity ................................................................................................ 9
Installation of a Wavecom Modem .............................................................................. 18
Send SMS with GSM Modem - CMS Error codes ...................................................... 26
Send SMS using a GSM modem - Connection problems ............................................ 29
SMPP Connection ............................................................................................................ 31
UCP connection ................................................................................................................ 40
CIMD2 connection ........................................................................................................... 49
HTTP Client Connection .................................................................................................. 55
HTTP Server Connection ................................................................................................. 62
Users and Applications ............................................. 69 Standard User ................................................................................................................... 70
Database User ................................................................................................................... 74
Microsoft SQL .............................................................................................................. 85
Microsoft SQL Express ................................................................................................ 91
MySql ........................................................................................................................... 95
Oracle ........................................................................................................................... 98
Sybase / SQL Anywhere ............................................................................................ 101
PostgreSQL ................................................................................................................ 104
Date Format Strings to be used in SQL SMS configurations .................................... 106
How to schedule SMS messages for sending ............................................................. 111
SMPP User ..................................................................................................................... 112
How to provide SMS Service for SMPP Client Applications .................................... 117
Autoreply User ............................................................................................................... 123
AutoReplyEasy User ...................................................................................................... 130
File user .......................................................................................................................... 136
HTTP Client User ........................................................................................................... 146
Colour SMS User ........................................................................................................... 152
E-mail User .................................................................................................................... 157
E-mail to SMS Configuration .................................................................................... 161
SMS to E-mail Configuration .................................................................................... 165
Autoreply Database User ............................................................................................... 168
Autoreply Database User installation guide ............................................................... 171
Create database layout for SMS autoresponses .......................................................... 174
File structure for controling SQL information query from database ......................... 176
Client software .................................................. 179 Outlook SMS Client ....................................................................................................... 179
Sending SMS messages from Excel ............................................................................... 179
Ozeki SMS Client ........................................................................................................... 188
OZEKI NG – SMS Gateway Product Guide
__________________ OZEKI INFORMATIKAI KFT________________________
© Copyright, Ozeki Informatics Ltd Page 3/188
Prerequisites
This page provides detailed information about the hardware and software requirements
for your computer to be able to send and receive SMS messages using the Ozeki NG -
SMS Gateway software.
To run the Ozeki NG - SMS Gateway software on your computer, you have to meet some
essential hardware and software requirements.
Minimum hardware requirements
CPU: Intel Pentium III, 450 Mhz
RAM: 512 Mb
Hard disk space: 50 Mb
Ports: RS232 and/or USB (if you use a GSM modem)
Network: Internet connection (if you use IP SMS connection)
Recommended hardware requirements
CPU: Intel P4D 3Ghz
RAM: 2 GB
Hard disk space: 500 Mb (SATA or SCSI)
Ports: RS232 and/or USB (if you use a GSM modem)
Phone-to-PC data cable (USB or RS232) or
Network: Internet connection (if you use IP SMS connection)
If you wish to use a GSM modem attached to the PC with a phone-to-PC data cable for SMS
messaging, you need a suitable device. For more information about suitable telephones for
SMS messaging, check out the Recommended SMS Hardware guide.
Software requirements
Ozeki NG - SMS Gateway runs on one of the following operating systems:
Windows 2000
Windows XP
Windows 2003
Windows Vista
The following updates should be installed:
.NET Framework 3.0
Windows Installer 3.0
Windows XP Service Pack 2.0 (if you use Windows XP)
You can download Ozeki NG - SMS Gateway and the programs listed in the software
requirements on the Download page (http://www.ozekisms.com/index.php?owpn=112). You
should always download and use the latest version of Ozeki NG.

OZEKI NG – SMS Gateway Product Guide
__________________ OZEKI INFORMATIKAI KFT________________________
© Copyright, Ozeki Informatics Ltd Page 4/188
Download Information
You can download the Ozeki NG - SMS Gateway software and the necessary prerequisites
from the Download page.
The download page URL is:
http://www.ozekisms.com/index.php?owpn=112
You need to download the following packages:
NET Framework 3.0 - redistributable package
Windows Installer 3.0
Windows XP Service Pack 2.0
and the latest version of
Ozeki NG - SMS Gateway
To start downloading, click the download link. You can decide whether to open or save the
program. If you open it, the installation process will start immediately (Figure 1).
Figure 1 - Downloading the software
To find out how to install the program, check out the Installation Steps in the next chapter.
OZEKI NG – SMS Gateway Product Guide
__________________ OZEKI INFORMATIKAI KFT________________________
© Copyright, Ozeki Informatics Ltd Page 5/188
Installation Steps
In this guide you can learn how to install the Ozeki NG - SMS Gateway software. You
will be instructed what to do in each dialogue box of the Ozeki NG - SMS Gateway
Setup Wizard to successfully finish the installation.
After you have downloaded the Ozeki NG - SMS Gateway software, you need to install it.
Take the following installation steps:
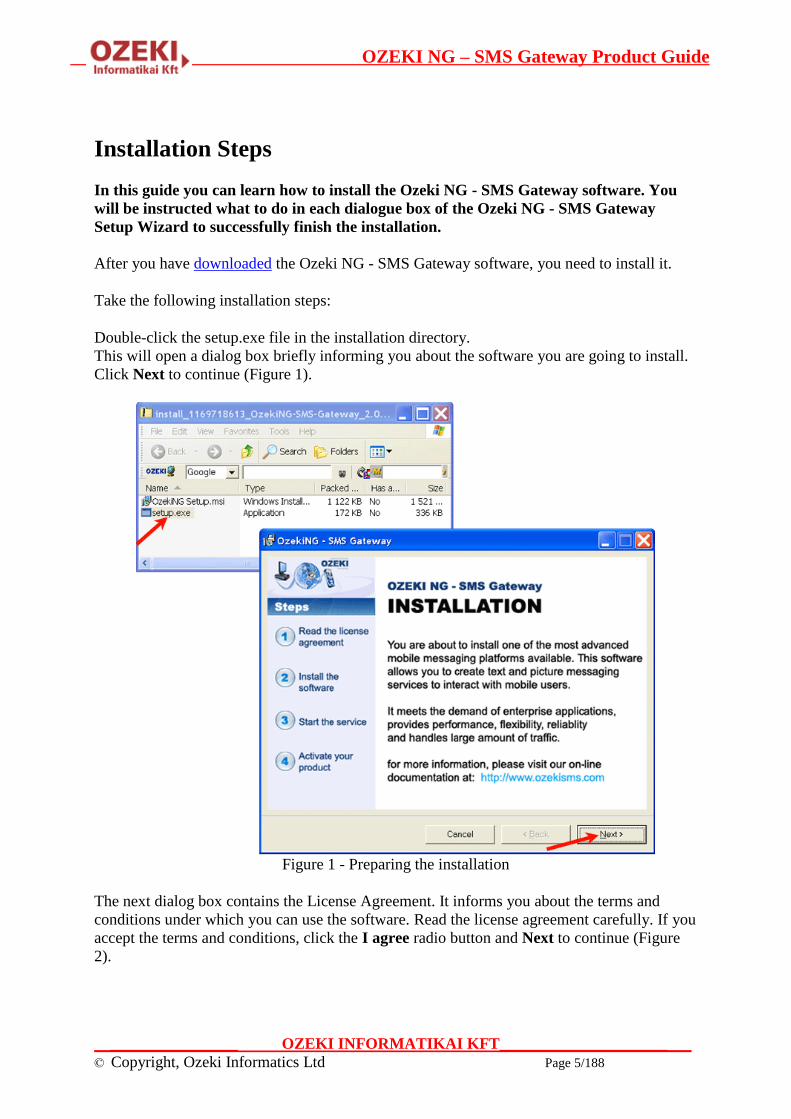
Double-click the setup.exe file in the installation directory.
This will open a dialog box briefly informing you about the software you are going to install.
Click Next to continue (Figure 1).
Figure 1 - Preparing the installation
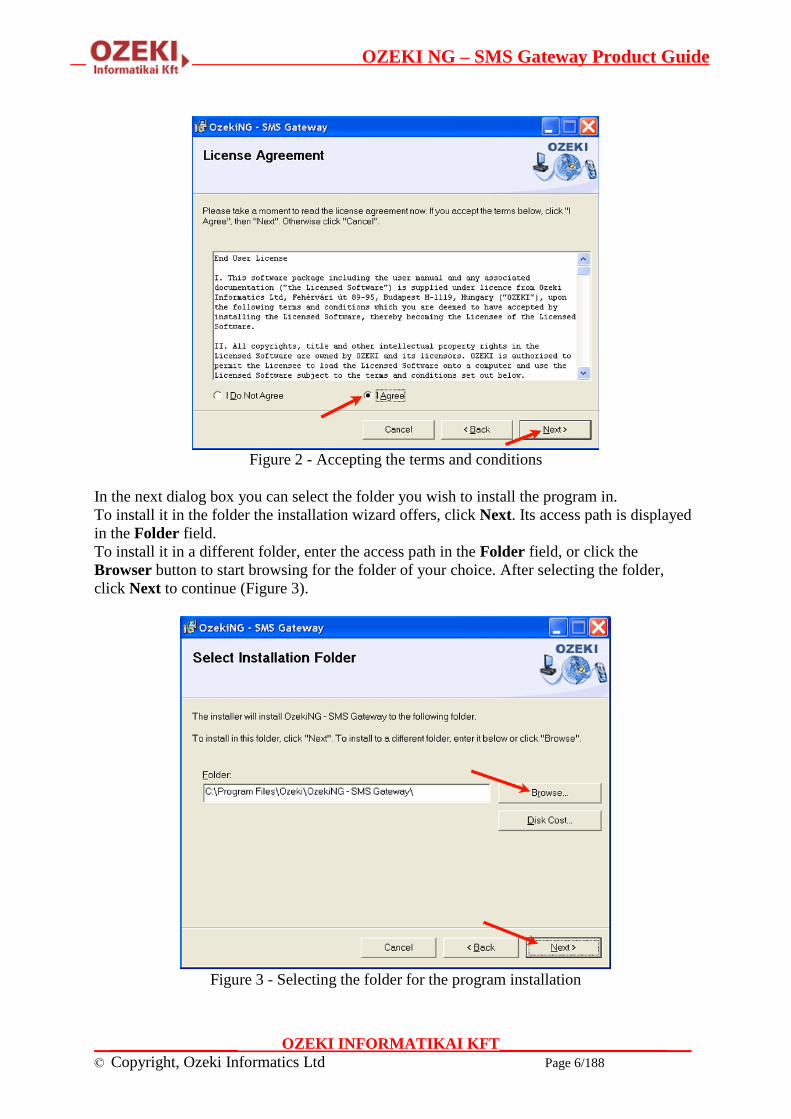
The next dialog box contains the License Agreement. It informs you about the terms and
conditions under which you can use the software. Read the license agreement carefully. If you
accept the terms and conditions, click the I agree radio button and Next to continue (Figure
2).
OZEKI NG – SMS Gateway Product Guide
__________________ OZEKI INFORMATIKAI KFT________________________
© Copyright, Ozeki Informatics Ltd Page 6/188
Figure 2 - Accepting the terms and conditions
In the next dialog box you can select the folder you wish to install the program in.
To install it in the folder the installation wizard offers, click Next. Its access path is displayed
in the Folder field.
To install it in a different folder, enter the access path in the Folder field, or click the
Browser button to start browsing for the folder of your choice. After selecting the folder,
click Next to continue (Figure 3).
Figure 3 - Selecting the folder for the program installation

OZEKI NG – SMS Gateway Product Guide
__________________ OZEKI INFORMATIKAI KFT________________________
© Copyright, Ozeki Informatics Ltd Page 7/188
Next, the Confirm Installation dialog box expects you to confirm that you wish to install the
Ozeki NG - SMS Gateway software. Click Next to continue.
The next dialog box informs you that the Ozeki NG - SMS Gateway software is being
installed. Wait for the installation to finish (Figure 4).
Figure 4 - Installation in progress
After the installation finishes, both the Installation Complete dialog box and the login
window will show up.
Click Close in the dialog box, and then you can log in to start configuring the software
(Figure 5).
Figure 5 - Closing the installation
OZEKI NG – SMS Gateway Product Guide
__________________ OZEKI INFORMATIKAI KFT________________________
© Copyright, Ozeki Informatics Ltd Page 8/188
Service Provider Connections
This chapter explains service provider connectivity and provides information detailing
how to configure different service provider connections for SMS messaging using the
Ozeki NG - SMS Gateway software.
In SMS messaging using Ozeki NG - SMS Gateway, a service provider is an entity that is
responsible for sending and delivering SMS messages from users/applications of the program
to recipient mobile phones, and responsible for sending SMS messages from mobile phones to
Ozeki NG - SMS Gateway, which will deliver them to users/applications of the program.
To be able to send and receive SMS messages using Ozeki NG - SMS Gateway, you need to
pay one or more GSM service providers for the service described above, and you have to
connect Ozeki NG - SMS Gateway to the SMS Center of one or more service providers.
You can do this in two ways:
You can connect directly to the SMS Center of a GSM service provider over the
Internet. In this case, you need to make a contract with the service provider. In
compensation for your subscription, the GSM service provider will provide you with
the information required for connecting to the SMS Center over the Internet
(hostname, port, username, password).
You can connect to the SMS Center using a GSM modem attached to the PC with a
phone-to-PC data cable. In this case you pay for the service by buying a SIM card
from the service provider.
Direct connection to the SMS Center by setting up an IP SMS account with one ore more
GSM service providers has several advantages, including a greater speed and reliability.
For SMS messaging with a GSM modem, you need to use a suitable GSM device. For more
information, check out the following guide: Recommended hardware / GSM modems
The format of SMS messages exchanged between Ozeki NG - SMS Gateway and the SMS
Center of the GSM service provider is governed by an SMS protocol. When you install a
service provider connection, you have to select the appropriate protocol. The service provider
will tell you which protocol to use and will give you the protocol-specific parameters, such as
the username and password, IP address etc.
Ozeki NG - SMS Gateway allows the installation and configuration of the following protocols
/ service provider connections:
GSM Modem service provider connection
UCP IP SMS service provider connection
SMPP IP SMS service provider connection
CIMD2 IP SMS service provider connection
HTTP Server service provider connection
HTTP Client service provider connection
OZEKI NG – SMS Gateway Product Guide
__________________ OZEKI INFORMATIKAI KFT________________________
© Copyright, Ozeki Informatics Ltd Page 9/188
GSM Modem Connectivity
In this chapter you can learn how to install and configure GSM modem connectivity for
SMS messaging using the Ozeki NG - SMS Gateway software.
Introduction
If you plan to send and receive fewer than 15 000 SMS messages per day, you can use a
suitable GSM device (phone or modem) attached to your computer with a phone-to-PC data
cable. For information about suitable phones, check out the Supported Phones page. The
GSM device has to be equipped with a SIM card that charges (preferably) low rates for SMS
messages.
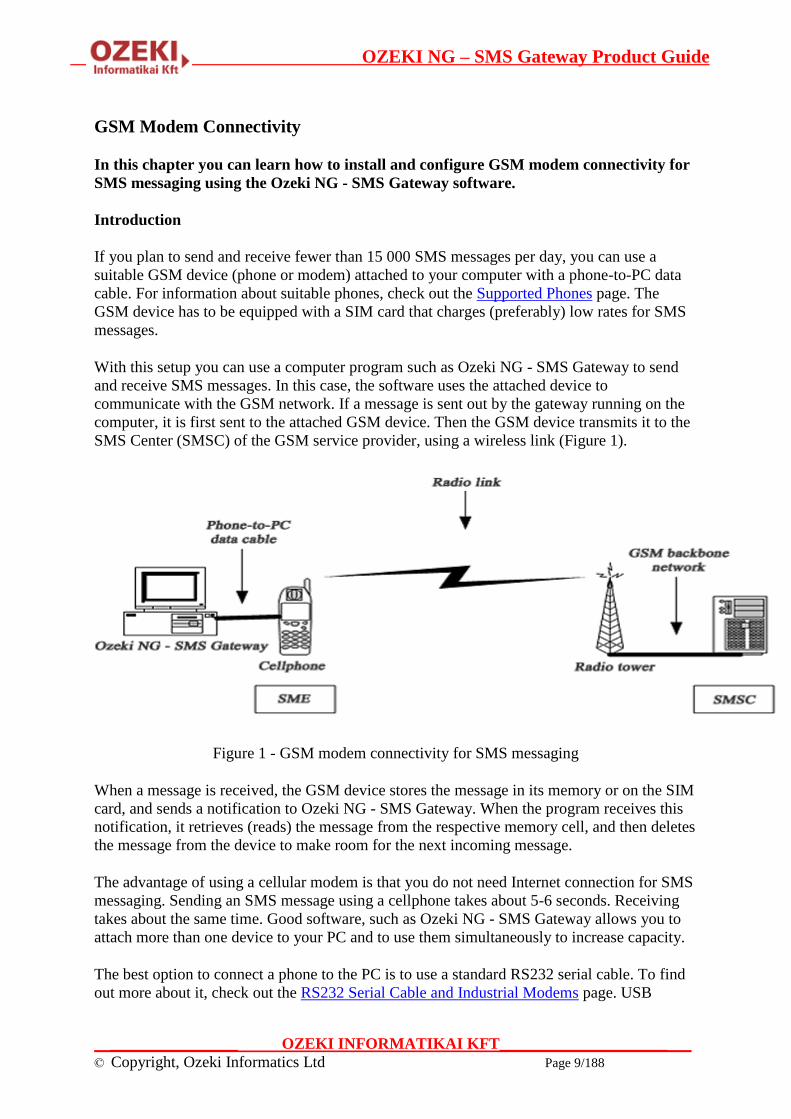
With this setup you can use a computer program such as Ozeki NG - SMS Gateway to send
and receive SMS messages. In this case, the software uses the attached device to
communicate with the GSM network. If a message is sent out by the gateway running on the
computer, it is first sent to the attached GSM device. Then the GSM device transmits it to the
SMS Center (SMSC) of the GSM service provider, using a wireless link (Figure 1).
Figure 1 - GSM modem connectivity for SMS messaging
When a message is received, the GSM device stores the message in its memory or on the SIM
card, and sends a notification to Ozeki NG - SMS Gateway. When the program receives this
notification, it retrieves (reads) the message from the respective memory cell, and then deletes
the message from the device to make room for the next incoming message.
The advantage of using a cellular modem is that you do not need Internet connection for SMS
messaging. Sending an SMS message using a cellphone takes about 5-6 seconds. Receiving
takes about the same time. Good software, such as Ozeki NG - SMS Gateway allows you to
attach more than one device to your PC and to use them simultaneously to increase capacity.
The best option to connect a phone to the PC is to use a standard RS232 serial cable. To find
out more about it, check out the RS232 Serial Cable and Industrial Modems page. USB

OZEKI NG – SMS Gateway Product Guide
__________________ OZEKI INFORMATIKAI KFT________________________
© Copyright, Ozeki Informatics Ltd Page 10/188
cables, InfraRed and BlueTooth connections are not as reliable. For information about
attaching the GSM device with a USB cable, visit the USB Cable page.
Configuration of the GSM modem connectivity
When you have installed a GSM modem driver on your computer, you can start to install and
configure the GSM modem connectivity.
You can install and configure this connection using the graphical user interface of Ozeki NG -
SMS Gateway. To start the installation, click the Add button in the top right-hand corner of
the Service providers panel on the left of the Management Console interface. (To find out
how to open this interface, check out the QuickStart Guide.)
You can also add a service provider connection by clicking the Add service provider item in
the Service providers menu. (To find out more about the menu, visit the Menu page.)
After you have clicked one of these, the Add service provider panel will show up on the
right of the interface. The panel contains a list of protocols you can install and use for
communication with an SMS service provider.
To select the GSM Modem protocol, click the Install link in the respective entry in the list
(Figure 2).
Figure 2 - Starting to install the GSM Modem connection

OZEKI NG – SMS Gateway Product Guide
__________________ OZEKI INFORMATIKAI KFT________________________
© Copyright, Ozeki Informatics Ltd Page 11/188
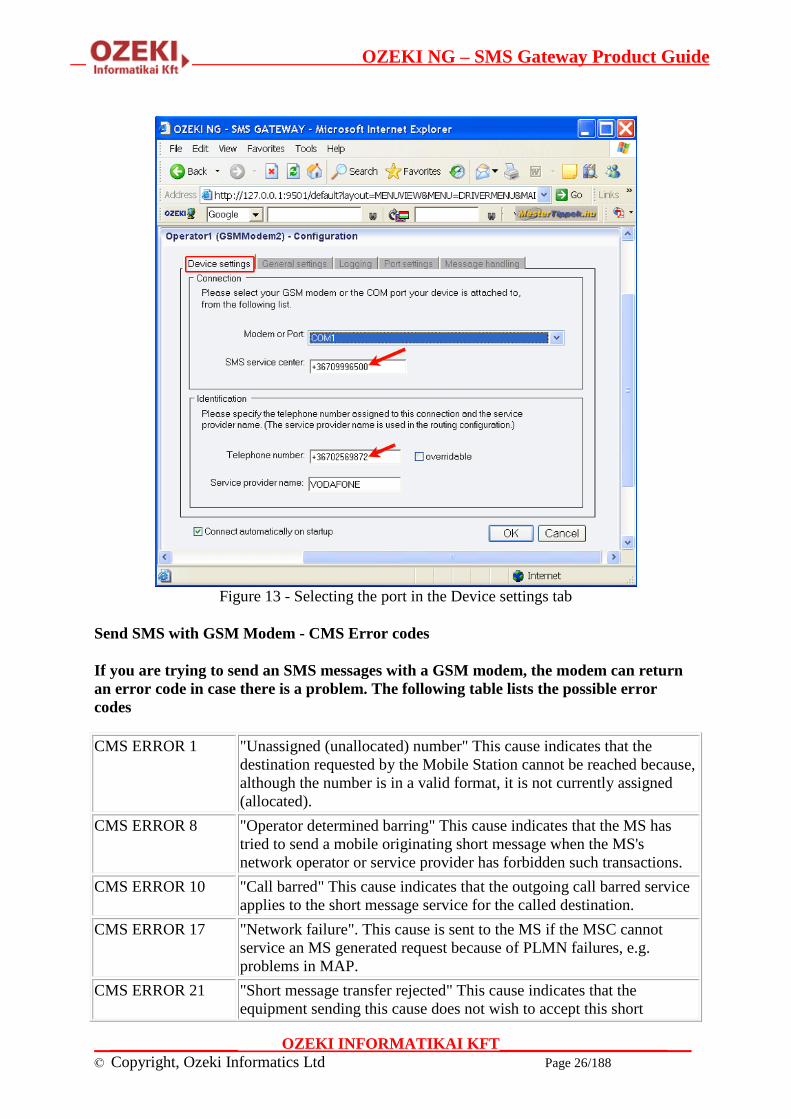
When you have installed the GSM Modem protocol, the Configuration panel will show up
on the right of the interface. The first tab of the panel is the Device settings tab, which
consists of a Connection and an Identification section (Figure 3).
Figure 3 - The Device settings tab
In the Modem or Port dropdown menu in the Connection section, select your GSM modem
or the COM port your device is attached to.
In the SMS service center edit box, specify the phone number of the SMS center of the GSM
service provider you connect to. This address is provided by your GSM service provider.
Some SMSC addresses are listed in this documentation. If you do not know the service center
address of your GSM service provider, you can check out Appendix C.
In the Identification section, specify the telephone number assigned to this connection (the
phone number of your GSM device) and the service provider name in the respective edit
boxes.
Note that the phone number to be specified in the Telephone number edit box is a mandatory
value. If you leave the edit box blank, the sending will be unsuccessful.
To facilitate identification and to avoid confusion, you should name the connection after the
GSM service provider. E.g., if you have set up a GSM Modem connection with Vodafone, it
is advisable to name it "Vodafone". Also, note that different connections should be given
different names. If you have different connections from the same service provider, you can
use different but similar names for them, e.g.: "Vodafone1", "Vodafone2" (or something of

OZEKI NG – SMS Gateway Product Guide
__________________ OZEKI INFORMATIKAI KFT________________________
© Copyright, Ozeki Informatics Ltd Page 12/188
the like). However, some load balancing solutions require an identical name for different
connections. For details, visit the Load Balancing and the Load Balancing for SMPP v3.3
page.
To perform general settings related to sending and receiving SMS messages using this
protocol, click the General Settings tab. This will open a panel consisting of the Send,
receive and delivery report options and the Timeout handling section.
In the upper section of the panel you can check either or both of the checkboxes. Which
one(s) to check depends on what you wish to use this connection for. You can choose to use
the connection for only sending or only receiving SMS messages (or both sending and
receiving).
Figure 3 - The General settings tab
In the lower section of the tab you can make choices and specifications to handle your
connection to the SMS Center and the status of your SMS messages.
In the Submit timeout edit box you can specify the maximum waiting time for an SMS
Center response confirming that your message has been successfully submitted. Successful
submission means that the SMS Center has accepted the message for delivery. You can
specify the waiting time by giving the number of seconds in numerical characters representing
any positive whole number. If you are content with the default specification (60 seconds),
leave this edit box unchanged.
OZEKI NG – SMS Gateway Product Guide
__________________ OZEKI INFORMATIKAI KFT________________________
© Copyright, Ozeki Informatics Ltd Page 13/188
You can choose how to consider a message you have sent if there is no response from the
SMS Center after the specified length of time. Select one of the three radio buttons.
Select Sent to consider a message sent even if there is no response from the SMS Center.
Select Not sent to consider a message not sent if there is no response from the SMS Center.
Select Retry later to make the program try to send a message later if the SMS Center has not
confirmed its status as sent. Then, the message will be placed last in the outgoing message
queue and sent out again when it is its turn.
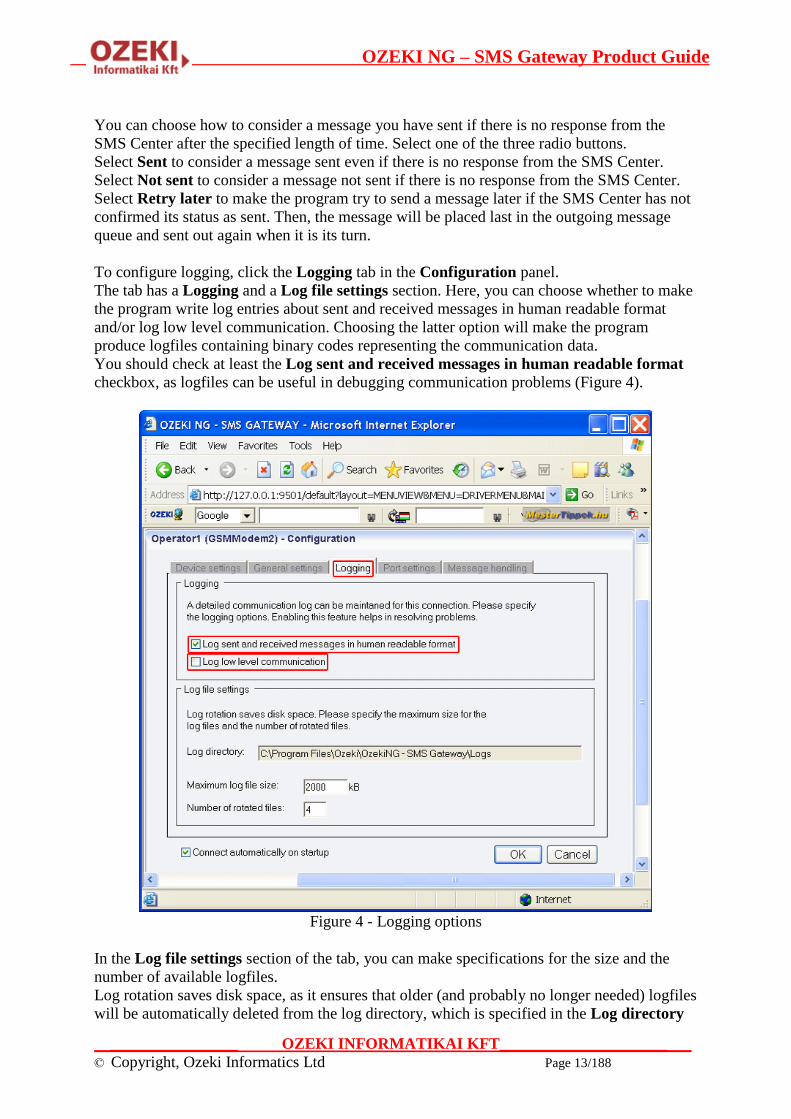
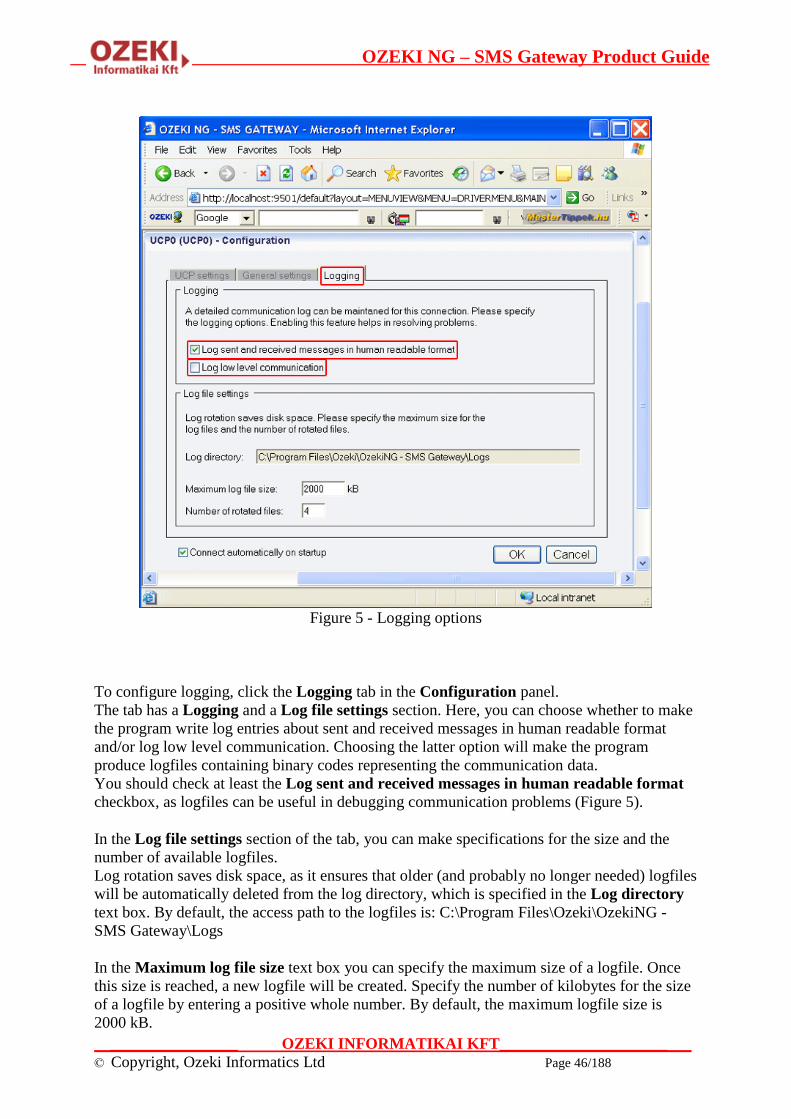
To configure logging, click the Logging tab in the Configuration panel.
The tab has a Logging and a Log file settings section. Here, you can choose whether to make
the program write log entries about sent and received messages in human readable format
and/or log low level communication. Choosing the latter option will make the program
produce logfiles containing binary codes representing the communication data.
You should check at least the Log sent and received messages in human readable format
checkbox, as logfiles can be useful in debugging communication problems (Figure 4).
Figure 4 - Logging options
In the Log file settings section of the tab, you can make specifications for the size and the
number of available logfiles.
Log rotation saves disk space, as it ensures that older (and probably no longer needed) logfiles
will be automatically deleted from the log directory, which is specified in the Log directory

OZEKI NG – SMS Gateway Product Guide
__________________ OZEKI INFORMATIKAI KFT________________________
© Copyright, Ozeki Informatics Ltd Page 14/188
text box. By default, the access path to the logfiles is: C:\Program Files\Ozeki\OzekiNG -
SMS Gateway\Logs
In the Maximum log file size text box you can specify the maximum size of a logfile. Once
this size is reached, a new logfile will be created. Specify the number of kilobytes for the size
of a logfile by entering a positive whole number. By default, the maximum logfile size is
2000 kB.
In the Number of rotated files text box, specify the maximum number of rotated logfiles that
are saved. Specify this number by entering a positive whole number. By default, the number
of logfiles that are saved is 4 (see Figure 4 above).
If you are content with the default specifications, leave the text boxes unchanged.
In the Port setings tab, you can modify the port settings and the modem initialization
commands. Note, however, that most GSM devices only allow using the default settings you
can see in Figure 5.
Figure 5 - The Port settings tab
In the Message handling tab, you can make settings related to retrieving incoming messages,
sending outgoing messages, SMS coding and line feed characters (Figure 6).

OZEKI NG – SMS Gateway Product Guide
__________________ OZEKI INFORMATIKAI KFT________________________
© Copyright, Ozeki Informatics Ltd Page 15/188
Figure 6 - The Message handling tab
In the Preferred memory for incoming messages dropdown menu, you can select where to
read incoming messages from: the SIM card, the Device or Both.
The most basic GSM devices are not equipped with device memory; they can only store a
limited numer of SMS messages on the SIM card. Advanced devices, however, are equipped
with additional memory on the device. SMS messages are stored directly on the device
memory.
In the Method to use to read incoming SMS dropdown menu, you can select which method
to use to read incoming messages: CMT, CMGL or CMGR.
Use the CMT method to make the GSM device send a notification about incoming messages.
Use the CMGL method to request the list of incoming messages.
Use the CMGR method to read the content of memory cells one at a time.
The latest standard is CMT.
In the The number of memory cells in the phone edit box, you can specify the number of
memory cells to be checked for SMS messages in the phone.
Incoming messages are stored in different memory cells in the phone. Ozeki NG - SMS
Gateway retrieves incoming messages by reading the memory cells of the phone and/or the
SIM card.

OZEKI NG – SMS Gateway Product Guide
__________________ OZEKI INFORMATIKAI KFT________________________
© Copyright, Ozeki Informatics Ltd Page 16/188
The program checks the memory cells for SMS messages one by one. If a cell contains a
message, the program retrieves and then deletes it from the cell and goes on to the next cell.
When it has finished checking all the cells, it returns to the first cell and starts checking again.
The more memory cells the program has to check, the longer it takes to return to the first cell.
If the cells to be checked include a large number of empty ones, a considerable amount of
time is wasted. Therefore, the number specified in the edit box should not be too large. When
you start using the software, with your phone already containing SMS messages, set this
number high enough to read all the messages, and then specify a new number.
Note that if you start using the software with your phone and/or SIM card already containing
messages, the program will read and delete them unless you check the Leave messages on
the device checkbox.
With the (optimal) default setting (10), the program will only check the first ten memory cells,
and delete the message after reading it in each cell to make space for a new one.
In the The number of memory cells on the SIM edit box, you can specify the number of
memory cells on the SIM.
In the Delay between reading messages (sec) edit box, you can specify, in seconds, a delay
to wait for a specific length of time between reading messages. To have the highest
performance, set this to 0.
By default, the program deletes incoming messages from the SIM card and/or the phone after
they have been read. However, if you check the Leave messages on the device checkbox,
they will not be deleted.
In the Outgoing messages section, there is an edit box in which you can set a delay to wait
for a specific length of time between sending out messages. To have the highest performance,
set this to 0.
The Outgoing messages section also contains two checkboxes. If you check the Request
delivery report SMS checkbox, the SMS center will send you a delivery report after an SMS
message has been delivered to the recipient phone number.
If you check the Do not allow loopback outgoing messages checkbox, you can prevent the
program from sending SMS messages to yourself, i.e. to the phone number of your SIM card.
The SMS coding section contains the Do not use PDU mode and the Include SCA in PDU
checkbox.
SMS messages can be received in two ways: by text mode and by protocol description unit
(PDU) mode. If PDU mode is used, any encoding can be implemented.
In the Line feed characters section, you can select one of three radio buttons. You can choose
whether to Delete line feed (LF), Replace LF with space or Leave LF in the message.
The Configuration panel for service provider connections contains a Connect automatically
on startup checkbox (in the bottom left-hand corner). If it is checked, Ozeki NG - SMS
Gateway will automatically initiate a connection with the SMS Center when the program has

OZEKI NG – SMS Gateway Product Guide
__________________ OZEKI INFORMATIKAI KFT________________________
© Copyright, Ozeki Informatics Ltd Page 17/188
started.
If this checkbox is not checked, the connection has to be initiated manually.
You can connect a service provider connection by clicking the green play button beside its
name in the panel of installed service provider connections (Figure 6). To disconnect a service
provider connection, click the red disconnect button next to the green button.
Figure 6 - Connecting the service provider connection
You can also initiate the connection manually by clicking the Connect link in the panel of the
service provider connection (Figure 7).
Figure 7 - Links to operations

OZEKI NG – SMS Gateway Product Guide
__________________ OZEKI INFORMATIKAI KFT________________________
© Copyright, Ozeki Informatics Ltd Page 18/188
You can open the panel of a service provider connection by clicking the name of the service
provider connection in the Service providers panel in the Management Console.
The panel of a service provider connection consists of three sections.
In the upper section you can find the name of the service provider connection (with the name
of its protocol in brackets).
You can see an icon showing if the service provider connection is connected. If it is not, the
icon is marked with an "x".
To the right of the icon you can find links to perform different operations.
Configure: to configure or modify the configuration of an installed service provider
connection. Clicking this link will take you back to the Configuration panel.
Events: to view the logging of the latest server events related to the service provider
connection. Clicking it will bring up the Events panel containing the logging of the
latest server events.
Connect: to connect the service provider connection with the SMS Center.
Disconnect: to disconnect the service provider connection from the SMS Center.
Uninstall: to uninstall the service provider connection.
In the middle section of the panel you can see some of the most important configuration
information.
The options that have been (re)activated during the configuration are marked with a tick.
The options that have not been activated or those that have been deactivated during the
configuration are marked with an "x".
In the lower section of the panel of the service provider connection you can read some
information about its protocol.
Installation of a Wavecom Modem
On this page you can learn how to attach a Wavecom modem to the computer and how
to install a standard modem driver for SMS messaging using a GSM modem connection
with the Ozeki NG - SMS Gateway software.
For SMS messaging using GSM modem connectivity with Ozeki NG - SMS Gateway, you
need a suitable GSM device attached to your computer with a phone-to-PC data cable. You
also need a modem driver installed on your Windows Operating system. (See the
Prerequisites page.)
If performance, reliability and continuous operation are important, you should use an
industrial GSM modem for SMS messaging. The Wavecom Fastrack industrial GSM modem
(Figure 1) is one of the most reliable devices for this purpose.

OZEKI NG – SMS Gateway Product Guide
__________________ OZEKI INFORMATIKAI KFT________________________
© Copyright, Ozeki Informatics Ltd Page 19/188
Figure 1 - Wavecom Fastrack
You can attach it to the computer with an RS232 serial cable, and you can install a standard
modem driver to allow communication between the computer and the modem.
To attach the modem and to install the modem driver, follow the instructions below.
In Figure 2 below you can clearly see that the Wavecom Fastrack modem has a data cable that
can be attached to a serial port, a SIM card slot and a SIM card. A network adapter also
belongs to the modem. However, it is not included in the figure because of its large size.
Figure 2 - Wavecom GSM Modem with accessories
Attach the serial data cable and the power cable to the Wavecom, with the SIM card already
inserted (Figure 3).

OZEKI NG – SMS Gateway Product Guide
__________________ OZEKI INFORMATIKAI KFT________________________
© Copyright, Ozeki Informatics Ltd Page 20/188
Figure 3 - Attaching the data cable and the power cable to the modem
Attach the data cable to the computer.
Figure 4 - Attaching the data cable to the computer

OZEKI NG – SMS Gateway Product Guide
__________________ OZEKI INFORMATIKAI KFT________________________
© Copyright, Ozeki Informatics Ltd Page 21/188
Make sure the modem works. In Figure 4 you can see the Wavecom modem attached to the
computer. If you have inserted the SIM card in the modem, a red LED (light-emitting diode)
is supposed to flash at the front (Figure 5).
Figure 5 - The Wavecom with a flashing red LED
When you have attached the modem to the computer, you can install the GSM modem driver
on your computer's operating system.
Professional, high quality modems allow a simple installation of the modem driver. For the
Wavecom modem, for instance, a Standard 56000 modem driver can be installed. If you have
a different sort of modem, the steps described below will be more complicated. Then you will
have to select the driver provided by the manufacturer of the mobile phone or data cable when
selecting the driver during the installation procedure.
OZEKI NG – SMS Gateway Product Guide
__________________ OZEKI INFORMATIKAI KFT________________________
© Copyright, Ozeki Informatics Ltd Page 22/188
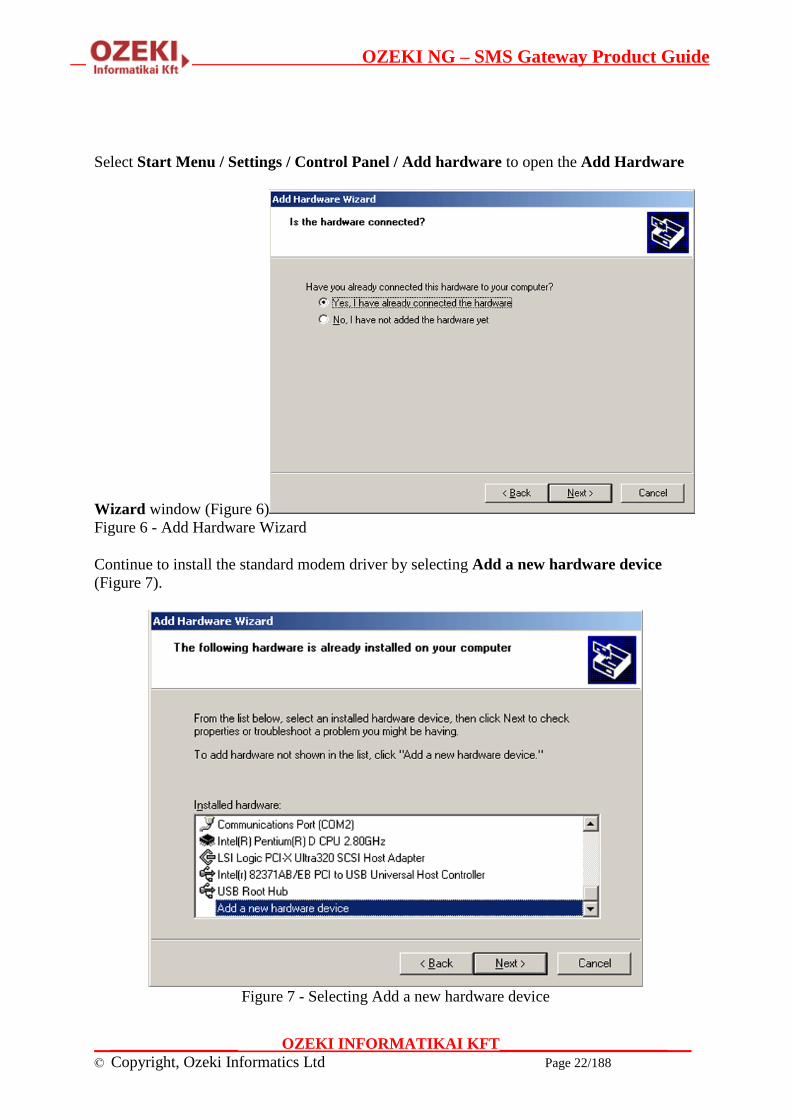
Select Start Menu / Settings / Control Panel / Add hardware to open the Add Hardware
Wizard window (Figure 6)
Figure 6 - Add Hardware Wizard
Continue to install the standard modem driver by selecting Add a new hardware device
(Figure 7).
Figure 7 - Selecting Add a new hardware device
OZEKI NG – SMS Gateway Product Guide
__________________ OZEKI INFORMATIKAI KFT________________________
© Copyright, Ozeki Informatics Ltd Page 23/188
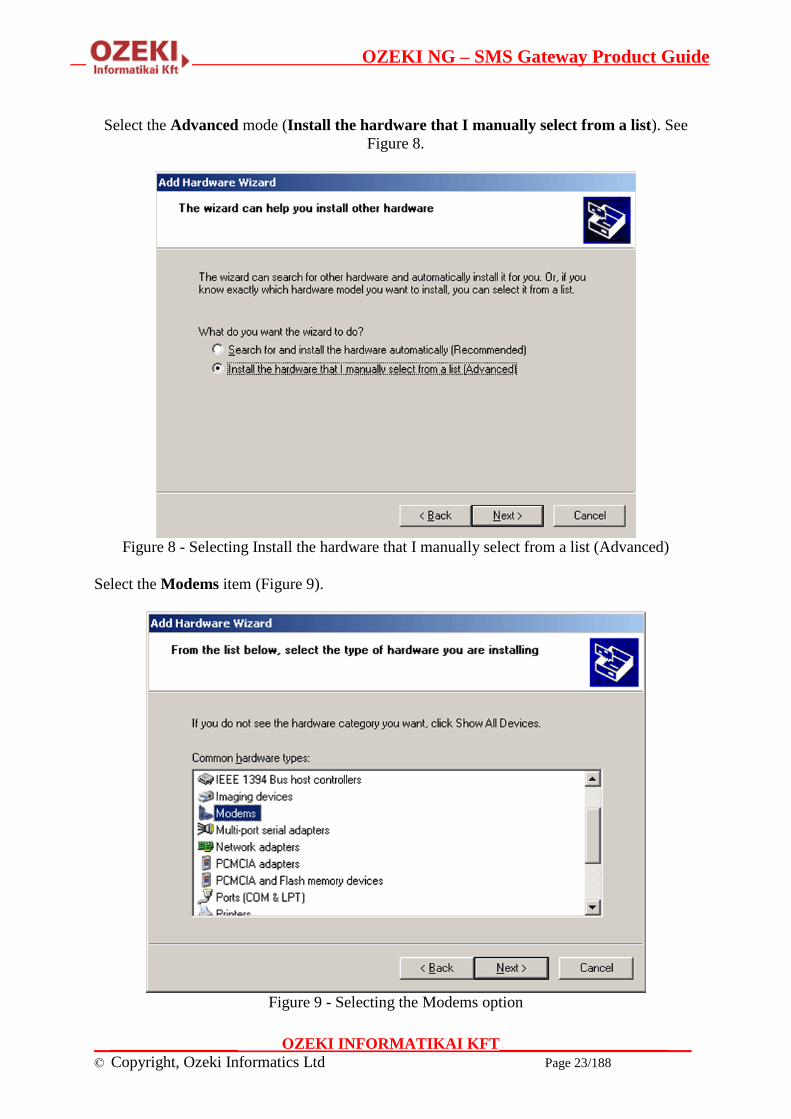
Select the Advanced mode (Install the hardware that I manually select from a list). See
Figure 8.
Figure 8 - Selecting Install the hardware that I manually select from a list (Advanced)
Select the Modems item (Figure 9).
Figure 9 - Selecting the Modems option

OZEKI NG – SMS Gateway Product Guide
__________________ OZEKI INFORMATIKAI KFT________________________
© Copyright, Ozeki Informatics Ltd Page 24/188
Select Don't detect my modem; I will select it from a list (Figure 10).
Figure 10 - Preventing autodetection
Select the modem driver (Figure 11).
Figure 11 - Selecting the modem driver

OZEKI NG – SMS Gateway Product Guide
__________________ OZEKI INFORMATIKAI KFT________________________
© Copyright, Ozeki Informatics Ltd Page 25/188
Select the port for the modem to be installed (Figure 12).
Figure 12 - Selecting the port
After you have selected the port for the modem, you can start to install and configure the
GSM Modem protocol.
You can find the installation and configuration instructions on the GSM Modem Connectivity
page.
One of the steps you need to take is to select the GSM modem or the COM port your device is
attached to (Figure 13).
OZEKI NG – SMS Gateway Product Guide
__________________ OZEKI INFORMATIKAI KFT________________________
© Copyright, Ozeki Informatics Ltd Page 26/188
Figure 13 - Selecting the port in the Device settings tab
Send SMS with GSM Modem - CMS Error codes
If you are trying to send an SMS messages with a GSM modem, the modem can return
an error code in case there is a problem. The following table lists the possible error
codes
CMS ERROR 1 "Unassigned (unallocated) number" This cause indicates that the
destination requested by the Mobile Station cannot be reached because,
although the number is in a valid format, it is not currently assigned
(allocated).
CMS ERROR 8 "Operator determined barring" This cause indicates that the MS has
tried to send a mobile originating short message when the MS's
network operator or service provider has forbidden such transactions.
CMS ERROR 10 "Call barred" This cause indicates that the outgoing call barred service
applies to the short message service for the called destination.
CMS ERROR 17 "Network failure". This cause is sent to the MS if the MSC cannot
service an MS generated request because of PLMN failures, e.g.
problems in MAP.
CMS ERROR 21 "Short message transfer rejected" This cause indicates that the
equipment sending this cause does not wish to accept this short

OZEKI NG – SMS Gateway Product Guide
__________________ OZEKI INFORMATIKAI KFT________________________
© Copyright, Ozeki Informatics Ltd Page 27/188
message, although it could have accepted the short message since the
equipment sending this cause is neither busy nor incompatible.
CMS ERROR 22 "Congestion". This cause is sent if the service request cannot be
actioned because of congestion (e.g. no channel, facility
busy/congested etc.).
CMS ERROR 27 "Destination out of service" This cause indicates that the destination
indicated by the Mobile Station cannot be reached because the
interface to the destination is not functioning correctly. The term "not
functioning correctly" indicates that a signalling message was unable to
be delivered to the remote user; e.g., a physical layer or data link layer
failure at the remote user, user equipment off line, etc.
CMS ERROR 28 "Unidentified subscriber" This cause indicates that the subscriber is not
registered in the PLMN (i.e. IMSI not known).
CMS ERROR 29 "Facility rejected" This cause indicates that the facility requested by
the Mobile Station is not supported by the PLMN.
CMS ERROR 30 "Unknown subscriber" This cause indicates that the subscriber is not
registered in the HLR (i.e. IMSI or directory number is not allocated to
a subscriber).
CMS ERROR 38 "Network out of order" This cause indicates that the network is not
functioning correctly and that the condition is likely to last a relatively
long period of time; e.g., immediately reattempting the short message
transfer is not likely to be successful.
CMS ERROR 41 "Temporary failure" This cause indicates that the network is not
functioning correctly and that the condition is not likely to last a long
period of time; e.g., the Mobile Station may wish to try another short
message transfer attempt almost immediately.
CMS ERROR 42 "Congestion" This cause indicates that the short message service
cannot be serviced because of high traffic.
CMS ERROR 47 "Resources unavailable, unspecified" This cause is used to report a
resource unavailable event only when no other cause applies.
CMS ERROR 50 "Requested facility not subscribed" This cause indicates that the
requested short message service could not be provided by the network
because the user has not completed the necessary administrative
arrangements with its supporting networks.
CMS ERROR 69 "Requested facility not implemented" This cause indicates that the
network is unable to provide the requested short message service.
CMS ERROR 81 "Invalid short message transfer reference value" This cause indicates
that the equipment sending this cause has received a message with a
short message reference which is not currently in use on the MS
network interface.
CMS ERROR 95 "Invalid message, unspecified" This cause is used to report an invalid
message event only when no other cause in the invalid message class
applies.
CMS ERROR 96 "Invalid mandatory information" This cause indicates that the
equipment sending this cause has received a message where a

OZEKI NG – SMS Gateway Product Guide
__________________ OZEKI INFORMATIKAI KFT________________________
© Copyright, Ozeki Informatics Ltd Page 28/188
mandatory information element is missing and/or has a content error
(the two cases are indistinguishable).
CMS ERROR 97 "Message type non existent or not implemented" This cause indicates
that the equipment sending this cause has received a message with a
message type it does not recognize either because this is a message not
defined or defined but not implemented by the equipment sending this
cause.
CMS ERROR 98 "Message not compatible with short message protocol state" This cause
indicates that the equipment sending this cause has received a message
such that the procedures do not indicate that this is a permissible
message to receive while in the short message transfer state.
CMS ERROR 99 "Information element non existent or not implemented" This cause
indicates that the equipment sending this cause has received a message
which includes information elements not recognized because the
information element identifier is not defined or it is defined but not
implemented by the equipment sending the cause. However, the
information element is not required to be present in the message in
order for the equipment sending the cause to process the message.
CMS ERROR 111 "Protocol error, unspecified" This cause is used to report a protocol
error event only when no other cause applies.
CMS ERROR 127 "Interworking, unspecified" This cause indicates that there has been
interworking with a network which does not provide causes for actions
it takes; thus, the precise cause for a message which is being send
cannot be ascertained.
CMS ERROR 128 Telematic interworking not supported x
CMS ERROR 129 Short message Type 0 not supported x x
CMS ERROR 130 Cannot replace short message x x
CMS ERROR 143 Unspecified TP PID error x x
CMS ERROR 144 Data coding scheme (alphabet) not supported x
CMS ERROR 145 Message class not supported x
CMS ERROR 159 Unspecified TP DCS error x x
CMS ERROR 160 Command cannot be actioned x
CMS ERROR 161 Command unsupported x
CMS ERROR 175 Unspecified TP Command error x
CMS ERROR 176 TPDU not supported x x
CMS ERROR 192 SC busy x
CMS ERROR 193 No SC subscription x
CMS ERROR 194 SC system failure x
CMS ERROR 195 Invalid SME address x
CMS ERROR 196 Destination SME barred x
CMS ERROR 197 SM Rejected Duplicate SM x
CMS ERROR 198 TP VPF not supported X
OZEKI NG – SMS Gateway Product Guide
__________________ OZEKI INFORMATIKAI KFT________________________
© Copyright, Ozeki Informatics Ltd Page 29/188
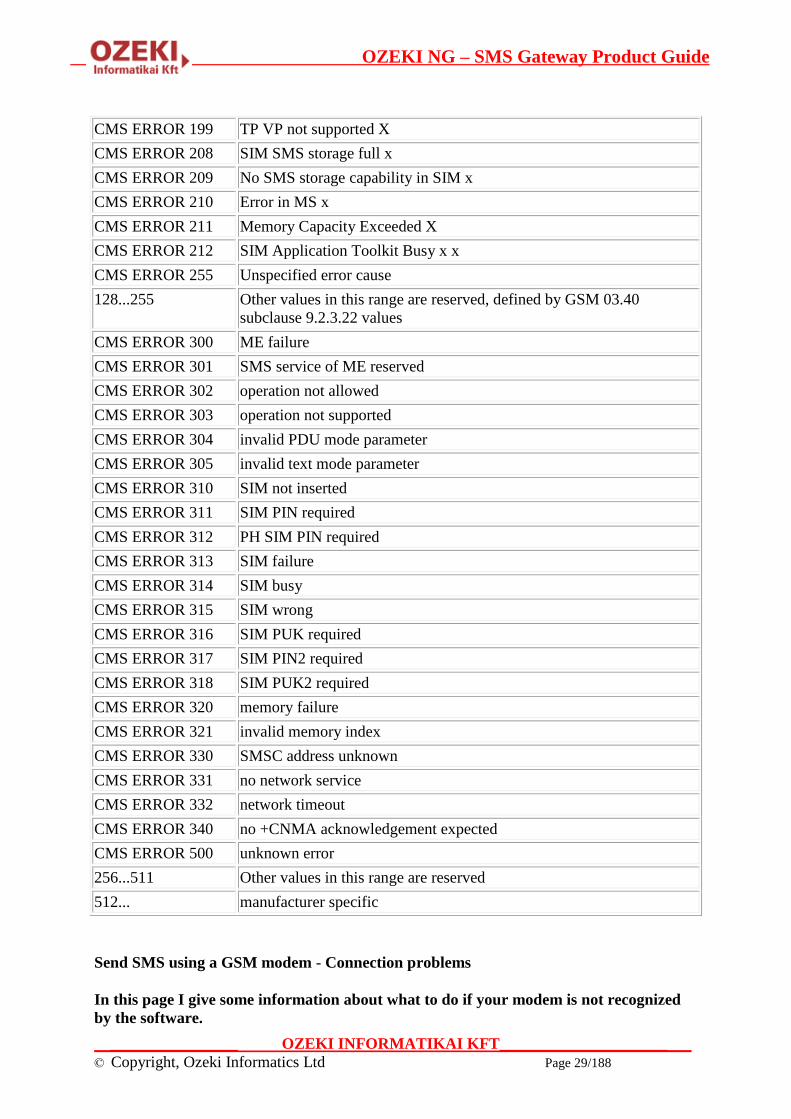
CMS ERROR 199 TP VP not supported X
CMS ERROR 208 SIM SMS storage full x
CMS ERROR 209 No SMS storage capability in SIM x
CMS ERROR 210 Error in MS x
CMS ERROR 211 Memory Capacity Exceeded X
CMS ERROR 212 SIM Application Toolkit Busy x x
CMS ERROR 255 Unspecified error cause
128...255 Other values in this range are reserved, defined by GSM 03.40
subclause 9.2.3.22 values
CMS ERROR 300 ME failure
CMS ERROR 301 SMS service of ME reserved
CMS ERROR 302 operation not allowed
CMS ERROR 303 operation not supported
CMS ERROR 304 invalid PDU mode parameter
CMS ERROR 305 invalid text mode parameter
CMS ERROR 310 SIM not inserted
CMS ERROR 311 SIM PIN required
CMS ERROR 312 PH SIM PIN required
CMS ERROR 313 SIM failure
CMS ERROR 314 SIM busy
CMS ERROR 315 SIM wrong
CMS ERROR 316 SIM PUK required
CMS ERROR 317 SIM PIN2 required
CMS ERROR 318 SIM PUK2 required
CMS ERROR 320 memory failure
CMS ERROR 321 invalid memory index
CMS ERROR 330 SMSC address unknown
CMS ERROR 331 no network service
CMS ERROR 332 network timeout
CMS ERROR 340 no +CNMA acknowledgement expected
CMS ERROR 500 unknown error
256...511 Other values in this range are reserved
512... manufacturer specific
Send SMS using a GSM modem - Connection problems
In this page I give some information about what to do if your modem is not recognized
by the software.
OZEKI NG – SMS Gateway Product Guide
__________________ OZEKI INFORMATIKAI KFT________________________
© Copyright, Ozeki Informatics Ltd Page 30/188
In some situations Ozeki NG SMS Gateway will not detect your GSM phone. In this case you
can test whether you phone responds using Hyper Terminal. Hyper Terminal is built into
windows. It is a good tool to test modem connectivity.
To start hyperterminal, select Start->All programs->Accesseries->Communications-
>HyperTerminal. When Hyperterminal starts, you must provide a name for the connection.
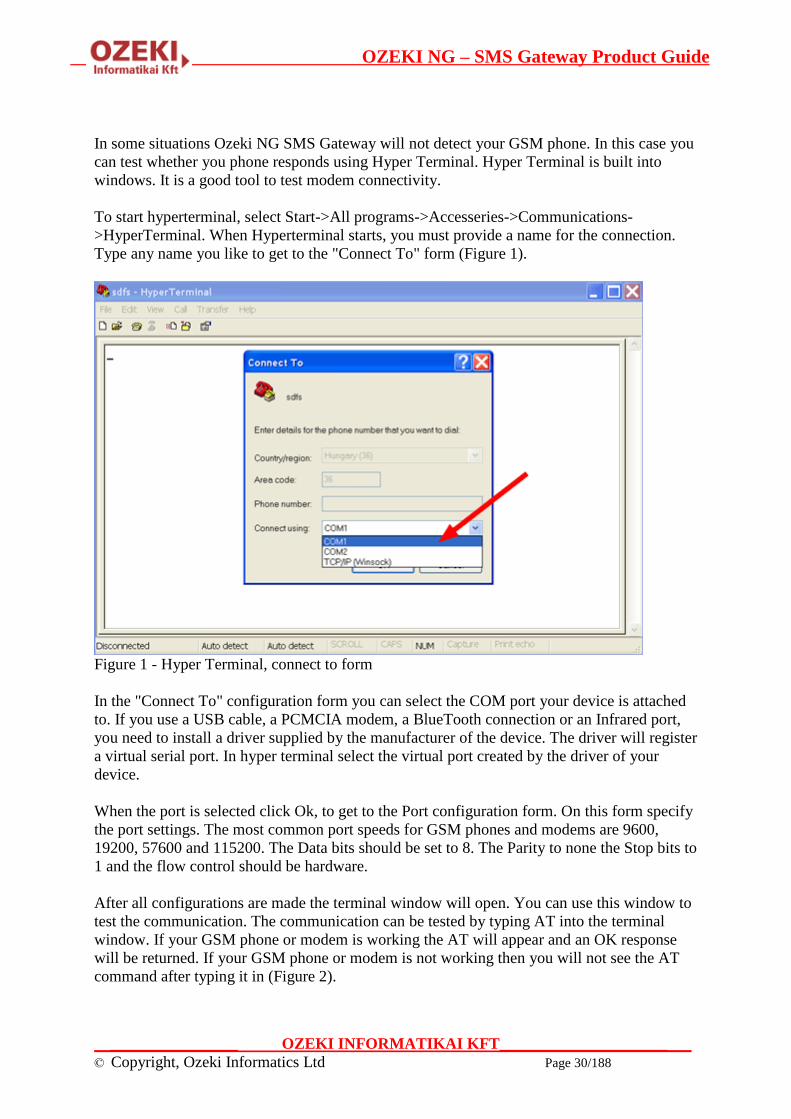
Type any name you like to get to the "Connect To" form (Figure 1).
Figure 1 - Hyper Terminal, connect to form
In the "Connect To" configuration form you can select the COM port your device is attached
to. If you use a USB cable, a PCMCIA modem, a BlueTooth connection or an Infrared port,
you need to install a driver supplied by the manufacturer of the device. The driver will register
a virtual serial port. In hyper terminal select the virtual port created by the driver of your
device.
When the port is selected click Ok, to get to the Port configuration form. On this form specify
the port settings. The most common port speeds for GSM phones and modems are 9600,
19200, 57600 and 115200. The Data bits should be set to 8. The Parity to none the Stop bits to
1 and the flow control should be hardware.
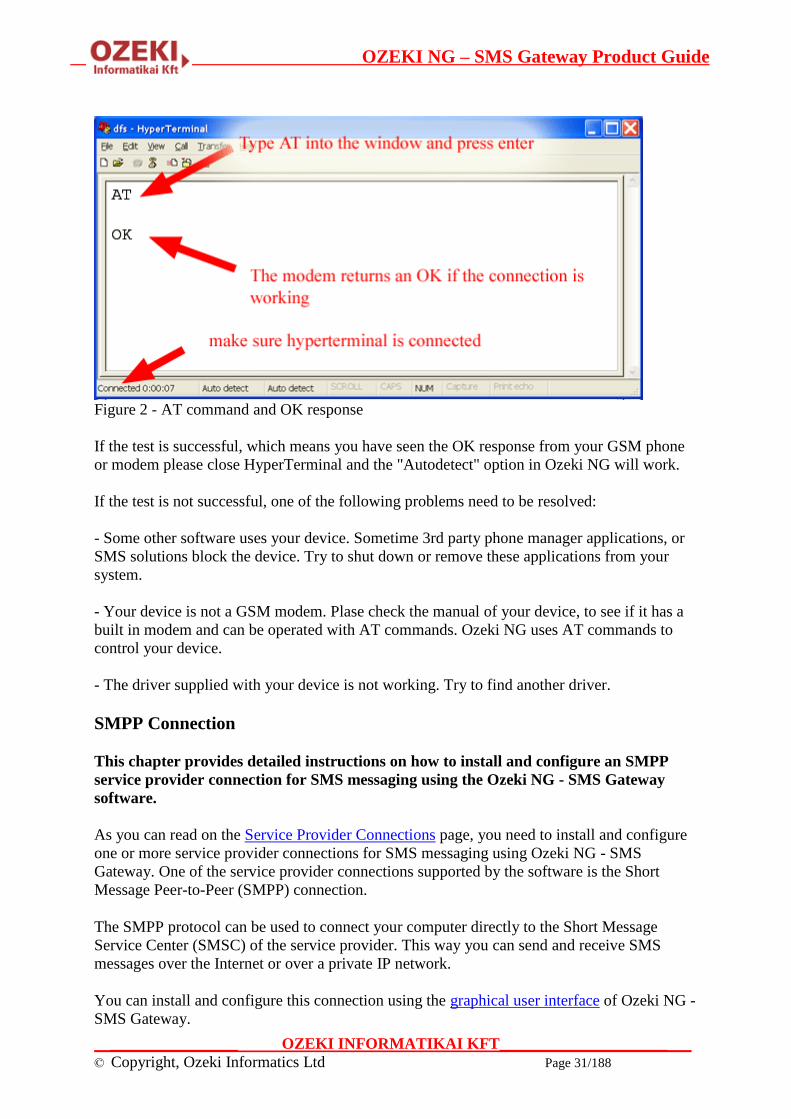
After all configurations are made the terminal window will open. You can use this window to
test the communication. The communication can be tested by typing AT into the terminal
window. If your GSM phone or modem is working the AT will appear and an OK response
will be returned. If your GSM phone or modem is not working then you will not see the AT
command after typing it in (Figure 2).
OZEKI NG – SMS Gateway Product Guide
__________________ OZEKI INFORMATIKAI KFT________________________
© Copyright, Ozeki Informatics Ltd Page 31/188
Figure 2 - AT command and OK response
If the test is successful, which means you have seen the OK response from your GSM phone
or modem please close HyperTerminal and the "Autodetect" option in Ozeki NG will work.
If the test is not successful, one of the following problems need to be resolved:
- Some other software uses your device. Sometime 3rd party phone manager applications, or
SMS solutions block the device. Try to shut down or remove these applications from your
system.
- Your device is not a GSM modem. Plase check the manual of your device, to see if it has a
built in modem and can be operated with AT commands. Ozeki NG uses AT commands to
control your device.
- The driver supplied with your device is not working. Try to find another driver.
SMPP Connection
This chapter provides detailed instructions on how to install and configure an SMPP
service provider connection for SMS messaging using the Ozeki NG - SMS Gateway
software.
As you can read on the Service Provider Connections page, you need to install and configure
one or more service provider connections for SMS messaging using Ozeki NG - SMS
Gateway. One of the service provider connections supported by the software is the Short
Message Peer-to-Peer (SMPP) connection.
The SMPP protocol can be used to connect your computer directly to the Short Message
Service Center (SMSC) of the service provider. This way you can send and receive SMS
messages over the Internet or over a private IP network.
You can install and configure this connection using the graphical user interface of Ozeki NG -
SMS Gateway.

OZEKI NG – SMS Gateway Product Guide
__________________ OZEKI INFORMATIKAI KFT________________________
© Copyright, Ozeki Informatics Ltd Page 32/188
To start installing and configuring an SMPP connection, click the Add button in the top right-
hand corner of the Service providers panel on the left of the Management Console interface.
(To find out how to open this interface, check out the QuickStart Guide.)
You can also add a service provider connection by clicking the Add service provider item in
the Service providers menu.
After you have clicked one of these, the Add service provider panel will show up on the
right of the interface. The panel contains a list of protocols you can install and use for
communication with an SMS service provider.
To select the SMPP protocol, click the Install link in the respective entry in the list (Figure 1).
Figure 1 - Starting to install the SMPP connection
When you have installed the SMPP Connection, the Configuration panel will show up on
the right of the interface. The first tab of the panel is the SMPP settings tab, which consists of
a Connection and an Identification section.
In the Connection section, specify the SMPP server settings. This information is provided by
the GSM service provider whose service you have subscribed to. The connection parameters
are the host name (sometimes only an IP address is given), the port number, a username and a
password. Service providers often use the phone number of the service or the port number as
the username. Enter the information in the respective edit boxes (Figure 2).
OZEKI NG – SMS Gateway Product Guide
__________________ OZEKI INFORMATIKAI KFT________________________
© Copyright, Ozeki Informatics Ltd Page 33/188
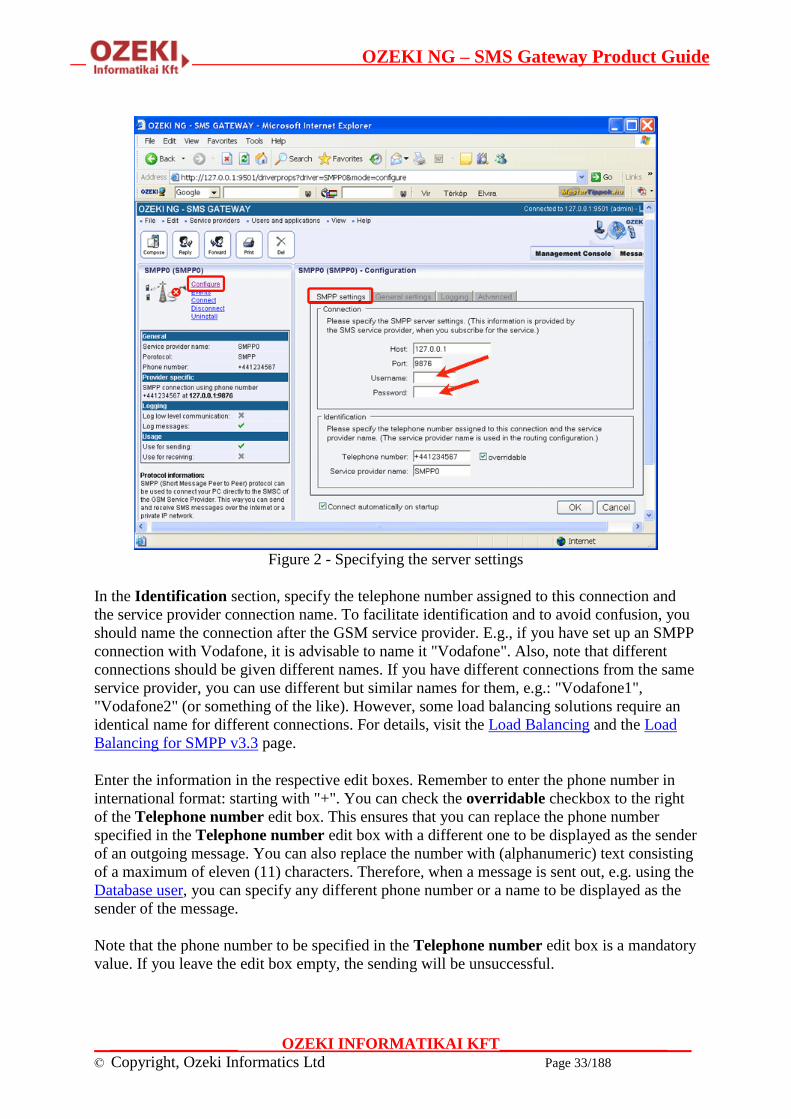
Figure 2 - Specifying the server settings
In the Identification section, specify the telephone number assigned to this connection and
the service provider connection name. To facilitate identification and to avoid confusion, you
should name the connection after the GSM service provider. E.g., if you have set up an SMPP
connection with Vodafone, it is advisable to name it "Vodafone". Also, note that different
connections should be given different names. If you have different connections from the same
service provider, you can use different but similar names for them, e.g.: "Vodafone1",
"Vodafone2" (or something of the like). However, some load balancing solutions require an
identical name for different connections. For details, visit the Load Balancing and the Load
Balancing for SMPP v3.3 page.
Enter the information in the respective edit boxes. Remember to enter the phone number in
international format: starting with "+". You can check the overridable checkbox to the right
of the Telephone number edit box. This ensures that you can replace the phone number
specified in the Telephone number edit box with a different one to be displayed as the sender
of an outgoing message. You can also replace the number with (alphanumeric) text consisting
of a maximum of eleven (11) characters. Therefore, when a message is sent out, e.g. using the
Database user, you can specify any different phone number or a name to be displayed as the
sender of the message.
Note that the phone number to be specified in the Telephone number edit box is a mandatory
value. If you leave the edit box empty, the sending will be unsuccessful.
OZEKI NG – SMS Gateway Product Guide
__________________ OZEKI INFORMATIKAI KFT________________________
© Copyright, Ozeki Informatics Ltd Page 34/188
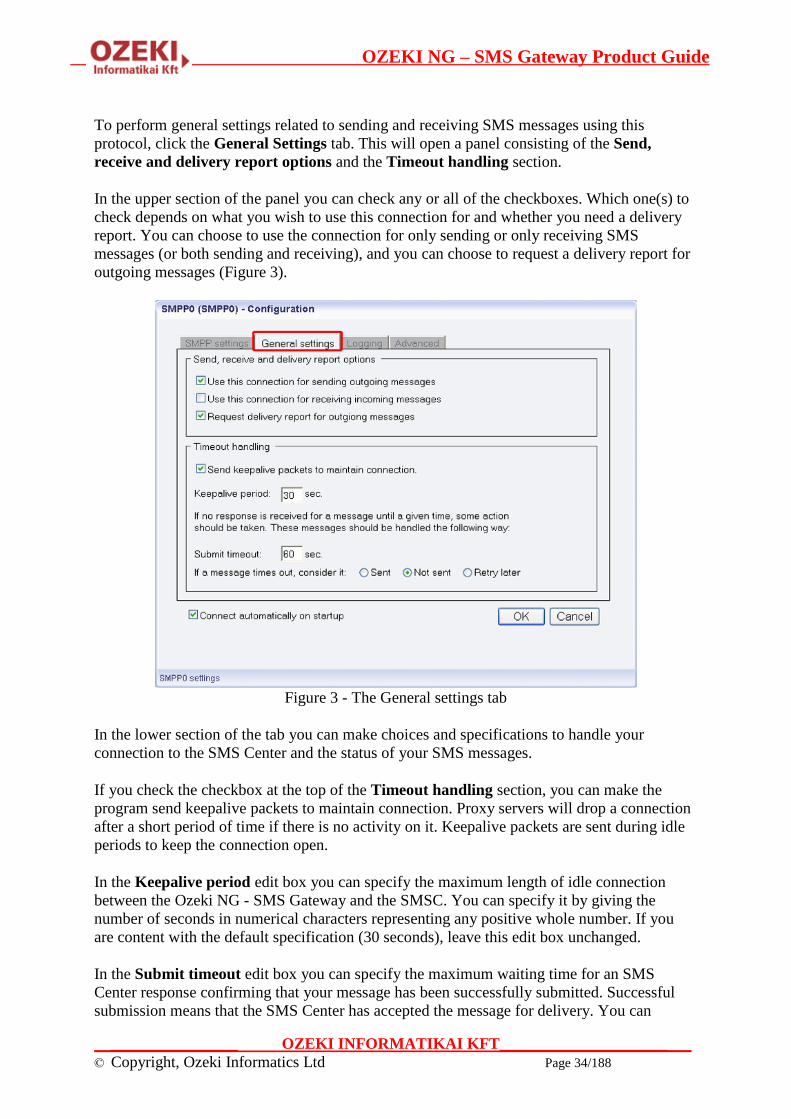
To perform general settings related to sending and receiving SMS messages using this
protocol, click the General Settings tab. This will open a panel consisting of the Send,
receive and delivery report options and the Timeout handling section.
In the upper section of the panel you can check any or all of the checkboxes. Which one(s) to
check depends on what you wish to use this connection for and whether you need a delivery
report. You can choose to use the connection for only sending or only receiving SMS
messages (or both sending and receiving), and you can choose to request a delivery report for
outgoing messages (Figure 3).
Figure 3 - The General settings tab
In the lower section of the tab you can make choices and specifications to handle your
connection to the SMS Center and the status of your SMS messages.
If you check the checkbox at the top of the Timeout handling section, you can make the
program send keepalive packets to maintain connection. Proxy servers will drop a connection
after a short period of time if there is no activity on it. Keepalive packets are sent during idle
periods to keep the connection open.
In the Keepalive period edit box you can specify the maximum length of idle connection
between the Ozeki NG - SMS Gateway and the SMSC. You can specify it by giving the
number of seconds in numerical characters representing any positive whole number. If you
are content with the default specification (30 seconds), leave this edit box unchanged.
In the Submit timeout edit box you can specify the maximum waiting time for an SMS
Center response confirming that your message has been successfully submitted. Successful
submission means that the SMS Center has accepted the message for delivery. You can
OZEKI NG – SMS Gateway Product Guide
__________________ OZEKI INFORMATIKAI KFT________________________
© Copyright, Ozeki Informatics Ltd Page 35/188
specify the waiting time by giving the number of seconds in numerical characters representing
any positive whole number. If you are content with the default specification (60 seconds),
leave this edit box unchanged.
You can choose how to consider a message you have sent if there is no response from the
SMS Center after the specified length of time. Select one of the three radio buttons.
Select Sent to consider a message sent even if there is no response from the SMS Center.
Select Not sent to consider a message not sent if there is no response from the SMS Center.
Select Retry later to make the program try to send a message later if the SMS Center has not
confirmed its status as sent. Then, the message will be placed last in the outgoing message
queue and sent out again when it is its turn.
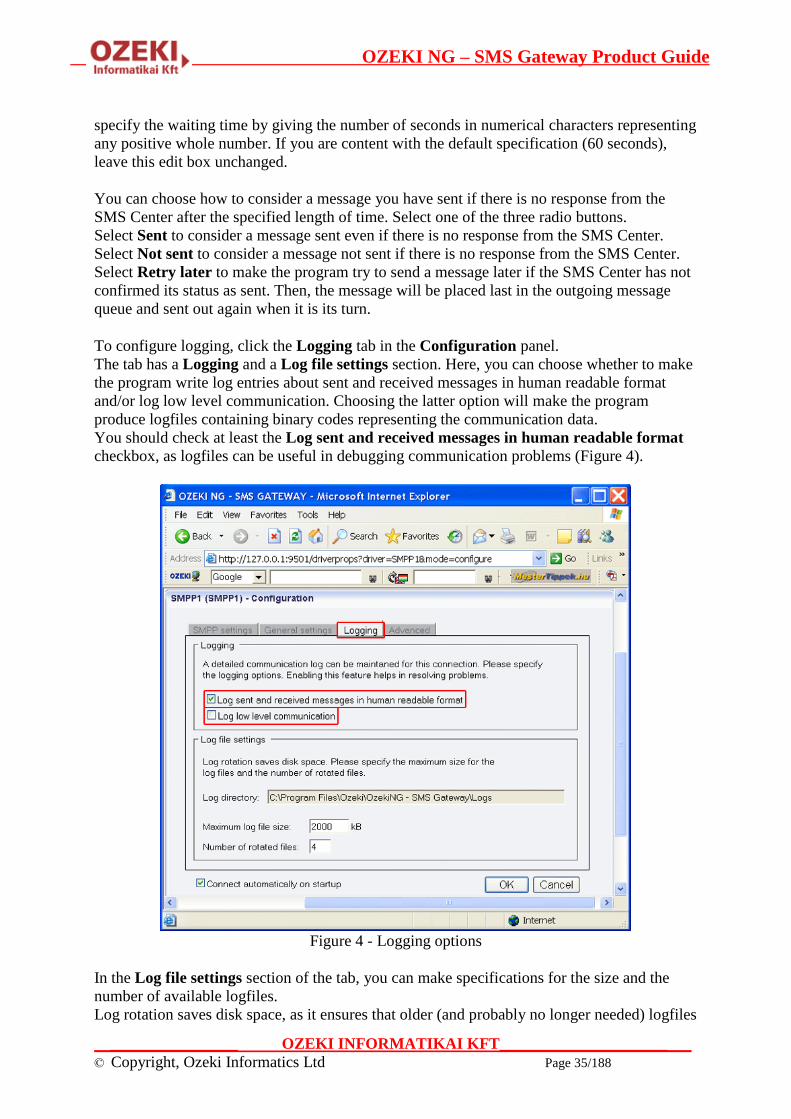
To configure logging, click the Logging tab in the Configuration panel.
The tab has a Logging and a Log file settings section. Here, you can choose whether to make
the program write log entries about sent and received messages in human readable format
and/or log low level communication. Choosing the latter option will make the program
produce logfiles containing binary codes representing the communication data.
You should check at least the Log sent and received messages in human readable format
checkbox, as logfiles can be useful in debugging communication problems (Figure 4).
Figure 4 - Logging options
In the Log file settings section of the tab, you can make specifications for the size and the
number of available logfiles.
Log rotation saves disk space, as it ensures that older (and probably no longer needed) logfiles
OZEKI NG – SMS Gateway Product Guide
__________________ OZEKI INFORMATIKAI KFT________________________
© Copyright, Ozeki Informatics Ltd Page 36/188
will be automatically deleted from the log directory, which is specified in the Log directory
text box. By default, the access path to the logfiles is: C:\Program Files\Ozeki\OzekiNG -
SMS Gateway\Logs
In the Maximum log file size text box you can specify the maximum size of a logfile. Once
this size is reached, a new logfile will be created. Specify the number of kilobytes for the size
of a logfile by entering a positive whole number. By default, the maximum logfile size is
2000 kB.
In the Number of rotated files text box, specify the maximum number of rotated logfiles that
are saved. Specify this number by entering a positive whole number. By default, the number
of logfiles that are saved is 4 (see Figure 4 above).
If you are content with the default specifications, leave the text boxes unchanged.
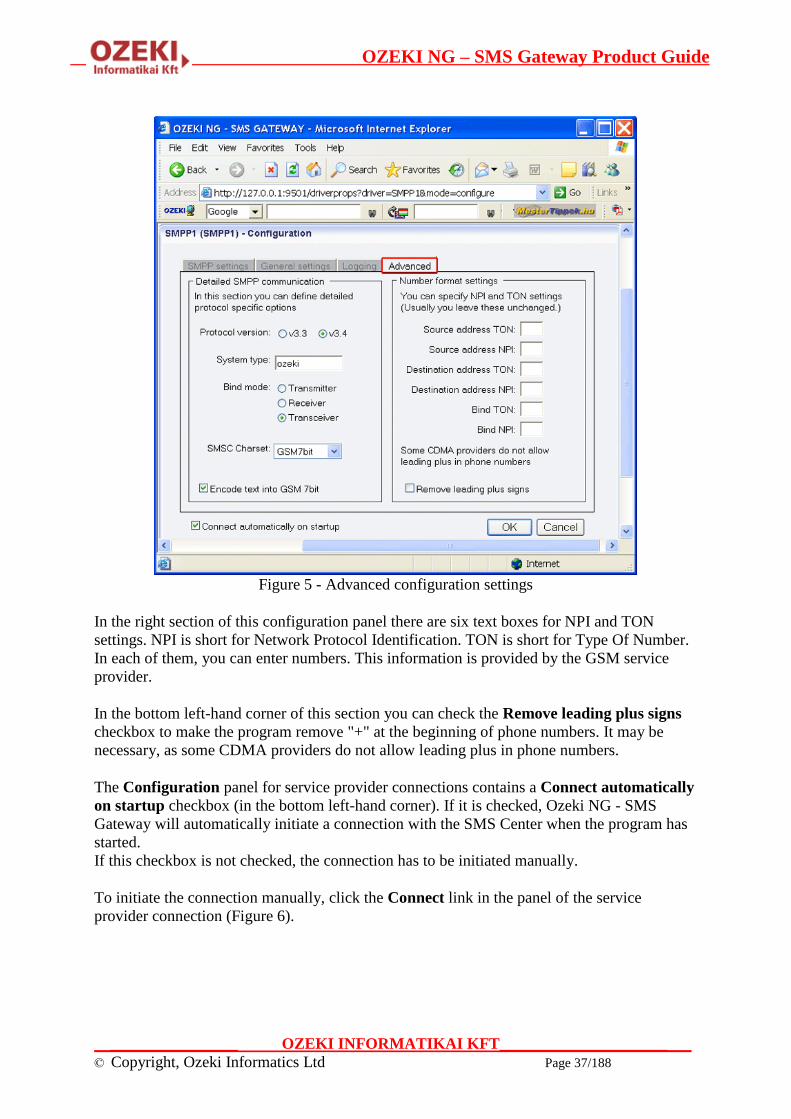
In the Advanced tab of the Configuration panel, you can define detailed protocol-specific
options (in the left section) and specify NPI and TON settings (in the right section).
Selecting either of the radio buttons (v3.3 or v3.4), you can specify the protocol version.
You can specify the system type by entering its name in the System type text box. The
system type is for assigning the protocol standard of the other side (SMSC). It is specified by
the service provider.
To specify the bind mode, select one of the three radio buttons: Transmitter, Receiver or
Transceiver.
The bind mode describes the way of communication between Ozeki NG - SMS Gateway and
the SMS Center of a service provider.
Select Transmitter if you use this connection only for sending SMS messages.
Select Receiver if you use this connection only for receiving messages.
Select Transceiver if you use this connection for both sending and receiving messages (Figure
5).
In the SMSC Charset dropdown menu, you can select the character set you wish to use for
SMS messaging with this connection.
You can check the Encode text into GSM 7bit checkbox to make the program encode the
text of your SMS messages into text composed of characters of the GSM 7bit character set
(Figure 5).
OZEKI NG – SMS Gateway Product Guide
__________________ OZEKI INFORMATIKAI KFT________________________
© Copyright, Ozeki Informatics Ltd Page 37/188
Figure 5 - Advanced configuration settings
In the right section of this configuration panel there are six text boxes for NPI and TON
settings. NPI is short for Network Protocol Identification. TON is short for Type Of Number.
In each of them, you can enter numbers. This information is provided by the GSM service
provider.
In the bottom left-hand corner of this section you can check the Remove leading plus signs
checkbox to make the program remove "+" at the beginning of phone numbers. It may be
necessary, as some CDMA providers do not allow leading plus in phone numbers.
The Configuration panel for service provider connections contains a Connect automatically
on startup checkbox (in the bottom left-hand corner). If it is checked, Ozeki NG - SMS
Gateway will automatically initiate a connection with the SMS Center when the program has
started.
If this checkbox is not checked, the connection has to be initiated manually.
To initiate the connection manually, click the Connect link in the panel of the service
provider connection (Figure 6).

OZEKI NG – SMS Gateway Product Guide
__________________ OZEKI INFORMATIKAI KFT________________________
© Copyright, Ozeki Informatics Ltd Page 38/188
Figure 6 - Links to operations
You can open the panel of a service provider connection by clicking its name in the Service
providers panel in the Management Console.
The panel of a service provider connection consists of three sections.
In the upper section you can find the name of the service provider connection (with the name
of its protocol in brackets).
You can see an icon showing if the service provider connection is connected. If it is not, the
icon is marked with an "x".
To the right of the icon you can find links to perform different operations.
Configure: to configure or modify the configuration of an installed service provider
connection. Clicking this link will take you back to the Configuration panel.
Events: to view the logging of the latest server events related to the service provider
connection. Clicking it will bring up the Events panel containing the logging of the
latest server events.
Connect: to connect the service provider connection with the SMS Center.
Disconnect: to disconnect the service provider connection from the SMS Center.
Uninstall: to uninstall the service provider connection.
In the middle section of the panel you can see some of the most important configuration
information.
The options that have been (re)activated during the configuration are marked with a tick.
The options that have not been activated or those that have been deactivated during the
configuration are marked with an "x".
OZEKI NG – SMS Gateway Product Guide
__________________ OZEKI INFORMATIKAI KFT________________________
© Copyright, Ozeki Informatics Ltd Page 39/188
In the lower section of the panel of the service provider connection you can read some
information about its protocol.
Flash SMS support in SMPP SMS Services
The FLASH SMS functionality is implemented in Ozeki NG SMS Gateway. If you use
the SMPP protocol, you have to configure your SMPP service provider connection to
support FLASH SMS messages.
Configure your SMPP service provider connection
You can use FLASH SMS in SMPP connections in two ways:
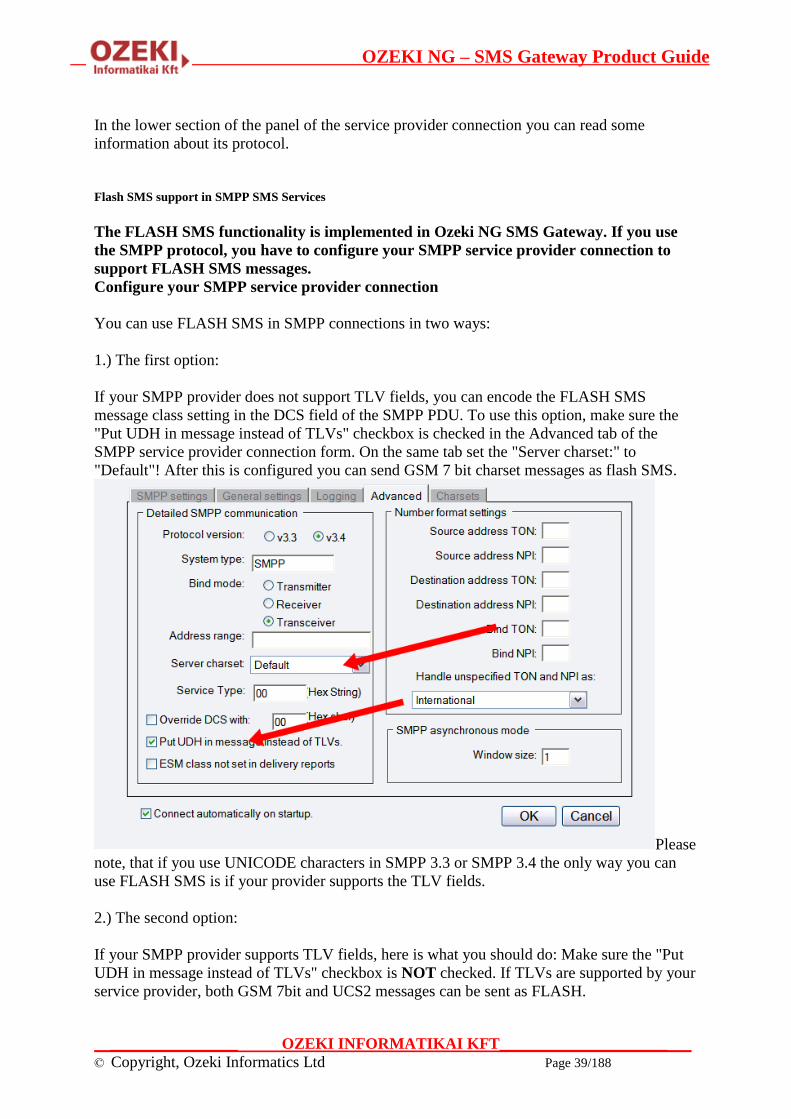
1.) The first option:
If your SMPP provider does not support TLV fields, you can encode the FLASH SMS
message class setting in the DCS field of the SMPP PDU. To use this option, make sure the
"Put UDH in message instead of TLVs" checkbox is checked in the Advanced tab of the
SMPP service provider connection form. On the same tab set the "Server charset:" to
"Default"! After this is configured you can send GSM 7 bit charset messages as flash SMS.
Please
note, that if you use UNICODE characters in SMPP 3.3 or SMPP 3.4 the only way you can
use FLASH SMS is if your provider supports the TLV fields.
2.) The second option:
If your SMPP provider supports TLV fields, here is what you should do: Make sure the "Put
UDH in message instead of TLVs" checkbox is NOT checked. If TLVs are supported by your
service provider, both GSM 7bit and UCS2 messages can be sent as FLASH.

OZEKI NG – SMS Gateway Product Guide
__________________ OZEKI INFORMATIKAI KFT________________________
© Copyright, Ozeki Informatics Ltd Page 40/188
UCP connection
In this chapter you can find out how to install and configure the UCP IP SMS protocol
for SMS messaging using the Ozeki NG - SMS Gateway software. In addition to an
introduction containing general information about this protocol, this page provides
detailed installation and configuration instructions.
Introduction
As you can read on the Service Provider Connections page, you need to install and configure
one or more service provider connections for SMS messaging using Ozeki NG - SMS
Gateway. One of the service provider connections supported by the software is the Universal
Computer Protocol (UCP) connection.
This protocol is often used by GSM service providers for IP SMS connectivity. The currently
used protocol versions (v3, v3.5, v4.0) can be used to transfer high volumes of SMS traffic. It
is used for both premium rate and normal rate SMS messages.
One of the advantages of using UCP connections is that you can specify the sender address of
the message. The sender address can be a custom phone number or a short word containing
alphanumeric characters. (See the instructions about the overridable checkbox below.) Note,
however, that some GSM service providers restrict the use of this option.
Another advantage of UCP is that it allows sending messages of every type the GSM network
can carry. It can be used to send binary SMS messages (operator logos, ringtones), WAP Push
messages, as well as other types of messages. (Check out the Appendix for links to pages
about different message types.) Concatenated SMS messages and various alphabets can also
be used.
In order to use UCP to connect to an SMSC over the Internet or other private TCP/IP
network, you need to subscribe to the service of a service provider.
If you wish to use UCP to connect to your service provider, you need the following
information from the service provider:
IP address of the SMSC
Port number of the SMSC
User name
Password
Some service providers require you to set up an IPSEC VPN tunnel to connect to their SMSC
(Figure 1).

OZEKI NG – SMS Gateway Product Guide
__________________ OZEKI INFORMATIKAI KFT________________________
© Copyright, Ozeki Informatics Ltd Page 41/188
Figure 1 - UCP connection with VPN
In most cases you need a fix IP address, which you have to let the GSM service provider
know so that they can give you access through their firewall. In some situations, the service
provider does not want you to be able to set up more than one UCP connection from your
computer to their service. If this is the case, they might ask you to use a specific source port
for the connection.
Installation and configuration
You can install and configure this connection using the graphical user interface of Ozeki NG -
SMS Gateway.
To start installing and configuring a UCP service provider connection, click the Add button in
the top right-hand corner of the Service providers panel on the left of the Management
Console interface. (To find out how to open this interface, check out the QuickStart Guide.)
You can also add a service provider connection by clicking the Add service provider item in
the Service providers menu.
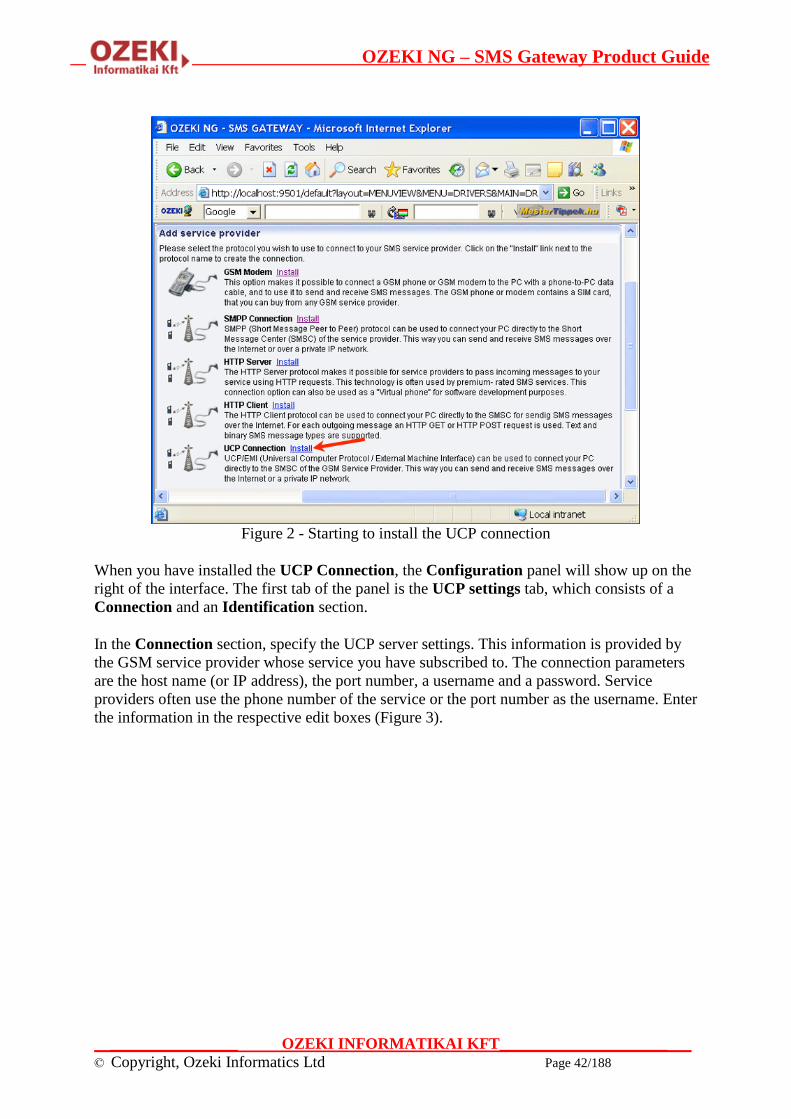
After you have clicked one of these, the Add service provider panel will show up on the
right of the interface. The panel contains a list of protocols you can install and use for
communication with an SMS service provider.
To select the UCP protocol, click the Install link in the respective entry in the list (Figure 2).
OZEKI NG – SMS Gateway Product Guide
__________________ OZEKI INFORMATIKAI KFT________________________
© Copyright, Ozeki Informatics Ltd Page 42/188
Figure 2 - Starting to install the UCP connection
When you have installed the UCP Connection, the Configuration panel will show up on the
right of the interface. The first tab of the panel is the UCP settings tab, which consists of a
Connection and an Identification section.
In the Connection section, specify the UCP server settings. This information is provided by
the GSM service provider whose service you have subscribed to. The connection parameters
are the host name (or IP address), the port number, a username and a password. Service
providers often use the phone number of the service or the port number as the username. Enter
the information in the respective edit boxes (Figure 3).

OZEKI NG – SMS Gateway Product Guide
__________________ OZEKI INFORMATIKAI KFT________________________
© Copyright, Ozeki Informatics Ltd Page 43/188
Figure 3 - Specifying the server settings
In the Identification section, specify the telephone number assigned to this connection and
the service provider name. To facilitate identification and to avoid confusion, you should
name the connection after the GSM service provider. E.g., if you have set up an SMPP
connection with Vodafone, it is advisable to name it "Vodafone". Also, note that different
connections should be given different names. If you have different connections from the same
service provider, you can use different but similar names for them, e.g.: "Vodafone1",
"Vodafone2" (or something of the like). However, some load balancing solutions require an
identical name for different connections. For details, visit the Load Balancing and the Load
Balancing for SMPP v3.3 page.
Some UCP servers require login. If this is the case, check the Server requires login
checkbox.
Enter the information in the respective edit boxes. Remember to enter the phone number in
international format: starting with "+". You can check the overridable checkbox to the right
of the Telephone number edit box. This ensures that you can replace the phone number
specified in the Telephone number edit box with a different one to be displayed as the sender
of an outgoing message. You can also replace the number with (alphanumeric) text consisting
of a maximum of eleven (11) characters. Therefore, when a message is sent out, e.g. using the
Database user, you can specify any different phone number or a name to be displayed as the
sender of the message.
OZEKI NG – SMS Gateway Product Guide
__________________ OZEKI INFORMATIKAI KFT________________________
© Copyright, Ozeki Informatics Ltd Page 44/188
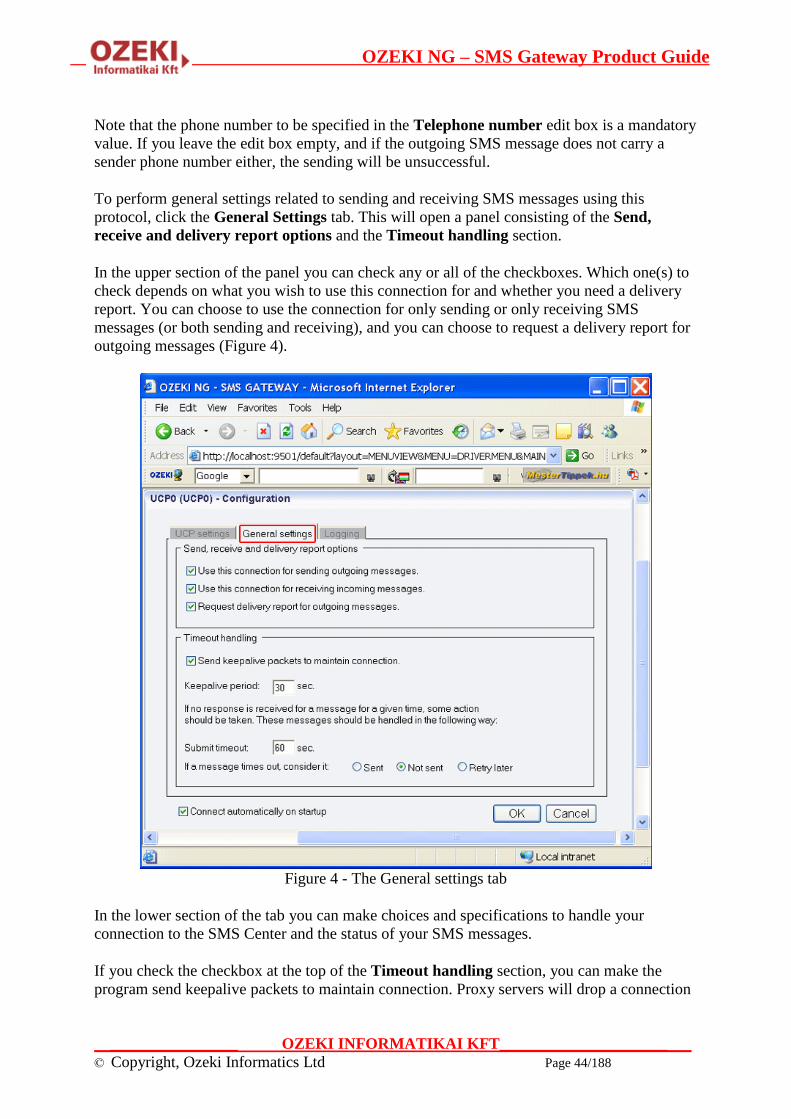
Note that the phone number to be specified in the Telephone number edit box is a mandatory
value. If you leave the edit box empty, and if the outgoing SMS message does not carry a
sender phone number either, the sending will be unsuccessful.
To perform general settings related to sending and receiving SMS messages using this
protocol, click the General Settings tab. This will open a panel consisting of the Send,
receive and delivery report options and the Timeout handling section.
In the upper section of the panel you can check any or all of the checkboxes. Which one(s) to
check depends on what you wish to use this connection for and whether you need a delivery
report. You can choose to use the connection for only sending or only receiving SMS
messages (or both sending and receiving), and you can choose to request a delivery report for
outgoing messages (Figure 4).
Figure 4 - The General settings tab
In the lower section of the tab you can make choices and specifications to handle your
connection to the SMS Center and the status of your SMS messages.
If you check the checkbox at the top of the Timeout handling section, you can make the
program send keepalive packets to maintain connection. Proxy servers will drop a connection

OZEKI NG – SMS Gateway Product Guide
__________________ OZEKI INFORMATIKAI KFT________________________
© Copyright, Ozeki Informatics Ltd Page 45/188
after a short period of time if there is no activity on it. Keepalive packets are sent during idle
periods to keep the connection open.
In the Keepalive period edit box you can specify the maximum length of idle connection
between the Ozeki NG - SMS Gateway and the SMSC. You can specify it by giving the
number of seconds in numerical characters representing any positive whole number. If you
are content with the default specification (30 seconds), leave this edit box unchanged.
In the Submit timeout edit box you can specify the maximum waiting time for an SMS
Center response confirming that your message has been successfully submitted. Successful
submission means that the SMS Center has accepted the message for delivery. You can
specify the waiting time by giving the number of seconds in numerical characters representing
any positive whole number. If you are content with the default specification (60 seconds),
leave this edit box unchanged.
You can choose how to consider a message you have sent if there is no response from the
SMS Center after the specified length of time. Select one of the three radio buttons.
Select Sent to consider a message sent even if there is no response from the SMS Center.
Select Not sent to consider a message not sent if there is no response from the SMS Center.
Select Retry later to make the program try to send a message later if the SMS Center has not
confirmed its status as sent. Then, the message will be placed last in the outgoing message
queue and sent out again when it is its turn.
OZEKI NG – SMS Gateway Product Guide
__________________ OZEKI INFORMATIKAI KFT________________________
© Copyright, Ozeki Informatics Ltd Page 46/188
Figure 5 - Logging options
To configure logging, click the Logging tab in the Configuration panel.
The tab has a Logging and a Log file settings section. Here, you can choose whether to make
the program write log entries about sent and received messages in human readable format
and/or log low level communication. Choosing the latter option will make the program
produce logfiles containing binary codes representing the communication data.
You should check at least the Log sent and received messages in human readable format
checkbox, as logfiles can be useful in debugging communication problems (Figure 5).
In the Log file settings section of the tab, you can make specifications for the size and the
number of available logfiles.
Log rotation saves disk space, as it ensures that older (and probably no longer needed) logfiles
will be automatically deleted from the log directory, which is specified in the Log directory
text box. By default, the access path to the logfiles is: C:\Program Files\Ozeki\OzekiNG -
SMS Gateway\Logs
In the Maximum log file size text box you can specify the maximum size of a logfile. Once
this size is reached, a new logfile will be created. Specify the number of kilobytes for the size
of a logfile by entering a positive whole number. By default, the maximum logfile size is
2000 kB.
OZEKI NG – SMS Gateway Product Guide
__________________ OZEKI INFORMATIKAI KFT________________________
© Copyright, Ozeki Informatics Ltd Page 47/188
In the Number of rotated files text box, specify the maximum number of rotated logfiles that
are saved. Specify this number by entering a positive whole number. By default, the number
of logfiles that are saved is 4 (see Figure 5 above).
If you are content with the default specifications, leave the text boxes unchanged.
The Configuration panel for service provider connections contains a Connect automatically
on startup checkbox (in the bottom left-hand corner). If it is checked, Ozeki NG - SMS
Gateway will automatically initiate a connection with the SMS Center when the program has
started.
If this checkbox is not checked, the connection has to be initiated manually.
To initiate the connection manually, click the Connect link in the panel of the service
provider connection (Figure 6).
You can open the panel of a service provider connection by clicking its name in the Service
providers panel in the Management Console.
The panel of a service provider connection consists of three sections.
In the upper section you can find the name of the service provider connection (with the name
of its protocol in brackets).
You can see an icon showing if the service provider connection is connected. If it is not, the
icon is marked with an "x".

OZEKI NG – SMS Gateway Product Guide
__________________ OZEKI INFORMATIKAI KFT________________________
© Copyright, Ozeki Informatics Ltd Page 48/188
Figure 6 - Links to operations
To the right of the icon you can find links to perform different operations.
Configure: to configure or modify the configuration of an installed service provider
connection. Clicking this link will take you back to the Configuration panel.
Events: to view the logging of the latest server events related to the service provider
connection. Clicking it will bring up the Events panel containing the logging of the
latest server events.
Connect: to connect the service provider connection with the SMS Center.
Disconnect: to disconnect the service provider connection from the SMS Center.
Uninstall: to uninstall the service provider connection.
In the middle section of the panel you can see some of the most important configuration
information.
The options that have been (re)activated during the configuration are marked with a tick.
The options that have not been activated or those that have been deactivated during the
configuration are marked with an "x".
In the lower section of the panel of the service provider connection you can read some
information about its protocol.

OZEKI NG – SMS Gateway Product Guide
__________________ OZEKI INFORMATIKAI KFT________________________
© Copyright, Ozeki Informatics Ltd Page 49/188
CIMD2 connection
In this chapter you can find out how to install and configure the UCP IP SMS protocol
for SMS messaging using the Ozeki NG - SMS Gateway software. In addition to an
introduction containing general information about this protocol, this page provides
detailed installation and configuration instructions.
Introduction
As you can read on the Service Provider Connections page, you need to install and configure
one or more service provider connections for SMS messaging using Ozeki NG - SMS
Gateway. One of the service provider connections supported by the software is the CIMD2
connection.
The Computer Interface Message Distribution (CIMD) protocol was introduced by Nokia.
The Nokia SMS Center includes an CIMD2 interface that transfers messages between
applications and the Nokia Short Message Service Center (SMSC).
CIMD2 is version 2 of the Computer Interface to Message Distribution protocol. The CIMD2
interface is suitable for client applications that send and retrieve messages over TCP/IP
sockets, such as Ozeki NG - SMS Gateway.
One of the advantages of using CIMD2 connections is that you can specify the sender address
of the message. The sender address can be a custom phone number or a short word containing
alphanumeric characters. (See the instructions about the overridable checkbox below.) Note,
however, that some GSM service providers restrict the use of this option.
Another advantage of CIMD2 is that it allows sending messages of every type the GSM
network can carry. It can be used to send binary SMS messages (operator logos, ringtones),
WAP Push messages, as well as other types of messages. (Check out the Appendix for links
to pages about different message types.) Concatenated SMS messages and various alphabets
can also be used.
A CIMD2 connection can be used through an IP link. This link can be a leased line or the
Internet. Optionally the link can be protected by VPN.
If you wish to use CIMD2 to connect to your service provider, you need to receive the
following information from the service provider:
IP address of the SMSC
Port number of the SMSC
User name
Password
Installation and configuration
You can install and configure this connection using the graphical user interface of Ozeki NG -
SMS Gateway.

OZEKI NG – SMS Gateway Product Guide
__________________ OZEKI INFORMATIKAI KFT________________________
© Copyright, Ozeki Informatics Ltd Page 50/188
To start installing and configuring a UCP service provider connection, click the Add button in
the top right-hand corner of the Service providers panel on the left of the Management
Console interface. (To find out how to open this interface, check out the QuickStart Guide.)
You can also add a service provider connection by clicking the Add service provider item in
the Service providers menu.
After you have clicked one of these, the Add service provider panel will show up on the
right of the interface. The panel contains a list of protocols you can install and use for
communication with an SMS service provider.
To select the CIMD2 protocol, click the Install link in the respective entry in the list (Figure
1).
Figure 1 - Starting to install the CIMD2 connection
When you have installed the CIMD2 Connection, the Configuration panel will show up on
the right of the interface. The first tab of the panel is the CIMD2 settings tab, which consists
of a Connection and an Identification section.
In the Connection section, specify the CIMD2 server settings. This information is provided
by the GSM service provider whose service you have subscribed to. The connection
parameters are the host name (or IP address), the port number, a username and a password.
The hostname refers to the server that Ozeki NG - SMS Gateway will connect to. This
specification allows you to customize a connection. The valid values of the port parameter
range from 0 to 65535. The username and the password are text attributes which can also
include numerical characters. Service providers often use the phone number of the service or
the port number as the username. These specifications are an essential part of the SMSC
authentication method. Enter the information in the respective edit boxes (Figure 2).
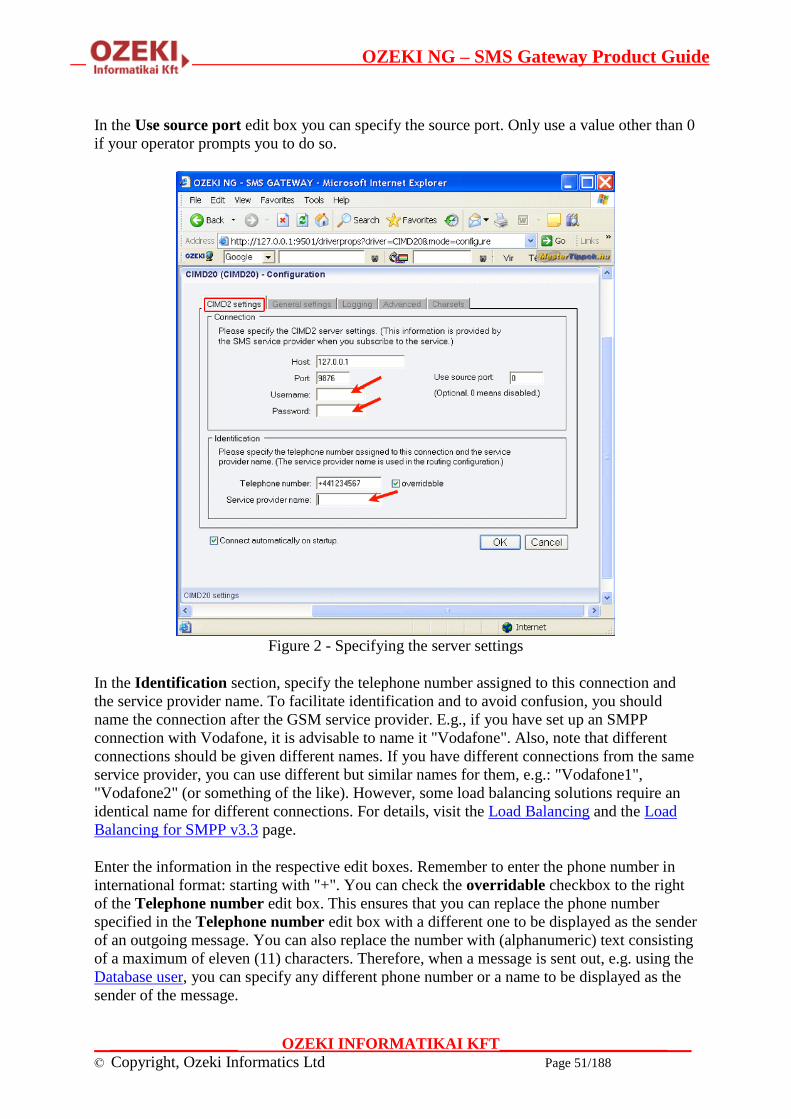
OZEKI NG – SMS Gateway Product Guide
__________________ OZEKI INFORMATIKAI KFT________________________
© Copyright, Ozeki Informatics Ltd Page 51/188
In the Use source port edit box you can specify the source port. Only use a value other than 0
if your operator prompts you to do so.
Figure 2 - Specifying the server settings
In the Identification section, specify the telephone number assigned to this connection and
the service provider name. To facilitate identification and to avoid confusion, you should
name the connection after the GSM service provider. E.g., if you have set up an SMPP
connection with Vodafone, it is advisable to name it "Vodafone". Also, note that different
connections should be given different names. If you have different connections from the same
service provider, you can use different but similar names for them, e.g.: "Vodafone1",
"Vodafone2" (or something of the like). However, some load balancing solutions require an
identical name for different connections. For details, visit the Load Balancing and the Load
Balancing for SMPP v3.3 page.
Enter the information in the respective edit boxes. Remember to enter the phone number in
international format: starting with "+". You can check the overridable checkbox to the right
of the Telephone number edit box. This ensures that you can replace the phone number
specified in the Telephone number edit box with a different one to be displayed as the sender
of an outgoing message. You can also replace the number with (alphanumeric) text consisting
of a maximum of eleven (11) characters. Therefore, when a message is sent out, e.g. using the
Database user, you can specify any different phone number or a name to be displayed as the
sender of the message.
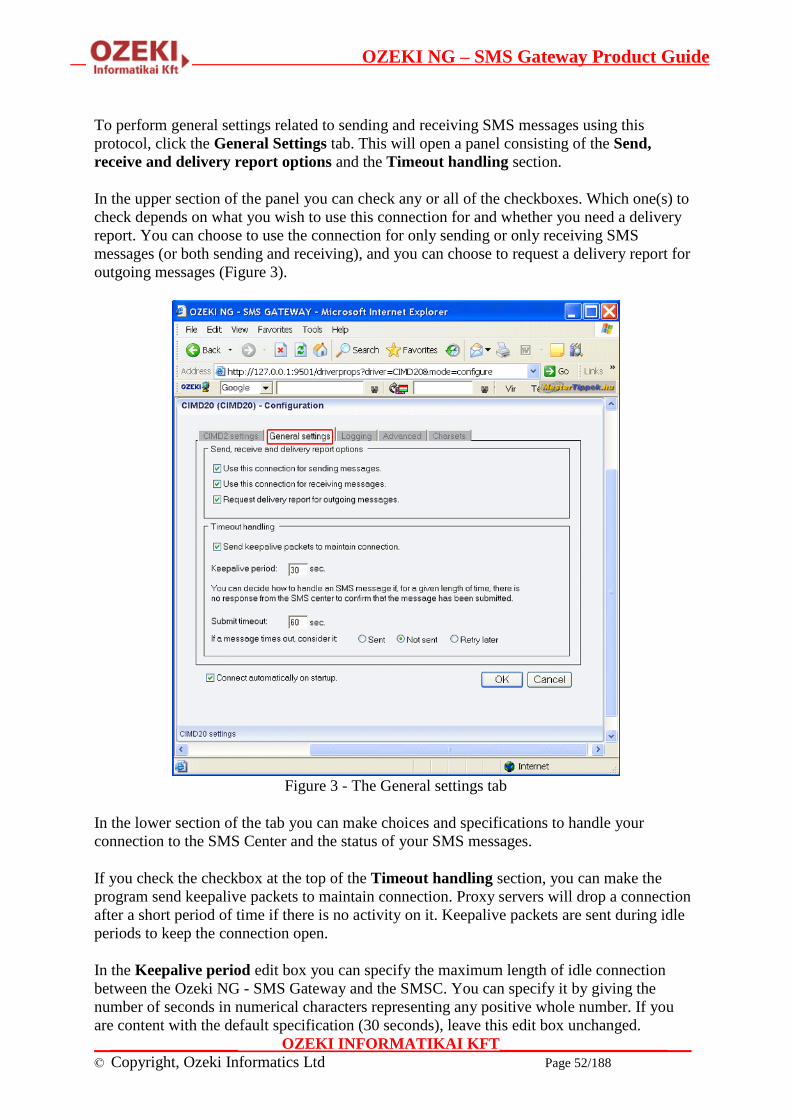
OZEKI NG – SMS Gateway Product Guide
__________________ OZEKI INFORMATIKAI KFT________________________
© Copyright, Ozeki Informatics Ltd Page 52/188
To perform general settings related to sending and receiving SMS messages using this
protocol, click the General Settings tab. This will open a panel consisting of the Send,
receive and delivery report options and the Timeout handling section.
In the upper section of the panel you can check any or all of the checkboxes. Which one(s) to
check depends on what you wish to use this connection for and whether you need a delivery
report. You can choose to use the connection for only sending or only receiving SMS
messages (or both sending and receiving), and you can choose to request a delivery report for
outgoing messages (Figure 3).
Figure 3 - The General settings tab
In the lower section of the tab you can make choices and specifications to handle your
connection to the SMS Center and the status of your SMS messages.
If you check the checkbox at the top of the Timeout handling section, you can make the
program send keepalive packets to maintain connection. Proxy servers will drop a connection
after a short period of time if there is no activity on it. Keepalive packets are sent during idle
periods to keep the connection open.
In the Keepalive period edit box you can specify the maximum length of idle connection
between the Ozeki NG - SMS Gateway and the SMSC. You can specify it by giving the
number of seconds in numerical characters representing any positive whole number. If you
are content with the default specification (30 seconds), leave this edit box unchanged.
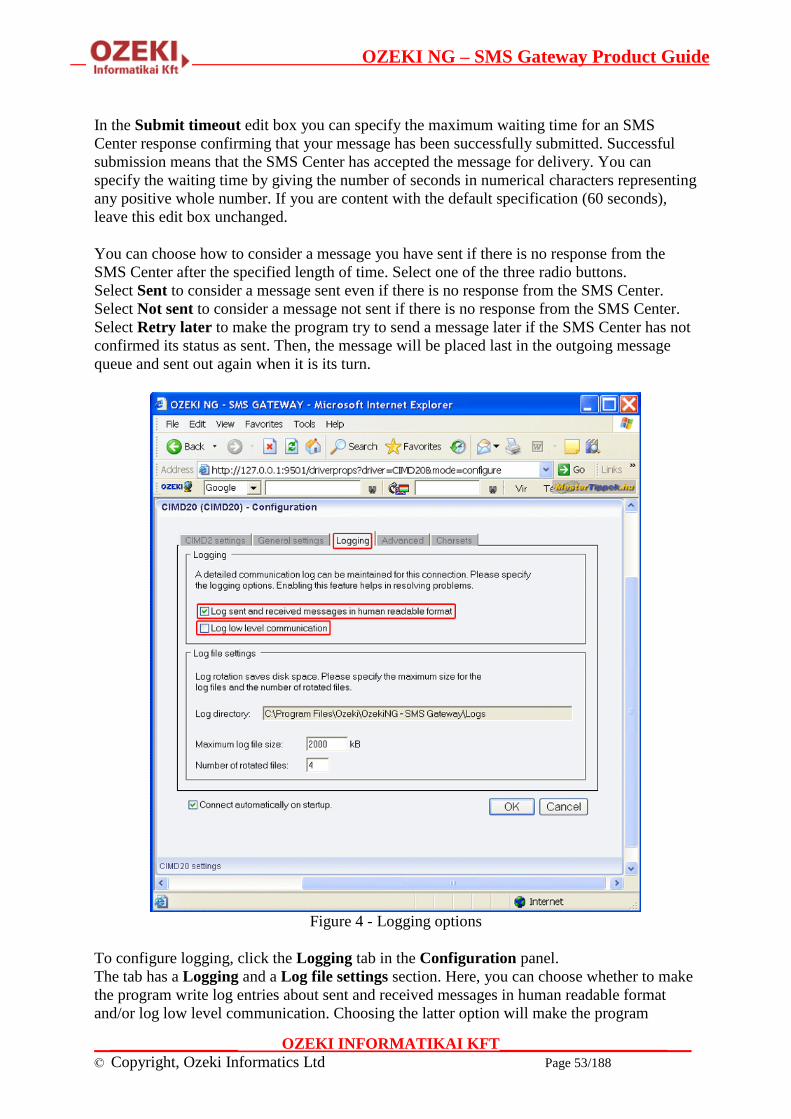
OZEKI NG – SMS Gateway Product Guide
__________________ OZEKI INFORMATIKAI KFT________________________
© Copyright, Ozeki Informatics Ltd Page 53/188
In the Submit timeout edit box you can specify the maximum waiting time for an SMS
Center response confirming that your message has been successfully submitted. Successful
submission means that the SMS Center has accepted the message for delivery. You can
specify the waiting time by giving the number of seconds in numerical characters representing
any positive whole number. If you are content with the default specification (60 seconds),
leave this edit box unchanged.
You can choose how to consider a message you have sent if there is no response from the
SMS Center after the specified length of time. Select one of the three radio buttons.
Select Sent to consider a message sent even if there is no response from the SMS Center.
Select Not sent to consider a message not sent if there is no response from the SMS Center.
Select Retry later to make the program try to send a message later if the SMS Center has not
confirmed its status as sent. Then, the message will be placed last in the outgoing message
queue and sent out again when it is its turn.
Figure 4 - Logging options
To configure logging, click the Logging tab in the Configuration panel.
The tab has a Logging and a Log file settings section. Here, you can choose whether to make
the program write log entries about sent and received messages in human readable format
and/or log low level communication. Choosing the latter option will make the program
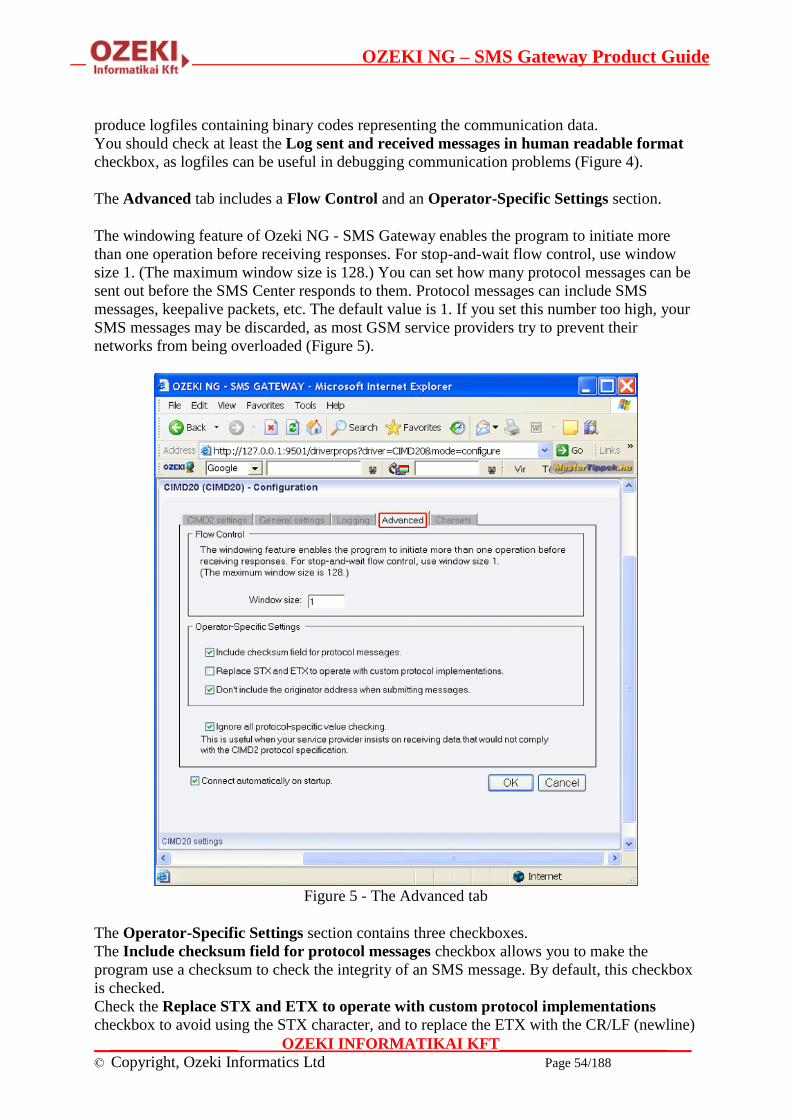
OZEKI NG – SMS Gateway Product Guide
__________________ OZEKI INFORMATIKAI KFT________________________
© Copyright, Ozeki Informatics Ltd Page 54/188
produce logfiles containing binary codes representing the communication data.
You should check at least the Log sent and received messages in human readable format
checkbox, as logfiles can be useful in debugging communication problems (Figure 4).
The Advanced tab includes a Flow Control and an Operator-Specific Settings section.
The windowing feature of Ozeki NG - SMS Gateway enables the program to initiate more
than one operation before receiving responses. For stop-and-wait flow control, use window
size 1. (The maximum window size is 128.) You can set how many protocol messages can be
sent out before the SMS Center responds to them. Protocol messages can include SMS
messages, keepalive packets, etc. The default value is 1. If you set this number too high, your
SMS messages may be discarded, as most GSM service providers try to prevent their
networks from being overloaded (Figure 5).
Figure 5 - The Advanced tab
The Operator-Specific Settings section contains three checkboxes.
The Include checksum field for protocol messages checkbox allows you to make the
program use a checksum to check the integrity of an SMS message. By default, this checkbox
is checked.
Check the Replace STX and ETX to operate with custom protocol implementations
checkbox to avoid using the STX character, and to replace the ETX with the CR/LF (newline)

OZEKI NG – SMS Gateway Product Guide
__________________ OZEKI INFORMATIKAI KFT________________________
© Copyright, Ozeki Informatics Ltd Page 55/188
character.
Check the Don't include the originator address when submitting messages checkbox
HTTP Client Connection
This chapter provides detailed instructions on how to install and configure the HTTP
Client service provider connection for SMS messaging using the Ozeki NG - SMS
Gateway software.
As you can read on the Service Provider Connections page, you need to install and configure
one or more service provider connections for SMS messaging using Ozeki NG - SMS
Gateway. One of the service provider connections supported by the software is the HTTP
Client connection.
The HTTP Client protocol can be used to connect your PC directly to the SMSC for sending
SMS messages over the Internet. For each outgoing message an HTTP GET or HTTP POST
request is used. Text and binary SMS message types are supported.
You can install and configure this connection using the graphical user interface of Ozeki NG -
SMS Gateway. To start installing and configuring an HTTP Client connection, click the Add
button in the top right-hand corner of the Service providers panel on the left of the
Management Console interface. (To find out how to open this interface, check out the
QuickStart Guide.)
You can also add a service provider connection by clicking the Add service provider item in
the Service providers menu.
Figure 1 - Starting to install the HTTP Client connection

OZEKI NG – SMS Gateway Product Guide
__________________ OZEKI INFORMATIKAI KFT________________________
© Copyright, Ozeki Informatics Ltd Page 56/188
After you have clicked one of these, the Add service provider panel will show up on the
right of the interface. The panel contains a list of protocols you can install and use for
communication with an SMS service provider.
To select the HTTP Client protocol, click the Install link in the respective entry in the list
(Figure 1).
When you have installed the HTTP Client protocol, the Configuration panel will show up
on the right of the interface. The first tab of the panel is the HTTP settings tab, which
consists of a Connection and an Identification section.
Figure 2 - The HTTP settings tab
In the Connection section, specify the HTTP Client settings. This information is provided by
the SMS service provider when you subscribe to the service (Figure 2).
In the Target URL template you can specify the URL of the HTTP server. This URL can
contain certain keywords that will be replaced before the URL is called. The following
keywords can be used:
Keyword Description
$originator This denotes the sender telephone number.

OZEKI NG – SMS Gateway Product Guide
__________________ OZEKI INFORMATIKAI KFT________________________
© Copyright, Ozeki Informatics Ltd Page 57/188
$recipient This denotes the recipient telephone number.
$messagedata This denotes the first 1024 characters of the message text.
$messageid This is the unique identifier string of the message. This identifier is generated
by Ozeki NG - SMS Gateway.
In the Identification section, specify the telephone number assigned to this connection and
the service provider connection name. To facilitate identification and to avoid confusion, you
should name the connection after the GSM service provider. E.g., if you have set up an HTTP
Client connection with Vodafone, it is advisable to name it "Vodafone". Also, note that
different connections should be given different names. If you have different connections from
the same service provider, you can use different but similar names for them, e.g.:
"Vodafone1", "Vodafone2" (or something of the like). However, some load balancing
solutions require an identical name for different connections. For details, visit the Load
Balancing and the Load Balancing for SMPP v3.3 page.
Enter the information in the respective edit boxes. Remember to enter the phone number in
international format: starting with "+". You can check the overridable checkbox to the right
of the Telephone number edit box. This ensures that you can replace the phone number
specified in the Telephone number edit box with a different one to be displayed as the sender
of an outgoing message. You can also replace the number with (alphanumeric) text consisting
of a maximum of eleven (11) characters. Therefore, when a message is sent out, e.g. using the
Database user, you can specify any different phone number or a name to be displayed as the
sender of the message.

OZEKI NG – SMS Gateway Product Guide
__________________ OZEKI INFORMATIKAI KFT________________________
© Copyright, Ozeki Informatics Ltd Page 58/188
Figure 3 - The General settings tab
Note that the phone number to be specified in the Telephone number edit box is a mandatory
value. If you leave the edit box blank, the sending will be unsuccessful.
To perform general settings related to sending and receiving SMS messages using the HTTP
Client connection, click the General Settings tab. This will open a panel consisting of the
Send, receive and delivery report options and the Timeout handling section (Figure 3).
In the upper section of the panel you can check either or both of the checkboxes. Which
one(s) to check depends on what you wish to use this connection for. You can choose to use
the connection for only sending or only receiving SMS messages (or both sending and
receiving). Note that HTTP Client connections are mainly used for sending messages.
However, it is possible to set up HTTP polling to download incoming messages from an
HTTP server. In the Polling interval edit box at the bottom of this section, you can specify
the polling interval in seconds by entering a positive whole number in numerical format. If
you are content with the default specification (2 seconds), leave this edit box unchanged.
In the lower section of the tab you can make choices and specifications to handle your
connection to the SMS Center and the status of your SMS messages.
In the Submit timeout edit box you can specify the maximum waiting time for an SMS
Center response confirming that your message has been successfully submitted. Successful
submission means that the SMS Center has accepted the message for delivery. You can

OZEKI NG – SMS Gateway Product Guide
__________________ OZEKI INFORMATIKAI KFT________________________
© Copyright, Ozeki Informatics Ltd Page 59/188
specify the waiting time by giving the number of seconds in numerical characters representing
any positive whole number. If you are content with the default specification (60 seconds),
leave this edit box unchanged.
You can choose how to consider a message you have sent if there is no response from the
SMS Center after the specified length of time. Select one of the three radio buttons.
Select Sent to consider a message sent even if there is no response from the SMS Center.
Select Not sent to consider a message not sent if there is no response from the SMS Center.
Select Retry later to make the program try to send a message later if the SMS Center has not
confirmed its status as sent. Then, the message will be placed last in the outgoing message
queue and sent out again when it is its turn.
To configure logging, click the Logging tab in the Configuration panel.
The tab has a Logging and a Log file settings section. Here, you can choose whether to make
the program write log entries about sent and received messages in human readable format
and/or log low level communication. Choosing the latter option will make the program
produce logfiles containing binary codes representing the communication data.
You should check at least the Log sent and received messages in human readable format
checkbox, as logfiles can be useful in debugging communication problems (Figure 4).

OZEKI NG – SMS Gateway Product Guide
__________________ OZEKI INFORMATIKAI KFT________________________
© Copyright, Ozeki Informatics Ltd Page 60/188
Figure 4 - Logging options
In the Log file settings section of the tab, you can make specifications for the size and the
number of available logfiles.
Log rotation saves disk space, as it ensures that older (and probably no longer needed) logfiles
will be automatically deleted from the log directory, which is specified in the Log directory
text box. By default, the access path to the logfiles is: C:\Program Files\Ozeki\OzekiNG -
SMS Gateway\Logs
In the Maximum log file size text box you can specify the maximum size of a logfile. Once
this size is reached, a new logfile will be created. Specify the number of kilobytes for the size
of a logfile by entering a positive whole number. By default, the maximum logfile size is
2000 kB.
In the Number of rotated files text box, specify the maximum number of rotated logfiles that
are saved. Specify this number by entering a positive whole number. By default, the number
of logfiles that are saved is 4 (see Figure 4 above).
If you are content with the default specifications, leave the text boxes unchanged.

OZEKI NG – SMS Gateway Product Guide
__________________ OZEKI INFORMATIKAI KFT________________________
© Copyright, Ozeki Informatics Ltd Page 61/188
The Configuration panel for service provider connections contains a Connect automatically
on startup checkbox (in the bottom left-hand corner). If it is checked, Ozeki NG - SMS
Gateway will automatically initiate a connection with the SMS Center when the program has
started.
If this checkbox is not checked, the connection has to be initiated manually.
To initiate the connection manually, click the Connect link in the panel of the service
provider connection(Figure 5).
Figure 5 - Links to operations
You can open the panel of a service provider connection by clicking its name in the Service
providers panel in the Management Console.
The panel of a service provider connection consists of three sections.
In the upper section you can find the name of the service provider connection (with the name
of its protocol in brackets).
You can see an icon showing if the service provider connection is connected. If it is not, the
icon is marked with an "x".
To the right of the icon you can find links to perform different operations.

OZEKI NG – SMS Gateway Product Guide
__________________ OZEKI INFORMATIKAI KFT________________________
© Copyright, Ozeki Informatics Ltd Page 62/188
Configure: to configure or modify the configuration of an installed service provider
connection. Clicking this link will take you back to the Configuration panel.
Events: to view the logging of the latest server events related to the service provider
connection. Clicking it will bring up the Events panel containing the logging of the
latest server events.
Connect: to connect the service provider connection with the SMS Center.
Disconnect: to disconnect the service provider connection from the SMS Center.
Uninstall: to uninstall the service provider connection.
In the middle section of the panel you can see some of the most important configuration
information.
The options that have been (re)activated during the configuration are marked with a tick.
The options that have not been activated or those that have been deactivated during the
configuration are marked with an "x".
In the lower section of the panel of the service provider connection you can read some
information about its protocol.
Variables for HTTP Client Service Provider Connection
The following table lists the variables you can use in the HTTP requests sent to HTTP
Client service provider connections.
recipient The recipient of the message
originator The sender of the message
messagedata The message text (or message data for binary messages)
messagedataHEX The message text encoded as a hexadecimal string
messagetype The message type. For more information please take a look at the SMS
Message Types page.
messageid A unique string for the message.
dcs The GSM data codeing scheme
username The Ozeki User name of the user who submitted the message
password The Ozeki Password of the user who submitted the message.
Please handle this parameter with great care, as it can expose the user
information of the SMS gateway!
HTTP Server Connection
This chapter provides detailed instructions on how to install and configure the HTTP
Server connection for SMS messaging using the Ozeki NG - SMS Gateway software.
As you can read on the Service Provider Connections page, you need to install and configure
one or more service provider connections for SMS messaging using Ozeki NG - SMS
Gateway. One of the service provider connections supported by the software is the HTTP
Server connection.

OZEKI NG – SMS Gateway Product Guide
__________________ OZEKI INFORMATIKAI KFT________________________
© Copyright, Ozeki Informatics Ltd Page 63/188
The HTTP Server protocol makes it possible for service providers to pass incoming messages
to your service using an HTTP request for each incoming SMS message and they optionally
accept a reply message in the HTTP response. This technology is often used by premium-
rated SMS services. This connection option can also be used as a "Virtual phone" for software
development purposes.
You can install and configure the HTTP Server connection using the graphical user interface
of Ozeki NG - SMS Gateway. To start installing and configuring an HTTP Server connection,
click the Add button in the top right-hand corner of the Service providers panel on the left of
the Management Console interface. (To find out how to open this interface, check out the
QuickStart Guide.)
You can also add a service provider connection by clicking the Add service provider item in
the Service providers menu.
After you have clicked one of these, the Add service provider panel will show up on the
right of the interface. The panel contains a list of protocols you can install and use for
communication with an SMS service provider.
To select the HTTP Server protocol, click the Install link in the respective entry in the list
(Figure 1).
Figure 1 - Starting to install the HTTP Server connection
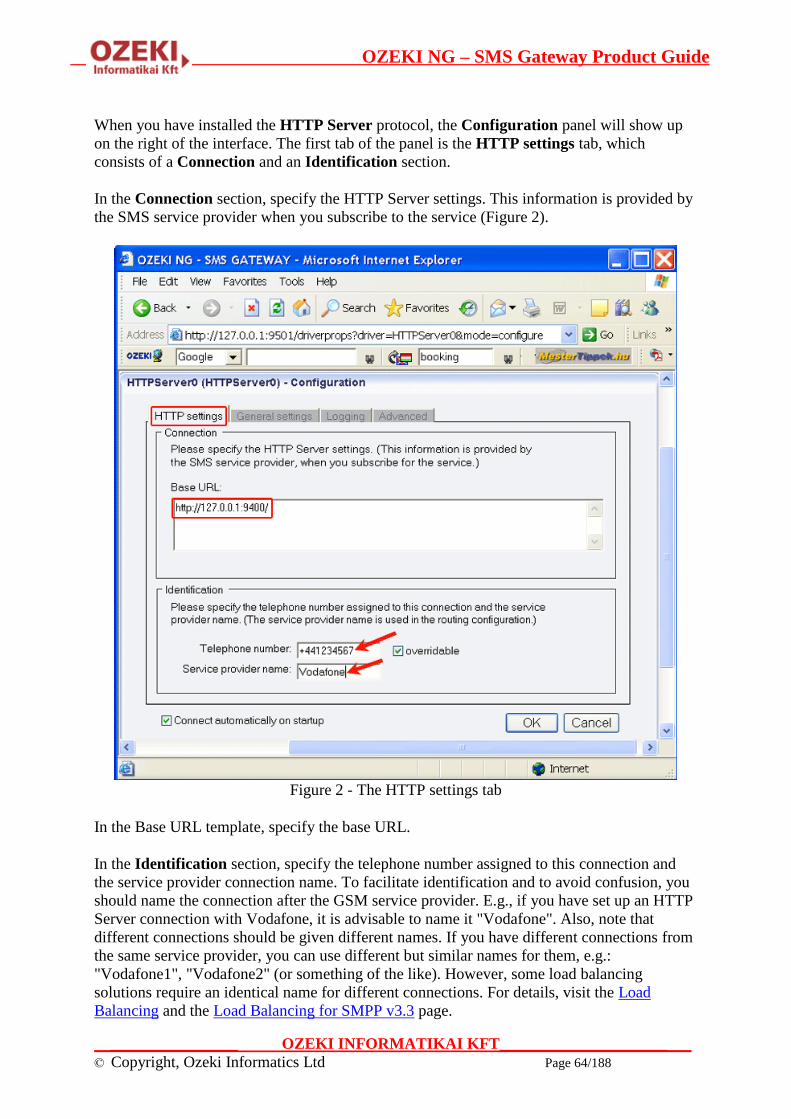
OZEKI NG – SMS Gateway Product Guide
__________________ OZEKI INFORMATIKAI KFT________________________
© Copyright, Ozeki Informatics Ltd Page 64/188
When you have installed the HTTP Server protocol, the Configuration panel will show up
on the right of the interface. The first tab of the panel is the HTTP settings tab, which
consists of a Connection and an Identification section.
In the Connection section, specify the HTTP Server settings. This information is provided by
the SMS service provider when you subscribe to the service (Figure 2).
Figure 2 - The HTTP settings tab
In the Base URL template, specify the base URL.
In the Identification section, specify the telephone number assigned to this connection and
the service provider connection name. To facilitate identification and to avoid confusion, you
should name the connection after the GSM service provider. E.g., if you have set up an HTTP
Server connection with Vodafone, it is advisable to name it "Vodafone". Also, note that
different connections should be given different names. If you have different connections from
the same service provider, you can use different but similar names for them, e.g.:
"Vodafone1", "Vodafone2" (or something of the like). However, some load balancing
solutions require an identical name for different connections. For details, visit the Load
Balancing and the Load Balancing for SMPP v3.3 page.
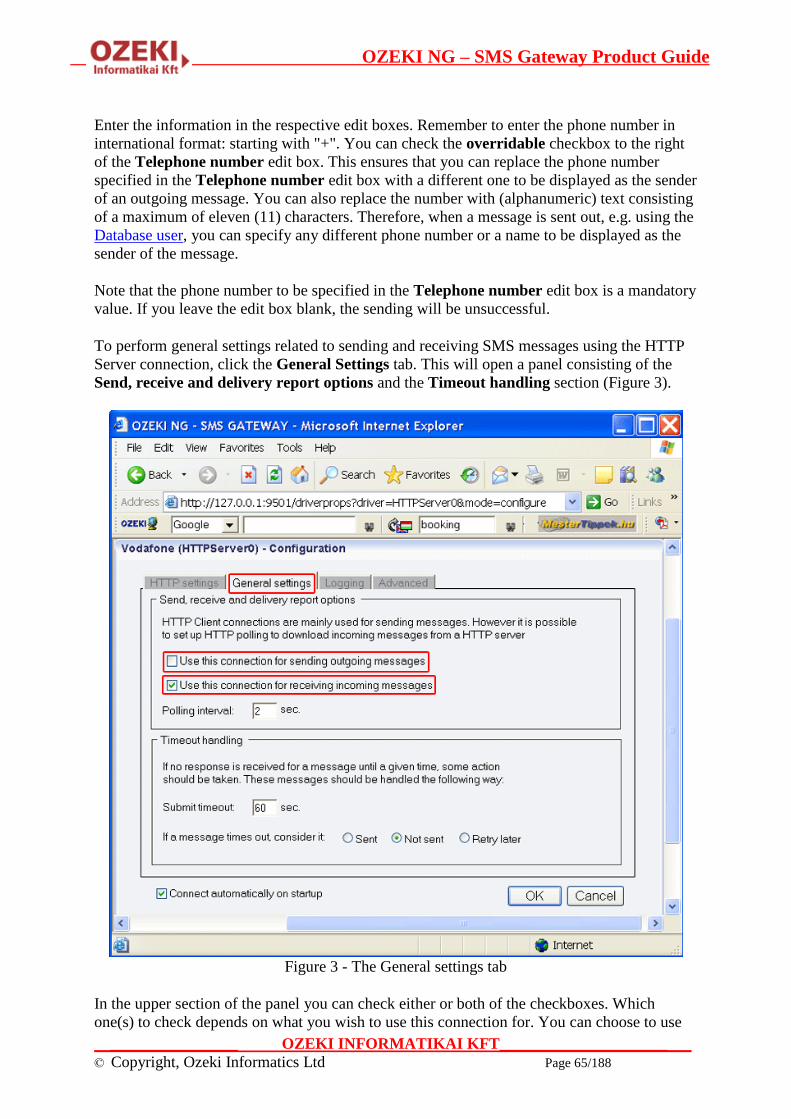
OZEKI NG – SMS Gateway Product Guide
__________________ OZEKI INFORMATIKAI KFT________________________
© Copyright, Ozeki Informatics Ltd Page 65/188
Enter the information in the respective edit boxes. Remember to enter the phone number in
international format: starting with "+". You can check the overridable checkbox to the right
of the Telephone number edit box. This ensures that you can replace the phone number
specified in the Telephone number edit box with a different one to be displayed as the sender
of an outgoing message. You can also replace the number with (alphanumeric) text consisting
of a maximum of eleven (11) characters. Therefore, when a message is sent out, e.g. using the
Database user, you can specify any different phone number or a name to be displayed as the
sender of the message.
Note that the phone number to be specified in the Telephone number edit box is a mandatory
value. If you leave the edit box blank, the sending will be unsuccessful.
To perform general settings related to sending and receiving SMS messages using the HTTP
Server connection, click the General Settings tab. This will open a panel consisting of the
Send, receive and delivery report options and the Timeout handling section (Figure 3).
Figure 3 - The General settings tab
In the upper section of the panel you can check either or both of the checkboxes. Which
one(s) to check depends on what you wish to use this connection for. You can choose to use

OZEKI NG – SMS Gateway Product Guide
__________________ OZEKI INFORMATIKAI KFT________________________
© Copyright, Ozeki Informatics Ltd Page 66/188
the connection for only sending or only receiving SMS messages (or both sending and
receiving). Note that HTTP Server connections are mainly used for sending messages.
However, it is possible to set up HTTP polling to download incoming messages from a HTTP
server. In the Polling interval edit box at the bottom of this section, you can specify the
polling interval in seconds by entering a positive whole number in numerical format. If you
are content with the default specification (2 seconds), leave this edit box unchanged.
In the lower section of the tab you can make choices and specifications to handle your
connection to the SMS Center and the status of your SMS messages.
In the Submit timeout edit box you can specify the maximum waiting time for an SMS
Center response confirming that your message has been successfully submitted. Successful
submission means that the SMS Center has accepted the message for delivery. You can
specify the waiting time by giving the number of seconds in numerical characters representing
any positive whole number. If you are content with the default specification (60 seconds),
leave this edit box unchanged.
You can choose how to consider a message you have sent if there is no response from the
SMS Center after the specified length of time. Select one of the three radio buttons.
Select Sent to consider a message sent even if there is no response from the SMS Center.
Select Not sent to consider a message not sent if there is no response from the SMS Center.
Select Retry later to make the program try to send a message later if the SMS Center has not
confirmed its status as sent. Then, the message will be placed last in the outgoing message
queue and sent out again when it is its turn.
To configure logging, click the Logging tab in the Configuration panel.
The tab has a Logging and a Log file settings section. Here, you can choose whether to make
the program write log entries about sent and received messages in human readable format
and/or log low level communication. Choosing the latter option will make the program
produce logfiles containing binary codes representing the communication data.
You should check at least the Log sent and received messages in human readable format
checkbox, as logfiles can be useful in debugging communication problems (Figure 4).

OZEKI NG – SMS Gateway Product Guide
__________________ OZEKI INFORMATIKAI KFT________________________
© Copyright, Ozeki Informatics Ltd Page 67/188
Figure 4 - Logging options
In the Log file settings section of the tab, you can make specifications for the size and the
number of available logfiles.
Log rotation saves disk space, as it ensures that older (and probably no longer needed) logfiles
will be automatically deleted from the log directory, which is specified in the Log directory
text box. By default, the access path to the logfiles is: C:\Program Files\Ozeki\OzekiNG -
SMS Gateway\Logs
In the Maximum log file size text box you can specify the maximum size of a logfile. Once
this size is reached, a new logfile will be created. Specify the number of kilobytes for the size
of a logfile by entering a positive whole number. By default, the maximum logfile size is
2000 kB.
In the Number of rotated files text box, specify the maximum number of rotated logfiles that
are saved. Specify this number by entering a positive whole number. By default, the number
of logfiles that are saved is 4 (see Figure 4 above).
If you are content with the default specifications, leave the text boxes unchanged.
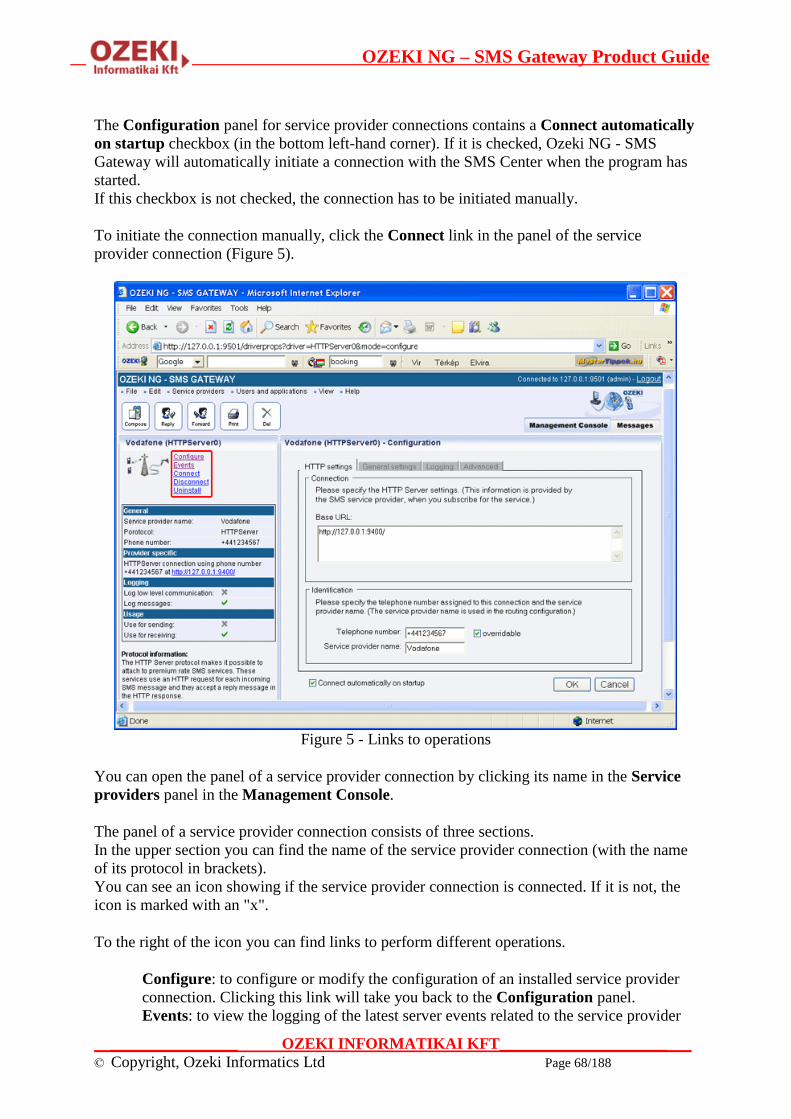
OZEKI NG – SMS Gateway Product Guide
__________________ OZEKI INFORMATIKAI KFT________________________
© Copyright, Ozeki Informatics Ltd Page 68/188
The Configuration panel for service provider connections contains a Connect automatically
on startup checkbox (in the bottom left-hand corner). If it is checked, Ozeki NG - SMS
Gateway will automatically initiate a connection with the SMS Center when the program has
started.
If this checkbox is not checked, the connection has to be initiated manually.
To initiate the connection manually, click the Connect link in the panel of the service
provider connection (Figure 5).
Figure 5 - Links to operations
You can open the panel of a service provider connection by clicking its name in the Service
providers panel in the Management Console.
The panel of a service provider connection consists of three sections.
In the upper section you can find the name of the service provider connection (with the name
of its protocol in brackets).
You can see an icon showing if the service provider connection is connected. If it is not, the
icon is marked with an "x".
To the right of the icon you can find links to perform different operations.
Configure: to configure or modify the configuration of an installed service provider
connection. Clicking this link will take you back to the Configuration panel.
Events: to view the logging of the latest server events related to the service provider

OZEKI NG – SMS Gateway Product Guide
__________________ OZEKI INFORMATIKAI KFT________________________
© Copyright, Ozeki Informatics Ltd Page 69/188
connection. Clicking it will bring up the Events panel containing the logging of the
latest server events.
Connect: to connect the service provider connection with the SMS Center.
Disconnect: to disconnect the service provider connection from the SMS Center.
Uninstall: to uninstall the service provider connection.
In the middle section of the panel you can see some of the most important configuration
information.
The options that have been (re)activated during the configuration are marked with a tick.
The options that have not been activated or those that have been deactivated during the
configuration are marked with an "x".
In the lower section of the panel of the service provider connection you can read some
information about its protocol.
Users and Applications
This section explains the terms user/application in SMS messaging using the Ozeki NG -
SMS Gateway software, and provides links to different pages detailing how to install
and configure different users and applications.
In SMS messaging using Ozeki NG - SMS Gateway, a user or application is an entity
provided with service with the help of the software. For instance, a user (human person) can
log in to Ozeki NG - SMS Gateway to send and receive SMS messages using the graphical
user interface (GUI) of the program.
An application allows automated SMS messaging, without human involvement, though with
human configuration. For example, a database user inserts incoming messages into a database,
and periodically checks the database for messages to be sent out.
For reasons of simplicity, applications are also often referred to as users in the documentation
and the GUI of Ozeki NG - SMS Gateway.
Ozeki NG - SMS Gateway allows you to install and configure a large number of and different
types of users and applications using the graphical user interface of the software.
At present, the program supports the installation and configuration of the following users and
applications:
Standard user
E-mail user
Autoreply user
AutoReplyEasy user
Colour SMS user
Database user
File user
HTTP Client user

OZEKI NG – SMS Gateway Product Guide
__________________ OZEKI INFORMATIKAI KFT________________________
© Copyright, Ozeki Informatics Ltd Page 70/188
SMPP user
Standard User
This chapter explains how to install and configure a standard user for SMS messaging
using the graphical user interface of the Ozeki NG - SMS Gateway software.
Ozeki NG - SMS Gateway allows, among others (see the Users and Applications page), the
installation and configuration of a Standard user.
A standard user can use the HTTP user interface to log in to the program to send and receive
SMS messages.
You can use the graphical user interface of Ozeki NG - SMS Gateway to install and configure
a standard user.
To start installing and configuring a standard user, click the Add button in the top right-hand
corner of the Users and Applications panel on the right of the Management Console. You
can also add a user by clicking the Add user item in the Users and applications menu
(Figure 1).
Figure 1 - Adding a user
This will bring up an interface consisting of two panels.
The panel on the left contains a list of users that have been installed. In the bar at the bottom
of the panel you can read how many users have been installed.
The panel on the right contains a list of users that can be installed.
Each user in the left-hand panel is listed with a unique name (and the user type stated in
brackets).
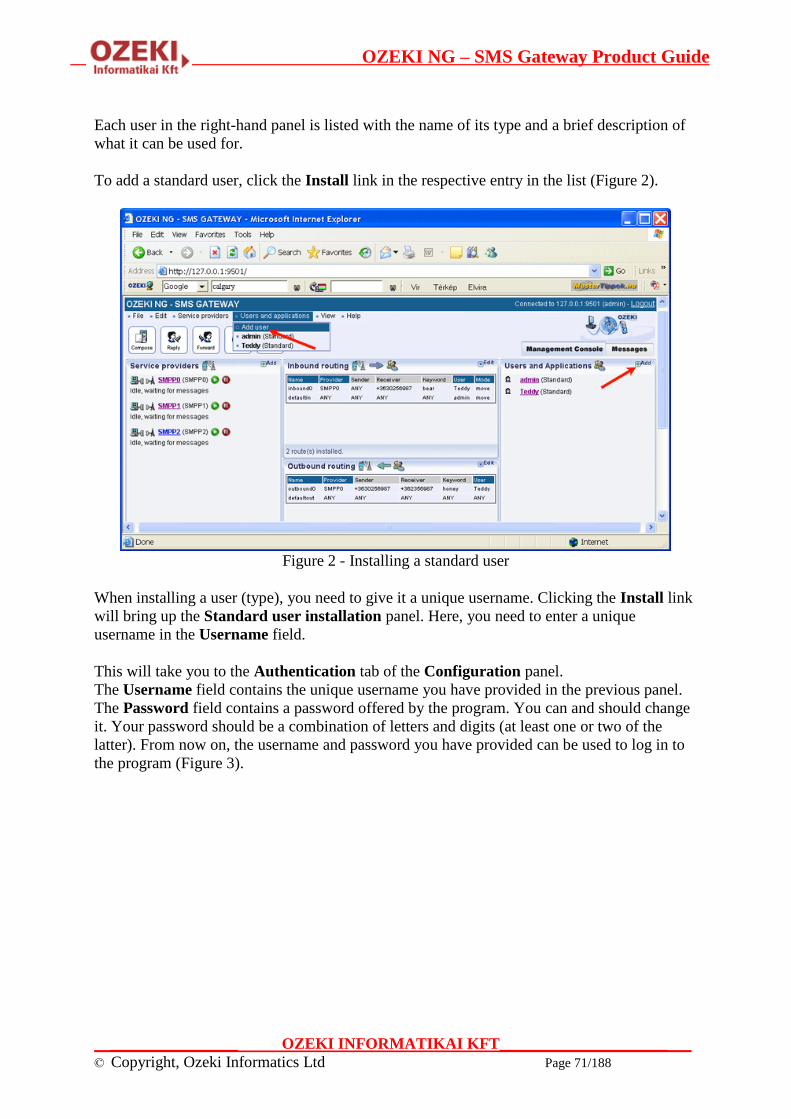
OZEKI NG – SMS Gateway Product Guide
__________________ OZEKI INFORMATIKAI KFT________________________
© Copyright, Ozeki Informatics Ltd Page 71/188
Each user in the right-hand panel is listed with the name of its type and a brief description of
what it can be used for.
To add a standard user, click the Install link in the respective entry in the list (Figure 2).
Figure 2 - Installing a standard user
When installing a user (type), you need to give it a unique username. Clicking the Install link
will bring up the Standard user installation panel. Here, you need to enter a unique
username in the Username field.
This will take you to the Authentication tab of the Configuration panel.
The Username field contains the unique username you have provided in the previous panel.
The Password field contains a password offered by the program. You can and should change
it. Your password should be a combination of letters and digits (at least one or two of the
latter). From now on, the username and password you have provided can be used to log in to
the program (Figure 3).
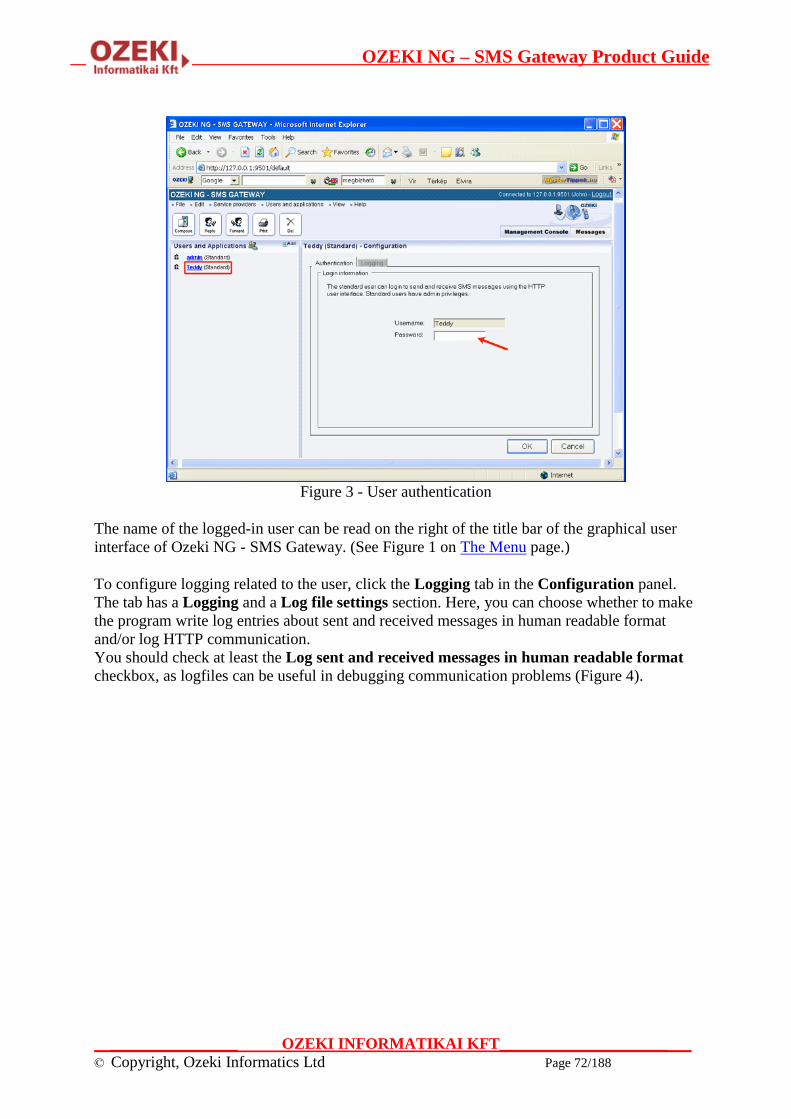
OZEKI NG – SMS Gateway Product Guide
__________________ OZEKI INFORMATIKAI KFT________________________
© Copyright, Ozeki Informatics Ltd Page 72/188
Figure 3 - User authentication
The name of the logged-in user can be read on the right of the title bar of the graphical user
interface of Ozeki NG - SMS Gateway. (See Figure 1 on The Menu page.)
To configure logging related to the user, click the Logging tab in the Configuration panel.
The tab has a Logging and a Log file settings section. Here, you can choose whether to make
the program write log entries about sent and received messages in human readable format
and/or log HTTP communication.
You should check at least the Log sent and received messages in human readable format
checkbox, as logfiles can be useful in debugging communication problems (Figure 4).

OZEKI NG – SMS Gateway Product Guide
__________________ OZEKI INFORMATIKAI KFT________________________
© Copyright, Ozeki Informatics Ltd Page 73/188
Figure 4 - Logging options
In the Log file settings section of the tab, you can make specifications for the size and the
number of available logfiles.
Log rotation saves disk space, as it ensures that older (and probably no longer needed) logfiles
will be automatically deleted from the log directory, which is specified in the Log directory
text box. By default, the access path to the logfiles is: C:\Program Files\Ozeki\OzekiNG -
SMS Gateway\Logs
In the Maximum log file size text box in the Logfile settings section, you can specify the
maximum size of a logfile. Once this size is reached, a new logfile will be created. Specify the
number of kilobytes for the size of a logfile by entering a positive whole number. By default,
the maximum logfile size is 2000 kB.
In the Number of rotated files text box, specify the maximum number of rotated logfiles that
are saved. Specify this number by entering a positive whole number. By default, the number
of logfiles that are saved is 4 (see Figure 4 above).
If you are content with the default specifications, leave the text boxes unchanged.
To modify the configuration or to view server events related to an installed user, open the
panel of the user's account. To do this, click the name of the user in the Users and
Applications panel of the Management Console. In the panel of the user's account, click the
link of the task you wish to perform (Figure 5).
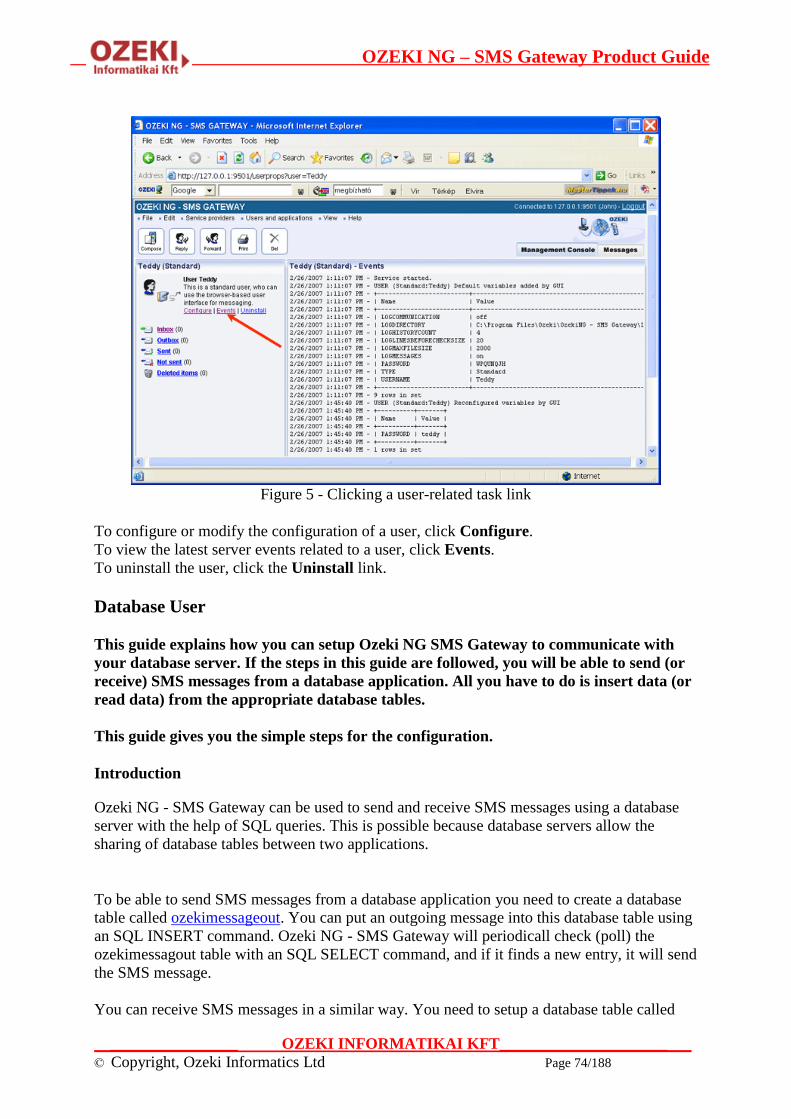
OZEKI NG – SMS Gateway Product Guide
__________________ OZEKI INFORMATIKAI KFT________________________
© Copyright, Ozeki Informatics Ltd Page 74/188
Figure 5 - Clicking a user-related task link
To configure or modify the configuration of a user, click Configure.
To view the latest server events related to a user, click Events.
To uninstall the user, click the Uninstall link.
Database User
This guide explains how you can setup Ozeki NG SMS Gateway to communicate with
your database server. If the steps in this guide are followed, you will be able to send (or
receive) SMS messages from a database application. All you have to do is insert data (or
read data) from the appropriate database tables.
This guide gives you the simple steps for the configuration.
Introduction
Ozeki NG - SMS Gateway can be used to send and receive SMS messages using a database
server with the help of SQL queries. This is possible because database servers allow the
sharing of database tables between two applications.
To be able to send SMS messages from a database application you need to create a database
table called ozekimessageout. You can put an outgoing message into this database table using
an SQL INSERT command. Ozeki NG - SMS Gateway will periodicall check (poll) the
ozekimessagout table with an SQL SELECT command, and if it finds a new entry, it will send
the SMS message.
You can receive SMS messages in a similar way. You need to setup a database table called

OZEKI NG – SMS Gateway Product Guide
__________________ OZEKI INFORMATIKAI KFT________________________
© Copyright, Ozeki Informatics Ltd Page 75/188
ozekimessagein. If an SMS message is received from a mobile phone, it is inserted by Ozeki
NG SMS gateway into the ozekimessagein database table (Figure 1). You can use an SQL
SELECT to read this message.
Figure 1 - SMS messaging using a database server
In order to get this configuration working, you need to have a database server (such as Oracle,
Access, MySql, MS SQL, Postgres, Sybase, etc.) installed, and you need to create two database
tables: ozekimessageout and ozekimessagein. The ozekimessageout table is used for sending,
while ozekimessagein is used for receiving SMS messages. To find out how to create the
ozekimessagein and the ozekimessageout table for different database servers, read the
respective pages related to the different database users. Check out the links at the end of this
introduction.
Once you have created the database structure, you need to connect Ozeki NG SMS Gateway
to your database. To establish a connection you can use an ODBC connection or an OLEDb
connection. (To setup the connection you might have to install and configure an OleDB or an
ODBC driver. For example MySQL requires the MyODBC Database driver to be installed.
For Microsoft SQL Express, Microsoft SQL Server and Oracel, Microsoft Windows has a
built in OleDb drier, so you do not have to install a driver separately).
The connection can be configured with a database connection string. This connection string
includes the database driver name, the ip address, the username and the password and the
name of the database. More information about the database connection string can be found in
our "Database connection strings" manual.
If you have figured out the connection string for your database server, you need to install and
configure a database user in Ozeki NG - SMS Gateway. This is a virtual user that will
communicate with a specified database server and will provide you the SQL SMS Gateway
functionality.
For more information about different databases, check out any of the following links:
Oracle User
MSSQL User
MySQL User
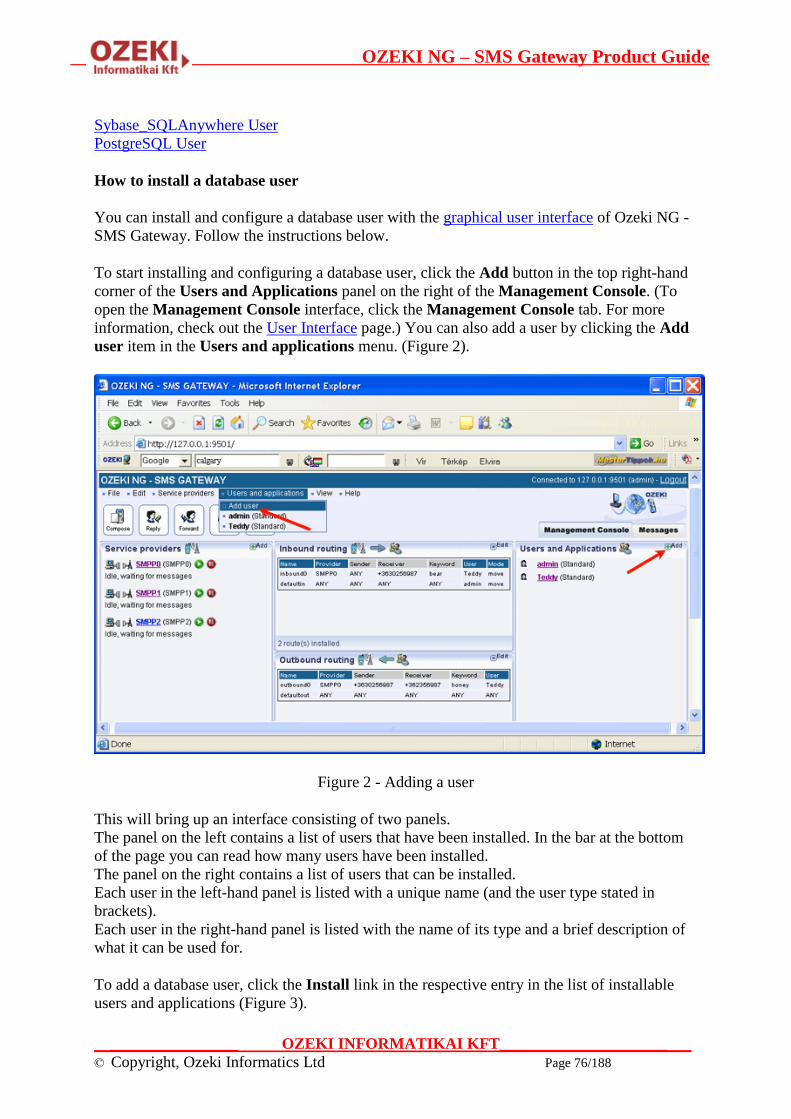
OZEKI NG – SMS Gateway Product Guide
__________________ OZEKI INFORMATIKAI KFT________________________
© Copyright, Ozeki Informatics Ltd Page 76/188
Sybase_SQLAnywhere User
PostgreSQL User
How to install a database user
You can install and configure a database user with the graphical user interface of Ozeki NG -
SMS Gateway. Follow the instructions below.
To start installing and configuring a database user, click the Add button in the top right-hand
corner of the Users and Applications panel on the right of the Management Console. (To
open the Management Console interface, click the Management Console tab. For more
information, check out the User Interface page.) You can also add a user by clicking the Add
user item in the Users and applications menu. (Figure 2).
Figure 2 - Adding a user
This will bring up an interface consisting of two panels.
The panel on the left contains a list of users that have been installed. In the bar at the bottom
of the page you can read how many users have been installed.
The panel on the right contains a list of users that can be installed.
Each user in the left-hand panel is listed with a unique name (and the user type stated in
brackets).
Each user in the right-hand panel is listed with the name of its type and a brief description of
what it can be used for.
To add a database user, click the Install link in the respective entry in the list of installable
users and applications (Figure 3).

OZEKI NG – SMS Gateway Product Guide
__________________ OZEKI INFORMATIKAI KFT________________________
© Copyright, Ozeki Informatics Ltd Page 77/188
Figure 3 - Installing a database user
This will open a panel asking you to give the database user a unique name (Figure 4).
Figure 4 - Naming the database user
Enter a unique name in the User name edit box, and click OK. Then the installation is
finished, and the name of the database user will show up in the list of users on the left in the
panel.

OZEKI NG – SMS Gateway Product Guide
__________________ OZEKI INFORMATIKAI KFT________________________
© Copyright, Ozeki Informatics Ltd Page 78/188
How to configure a database user
Once you have installed a database user, you can start to configure it. After you have provided
a unique name for the database user and clicked OK (see Figure 4 above), the Configuration
panel will open.
The first tab that will show up is the Database connection tab (Figure 5).
In the Connection section, select the connection string type in the Connection string type
dropdown menu. Make sure that the connection you specify is accessible for the system user
account.
For Open Database Connectivity, select Odbc.
For Object Linking and Embedding Database, select OleDb.
Figure 5 - The Database connection tab
In the Connection string template, modify any variables if necessary. For instance, as you
have probably changed the username and password, you will need to modify them in the
template.

OZEKI NG – SMS Gateway Product Guide
__________________ OZEKI INFORMATIKAI KFT________________________
© Copyright, Ozeki Informatics Ltd Page 79/188
If Ozeki NG - SMS Gateway and the database reside on the same server, "localhost" can be
used to describe the database location. If they do not reside on the same server, you need to
specify the database location by replacing "localhost" with the IP address.
Different database servers require different connection strings. By default, this template
contains the connection string of the MySQL database server. For information about
connection strings of other database servers, check out Appendix B - Connection Strings.
The connection string for the Oracle SQL server is:
Provider=MSDAORA.1;Password=YourPassword;User ID=YourUserID;Persist
Security Info=True
The connection string for the MS SQL server is:
Provider=SQLNCLI;Server=YourServer;Database=YourDatabase;UID=YourUsernam
e; PWD=YourPassword;
The connection string for the Sybase / SQL Anywhere Server is:
Provider=ASAProv.90;UID=MyUsername;PWD=MyPassword;DatabaseFile=Database
FileLocationOnYourComputer.db;
EngineName=Yourdbenginename;Start=YourDatabaseBinaryLocation.exe -c
32M;AutoStop=Yes
The connection string for the Postgre SQL server is:
DRIVER={PostgreSQL};SERVER=YourServerIP;port=5432;DATABASE=
YourDatabaseName;UID=YourUsername;PWD=YourPassword;
Additional connection strings can be found in Appendix B - Connection Strings.
In the Date format section, specify - in the Date format string edit box - the date format
string used to create the date value for the SQL statements.
The default date format string is yyyy-MM-dd HH:mm:ss.
In the date format string, yyyy stands for the year as a four-digit number. If the year has more
than four digits, only the four low-order digits appear in the result. If the year has fewer than
four digits, the number is padded with leading zeroes to achieve four digits. (Note that for the
Thai Buddhist calendar, which can have five-digit years, this format specifier renders all five
digits.)
MM stands for the month as a number from 01 through 12. A single-digit month is formatted
with a leading zero.
The dd string stands for the day of the month as a number from 01 through 31. A single-digit
day is formatted with a leading zero.
HH stands for the hour as a number from 00 through 23, that is, the hour as represented by a
zero-based 24-hour clock that counts the hours since midnight. A single-digit hour is
formatted with a leading zero.
The mm string stands represents the minute as a number from 00 through 59. The minute
represents whole minutes passed since the last hour. A single-digit minute is formatted with a
leading zero.
The ss string stands for the seconds as a number from 00 through 59. The second represents
whole seconds passed since the last minute. A single-digit second is formatted with a leading
zero.
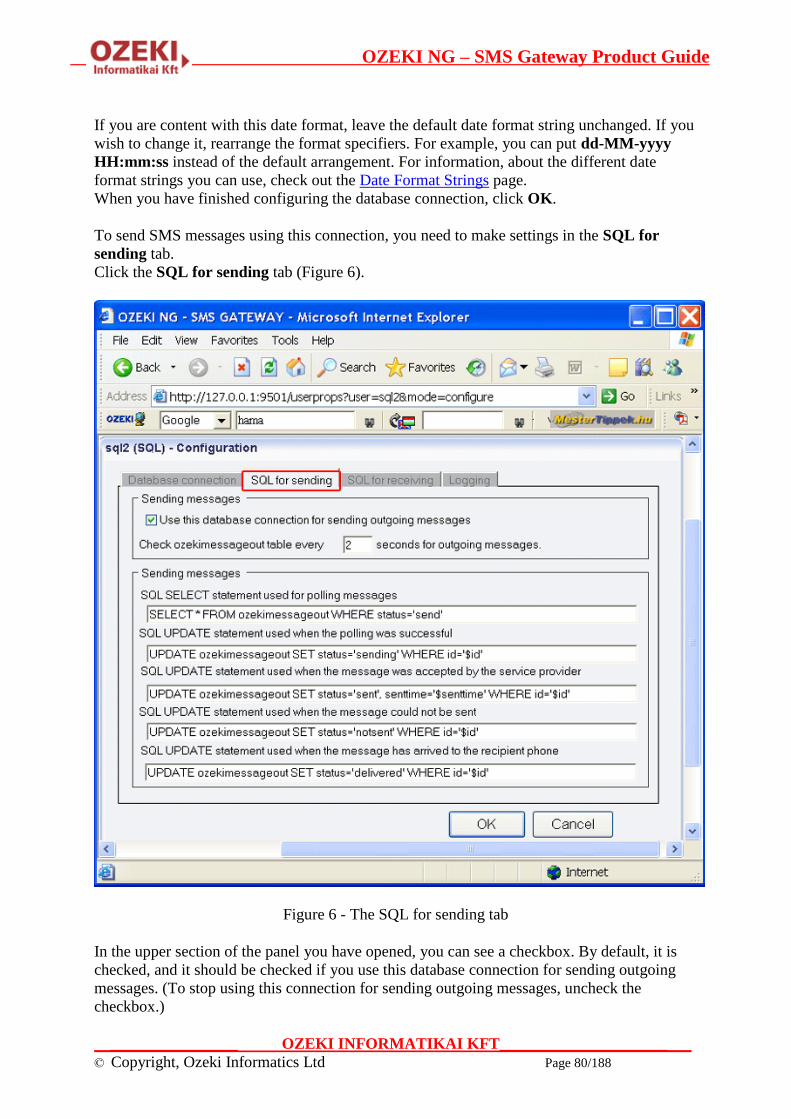
OZEKI NG – SMS Gateway Product Guide
__________________ OZEKI INFORMATIKAI KFT________________________
© Copyright, Ozeki Informatics Ltd Page 80/188
If you are content with this date format, leave the default date format string unchanged. If you
wish to change it, rearrange the format specifiers. For example, you can put dd-MM-yyyy
HH:mm:ss instead of the default arrangement. For information, about the different date
format strings you can use, check out the Date Format Strings page.
When you have finished configuring the database connection, click OK.
To send SMS messages using this connection, you need to make settings in the SQL for
sending tab.
Click the SQL for sending tab (Figure 6).
Figure 6 - The SQL for sending tab
In the upper section of the panel you have opened, you can see a checkbox. By default, it is
checked, and it should be checked if you use this database connection for sending outgoing
messages. (To stop using this connection for sending outgoing messages, uncheck the
checkbox.)

OZEKI NG – SMS Gateway Product Guide
__________________ OZEKI INFORMATIKAI KFT________________________
© Copyright, Ozeki Informatics Ltd Page 81/188
Below this checkbox you can specify how often Ozeki NG - SMS Gateway should check the
ozekimessageout table for outgoing messages. Specify the frequency in seconds by entering a
positive whole number in numerical form.
If you are content with the default value (2), leave this edit box unchanged (Figure 7).
Figure 7 - Specifying the frequency of queries and the SQL statements
In the lower section, you can specify SQL statements related to the polling and the status of
outgoing messages.
Modify any variables in the templates, or if you are content with them, leave them unchanged.
The statement in the first template describes the way of selecting outgoing messages.
The statement in the second template is used if the polling has been successful.
The statement in the third template is used if the message has been accepted by the service
provider.
The statement in the fourth template is used if the message has not been sent.
The statement in the fifth template is used if the message has been delivered to the recipient
phone number.
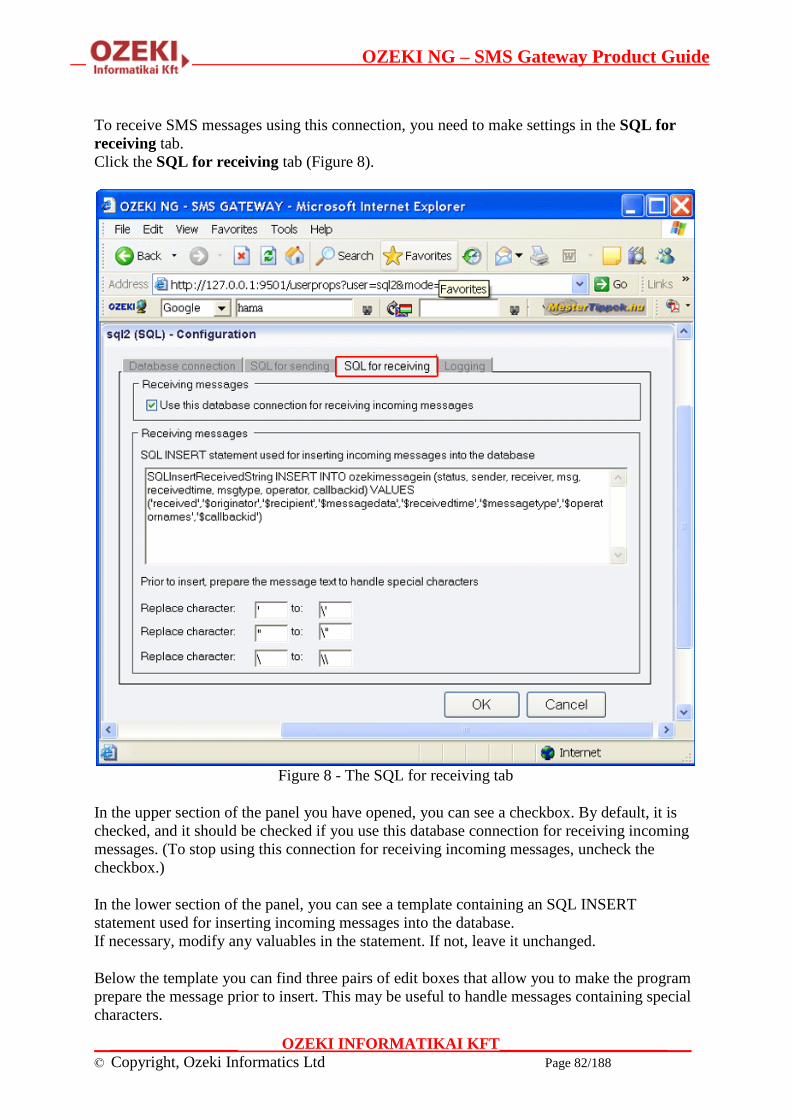
OZEKI NG – SMS Gateway Product Guide
__________________ OZEKI INFORMATIKAI KFT________________________
© Copyright, Ozeki Informatics Ltd Page 82/188
To receive SMS messages using this connection, you need to make settings in the SQL for
receiving tab.
Click the SQL for receiving tab (Figure 8).
Figure 8 - The SQL for receiving tab
In the upper section of the panel you have opened, you can see a checkbox. By default, it is
checked, and it should be checked if you use this database connection for receiving incoming
messages. (To stop using this connection for receiving incoming messages, uncheck the
checkbox.)
In the lower section of the panel, you can see a template containing an SQL INSERT
statement used for inserting incoming messages into the database.
If necessary, modify any valuables in the statement. If not, leave it unchanged.
Below the template you can find three pairs of edit boxes that allow you to make the program
prepare the message prior to insert. This may be useful to handle messages containing special
characters.
OZEKI NG – SMS Gateway Product Guide
__________________ OZEKI INFORMATIKAI KFT________________________
© Copyright, Ozeki Informatics Ltd Page 83/188
Each pair consists of one edit box (on the left) for the character to be replaced, and one (on
the right) for the characters that will replace the character on the left.
By default, the boxes contain the most problematic special characters to be replaced and those
to be used instead. Modify these setings if you wish to specify different characters.
You can also configure the logging related to the database user.
Click the Logging tab to open the panel for logging settings.
In the Logging section of the panel, you can find three checkboxes. You can choose to check
any or all (or none) of them. Your choice depends on whether you want the program to log
sent and received messages in human readable format, to log SQL SELECT statements and/or
to log SQL UPDATE statements (Figure 9).
Figure 9 - The Logging tab
In the Log file settings section of the tab, you can make specifications for the size and the
number of available logfiles.
Log rotation saves disk space, as it ensures that older (and probably no longer needed) logfiles
will be automatically deleted from the log directory, which is specified in the Log directory
text box. By default, the access path to the logfiles is: C:\Program Files\Ozeki\OzekiNG -
SMS Gateway\Logs

OZEKI NG – SMS Gateway Product Guide
__________________ OZEKI INFORMATIKAI KFT________________________
© Copyright, Ozeki Informatics Ltd Page 84/188
In the Maximum log file size text box you can specify the maximum size of a logfile. Once
this size is reached, a new logfile will be created. Specify the number of kilobytes for the size
of a logfile by entering a positive whole number. By default, the maximum logfile size is
2000 kB.
In the Number of rotated files text box, specify the maximum number of rotated logfiles that
are saved. Specify this number by entering a positive whole number. By default, the number
of logfiles that are saved is 4.
If you are content with the default specifications, leave the text boxes unchanged (Figure 10).
Figure 10 - Log file settings
To modify the configuration or to view server events related to a database user, open the panel
of the user's account. To do this, click the name of the user in the Users and Applications
panel of the Management Console. In the panel of the user's account, click the link of the
task you wish to perform (Figure 11).
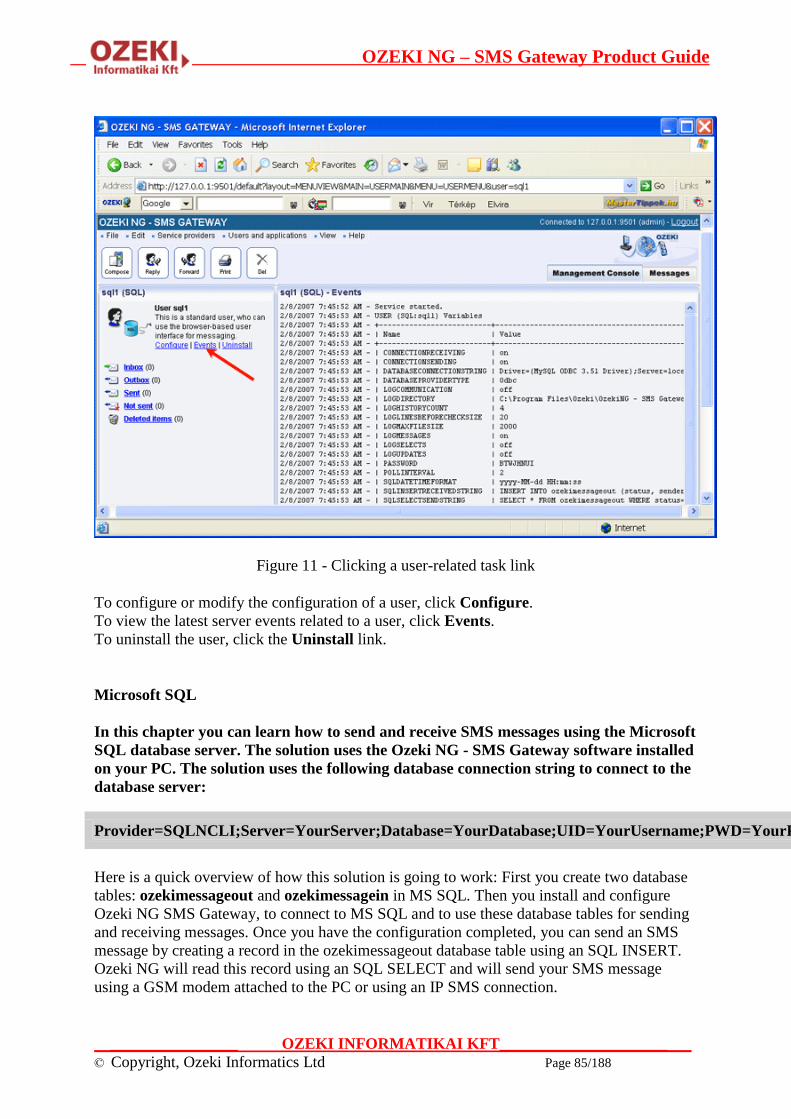
OZEKI NG – SMS Gateway Product Guide
__________________ OZEKI INFORMATIKAI KFT________________________
© Copyright, Ozeki Informatics Ltd Page 85/188
Figure 11 - Clicking a user-related task link
To configure or modify the configuration of a user, click Configure.
To view the latest server events related to a user, click Events.
To uninstall the user, click the Uninstall link.
Microsoft SQL
In this chapter you can learn how to send and receive SMS messages using the Microsoft
SQL database server. The solution uses the Ozeki NG - SMS Gateway software installed
on your PC. The solution uses the following database connection string to connect to the
database server:
Provider=SQLNCLI;Server=YourServer;Database=YourDatabase;UID=YourUsername;PWD=YourPassword;
Here is a quick overview of how this solution is going to work: First you create two database
tables: ozekimessageout and ozekimessagein in MS SQL. Then you install and configure
Ozeki NG SMS Gateway, to connect to MS SQL and to use these database tables for sending
and receiving messages. Once you have the configuration completed, you can send an SMS
message by creating a record in the ozekimessageout database table using an SQL INSERT.
Ozeki NG will read this record using an SQL SELECT and will send your SMS message
using a GSM modem attached to the PC or using an IP SMS connection.
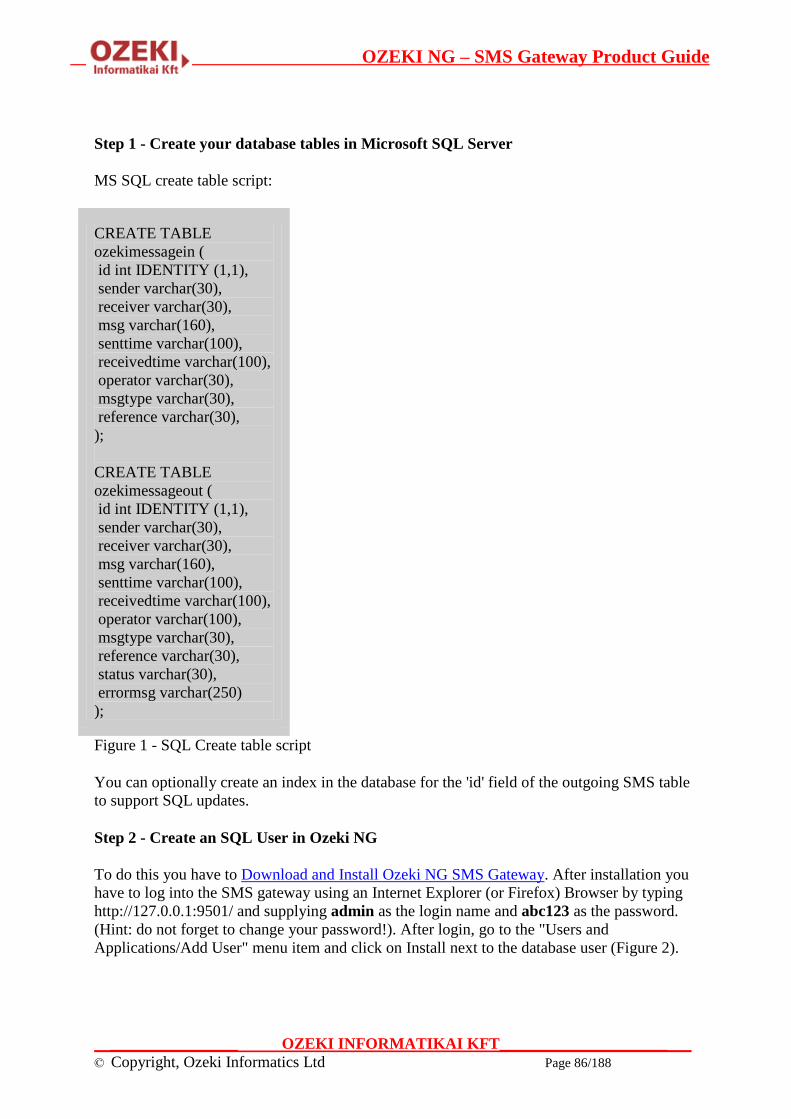
OZEKI NG – SMS Gateway Product Guide
__________________ OZEKI INFORMATIKAI KFT________________________
© Copyright, Ozeki Informatics Ltd Page 86/188
Step 1 - Create your database tables in Microsoft SQL Server
MS SQL create table script:
CREATE TABLE
ozekimessagein (
id int IDENTITY (1,1),
sender varchar(30),
receiver varchar(30),
msg varchar(160),
senttime varchar(100),
receivedtime varchar(100),
operator varchar(30),
msgtype varchar(30),
reference varchar(30),
);
CREATE TABLE
ozekimessageout (
id int IDENTITY (1,1),
sender varchar(30),
receiver varchar(30),
msg varchar(160),
senttime varchar(100),
receivedtime varchar(100),
operator varchar(100),
msgtype varchar(30),
reference varchar(30),
status varchar(30),
errormsg varchar(250)
);
Figure 1 - SQL Create table script
You can optionally create an index in the database for the 'id' field of the outgoing SMS table
to support SQL updates.
Step 2 - Create an SQL User in Ozeki NG
To do this you have to Download and Install Ozeki NG SMS Gateway. After installation you
have to log into the SMS gateway using an Internet Explorer (or Firefox) Browser by typing
http://127.0.0.1:9501/ and supplying admin as the login name and abc123 as the password.
(Hint: do not forget to change your password!). After login, go to the "Users and
Applications/Add User" menu item and click on Install next to the database user (Figure 2).
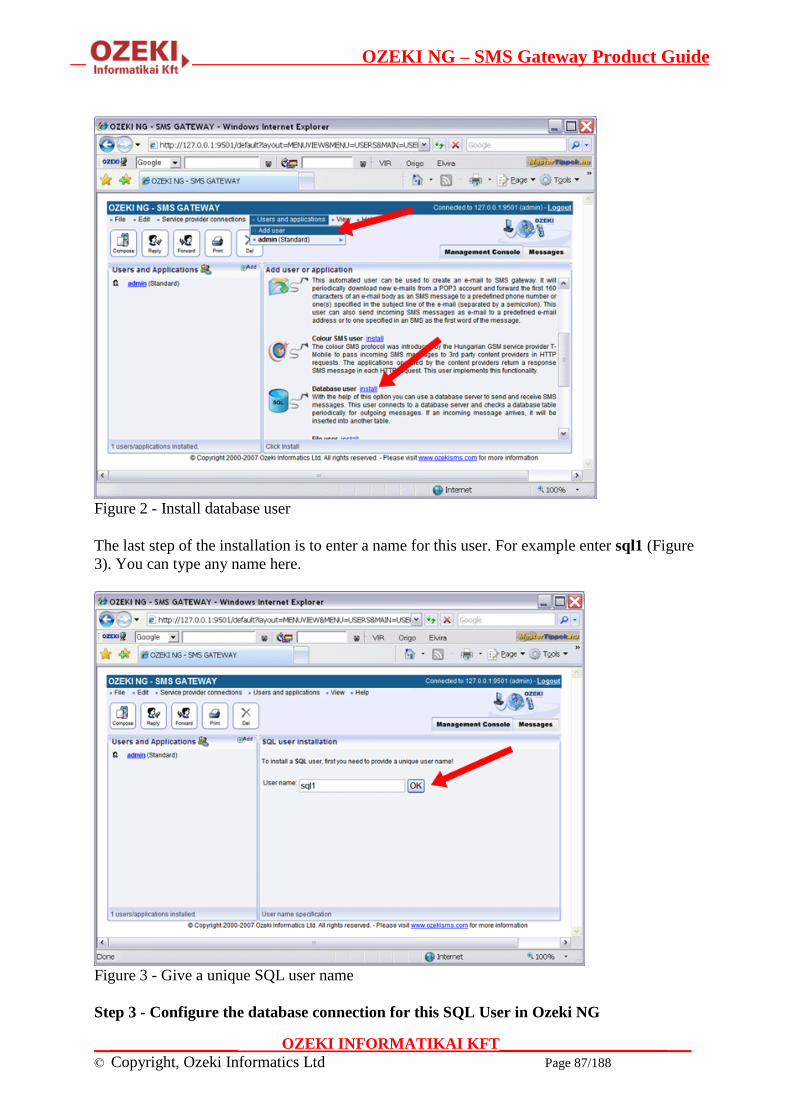
OZEKI NG – SMS Gateway Product Guide
__________________ OZEKI INFORMATIKAI KFT________________________
© Copyright, Ozeki Informatics Ltd Page 87/188
Figure 2 - Install database user
The last step of the installation is to enter a name for this user. For example enter sql1 (Figure
3). You can type any name here.
Figure 3 - Give a unique SQL user name
Step 3 - Configure the database connection for this SQL User in Ozeki NG
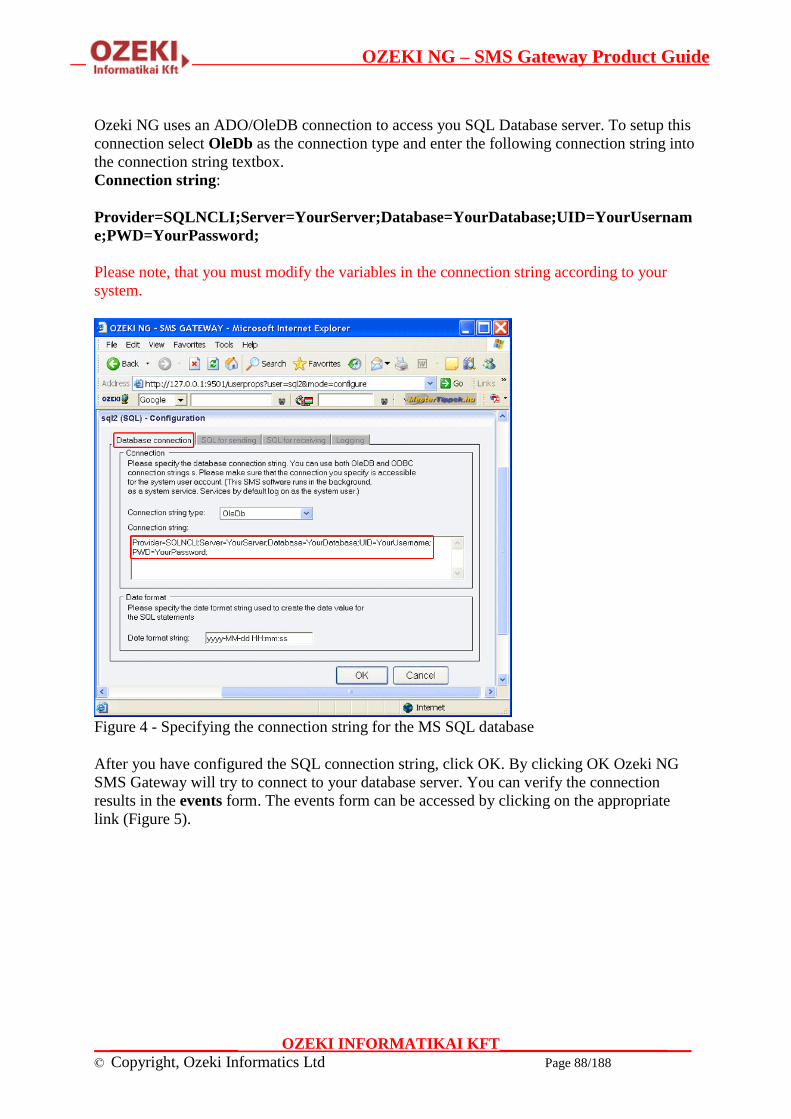
OZEKI NG – SMS Gateway Product Guide
__________________ OZEKI INFORMATIKAI KFT________________________
© Copyright, Ozeki Informatics Ltd Page 88/188
Ozeki NG uses an ADO/OleDB connection to access you SQL Database server. To setup this
connection select OleDb as the connection type and enter the following connection string into
the connection string textbox.
Connection string:
Provider=SQLNCLI;Server=YourServer;Database=YourDatabase;UID=YourUsernam
e;PWD=YourPassword;
Please note, that you must modify the variables in the connection string according to your
system.
Figure 4 - Specifying the connection string for the MS SQL database
After you have configured the SQL connection string, click OK. By clicking OK Ozeki NG
SMS Gateway will try to connect to your database server. You can verify the connection
results in the events form. The events form can be accessed by clicking on the appropriate
link (Figure 5).
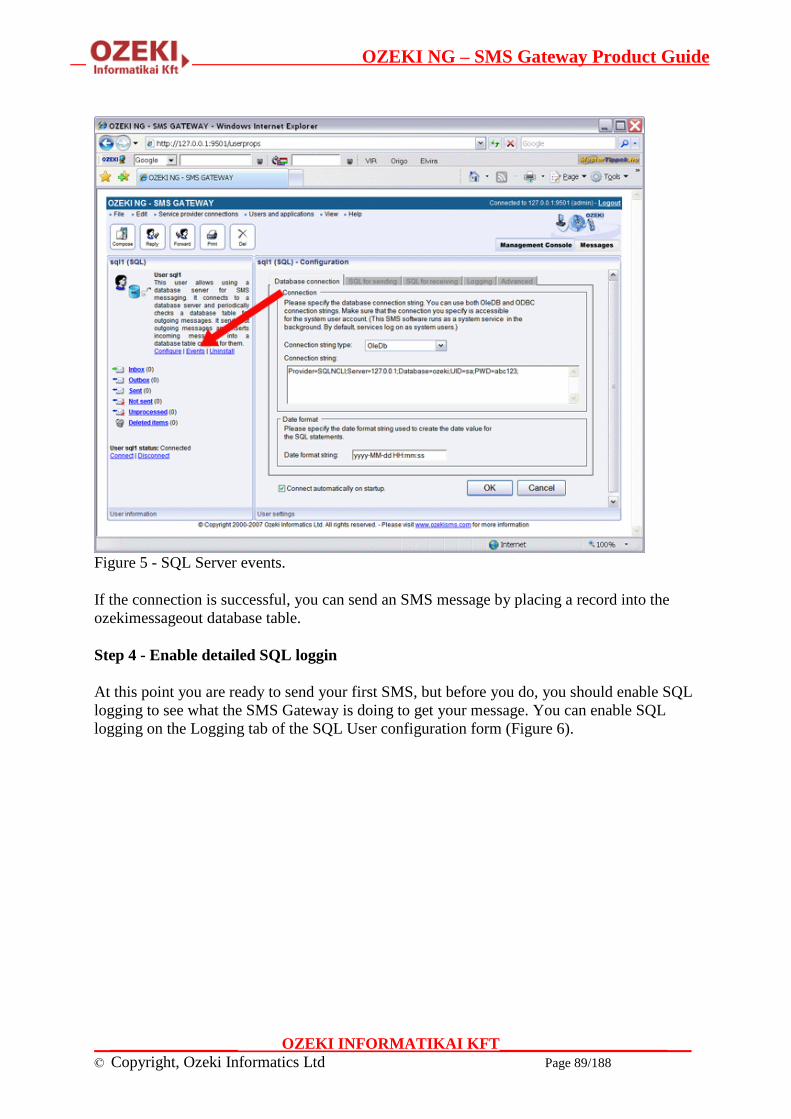
OZEKI NG – SMS Gateway Product Guide
__________________ OZEKI INFORMATIKAI KFT________________________
© Copyright, Ozeki Informatics Ltd Page 89/188
Figure 5 - SQL Server events.
If the connection is successful, you can send an SMS message by placing a record into the
ozekimessageout database table.
Step 4 - Enable detailed SQL loggin
At this point you are ready to send your first SMS, but before you do, you should enable SQL
logging to see what the SMS Gateway is doing to get your message. You can enable SQL
logging on the Logging tab of the SQL User configuration form (Figure 6).
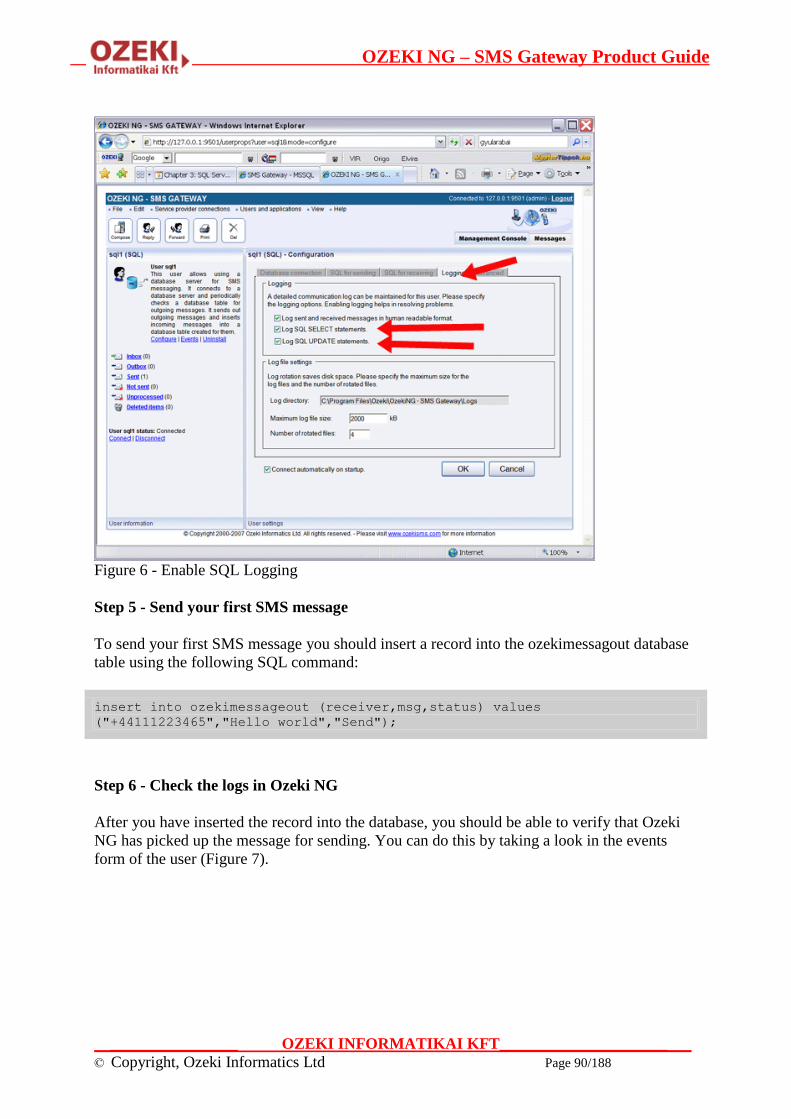
OZEKI NG – SMS Gateway Product Guide
__________________ OZEKI INFORMATIKAI KFT________________________
© Copyright, Ozeki Informatics Ltd Page 90/188
Figure 6 - Enable SQL Logging
Step 5 - Send your first SMS message
To send your first SMS message you should insert a record into the ozekimessagout database
table using the following SQL command:
insert into ozekimessageout (receiver,msg,status) values
("+44111223465","Hello world","Send");
Step 6 - Check the logs in Ozeki NG
After you have inserted the record into the database, you should be able to verify that Ozeki
NG has picked up the message for sending. You can do this by taking a look in the events
form of the user (Figure 7).

OZEKI NG – SMS Gateway Product Guide
__________________ OZEKI INFORMATIKAI KFT________________________
© Copyright, Ozeki Informatics Ltd Page 91/188
Figure 7 - User events after successful sending
If everything goes well you should see the following entries in the log:
2007.08.09. 9:20:53 - INFO 3500: Opening OleDb connection to database server using connection string ...
2007.08.09. 9:20:53 - INFO 3501: Successfully connected to database.
2007.08.09. 9:20:53 - User connected.
2007.08.09. 9:20:55 - SQL Command: 'SELECT id,sender,receiver,msg,msgtype,operator FROM ozekimessageout WHERE
status='send'' returned 1 rows.
2007.08.09. 9:20:55 - SQL Command: 'UPDATE ozekimessageout SET status='sending' WHERE id='2'' affected 1 row.
2007.08.09. 9:20:55 - -> Sending message (dataBase id:2): ';SMS:TEXT;VVMSUDVX;;+44111223465;Hello world;'
2007.08.09. 9:20:55 - INFO 3098: Message sql1;SMS:TEXT;VVMSUDVX;sql1;+44111223465;Hello world; accepted for delivery
from user 'sql1'.
2007.08.09. 9:20:55 - INFO 3099: Message successfully sent. sql1;SMS:TEXT;VVMSUDVX;sql1;+44111223465;Hello world;
2007.08.09. 9:20:55 - SQL Command: 'UPDATE ozekimessageout SET status='sent', senttime='2007-08-09 09:20:56' WHERE
id='2'' affected 1 row.
2007.08.09. 9:20:55 - <- Message sent (dataBase id:2): 'sql1;SMS:TEXT;VVMSUDVX;sql1;+44111223465;Hello world;'
Microsoft SQL Express
On this page you can learn how to send and receive SMS messages using the Microsoft
SQL Express database server. The solution uses the Ozeki NG - SMS Gateway software
installed on your PC. The solution uses the following database connection string to
connect to the database server:
Provider=SQLNCLI;Server=.\SQLEXPRESS;User
ID=ozekiuser;password=ozekipass;Database=ozeki;Persist Security Info=True
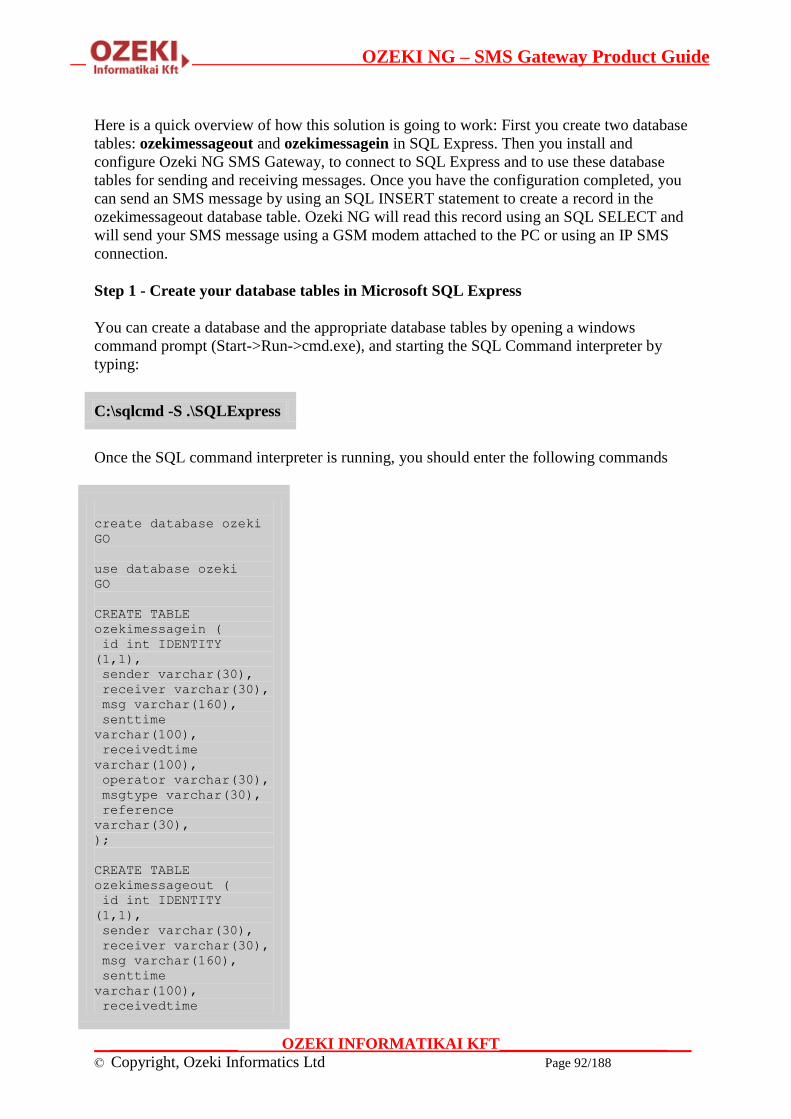
OZEKI NG – SMS Gateway Product Guide
__________________ OZEKI INFORMATIKAI KFT________________________
© Copyright, Ozeki Informatics Ltd Page 92/188
Here is a quick overview of how this solution is going to work: First you create two database
tables: ozekimessageout and ozekimessagein in SQL Express. Then you install and
configure Ozeki NG SMS Gateway, to connect to SQL Express and to use these database
tables for sending and receiving messages. Once you have the configuration completed, you
can send an SMS message by using an SQL INSERT statement to create a record in the
ozekimessageout database table. Ozeki NG will read this record using an SQL SELECT and
will send your SMS message using a GSM modem attached to the PC or using an IP SMS
connection.
Step 1 - Create your database tables in Microsoft SQL Express
You can create a database and the appropriate database tables by opening a windows
command prompt (Start->Run->cmd.exe), and starting the SQL Command interpreter by
typing:
C:\sqlcmd -S .\SQLExpress
Once the SQL command interpreter is running, you should enter the following commands
create database ozeki
GO
use database ozeki
GO
CREATE TABLE
ozekimessagein (
id int IDENTITY
(1,1),
sender varchar(30),
receiver varchar(30),
msg varchar(160),
senttime
varchar(100),
receivedtime
varchar(100),
operator varchar(30),
msgtype varchar(30),
reference
varchar(30),
);
CREATE TABLE
ozekimessageout (
id int IDENTITY
(1,1),
sender varchar(30),
receiver varchar(30),
msg varchar(160),
senttime
varchar(100),
receivedtime
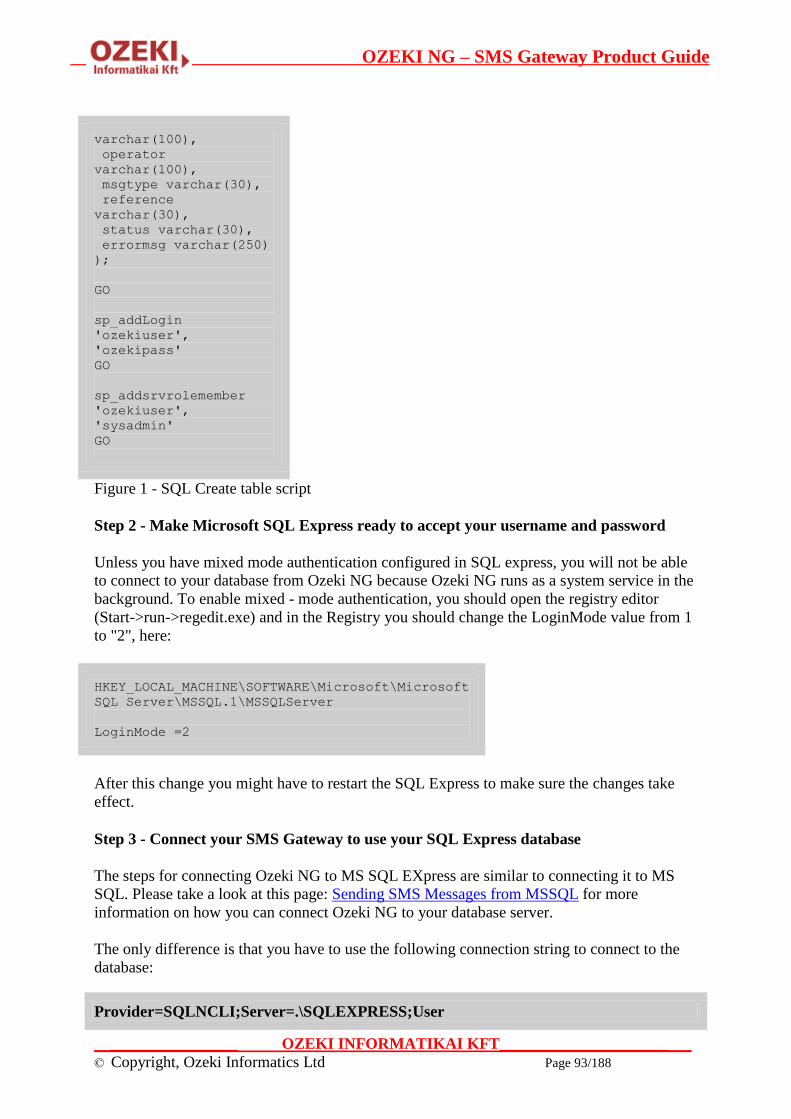
OZEKI NG – SMS Gateway Product Guide
__________________ OZEKI INFORMATIKAI KFT________________________
© Copyright, Ozeki Informatics Ltd Page 93/188
varchar(100),
operator
varchar(100),
msgtype varchar(30),
reference
varchar(30),
status varchar(30),
errormsg varchar(250)
);
GO
sp_addLogin
'ozekiuser',
'ozekipass'
GO
sp_addsrvrolemember
'ozekiuser',
'sysadmin'
GO
Figure 1 - SQL Create table script
Step 2 - Make Microsoft SQL Express ready to accept your username and password
Unless you have mixed mode authentication configured in SQL express, you will not be able
to connect to your database from Ozeki NG because Ozeki NG runs as a system service in the
background. To enable mixed - mode authentication, you should open the registry editor
(Start->run->regedit.exe) and in the Registry you should change the LoginMode value from 1
to "2", here:
HKEY_LOCAL_MACHINE\SOFTWARE\Microsoft\Microsoft
SQL Server\MSSQL.1\MSSQLServer
LoginMode =2
After this change you might have to restart the SQL Express to make sure the changes take
effect.
Step 3 - Connect your SMS Gateway to use your SQL Express database
The steps for connecting Ozeki NG to MS SQL EXpress are similar to connecting it to MS
SQL. Please take a look at this page: Sending SMS Messages from MSSQL for more
information on how you can connect Ozeki NG to your database server.
The only difference is that you have to use the following connection string to connect to the
database:
Provider=SQLNCLI;Server=.\SQLEXPRESS;User

OZEKI NG – SMS Gateway Product Guide
__________________ OZEKI INFORMATIKAI KFT________________________
© Copyright, Ozeki Informatics Ltd Page 94/188
ID=ozekiuser;password=ozekipass;Database=ozeki;Persist Security Info=True
Step 4 - Send your first SMS message
To send your first SMS message you should insert a record into the ozekimessagout database
table. You can use the following SQL command to achieve this:
insert into
ozekimessageout
(receiver,msg,status)
values
("+44111223465","Hello
world","Send");
GO
Hint: You can download SQLExpress free of charge from the following URL:
http://msdn2.microsoft.com/en-us/express/aa718378.aspx
A FAQ question related to SQL Express - SMS gateway:
I cannot connect to the database server. I have received this errormessage, what should I
do?
Connecting to database (Provider=SQLOLEDB.1;Persist Security Info=False;User
ID=myuser;Initial Catalog=mydb;Data Source=mydsn) :
2007-07-25 11:38:25 356:Database plugin 1 : Connection error: Login failed for user
'myuser'. (Provider=SQLOLEDB.1;Persist Security Info=False;User ID=myuser;Initial
Catalog=mydb;Data Source=mdsn) :
This means, that the software cannot connect to your database server. Based on the
connection string I assume you use Microsoft SQL server. In this case, please use the
following connection string:
Provider=SQLNCLI;Server=YourServer;Database=YourDatabase;UID=YourUsername;PW
D=YourPassword;
There is a good chance, that the software will be able to connect to your database server as
soon as you use this connection string. You might notice, that there is no DSN in this
connection string. This is because, you need to connect with username/password
authentication.
If the connection is not established after switching to this connection string, probably the
OZEKI NG – SMS Gateway Product Guide
__________________ OZEKI INFORMATIKAI KFT________________________
© Copyright, Ozeki Informatics Ltd Page 95/188
username and password authentication is not enabled in your registry for MSSQL. To enable
it, you should set the following setting in your registry:
HKEY_LOCAL_MACHINE\SOFTWARE\Microsoft\Microsoft SQL
Server\MSSQL.1\MSSQLServer
LoginMode =2
To create a username and a password in Microsoft SQL Server, issue the following command:
sp_addLogin 'ozekiuser', 'ozekipass'
GO
sp_addsrvrolemember 'ozekiuser', 'sysadmin'
GO
This will solve the problem.
MySql
In this chapter you can learn how to send and receive SMS messages using a MySQL
database with the Ozeki NG - SMS Gateway software. You will be provided with the
connection string for the MySQL database, instructions on the ODBC driver
installation, with a link to a MyODBC database driver download page, and the create
table script.
Ozeki NG - SMS Gateway allows you to send and receive SMS messages using a database
server with the help of SQL queries. The software supports, among others, the MySQL
database.
For SMS messaging with a MySQL database you need to install and appropriately configure a
database user in the Ozeki NG - SMS Gateway program. Also, you need a MySQL database
server, in which you have to create an ozekimessageout and an ozekimessagein table for
outgoing and incoming messages.
You can install and configure a MySQL user on the graphical user interface of the software.
The installation and configuration of a MySQL user is similar to that of any other database
user.
To find out how to install and configure a database user, check out the Database User page.
As the MySQL database requires Open DataBase Connectivity (ODBC), select Odbc in the
Connection string type dropdown menu.
The default database connection string in the Connection string template is the connection
string for MySQL (Figure 1):
Driver={MySQL ODBC 3.51 Driver};Server=localhost;Database=
ozekisms;User=root;Password=abc123;Option=4;

OZEKI NG – SMS Gateway Product Guide
__________________ OZEKI INFORMATIKAI KFT________________________
© Copyright, Ozeki Informatics Ltd Page 96/188
If you wish to use unicode (international) characters, you should use MySQL ODBC Driver
v5! Version v3.51 does not support unicode characters for .NET
For MySQL ODBC Driver v5, the connection string is:
DRIVER={MySQL Connector/ODBC
v5};Server=localhost;Database=ozeki;UID=root;PWD=abc123
Modify the variables in the connection string according to your needs.
Figure 1 - Specifying the connection string for the MySQL database
ODBC Driver Installation and Configuration
As mentioned above, for using a MySQL database you need Open DataBase Connectivity
between your database server and Ozeki NG - SMS Gateway.
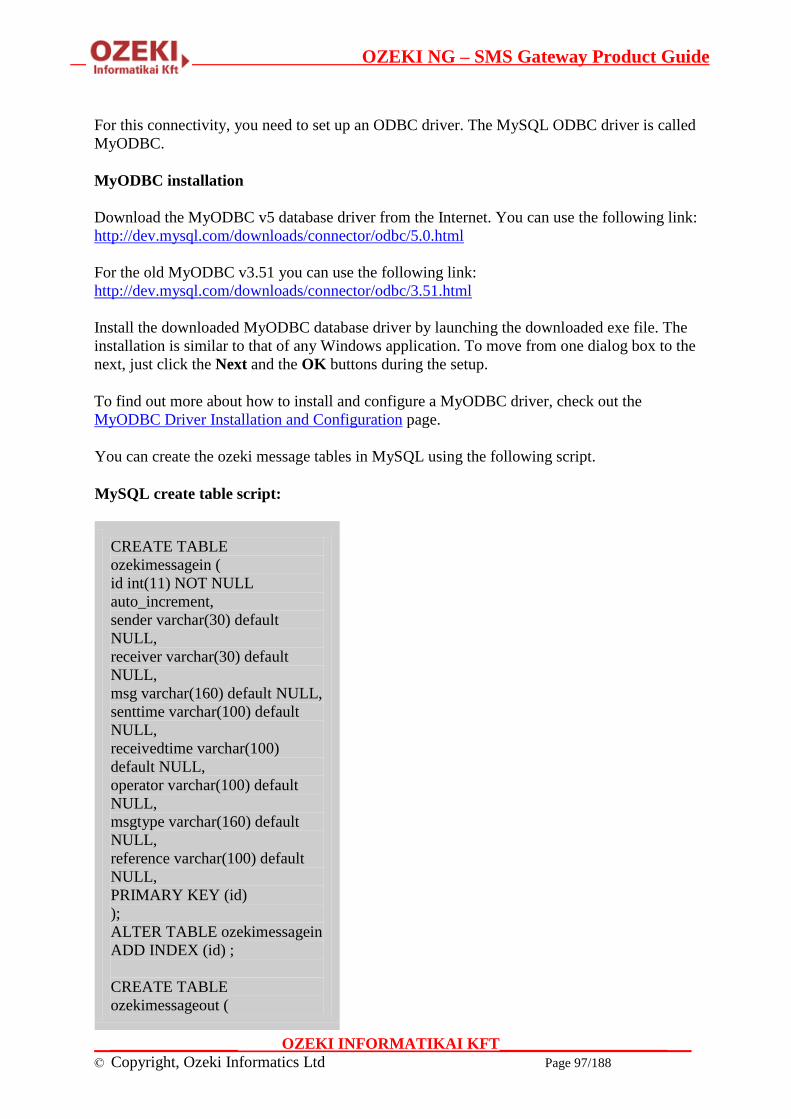
OZEKI NG – SMS Gateway Product Guide
__________________ OZEKI INFORMATIKAI KFT________________________
© Copyright, Ozeki Informatics Ltd Page 97/188
For this connectivity, you need to set up an ODBC driver. The MySQL ODBC driver is called
MyODBC.
MyODBC installation
Download the MyODBC v5 database driver from the Internet. You can use the following link:
http://dev.mysql.com/downloads/connector/odbc/5.0.html
For the old MyODBC v3.51 you can use the following link:
http://dev.mysql.com/downloads/connector/odbc/3.51.html
Install the downloaded MyODBC database driver by launching the downloaded exe file. The
installation is similar to that of any Windows application. To move from one dialog box to the
next, just click the Next and the OK buttons during the setup.
To find out more about how to install and configure a MyODBC driver, check out the
MyODBC Driver Installation and Configuration page.
You can create the ozeki message tables in MySQL using the following script.
MySQL create table script:
CREATE TABLE
ozekimessagein (
id int(11) NOT NULL
auto_increment,
sender varchar(30) default
NULL,
receiver varchar(30) default
NULL,
msg varchar(160) default NULL,
senttime varchar(100) default
NULL,
receivedtime varchar(100)
default NULL,
operator varchar(100) default
NULL,
msgtype varchar(160) default
NULL,
reference varchar(100) default
NULL,
PRIMARY KEY (id)
);
ALTER TABLE ozekimessagein
ADD INDEX (id) ;
CREATE TABLE
ozekimessageout (

OZEKI NG – SMS Gateway Product Guide
__________________ OZEKI INFORMATIKAI KFT________________________
© Copyright, Ozeki Informatics Ltd Page 98/188
id int(11) NOT NULL
auto_increment,
sender varchar(30) default
NULL,
receiver varchar(30) default
NULL,
msg varchar(160) default NULL,
senttime varchar(100) default
NULL,
receivedtime varchar(100)
default NULL,
reference varchar(100) default
NULL,
status varchar(20) default
NULL,
msgtype varchar(160) default
NULL,
operator varchar(100) default
NULL,
errormsg varchar(250) default
NULL,
PRIMARY KEY (id)
);
ALTER TABLE
ozekimessageout ADD INDEX
(id);
It is strongly recommended to maintain an index in the database for the 'id' field of the
outgoing SMS table to support SQL updates.
Oracle
In this chapter you can learn how to send and receive SMS messages using an Oracle
database with the Ozeki NG - SMS Gateway software. You will be provided with the
connection string and the create table script.
Ozeki NG - SMS Gateway allows you to send and receive SMS messages using a database
server with the help of SQL queries. The software supports, among others, the Oracle
database.
For SMS messaging with an Oracle database you need to install and appropriately configure a
database user in the Ozeki NG - SMS Gateway program. Also, you need an Oracle database
server, in which you have to create an ozekimessageout and an ozekimessagein table for
outgoing and incoming messages.
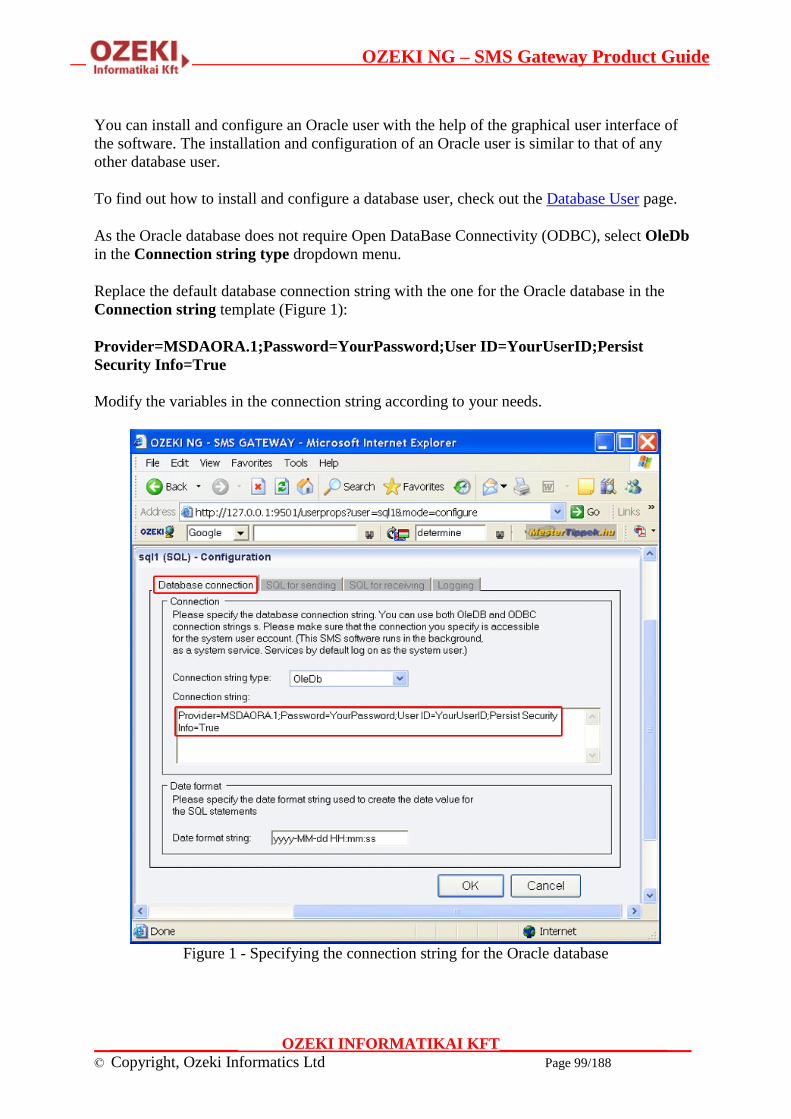
OZEKI NG – SMS Gateway Product Guide
__________________ OZEKI INFORMATIKAI KFT________________________
© Copyright, Ozeki Informatics Ltd Page 99/188
You can install and configure an Oracle user with the help of the graphical user interface of
the software. The installation and configuration of an Oracle user is similar to that of any
other database user.
To find out how to install and configure a database user, check out the Database User page.
As the Oracle database does not require Open DataBase Connectivity (ODBC), select OleDb
in the Connection string type dropdown menu.
Replace the default database connection string with the one for the Oracle database in the
Connection string template (Figure 1):
Provider=MSDAORA.1;Password=YourPassword;User ID=YourUserID;Persist
Security Info=True
Modify the variables in the connection string according to your needs.
Figure 1 - Specifying the connection string for the Oracle database
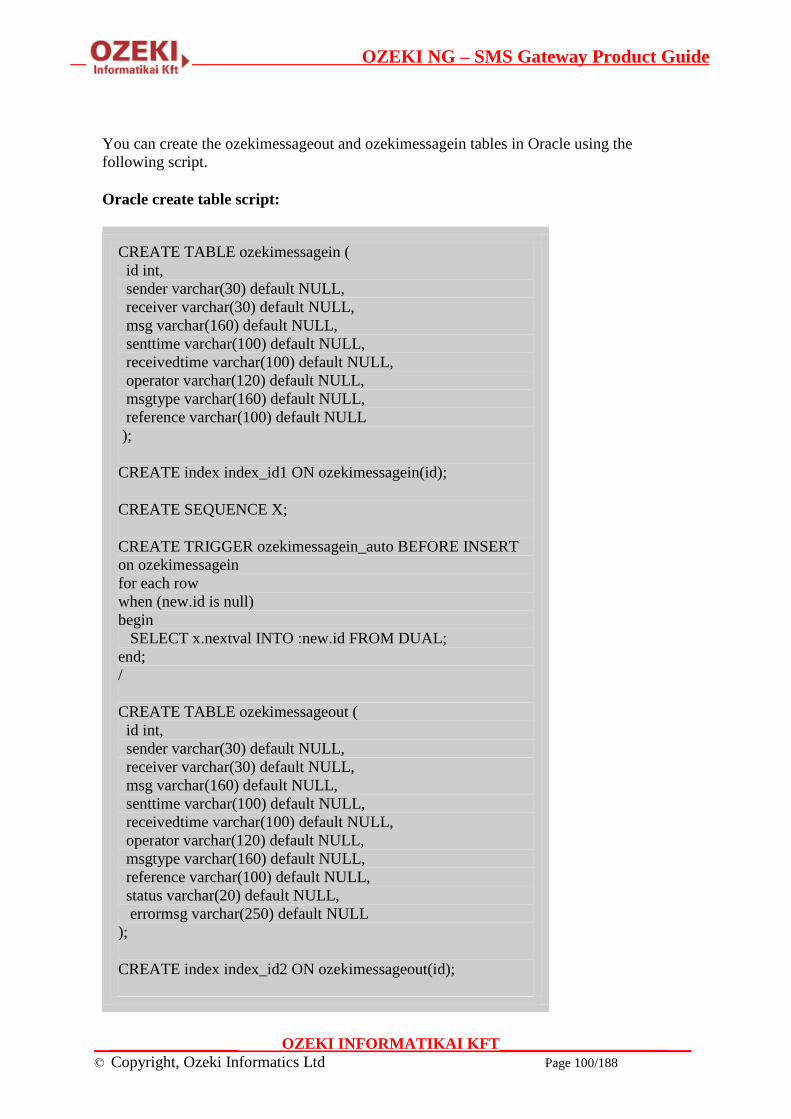
OZEKI NG – SMS Gateway Product Guide
__________________ OZEKI INFORMATIKAI KFT________________________
© Copyright, Ozeki Informatics Ltd Page 100/188
You can create the ozekimessageout and ozekimessagein tables in Oracle using the
following script.
Oracle create table script:
CREATE TABLE ozekimessagein (
id int,
sender varchar(30) default NULL,
receiver varchar(30) default NULL,
msg varchar(160) default NULL,
senttime varchar(100) default NULL,
receivedtime varchar(100) default NULL,
operator varchar(120) default NULL,
msgtype varchar(160) default NULL,
reference varchar(100) default NULL
);
CREATE index index_id1 ON ozekimessagein(id);
CREATE SEQUENCE X;
CREATE TRIGGER ozekimessagein_auto BEFORE INSERT
on ozekimessagein
for each row
when (new.id is null)
begin
SELECT x.nextval INTO :new.id FROM DUAL;
end;
/
CREATE TABLE ozekimessageout (
id int,
sender varchar(30) default NULL,
receiver varchar(30) default NULL,
msg varchar(160) default NULL,
senttime varchar(100) default NULL,
receivedtime varchar(100) default NULL,
operator varchar(120) default NULL,
msgtype varchar(160) default NULL,
reference varchar(100) default NULL,
status varchar(20) default NULL,
errormsg varchar(250) default NULL
);
CREATE index index_id2 ON ozekimessageout(id);
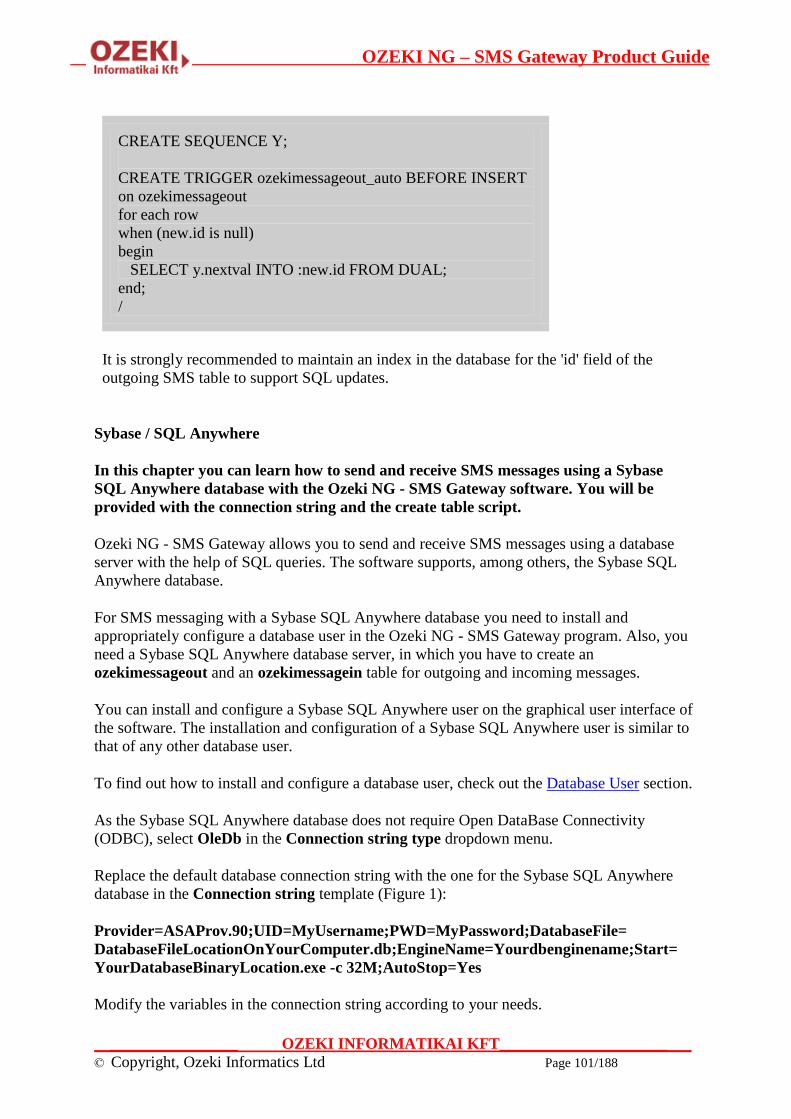
OZEKI NG – SMS Gateway Product Guide
__________________ OZEKI INFORMATIKAI KFT________________________
© Copyright, Ozeki Informatics Ltd Page 101/188
CREATE SEQUENCE Y;
CREATE TRIGGER ozekimessageout_auto BEFORE INSERT
on ozekimessageout
for each row
when (new.id is null)
begin
SELECT y.nextval INTO :new.id FROM DUAL;
end;
/
It is strongly recommended to maintain an index in the database for the 'id' field of the
outgoing SMS table to support SQL updates.
Sybase / SQL Anywhere
In this chapter you can learn how to send and receive SMS messages using a Sybase
SQL Anywhere database with the Ozeki NG - SMS Gateway software. You will be
provided with the connection string and the create table script.
Ozeki NG - SMS Gateway allows you to send and receive SMS messages using a database
server with the help of SQL queries. The software supports, among others, the Sybase SQL
Anywhere database.
For SMS messaging with a Sybase SQL Anywhere database you need to install and
appropriately configure a database user in the Ozeki NG - SMS Gateway program. Also, you
need a Sybase SQL Anywhere database server, in which you have to create an
ozekimessageout and an ozekimessagein table for outgoing and incoming messages.
You can install and configure a Sybase SQL Anywhere user on the graphical user interface of
the software. The installation and configuration of a Sybase SQL Anywhere user is similar to
that of any other database user.
To find out how to install and configure a database user, check out the Database User section.
As the Sybase SQL Anywhere database does not require Open DataBase Connectivity
(ODBC), select OleDb in the Connection string type dropdown menu.
Replace the default database connection string with the one for the Sybase SQL Anywhere
database in the Connection string template (Figure 1):
Provider=ASAProv.90;UID=MyUsername;PWD=MyPassword;DatabaseFile=
DatabaseFileLocationOnYourComputer.db;EngineName=Yourdbenginename;Start=
YourDatabaseBinaryLocation.exe -c 32M;AutoStop=Yes
Modify the variables in the connection string according to your needs.

OZEKI NG – SMS Gateway Product Guide
__________________ OZEKI INFORMATIKAI KFT________________________
© Copyright, Ozeki Informatics Ltd Page 102/188
Figure 1 - Specifying the connection string for the Oracle database
You can create the ozekimessageout and ozekimessagein tables in Sybase SQL Anywhere
using the following script.
Sybase SQL Anywhere create table script:
CREATE TABLE "ozekimessagein"
(
"id" integer NOT NULL DEFAULT
autoincrement ,
"sender" varchar(160) NULL ,
"receiver" varchar(160) NULL ,
"msg" varchar(160) NULL ,
"senttime" varchar(100) NULL ,
"receivedtime" varchar(100) NULL ,
"operator" varchar(100) NULL ,

OZEKI NG – SMS Gateway Product Guide
__________________ OZEKI INFORMATIKAI KFT________________________
© Copyright, Ozeki Informatics Ltd Page 103/188
"msgtype" varchar(160) NULL ,
"reference" varchar(100) NULL ,
PRIMARY KEY ("id"),
)
go
commit work
go
CREATE TABLE "ozekimessageout"
(
"id" integer NOT NULL DEFAULT
autoincrement ,
"sender" varchar(160) NULL ,
"receiver" varchar(160) NULL ,
"msg" varchar(160) NULL ,
"senttime" varchar(100) NULL ,
"receivedtime" varchar(100) NULL ,
"operator" varchar(100) NULL ,
"status" varchar(20) NULL ,
"msgtype" varchar(160) NULL ,
"reference" varchar(100) NULL ,
"errormsg" varchar(250) NULL ,
PRIMARY KEY ("id"),
)
go
commit work
go
CREATE INDEX "ozekimessageinindex" ON
"ozekimessagein"
(
"id" ASC
)
go
commit work
go
CREATE INDEX "ozekimessageoutindex" ON
"ozekimessageout"
(
"id" ASC
)
go
commit work
go

OZEKI NG – SMS Gateway Product Guide
__________________ OZEKI INFORMATIKAI KFT________________________
© Copyright, Ozeki Informatics Ltd Page 104/188
It is strongly recommended to maintain an index in the database for the 'id' field of the
outgoing SMS table to support SQL updates.
PostgreSQL
In this chapter you can learn how to send and receive messages using a PostgreSQL
database with the Ozeki NG - SMS Gateway software. You will be provided with the
connection string for the PostgreSQL database, instructions on the ODBC driver
installation, with a link to a PostgreSQL database driver download page, and the create
table script.
Ozeki NG - SMS Gateway allows you to send and receive SMS messages using a database
server with the help of SQL queries. The software supports, among others, the PostgreSQL
database.
For SMS messaging with a PostgreSQL database you need to install and appropriately
configure a database user in the Ozeki NG - SMS Gateway program. Also, you need a
PostgreSQL database server, in which you have to create an ozekimessageout and an
ozekimessagein table for outgoing and incoming messages.
You can install and configure a PostgreSQL user on the graphical user interface of the
software. The installation and configuration of a PostgreSQL user is similar to that of any
other database user.
To find out how to install and configure a database user, check out the Database User page.
As the PostgreSQL database requires Open DataBase Connectivity (ODBC), select Odbc in
the Connection string type dropdown menu (Figure 1).
Replace the default database connection string with the one for the PostgreSQL database in
the Connection string template (Figure 1):
DRIVER={PostgreSQL};SERVER=YourServerIP;port=5432;DATABASE=
YourDatabaseName;UID=YourUsername;PWD=YourPassword
Modify the variables in the connection string according to your needs.

OZEKI NG – SMS Gateway Product Guide
__________________ OZEKI INFORMATIKAI KFT________________________
© Copyright, Ozeki Informatics Ltd Page 105/188
Figure 1 - Specifying the connection string for the MySQL database
ODBC Driver Installation
As mentioned above, for using a PostgreSQL database you need Open DataBase Connectivity
between your database server and Ozeki NG - SMS Gateway.
For this connectivity, you need to set up an ODBC driver. The PostgreSQL driver is called
psqlODBC.
Installation of the psqlODBC driver
Download the psqlODBC database driver from the Internet. You can use the following link:
http://pgfoundry.org/projects/psqlodbc/
Install the downloaded psqlODBC database driver by launching the downloaded exe file. The
installation is similar to that of any Windows application. To move from one dialog box to the
next, just click the Next and the OK button during the setup.
You can create the ozeki message tables in Postgre SQL using the following script.
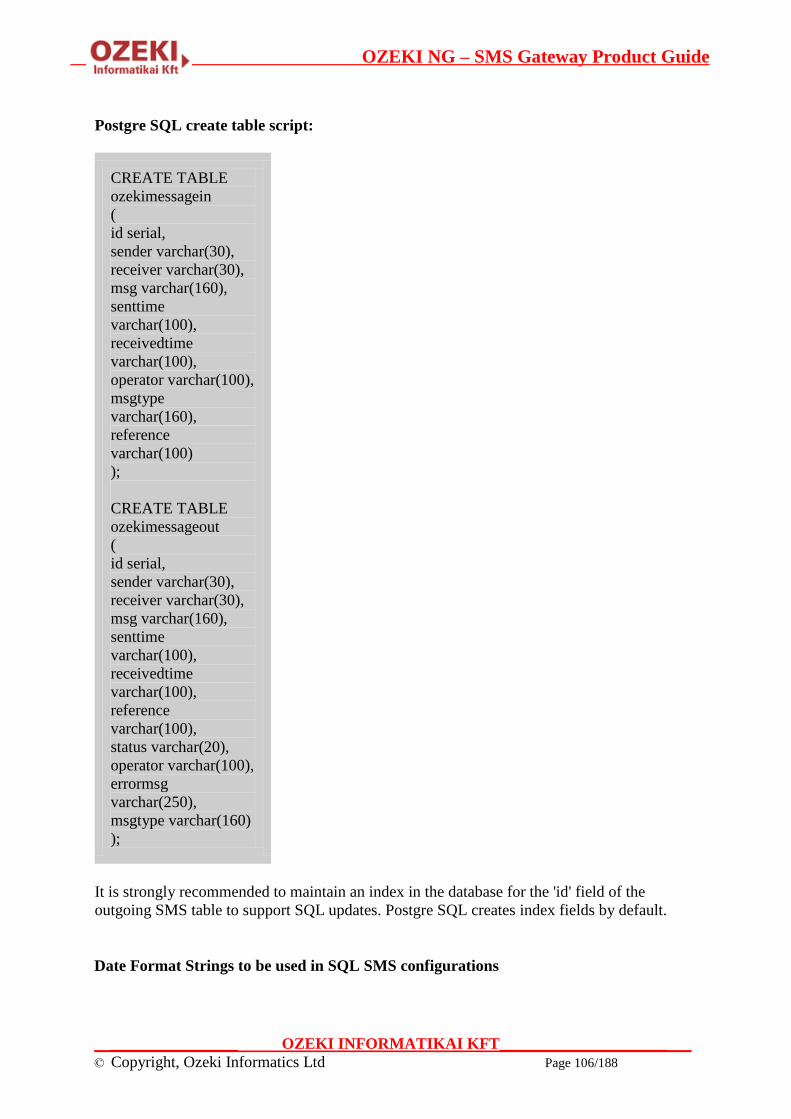
OZEKI NG – SMS Gateway Product Guide
__________________ OZEKI INFORMATIKAI KFT________________________
© Copyright, Ozeki Informatics Ltd Page 106/188
Postgre SQL create table script:
CREATE TABLE
ozekimessagein
(
id serial,
sender varchar(30),
receiver varchar(30),
msg varchar(160),
senttime
varchar(100),
receivedtime
varchar(100),
operator varchar(100),
msgtype
varchar(160),
reference
varchar(100)
);
CREATE TABLE
ozekimessageout
(
id serial,
sender varchar(30),
receiver varchar(30),
msg varchar(160),
senttime
varchar(100),
receivedtime
varchar(100),
reference
varchar(100),
status varchar(20),
operator varchar(100),
errormsg
varchar(250),
msgtype varchar(160)
);
It is strongly recommended to maintain an index in the database for the 'id' field of the
outgoing SMS table to support SQL updates. Postgre SQL creates index fields by default.
Date Format Strings to be used in SQL SMS configurations

OZEKI NG – SMS Gateway Product Guide
__________________ OZEKI INFORMATIKAI KFT________________________
© Copyright, Ozeki Informatics Ltd Page 107/188
This page provides you with date format strings you can use if you want to change the
default date format string in the configuration of the Database user of the Ozeki NG -
SMS Gateway software.
When configuring the Database user of Ozeki NG - SMS Gateway, you can specify the date
format string used to create the date value for the SQL statements. (See Figure 5 and the
instructions below it on the Database User page.)
If you would like to change the default date format string (dd/mm/yyyy hh:mm:ss) in the
Database connection tab of the Database user, you can use any of the date format strings
below.
You can use a hyphen (-), a period (.), a slash (/) or a space ( ) character to separate format
specifiers.
The following formatting characters can be used for date and time formatting:
d Represents the day of the month as a number from 1 through 31. A
single-digit day is formatted without a leading zero.
dd Represents the day of the month as a number from 01 through 31. A
single-digit day is formatted with a leading zero.
ddd Represents the abbreviated name of the day of the week: "Sun", "Mon",
"Tue", "Wed", "Thu", "Fri", and "Sat".
dddd (plus
any
number of
additional
"d"
specifiers)
Represents the full name of the day of the week: "Sunday", "Monday",
"Tuesday", "Wednesday", "Thursday", "Friday", and "Saturday".
f Represents the most significant digit of the seconds fraction.
ff Represents the two most significant digits of the seconds fraction.
fff Represents the three most significant digits of the seconds fraction.
ffff Represents the four most significant digits of the seconds fraction.
fffff Represents the five most significant digits of the seconds fraction.
ffffff Represents the six most significant digits of the seconds fraction.
fffffff Represents the seven most significant digits of the seconds fraction.
F Represents the most significant digit of the seconds fraction. Nothing is
displayed if the digit is zero.
FF Represents the two most significant digits of the seconds fraction.
However, trailing zeros, or two zero digits, are not displayed.
FFF Represents the three most significant digits of the seconds fraction.

OZEKI NG – SMS Gateway Product Guide
__________________ OZEKI INFORMATIKAI KFT________________________
© Copyright, Ozeki Informatics Ltd Page 108/188
However, trailing zeros, or three zero digits, are not displayed.
FFFF Represents the four most significant digits of the seconds fraction.
However, trailing zeros, or four zero digits, are not displayed.
FFFFF Represents the five most significant digits of the seconds fraction.
However, trailing zeros, or five zero digits, are not displayed.
FFFFFF Represents the six most significant digits of the seconds fraction.
However, trailing zeros, or six zero digits, are not displayed.
FFFFFFF Represents the seven most significant digits of the seconds fraction.
However, trailing zeros, or seven zero digits, are not displayed.
g or gg
(plus any
number of
additional
"g"
specifiers)
Represents the period or era (A.D. for example). This specifier is ignored
if the date to be formatted does not have an associated period or era
string.
h Represents the hour as a number from 1 through 12, that is, the hour as
represented by a 12-hour clock that counts the whole hours since
midnight or noon. Consequently, a particular hour after midnight is
indistinguishable from the same hour after noon. The hour is not
rounded, and a single-digit hour is formatted without a leading zero. For
example, given a time of 5:43, this format specifier displays "5".
hh, hh
(plus any
number of
additional
"h"
specifiers)
Represents the hour as a number from 01 through 12, that is, the hour as
represented by a 12-hour clock that counts the whole hours since
midnight or noon. Consequently, a particular hour after midnight is
indistinguishable from the same hour after noon. The hour is not
rounded, and a single-digit hour is formatted with a leading zero. For
example, given a time of 5:43, this format specifier displays "05".
H Represents the hour as a number from 0 through 23, that is, the hour as
represented by a zero-based 24-hour clock that counts the hours since
midnight. A single-digit hour is formatted without a leading zero.
HH, HH
(plus any
number of
additional
"H"
specifiers)
Represents the hour as a number from 00 through 23, that is, the hour as
represented by a zero-based 24-hour clock that counts the hours since
midnight. A single-digit hour is formatted with a leading zero.
m Represents the minute as a number from 0 through 59. The minute
represents whole minutes passed since the last hour. A single-digit
minute is formatted without a leading zero.
mm, mm
(plus any
number of
additional
Represents the minute as a number from 00 through 59. The minute
represents whole minutes passed since the last hour. A single-digit
minute is formatted with a leading zero.
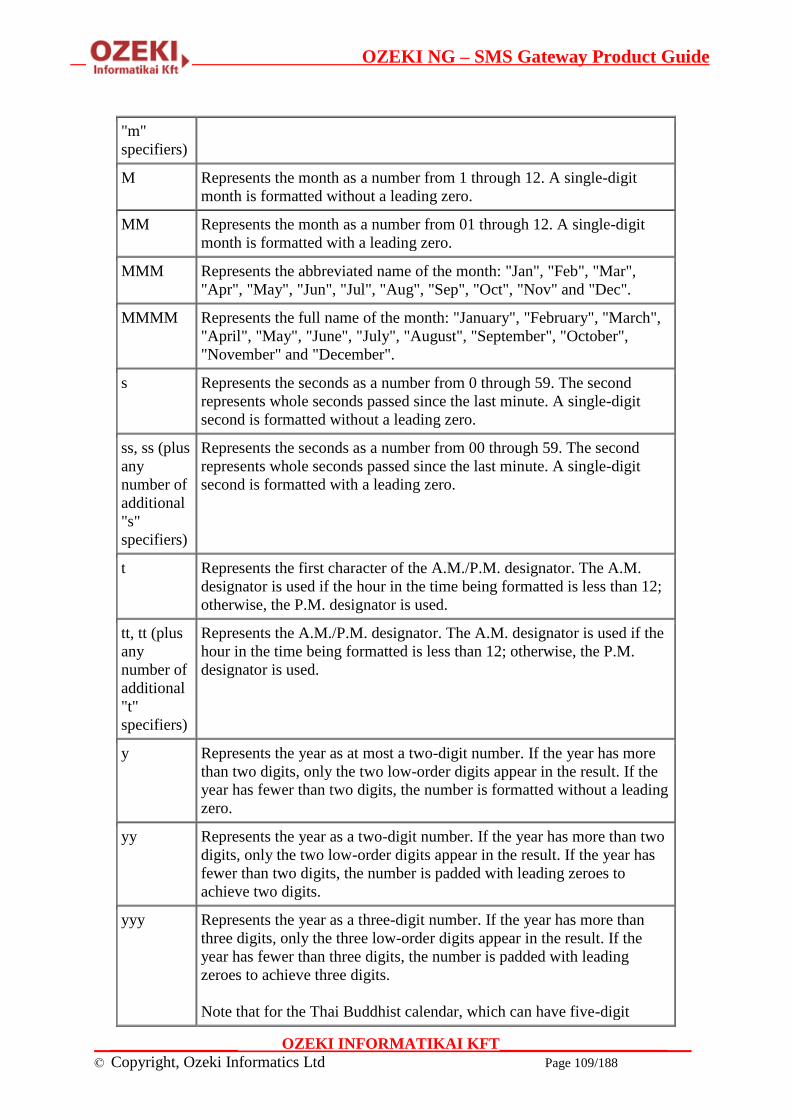
OZEKI NG – SMS Gateway Product Guide
__________________ OZEKI INFORMATIKAI KFT________________________
© Copyright, Ozeki Informatics Ltd Page 109/188
"m"
specifiers)
M Represents the month as a number from 1 through 12. A single-digit
month is formatted without a leading zero.
MM Represents the month as a number from 01 through 12. A single-digit
month is formatted with a leading zero.
MMM Represents the abbreviated name of the month: "Jan", "Feb", "Mar",
"Apr", "May", "Jun", "Jul", "Aug", "Sep", "Oct", "Nov" and "Dec".
MMMM Represents the full name of the month: "January", "February", "March",
"April", "May", "June", "July", "August", "September", "October",
"November" and "December".
s Represents the seconds as a number from 0 through 59. The second
represents whole seconds passed since the last minute. A single-digit
second is formatted without a leading zero.
ss, ss (plus
any
number of
additional
"s"
specifiers)
Represents the seconds as a number from 00 through 59. The second
represents whole seconds passed since the last minute. A single-digit
second is formatted with a leading zero.
t Represents the first character of the A.M./P.M. designator. The A.M.
designator is used if the hour in the time being formatted is less than 12;
otherwise, the P.M. designator is used.
tt, tt (plus
any
number of
additional
"t"
specifiers)
Represents the A.M./P.M. designator. The A.M. designator is used if the
hour in the time being formatted is less than 12; otherwise, the P.M.
designator is used.
y Represents the year as at most a two-digit number. If the year has more
than two digits, only the two low-order digits appear in the result. If the
year has fewer than two digits, the number is formatted without a leading
zero.
yy Represents the year as a two-digit number. If the year has more than two
digits, only the two low-order digits appear in the result. If the year has
fewer than two digits, the number is padded with leading zeroes to
achieve two digits.
yyy Represents the year as a three-digit number. If the year has more than
three digits, only the three low-order digits appear in the result. If the
year has fewer than three digits, the number is padded with leading
zeroes to achieve three digits.
Note that for the Thai Buddhist calendar, which can have five-digit

OZEKI NG – SMS Gateway Product Guide
__________________ OZEKI INFORMATIKAI KFT________________________
© Copyright, Ozeki Informatics Ltd Page 110/188
years, this format specifier displays all five digits.
yyyy Represents the year as a four-digit number. If the year has more than
four digits, only the four low-order digits appear in the result. If the year
has fewer than four digits, the number is padded with leading zeroes to
achieve four digits.
Note that for the Thai Buddhist calendar, which can have five-digit
years, this format specifier renders all five digits.
yyyyy
(plus any
number of
additional
"y"
specifiers)
Represents the year as a five-digit number. If the year has more than five
digits, only the five low-order digits appear in the result. If the year has
fewer than five digits, the number is padded with leading zeroes to
achieve five digits.
If there are additional "y" specifiers, the number is padded with as many
leading zeroes as necessary to achieve the number of "y" specifiers.
z Represents the signed time zone offset of your system from Greenwich
Mean Time (GMT) measured in hours. For example, the offset for a
computer in the Pacific Standard Time zone is "-8".
The offset is always displayed with a leading sign. A plus sign (+)
indicates hours ahead of GMT and a minus sign (-) indicates hours
behind GMT. The offset ranges from –12 through +13. A single-digit
offset is formatted without a leading zero. The offset is affected by
daylight savings time.
zz Represents the signed time zone offset of your system from Greenwich
Mean Time (GMT) measured in hours. For example, the offset for a
computer in the Pacific Standard Time zone is "-08".
The offset is always displayed with a leading sign. A plus sign (+)
indicates hours ahead of GMT and a minus sign (-) indicates hours
behind GMT. The offset ranges from –12 through +13. A single-digit
offset is formatted with a leading zero. The offset is affected by daylight
savings time.
zzz, zzz
(plus any
number of
additional
"z"
specifiers)
Represents the signed time zone offset of your system from Greenwich
Mean Time (GMT) measured in hours and minutes. For example, the
offset for a computer in the Pacific Standard Time zone is "-08:00".
The offset is always displayed with a leading sign. A plus sign (+)
indicates hours ahead of GMT and a minus sign (-) indicates hours
behind GMT. The offset ranges from –12 through +13. A single-digit
offset is formatted with a leading zero. The offset is affected by daylight
savings time.
: The time separator.
/ The date separator.
" Quoted string (quotation mark). Displays the literal value of any string
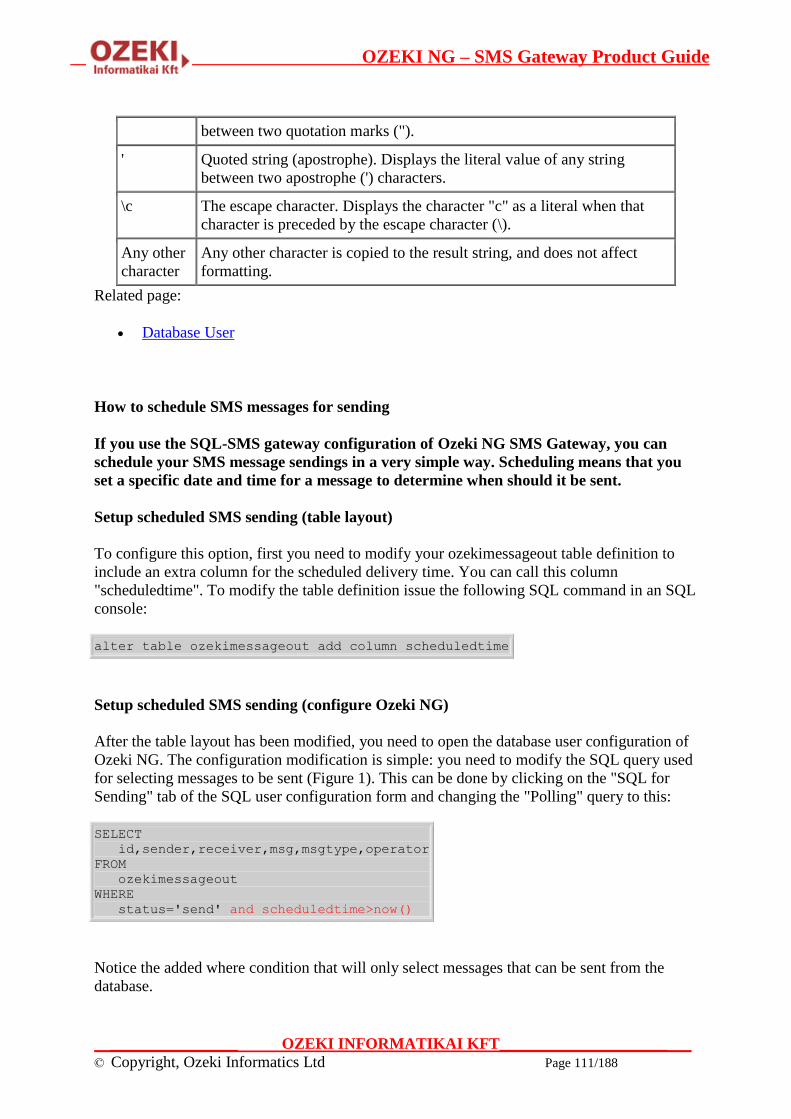
OZEKI NG – SMS Gateway Product Guide
__________________ OZEKI INFORMATIKAI KFT________________________
© Copyright, Ozeki Informatics Ltd Page 111/188
between two quotation marks (").
' Quoted string (apostrophe). Displays the literal value of any string
between two apostrophe (') characters.
\c The escape character. Displays the character "c" as a literal when that
character is preceded by the escape character (\).
Any other
character
Any other character is copied to the result string, and does not affect
formatting.
Related page:
Database User
How to schedule SMS messages for sending
If you use the SQL-SMS gateway configuration of Ozeki NG SMS Gateway, you can
schedule your SMS message sendings in a very simple way. Scheduling means that you
set a specific date and time for a message to determine when should it be sent.
Setup scheduled SMS sending (table layout)
To configure this option, first you need to modify your ozekimessageout table definition to
include an extra column for the scheduled delivery time. You can call this column
"scheduledtime". To modify the table definition issue the following SQL command in an SQL
console:
alter table ozekimessageout add column scheduledtime
Setup scheduled SMS sending (configure Ozeki NG)
After the table layout has been modified, you need to open the database user configuration of
Ozeki NG. The configuration modification is simple: you need to modify the SQL query used
for selecting messages to be sent (Figure 1). This can be done by clicking on the "SQL for
Sending" tab of the SQL user configuration form and changing the "Polling" query to this:
SELECT
id,sender,receiver,msg,msgtype,operator
FROM
ozekimessageout
WHERE
status='send' and scheduledtime>now()
Notice the added where condition that will only select messages that can be sent from the
database.

OZEKI NG – SMS Gateway Product Guide
__________________ OZEKI INFORMATIKAI KFT________________________
© Copyright, Ozeki Informatics Ltd Page 112/188
Figure 1 - How to configure scheduled SMS sending
After this is configured, to send a scheduled SMS message all you have to do is specify the
datetime value in the ozekimessagout table.
SMPP User
This page explains how to install and configure an SMPP user for SMS messaging using
the graphical user interface of the Ozeki NG - SMS Gateway software.
Ozeki NG - SMS Gateway allows, among others (see the Users and Applications page), the
installation and configuration of an SMPP user.
The software enables all users to connect to the gateway through the Listener port and to
exercise their user functions. The creation of an SMPP user account means enabling
connection to the Gateway using the SMPP protocol. Anyone who knows the username and
the password of a given SMPP user account can connect to the Ozeki NG - SMS Gateway if
their IP address is authorized for connection. Once the Gateway has authenticated the user,
they are enabled to send and receive messages. Consequently, the creation of an SMPP user
allows the Ozeki NG - SMS Gateway to be fully authorized to act as an SMS Center.
You can use the graphical user interface of Ozeki NG - SMS Gateway to install and configure
any user or application.
To start installing and configuring an SMPP user, click the Add button in the top right-hand
corner of the Users and Applications panel on the right of the Management Console. You
can also add a user by clicking the Add user item in the Users and applications menu.
(Figure 1).
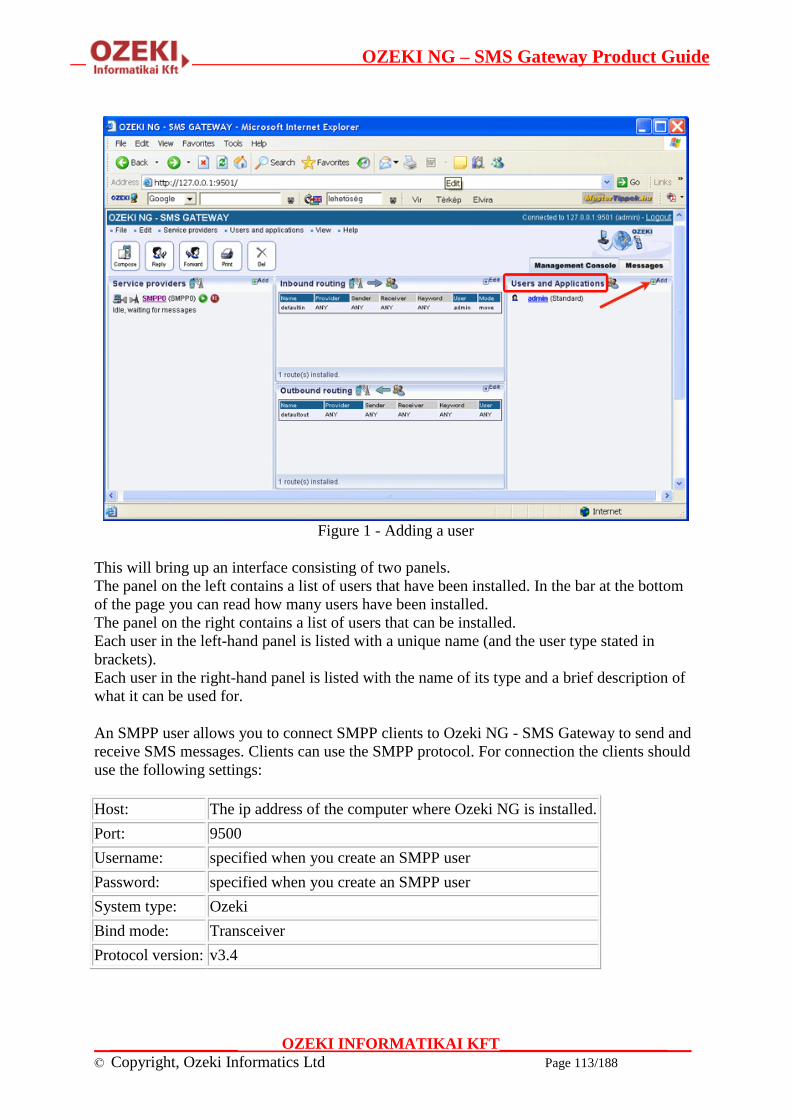
OZEKI NG – SMS Gateway Product Guide
__________________ OZEKI INFORMATIKAI KFT________________________
© Copyright, Ozeki Informatics Ltd Page 113/188
Figure 1 - Adding a user
This will bring up an interface consisting of two panels.
The panel on the left contains a list of users that have been installed. In the bar at the bottom
of the page you can read how many users have been installed.
The panel on the right contains a list of users that can be installed.
Each user in the left-hand panel is listed with a unique name (and the user type stated in
brackets).
Each user in the right-hand panel is listed with the name of its type and a brief description of
what it can be used for.
An SMPP user allows you to connect SMPP clients to Ozeki NG - SMS Gateway to send and
receive SMS messages. Clients can use the SMPP protocol. For connection the clients should
use the following settings:
Host: The ip address of the computer where Ozeki NG is installed.
Port: 9500
Username: specified when you create an SMPP user
Password: specified when you create an SMPP user
System type: Ozeki
Bind mode: Transceiver
Protocol version: v3.4

OZEKI NG – SMS Gateway Product Guide
__________________ OZEKI INFORMATIKAI KFT________________________
© Copyright, Ozeki Informatics Ltd Page 114/188
To add an SMPP user, click the Install link in the respective entry in the list (Figure 2).
Figure 2 - Installing an SMPP user
When installing a user (type), you need to give it a unique username. Clicking the Install link
will bring up the SMPP user installation panel. Here, you need to enter a unique username in
the Username field.
This will take you to the Authentication tab of the Configuration panel.
The Username field contains the unique username you have provided in the previous panel.
The Password field contains a password offered by the program. You can and should change
it. Your password should be a combination of letters and digits (at least one or two of the
latter). From now on, the username and password you have provided can be used to log in to
the program (Figure 3).
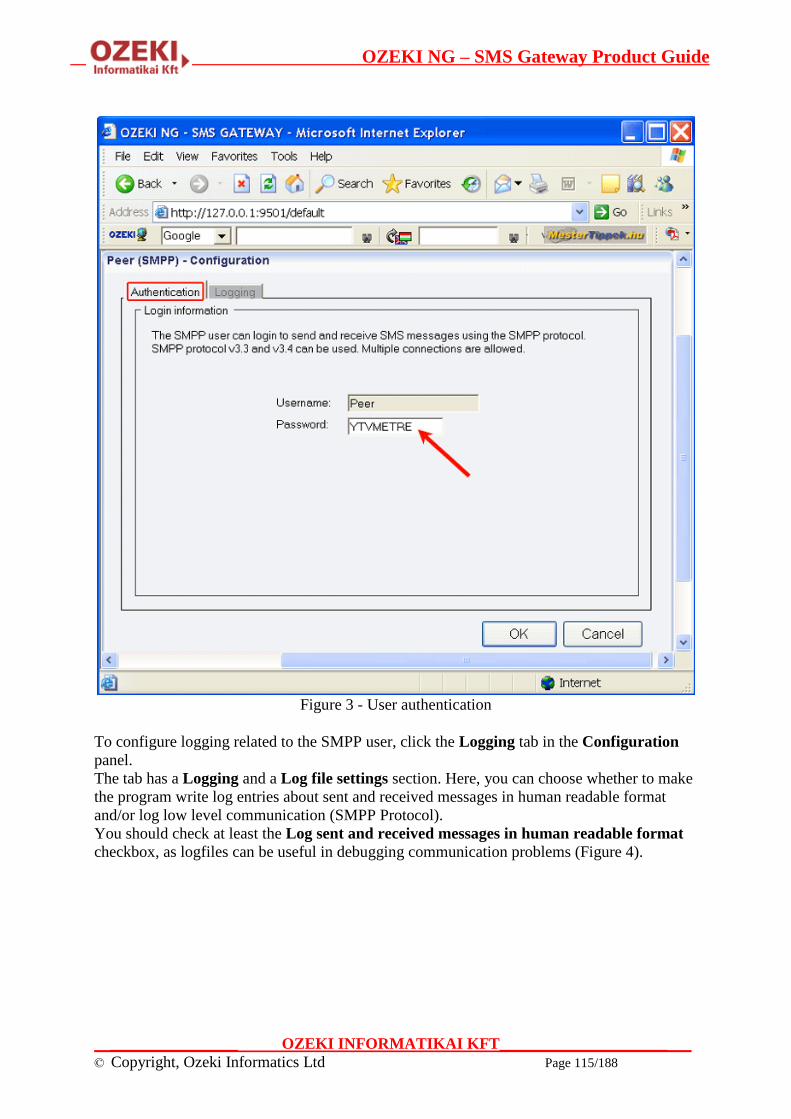
OZEKI NG – SMS Gateway Product Guide
__________________ OZEKI INFORMATIKAI KFT________________________
© Copyright, Ozeki Informatics Ltd Page 115/188
Figure 3 - User authentication
To configure logging related to the SMPP user, click the Logging tab in the Configuration
panel.
The tab has a Logging and a Log file settings section. Here, you can choose whether to make
the program write log entries about sent and received messages in human readable format
and/or log low level communication (SMPP Protocol).
You should check at least the Log sent and received messages in human readable format
checkbox, as logfiles can be useful in debugging communication problems (Figure 4).

OZEKI NG – SMS Gateway Product Guide
__________________ OZEKI INFORMATIKAI KFT________________________
© Copyright, Ozeki Informatics Ltd Page 116/188
Figure 4 - Logging options
In the Log file settings section of the tab, you can make specifications for the size and the
number of available logfiles.
Log rotation saves disk space, as it ensures that older (and probably no longer needed) logfiles
will be automatically deleted from the log directory, which is specified in the Log directory
text box. By default, the access path to the logfiles is: C:\Program Files\Ozeki\OzekiNG -
SMS Gateway\Logs
In the Maximum log file size text box in the Logfile settings section, you can specify the
maximum size of a logfile. Once this size is reached, a new logfile will be created. Specify the
number of kilobytes for the size of a logfile by entering a positive whole number. By default,
the maximum logfile size is 2000 kB.
In the Number of rotated files text box, specify the maximum number of rotated logfiles that
are saved. Specify this number by entering a positive whole number. By default, the number
of logfiles that are saved is 4 (see Figure 4 above).
If you are content with the default specifications, leave the text boxes unchanged.

OZEKI NG – SMS Gateway Product Guide
__________________ OZEKI INFORMATIKAI KFT________________________
© Copyright, Ozeki Informatics Ltd Page 117/188
To modify the configuration or to view server events related to an SMPP user, open the panel
of the user's account. To do this, click the name of the user in the Users and Applications
panel of the Management Console. In the panel of the user's account, click the link of the
task you wish to perform (Figure 4).
Figure 5 - Clicking a user-related task link
To configure or modify the configuration of the user, click Configure.
To view the latest server events related to the user, click Events.
To uninstall the user, click the Uninstall link.
How to provide SMS Service for SMPP Client Applications
If you have Ozeki NG SMS Gateway installed on your server, you can provide SMS
service for your applications (or your customers). Your applications can connect to
Ozeki NG SMS Gateway over the SMPP protocol. This is possible because Ozeki NG
SMS Gateway has a built in SMPP SMSC. In this guide you can read about how you can
configure your Ozeki NG SMS Gateway to provide SMPP Service.
1. Introduction
In this example, we configure Ozeki NG SMS gateway to provide SMS service over the
SMPP protocol for two SMS Client Applications (User John and User Paul). These
applications will connect to the built in SMSC of Ozeki NG SMS Gateway (Figure 1). I
assume the Ozeki NG SMS Gateway software was installed on a server that has an IP address
of: 192.168.1.1.

OZEKI NG – SMS Gateway Product Guide
__________________ OZEKI INFORMATIKAI KFT________________________
© Copyright, Ozeki Informatics Ltd Page 118/188
Figure 1 - SMPP Clients connect to the build int SMSC of Ozeki NG SMS Gateway
After installation Ozeki NG SMS Gateway will automatically start the build in SMSC on port
9500. This means that the SMPP Client Applications (User John and User Paul) will connect
to 192.168.1.1 on port 9500. The SMPP Protocol they will use is SMPP v3.4 and the
connection type will be Transceiver.
2. How to setup an SMPP user account for SMPP Client Application (User John)
To make it possible for User John to connect to the built in SMSC of the Ozeki NG SMS
Gateway, you have to create an SMPP User account. To do this you should click on Add user
in the Management console (Figure 2).

OZEKI NG – SMS Gateway Product Guide
__________________ OZEKI INFORMATIKAI KFT________________________
© Copyright, Ozeki Informatics Ltd Page 119/188
Figure 2 - Click on Add user.
The next step is to select the SMPP User type and click on install (Figure 3).
Figure 3 - Select user type SMPP User.
Then you have to provide the username and password. The username should be: john (Figure
4). The password can be wpsd123 (Figure 5).
Figure 4 - SMPP Client username: john

OZEKI NG – SMS Gateway Product Guide
__________________ OZEKI INFORMATIKAI KFT________________________
© Copyright, Ozeki Informatics Ltd Page 120/188
Figure 5 - SMPP Client password: wpsd123
After clicking OK on the SMPP user configuration form, your SMPP user account is
successfully created. Following this your SMPP client application can connect to the build in
SMSC of your Ozeki NG SMS Gateway using the following connection information. This
connection information should be configured in the SMPP Client Application of User John:
SMPP Connection Information for User John:
SMPP Host: 192.168.1.1
Port: 9500
Username: john
Password: wpsd123
SMPP version: 3.4
SMPP bind: transceiver
SMPP system type: SMPP
More detailed information on how to create accounts for SMPP client connections, can be
found in the How to add an SMPP user guide. If you repeat the same steps for the client
application user Paul, he will also be able to connect to the built in SMSC over SMPP. For
example if you specify the password wp44sd55 for user Paul, he can connect to your Ozeki
NG SMS Gateway using the following parameters:
SMPP Host: 192.168.1.1
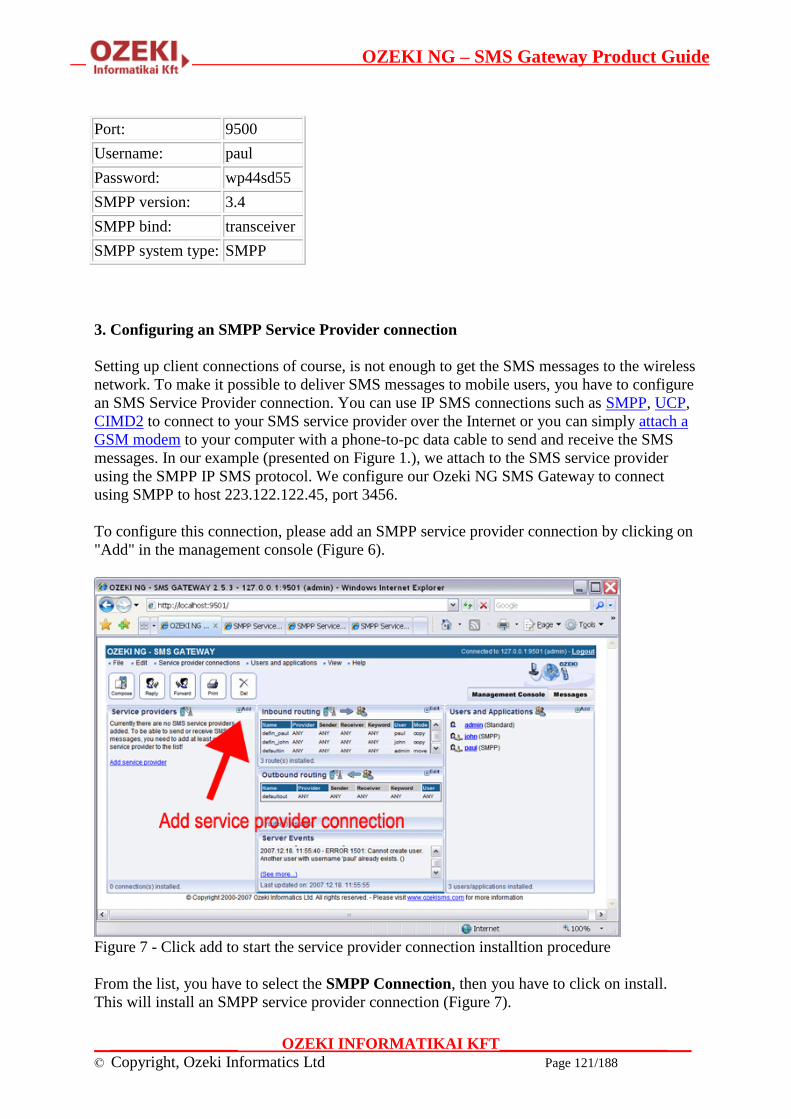
OZEKI NG – SMS Gateway Product Guide
__________________ OZEKI INFORMATIKAI KFT________________________
© Copyright, Ozeki Informatics Ltd Page 121/188
Port: 9500
Username: paul
Password: wp44sd55
SMPP version: 3.4
SMPP bind: transceiver
SMPP system type: SMPP
3. Configuring an SMPP Service Provider connection
Setting up client connections of course, is not enough to get the SMS messages to the wireless
network. To make it possible to deliver SMS messages to mobile users, you have to configure
an SMS Service Provider connection. You can use IP SMS connections such as SMPP, UCP,
CIMD2 to connect to your SMS service provider over the Internet or you can simply attach a
GSM modem to your computer with a phone-to-pc data cable to send and receive the SMS
messages. In our example (presented on Figure 1.), we attach to the SMS service provider
using the SMPP IP SMS protocol. We configure our Ozeki NG SMS Gateway to connect
using SMPP to host 223.122.122.45, port 3456.
To configure this connection, please add an SMPP service provider connection by clicking on
"Add" in the management console (Figure 6).
Figure 7 - Click add to start the service provider connection installtion procedure
From the list, you have to select the SMPP Connection, then you have to click on install.
This will install an SMPP service provider connection (Figure 7).

OZEKI NG – SMS Gateway Product Guide
__________________ OZEKI INFORMATIKAI KFT________________________
© Copyright, Ozeki Informatics Ltd Page 122/188
Figure 7 - Install an SMPP service provider connection
After you have clicked install, you will be presented with the configuration form of the SMPP
service provider configuration. On this form you have to configure the connection details of
the SMS Service provider connection. The connection details are provided by the SMS
Service provider. For example if the GSM network operator Vodafone provides you the SMS
Service, they will give you a data sheet with the following information:
Connection details provided by your SMS Service provider (e.g.: Vodafone):
SMPP Host: 223.122.122.45
Port: 3456
Username: accnt
Password: ER32wp
You reacieve the information presented in above table when you sign up for their service.
This information can be entered on the SMPP Service provider configuraiton form (Figure 8).

OZEKI NG – SMS Gateway Product Guide
__________________ OZEKI INFORMATIKAI KFT________________________
© Copyright, Ozeki Informatics Ltd Page 123/188
Figure 8 - Configure the SMPP connection details.
After the configuration details are entered you can click connect to start the service. That's all
you have to do.
4. More information
With Ozeki NG SMS Gateway you can add more then one service provider connection. If
more then one connection is available you can use inbound SMS routing and outbound SMS
routing to adjust the system according to your needs. You may also want to keep track of all
the SMS Messages sent or received for accounting puproses. If this is a requirement, you can
configure SQL logging to save a record of all outgoing and incoming messages into a
database.
Autoreply User
This page explains how to install and configure an autoreply user for SMS messaging
using the graphical user interface of the Ozeki NG - SMS Gateway software. You will be
provided with step-by-step installation and configuration instructions, including
explanations of configuration examples.
Ozeki NG - SMS Gateway supports the installation and configuration of an autoreply user
(among several other users and applications, see the Users and Applications page).
The autoreply user allows you to automatically reply to and forward incoming messages to
various phone numbers, based on the sender address and the message content.
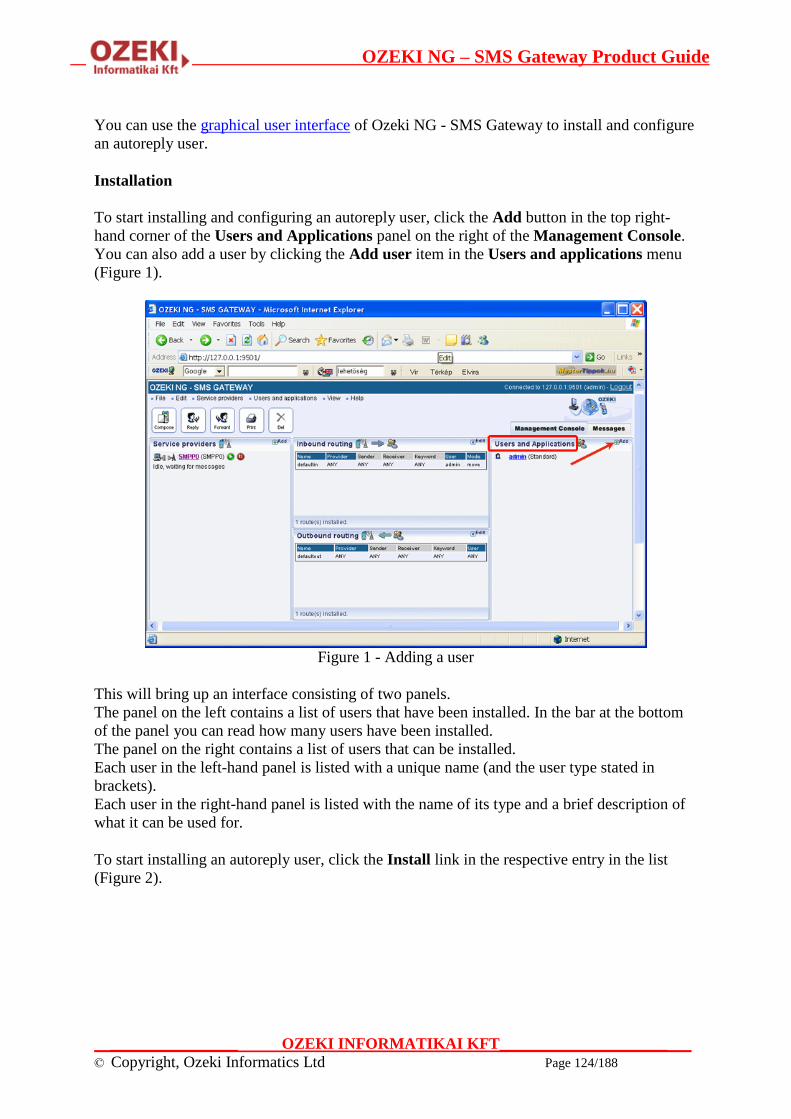
OZEKI NG – SMS Gateway Product Guide
__________________ OZEKI INFORMATIKAI KFT________________________
© Copyright, Ozeki Informatics Ltd Page 124/188
You can use the graphical user interface of Ozeki NG - SMS Gateway to install and configure
an autoreply user.
Installation
To start installing and configuring an autoreply user, click the Add button in the top right-
hand corner of the Users and Applications panel on the right of the Management Console.
You can also add a user by clicking the Add user item in the Users and applications menu
(Figure 1).
Figure 1 - Adding a user
This will bring up an interface consisting of two panels.
The panel on the left contains a list of users that have been installed. In the bar at the bottom
of the panel you can read how many users have been installed.
The panel on the right contains a list of users that can be installed.
Each user in the left-hand panel is listed with a unique name (and the user type stated in
brackets).
Each user in the right-hand panel is listed with the name of its type and a brief description of
what it can be used for.
To start installing an autoreply user, click the Install link in the respective entry in the list
(Figure 2).
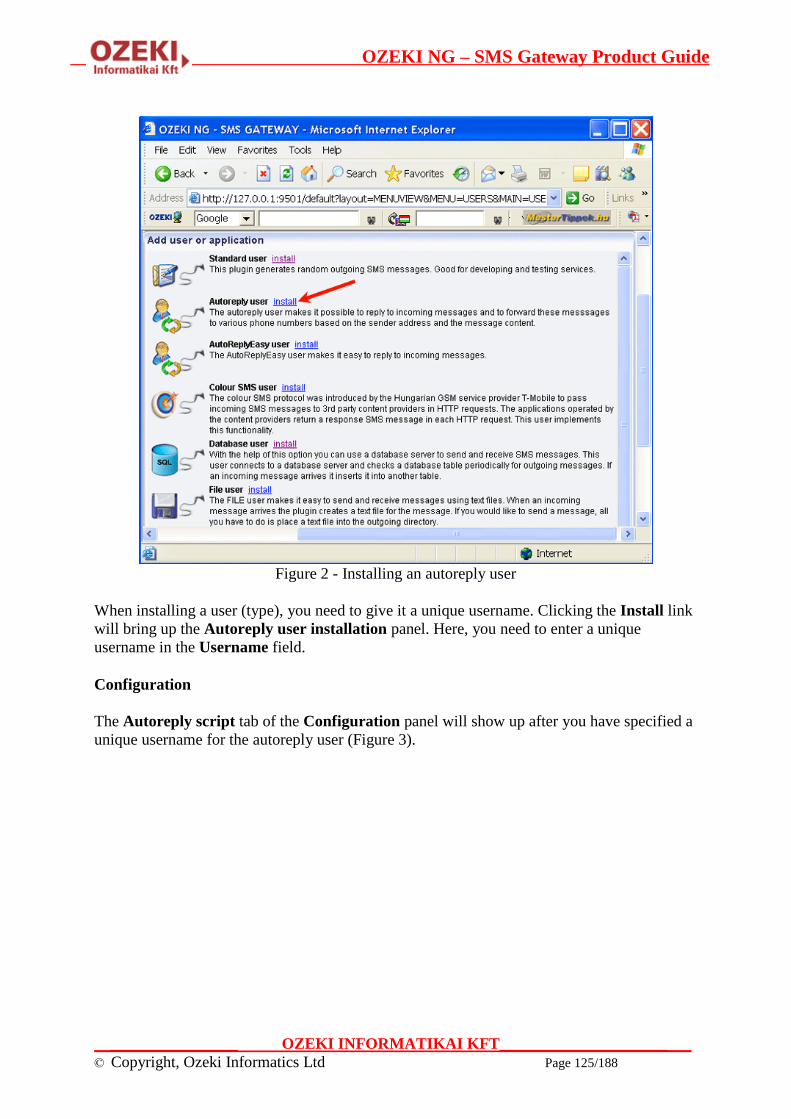
OZEKI NG – SMS Gateway Product Guide
__________________ OZEKI INFORMATIKAI KFT________________________
© Copyright, Ozeki Informatics Ltd Page 125/188
Figure 2 - Installing an autoreply user
When installing a user (type), you need to give it a unique username. Clicking the Install link
will bring up the Autoreply user installation panel. Here, you need to enter a unique
username in the Username field.
Configuration
The Autoreply script tab of the Configuration panel will show up after you have specified a
unique username for the autoreply user (Figure 3).
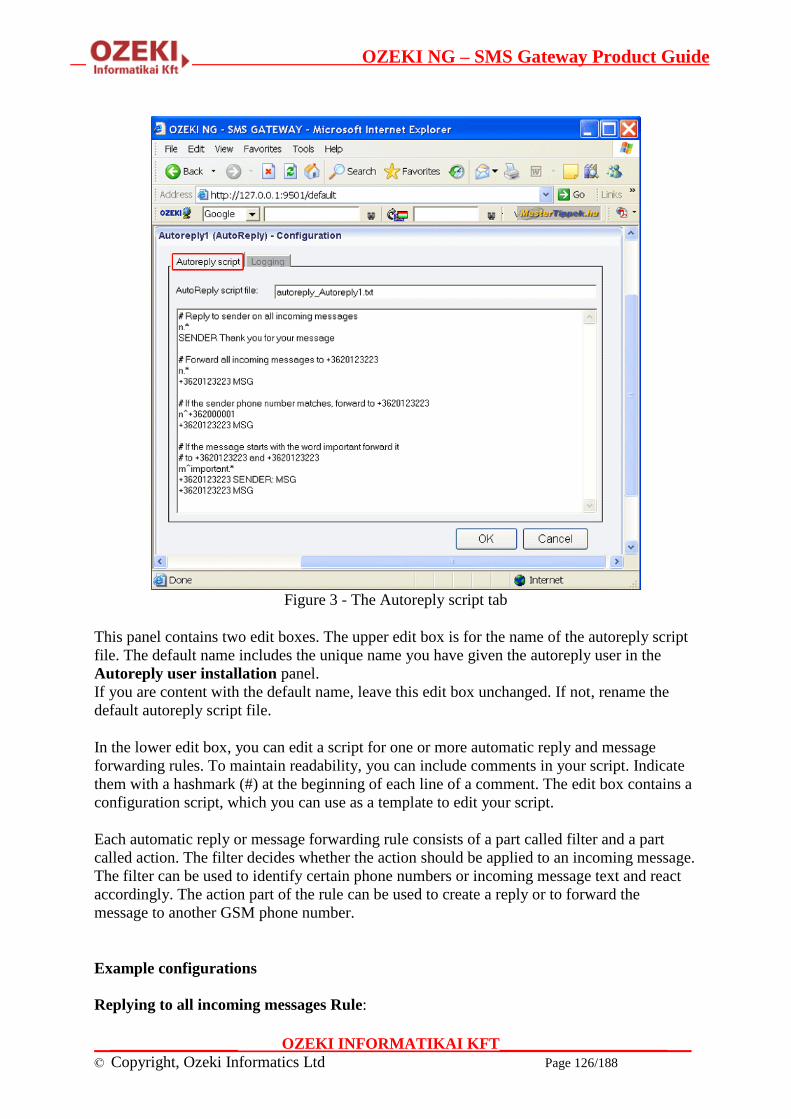
OZEKI NG – SMS Gateway Product Guide
__________________ OZEKI INFORMATIKAI KFT________________________
© Copyright, Ozeki Informatics Ltd Page 126/188
Figure 3 - The Autoreply script tab
This panel contains two edit boxes. The upper edit box is for the name of the autoreply script
file. The default name includes the unique name you have given the autoreply user in the
Autoreply user installation panel.
If you are content with the default name, leave this edit box unchanged. If not, rename the
default autoreply script file.
In the lower edit box, you can edit a script for one or more automatic reply and message
forwarding rules. To maintain readability, you can include comments in your script. Indicate
them with a hashmark (#) at the beginning of each line of a comment. The edit box contains a
configuration script, which you can use as a template to edit your script.
Each automatic reply or message forwarding rule consists of a part called filter and a part
called action. The filter decides whether the action should be applied to an incoming message.
The filter can be used to identify certain phone numbers or incoming message text and react
accordingly. The action part of the rule can be used to create a reply or to forward the
message to another GSM phone number.
Example configurations
Replying to all incoming messages Rule:
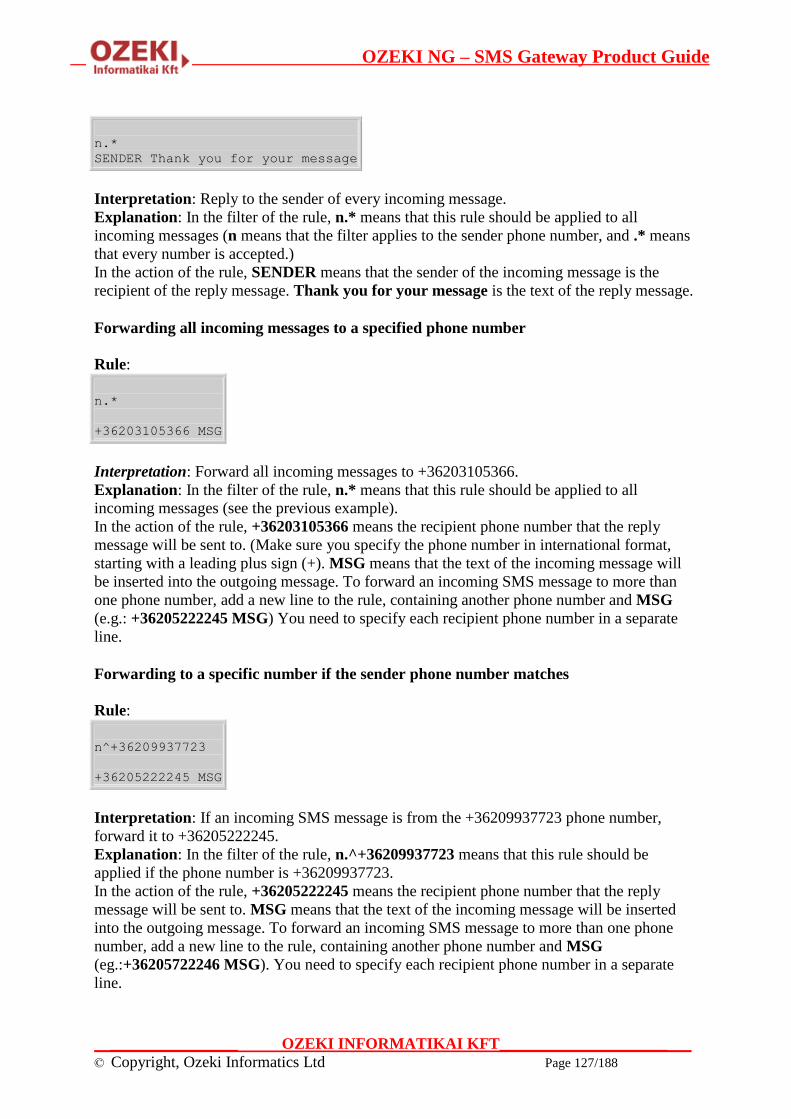
OZEKI NG – SMS Gateway Product Guide
__________________ OZEKI INFORMATIKAI KFT________________________
© Copyright, Ozeki Informatics Ltd Page 127/188
n.*
SENDER Thank you for your message
Interpretation: Reply to the sender of every incoming message.
Explanation: In the filter of the rule, n.* means that this rule should be applied to all
incoming messages (n means that the filter applies to the sender phone number, and .* means
that every number is accepted.)
In the action of the rule, SENDER means that the sender of the incoming message is the
recipient of the reply message. Thank you for your message is the text of the reply message.
Forwarding all incoming messages to a specified phone number
Rule:
n.*
+36203105366 MSG
Interpretation: Forward all incoming messages to +36203105366.
Explanation: In the filter of the rule, n.* means that this rule should be applied to all
incoming messages (see the previous example).
In the action of the rule, +36203105366 means the recipient phone number that the reply
message will be sent to. (Make sure you specify the phone number in international format,
starting with a leading plus sign (+). MSG means that the text of the incoming message will
be inserted into the outgoing message. To forward an incoming SMS message to more than
one phone number, add a new line to the rule, containing another phone number and MSG
(e.g.: +36205222245 MSG) You need to specify each recipient phone number in a separate
line.
Forwarding to a specific number if the sender phone number matches
Rule:
n^+36209937723
+36205222245 MSG
Interpretation: If an incoming SMS message is from the +36209937723 phone number,
forward it to +36205222245.
Explanation: In the filter of the rule, n.^+36209937723 means that this rule should be
applied if the phone number is +36209937723.
In the action of the rule, +36205222245 means the recipient phone number that the reply
message will be sent to. MSG means that the text of the incoming message will be inserted
into the outgoing message. To forward an incoming SMS message to more than one phone
number, add a new line to the rule, containing another phone number and MSG
(eg.:+36205722246 MSG). You need to specify each recipient phone number in a separate
line.
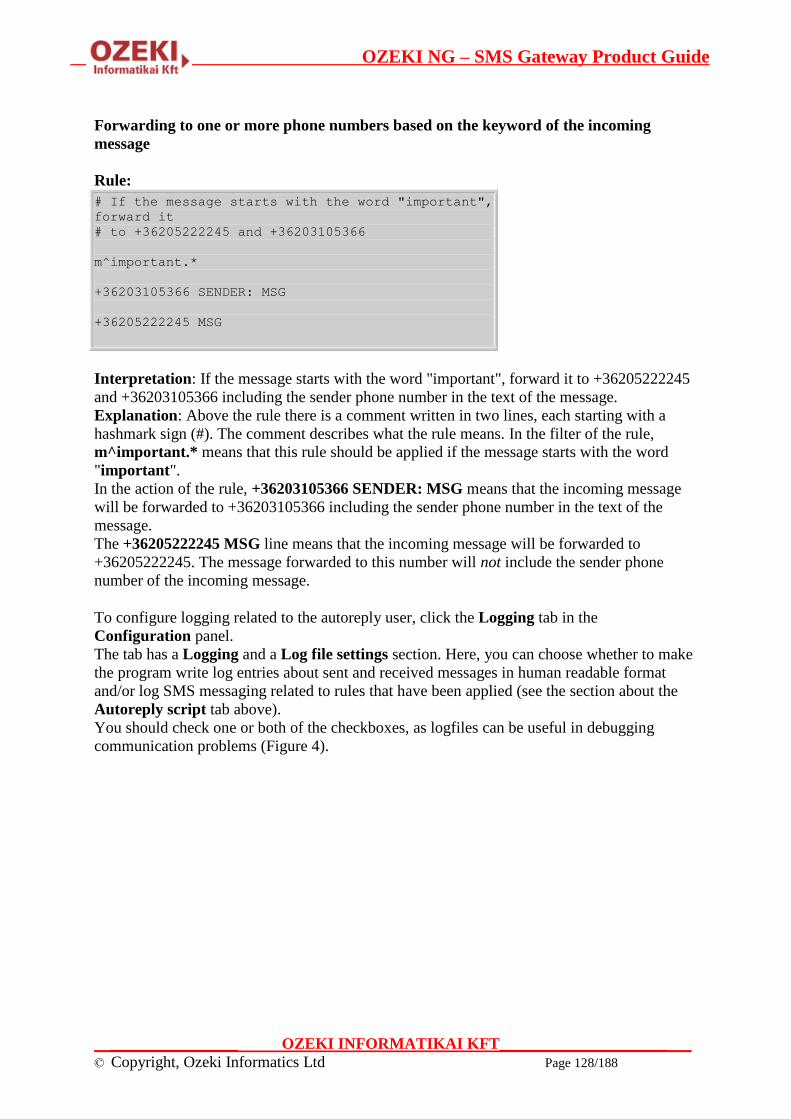
OZEKI NG – SMS Gateway Product Guide
__________________ OZEKI INFORMATIKAI KFT________________________
© Copyright, Ozeki Informatics Ltd Page 128/188
Forwarding to one or more phone numbers based on the keyword of the incoming
message
Rule:
# If the message starts with the word "important",
forward it
# to +36205222245 and +36203105366
m^important.*
+36203105366 SENDER: MSG
+36205222245 MSG
Interpretation: If the message starts with the word "important", forward it to +36205222245
and +36203105366 including the sender phone number in the text of the message.
Explanation: Above the rule there is a comment written in two lines, each starting with a
hashmark sign (#). The comment describes what the rule means. In the filter of the rule,
m^important.* means that this rule should be applied if the message starts with the word
"important".
In the action of the rule, +36203105366 SENDER: MSG means that the incoming message
will be forwarded to +36203105366 including the sender phone number in the text of the
message.
The +36205222245 MSG line means that the incoming message will be forwarded to
+36205222245. The message forwarded to this number will not include the sender phone
number of the incoming message.
To configure logging related to the autoreply user, click the Logging tab in the
Configuration panel.
The tab has a Logging and a Log file settings section. Here, you can choose whether to make
the program write log entries about sent and received messages in human readable format
and/or log SMS messaging related to rules that have been applied (see the section about the
Autoreply script tab above).
You should check one or both of the checkboxes, as logfiles can be useful in debugging
communication problems (Figure 4).
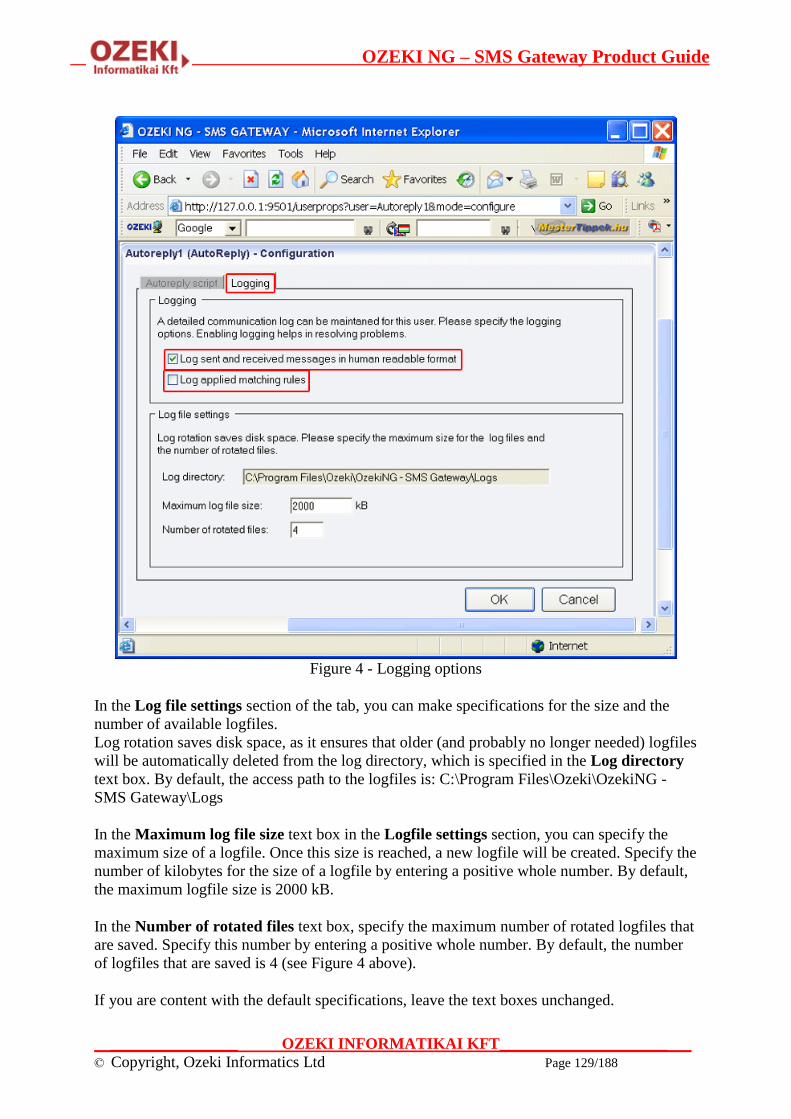
OZEKI NG – SMS Gateway Product Guide
__________________ OZEKI INFORMATIKAI KFT________________________
© Copyright, Ozeki Informatics Ltd Page 129/188
Figure 4 - Logging options
In the Log file settings section of the tab, you can make specifications for the size and the
number of available logfiles.
Log rotation saves disk space, as it ensures that older (and probably no longer needed) logfiles
will be automatically deleted from the log directory, which is specified in the Log directory
text box. By default, the access path to the logfiles is: C:\Program Files\Ozeki\OzekiNG -
SMS Gateway\Logs
In the Maximum log file size text box in the Logfile settings section, you can specify the
maximum size of a logfile. Once this size is reached, a new logfile will be created. Specify the
number of kilobytes for the size of a logfile by entering a positive whole number. By default,
the maximum logfile size is 2000 kB.
In the Number of rotated files text box, specify the maximum number of rotated logfiles that
are saved. Specify this number by entering a positive whole number. By default, the number
of logfiles that are saved is 4 (see Figure 4 above).
If you are content with the default specifications, leave the text boxes unchanged.
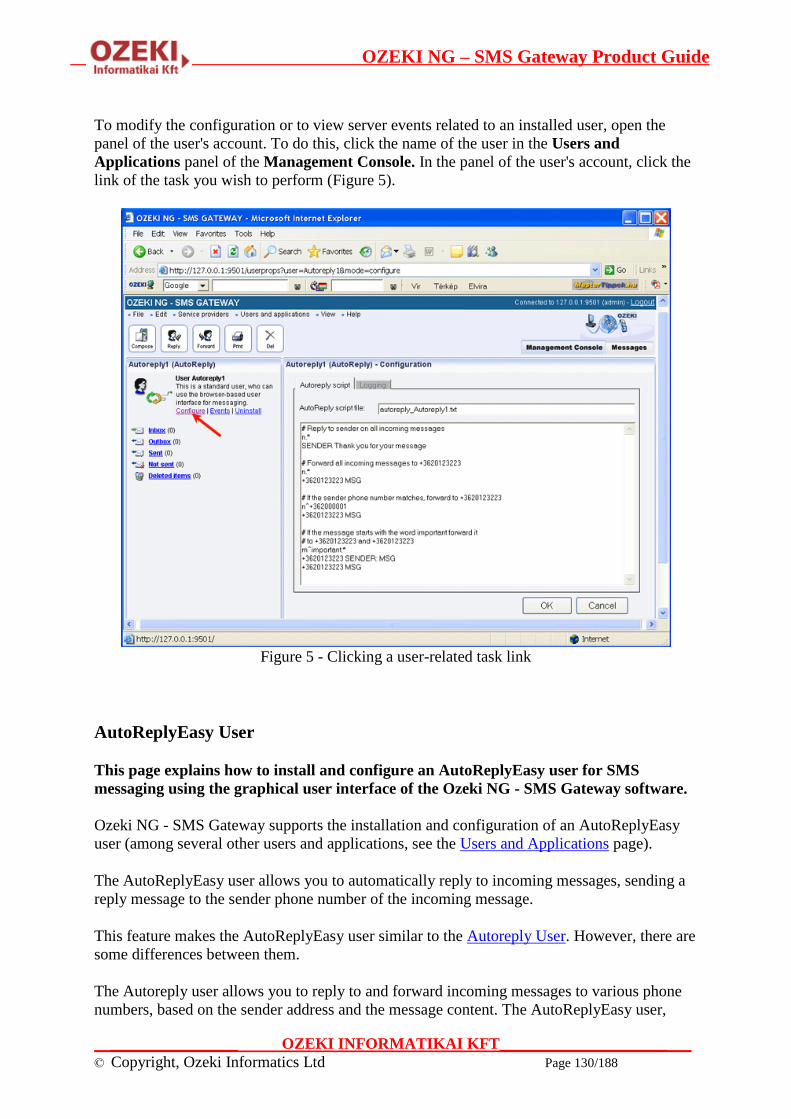
OZEKI NG – SMS Gateway Product Guide
__________________ OZEKI INFORMATIKAI KFT________________________
© Copyright, Ozeki Informatics Ltd Page 130/188
To modify the configuration or to view server events related to an installed user, open the
panel of the user's account. To do this, click the name of the user in the Users and
Applications panel of the Management Console. In the panel of the user's account, click the
link of the task you wish to perform (Figure 5).
Figure 5 - Clicking a user-related task link
AutoReplyEasy User
This page explains how to install and configure an AutoReplyEasy user for SMS
messaging using the graphical user interface of the Ozeki NG - SMS Gateway software.
Ozeki NG - SMS Gateway supports the installation and configuration of an AutoReplyEasy
user (among several other users and applications, see the Users and Applications page).
The AutoReplyEasy user allows you to automatically reply to incoming messages, sending a
reply message to the sender phone number of the incoming message.
This feature makes the AutoReplyEasy user similar to the Autoreply User. However, there are
some differences between them.
The Autoreply user allows you to reply to and forward incoming messages to various phone
numbers, based on the sender address and the message content. The AutoReplyEasy user,

OZEKI NG – SMS Gateway Product Guide
__________________ OZEKI INFORMATIKAI KFT________________________
© Copyright, Ozeki Informatics Ltd Page 131/188
however, only allows you to automatically send a reply message to the sender phone number
of the recipient message. The reply can be a plain text or a WAPPUSH SMS. A WAPPUSH
SMS is basically a specially encoded message which includes a link to a WAP or webpage
address.
Unlike the Autoreply user, the AutoReplyEasy user does not require you to edit rules
following a rule syntax in the autoreply script file. Instead of having to set rules in the script
file, you only have to edit your reply message. (This is the reason for the distinction "Easy" in
its name.)
The reply message can contain the following special keywords. These keywords will be
replaced to the appropriate content in the message text before the reply message is sent.
$MSG The incoming message text
$SENDER The originator number
$RECEIVER The recipient number
You can use the graphical user interface of Ozeki NG - SMS Gateway to install and configure
an AutoReplyEasy user.
Installation
To start installing and configuring an AutoReplyEasy user, click the Add button in the top
right-hand corner of the Users and Applications panel on the right of the Management
Console. You can also add a user by clicking the Add user item in the Users and
applications menu (Figure 1).
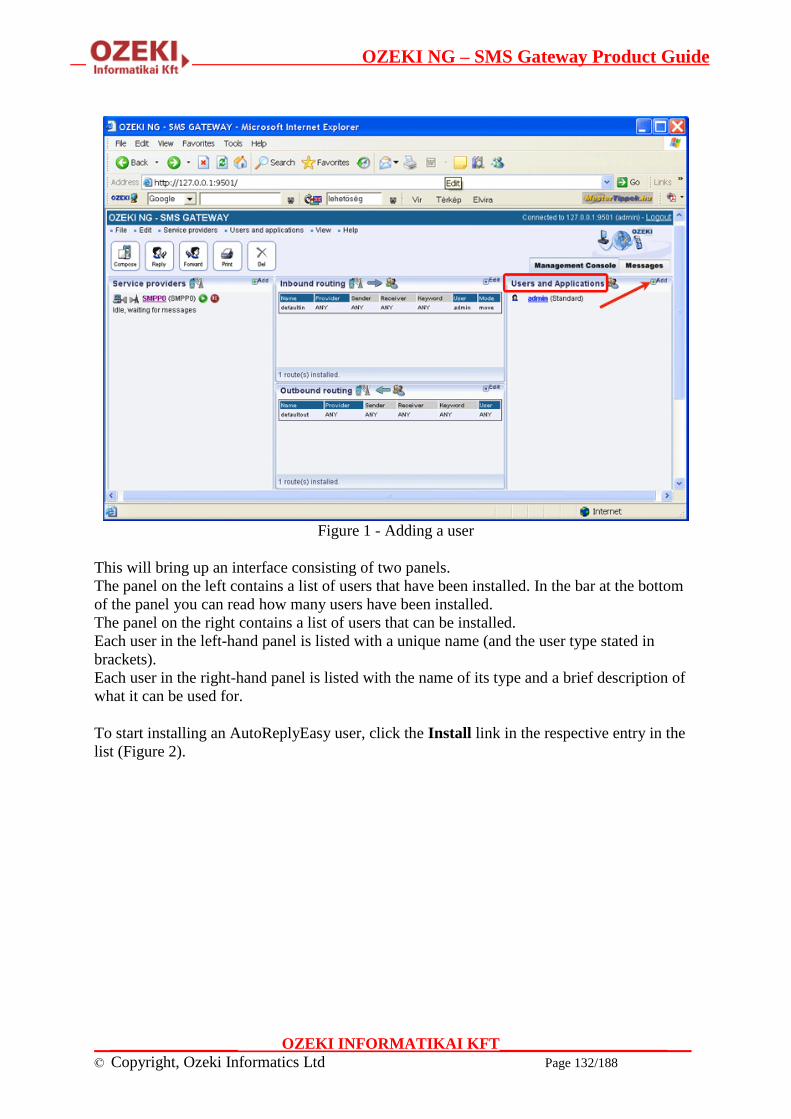
OZEKI NG – SMS Gateway Product Guide
__________________ OZEKI INFORMATIKAI KFT________________________
© Copyright, Ozeki Informatics Ltd Page 132/188
Figure 1 - Adding a user
This will bring up an interface consisting of two panels.
The panel on the left contains a list of users that have been installed. In the bar at the bottom
of the panel you can read how many users have been installed.
The panel on the right contains a list of users that can be installed.
Each user in the left-hand panel is listed with a unique name (and the user type stated in
brackets).
Each user in the right-hand panel is listed with the name of its type and a brief description of
what it can be used for.
To start installing an AutoReplyEasy user, click the Install link in the respective entry in the
list (Figure 2).

OZEKI NG – SMS Gateway Product Guide
__________________ OZEKI INFORMATIKAI KFT________________________
© Copyright, Ozeki Informatics Ltd Page 133/188
Figure 2 - Installing an AutoReplyEasy user
When installing a user (type), you need to give it a unique username. Clicking the Install link
will bring up the AutoReplyEasy user installation panel. Here, you need to enter a unique
username in the Username field.
Configuration
The Autoreply script tab of the Configuration panel will show up after you have specified a
unique username for the AutoReplyEasy user (Figure 3).
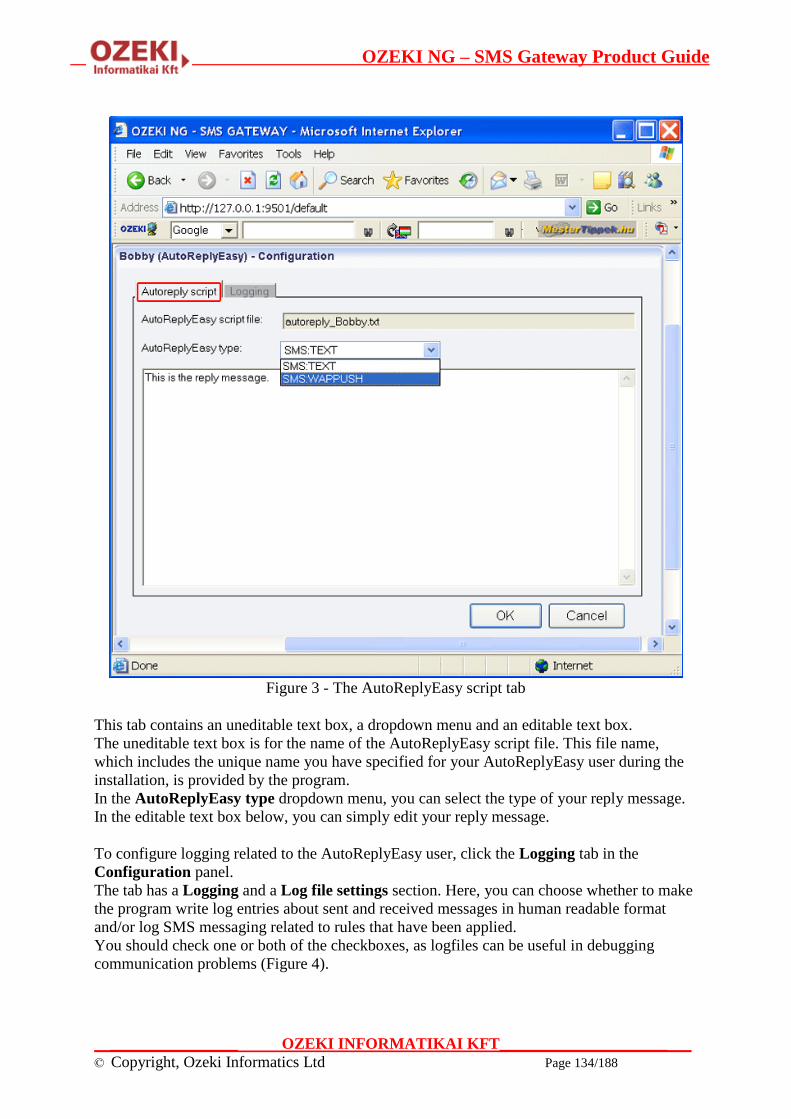
OZEKI NG – SMS Gateway Product Guide
__________________ OZEKI INFORMATIKAI KFT________________________
© Copyright, Ozeki Informatics Ltd Page 134/188
Figure 3 - The AutoReplyEasy script tab
This tab contains an uneditable text box, a dropdown menu and an editable text box.
The uneditable text box is for the name of the AutoReplyEasy script file. This file name,
which includes the unique name you have specified for your AutoReplyEasy user during the
installation, is provided by the program.
In the AutoReplyEasy type dropdown menu, you can select the type of your reply message.
In the editable text box below, you can simply edit your reply message.
To configure logging related to the AutoReplyEasy user, click the Logging tab in the
Configuration panel.
The tab has a Logging and a Log file settings section. Here, you can choose whether to make
the program write log entries about sent and received messages in human readable format
and/or log SMS messaging related to rules that have been applied.
You should check one or both of the checkboxes, as logfiles can be useful in debugging
communication problems (Figure 4).
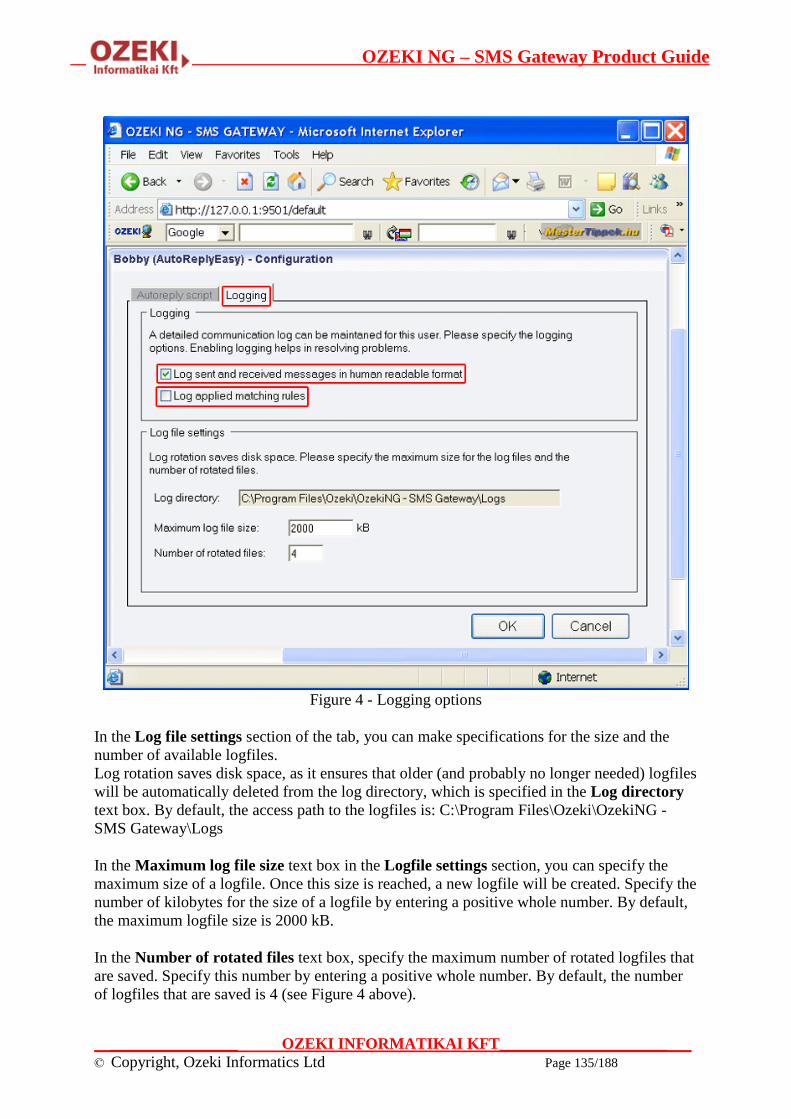
OZEKI NG – SMS Gateway Product Guide
__________________ OZEKI INFORMATIKAI KFT________________________
© Copyright, Ozeki Informatics Ltd Page 135/188
Figure 4 - Logging options
In the Log file settings section of the tab, you can make specifications for the size and the
number of available logfiles.
Log rotation saves disk space, as it ensures that older (and probably no longer needed) logfiles
will be automatically deleted from the log directory, which is specified in the Log directory
text box. By default, the access path to the logfiles is: C:\Program Files\Ozeki\OzekiNG -
SMS Gateway\Logs
In the Maximum log file size text box in the Logfile settings section, you can specify the
maximum size of a logfile. Once this size is reached, a new logfile will be created. Specify the
number of kilobytes for the size of a logfile by entering a positive whole number. By default,
the maximum logfile size is 2000 kB.
In the Number of rotated files text box, specify the maximum number of rotated logfiles that
are saved. Specify this number by entering a positive whole number. By default, the number
of logfiles that are saved is 4 (see Figure 4 above).
OZEKI NG – SMS Gateway Product Guide
__________________ OZEKI INFORMATIKAI KFT________________________
© Copyright, Ozeki Informatics Ltd Page 136/188
If you are content with the default specifications, leave the text boxes unchanged.
To modify the configuration or to view server events related to an installed user, open the
panel of the user's account. To do this, click the name of the user in the Users and
Applications panel of the Management Console. In the panel of the user's account, click the
link of the task you wish to perform.
File user
This chapter explains how to install and configure a File user for SMS messaging using
the graphical user interface of the Ozeki NG - SMS Gateway software. You will be
provided with step-by-step instructions on how to install and configure this user, along
with explanations about the different file formats you can use to send and receive SMS
messages with the File user.
Ozeki NG - SMS Gateway allows, among others (see the Users and Applications page), the
installation and configuration of a file user.
A File user allows you to send and receive messages using text files. When an incoming
message arrives, the File user creates a text file for the message and places it into the
incoming directory. If you would like to send a message, all you have to do is place a text file
into the outgoing directory. The File user will periodically check this outgoing directory for
messages to be sent. If it finds messages there, they will be sent out by the File user.
When you install a File user, Ozeki NG - SMS Gateway will automatically create the
incoming and the outgoing directory along with other directories for SMS messages related to
the File user. These directories can be found in a collection directory named smsTemp by
default. You can rename this collection directory and the subdirectories. However, make sure
you specify them correctly for the File user in the respective edit boxes containing the paths in
the General tab of the Configuration panel (see the Configuration section below).
You can use the graphical user interface of Ozeki NG - SMS Gateway to install and configure
a File user.
Installation
To start installing and configuring a File user, click the Add button in the top right-hand
corner of the Users and Applications panel on the right of the Management Console. You
can also add a user by clicking the Add user item in the Users and applications menu
(Figure 1).
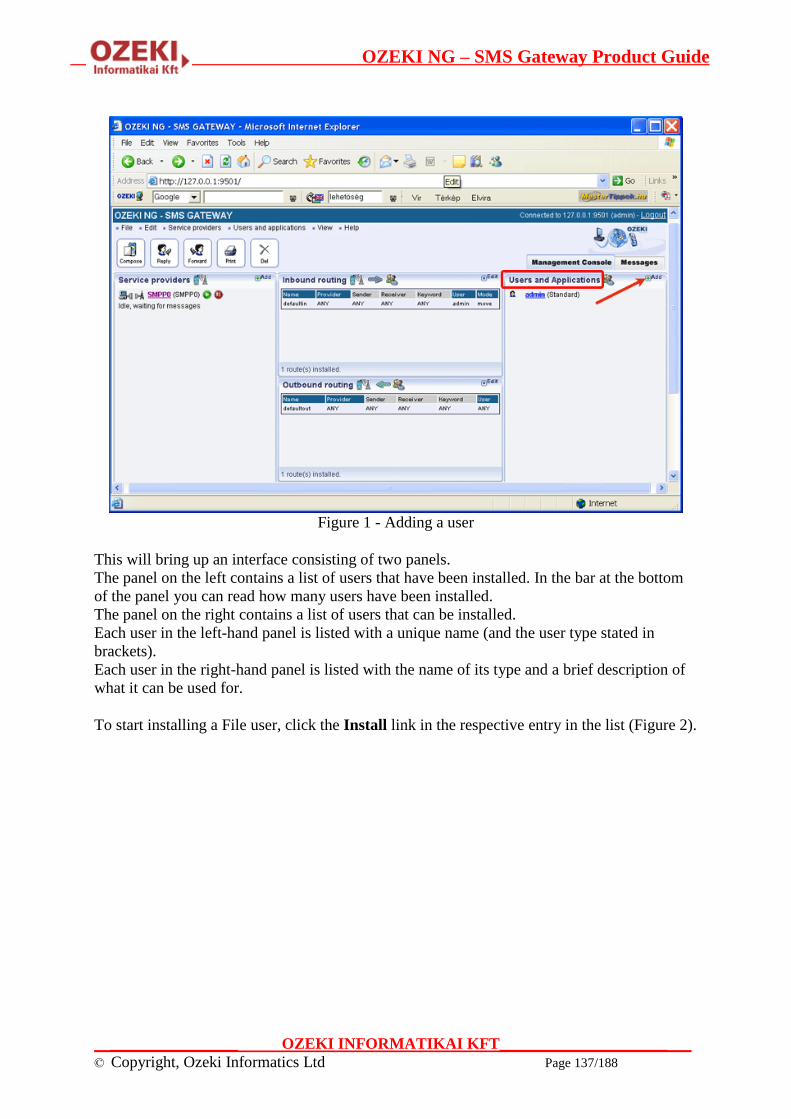
OZEKI NG – SMS Gateway Product Guide
__________________ OZEKI INFORMATIKAI KFT________________________
© Copyright, Ozeki Informatics Ltd Page 137/188
Figure 1 - Adding a user
This will bring up an interface consisting of two panels.
The panel on the left contains a list of users that have been installed. In the bar at the bottom
of the panel you can read how many users have been installed.
The panel on the right contains a list of users that can be installed.
Each user in the left-hand panel is listed with a unique name (and the user type stated in
brackets).
Each user in the right-hand panel is listed with the name of its type and a brief description of
what it can be used for.
To start installing a File user, click the Install link in the respective entry in the list (Figure 2).

OZEKI NG – SMS Gateway Product Guide
__________________ OZEKI INFORMATIKAI KFT________________________
© Copyright, Ozeki Informatics Ltd Page 138/188
Figure 2 - Installing a File user
When installing a user (type), you need to give it a unique username. Clicking the Install link
will bring up the File user installation panel. Here, you need to enter a unique username in
the Username field.
General configuration
The General tab of the Configuration panel will show up after you have specified a unique
username for the File user (Figure 3).
The upper section of the tab contains the File format dropdown menu. Select an appropriate
file format: List, Simple or Verbose. (For more information, see the File formats section
below.)
Below the File format dropdown menu, there is an edit box. In this, you can specify how
often the program should check the outgoing directory for messages to send. Enter the number
of seconds in numerical format, representing a positive whole number. If you are content with
the default specification (every 2 seconds), leave the edit box unchanged (Figure 3).
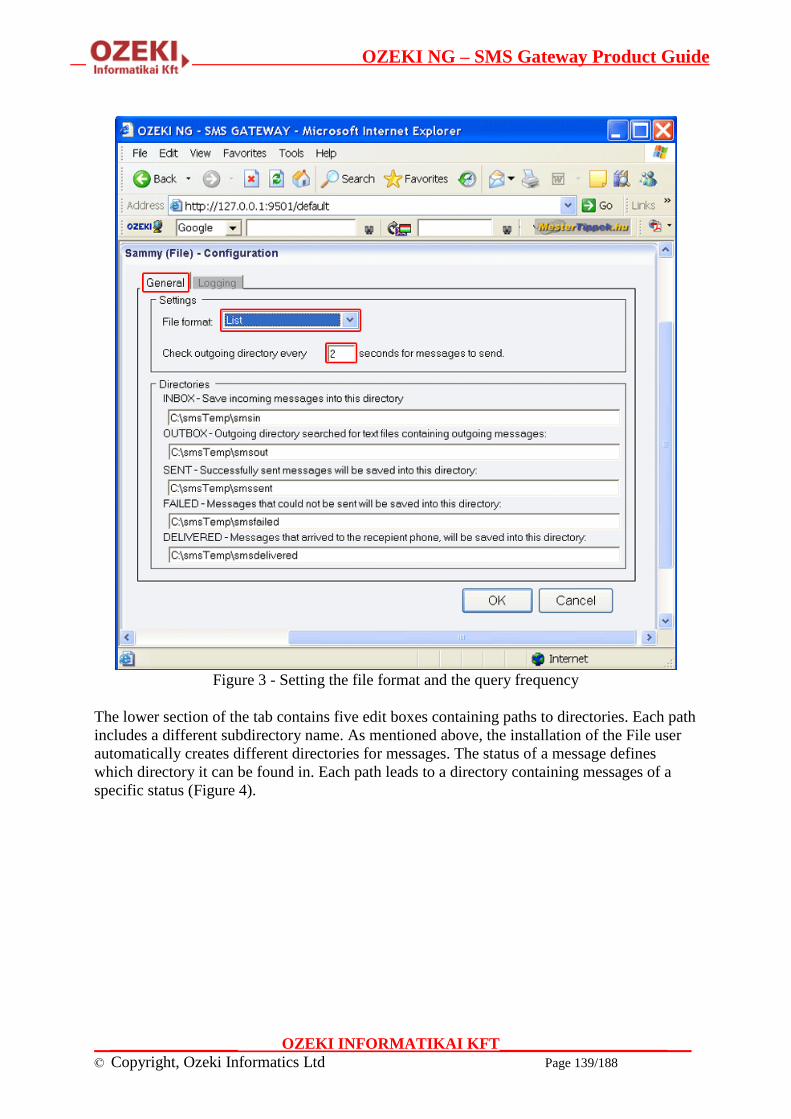
OZEKI NG – SMS Gateway Product Guide
__________________ OZEKI INFORMATIKAI KFT________________________
© Copyright, Ozeki Informatics Ltd Page 139/188
Figure 3 - Setting the file format and the query frequency
The lower section of the tab contains five edit boxes containing paths to directories. Each path
includes a different subdirectory name. As mentioned above, the installation of the File user
automatically creates different directories for messages. The status of a message defines
which directory it can be found in. Each path leads to a directory containing messages of a
specific status (Figure 4).
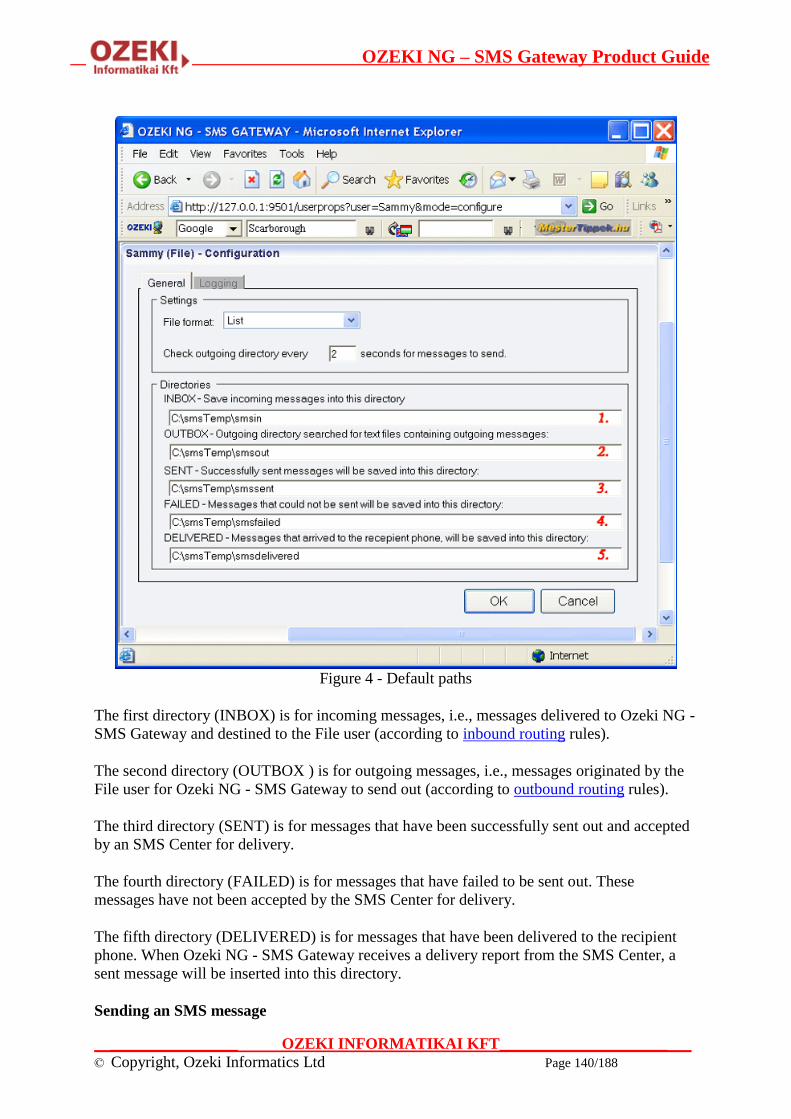
OZEKI NG – SMS Gateway Product Guide
__________________ OZEKI INFORMATIKAI KFT________________________
© Copyright, Ozeki Informatics Ltd Page 140/188
Figure 4 - Default paths
The first directory (INBOX) is for incoming messages, i.e., messages delivered to Ozeki NG -
SMS Gateway and destined to the File user (according to inbound routing rules).
The second directory (OUTBOX ) is for outgoing messages, i.e., messages originated by the
File user for Ozeki NG - SMS Gateway to send out (according to outbound routing rules).
The third directory (SENT) is for messages that have been successfully sent out and accepted
by an SMS Center for delivery.
The fourth directory (FAILED) is for messages that have failed to be sent out. These
messages have not been accepted by the SMS Center for delivery.
The fifth directory (DELIVERED) is for messages that have been delivered to the recipient
phone. When Ozeki NG - SMS Gateway receives a delivery report from the SMS Center, a
sent message will be inserted into this directory.
Sending an SMS message

OZEKI NG – SMS Gateway Product Guide
__________________ OZEKI INFORMATIKAI KFT________________________
© Copyright, Ozeki Informatics Ltd Page 141/188
When you wish to send a message using the file plugin your application and the SMS engine
will work on the same set of files. This cooperation can have conflicts if the same file is
accessed by the SMS engine and your application at the same time. To avoid the possible
conflicts you can use a locking mechanism when you use the the File API.
In the following example I will give you the steps you should take if you wish to send files
using a safe way. (These steps are particularly important if you are using the network to put
files to be sent into the SMSout directory. If you use FTP, NFS or Samba to access the remote
directory make sure you follow these steps.)
To perform sending 4 directories are used:
1.) C:\smsTemp\smsout\ - the outgoing directory
2.) C:\smsTemp\smssent\ - the directory that holds the messages that were successfully sent
3.) C:\smsTemp\smsfailed\ - the directory that holds the messages that could not be sent.
4.) C:\smsTemp\smsdelivered\ - the directory that holds the messages that have arrived to the
destination handset.
To send an SMS first you should create a "lock" file in the outgoing directory. A lock file is
used to make sure the SMS Engine will not start to read the real file containing the messages
while the file is still beeing written. The lock file is an empty file, that has a name that
matches the real file. The lock file name has a special extension: .lock. This extension is
appended to the end of the filename. After the lock file is created you can edit the real file
containing the outgoing message text. When you are finished simply delete the lock file.
Step 1.)
Create: C:\smsTemp\smsout\mysms.sml.lock
Step 2.)
Create: C:\smsTemp\smsout\mysms.sml
Write : C:/smsout/mysms.sml
Step 3.)
Delete: C:\smsTemp\smsout\mysms.sml.lock
After you have created your file, you need to wait. The SMS Engine will delete your file, and
will try to send the messages. When the sending is done a new text file will be placed into the
smssent or the smsfailed directory based on the sending results. When the file is created the
same locking steps are performed.
Please take a look at the following diagram:

OZEKI NG – SMS Gateway Product Guide
__________________ OZEKI INFORMATIKAI KFT________________________
© Copyright, Ozeki Informatics Ltd Page 142/188
Figure 1 - Sending an SMS using the file user
If the new text file is saved into the sent directory, it means the message was successfully
delivered to the SMS network. If delivery reports are configured on the service provider
connection configuration form and delivery reports are supported by the SMS service
provider, you will receive a status report sms when the SMS is delivered to the destination
handset. If this happens, the SMS engine will create a text file with the same locking steps in
the smsdelivered directory.
File formats
As mentioned above, Ozeki NG - SMS Gateway supports the following file formats: simple,
verbose and list. You can use any of these formats to send a message. To select a particular
format use the configuration form of the file user.
The simple file format

OZEKI NG – SMS Gateway Product Guide
__________________ OZEKI INFORMATIKAI KFT________________________
© Copyright, Ozeki Informatics Ltd Page 143/188
If you select the simple file format in the dropdown menu (see Figure 3 above), each
incoming message will be saved in a separate file. The name of the file is the sender phone
number, and the only line of the file contains the message. For example:
c:\smsout\+36203105366
Hello world
To send messages using the simple file format, create a separate textfile for each outgoing
message and place these files into the smsout directory. The name of the textfile has to be the
recipient phone number. When the message has been sent out, the textfile will be
automatically deleted from the directory.
Note that if you want to send more than one message to the same recipient phone number, you
can only place a new message into the outgoing directory if the previous message has been
sent out and is no longer there. This is because you cannot have two files with the same name
in the same directory. If the previously inserted file is still in the directory (has not yet been
sent out), you can only insert the new file by overwriting the previous file. Therefore, if you
insert a new file with the same name (which is the telephone number of the recipient) into the
outgoing directory, your previous SMS message will not be sent out at all. This is because the
file containing it will be replaced with a new one. Replacing the previous file is essentially
equal to deleting it.
Accordingly, if you select the simple file format, an incoming message from a specific sender
phone number will overwrite (delete) the previous message from the same number. Therefore,
it is always only the latest message from a specific phone number that will be saved in the
inbox. This may be inconvenient if you wish to save more than one SMS message from the
same sender. Take this into consideration when you select the file format in the respective
dropdown menu.
On the other hand, this file format may be convenient for position tracking SMS applications.
The movement of vehicles can be tracked with a GSM device transmitting the vehicle's
position coordinates via SMS to the File user of Ozeki NG - SMS Gateway. In this case, it
may not be problematic (or it may even be desirable) that only the latest report is saved in the
inbox.
The verbose file format
The verbose file format is similar to the simple file format inasmuch as each message resides
in a separate file. The difference is that the file contains more information than just the
message text. The main advantage of this file format is that you can place into the directory
more than one file containing a message to the same destination (phone number). You can
give each file any name, which has to be different from the name(s) of any other files(s). Note
that the extension of the file has to be .sms.
The first line in the file has to contain the sender phone number, the second line contains the
recipient phone number, and the message text follows these in the next line. For example:
c:\smsout\anyname.sms
+36203105366
+36209937723
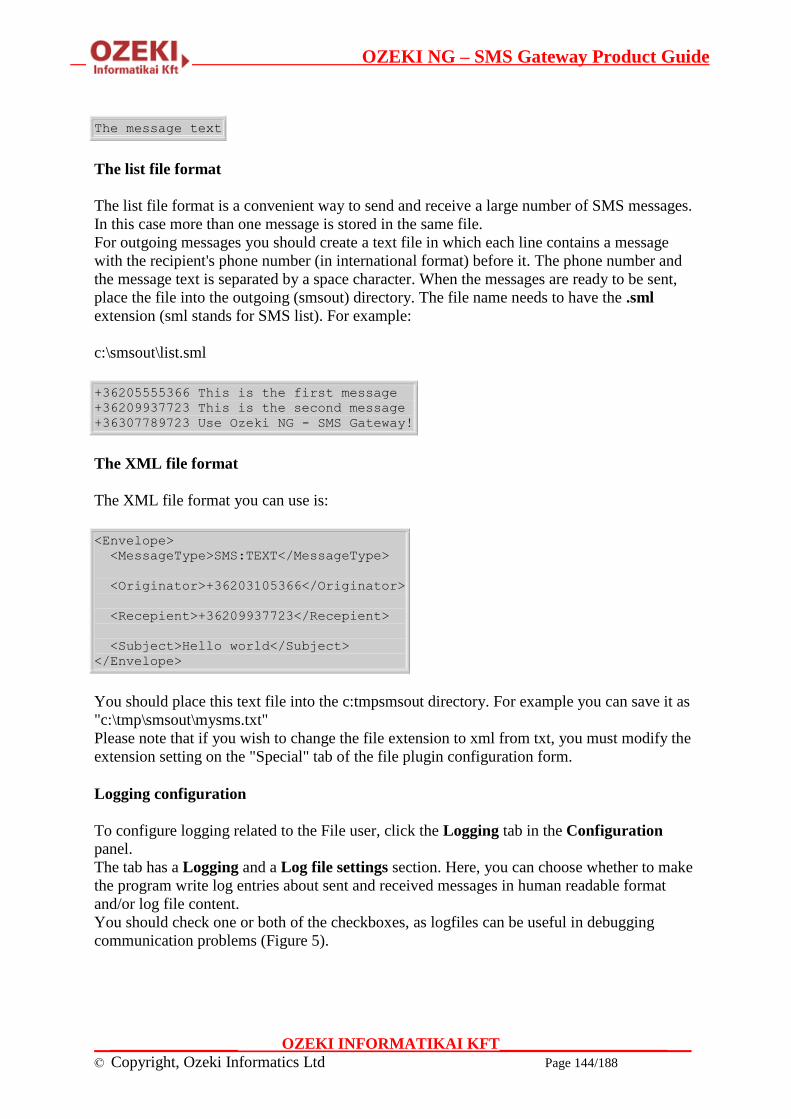
OZEKI NG – SMS Gateway Product Guide
__________________ OZEKI INFORMATIKAI KFT________________________
© Copyright, Ozeki Informatics Ltd Page 144/188
The message text
The list file format
The list file format is a convenient way to send and receive a large number of SMS messages.
In this case more than one message is stored in the same file.
For outgoing messages you should create a text file in which each line contains a message
with the recipient's phone number (in international format) before it. The phone number and
the message text is separated by a space character. When the messages are ready to be sent,
place the file into the outgoing (smsout) directory. The file name needs to have the .sml
extension (sml stands for SMS list). For example:
c:\smsout\list.sml
+36205555366 This is the first message
+36209937723 This is the second message
+36307789723 Use Ozeki NG - SMS Gateway!
The XML file format
The XML file format you can use is:
<Envelope>
<MessageType>SMS:TEXT</MessageType>
<Originator>+36203105366</Originator>
<Recepient>+36209937723</Recepient>
<Subject>Hello world</Subject>
</Envelope>
You should place this text file into the c:tmpsmsout directory. For example you can save it as
"c:\tmp\smsout\mysms.txt"
Please note that if you wish to change the file extension to xml from txt, you must modify the
extension setting on the "Special" tab of the file plugin configuration form.
Logging configuration
To configure logging related to the File user, click the Logging tab in the Configuration
panel.
The tab has a Logging and a Log file settings section. Here, you can choose whether to make
the program write log entries about sent and received messages in human readable format
and/or log file content.
You should check one or both of the checkboxes, as logfiles can be useful in debugging
communication problems (Figure 5).
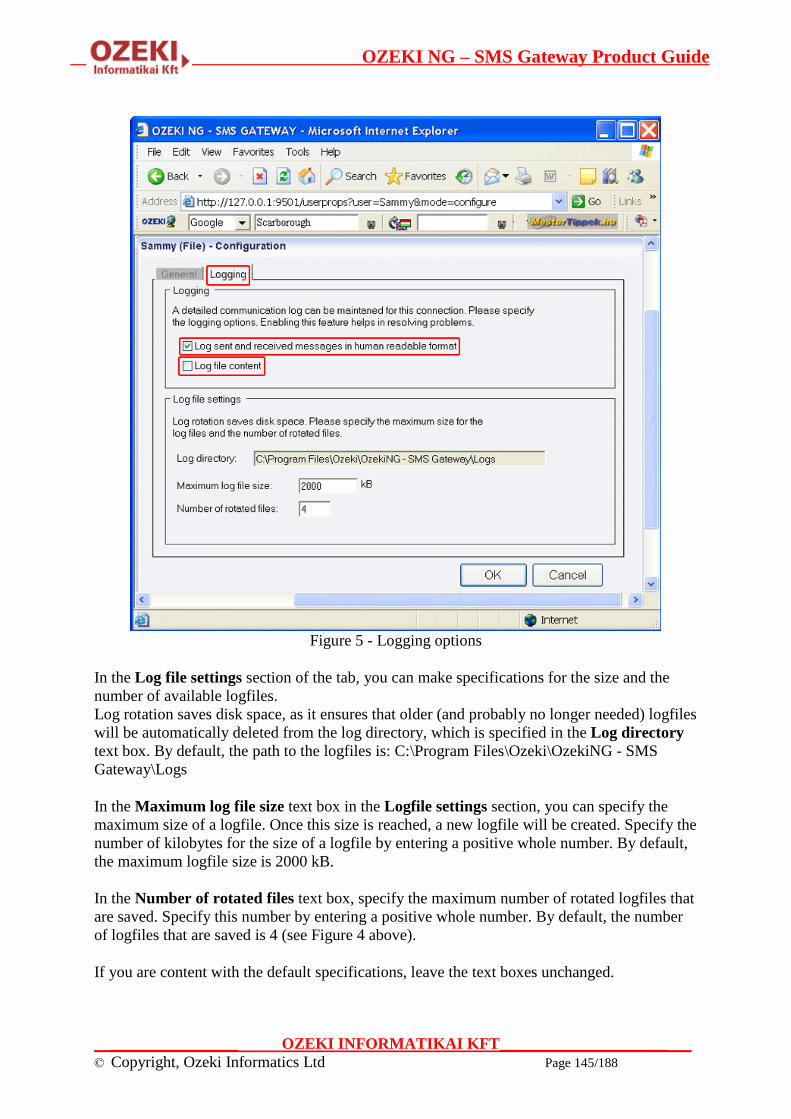
OZEKI NG – SMS Gateway Product Guide
__________________ OZEKI INFORMATIKAI KFT________________________
© Copyright, Ozeki Informatics Ltd Page 145/188
Figure 5 - Logging options
In the Log file settings section of the tab, you can make specifications for the size and the
number of available logfiles.
Log rotation saves disk space, as it ensures that older (and probably no longer needed) logfiles
will be automatically deleted from the log directory, which is specified in the Log directory
text box. By default, the path to the logfiles is: C:\Program Files\Ozeki\OzekiNG - SMS
Gateway\Logs
In the Maximum log file size text box in the Logfile settings section, you can specify the
maximum size of a logfile. Once this size is reached, a new logfile will be created. Specify the
number of kilobytes for the size of a logfile by entering a positive whole number. By default,
the maximum logfile size is 2000 kB.
In the Number of rotated files text box, specify the maximum number of rotated logfiles that
are saved. Specify this number by entering a positive whole number. By default, the number
of logfiles that are saved is 4 (see Figure 4 above).
If you are content with the default specifications, leave the text boxes unchanged.
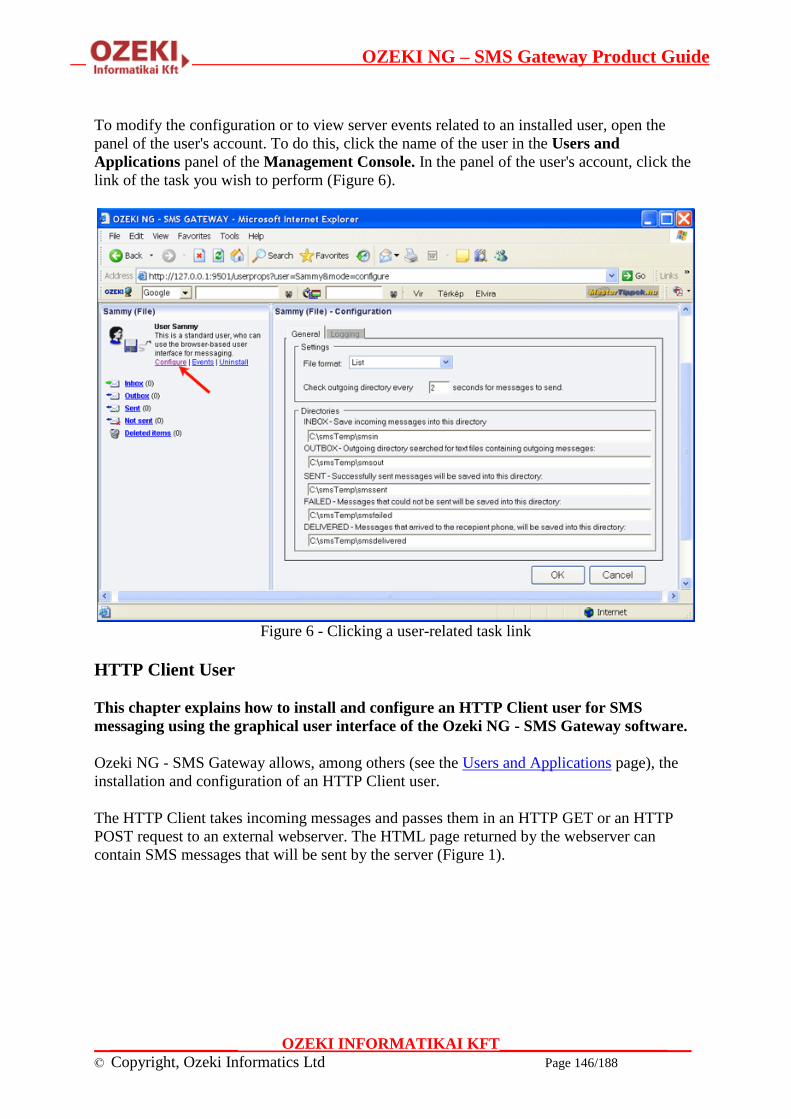
OZEKI NG – SMS Gateway Product Guide
__________________ OZEKI INFORMATIKAI KFT________________________
© Copyright, Ozeki Informatics Ltd Page 146/188
To modify the configuration or to view server events related to an installed user, open the
panel of the user's account. To do this, click the name of the user in the Users and
Applications panel of the Management Console. In the panel of the user's account, click the
link of the task you wish to perform (Figure 6).
Figure 6 - Clicking a user-related task link
HTTP Client User
This chapter explains how to install and configure an HTTP Client user for SMS
messaging using the graphical user interface of the Ozeki NG - SMS Gateway software.
Ozeki NG - SMS Gateway allows, among others (see the Users and Applications page), the
installation and configuration of an HTTP Client user.
The HTTP Client takes incoming messages and passes them in an HTTP GET or an HTTP
POST request to an external webserver. The HTML page returned by the webserver can
contain SMS messages that will be sent by the server (Figure 1).
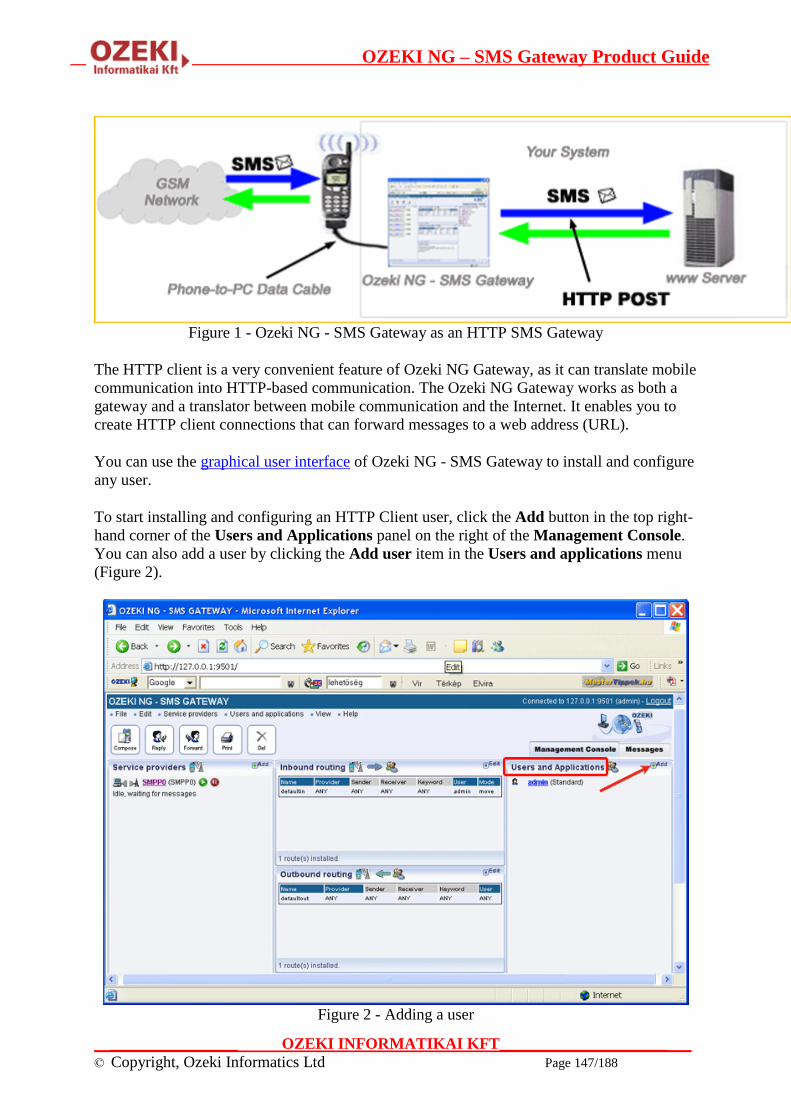
OZEKI NG – SMS Gateway Product Guide
__________________ OZEKI INFORMATIKAI KFT________________________
© Copyright, Ozeki Informatics Ltd Page 147/188
Figure 1 - Ozeki NG - SMS Gateway as an HTTP SMS Gateway
The HTTP client is a very convenient feature of Ozeki NG Gateway, as it can translate mobile
communication into HTTP-based communication. The Ozeki NG Gateway works as both a
gateway and a translator between mobile communication and the Internet. It enables you to
create HTTP client connections that can forward messages to a web address (URL).
You can use the graphical user interface of Ozeki NG - SMS Gateway to install and configure
any user.
To start installing and configuring an HTTP Client user, click the Add button in the top right-
hand corner of the Users and Applications panel on the right of the Management Console.
You can also add a user by clicking the Add user item in the Users and applications menu
(Figure 2).
Figure 2 - Adding a user
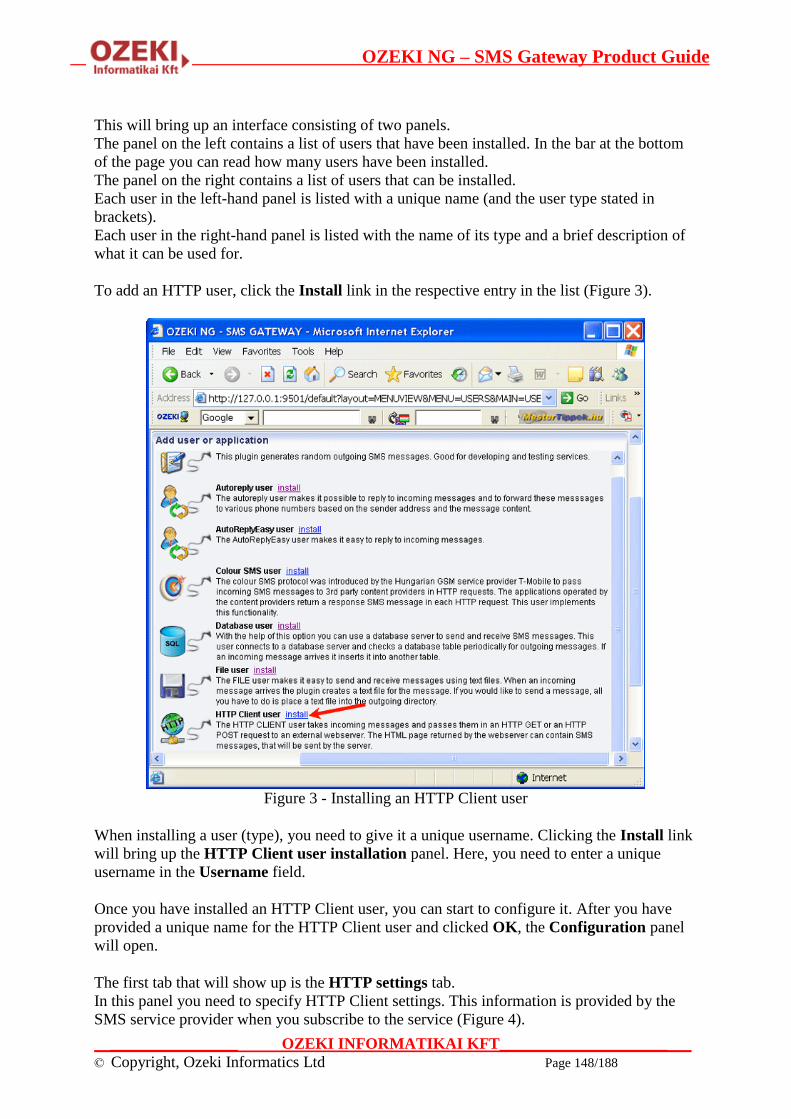
OZEKI NG – SMS Gateway Product Guide
__________________ OZEKI INFORMATIKAI KFT________________________
© Copyright, Ozeki Informatics Ltd Page 148/188
This will bring up an interface consisting of two panels.
The panel on the left contains a list of users that have been installed. In the bar at the bottom
of the page you can read how many users have been installed.
The panel on the right contains a list of users that can be installed.
Each user in the left-hand panel is listed with a unique name (and the user type stated in
brackets).
Each user in the right-hand panel is listed with the name of its type and a brief description of
what it can be used for.
To add an HTTP user, click the Install link in the respective entry in the list (Figure 3).
Figure 3 - Installing an HTTP Client user
When installing a user (type), you need to give it a unique username. Clicking the Install link
will bring up the HTTP Client user installation panel. Here, you need to enter a unique
username in the Username field.
Once you have installed an HTTP Client user, you can start to configure it. After you have
provided a unique name for the HTTP Client user and clicked OK, the Configuration panel
will open.
The first tab that will show up is the HTTP settings tab.
In this panel you need to specify HTTP Client settings. This information is provided by the
SMS service provider when you subscribe to the service (Figure 4).

OZEKI NG – SMS Gateway Product Guide
__________________ OZEKI INFORMATIKAI KFT________________________
© Copyright, Ozeki Informatics Ltd Page 149/188
Figure 4 - The HTTP settings tab
In the Target URL template you can specify the URL of the HTTP server. This URL can
contain certain keywords that will be replaced before the URL is called. The following
keywords can be used:
Keyword Description
$originator This denotes the sender telephone number.
$recipient This denotes the recipient telephone number.
$messagetype This the text containing the SMS message format.
$messagedata This contains the message text.
$receivedtime This is the timestamp, denoting when the message was received.
$senttime This is the timestamp, denoting when the message was sent.
$messageid This is the unique identifier string of the message. This identifier is generated
by Ozeki NG - SMS Gateway.
$dcs The SMS data coding scheme.
$pid The protocol identifier.
$operator The instance name of the service provider connection that received the
message.
Below this template, you can specify the HTTP request method by selecting the GET or the
POST radio button.
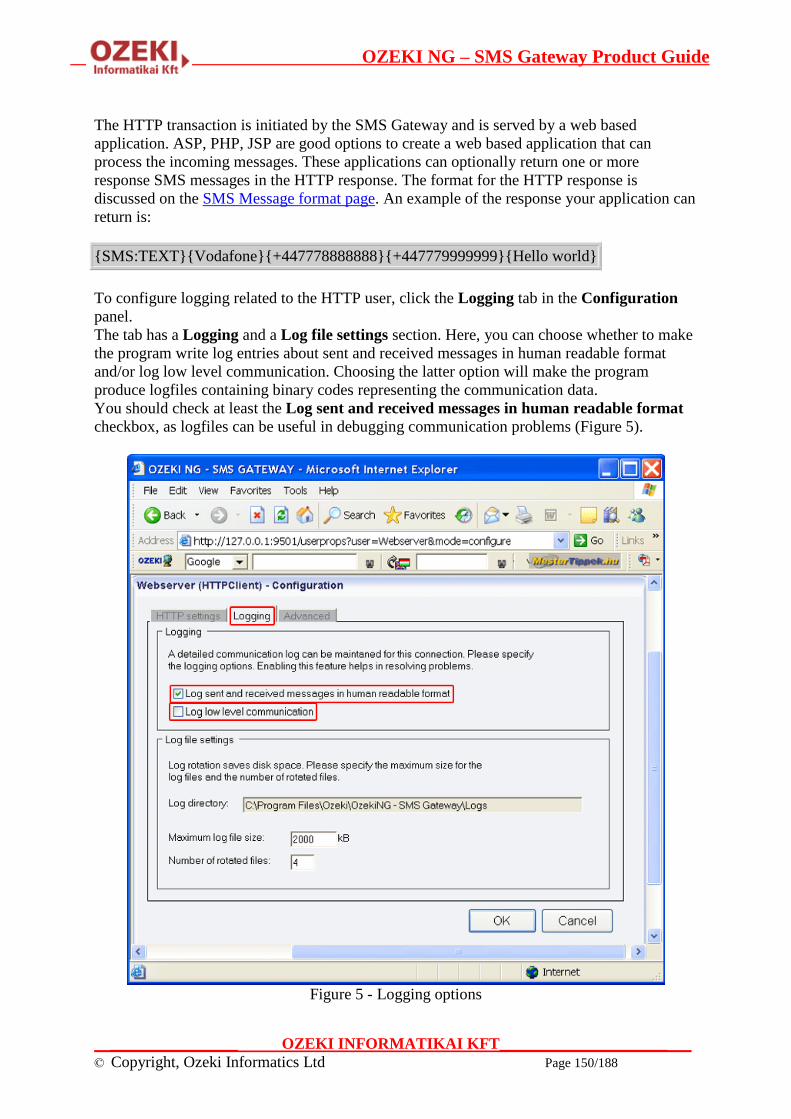
OZEKI NG – SMS Gateway Product Guide
__________________ OZEKI INFORMATIKAI KFT________________________
© Copyright, Ozeki Informatics Ltd Page 150/188
The HTTP transaction is initiated by the SMS Gateway and is served by a web based
application. ASP, PHP, JSP are good options to create a web based application that can
process the incoming messages. These applications can optionally return one or more
response SMS messages in the HTTP response. The format for the HTTP response is
discussed on the SMS Message format page. An example of the response your application can
return is:
{SMS:TEXT}{Vodafone}{+447778888888}{+447779999999}{Hello world}
To configure logging related to the HTTP user, click the Logging tab in the Configuration
panel.
The tab has a Logging and a Log file settings section. Here, you can choose whether to make
the program write log entries about sent and received messages in human readable format
and/or log low level communication. Choosing the latter option will make the program
produce logfiles containing binary codes representing the communication data.
You should check at least the Log sent and received messages in human readable format
checkbox, as logfiles can be useful in debugging communication problems (Figure 5).
Figure 5 - Logging options
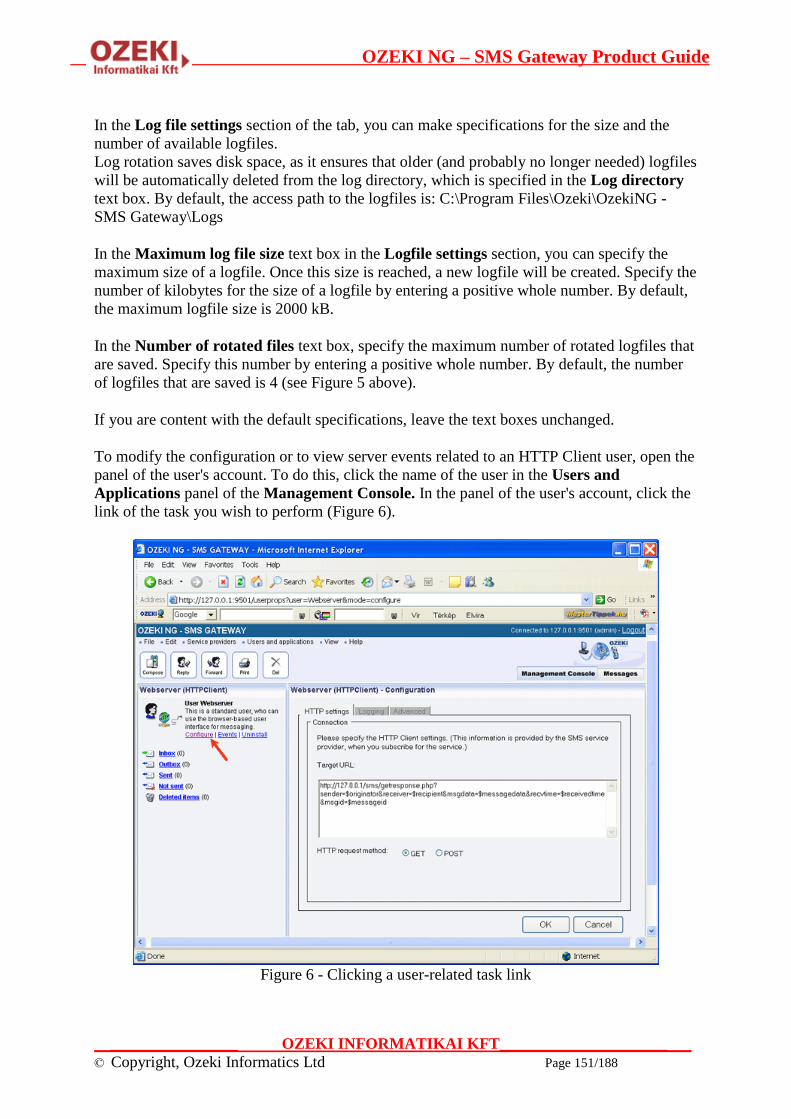
OZEKI NG – SMS Gateway Product Guide
__________________ OZEKI INFORMATIKAI KFT________________________
© Copyright, Ozeki Informatics Ltd Page 151/188
In the Log file settings section of the tab, you can make specifications for the size and the
number of available logfiles.
Log rotation saves disk space, as it ensures that older (and probably no longer needed) logfiles
will be automatically deleted from the log directory, which is specified in the Log directory
text box. By default, the access path to the logfiles is: C:\Program Files\Ozeki\OzekiNG -
SMS Gateway\Logs
In the Maximum log file size text box in the Logfile settings section, you can specify the
maximum size of a logfile. Once this size is reached, a new logfile will be created. Specify the
number of kilobytes for the size of a logfile by entering a positive whole number. By default,
the maximum logfile size is 2000 kB.
In the Number of rotated files text box, specify the maximum number of rotated logfiles that
are saved. Specify this number by entering a positive whole number. By default, the number
of logfiles that are saved is 4 (see Figure 5 above).
If you are content with the default specifications, leave the text boxes unchanged.
To modify the configuration or to view server events related to an HTTP Client user, open the
panel of the user's account. To do this, click the name of the user in the Users and
Applications panel of the Management Console. In the panel of the user's account, click the
link of the task you wish to perform (Figure 6).
Figure 6 - Clicking a user-related task link

OZEKI NG – SMS Gateway Product Guide
__________________ OZEKI INFORMATIKAI KFT________________________
© Copyright, Ozeki Informatics Ltd Page 152/188
Colour SMS User
This chapter explains how to install and configure a Colour SMS user for SMS
messaging using the graphical user interface of the Ozeki NG - SMS Gateway software.
Ozeki NG - SMS Gateway allows, among others (see the Users and Applications page), the
installation and configuration of a Colour SMS user.
The Colour SMS protocol was developed by T-mobile Hungary for premium rate SMS
services. It is an easy to use HTTP based SMS protocol. When a customer tries to access a
premium rate SMS service by sending an SMS to a premium rate phone number, the SMSC
transfers this message as an HTTP post request to the HTTP Server operated by the content
provider. The content provider returns a response to the HTTP request in XML format. This
response is sent as an SMS message back to the customer. The HTTP server operated by the
service provider is Ozeki NG - SMS Gateway. This user implements this functionality (Figure
1).
Figure 1 - Colour SMS transport
Due to the nature of the HTTP protocol, it is always required to return a response to incoming
messages in a short period of time. The Colour SMS protocol is often used with other
connection methods, such as UCP to make delayed responses to incoming messages possible.
Using a UCP connection, response messages can be sent at a later time, which is useful if you
would like to set up periodic SMS notifications, such as weekly news service.
You can use the graphical user interface of Ozeki NG - SMS Gateway to install and configure
any user.
To start installing and configuring a Colour SMS user, click the Add button in the top right-
hand corner of the Users and Applications panel on the right of the Management Console.
You can also add a user by clicking the Add user item in the Users and applications menu.
(Figure 2).

OZEKI NG – SMS Gateway Product Guide
__________________ OZEKI INFORMATIKAI KFT________________________
© Copyright, Ozeki Informatics Ltd Page 153/188
Figure 2 - Adding a user
This will bring up an interface consisting of two panels.
The panel on the left contains a list of users that have been installed. In the bar at the bottom
of the page you can read how many users have been installed.
The panel on the right contains a list of users that can be installed.
Each user in the left-hand panel is listed with a unique name (and the user type stated in
brackets).
Each user in the right-hand panel is listed with the name of its type and a brief description of
what it can be used for.
To add a Colour SMS user, click the Install link in the respective entry in the list (Figure 3).

OZEKI NG – SMS Gateway Product Guide
__________________ OZEKI INFORMATIKAI KFT________________________
© Copyright, Ozeki Informatics Ltd Page 154/188
Figure 3 - Installing a Colour SMS user
When installing a user (type), you need to give it a unique username. Clicking the Install link
will bring up the Colour SMS user installation panel. Here, you need to enter a unique
username in the Username field.
Once you have installed a Colour SMS user, you can start to configure it. After you have
provided a unique name for the Colour SMS user and clicked OK, the Configuration panel
will open.
The first tab that will show up is the HTTP settings tab.
In this panel you need to specify HTTP Client settings. This information is provided by the
SMS service provider when you subscribe to the service (Figure 4).
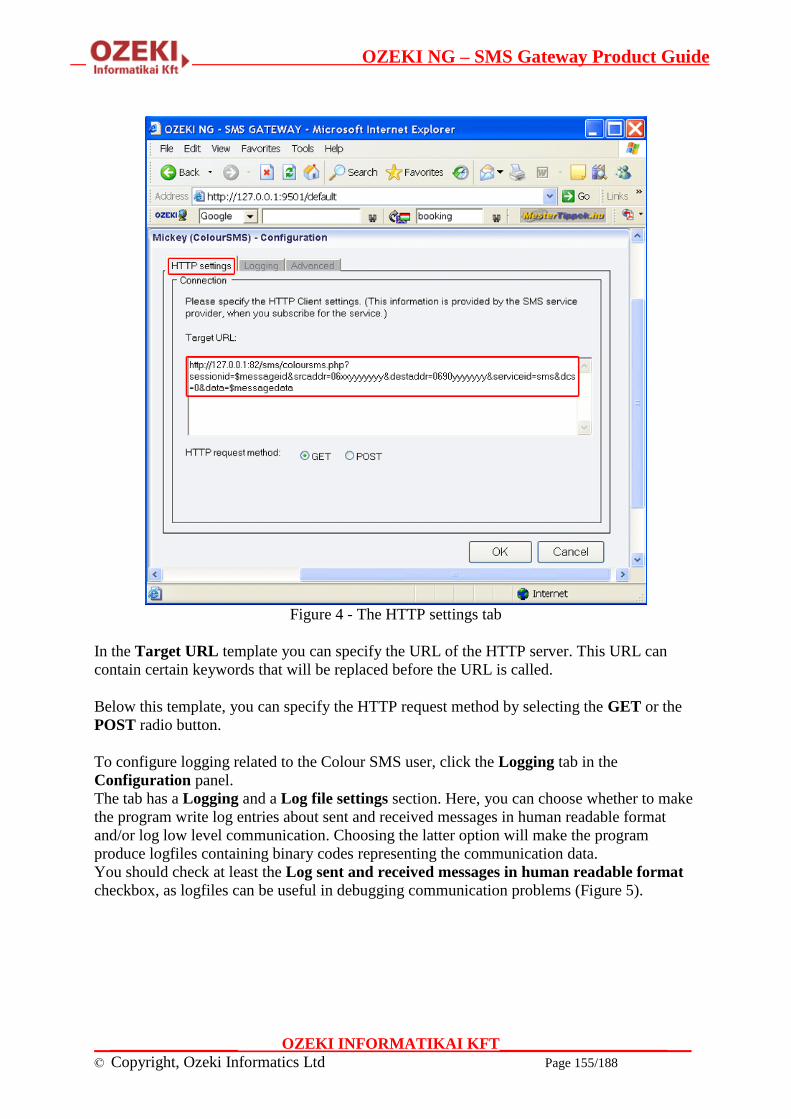
OZEKI NG – SMS Gateway Product Guide
__________________ OZEKI INFORMATIKAI KFT________________________
© Copyright, Ozeki Informatics Ltd Page 155/188
Figure 4 - The HTTP settings tab
In the Target URL template you can specify the URL of the HTTP server. This URL can
contain certain keywords that will be replaced before the URL is called.
Below this template, you can specify the HTTP request method by selecting the GET or the
POST radio button.
To configure logging related to the Colour SMS user, click the Logging tab in the
Configuration panel.
The tab has a Logging and a Log file settings section. Here, you can choose whether to make
the program write log entries about sent and received messages in human readable format
and/or log low level communication. Choosing the latter option will make the program
produce logfiles containing binary codes representing the communication data.
You should check at least the Log sent and received messages in human readable format
checkbox, as logfiles can be useful in debugging communication problems (Figure 5).

OZEKI NG – SMS Gateway Product Guide
__________________ OZEKI INFORMATIKAI KFT________________________
© Copyright, Ozeki Informatics Ltd Page 156/188
Figure 5 - Logging options
In the Log file settings section of the tab, you can make specifications for the size and the
number of available logfiles.
Log rotation saves disk space, as it ensures that older (and probably no longer needed) logfiles
will be automatically deleted from the log directory, which is specified in the Log directory
text box. By default, the access path to the logfiles is: C:\Program Files\Ozeki\OzekiNG -
SMS Gateway\Logs
In the Maximum log file size text box in the Logfile settings section, you can specify the
maximum size of a logfile. Once this size is reached, a new logfile will be created. Specify the
number of kilobytes for the size of a logfile by entering a positive whole number. By default,
the maximum logfile size is 2000 kB.
In the Number of rotated files text box, specify the maximum number of rotated logfiles that
are saved. Specify this number by entering a positive whole number. By default, the number
of logfiles that are saved is 4 (see Figure 5 above).
If you are content with the default specifications, leave the text boxes unchanged.

OZEKI NG – SMS Gateway Product Guide
__________________ OZEKI INFORMATIKAI KFT________________________
© Copyright, Ozeki Informatics Ltd Page 157/188
To modify the configuration or to view server events related to a Colour SMS user, open the
panel of the user's account. To do this, click the name of the user in the Users and
Applications panel of the Management Console. In the panel of the user's account, click the
link of the task you wish to perform (Figure 6).
Figure 6 - Clicking a user-related task link
E-mail User
This chapter provides an introduction to the E-mail user. You can learn what it can be
used for, and how to install it using the graphical user interface of the Ozeki NG - SMS
Gateway software. You are also provided with links to respective pages instructing you
how to configure it to send an e-mail as an SMS message and to send an SMS message as
an e-mail.
Ozeki NG - SMS Gateway allows, among others (see the Users and Applications page), the
installation and configuration of an E-mail user. This is an automated user that can be used to
realize two-way e-mail - SMS gateway service. It can forward an incoming e-mail as an SMS
message to a specified phone number (or phone numbers), and an incoming SMS message as
an e-mail to a specified e-mail address or e-mail addresses (Figure 1).

OZEKI NG – SMS Gateway Product Guide
__________________ OZEKI INFORMATIKAI KFT________________________
© Copyright, Ozeki Informatics Ltd Page 158/188
Figure 1 - System architecture of the service
The Ozeki NG - SMS Gateway software acts as an e-mail client, using an SMTP server to
send, and a POP3 server to receive messages. You can use its graphical user interface to
install and configure an E-mail user.
For detailed instructions on how to realize a two-way E-mail - SMS gateway service and a
detailed explanation of Figure 1, check out the How to Set up an E-mail - SMS Gateway page.
To start installing and configuring an E-mail user, click the Add button in the top right-hand
corner of the Users and Applications panel on the right of the Management Console. You
can also add a user by clicking the Add user item in the Users and applications menu
(Figure 2).
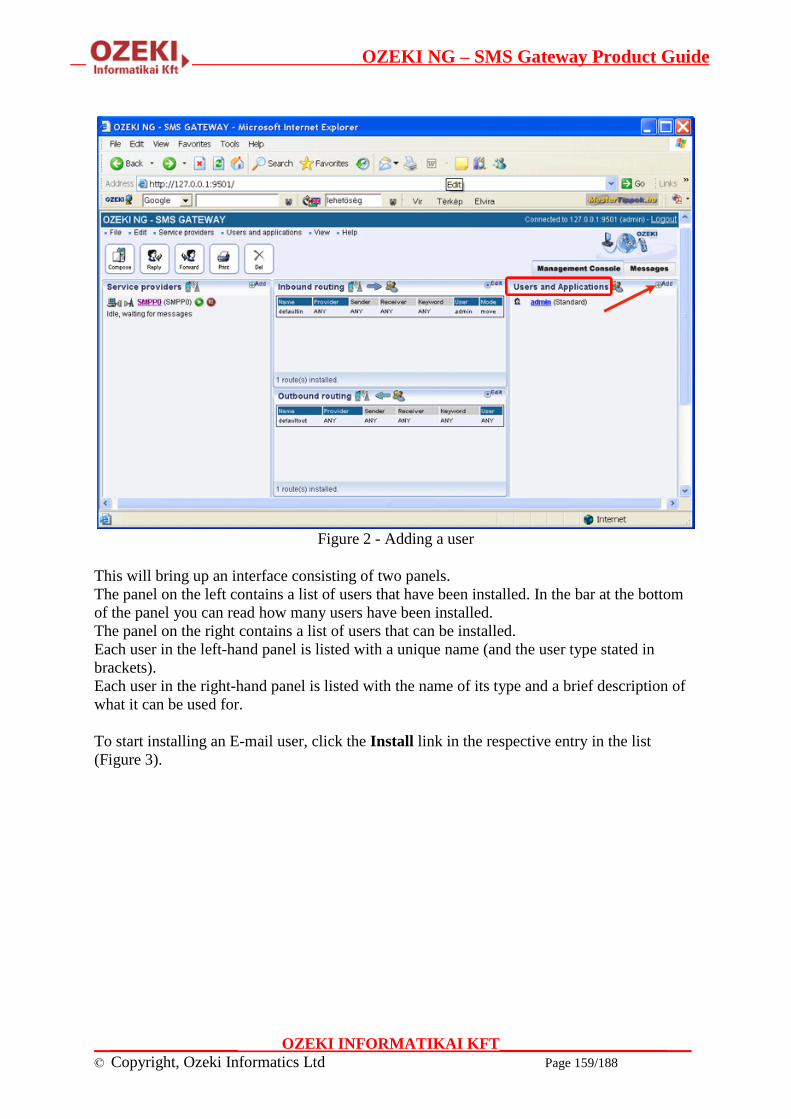
OZEKI NG – SMS Gateway Product Guide
__________________ OZEKI INFORMATIKAI KFT________________________
© Copyright, Ozeki Informatics Ltd Page 159/188
Figure 2 - Adding a user
This will bring up an interface consisting of two panels.
The panel on the left contains a list of users that have been installed. In the bar at the bottom
of the panel you can read how many users have been installed.
The panel on the right contains a list of users that can be installed.
Each user in the left-hand panel is listed with a unique name (and the user type stated in
brackets).
Each user in the right-hand panel is listed with the name of its type and a brief description of
what it can be used for.
To start installing an E-mail user, click the Install link in the respective entry in the list
(Figure 3).
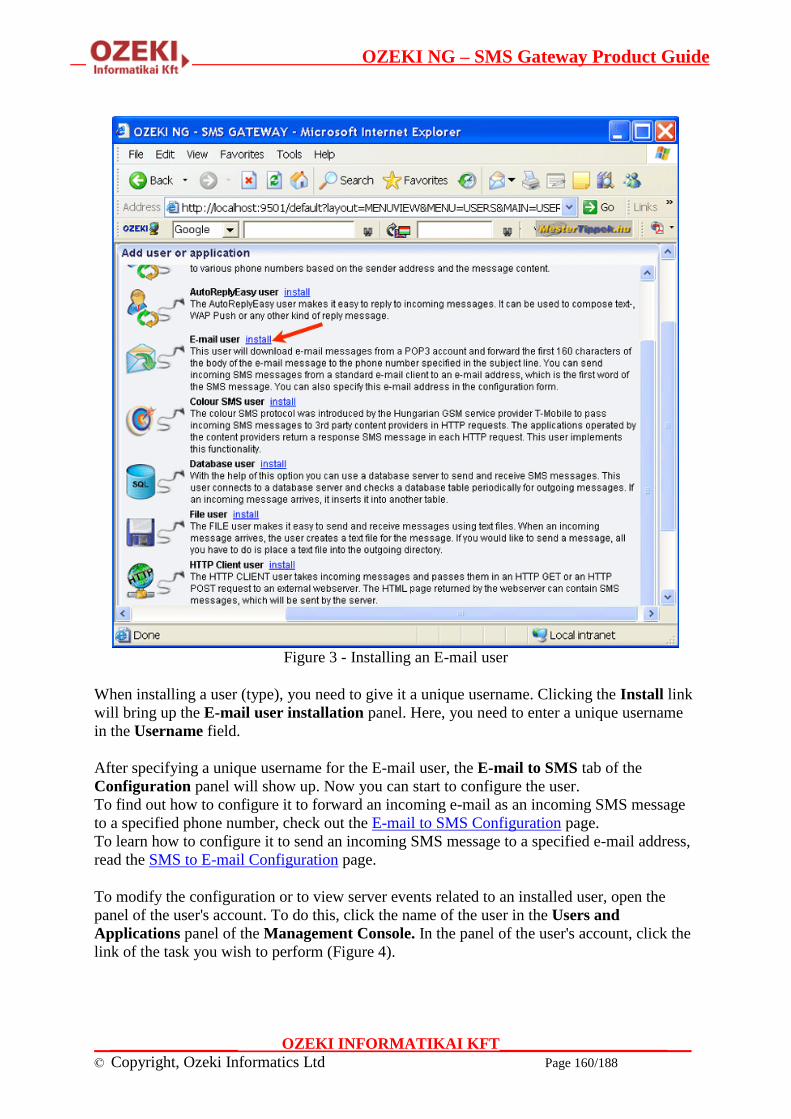
OZEKI NG – SMS Gateway Product Guide
__________________ OZEKI INFORMATIKAI KFT________________________
© Copyright, Ozeki Informatics Ltd Page 160/188
Figure 3 - Installing an E-mail user
When installing a user (type), you need to give it a unique username. Clicking the Install link
will bring up the E-mail user installation panel. Here, you need to enter a unique username
in the Username field.
After specifying a unique username for the E-mail user, the E-mail to SMS tab of the
Configuration panel will show up. Now you can start to configure the user.
To find out how to configure it to forward an incoming e-mail as an incoming SMS message
to a specified phone number, check out the E-mail to SMS Configuration page.
To learn how to configure it to send an incoming SMS message to a specified e-mail address,
read the SMS to E-mail Configuration page.
To modify the configuration or to view server events related to an installed user, open the
panel of the user's account. To do this, click the name of the user in the Users and
Applications panel of the Management Console. In the panel of the user's account, click the
link of the task you wish to perform (Figure 4).

OZEKI NG – SMS Gateway Product Guide
__________________ OZEKI INFORMATIKAI KFT________________________
© Copyright, Ozeki Informatics Ltd Page 161/188
Figure 4 - User-related task links
E-mail to SMS Configuration
This section provides you with step-by-step instructions on how to configure the E-mail
user of the Ozeki NG - SMS Gateway software to forward an incoming e-mail as an
SMS message to a specified phone number.
The E-mail user, which is one of the installable users of Ozeki NG - SMS Gateway, can
forward an incoming e-mail as an SMS message to a specified phone number. It will
periodically download e-mails from a POP3 e-mail account and forward the first 160
characters of the body of an e-mail to the phone number specified in the configuration form of
the user. It can also forward an e-mail as an SMS message to a phone number (or phone
numbers) specified in the subject line of the e-mail (Figure 1).
Figure 1 - Incoming e-mail sent out as SMS

OZEKI NG – SMS Gateway Product Guide
__________________ OZEKI INFORMATIKAI KFT________________________
© Copyright, Ozeki Informatics Ltd Page 162/188
After the installation of the E-mail user (for installation instructions, check out the E-mail
User page), you can start to configure it using the graphical user interface of the software.
After specifying a unique username for the E-mail user, which is the last step of the
installation, the E-mail to SMS tab of the Configuration panel will show up. This tab
consists of the POP3 settings and the SMS settings section (Figure 2).
Figure 2 - The E-mail to SMS tab
As mentioned above, Ozeki NG - SMS Gateway can periodically download incoming e-mail
messages from a POP3 account. The downloaded e-mail messages will be forwarded by SMS
to a specified phone number. The subject line of the e-mail can also contain telephone
numbers.
In the POP3 Server edit box in the POP3 settings section, specify the address of the server.
In the Port edit box, enter the number of the POP3 port.
OZEKI NG – SMS Gateway Product Guide
__________________ OZEKI INFORMATIKAI KFT________________________
© Copyright, Ozeki Informatics Ltd Page 163/188
In the POP3 Username edit box, specify the username of the POP3 user account.
In the POP3 Password edit box, specify the password of the POP3 user account.
In the Download interval edit box, you can specify how often the program should check the
POP3 account for new messages to download.
In the SMS settings section, specify a recipient phone number in the Send SMS to (phone
number) edit box. This is the phone number that the SMS (the first 160 characters of the e-
mail) will be sent to. Specify it in international format, starting with the leading plus sign (+).
If you check the Use the phone numbers in the subject line checkbox below, the SMS will
be sent to the phone number(s) in the subject line of the e-mail if it contains any. In this case,
the SMS message will not be sent to the phone number specified in the Send SMS to (phone
number) edit box. It will only be sent to the phone number(s) specified in the e-mail subject
line. If it contains more than one phone number, they have to be separated with a semicolon.
It should look something like this:
+36703384532;+36303658734;+36203462111
In the Maximum message length edit box, specify how many of the first characters of the e-
mail message should be sent as an SMS message. Enter the number in numerical format
representing a positive whole number. If you specify a larger number than 160, a
concatenated (i.e. more than one) SMS message will be sent. A long message will be split into
single pieces. Then, each piece can contain a maximum of 153 characters. This is because the
information for concatenation needs to be stored in the SMS. Each piece will be sent as a
single SMS message. When they reach the destination, the recipient mobile phone will
combine them back to one long message. If you are content with the default value (160) in the
edit box, leave it unchanged.
If you check the Include the sender e-mail address in the SMS checkbox, you can include
the sender e-mail address at the beginning of the downloaded e-mail message.
In the Filter tab, you can make specifications as to which e-mails should be forwarded as
SMS messages to one or more mobile phones. As you may receive a large number of e-mails
(including a great deal of spam), you may have to pay a large amount of money if all of them
are forwarded via SMS. Therefore, it is advisable to specify the sender(s), the receiver(s) and
the keyword(s) in the subject lines of the e-mails to be forwarded via SMS (Figure 3).

OZEKI NG – SMS Gateway Product Guide
__________________ OZEKI INFORMATIKAI KFT________________________
© Copyright, Ozeki Informatics Ltd Page 164/188
Figure 3 - The Filter tab
In the From addresses edit box, you can specify the e-mail address(es) from which e-mails
should be forwarded via SMS. You can enter one or more e-mail addresses, separated with a
semicolon (;).
In the To addresses edit box, you can specify the e-mail address(es) of recipients whose
incoming e-mails should be forwarded via SMS. You can enter one or more e-mail addresses,
separated with a semicolon (;).
In the Keywords in Subject edit box you can specify one or more keywords that should be
included in the subject line(s) of email(s) to be forwarded via SMS. You can enter one or
more keywords, separated with a semicolon (;).
The specifications in Figure 3 above will result in the E-mail user forwarding only e-mails
sent from [email protected] to [email protected], including the keyword
"order" in their subject lines. You could add other sender and recipient e-mail addresses or
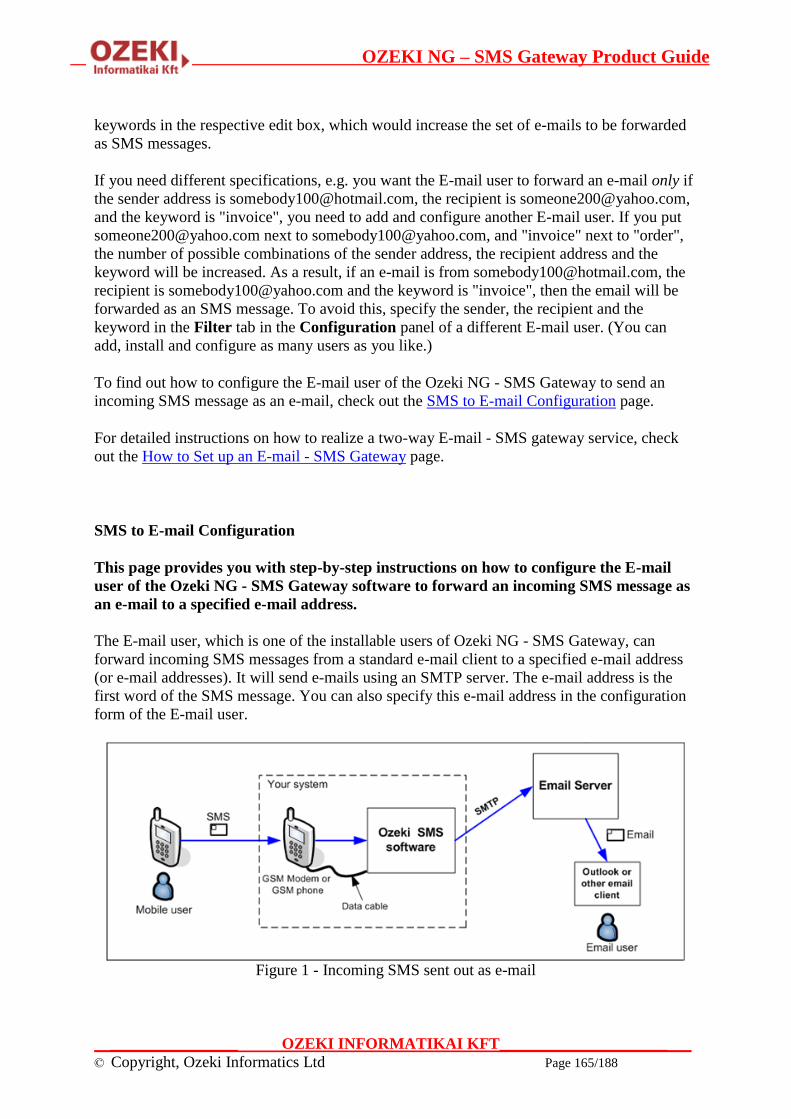
OZEKI NG – SMS Gateway Product Guide
__________________ OZEKI INFORMATIKAI KFT________________________
© Copyright, Ozeki Informatics Ltd Page 165/188
keywords in the respective edit box, which would increase the set of e-mails to be forwarded
as SMS messages.
If you need different specifications, e.g. you want the E-mail user to forward an e-mail only if
the sender address is [email protected], the recipient is [email protected],
and the keyword is "invoice", you need to add and configure another E-mail user. If you put
[email protected] next to [email protected], and "invoice" next to "order",
the number of possible combinations of the sender address, the recipient address and the
keyword will be increased. As a result, if an e-mail is from [email protected], the
recipient is [email protected] and the keyword is "invoice", then the email will be
forwarded as an SMS message. To avoid this, specify the sender, the recipient and the
keyword in the Filter tab in the Configuration panel of a different E-mail user. (You can
add, install and configure as many users as you like.)
To find out how to configure the E-mail user of the Ozeki NG - SMS Gateway to send an
incoming SMS message as an e-mail, check out the SMS to E-mail Configuration page.
For detailed instructions on how to realize a two-way E-mail - SMS gateway service, check
out the How to Set up an E-mail - SMS Gateway page.
SMS to E-mail Configuration
This page provides you with step-by-step instructions on how to configure the E-mail
user of the Ozeki NG - SMS Gateway software to forward an incoming SMS message as
an e-mail to a specified e-mail address.
The E-mail user, which is one of the installable users of Ozeki NG - SMS Gateway, can
forward incoming SMS messages from a standard e-mail client to a specified e-mail address
(or e-mail addresses). It will send e-mails using an SMTP server. The e-mail address is the
first word of the SMS message. You can also specify this e-mail address in the configuration
form of the E-mail user.
Figure 1 - Incoming SMS sent out as e-mail
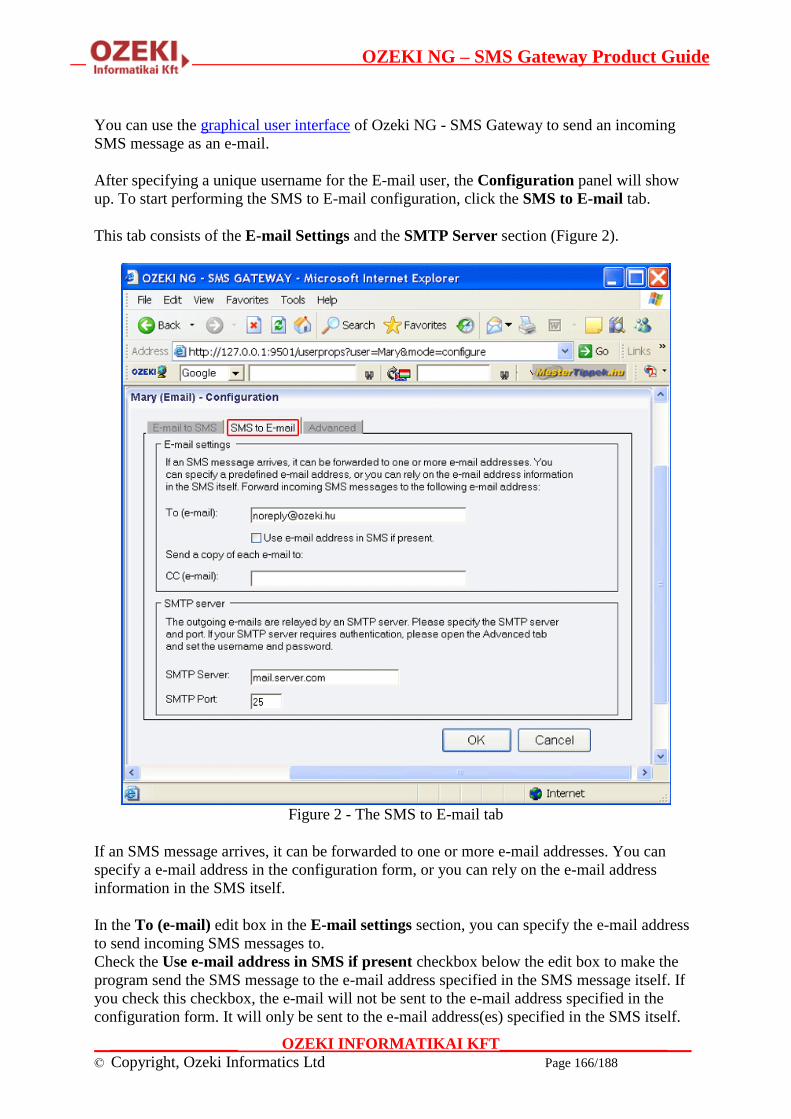
OZEKI NG – SMS Gateway Product Guide
__________________ OZEKI INFORMATIKAI KFT________________________
© Copyright, Ozeki Informatics Ltd Page 166/188
You can use the graphical user interface of Ozeki NG - SMS Gateway to send an incoming
SMS message as an e-mail.
After specifying a unique username for the E-mail user, the Configuration panel will show
up. To start performing the SMS to E-mail configuration, click the SMS to E-mail tab.
This tab consists of the E-mail Settings and the SMTP Server section (Figure 2).
Figure 2 - The SMS to E-mail tab
If an SMS message arrives, it can be forwarded to one or more e-mail addresses. You can
specify a e-mail address in the configuration form, or you can rely on the e-mail address
information in the SMS itself.
In the To (e-mail) edit box in the E-mail settings section, you can specify the e-mail address
to send incoming SMS messages to.
Check the Use e-mail address in SMS if present checkbox below the edit box to make the
program send the SMS message to the e-mail address specified in the SMS message itself. If
you check this checkbox, the e-mail will not be sent to the e-mail address specified in the
configuration form. It will only be sent to the e-mail address(es) specified in the SMS itself.
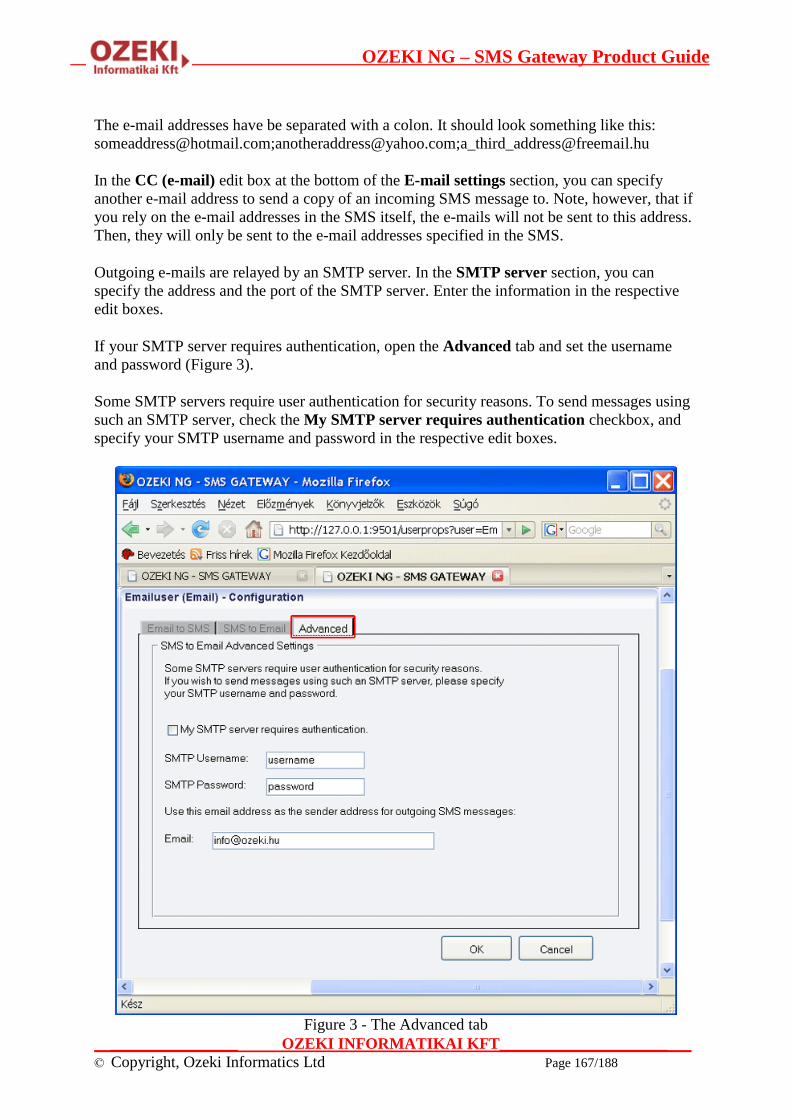
OZEKI NG – SMS Gateway Product Guide
__________________ OZEKI INFORMATIKAI KFT________________________
© Copyright, Ozeki Informatics Ltd Page 167/188
The e-mail addresses have be separated with a colon. It should look something like this:
[email protected];[email protected];[email protected]
In the CC (e-mail) edit box at the bottom of the E-mail settings section, you can specify
another e-mail address to send a copy of an incoming SMS message to. Note, however, that if
you rely on the e-mail addresses in the SMS itself, the e-mails will not be sent to this address.
Then, they will only be sent to the e-mail addresses specified in the SMS.
Outgoing e-mails are relayed by an SMTP server. In the SMTP server section, you can
specify the address and the port of the SMTP server. Enter the information in the respective
edit boxes.
If your SMTP server requires authentication, open the Advanced tab and set the username
and password (Figure 3).
Some SMTP servers require user authentication for security reasons. To send messages using
such an SMTP server, check the My SMTP server requires authentication checkbox, and
specify your SMTP username and password in the respective edit boxes.
Figure 3 - The Advanced tab
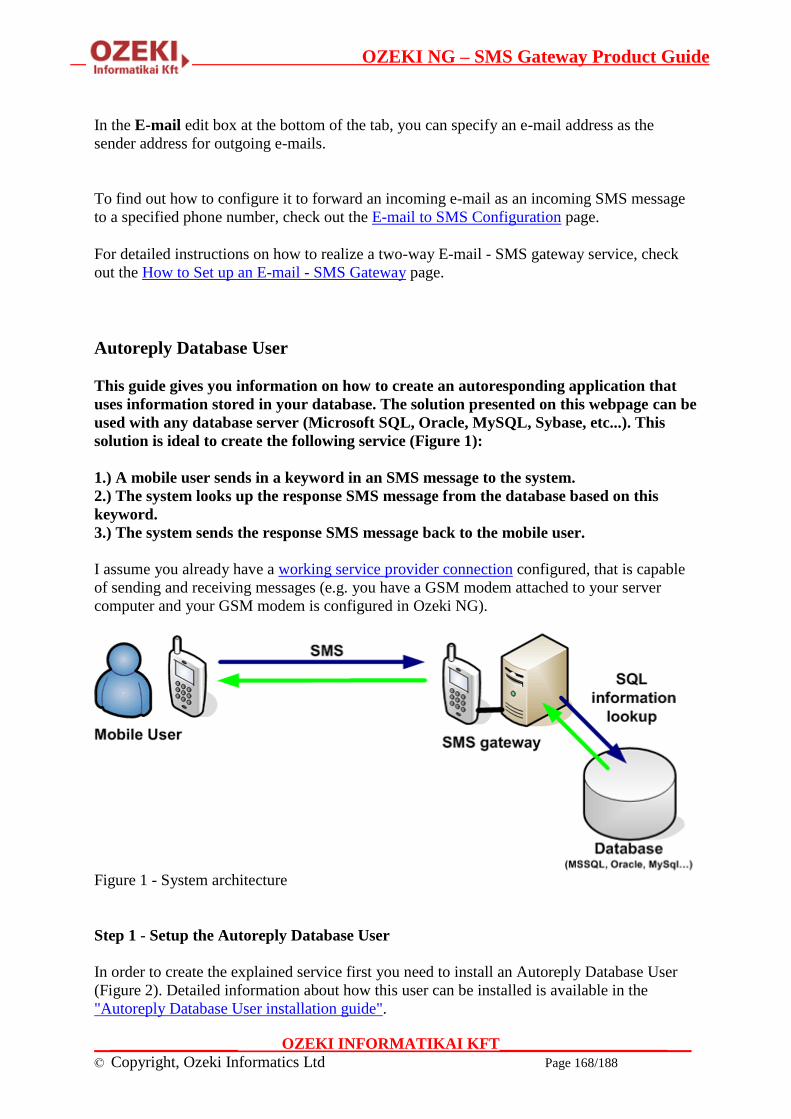
OZEKI NG – SMS Gateway Product Guide
__________________ OZEKI INFORMATIKAI KFT________________________
© Copyright, Ozeki Informatics Ltd Page 168/188
In the E-mail edit box at the bottom of the tab, you can specify an e-mail address as the
sender address for outgoing e-mails.
To find out how to configure it to forward an incoming e-mail as an incoming SMS message
to a specified phone number, check out the E-mail to SMS Configuration page.
For detailed instructions on how to realize a two-way E-mail - SMS gateway service, check
out the How to Set up an E-mail - SMS Gateway page.
Autoreply Database User
This guide gives you information on how to create an autoresponding application that
uses information stored in your database. The solution presented on this webpage can be
used with any database server (Microsoft SQL, Oracle, MySQL, Sybase, etc...). This
solution is ideal to create the following service (Figure 1):
1.) A mobile user sends in a keyword in an SMS message to the system.
2.) The system looks up the response SMS message from the database based on this
keyword.
3.) The system sends the response SMS message back to the mobile user.
I assume you already have a working service provider connection configured, that is capable
of sending and receiving messages (e.g. you have a GSM modem attached to your server
computer and your GSM modem is configured in Ozeki NG).
Figure 1 - System architecture
Step 1 - Setup the Autoreply Database User
In order to create the explained service first you need to install an Autoreply Database User
(Figure 2). Detailed information about how this user can be installed is available in the
"Autoreply Database User installation guide".
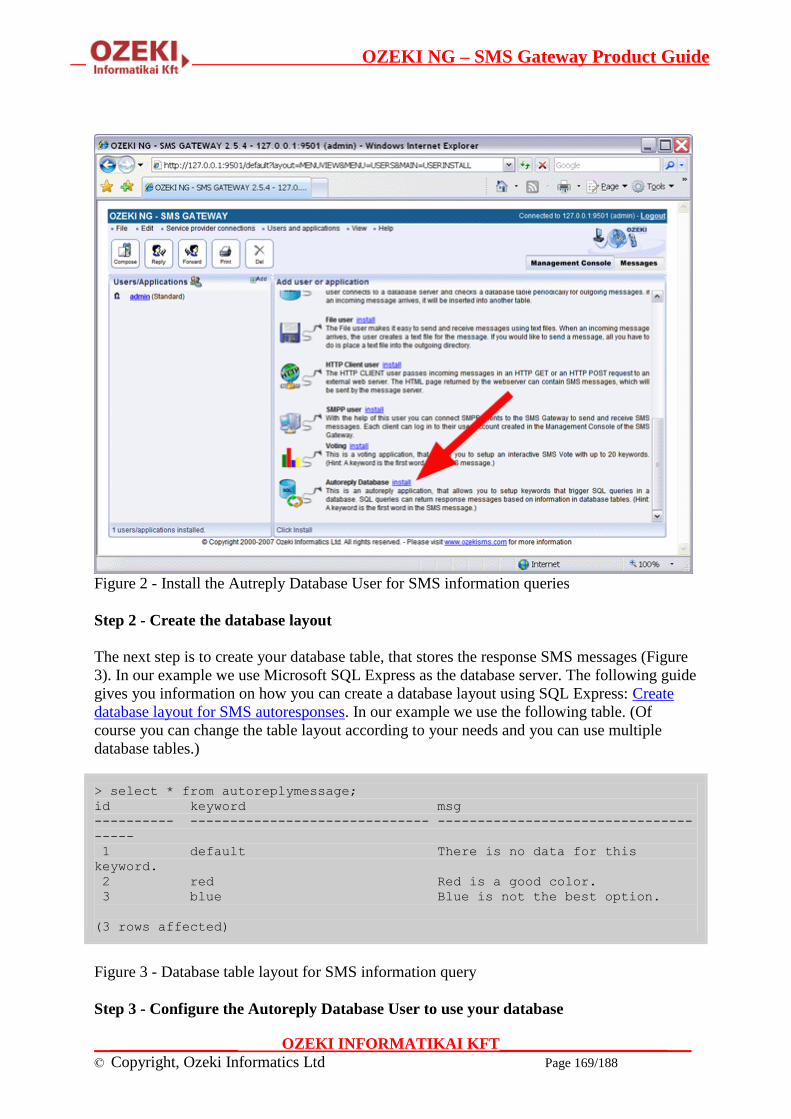
OZEKI NG – SMS Gateway Product Guide
__________________ OZEKI INFORMATIKAI KFT________________________
© Copyright, Ozeki Informatics Ltd Page 169/188
Figure 2 - Install the Autreply Database User for SMS information queries
Step 2 - Create the database layout
The next step is to create your database table, that stores the response SMS messages (Figure
3). In our example we use Microsoft SQL Express as the database server. The following guide
gives you information on how you can create a database layout using SQL Express: Create
database layout for SMS autoresponses. In our example we use the following table. (Of
course you can change the table layout according to your needs and you can use multiple
database tables.)
> select * from autoreplymessage;
id keyword msg
---------- ------------------------------ --------------------------------
-----
1 default There is no data for this
keyword.
2 red Red is a good color.
3 blue Blue is not the best option.
(3 rows affected)
Figure 3 - Database table layout for SMS information query
Step 3 - Configure the Autoreply Database User to use your database

OZEKI NG – SMS Gateway Product Guide
__________________ OZEKI INFORMATIKAI KFT________________________
© Copyright, Ozeki Informatics Ltd Page 170/188
When your database is ready, you need to enter the database connection information
(connection type and connection string) into the database settings configuration form of the
Autoreply Database user. This configuration form can be opened by clicking on the "Database
setup" menu item (Figure 4).
Figure 4 - Database settigns for SMS information query
On this form you can select the database connection type and you can enter the connection
string. In our example (for SQL Express) the connection information that should be used is:
Connection type:
OleDb
Connection string:
Provider=SQLNCLI;Server=.\SQLEXPRESS;User ID=ozekiuser;password=ozekipass;
Database=ozeki;Persist Security Info=True
For other database servers, such as Oracle, MySQL, etc..., you can find information about
how to format the connection string in the Database Connection Strings guide.

OZEKI NG – SMS Gateway Product Guide
__________________ OZEKI INFORMATIKAI KFT________________________
© Copyright, Ozeki Informatics Ltd Page 171/188
Step 4 - Write the autoresponding command script
The final step to make SMS information query possible is to write the script file. The script
file is a plain text file that controls which SQL command should be executed when an
incoming SMS arrives. You can edit the scriptfile with notepad or any other text editor. In our
example the location of the script file is:
C:\Program Files\Ozeki\OzekiNG - SMS Gateway\config\TestApp\sqlscript.txt
The contents of the script file in our example has three sections (Figure 5). The first two
sections are triggered for a response SMS if the keyword "RED" or "BLUE" is received in an
SMS message. The final section creates the default response message if something else was
received.
C:\Program Files\Ozeki\OzekiNG - SMS Gateway\config\TestApp\sqlscript.txt
k^RED
SELECT '$sender',msg from autoreplymessage where keyword='red'
k^BLUE
SELECT '$sender',msg from autoreplymessage where keyword='blue'
k.*
SELECT '$sender',msg from autoreplymessage where keyword='default'
Figure 5 - example script file
The structure of the autoreply script is explained in the following documents:
Script file structure for SMS information query from database
Sample script file for SMS information query from database.
Step 5 - Testing the solution
After this is done, you can test the solution by sending an SMS message to your SMS
gateway. The SMS gateway will forward the message to the Autoreply Database User, where
the command script will be executed for the response. The response will be returned by an
SQL SELECT query defined in the script file. After the appropriate SQL SELECT is executed
the response messages will be sent back to you in SMS. To track what is going on, read the
logs in the following directory:
C:\Program Files\Ozeki\OzekiNG - SMS Gateway\Logs
Autoreply Database User installation guide
This guid gives you the steps to install the autoreply database user.
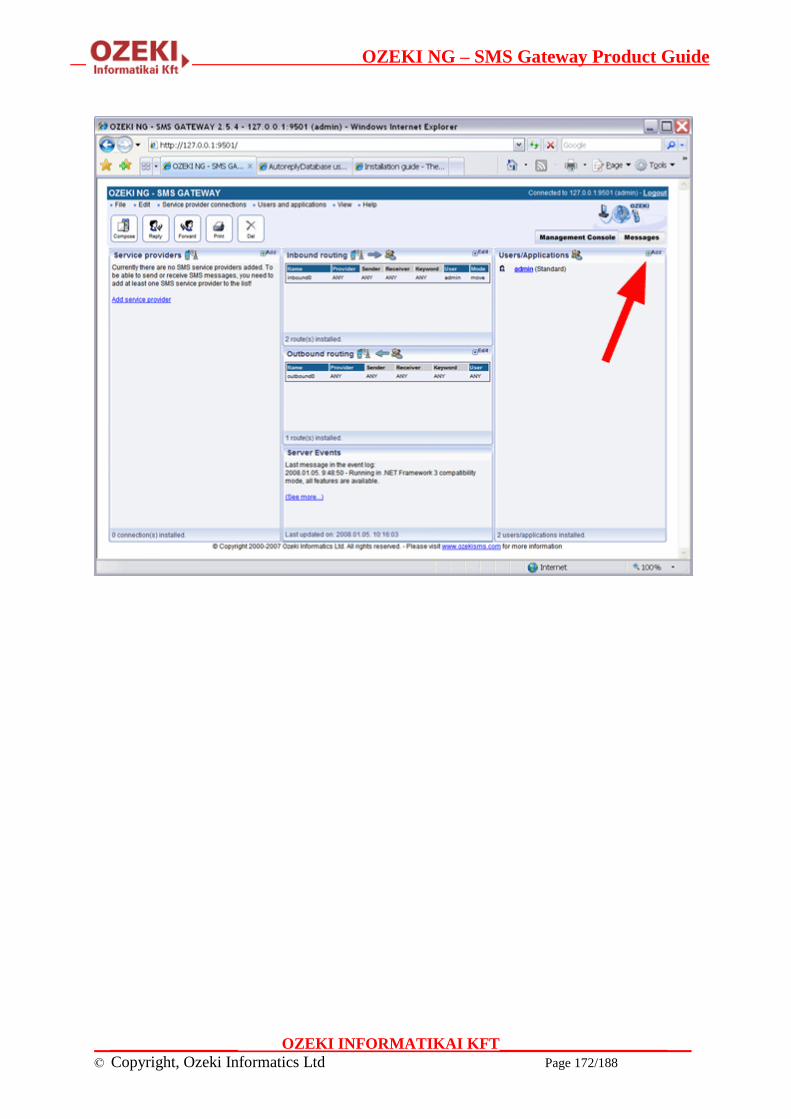
OZEKI NG – SMS Gateway Product Guide
__________________ OZEKI INFORMATIKAI KFT________________________
© Copyright, Ozeki Informatics Ltd Page 172/188
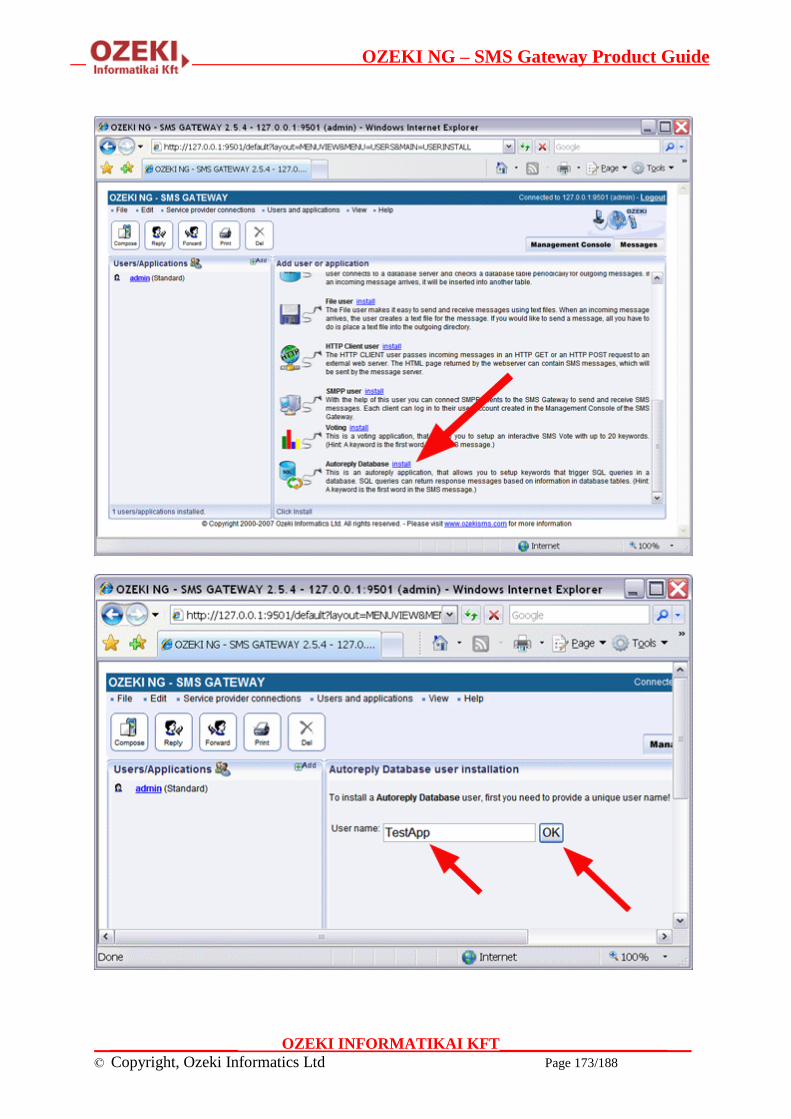
OZEKI NG – SMS Gateway Product Guide
__________________ OZEKI INFORMATIKAI KFT________________________
© Copyright, Ozeki Informatics Ltd Page 173/188

OZEKI NG – SMS Gateway Product Guide
__________________ OZEKI INFORMATIKAI KFT________________________
© Copyright, Ozeki Informatics Ltd Page 174/188
Create database layout for SMS autoresponses
In this guide we create an example database layout for an autoresponding SMS
application that uses data stored in an SQL datatabase. We use the Microsoft SQL
Express database server that can be downloaded from the Microsoft website.
Step 1. - Download and install Microsoft SQL Express.
You can download the Microsoft SQL Exrpess Database Server from the following location:
Download details: Microsoft SQL Server 2005 Express Edition
Step 2 - Create your database tables in Microsoft SQL Express
You can create a database and the appropriate database tables by opening a windows
command prompt (Start->Run->cmd.exe), and starting the SQL Command interpreter by
typing:
C:\sqlcmd -S .\SQLExpress
Once the SQL command interpreter is running, you should enter the following commands
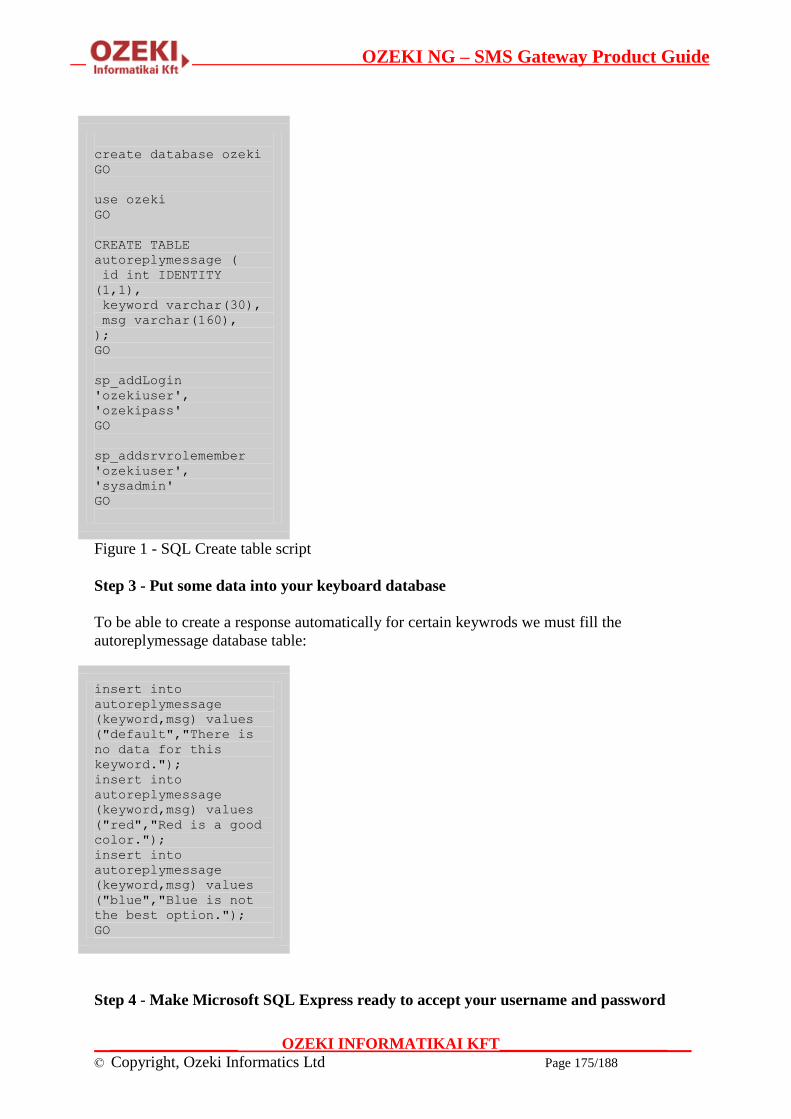
OZEKI NG – SMS Gateway Product Guide
__________________ OZEKI INFORMATIKAI KFT________________________
© Copyright, Ozeki Informatics Ltd Page 175/188
create database ozeki
GO
use ozeki
GO
CREATE TABLE
autoreplymessage (
id int IDENTITY
(1,1),
keyword varchar(30),
msg varchar(160),
);
GO
sp_addLogin
'ozekiuser',
'ozekipass'
GO
sp_addsrvrolemember
'ozekiuser',
'sysadmin'
GO
Figure 1 - SQL Create table script
Step 3 - Put some data into your keyboard database
To be able to create a response automatically for certain keywrods we must fill the
autoreplymessage database table:
insert into
autoreplymessage
(keyword,msg) values
("default","There is
no data for this
keyword.");
insert into
autoreplymessage
(keyword,msg) values
("red","Red is a good
color.");
insert into
autoreplymessage
(keyword,msg) values
("blue","Blue is not
the best option.");
GO
Step 4 - Make Microsoft SQL Express ready to accept your username and password

OZEKI NG – SMS Gateway Product Guide
__________________ OZEKI INFORMATIKAI KFT________________________
© Copyright, Ozeki Informatics Ltd Page 176/188
Unless you have mixed mode authentication configured in SQL express, you will not be able
to connect to your database from Ozeki NG because Ozeki NG runs as a system service in the
background. To enable mixed - mode authentication, you should open the registry editor
(Start->run->regedit.exe) and in the Registry you should change the LoginMode value from 1
to "2", here:
HKEY_LOCAL_MACHINE\SOFTWARE\Microsoft\Microsoft
SQL Server\MSSQL.1\MSSQLServer
LoginMode =2
After this change you might have to restart the SQL Express to make sure the changes take
effect.
File structure for controling SQL information query from database
This ducument explain the file structure of the script file that is used to control which
SQL query is executed when an incoming SMS message arrives to the system.
Introduction
The script file contains sections. Sections are separated by an empty line. There is now limit
for the number of sections. When the script is consulted sections are read sequentally. The
first section that matches an incoming SMS is used to create the response SMS message.
A section contains a condition and a set of SQL commands called action (Figure 1). The
condition is the first line in the section. Any number of SQL commands can follow this line. If
the condition matches all the SQL commands following the condition will be executed until
an empty line is found. The SQL commands can return one or more response messages.
Figure 1 - Sections in the script file
Condition

OZEKI NG – SMS Gateway Product Guide
__________________ OZEKI INFORMATIKAI KFT________________________
© Copyright, Ozeki Informatics Ltd Page 177/188
The conidition is a single line statement. It has two parts the match target selector, and the
match pattern (Figure 2). The match selector is a single letter, that determines which part of
the incoming SMS message is checked with the matching pattern.
Figure 2 - Information query condition
The match selector letter can be one of the following:
k - keyword //The first word of the SMS message converted to uppercase
n - sender telephone number
m - the message text
The match pattern is a standard regular expression. Regular expressions are explain in the
Regualar expressions tutorial.
Some examples:
.* - matches any letter
^abc.* - matches a text starting with abc
.*abc.* - matches a text that contains abc
Action
If the condition matches the incoming SMS message, the SQL commands in the section will
be executed. You can use one ore more SQL SELECT statements to query the information for
the response messages and you can use SQL INSERT, SQL UPDATE or any other SQL
statement to modify the database. Before the SQL commands are executed on the database,
the following words are replaced in them:
$originator - is replaced to the sender telephone number of the messages
$recipient - is replaced to the telephone number that received the message
$messagedata - is replaced to the message text
$keyword - is replaced to the keyword in the message
$senttime - is replaced to the timestamp, that represents when the message
was sent

OZEKI NG – SMS Gateway Product Guide
__________________ OZEKI INFORMATIKAI KFT________________________
© Copyright, Ozeki Informatics Ltd Page 178/188
$receivedtime - is replaced to the timestamp, that represents when the
message was received
$messagetype - is replaced to the message type (in most cases this will be
SMS:TEXT)
$id - is replaced to the unique string identifier of the message
$operator - is replaced to the name of the service provider connection that
received the message
The SQL statements will be executed in the order they follow each other. Every SQL
statement must be written on a single line.
(Hint: In most cases you will only use one SQL SELECT to get the content for the response
SMS message.)
Response
When SELECT SQL statements are executed, they can return one or more response messages.
A response message is a row in the result set of the SQL select. A row in the result set should
contain the following columns:
recipient - The 1st column in the result set (Mandatory)
messageData - The 2nd column in the result set (Mandatory)
messageType - The 3rd column in the result set (Optional)
sender - The 4th column in the result set (Optional)
operatorNames - The 5th column in the result set (Optional)
The SMS gateway will process the returened results and will send them as SMS messages.
Example
The following is an example script that matches two keywords: RED and BLUE and handles
unmatched incoming messages with a default response.
C:\Program Files\Ozeki\OzekiNG - SMS Gateway\config\TestApp\sqlscript.txt
k^RED
INSERT INTO log (sender,message) VALUES ('$sender','$messagedata');
SELECT '$sender',msg FROM autoreplymessage WHERE keyword='red'
k^BLUE
SELECT '$sender',msg FROM autoreplymessage WHERE keyword='blue'
k.*
SELECT '$sender',msg FROM autoreplymessage WHERE keyword='default'

OZEKI NG – SMS Gateway Product Guide
__________________ OZEKI INFORMATIKAI KFT________________________
© Copyright, Ozeki Informatics Ltd Page 179/188
Client software
If you wish to provide SMS functionality for office users, you can install desktop client
software that communicates with Ozeki NG SMS gateway. To serve desktop clients, you need
to configure standard user accounts in the SMS gateway.
Outlook SMS Client
The Outlook SMS Client plugin creates a button in Microsoft Outlook. If the button is
pressed a message composer window is opened. In this window the SMS message can be
created and by clicking on the send button it is sent over the network to the Ozeki NG
SMS Gateway for delivery.
The sent messages are saved in the sent items folder of Outlook.
If an incoming message arrives it is saved in t he inbox folder of Outlook.
The user of this Outlook SMS Client can use the addressbook of outlook to look up and select
the appropriate phone numbers for delivery.
Sending SMS messages from Excel
On this page you can learn how to send SMS messages from Excel using the Ozeki NG -
SMS Gateway software. You can read a short introduction about the Excel files you
need to use, and you are provided with details about the Messages.xls spreadsheet,
explaining what each column is for. You can also learn how to configure the Excel
macro connection and how to set the appropriate security level in the Excel client file to
allow sending messages.

OZEKI NG – SMS Gateway Product Guide
__________________ OZEKI INFORMATIKAI KFT________________________
© Copyright, Ozeki Informatics Ltd Page 180/188
Introduction
The Excel SMS client of Ozeki NG - SMS Gateway enables you to send SMS messages from
Microsoft Excel. For this, you just need to open two Excel spreadsheets: Messages.xls and
Ozeki.xls. In the Messages.xls spreadsheet, you need to put the telephone numbers in the first
and the messages in the second column. To learn what the other columns are for, read the
Messages spreadsheet section below.
In the Ozeki.xls Excel spreadsheet you will find a macro you can start by clicking the Send
all button. This macro will connect to Ozeki NG - SMS Gateway over the office LAN or the
Internet and will send the SMS messages you have edited in the Messages.xls spreadsheet.
The parameters for this network connection can be edited on the Ozeki.xls spreadsheet.
Using the Excel Client allows you to keep a record of the SMS messages you have sent in an
Excel spreadsheet. You can identify which of the messages you have sent belongs to a given
telephone number. They are in the same row in the spreadsheet.
For sending messages, the Ozeki NG - SMS Gateway program and Excel do not need to be on
the same computer. You can send messages from different computers in an office network.
You just need to enter the IP of the server PC running Ozeki NG - SMS Gateway (Figure 1).
Figure 1 - Sending SMS from different computers
Both Excel files you have to use can be found in the C:\Program Files\Ozeki\OzekiNG -
SMS Gateway directory after the program has been installed. (From here, they can be moved
to any other folder.) You can also open the Excel files by clicking their icons below the
Manage OzekiNG file icon (Figure 2).
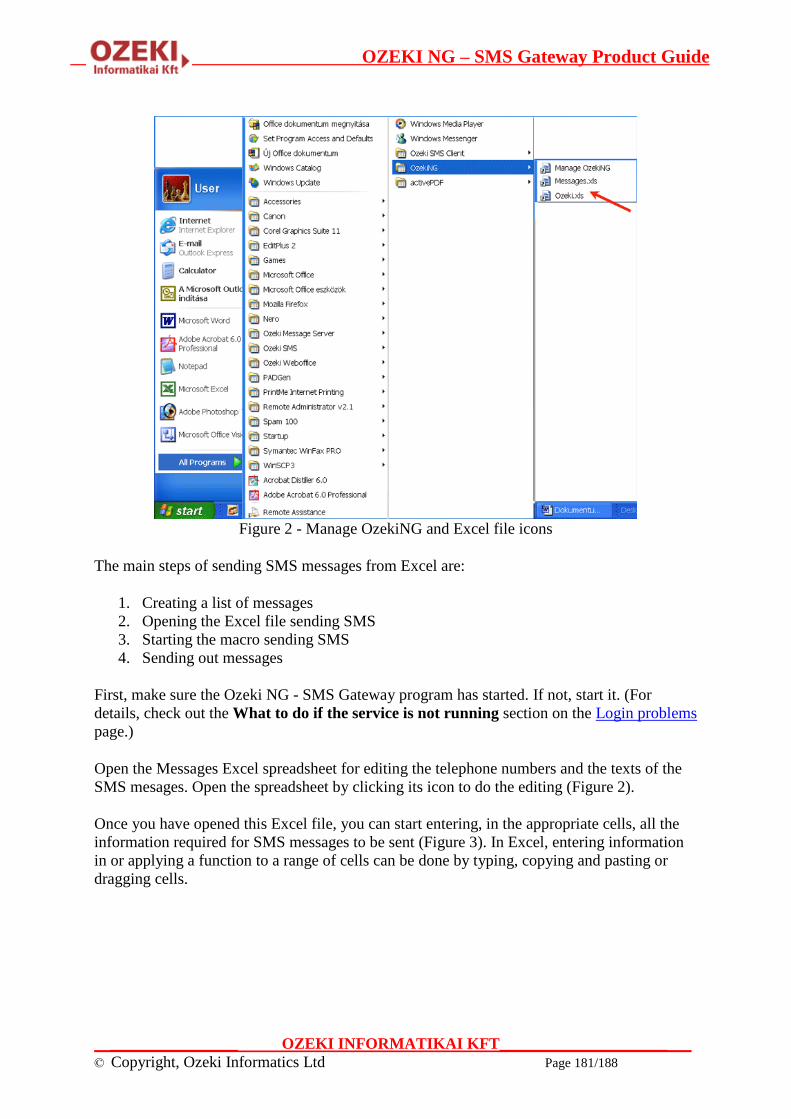
OZEKI NG – SMS Gateway Product Guide
__________________ OZEKI INFORMATIKAI KFT________________________
© Copyright, Ozeki Informatics Ltd Page 181/188
Figure 2 - Manage OzekiNG and Excel file icons
The main steps of sending SMS messages from Excel are:
1. Creating a list of messages
2. Opening the Excel file sending SMS
3. Starting the macro sending SMS
4. Sending out messages
First, make sure the Ozeki NG - SMS Gateway program has started. If not, start it. (For
details, check out the What to do if the service is not running section on the Login problems
page.)
Open the Messages Excel spreadsheet for editing the telephone numbers and the texts of the
SMS mesages. Open the spreadsheet by clicking its icon to do the editing (Figure 2).
Once you have opened this Excel file, you can start entering, in the appropriate cells, all the
information required for SMS messages to be sent (Figure 3). In Excel, entering information
in or applying a function to a range of cells can be done by typing, copying and pasting or
dragging cells.
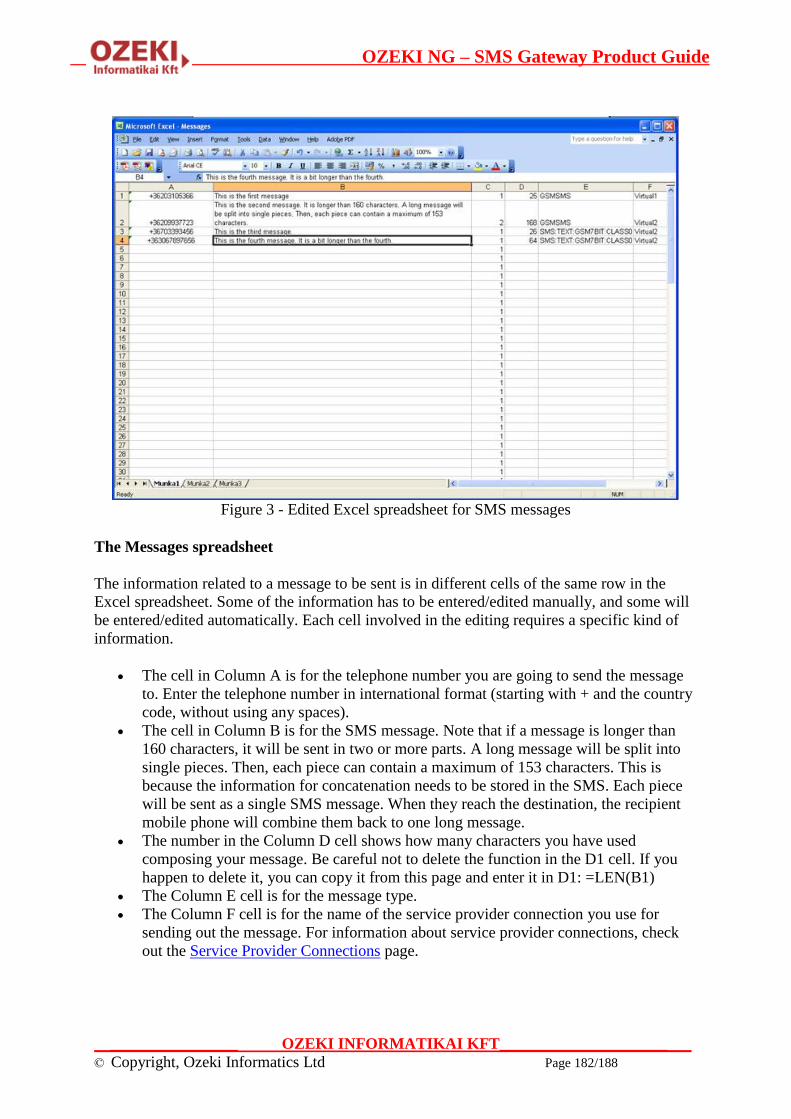
OZEKI NG – SMS Gateway Product Guide
__________________ OZEKI INFORMATIKAI KFT________________________
© Copyright, Ozeki Informatics Ltd Page 182/188
Figure 3 - Edited Excel spreadsheet for SMS messages
The Messages spreadsheet
The information related to a message to be sent is in different cells of the same row in the
Excel spreadsheet. Some of the information has to be entered/edited manually, and some will
be entered/edited automatically. Each cell involved in the editing requires a specific kind of
information.
The cell in Column A is for the telephone number you are going to send the message
to. Enter the telephone number in international format (starting with + and the country
code, without using any spaces).
The cell in Column B is for the SMS message. Note that if a message is longer than
160 characters, it will be sent in two or more parts. A long message will be split into
single pieces. Then, each piece can contain a maximum of 153 characters. This is
because the information for concatenation needs to be stored in the SMS. Each piece
will be sent as a single SMS message. When they reach the destination, the recipient
mobile phone will combine them back to one long message.
The number in the Column D cell shows how many characters you have used
composing your message. Be careful not to delete the function in the D1 cell. If you
happen to delete it, you can copy it from this page and enter it in D1: =LEN(B1)
The Column E cell is for the message type.
The Column F cell is for the name of the service provider connection you use for
sending out the message. For information about service provider connections, check
out the Service Provider Connections page.

OZEKI NG – SMS Gateway Product Guide
__________________ OZEKI INFORMATIKAI KFT________________________
© Copyright, Ozeki Informatics Ltd Page 183/188
The Excel client file
When you have finished editing all the messages to be sent out, open the Excel client. It is
automatically installed along with Ozeki NG - SMS Gateway. Do not close the Messages
spreadsheet before you open this file. After the messages are edited, the Messages spreadsheet
has to stay open along with the Ozeki.xls file.
The Excel client file is - just like the Messages file - in the C:\Program
Files\Ozeki\OzekiNG - SMS Gateway directory. To start the Excel client, double-click
Ozeki.xls. (You can click it after opening the C:\Program Files\Ozeki\OzekiNG - SMS
Gateway directory or clicking the file icon (see Figure 2 above). This file contains an Excel
macro that can be started by pressing the Send all button. This macro will connect to Ozeki
NG - SMS Gateway over the office LAN or the Internet and will send the SMS messages you
have edited in the Messages spreadsheet. The parameters for this network connection can be
edited in the Ozeki.xls spreadsheet (Figure 4).
Figure 4 - Starting the Excel SMS Macro
When you have opened the file, click on the Send all button. Then, the Message Server will
send out the messages if the Excel macro connection is already configured and the security
level is appropriate. If Excel's security level is not appropriate, i.e. Very high or High, for
sending messages, you can see one of the following messages (Figure 5, Figure 6):
Figure 5 - Very High security level

OZEKI NG – SMS Gateway Product Guide
__________________ OZEKI INFORMATIKAI KFT________________________
© Copyright, Ozeki Informatics Ltd Page 184/188
Figure 6 - High security level
Then you should change the security level to Medium or Low. Select the
Tools/Macro/Security menu item. In the Security Level tab, select Medium or Low (Figure
7).
Figure 7 - Changing the security level
If the security level is Medium, you receive the following message (Figure 8):

OZEKI NG – SMS Gateway Product Guide
__________________ OZEKI INFORMATIKAI KFT________________________
© Copyright, Ozeki Informatics Ltd Page 185/188
Figure 8 - Enabling macros
Click the Enable Macros button. To configure the Excel macro connection (Figure 9),
specify the IP address and the server port of the computer, divided by a colon. Also, specify
the server account and the password.
Figure 9 - Configuring the Excel macro connection
You only have to do this once, and the next time you want to send messages, you just need to
click the Send all button. If you have created a different user in the Message Server, specify
the username and the password. After Credits, in the column B cell you can specify the
maximum number of SMS messages a user can send out. When you have finished the
configuration, click the Send all button. Then the SMS sender window will show up. It
contains a drop-down menu of open Excel files to be processed. Select the one(s) containing
the messages to be sent out, and click OK (Figure 10).

OZEKI NG – SMS Gateway Product Guide
__________________ OZEKI INFORMATIKAI KFT________________________
© Copyright, Ozeki Informatics Ltd Page 186/188
Figure 10 - Sending out messages
After clicking OK (and sending out the messages), a new browser window will open,
containing a list of the messages that have been sent, displaying if they have been accepted by
Ozeki NG - SMS Gateway for delivery (Figure 11).
Figure 11 - Messages accepted for delivery
After the messages have been sent, you can check their status by opening the sender's user
account. To find out how to open a user account, check out the Users and Applications page.
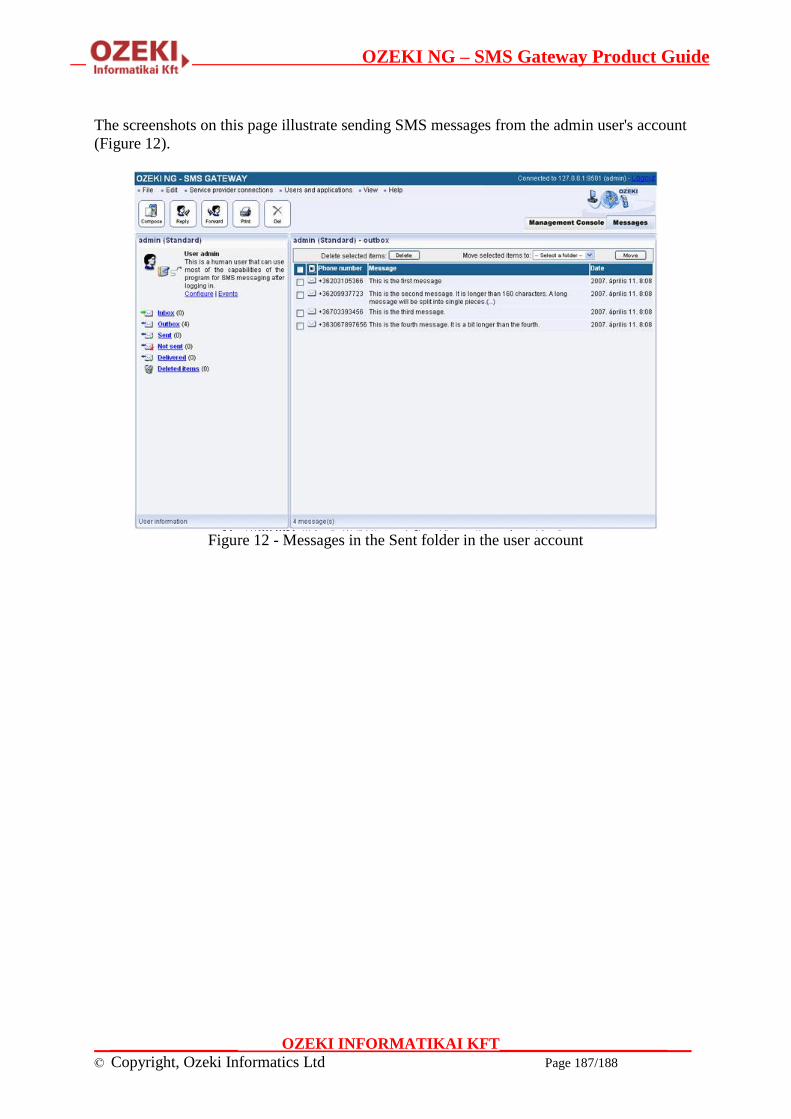
OZEKI NG – SMS Gateway Product Guide
__________________ OZEKI INFORMATIKAI KFT________________________
© Copyright, Ozeki Informatics Ltd Page 187/188
The screenshots on this page illustrate sending SMS messages from the admin user's account
(Figure 12).
Figure 12 - Messages in the Sent folder in the user account
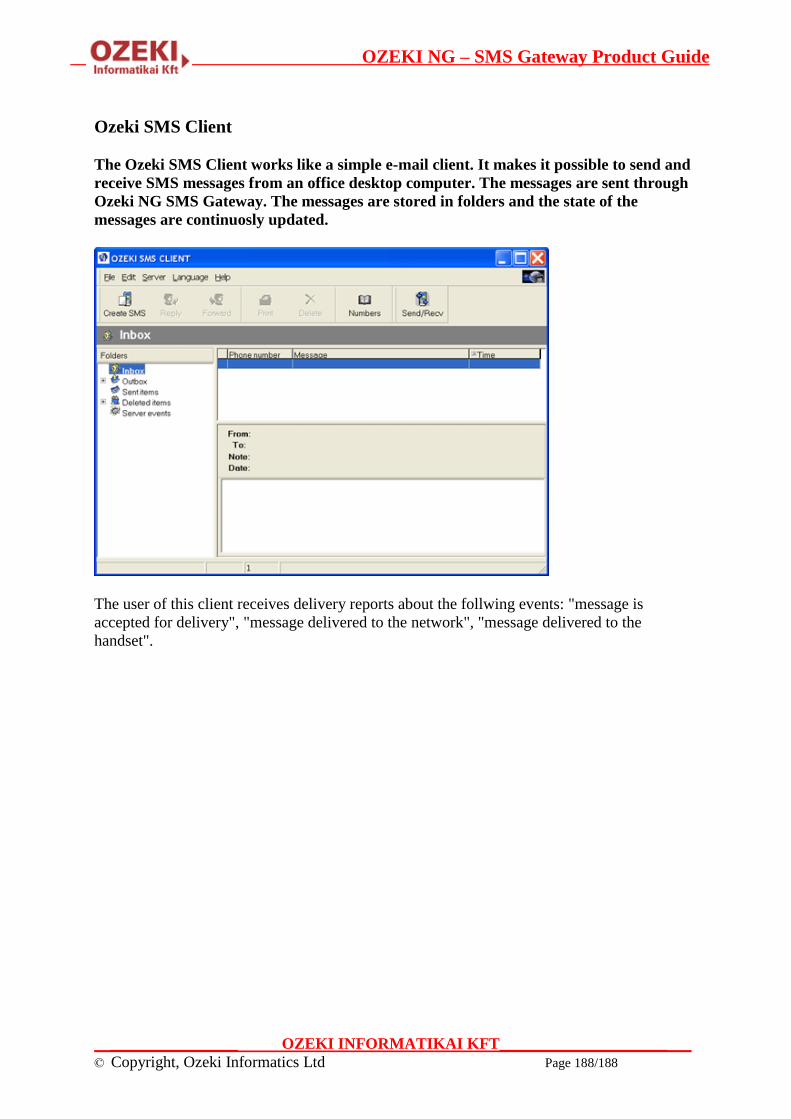
OZEKI NG – SMS Gateway Product Guide
__________________ OZEKI INFORMATIKAI KFT________________________
© Copyright, Ozeki Informatics Ltd Page 188/188
Ozeki SMS Client
The Ozeki SMS Client works like a simple e-mail client. It makes it possible to send and
receive SMS messages from an office desktop computer. The messages are sent through
Ozeki NG SMS Gateway. The messages are stored in folders and the state of the
messages are continuosly updated.
The user of this client receives delivery reports about the follwing events: "message is
accepted for delivery", "message delivered to the network", "message delivered to the
handset".