p-file imaging procedures - university of wisconsin imaging procedures this document provides...
TRANSCRIPT

P-File Imaging Procedures | P-File Imaging
June 2017, Version 1.0 1
P-File Imaging Procedures This document provides directions on how to use ImageNow software for scanning and capturing personnel files (P-File). The first time you use this document please follow along with guidance from DoIT’s Imaging team or your division’s Human Resources (HR) director or manager.
Table of Contents
Section 1: Imaging Overview & Document Orientation (page 2)
Section 2: Scanner Overview (page 5)
Section 3: Logging In (page 5)
Section 4: Scanning and Storing Doucment Using LearnMode Linking (page 6) Part A: LearnMode linking of a paper document (page 6) Part B: LearnMode linking of an electronic document (page 11)
Section 5: Manual Linking (page 17) Part A: Manual linking of a paper document (page 17)
Part B: Manual linking of an electronic document (page 18)
Section 6: LearnMode and Linking Tips (page 20)
Section 7: Document Search (page 21)
Section 8: Exporting Documents (page 24)
Section 9: Redacting Information on a Document in your QA Workflow (page 25)
Section 10: Troubleshooting Information (page 29)
P-File Imaging Procedures | P-File Imaging
2
Section 1: Imaging Overview & Document Orientation Campus has the option to utilize ImageNow for personnel file (P-File) imaging to store all personnel files electronically. Note: Imaging will only be used for required (e.g., appointment letter) and optional (e.g., emergency contact) personnel file imaging at this time. P-file imaging does not include documents related to payroll & benefits, medical, etc.
P-File Imaging Access
● Access to personnel files is granted to HR staff only. ● Requests for access are accepted from HR Directors and HR Managers. ● HR Directors authorize access to their Divisions drawers. ● The Office of Human Resources (OHR) provides oversight related to applicable P-
File policies and procedures and authorizes access to the cross-campus view. ● User account requests are fulfilled by Office of Cybersecurity via a dedicated JIRA
website (https://kb.wisc.edu/page.php?id=41763).
Drawers
Drawers are a primary way of organizing documents in the imaging system.
The standard naming convention for divisional drawers is: ● “A_OHR_’division acronym’_Pfile_DivSpec” or ● “A_OHR_’division acronym’_Pfile_Required”
For ease of reference in this document we will refer to them by their suffix. Foex example:
● *_DivSpec, ● *_Required)

P-File Imaging Procedures | P-File Imaging
3
Drawer Abbreviation
Drawer Name Example
This information is viewable by your division’s HR staff. This drawer is for documents that are optional personnel file documents. These documents include things such as resumes, new employee orientation acknowledgment forms, etc.
*_DivSpec “A_OHR_’division acronym’_Pfile_DivSpec”
A_OHR_DOIT_Pfile_DivSpec, A_OHR_OVCRGE_Pfile_DivSpec
This information is viewable by your division’s HR staff, OHR staff, and staff from any other opting-in division staff. This drawer is for required personnel file documents such as position descriptions, performance reviews, etc.
*_Required “A_OHR_’division acronym’_Pfile_Required”
A_OHR_ENGR_Pfile_Required, A_OHR_PHARM_Pfile_ Required
Document Types
● Each drawer has document types specific to its purpose. Refer to the “ImageNow P-File Document Crosswalk” to identify which document types are in each drawer.
● When scanning and reviewing, assigning the correct document type values is critical for campus consistency and for locating documents in subsequent searches.
Document Metadata (Index Keys / Custom Properties)
Regardless of drawer or type, each document in P-File imaging has the same metadata fields. Metadata fields provide the key to help locate the document after it is placed in the system.
Document Metadata
Field 1 EMPLID
Field 2 Employee Name
Field 3 Position Number
Field 4 UDDS
P-File Imaging Procedures | P-File Imaging
4
Field 5 Unique Value (system generated)
Custom Properties
A_OHR_Pfile_Job Code: Job Code A_OHR_Pfile_Appt_Title: Appt. Title A_OHR_Pfile_Appt Title Code: Appt. Title Code A_OHR_Pfile_Eff Date: Effective Date Z_CreationDate (required) Z_RetentionDate
Imaging Methods
Both electronic and paper/hardcopy documents can be input into ImageNow. Refer to your division’s P-File workflow document for internal process.
● Electronic documents - ImageNow Printer (INP) and Associated Capture Profiles: ImageNow Printer enables you to get electronic documents (e.g., email, web page, PDF) into ImageNow. Refer to KnowledgeBase document: https://kb.wisc.edu/ecms/page.php?id=33106.
● Hardcopy documents - Scanner (SCAN) and Associated Capture Profiles: Scan paper documents into the Imaging system as electronic documents.
Capture Profiles
A capture profile must be selected when beginning the document capture process. The capture profile determines which drawer the document will be filed in and how it will be linked to index keys/custom properties (manually or through HRS).
Capture Profile Examples
SCAN DivSpec LRN Private IE (Version #):
● Method: ImageNow printer (electronic document)
● Destination: *_DivSpec ● Document index key data: HRS Employee
Information(ImageNow)
SCAN Required MAN: ● Method: Scanner (hardcopy document) ● Destination: *_Required ● Document index key data: manual data
entry

P-File Imaging Procedures | P-File Imaging
5
Section 2: Scanner Overview Please refer to your division’s scanner manuals for correct operating procedures.
Section 3: Logging In
1. Double-click the Perceptive Content icon on the desktop to launch ImageNow.
2. Enter your User name ([email protected]) and Password (NetID password) and then click Connect.
3. You will now see the ImageNow toolbar.

P-File Imaging Procedures | P-File Imaging
6
Section 4: Scanning and Storing Documents Using Learn Mode Linking Learn Mode is the most consistent approach available for linking documents because it minimizes data entry and errors by pulling metadata from a standard Human Resource Syestem (HRS) webpage. The Learn Mode requires user access to the Employee Information(ImageNow) HRS Resource. At the time of document capture must be logged into HRS in Internet Explorer as well as the imaging client.
Part A: Learn Mode Linking of a Paper Document
1. Login to the ImageNow client on the workstation with the scanner. (Reference: Section 3, page 5)
2. Login to HRS using the Private Internet Explorer Shortcut on your desktop. 3. Navigate to Employee Information(ImageNow). To do this, go to Workforce
Administration > UW External HR Systems > Employee Information(ImageNow).
4. Search for the desired employee by Empl ID. (You may search by “Employee name” but it will take considerably longer.)
5. This returns a list of appointments for the specified “Empl ID.” Click the correct
Empl entry with “(blank)” listed in the Job End Date field. If these conditions

P-File Imaging Procedures | P-File Imaging
7
do not match your results, contact your divisional HR representative.
6. You should now see the employee information that will be used in Learn Mode Linking.
7. Keep the Internet Explorer window open. Next, place the hardcopy document to be scanned into the document feeder of your scanner. Be sure to orient the physical document according to your scanner requirements (e.g., face down with the bottom of the document feeding first)
8. In this step, you will choose a LRN (Learnmode) capture profile associated with a drawer (DivSpec or Required) appropriate to your document. On the ImageNow toolbar, click the Capture down arrow and then select the capture profile you want to use (e.g., SCAN DivSpec LRN Private IE (Version #) or SCAN Required LRN Private IE (Version #)).

P-File Imaging Procedures | P-File Imaging
8
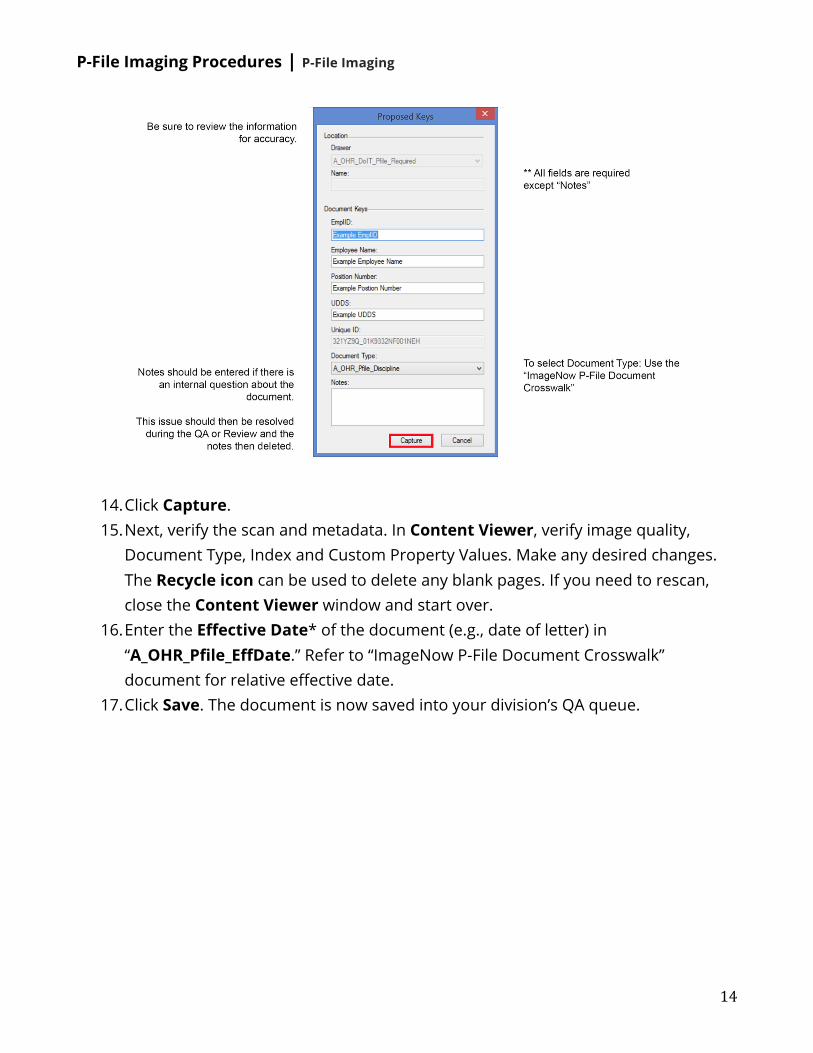
9. This will return the Proposed Keys dialog, image shown below. Review the information for accuracy.
10. In the Document Type drop-down, select the correct Document Type option based on the content of your document. Refer to “ImageNow P-File Document Crosswalk” document.
11. Click Capture.

P-File Imaging Procedures | P-File Imaging
9
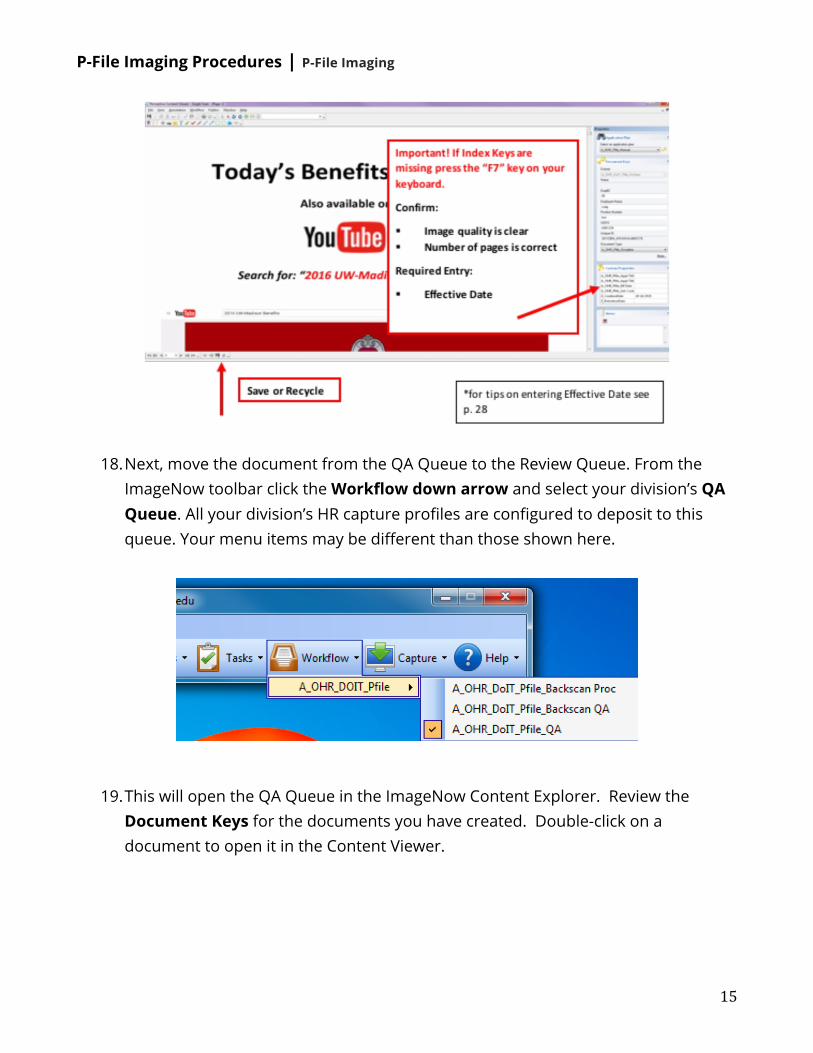
12. Next verify the scan and metadata. In Content Viewer, verify image quality, Document Type, Index and Custom Property Values. Make any desired changes. The Recycle icon can be used to delete blank pages. If you need to rescan, close the Content Viewer window and start over.
13. Enter the Effective Date* of the document (e.g., date of letter) in “A_OHR_Pfile_EffDate.” Refer to “ImageNow P-File Document Crosswalk” document for relative effective date.
14. Click Save. The document is now saved into your division’s QA queue.
15. Next, move the document from the QA Queue to the Review Queue. From the ImageNow toolbar click the Workflow down arrow and select your division’s QA Queue. All your division’s HR capture profiles are configured to deposit to this queue. Your menu items may be different than those shown here.
P-File Imaging Procedures | P-File Imaging
10
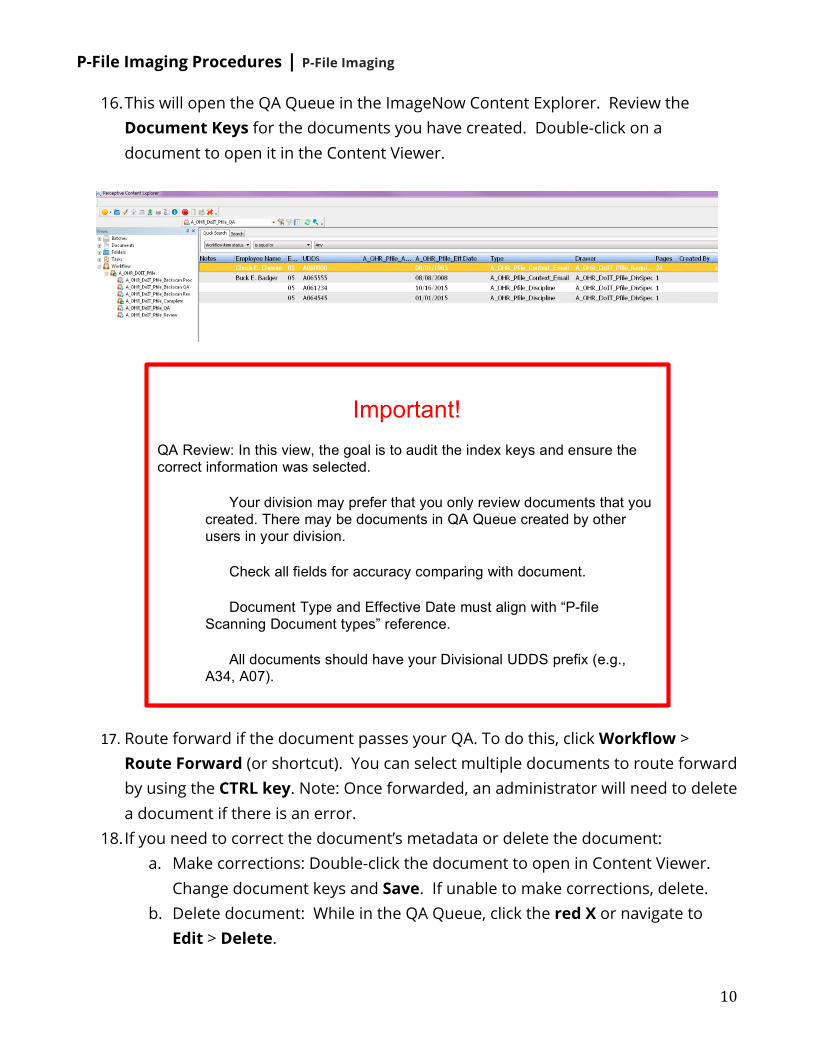
16. This will open the QA Queue in the ImageNow Content Explorer. Review the Document Keys for the documents you have created. Double-click on a document to open it in the Content Viewer.
17. Route forward if the document passes your QA. To do this, click Workflow > Route Forward (or shortcut). You can select multiple documents to route forward by using the CTRL key. Note: Once forwarded, an administrator will need to delete a document if there is an error.
18. If you need to correct the document’s metadata or delete the document: a. Make corrections: Double-click the document to open in Content Viewer.
Change document keys and Save. If unable to make corrections, delete. b. Delete document: While in the QA Queue, click the red X or navigate to
Edit > Delete.
Important!
QA Review: In this view, the goal is to audit the index keys and ensure the correct information was selected.
Your division may prefer that you only review documents that you created. There may be documents in QA Queue created by other users in your division.
Check all fields for accuracy comparing with document.
Document Type and Effective Date must align with “P-file
Scanning Document types” reference.
All documents should have your Divisional UDDS prefix (e.g., A34, A07).
P-File Imaging Procedures | P-File Imaging
11
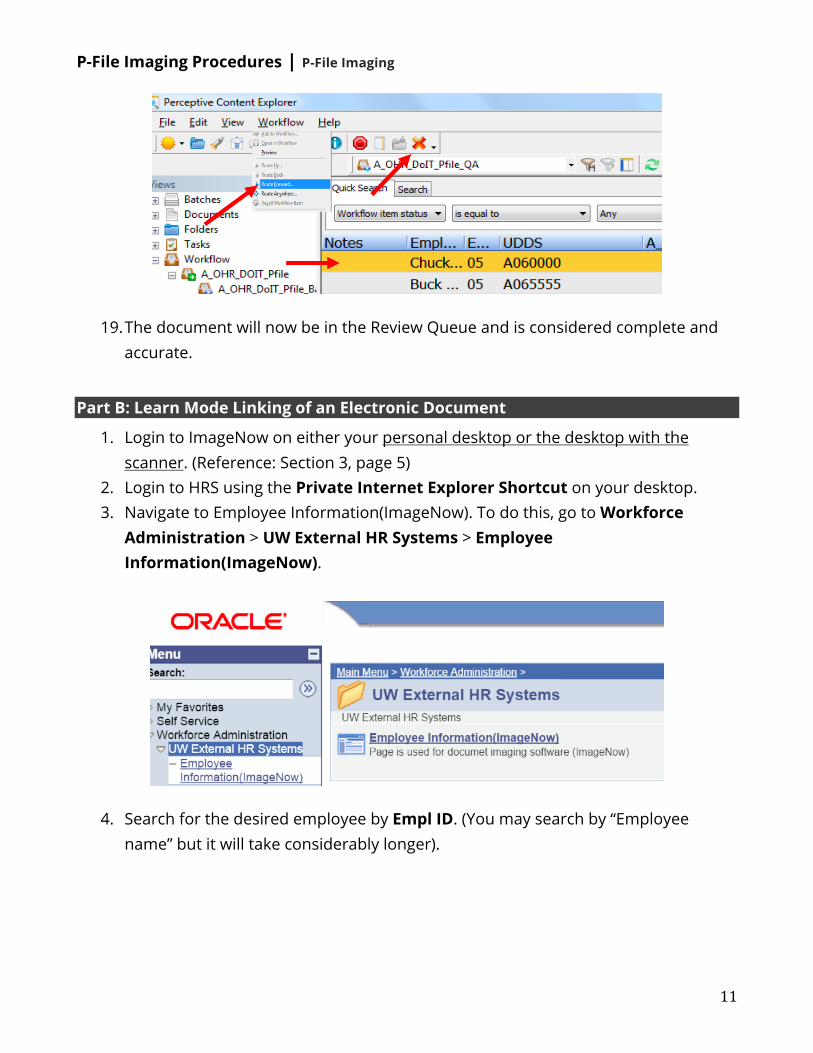
19. The document will now be in the Review Queue and is considered complete and accurate.
Part B: Learn Mode Linking of an Electronic Document
1. Login to ImageNow on either your personal desktop or the desktop with the scanner. (Reference: Section 3, page 5)
2. Login to HRS using the Private Internet Explorer Shortcut on your desktop. 3. Navigate to Employee Information(ImageNow). To do this, go to Workforce
Administration > UW External HR Systems > Employee Information(ImageNow).
4. Search for the desired employee by Empl ID. (You may search by “Employee name” but it will take considerably longer).

P-File Imaging Procedures | P-File Imaging
12
5. This returns a list of appointments for the specified “Empl ID.” Click the correct
Empl entry with “(blank)” listed in the Job End Date field. If these conditions do not match your results, contact your divisional HR representative.
6. You should now see the employee information that will be used in Learn Mode Linking.
7. Keep the Internet Explorer window open. 8. Open the document in the business application that houses the document (e.g.,
Adobe Acrobat, MS Word, E-mail). In that application, choose File > Print. 9. Select ImageNow Printer and then Print.

P-File Imaging Procedures | P-File Imaging
13
10. In this step, choose a LRN (Learnmode) capture profile associated with a drawer (DivSpec or Required) appropriate to your document. On the ImageNow toolbar, click the Capture down arrow and then select the capture profile you want to use (e.g., SCAN DivSpec LRN Private IE (Version #) or SCAN Required LRN Private IE (Version #)).
11. Click OK. 12. This will return the Proposed Keys dialog, image shown below. Review the
information for accuracy. 13. In the Document Type drop-down, select the correct Document Type option
based on the content of your document. Refer to “ImageNow P-File Document Crosswalk” document.
P-File Imaging Procedures | P-File Imaging
14
14. Click Capture. 15. Next, verify the scan and metadata. In Content Viewer, verify image quality,
Document Type, Index and Custom Property Values. Make any desired changes. The Recycle icon can be used to delete any blank pages. If you need to rescan, close the Content Viewer window and start over.
16. Enter the Effective Date* of the document (e.g., date of letter) in “A_OHR_Pfile_EffDate.” Refer to “ImageNow P-File Document Crosswalk” document for relative effective date.
17. Click Save. The document is now saved into your division’s QA queue.
P-File Imaging Procedures | P-File Imaging
15
18. Next, move the document from the QA Queue to the Review Queue. From the ImageNow toolbar click the Workflow down arrow and select your division’s QA Queue. All your division’s HR capture profiles are configured to deposit to this queue. Your menu items may be different than those shown here.
19. This will open the QA Queue in the ImageNow Content Explorer. Review the
Document Keys for the documents you have created. Double-click on a document to open it in the Content Viewer.

P-File Imaging Procedures | P-File Imaging
16
20. Route forward if the document passes your QA. To do this, click Workflow > Route Forward (or shortcut). You can select multiple documents to route forward by using the CTRL key. Note: Once forwarded, an administrator will need to delete a document if there is an error.
21. To correct the document metadata or delete the document: a. Make corrections: Double-click the document to open in Content Viewer.
Change Document Keys and Save. If unable to make corrections, delete. b. Delete document: While in the QA Queue, click the red X or navigate to
Edit > Delete.
Important!
QA Review: In this view, the goal is to audit the index keys and ensure the correct information was selected.
Your division may prefer that you only review documents that you created. There may be documents in QA Queue created by other users in your division.
Check all fields for accuracy comparing with document.
Document Type and Effective Date must align with “P-file Scanning Document
types” reference.
All documents should have your Divisional UDDS prefix (e.g., A34, A07).
Double click on a document row to open the full view in Content Viewer if needed.

P-File Imaging Procedures | P-File Imaging
17
22. The document will now be in the Review Queue and is considered complete and accurate.
Section 5: Manual Linking (Not Recommended) If Learn Mode is not working you are able to manually link the documents by manually entering the metadata.
Part A: Manual Linking of a Paper Document
1. Login to the ImageNow client on the workstation with the scanner. (Reference: Section 3, page 5)
2. Login to HRS using the Private Internet Explorer shortcut on your desktop. 3. On the ImageNow toolbar, click the Capture down arrow and then select the
capture profile you want to use (e.g., SCAN DivSpec MAN or SCAN Required MAN).

P-File Imaging Procedures | P-File Imaging
18
4. In the Proposed Keys dialog, manually enter the Document Keys and select the appropriate Document Type. All fields are required. You may look up this information in Job Data in HRS. (Reference: Section 6, page 20).
5. When complete, click Capture. 6. Then continue to follow the same process from Section 4, Part A, page 6 and refer
to the “P-File ImageNow Document Crosswalk.”
Part B: Manual Linking of an Electronic Document
1. Login to ImageNow on either your personal desktop or the desktop with the scanner. (Reference: Section 3, page 6)
2. Open the document in the business application that houses the document (e.g., Adobe Acrobat, MS Word, e-Mail). In that application, navigate to File > Print.
3. Select ImageNow Printer and click Print.

P-File Imaging Procedures | P-File Imaging
19
4. In this step, choose a capture profile that is appropriate for the document and drawer (e.g., DivSpec or Required). Select the capture profile you want to use (e.g., SCAN DivSpec MAN or SCAN Required MAN).
5. Click OK. 6. In the Proposed Keys dialog, manually enter the Document Keys and select the
appropriate Document Type. All fields are required. You can look up this information in Job Data in HRS. (Reference: Section 6, page 20)

P-File Imaging Procedures | P-File Imaging
20
7. When complete, click Capture. 8. Then continue to follow the same process from Section 4, Part B, page 11.
Section 6: LearnMode and Linking Tips
Acceptable Formatting for Effective Dates
Ways you can enter the effective date:
Ways you cannot enter the effective date:
04/08/2016 4/8/16 04-08-2016 4-8-16
04082016 4816 4.8.16 04.08.16

P-File Imaging Procedures | P-File Imaging
21
If you need to manually link, use HRS Job Data screen to find values for the Document Keys
Section 7: Document Search
Search Feature
1. Click Documents in the toolbar to begin your search
2. This will open the Documents section in the ImageNow Viewer. Select the “A_OHR_’division acronym’_Pfile” view for your division. (Please note this screenshot is from DoIT. Your division acronym will be listed in your system.)

P-File Imaging Procedures | P-File Imaging
22
Filter
1. Click on the appropriate document search filter in the left column (e.g., Empl ID, Name, UDDS). Enter the search value in the dialog pop-up.
2. Click OK. Results will be listed and can be sorted by each column.
P-File Imaging Procedures | P-File Imaging
23
Quick Search (Searching by 1 Value)
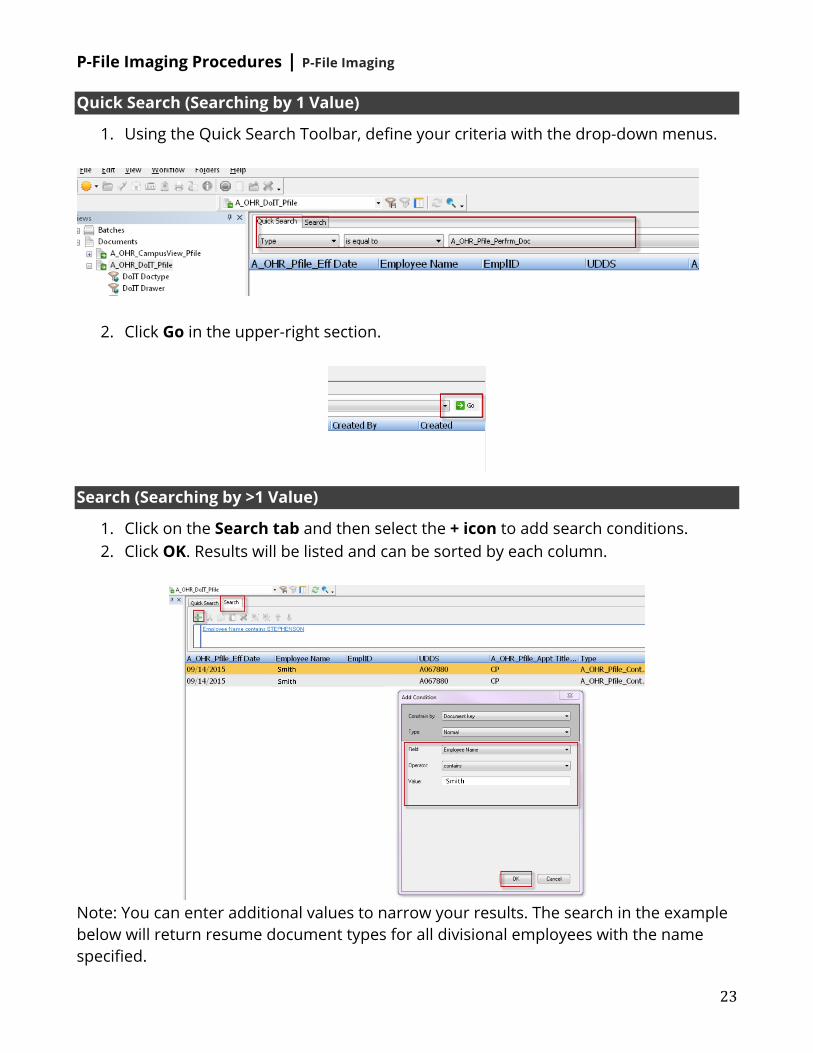
1. Using the Quick Search Toolbar, define your criteria with the drop-down menus.
2. Click Go in the upper-right section.
Search (Searching by >1 Value)
1. Click on the Search tab and then select the + icon to add search conditions. 2. Click OK. Results will be listed and can be sorted by each column.
Note: You can enter additional values to narrow your results. The search in the example below will return resume document types for all divisional employees with the name specified.

P-File Imaging Procedures | P-File Imaging
24
Section 8: Exporting Documents
1. Locate and open the desired document. (Reference: Section 7 starting on page 21) 2. Click File > Export.
3. When the Export window opens, customize the Profile, Format, Pages and Annotations. The recommended settings are shown below.

P-File Imaging Procedures | P-File Imaging
25
4. To name a file, click Browse and choose a location on your computer where you would like the PDF to be saved. Enter a name for the file and click Save.
5. Click OK. 6. Your PDF will be saved to the location you specified.
Section 9: Redacting Information on a Document in your QA Workflow 1. Locate and open the document in your QA workflow.
2. Select the Redact tool on the ImageNow toolbar.

P-File Imaging Procedures | P-File Imaging
26
3. Click and drag the redaction boxes around the information you wish to remove.
4. Click File and select Generate Redacted Document.

P-File Imaging Procedures | P-File Imaging
27
5. To generate the redaction, you must change a few things in the Generate Redacted Document menu.
a. Add an “R” in front of the EmplID. b. Check Send to workflow queue and select the QA queue (e.g., z “A_OHR_’division acronym’_Pfile_QA”). c. Verify All Pages is selected under Page Options.
6. Click OK to generate the new version of your document.
6. Your workflow queue will now contain both the non-redacted and redacted version of the document you updated.

P-File Imaging Procedures | P-File Imaging
28
7. Open the redacted version to make sure the redactions are correct. (The document with the “R” in front of the EmplID.) If the redactions are accurate, close the document. 8. Delete the original version of the document. (The document without the “R” in front of the EmplID.) 9. Click Yes in the Delete Items dialog box.
10. Locate and open the redacted document in your QA workflow. (The document with the “R” in front of the EmplID.) 11. Remove the “R” in front of the EmplID. 12. Save the edits and route on to the Review Queue.

P-File Imaging Procedures | P-File Imaging
29
Section 10: Troubleshooting Information KnowledgeBase Documents
ImageNow Concepts: How it works · https://kb.wisc.edu/ecms/page.php?id=33110 End User Training: Perceptive Content Fundamentals · https://kb.wisc.edu/ecms/page.php?id=33111
Enterprise Content Management Service (ECMS) KnowledgeBase · https://kb.wisc.edu/ecms
How to Get Support for Technical Issues Scanner or Client Issues
• Contact your Local IT Support (e.g., DoIT DS, AIMS, Internal IT Support).

P-File Imaging Procedures | P-File Imaging
30
ECMS / Imaging Service Issues • Contact DoIT Helpdesk @ 608-264-4357 or • E-mail @ [email protected].
Questions regarding internal process
• Contact your Divisional HR Manager.
Workforce Relations P-File Resources • http://www.ohr.wisc.edu/workforce/p-file.aspx