pace clock manual - colorado time systems
TRANSCRIPT

Pace Clock
For the System 6 Sports Timer Software User Guide F873 rev 20100820
Customer Service Department www.coloradotime.com
Email: [email protected]
Phone: 970-667-1000 ext. 256
Toll Free U.S./Canada 800-287-0653, x256
Fax: 970-667-1032

Colorado Time Systems
Corporate Office
1551 East 11th Street
Loveland, CO 80537 USA
Sales: 1-800-279-0111 or +1 970-667-1000
Service: 1-800-287-0653 x256 or +1 970-667-1000 x256
Service Fax: 970-667-1032
Web: www.coloradotime.com
Email: [email protected]
Part Number F873, Rev. 20100820
©2010. Colorado Time Systems, LLC. All rights reserved.
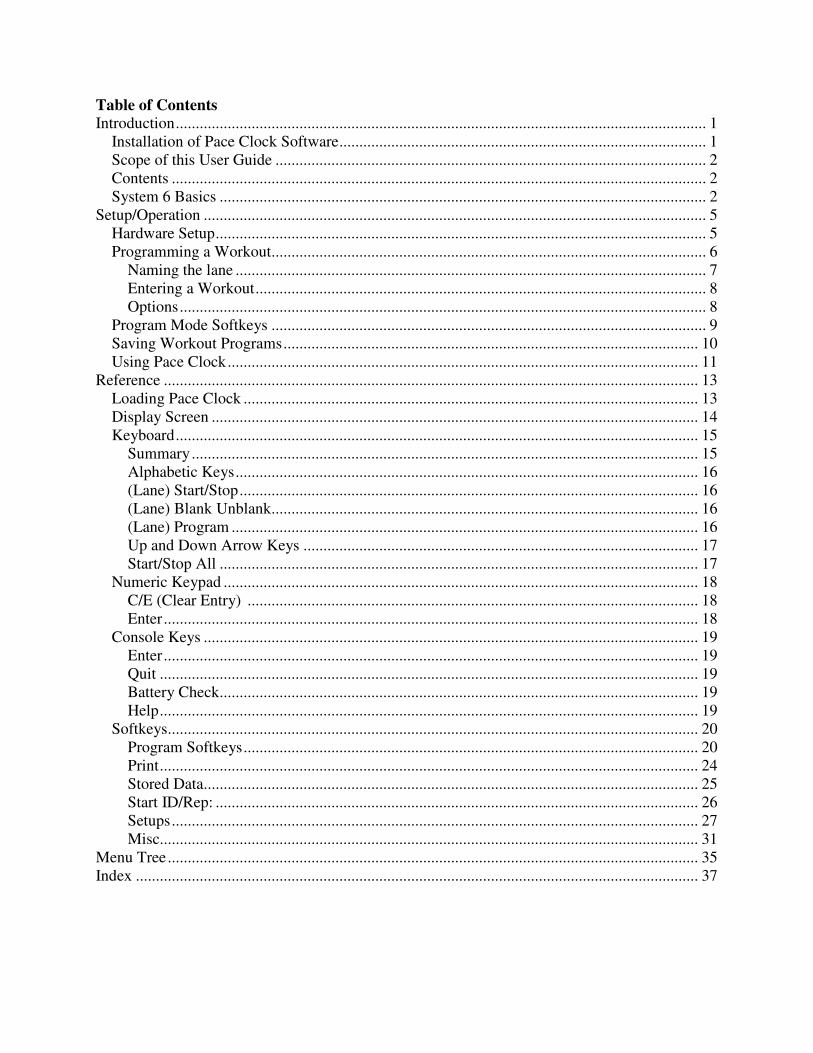
Table of Contents
Introduction ..................................................................................................................................... 1
Installation of Pace Clock Software ............................................................................................ 1
Scope of this User Guide ............................................................................................................ 2
Contents ...................................................................................................................................... 2
System 6 Basics .......................................................................................................................... 2
Setup/Operation .............................................................................................................................. 5
Hardware Setup ........................................................................................................................... 5
Programming a Workout............................................................................................................. 6
Naming the lane ...................................................................................................................... 7
Entering a Workout ................................................................................................................. 8
Options .................................................................................................................................... 8
Program Mode Softkeys ............................................................................................................. 9
Saving Workout Programs ........................................................................................................ 10
Using Pace Clock ...................................................................................................................... 11
Reference ...................................................................................................................................... 13
Loading Pace Clock .................................................................................................................. 13
Display Screen .......................................................................................................................... 14
Keyboard ................................................................................................................................... 15
Summary ............................................................................................................................... 15
Alphabetic Keys .................................................................................................................... 16
(Lane) Start/Stop ................................................................................................................... 16
(Lane) Blank Unblank........................................................................................................... 16
(Lane) Program ..................................................................................................................... 16
Up and Down Arrow Keys ................................................................................................... 17
Start/Stop All ........................................................................................................................ 17
Numeric Keypad ....................................................................................................................... 18
C/E (Clear Entry) ................................................................................................................. 18
Enter ...................................................................................................................................... 18
Console Keys ............................................................................................................................ 19
Enter ...................................................................................................................................... 19
Quit ....................................................................................................................................... 19
Battery Check........................................................................................................................ 19
Help ....................................................................................................................................... 19
Softkeys..................................................................................................................................... 20
Program Softkeys .................................................................................................................. 20
Print ....................................................................................................................................... 24
Stored Data............................................................................................................................ 25
Start ID/Rep: ......................................................................................................................... 26
Setups .................................................................................................................................... 27
Misc....................................................................................................................................... 31
Menu Tree ..................................................................................................................................... 35
Index ............................................................................................................................................. 37


1 Introduction
1
Introduction
Colorado Time Systems would like to thank you for purchasing the Pace Clock program for your
System 6 Sports Timer. Pace Clock software is a full-featured yet easy to use automatic training
aid designed to help you help your swimmers achieve peak condition. Pace Clock was
developed with input from many experienced coaches to incorporate the features most helpful to
them. If you have additional suggestions concerning Pace Clock, please contact your Sales
Representative.
If you should experience difficulties with any of your Colorado Time Systems’ equipment, check
the appropriate user guide for a solution first. If the user guide does not offer a solution to the
problem, call Colorado Time Systems’ Customer Service Department toll-free (US and Canada)
at ext. 256, 800-287-0653 or 970-667-1000 (international).
Installation of Pace Clock Software
Your System 6 will already have Pace Clock training software installed on it if you ordered the
System 6 and the software at the same time. Otherwise, you will receive the software
electronically (by email or via the internet).
Online installation:
Once you have purchased the software, you will be able to connect your System 6 to the internet
and download the latest version of Pace Clock training software. You can also update your
software this way, as newer versions are available. It’s a good idea to check for updates at the
beginning of each season.
USB/Floppy disk installation: If you want to install from a USB key or floppy disk (depending on which one your timer
supports), you can download the file from the website. See the Sport Loader manual for details
on how to complete this installation. Updates are available this way as well.
NOTE: If the firmware revision on your System 6 is earlier than 1.34, you must update it so that
the Pace Clock training software will run. There are two ways to do this:
• The easiest and fastest is to connect your timer to the Internet, as described above in
online installation.
• The other option is to contact CTS customer support (email
[email protected] or call 800-287-0653 x256 or 970-667-1000 x256).
You will need your timer’s serial number (found on the Diagnostics screen from the main
Sport Loader menu). The customer service representative will email you an updated

2 Introduction
firmware file. Copy this file to a removable medium that your timer supports (UBS or
floppy disk), and it to install the firmware on your System 6. The firmware must be the
only file on the medium. Do not try to install software updates at the same time. Once the
firmware is at revision 1.34 or higher, your timer can be updated by either of the methods
described above.
Scope of this User Guide
This user guide addresses all issues relating to the normal operation of the Pace Clock program
on the System 6 Sports Timer. It is written with the beginning timer operator in mind, but also
contains detailed information of interest to experienced operators. Use the Table of Contents and
Index to locate specific information quickly.
Contents Chapter 1 – Contains introductory and background information on the Pace Clock program.
Chapter 2 – Covers Pace Clock program setup and basic operating instructions, including
instructions to help you begin using Pace Clock right away.
Chapter 3 – This is the Reference section which describes in detail the operation of all Pace
Clock program features. It includes descriptions of all key functions and contains display screen
examples. Use this chapter to learn how to use specific features or to refresh your memory on
any aspect of Pace Clock.
Index –Provides quick access to specific information.
System 6 Basics
Battery
An internal lithium ion battery provides backup power in case of emergency or power outage. To
charge the battery, plug the System 6 into a grounded power outlet with the unit turned off. The
charge time of the battery is a minimum of 3 hours, or overnight. The battery will provide
approximately 45 minutes of usage time. This can be increased to 1 hour after 4 to 5 cycles of
fully charging and fully discharging.
If you are discharging the battery, go the Sport Loader Menu and let the timer run until it dies.
CTS recommends completely discharging the battery once a year.
Proper Shutdown Procedure

3 Introduction
When finished using the System 6, be sure to properly shut down your timer. The proper
shutdown procedure is as follows:
1. On the softkey menu, choose Misc
2. Choose Change Sport
3. Confirm that you wish to leave pace clock
4. Choose Shut Down on the Sport Loader Menu, and press yes
5. Turn off the timer using the power switch on the back.


5 Setup/Operation
2
Setup/Operation
The first part of this chapter describes how to set up your Pace Clock program. Setup is easy,
but must be done correctly to ensure proper operation of your Pace Clock and System 6 Sports
Timer. The second part of this chapter gives you step-by-step instructions for setting up and
saving a training program.
Hardware Setup
To set up the hardware for Pace Clock, ensure the following:
o Your System 6 can send data to the scoreboard, either because it is connected by data
cables, or because it is connected to a wireless adapter to send the data wirelessly
o The Pace Clock keyboard insert is in your System 6. If the keyboard insert that’s there
isn’t Pace Clock, slide it out and store it in a safe place. Slide the Pace Clock insert in.
o The Pace Clock software is installed and updated on your timer (see page1, Chapter 1)
Figure 2-A: Sports Menu

6 Setup/Operation
Turn on your System 6. After the standard self-tests, the Sports menu appears, displaying the
sports programs currently installed on your System 6. Press the Pace Clock softkey. Pace Clock
loads and the Pace Clock main screen appears. See Figure 2-B for an example Main screen.
You are ready to begin programming workouts.
Tips:
Softkeys are on the screen and correspond to the buttons of the face of the System 6.
Keyboard keys are on the lower keyboard and are labeled with the keyboard insert.
The Enter key on the lower right of the keyboard and the Enter key on the face of the System 6
function the same way; use whichever one is most convenient at the time.
Figure 2-B Pace Clock Main Screen
Programming a Workout
To begin using Pace Clock, the first step is to program a workout. Programming Pace Clock is
quite easy, and you should read through this section to be sure you are taking full advantage of
its many features.
7 Setup/Operation
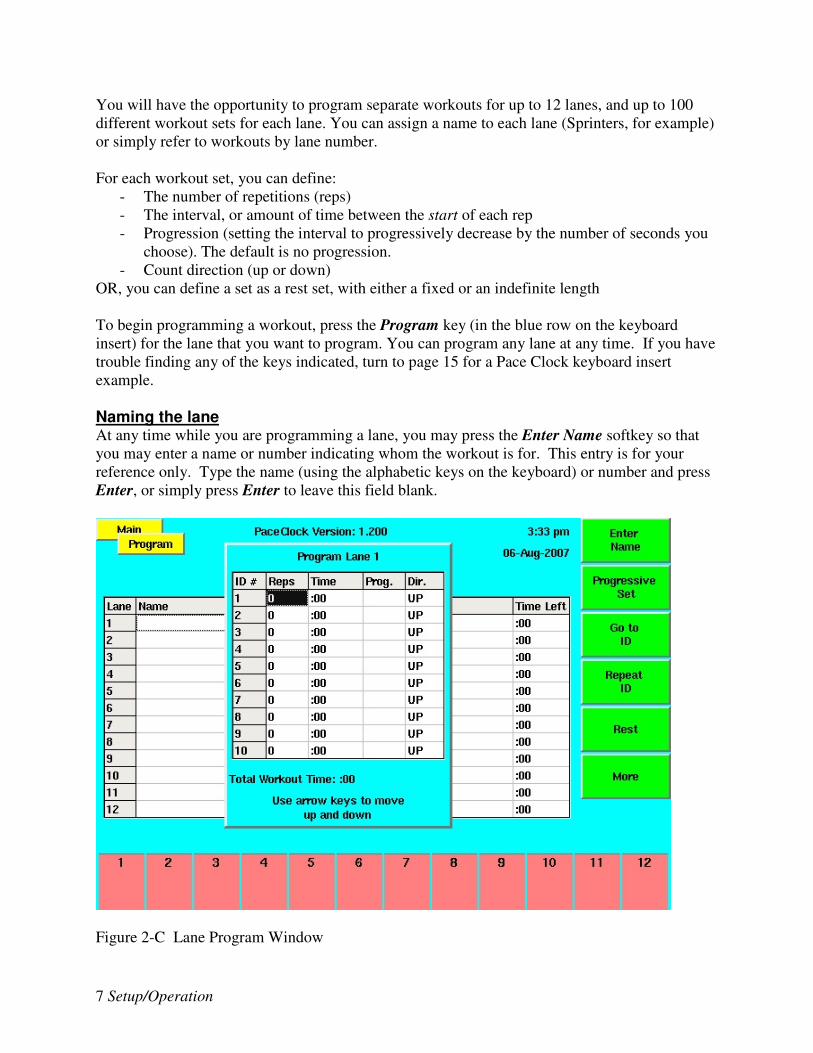
You will have the opportunity to program separate workouts for up to 12 lanes, and up to 100
different workout sets for each lane. You can assign a name to each lane (Sprinters, for example)
or simply refer to workouts by lane number.
For each workout set, you can define:
- The number of repetitions (reps)
- The interval, or amount of time between the start of each rep
- Progression (setting the interval to progressively decrease by the number of seconds you
choose). The default is no progression.
- Count direction (up or down)
OR, you can define a set as a rest set, with either a fixed or an indefinite length
To begin programming a workout, press the Program key (in the blue row on the keyboard
insert) for the lane that you want to program. You can program any lane at any time. If you have
trouble finding any of the keys indicated, turn to page 15 for a Pace Clock keyboard insert
example.
Naming the lane At any time while you are programming a lane, you may press the Enter Name softkey so that
you may enter a name or number indicating whom the workout is for. This entry is for your
reference only. Type the name (using the alphabetic keys on the keyboard) or number and press
Enter, or simply press Enter to leave this field blank.
Figure 2-C Lane Program Window
8 Setup/Operation
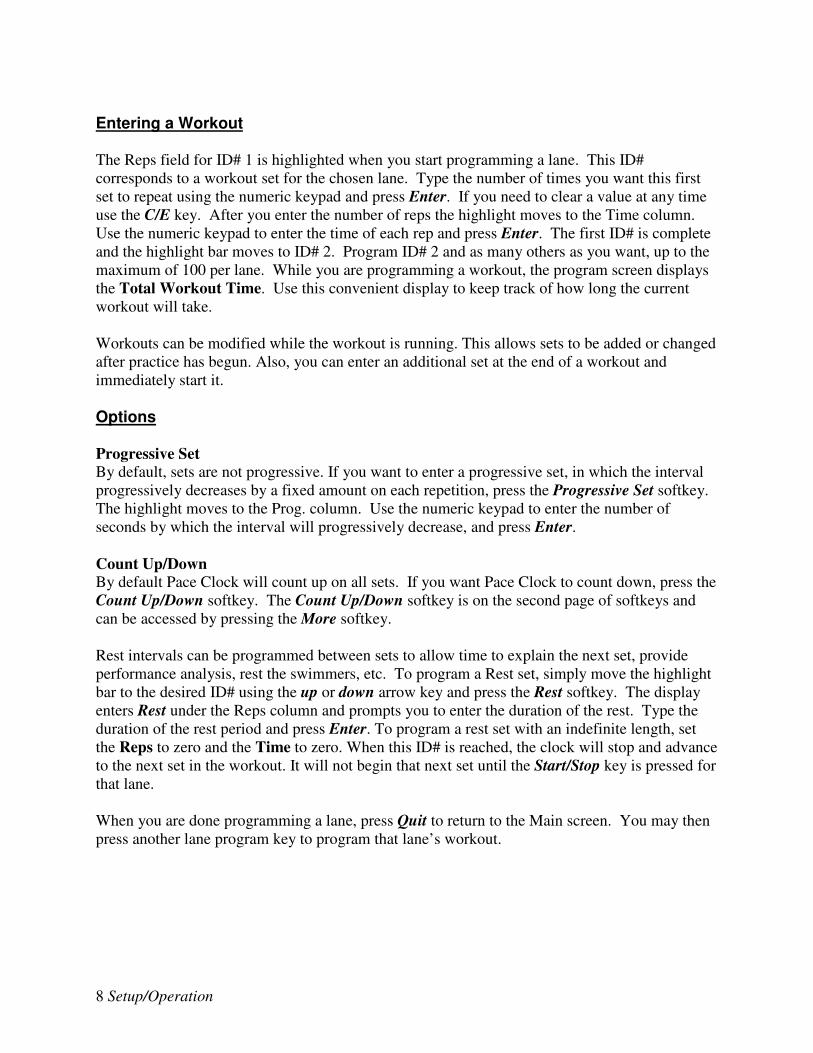
Entering a Workout
The Reps field for ID# 1 is highlighted when you start programming a lane. This ID#
corresponds to a workout set for the chosen lane. Type the number of times you want this first
set to repeat using the numeric keypad and press Enter. If you need to clear a value at any time
use the C/E key. After you enter the number of reps the highlight moves to the Time column.
Use the numeric keypad to enter the time of each rep and press Enter. The first ID# is complete
and the highlight bar moves to ID# 2. Program ID# 2 and as many others as you want, up to the
maximum of 100 per lane. While you are programming a workout, the program screen displays
the Total Workout Time. Use this convenient display to keep track of how long the current
workout will take.
Workouts can be modified while the workout is running. This allows sets to be added or changed
after practice has begun. Also, you can enter an additional set at the end of a workout and
immediately start it.
Options
Progressive Set
By default, sets are not progressive. If you want to enter a progressive set, in which the interval
progressively decreases by a fixed amount on each repetition, press the Progressive Set softkey.
The highlight moves to the Prog. column. Use the numeric keypad to enter the number of
seconds by which the interval will progressively decrease, and press Enter.
Count Up/Down
By default Pace Clock will count up on all sets. If you want Pace Clock to count down, press the
Count Up/Down softkey. The Count Up/Down softkey is on the second page of softkeys and
can be accessed by pressing the More softkey.
Rest intervals can be programmed between sets to allow time to explain the next set, provide
performance analysis, rest the swimmers, etc. To program a Rest set, simply move the highlight
bar to the desired ID# using the up or down arrow key and press the Rest softkey. The display
enters Rest under the Reps column and prompts you to enter the duration of the rest. Type the
duration of the rest period and press Enter. To program a rest set with an indefinite length, set
the Reps to zero and the Time to zero. When this ID# is reached, the clock will stop and advance
to the next set in the workout. It will not begin that next set until the Start/Stop key is pressed for
that lane.
When you are done programming a lane, press Quit to return to the Main screen. You may then
press another lane program key to program that lane’s workout.
9 Setup/Operation
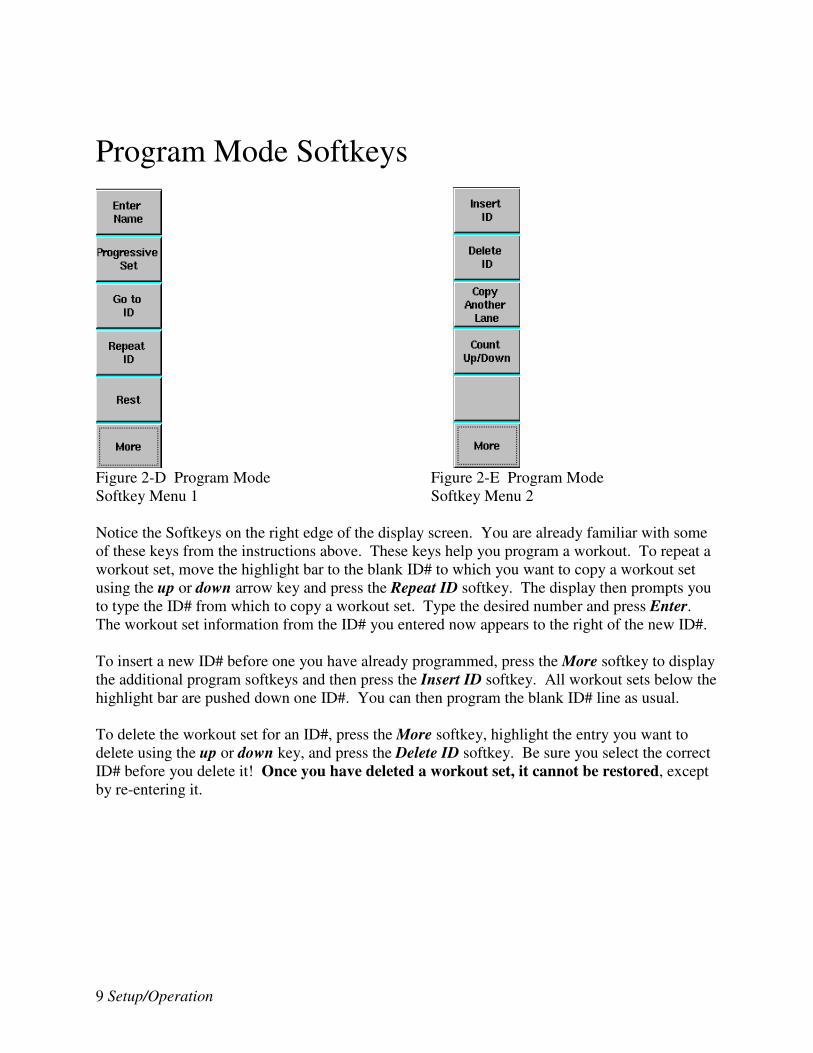
Program Mode Softkeys
Figure 2-D Program Mode Figure 2-E Program Mode
Softkey Menu 1 Softkey Menu 2
Notice the Softkeys on the right edge of the display screen. You are already familiar with some
of these keys from the instructions above. These keys help you program a workout. To repeat a
workout set, move the highlight bar to the blank ID# to which you want to copy a workout set
using the up or down arrow key and press the Repeat ID softkey. The display then prompts you
to type the ID# from which to copy a workout set. Type the desired number and press Enter.
The workout set information from the ID# you entered now appears to the right of the new ID#.
To insert a new ID# before one you have already programmed, press the More softkey to display
the additional program softkeys and then press the Insert ID softkey. All workout sets below the
highlight bar are pushed down one ID#. You can then program the blank ID# line as usual.
To delete the workout set for an ID#, press the More softkey, highlight the entry you want to
delete using the up or down key, and press the Delete ID softkey. Be sure you select the correct
ID# before you delete it! Once you have deleted a workout set, it cannot be restored, except
by re-entering it.

10 Setup/Operation
Saving Workout Programs
After you have programmed the entire workout for a lane, you can copy it to as many other lanes
as you like. To do this, press the program key for the new lane; press the More softkey and press
the Copy Another Lane softkey. The display prompts you to enter the lane from which to copy
the workout. Type the desired lane number using the numeric keypad and press Enter. All
workout sets from the lane number you entered now appear under the new lane.
After programming workouts, you can save them for use at any time. To save a new set of
workouts, press Quit to return to the Main screen and then press the Stored Data softkey. The
display shows you the names of any other workout events already saved. Press the Save
Workout softkey, type the name for the new workout event, and press Enter. To delete a
workout, press the Delete Workout softkey, highlight the event you want to delete and press
Enter.
If you have already programmed and stored a workout, press the Stored Data softkey and then
press the Load Workout softkey. Select the desired workout using the up or down arrow key
and press Enter to load. You are now ready to begin the workout.
When you exit the PaceClock program, the current workout is automatically saved and recalled
the next time you enter the program. You can clear the current workout at any time by pressing
Clear Workout in the Misc. menu.

11 Setup/Operation
Figure 2-F Loading a Stored Pace Clock Workout
Using Pace Clock
Now that you have programmed Pace Clock, you can use it to automate your workouts. To
begin a workout, load the desired workout from memory using the procedure described above.
To start the programmed workout one lane at a time, press Start/Stop (in the red row on the
keyboard insert) for that lane. To start or stop all lanes at once, press Start/Stop All.
This section described only the basic features of Pace Clock. For complete information on all
features, turn to Chapter 3.

13 Reference
3
Reference
This chapter describes in detail the operation of the Pace Clock program, the function of each
key on the keyboard, and all softkey functions. Screen display examples appear as appropriate.
This chapter is not meant to be read from beginning to end. Instead, use it as a reference to learn
about individual features and functions of Pace Clock. To locate specific information quickly,
look up the desired feature in the Index or Table of Contents.
Loading Pace Clock
Summary
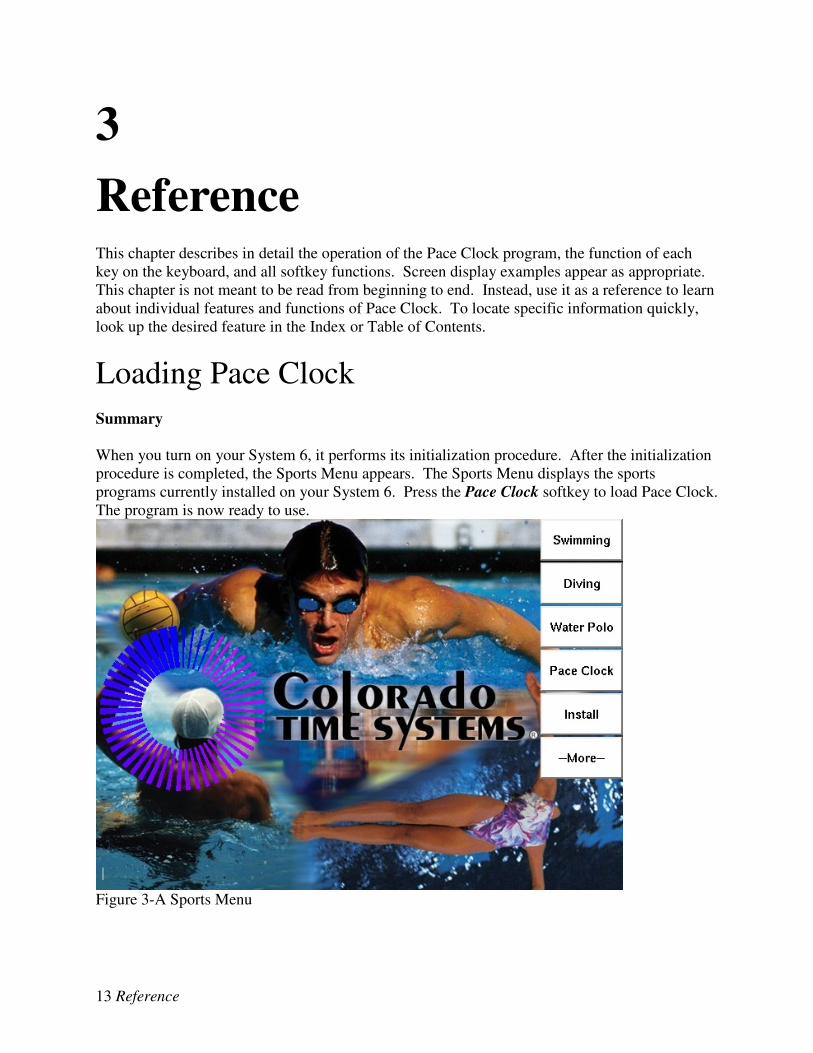
When you turn on your System 6, it performs its initialization procedure. After the initialization
procedure is completed, the Sports Menu appears. The Sports Menu displays the sports
programs currently installed on your System 6. Press the Pace Clock softkey to load Pace Clock.
The program is now ready to use.
Figure 3-A Sports Menu
14 Reference
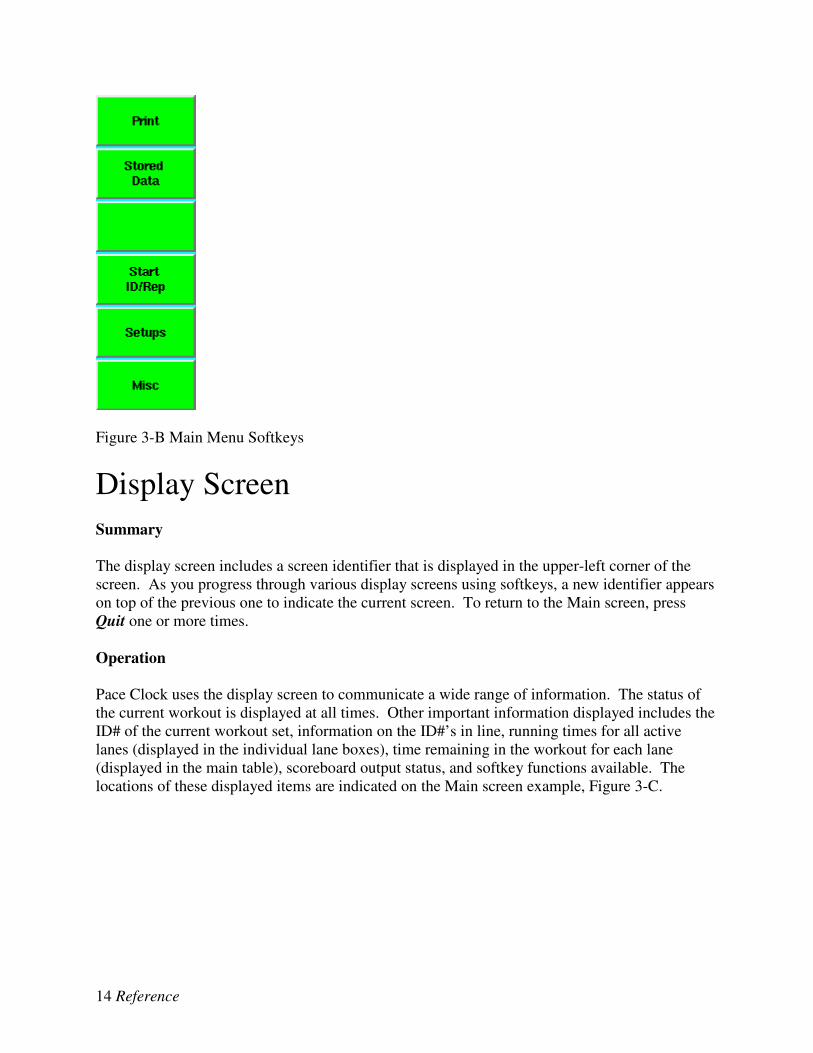
Figure 3-B Main Menu Softkeys
Display Screen
Summary
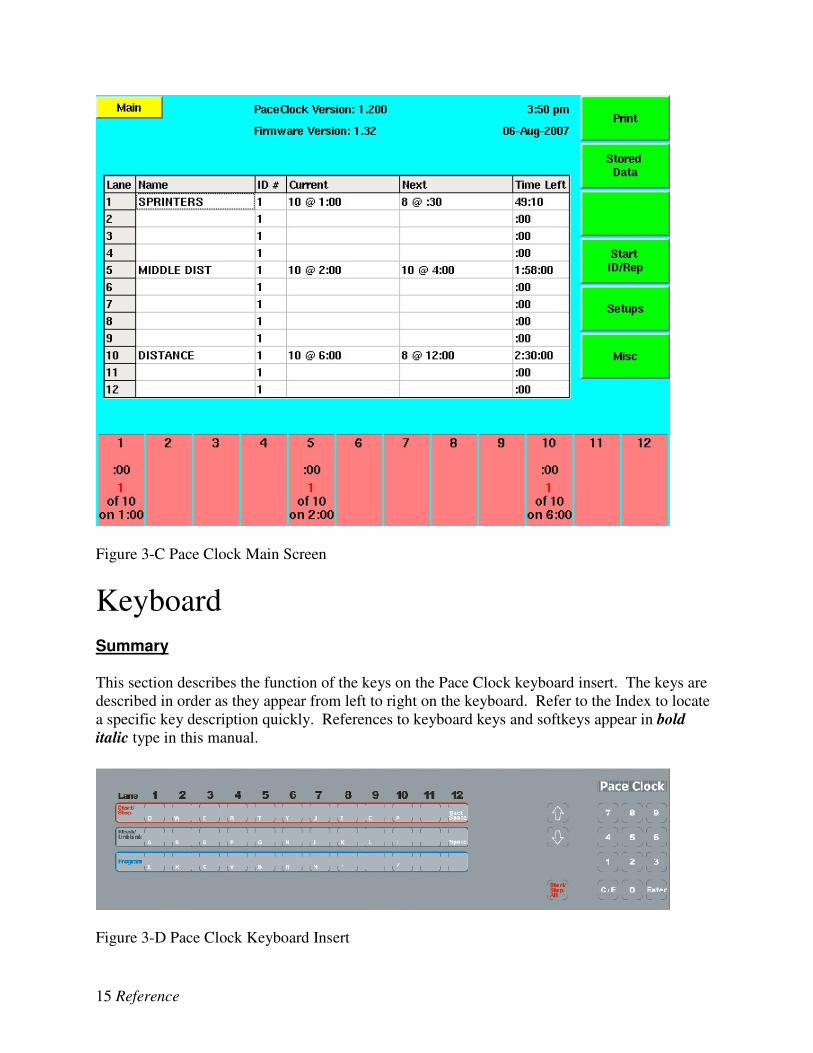
The display screen includes a screen identifier that is displayed in the upper-left corner of the
screen. As you progress through various display screens using softkeys, a new identifier appears
on top of the previous one to indicate the current screen. To return to the Main screen, press
Quit one or more times.
Operation
Pace Clock uses the display screen to communicate a wide range of information. The status of
the current workout is displayed at all times. Other important information displayed includes the
ID# of the current workout set, information on the ID#’s in line, running times for all active
lanes (displayed in the individual lane boxes), time remaining in the workout for each lane
(displayed in the main table), scoreboard output status, and softkey functions available. The
locations of these displayed items are indicated on the Main screen example, Figure 3-C.
15 Reference
Figure 3-C Pace Clock Main Screen
Keyboard
Summary
This section describes the function of the keys on the Pace Clock keyboard insert. The keys are
described in order as they appear from left to right on the keyboard. Refer to the Index to locate
a specific key description quickly. References to keyboard keys and softkeys appear in bold
italic type in this manual.
Figure 3-D Pace Clock Keyboard Insert
16 Reference: Keyboard
Alphabetic Keys
The alphabetic keys occupy the top three rows of the Pace Clock keyboard. They are arranged in
standard typewriter order. Use these keys to enter names of swimmers, workouts, etc., when
Pace Clock prompts you to do so.
(Lane) Start/Stop
The lane Start/Stop keys are located in the first (red) row under the lane numbers on the Pace
Clock keyboard. These keys start or stop each lane, depending on current status. When a lane is
restarted after being stopped, the running time for the current repetition is reset to 0:00 (or the
maximum if the set is programmed to count down).
For example, if lane 1 is currently stopped, press the Start/Stop key for lane 1 to start the current
set. To interrupt the workout for lane 1, press Start/Stop for lane 1. Press Start/Stop for lane 1
again to resume the workout, starting at the beginning of an interval. The lane boxes at the
bottom of the screen are green for lanes that are running and red for lanes that are stopped.
(Lane) Blank Unblank
The Blank/Unblank keys are located in the second row from the top on the Pace Clock
keyboard. Depending on current status, each key blanks or unblanks (turns off or on) the
scoreboard display corresponding to the lane number above it at the top of the keyboard insert.
This feature can be used to get the attention of the swimmer in a particular lane.
If lane 1 is currently on, press the Blank/Unblank key for lane 1 to blank its scoreboard display.
To unblank the scoreboard display for lane 1, press the lane 1 Blank/Unblank key. If a lane is
blanked, the word “BLANK” will appear in the lane status box at the bottom of the screen.
(Lane) Program
Function: The Program keys (the blue row on the keyboard) allow you to program the workout
set for each lane. Pace Clock is designed to be used with a multi-line scoreboard. You can
therefore program workout sets for each scoreboard module. If you find the scoreboard difficult
to read, you may consider programming every other lane to improve readability.
Operation: At any time while you are programming a lane, you may press the Enter Name
softkey so that you may enter a name or number indicating whom the workout is for. This entry
is for your reference only. Type the name, using the alphabetic keys on the keyboard, or number
and press Enter, or simply press Enter to leave this field blank.
The Reps field for ID# 1 is highlighted when you start programming a lane. This ID#
corresponds to a workout set for the chosen lane. Type the number of times you want this first
set to repeat using the numeric keypad and press Enter. If you need to clear a value at any time
use the C/E key.
17 Reference: Keyboard
After you enter the number of reps the highlight moves to the Time column. Use the numeric
keypad to enter the time of each repetition and press Enter. The first ID# is complete and the
highlight bar moves to ID# 2. Program ID# 2 and as many others as you want, up to the
maximum of 100 per lane. Notice that while you are programming a workout, the program
screen displays the Total Workout Time. Use this convenient display to keep track of the total
time of the current workout.
By default Pace Clock will count up time on all sets. If you want Pace Clock to count down,
press the Count Up/Down softkey. The Count Up/Down softkey is on the second page of
softkeys and can be accessed by pressing the More softkey.
If you want to enter a progressive set in which the time of each interval decreases by a fixed
amount on each repetition, press the Progressive Set softkey. The highlight moves to the Prog.
column. Use the numeric keypad to enter the number of seconds by which the interval will
decrease for each repetition and press Enter.
Rest intervals can be programmed between sets to allow time to explain the next set, provide
performance analysis, rest the swimmers, etc.
• To program a Rest set with a fixed length, simply move the highlight bar to the desired
ID# using the up or down arrow key and press the Rest softkey. The display enters Rest
under the Reps column and prompts you to enter the duration of the rest. Type the
duration of the rest period and press Enter. Press the Rest softkey to toggle off of rest sets
and back to programming regular sets.
• To program a rest set with an indefinite length, set the Reps to zero and the Time to zero.
When this ID# is reached, the clock will stop and advance to the next set in the workout.
It will not begin that next set until the Start/Stop key is pressed for that lane.
When you are done programming a lane, press Quit to return to the Main screen. You may then
press another lane program key to program that lane’s workout.
Note: Refer to the Program Screen Softkeys section beginning on page 20 for complete
information on using softkeys while programming a workout.
Up and Down Arrow Keys
The up and down arrow keys move the highlight bar on the display screen up or down, allowing
you to select the desired line on the screen.
Start/Stop All
Depending on current lane status, this key starts or stops the timer for all lanes simultaneously.
If all lanes are stopped, press Start/Stop All to start the pace clock for all lanes that have workout
sets programmed. Press this key again to stop the pace clock for all lanes. If one or more lanes
are currently running, press Start/Stop All starts the pace clock for the remaining lanes that have
18 Reference: Keyboard
sets programmed while not affecting the lanes that were already running. If you stop all lanes,
the restart them (either one at a time or all at once) the running time of the current repetition will
be reset to 0:00 (or the maximum if the set is programmed to count down).
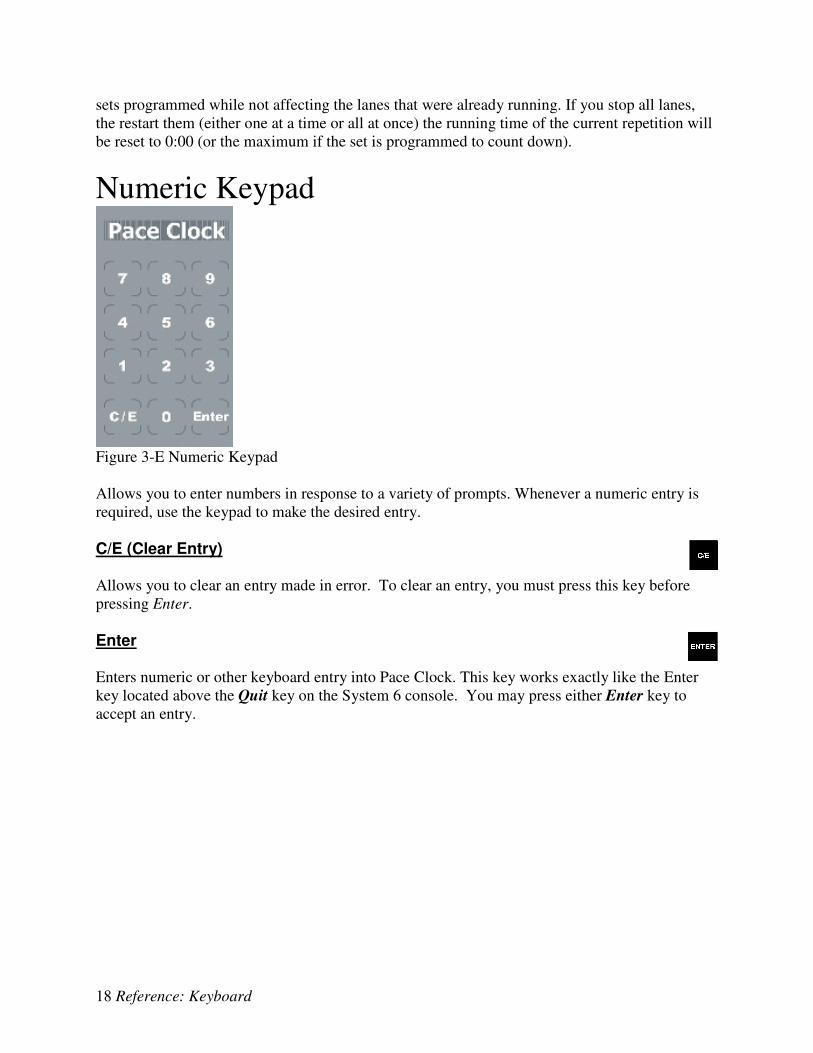
Numeric Keypad
Figure 3-E Numeric Keypad
Allows you to enter numbers in response to a variety of prompts. Whenever a numeric entry is
required, use the keypad to make the desired entry.
C/E (Clear Entry)
Allows you to clear an entry made in error. To clear an entry, you must press this key before
pressing Enter.
Enter
Enters numeric or other keyboard entry into Pace Clock. This key works exactly like the Enter
key located above the Quit key on the System 6 console. You may press either Enter key to
accept an entry.
19 Reference: Keyboard
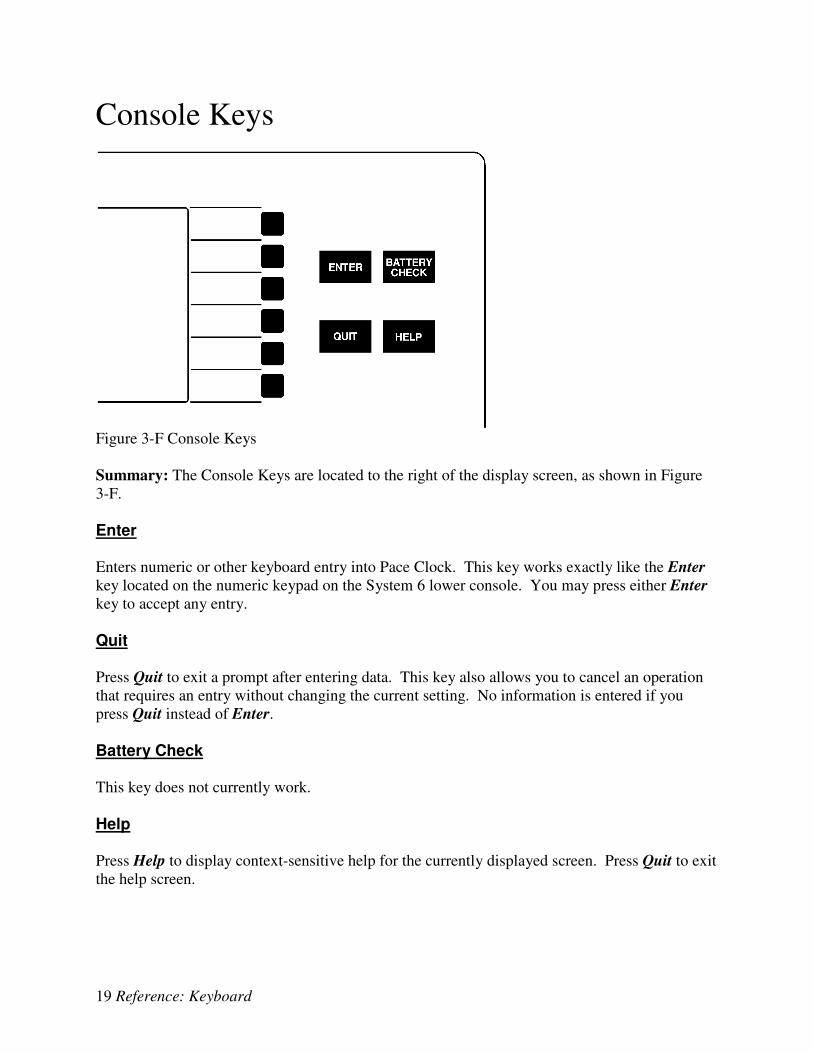
Console Keys
Figure 3-F Console Keys
Summary: The Console Keys are located to the right of the display screen, as shown in Figure
3-F.
Enter
Enters numeric or other keyboard entry into Pace Clock. This key works exactly like the Enter
key located on the numeric keypad on the System 6 lower console. You may press either Enter
key to accept any entry.
Quit
Press Quit to exit a prompt after entering data. This key also allows you to cancel an operation
that requires an entry without changing the current setting. No information is entered if you
press Quit instead of Enter.
Battery Check
This key does not currently work.
Help
Press Help to display context-sensitive help for the currently displayed screen. Press Quit to exit
the help screen.

20 Reference: Softkeys
Softkeys
Summary: This section describes the operation of the Pace Clock softkeys. The softkeys are the
column of six unlabeled keys to the immediate right of the display screen. The function of each
key varies depending on the operation selected. The screen displays the function currently
available directly to the left of each softkey. If no label appears next to a softkey, that key is
inactive. See Figure 3-G for an example of the main softkey menu.
Figure 3-G Pace Clock Main Softkey Menu
Operation: Each softkey’s functions are organized in layers or levels. The first level consists of
the five softkeys displayed when you first turn on Pace Clock. This is the Main softkey menu.
When you press one of these softkeys, a second level offering more specific choices is displayed.
If you press a softkey by mistake, or want to return to the Main screen after using a softkey,
press Quit. If you have not pressed Enter after typing an entry, pressing Quit exits without
saving that entry.
Program Softkeys
Function: When you press one of the lane Program keys, the Lane Program window is
displayed. An example Lane Program window appears in Figure 3-H.
Operation: While Pace Clock is in program mode, the main Program softkey menu appears.
You create a workout program by using a combination of Program softkeys and keyboard keys.
An example of this softkey menu is shown in Figure 3-H.

21 Reference: Softkeys
To program a workout, press the Program key for the desired lane, type the number of
repetitions and time for each ID#, up to 100 for each lane. See “Programming a Workout,”
beginning on page 6, for a detailed description of the process.
Figure 3-H Lane Program Window
Enter Name
Press this softkey to enter or edit the name for the lane you are currently programming. Type the
name or number and press Enter. This is optional.

22 Reference: Softkeys
Figure 3-I Program Softkey Menu 1
Progressive Set
Press the Progressive Set softkey to create a decreasing time interval for an ID#. For example, if
there are 3 reps, the Time is :40 and the Prog. is :02, the 3 intervals will be :40, :38, and :36
seconds.
Go to ID
Press the Go to ID softkey, enter the ID# to go to, and press Enter. The highlight moves to the
entered ID#.
Repeat ID
With the highlight bar on a blank ID# line, press the Repeat ID softkey, enter the ID# to repeat,
and press Enter. The Reps and Time from the specified ID# appear on the new ID# line.
Rest
On the desired blank ID# line, press the Rest softkey to insert a rest period into the workout you
are programming. The word Rest appears in the Reps column. Type the duration of the rest
period and press Enter. Press the Rest softkey again to toggle off of rest sets and back to
programming regular sets.
When the scoreboard is displaying a rest set, the repetitions digit is replaced by a small letter “r”.
More
Press this key to toggle between the two Program softkey menus. The second Program softkey
menu is shown in Figure 3-J.

23 Reference: Softkeys
Figure 3-J Program Softkey Menu 2
Insert ID
Position the highlighted bar on the desired ID# using the up or down arrow key and press the
Insert ID softkey to insert a blank ID# line. All lines below the newly inserted line move down
the ID# list one position.
Delete ID
Position the highlighted bar on the desired ID# using the up or down arrow key and press the
Delete ID softkey to delete the ID#. All lines below the deleted line move up the ID# list one
position.
Copy Another Lane
This key copies the entire workout from another lane that you have already programmed. Press
the Copy Another Lane softkey and enter the lane number from which to copy. Press Enter to
complete the transfer.
Note: If you are copying a workout to a lane that already has workout information programmed,
the existing workout is erased when you copy information from another lane. Be careful when
using this key to avoid inadvertently destroying desired program information.
Count Up/Down
Press the Count Up/Down softkey to change the direction in which the timer counts. Notice the
DOWN or UP text to the right of the Prog. column on the program window, indicating the
direction of counting.

24 Reference: Softkeys
The Print softkey allows you to print the workout for individual lanes, or for all lanes. Make
sure the printer is properly attached to your System 6, is on-line, and is loaded with paper before
attempting to print. Notice also that a lane selection window appears on the display screen. This
window allows you to select the lane(s) you want to print.
Figure 3-K Print Softkey Menu
Print Lane
Move the highlight bar to the desired lane using the up or down arrow key and press the Print
Lane softkey. Notice that the lane number displayed with this softkey changes to indicate the
selected lane. Repeat the process to print the total workout for other lanes.
Print All Lanes
Prints the workout for all lanes for which a workout set is programmed.

25 Reference: Softkeys
Form Feed
This key advances the paper to the top of the next page. Provides page breaks between pages of
workout information. Press the Form Feed softkey when you want to end a page. Any
information printed after a form feed begins at the top of the next page.
Stored Data
The Stored Data softkey allows you to save the current workout and provides access to workouts
that have already been saved. Pressing the Stored Data softkey displays the Stored Data screen
and softkey menu. All workouts stored are retained in memory when you turn off your System
6.
Figure 3-L Stored Data Screen
Load Workout
Press the Load Workout softkey and use the up or down arrow key to highlight the workout set
you want to load. Press Enter to load the selected set or press Quit to cancel the Load Event
function without loading a workout.
Save Workout

26 Reference: Softkeys
After programming a workout set, press the Save Workout softkey to store it in memory. The
display prompts you to name the event you want to save. Type a name that will help you
remember the content of the workout and press Enter. Press Quit to return to the Main screen.
Delete Workout
Operation: Press the Delete Workout softkey and then use the up or down arrow key to
highlight the workout event you want to delete. Press Enter to delete the selected event. After
deleting unwanted workout events, press Quit to return to the Main screen.
Caution: Make sure the workout you have selected is the one you really want to delete. Once
you delete a workout, it is gone forever. If you delete a workout by mistake, you must re-
program it from scratch!
Rename Workout
If there is a saved workout selected in the list, this feature will appear and allow you to change
the name.
Download Transfer
Function: Allows you to transfer a downloaded workout program from a PC to Pace Clock.
This feature requires separate workout management software for your PC.
Operation: Follow the directions in your workout manager program.
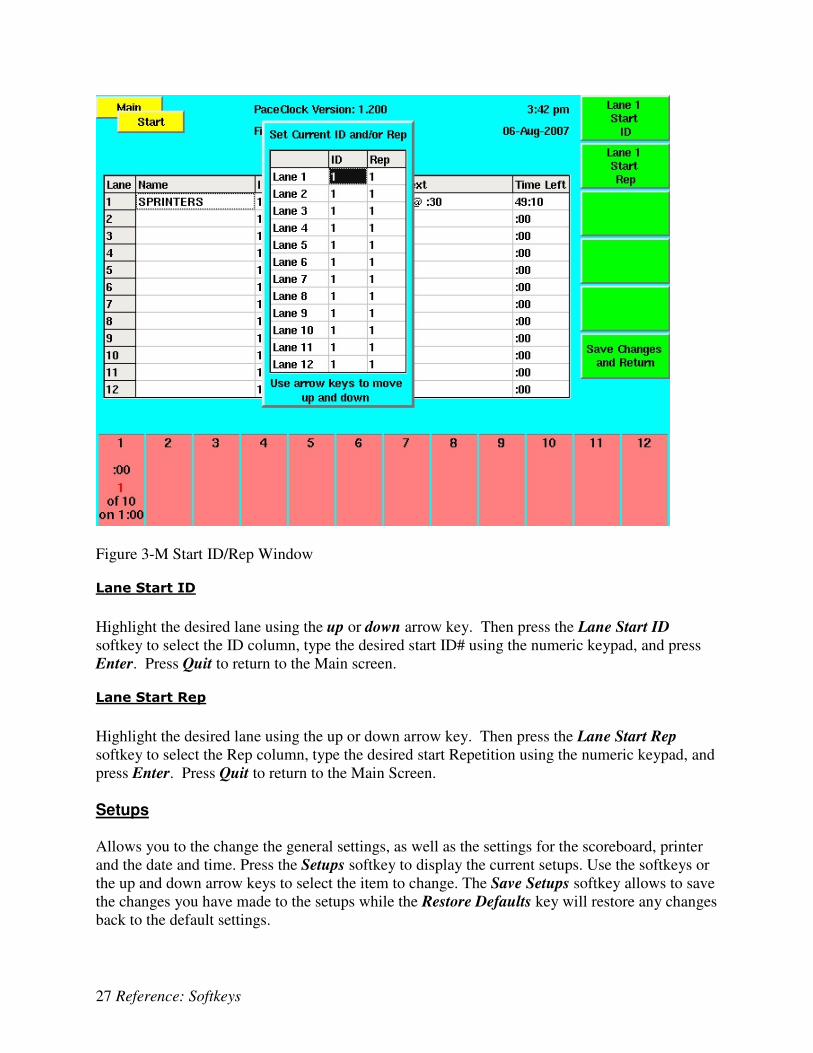
Start ID/Rep:
The Start ID/Rep softkey allows you to select the ID# and Repetition with which to begin a
workout session. You may also use this key to skip parts of a workout.
27 Reference: Softkeys
Figure 3-M Start ID/Rep Window
Lane Start ID
Highlight the desired lane using the up or down arrow key. Then press the Lane Start ID
softkey to select the ID column, type the desired start ID# using the numeric keypad, and press
Enter. Press Quit to return to the Main screen.
Lane Start Rep
Highlight the desired lane using the up or down arrow key. Then press the Lane Start Rep
softkey to select the Rep column, type the desired start Repetition using the numeric keypad, and
press Enter. Press Quit to return to the Main Screen.
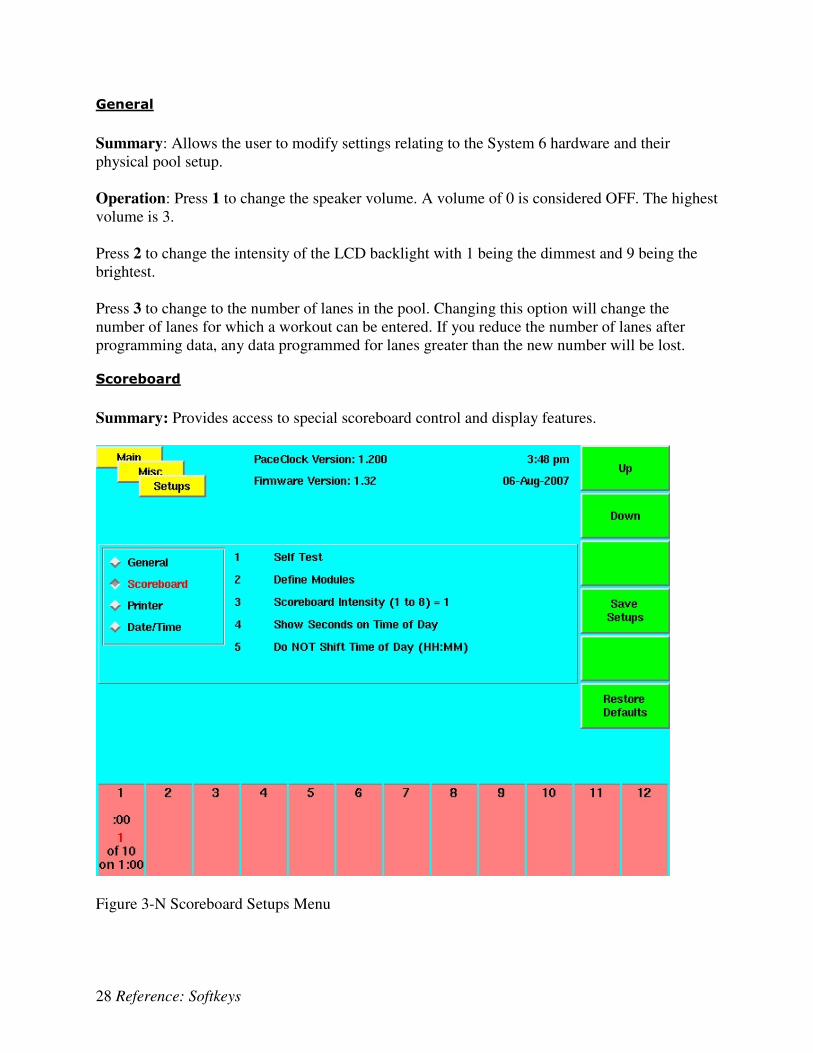
Setups
Allows you to the change the general settings, as well as the settings for the scoreboard, printer
and the date and time. Press the Setups softkey to display the current setups. Use the softkeys or
the up and down arrow keys to select the item to change. The Save Setups softkey allows to save
the changes you have made to the setups while the Restore Defaults key will restore any changes
back to the default settings.
28 Reference: Softkeys
General
Summary: Allows the user to modify settings relating to the System 6 hardware and their
physical pool setup.
Operation: Press 1 to change the speaker volume. A volume of 0 is considered OFF. The highest
volume is 3.
Press 2 to change the intensity of the LCD backlight with 1 being the dimmest and 9 being the
brightest.
Press 3 to change to the number of lanes in the pool. Changing this option will change the
number of lanes for which a workout can be entered. If you reduce the number of lanes after
programming data, any data programmed for lanes greater than the new number will be lost.
Scoreboard
Summary: Provides access to special scoreboard control and display features.
Figure 3-N Scoreboard Setups Menu
29 Reference: Softkeys
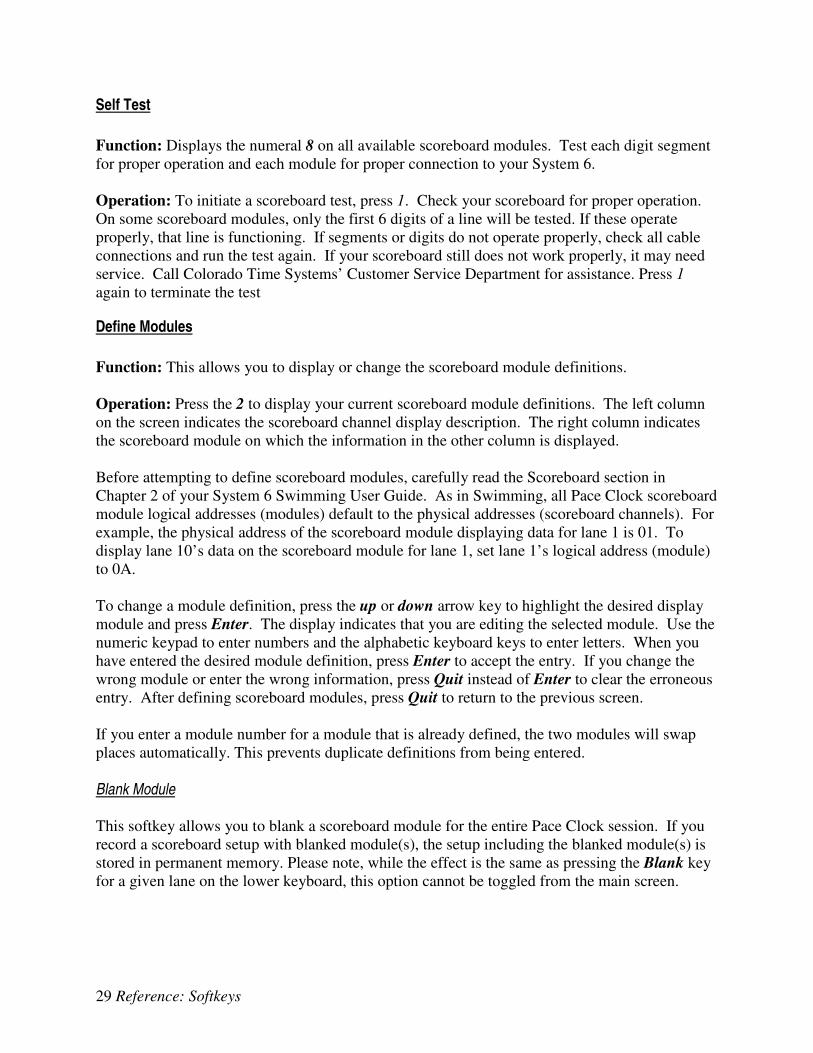
Self Test
Function: Displays the numeral 8 on all available scoreboard modules. Test each digit segment
for proper operation and each module for proper connection to your System 6.
Operation: To initiate a scoreboard test, press 1. Check your scoreboard for proper operation.
On some scoreboard modules, only the first 6 digits of a line will be tested. If these operate
properly, that line is functioning. If segments or digits do not operate properly, check all cable
connections and run the test again. If your scoreboard still does not work properly, it may need
service. Call Colorado Time Systems’ Customer Service Department for assistance. Press 1
again to terminate the test
Define Modules
Function: This allows you to display or change the scoreboard module definitions.
Operation: Press the 2 to display your current scoreboard module definitions. The left column
on the screen indicates the scoreboard channel display description. The right column indicates
the scoreboard module on which the information in the other column is displayed.
Before attempting to define scoreboard modules, carefully read the Scoreboard section in
Chapter 2 of your System 6 Swimming User Guide. As in Swimming, all Pace Clock scoreboard
module logical addresses (modules) default to the physical addresses (scoreboard channels). For
example, the physical address of the scoreboard module displaying data for lane 1 is 01. To
display lane 10’s data on the scoreboard module for lane 1, set lane 1’s logical address (module)
to 0A.
To change a module definition, press the up or down arrow key to highlight the desired display
module and press Enter. The display indicates that you are editing the selected module. Use the
numeric keypad to enter numbers and the alphabetic keyboard keys to enter letters. When you
have entered the desired module definition, press Enter to accept the entry. If you change the
wrong module or enter the wrong information, press Quit instead of Enter to clear the erroneous
entry. After defining scoreboard modules, press Quit to return to the previous screen.
If you enter a module number for a module that is already defined, the two modules will swap
places automatically. This prevents duplicate definitions from being entered.
Blank Module
This softkey allows you to blank a scoreboard module for the entire Pace Clock session. If you
record a scoreboard setup with blanked module(s), the setup including the blanked module(s) is
stored in permanent memory. Please note, while the effect is the same as pressing the Blank key
for a given lane on the lower keyboard, this option cannot be toggled from the main screen.
30 Reference: Softkeys
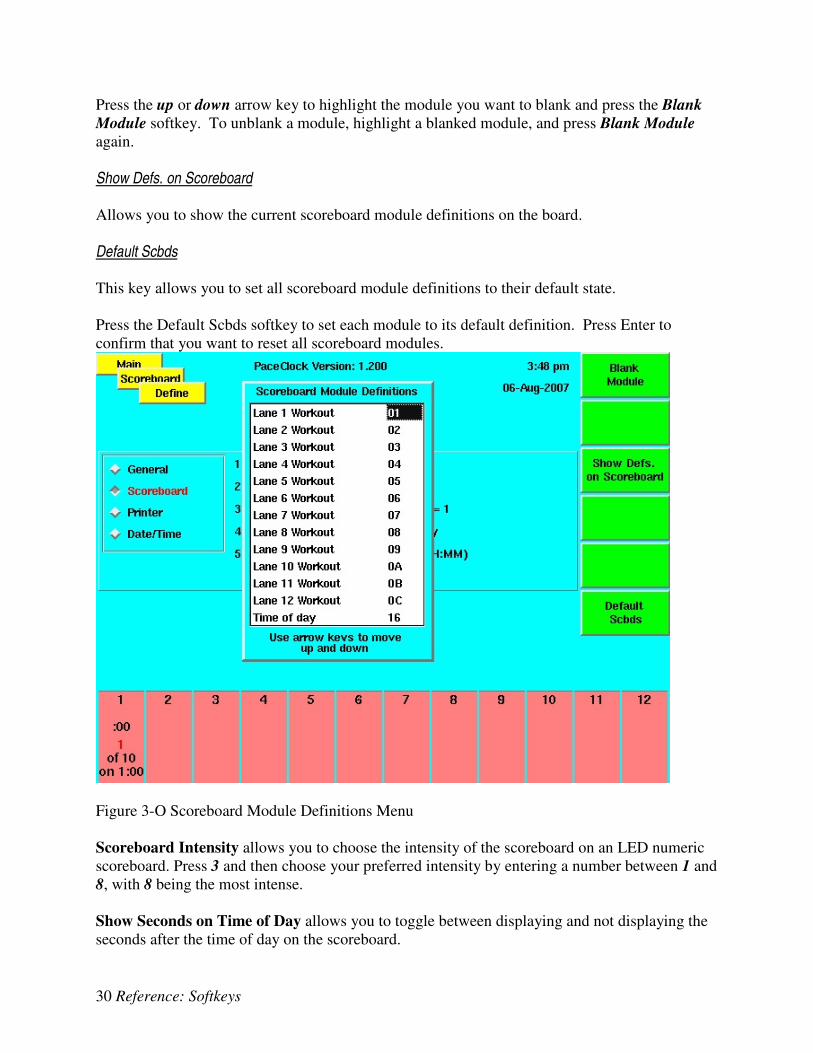
Press the up or down arrow key to highlight the module you want to blank and press the Blank
Module softkey. To unblank a module, highlight a blanked module, and press Blank Module
again.
Show Defs. on Scoreboard
Allows you to show the current scoreboard module definitions on the board.
Default Scbds
This key allows you to set all scoreboard module definitions to their default state.
Press the Default Scbds softkey to set each module to its default definition. Press Enter to
confirm that you want to reset all scoreboard modules.
Figure 3-O Scoreboard Module Definitions Menu
Scoreboard Intensity allows you to choose the intensity of the scoreboard on an LED numeric
scoreboard. Press 3 and then choose your preferred intensity by entering a number between 1 and
8, with 8 being the most intense.
Show Seconds on Time of Day allows you to toggle between displaying and not displaying the
seconds after the time of day on the scoreboard.

31 Reference: Softkeys
Shift Time of Day: If Show Seconds on Time of Day is enabled, this option will appear. If
enabled, this option will display the time on the scoreboard in terms of minutes and seconds
(MM:SS) instead of hours, minutes and seconds (HH:MM.SS). This allows the time of day to be
displayed on LED PC-series pace clocks
Printer
Note: to use a USB printer, you must add it through the Sport Loader menu. See the Sport
Loader manual for details.
Function: This option in the Setups menu allows you to control the printer setups.
Option 1 allows you to choose what type of printer you will be using. Press 1 until the model of
printer being used is displayed, or select other.
Option 2 toggles between the different sizes of type.
Option 3 allows you to choose how many lines per inch will be printed.
To set the printer control codes, press 4 when the highlight is on the printer control code line.
The printer control code window appears. You can enter printer control codes for Pica, Elite,
Condensed and Super condensed type sizes, 6 lines per inch and 8 lines per inch. Select the item
for which you want to enter printer control codes with the Choices Up and Choices Down
softkeys, then use the numeric keypad to enter the ASCII value representing the code that you
want to enter. Press the Insert softkey to place the ASCII value into the printer control code
string. Press the Delete softkey to delete the highlighted ASCII value from the printer control
code string. Use the Left and Right softkeys to move within the printer control code string.
Date/Time
Option 1 allows you to set the time of day. Press 1 and enter in the time in 24-hour format (using
HHMMSS configuration).
Option 2 allows you to set the date. Press 2 and enter in the date (using MMDDYY format).
Option 3 allows you to toggle between a 24-hour and a 12-hour clock for the display. This option
affects both the System 6 screen and the scoreboard.
The Save Setups softkey will save the changes you have made while the Restore Defaults
softkey will restore the changes back to the default settings.
Misc
Press the Misc softkey to display the miscellaneous softkey menu. Press Quit to return to the
Main screen when you have finished using miscellaneous features.
32 Reference: Softkeys
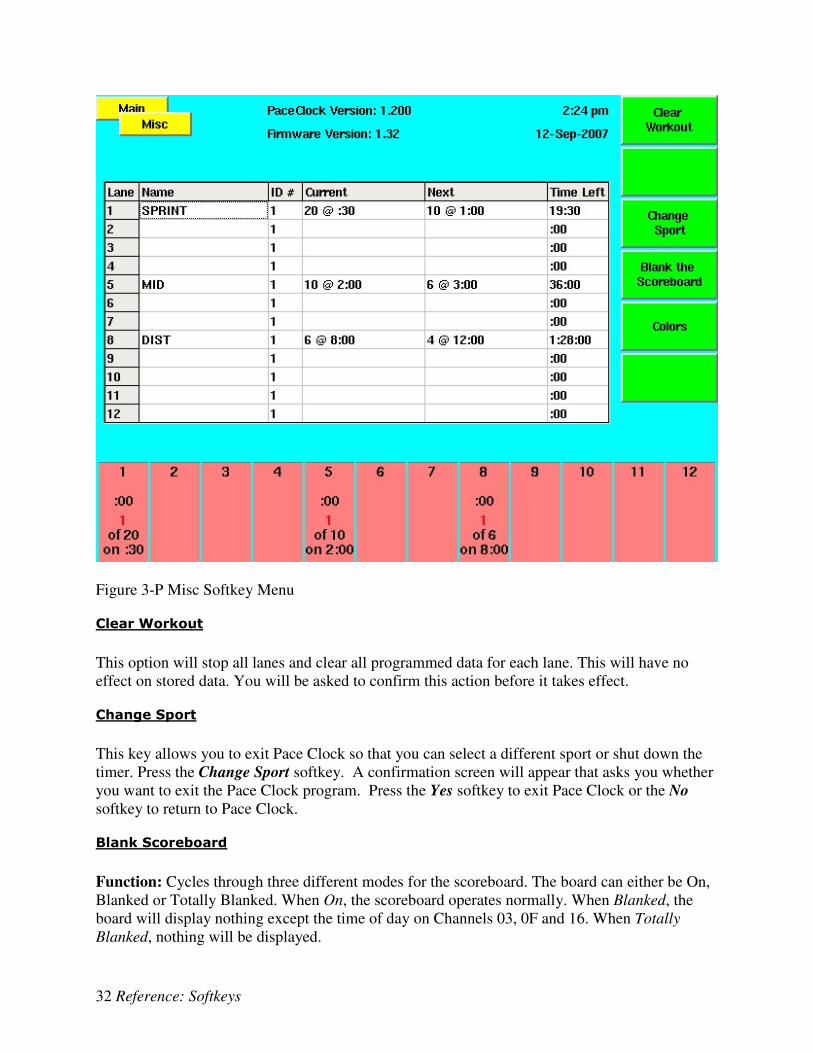
Figure 3-P Misc Softkey Menu
Clear Workout
This option will stop all lanes and clear all programmed data for each lane. This will have no
effect on stored data. You will be asked to confirm this action before it takes effect.
Change Sport
This key allows you to exit Pace Clock so that you can select a different sport or shut down the
timer. Press the Change Sport softkey. A confirmation screen will appear that asks you whether
you want to exit the Pace Clock program. Press the Yes softkey to exit Pace Clock or the No
softkey to return to Pace Clock.
Blank Scoreboard
Function: Cycles through three different modes for the scoreboard. The board can either be On,
Blanked or Totally Blanked. When On, the scoreboard operates normally. When Blanked, the
board will display nothing except the time of day on Channels 03, 0F and 16. When Totally
Blanked, nothing will be displayed.
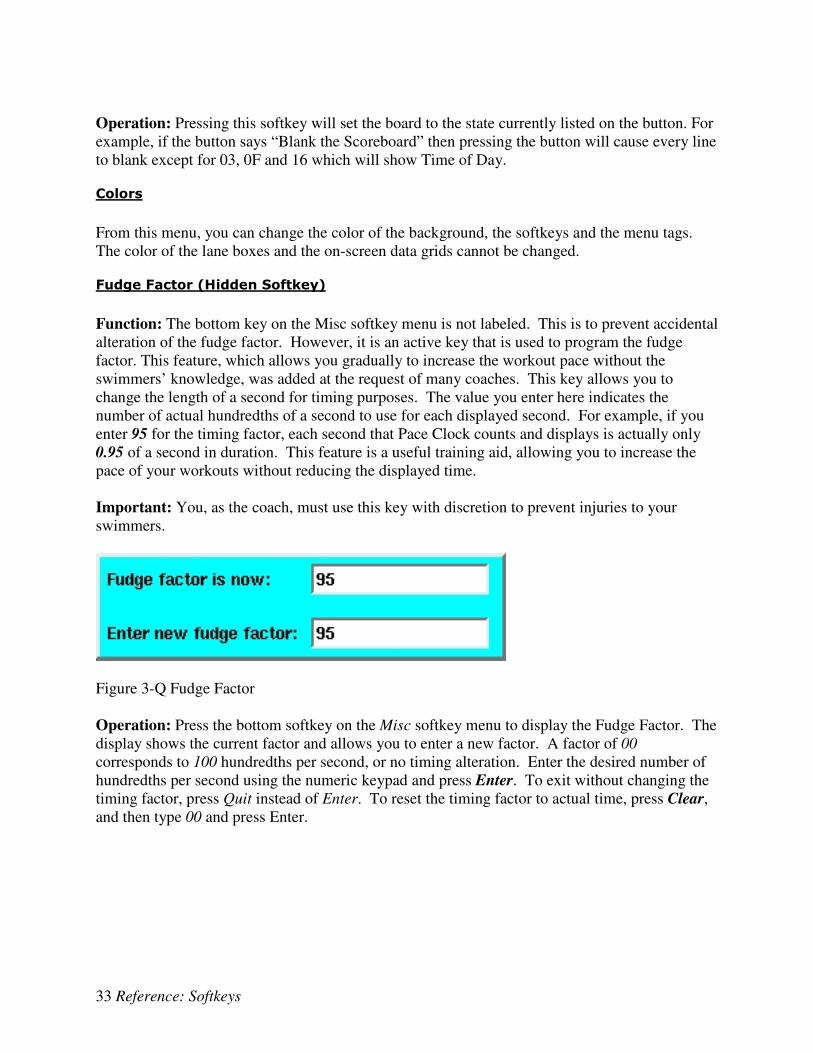
33 Reference: Softkeys
Operation: Pressing this softkey will set the board to the state currently listed on the button. For
example, if the button says “Blank the Scoreboard” then pressing the button will cause every line
to blank except for 03, 0F and 16 which will show Time of Day.
Colors
From this menu, you can change the color of the background, the softkeys and the menu tags.
The color of the lane boxes and the on-screen data grids cannot be changed.
Fudge Factor (Hidden Softkey)
Function: The bottom key on the Misc softkey menu is not labeled. This is to prevent accidental
alteration of the fudge factor. However, it is an active key that is used to program the fudge
factor. This feature, which allows you gradually to increase the workout pace without the
swimmers’ knowledge, was added at the request of many coaches. This key allows you to
change the length of a second for timing purposes. The value you enter here indicates the
number of actual hundredths of a second to use for each displayed second. For example, if you
enter 95 for the timing factor, each second that Pace Clock counts and displays is actually only
0.95 of a second in duration. This feature is a useful training aid, allowing you to increase the
pace of your workouts without reducing the displayed time.
Important: You, as the coach, must use this key with discretion to prevent injuries to your
swimmers.
Figure 3-Q Fudge Factor
Operation: Press the bottom softkey on the Misc softkey menu to display the Fudge Factor. The
display shows the current factor and allows you to enter a new factor. A factor of 00
corresponds to 100 hundredths per second, or no timing alteration. Enter the desired number of
hundredths per second using the numeric keypad and press Enter. To exit without changing the
timing factor, press Quit instead of Enter. To reset the timing factor to actual time, press Clear,
and then type 00 and press Enter.

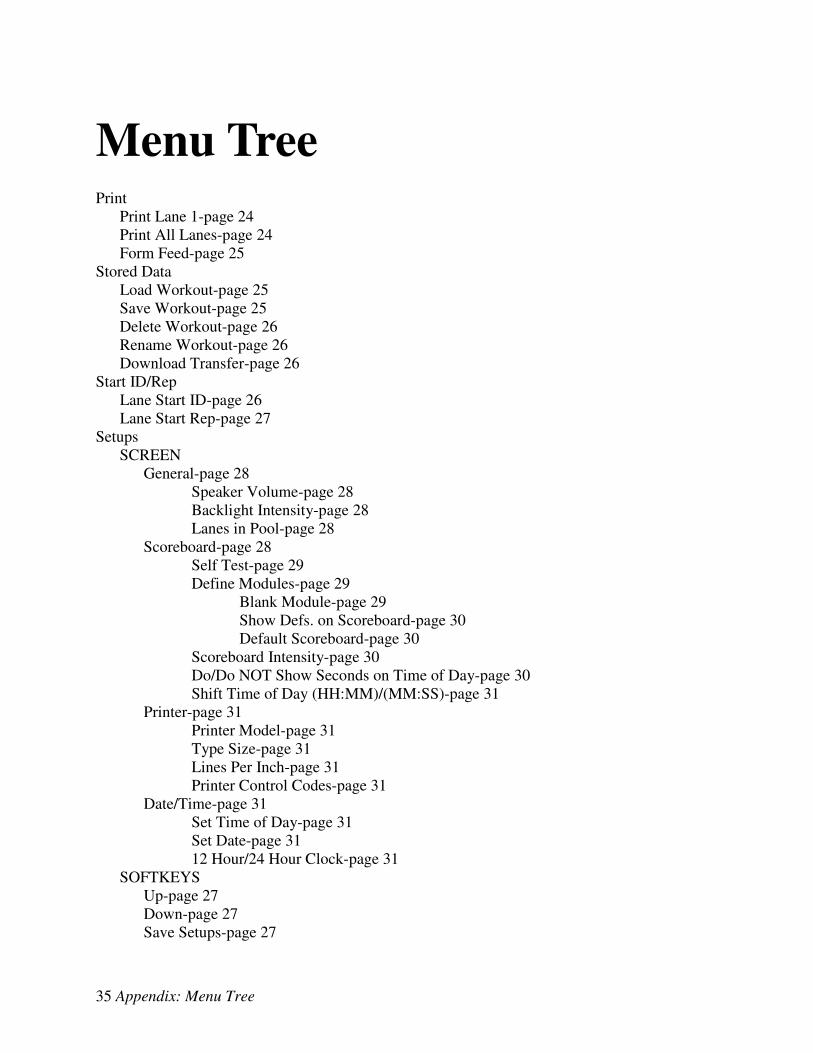
35 Appendix: Menu Tree
Menu Tree
Print Lane 1-page 24
Print All Lanes-page 24
Form Feed-page 25
Stored Data
Load Workout-page 25
Save Workout-page 25
Delete Workout-page 26
Rename Workout-page 26
Download Transfer-page 26
Start ID/Rep
Lane Start ID-page 26
Lane Start Rep-page 27
Setups
SCREEN
General-page 28
Speaker Volume-page 28
Backlight Intensity-page 28
Lanes in Pool-page 28
Scoreboard-page 28
Self Test-page 29
Define Modules-page 29
Blank Module-page 29
Show Defs. on Scoreboard-page 30
Default Scoreboard-page 30
Scoreboard Intensity-page 30
Do/Do NOT Show Seconds on Time of Day-page 30
Shift Time of Day (HH:MM)/(MM:SS)-page 31
Printer-page 31
Printer Model-page 31
Type Size-page 31
Lines Per Inch-page 31
Printer Control Codes-page 31
Date/Time-page 31
Set Time of Day-page 31
Set Date-page 31
12 Hour/24 Hour Clock-page 31
SOFTKEYS
Up-page 27
Down-page 27
Save Setups-page 27

36 Appendix: Menu Tree
Restore Defaults-page 27
Misc-page 31
Clear Workout-page 32
Change Sport-page 32
Blank Scoreboard-page 32
Colors-page 33
Fudge Factor (Hidden Softkey)-page 33
37 Index
Index C
Console Keys, 18–19
Battery Check, 19
Enter, 19
Help, 19
Quit, 19
Customer Service Dept, 1
D
Download Transfer, 26
K
Keyboard Insert, 15–18
Alphabetic Keyboard, 16
Blank Unblank (Lane), 16
Program, 16–17
Start Stop (Lane), 16
Start Stop All, 18
L
LCD Screen, 14
Loading Stored Workouts, 10
M
Main Screen, 6, 14
Menu Tree, 35
Misc Softkey
Fudge Factor, 33
N
Numeric Keypad
C/E (Clear Entry), 18
P
Print Softkey
Form Feed, 25
Print All Lanes, 24
Print Lane, 24
Printing Workouts, 24
Program Softkey
Copy Another Lane, 9
Delete ID, 9
Program Softkeys
Copy Another Lane, 23
Count Up/Down, 8, 23
Delete ID, 23
Enter Name, 7, 21
Insert ID, 9, 23
More, 9, 23
Repeat ID, 9, 22
Rest, 8, 22
S
Scoreboard
Blank Module, 30
Default Scbds, 30
Define Module, 29
Scbd Test, 29
Setups
Date/Time, 31
Printer, 31
Scoreboard, 31
Softkeys
Misc, 33