packetboy - overview - ftp.gunadarma.ac.idftp.gunadarma.ac.id/research/modul/packetboy.pdf · test...
TRANSCRIPT

PacketBoy - Overview
PacketBoy is a sophisticated packet analyser/decoder utility, capable of decoding a large variety of commonly used networking protocols. It provides an intuitive display of the contents of captured packets, with a detailed breakdown of all identifiable protocol fields. PacketBoy allows you to work with multiple packet captures at the same time, each either loaded from a file or captured live from the network.

Using PacketBoy
PacketBoy Windows
Menus and Options

PacketBoy Windows
PacketBoy Windows – Overview
The Capture Console
Realtime Monitor
Name Table Editor
Decoder Windows

PacketBoy Windows - Overview
PacketBoy has a familiar multiple document style interface, allowing you to have many packet captures visible at the same time. The main windows that are used are shown here:
The Capture Console (top left) provides the main interface for you to control the capturing of packets live off the network. It gives you buttons to control when PacketBoy should start and stop the capturing process. It also provides you with convenient controls for specifying and defining the filters and triggers for the capture. The Realtime Monitor (top right) gives you a continuous realtime display of the current (and recently past) network utilisation. The other window visible in this screenshot is a Decode Window. Decode windows provide the important interface that allows you to explore the various protocol headers and data contents of packets within a packet capture. PacketBoy also has a Name Table Editor window that allows you to define the various names and addresses associated with each host on your network.
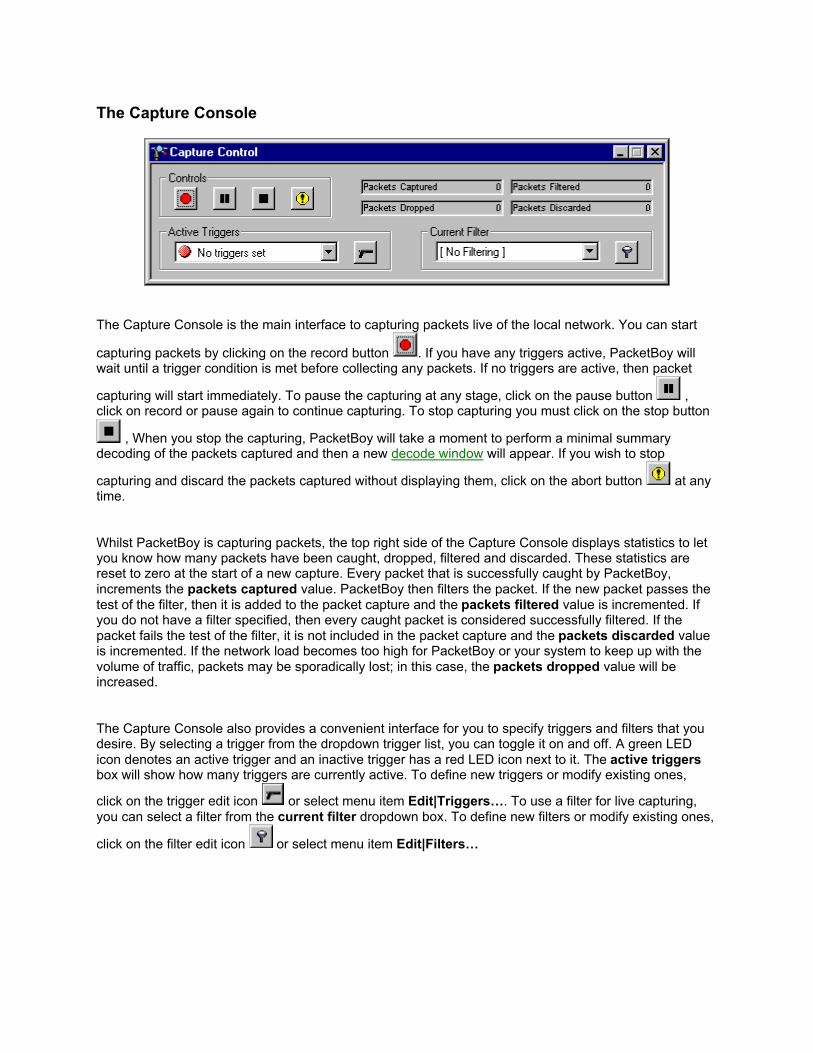
The Capture Console
The Capture Console is the main interface to capturing packets live of the local network. You can start
capturing packets by clicking on the record button . If you have any triggers active, PacketBoy will wait until a trigger condition is met before collecting any packets. If no triggers are active, then packet
capturing will start immediately. To pause the capturing at any stage, click on the pause button , click on record or pause again to continue capturing. To stop capturing you must click on the stop button
, When you stop the capturing, PacketBoy will take a moment to perform a minimal summary decoding of the packets captured and then a new decode window will appear. If you wish to stop
capturing and discard the packets captured without displaying them, click on the abort button at any time.
Whilst PacketBoy is capturing packets, the top right side of the Capture Console displays statistics to let you know how many packets have been caught, dropped, filtered and discarded. These statistics are reset to zero at the start of a new capture. Every packet that is successfully caught by PacketBoy, increments the packets captured value. PacketBoy then filters the packet. If the new packet passes the test of the filter, then it is added to the packet capture and the packets filtered value is incremented. If you do not have a filter specified, then every caught packet is considered successfully filtered. If the packet fails the test of the filter, it is not included in the packet capture and the packets discarded value is incremented. If the network load becomes too high for PacketBoy or your system to keep up with the volume of traffic, packets may be sporadically lost; in this case, the packets dropped value will be increased.
The Capture Console also provides a convenient interface for you to specify triggers and filters that you desire. By selecting a trigger from the dropdown trigger list, you can toggle it on and off. A green LED icon denotes an active trigger and an inactive trigger has a red LED icon next to it. The active triggers box will show how many triggers are currently active. To define new triggers or modify existing ones,
click on the trigger edit icon or select menu item Edit|Triggers…. To use a filter for live capturing, you can select a filter from the current filter dropdown box. To define new filters or modify existing ones,
click on the filter edit icon or select menu item Edit|Filters…
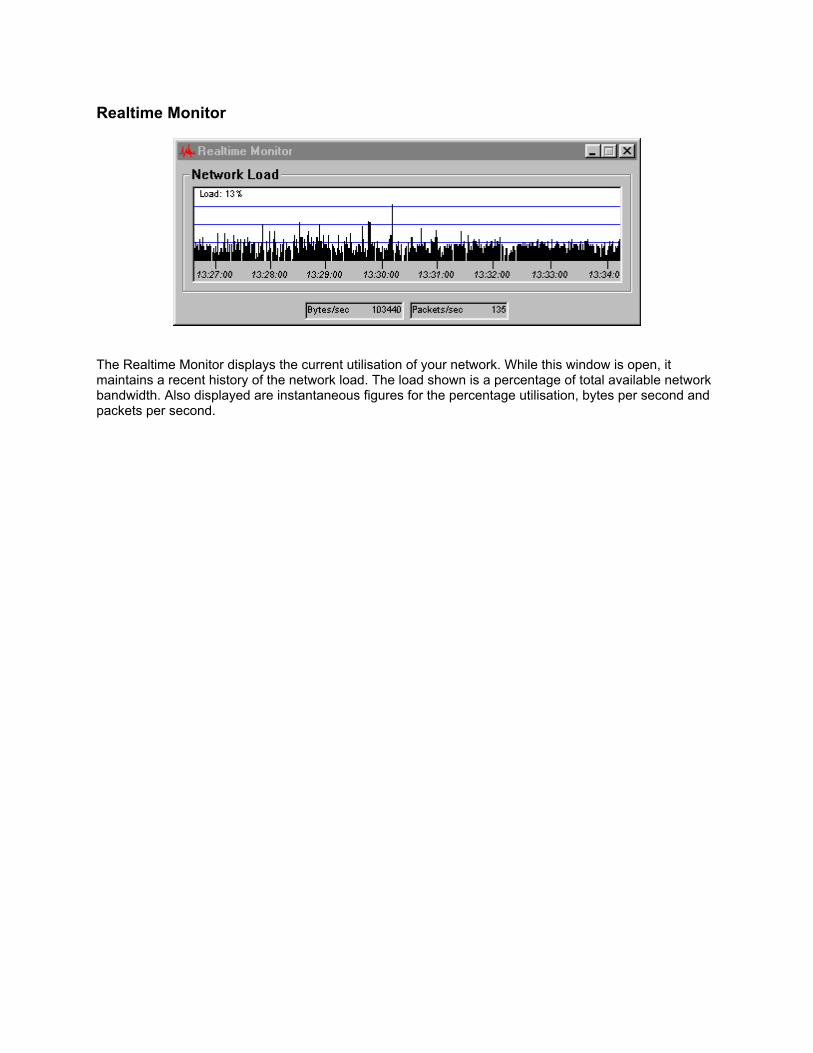
Realtime Monitor
The Realtime Monitor displays the current utilisation of your network. While this window is open, it maintains a recent history of the network load. The load shown is a percentage of total available network bandwidth. Also displayed are instantaneous figures for the percentage utilisation, bytes per second and packets per second.

Name Table Editor
The name table editor is the centre of PacketBoy’s name resolving ability. It provides a visual interface to the name resolution database that is maintained in the background. To understand the host editor it is important to understand how collects information:
• If “learn host info in background” is enabled, when PacketBoy sees traffic from a new host (one that does not appear in the database) it adds an entry for that host. If the host is a multicast address then it is checked against a local list of well-defined multicast addresses. The specific multicast type or the generic label “Multicast” is inserted into the local name field of the table (see below). The host is automatically marked as “non resolvable” (see below).
• If the host is using the IP protocol then the IP address is also added to the name table.
• If DNS name resolution is enabled in the preferences then will issue a DNS request to try to resolve the IP address to an IP name. If the name resolves then this name is truncated (to the local portion of the name) and added to the table.
• An additional column is also available (referred to as local name) that allows the user to assign an additional, more meaningful name to a given entry.
To aid in finding a specific host the table can be sorted on any of the available fields by clicking on the column header. Note that even when the host editor is open entries may be added in the background. The onscreen display can be refreshed using the update button.
A variety of options are available to manipulate the name table:
• Edit local name: The local name can be edited by left clicking once to select an entry, then clicking again in the local name field to initiate editing. Alternatively the user can initiate editing by right clicking on an entry and selecting “Edit Local Name” from the popup menu.
• Toggle IP resolve state: The icon in the first column of the table depicts the resolve status, there are two states.
When IP resolution is on for a specific host the icon will be a small picture of a computer.
When IP resolution is on for a specific host the icon will be a small picture of a

computer.
The resolve state can be toggle by double clicking on an entry or right clicking on an entry and selecting “Toggle IP Resolve State” from the popup menu.
Some IP traffic should not be resolved. Multicast addresses are automatically added with no IP resolution. In addition to this IP routers/gateways resolve state should be disabled to prevent erroneous output. If this is not the case then will report the devices IP address as that of the first inbound IP packet coming through the gateway.
• Delete Entry: By right clicking on an entry and selecting “Delete Entry” from the popup menu the user can delete any one entry.
• Flush Host IP information: Unlike MAC addresses IP addresses/names are configurable and this information may change over time. By selection this option from the popup menu the user can flush all IP information (address and name) from the name table forcing to rediscover IP names and addresses.
• Flush All IP information: By selecting this option from the popup menu the user can flush all IP information from the database forcing to rediscover IP names and addresses. A final warning dialog will appear before the information is flushed.
• Delete All entries: By selecting this option the user can remove all entries from the name database. A final warning dialog will appear before the information is deleted.

Decode Windows
The main function of PacketBoy is to give a detailed breakdown of the various protocol fields and data units that are stored inside a captured packet. The decode window provides the interface that allows you to view this information and even the very bytes that make up the packet. The decode window title bar will always show you this group of packets current file name and the total number of packets in the group.
From this example decode window image, you can see that each decode window is divided into a toolbar and three main panes.
The toolbar provides convenient buttons for working with a packet capture. The buttons here allow you to load, save, print and display filter the packets in the list. The dropdown box allows you to apply a predefined filter as a display filter to the packets. A display filter changes the packets in the capture that you can see in the window, it does not remove any of the packets from the capture. Only the packets that pass the test of the selected filter will be displayed and you will notice still have their original packet numbers within the set. There is also a button that provides you with quick access to the filter edit dialog and the display marked button lets you open a new decode window with the marked packets from this one (this is also available from the Edit menu).
The top pane shows a summary of each of the packets in the capture. You can select and decode a packet by clicking once on the line of the packet. The full protocol decode will then appear in the centre decode tree pane and the byte contents of the packet are displayed in hex and ASCII in the bottom pane. The packet list shows the time and original size of the ethernet frame as the network adaptor received it. It also summarises the source and destination node on the network and a brief summary of the protocols contained in the packet. By clicking on the column header you can change the order that the packets are sorted by. Click a second time on the same column header to reverse the sort order. The first column contains a number representing the order in which the packets were originally received.
The information in the time and node address columns can be represented in different ways. If you click the right mouse button in any of these columns, a small popup menu will appear with a list of representation choices for that column.
The information in the time column can be represented in three different ways:

• delta time – shows the time difference in seconds between each pair of consecutive packets.
• relative time – shows the time difference between the first packet in the listed set and each other packet.
• absolute time – shows the real world time (according to your computers clock) of each packet as it was received by the network adaptor.
Both of the node address columns can be represented by:
• MAC address – shows the node address as the six bytes of its Ethernet address, each byte is separated by a colon.
• Manufacturer – shows the name of the manufacturer of the network interface hardware for the node.
• Local Name – shows the local name that you use for this node. To assign local names you should use the Name Table Editor.
• IP Name – shows the nodes hostname, if the node uses the IP protocol and has a hostname that can be obtained from your domain name service (DNS). If you disable DNS lookups in the preferences, you may not get any information from this choice.
The boxes in the first column allow you to mark a group of packets for printing or saving or displaying in a separate window. You can mark individual packets by simply clicking in the box or groups of packets by using the options in the Edit menu item.
When a packet is selected in the top list, it is decoded and displayed in the bottom two panes. The output from the protocol decoding is displayed in a tree form in the centre panel. Each protocol header in the packet is at the top level in the tree. To examine further into a particular protocol, double click on the item of interest and the tree will expand to show all the relevant fields. Each detail field shows the size of the field, the name of the field, the value of the field in this packet and any extra information that the value may represent. By clicking on any field or header, you can select that field and see, from the bottom byte dump pane, which bytes within the packet that the field corresponds to. The bottom pane displays the entire frame content in hexadecimal and ASCII. The number on the left is the offset (in bytes represented in hexadecimal) for the first byte in each row. Click once on any byte in this window to see which protocol fields contain the selected bytes.
You can change the relative sizes of each panel in the decode window by clicking on and dragging the slider bars that separate the panes.

Menus and Options
File Menu
Edit Menu
Tools Menu
Windows Menu
Preferences

File Menu
The File menu provides the following options:
• Open – allows you to open a previously saved file of packets. PacketBoy currently loads and saves files using sniffer type files (compatible with Network General’s Sniffer™ Version 4.0 output). A new decode window will open up containing the loaded packets.
• Save As* - allows you to save the packets in the active decode window. You can save the single currently selected packet (that is highlighted in the decode window), the packets you have marked or all the packets in the capture.
• Close* - closes the currently active window without saving data.
• Choose Adaptor – If you have more than one network interface, this option will allow you to switch between adaptors. At present, all configured network interfaces (excluding the dial-up adaptor) will be displayed. The bit rate of your interface will be displayed in the “Link Speed” column. If you have an interface which supports more than one bit rate (eg. auto-sensing 10/100), the currently active speed will be displayed. Upon changing interfaces, all overall network statistics will be resumed for that interface.
The reference to the default adaptor resides in the registry via the path:
\HKEY_LOCAL_MACHINE\SOFTWARE\NDG Software\PacketBoy\1.4\interface
Interface is a “dword” value that corresponds to the adapter id shown in the “Adapter” column of this dialog.
• Page Setup - allows you to setup the page details for your printer.
• Print* - lets you print the packets from the currently active decode window. You can print the selected packet, the marked packets or all the packets in the window. The printed output is text in a similar format to that displayed in the decode window, with all the fields included. You can select what information you are interested in, by printing the summary headers of each packet, the protocol decode information and/or the hex/ASCII byte dump.
• Preferences – allows you to set various parameters to customise the behaviour of PacketBoy.
• Quit – quits PacketBoy.
* These menu options only available when a decode window is open and active.
Network General Sniffer is a registered trademark of Network General Corporation and/or its wholly owned subsidiaries.

Edit Menu
The Edit menu provides the following options:
• Filters – opens up the Filter Builder so you can add, modify and delete filters.
• Triggers – opens up the Trigger Builder to allow you to add, modify and delete triggers.
• Names – opens up the Name Table Editor so you can modify the various pieces of name information associated with each node on your network.
• Mark All Packets* - marks all the packets in the active decode window.
• Unmark All Packets* - removes the marks from all the packets in the active decode window.
• Invert All Marks* - reverses the marks on the packets. All marked packets become unmarked and all unmarked packets become marked.
• Mark Packet Range* - marks a specified range of packets in the active decode window.
• Display Marked Packets* - opens a new decode window containing only the packets that are marked in the currently active decode window.
* These menu options only available when a decode window is open and active.

Tools Menu
The Tools menu provides the following options:
• Capture Console – opens the Capture Console window, so you can control the capturing of packets live off your network. When this menu option has a tick next to it, the Capture Console is already open.
• Realtime Monitor – opens the Realtime Monitor, allowing you to view your network activity in realtime. This menu option is also ticked when the Realtime Monitor is already open.

Windows Menu
The Windows menu provides the following options:
• Cascade – arranges all open decode windows, realtime monitor and capture console in a cascading pattern working from the top left of the PacketBoy client area down and right.
• Tile Horizontally – tiles horizontally all open windows in the PacketBoy client area to the width of the main window.
• Tile Vertically – tiles vertically all open windows in the PacketBoy client area to the height of the main window.
• Arrange – realigns all the minimised window icons in a neat way at the bottom of the PacketBoy client area.
The bottom of the Window menu maintains a list of the titles of the open windows in the PacketBoy client area. Selecting an entry from this list restores the window if it is minimised, brings the window to the front of the other windows and makes it active.

Preferences
Name Resolution Options
• Resolve IP info using DNS – When checked, PacketBoy will use Windows to query your domain name server (DNS) to find out the names of any nodes on your network that use IP and are registered with the DNS.
• Learn host info in background – When checked, PacketBoy will monitor all packets in the background, and add whatever information it can find to the Name Table database. This includes MAC addresses, IP addresses and IP names (if DNS resolving is enabled).

Customising PacketBoy
Defining Custom Protocols
Defining Custom Filters
Defining Custom Triggers

Defining Protocols
Protocol Definition Language – Overview
The primitive Statement
The protocol Statement

Protocol Definition Language - Overview
PacketBoy captures all LAN traffic. It identifies the various protocols via a protocol definition file (called protocol.pdl) which is written using NDG Software's Protocol Definition Language (PDL).
The language has two basic statements these are: primitive and protocol. The primitive statement is used to assign a tag to a value within a protocol.
The pdl language described here is very versatile and will allow you to incorporate your own custom protocol specifications into PacketBoy. Complete definitions can be found in the protocol.pdl file. Once a new protocol has been included into this file it will automatically appear in the protocol lists for inclusion into PacketBoy’s triggers and filters.
Note that the pdl language allows you to identify custom protocols, NOT decode them. At this point in development, PacketBoy does not allow you to fully decode custom protocols. Using the pdl file allows you to apply triggers and filters based on your own protocols, but cannot breakdown your protocol into full decodes.

The primitive Statement
The syntax is:primitive tag_name:tag_value "string"
The protocol definition begins with a tag name that is used to identify the primitive and can be used in further definitions. The tag value specifies a symbol or value to be searched for in the packet to identify this protocol. The string is for identification of the protocols by the user and is the string that will appear in the various selection boxes for filters and triggers.
Primitives are primarily used to define tags to be used in protocol definitions. A primitive by itself does not constitute a protocol definition. Here are some example primitive definitions:
primitive TELNET:23 "Telnet"
In this primitive definition the tag is TELNET and the tag's value is 23 (the port number for telnet). This tag value is important since it is the value that will be searched for to identify TELNET packets.
primitive ICMP:1 "ICMP"
primitive IGMP:2 "IGMP"
primitive FTP:20,21 "FTP"
primitive SMTP:25 "Mail"
primitive HTTP:80,81 "HTTP"
primitive HTTP_2:8000, 8080 "HTTP"
The HTTP definitions show how to define a range of values for the tag value. Ranges are used when a protocol is identified by a set of numbers within a range. Ranges must be continuous which is why two tags are needed for HTTP, one defining port numbers 80 and 81 (HTTP) and another defining port numbers 8000 through to 8080 (HTTP_2).

The protocol Statement
The protocol statement is used to define protocols and to provide classification rules for packets. The syntax of a protocol definition is as follows:
protocol tag_name:tag_value "String" header_size
{
byte | word:location_value tag_name
...
}
The protocol definition begins with a tag name that is used to identify the protocol and can be used in further definitions. The tag_value specifies a symbol or value to be searched for in the packet to identify this protocol. The string is for identification of the protocols by the user and is the string that will appear in the various selection boxes for filters and triggers.The header size is supplied as a check for the packet parser when parsing incoming packets.
Here are some examples of protocol definitions:protocol IP:0x800 "IP" 20
{
byte:9 ICMP
byte:9 IGMP
byte:9 TCP
byte:9 UDP
}
The first line defines a protocol with a name tag of IP and a name value 0x800. The identification string is "IP" and the IP header has a size of 20 bytes. Inside the IP header are further sub-protocols and primitives called ICMP, IGMP, TCP and UDP. These sub-protocols will have either protocol or primitive definitions themselves defining tag values that identify the sub-protocols contained within each IP packet. The byte:9 in the specification denotes the primary offset and size of the value to check from the beginning of this protocol specification. In other words we are to compare a byte value 9 bytes into the IP header looking for a byte containing the tag value of ICMP, IGMP, TCP or UDP. The tag value for each of these is contained within their specification.
Given the previous definition of IP consider the following definition of TCP. protocol TCP:0x6 "TCP" 20
{
word:0,2 FTP
word:0,2 TELNET
word:0,2 SMTP
word:0,2 HTTP
word:0,2 HTTP_2
...
}
From this definition we can see that the tag value for TCP is 0x6 and that the TCP header is 20 bytes long. The word:0,2 in the specification specifies that tag value for sub-protocols can be found at 2 locations called the primary offset or secondary offset. The primary offset is 0 meaning that the tag value for FTP, TELNET etc. can be found by doing a word sized comparison (16 bits) starting at byte 0 (the

primary offset) or 2 (the secondary offset) inside the TCP header. The tag value to look for at these offsets can be found along with the definitions of FTP, TELNET etc. As a further example what follows is part of the specification for UDP.
protocol UDP:0x17 "UDP" 8
{
word:0,2 NFS
word:0,2 X11
...
}

Defining Filters
Overview
The Filter Builder
The Filter Definition Language

Filters - Overview
PacketBoy has a filtering mechanism built in that allows you to define a type of packet that you wish to capture. The Filter Builder in PacketBoy and the Filter Definition Language provide you with two different ways in which you can modify your list of filters. Once defined, filters can be used both for capturing live off the network and also for display purposes. To apply a filter to the capturing process, select a previously defined filter in the Capture Console. To apply a filter for display purposes to an existing set of packets, select the filter from the dropdown box in the toolbar of the decode window.
A filter is made up of a number of conditions, called primitives. To define a new useable filter you must first define some primitives and then add them to you filter. All primitives in a filter are logically “OR”ed together, so that if any of the primitives match when testing a packet against the filter, then the filter matches and the packet is accepted.

The Filter Builder
The Filter Builder is a dialog that allows you to create, modify and delete filters and their primitives. You
can access the Filter Builder by clicking on the filter edit icon wherever you may see it or select menu item Edit|Filters…. The Filter Builder looks like the following picture:
There are three main sections to the Filter Builder. At the top left is a box containing the attributes for the currently selected primitive (select a primitive by clicking on it in the Primitive List). Here you can change all the details relevant to a particular filter primitive, such as its type (host or link), the addresses associated with it, what protocols it matches and whether it is an inclusively or exclusively matched primitive.
At the bottom on the left is the Primitive List. All the primitives defined are listed here, one per line with a summary of their details. To add a new primitive, click on the “New Primitive” button. A new primitive will appear in the list and will be automatically selected, so that you may define its attributes. To change the name of a primitive, select the primitive (by clicking on it), then click on it again once and a small edit box will popup allowing you to edit the primitive name. To delete a primitive, select the primitive from the list and click on the “Delete Primitive” button. You will not be able to delete any primitives that are part of a filter; in this instance you must remove the filter first, or remove the primitive from that filter.
The right hand side of the Filter Builder shows the Filter List. This is a tree like view of all the filters defined in PacketBoy. To add a new filter, simply click on the “New Filter” button. To change the name of a filter, select it from the list and then click on it once and wait for the small label edit box to appear. To add and remove primitives from a filter, you can right click on the filter and conveniently select from the popup menu list of primitives or use the “Add/Del Primitive” button. To delete a filter, use the “Delete Filter” button or the popup menu from clicking on the filter with the right mouse button.

Once you have defined primitives and filters and added some primitives to a filter, they will become available to you for use in the display filter lists in the decode windows and the filter list in the capture console.

The Filter Definition Language
Filters that you define using the Filter Builder in PacketBoy are saved in the filters.fdl file using NDG Software’s Filter Definition Language (FDL). The Filter Builder gives you all the functionality required to add, modify and delete filters, but should the need arise, the FDL file provides you with an alternate mechanism to change filters. Each time PacketBoy is started, the filters specified in the filters.fdl file are loaded into PacketBoy’s internal table of filters and will appear when you open the Filter Builder. Caution must be exercised when editing the filter.fdl file, as PacketBoy is quite unforgiving of mistakes made in this file. It is strongly recommended that you make a backup copy of the filters.fdl file before editing. Editing the FDL file is really designed for use by power users or PacketBoy authors.
The essence of an FDL file is a single line primitive in one of the two following formats:host address1 protocol protocol_tag primitive_name include_val
link address1 address2 protocol protocol_tag primitive_name include_val
A primitive has both an address part and a protocol part, so all these fields must be specified for all primitives as shown. The keyword host is used for host primitives or protocol primitives where the address fields are not important. Link primitives could also be used for protocol primitives, if your intention is to match by protocol only, then the type of primitive is not important so long as the address fields required do exist and contain a single star “*” character.
A host type primitive has only a single address that can be matched against either the source or destination address in a packet. A link style primitive has two address fields, one for the source node and the second for the destination node. Addresses can be specified by a single star “*” character (to match all addresses), MAC address (6 hexadecimal bytes, colon separated), an IP number (4 decimal numbers separated by dots “.”) or a fully qualified domain name.
The protocol_tag field following the keyword protocol must always specify a protocol tag from the protocol.pdl file (see Protocol Definition Language for more information). If the primitive is to match any protocol, then the protocol_tag must be ROOT (by default, the lowest level tag in the protocol hierarchy specified in protcol.pdl)
The primitive_name can be any double quoted string that you chose to name the primitive.
The include_val must be either true or false. A value of true will match the packet if it matches the primitive, a value of false will match the packet if it does not match the primitive, in other words, this value can invert the pattern of the primitive.
Here is some example primitive definitions:host * protocol IP "IP Traffic" true host 08:00:20:0f:e7:ba protocol ROOT "Admin File Server" true link * 08:00:20:1f:e4:bd protocol ICMP "Ping to Main Web Server" true
The first primitive specifies a protocol primitive that will match any IP packet regardless of the source or destination nodes. The second primitive matches any packet that has the address shown as either the source or destination address regardless of the protocol. The last primitive will match whenever any ICMP protocol packet destined for the address specified is captured, regardless of which node it came from.
A filter is simply a collection of primitives and are specified in FDL like this:filter filter_name
{
[primitive list]
}

The filter_name following the keyword filter, is any double quoted string that you use to name your filter. The curly braces “{}” contain the list of primitives and must each be on a separate line as shown. The primitive list is any number of primitive lines as discussed in the previous section.
The filters.fdl file always contains a complete list of the primitives used in one unnamed filter at the top of the file. PacketBoy will expect to find all the primitives in this first filter before it processes your own defined filters. The unnamed filter is specified as this example filters.fdl file shows:
filter ""{host * protocol IP "IP Traffic" true host 08:00:20:0f:e7:ba protocol ROOT "Admin File Server" true link * 08:00:20:1f:e4:bd protocol ICMP "Ping to Main Web Server" true host * protocol IRC "IRC" true host * protocol NFS "NFS" false }filter "IP Protocol"{host * protocol IP "IP Traffic" true }filter "Admin File Server speaking IRC"{host 08:00:20:0f:e7:ba protocol ROOT "Admin File Server" true host * protocol IRC "IRC" true }filter "Web Server being pinged to death again"{link * 08:00:20:1f:e4:bd protocol ICMP "File Server" true }

Defining Triggers
Overview
The Trigger Builder
The Trigger Definition Language

Triggers - Overview
PacketBoy has a flexible trigger mechanism that allows you to start capturing packets automatically. You can specify the trigger conditions based any number of the following events:
• any packet to/from a specific host
• any packet between two specified hosts
• any packet of a particular protocol
• any time the network traffic exceeds a given threshold

The Trigger Builder
The Trigger Builder is a dialog that allows you to create, modify, delete and activate triggers. You can
access the Trigger Builder from the Edit Menu or by clicking on the Trigger Builder icon wherever you may see it. The Trigger Builder looks like the following picture.
There are two main parts to the Trigger Builder. The left side of the window, shows the list of currently defined triggers and their state. The right half shows the various details of the currently selected trigger.
In the Trigger List, an active trigger has a green LED icon next to it; an inactive trigger has a red one. To define a new trigger, click on the “New” button and a trigger will appear in the list and be selected. To change the name of a trigger, select the trigger from the Trigger List (by single clicking on its name until it is highlighted) and then click on it again once and wait for the small edit box to popup. To delete a trigger, select it from the Trigger List and the click on the “Delete” button. When you select a trigger from the list, the sections on the right half of the window fillout the details of the trigger, allowing you to modify them.
The details of a trigger depend on the type of trigger that it is. The top section defines the trigger type. If it is a host, link or protocol type, then the addresses or protocol can be selected from the dropdown lists. Below this section is where you specify the threshold type of the trigger, if it is a protocol, host or link, then it can only be an occurrence type trigger. If the trigger is of network type, then the threshold type can be either high or low. A high trigger is activated when the network goes above the specified value; a low trigger is activated when the network level falls below the specified value. Below this section is where you specify the value you want as a threshold for the network triggers and the units the value is in. The units can be either kilobytes per second, packets per second or percentage of total network bandwidth. The value itself should be an integral decimal value.

The Trigger Definition Language
Triggers that you define using the Trigger Builder in PacketBoy are saved in the trigger.tdl file using NDG Software’s Trigger Definition Language (TDL). The Trigger Builder gives you all the functionality required to add, modify and delete triggers, but should the need arise, the tdl file provides you with an alternate mechanism to change triggers. Each time PacketBoy is started, the triggers specified in the trigger.tdl file are loaded into PacketBoy’s internal table of triggers and will appear when you open the Trigger Builder.
The TDL file consists of a list of triggers each defined on a separate line. The first two keywords specify the type of trigger and is either Occurrence or Threshold and one of host, link, protocol or network. The parameter following that depends on the type of the trigger. At the end of each line is a double quoted string defining the name you wish for the trigger and the active status of the trigger, as either ON or OFF. Here are some example trigger definitions from a TDL file:
Occurrence host 08:00:20:79:41:99 "Admin host is talking" OFFOccurrence link * 08:00:20:79:AC:5E "Traffic to Web Server" ONOccurrence protocol IRC "IRC alert" OFFThreshold network high 30 bandwidth "30% Network Bandwidth" ON
The first trigger shows a host trigger, meaning it will match a packet with the specified address as either the source or destination address. The next parameter of this type is the address of the host which can be specified by a single star “*” character (to match all addresses), MAC address (6 hexadecimal bytes, colon separated), an IP number (4 decimal numbers separated by dots “.”) or a fully qualified domain name.
The second trigger show a link trigger, where both the source and destination addresses specified must match those of the packet. The source is listed first, followed by the destination address.
The third address shows a protocol trigger, the string following the protocol keyword must be a valid protocol identifier from the protocol.pdl file.
The last trigger shows a network threshold trigger. When the utilisation of the network being monitored reaches this specified value, the trigger will activate. Following the network keyword, is either the high or low keyword. If the trigger is high, then when the network goes above the specified level, the trigger is activated. If the trigger is low then when the network level falls below the value the trigger is activated. The numeric, decimal value following, is the value you are specifying for the threshold. Following the value is an optional units keyword of kbytes or pkts. If specified as kbytes, the value represents kilobytes per second. If specified as pkts it represents packets per second. If neither of these keywords are present, then the value is considered as a percentage of total network bandwidth.

Decoding SNMP MIB OID's.
One of the advanced features incorporated into PacketBoy is the ability to map Management Information Base (MIB) Object Identifiers (OIDs) onto their textual equivalents. The MIB OIDs and contained within SNMP packets.
The mapping of OIDs to textual names is done using a file called “mibs.def” in the PacketBoy files directory (usually c:\program files\ndg software\packetboy). The file can be produced (or edited/amended) by hand or generated using a MIB compiler. The example file was produced using the public domain MOSY MIB Compiler which can be downloaded from the Internet.
The format of the mib.defs file is as follows:
-- automatically generated by mosy 8.0 #1 (homer)
-- object definitions compiled from RFCs
iso 1internet iso.3.6.1directory internet.1mgmt internet.2experimental internet.3private internet.4enterprises private.1
mib2 mgmt.1system mib2.1sysdesc system.1sysoid system.2sysuptime system.3syscontact system.4sysname system.5syslocation system.6sysservices system.7
The first 2 lines are comments and are ignored by PacketBoy. PacketBoy ignores blank lines as well as lines with begin with --.
The next line defines that any OID beginning with 1 will have the text (iso) associated with it. The next line means that OIDs beginning with 1(iso) and followed by 3.6.1 with have the text (internet). Of course these lines could also have been
iso 1org iso.3dod org.6internet dod.1
A definition in this form would map (iso.org.dod.internet) to the OID 1.3.6.1
The file can be customised in ether way and extended by the user to suit individual preferences.