(page intentionally blank. continued below.) -...
TRANSCRIPT
�
�

(Page intentionally blank. Continued below.)

EPILEPSY WARNING
PLEASE READ THIS NOTICE BEFORE PLAYING THIS GAME OR BEFORE ALLOWING YOUR CHILDREN TO PLAY.
Certain individuals may experience epileptic seizures or loss of consciousness when subjected to strong, flashing lights for long periods of time. Such individuals may therefore experience a seizure while operating computer or video games. This can also affect individuals who have no prior medical record of epilepsy or have never previously experienced a seizure.
If you or any family member has ever experienced epilepsy symptoms (seizures or loss of consciousness) after exposure to flashing lights, please consult your doctor before playing this game.
Parental guidance is always suggested when children are using a computer and video games. Should you or your child experience dizziness, poor eyesight, eye or muscle twitching, loss of consciousness, feelings of disorientation or any type of involuntary movements or cramps while playing this game, turn it off immediately and consult your doctor before playing again.
PRECAUTIONS DURING USE:
- Do not sit too close to the monitor. Sit as far as comfortably possible.- Use as small a monitor as possible.- Do not play when tired or short on sleep.- Take care that there is sufficient lighting in the room.- Be sure to take a break of 10-15 minutes every hour.
© 2008 Slitherine Software UK Ltd. . All Rights Reserved. All other trademarks and trade names are the properties of their respective owners and Slitherine Software UK Ltd. make no claim thereto.

- 4 -
COMMANDER: NAPOLEON AT WAR™
. . . . . . . . . . . . . . . . . . . . . . . . . . . . . . . . . . . . . .
. . . . . . . . . . . . . . . . . . . . . . . . . . . . . . . . . . . . . . . . . . . . . . . . . . . . . . . .
. . . . . . . . . . . . . . . . . . . . . . . . . . . . . . . . . . . . . . . . . . . . . . . . . . . . . . . .
. . . . . . . . . . . . . . . . . . . . . . . . . . . . . . . . . . . . . . . . . . . . . . . . . . . . . . . .
. . . . . . . . . . . . . . . . . . . . . . . . . . . . . . . . . . . . . . . . . . . . . . . . . . . . . . . .
. . . . . . . . . . . . . . . . . . . . . . . . . . . . . . . . . . . . . . . . . . . . . . . . . . . . . . . .
. . . . . . . . . . . . . . . . . . . . . . . . . . . . . . . . . . . . . . . . . . . . . . . . . . . . . . . .
. . . . . . . . . . . . . . . . . . . . . . . . . . . . . . . . . . . . . . . . . . . . . . . . . . . . . . . .
. . . . . . . . . . . . . . . . . . . . . . . . . . . . . . . . . . . . . . . . . . . . . . . . . . . . . . . .
. . . . . . . . . . . . . . . . . . . . . . . . . . . . . . . . . . . . . . . . . . . . . . . . . . . . . . . .
. . . . . . . . . . . . . . . . . . . . . . . . . . . . . . . . . . . . . . . . . . . . . . . . . . . . . . . .
. . . . . . . . . . . . . . . . . . . . . . . . . . . . . . . . . . . . . . . . . . . . . . . . . . . . . . . .
. . . . . . . . . . . . . . . . . . . . . . . . . . . . . . . . . . . . . . . . . . . . . . . . . . . . . . . .
. . . . . . . . . . . . . . . . . . . . . . . . . . . . . . . . . . . . . . . . . . . . . . . . . . . . . . . .
. . . . . . . . . . . . . . . . . . . . . . . . . . . . . . . . . . . . . . . . . . . . . . . . . . . . . . . .
. . . . . . . . . . . . . . . . . . . . . . . . . . . . . . . . . . . . . . . . . . . . . . . . . . . . . . . .
. . . . . . . . . . . . . . . . . . . . . . . . . . . . . . . . . . . . . . . . . . . . . . . . . . . . . . . .
. . . . . . . . . . . . . . . . . . . . . . . . . . . . . . . . . . . . . . . . . . . . . . . . . . . . . . . .
. . . . . . . . . . . . . . . . . . . . . . . . . . . . . . . . . . . . . . . . . . . . . . . . . . . . . . . .
. . . . . . . . . . . . . . . . . . . . . . . . . . . . . . . . . . . . . . . . . . . . . . . . . . . . . . . .
. . . . . . . . . . . . . . . . . . . . . . . . . . . . . . . . . . . . . . . . . . . . . . . . . . . . . . . .
. . . . . . . . . . . . . . . . . . . . . . . . . . . . . . . . . . . . . . . . . . . . . . . . . . . . . . . .
. . . . . . . . . . . . . . . . . . . . . . . . . . . . . . . . . . . . . . . . . . . . . . . . . . . . . . . .
. . . . . . . . . . . . . . . . . . . . . . . . . . . . . . . . . . . . . . . . . . . . . . . . . . . . . . . .
. . . . . . . . . . . . . . . . . . . . . . . . . . . . . . . . . . . . . . . . . . . . . . . . . . . . . . . .
. . . . . . . . . . . . . . . . . . . . . . . . . . . . . . . . . . . . . . . . . . . . . . . . . . . . . . . .
- 5 -
Game Manual
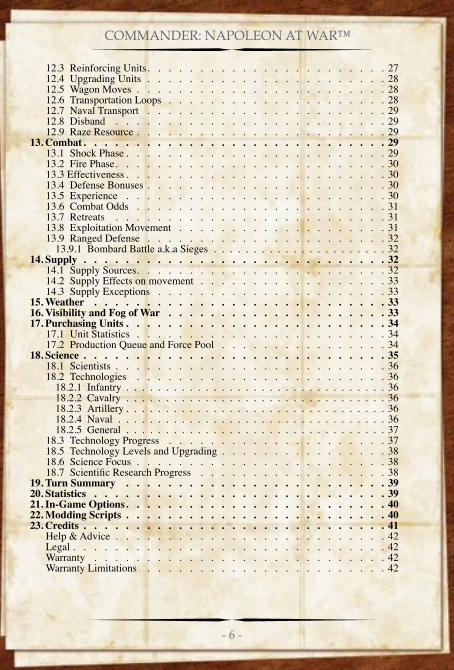
CONTENTS1. Commander: Napoleon at War . . . . . . . . . . . . . . . . . . . 7
Minimum System Requirements . . . . . . . . . . . . . . . . . . . 7Installation Procedures . . . . . . . . . . . . . . . . . . . . . . . 7Uninstalling the Game . . . . . . . . . . . . . . . . . . . . . . . 7Product Updates . . . . . . . . . . . . . . . . . . . . . . . . . 7Game Forums . . . . . . . . . . . . . . . . . . . . . . . . . . 8Technical Support . . . . . . . . . . . . . . . . . . . . . . . . . 8
2. Introduction . . . . . . . . . . . . . . . . . . . . . . . . . . . 93. Conventions . . . . . . . . . . . . . . . . . . . . . . . . . . . 9
3.1 Keyboard/Mouse Controls . . . . . . . . . . . . . . . . . . . 94. The Main Menu . . . . . . . . . . . . . . . . . . . . . . . . . 105. Game Setup . . . . . . . . . . . . . . . . . . . . . . . . . . . 11
5.1 Basic Options . . . . . . . . . . . . . . . . . . . . . . . . 115.2 Advanced Options . . . . . . . . . . . . . . . . . . . . . . 125.3 Multiplayer Options . . . . . . . . . . . . . . . . . . . . . . 12
6. Loading and Saving Games . . . . . . . . . . . . . . . . . . . . 137. The War Map . . . . . . . . . . . . . . . . . . . . . . . . . . 13
7.1 Sides, Factions, and Countries . . . . . . . . . . . . . . . . . . 147.2 Ownership and Nationality of Hexes . . . . . . . . . . . . . . . 147.3 Terrain . . . . . . . . . . . . . . . . . . . . . . . . . . . 15
8. Control Panel . . . . . . . . . . . . . . . . . . . . . . . . . . 168.1 Production Overview . . . . . . . . . . . . . . . . . . . . . 168.2 Mini-Map . . . . . . . . . . . . . . . . . . . . . . . . . . 168.3 Control Panel Buttons . . . . . . . . . . . . . . . . . . . . . 178.4 Dynamic Unit Panel . . . . . . . . . . . . . . . . . . . . . . 18
9. Resources . . . . . . . . . . . . . . . . . . . . . . . . . . . . 199.1 Production Points . . . . . . . . . . . . . . . . . . . . . . . 199.2 Manpower . . . . . . . . . . . . . . . . . . . . . . . . . 209.3 Horses . . . . . . . . . . . . . . . . . . . . . . . . . . . 209.4 War Effort . . . . . . . . . . . . . . . . . . . . . . . . . 209.5 Country Deficits . . . . . . . . . . . . . . . . . . . . . . . 219.6 Cities, Fortresses, and Resources Locations . . . . . . . . . . . . 219.7 Convoys . . . . . . . . . . . . . . . . . . . . . . . . . . 21
10. Politics and War . . . . . . . . . . . . . . . . . . . . . . . . . 2210.1 The Political Map . . . . . . . . . . . . . . . . . . . . . . . 2210.2 Conquering and Surrender . . . . . . . . . . . . . . . . . . . 2310.3 Vassals and Revolts . . . . . . . . . . . . . . . . . . . . . . 2310.4 Victory Conditions . . . . . . . . . . . . . . . . . . . . . . 23
11. Units . . . . . . . . . . . . . . . . . . . . . . . . . . . . . . 2311.1 Unit Types . . . . . . . . . . . . . . . . . . . . . . . . . 2411.2 Units List . . . . . . . . . . . . . . . . . . . . . . . . . . 2411.3 Unit Attributes . . . . . . . . . . . . . . . . . . . . . . . . 2511.4 Commanders . . . . . . . . . . . . . . . . . . . . . . . . 26
12. Unit Actions . . . . . . . . . . . . . . . . . . . . . . . . . . . 2612.1 Movement . . . . . . . . . . . . . . . . . . . . . . . . . . 26
12.1.1 Zone Of Control . . . . . . . . . . . . . . . . . . . . . . . . . . . . 26121.2 Movement Costs . . . . . . . . . . . . . . . . . . . . . . . . . . . . 26
12.2 Attacking . . . . . . . . . . . . . . . . . . . . . . . . . . 27
- 6 -
COMMANDER: NAPOLEON AT WAR™
12.3 Reinforcing Units . . . . . . . . . . . . . . . . . . . . . . . 2712.4 Upgrading Units . . . . . . . . . . . . . . . . . . . . . . . 2812.5 Wagon Moves . . . . . . . . . . . . . . . . . . . . . . . . 2812.6 Transportation Loops . . . . . . . . . . . . . . . . . . . . . 2812.7 Naval Transport . . . . . . . . . . . . . . . . . . . . . . . 2912.8 Disband . . . . . . . . . . . . . . . . . . . . . . . . . . 2912.9 Raze Resource . . . . . . . . . . . . . . . . . . . . . . . . 29
13. Combat . . . . . . . . . . . . . . . . . . . . . . . . . . . . . 2913.1 Shock Phase . . . . . . . . . . . . . . . . . . . . . . . . . 2913.2 Fire Phase . . . . . . . . . . . . . . . . . . . . . . . . . . 3013.3 Effectiveness . . . . . . . . . . . . . . . . . . . . . . . . . 3013.4 Defense Bonuses . . . . . . . . . . . . . . . . . . . . . . . 3013.5 Experience . . . . . . . . . . . . . . . . . . . . . . . . . 3013.6 Combat Odds . . . . . . . . . . . . . . . . . . . . . . . . 3113.7 Retreats . . . . . . . . . . . . . . . . . . . . . . . . . . 3113.8 Exploitation Movement . . . . . . . . . . . . . . . . . . . . 3113.9 Ranged Defense . . . . . . . . . . . . . . . . . . . . . . . 32
13.9.1 Bombard Battle a.k.a Sieges . . . . . . . . . . . . . . . . . . . . . . 3214. Supply . . . . . . . . . . . . . . . . . . . . . . . . . . . . . 32
14.1 Supply Sources. . . . . . . . . . . . . . . . . . . . . . . . 3214.2 Supply Effects on movement . . . . . . . . . . . . . . . . . . 3314.3 Supply Exceptions . . . . . . . . . . . . . . . . . . . . . . 33
15. Weather . . . . . . . . . . . . . . . . . . . . . . . . . . . . 3316. Visibility and Fog of War . . . . . . . . . . . . . . . . . . . . . 3317. Purchasing Units . . . . . . . . . . . . . . . . . . . . . . . . . 34
17.1 Unit Statistics . . . . . . . . . . . . . . . . . . . . . . . . 3417.2 Production Queue and Force Pool . . . . . . . . . . . . . . . . 34
18. Science . . . . . . . . . . . . . . . . . . . . . . . . . . . . . 3518.1 Scientists . . . . . . . . . . . . . . . . . . . . . . . . . . 3618.2 Technologies . . . . . . . . . . . . . . . . . . . . . . . . 36
18.2.1 Infantry . . . . . . . . . . . . . . . . . . . . . . . . . . . . . . . . . 3618.2.2 Cavalry . . . . . . . . . . . . . . . . . . . . . . . . . . . . . . . . . 3618.2.3 Artillery . . . . . . . . . . . . . . . . . . . . . . . . . . . . . . . . . 3618.2.4 Naval . . . . . . . . . . . . . . . . . . . . . . . . . . . . . . . . . . 3618.2.5 General . . . . . . . . . . . . . . . . . . . . . . . . . . . . . . . . . 37
18.3 Technology Progress . . . . . . . . . . . . . . . . . . . . . 3718.5 Technology Levels and Upgrading . . . . . . . . . . . . . . . . 3818.6 Science Focus . . . . . . . . . . . . . . . . . . . . . . . . 3818.7 Scientific Research Progress . . . . . . . . . . . . . . . . . . 38
19. Turn Summary . . . . . . . . . . . . . . . . . . . . . . . . . 3920. Statistics . . . . . . . . . . . . . . . . . . . . . . . . . . . . 3921. In-Game Options . . . . . . . . . . . . . . . . . . . . . . . . . 4022. Modding Scripts . . . . . . . . . . . . . . . . . . . . . . . . . 4023. Credits . . . . . . . . . . . . . . . . . . . . . . . . . . . . . 41
Help & Advice . . . . . . . . . . . . . . . . . . . . . . . . . . 42Legal . . . . . . . . . . . . . . . . . . . . . . . . . . . . . . 42Warranty . . . . . . . . . . . . . . . . . . . . . . . . . . . . 42Warranty Limitations . . . . . . . . . . . . . . . . . . . . . . . 42
- 7 -
Game Manual
COMMANDER: NAPOLEON AT WAR Thank you for purchasing Commander: Napoleon at War!
SYSTEM REQUIREMENTSTo play Commander: Napoleon at War, your computer system must meet these requirements:
Mac OS X 10.4 or higher•
1.4 GHz CPU or higher.•
512 MB RAM•
300 MB of free space on hard drive•
For maximum performance, your computer system must meet these requirements:
1.6 GHz SPU or higher•
1 GB RAM•
..
.
- 8 -
COMMANDER: NAPOLEON AT WAR™
TECHNICAL SUPPORTShould you have a technical problem with the game, the best way to get help is to post a note in the forums at http://www.freeverse.com. You’ll then hear back from our personnel, or from one of the many helpful players of the game.
. .
.
- 9 -
Game Manual
2. INTRODUCTIONCommander: Napoleon at War is a strategic level turn based war game set during the Napoleonic era. It puts you, the player, in command of either French or Coalition led forces for the duration of the war. As well as controlling the armed forces of these powers, you’ll be making decisions on recruitment, science, and diplomacy.
The game has been carefully designed to be easy to play yet hard to master. The challenging AI opponent will give even the most experienced players a good game. The user interface is laid out in a clear and easy-to-use manner, meaning you’ll be spending your time fighting the
enemy and not the game’s interface. All in all, Commander: Napoleon at War is the game that fans of the Napoleonic era have been waiting for and it will not disappoint!
3. CONVENTIONSThroughout the manual we use a number of terms and we list their meaning here for those who may be unfamiliar with the jargon.
Click: Place your mouse pointer over an area or •
button and click the left mouse button.Right Click: Place your mouse pointer over an area or •
button and click the right mouse button.Drag: Hold down the left mouse button down while •
moving the mouse pointer across the screenSelect: Click on an item or press the keyboard key.•
Tool Tip: Useful instant guidance found by resting you •
mouse pointer over buttons, units, etc.UI: User Interface is a generic term that we use to describe the “in •
game controls” that will be used by you to manage the game.
3.1 KEYBOARD/MOUSE CONTROLS<Enter> Chat / Send Chat Message•
<Page Up> Scroll through ready units•
<Page Down> Scroll through ready units•
+/Keys – Zoom In/Out•
S – Sentry Mode•
Mouse Wheel – Zoom In/Out•
Arrow Keys Scrolls the map•
- 10 -
COMMANDER: NAPOLEON AT WAR™
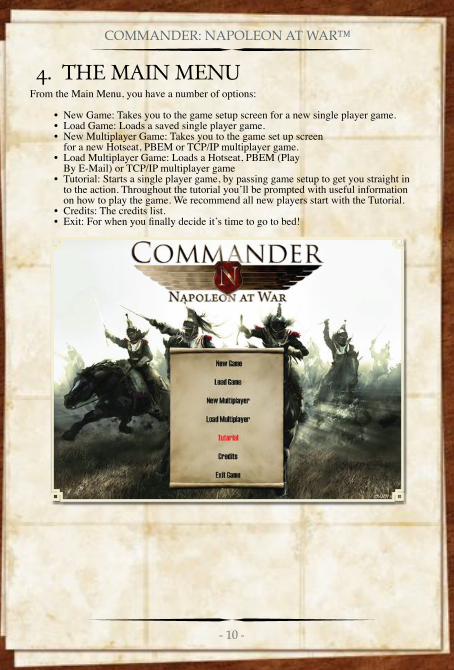
4. THE MAIN MENUFrom the Main Menu, you have a number of options:
New Game: Takes you to the game setup screen for a new single player game.•
Load Game: Loads a saved single player game.•
New Multiplayer Game: Takes you to the game set up screen •
for a new Hotseat, PBEM or TCP/IP multiplayer game.Load Multiplayer Game: Loads a Hotseat, PBEM (Play •
By E-Mail) or TCP/IP multiplayer gameTutorial: Starts a single player game, by passing game setup to get you straight in •
to the action. Throughout the tutorial you’ll be prompted with useful information on how to play the game. We recommend all new players start with the Tutorial. Credits: The credits list. •
Exit: For when you finally decide it’s time to go to bed!•
- 11 -
Game Manual
5. GAME SETUPBefore you can start your new game, you must select settings for it. The same options are available in single Player and multiplayer games. There are a number of basic and advanced options, as follows:
5.1 BASIC OPTIONS
Side. You can play as either France or Coalition. To select one or the other, click on the large button associated with that side. In a Single Player game, the AI will control the other side, while in multiplayer, it will be controlled by your opponent.
Scenario. The large number between the France and Coalition buttons is the starting date of your campaign. Click on this button to change the start date. Each start date is associated with a different scenario, so for example, the 1809 scenario is called Campaign on the Danube, while the 1815 scenario is called The Waterloo Campaign.
Handicap/Difficulty Levels. The round gold and silver buttons are used to set the handicap level. You can give either side a small, medium, or large advantage, or keep it even for both. This will affect the resources available, the income collected, and a number of other factors that all add up to making it easier for that side. This can be used for balancing multiplayer games between novice and experienced players, or for experienced players to get a more challenging game against an AI opponent.
- 12 -
COMMANDER: NAPOLEON AT WAR™
5.2 ADVANCED OPTIONSBy default, the advanced options are hidden, but you can display them by clicking the ‘Show Options’ button. Advanced options are as follows:
Fog of War. This toggles the fog of war feature on and off. With fog of war off, you will be able to see all enemy units and the enemy’s production at any time. With fog of war on, the map will be shrouded in a black fog that hides anything your troops are not aware of. This makes for a much tougher game!
Scenario End Limit. This option toggles the scenario set end dates on and off. With this option off, you can continue to play as long as you like.
Random science. This option toggles on the randomized science. With this option on there is a random factor to science meaning the game will be less predictable and players have to adapt their strategies as events unfold.
Advanced Weather. This toggles on and off between showing weather as large area icons or showing them for each hex. In addition advanced weather gives greater movement penalties to troops caught in it.
5.3 MULTIPLAYER OPTIONSIn addition to the above options, there is an extra option available for TCP/IP multiplayer games:
Timers. In TCP/IP multiplayer games you can limit the amount of time available to your opponent to do his or her turn. It works very much like a chess clock. At the top right of the screen is a timer that counts down. When this timer runs out you cannot issue any more orders and your turn ends, but don’t worry you don’t lose the game! Any unused time accumulates for future turns.
Once you’re happy with your settings, click the check button to start your game.
When playing against someone in TCP/IP or PBEM, both players must have the same version of the game including patches.
For best results you should have the Hattenschweiler and Franklin Medium Gothic fonts installed on your PC. If you do not have these fonts, the game will find a substitute font.
- 13 -
Game Manual
6. LOADING AND SAVING GAMESWhen you click the Load Game button, a window will pop up with a list of saved games available for loading. If you have not saved any games, no games will be available to load.
If you are loading a multiplayer game, please note that you cannot change game mode, so if you started the game in hotseat, you cannot later load it in
single player, PBEM, or TCP/IP mode.
You can save the game at any point in your turn from the options menu. The game will also autosave your progress every turn as a backup in case any problems arise.
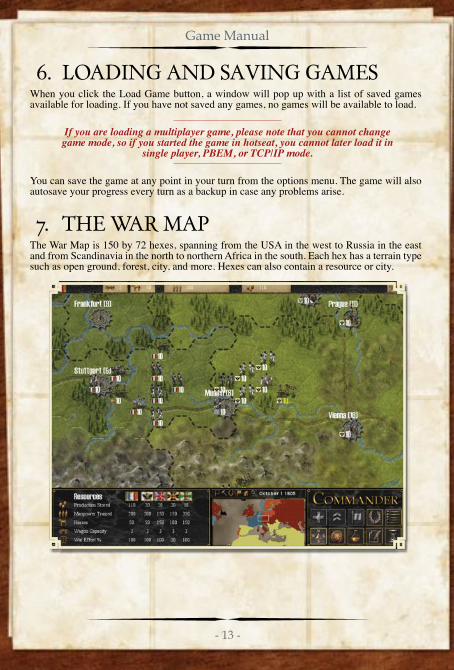
7. THE WAR MAPThe War Map is 150 by 72 hexes, spanning from the USA in the west to Russia in the east and from Scandinavia in the north to northern Africa in the south. Each hex has a terrain type such as open ground, forest, city, and more. Hexes can also contain a resource or city.

- 14 -
COMMANDER: NAPOLEON AT WAR™
7.1 SIDES, FACTIONS, AND COUNTRIESThere are two sides in the game – France and Coalition.
The French faction consists of only France. The Coalition at the start of the war includes the following countries: Great Britain, Austria, Prussia, and Russia. Each faction has a faction leader, and for the French it is of course France while for the Coalition it is Great Britain unless they are conquered, in which case it switches faction leadership to some other Coalition country.
Every country is either a major or minor. Major countries have their own manpower levels, collect their own production, and handle their own science. Minor countries are controlled by their faction leader.
Countries in the same faction will share their wagon capacity. •
Manpower and production points are NOT faction-•
based and are counted on a per-country basis.Faction leaders fund any Minor Countries that join that faction and •
receive any production generated by that Minor Country.
Every country owns land and units and its allegiance can be:
France – This nation is at war and under the control of the French side. •
Coalition – This nation is at war and under the control of the Coalition led side.•
Neutral – This nation is Neutral and has no allegiance to either •
the French or Coalition led sides. Both French and Coalition led sides may declare war on neutral countries. Pro-France – This nation has allegiance to the French side. It may join •
the war later in the game and become fully aligned to the French side. The French side may not declare war on Pro-French Countries. Pro-Coalition – This nation has allegiance to the Coalition led side. It may •
join the war later in the game and become fully aligned with the Coalition. The Coalition side may not declare war on Pro-Coalition Countries.
Any hexes belonging to a faction will be tinted to show who controls it. French-owned hexes will display in blue, Coalition-owned hexes are yellow.
7.2 OWNERSHIP AND NATIONALITY OF HEXESEvery land hex has a nationality, which is based on the national boundaries in 1805; these are the nations ‘core’ hexes. Each hex also has an owner, which is the side that currently controls that hex. If French troops conquer Austria, the hexes in Austria will have their nationality displayed as Austrian, but the owner as France.
Conquered cities and resources do not generate as much production as cities and resources on core hexes.
- 15 -
Game Manual
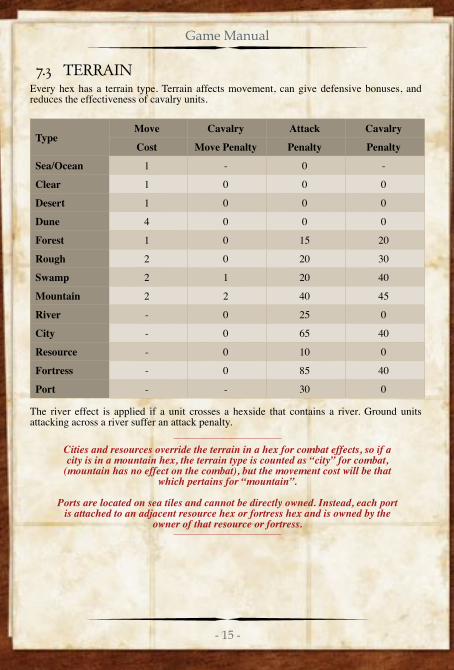
7.3 TERRAIN Every hex has a terrain type. Terrain affects movement, can give defensive bonuses, and reduces the effectiveness of cavalry units.
TypeMove Cavalry Attack Cavalry
Cost Move Penalty Penalty Penalty
Sea/Ocean 1 - 0 -
Clear 1 0 0 0
Desert 1 0 0 0
Dune 4 0 0 0
Forest 1 0 15 20
Rough 2 0 20 30
Swamp 2 1 20 40
Mountain 2 2 40 45
River - 0 25 0
City - 0 65 40
Resource - 0 10 0
Fortress - 0 85 40
Port - - 30 0
The river effect is applied if a unit crosses a hexside that contains a river. Ground units attacking across a river suffer an attack penalty.
Cities and resources override the terrain in a hex for combat effects, so if a city is in a mountain hex, the terrain type is counted as “city” for combat,
(mountain has no effect on the combat), but the movement cost will be that which pertains for “mountain”.
Ports are located on sea tiles and cannot be directly owned. Instead, each port
is attached to an adjacent resource hex or fortress hex and is owned by the owner of that resource or fortress.
- 16 -
COMMANDER: NAPOLEON AT WAR™
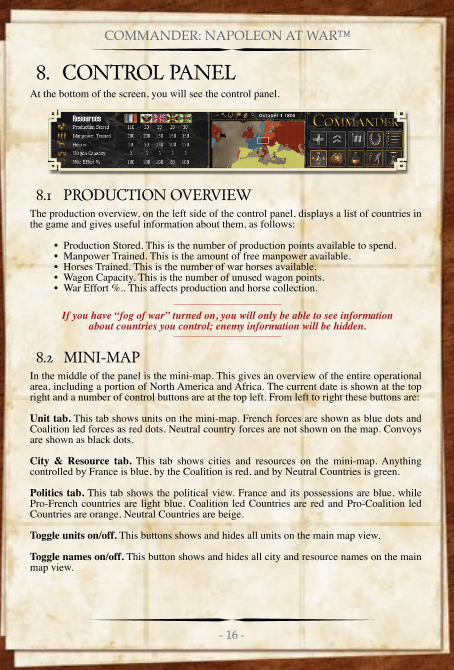
8. CONTROL PANELAt the bottom of the screen, you will see the control panel.
8.1 PRODUCTION OVERVIEWThe production overview, on the left side of the control panel, displays a list of countries in the game and gives useful information about them, as follows:
Production Stored. This is the number of production points available to spend. •
Manpower Trained. This is the amount of free manpower available. •
Horses Trained. This is the number of war horses available.•
Wagon Capacity. This is the number of unused wagon points. •
War Effort %.. This affects production and horse collection. •
If you have “fog of war” turned on, you will only be able to see information about countries you control; enemy information will be hidden.
8.2 MINI-MAPIn the middle of the panel is the mini-map. This gives an overview of the entire operational area, including a portion of North America and Africa. The current date is shown at the top right and a number of control buttons are at the top left. From left to right these buttons are:
Unit tab. This tab shows units on the mini-map. French forces are shown as blue dots and Coalition led forces as red dots. Neutral country forces are not shown on the map. Convoys are shown as black dots.
City & Resource tab. This tab shows cities and resources on the mini-map. Anything controlled by France is blue, by the Coalition is red, and by Neutral Countries is green.
Politics tab. This tab shows the political view. France and its possessions are blue, while Pro-French countries are light blue. Coalition led Countries are red and Pro-Coalition led Countries are orange. Neutral Countries are beige.
Toggle units on/off. This buttons shows and hides all units on the main map view.
Toggle names on/off. This button shows and hides all city and resource names on the main map view.
- 17 -
Game Manual
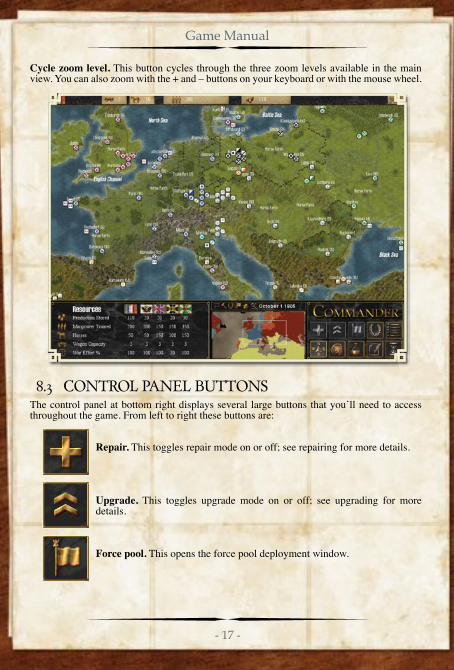
Cycle zoom level. This button cycles through the three zoom levels available in the main view. You can also zoom with the + and – buttons on your keyboard or with the mouse wheel.
8.3 CONTROL PANEL BUTTONSThe control panel at bottom right displays several large buttons that you’ll need to access throughout the game. From left to right these buttons are:
Repair. This toggles repair mode on or off; see repairing for more details.
Upgrade. This toggles upgrade mode on or off; see upgrading for more details.
Force pool. This opens the force pool deployment window.
- 18 -
COMMANDER: NAPOLEON AT WAR™
Declare War. This toggles the Political Mode, where you can declare war on other Countries.
Options. See In Game Options for more details.
War Map. This takes you to the War Map if you were viewing another screen.
Produce Units. This takes you to the Unit Production screen.
Science. This takes you to the Unit Science screen.
Statistics. This takes you to the Statistics screen.
End Turn. This ends your current turn and passes control over to your opponent or the AI.
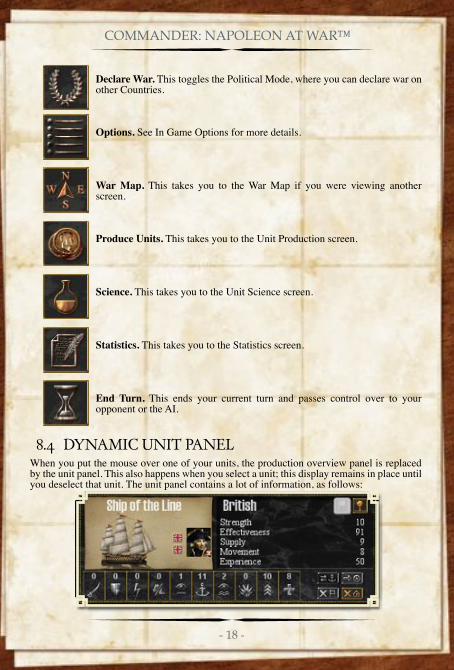
8.4 DYNAMIC UNIT PANELWhen you put the mouse over one of your units, the production overview panel is replaced by the unit panel. This also happens when you select a unit; this display remains in place until you deselect that unit. The unit panel contains a lot of information, as follows:
- 19 -
Game Manual
Unit Type. This can be militia, light cavalry, siege artillery etc.
Unit Graphic. This is a large image of the selected unit. As you develop new technologies, this graphic will update.
Commander Image. If there is a commander with the unit, his image appears, along with a small ‘x’ button, which is used to dismiss the leader and send him back to the force pool.
Experience. The experience level is shown by stacking nationality icons next to the unit. Each icon means one experience level.
Unit & Terrain Buttons. These icons are used to switch between terrain info and unit info.
The right-hand box shows information about the unit’s nationality, strength, effectiveness, supply Level, movement
The bottom of this panel shows detailed information about the unit’s combat abilities, which will be covered later in the Units section.
If you use the “terrain” button, the unit panel will change to show a picture of the terrain you are occupying and details about its effects, such as movement cost, cavalry movement penalty, attack penalty, cavalry battle penalty, and defense (all explained in more detail later).
9. RESOURCESThere are three resources in the game:
Production Points. Production points are generated by cities and resources and are a measure of the industrial capacity of the nation.
Manpower. Manpower is a measure of the number of men the country can call on for military service.
Horses. Horses is a measure of the amount of trained war horses you have available to allocate for the purchase and repair of certain unit types
9.1 PRODUCTION POINTSEvery major country collects production points (PP) from the cities and resources they control each turn; these can be used or stored for later use.
PP are used for many different actions in the game, including purchasing new units, buying laboratories for science, repairing damaged units, upgrading old units, loading troops on transport ships, and overusing your wagon capacity.
- 20 -
COMMANDER: NAPOLEON AT WAR™
Every city and resource on the map has a number next to it indicating the PP produced by that hex each turn. The number of PP received by a nation is a combination of this value, multiplied by the nation’s war effort % (see War Effort, below).
The number of stored PP is shown on the right of the top bar, with a coins icon. If more than one country belongs to the faction you are controlling, the order of the flags on the left of the
bar show which PP number applies to which country.
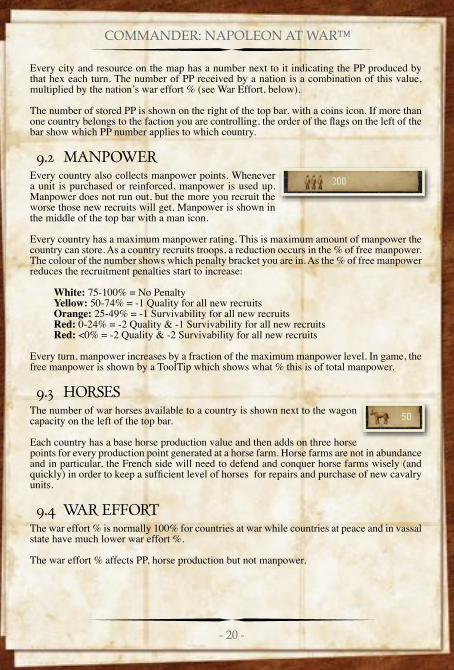
9.2 MANPOWEREvery country also collects manpower points. Whenever a unit is purchased or reinforced, manpower is used up. Manpower does not run out, but the more you recruit the worse those new recruits will get. Manpower is shown in the middle of the top bar with a man icon.
Every country has a maximum manpower rating. This is maximum amount of manpower the country can store. As a country recruits troops, a reduction occurs in the % of free manpower. The colour of the number shows which penalty bracket you are in. As the % of free manpower reduces the recruitment penalties start to increase:
White: 75-100% = No PenaltyYellow: 50-74% = -1 Quality for all new recruitsOrange: 25-49% = -1 Survivability for all new recruitsRed: 0-24% = -2 Quality & -1 Survivability for all new recruitsRed: <0% = -2 Quality & -2 Survivability for all new recruits
Every turn, manpower increases by a fraction of the maximum manpower level. In game, the free manpower is shown by a ToolTip which shows what % this is of total manpower.
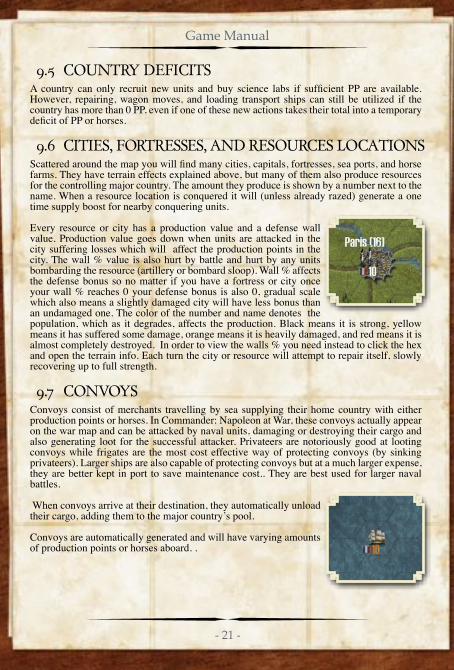
9.3 HORSESThe number of war horses available to a country is shown next to the wagon capacity on the left of the top bar.
Each country has a base horse production value and then adds on three horse points for every production point generated at a horse farm. Horse farms are not in abundance and in particular, the French side will need to defend and conquer horse farms wisely (and quickly) in order to keep a sufficient level of horses for repairs and purchase of new cavalry
units.
9.4 WAR EFFORT The war effort % is normally 100% for countries at war while countries at peace and in vassal state have much lower war effort %.
The war effort % affects PP, horse production but not manpower.
- 21 -
Game Manual
9.5 COUNTRY DEFICITSA country can only recruit new units and buy science labs if sufficient PP are available.
However, repairing, wagon moves, and loading transport ships can still be utilized if the country has more than 0 PP, even if one of these new actions takes their total into a temporary deficit of PP or horses.
9.6 CITIES, FORTRESSES, AND RESOURCES LOCATIONSScattered around the map you will find many cities, capitals, fortresses, sea ports, and horse
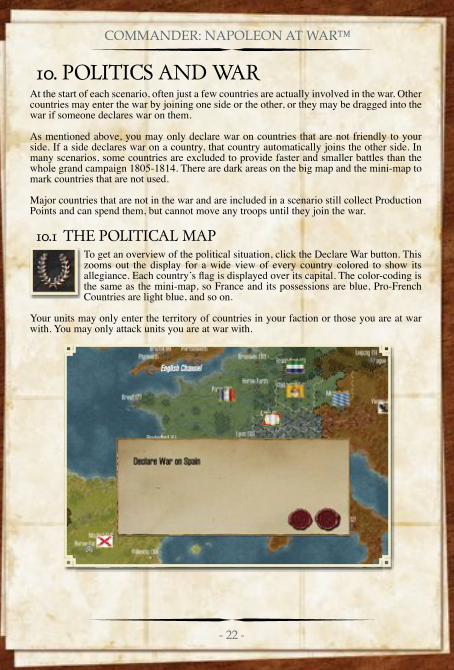
farms. They have terrain effects explained above, but many of them also produce resources for the controlling major country. The amount they produce is shown by a number next to the name. When a resource location is conquered it will (unless already razed) generate a one time supply boost for nearby conquering units.
Every resource or city has a production value and a defense wall value. Production value goes down when units are attacked in the city suffering losses which will affect the production points in the city. The wall % value is also hurt by battle and hurt by any units bombarding the resource (artillery or bombard sloop). Wall % affects the defense bonus so no matter if you have a fortress or city once your wall % reaches 0 your defense bonus is also 0, gradual scale which also means a slightly damaged city will have less bonus than an undamaged one. The color of the number and name denotes the population, which as it degrades, affects the production. Black means it is strong, yellow means it has suffered some damage, orange means it is heavily damaged, and red means it is almost completely destroyed. In order to view the walls % you need instead to click the hex and open the terrain info. Each turn the city or resource will attempt to repair itself, slowly recovering up to full strength.
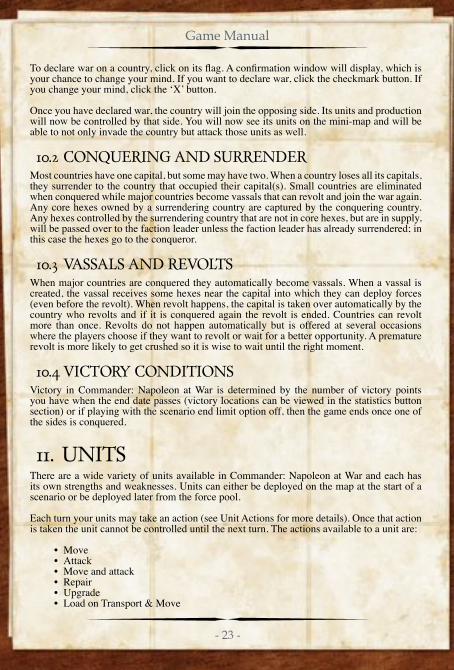
9.7 CONVOYSConvoys consist of merchants travelling by sea supplying their home country with either production points or horses. In Commander: Napoleon at War, these convoys actually appear on the war map and can be attacked by naval units, damaging or destroying their cargo and also generating loot for the successful attacker. Privateers are notoriously good at looting convoys while frigates are the most cost effective way of protecting convoys (by sinking privateers). Larger ships are also capable of protecting convoys but at a much larger expense, they are better kept in port to save maintenance cost.. They are best used for larger naval battles.
When convoys arrive at their destination, they automatically unload their cargo, adding them to the major country’s pool.
Convoys are automatically generated and will have varying amounts of production points or horses aboard. .
- 22 -
COMMANDER: NAPOLEON AT WAR™
10. POLITICS AND WARAt the start of each scenario, often just a few countries are actually involved in the war. Other countries may enter the war by joining one side or the other, or they may be dragged into the war if someone declares war on them.
As mentioned above, you may only declare war on countries that are not friendly to your side. If a side declares war on a country, that country automatically joins the other side. In many scenarios, some countries are excluded to provide faster and smaller battles than the whole grand campaign 1805-1814. There are dark areas on the big map and the mini-map to mark countries that are not used.
Major countries that are not in the war and are included in a scenario still collect Production Points and can spend them, but cannot move any troops until they join the war.
10.1 THE POLITICAL MAPTo get an overview of the political situation, click the Declare War button. This zooms out the display for a wide view of every country colored to show its allegiance. Each country’s flag is displayed over its capital. The color-coding is
the same as the mini-map, so France and its possessions are blue, Pro-French Countries are light blue, and so on.
Your units may only enter the territory of countries in your faction or those you are at war with. You may only attack units you are at war with.
- 23 -
Game Manual
To declare war on a country, click on its flag. A confirmation window will display, which is
your chance to change your mind. If you want to declare war, click the checkmark button. If you change your mind, click the ‘X’ button.
Once you have declared war, the country will join the opposing side. Its units and production will now be controlled by that side. You will now see its units on the mini-map and will be able to not only invade the country but attack those units as well.
10.2 CONQUERING AND SURRENDERMost countries have one capital, but some may have two. When a country loses all its capitals, they surrender to the country that occupied their capital(s). Small countries are eliminated when conquered while major countries become vassals that can revolt and join the war again. Any core hexes owned by a surrendering country are captured by the conquering country. Any hexes controlled by the surrendering country that are not in core hexes, but are in supply, will be passed over to the faction leader unless the faction leader has already surrendered; in this case the hexes go to the conqueror.
10.3 VASSALS AND REVOLTSWhen major countries are conquered they automatically become vassals. When a vassal is created, the vassal receives some hexes near the capital into which they can deploy forces (even before the revolt). When revolt happens, the capital is taken over automatically by the country who revolts and if it is conquered again the revolt is ended. Countries can revolt more than once. Revolts do not happen automatically but is offered at several occasions where the players choose if they want to revolt or wait for a better opportunity. A premature revolt is more likely to get crushed so it is wise to wait until the right moment.
10.4 VICTORY CONDITIONSVictory in Commander: Napoleon at War is determined by the number of victory points you have when the end date passes (victory locations can be viewed in the statistics button section) or if playing with the scenario end limit option off, then the game ends once one of the sides is conquered.
11. UNITSThere are a wide variety of units available in Commander: Napoleon at War and each has its own strengths and weaknesses. Units can either be deployed on the map at the start of a scenario or be deployed later from the force pool.
Each turn your units may take an action (see Unit Actions for more details). Once that action is taken the unit cannot be controlled until the next turn. The actions available to a unit are:
Move•
Attack•
Move and attack•
Repair•
Upgrade•
Load on Transport & Move•

- 24 -
COMMANDER: NAPOLEON AT WAR™
Unload from Transport•
Wagon Redeployment•
Raze •
Disband•
11.1 UNIT TYPESUnits are divided into types and this determines how they move, which attack value is used against them, and how combats are resolved. These types are:
Infantry – can move and occupy hexes. Use ground attack value against this unit.
Cavalry – can move and occupy hexes. Use ground attack value against this unit. Also apply the anti cavalry bonus when attacking this unit.
Artillery – can move and occupy hexes. Use ground attack value against this unit. They can attack resources directly using bombard , bypassing any battle with defending units and putting them under siege.
Naval – naval units can only go in sea hexes or ports. Land units cost maintenance PP each turn while naval units only cost maintenance when not in or adjacent to a friendly port so use this rule to your advantage and to save huge upkeep costs by not operating navy when not needed. Use naval attack values against these units.
11.2 UNITS LISTMilitia. Infantry units with weak offence and can be used as cannon fodder or for defending locations.
Light Infantry. They are used as elite skirmishers for harassing enemy infantry with their durability. They are weak against cavalry
Line Infantry. The bulk of the army. An all-round unit that is decent against any other unit
Light Cavalry. This is the fastest unit, used for scouting but also efficient at attacking already
damaged units and pursuing fleeing units.
Heavy Cavalry. Fast and powerful but best used attacking already damaged units to avoid expensive repairs
Horse Artillery. The only artillery unit that can move and fire in the same turn, flexible for
use as support.
Foot Artillery. The most powerful support unit in battle but slow and can only move or attack, not both.
Siege Artillery. Slow and not very effective in battle but powerful when attacking cities, forts and resources eventually bringing down their defenses for easy conquest
Privateer. A fast naval unit capable of sinking and looting merchants but inferior to larger naval units
- 25 -
Game Manual
Frigate. Stronger than the privateer and cheap enough to be the best unit for patrolling and protecting your trade routes.
Ship of the Line. The most powerful naval unit in naval battle but expensive maintenance costs make this unit better suited for large battles rather than patrolling.
Bombard Sloop. The only naval unit that has bombardment and can (similar to artillery) attack enemy cities, forts or resources softening up the defense walls. They are weak in direct naval combat
Merchants and Transports. These are very weak in naval combat. They carry either production points (merchants), horses (merchants) or ground units (transports). Merchants are slow so can be easily hunted by faster ships while transports are a lot quicker
11.3 UNIT ATTRIBUTESEvery unit is rated in a number of areas that determine its ability. These are:
Ground Attack. How good the unit is at offensive maneuvers.
Ground Defense. This is used when defending against a ground unit.
Shock. This relates to speed of attack. It reduces the defender’s effectiveness prior to the fire phase.
Anti-Cavalry Bonus. This is used against cavalry units, reducing their survivability and making them easier to damage.
Naval Attack. This is used against naval units.
Bombard Attack. Used against cities, forts or resources to damage their wall protection
Movement. This is the number of movement points this unit receives each turn when fully supplied.
Attack Range. This is the number of hexes away the unit may strike an enemy unit.
Land Spotting. How many hexes the unit can see on land to spot enemy units.
Naval Spotting. How many hexes the unit can spot at sea.
Quality. This determines how much effectiveness the unit loses due to combat, how quickly it regains it afterwards, and its maximum effectiveness.
Survivability. The higher this value, the less casualties a unit takes from combat.
Production Cost. The number of PP required to build the unit.
Manpower Cost. The amount of manpower used up building the unit.

- 26 -
COMMANDER: NAPOLEON AT WAR™
Horses. How many horses a unit uses to construct and also when reinforcing. Build Time. How many turns it takes to construct this unit.
Production Upkeep. The number of PP the unit cost to maintain per turn
Loot skill. The % of damaged goods that the unit will capture when attacking merchants
11.4 COMMANDERSCommanders are a special type of unit. They are attachments to existing units so cannot move on the map on their own. There are 2 sorts. Land commanders must always be with a ground unit and sea commanders must always be with a naval unit. Commanders are deployed to a unit and can be reassigned back to the Force Pool and on to another unit, but this takes time and costs PP.
Each commander has a leadership rating, which increases the maximum effectiveness of all units within his leadership range.
In addition, some commanders also have bonuses that will apply to the unit they are attached to. land commanders may give a bonus to ground attack or ground defense values. Sea commanders may give a bonus to naval attack or loot skill
If a unit with a commander is destroyed, the commander will be injured. If a unit is damaged, there is also a chance the commander will be injured. The length of time he is injured varies and he will be placed in the production queue and be available for reassignment after he has recovered.
12. UNIT ACTIONS
12.1 MOVEMENTUnits that are available to move will have their national icon flash. Once moved the icon
stops flashing and fades out. To select a unit that has not moved, click on it. To deselect the
unit, right click. Once selected, it will show all the possible destination hexes that the unit can move to, and all the possible hexes it can attack.
12.1.1 ZONE OF CONTROLBoth land and sea units have a zone of control (ZOC) on adjacent hexes. Sea units only affect and are affected by sea hexes while land units only affect and are affected by land hexes. ZOCs can reduce enemy movement.
121.2 MOVEMENT COSTSWhen moving a unit the hexes highlighted are calculated from the starting location and take in to account the unit’s movement points, subtracting the movement cost of each hex and any additional penalties like ZOC penalty or cavalry penalties.
- 27 -
Game Manual
A ZOC hex increases movement cost by two per hex. A hex has ZOC penalty if either:
The destination hex is in the ZOC of at least 2 enemy land units•
Both the hex the unit is leaving and the hex it is entering are in a ZOC•
There is an exception to the movement cost rules. A unit that has movement points and start its turn outside of enemy ZOC can always move at least one hex.
12.2 ATTACKINGUnits may attack anything within their attack range. Most units have an attack range of one, meaning they can only attack enemy units they are adjacent to, but artillery units and bombard sloops have higher ranges, allowing them to attack enemy units from a distance.
Ground units may not attack naval units unless the naval unit is in a port. Some naval units can attack ground units. Artillery may also attack cities or resources.
Ground and naval units can attack, or move then attack. Artillery units may either attack or move, but may not do both.
12.3 REINFORCING UNITSDuring combat, units may become damaged. You can repair them up to their maximum strength of 10. To reinforce units, click the repair button in the control panel (the button with the medical sign on it) to enter repair mode. To leave repair mode, right click. While in repair mode, any damaged units that have not yet moved will be highlighted to show that they can be repaired.
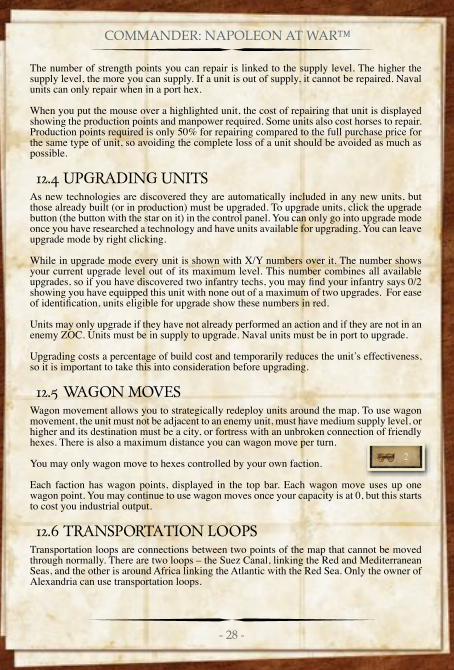
- 28 -
COMMANDER: NAPOLEON AT WAR™
The number of strength points you can repair is linked to the supply level. The higher the supply level, the more you can supply. If a unit is out of supply, it cannot be repaired. Naval units can only repair when in a port hex.
When you put the mouse over a highlighted unit, the cost of repairing that unit is displayed showing the production points and manpower required. Some units also cost horses to repair. Production points required is only 50% for repairing compared to the full purchase price for the same type of unit, so avoiding the complete loss of a unit should be avoided as much as possible.
12.4 UPGRADING UNITSAs new technologies are discovered they are automatically included in any new units, but those already built (or in production) must be upgraded. To upgrade units, click the upgrade button (the button with the star on it) in the control panel. You can only go into upgrade mode once you have researched a technology and have units available for upgrading. You can leave upgrade mode by right clicking.
While in upgrade mode every unit is shown with X/Y numbers over it. The number shows your current upgrade level out of its maximum level. This number combines all available upgrades, so if you have discovered two infantry techs, you may find your infantry says 0/2
showing you have equipped this unit with none out of a maximum of two upgrades. For ease of identification, units eligible for upgrade show these numbers in red.
Units may only upgrade if they have not already performed an action and if they are not in an enemy ZOC. Units must be in supply to upgrade. Naval units must be in port to upgrade.
Upgrading costs a percentage of build cost and temporarily reduces the unit’s effectiveness, so it is important to take this into consideration before upgrading.
12.5 WAGON MOVESWagon movement allows you to strategically redeploy units around the map. To use wagon movement, the unit must not be adjacent to an enemy unit, must have medium supply level, or higher and its destination must be a city, or fortress with an unbroken connection of friendly hexes. There is also a maximum distance you can wagon move per turn.
You may only wagon move to hexes controlled by your own faction.
Each faction has wagon points, displayed in the top bar. Each wagon move uses up one wagon point. You may continue to use wagon moves once your capacity is at 0, but this starts to cost you industrial output.
12.6 TRANSPORTATION LOOPSTransportation loops are connections between two points of the map that cannot be moved through normally. There are two loops – the Suez Canal, linking the Red and Mediterranean Seas, and the other is around Africa linking the Atlantic with the Red Sea. Only the owner of Alexandria can use transportation loops.
- 29 -
Game Manual
Units that enter a loop will instantly disappear and are added to a queue. You will be told how many turns it will take for them to arrive at their destination. When arriving, the unit will automatically be deployed as close to the other end of the loop as possible.
12.7 NAVAL TRANSPORTGround units may load on to transports at a friendly port. If they start the turn adjacent to the port, they may load onto a ship. When loaded they may then make a naval move. Loading on to a ship costs production points. To unload from a transport you must start your turn next to an unoccupied and non-neutral land hex. Click the unload button and then select which hex to offload to. Landing units from transports greatly reduces their effectiveness.
12.8 DISBANDSince units cost upkeep every turn (except for naval units in or adjacent to a friendly seaport), a situation may arise where disbanding the unit is the best option. Disbanding a unit immediately removes it from the game. To disband, click the disband button.
12.9 RAZE RESOURCEIn times where enemy is too strong and you do not think it is even worth defending a city, you can instead raze it. Razing means the production and wall value go down to 0. This means the enemy won’t get any supply from looting and cannot use the resource as a supply source for several months. To raze a resource, you need a full strength unit at the beginning of its turn inside the resource. Razing does not use up your movement so you can raze and afterwards withdraw from the area before enemy arrive.
13. COMBATWhenever an attack is launched, combat results. Combat is split into two phases, the shock phase and fire phase.
Every combat has modifiers that can dramatically affect the result. The combat modifier for
any given battle is the unit’s effectiveness, modified by any terrain penalties for attacking
or for cavalry units adjacent to the combatants. The combat modifier is then divided by the
opponent’s survivability. If the target is a cavalry unit and the firing unit has anti-cavalry
capabilities, this reduces the cavalry unit’s survivability.
13.1 SHOCK PHASEAll attacks, except bombard battles, have a shock phase. This occurs before the fire phase.
During the shock phase the attacker applies its shock value to make a shock attack, disrupting the defender before they can fire back.
The shock value of the attacker is multiplied by its combat modifier to produce a shock
attack chance. This value is a percent chance for each strength point to achieve a hit; each hit reduces the defender’s effectiveness.
- 30 -
COMMANDER: NAPOLEON AT WAR™
13.2 FIRE PHASEAfter the shock phase comes the fire phase. Both attacker and defender fire simultaneously
in this phase, using the appropriate combat attribute as specified in the unit attributes above.
This is multiplied by the combat modifier to get a percent chance of each strength point in the
unit hitting and killing an enemy strength point and reducing the unit’s effectiveness.
13.3 EFFECTIVENESSThe effectiveness of a unit takes in to account many factors. It is the major determinant when calculating the results of a combat and also affects the chance of units retreating from combat. The maximum effectiveness of a unit depends on supply, quality, organization and leadership. If a unit loses effectiveness, it will regain a percentage of it each turn until it reaches its maximum effectiveness.
There are a number of ways to lose effectiveness, as follows:
Being out of supply•
Unloading from transport ship•
Moving •
Wagon redeployment•
Upgrading•
Combat casualties•
13.4 DEFENSE BONUSESDefense bonuses reduce the attacker’s combat value. If the terrain has attack penalty of 75, it means a unit attacking into that terrain will attack at -75% of its normal strength (i.e. at 100-75=25%).
Hexes with cities or resources do not use terrain effects, but instead use the effects of the city or resource.
Defense bonuses do not affect a bombard battle since it attacks the wall only, and not any unit taking cover behind the wall.
13.5 EXPERIENCEEvery time a unit fights, it gains some experience points. Over time
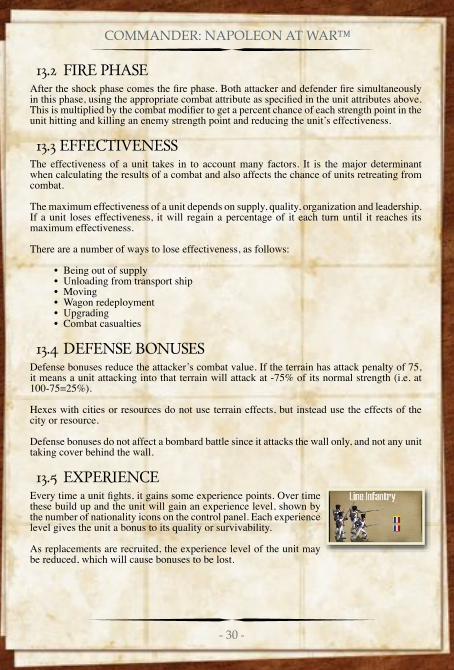
these build up and the unit will gain an experience level, shown by the number of nationality icons on the control panel. Each experience level gives the unit a bonus to its quality or survivability.
As replacements are recruited, the experience level of the unit may be reduced, which will cause bonuses to be lost.

- 31 -
Game Manual
13.6 COMBAT ODDSWhen you have a unit selected and it is possible to attack an enemy, the attack icon will appear over the available targets. If you put the mouse over one of these targets, the control panel will display the combat odds in the center between the currently selected friendly unit on the left and the target unit on the right.
Odds are expressed in ratio format (1:1, 4:2, etc.). In Commander: Napoleon at War, this ratio is the firepower and is not the same as casualties. The firepower normally has higher numbers
than the actual casualties and is displayed that way in order to better show minor advantages. So, for example, if the odds are 2:1, the attacker is roughly going to score twice as many casualties on the defender than the defender will cause the attacker. The actual results will vary due to random factors.
One factor to note is that the odds do not take in to account the attack sequence. This means that a shock attack prior to fire combat may actually hamper the defenders and means that,
for example, 6:6 odds can favour the attacker once the shock value is applied. Accordingly, a wise player will only use the odds as a guide.
13.7 RETREATSIf a ground unit attacks any non-naval unit, there is a chance the defender will be forced to retreat. The defender must take at least one casualty point and their effectiveness must be below the retreat threshold to have a chance of retreating. The retreat chance increases as the unit’s effectiveness drops and the amount of effectiveness lost during the attack increases. Units can never retreat from cities or fortresses.
If a unit is forced to retreat it automatically picks an adjacent empty friendly hex to retreat to. If no such hex is available, the unit will instead hold ground and fight to the last man.
Retreats will attempt to go to hexes that are not adjacent to the attacker, and also if possible, not adjacent to any other enemy units.
Retreats are more common when combat occurs in clear terrain than in more difficult terrain
such as forests and mountains.
13.8 EXPLOITATION MOVEMENTA ground unit that attacked and either destroyed or forced the defender to retreat from its hex has the option to make an exploitation move into the vacated hex. Exploitation moves do not consume horses.
- 32 -
COMMANDER: NAPOLEON AT WAR™
13.9 RANGED DEFENSEA ranged unit can fire at a non ranged unit without getting any return of fire. This means
you can use artillery units from range shooting at enemy non artillery units and take no casualties
13.9.1 BOMBARD BATTLE A.K.A SIEGESIf a unit with a bombard value greater than zero (artillery unit or bombard sloop) attacks a city or resource location or a unit defending one it becomes a bombard attack.
The bombard battle only includes the attacker and the resource; an enemy unit defending the resource can do nothing about it and will not participate. There is no shock phase, defense fire or retreat in bombard battle.
In a bombard battle, the attacker fires using the bombard value. Casualties lower the defense
wall value (without effect upon any defender in the same hex). Bombard cannot be used in terrain such as forest or other non-resource hexes since they have no defense walls.
The wall % value is rated from 0-100 and visible in the hex info panel. Basically it works so that, for example, a city with 60% defense penalty having 50% wall value means the defense penalty actually will be only 60%*50%=30% instead of the maximum 60% when the wall is at 100%.
Defense bonus will, after several bombardments, be so low that it enables easy conquest for your other forces. The resource location could now be said to be under siege. Each turn cities and resources rebuild some wall and production up to their maximum value.
14. SUPPLYSupply is a very important part of Commander: Napoleon at War. It represents vital supplies needed to keep armies functioning, such as food, ammunition, and medical supplies, as well as intangible things such as administrative components that keep things running. Well-supplied troops fight better, while those out of supply will soon fall apart.
To be in full supply you must be connected to a supply source. Two hexes are considered connected if they have an unbroken land route between them where all the tiles are controlled by their side. You cannot trace supply through neutral countries or across water hexes, but you can trace supply through a friendly Sea Port hex.
14.1 SUPPLY SOURCESThere are a number of supply sources:
Major Country Capital. This is the best supply source and allows full supply.
City or Minor Capital. These allow a maximum level of medium supply.
Fortresses. These allow a maximum level of medium supply to any units occupying them. If the hex also has a production value, they can also supply any units connected to them.
- 33 -
Game Manual
Naval Unit. These allow a maximum level of low supply.
A unit uses the best supply source it is connected to. If a unit is connected to its capital, this is always the best supply source. If it is cut off from its capital it will attempt to take supply from a friendly city or port. If neither of these is available it will attempt to take supply from naval units on the coast. If none of these is available, the unit is out of supply.
If using capital supply, the distance from the capital affects the level of supply. Once you are more than 50 hexes from your capital your supply level will be reduced to medium.
14.2 SUPPLY EFFECTS ON MOVEMENTFull: No PenaltiesHalf: Movement Points -1Low: (Movement Point/4) +1None: Movement =1, Effectiveness drops each turn.
14.3 SUPPLY EXCEPTIONSNaval units are always in full supply.
15. WEATHERThe weather consists of 3 states namely clear, mud and snow. If a battle takes place in a hex with mud or snow then there is a battle penalty for both attacker and defender. The attack penalty is affected by the country weather adaption technologies and penalty is always greater in snow than in mud. If playing with the advanced weather option on then there are also great movement penalties in snow but especially in mud. Without the weather option on, only mud imposes movement problems and only for cavalry.
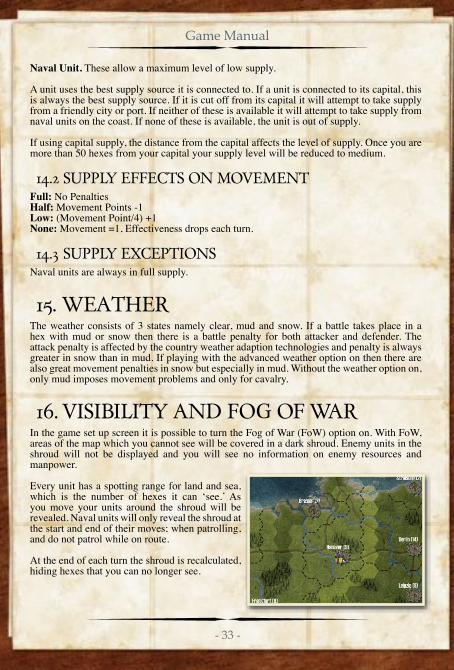
16. VISIBILITY AND FOG OF WARIn the game set up screen it is possible to turn the Fog of War (FoW) option on. With FoW, areas of the map which you cannot see will be covered in a dark shroud. Enemy units in the shroud will not be displayed and you will see no information on enemy resources and manpower.
Every unit has a spotting range for land and sea, which is the number of hexes it can ‘see.’ As you move your units around the shroud will be revealed. Naval units will only reveal the shroud at the start and end of their moves; when patrolling, and do not patrol while on route.
At the end of each turn the shroud is recalculated, hiding hexes that you can no longer see.
- 34 -
COMMANDER: NAPOLEON AT WAR™
17. PURCHASING UNITSYou can purchase new units and recruit commanders from the production screen. Each major country recruits its own unique troops and commanders. Minor countries may only repair existing units. The flag icon at the top left of the screen shows which major country you are
currently controlling; the arrows allow you to cycle to other countries on that side. Select the unit type you wish to recruit and click the purchase button.
When a unit is purchased it is placed in the production queue across the top of the screen. Purchasing units costs production points, manpower and sometimes horses.
17.1 UNIT STATISTICSDetailed information about each unit is shown on the left side of the screen when a unit is selected from the right side of the screen. Numbers in white are the default values. If a number has been increased, through science, it is shown in green. If a number has been reduced, due to manpower shortages, it is shown in red.
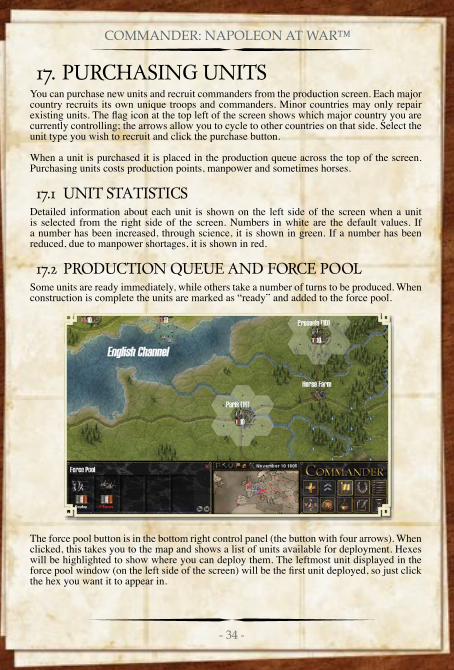
17.2 PRODUCTION QUEUE AND FORCE POOLSome units are ready immediately, while others take a number of turns to be produced. When construction is complete the units are marked as “ready” and added to the force pool.
The force pool button is in the bottom right control panel (the button with four arrows). When clicked, this takes you to the map and shows a list of units available for deployment. Hexes will be highlighted to show where you can deploy them. The leftmost unit displayed in the force pool window (on the left side of the screen) will be the first unit deployed, so just click
the hex you want it to appear in.
- 35 -
Game Manual
Troops may only be deployed in national core hexes (hexes that start under your control in 1805) and must be in or adjacent to a city, or for naval units, a port. Great Britain’s troops may not deploy in Russia and vice versa. The hex must also be connected to the country’s capital by an unbroken chain of friendly hexes.
You may deploy one unit per city or port per turn. You may deploy as many units as you can fit next to your capital.
Commanders can only be deployed to units owned by that nation. Allocating a commander uses up the unit’s turn, so only units that have not already moved can have a commander allocated to them. If you have a commander ready to deploy, any units that are available for him to be allocated to will be highlighted.
18. SCIENCEMajor countries can improve their economy and units by conducting scientific research..
At the top left of the screen is a flag icon showing which major country’s science you are
conducting. You can cycle through countries using the arrow buttons in the same way you control the production screen.
Below this is a list of science areas – Infantry, Cavalry, Artillery, Naval, and General. Each science area has a number next to it showing how many scientists you have in that category and arrows to increase and decrease this number.
To the right of the flag icon is the recruitment cost for each scientist, the maximum number
of scientists you can deploy, the total number of scientists you currently have, and how many focus points you have remaining.
Below this is a progress chart for each science area and buttons to focus science in specific
areas.
- 36 -
COMMANDER: NAPOLEON AT WAR™
18.1 SCIENTISTSMajor countries can recruit scientists up to their maximum scientist level. This level is dependant on the war effort %, so it increases as your war effort % increases. Scientists can also be sold, but only at a percentage of their price. The cost of recruiting a scientist increases each time you recruit a new one. The cost of science in general declines over time, so later in the war Scientists will be cheaper than at the start, meaning science can still be worthwhile despite short time of usage.
Every scientist produces 1, 8, or 15 science points per turn. Low values are much more likely and you’ll receive a “major breakthrough” message if you had a large increase in any technology the previous turn.
You cannot move scientists from one area to another (e.g. from cavalry to artillery); instead, you must sell a scientist from the area you want to remove it from, then recruit a new one in the area you want..
18.2 TECHNOLOGIESThere are 15 Technologies in the game, split among the 5 science areas. They are as follows:
18.2.1 INFANTRYFrontal assault – Increases the ground attack and shock attack values of infantry.Toughness – Increases ground defense, survivability and quality values of infantry.Anti Cavalry – Increases the anti-cavalry bonus of infantry.
18.2.2 CAVALRY Cavalry Charge – Increases the ground attack and shock attack values of cavalry units.Mounted Toughness – Increases ground defense, survivability and quality values of cavalry units.Cavalry Special – Increases the anti-cavalry bonus, support and spotting values of cavalry units.
18.2.3 ARTILLERYFire Support – Increases the ground attack, shock and support value of artillery unitsSiege Warfare – Increases the bombard values of artillery units.Horse Artillery – Increases the spotting, movement and cost efficiency of horse artillery
18.2.4 NAVALNaval Battles – Increases the combat and movement of frigates, ships and bombard sloopsMerchants – Increases the combat, durability and movement of merchantsPiracy – Increases the combat and looting skills of privateers
- 37 -
Game Manual
18.2.5 GENERAL Weather Adaption – Decreases the penalties fighting in mud and snow
Organization – Increases maximum effectiveness valuesLogistics – Increases maximum supply for land units
18.3 TECHNOLOGY PROGRESSEach technology update affects specific units. You can see which units are affected in the
science detail window. A unit can be upgraded by certain levels, while other units may not get as many infantry attack updates (e.g. a militia unit may not get as many increases as, say, a line infantry).
Click on one of the five science area icons (infantry, cavalry, artillery, navy, or general) you
wish to investigate in detail on the left side of the window. This changes the view in the window to the right, which displays the levels that are possible to gain through science.
Note at the top right above this window are three buttons. In this case, they are naval battles, merchants and piracy. Each science area is subdivided into three areas, which can be viewed through each of these buttons. This will change the display to indicate the area that you want to view.
Once you’ve selected a science area and then selected one of the three sub-areas, the display will show each level that can be gained through science. In the example above, we’re looking at naval battles and can see three levels (one through three) displayed within their own smaller window.
- 38 -
COMMANDER: NAPOLEON AT WAR™
At the top of these smaller windows, the particular technology you’re researching is displayed. Below this title are unit icons showing which units will be affected by gaining this level of technology.
Underneath the unit icons, the actual benefit for gaining this particular level is displayed.
18.5 TECHNOLOGY LEVELS AND UPGRADINGEach major country has a technology level in each of the 15 technologies. Minor countries do not conduct scientific research themselves, but instead are ‘given’ older technologies
developed by their faction leaders. New technologies allow you to upgrade existing troops and means that any new recruits will have these improvements.
Minor countries may upgrade to a technology level equal to that of their faction leader’s tech level minus 2. So if France has a tech level of 3 in naval battles, any minor French country may upgrade to tech level 1.
18.6 SCIENCE FOCUSUnless otherwise directed, science is split among the three technologies in each science area randomly. By using focus points, you can concentrate on specific technologies at the expense
of other technologies in that area.
By clicking on the small round focus buttons on science summary screen you can tell your scientists to focus on this specific technology.
If you later decide to return to a more balanced policy, then click the balance button (with the scales on it).
Each time you click on a focus button it uses one focus point. The number of remaining focus points is shown at the top of the screen.
With a balanced focus, every technology within the tech area gets 33% of the generated research this turn. With focus set to a certain technology, that technology will get 50% of the research, while the others two techs will only get 25%.
Focus points accumulate twice a year, in January and July.
18.7 SCIENTIFIC RESEARCH PROGRESSThe progress through each technology is shown on the summary page. If you discover a new technology you will be notified during the end turn phase. The number of science points
required for the next level varies from technology to technology, with some being much harder to research than others.
- 39 -
Game Manual
If a Technology has reached its Max Tech Level, any science points allocated to that technology will be wasted.
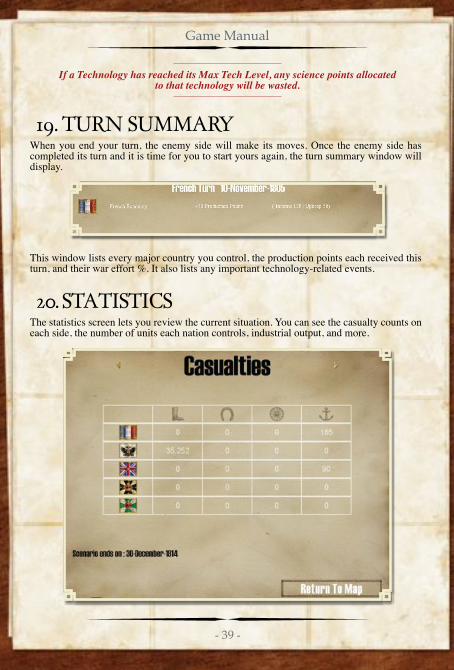
19. TURN SUMMARYWhen you end your turn, the enemy side will make its moves. Once the enemy side has completed its turn and it is time for you to start yours again, the turn summary window will display.
This window lists every major country you control, the production points each received this turn, and their war effort %. It also lists any important technology-related events.
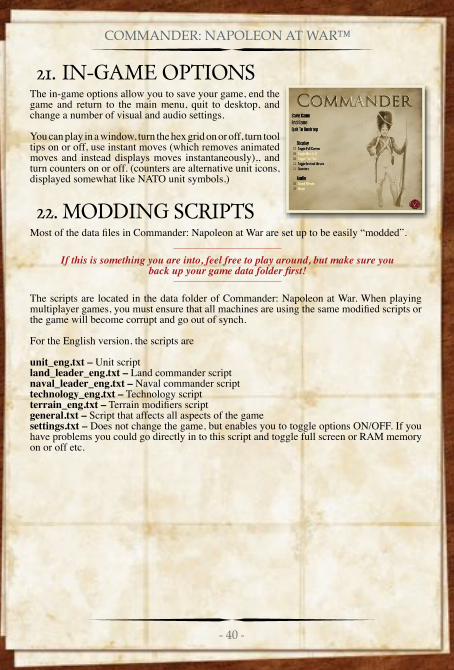
20. STATISTICSThe statistics screen lets you review the current situation. You can see the casualty counts on each side, the number of units each nation controls, industrial output, and more.
- 40 -
COMMANDER: NAPOLEON AT WAR™
21. IN-GAME OPTIONSThe in-game options allow you to save your game, end the game and return to the main menu, quit to desktop, and change a number of visual and audio settings.
You can play in a window, turn the hex grid on or off, turn tool tips on or off, use instant moves (which removes animated moves and instead displays moves instantaneously),, and turn counters on or off. (counters are alternative unit icons, displayed somewhat like NATO unit symbols.)
22. MODDING SCRIPTS Most of the data files in Commander: Napoleon at War are set up to be easily “modded”.
If this is something you are into, feel free to play around, but make sure you back up your game data folder first!
The scripts are located in the data folder of Commander: Napoleon at War. When playing multiplayer games, you must ensure that all machines are using the same modified scripts or
the game will become corrupt and go out of synch.
For the English version, the scripts are
unit_eng.txt – Unit scriptland_leader_eng.txt – Land commander scriptnaval_leader_eng.txt – Naval commander scripttechnology_eng.txt – Technology script terrain_eng.txt – Terrain modifiers script
general.txt – Script that affects all aspects of the gamesettings.txt – Does not change the game, but enables you to toggle options ON/OFF. If you have problems you could go directly in to this script and toggle full screen or RAM memory on or off etc.

- 41 -
Game Manual
23. CREDITSFIREPOWER ENTERTAINMENTJohan Persson, Programming and Game Design
FREEVERSEIan SmithColin SmithLouis MartiDennis PiatkowskiSteve Tze
THE LORDZ GAMES STUDIOTim van der Moer, Executive ProducerLukas Nijsten, Art and Design DirectorChris Hogg, ArtistMariusz Kozik, ArtistDrew Morris, ArtistChristian Sturm, Artist
MUSIC & SOUNDMorgan Casey
SLITHERINEIain McNeil, Director of DevelopmentJD McNeil, Director of Business DevelopmentMarco Minoli, Director of MarketingPhilip Veale, Technical DirectorRichard Evans, Creative DirectorAndrea Nicola, Website Manager
BETA TESTERSBorger Borgersen (Stauffenberg), Rob CarstensenJeff ChanKristian FischerPascal GiovanniniDouglas GoldAdriano MarcheseGustavo Pardo MunizAaron NeilsonJim Potts (Happycat)Stefan RachFred SchneeNicolai ThorningPaul YoungGiorgos ChrysochoosAlexander KrakeliJesper PetersenBob PieperMikolaj Witkowski
MANUAL DESIGN & LAYOUTMarc von Martial - cogwheeldesigns
SPECIAL THANKSto Osprey Publishing for use of their artwork in game.www.ospreypublishing.com
- 42 -
COMMANDER: NAPOLEON AT WAR™
HELP & ADVICEIf you need any gameplay or technical advice on Commander – Napoleon at War please come to our forums at http://www.slitherine.com where our active community will be more than happy to help.
LEGAL Published by Slitherine Software UK Ltd©: 2008 Slitherine.Developed by Firepower Entertainment and The Lordz Games Studio. All rights reserved. Commander Napoleon at War © Slitherine Software UK Ltd 2008. All brands and associated imagery featured in this game are trademarks and/or copyrighted materials of their respective owners. All rights reservedMILITARY HISTORY and the “M Military History” logo are trademarks of A&E Television Networks. All rights reserved. Slitherine Software UK Ltd42-46 High StreetEsherSurreyKT10 9QYwww.slitherine.com
WARRANTY90 DAY LIMITED WARRANTYSlitherine Software UK Ltd. (Slitherine) warrants to the original purchaser of this Slitherine product that the software storage medium (“CD”) in this product shall be free from defects in material and workmanship for a period of 90 days from date of purchase. If a defect covered by this warranty occurs during this 90-day warranty period, Slitherine will replace the CD free of charge. To receive this warranty service you may return the product and all accompanying materials to the place you obtained it for a replacement or refund showing your dated proof-of-purchase. This warranty shall not apply if the CD has been damaged by negligence, accident, unreasonable use, modification, tampering or by other causes unrelated
to the defective materials or workmanship.
WARRANTY LIMITATIONSANY APPLICABLE IMPLIED WARRANTIES, INCLUDING WARRANTIES OF MERCHANTABILITY AND FITNESS FOR A PARTICULAR PURPOSE, ARE HEREBY LIMITED NINETY (90) DAYS FROM THE DATE OF PURCHASE AND ARE SUBJECT TO THE CONDITIONS SETFORTH HEREIN. IN NO EVENT SHALL SLITHERINE BE LIABLE FOR CONSEQUENTIAL OR INCIDENTAL DAMAGES RESULTING FROM THE BREACH OF ANY EXPRESS OR IMPLIED WARRANTIES.

(Page intentionally blank.)