pages 1. (word processing) help menu
TRANSCRIPT

Pages 1. (Word Processing)
Pages © Shirley Allan �1
Click on the Rulers Preference. You may change the color of the Alignment Guides just as you do the Invisibles. I find the guides distracting so don’t have them checked. Instead, pull guides out of rulers when needed.
Editing: A Check mark in “Curves” allows you to manipulate curves with a sprouted wand. No check mark in “Curves” allows you to double click on points to change between straight and curved lines.
Pages Help Menu has a wealth of information (some open in Safari). Click on each Disclosure Triangle on the left to view each segment or Search on the right.
Click on the Pages Icon to open it. Go to the Pages Menu and choose Preferences.
Change the Invisibles color by clicking on the frame to bring up the System Colors.
Preferences
Click on General Preference and set each Preference. If you don’t want templates each time you open Pages, choose “Use template Blank”. Or chose a supplied Template or “My Template” at Change Template.
Adding Media will not be addressed in this class. Your name will show when you use Comments and Tracking in 12 points.
Auto Correct You may choose to correct and capitalize plus tell Pages to ignore spelling of particular words with the plus sign.
Formatting I prefer to decide on my own to use a list and links which can be added when needed with the Edit menu> Substitutions. Superscript is handy for dates like August 1st and the Smart (curly) quotes and “Em” Dashes are just fine.
Choose the Default Zoom (meaning the percent each page opens with)depending on your screen size.

Pages 1. (Word Processing)
Pages © Shirley Allan �2
Replacement stands alone but Pages also picks up the Replacements you have inserted in System Preferences> Keyboard > Text. Use the minus sign to delete what you won't use and the plus to add your own specifically to use in Pages.
The WP “Document” Tool has three sidebar panels which Apple calls “Inspectors”.
If your cursor is an i-beam instead of a cursor (pointer) AND you see a
blinking insertion point you know you are in Word Processing.
If you are going to use more text and few images, use Word Processing.
If you are going to use many images and little text use Page Layout.
It is important that you begin your document in the appropriate
Format. Why? Because if you start in WP and change to PL you will loose
all the text you have created unless it is in a text box.
The templates included in Pages are predominately WP but may contain Text Boxes and/or Objects just as you would in PL. Pages 1 just addresses WP and Pages 2 just addresses PL. Linking Text Boxes that may be done in WP is addressed in PL as that is the format that they would normally be used.
It is important to understand the differences between Word Processing (WP) and Page Layout (PL) to understand the templates offered in Pages.
A PL Document Tool has only two sidebar panels.
The Differences

Pages 1. (Word Processing)
Pages © Shirley Allan �3
Let’s look at the DOCUMENT Tool panel first. Click on the Document Tool.
Use the View Menu > Show Layout to show Margins and Header/Footer.
NOTE: UNCHECKING Document Body converts a WP to a PL document and will delete any text already in the document. except that which is inside Text Boxes.
Adjust Document Margins for WP documents with the double arrows. There is no margin adjustment for PL documents. They can be as narrow as your printer will accept.
Header and Footer are always present in WP or PL. Adjust the placement by using the Top and Bottom double arrows. Delete by unchecking.
Page Orientation is Portrait or Landscape, the check mark means the active choice.
Your Printer and the Paper Size are at the top. Use the double arrows to make your choice.
Use Document Panel >Document Tab to configure your document.
Set Up Your Document
The Document Panel > Section Tab has Header & Footer and Page Numbering options.
If you choose Create a new section “After this section” you will be able to move your pages independently of one another.
The Bookmark side panel is beyond the scope of this class.
New is Facing Pages to show two pages side by side. Use the Zoom Tool to change back to one page. Use Fit Spread to fit vertically.
Click inside a Header or Footer to see Insert Page Number. Click ON “Insert Page Number” to get options.
Inside the Header, use the Insert Tool and Date & Time. Click on it to choose the format including Time.
OR

Pages 1. (Word Processing)
Pages © Shirley Allan �4
The Format Tool sidebar panel TEXT includes Tabs for Styles, Layout, and More. In WP Style is used predominantly.
Note: each section has Vs and/or “disclosure triangles” to reveal additional options. These sidebar panels all show the disclosure triangles open.

Pages 1. (Word Processing)
Pages © Shirley Allan �5
If the Font has Bold and Italic Type Faces you will be able to use the “B” and “I” Buttons. If not, nothing will happen. All fonts can be underlined. The Action “gear” gives you advanced options including text background color. Character Styles will allow Strikethrough and Underline.
Type your first and last name. Triple Click your name to select it.
Change your Name’s Font from Helvetica (the default) to one you like by using the double arrows to see all the Fonts.
Some, but not all Fonts have different “Type Faces.” If they do, they will be shown just below. If not, it will just say “Regular.”
With your name still selected, change the size of the Text (11 is the default) using the double arrows.
With your name still selected, change the color of your Name by clicking on the Left side of the Color Tool to bring up limited colors (which change with each Template).
Font, Size & Color
Click on the Format Tool to bring up the Format Panel (A second click on the Format Tool will hide the Panel, click it again to show.)
In the Format Panel, click on the Style Tab.
Styl
e Ta
b
Clicking on the Color Wheel on the Right will bring up the System Colors. Click on the far right across the top to see the easy colors to use.
Choose paragraph styles headings subheadings etc.,here.
Pages 1. (Word Processing)
Pages © Shirley Allan �6
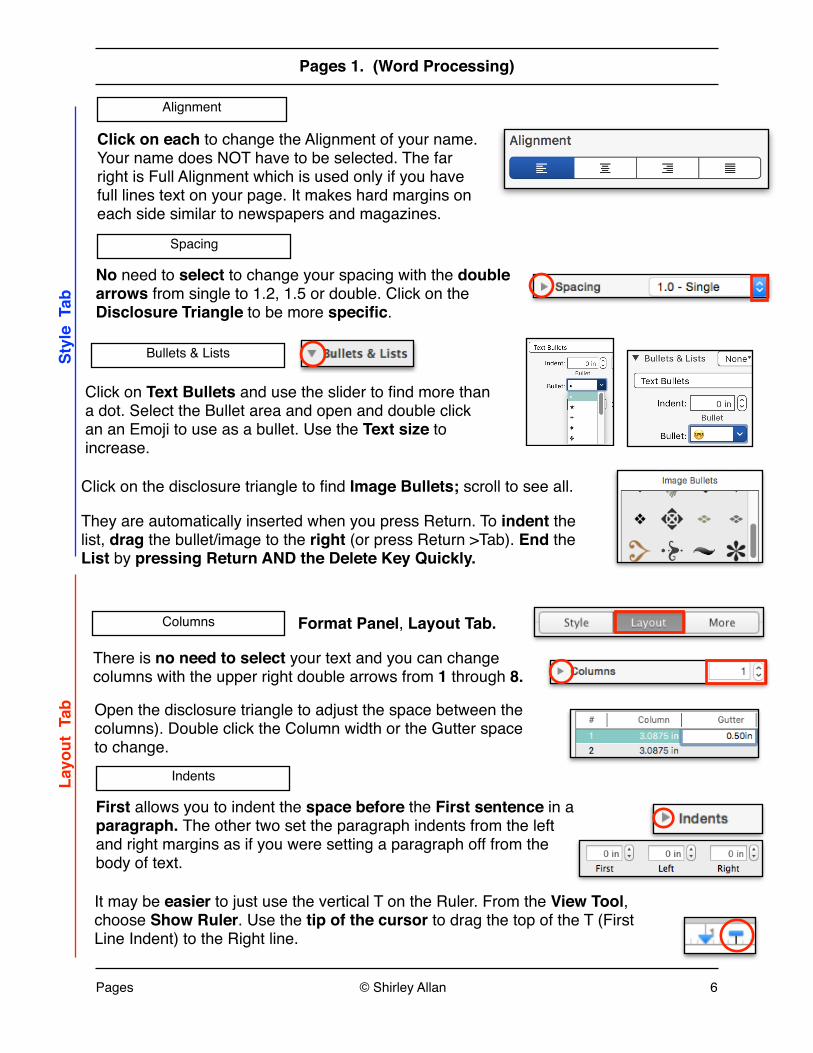
Click on the disclosure triangle to find Image Bullets; scroll to see all.
They are automatically inserted when you press Return. To indent the list, drag the bullet/image to the right (or press Return >Tab). End the List by pressing Return AND the Delete Key Quickly.
No need to select to change your spacing with the double arrows from single to 1.2, 1.5 or double. Click on the Disclosure Triangle to be more specific.
Spacing
Format Panel, Layout Tab.
Open the disclosure triangle to adjust the space between the columns). Double click the Column width or the Gutter space to change.
Bullets & Lists
Columns
Indents
First allows you to indent the space before the First sentence in a paragraph. The other two set the paragraph indents from the left and right margins as if you were setting a paragraph off from the body of text.
It may be easier to just use the vertical T on the Ruler. From the View Tool, choose Show Ruler. Use the tip of the cursor to drag the top of the T (First Line Indent) to the Right line.
There is no need to select your text and you can change columns with the upper right double arrows from 1 through 8.
Layo
ut T
ab
Click on each to change the Alignment of your name. Your name does NOT have to be selected. The far right is Full Alignment which is used only if you have full lines text on your page. It makes hard margins on each side similar to newspapers and magazines.
Alignment
Styl
e T
ab
Click on Text Bullets and use the slider to find more than a dot. Select the Bullet area and open and double click an an Emoji to use as a bullet. Use the Text size to increase.

Pages 1. (Word Processing)
Pages © Shirley Allan �7
Easier, go to the View Tool and choose “Show Ruler.” Add a tab by Control clicking anywhere on the Ruler to get the kind of tab you want. Drag it sideways to place it, drag it down off the Ruler to delete it. When you set a Tab, all the hidden default Tabs to the left of it disappear.
TABS should be set before you start a document. There are hidden Left default Tabs every half inch. You can add Leaders here.
Tabs
Layo
ut T
ab
BORDERS & Rules: Insert a line wherever your insertion point is. Add many lines by choosing a line pressing the Return Key. How far apart your lines are depends on the size of your font. Remove them by choosing None.
Borders
Sixty Templates are offered. Most are Word Processing. Some have more than one page but you have to open them to find out. Some have Text Boxes which are discussed in Pages 2 Page Layout as they are more often used in Page Layout.
Double click on Traditional Letter (a typical Word Processing Template). Find it by scrolling down. I chose this because it has a mixture of Placeholder Text and Text Boxes.
The title “From the Desk Of Urna Semper” is in a Text Box containing Placeholder Text. The first click shows you the text box, then click on “From The Desk Of” and then on “Urna Semper” to select and replace it with your text.
NOTE Very Important: Format Panels automatically change depending on what is selected e.g.,When you select a Text Box, the Style Panel shows up. When you select text the Text Panel>Styles automatically shows up.
Tem
plat
es
Templates
Highlight Text with Paragraph Background

Pages 1. (Word Processing)
Pages © Shirley Allan �8
Sharing
File Menu > Export allows you to send your documents to PC users. PDF (Portable Document File) is the safest (the receiver cannot edit the document). If you want them to be able to edit and know they have Word, choose it. It gives you two choices in Advanced > Format.
Use the Share Menu to Send a copy. You may add things like Facebook, Twitter etc. to the Share Menu in System Preferences> Extensions > Share Menu. If you don’t know if the recipient has Pages, use the File Menu and choose “Export to a PDF.” You can use Collaborate only in documents saved in the Cloud.
Exporting
Men
us
That’s all folks !
Click outside the Text box and then inside the text box to see the selection handles, press the Delete Key to remove the Text Box. You will be left with a “Stroke” (line) and need to click on it to get the selection handles and press the Delete Key again to remove it.
The Address and Salutation are separate Placeholder Text blocks meaning that each can be changed, or deleted individually.
The body of the letter is a Placeholder Text block meaning whatever you type will replace the whole block of dummy text.
Click on the date, to choose the date format with the double arrows. Today’s date will always show up; change the date by clicking on the calendar and choosing a date prior or in the future.
View Tool or Menu and choose Show Word Count. It is superimposed on your document but does NOT print. Click on it to see how many paragraphs and Pages too. You can drag it to place it where you want it.
Tem
plat
es