panda posing class
DESCRIPTION
Panda Posing Classdrawanimalcartoonlearnbishoy eliaTRANSCRIPT
Dynamic PosingDynamic Posingforfor
AnimationAnimationby
Brian Lemay
Section OneSection OneQuick Sketch Posing
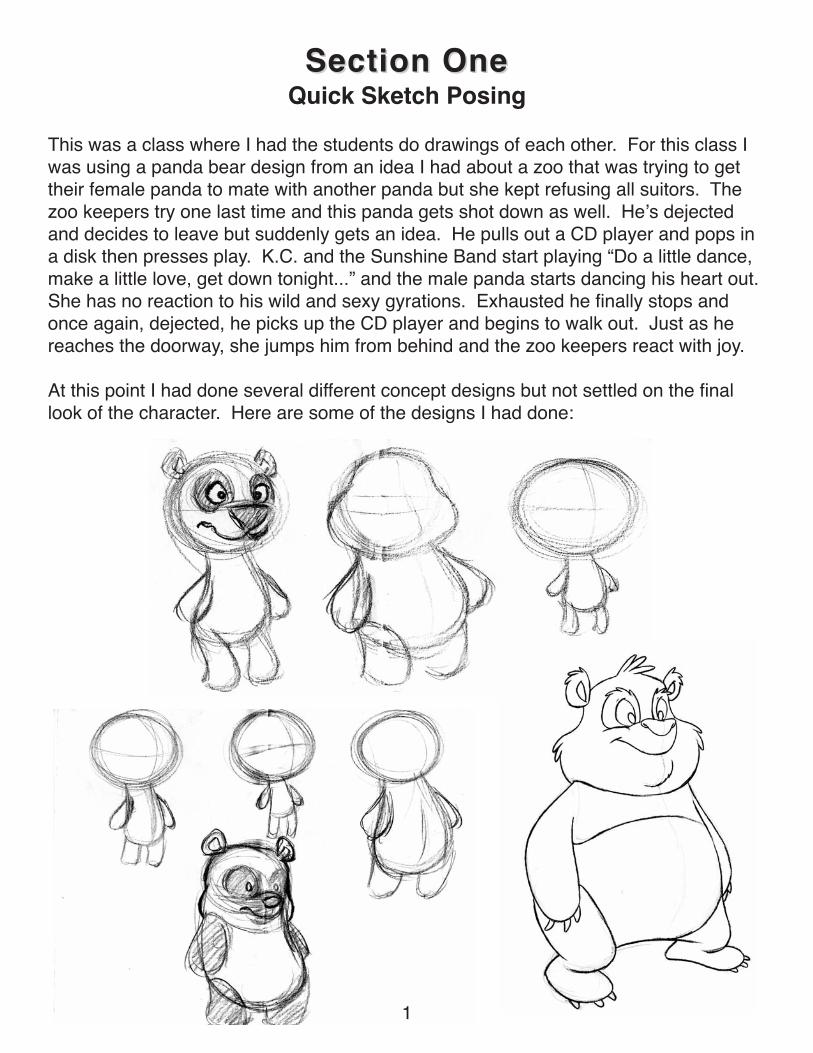
This was a class where I had the students do drawings of each other. For this class Iwas using a panda bear design from an idea I had about a zoo that was trying to gettheir female panda to mate with another panda but she kept refusing all suitors. Thezoo keepers try one last time and this panda gets shot down as well. Heʼs dejectedand decides to leave but suddenly gets an idea. He pulls out a CD player and pops ina disk then presses play. K.C. and the Sunshine Band start playing “Do a little dance,make a little love, get down tonight...” and the male panda starts dancing his heart out.She has no reaction to his wild and sexy gyrations. Exhausted he finally stops andonce again, dejected, he picks up the CD player and begins to walk out. Just as hereaches the doorway, she jumps him from behind and the zoo keepers react with joy.
At this point I had done several different concept designs but not settled on the finallook of the character. Here are some of the designs I had done:
1
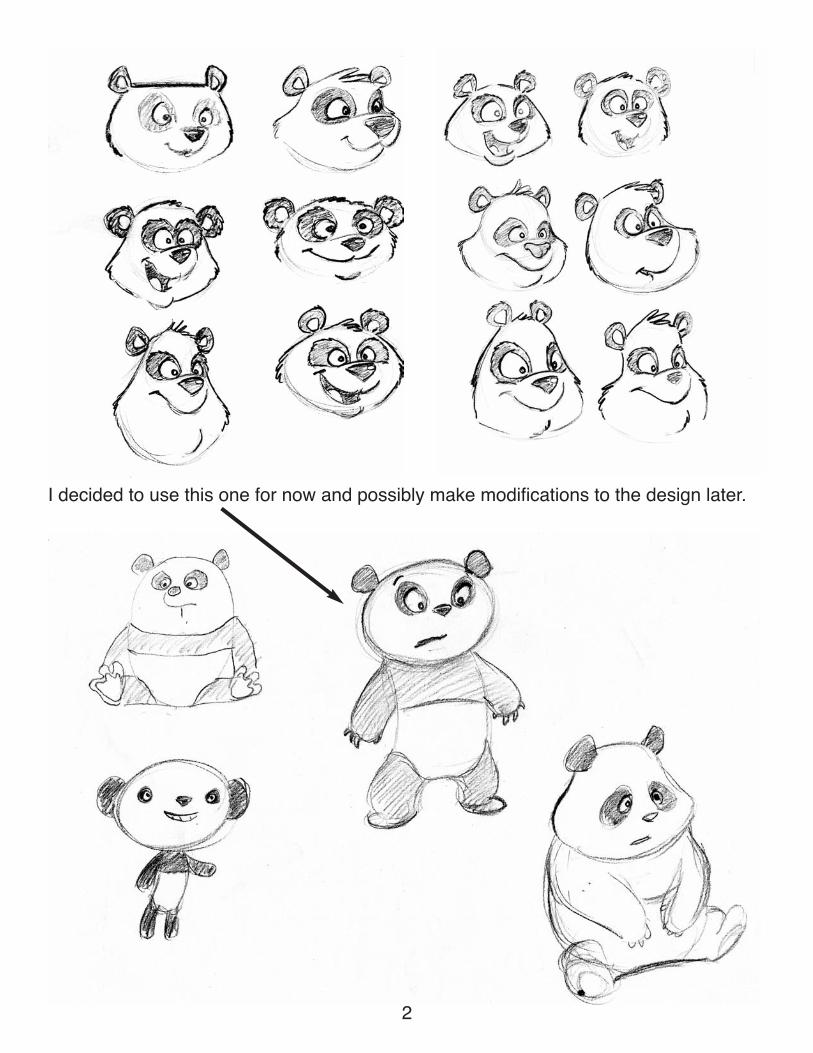
I decided to use this one for now and possibly make modifications to the design later.
2
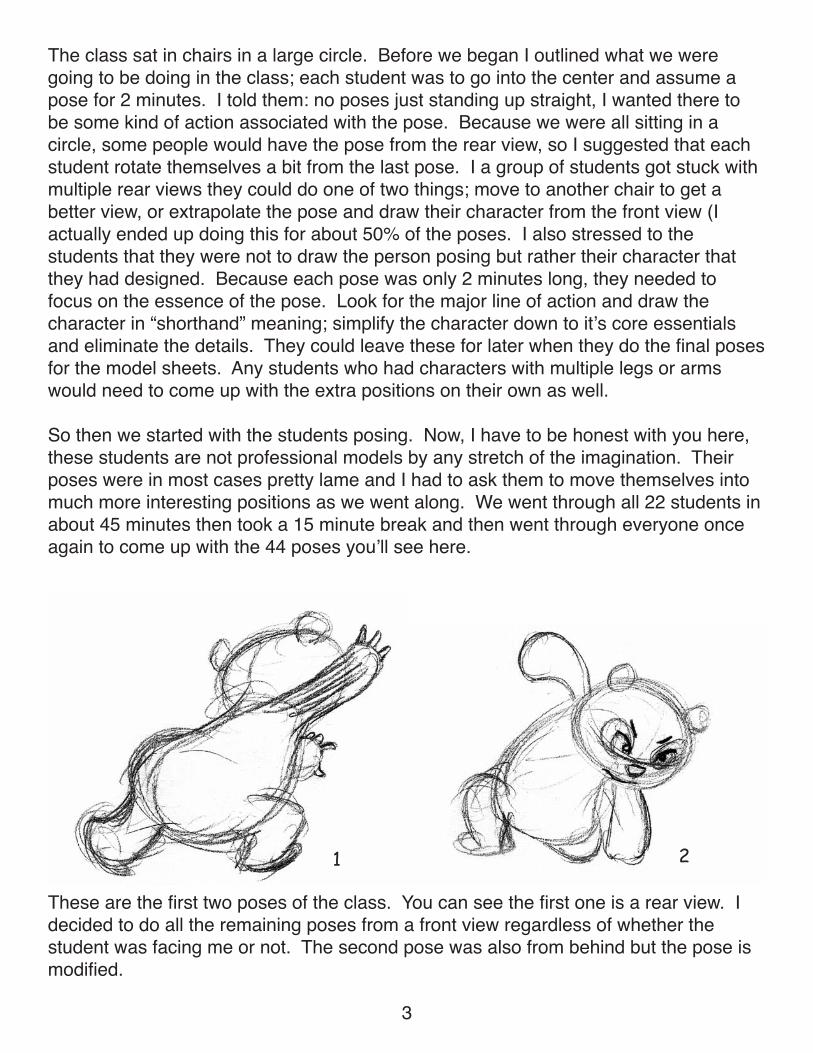
The class sat in chairs in a large circle. Before we began I outlined what we weregoing to be doing in the class; each student was to go into the center and assume apose for 2 minutes. I told them: no poses just standing up straight, I wanted there tobe some kind of action associated with the pose. Because we were all sitting in acircle, some people would have the pose from the rear view, so I suggested that eachstudent rotate themselves a bit from the last pose. I a group of students got stuck withmultiple rear views they could do one of two things; move to another chair to get abetter view, or extrapolate the pose and draw their character from the front view (Iactually ended up doing this for about 50% of the poses. I also stressed to thestudents that they were not to draw the person posing but rather their character thatthey had designed. Because each pose was only 2 minutes long, they needed tofocus on the essence of the pose. Look for the major line of action and draw thecharacter in “shorthand” meaning; simplify the character down to itʼs core essentialsand eliminate the details. They could leave these for later when they do the final posesfor the model sheets. Any students who had characters with multiple legs or armswould need to come up with the extra positions on their own as well.
So then we started with the students posing. Now, I have to be honest with you here,these students are not professional models by any stretch of the imagination. Theirposes were in most cases pretty lame and I had to ask them to move themselves intomuch more interesting positions as we went along. We went through all 22 students inabout 45 minutes then took a 15 minute break and then went through everyone onceagain to come up with the 44 poses youʼll see here.
These are the first two poses of the class. You can see the first one is a rear view. Idecided to do all the remaining poses from a front view regardless of whether thestudent was facing me or not. The second pose was also from behind but the pose ismodified.
1 2
3
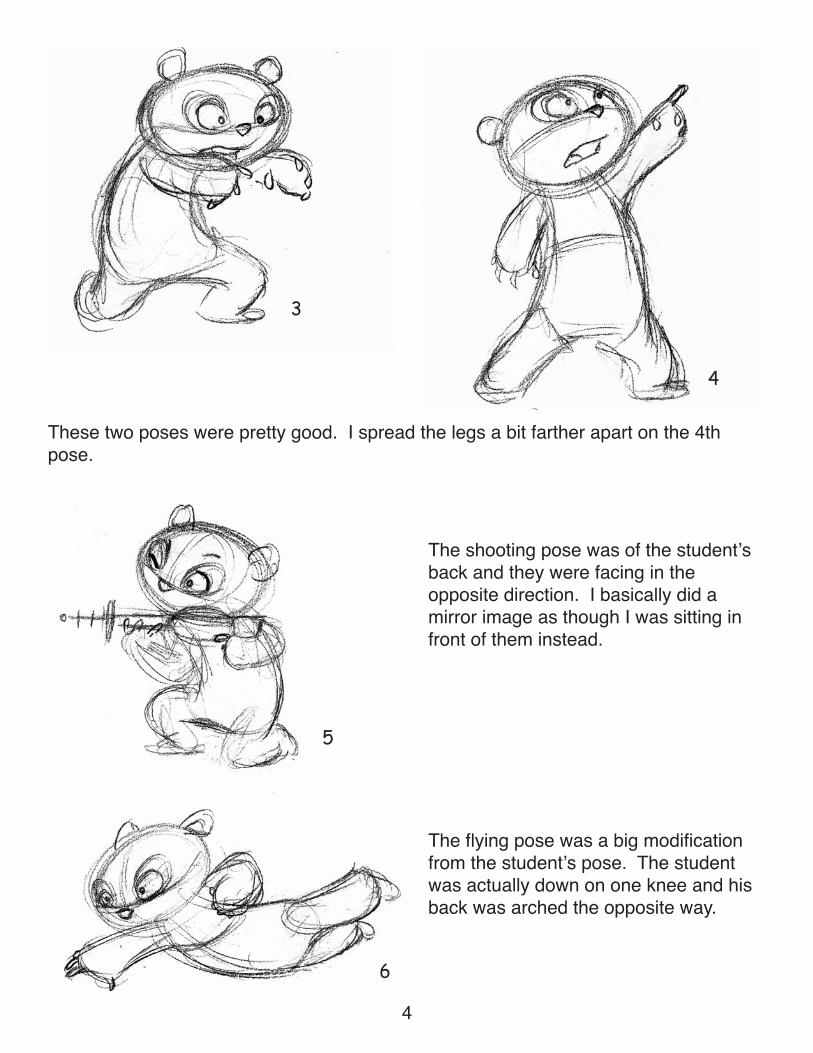
These two poses were pretty good. I spread the legs a bit farther apart on the 4thpose.
The shooting pose was of the studentʼsback and they were facing in theopposite direction. I basically did amirror image as though I was sitting infront of them instead.
The flying pose was a big modificationfrom the studentʼs pose. The studentwas actually down on one knee and hisback was arched the opposite way.
3
4
5
6
4
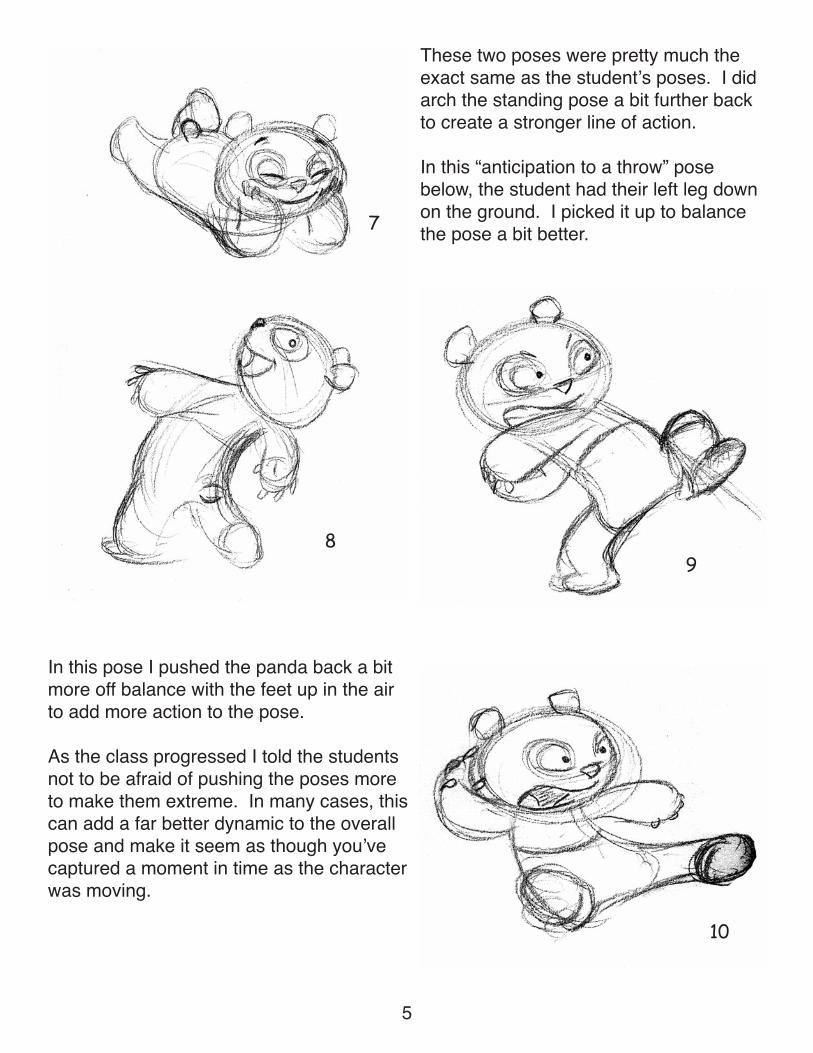
These two poses were pretty much theexact same as the studentʼs poses. I didarch the standing pose a bit further backto create a stronger line of action.
In this “anticipation to a throw” posebelow, the student had their left leg downon the ground. I picked it up to balancethe pose a bit better.7
89
In this pose I pushed the panda back a bitmore off balance with the feet up in the airto add more action to the pose.
As the class progressed I told the studentsnot to be afraid of pushing the poses moreto make them extreme. In many cases, thiscan add a far better dynamic to the overallpose and make it seem as though youʼvecaptured a moment in time as the characterwas moving.
10
5
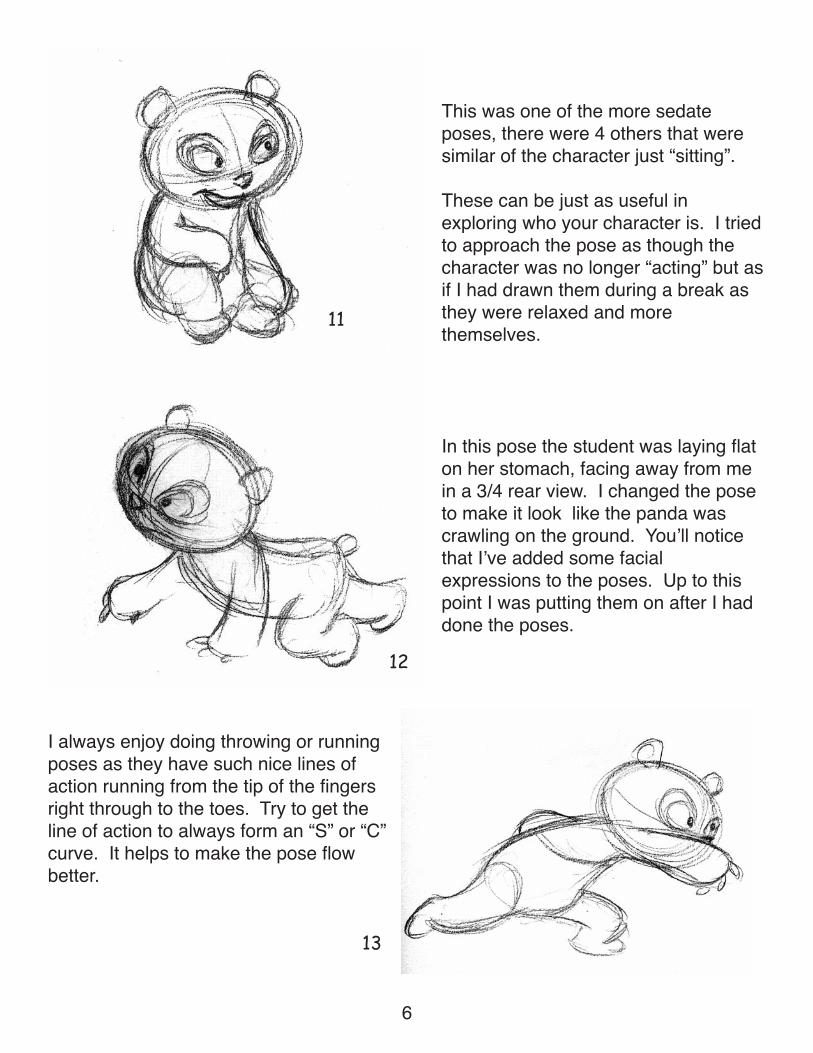
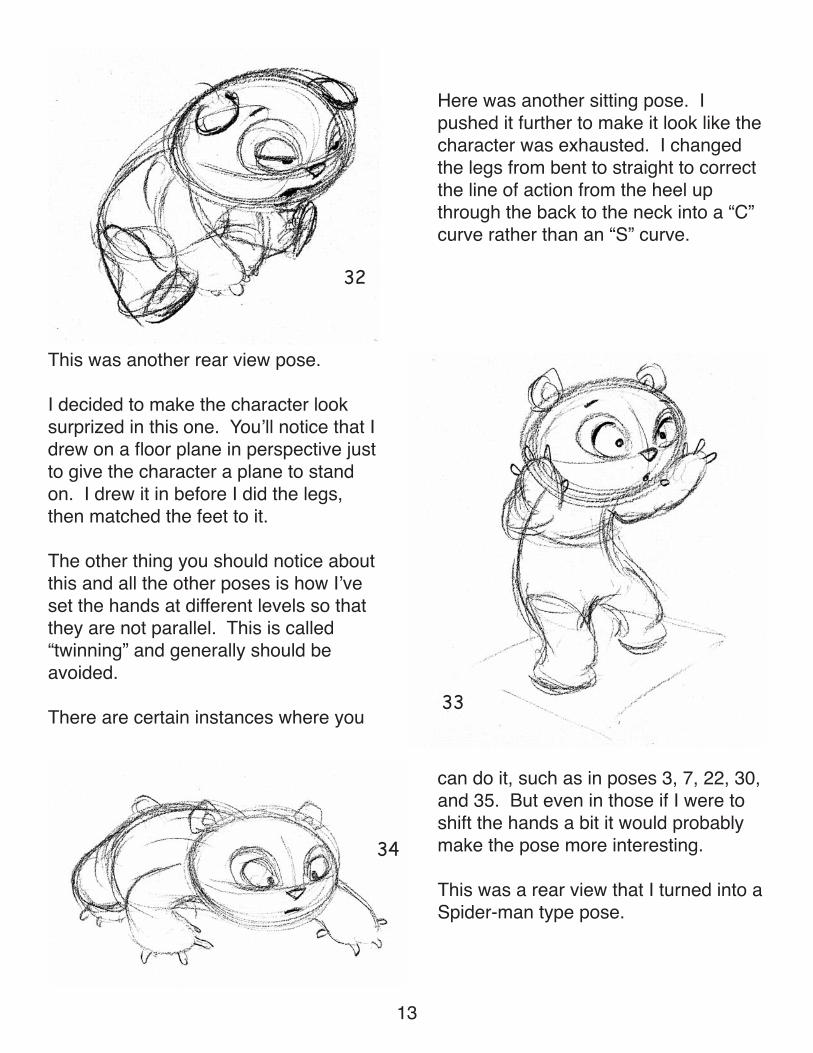
This was one of the more sedateposes, there were 4 others that weresimilar of the character just “sitting”.
These can be just as useful inexploring who your character is. I triedto approach the pose as though thecharacter was no longer “acting” but asif I had drawn them during a break asthey were relaxed and morethemselves.
In this pose the student was laying flaton her stomach, facing away from mein a 3/4 rear view. I changed the poseto make it look like the panda wascrawling on the ground. Youʼll noticethat Iʼve added some facialexpressions to the poses. Up to thispoint I was putting them on after I haddone the poses.
11
12
I always enjoy doing throwing or runningposes as they have such nice lines ofaction running from the tip of the fingersright through to the toes. Try to get theline of action to always form an “S” or “C”curve. It helps to make the pose flowbetter.
13
6
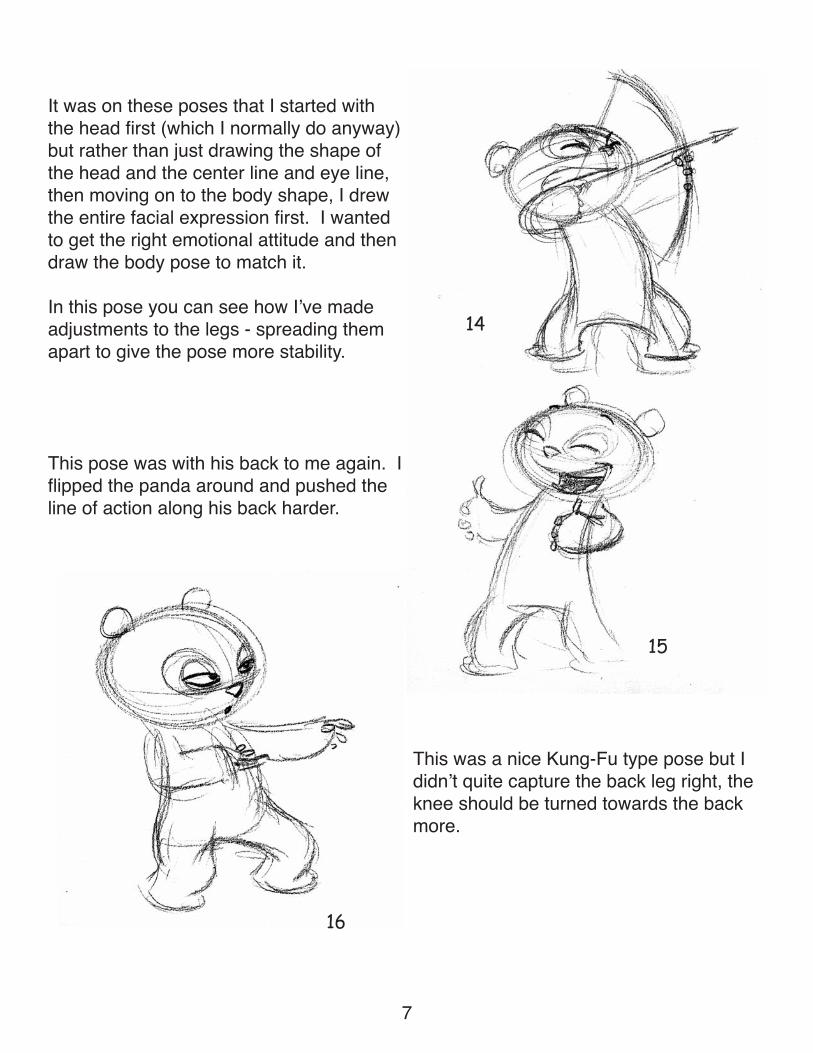
It was on these poses that I started withthe head first (which I normally do anyway)but rather than just drawing the shape ofthe head and the center line and eye line,then moving on to the body shape, I drewthe entire facial expression first. I wantedto get the right emotional attitude and thendraw the body pose to match it.
In this pose you can see how Iʼve madeadjustments to the legs - spreading themapart to give the pose more stability.
This pose was with his back to me again. Iflipped the panda around and pushed theline of action along his back harder.
14
15
16
This was a nice Kung-Fu type pose but Ididnʼt quite capture the back leg right, theknee should be turned towards the backmore.
7
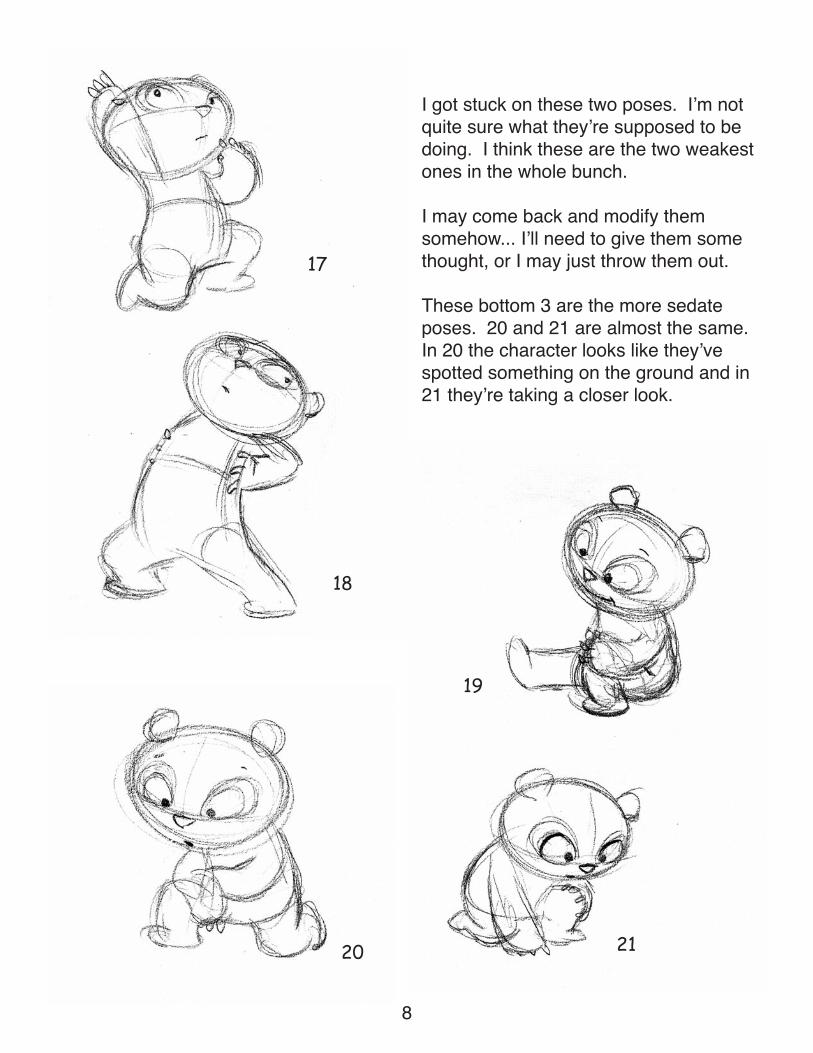
I got stuck on these two poses. Iʼm notquite sure what theyʼre supposed to bedoing. I think these are the two weakestones in the whole bunch.
I may come back and modify themsomehow... Iʼll need to give them somethought, or I may just throw them out.
These bottom 3 are the more sedateposes. 20 and 21 are almost the same.In 20 the character looks like theyʼvespotted something on the ground and in21 theyʼre taking a closer look.
17
18
19
20 21
8
We took a 15 minute break to stretch. I photocopied the poses out of my sketchbookand then laid them out on the floor.
I let the students take a look and see if they could find their pose. We talked abouthow I pushed the poses further than what they were doing, also how I had looked atthe pose and then, even though they might have had their backs to mereversed the position and drew it the way I saw it in my head.
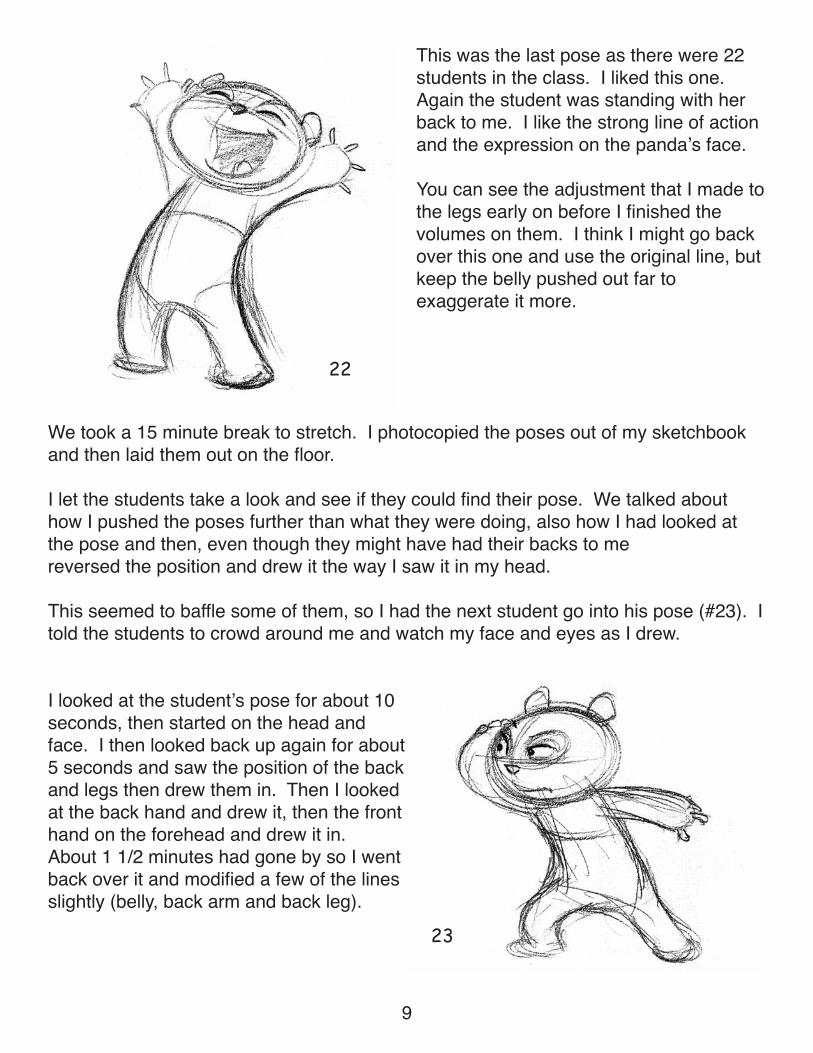
This seemed to baffle some of them, so I had the next student go into his pose (#23). Itold the students to crowd around me and watch my face and eyes as I drew.
I looked at the studentʼs pose for about 10seconds, then started on the head andface. I then looked back up again for about5 seconds and saw the position of the backand legs then drew them in. Then I lookedat the back hand and drew it, then the fronthand on the forehead and drew it in.About 1 1/2 minutes had gone by so I wentback over it and modified a few of the linesslightly (belly, back arm and back leg).
This was the last pose as there were 22students in the class. I liked this one.Again the student was standing with herback to me. I like the strong line of actionand the expression on the pandaʼs face.
You can see the adjustment that I made tothe legs early on before I finished thevolumes on them. I think I might go backover this one and use the original line, butkeep the belly pushed out far toexaggerate it more.
9
22
23
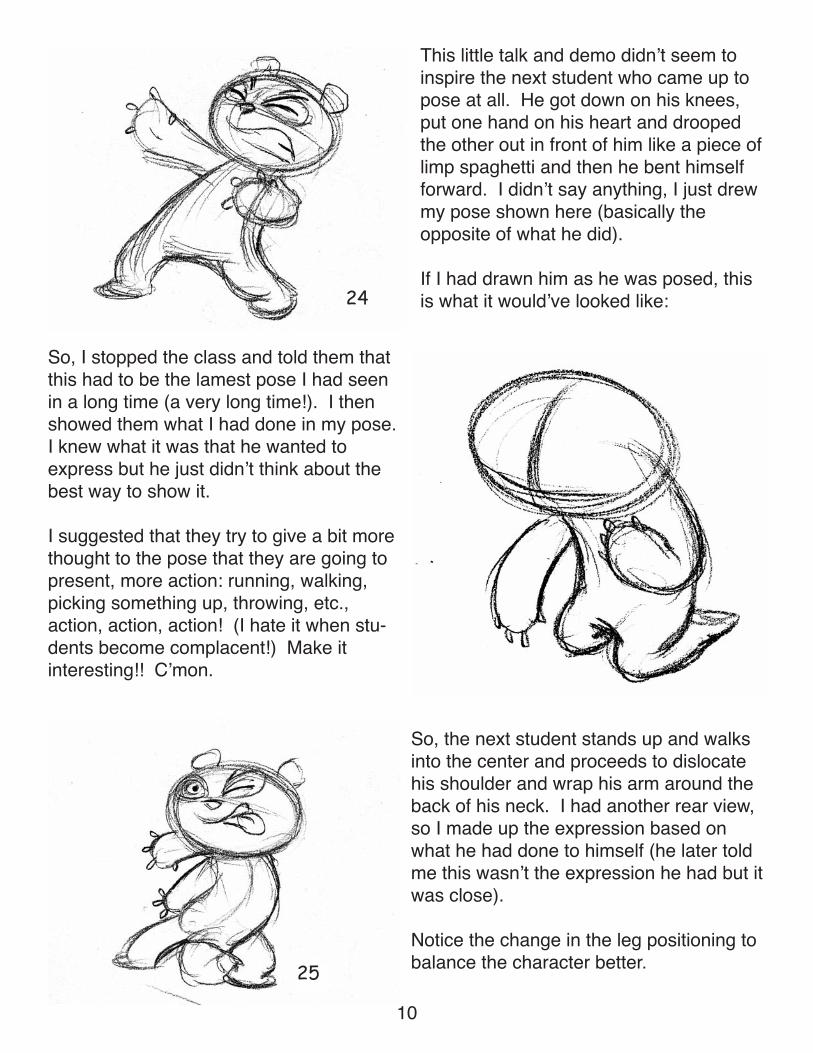
This little talk and demo didnʼt seem toinspire the next student who came up topose at all. He got down on his knees,put one hand on his heart and droopedthe other out in front of him like a piece oflimp spaghetti and then he bent himselfforward. I didnʼt say anything, I just drewmy pose shown here (basically theopposite of what he did).
If I had drawn him as he was posed, thisis what it wouldʼve looked like:
So, I stopped the class and told them thatthis had to be the lamest pose I had seenin a long time (a very long time!). I thenshowed them what I had done in my pose.I knew what it was that he wanted toexpress but he just didnʼt think about thebest way to show it.
I suggested that they try to give a bit morethought to the pose that they are going topresent, more action: running, walking,picking something up, throwing, etc.,action, action, action! (I hate it when stu-dents become complacent!) Make itinteresting!! Cʼmon.
So, the next student stands up and walksinto the center and proceeds to dislocatehis shoulder and wrap his arm around theback of his neck. I had another rear view,so I made up the expression based onwhat he had done to himself (he later toldme this wasnʼt the expression he had but itwas close).
Notice the change in the leg positioning tobalance the character better.
10
24
25
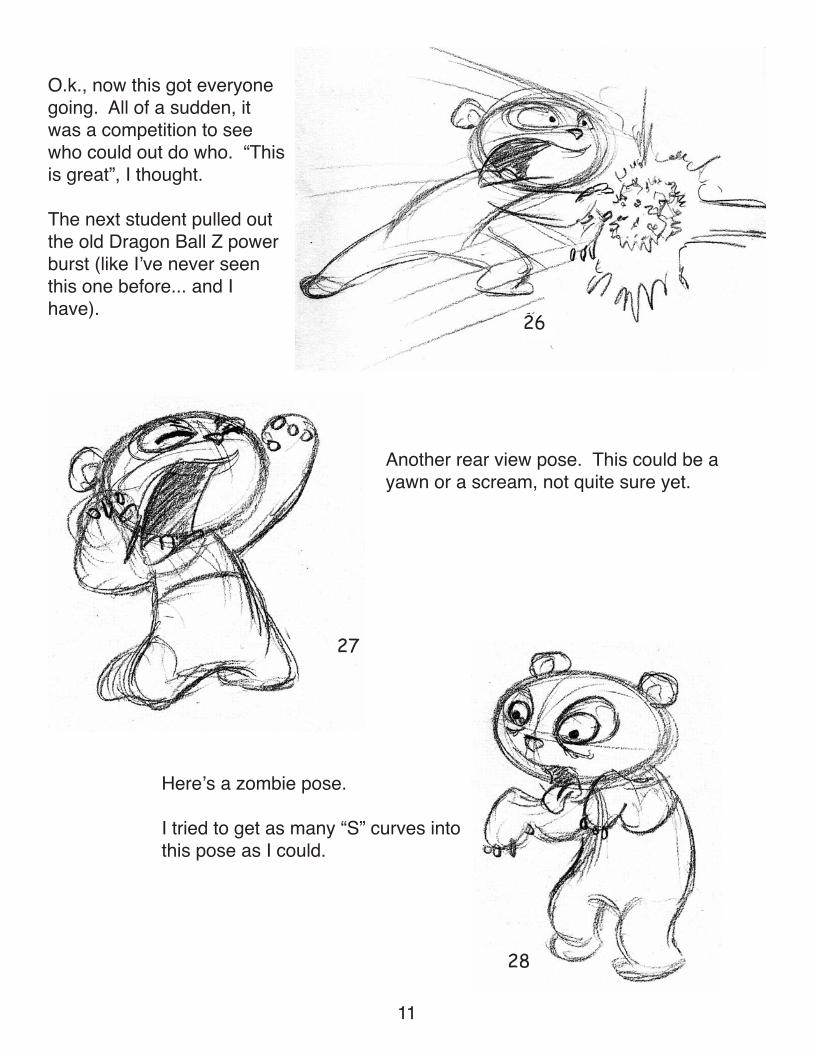
O.k., now this got everyonegoing. All of a sudden, itwas a competition to seewho could out do who. “Thisis great”, I thought.
The next student pulled outthe old Dragon Ball Z powerburst (like Iʼve never seenthis one before... and Ihave).
Another rear view pose. This could be ayawn or a scream, not quite sure yet.
Hereʼs a zombie pose.
I tried to get as many “S” curves intothis pose as I could.
11
26
27
28
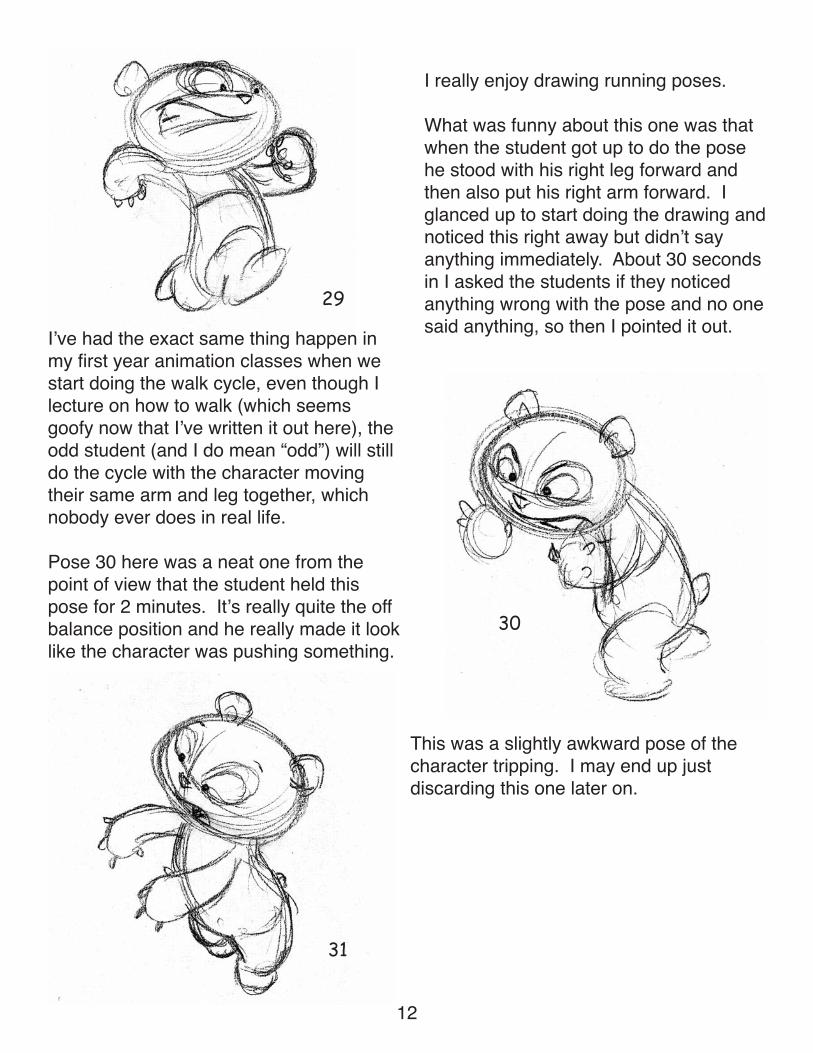
This was a slightly awkward pose of thecharacter tripping. I may end up justdiscarding this one later on.
Iʼve had the exact same thing happen inmy first year animation classes when westart doing the walk cycle, even though Ilecture on how to walk (which seemsgoofy now that Iʼve written it out here), theodd student (and I do mean “odd”) will stilldo the cycle with the character movingtheir same arm and leg together, whichnobody ever does in real life.
Pose 30 here was a neat one from thepoint of view that the student held thispose for 2 minutes. Itʼs really quite the offbalance position and he really made it looklike the character was pushing something.
I really enjoy drawing running poses.
What was funny about this one was thatwhen the student got up to do the posehe stood with his right leg forward andthen also put his right arm forward. Iglanced up to start doing the drawing andnoticed this right away but didnʼt sayanything immediately. About 30 secondsin I asked the students if they noticedanything wrong with the pose and no onesaid anything, so then I pointed it out.
29
30
31
12
13
This was another rear view pose.
I decided to make the character looksurprized in this one. Youʼll notice that Idrew on a floor plane in perspective justto give the character a plane to standon. I drew it in before I did the legs,then matched the feet to it.
The other thing you should notice aboutthis and all the other poses is how Iʼveset the hands at different levels so thatthey are not parallel. This is called“twinning” and generally should beavoided.
There are certain instances where you
can do it, such as in poses 3, 7, 22, 30,and 35. But even in those if I were toshift the hands a bit it would probablymake the pose more interesting.
This was a rear view that I turned into aSpider-man type pose.
Here was another sitting pose. Ipushed it further to make it look like thecharacter was exhausted. I changedthe legs from bent to straight to correctthe line of action from the heel upthrough the back to the neck into a “C”curve rather than an “S” curve.
32
33
34
14
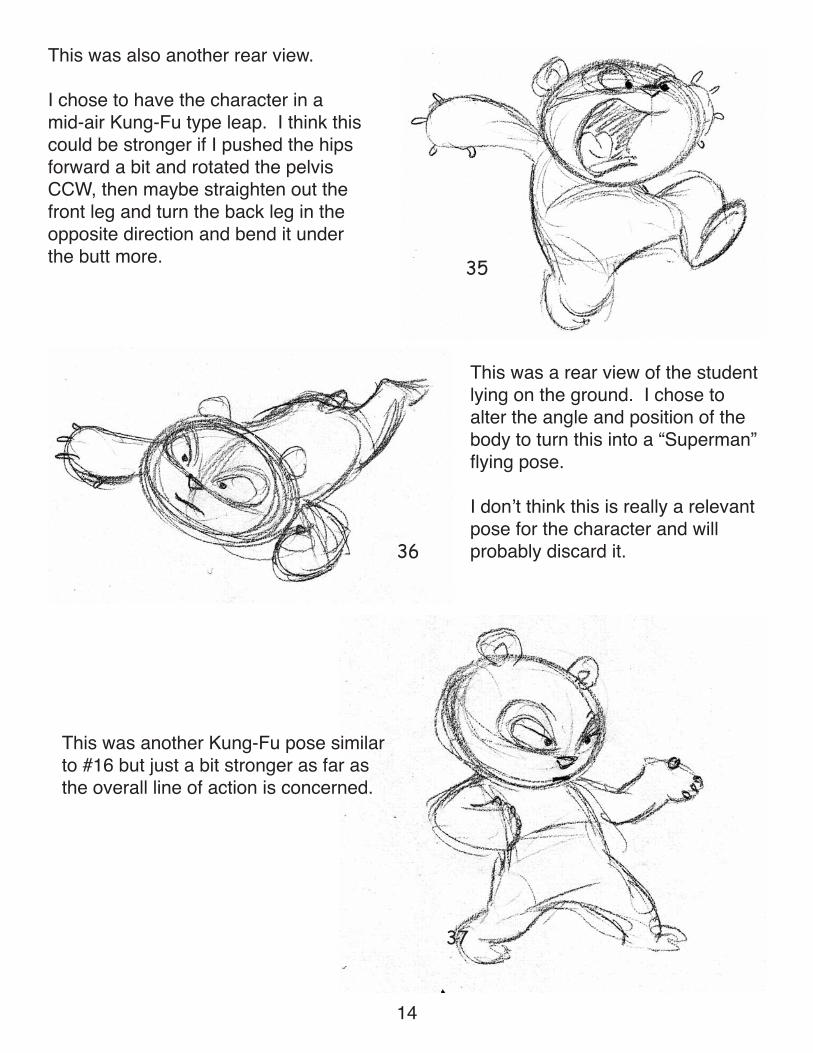
This was another Kung-Fu pose similarto #16 but just a bit stronger as far asthe overall line of action is concerned.
This was a rear view of the studentlying on the ground. I chose toalter the angle and position of thebody to turn this into a “Superman”flying pose.
I donʼt think this is really a relevantpose for the character and willprobably discard it.
This was also another rear view.
I chose to have the character in amid-air Kung-Fu type leap. I think thiscould be stronger if I pushed the hipsforward a bit and rotated the pelvisCCW, then maybe straighten out thefront leg and turn the back leg in theopposite direction and bend it underthe butt more. 35
36
37
15
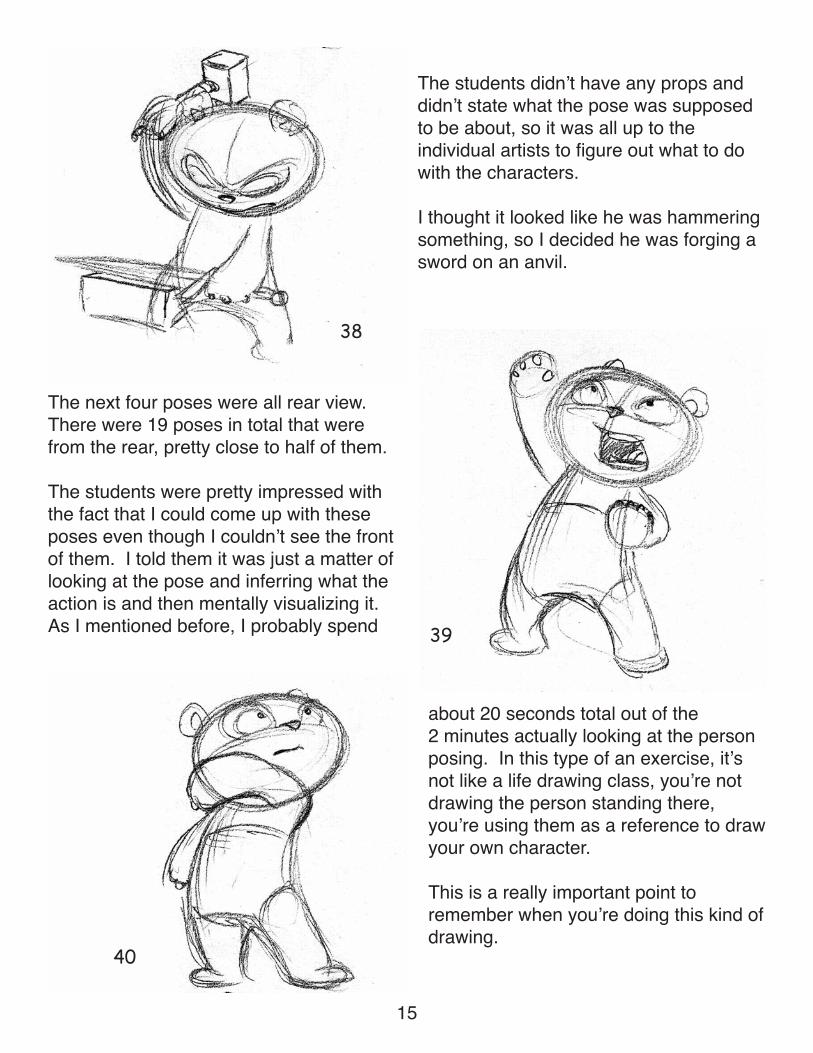
The next four poses were all rear view.There were 19 poses in total that werefrom the rear, pretty close to half of them.
The students were pretty impressed withthe fact that I could come up with theseposes even though I couldnʼt see the frontof them. I told them it was just a matter oflooking at the pose and inferring what theaction is and then mentally visualizing it.As I mentioned before, I probably spend
about 20 seconds total out of the2 minutes actually looking at the personposing. In this type of an exercise, itʼsnot like a life drawing class, youʼre notdrawing the person standing there,youʼre using them as a reference to drawyour own character.
This is a really important point toremember when youʼre doing this kind ofdrawing.
The students didnʼt have any props anddidnʼt state what the pose was supposedto be about, so it was all up to theindividual artists to figure out what to dowith the characters.
I thought it looked like he was hammeringsomething, so I decided he was forging asword on an anvil.
38
39
40
16
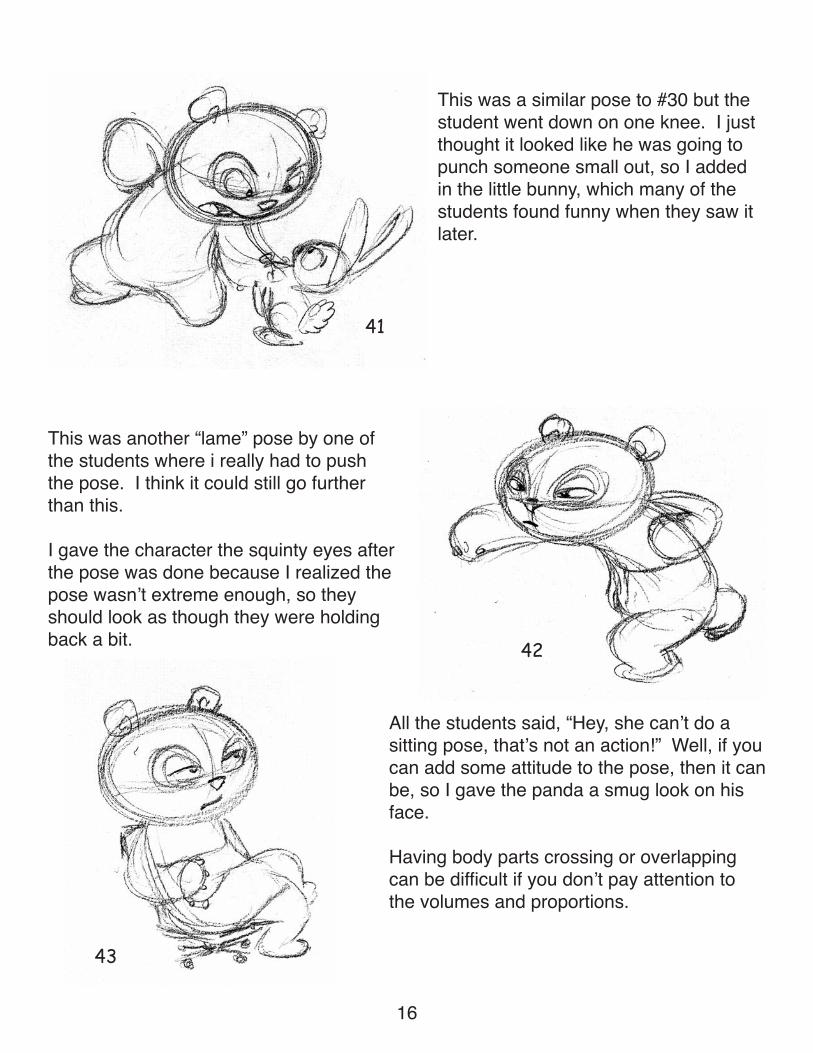
All the students said, “Hey, she canʼt do asitting pose, thatʼs not an action!” Well, if youcan add some attitude to the pose, then it canbe, so I gave the panda a smug look on hisface.
Having body parts crossing or overlappingcan be difficult if you donʼt pay attention tothe volumes and proportions.
This was another “lame” pose by one ofthe students where i really had to pushthe pose. I think it could still go furtherthan this.
I gave the character the squinty eyes afterthe pose was done because I realized thepose wasnʼt extreme enough, so theyshould look as though they were holdingback a bit.
This was a similar pose to #30 but thestudent went down on one knee. I justthought it looked like he was going topunch someone small out, so I addedin the little bunny, which many of thestudents found funny when they saw itlater.
41
42
43
17
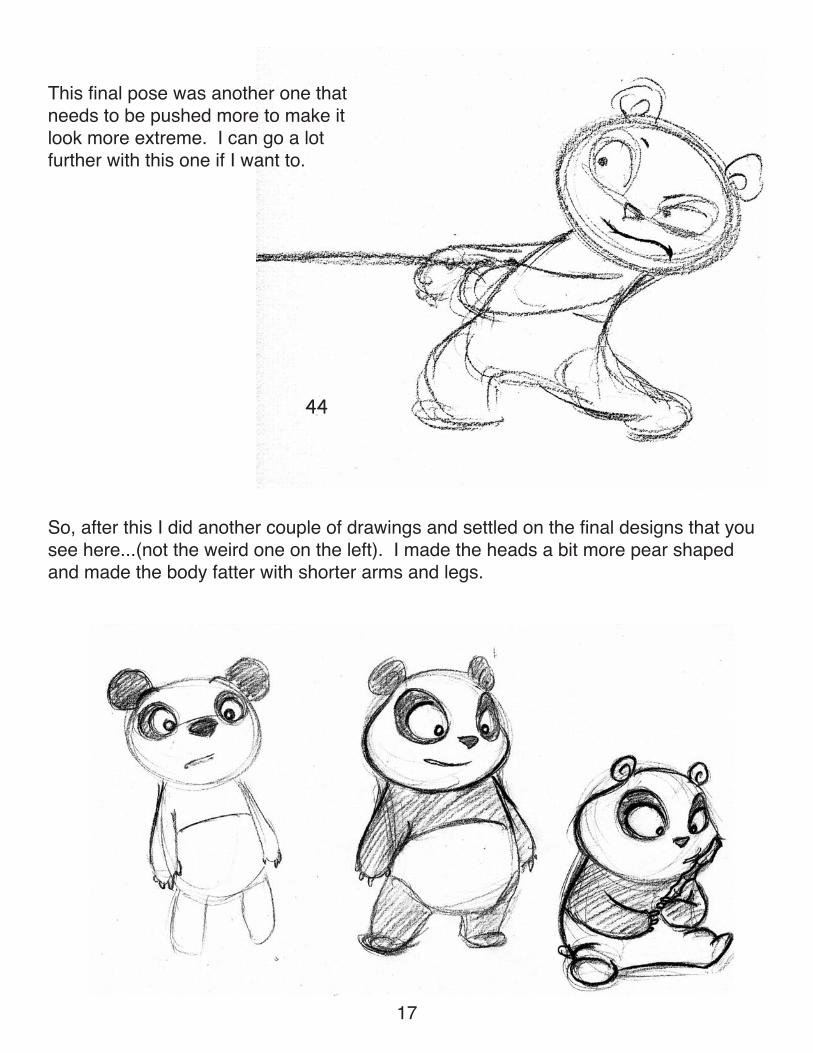
This final pose was another one thatneeds to be pushed more to make itlook more extreme. I can go a lotfurther with this one if I want to.
44
So, after this I did another couple of drawings and settled on the final designs that yousee here...(not the weird one on the left). I made the heads a bit more pear shapedand made the body fatter with shorter arms and legs.
The next step is to now go back over the poses that I like and will use in the final modelsheets and redraw them using the new character designs. I basically just take thesketches that I did in class and put a blank sheet of paper on top of it and trace off thepose, modifying the proportions and possibly pushing the pose further or moving thearms and legs a bit to rebalance the pose.
Over the next few pages Iʼll show you the revised sketches along with the finishedclean ups beside them. For cleaning up, I like to use a Pilot Fineliner marker. You re-ally need to be careful when cleaning up with markers because, if you make a mistakeyou really have to start the drawing all over again. Using white out can leave somemessy bumps on the paper that will effect the new line that you go over with and makeit not as nice. Over the years, Iʼve practiced with it so much that I feel very confidentusing it. I usually go fairly slowly and if I sense that the line is going off a bit, I simplystop drawing the line and lift the pen off the paper. You really need to pay attention towhat youʼre doing during this process and simply be in control of what your hand doesat all times.
At the end Iʼll show you the final composited model sheets with some rendering onthem. Iʼll do all that stuff in Photoshop.
18
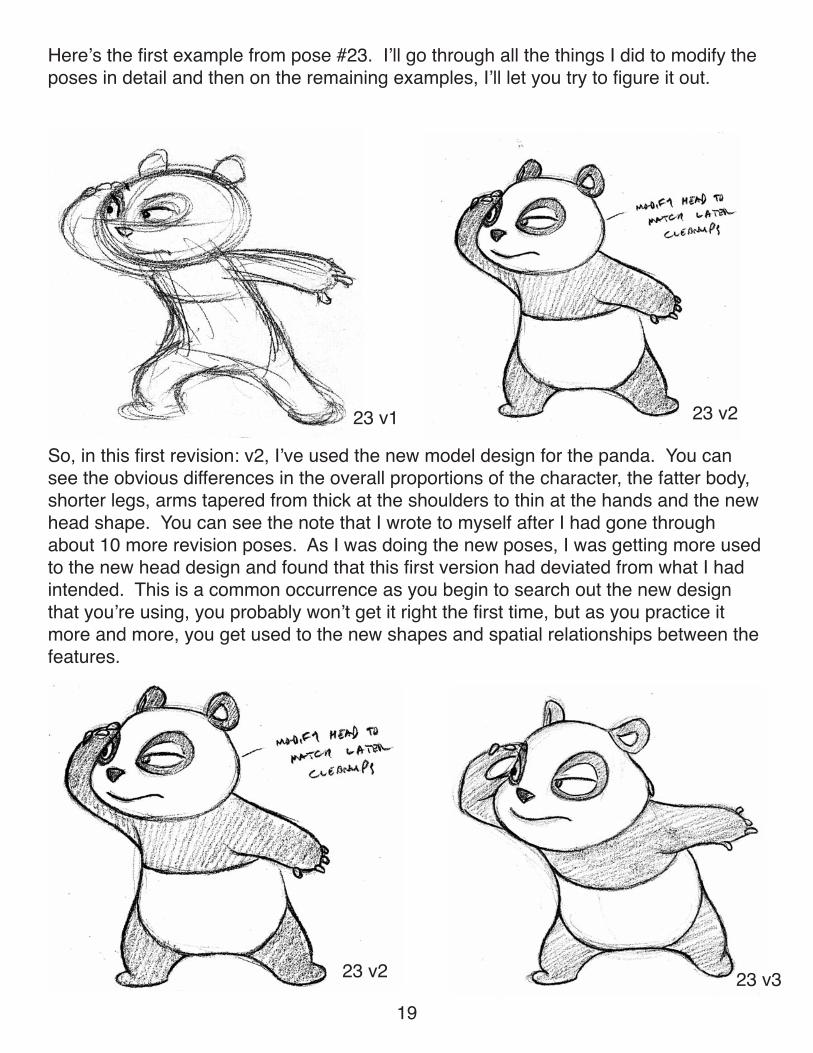
Hereʼs the first example from pose #23. Iʼll go through all the things I did to modify theposes in detail and then on the remaining examples, Iʼll let you try to figure it out.
So, in this first revision: v2, Iʼve used the new model design for the panda. You cansee the obvious differences in the overall proportions of the character, the fatter body,shorter legs, arms tapered from thick at the shoulders to thin at the hands and the newhead shape. You can see the note that I wrote to myself after I had gone throughabout 10 more revision poses. As I was doing the new poses, I was getting more usedto the new head design and found that this first version had deviated from what I hadintended. This is a common occurrence as you begin to search out the new designthat youʼre using, you probably wonʼt get it right the first time, but as you practice itmore and more, you get used to the new shapes and spatial relationships between thefeatures.
23 v1 23 v2
23 v2 23 v319
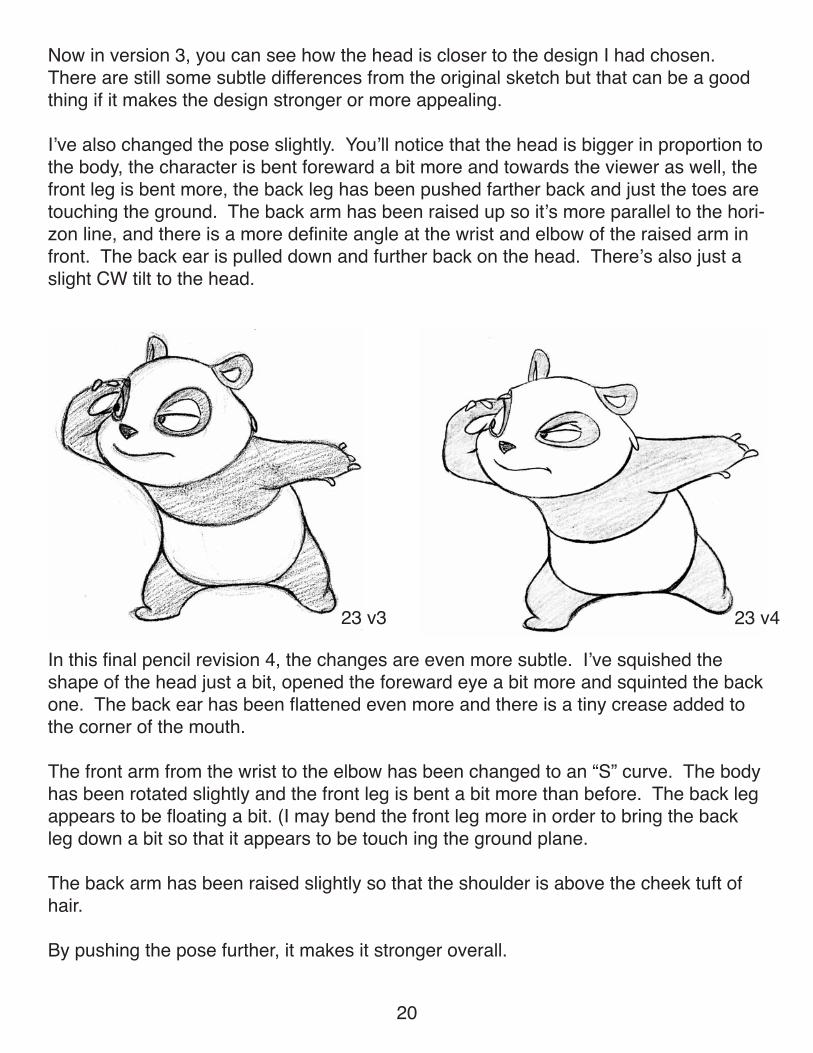
Now in version 3, you can see how the head is closer to the design I had chosen.There are still some subtle differences from the original sketch but that can be a goodthing if it makes the design stronger or more appealing.
Iʼve also changed the pose slightly. Youʼll notice that the head is bigger in proportion tothe body, the character is bent foreward a bit more and towards the viewer as well, thefront leg is bent more, the back leg has been pushed farther back and just the toes aretouching the ground. The back arm has been raised up so itʼs more parallel to the hori-zon line, and there is a more definite angle at the wrist and elbow of the raised arm infront. The back ear is pulled down and further back on the head. Thereʼs also just aslight CW tilt to the head.
In this final pencil revision 4, the changes are even more subtle. Iʼve squished theshape of the head just a bit, opened the foreward eye a bit more and squinted the backone. The back ear has been flattened even more and there is a tiny crease added tothe corner of the mouth.
The front arm from the wrist to the elbow has been changed to an “S” curve. The bodyhas been rotated slightly and the front leg is bent a bit more than before. The back legappears to be floating a bit. (I may bend the front leg more in order to bring the backleg down a bit so that it appears to be touch ing the ground plane.
The back arm has been raised slightly so that the shoulder is above the cheek tuft ofhair.
By pushing the pose further, it makes it stronger overall.
23 v3 23 v4
20
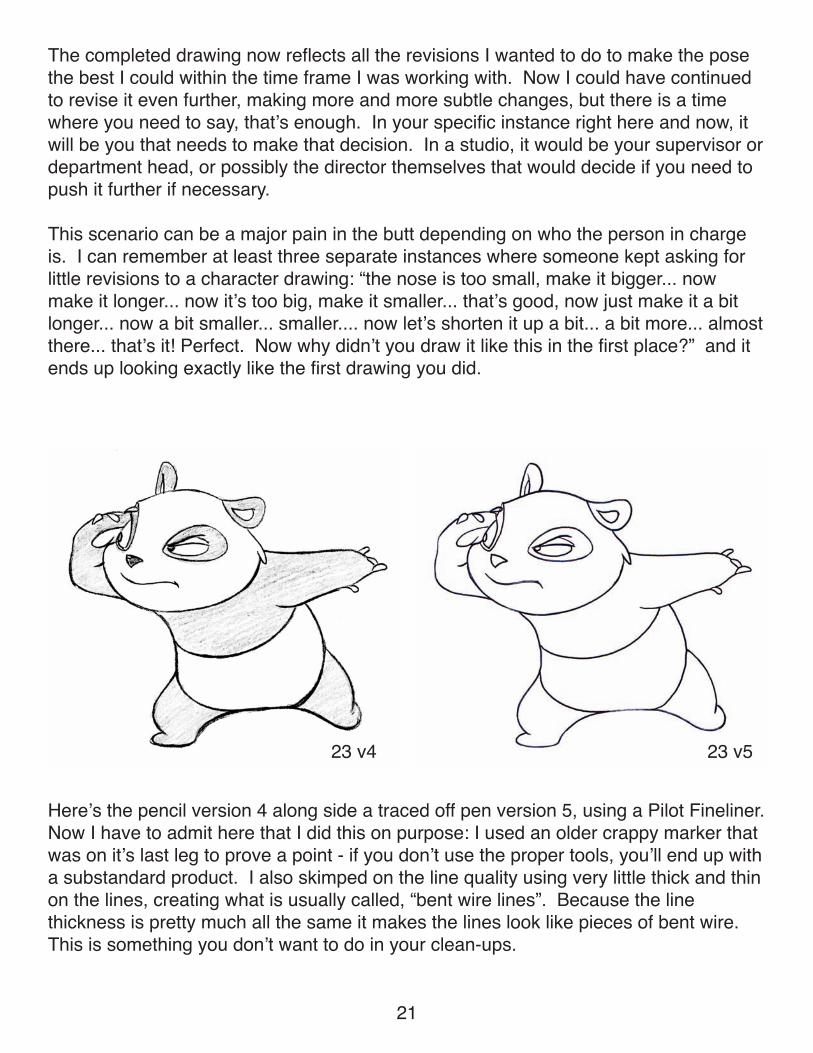
The completed drawing now reflects all the revisions I wanted to do to make the posethe best I could within the time frame I was working with. Now I could have continuedto revise it even further, making more and more subtle changes, but there is a timewhere you need to say, thatʼs enough. In your specific instance right here and now, itwill be you that needs to make that decision. In a studio, it would be your supervisor ordepartment head, or possibly the director themselves that would decide if you need topush it further if necessary.
This scenario can be a major pain in the butt depending on who the person in chargeis. I can remember at least three separate instances where someone kept asking forlittle revisions to a character drawing: “the nose is too small, make it bigger... nowmake it longer... now itʼs too big, make it smaller... thatʼs good, now just make it a bitlonger... now a bit smaller... smaller.... now letʼs shorten it up a bit... a bit more... almostthere... thatʼs it! Perfect. Now why didnʼt you draw it like this in the first place?” and itends up looking exactly like the first drawing you did.
23 v4 23 v5
Hereʼs the pencil version 4 along side a traced off pen version 5, using a Pilot Fineliner.Now I have to admit here that I did this on purpose: I used an older crappy marker thatwas on itʼs last leg to prove a point - if you donʼt use the proper tools, youʼll end up witha substandard product. I also skimped on the line quality using very little thick and thinon the lines, creating what is usually called, “bent wire lines”. Because the linethickness is pretty much all the same it makes the lines look like pieces of bent wire.This is something you donʼt want to do in your clean-ups.
21
23 v5 23 v6
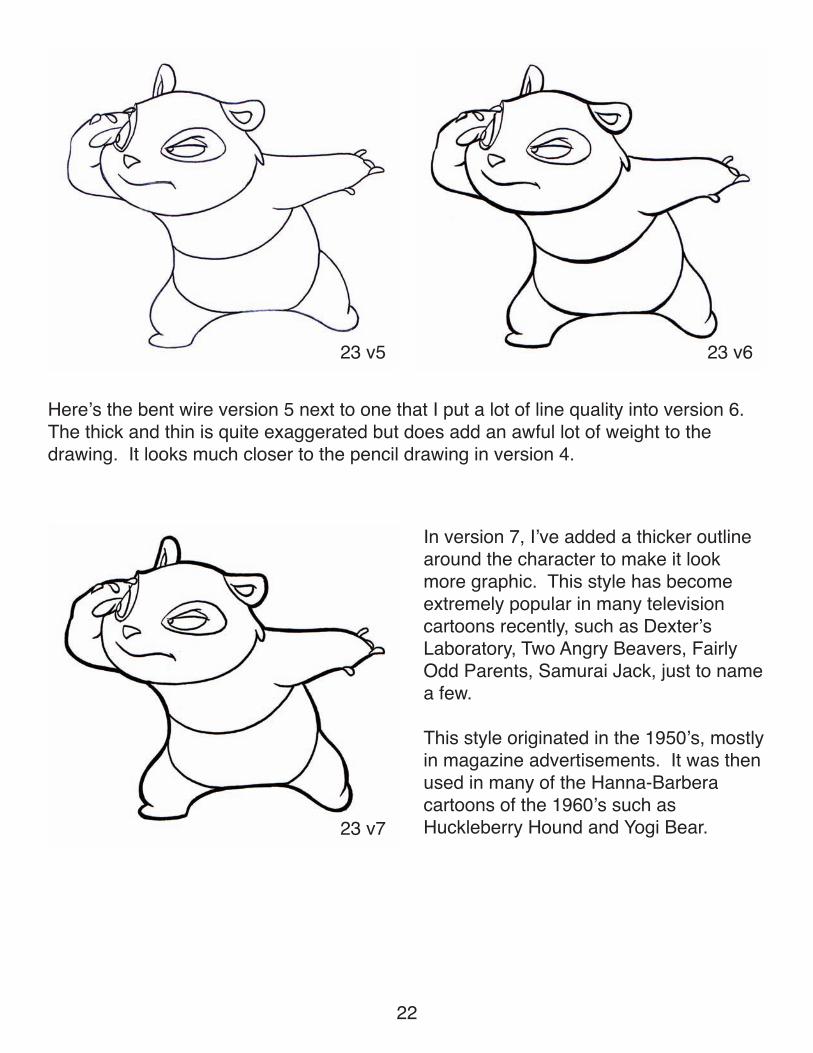
Hereʼs the bent wire version 5 next to one that I put a lot of line quality into version 6.The thick and thin is quite exaggerated but does add an awful lot of weight to thedrawing. It looks much closer to the pencil drawing in version 4.
23 v7
In version 7, Iʼve added a thicker outlinearound the character to make it lookmore graphic. This style has becomeextremely popular in many televisioncartoons recently, such as DexterʼsLaboratory, Two Angry Beavers, FairlyOdd Parents, Samurai Jack, just to namea few.
This style originated in the 1950ʼs, mostlyin magazine advertisements. It was thenused in many of the Hanna-Barberacartoons of the 1960ʼs such asHuckleberry Hound and Yogi Bear.
22
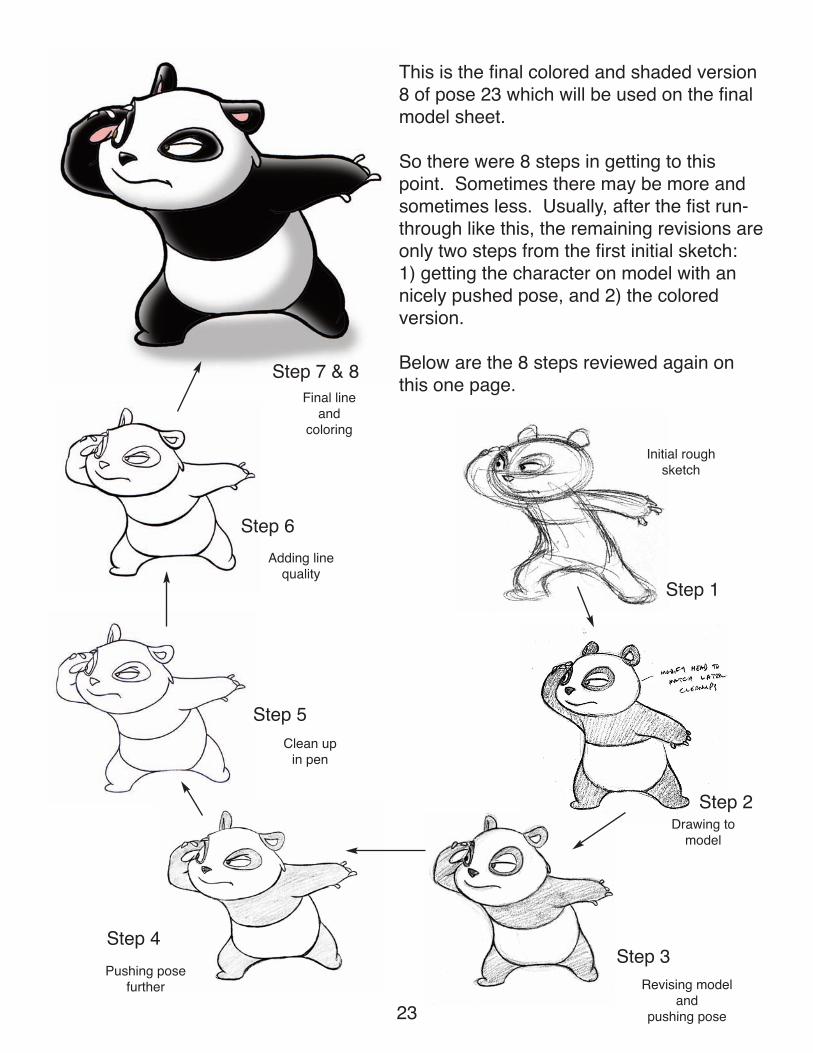
This is the final colored and shaded version8 of pose 23 which will be used on the finalmodel sheet.
So there were 8 steps in getting to thispoint. Sometimes there may be more andsometimes less. Usually, after the fist run-through like this, the remaining revisions areonly two steps from the first initial sketch:1) getting the character on model with annicely pushed pose, and 2) the coloredversion.
Below are the 8 steps reviewed again onthis one page.Step 7 & 8
Step 1
Step 2
Step 3Step 4
Step 5
Step 6
Initial roughsketch
Drawing tomodel
Revising modeland
pushing pose
Pushing posefurther
Clean upin pen
Adding linequality
Final lineand
coloring
23
29 v1
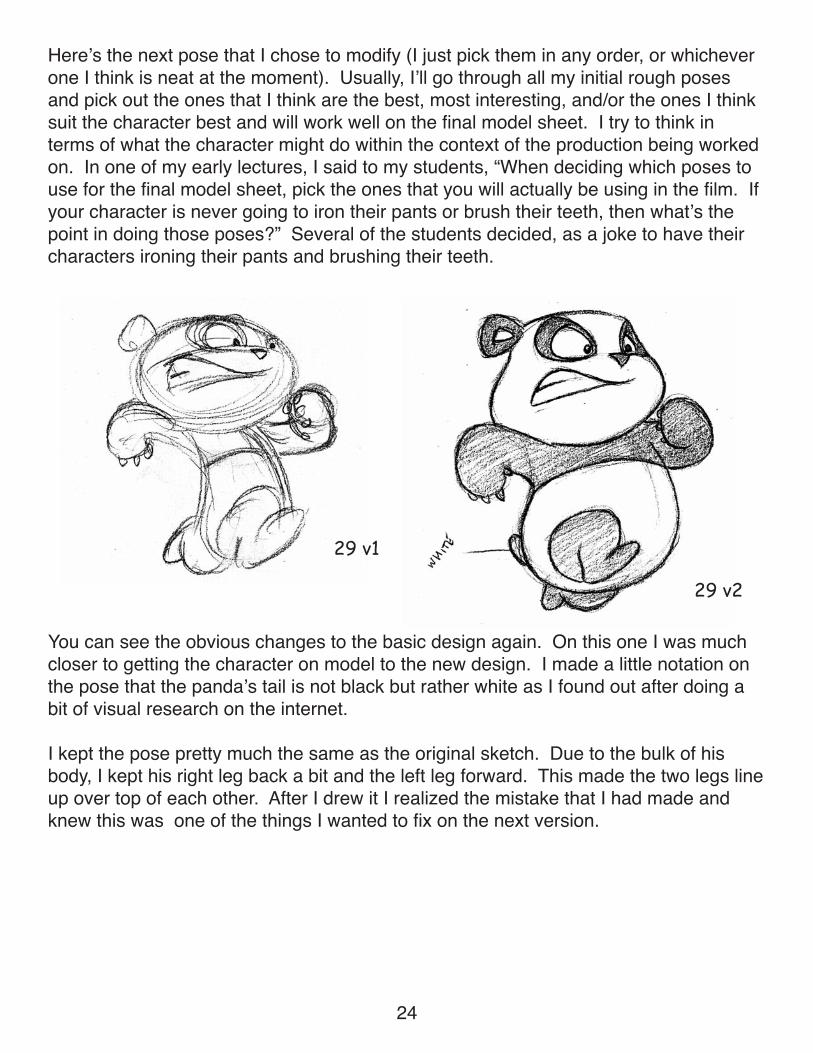
Hereʼs the next pose that I chose to modify (I just pick them in any order, or whicheverone I think is neat at the moment). Usually, Iʼll go through all my initial rough posesand pick out the ones that I think are the best, most interesting, and/or the ones I thinksuit the character best and will work well on the final model sheet. I try to think interms of what the character might do within the context of the production being workedon. In one of my early lectures, I said to my students, “When deciding which poses touse for the final model sheet, pick the ones that you will actually be using in the film. Ifyour character is never going to iron their pants or brush their teeth, then whatʼs thepoint in doing those poses?” Several of the students decided, as a joke to have theircharacters ironing their pants and brushing their teeth.
29 v2
You can see the obvious changes to the basic design again. On this one I was muchcloser to getting the character on model to the new design. I made a little notation onthe pose that the pandaʼs tail is not black but rather white as I found out after doing abit of visual research on the internet.
I kept the pose pretty much the same as the original sketch. Due to the bulk of hisbody, I kept his right leg back a bit and the left leg forward. This made the two legs lineup over top of each other. After I drew it I realized the mistake that I had made andknew this was one of the things I wanted to fix on the next version.
24
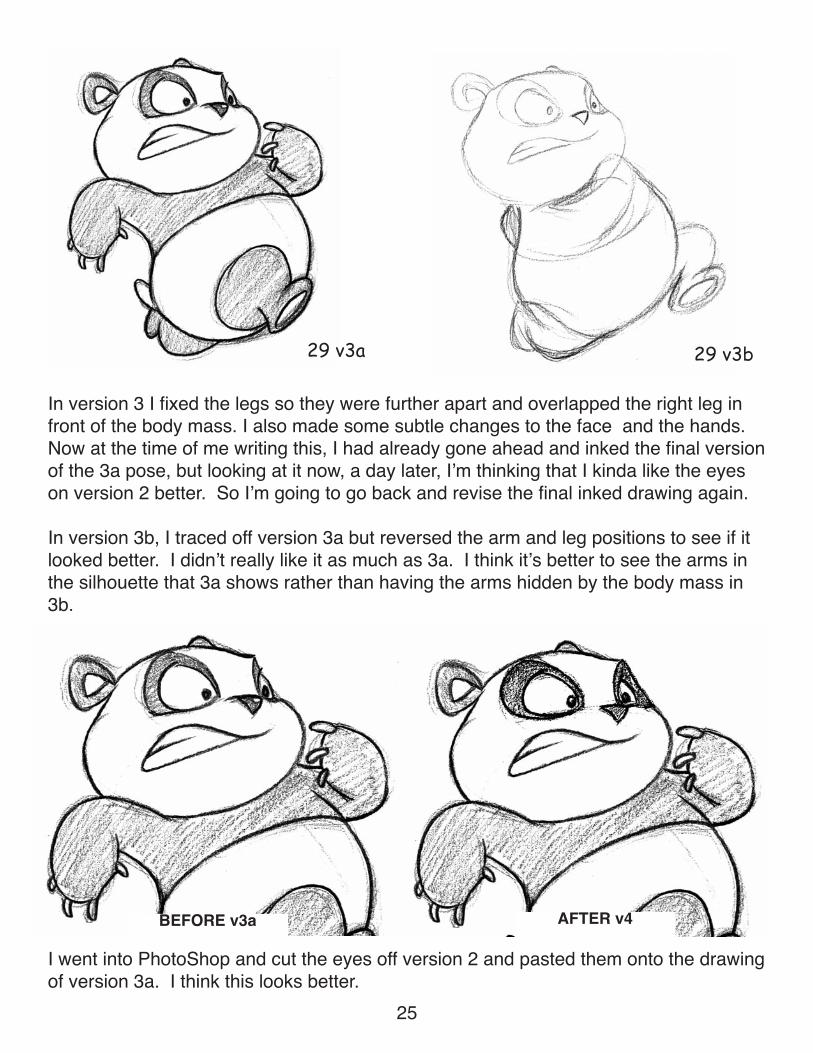
In version 3 I fixed the legs so they were further apart and overlapped the right leg infront of the body mass. I also made some subtle changes to the face and the hands.Now at the time of me writing this, I had already gone ahead and inked the final versionof the 3a pose, but looking at it now, a day later, Iʼm thinking that I kinda like the eyeson version 2 better. So Iʼm going to go back and revise the final inked drawing again.
In version 3b, I traced off version 3a but reversed the arm and leg positions to see if itlooked better. I didnʼt really like it as much as 3a. I think itʼs better to see the arms inthe silhouette that 3a shows rather than having the arms hidden by the body mass in3b.
29 v3a 29 v3b
I went into PhotoShop and cut the eyes off version 2 and pasted them onto the drawingof version 3a. I think this looks better.
BEFORE v3a AFTER v4
25
26
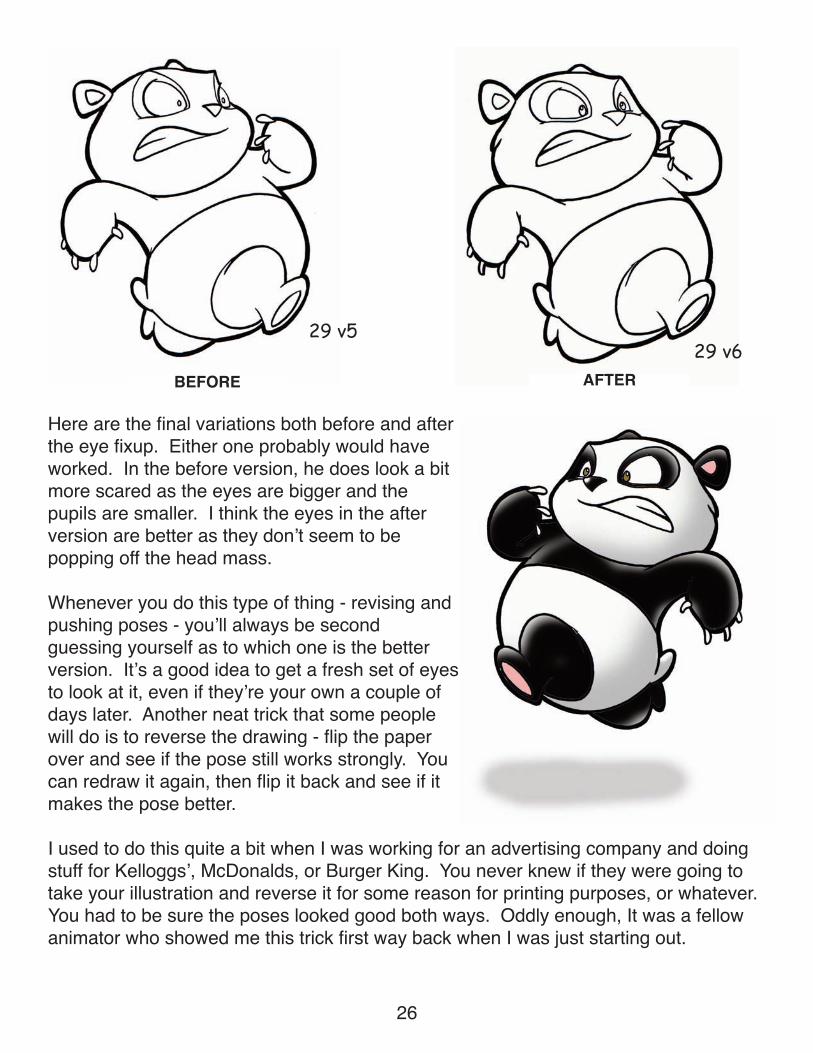
Here are the final variations both before and afterthe eye fixup. Either one probably would haveworked. In the before version, he does look a bitmore scared as the eyes are bigger and thepupils are smaller. I think the eyes in the afterversion are better as they donʼt seem to bepopping off the head mass.
Whenever you do this type of thing - revising andpushing poses - youʼll always be secondguessing yourself as to which one is the betterversion. Itʼs a good idea to get a fresh set of eyesto look at it, even if theyʼre your own a couple ofdays later. Another neat trick that some peoplewill do is to reverse the drawing - flip the paperover and see if the pose still works strongly. Youcan redraw it again, then flip it back and see if itmakes the pose better.
I used to do this quite a bit when I was working for an advertising company and doingstuff for Kelloggsʼ, McDonalds, or Burger King. You never knew if they were going totake your illustration and reverse it for some reason for printing purposes, or whatever.You had to be sure the poses looked good both ways. Oddly enough, It was a fellowanimator who showed me this trick first way back when I was just starting out.
29 v529 v6
BEFORE AFTER
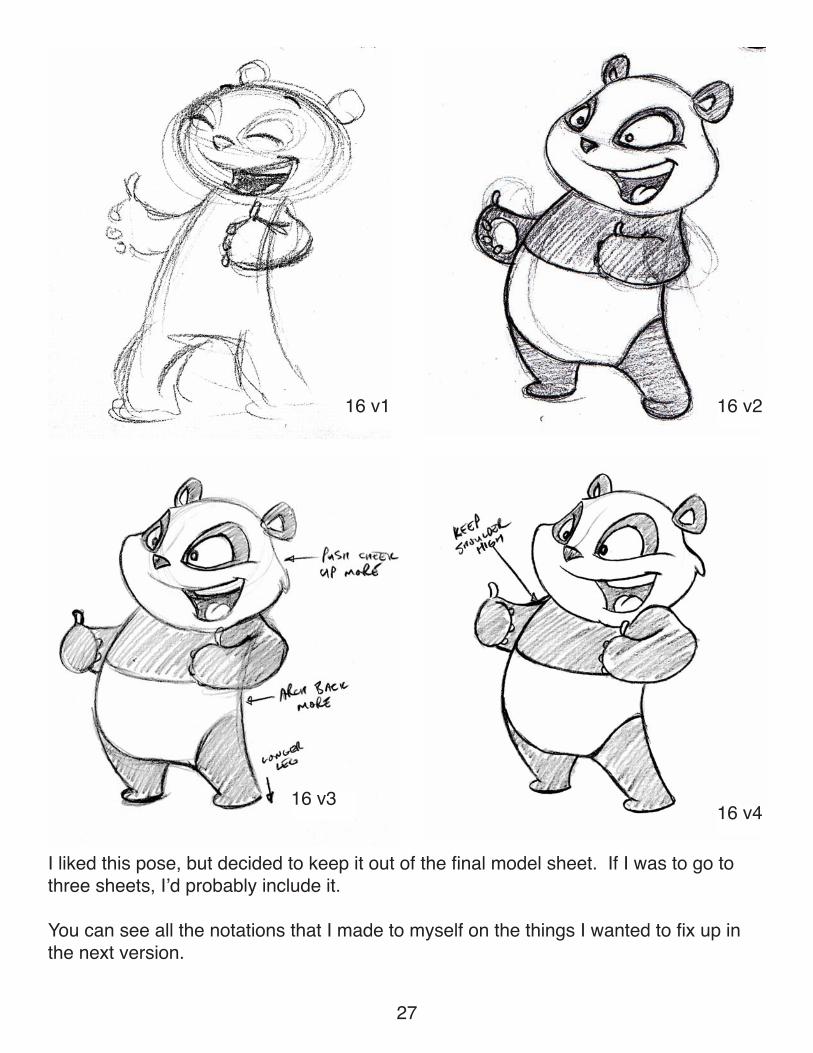
I liked this pose, but decided to keep it out of the final model sheet. If I was to go tothree sheets, Iʼd probably include it.
You can see all the notations that I made to myself on the things I wanted to fix up inthe next version.
16 v1 16 v2
27
16 v3 16 v4
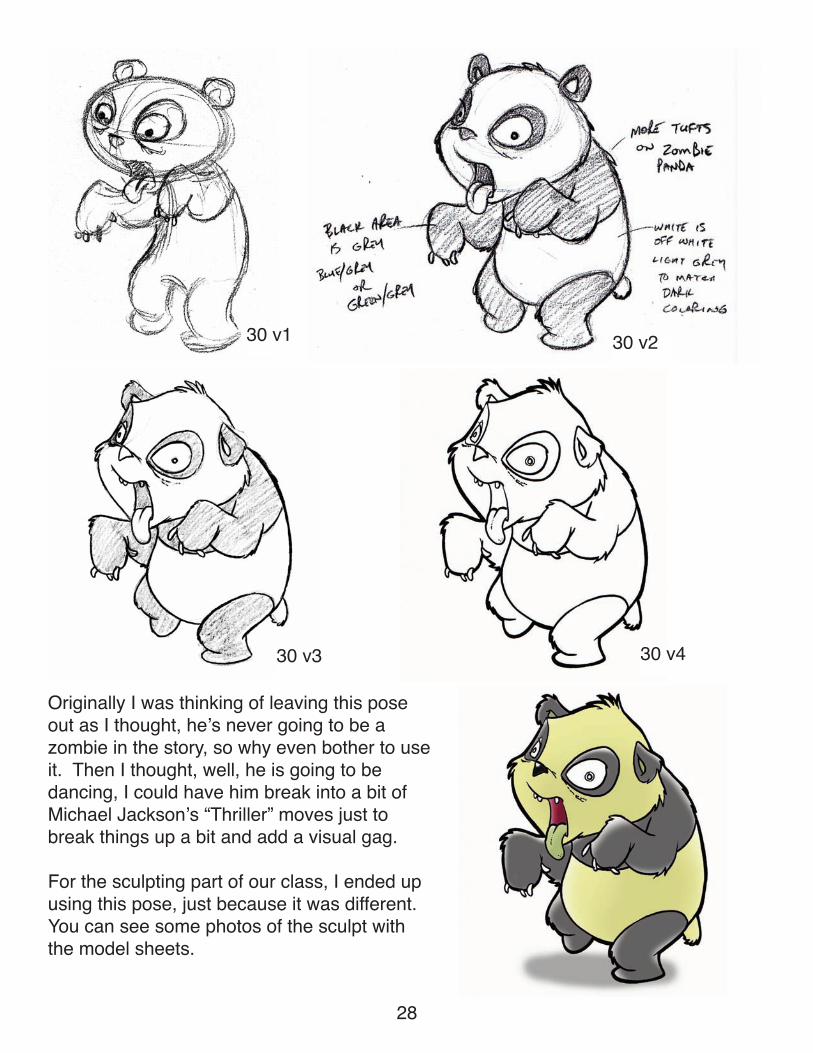
Originally I was thinking of leaving this poseout as I thought, heʼs never going to be azombie in the story, so why even bother to useit. Then I thought, well, he is going to bedancing, I could have him break into a bit ofMichael Jacksonʼs “Thriller” moves just tobreak things up a bit and add a visual gag.
For the sculpting part of our class, I ended upusing this pose, just because it was different.You can see some photos of the sculpt withthe model sheets.
30 v1 30 v2
30 v3
28
30 v4
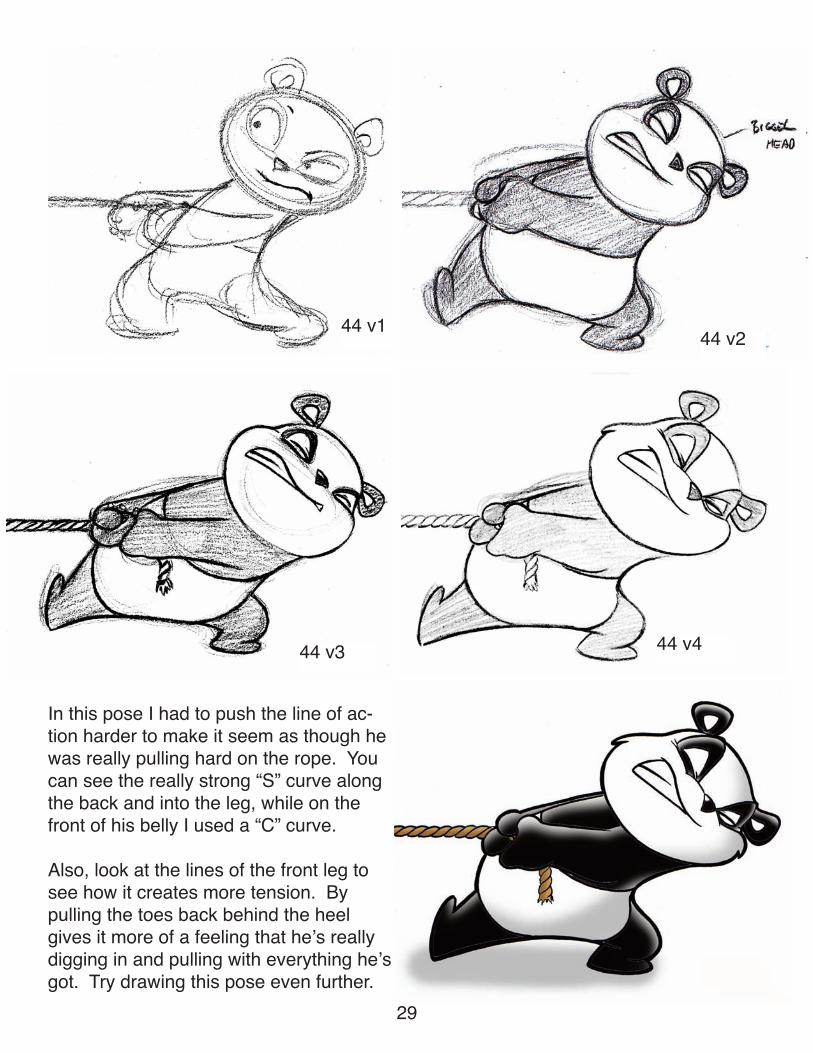
In this pose I had to push the line of ac-tion harder to make it seem as though hewas really pulling hard on the rope. Youcan see the really strong “S” curve alongthe back and into the leg, while on thefront of his belly I used a “C” curve.
Also, look at the lines of the front leg tosee how it creates more tension. Bypulling the toes back behind the heelgives it more of a feeling that heʼs reallydigging in and pulling with everything heʼsgot. Try drawing this pose even further.
44 v1 44 v2
29
44 v3 44 v4
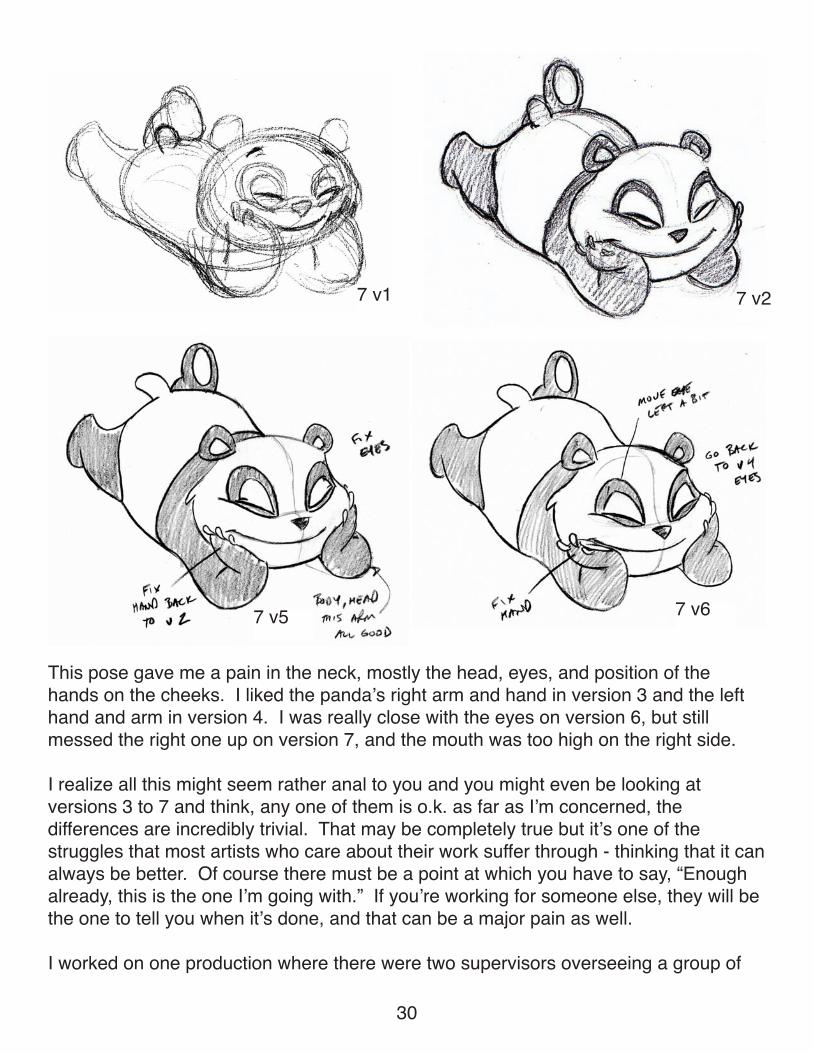
7 v1 7 v2
30
7 v67 v5
This pose gave me a pain in the neck, mostly the head, eyes, and position of thehands on the cheeks. I liked the pandaʼs right arm and hand in version 3 and the lefthand and arm in version 4. I was really close with the eyes on version 6, but stillmessed the right one up on version 7, and the mouth was too high on the right side.
I realize all this might seem rather anal to you and you might even be looking atversions 3 to 7 and think, any one of them is o.k. as far as Iʼm concerned, thedifferences are incredibly trivial. That may be completely true but itʼs one of thestruggles that most artists who care about their work suffer through - thinking that it canalways be better. Of course there must be a point at which you have to say, “Enoughalready, this is the one Iʼm going with.” If youʼre working for someone else, they will bethe one to tell you when itʼs done, and that can be a major pain as well.
I worked on one production where there were two supervisors overseeing a group of
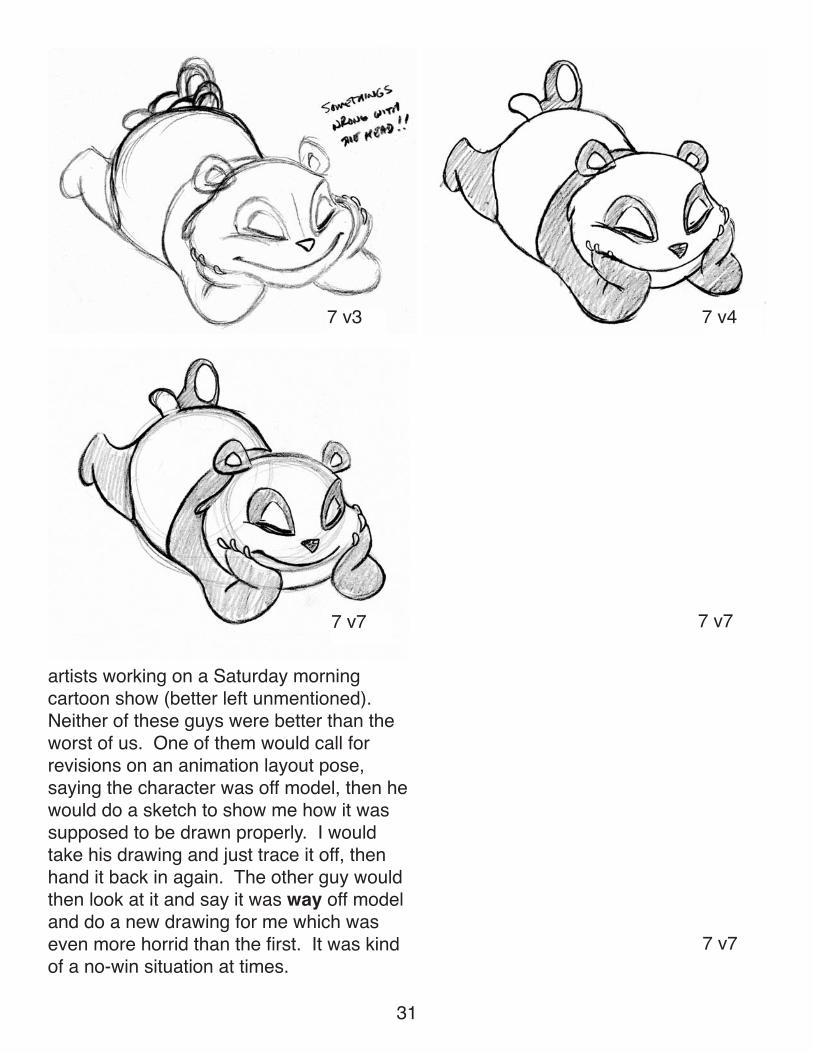
7 v47 v3
7 v7
artists working on a Saturday morningcartoon show (better left unmentioned).Neither of these guys were better than theworst of us. One of them would call forrevisions on an animation layout pose,saying the character was off model, then hewould do a sketch to show me how it wassupposed to be drawn properly. I wouldtake his drawing and just trace it off, thenhand it back in again. The other guy wouldthen look at it and say it was way off modeland do a new drawing for me which waseven more horrid than the first. It was kindof a no-win situation at times.
31
7 v7
7 v7
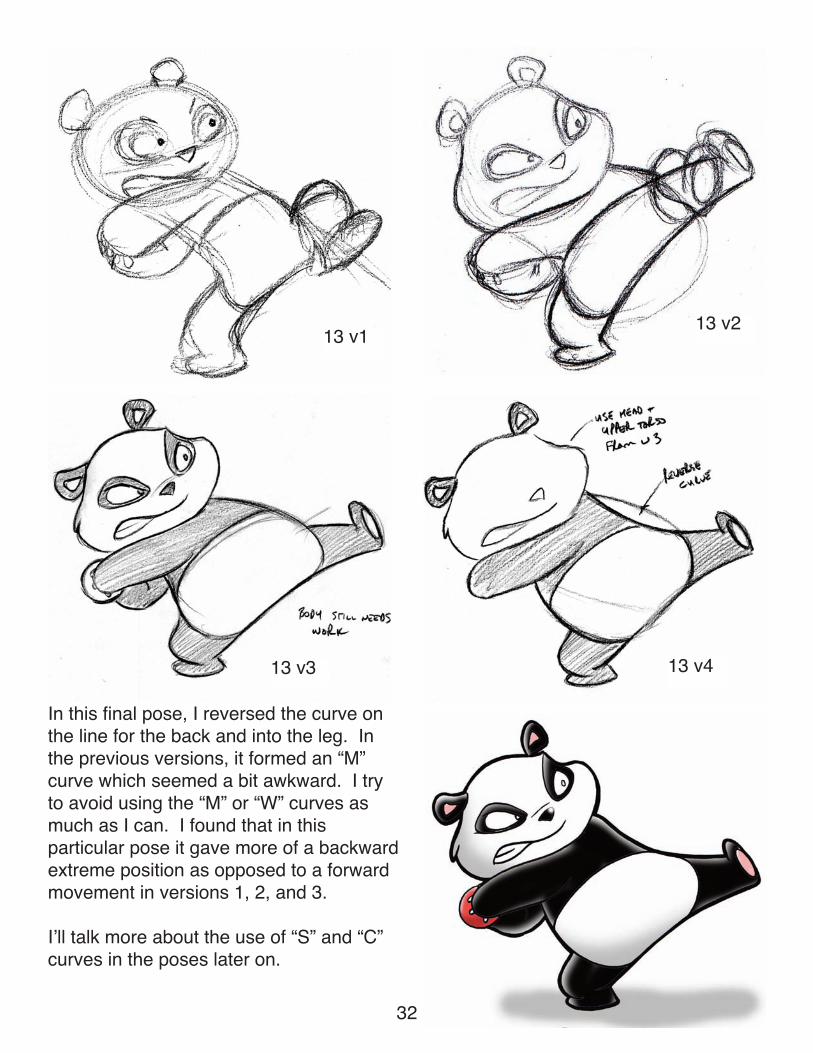
In this final pose, I reversed the curve onthe line for the back and into the leg. Inthe previous versions, it formed an “M”curve which seemed a bit awkward. I tryto avoid using the “M” or “W” curves asmuch as I can. I found that in thisparticular pose it gave more of a backwardextreme position as opposed to a forwardmovement in versions 1, 2, and 3.
Iʼll talk more about the use of “S” and “C”curves in the poses later on.
13 v1 13 v2
32
13 v3 13 v4
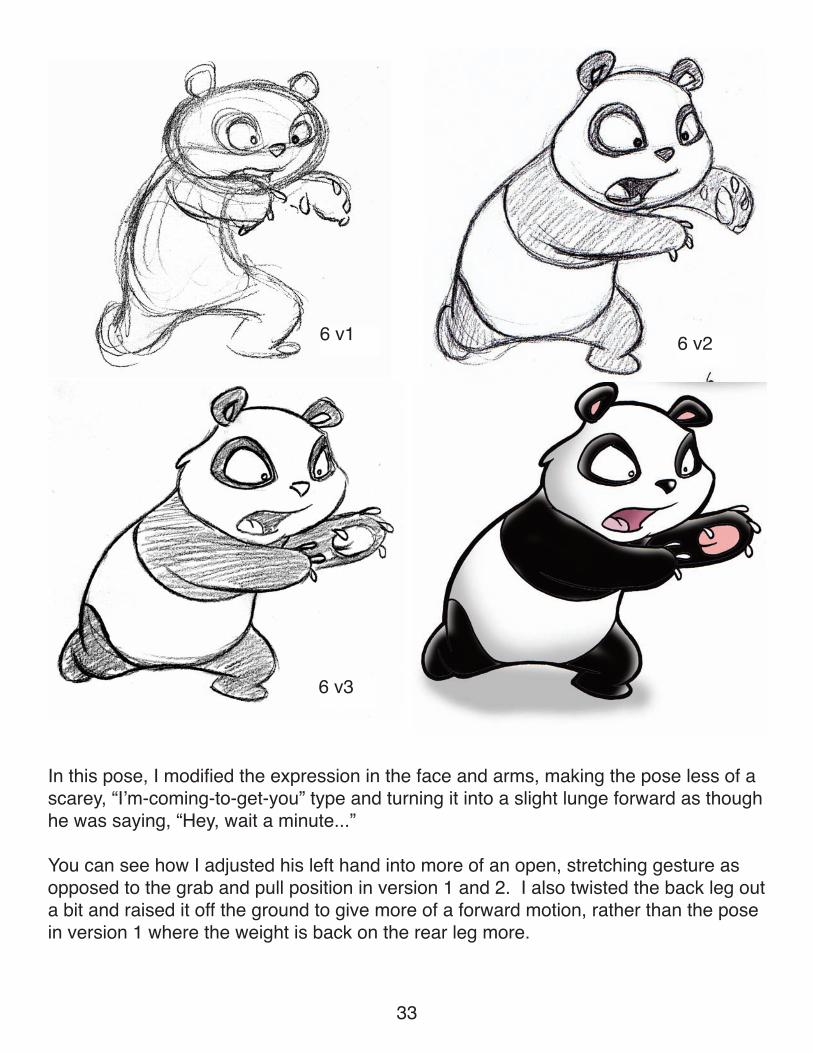
In this pose, I modified the expression in the face and arms, making the pose less of ascarey, “Iʼm-coming-to-get-you” type and turning it into a slight lunge forward as thoughhe was saying, “Hey, wait a minute...”
You can see how I adjusted his left hand into more of an open, stretching gesture asopposed to the grab and pull position in version 1 and 2. I also twisted the back leg outa bit and raised it off the ground to give more of a forward motion, rather than the posein version 1 where the weight is back on the rear leg more.
6 v1 6 v2
33
6 v3
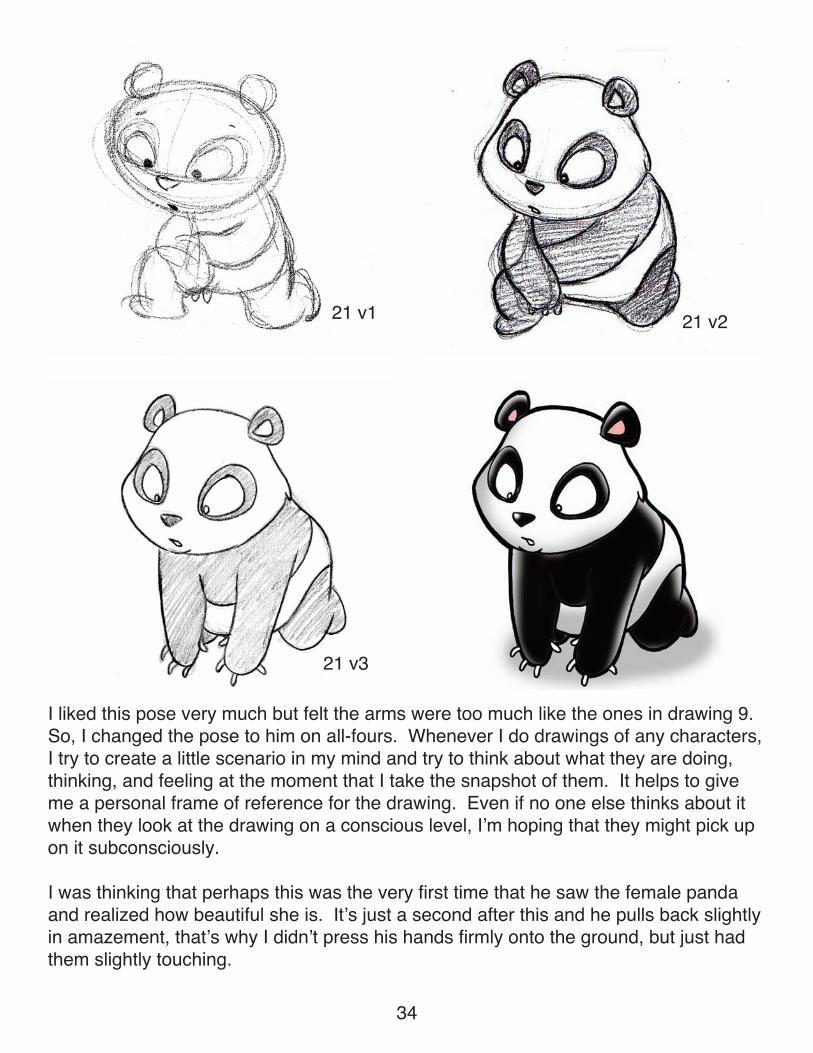
I liked this pose very much but felt the arms were too much like the ones in drawing 9.So, I changed the pose to him on all-fours. Whenever I do drawings of any characters,I try to create a little scenario in my mind and try to think about what they are doing,thinking, and feeling at the moment that I take the snapshot of them. It helps to giveme a personal frame of reference for the drawing. Even if no one else thinks about itwhen they look at the drawing on a conscious level, Iʼm hoping that they might pick upon it subconsciously.
I was thinking that perhaps this was the very first time that he saw the female pandaand realized how beautiful she is. Itʼs just a second after this and he pulls back slightlyin amazement, thatʼs why I didnʼt press his hands firmly onto the ground, but just hadthem slightly touching.
21 v1 21 v2
34
21 v3
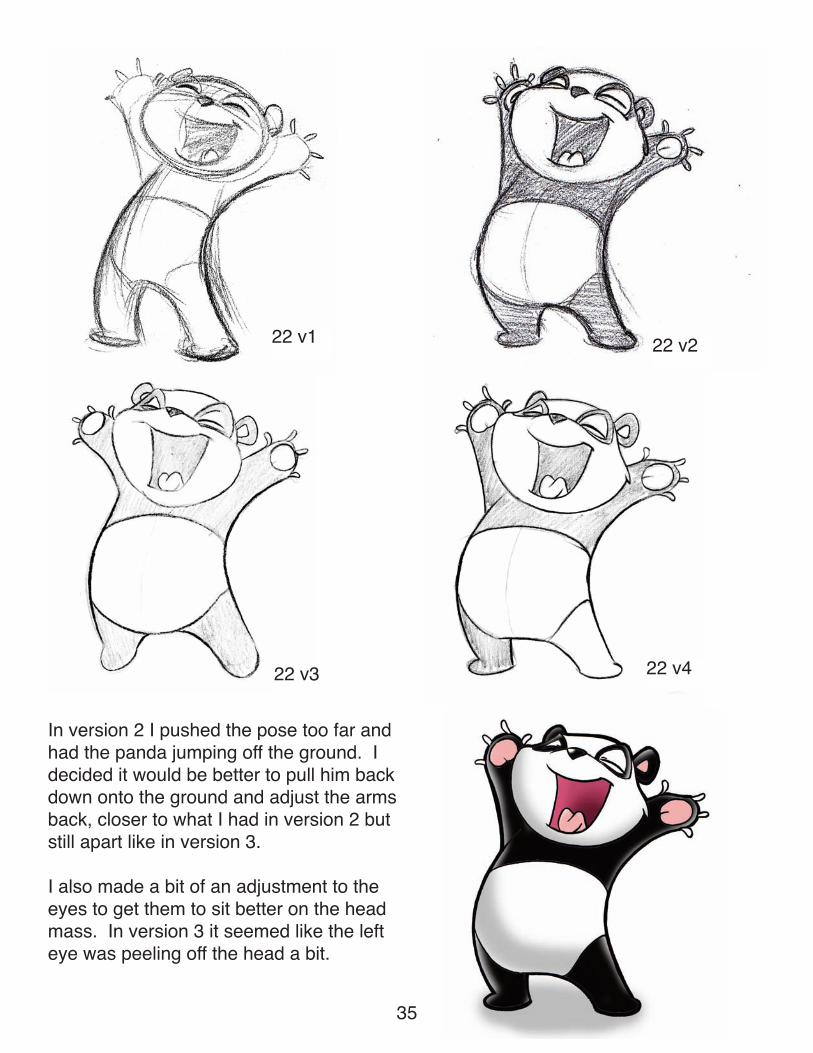
In version 2 I pushed the pose too far andhad the panda jumping off the ground. Idecided it would be better to pull him backdown onto the ground and adjust the armsback, closer to what I had in version 2 butstill apart like in version 3.
I also made a bit of an adjustment to theeyes to get them to sit better on the headmass. In version 3 it seemed like the lefteye was peeling off the head a bit.
22 v1 22 v2
22 v3 22 v4
35
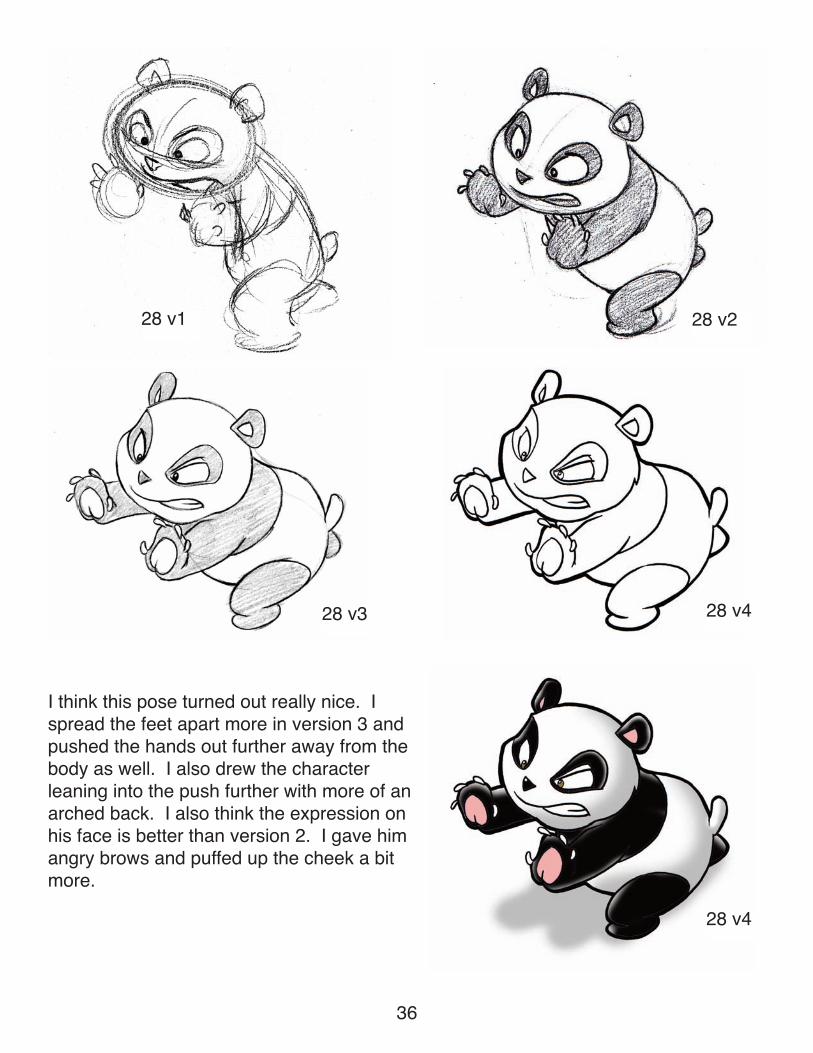
I think this pose turned out really nice. Ispread the feet apart more in version 3 andpushed the hands out further away from thebody as well. I also drew the characterleaning into the push further with more of anarched back. I also think the expression onhis face is better than version 2. I gave himangry brows and puffed up the cheek a bitmore.
28 v3
28 v1 28 v2
36
28 v4
28 v4
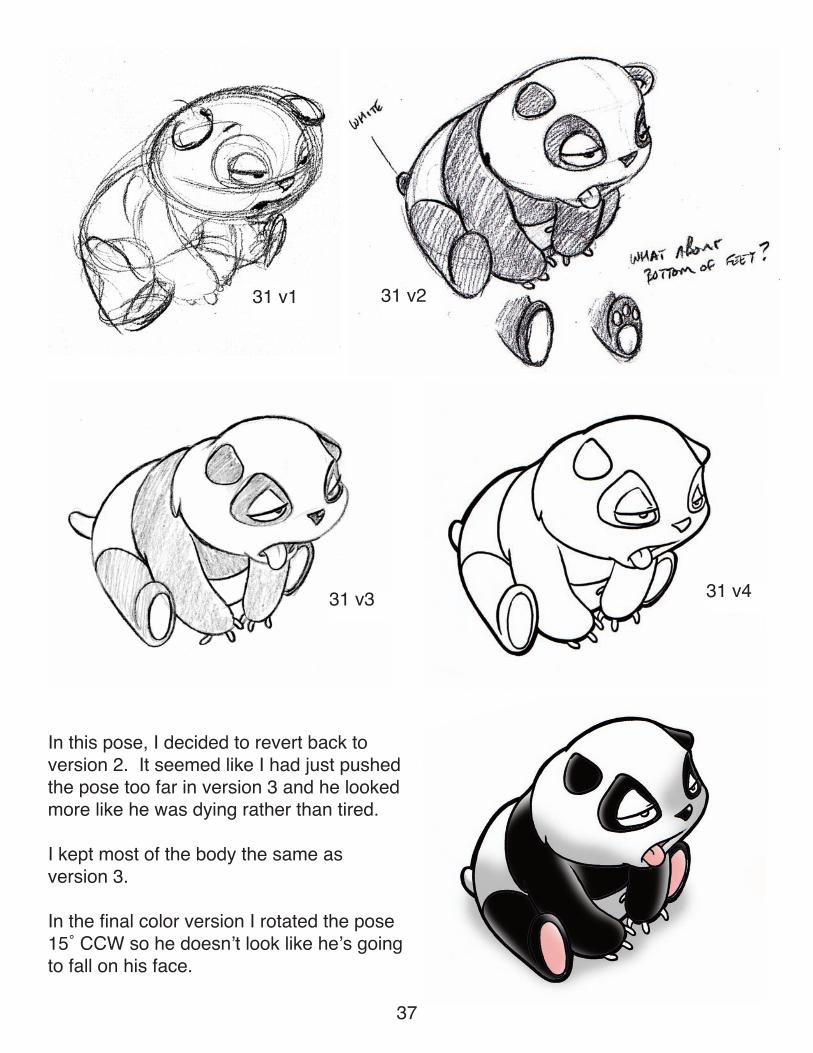
In this pose, I decided to revert back toversion 2. It seemed like I had just pushedthe pose too far in version 3 and he lookedmore like he was dying rather than tired.
I kept most of the body the same asversion 3.
In the final color version I rotated the pose15˚ CCW so he doesnʼt look like heʼs goingto fall on his face.
31 v1 31 v2
31 v3
37
31 v4
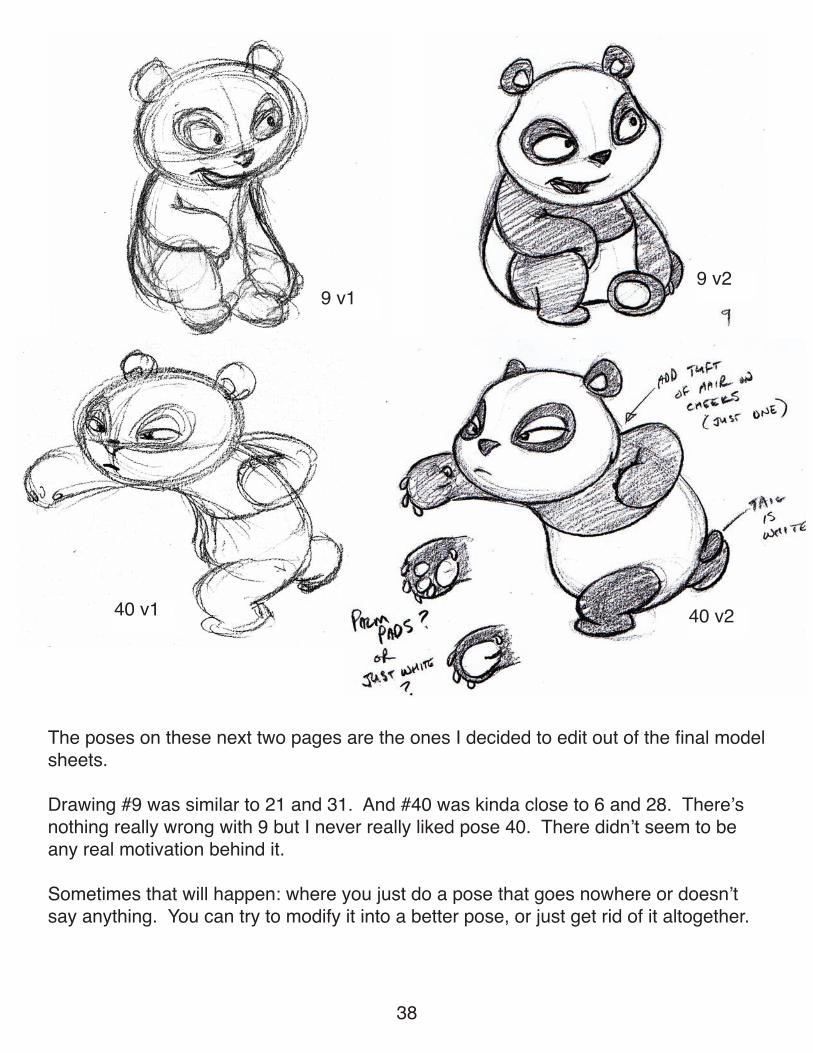
9 v19 v2
40 v1 40 v2
38
The poses on these next two pages are the ones I decided to edit out of the final modelsheets.
Drawing #9 was similar to 21 and 31. And #40 was kinda close to 6 and 28. Thereʼsnothing really wrong with 9 but I never really liked pose 40. There didnʼt seem to beany real motivation behind it.
Sometimes that will happen: where you just do a pose that goes nowhere or doesnʼtsay anything. You can try to modify it into a better pose, or just get rid of it altogether.
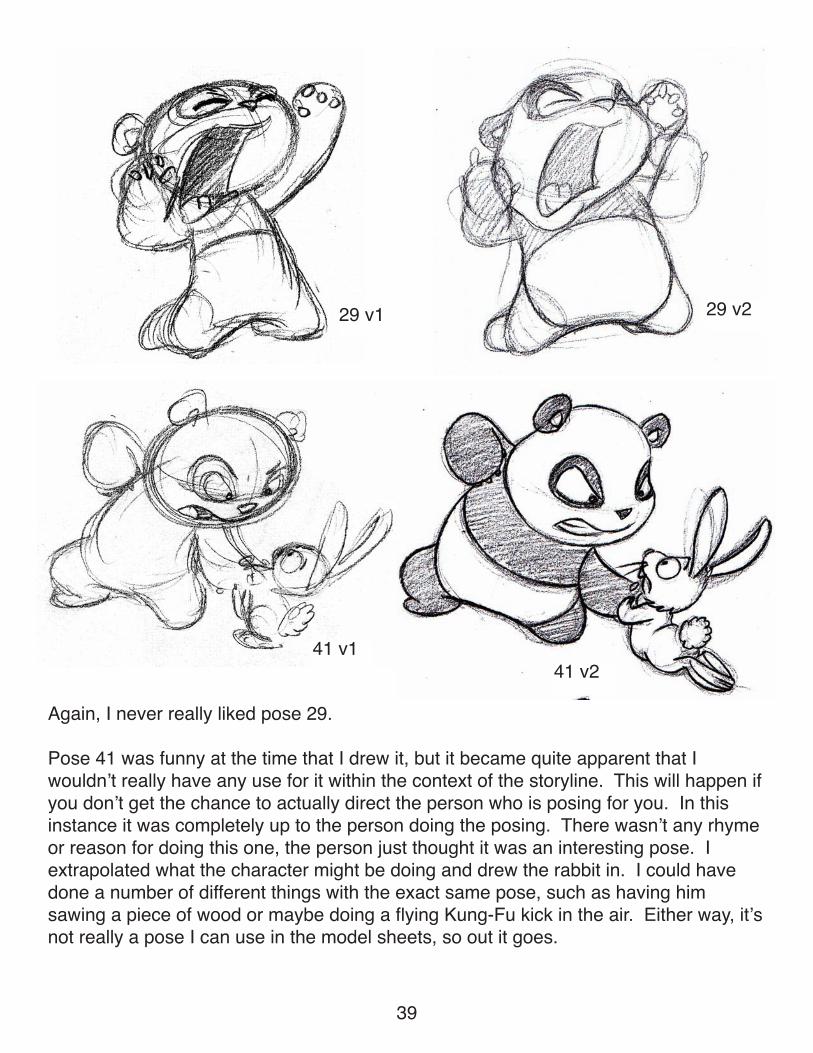
Again, I never really liked pose 29.
Pose 41 was funny at the time that I drew it, but it became quite apparent that Iwouldnʼt really have any use for it within the context of the storyline. This will happen ifyou donʼt get the chance to actually direct the person who is posing for you. In thisinstance it was completely up to the person doing the posing. There wasnʼt any rhymeor reason for doing this one, the person just thought it was an interesting pose. Iextrapolated what the character might be doing and drew the rabbit in. I could havedone a number of different things with the exact same pose, such as having himsawing a piece of wood or maybe doing a flying Kung-Fu kick in the air. Either way, itʼsnot really a pose I can use in the model sheets, so out it goes.
29 v229 v1
39
41 v141 v2
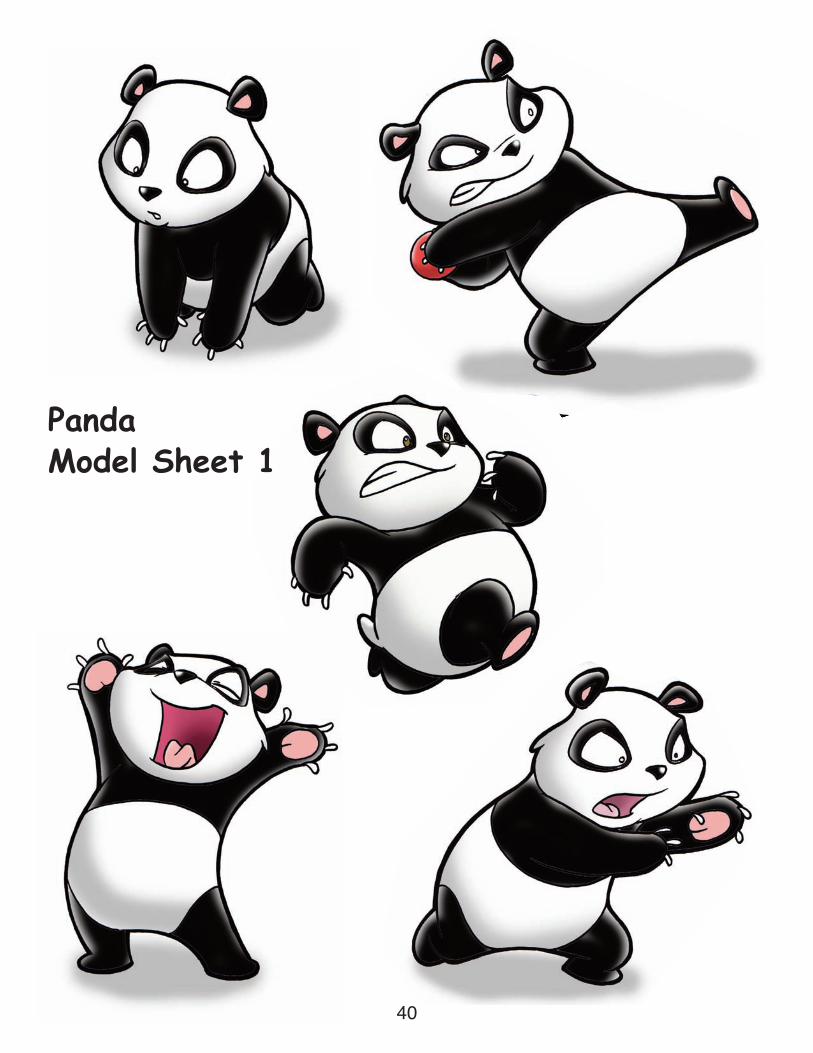
PandaModel Sheet 1
40
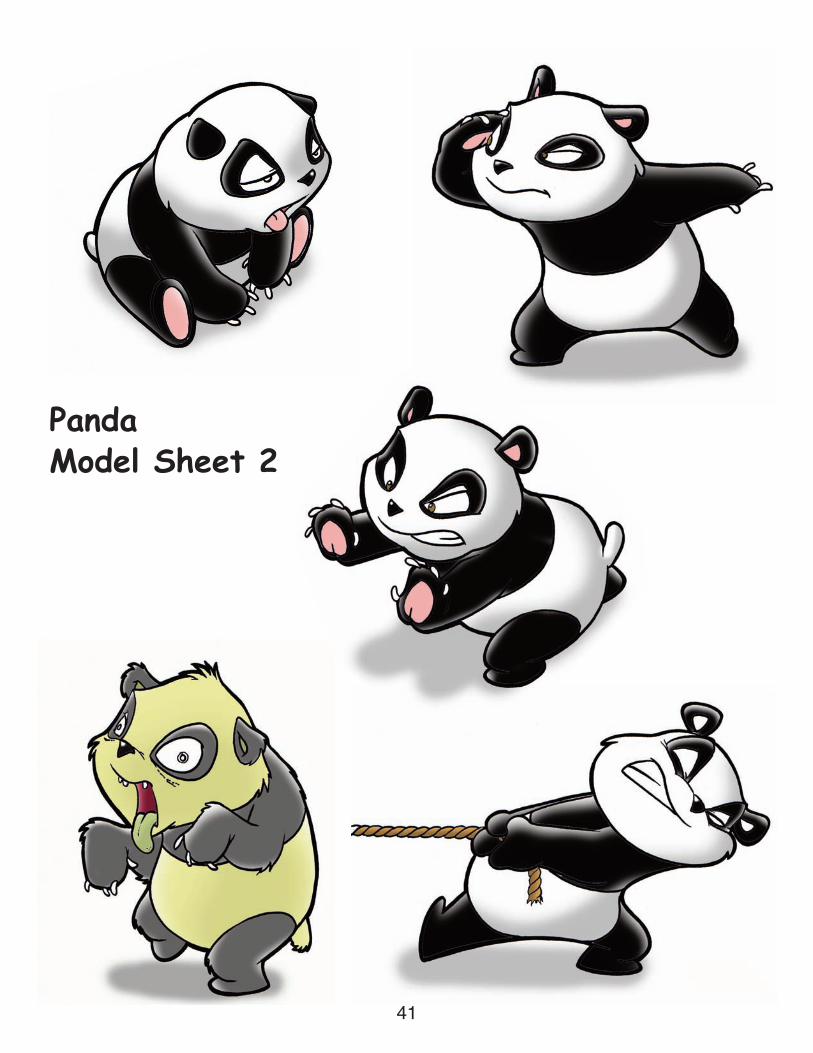
PandaModel Sheet 2
41
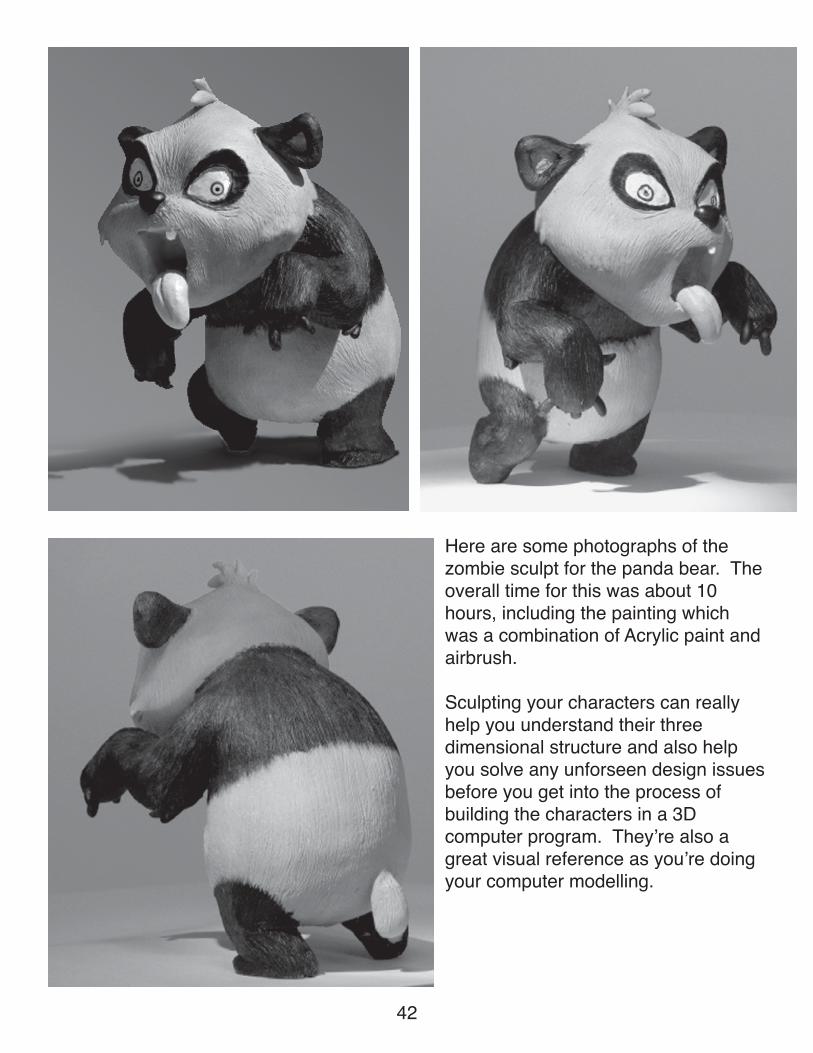
Here are some photographs of thezombie sculpt for the panda bear. Theoverall time for this was about 10hours, including the painting whichwas a combination of Acrylic paint andairbrush.
Sculpting your characters can reallyhelp you understand their threedimensional structure and also helpyou solve any unforseen design issuesbefore you get into the process ofbuilding the characters in a 3Dcomputer program. Theyʼre also agreat visual reference as youʼre doingyour computer modelling.
42
Line of Action“S” Curves and “C” Curves
Iʼd like to spend a few pages here talking about these areas because they are soimportant to your drawings. This is something that I was taught in College when I wastaking animation but didnʼt fully grasp or apply until I had started working at Nelvana,an animation studio in Toronto.
In my other books on animation and character design Iʼve listed S and C curves underthe basic drawing principles of animation and for a good reason too. Without theproper use of them, your drawings will seem stiff and lifeless.You want to use your lines to create a rhythm and flowthroughout the drawing.
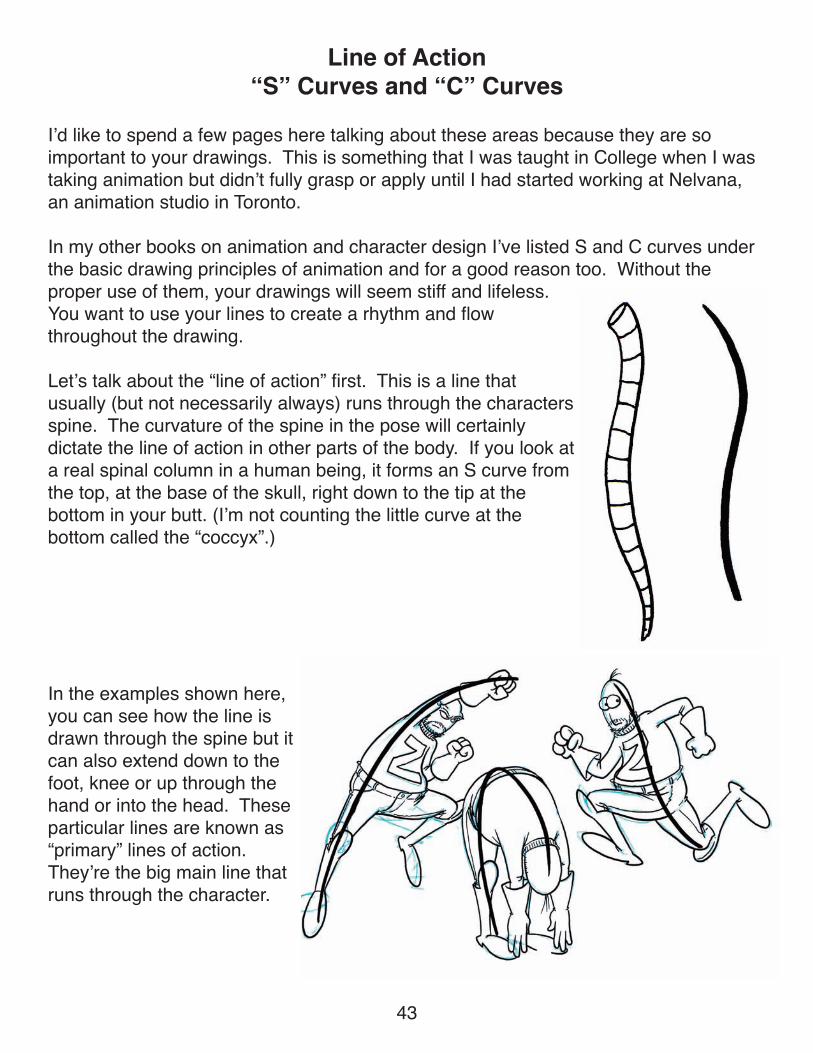
Letʼs talk about the “line of action” first. This is a line thatusually (but not necessarily always) runs through the charactersspine. The curvature of the spine in the pose will certainlydictate the line of action in other parts of the body. If you look ata real spinal column in a human being, it forms an S curve fromthe top, at the base of the skull, right down to the tip at thebottom in your butt. (Iʼm not counting the little curve at thebottom called the “coccyx”.)
In the examples shown here,you can see how the line isdrawn through the spine but itcan also extend down to thefoot, knee or up through thehand or into the head. Theseparticular lines are known as“primary” lines of action.Theyʼre the big main line thatruns through the character.
43
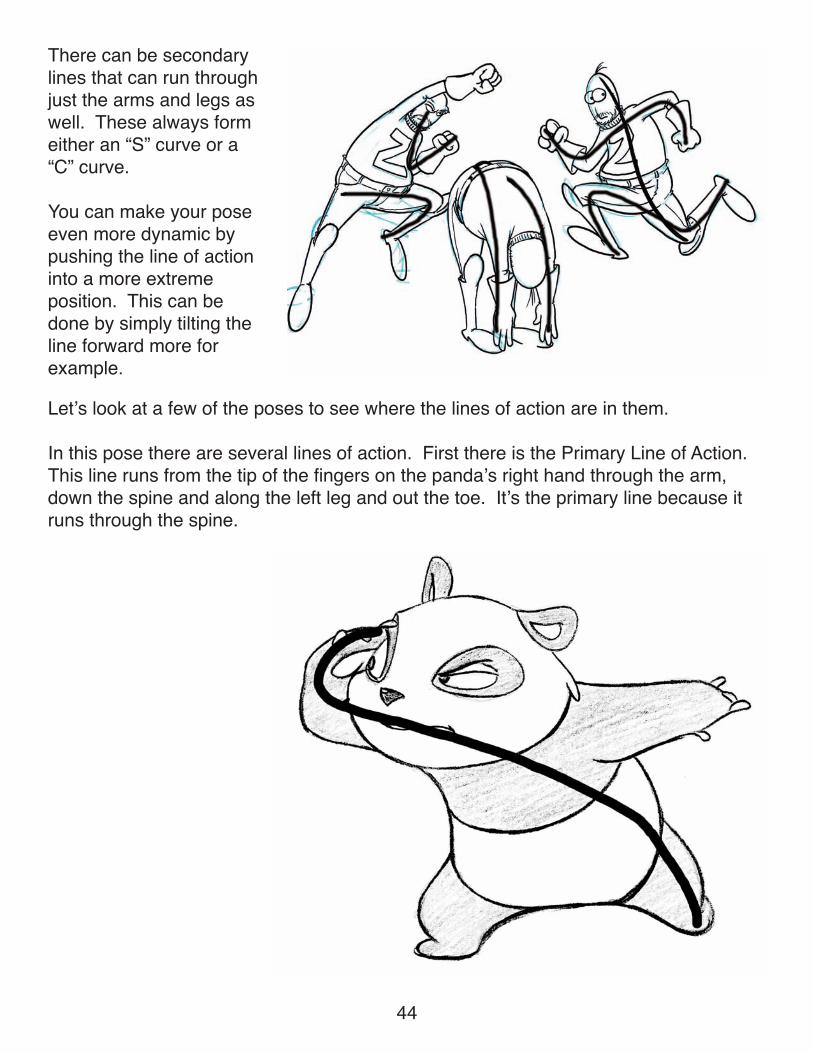
There can be secondarylines that can run throughjust the arms and legs aswell. These always formeither an “S” curve or a“C” curve.
You can make your poseeven more dynamic bypushing the line of actioninto a more extremeposition. This can bedone by simply tilting theline forward more forexample.
Letʼs look at a few of the poses to see where the lines of action are in them.
In this pose there are several lines of action. First there is the Primary Line of Action.This line runs from the tip of the fingers on the pandaʼs right hand through the arm,down the spine and along the left leg and out the toe. Itʼs the primary line because itruns through the spine.
44
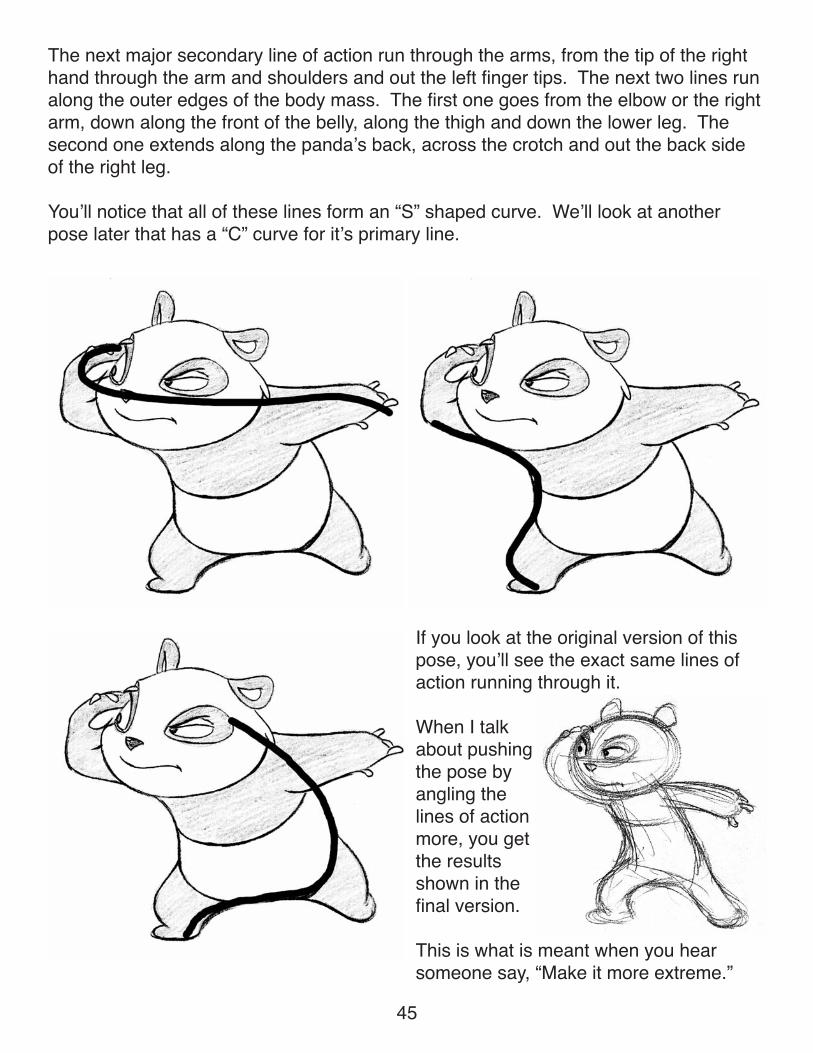
The next major secondary line of action run through the arms, from the tip of the righthand through the arm and shoulders and out the left finger tips. The next two lines runalong the outer edges of the body mass. The first one goes from the elbow or the rightarm, down along the front of the belly, along the thigh and down the lower leg. Thesecond one extends along the pandaʼs back, across the crotch and out the back sideof the right leg.
Youʼll notice that all of these lines form an “S” shaped curve. Weʼll look at anotherpose later that has a “C” curve for itʼs primary line.
45
If you look at the original version of thispose, youʼll see the exact same lines ofaction running through it.
When I talkabout pushingthe pose byangling thelines of actionmore, you getthe resultsshown in thefinal version.
This is what is meant when you hearsomeone say, “Make it more extreme.”

In this running pose, the primary line of action is a C curve, but it could be extendedout the back leg to turn it into a modified S curve. Itʼs not really important as towhether itʼs an S curve or a C curve in this case, just so long as you know what themain intent of the line is to the pose.
46
The secondary lines run through the arms and legs forming an S curve and each leghas itʼs own S curve if you include the feet as well.
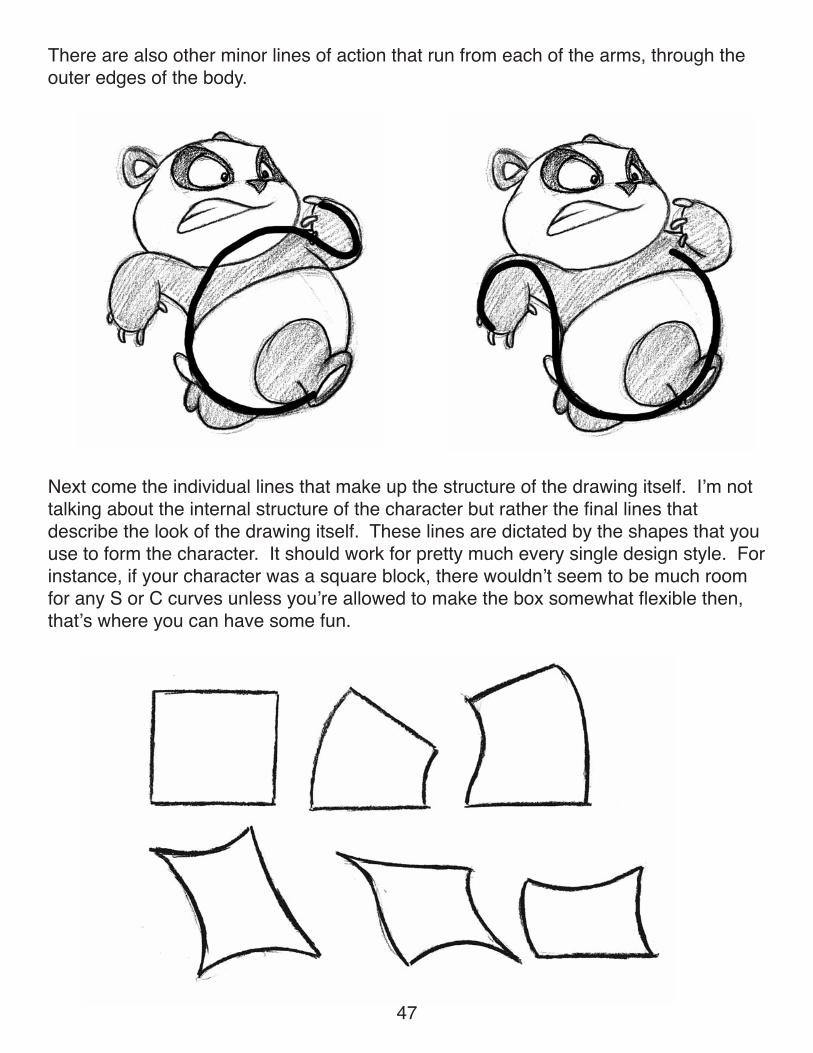
There are also other minor lines of action that run from each of the arms, through theouter edges of the body.
Next come the individual lines that make up the structure of the drawing itself. Iʼm nottalking about the internal structure of the character but rather the final lines thatdescribe the look of the drawing itself. These lines are dictated by the shapes that youuse to form the character. It should work for pretty much every single design style. Forinstance, if your character was a square block, there wouldnʼt seem to be much roomfor any S or C curves unless youʼre allowed to make the box somewhat flexible then,thatʼs where you can have some fun.
47
48
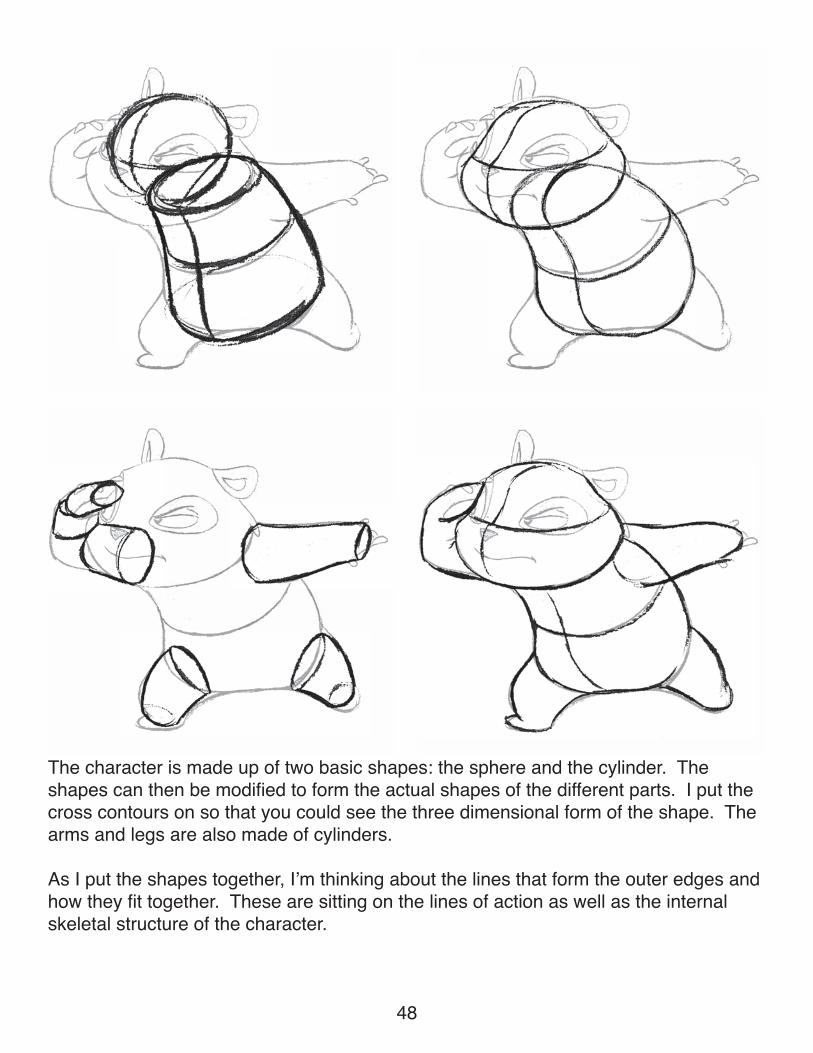
The character is made up of two basic shapes: the sphere and the cylinder. Theshapes can then be modified to form the actual shapes of the different parts. I put thecross contours on so that you could see the three dimensional form of the shape. Thearms and legs are also made of cylinders.
As I put the shapes together, Iʼm thinking about the lines that form the outer edges andhow they fit together. These are sitting on the lines of action as well as the internalskeletal structure of the character.
49
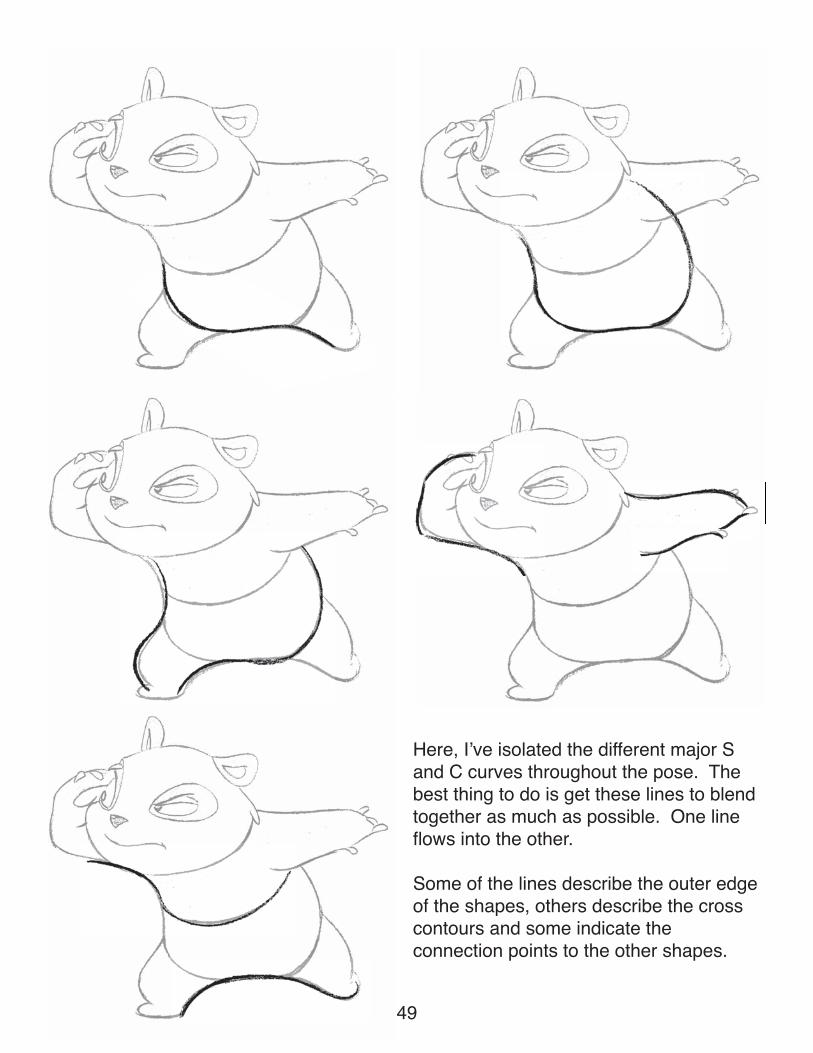
Here, Iʼve isolated the different major Sand C curves throughout the pose. Thebest thing to do is get these lines to blendtogether as much as possible. One lineflows into the other.
Some of the lines describe the outer edgeof the shapes, others describe the crosscontours and some indicate theconnection points to the other shapes.
50
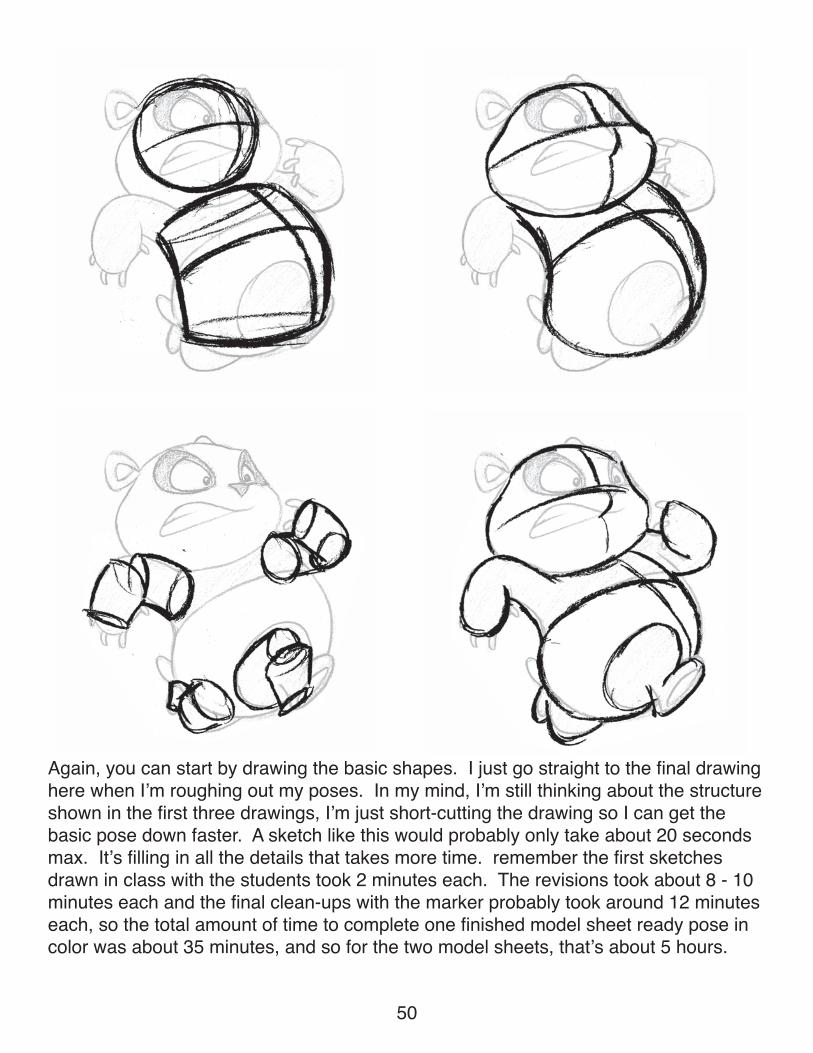
Again, you can start by drawing the basic shapes. I just go straight to the final drawinghere when Iʼm roughing out my poses. In my mind, Iʼm still thinking about the structureshown in the first three drawings, Iʼm just short-cutting the drawing so I can get thebasic pose down faster. A sketch like this would probably only take about 20 secondsmax. Itʼs filling in all the details that takes more time. remember the first sketchesdrawn in class with the students took 2 minutes each. The revisions took about 8 - 10minutes each and the final clean-ups with the marker probably took around 12 minuteseach, so the total amount of time to complete one finished model sheet ready pose incolor was about 35 minutes, and so for the two model sheets, thatʼs about 5 hours.
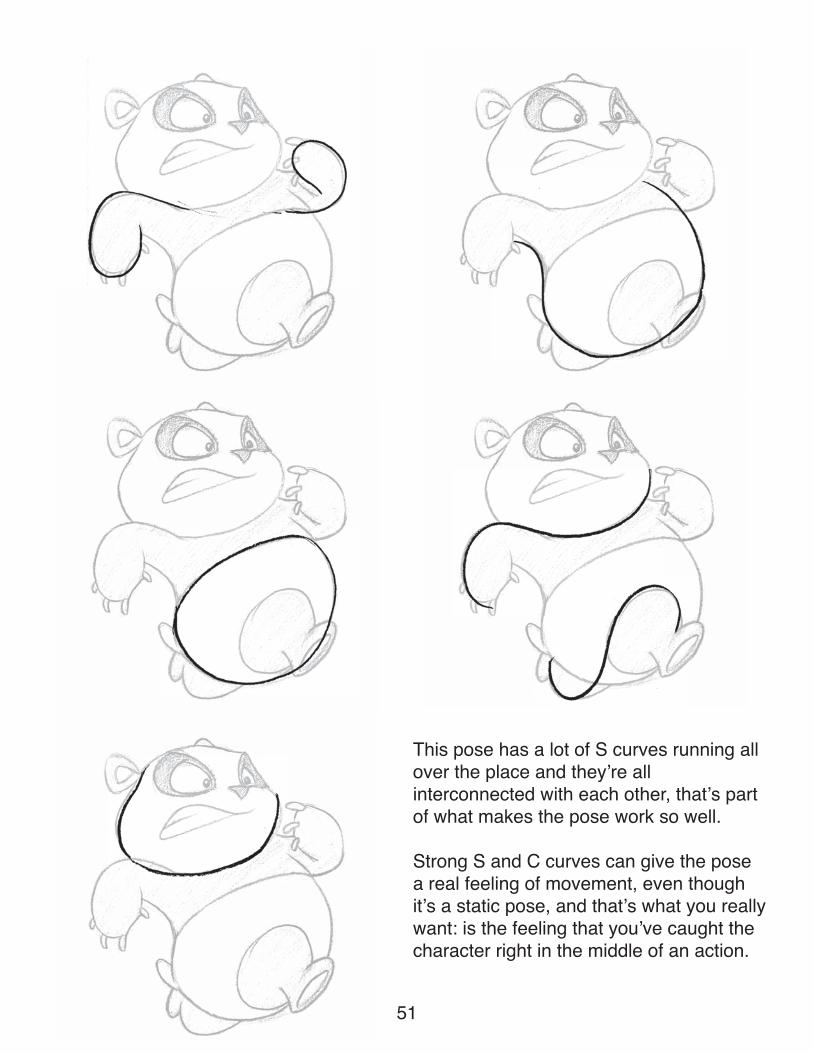
This pose has a lot of S curves running allover the place and theyʼre allinterconnected with each other, thatʼs partof what makes the pose work so well.
Strong S and C curves can give the posea real feeling of movement, even thoughitʼs a static pose, and thatʼs what you reallywant: is the feeling that youʼve caught thecharacter right in the middle of an action.
51
What I want you to do now is go back over all the drawings that Iʼve done throughoutthe first 38 pages, and using a colored pencil crayon (I donʼt care what color you use),find the primary and secondary lines of action, and draw them directly onto the page.Take your time to find the right placement for the lines and think it through.
Next, take a separate sheet of paper and place it over the drawings and try to push thelines of action to more of an extreme position. Then block out the volumes of thecharacter based on the new lines of action. See just how far you can with each one.
Learning about this process is not just a matter of reading and looking at my drawings,then hoping that somehow it seeps into you by osmosis. You have to actually do ityourself.
When I had first started working in animation as an inbetweener, I was only 19 yearsold. I actually dropped out of Sheridan College just before the end of my second year(but somehow still managed to get passing grades). I can remember how incrediblyexcited I was to actually be working in an animation studio and getting paid to draw! Itwas great. The very first scene that I got to work on was about 50 drawings in length(thatʼs about 4 seconds of animation). My job was to do the inbetween drawings - theones between the main keys that the animator had drawn. I went back to my desk andstarted in on the drawings which took me about 15 minutes each. The entire scenetook me about 12 1/2 hours to complete over two days.
After I had finished them, I took them back to the animator to pick up a new scene. Hetook the drawings from me and flipped through them a few times and then started tochew me out for doing such a crappy job on the drawings. He took out a red pen andproceeded to go through the drawings (not every single last one of them, just the first10 or so) and circled all the mistakes that I had made. That way I couldnʼt just erasethe errors, I had to go back and completely redo the entire drawing from scratch. Thewhole while heʼs doing this heʼs yelling every obscenity you can think of at me. “Whatthe FUCK do you think youʼre doing here you ASS hole?! Youʼre supposed to begetting paid to draw better SHIT than this!” and on and on it went. I thought I wasgonna crap my pants.
I figured that was my last day there, that I was going to get fired on the spot. All mydreams of working in animation - shattered in an instant. He threw the drawings backat me and told me not to come back unless they were perfect. I can sure tell you that Ireally took my time on those drawings and made sure they were absolutely perfectwhen I gave them back to him again. He looked them over and flipped them a fewtimes then said, “Why the FUCK didnʼt you do it like this the first time? Hereʼs the nextscene, try not to FUCK this one up too.”
52
bleep!
bleep!
bleep!
bleep!
bleep!
I realized right then and there that if this was what I really wanted to do for the rest ofmy life (not necessarily be an inbetweener, but rather work in animation) I had to be aprofessional about what I was doing.
One of the other animators who was working in my area overheard what hadhappened (as did about 20 other people who also worked in that area). He pulled measide and suggested that I get some model sheets from some cartoon characters andpractice drawing them to strengthen my drawing skills. He told me to start off by justtracing the drawings right off the model sheets and think about each line I was drawing.Try to get into the mind of the person who had originally done the model sheets andfigure out what they were thinking about as they drew the characters. After I hadfamiliarized myself with the basic design components of the character, then I could goahead and start doing some poses on my own, trying to keep the character “on model”.I started doing this immediately. I remember that very night beginning with a modelsheet of Popeye the Sailor from the 1940ʼs. I enlarged the poses on a photocopier andtraced them off, really thinking about each and every line. Why it curved one way andnot the other. Why one line overlapped another. The relationships of the lines to eachother and to the volumes and proportions of the character. Did the line represent skinor cloth? Was it supposed to be hard or soft? Why was it an S curve or a C curve?Where was the primary line of action? Where were the secondary lines? Constantlythinking and questioning every movement of the pencil.
Thatʼs what you need to do if you want to get better.
Itʼs not an easy thing to do and it will take some time. I noticed a huge improvement inmy drawings at the end of just two weeks. Iʼm constantly struggling to try and makemy drawings better each time I do a drawing. Sometimes it works and I do a good job,other times I fall flat on my face and the drawing ends up in the garbage pail (sorry,recycling bin).
Just as Iʼve shown you here in this book, Iʼm not just showing only the really gooddrawings. What youʼre seeing here is the unedited real-time stuff. The rough conceptsketches, through all the revisions and into the final product. Iʼve always hated thosebooks that show the one-two-three step process to drawing cartoons: Step 1) draw acircle, Step 2) draw the center lines, and Step 3) hereʼs the finished drawing. How theheck did you get that???!
So now, grab your pencil and get to work.
The next section will be another series of sketches with a different character design.
53