papercut toshiba mds v3 embedded manual mf - toshiba mds v3 embedded manual...charging, allocation,...
TRANSCRIPT

PaperCut Toshiba MDS V3 Embedded
Manual
Contents 1 Version history .................................................................................................................. 5
2 Overview ........................................................................................................................... 6
2.1 Consistency ................................................................................................................ 6
2.2 Integration ................................................................................................................. 6
2.3 Rate of development ................................................................................................. 6
2.4 Vendor Neutral .......................................................................................................... 6
2.5 Security ...................................................................................................................... 7
2.6 Which version should I install? .................................................................................. 7
2.7 Migrating from SDK 2 to Toshiba v3+ Devices .......................................................... 7
2.8 Installation methodology for Toshiba v3+ Devices ................................................... 8
3 Installation ........................................................................................................................ 9
3.1 Upgrading to a newer version of PaperCut ............................................................... 9
3.2 Requirements ............................................................................................................ 9
3.3 Supported Toshiba Devices ....................................................................................... 9
3.4 Setup Procedure ...................................................................................................... 11
3.4.1 Verify Access to the Toshiba Administrative Web Interface ........................... 11
3.4.2 Log in as device Administrator ........................................................................ 11
3.4.3 Networking/Firewall Configuration ................................................................. 11
4 MFD Device configuration .............................................................................................. 12
4.1 ODCA (Off Device Customization Architecture) (mandatory) ................................. 12
4.2 Set an “Auto Clear” timeout (recommended) ......................................................... 12
4.3 Disable Logout pop-up dialogue display (optional) ................................................. 12
4.4 Disable Automatic logout of users during fax send (optional) ................................ 13
4.5 Additional 08 code setting (optional) ...................................................................... 13
4.6 Enable OCR on the device (optional) ....................................................................... 13
4.7 Enable Zero Stop functionality for Copy and Scan (optional) ................................. 14
4.8 Disable MFD control of print jobs (mandatory) ...................................................... 14
4.9 Allow anyone to manage print jobs at the MFD (mandatory) ................................ 14
4.10 Allow all users to delete their jobs from the Private/Hold screen on the copier
(mandatory) ........................................................................................................................ 14
4.11 Configure the Web Services Scan Port (optional) ................................................... 15

| Toshiba MDS V3 Embedded Manual 2018-07-18
Copyright © 2018 PaperCut Software International Pty. Ltd., All Rights Reserved. 2 of 81
4.12 WSD scanning (confirmation) .................................................................................. 15
4.13 Disable authentication for WSD scanning (optional) .............................................. 15
4.14 Disable the “missing home directory” warning (optional) ...................................... 15
4.15 Create Toshiba MFD device in PaperCut ................................................................. 16
5 Post-install testing .......................................................................................................... 17
5.1 Test preparation: create test users ......................................................................... 17
5.2 Simple printing and copying .................................................................................... 18
5.2.1 Test preparation: configure simple test user .................................................. 18
5.2.2 Simple printing ................................................................................................ 19
5.2.3 Simple copying ................................................................................................. 22
5.3 Advanced copying.................................................................................................... 24
6 Configuration .................................................................................................................. 28
6.1 HTTPS Security (recommended) .............................................................................. 29
6.2 Enable secure ODCA in PaperCut ............................................................................ 30
6.3 Inbound connections ............................................................................................... 31
6.3.1 Inbound connections to PaperCut MF Application Server .............................. 31
6.3.2 Inbound connections to PaperCut MF Site Servers ......................................... 31
6.4 Device Function ....................................................................................................... 31
6.5 Held print job settings at the device ....................................................................... 32
6.5.1 Held print jobs settings that can be changed at the device ............................ 32
6.5.2 Held print jobs settings that can be viewed at the device .............................. 33
6.6 Authentication Methods ......................................................................................... 33
6.7 Account selection .................................................................................................... 36
6.7.1 By name and by code ...................................................................................... 36
6.7.2 By name ........................................................................................................... 37
6.7.3 By code ............................................................................................................ 38
6.8 Prevent the release of print jobs to devices in error (optional) .............................. 38
6.9 Customizing Text and Messages.............................................................................. 38
6.10 Customizing the header logo and colors ................................................................. 38
6.11 Configuring Swipe Card Readers ............................................................................. 39
6.12 Config Editor ............................................................................................................ 40
7 Scanning .......................................................................................................................... 50
7.1 MFD Native Scanning Setup .................................................................................... 51
7.2 PaperCut Integrated Scanning ................................................................................. 53
8 Known Limitations and Security ..................................................................................... 54
8.1 The guest access authentication method is unavailable ......................................... 54

| Toshiba MDS V3 Embedded Manual 2018-07-18
Copyright © 2018 PaperCut Software International Pty. Ltd., All Rights Reserved. 3 of 81
8.2 Zero stop when Copying and Scanning ................................................................... 54
8.3 Zero stop when Faxing ............................................................................................ 55
8.4 Internal MFD usernames ......................................................................................... 55
8.5 Bypassing the System .............................................................................................. 55
8.6 Scan from feeder ..................................................................................................... 56
9 Uninstalling PaperCut from the MFD ............................................................................. 57
9.1 Further optional uninstallation steps ...................................................................... 57
10 FAQ & Troubleshooting .................................................................................................. 59
11 Appendix A: Supported Authentication Card Readers ................................................... 63
11.1 Elatec TWN3 ............................................................................................................ 63
11.2 Magtek Dynamag..................................................................................................... 63
11.3 Generic Keyboard Mode Readers ............................................................................ 65
11.4 Configuring Swipe Card Reader Validation ............................................................. 65
12 Appendix B: Process for performing user card association ............................................ 69
13 Appendix C: Device screenshots for user documentation.............................................. 70
14 Appendix D: 08 Code Check list ...................................................................................... 79
15 Appendix E: TopAccess Settings Check list ..................................................................... 81


| Toshiba MDS V3 Embedded Manual 2018-07-18
Copyright © 2018 PaperCut Software International Pty. Ltd., All Rights Reserved. 5 of 81
1 Version history
PaperCut MF version Date Details
18.2.0 5 July 2018 2 Overview; 5 Post-install testing; 6
Configuration; 13 Appendix C: Device screenshots
for user documentation
18.1.1 26 April 2018 5 Post-install testing; 6.1 HTTPS Security
(recommended); 6.3 Inbound connections; 6.6
Shared Account Selection; 6.11 Config Editor;
Appendix C: Device screenshots for user
documentation

| Toshiba MDS V3 Embedded Manual 2018-07-18
Copyright © 2018 PaperCut Software International Pty. Ltd., All Rights Reserved. 6 of 81
2 Overview
This manual covers the Toshiba MDS V3 embedded MFD setup. For general PaperCut MF
documentation, please see the PaperCut MF manual.
This manual provides an overview of the installation, configuration and operation of PaperCut’s
embedded software MFD (Multi-Function Device) solutions. Today’s MFDs are smarter – they have
touch screens and offer the ability to run applications directly on the device. The goal of PaperCut
Software’s embedded MFD solution is to leverage these smart devices and to provide walk-up copier
users with the same set of rich application features provided in the print control area. These include:
• Secure access to the device via user authentication
• Integration with single sign-on environments
• Print release of held print jobs (Secure & Find Me Printing)
• Monitoring, control and tracking of printing, copying, scanning, and faxing (Quotas,
Charging, Allocation, Job Limiting, Zero Stop, and Logging)
• Integrated Scanning
• Card self-association and print release at login
• Allocation of printing, copying, scanning, and faxing costs to different accounts,
departments, cost centers, or projects (Shared Accounts)
• Multiple ways to locate Shared Accounts
• Adding comments to invoices of Shared Accounts
• Customization of most device screens, including logos, colors, and messages
• Changing and viewing the settings of held print jobs at the device
2.1 Consistency
The embedded solutions are developed in-house by the PaperCut Software development team. This
ensures that the copier interface is consistent with the workstation print interface, meaning users
only have to learn one system.
2.2 Integration
PaperCut is a single integrated solution where print, internet and copier control are all managed in
the one system. Users have a single account and administrators have the same level of reporting and
administration for all services. The embedded solution interacts with the PaperCut server using a
Service Oriented Architecture (SOA) and web services based protocols.
2.3 Rate of development
PaperCut is developed under a release-often policy where new features are made available to users
as soon as they are complete. Unlike hardware based solutions, new versions can be delivered to
users regularly as software updates.
2.4 Vendor Neutral
PaperCut remains true to its vendor neutral stance. All embedded solutions are equal and support all
server OS’s including Windows, Linux and Mac.

| Toshiba MDS V3 Embedded Manual 2018-07-18
Copyright © 2018 PaperCut Software International Pty. Ltd., All Rights Reserved. 7 of 81
2.5 Security
A large percentage of PaperCut’s user base is in Education environments where security is
important. All embedded solutions are developed with security in mind. Where security objectives
can’t be satisfied, any known deficiencies are fully disclosed.
2.6 Which version should I install?
This manual is for Toshiba v3+ devices.
To be compatible, devices must support Toshiba Open Platform SDK version 3 or later, and be listed
in “3.3 Supported Toshiba Devices”.
Devices supporting only Toshiba SDK 2 should use PaperCut’s Toshiba V2 embedded software,
documented separately in the manual entitled PaperCut MF - Toshiba SDK2 Embedded Manual.
Devices that support Open Platform SDK version 3 that had previously been installed with PaperCut’s
SDK 2 support, can be migrated using the instructions in “1.7 Migrating from SDK 2 to Toshiba v3+
Devices.
2.7 Migrating from SDK 2 to Toshiba v3+ Devices
If you have a compatible device (see 3.3 Supported Toshiba Devices), that is currently using the non-
SDK 3 integration, then you need to perform some additional configuration to take advantage of
this.
To migrate your current Toshiba SDK2 device (now known as “Toshiba v2”) to MDS V3 device
(known as “Toshiba v3+”):
1. In the PaperCut Admin web interface Device section, take the following screenshots for the
existing Toshiba device:
• Summary
• Charging
• Filters and Restrictions
You will use these as a reference when filling out the new device settings.
2. Delete the existing “Toshiba v2” device.
3. Wait a few minutes so that PaperCut can fully finish all necessary maintenance/uninstall
tasks on the device.
4. Create a new “Toshiba v3+” device with the same name you gave the “Toshiba v2” device;
then apply any relevant settings from the screenshots.
5. To verify that the “Toshiba v3+” has been successfully registered, check the following:
• The External Device List page displays “Started – Awaiting user login” in the Status
column.
• The device panel displays the PaperCut login page (you might need to refresh the
screen by clicking the “Access” hard key button).

| Toshiba MDS V3 Embedded Manual 2018-07-18
Copyright © 2018 PaperCut Software International Pty. Ltd., All Rights Reserved. 8 of 81
NOTE: When the original device is deleted, all historical log records in the PaperCut database will not
be deleted. This data will still be available in all the available usage reports.
2.8 Installation methodology for Toshiba v3+ Devices
The following approach is recommended when installing Toshiba v3+ devices:-
1. Set device [08] codes. See 4 MFD Device configuration
2. Add Toshiba v3+ device in PaperCut. See 4.15 Create Toshiba MFD device in PaperCut
3. Quick confirmation test. See 5 Post-install testing
4. PaperCut configuration. See 6 Configuration
5. Scanning setup. See 7 Scanning (optional)

| Toshiba MDS V3 Embedded Manual 2018-07-18
Copyright © 2018 PaperCut Software International Pty. Ltd., All Rights Reserved. 9 of 81
3 Installation
This section covers the installation of the PaperCut embedded application for compatible Toshiba
devices. The embedded application allows the control, logging, and monitoring of walk-up off-the-
glass copier, fax, and scanner usage, and can serve as a Release Station for network prints (for
information on tracking network printing, see the PaperCut manual).
3.1 Upgrading to a newer version of PaperCut
When you upgrade your PaperCut installation, the embedded application will be up to date. No
further action is necessary.
3.2 Requirements
Ensure that the following points are checked off before getting started:
• PaperCut is installed and running on your network. For more information, see Installation in
the PaperCut manual.
• Ensure that your Toshiba MFD supports Open Platform SDK version 3 and is in the list of
supported devices (see 3.3 Supported Toshiba Devices)
• The Toshiba devices must be directly accessible over the network by the PaperCut server
(i.e. not via a NAT network).
• Verify that the Toshiba Embedded Web Browser (EWB) is enabled on your device. This is
enabled through the “External Interface Enabler” (Code: GS-1020). This is an option in some
markets and you should check with your Toshiba representatives.
• Have available the network name and IP address of the system running PaperCut (e.g. the
print server).
• Ensure that the Toshiba MFD is connected to the network.
• Have available the network address of the Toshiba MFD. It is recommended that the MFD is
configured with a static IP.
3.3 Supported Toshiba Devices
The following table shows Toshiba devices that support Open Platform SDK version 3, and includes
the recommended minimum firmware revision for optimum stability and feature set.
To check the firmware revision, please do the following steps:
1. Log in to the device’s web administration (TopAccess) with a web browser.
2. Select the “Administration” tab and log in as an admin user.
3. Select the Version link and you should see “Copier Firmware Version” as shown below. The
firmware version should be set according to the table below depending on the model of the
MFD.
e-BRIDGE Next Minimum Firmware Version

| Toshiba MDS V3 Embedded Manual 2018-07-18
Copyright © 2018 PaperCut Software International Pty. Ltd., All Rights Reserved. 10 of 81
e-STUDIO 2008A
e-STUDIO 2508A
e-STUDIO 3008A
e-STUDIO 3508A
e-STUDIO 4508A
e-STUDIO 5008A
T410HD0W1043
e-STUDIO 2000AC
e-STUDIO 2500AC
T370HD0W1043
e-STUDIO 2505AC
e-STUDIO 3005AC
e-STUDIO 3505AC
e-STUDIO 4505AC
e-STUDIO 5005AC
T373HD0W1043
e-STUDIO5508A
e-STUDIO6508A
e-STUDIO7508A
e-STUDIO8508A
T385HD0W1043
e-STUDIO5506AC
e-STUDIO6506AC
e-STUDIO7506AC
T380HD0W1043

| Toshiba MDS V3 Embedded Manual 2018-07-18
Copyright © 2018 PaperCut Software International Pty. Ltd., All Rights Reserved. 11 of 81
3.4 Setup Procedure
3.4.1 Verify Access to the Toshiba Administrative Web Interface
The Toshiba devices have an embedded web server that provides an alternate administration
interface. The web interface is used to configure the MFD to connect to PaperCut.
To verify admin access:
1. On a computer, open your web browser
2. Enter the URL of the Toshiba device.
E.g. http://xxx.xxx.xxx.xxx/ (device-ip address) or https://xxx.xxx.xxx.xxx/ (device-ip address)
3. Click the "Administration" tab at the top right of the page.
4. Enter the device administrator username and password; then press "Login". By default, this
is Admin/123456.
3.4.2 Log in as device Administrator
To display the device Administrator login screen from the PaperCut login screen:
• On Toshiba e-BRIDGE Next models, press shortcut key “1”
Note: This is only available after performing Create Toshiba MFD device in PaperCut
3.4.3 Networking/Firewall Configuration
Ensure that your networking/firewall configuration allows:
• Inbound connections from the Toshiba devices to the PaperCut server on ports:
o 9191 (TCP/HTTP).
o 9292 (TCP/HTTPS).
• Outbound connections from PaperCut to the Toshiba Device on ports:
o 49629 (TCP/HTTP)
o 49630 (TCP/HTTPS)
o 50083 (TCP/HTTP) (or any other customized port for scanning services)

| Toshiba MDS V3 Embedded Manual 2018-07-18
Copyright © 2018 PaperCut Software International Pty. Ltd., All Rights Reserved. 12 of 81
4 MFD Device configuration
This section describes the MFD device configuration using “Service Mode” and “TopAccess” Note: All
08 “service mode” changes should be done only by a qualified Toshiba technician. If many 08 codes
need to be set, do not restart the MFD until all the required settings have been made.
Detailed instructions below (consolidated matrix see Appendix D: 08 Code Check list)
4.1 ODCA (Off Device Customization Architecture) (mandatory)
ODCA is mandatory for MDS V3, you can either use a non-secure or secure port for communication.
Non-Secure ODCA using Service Mode is enabled by default (confirmation):
1. Enter FS service mode, enter 08 service mode.
2. Enter “Classic” mode.
3. Enter: 9820
4. Press the “Start” button.
5. Enter: 1 (default value 1)
6. On the LCD screen, press “OK”.
7. Restart the MFD by holding down the “Main Power” button until it stops.
8. Press “Main Power” again to restart.
To enable Secure ODCA using Service Mode (optional):
1. Enter FS service mode, enter 08 service mode.
2. Enter “Classic” mode.
3. Enter: 9819
4. Press the “Start” button.
5. Enter: 1 (default value 0)
6. On the LCD screen, press “OK”.
7. Restart the MFD by holding down the “Main Power” button until it stops.
8. Press “Main Power” again to restart.
Note: you are also required to enable secure ODCA in PaperCut.
4.2 Set an “Auto Clear” timeout (recommended)
For security purposes, set the “Auto Clear” timeout to automatically log out MFD users after a
specific period of inactivity. PaperCut recommends a value of 60 seconds.
To set an “Auto Clear” timeout value in [08] service Mode:
1. Enter FS service mode, enter 08 service mode.
2. Enter “Classic” mode.
3. Enter: 9110, press “Start”.
4. Enter: 4 (default value 3)
5. On the LCD screen, press “OK”.
6. Restart the MFD by holding down the “Main Power” button until it stops.
7. Press “Main Power” again to restart
4.3 Disable Logout pop-up dialogue display (optional)
Sets whether the pop-up dialogue confirmation for user logging out will be displayed

| Toshiba MDS V3 Embedded Manual 2018-07-18
Copyright © 2018 PaperCut Software International Pty. Ltd., All Rights Reserved. 13 of 81
1. Enter FS service mode, enter 08 service mode.
2. Enter “Classic” mode.
3. Enter: 8723, press “Start”.
4. Enter: 0 (default value 1)
5. On the LCD screen, press “OK”.
6. Restart the MFD by holding down the “Main Power” button until it stops.
7. Press “Main Power” again to restart.
4.4 Disable Automatic logout of users during fax send (optional)
Disables automatic logout of users whilst sending a fax
1. Enter FS service mode, enter 08 service mode.
2. Enter “Classic” mode.
3. Enter: 9987, press “Start”.
4. Enter: 2 (default value 0)
5. On the LCD screen, press “OK”.
6. Restart the MFD by holding down the “Main Power” button until it stops.
7. Press “Main Power” again to restart.
4.5 Additional 08 code setting (optional)
When using a supported USB card reader for authentication, an additional 08 code setting is
required. For more information about the supported card readers and required 08 codes, see
Appendix A: Supported Authentication Card Readers and Appendix D: 08 Code Check list.
To enable the card reader:
1. Enter FS service mode, enter 08 service mode.
2. Enter “Classic” mode.
3. Look up the required config code in Appendix A: Supported Authentication Card Readers.
For example, Generic Keyboard mode readers, use code 60001.
4. Change setting 3500 to the code for the given card reader:
5. Enter: 3500, press “Start”.
6. Enter the appropriate code, example 60001
7. On the LCD screen, press “OK”.
8. Restart the MFD by holding down the “Main Power” button until it stops.
9. Press “Main Power” again to restart.
4.6 Enable OCR on the device (optional)
If you have installed MFD Embedded OCR and PaperCut Integrated Scanning enabled, you need to enable OCR using service mode.
1. Enter FS service mode, enter 08 service mode.
2. Enter “Classic” mode.
3. Enter: 3786, press “Start”.
4. Enter: 0, press “Start”.
5. Enter: 0 (default value of code is 1).
6. On the LCD screen, press “OK”.
7. Restart the MFD by holding down the “Main Power” button until it stops.
8. Press “Main Power” again to restart.

| Toshiba MDS V3 Embedded Manual 2018-07-18
Copyright © 2018 PaperCut Software International Pty. Ltd., All Rights Reserved. 14 of 81
4.7 Enable Zero Stop functionality for Copy and Scan (optional)
To enable the Zero Stop functionality for both Copy and Scan walk up functions, “Quota Setting”
needs to be set to “Job Quota”
1. Enter FS service mode, enter 08 service mode.
2. Enter “Classic” mode.
3. Enter: 6084, press “Start”.
4. Enter: 1 (default value of code is 0)
5. On the LCD screen, press “OK”.
6. Restart the MFD by holding down the “Main Power” button until it stops.
7. Press “Main Power” again to restart
4.8 Disable MFD control of print jobs (mandatory)
Note: service code replaces the need for the Print Data Converter and affects Authentication, Quota
Management and Permissions
1. Enter FS service mode, enter 08 service mode.
2. Enter “Classic” mode.
3. Enter: 3642, press “Start”.
4. Enter: 0, press “Start”.
5. Enter: 1 (default value of sub code 0)
6. On the LCD screen, press “OK”.
7. Restart the MFD by holding down the “Main Power” button until it stops.
8. Press “Main Power” again to restart.
4.9 Allow anyone to manage print jobs at the MFD (mandatory)
1. Enter FS service mode, enter 08 service mode.
2. Enter “Classic” mode.
3. Enter: 8726, press “Start”.
4. Enter: 1 (default value 0)
5. On the LCD screen, press “OK”.
6. Restart the MFD by holding down the “Main Power” button until it stops.
7. Press “Main Power” again to restart.
4.10 Allow all users to delete their jobs from the Private/Hold
screen on the copier (mandatory)
1. Enter FS service mode, enter 08 service mode.
2. Enter “Classic” mode.
3. Enter: 9236, press “Start”.
4. Enter: 3 (default value 1)
5. On the LCD screen, press “OK”.
6. Restart the MFD by holding down the “Main Power” button until it stops.
7. Press “Main Power” again to restart.
Note: print jobs will only need to “managed” after being secularly release from PaperCut.

| Toshiba MDS V3 Embedded Manual 2018-07-18
Copyright © 2018 PaperCut Software International Pty. Ltd., All Rights Reserved. 15 of 81
4.11 Configure the Web Services Scan Port (optional)
If a print job was released in error and needs to be deleted or the device has run out of paper and
cannot be replenished then you may need to configure the Web Services Scan Port:
1. Enter FS service mode, enter 08 service mode.
2. Enter “Classic” mode.
3. Enter 3760, press “Start”
4. Enter the desired numeric port value (default is 50083)
5. On the LCD screen, press “OK”
6. Restart the MFD by holding down the “Main Power” button until it stops.
7. Press “Main Power” again to restart.
4.12 WSD scanning (confirmation)
This is only required when using PaperCut Integrated Scanning (enabled by default)
1. Enter FS service mode, enter 08 service mode.
2. Enter “Classic” mode.
3. Enter: 3755, press “Start”.
4. Enter: 1 (default value 1)
5. On the LCD screen, press “OK”.
6. Restart the MFD by holding down the “Main Power” button until it stops.
7. Press “Main Power” again to restart.
4.13 Disable authentication for WSD scanning (optional)
This disables automatic logout of users whilst sending a fax.
1. Enter FS service mode, enter 08 service mode.
2. Enter “Classic” mode.
3. Enter: 3642 sub-code 2, press “Start”.
4. Enter: 1 (default value 0)
5. On the LCD screen, press “OK”.
6. Restart the MFD by holding down the “Main Power” button until it stops.
7. Press “Main Power” again to restart.
4.14 Disable the “missing home directory” warning (optional)
This disables the missing home directory message. It is optional for MFD native scan to home.
1. Enter FS service mode, enter 08 service mode.
2. Enter “Classic” mode.
3. Enter: 8722, press “Start”.
4. Enter: 1 (default value 0)
5. On the LCD screen, press “OK”.
6. Restart the MFD by holding down the “Main Power” button until it stops.
7. Press “Main Power” again to restart.

| Toshiba MDS V3 Embedded Manual 2018-07-18
Copyright © 2018 PaperCut Software International Pty. Ltd., All Rights Reserved. 16 of 81
4.15 Create Toshiba MFD device in PaperCut
Now that the MFD default settings have been configured PaperCut will perform all remaining MFD
settings automatically, as listed (“Toshiba v3+” see below)
• MDS Mode
• Programmable Hard Key “1”
• EWB Login and Home pages
• MFD security settings
To add an Toshiba v3+ MFD in PaperCut:
1. In a web browser, log in to the PaperCut Admin web interface (e.g. http://papercut-
server:9191/admin ).
2. Navigate to “Options > Advanced”.
3. In the “External Hardware Integration” area, select “Enable external hardware”.
4. Click “Apply”.
5. Select the “Devices” tab.
6. In the Actions menu, click “Create device”.
7. In “Type”, select “Toshiba v3+”.
8. Enter the device details, including the network address / IP address of the Toshiba device.
9. Select the device functions to control/log (e.g. copying, scan, fax, etc).
10. Click “OK”.
The Device Details page is displayed.
11. Change any options as required. For example, you can change the costs of copying, scanning,
and faxing. You can also select the print queues for which this device will act as a “Print
Release Station”.
+

| Toshiba MDS V3 Embedded Manual 2018-07-18
Copyright © 2018 PaperCut Software International Pty. Ltd., All Rights Reserved. 17 of 81
12. Click “OK”.
The device is displayed in the Device List. If the connection to the device is established, the
Status column will not display “Error”.
5 Post-install testing
After PaperCut MF is installed on the device (i.e. device registration and integration is completed), it
is recommended that you test some common usage scenarios. This is important for two reasons:
• To ensure that PaperCut MF works as expected.
• To familiarize yourself with the features and functionality of PaperCut MF.
This section covers the following post-install testing scenarios for PaperCut MF - Toshiba v3+:
• 5.2 Simple printing and copying
• 5.3 Advanced copying
5.1 Test preparation: create test users
To execute the post-install testing scenarios, ensure at least two test users are created:
• Simple test user – A user who performs simple printing and copying.
• Advanced test user – A user who performs advanced copying.
To create test users:
1. Log in to the PaperCut MF Admin web interface.
2. Navigate to Options.
3. In Internal User Options, select Enable internal users.
4. Click Apply.
5. Navigate to Users.
6. Click Create internal user…

| Toshiba MDS V3 Embedded Manual 2018-07-18
Copyright © 2018 PaperCut Software International Pty. Ltd., All Rights Reserved. 18 of 81
7. Enter the relevant details for the test users as required (simple test user, advanced test
user):
8. Click Register.
5.2 Simple printing and copying
5.2.1 Test preparation: configure simple test user
To test the simple test scenarios, ensure at least one simple test user is created. For more
information, see 5.1 Test preparation: create test users. Once created, ensure the simple test user is
configured.
To configure the simple test user:
1. Log in to the PaperCut MF Admin web interface.
2. Navigate to Users.
3. From the User List, select the simple test user.
4. In the Account Details area, set the Balance to $50.00 and select Restricted:

| Toshiba MDS V3 Embedded Manual 2018-07-18
Copyright © 2018 PaperCut Software International Pty. Ltd., All Rights Reserved. 19 of 81
5. In the Account Selection area’s Print account selection, select Automatically charge to
personal account:
6. Click Apply.
5.2.2 Simple printing
Simple printing does not involve providing the simple test user with a choice of accounts to choose
from. Printing is charged to the simple test user’s default My Personal Account.
To test simple printing, ensure the following test preparation requirements are met:
• Simple test user - A simple test user is created and configured. For more information, see
5.1 Test preparation: create test users and 5.2.1 Test preparation: configure simple test user.
• Printer queue settings - The printer queue’s Hold/Release Queue Settings are configured.
For more information, see the PaperCut MF manual.
To configure the printer queue’s Hold/Release Queue Settings:
1. Log in to the PaperCut MF Admin web interface.
2. Navigate to Printers.
3. Select the Printer that is applicable to the device being tested.
4. In the Hold/Release Queue Settings area, select the Enable hold/release queue.
5. Click Apply.
Print jobs to this printer queue are held until released by a user.
• Device functions – The printing function is enabled.
To enable the printing function:
1. Log in to the PaperCut MF Admin web interface.
2. Navigate to Devices.
3. Select the device being tested.
4. In the Print Release area, select Enable print release.
5. In the This device will display jobs for release from the selected source queues,
select at least one source queue for print release that corresponds to this device’s
configured printer queue.
6. Click Apply.
7. Verify that the Devices > External Device List displays the device with Print Release
in the Function column.
To test simple printing:
1. Log in to a computer as the simple test user.

| Toshiba MDS V3 Embedded Manual 2018-07-18
Copyright © 2018 PaperCut Software International Pty. Ltd., All Rights Reserved. 20 of 81
2. Print a few jobs to the source queue that was selected in the Devices > External Device
List > Device Details > Print Release > Enable print release area of the device being tested.
3. Log in to the PaperCut MF Admin web interface.
4. Navigate to Printers > Jobs Pending Release.
5. Verify that the print jobs for the simple test user are being held and listed:
6. Log out of the PaperCut MF Admin web interface.
7. Log in to the device as the simple test user:

| Toshiba MDS V3 Embedded Manual 2018-07-18
Copyright © 2018 PaperCut Software International Pty. Ltd., All Rights Reserved. 21 of 81
8. Verify that the print jobs for the simple test user are being held and listed:
Note: You may be able to change the settings of held print jobs on the PaperCut MF Print
Release screen before releasing them. For more information, see 6.5 Held print job settings
at the device.
9. To release one or many held print jobs at once, select all the relevant held print jobs and
click Print.
10. To delete one or many held print jobs at once, select all the relevant held print jobs and click
the Bin icon.
11. To view and take actions on a single held print job, click the chevron:
Details of the held print job are displayed:
Note: You may be able to change the settings of held print jobs on the PaperCut MF Print
Release screen before releasing them. For more information, see 6.5 Held print job settings
at the device.
12. Log out of the device.
13. Log in to the PaperCut MF Admin web interface.

| Toshiba MDS V3 Embedded Manual 2018-07-18
Copyright © 2018 PaperCut Software International Pty. Ltd., All Rights Reserved. 22 of 81
14. Navigate to Logs.
15. After printing is completed, verify that Job Log page displays the test user’s name, simple
test user, in the User column and the Charged To column:
16. Log out of the PaperCut MF Admin web interface.
5.2.3 Simple copying
Simple copying does not involve providing the simple test user with a choice of accounts to choose
from. Copying is charged to the simple test user’s default My Personal Account.
To test simple copying, ensure the following test preparation requirements are met:
• Simple test user - A simple test user is created and configured. For more information, see
5.1 Test preparation: create test users and 5.2.1 Test preparation: configure simple test user.
• Device functions – The copying function is enabled. To enable the copying function:
1. Log in to the PaperCut MF Admin web interface.
2. Navigate to Devices.
3. Select the device being tested.
4. In the External Device Settings > Tracking area, select Track & control copying.
5. Click Apply.
6. Verify that the Devices > External Device List displays the device with Copier in the
Function column.
To test simple copying:

| Toshiba MDS V3 Embedded Manual 2018-07-18
Copyright © 2018 PaperCut Software International Pty. Ltd., All Rights Reserved. 23 of 81
1. Log in to the device as the simple test user:
2. Select Access Device.
3. Verify that the PaperCut MF Account Confirmation screen does not provide the simple test
user with a choice of accounts to choose from, and charges copying to the simple test user’s
default My Personal Account:
4. Click Access Device.
5. Select Copy.
6. Complete copying by following the device’s workflow.
7. Log out of the device.
8. Log in to the PaperCut MF Admin web interface.
9. Navigate to Logs.
| Toshiba MDS V3 Embedded Manual 2018-07-18
Copyright © 2018 PaperCut Software International Pty. Ltd., All Rights Reserved. 24 of 81
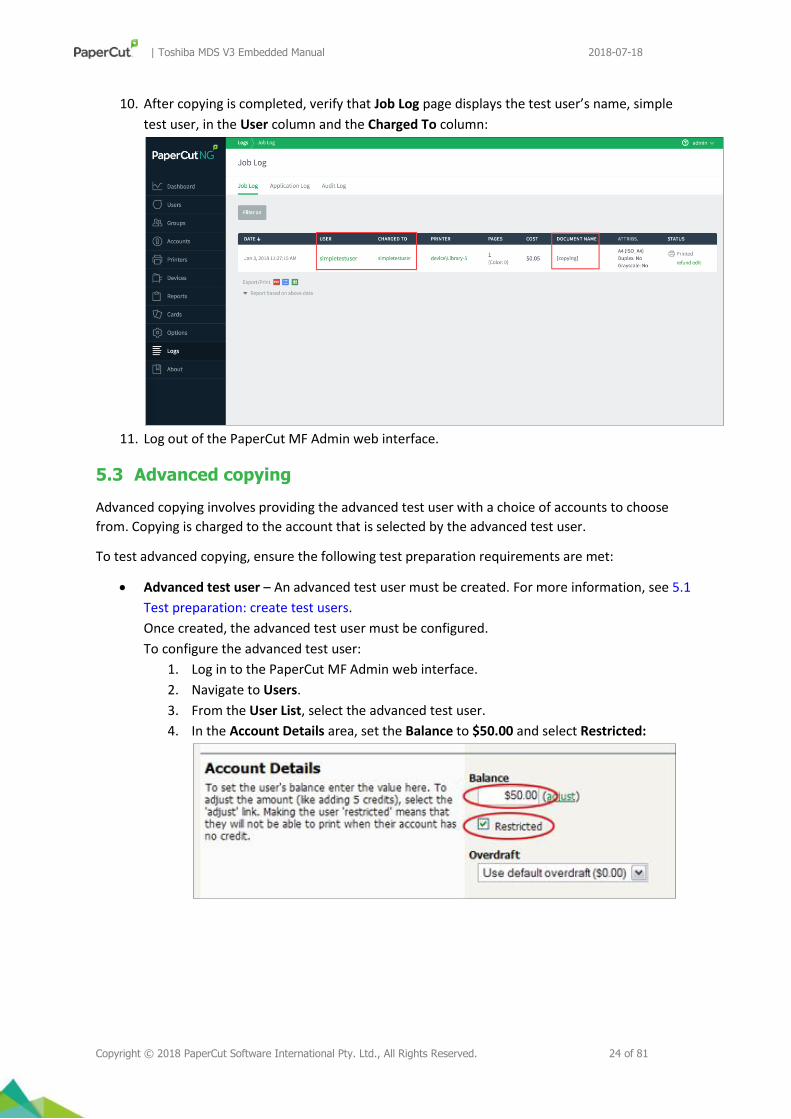
10. After copying is completed, verify that Job Log page displays the test user’s name, simple
test user, in the User column and the Charged To column:
11. Log out of the PaperCut MF Admin web interface.
5.3 Advanced copying
Advanced copying involves providing the advanced test user with a choice of accounts to choose
from. Copying is charged to the account that is selected by the advanced test user.
To test advanced copying, ensure the following test preparation requirements are met:
• Advanced test user – An advanced test user must be created. For more information, see 5.1
Test preparation: create test users.
Once created, the advanced test user must be configured.
To configure the advanced test user:
1. Log in to the PaperCut MF Admin web interface.
2. Navigate to Users.
3. From the User List, select the advanced test user.
4. In the Account Details area, set the Balance to $50.00 and select Restricted:

| Toshiba MDS V3 Embedded Manual 2018-07-18
Copyright © 2018 PaperCut Software International Pty. Ltd., All Rights Reserved. 25 of 81
5. In the Account Selection area’s Print account selection, select Standard account
selection popup and in Information to show in popup, select all the options:
6. Click Apply.
• Device functions – The copying function is enabled.
To enable the copying function:
1. Log in to the PaperCut MF Admin web interface.
2. Navigate to Devices.
3. Select the device being tested.
4. In the External Device Settings > Tracking area, select Track & control copying.
5. Click Apply.
6. Verify that the Devices > External Device List displays the device with Copier in the
Function column.
• Advanced account – A test account is created.
To create a test account:
1. Log in to the PaperCut MF Admin web interface.
2. Navigate to Accounts.
3. Click Create a new account….
4. In the Details & Balance area’s field Account Name, enter the name of the test
account (test account).
5. Click Apply.
6. Verify that the Accounts > Shared Account List page displays the test account
created.
7. Click the test account.
8. Navigate to Security.

| Toshiba MDS V3 Embedded Manual 2018-07-18
Copyright © 2018 PaperCut Software International Pty. Ltd., All Rights Reserved. 26 of 81
9. In the Control access to this account > Groups area, select [All Users]; then click
Add:
10. Verify that the Control access to this account > Groups area displays [All Users]:
To test advanced copying:
| Toshiba MDS V3 Embedded Manual 2018-07-18
Copyright © 2018 PaperCut Software International Pty. Ltd., All Rights Reserved. 27 of 81
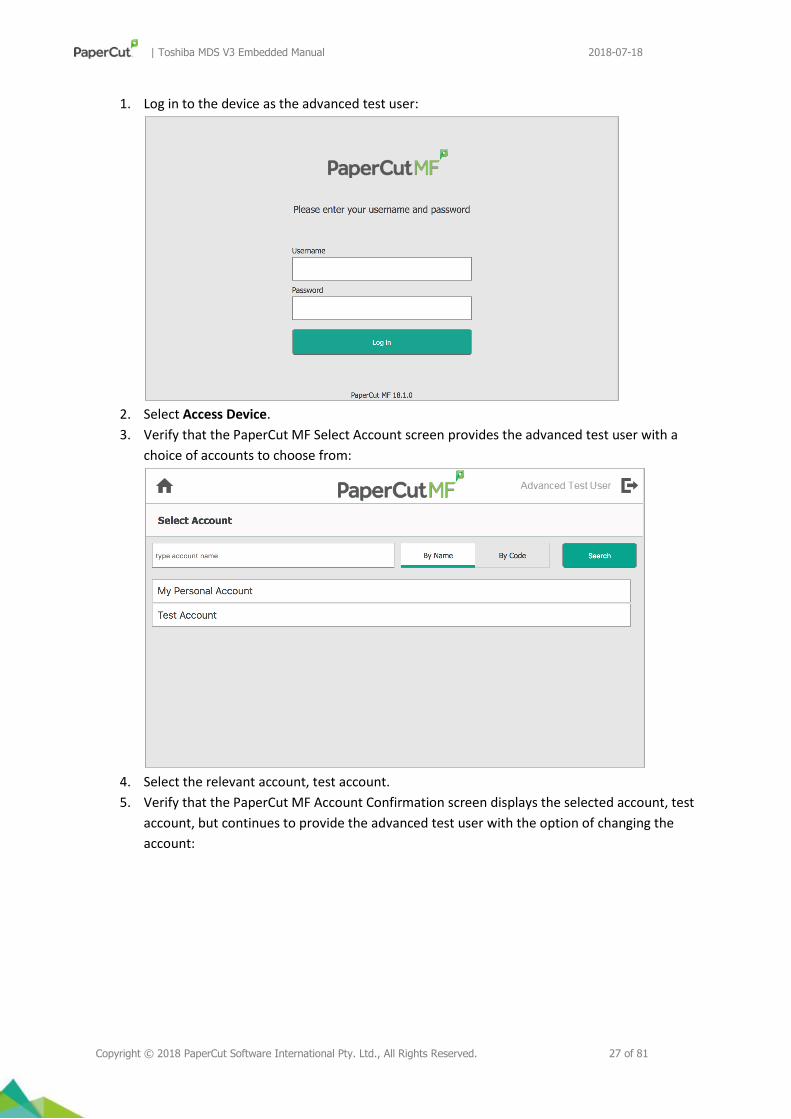
1. Log in to the device as the advanced test user:
2. Select Access Device.
3. Verify that the PaperCut MF Select Account screen provides the advanced test user with a
choice of accounts to choose from:
4. Select the relevant account, test account.
5. Verify that the PaperCut MF Account Confirmation screen displays the selected account, test
account, but continues to provide the advanced test user with the option of changing the
account:

| Toshiba MDS V3 Embedded Manual 2018-07-18
Copyright © 2018 PaperCut Software International Pty. Ltd., All Rights Reserved. 28 of 81
6. Click Access Device.
Copying is charged to the account selected by the advanced test user, test account.
7. Select Copy.
8. Complete copying by following the device’s workflow.
9. Log out of the device.
10. Log in to the PaperCut MF Admin web interface.
11. Navigate to Logs.
12. After copying is completed, verify that Job Log page displays the test user’s name, advanced
test user, in the User column and the selected account’s name, test account, in the Charged
To column:
13. Log out of the PaperCut MF Admin web interface.
6 Configuration
After completing the Installation section and registering the device with PaperCut, it has been
configured with reasonable default settings that are suitable for most environments. This section

| Toshiba MDS V3 Embedded Manual 2018-07-18
Copyright © 2018 PaperCut Software International Pty. Ltd., All Rights Reserved. 29 of 81
covers how to change the default settings. All the following settings are available via the device’s
‘Summary’ tab in the PaperCut administration interface.
6.1 HTTPS Security (recommended)
PaperCut MF can be configured to communicate with the device using the HTTPS (SSL/TLS) protocol,
which is a secure and encrypted protocol.
To enable HTTPS:
1. You must have an SSL certificate installed on the PaperCut MF Application Server.
The certificate must use the server’s fully-qualified domain name. This must be defined
either in the Common Name (CN) field or included in the Alternative Names (AN) of the
subject of the certificate. Without this, the device cannot connect to the server, since
devices do not work with hostname-only certificates (i.e. not fully qualified).
You may use an official Certificate Authority-signed certificate or a self-signed certificate:
• If you are using an official CA-signed certificate (for example, Verisign, Thawte), it is
likely to use the server’s fully qualified domain name (or wildcard). This is because
Certificate Authorities generally no longer accept certificate requests for either intranet
names or IP addresses.
• If you are using the self-signed certificate that is generated by default when installing
PaperCut MF, ensure to regenerate it for a fully qualified domain name. This is because
the default self-signed certificate generated during PaperCut MF installation (device
registration and integration) is issued using a hostname, instead of the domain name.
Regenerate it using PaperCut MF’s create-ssl-keystore tool in:
[PaperCut MF Install Location]\server\bin\[platform]
Run the following command to regenerate the certificate using the tool: create-ssl-keystore -f "myserver.fullname.com"
For more information, see the PaperCut MF manual.
After the certificate is regenerated, you must upload it on the device’s web interface
(TOPACCESS). To upload the regenerated certificate on the device’s web interface
(TOPACCESS):
a. Extract the regenerated certificate that is installed on the PaperCut MF Application
Server, using Keystore Explorer (the password is default), as a PEM file. For more
information, see SSL with PaperCut and Keystore Explorer.
b. Log in to the device’s web interface (TOPACCESS) as an administrator.
c. Navigate to Administration > Security > Certificate Management
d. In the CA Certificate section, select CA Certificate (PEM).
e. Click Choose file and follow the prompts to upload the extracted regenerated
certificate (PEM file):

| Toshiba MDS V3 Embedded Manual 2018-07-18
Copyright © 2018 PaperCut Software International Pty. Ltd., All Rights Reserved. 30 of 81
f. Click Save.
2. Use the following config keys:
ext-device.toshiba.secure-odca
ext-device.toshiba.secure-app-server-url
system.network-address
ext-device.toshiba.secure-scanning
For more information, see 6.12 Config Editor.
3. Ensure to enable secure ODCA. For more information, see 6.2 Enable secure ODCA in
PaperCut.
4. Ensure to configure inbound connections to PaperCut MF Application Server. For more
information, see 6.3.1 Inbound connections to PaperCut MF Application Server.
6.2 Enable secure ODCA in PaperCut
1. In a web browser, log in to the PaperCut Admin web interface (e.g. http://papercut-
server:9191/admin ).
2. Select the “Devices” tab.
3. Select a device.
4. Click “Advanced Config”.
5. set the ext-device.toshiba.secure-odca config key to “Y”. For more information,
see 6.12 Config Editor.
NOTE: If the Toshiba Device Advance Configuration parameter of ext-device.toshiba.port-
num is set to "49629", change it to either "49630" or "DEFAULT". For more information, see
6.12 Config Editor.

| Toshiba MDS V3 Embedded Manual 2018-07-18
Copyright © 2018 PaperCut Software International Pty. Ltd., All Rights Reserved. 31 of 81
6.3 Inbound connections
6.3.1 Inbound connections to PaperCut MF Application Server
To configure PaperCut MF to allow inbound connections from the device to the PaperCut MF
Application Server, use the config key system.network-address. For more information, see 6.12
Config Editor.
6.3.2 Inbound connections to PaperCut MF Site Servers
To configure PaperCut MF to allow inbound connections from the device to PaperCut MF Site
Servers on the PaperCut MF Admin web interface:
1. Site Servers must already be installed and configured. For more information, see the
PaperCut MF manual.
2. Log in to the PaperCut MF Admin web interface.
3. Navigate to Sites.
4. Select the Site Server.
5. In the Configuration area, enter the network IP address (if using HTTP) or DNS name (if using
HTTP or HTTPS) of the PaperCut MF Site Server that the device uses to make inbound
connections.
6. Click Apply.
6.4 Device Function
The device function setting defines which functions are available on the device and how they will be
used. Not all function settings are supported on all devices.
Each device function is discussed in the following table.
Device Function Description

| Toshiba MDS V3 Embedded Manual 2018-07-18
Copyright © 2018 PaperCut Software International Pty. Ltd., All Rights Reserved. 32 of 81
Track & control copying The device will track walk-up off-the-glass copying and on-device
printing.
Track & control scanning The device will track scanning such as scan-to-email or scan-to-file.
Track & control faxing The device will track the sending of faxes.
Enable release station The device will act as a print Release Station.
6.5 Held print job settings at the device
PaperCut MF allows you to configure the following:
• 6.5.1 Held print jobs settings that can be changed at the device
• 6.5.2 Held print jobs settings that can be viewed at the device
6.5.1 Held print jobs settings that can be changed at the device
PaperCut MF allows users to change the settings of held print jobs on the device. Based on the
changes made, PaperCut MF shows the updated cost and savings, to give immediate positive
feedback to the user, encouraging behavior change.
Users can make the following changes to print settings for multiple jobs on the device:
• Force grayscale (from color to grayscale)
• Force 2-sided (from 1-sided to 2-sided)

| Toshiba MDS V3 Embedded Manual 2018-07-18
Copyright © 2018 PaperCut Software International Pty. Ltd., All Rights Reserved. 33 of 81
Clicking the chevron of a held print job displays all the settings for the individual job, allowing users
to make the following additional changes:
• Copies
• Duplex mode (from 1-sided to 2-sided)
• Color mode (from color to grayscale)
• Account
If required, you can however, prevent users from being able to change print settings on the device.
For more information, see the PaperCut MF manual
6.5.2 Held print jobs settings that can be viewed at the device
By default, PaperCut MF displays the following print settings for individual jobs on the device:
• Account
• Balance
• Cost
PaperCut MF also displays the total cost for multiple jobs on the device.
If required, you can however, prevent users from being able to view print settings on the device. For
more information, see the PaperCut MF manual
6.6 Authentication Methods
PaperCut MF provides you with several authentication methods to authenticate users when logging
in to PaperCut MF on the device.
To access the available authentication methods on the PaperCut MF Admin web interface:
1. Log in to the PaperCut MF Admin web interface.

| Toshiba MDS V3 Embedded Manual 2018-07-18
Copyright © 2018 PaperCut Software International Pty. Ltd., All Rights Reserved. 34 of 81
2. Navigate to Devices.
3. Select the device.
The available authenticate methods are in the Device Details page’s External Device
Settings area:
Note: You may use any one or a combination of all the available authentication methods,
including the anonymous access authentication method. However, you cannot use the guest
access authentication method. For more information, see 8.1 The guest access
authentication method is unavailable.
The available authentication methods are:
Authentication
Method
Description
Username and password
This is the default authentication method.
With this method, users use their domain/network username and
password.
Identity number With this method, users use their ID number. For more information,
see the PaperCut MF manual.
Require PIN: With this method, users use their id number and the PIN
associated with the id number.
Note: Users can use an id number with or without a pre-set and
associated PIN. If using an id number without a pre-set and associated
PIN, users are prompted to set a valid PIN to associate with the id
number.
Swipe card With this method, users use their registered swipe card (e.g. magnetic
strip, smart card, RFID). For more information, see the PaperCut MF
manual.
Require PIN: With this method, users use their registered swipe card
and the PIN associated with the card.
Note: Users can use a swipe card with or without a pre-set and

| Toshiba MDS V3 Embedded Manual 2018-07-18
Copyright © 2018 PaperCut Software International Pty. Ltd., All Rights Reserved. 35 of 81
associated PIN. If using a swipe card without a pre-set and associated
PIN, users are prompted to set a valid PIN to associate with the swipe
card.
Enable self-association with existing user accounts: With this
method, users can use a registered swipe card or a new, unregistered
swipe card. If using new, unregistered swipe cards, users are
prompted to complete card self-association using their username and
password (i.e. associating a new unregistered card with a relevant,
valid user account). After card self-association is completed,
subsequent use of the registered swipe card does not require users to
enter their credentials. You may use the config keys: ext-device.card-
self-association.use-secondary-card-number and ext-device.self-
association-allowed-card-regex.
Allow guest/anonymous
access
With this method, you may choose to activate guest or anonymous
access, enabling users to be authenticated as guest or anonymous
users, as per the user specified in the Inherit settings from user field.
Inherit settings from user: Enter the username of the PaperCut MF
user’s profile that is used while authenticating users as guest or
anonymous users on the device.
• Guest access - Selecting the Allow guest/anonymous access
authentication method and also selecting one or more of the
other authentication methods (Username and password,
Identity number, Swipe card), activates Guest access. With
this method:
o A Guest button, which may be customized, is
displayed on the PaperCut MF Login screen on the
device, together with the other authentication
methods selected.
Note: To customize the text of the Guest button that
appears on the PaperCut MF Login screen, use the
config key ext-device.toshiba.guest-access.label. For
more information, see 6.12 Config Editor.
o A user clicking this Guest button is authenticated as a
guest user, as per the user specified in the Inherit
settings from user field.
o This guest user is shown the PaperCut MF Account
Confirmation screen only if the user profile of the user
specified in the Inherit settings from user field is
entitled with the option of account selection,
irrespective of the External Device Settings > Device
Options > Show account confirmation checkbox
setting.

| Toshiba MDS V3 Embedded Manual 2018-07-18
Copyright © 2018 PaperCut Software International Pty. Ltd., All Rights Reserved. 36 of 81
• Anonymous access - Only selecting the Allow
guest/anonymous access authentication method without
selecting any other authentication method, activates
Anonymous access. With this method:
o A user is authenticated as an anonymous user, as per
the user specified in the Inherit settings from user
field.
o This anonymous user can view held print jobs
belonging to all users.
Description of available authentication methods
6.7 Account selection
The PaperCut MF Select Account screen on the device allows users to select an account via any one
of the following ways:
• 6.7.1 By name and by code
• 6.7.2 By name
• 6.7.3 By code
This is based on a user’s Account Selection setting on the PaperCut MF Admin web interface. To this
on the PaperCut MF Admin web interface:
1. Log in to the PaperCut MF Admin web interface.
2. Navigate to Users.
3. From the User List, select the user.
4. In the Account Selection area’s Print account selection, select Standard account selection
popup and in Information to show in popup, select all the options:
6.7.1 By name and by code
For users who on the PaperCut MF Admin web interface (Users > Details) have Account Selection
set to either of the following, the PaperCut MF Select Account screen displays both methods of
selecting accounts – by name and by code:
• Show the advanced account selection popup, or
• Show the standard account selection popup and Information to show in popup set to
Allow user to select shared accounts (from list) and Allow user to select shared accounts
(using PIN/code)

| Toshiba MDS V3 Embedded Manual 2018-07-18
Copyright © 2018 PaperCut Software International Pty. Ltd., All Rights Reserved. 37 of 81
By Name By Code
Users select the relevant shared account by
scrolling through a list of all applicable shared
accounts (maximum of 500, with a scroll bar)
or by searching for the shared account using
the account’s name.
Note: The user’s My Personal Account and the
Default Shared Account (if set) is always
displayed.
Users select the relevant shared account by
using the shared account’s code.
Note: The user’s My Personal Account and the
Default Shared Account (if set) is not displayed.
6.7.2 By name
For users who on the PaperCut MF Admin web interface (Users > Details) have Account Selection
set to Show the standard account selection popup and Information to show in popup set to Allow
user to select shared accounts (from list), the PaperCut MF Select Account screen displays only one
method of selecting accounts – by name. Users select the relevant shared account by scrolling
through a list of all applicable shared accounts (maximum of 500, with a scroll bar) or by searching
for the shared account using the account’s name.
Note: The user’s My Personal Account and the Default Shared Account (if set) is always displayed.

| Toshiba MDS V3 Embedded Manual 2018-07-18
Copyright © 2018 PaperCut Software International Pty. Ltd., All Rights Reserved. 38 of 81
6.7.3 By code
For users who on the PaperCut MF Admin web interface (Users > Details) have Account Selection
set to Show the standard account selection popup and Information to show in popup set to Allow
user to select shared accounts (using PIN/code), the PaperCut MF Select Account screen displays
only one method of selecting accounts – by code. Users select the relevant shared account by using
the shared account’s code.
Note: The user’s My Personal Account and the Default Shared Account (if set) is always displayed.
6.8 Prevent the release of print jobs to devices in error (optional)
Toshiba MDS devices support the prevention of jobs being released to devices in error. For more
information, see the PaperCut MF manual. If you enable this feature, one of the default errors that
will block the release of jobs is noPaper. On Toshiba devices, this error occurs when one paper tray
is empty, even if there are multiple trays with paper. You can optionally remove the noPaper error
from the list of errors that will prevent the release of jobs, using the ext-device.block-
release-on-error.snmp-error-list config key. For more information, see 6.12 Config
Editor.
6.9 Customizing Text and Messages
PaperCut allows some text that appears in the device to be customized. The custom text might
include instructions or terminology that is more appropriate for the site. An example of text that is
customizable is the “welcome text” on the home page that displays on the EWB screen.
The text can be customized by editing the device configuration from the PaperCut administration
interface.
6.10 Customizing the header logo and colors
The header logo, the header background color, and the header text color appearing on all the
screens of the embedded application can be customized.
To customize the header logo:
• Create a 24bit PNG image of the logo, which is 230 pixels wide and 55 pixels high.
• Save the image with the filename “logo.png” in the following PaperCut application
directory and subdirectory:

| Toshiba MDS V3 Embedded Manual 2018-07-18
Copyright © 2018 PaperCut Software International Pty. Ltd., All Rights Reserved. 39 of 81
[PaperCut Install Location]\server\custom\web\device\toshiba-v3\
Create the subdirectory if necessary.
To customize the header background color, and the header text color, see the 6.12 Config Editor for
more information about configuring the following:
• ext-device.toshiba.header-background-color
• ext-device.toshiba.header-font-color
Note: Any customizations made (header logo, header background color, header text color) are
globally applied across all the embedded application screens, on all registered Toshiba V3+ devices.
Customizations made are not applied to other Toshiba devices on your network.
6.11 Configuring Swipe Card Readers
Swipe cards contain numbers that are used to identify users according to the card number
configured in the User Details screen under “Card/Identity” number. Some readers report
information in addition to the number encoded on the card, such as checksums. PaperCut can treat
these cases in two ways:
• A typical case is the checksum being reported after the card number, separated by an equals
sign, such as in 5235092385=8. PaperCut can handle this case by default; it will extract
the number before the equal sign as the card number: 5235092385.
• For some cases, a “regular expression” that will filter the card number from the complete
string of characters reported by the card reader might be required. Documentation on
regular expressions can be found on the Internet, e.g. at .
o The regular expression must be fashioned so that the card number is returned as the
first match group.
o Usually one regular expression will be used for all the devices managed by PaperCut;
this must be entered in the “Config editor” in the PaperCut Admin Console. Open
the Admin Console and select the Options tab, then select “Config Editor
(Advanced)” from the left menu. The key is called “ext-device.card-no-regex”.
o The global setting however can be overridden on a per-device basis: The key “ext-
device.card-no-regex” can also be found on the “Advanced Config” tab in the device
details screen. This setting will override the global setting unless the keyword
“GLOBAL” is specified.
o PaperCut developers will gladly assist in producing a regular expression when
supplied with a few sample outputs from your card reader. Contact your reseller or
Authorized Solution Center for help with regular expressions. You can find their
contact information in your PaperCut Admin interface on the About page.
o If you would like to write your own regular expressions, here are some examples:
▪ Use the first 10 characters (any character): (.{10})
▪ Use the first 19 digits: (\d{19})
▪ Extract the digits from between the two “=” characters in
“123453=292929=1221”: \d*=(\d*)=\d*

| Toshiba MDS V3 Embedded Manual 2018-07-18
Copyright © 2018 PaperCut Software International Pty. Ltd., All Rights Reserved. 40 of 81
6.12 Config Editor
The common configuration options for a device in PaperCut are available on the device’s ‘Summary’
tab, and are discussed in more detail in the Configuration section. This section covers the more
advanced or less common configuration options which are available via the ‘Advanced Config’ tab in
the device details screen.
Config name Description
ext-
device.admin.password
The admin password for the Toshiba copier.
ext-
device.admin.username
The admin username for the copier, by default it is “admin”.
ext-device.card-no-regex See chapter section 6.11 Configuring Swipe Card Readers
ext-device.card-self-
association.use-secondary-
card-number
Select whether user self-association should occupy the primary
or secondary card number. It overrides the global setting
unless the keyword "GLOBAL" is specified. This is useful when
there is a mix of different non-configurable card readers that
read different numbers from an ID card.
Set to "Y" to use the secondary card number, "N" to use the
primary card number. Default: "GLOBAL" to defer to the global
configuration option.
ext-device.id-
number.label
Customize the "ID Number" field label on the login page.
An organization might want to do this if, for example, users
need to enter their employee number to log in. Changing the
“ID Number” field label to “Employee Number” makes the user
experience more intuitive.
ext-device.id-number.in-
prompt
Customize the "ID Number" field label on user credential
prompts.
An organization might want to do this if, for example, users
need to enter their employee number to log in. Changing the
“ID Number” field label to “Employee Number” makes the user
experience more intuitive.
ext-device.id-number.mask Select whether or not to mask with asterisks (*), the
characters entered in the “ID Number” field on the login
screen.

| Toshiba MDS V3 Embedded Manual 2018-07-18
Copyright © 2018 PaperCut Software International Pty. Ltd., All Rights Reserved. 41 of 81
Default is blank, which means characters entered in the “ID
Number” field will be displayed. Set to "Y" to mask the
characters entered in the "ID Number" field.
ext-
device.toshiba.welcome-
text
The text displayed on the ‘welcome screen’ (the screen
displayed after pressing ‘Start’ from the ready screen). This
text can be used to provide specific information about logging
in to the device. Default: DEFAULT (uses the default
application text).
Note: This setting is overridden by the ext-device.home-
screen.show-balance setting for users who have an auto-
chargeable account.
ext-device.toshiba.locale-
override
Used to override the language displayed on the device. This is
the 2-letter language code for the required language. E.g. “ja”
for Japanese.
ext-device.toshiba.limit-
reference.duplex
Used at log in time, to assume whether the copying is going to
be duplex or not. This is used to decide if we have enough
quota to do a single copy.
ext-device.toshiba.limit-
reference.grayscale
Used at log in time, to assume whether the copying is going to
be grayscale or not. This is used to decide if we have enough
quota to do a single copy. By default, this is set to N and we
assume a color copy.
ext-device.toshiba.limit-
reference.paper-size
Used at log in time, to assume what page size the copying is
going to use. This is used to decide if we have enough quota to
do a single copy. By default, for the United States this size is
Letter and elsewhere it is A4.
ext-device.toshiba.limit-
reference.quota.duplex
Whether we consider the page to be duplex for the page
quota. By default, we consider the page to be duplex so we
don’t overcharge the user.
ext-device.toshiba.limit-
reference.quota.large-
paper-size
The reference paper size that we consider to be a large paper
size for the zero stop page costs. By default, for the United
States this size is Ledger and elsewhere it is A3.
ext-device.toshiba.limit-
reference.quota.small-
paper-size
The reference paper size that we consider to be a small paper
size for the zero stop page costs. By default, for the United
States this size is Letter and elsewhere it is A4.

| Toshiba MDS V3 Embedded Manual 2018-07-18
Copyright © 2018 PaperCut Software International Pty. Ltd., All Rights Reserved. 42 of 81
ext-device.toshiba.log-
highest-id
The highest log id that we have processed so far. Used to
determine what log entries to look at next from the copier.
If the device’s hard disk drive has been erased or replaced, it
might stop sending copy job logs to PaperCut. To prevent this
from happening, set this value to -1 after erasing the drive.
ext-device.toshiba.port-
num
The port number used for ODCA (Off Device Customization
Architecture) as set up in TopAccess.
ext-device.toshiba.scan-
port-num
The port number used to access scanning service on the
device.
ext-device.toshiba.serial-
number
The serial number of the device that was last queried from the
device. This is used so that we know if the device changes
across restarts of the PaperCut Application Server.
system.network-address Specify the network IP address (if using HTTP) or DNS name (if
using HTTP or HTTPS) of the PaperCut MF Application Server
that the device uses to make inbound connections.
This is a global config key.
• Values: Network IP address (if using HTTP) or DNS
name (if using HTTP or HTTPS) of the PaperCut MF
Application Server used by the device for inbound
connections
Note: For more information, see 6.3.1 Inbound connections to PaperCut MF Application Server and 6.1 HTTPS Security (recommended).
ext-device.toshiba.secure-
app-server-url
When set to “Y”, the MFP will use SSL for EWB (Embedded Web Browser) login/logout events and for integrated scanning events sent to the PaperCut server.
Default: “N” (EWB requests and events will not be encrypted).
For more information, see 6.1 HTTPS Security (recommended)
ext-device.toshiba.secure-
odca
When set to “Y”, PaperCut will use SSL for the SOAP communications with ODCA. This will ensure the setting of quotas and the Toshiba log information is encrypted.
Default: “N” (ODCA messages will not be encrypted).
For more information, see 6.2 Enable secure ODCA in PaperCut and 6.1 HTTPS Security (recommended)
| Toshiba MDS V3 Embedded Manual 2018-07-18
Copyright © 2018 PaperCut Software International Pty. Ltd., All Rights Reserved. 43 of 81
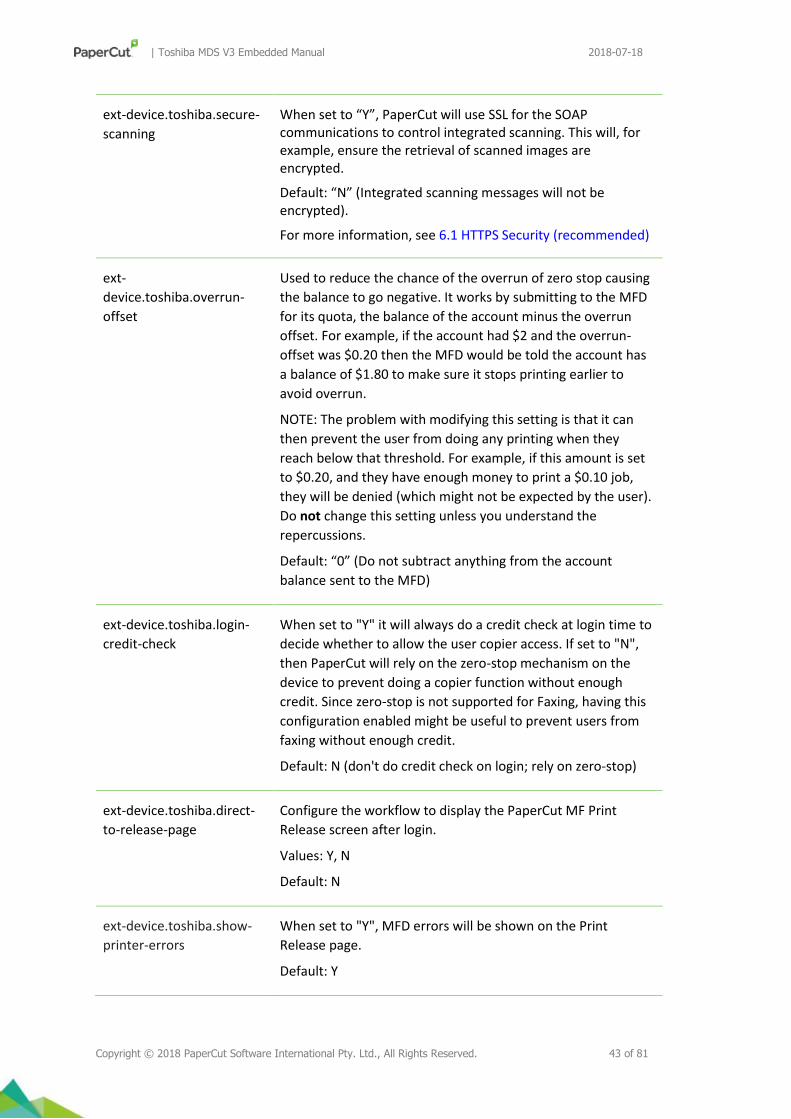
ext-device.toshiba.secure-
scanning
When set to “Y”, PaperCut will use SSL for the SOAP communications to control integrated scanning. This will, for example, ensure the retrieval of scanned images are encrypted.
Default: “N” (Integrated scanning messages will not be encrypted).
For more information, see 6.1 HTTPS Security (recommended)
ext-
device.toshiba.overrun-
offset
Used to reduce the chance of the overrun of zero stop causing
the balance to go negative. It works by submitting to the MFD
for its quota, the balance of the account minus the overrun
offset. For example, if the account had $2 and the overrun-
offset was $0.20 then the MFD would be told the account has
a balance of $1.80 to make sure it stops printing earlier to
avoid overrun.
NOTE: The problem with modifying this setting is that it can
then prevent the user from doing any printing when they
reach below that threshold. For example, if this amount is set
to $0.20, and they have enough money to print a $0.10 job,
they will be denied (which might not be expected by the user).
Do not change this setting unless you understand the
repercussions.
Default: “0” (Do not subtract anything from the account
balance sent to the MFD)
ext-device.toshiba.login-
credit-check
When set to "Y" it will always do a credit check at login time to
decide whether to allow the user copier access. If set to "N",
then PaperCut will rely on the zero-stop mechanism on the
device to prevent doing a copier function without enough
credit. Since zero-stop is not supported for Faxing, having this
configuration enabled might be useful to prevent users from
faxing without enough credit.
Default: N (don't do credit check on login; rely on zero-stop)
ext-device.toshiba.direct-
to-release-page
Configure the workflow to display the PaperCut MF Print
Release screen after login.
Values: Y, N
Default: N
ext-device.toshiba.show-
printer-errors
When set to "Y", MFD errors will be shown on the Print
Release page.
Default: Y

| Toshiba MDS V3 Embedded Manual 2018-07-18
Copyright © 2018 PaperCut Software International Pty. Ltd., All Rights Reserved. 44 of 81
ext-device.toshiba.no-
access-on-printer-errors
When set to "Y", MFD errors will be shown on the Welcome
page and the MFD will be locked down so that no operations
are allowed.
Default: N
ext-device.toshiba.delete-
suspended-jobs-on-logout
When set to "Y", any jobs in suspended state on the MFD (such
as jobs which cannot continue because of an error on the
MFD) will be deleted when the user logs out.
Default: N
ext-
device.toshiba.calculate-
printer-errors-using-tray-
data
When set to "Y", we will only consider the MFD to be in "No
Paper" error state if all the trays of a particular paper size are
out of paper. When set to "N", any tray out of paper will cause
the MFD to be in error.
Default: Y (always look at the MFD's tray data to determine
"No Paper")
ext-device.toshiba.scan-
port-num
The Web Services Scan port as configured on the Toshiba MFD.
On eBN devices, the value is updated automatically to reflect
the value read from the device. On eBX devices, the value
needs to be updated manually, depending on the value set.
ext-device.block-release-
on-error.snmp-error-list
Defines the error types that will block the release of jobs from
the MFD Print Release. Valid values:
• DEFAULT—includes noPaper, doorOpen,
jammed,offline, inputTrayMissing, outputTrayMissing,
markerSupplyMissing, outputFull
• A comma-separated list of error types. Valid error
types include lowPaper, noPaper, lowToner, noToner,
doorOpen, jammed, offline, serviceRequested,
inputTrayMissing, outputTrayMissing,
markerSupplyMissing, outputNearFull, outputFull,
inputTrayEmpty, overduePreventMaint
ext-device.toshiba.initial-
native-screen
Choose the first native device screen that is displayed, when
the user clicks Access Device from the PaperCut Home screen.
The native device screens available are: Menu, Home, Scan,
Fax, Print, eFiling, and Copy.
Values: Any one of the above native device screens, entered
using any case (not case sensitive).
Default: DEFAULT (Copy screen)

| Toshiba MDS V3 Embedded Manual 2018-07-18
Copyright © 2018 PaperCut Software International Pty. Ltd., All Rights Reserved. 45 of 81
ext-device.toshiba.header-
background-color The background color of the header.
Values: Any valid HTML color name or hexadecimal notation of
the color (#RRGGBB); where “RR” is the red component, “GG”
is the green component and “BB” is the blue component.
Default: DEFAULT (#fbfafa)
See 6.10 Customizing the header logo and colors
ext-device.toshiba.header-
font-color The color of the text in the header.
Values: Any valid HTML color name or hexadecimal notation of
the color (#RRGGBB); where “RR” is the red component, “GG”
is the green component and “BB” is the blue component.
Default: DEFAULT (#888888)
See 6.10 Customizing the header logo and colors
ext-device.home-
screen.show-balance Configure the PaperCut Home screen to display the following
based on the type of user (restricted or unrestricted):
• auto-chargeable account details AND balance on the
PaperCut Home screen – for restricted users
• only auto-chargeable account details on the PaperCut
Home screen – for unrestricted users
This is applicable only to users who have either of the
following Account Selection options enabled on the Admin
web interface (Users > User List > User Details):
• Automatically charge to personal account OR
• Automatically charge to a single shared account
This key can set in Options > Config editor (advanced).
Values: Y, N, Default
Default: DEFAULT (N)
Setting this to Y displays the auto-chargeable account and
balance, based on the type of user (restricted or unrestricted).
Note: This overrides the ext-device.toshiba.welcome-text
config key.
Note: If the user has print jobs waiting to be released, then the
PaperCut Home screen displays only the print jobs waiting to
be released. After the user has actioned the print jobs waiting
to be released, the PaperCut Home screen reverts to the
| Toshiba MDS V3 Embedded Manual 2018-07-18
Copyright © 2018 PaperCut Software International Pty. Ltd., All Rights Reserved. 46 of 81
display based on the type of user (restricted or unrestricted) as
per the config key setting.
ext-device.toshiba.show-
job-status-button Configure the PaperCut Print Release page to display the Job
Status button on the Print Release page to allow users to
access the native device’s job status page and view the status
of print/fax/scan jobs.
This is applicable only to Toshiba devices with no printer error,
running the Embedded Web Browser (EWB) version 2.1.37+.
Values: Y, N, Default
Default: DEFAULT (Y)
ext-device.toshiba.device-
functions-on-login Configure the workflow to suppress the display of the
PaperCut MF Home screen after login.
Values: Y, N
Default: N
Setting this to N – does not suppress the PaperCut MF Home
screen after login. Any one of the following screens maybe
displayed, based on other settings:
• the PaperCut MF Home screen, or
• the PaperCut MF Print Release screen, or
• the PaperCut MF Select Account screen, or
• the PaperCut MF Account Details screen, or
• the PaperCut MF Account Confirmation screen
Setting this to Y – suppresses the PaperCut MF Home screen
after login. Any one of the following screens maybe displayed,
based on other settings:
• the PaperCut MF Select Account screen, or
• the PaperCut MF Account Details screen, or
• the PaperCut MF Account Confirmation screen, or
• the native device functions screen
ext-device.home-
screen.force-show
After accessing PaperCut MF on the device, configure the workflow
to display the PaperCut MF Home screen, irrespective of whether or
not Integrated Scanning is enabled and irrespective of whether or
not print jobs are waiting to be released.

| Toshiba MDS V3 Embedded Manual 2018-07-18
Copyright © 2018 PaperCut Software International Pty. Ltd., All Rights Reserved. 47 of 81
Set this global config key in the PaperCut MF Admin web interface:
Options > Config editor (advanced).
Values: Y, N
Default: N
ext-device.toshiba.skip-
release-screen-when-no-
jobs
After accessing PaperCut MF on the device, configure the workflow
to suppress the PaperCut MF Print Release screen, when there are
no print jobs waiting to be released and either of the following
conditions are met:
• either the config key ext-device.toshiba.direct-to-release-
page is set to Y, or
• Integrated Scanning is not enabled and the config key ext-
device.toshiba.app-buttons.enabled is set to N
Values: Y, N
Default: N
Setting this to Y, suppresses the PaperCut MF Print Release screen.
Any one of the following screens is displayed, based on other
settings:
• the PaperCut MF Home screen, or
• the PaperCut MF Select Account screen, or
• the PaperCut MF Account Details screen, or
• the PaperCut MF Account Confirmation screen, or
• the native device functions screen
Note: This is recommended only if the device is used more for
copying rather than printing.
Setting this to N, displays the PaperCut MF Print Release screen.
Note: This is recommended if the device is used for all functions
(printing, scanning, copying).
ext-device.toshiba.app-
buttons.enabled
Toggle the display of additional buttons to access a third party
application from the PaperCut MF Home screen.
Values: Y, N
Default: N
Setting this to Y requires you to configure at least one of the
following:
• ext-device.toshiba.app-button1.label and ext-
device.toshiba.app-button1.url, or

| Toshiba MDS V3 Embedded Manual 2018-07-18
Copyright © 2018 PaperCut Software International Pty. Ltd., All Rights Reserved. 48 of 81
• ext-device.toshiba.app-button2.label and ext-
device.toshiba.app-button2.url
Setting this to N overrides the configuration of:
• ext-device.toshiba.app-button1.label
• ext-device.toshiba.app-button1.url
• ext-device.toshiba.app-button2.label
• ext-device.toshiba.app-button2.url
ext-device.toshiba.app-
button1.label
Toggle the display of an additional button to access a third party
application from the PaperCut MF Home screen by configuring the
text of the button.
Values: Relevant button text
Note: You must set the config keys ext-device.toshiba.app-
buttons.enabled and ext-device.toshiba.app-button1.url.
Default: NONE
ext-device.toshiba.app-
button1.url
Specify the relevant third party application’s URL that the the
additional button on the PaperCut MF Home screen links to.
Values: URL of the relevant third party application
Note: You must set the config keys ext-device.toshiba.app-
buttons.enabled and ext-device.toshiba.app-button1.label.
Default: NONE
ext-device.toshiba.app-
button2.label
Toggle the display of an additional button to access a third party
application from the PaperCut MF Home screen by configuring the
text of the button.
Values: Relevant button text
Note: You must set the config keys ext-device.toshiba.app-
buttons.enabled and ext-device.toshiba.app-button2.url.
Default: NONE
ext-device.toshiba.app-
button2.url
Specify the relevant third party application’s URL that the additional
button on the PaperCut MF Home screen links to.
Values: URL of the relevant third party application
Note: You must set the config keys ext-device.toshiba.app-
buttons.enabled and ext-device.toshiba.app-button2.label.
Default: NONE
ext-device.toshiba.release-
show-cost
Toggle the display of the cost of held print jobs on the PaperCut MF
Print Release screens on the device.

| Toshiba MDS V3 Embedded Manual 2018-07-18
Copyright © 2018 PaperCut Software International Pty. Ltd., All Rights Reserved. 49 of 81
This is a device-specific config key.
• Values: Y, N
• Default: Y
Note: Setting this to N also hides the account balance and does not
display the savings based on other changes made to held print job
settings. For more information, see 6.5 Held print job settings at
the device.
ext-device.toshiba.login-
instruction
Customize the text that appears on the PaperCut MF Login screen.
For example, instructions to help users log in to PaperCut MF on the
device.
Values: Any text, DEFAULT
Default: DEFAULT (device-specific PaperCut MF text)
Note: To add a line break, use \n. For example, PaperCut
Software\nSwipe your card to log in.
ext-device.toshiba.disable-
ocr
This configuration is only applicable to devices which have MFD
embedded OCR installed on them. If set to "Y" and Integrated
Scanning is used to produce a PDF format document, it prevents it
from producing a searchable PDF file using the MFP's OCR software.
This should also speed up the scanning process evident particularly
on high page count jobs, as no native OCR software is needed to be
run.
Values: Y, N, DEFAULT
Default: DEFAULT (N)
ext-device.inactivity-
timeout-secs
PaperCut MF timeout: Customize the interval of time (seconds) after
which a logged-in user who is detected as being idle on PaperCut MF
is automatically logged out.
Values: Any positive number (seconds)
Default: 60 (seconds)
Note: This comes into effect only if it is lower than the value of the
device’s timeout. However, if it is higher, then it is overridden by the
lower value of device’s timeout.
ext-
device.toshiba.timeout.sca
n-prompt-send.secs
PaperCut MF scan complete timeout 1: Customize the interval of
time (seconds) after which a user who is detected as being idle on
the PaperCut MF Scan Complete (with the two buttons - Add
another page, Send) screen is automatically taken to the PaperCut
MF Scan Complete (with scan completed or failed status). The

| Toshiba MDS V3 Embedded Manual 2018-07-18
Copyright © 2018 PaperCut Software International Pty. Ltd., All Rights Reserved. 50 of 81
Note: The limit quota reference configurations are used in a different way than the standard limit
references, such as, ext-device.toshiba.limit-reference.duplex. The standard ones are used at log in
time to decide if the user has permission to do copies, assuming they are going to try to do at least
one page of a certain page size and whether it will be duplex or not. The limit quota reference
configurations are used to set the page costs for quotas on the copier. For example, if PaperCut is
told to charge $0.50 for A3 pages, and ext-device.toshiba.limit-reference.quota.large-paper-size is
set to A3, then this will tell the copier that large-pages cost $0.50.
7 Scanning
There are now 2 choices regarding scanning in PaperCut:-
• MFD Native Scanning
scan to email, scan to home drive, scan to network drive
process of sending the completed scan job to the user (scan transfer)
is also automatically initiated, and the user is logged out.
Values: Any positive integer, DEFAULT
Default: DEFAULT (30 seconds)
Note: This timeout temporarily deactivates the PaperCut MF timeout
(ext-device.inactivity-timeout-secs) and the device timeout.
ext-
device.toshiba.timeout.co
mplete-scan-job.secs
PaperCut MF scan complete timeout 2: Customize the interval of
time (seconds) after which a user who is detected as being idle on
the PaperCut MF Scan Completes screen (with scan completed or
failed status), is automatically logged out.
Values: Any positive integer, DEFAULT
Default: DEFAULT (5 seconds)
Note: This timeout temporarily deactivates the PaperCut MF timeout
(ext-device.inactivity-timeout-secs) and the device timeout.
ext-device.toshiba.guest-
access.label
Customize the text of the Guest button that appears on the
PaperCut MF Login screen.
This is a device-specific config key.
• Values: Any text, DEFAULT
• Default: DEFAULT (Guest)
Note: This is applicable only if guest access is activated (the
Allow guest/anonymous access authentication method is
selected and at least any one other authentication method is
also selected). For more information, see 6.6 Authentication
Methods.

| Toshiba MDS V3 Embedded Manual 2018-07-18
Copyright © 2018 PaperCut Software International Pty. Ltd., All Rights Reserved. 51 of 81
• PaperCut Integrated Scanning
scan to my email, scan to my home drive, scan to network drive
Whilst very similar in features there are some key differences
• MFD Native Scanning the user will be required to leave the PaperCut interface however it
does support address book
• PaperCut Integrated Scanning provides an excellent user experience as all functions are
available in a unified interface and where administration is managed centrally.
Although it is technically possible to offer a hybrid of both Toshiba Native Scanning and PaperCut
Integrated Scanning, the overall user experience needs to be considered after consultation with your
client.
Irrespective of method chosen please be sure to have the latest MFD firmware is installed.
7.1 MFD Native Scanning Setup
Set up Scan-to-Network Folder:
Toshiba devices can be configured to scan to network folders that can be predetermined for each
user. This functionality requires PaperCut MF version 16.4 or later. To configure scan to network
folders:
1. Under the Toshiba TopAccess configuration, navigate to Administration > Security. 2. In the “Home Directory Setting” area:
a. Set the “Home Directory” to “Enable”.
b. Set the “Home Directory Server” to “Use User Authentication Server”.
3. Click “Save”.
4. Under the Toshiba TopAccess configuration, navigate to Administration > Setup > Save As
File.
5. In the “Destination” area:
a. Select “Use Network Folder Destination”
b. Set “Default file path” to “Remote 1”.
6. In the “Remote 1 and Remote 2 Settings” area.

| Toshiba MDS V3 Embedded Manual 2018-07-18
Copyright © 2018 PaperCut Software International Pty. Ltd., All Rights Reserved. 52 of 81
a. Complete the settings under “Remote 1”. This is the network location that will be
overwritten by the user’s home directory attribute. This is used as the default if the
user’s home directory is not specified in PaperCut.
b. Enter the Login User Name and Password for a user account that has read/write
permissions to all user home directories. These credentials are used to authenticate
to the shared drive if the user authenticates with card authentication. If the user logs
into the device with standard credentials, those will be used to authenticate against
the network folder.
c. Click “Save”.
7. Optionally, you can configure the device to skip showing a warning message on login when
the user has no home directory specified by setting the 08 code “8722” to “1”.
Set up Scan-to-Email Address:
Toshiba devices can be configured to scan to e-mail addresses that can be predetermined for each
user. This functionality requires PaperCut MF version 16.4 or later. The process to configure this
functionality is:
1. Under the Toshiba TopAccess configuration, navigate to Administration -> Security.
2. In the “Email Address Setting” are, if the “Use Email Address which was registered Local
User” option is available under “From Address” (on newer devices), then the device can use
the logged in user’s email address. In this case, set the following values.
a. Set the “From Address” value to “Use Email Address which was registered Local
User”.
b. Set the “From Name” value to “Login User Name”.
c. Set the “Restriction setting for Email Destination” value to “To”.
d. Click Save.
If the “Use Email Address which was registered Local User” option is not available under “From
Address” (on older devices), then the device still needs an LDAP server to detect the user’s email
address. In this case, refer to the Toshiba SDK v2 manual - Enable LDAP User Authentication for how
to set up an email address.
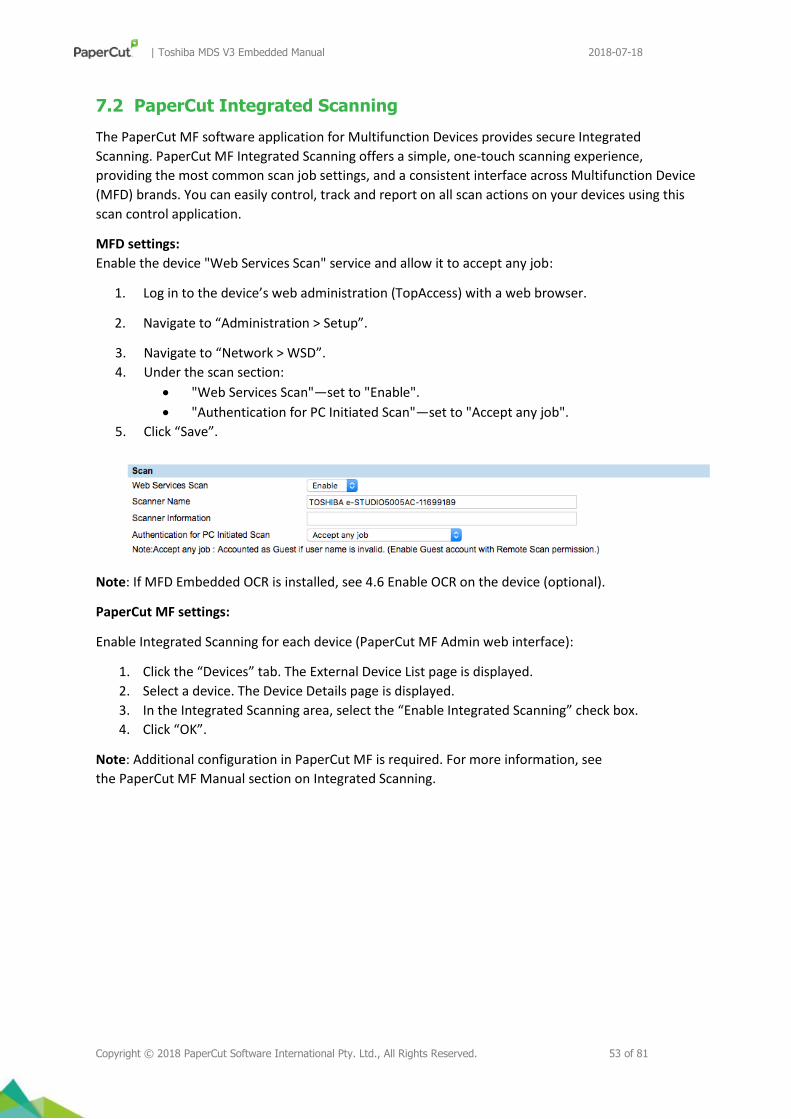
| Toshiba MDS V3 Embedded Manual 2018-07-18
Copyright © 2018 PaperCut Software International Pty. Ltd., All Rights Reserved. 53 of 81
7.2 PaperCut Integrated Scanning
The PaperCut MF software application for Multifunction Devices provides secure Integrated
Scanning. PaperCut MF Integrated Scanning offers a simple, one-touch scanning experience,
providing the most common scan job settings, and a consistent interface across Multifunction Device
(MFD) brands. You can easily control, track and report on all scan actions on your devices using this
scan control application.
MFD settings:
Enable the device "Web Services Scan" service and allow it to accept any job:
1. Log in to the device’s web administration (TopAccess) with a web browser.
2. Navigate to “Administration > Setup”.
3. Navigate to “Network > WSD”.
4. Under the scan section:
• "Web Services Scan"—set to "Enable".
• "Authentication for PC Initiated Scan"—set to "Accept any job".
5. Click “Save”.
Note: If MFD Embedded OCR is installed, see 4.6 Enable OCR on the device (optional).
PaperCut MF settings:
Enable Integrated Scanning for each device (PaperCut MF Admin web interface):
1. Click the “Devices” tab. The External Device List page is displayed.
2. Select a device. The Device Details page is displayed.
3. In the Integrated Scanning area, select the “Enable Integrated Scanning” check box.
4. Click “OK”.
Note: Additional configuration in PaperCut MF is required. For more information, see
the PaperCut MF Manual section on Integrated Scanning.

| Toshiba MDS V3 Embedded Manual 2018-07-18
Copyright © 2018 PaperCut Software International Pty. Ltd., All Rights Reserved. 54 of 81
8 Known Limitations and Security
8.1 The guest access authentication method is unavailable
Although the anonymous access authentication method is available (only the Allow
guest/anonymous access authentication method and no other authentication method), the guest
access authentication method is currently unavailable (the Allow guest/anonymous access
authentication method and at least any one other authentication method). As a result, if the Allow
guest/anonymous access authentication method is selected, all other methods are automatically
disabled, and cannot be used as authentication methods on the device. For more information, see
6.6 Authentication Methods.
8.2 Zero stop when Copying and Scanning
Since SDK version 2, we introduced the Zero Stop capability, enabling jobs to potentially be stopped
part way through when the user runs out of quota in PaperCut. In an ideal implementation,
PaperCut would be able to control exactly how many pages a user can copy and always prevent the
user from overdrawing their account. Toshiba offers the ability to limit page counts but has the
following limitations:
• The copier does not seem to stop immediately when limits are reached for copying. There is
a small delay meaning that users can overrun their account below zero by about 2 pages.
This can be avoided by using ext-device.toshiba.overrun-offset and setting to an appropriate
amount (please see the advanced configuration section for more details), however, there
are drawbacks with doing this.
• Ideally PaperCut would be informed of the user selection prior to copying or scanning and
can accept/reject the job at this point. Current Toshiba API implementations prevent this
level of pre-approval.
• SDK version 3 supports the page costs of color, grayscale, small page size and large page size.
It does not support costs or discounts for duplex and individual pages sizes other than the 2
sizes of small and large. By default, the small paper size is set to ext-device.toshiba.limit-
reference.quota.small-paper-size which is US letter in the United States and A4 everywhere
else. The large paper size is set to ext-device.toshiba.limit-reference.quota.large-paper-size
which is Ledger in the United States and A3 everywhere else.
When the quota limit is exceeded a popup message on the device will alert the user to having run
out of quota.

| Toshiba MDS V3 Embedded Manual 2018-07-18
Copyright © 2018 PaperCut Software International Pty. Ltd., All Rights Reserved. 55 of 81
If the scanning is stopped midway through when scanning off the platen, then the Toshiba error
message is different to above, instead it says, “The quota has been reached. Only the previously
scanned documents will be processed”. Zero stop is not supported when scanning (PaperCut MF’s
Integrated Scanning and device’s scanning). If the scanning is denied from the outset, then the
standard message above will be shown.
8.3 Zero stop when Faxing
Toshiba devices currently do not stop fax jobs mid-way when users run out of credit. Instead, users
can complete the fax job and possibly incur an overdraft in their accounts.
8.4 Internal MFD usernames
Logging in to the MDS session is not available for usernames registered internally on the device.
These usernames typically include:
• Undefined
• Admin
• Service
• Auditor
• Guest
NOTE: Other internal users can be added by an administrator.
If a PaperCut username matches an internal username (not case sensitive), login will fail and an error
message will be displayed.
The complete list of internal MFD usernames is available in TopAccess under “User Management >
User Accounts”.
8.5 Bypassing the System
It is important that the administrators take care to prevent users from bypassing the system and
directly accessing the copier. Likewise, it’s also important that administrators know how to
bypass/disable the system if direct copier access is required – say to change advanced system
settings. Administrators should take the following precautions:
• The copier’s built in admin password should be changed and always kept secure.

| Toshiba MDS V3 Embedded Manual 2018-07-18
Copyright © 2018 PaperCut Software International Pty. Ltd., All Rights Reserved. 56 of 81
• The power and network cable should be securely connected. The system is designed to be
robust and record copier usage if the power is lost during copying, but it is possible to start
copying before the embedded application starts after restarting the copier.
• Apply IP filtering settings in the MFD to restrict unauthorised direct printing (for more
information please refer to online Help in TopAccess or the Administrator Guide)
8.6 Scan from feeder
When scanning from the document feeder, the specified paper size and orientation is ignored. The
scan job is always the full size of the original document. For example, if the original document is A3
landscape, and you specify to scan it to A4 portrait, the scan will be A3 landscape.

| Toshiba MDS V3 Embedded Manual 2018-07-18
Copyright © 2018 PaperCut Software International Pty. Ltd., All Rights Reserved. 57 of 81
9 Uninstalling PaperCut from the MFD
To stop the Toshiba MFD from trying to authenticate with PaperCut and allow free copying on the
device, the simplest option is to delete the device from PaperCut and then disable the “User
Authentication Setting.” If all you do is this step, then it is very simple to re-enable the MFD for
PaperCut again if you change your mind.
To disable the PaperCut authentication:
1. Log in to the device’s web administration (TopAccess) with a web browser.
2. In TopAccess, select “Administration” -> “Security”.
3. In the “User Authentication Setting” area, change “User Authentication” to “Disable”.
4. Click “Save”.
9.1 Further optional uninstallation steps
When you delete the device from PaperCut, it is making all necessary changes to device
configuration to avoid the device communicating with the server in the future.
NOTE: Leave the MFD idle without any user interaction for at least the duration of the selected
“Auto Clear” option, before deleting the device from PaperCut. If you do not, some of the PaperCut
settings might remain on the device and an error message might be displayed.
Theoretically, you could reverse all the steps that you followed during the setup process. You could
revert the 08 codes back to what they were and change all the TopAccess menu options back to

| Toshiba MDS V3 Embedded Manual 2018-07-18
Copyright © 2018 PaperCut Software International Pty. Ltd., All Rights Reserved. 58 of 81
what they were. However, disabling the authentication would be the prime thing that is required.
Some other steps to be more complete could include:
• Disabling or Removing device in PaperCut device administration
• Disabling MDS Mode (if not done automatically)
• Disabling the ODCA option
• Unselecting the Job Quota Setting
• Reverting EWB settings
• Reverting email settings
• Reverting Home Directory settings
• Reverting settings for PaperCut shortcut on keys “1”

| Toshiba MDS V3 Embedded Manual 2018-07-18
Copyright © 2018 PaperCut Software International Pty. Ltd., All Rights Reserved. 59 of 81
10 FAQ & Troubleshooting
I can’t see the PaperCut login screen on the device panel.
If the PaperCut login screen is not displayed, check the following:
• Check the MFD Embedded Web Browser (EWB) is installed
• Ensure the EWB settings are correct
• Check MDS mode is enabled
Check the MFD Embedded Web Browser (EWB) is installed
The Toshiba Embedded Web Browser (EWB) is an optional module licensed from Toshiba. It provides
a web-based interface for print release, to select accounts/cost-centers, and to associate unknown
card numbers from users. If your Toshiba MFD does not have the EWB module enabled, contact your
Toshiba dealer.
Ensure the EWB settings are correct
With “Toshiba v3+”, Papercut updates the EWB settings automatically on registration of a new
device. There are two EWB settings updated. If you cannot see the PaperCut login screen, review the
settings as follow:
1. In your web browser, log in to the MFD web interface (TopAccess) as the “Admin” user.
2. Select the “Administration” tab.
3. Navigate to the “Administration” -> “EWB” page.
4. Under the “Home Page Setting”, set the “Home Page” by changing “server-address” to the
address of your PaperCut server, and “device-id” to the device id as set up in PaperCut. http://server-address:9191/device-web/toshiba/device-id/home
Alternatively, to use an encrypted HTTPS connection (advisable when using card-association)
enter: https://server-address:9192/device-web/toshiba/device-id/home
5. Under the “Login URL Setting in MDS Mode”, in “Login URL in MDS Mode”, change “server-
address” to the address of your PaperCut server, and “device-id” to the device id as set up in
PaperCut http://server-address:9191/device-web/toshiba/device-id/login
Alternatively, to use an encrypted HTTPS connection (advisable when using card-association)
enter: https://server-address:9192/device-web/toshiba/device-id/login
NOTE: To use HTTPS, you must have an officially signed SSL certificate (e.g. from Verisign,
Thawte, etc) installed on the PaperCut Application Server and use the server’s DNS name.
Without this, the Toshiba embedded web browser displays a certificate warning message
before displaying the page. For more information, see Generating an SSL/HTTPS Key in the
PaperCut manual.
Determine the device Id
1. Log in to the PaperCut Admin web interface as an Administrator.
2. Click “Devices”.
3. Select a device.
The Device Details page is displayed.

| Toshiba MDS V3 Embedded Manual 2018-07-18
Copyright © 2018 PaperCut Software International Pty. Ltd., All Rights Reserved. 60 of 81
4. The browser’s URL has the following pattern in the query parameters:
?service=direct/1/DeviceList/selectDevice&sp=l<device-id>
where <device-id> is the Id of the device.
Check MDS mode is enabled
Toshiba MDS V3 offers a new authentication mode called MDS. With MDS mode, an external
authentication server can control the authentication process.
When you register a new “Toshiba v3+” device in PaperCut, the device’s MDS mode is enabled.
This includes any dependency, such as, the Authentication Type, which is set to MFD Local
Authentication.
If you cannot see the PaperCut login screen, review the setting in TopAccess:
1. In your web browser, log in to the MFD web interface (TopAccess) as the “Admin” user.
2. Navigate to “Administration > Setup”.
3. Under “Device Information”, check that the “MDS Mode” setting is enabled
NOTE: If MDS mode is set to disabled, and you are unable to change it manually, click the question
mark next to it to check which of the dependencies you need to update first.
My Toshiba device is not logging any copy/fax/scan jobs? What’s wrong?
There are several possible problems. Check the following:
• In the PaperCut admin site, go to the “Devices” tab and select the device:
o Verify that the “Device hostname / IP” is correct.
o Verify that the appropriate “Device Functions” are enabled. i.e. To track faxes,
ensure “Track & control faxing” is enabled.
o Check the Device Status on this page (or in Status column of Device List) to ensure
no errors are occurring.
o Check that the Device’s administrator username and password are correct.
• Verify that the 08 service mode settings have been changed.
• Verify that ODCA has been enabled and the default port of 49629 was used.
• Verify the correct version of the firmware is running.
A user has overrun their quota during a copy job. Why didn’t it stop them earlier?

| Toshiba MDS V3 Embedded Manual 2018-07-18
Copyright © 2018 PaperCut Software International Pty. Ltd., All Rights Reserved. 61 of 81
There are several possible reasons for this:
• A copy job tends to overrun its quota by at least 2 pages probably because there are at least
2 pages in the device that have not yet come out of the copier. This is a restriction of the
device.
• You have used more advanced costs than just color, grayscale, small paper size, or large
paper size, which are all that MDS V3 provides direct support for. For example, you have set
a duplex discount and by default PaperCut assumes all pages are duplex (according to ext-
device.toshiba.limit-reference.quota.duplex).
The card reader isn’t working? What’s wrong?
Firstly, ensure that you are using a compatible card reader (see Appendix A: Supported
Authentication Card Readers).
If you are using a compatible card reader the most likely cause is a configuration issue:
• Make sure the card reader is connected while the device is booting up. Try rebooting the
device.
• Check the 08 codes used to enable the card reader (e.g. 3500)
What is the IP address of my PaperCut Server?
Use operating system command-line tools such as ipconfig or ifconfig to determine this.
I have thousands of accounts representing my clients. Will the system handle this?
Yes. We have designed the system to handle thousands of Shared Accounts. Users with many
accounts will also be presented with some “power options” to help them find accounts including
keywords based search.
Login on my Toshiba device is very slow
This can be caused by incorrect network settings on the copier such as incorrect DNS servers, subnet
masks and similar. We recommend checking all network settings. If this fails to address the issue,
review the following:
1. Make sure you are running PaperCut 16.4 or above and the latest device firmware.
2. On the device in TopAccess, switch off all DNS servers and enter all network addresses as IP
numbers. Bad DNS server settings, or slow reverse DNS can slow down login times.
Card self-association is enabled but the user is still prompted for a PIN. If they enter their PIN it
doesn’t work. What is wrong?
If Card Authentication is requiring a PIN and card self-association is enabled, then the user must
enter a PIN of “0” when prompted for a PIN. If they enter any other PIN including their own PIN
associated with the PaperCut account, it will not work.
I have enabled Identity Number authentication in PaperCut but it doesn’t prompt me for the ID
number. Why not?
You might not have enabled PIN code authentication in TopAccess on the MFD. With the correct
firmware on the MFD, you must enable “PIN Code Authentication” in the “PIN Code Authentication
Setting” under the Security tab. This requires a firmware version that supports this feature. Please

| Toshiba MDS V3 Embedded Manual 2018-07-18
Copyright © 2018 PaperCut Software International Pty. Ltd., All Rights Reserved. 62 of 81
check your device firmware is at or above the version listed in section 3.3 Supported Toshiba
Devices.
I have enabled Swipe Card requiring a PIN in PaperCut but it doesn’t prompt me for the PIN. Why
not?
You might not have enabled “Require PIN Code” in the “Card Authentication Setting” in the Security
tab in TopAccess. This requires the correct firmware on the MFD mentioned in section 3.3 Supported
Toshiba Devices.
Users are unable to cancel their print jobs at the MFD. How can I fix this?
This is explained in section “4.8 Disable MFD control of print jobs (mandatory)“
(Authenticate/Quota/Permission). Basically, to support the zero stop functionality, we have to force
network print jobs to be owned by “printope” instead of the real username. Therefore, by default
the MFD won’t let the authenticated user delete the print jobs which it believes are owned by
“printope”. To override this, an 08 code needs to be set (it is also listed in the 08 code checklist in
the appendix).
When a user chooses to copy using the Erasable Blue color option, why does the copy cost always
default to 1.0 per page?
Even after setting copy color job costs for the "Small Erasable Blue" and "Large Erasable Blue" on the
Admin web interface, the costs default to 1.00 on the device’s web admin. To override this, manually
set the copy color job costs on the device’s web admin (Counter > Quota Setting) and click Save.

| Toshiba MDS V3 Embedded Manual 2018-07-18
Copyright © 2018 PaperCut Software International Pty. Ltd., All Rights Reserved. 63 of 81
11 Appendix A: Supported Authentication Card
Readers
The Toshiba devices support the following card reader types. Each card reader type requires a
different 08 service mode setting configuration which is typically done in the section “Configuring
the ‘08 Service Mode’ MFD settings” and is described in the table below.
Card Reader Type 08 Service Code Service Mode Setting
Elatec TWN3 3500 90001
Magtek Dynamag 3500
3501
70001
1 or 2 or 3
e-Bridge IDGATE - HID iClass 3500 40002
e-Bridge IDGATE - Mifare 3500 30001
Generic Keyboard mode
readers
3500 60001
NOTE: e-Bridge IDGATE in the table refers to Toshiba’s own brand of card readers.
11.1 Elatec TWN3
The Elatec TWN3 card reader can support a large variety of card types including:
• HID PROX (HID PROX)
• HID iCLASS (HID iCLASS)
• Multi125 (EM410x, HITAG 1, HITAG 2, HITAG S, EM4150, T5567/Q5)
• Inditag (Indala)
• MIFARE (MIFARE, Ultralight, MIFARE Mini, MIFARE 1k/4k, MIFARE DESfire)
• Legic (Legic Prime, Legic Advant)
For this card reader set 08 service mode 3500 setting to: 90001.
NOTE: The Elatec TWN3 might require special firmware to use on the Toshiba devices. This is
available from PaperCut. Download and firmware upgrade instructions can be found on the
PaperCut knowledge base at the link below:
http://www.papercut.com/kb/Main/ElatecFirmwareForToshibaMFD
11.2 Magtek Dynamag
Toshiba has magnetic card reader support for the Magtek Dynamag card reader. This is set using the
08 code of 3500 with a mode setting of 70001. As well as setting the type of reader using the 3500

| Toshiba MDS V3 Embedded Manual 2018-07-18
Copyright © 2018 PaperCut Software International Pty. Ltd., All Rights Reserved. 64 of 81
code, one also needs to set the 3501 code to specify which track data to use as specified in the table
below.
Track data O8 service mode setting 3501
Use track 1 data 1
Use track 2 data 2
Use track 3 data 3
When entering the track number (for example, track 2 has been used for the banking industry), you
will be shown boxes with the letters A to F. Please ignore this and just enter one of the digits 1 to 3
on the key pad. Then press OK. You will be asked to repeat this for confirmation and so just enter the
same digit again and press OK.

| Toshiba MDS V3 Embedded Manual 2018-07-18
Copyright © 2018 PaperCut Software International Pty. Ltd., All Rights Reserved. 65 of 81
11.3 Generic Keyboard Mode Readers
Card readers in generic keyboard mode are supported in all e-BRIDGE Next Toshiba models.
The following card reader models below have been tested and are supported in generic keyboard
mode. Other models not in the table might be supported by calling a Toshiba technician to make the
necessary change (to register the new card reader’s Product ID (PID) and Vendor ID (VID)).
Vendor Product Name
Elatec TWN4
TWN3
RFIdeas pcProx Plus
pcProx Enroll iCLASS ID#
pcSwipe Enroll
RDR-8058AKU-PPCT
RDR-80581AKU
RDR-805H1AKU
RDR-805T1AKU
IDTECH OMNI combined barcode and magnetic stripe reader
Datalogic Magellan 800i 2D barcode reader
Magtek Dynamag
Cartadis TCM2MIFARE/HID
TCM3 13.56 MIFARE
TCM3 125KK HID
FTDI FT232R USB UART IC
USB UART IC
Zebra (formerly Motorola) DS9208 2D Orbital Head
Zebra (formerly Motorola) DS457 1D/2D barcode imager
11.4 Configuring Swipe Card Reader Validation

| Toshiba MDS V3 Embedded Manual 2018-07-18
Copyright © 2018 PaperCut Software International Pty. Ltd., All Rights Reserved. 66 of 81
Supporting Card Reader authentication is as easy as:
1. Connecting a supported card reader to the device via the USB port (Note: On e-BRIDGE Next
devices this is hidden under a sticker on the top/front panel).
2. Enabling Swipe card as an Authentication method under the device’s configuration in
PaperCut’s web interface.
3. Ensure the card number, as read by the reader, is loaded into the Card Number field in the
PaperCut database (or consider using user self-association).
Swipe cards contain numbers used to identify users according to the card number configured in the
User Details screen under “Card/Identity” number. Some readers report information in addition to
the number encoded on the card, such as checksums. PaperCut can treat these cases in three ways:
Card Number Needs No Conversion
• A typical case is the checksum being reported after the card number, separated by an equals
sign, such as in 5235092385=8. PaperCut can handle this case by default; it will extract
the number before the equal sign as the card number: 5235092385.
Regular Expression Filters
• For some cases, a “regular expression” that will filter the card number from the complete
string of characters reported by the card reader might be required. Documentation on
regular expressions can be found on the Internet, e.g. at .
o The regular expression must be fashioned so that the card number is returned as the
first match group.
o Usually one regular expression will be used for all the devices managed by PaperCut;
this must be entered in the “Config editor (advanced)” which you will find on the
Options tab under Actions. The key is called “ext-device.card-no-regex”.
o The global setting however can be overridden on a per-device basis: The key “ext-
device.card-no-regex” can also be found on the “ Advanced Config tab in the device
details screen. This setting will override the global setting unless the keyword
“GLOBAL” is specified.
o PaperCut developers will gladly assist in producing a regular expression when
supplied with a few sample outputs from your card reader. Contact your reseller or
Authorized Solution Center for help with regular expressions. You can find their
contact information in your PaperCut Admin interface on the About page.
o If you would like to write your own regular expressions, here are some examples:
▪ Use the first 10 characters (any character): (.{10})
▪ Use the first 19 digits: (\d{19})
▪ Extract the digits from between the two “=” characters in
“123453=292929=1221”: \d*=(\d*)=\d*
Card Number Format Converters In addition to extracting parts of the card numbers using regular expressions, converting numbers
from one format to another is a common requirement. For example, a card reader might report in
hexadecimal format, while the number stored in the source (e.g. Active Directory) is in a decimal
format. PaperCut includes several inbuilt converters to assist here.
Note: Many card readers are configurable - the number format can be changed at the hardware
level via utility or configuration tools. PaperCut’s software-level converters are there to support

| Toshiba MDS V3 Embedded Manual 2018-07-18
Copyright © 2018 PaperCut Software International Pty. Ltd., All Rights Reserved. 67 of 81
card readers that don’t offer this level of configuration, or where a global software-level
conversion is a better choice. For example, it might be quicker to do the conversion in PaperCut
rather than manually reprogram 100+ readers!
Like regex’s, the convertors can be defined on either a global (all devices) or on a per-device basis.
To set globally:
1. In the PaperCut Admin web interface, select “Options”.
2. In the “Actions” menu, select “Config editor (advanced)”.
3. Search for “ext-device.card-no-converter”
4. Enter the name of the required converter (see table below); then click “Update”.
To set at the device level:
1. In the PaperCut Admin web interface, navigate to “Devices -> [select device] -> Advanced
Config”.
2. Search for “ext-device.card-no-converter”
3. Enter the name of the required converter (see table below); then click “Update”.
Standard Converters
Convertor Description
hex2dec Convert a hexadecimal (base 16) encoded card number to decimal
format. Hexadecimal numbers usually contain 0-9 and A-F. This will
convert “946EBD28” to “2490285352”.
dec2hex Convert a decimal encoded card number to hexadecimal format. This
will convert “2490285352” to “946EBD28”.
ascii-enc Unpack an ASCII encoded card number string. E.g. given the number
“3934364542443238”, the ASCII code “39” is converted to 9, “34” -
> 4, “45” -> E, with the entire number resulting in “946EBD28”.
javascript:<path> Advanced: Define a custom conversion function in JavaScript (see
below)
It is possible to chain or pipeline converters by delimiting with a pipe (|). For example, ascii-
enc|hex2dec will first unpack the encoded ASCII number then convert it to a decimal.
Tip: Not sure which converter to use? Often trial and error is a good approach. After presenting a
card, the number will appear in an application logger message with conversions applied (assuming
the card is unknown to the system). Try different converters and inspect the resulting numbers in
the application log.

| Toshiba MDS V3 Embedded Manual 2018-07-18
Copyright © 2018 PaperCut Software International Pty. Ltd., All Rights Reserved. 68 of 81
Using custom JavaScript
If the inbuilt converter functions are unable to meet the requirements, it is possible to define your
own function using JavaScript. This is an advanced exercise and it is expected that any implementer
be familiar with programming and JavaScript. To implement your own converter:
1. Create a file text file [install-path]/server/custom/card.js
2. Define a single JavaScript function in this file called “convert” It should accept and return a
single string. Here is a trivial example: function convert(cardNumber) {
return cardNumber.substring(3,10).toLowerCase();
}
3. Enter a converter in the form: javascript:custom/card.js
Tip: Check the file [install-path]/server/log/server.log when testing. Any scripting
errors will be displayed as warning messages in the log.
Tip: A Javascript script can also be included in the pipeline. For example
ascii-enc|hex2dec|javascript:custom/card.js
Other advanced notes
• If both a regular expression and a converter are defined, the regular expression is applied
first. This means a regular expression can be used to clean up the input (e.g. remove
checksum or delimiters) before passing to a converter.
• In some situations, a custom JavaScript implementation might not be enough. For example,
there might be a requirement to use a 3rd party system to decrypt the number. PaperCut
includes an advanced plugin architecture that the PaperCut Software development team
uses to implement these advanced converters. Contact your reseller or Authorized Solution
Center to discuss development options and costs. You can find their contact information in
your PaperCut Admin interface on the About page.

| Toshiba MDS V3 Embedded Manual 2018-07-18
Copyright © 2018 PaperCut Software International Pty. Ltd., All Rights Reserved. 69 of 81
12 Appendix B: Process for performing user card
association
This section describes the process of how a user can associate a new card with their PaperCut
account on the Toshiba devices.
1. Present card at the MFD reader (you should hear a beep).
2. If the web screen is not set as the default, bring up the web interface (EWB):
a. Press the shortcut “1” hard key on the MFD.
3. The following screen is displayed. This screen allows the user to authenticate with a
username and password.
4. Enter your “Username” and “Password”; then press “Log in”. If the association is successful,
the user is notified on the LCD screen.
5. Click “OK”.
The card is now associated with the user’s account. Swiping the card again allows them to login
using the card.

| Toshiba MDS V3 Embedded Manual 2018-07-18
Copyright © 2018 PaperCut Software International Pty. Ltd., All Rights Reserved. 70 of 81
13 Appendix C: Device screenshots for user
documentation
The PaperCut MF Login screen (default authentication):
The PaperCut MF Home screen with PaperCut MF Integrated Scanning icon:
The PaperCut MF Print Release screen with all held print jobs:

| Toshiba MDS V3 Embedded Manual 2018-07-18
Copyright © 2018 PaperCut Software International Pty. Ltd., All Rights Reserved. 71 of 81
• Without the ability to allow users to change settings:
• With the ability to allow users to change settings:
The PaperCut MF Print Release screen with details of one held print job:

| Toshiba MDS V3 Embedded Manual 2018-07-18
Copyright © 2018 PaperCut Software International Pty. Ltd., All Rights Reserved. 72 of 81
• Without the ability to allow users to change settings:
• With the ability to allow users to change settings:

| Toshiba MDS V3 Embedded Manual 2018-07-18
Copyright © 2018 PaperCut Software International Pty. Ltd., All Rights Reserved. 73 of 81
The PaperCut MF Account Confirmation screen without the option of account selection:
The PaperCut MF Account Confirmation screen with the option of account selection:

| Toshiba MDS V3 Embedded Manual 2018-07-18
Copyright © 2018 PaperCut Software International Pty. Ltd., All Rights Reserved. 74 of 81
The PaperCut MF Select Account screens:

| Toshiba MDS V3 Embedded Manual 2018-07-18
Copyright © 2018 PaperCut Software International Pty. Ltd., All Rights Reserved. 75 of 81
The PaperCut MF Integrated Scanning screens:
1. The PaperCut MF Scan screens:

| Toshiba MDS V3 Embedded Manual 2018-07-18
Copyright © 2018 PaperCut Software International Pty. Ltd., All Rights Reserved. 76 of 81
2. The PaperCut MF Scanning (with a processing spinning wheel) screen:
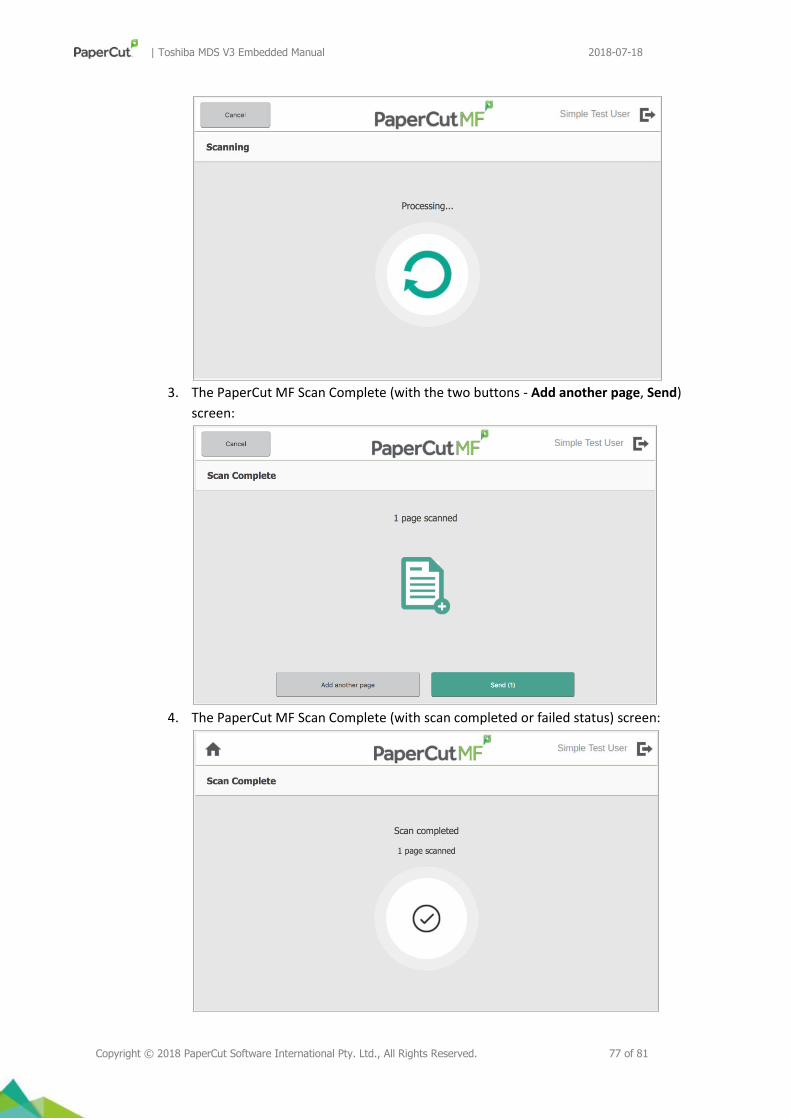
| Toshiba MDS V3 Embedded Manual 2018-07-18
Copyright © 2018 PaperCut Software International Pty. Ltd., All Rights Reserved. 77 of 81
3. The PaperCut MF Scan Complete (with the two buttons - Add another page, Send)
screen:
4. The PaperCut MF Scan Complete (with scan completed or failed status) screen:

| Toshiba MDS V3 Embedded Manual 2018-07-18
Copyright © 2018 PaperCut Software International Pty. Ltd., All Rights Reserved. 78 of 81

| Toshiba MDS V3 Embedded Manual 2018-07-18
Copyright © 2018 PaperCut Software International Pty. Ltd., All Rights Reserved. 79 of 81
14 Appendix D: 08 Code Check list
Description Code Setting Factory
Default
Category
ODCA Non Secure
(Off Device Customisation
Architecture)
9820 1 1 mandatory
ODCA Secure 9819 1 0 mandatory
Auto Clear timeout 9110 4 3 recommended
Disable Logout popup 8723 0 1 optional
Disable automatic Logout after
fax send
9987 2 0 optional
USB Card Reader 3500 60001
(e.g. Generic
Keyboard
Reader) – see
Appendix A:
Supported
Authentication
Card Readers
0 optional
Setting when MFD embedded
OCR is installed and PaperCut
Integrated Scanning is enabled
3786-0 Sub-code 0 = 0 Sub-code 0 = 1 optional
Zero Stop for Copy and Scan 6084 1 0 optional
Disable MFD control of print jobs
(Authenticate/Quota/Permission)
3642 Sub-code 0 = 1 Sub-code 0 = 0 mandatory

| Toshiba MDS V3 Embedded Manual 2018-07-18
Copyright © 2018 PaperCut Software International Pty. Ltd., All Rights Reserved. 80 of 81
Description Code Setting Factory
Default
Category
Allow anyone to manage print
jobs at the MFD
8726 1 0 mandatory
Allow all users to delete their
jobs from Private/Proof print
screen on the copier
9236 3 1 mandatory
Web Services Scan Port 3760 Enter alternative
port number if
required
50083 optional
WSD scanning 3755 1 1 confirmation
No authentication for WSD
scanning
3642 Sub-code 2 = 1 Sub-code 2 = 0 optional
Do not show missing home
directory warning
8722 1 0 Optional

| Toshiba MDS V3 Embedded Manual 2018-07-18
Copyright © 2018 PaperCut Software International Pty. Ltd., All Rights Reserved. 81 of 81
15 Appendix E: TopAccess Settings Check list
Description Menu
Review EWB (optional) Administration -> Setup -> EWB
Review MDS Mode (optional) Administration -> Setup -> General
ODCA Enabling Administration -> Setup -> ODCA
Configure Home Directory & Email Administration -> Security
Configure Home Directory Administration -> Setup -> Save As File