parent’s guide - vtech
TRANSCRIPT
Parent’s Guide
91-003342-007 UK
C
M
Y
CM
MY
CY
CMY
K
Grow with VTech(105x148)bw1P-V2.pdf 1 08/18/2014 9:35:53
3
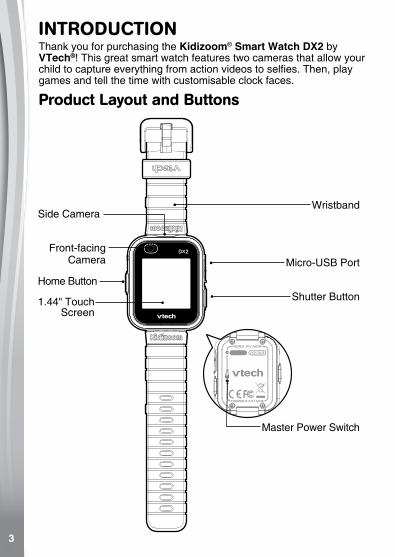
INTRODUCTIONThank you for purchasing the Kidizoom® Smart Watch DX2 by VTech®! This great smart watch features two cameras that allow your child to capture everything from action videos to selfies. Then, play games and tell the time with customisable clock faces.
Product Layout and Buttons
Side Camera
Front-facing Camera
Home Button
Micro-USB Port
Shutter Button
Master Power Switch
1.44" Touch Screen
Wristband
4
Shutter Button Press this button to launch the camera and to take photos and videos.Home Button From Clock Mode:
Press this button to display the home menu to choose other activities. Hold down this button for 2 seconds to turn the screen off.
From the Home Menu:Press this button to display the Clock screen.
In other activities:Press this button to return to the previous screen.
Smart Wake UpDouble tap the screen to wake up the watch and see the current time. For best results, we recommend tapping the screen using the tip of your finger and not your finger nail.Micro-USB Port Connect to your computer with the included Micro-USB Cable to transfer files and charge the watch.
INCLUDED IN THIS PACKAGE• One Kidizoom® Smart Watch DX2 • One Micro-USB cable• One parent's guideNote: The battery of the smart watch is not replaceable.WARNING: All packing materials, such as tape, plastic sheets,
packaging locks and tags are not part of this toy, and should be discarded for your child’s safety.
NOTE: Please keep this parent's guide as it contains important information.
The battery in this product must not be disposed of with household waste. This battery is recyclable. Please follow your local recycling regulations. Battery is not replaceable.The toy is only to be connected to Class II equipment bearing thefollowing symbol: The label covering the screen of the watch is packing material. Please remove this label before use.
5
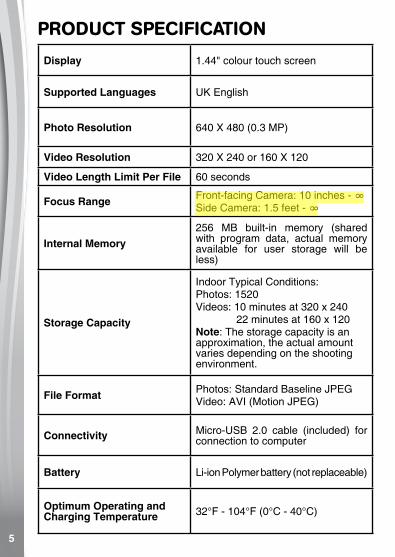
PRODUCT SPECIFICATION
Display 1.44" colour touch screen
Supported Languages UK English
Photo Resolution 640 X 480 (0.3 MP)
Video Resolution 320 X 240 or 160 X 120
Video Length Limit Per File 60 seconds
Focus Range Front-facing Camera: 10 inches - ∞Side Camera: 1.5 feet - ∞
Internal Memory256 MB built-in memory (shared with program data, actual memory available for user storage will be less)
Storage Capacity
Indoor Typical Conditions:Photos: 1520Videos: 10 minutes at 320 x 240
22 minutes at 160 x 120Note: The storage capacity is an approximation, the actual amount varies depending on the shooting environment.
File Format Photos: Standard Baseline JPEGVideo: AVI (Motion JPEG)
Connectivity Micro-USB 2.0 cable (included) for connection to computer
Battery Li-ion Polymer battery (not replaceable)
Optimum Operating and Charging Temperature 32°F - 104°F (0°C - 40°C)
6
WEARING THE SMART WATCHPeople with very sensitive skin may notice some irritation after wearing the Kidizoom® Smart Watch DX2 for extended periods of time. Skin may become irritated when moisture, sweat, soap, or other irritants get trapped under the wristband. To prevent this, we suggest that children remove the watch before going to bed for the night, to take the watch off if it's feeling uncomfortable, and keep their wrist and the band clean and dry.In addition, wearing the watch too tightly may also cause irritation. Make sure the fit is good - tight enough so the watch stays in place, but not so tight that it's uncomfortable. If you notice any redness, swelling, or other irritation, you may want to consult a doctor before wearing the watch again.
GETTING STARTEDMaster Power SwitchWhen using the Kidizoom® Smart Watch DX2 for the first time, you will need to slide the Master Power Switch (located on the underside of the watch) to the ON position . You may need a small tool such as a paper clip to move the switch to the ON position. It is recommended to fully charge the watch before first use. A full charge will take approximately 3 hours.When the Master Power Switch is set to the OFF position, the unit will not function and the battery will not charge. Only move the switch to the OFF position when the watch will not be used for an extended period of time.Note: It is not necessary to switch off the watch in daily use. Once the Master Power Switch is set to the OFF position, the watch will stop functioning. After the watch has been turned on again, the time and date has to be reset.
BATTERY RECHARGINGNote: Adult operation required.To charge the Kidizoom® Smart Watch DX2, the watch needs to be connected to a computer with the included Micro-USB Cable. To do so correctly, please follow these steps: • Make sure that the Master Power Switch is set to the ON position
before charging.• Pull up the rubber cover of the Micro-USB Port on the side of the
watch.
7
• Insert the Micro-USB Cable (small end) into the Micro-USB Port on the watch.
• Insert the large end of the Micro-USB Cable into a USB port on your computer. A USB port is usually marked with this symbol:
• Once the connection is successful, you will see a battery recharging symbol appear on the watch screen.
• Check the charging progress regularly throughout recharging.• When the battery is fully charged, a message will display on the
screen for a few seconds before the screen automatically turns off. You may then disconnect your fully charged watch from the computer.
Note: It will take approximately 3 hours to fully charge the battery. The actual charging time depends on the charging current, the remaining charge in the battery prior to recharging, and the ambient temperature. The optimum ambient temperature is 32°F - 104°F (0°C to 40°C). If your watch needs a much longer time to fully charge the battery, try a different USB power source.
BATTERY LIFEThe time the battery lasts between charges depends on play. Like other electronic devices, more frequent usage will drain the battery more quickly. Some activities are more demanding on the battery, such as taking photos and videos. The remaining battery capacity will appear in the top right corner of the screen. When the battery level is low, it is recommended to recharge the battery before further use. When the battery level is too low, the watch will not turn on until it has been recharged.
Battery Life ApproximationUsage Battery Time
Low Usage 2 weeks
Average Usage 2-3 days
Heavy Usage 1 day
Note: The above battery life approximations are based on the screen display set to turn off when not in use.
Battery MaintenanceCharge the battery regularly to keep it operating at optimum performance, even when the watch isn’t regularly in use. For example, charge the watch at least once every six months. Move the Master Power Switch to the ON position before recharging the battery. Move the Master Power Switch to the OFF position if the watch will not be in use for an extended period of time.
8
BATTERY NOTICEMisuse of batteries can lead to them bursting, causing a fire or chemical burns. Please read the below precautions:• Do not disassemble.• Do not crush and do not expose the battery to any shock or force
such as hammering, dropping or stepping on it.• Do not short circuit.• Do not expose to high temperatures or place near a heat source. Do
not leave in direct sunlight for any length of time.• Do not dispose of in fire.• Do not handle damaged or leaking batteries.• Keep the battery out of the reach of children.• Keep the battery dry.• Examine the battery charging cord periodically for conditions that
may result in the risk of fire, electric shock, or injury to persons (such as damage to the output cord, housing, or other parts) and that, in an event of such conditions, the battery charging cord should not be used until properly repaired or replaced.
• If you find the time between charges is considerably shortened with no change in usage, the battery could be nearing the end of its life. Please dispose of the used battery as described in this guide. The battery life varies from battery to battery depending on storage, operating conditions and environment.
Disposal of batteries and product The crossed-out wheelie bin symbols on products and batteries, or on their respective packaging, indicates they must not be disposed of in domestic waste as they contain substances that can be damaging to the environment and human health.The chemical symbols Hg, Cd or Pb, where marked, indicate that the battery contains more than the specified value of mercury (Hg), cadmium (Cd) or lead (Pb) set out in Battery Directive (2006/66/EC).
The solid bar indicates that the product was placed on the market after 13th August, 2005.Help protect the environment by disposing of your product and batteries responsibly. For more information, please visit:www.recycle-more.co.ukwww.recyclenow.com
9
SPLASH PROOF FOR EvERYDAY PLAY• Do not put under running water.• Do not submerge in water and do not wear whilst showering, bathing
or swimming.• Keep the rubber cover of the Micro-USB Port closed tightly while
it is not in use in order to prevent any water from getting inside the watch.
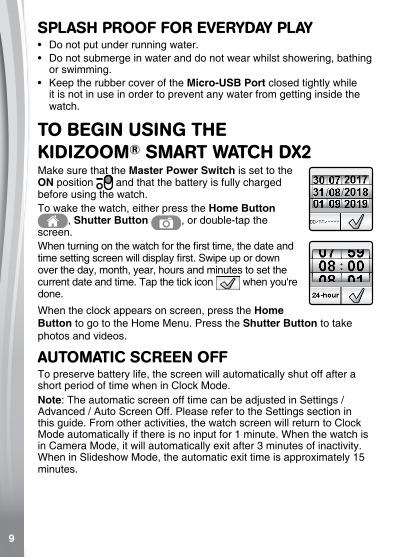
TO BEGIN USING THE KIDIzOOM® SMART WATCH DX2Make sure that the Master Power Switch is set to the ON position and that the battery is fully charged before using the watch.To wake the watch, either press the Home Button
, Shutter Button , or double-tap the screen.When turning on the watch for the first time, the date and time setting screen will display first. Swipe up or down over the day, month, year, hours and minutes to set the current date and time. Tap the tick icon when you're done.
When the clock appears on screen, press the Home Button to go to the Home Menu. Press the Shutter Button to take photos and videos.
AUTOMATIC SCREEN OFFTo preserve battery life, the screen will automatically shut off after a short period of time when in Clock Mode.Note: The automatic screen off time can be adjusted in Settings / Advanced / Auto Screen Off. Please refer to the Settings section in this guide. From other activities, the watch screen will return to Clock Mode automatically if there is no input for 1 minute. When the watch is in Camera Mode, it will automatically exit after 3 minutes of inactivity. When in Slideshow Mode, the automatic exit time is approximately 15 minutes.
10
CONNECTING TO A COMPUTERYou can connect the Kidizoom® Smart Watch DX2 to a PC or Mac computer using the included Micro-USB Cable. To transfer files between your watch and computer, follow these steps:• Pull up the rubber cover of the Micro-USB Port on the side of the
watch.• Insert the Micro-USB Cable (small end) into the Micro-USB Port on
the watch. • Insert the larger end of the cable into a USB port on your computer.
A USB port is usually marked with this symbol: • You will see a removable drive called VTech 1938, please use this
to transfer files to and from the watch. There is another removable drive called VT SYSTEM, which is for storage of system data and should not be accessed by users.
Note: Once the watch is connected to your computer, do not disconnect the watch whilst files are transferring. Only when your watch completes transferring files should you eject it from your computer. Once ejected, you can then physically disconnect the watch from the computer.To Backup Photos or Videos Taken with Kidizoom® Smart Watch DX2:• Locate and open the DCIM folder on the removable drive VTech
1938.• Copy and paste the photo and/or video files to a location on your
computer.To Backup Sounds Recorded with Kidizoom® Smart Watch DX2:• Locate and open the VOICE folder on the removable drive VTech
1938.• Copy and paste the files to a location on your computer.To Transfer Photos or Videos to Kidizoom® Smart Watch DX2:• First, select the photo or video files you would like to transfer from
your computer.• Locate and open the DOWNLOAD folder on the removable drive
VTech 1938 and copy and paste the photo or video files into the PHOTO or VIDEO subfolders.
Note: Do not transfer photo or video files created by other cameras (except for other Kidizoom® camera photo or video files) to the Kidizoom® Smart Watch DX2, as these files may not be compatible.
11
SYSTEM REQUIREMENTS FOR COMPUTER CONNECTIONMicrosoft®, Windows® 7, Windows® 8 or Windows® 10 Operating System or a Macintosh Computer with macOS version 10.6, 10.7, 10.8, 10.9, 10.10, 10.11 or 10.12.Microsoft®, Windows® and their logos are trademarks of the Microsoft Corporation in the United States and other countries. Macintosh and Mac logos are trademarks of Apple Inc. in the United States and other countries. All other trademarks are the property of their respective owners.
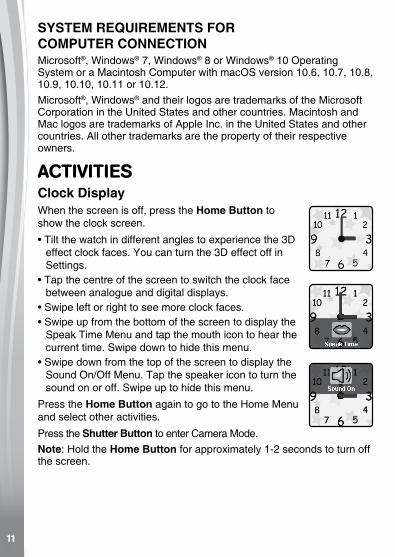
ACTIvITIESClock Display When the screen is off, press the Home Button to show the clock screen.
• Tilt the watch in different angles to experience the 3D effect clock faces. You can turn the 3D effect off in Settings.
• Tap the centre of the screen to switch the clock face between analogue and digital displays.
• Swipe left or right to see more clock faces.• Swipe up from the bottom of the screen to display the
Speak Time Menu and tap the mouth icon to hear the current time. Swipe down to hide this menu.
• Swipe down from the top of the screen to display the Sound On/Off Menu. Tap the speaker icon to turn the sound on or off. Swipe up to hide this menu.
Press the Home Button again to go to the Home Menu and select other activities.
Press the Shutter Button to enter Camera Mode.Note: Hold the Home Button for approximately 1-2 seconds to turn off the screen.

12
Home Menu When the screen is off, press the Home Button to show the clock screen. When the watch shows a clock face, press the Home Button again to display the Home Menu and choose an activity. Swipe left or right to scroll through the menu pages and tap an icon to enter the activity.
1. Camera Press the Shutter Button to enter Camera Mode.• Press the Shutter Button or Shutter icon to
take a photo.• Tap the Camera Switch icon to switch between
the Side Camera and Front-facing Camera.
Note: If games are turned off in Settings / Advanced / Parental Control, the Games, Monster Detector and Brain Booster icons will not appear in the Home Menu. The icon arrangement will be different so that Alarms, Timer, Stopwatch and Calendar will not be grouped together in Time Tools.
1
3
2
4
5
7
6
8
9 10
11 12 15
13
16
14
1. Camera2. Video3. Playback4. Voice Recorder5. Games6. Monster Detector7. Brain Booster8. Silly Yourself9. Photo Clock Face Maker
10. Action Challenges11. Sound Shakers12. Pedometer13. Time Tools
(Alarm, Timer, Stopwatch, Calendar)
14. Time Master15. Downloads16. Settings
13
• To explore the different photo effects, tap the Star icon, then swipe or tap on the left or right arrows to choose an effect. Tap the Star icon
again to turn off the photo effect.
• Tap the Playback icon to view your photos.
2. Video Tap the Video icon from the Home Menu to go to Video Mode.
• Press the Shutter Button or Record icon to start recording.
• To stop, either press the Shutter Button again or the Stop icon .
• Tap the Video Switch icon to switch between the Side Camera and Front-facing Camera.
• To explore the different video effects, tap the Star icon, then swipe or tap on the left or right arrows to choose an effect. Tap the Star icon again to turn off the video effect.
• Tap the Playback icon to view your videos.
When you finish recording a video, the playback screen will appear.
• Tap the Play icon to play the last recorded video.
• Tap the Rubbish Bin icon to display the Delete Menu.
Note: Each video can be a maximum of 1 minute long.
3. Playback Here you can view your photos and videos.• The most recently captured photo or video will be shown first. Tap
the arrow icons or swipe to see others.• Tap the Slideshow icon to view the photos in a slideshow.• Tap the Play icon to play a video.• Tap the Rubbish Bin icon to display the Delete Menu. Note: To delete all photos and videos, tap the Down Arrow icon on the Delete Menu and then follow the instructions to continue.Whilst playing a video, tap the Rewind or Fast Forward icons to toggle the rewind / fast forward functions at 1X, 2X and 4X speeds.

14
4. Voice Recorder The Voice Recorder allows you to record your own voice for up to 60 seconds per recording and apply fun voice-changing effects.
Tap the Record icon to start recording. When you're finished, tap the Stop icon.
Swipe left or right to review the previous or next recording. Tap the Star icon to display the Voice Effects screen.
There are five built-in voice effects. On the Voice Effect screen, tap the left or right icon to preview the different effects. Tap the Save As icon to save the recording with the selected effect as a separate file. To exit the voice effects screen, tap the Star icon again or press the Home Button.
To delete a recording, tap the Rubbish Bin icon to display the Delete Menu and tap the tick icon to confirm.
5. Games There are 3 built-in games on the Kidizoom® Smart Watch DX2.• Mousy Maze• Ancient Adventure• Puzzle SwapSwipe left or right to choose the game you want to play.Mousy MazeThe mouse is trapped! Help it collect cheese and find the key to escape. Eat as many cheese wedges as you can to set a new high score.Control: Tap an object on the current floor to direct the mouse to that location. Tap on the cheese to eat it and tap on the key to pick it up. Tap a ladder on the current floor and the mouse will climb it. Tap the door when you reach it to exit and complete the level.Ancient AdventureLife is hard when animals are trying to eat you! Help the caveman avoid the obstacles and bring food home for his family. Run as fast as possible for a high score.

15
Control: Tap the red or blue footprints to choose the next circle on the path. Avoid animals, stones and traps along the way.Puzzle SwapHelp, these photos don't make any sense! Solve the puzzle to see the beautiful pictures. In higher levels, you'll even see some of your own photos made into puzzles.Control: Tap one puzzle piece and then another to swap their positions.
6. Monster Detector There are invisible monsters hiding all around us. Use the Monster Detector on your watch to find and capture them! Level up as you gain experience and collect special rewards on your way to finding all 60+ monsters.Detection ModeWhen you first enter detection mode, the world seen through the Side Camera of the watch will appear in black and white. Walking around powers up the watch and enables it to see evidence of the nearest monster. Just aim the watch camera at a large collection of the coloured monster particles and tap on the screen to take a sample. Now the monster can be fully revealed and captured! Continue tapping until the monster's energy is gone.For some monsters to appear you will need to cast a spell by connecting the dots on the screen. Connect the dots to form the shape shown and the monster will appear.Every time you capture a monster your Experience Points (XP) and Magic Power (MP) will increase.Note: We suggest playing this game with natural light or in white lighting. Some lighting conditions, like fluorescent or yellow lights may affect the camera's ability to accurately detect colours.Exploration ModeWhen you see the walking person icon, keep walking to reach the next monster. You can see the distance to reach the monster on the bottom of the screen. Pay attention along the way, as some magic items may appear as you travel to increase your MP and XP.
16
The next three modes can be found from the Monster Detector Main Menu:Monster Book – Learn everything there is to know about all the monsters you've discovered.Monster Album – Review the photos you've taken once you have captured all of the monsters.Levels and Awards – Here you can see your XP, MP, current level and all the medals you've earned.
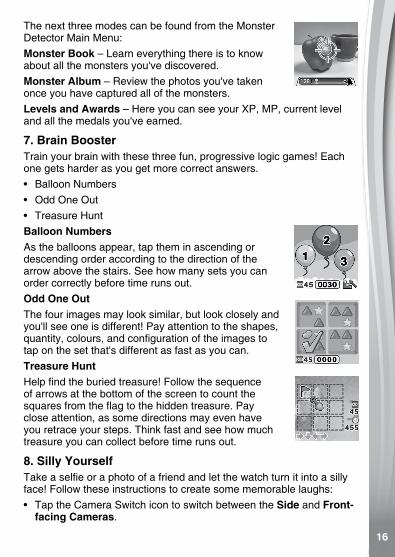
7. Brain Booster Train your brain with these three fun, progressive logic games! Each one gets harder as you get more correct answers.• Balloon Numbers• Odd One Out• Treasure HuntBalloon NumbersAs the balloons appear, tap them in ascending or descending order according to the direction of the arrow above the stairs. See how many sets you can order correctly before time runs out.Odd One OutThe four images may look similar, but look closely and you'll see one is different! Pay attention to the shapes, quantity, colours, and configuration of the images to tap on the set that's different as fast as you can. Treasure HuntHelp find the buried treasure! Follow the sequence of arrows at the bottom of the screen to count the squares from the flag to the hidden treasure. Pay close attention, as some directions may even have you retrace your steps. Think fast and see how much treasure you can collect before time runs out.
8. Silly Yourself Take a selfie or a photo of a friend and let the watch turn it into a silly face! Follow these instructions to create some memorable laughs:• Tap the Camera Switch icon to switch between the Side and Front-
facing Cameras.
17
• Carefully align your face or your friend's so it fits within the face outline on the watch. Try moving both the watch and your face to get it just right.
• The watch will randomly choose a silly effect to put on the image.Once you've made some silly faces, tap on the Gallery icon to see all the silly faces you've created.
9. Photo Clock Face Maker With Photo Clock Face Maker you can create custom clock faces from your own photos. From the main menu, either select a saved clock face to edit or choose to create a new clock face .Take a New Photo• From the Create a New Photo Clock Face menu, first tap on the
Capture icon on the left.• Next, swipe left or right or tap on the arrow icons to select a clock
face style.• Position the watch so it's pointing at the image you'd like to capture
and tap the Camera icon in the lower-left corner to take a picture. You can also choose to use the Front-facing camera by tapping the Camera Switch icon in the upper-left corner.
• After you've taken a picture, it will freeze on the screen. If you're happy with the image, tap the green tick icon in the lower-right corner to create the new clock face. To re-take the picture, tap the red X icon in the lower-left corner.
• After you've saved the clock face you will enter the Gallery. See below for instructions on browsing the gallery and editing existing photo clock faces. Press the Home Button to return to the main Photo Clock Face menu.
Use a Photo from the Camera Roll• From the Create a New Photo Clock Face menu, first tap the Album
icon on the right.• Next, swipe left or right or tap on the arrow icons to select the photo
you would like to use. Tap the green tick icon to select an image.• Next, swipe left or right or tap on the arrow icons to select the clock
face style you would like to use with the selected photo. Tap the green tick icon to create the clock face.
• After you've created the clock face you will enter the Gallery. See below for instructions on browsing the gallery and editing existing photo clock faces. Press the Home Button to return to the main Photo Clock Face menu.
18
Photo Clock Faces Gallery• Tap the arrow icons to see all the clock faces you've created.• Tap the Rubbish Bin icon to display the Delete Menu.• Tap the Pencil icon to enter Edit mode and select a different clock
style to use with the same image.Note: Saved photo clock faces will appear on the Clock Display mode automatically.
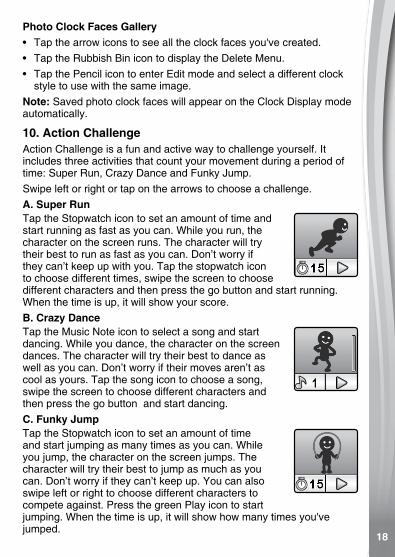
10. Action Challenge Action Challenge is a fun and active way to challenge yourself. It includes three activities that count your movement during a period of time: Super Run, Crazy Dance and Funky Jump.Swipe left or right or tap on the arrows to choose a challenge.A. Super RunTap the Stopwatch icon to set an amount of time and start running as fast as you can. While you run, the character on the screen runs. The character will try their best to run as fast as you can. Don’t worry if they can’t keep up with you. Tap the stopwatch icon to choose different times, swipe the screen to choose different characters and then press the go button and start running. When the time is up, it will show your score.B. Crazy DanceTap the Music Note icon to select a song and start dancing. While you dance, the character on the screen dances. The character will try their best to dance as well as you can. Don’t worry if their moves aren’t as cool as yours. Tap the song icon to choose a song, swipe the screen to choose different characters and then press the go button and start dancing.C. Funky JumpTap the Stopwatch icon to set an amount of time and start jumping as many times as you can. While you jump, the character on the screen jumps. The character will try their best to jump as much as you can. Don’t worry if they can’t keep up. You can also swipe left or right to choose different characters to compete against. Press the green Play icon to start jumping. When the time is up, it will show how many times you've jumped.
19
11. Sound Shaker Walk like a dinosaur or run like a race car! Choose from 10 different sound effects and then shake your hand with the Kidizoom® Smart Watch DX2 to play.
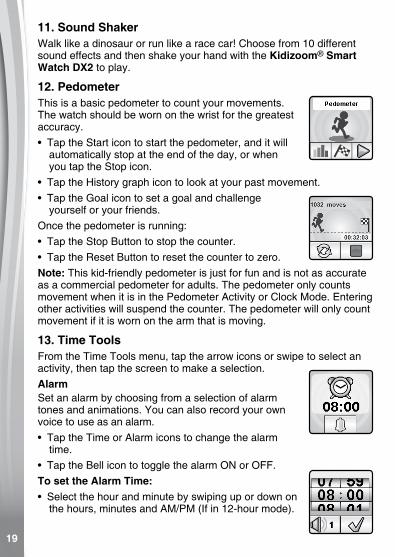
12. Pedometer This is a basic pedometer to count your movements. The watch should be worn on the wrist for the greatest accuracy.• Tap the Start icon to start the pedometer, and it will
automatically stop at the end of the day, or when you tap the Stop icon.
• Tap the History graph icon to look at your past movement.• Tap the Goal icon to set a goal and challenge
yourself or your friends.Once the pedometer is running:• Tap the Stop Button to stop the counter.• Tap the Reset Button to reset the counter to zero.Note: This kid-friendly pedometer is just for fun and is not as accurate as a commercial pedometer for adults. The pedometer only counts movement when it is in the Pedometer Activity or Clock Mode. Entering other activities will suspend the counter. The pedometer will only count movement if it is worn on the arm that is moving.
13. Time Tools From the Time Tools menu, tap the arrow icons or swipe to select an activity, then tap the screen to make a selection.Alarm Set an alarm by choosing from a selection of alarm tones and animations. You can also record your own voice to use as an alarm.• Tap the Time or Alarm icons to change the alarm
time.• Tap the Bell icon to toggle the alarm ON or OFF.To set the Alarm Time:• Select the hour and minute by swiping up or down on
the hours, minutes and AM/PM (If in 12-hour mode).
20
• Tap the Tone icon to display the Alarm Tone Selection menu. There are nine built-in alarm sounds and one voice recording alarm. Swipe left or right to preview the different tones and animations. Tap the tick icon to confirm your selection.
• To make your own voice alarm, tap the Record icon to start recording. While recording, tap the Stop icon to end the recording, or it will stop automatically after three seconds. Tap the Play icon to play the recorded voice.
• Once you choose an alarm, tap the green tick icon to confirm.Note: If the battery level is too low, the alarm will need to be set again.
Timer Use this app to set a countdown timer.• Tap the Play icon to start the timer immediately.• Tap the Style icon or swipe left or right to change the timer style.
There are five different timers for you to try out.• Tap the time to enter Timer Settings. Swipe up or down on the
minutes and seconds to change the time. Once set, tap the green tick icon to confirm.
• While the timer is running, tap the Pause icon to pause the countdown and tap it again to resume. Tap the Timer Reset icon to stop the countdown and reset the timer.
Stopwatch • Tap the Play icon to start the stopwatch.• Tap the Style icon or swipe left or right to change the stopwatch
style. There are 5 fun stopwatch styles to try!• While the stopwatch is running, tap the Pause icon to pause the
timer. Tap it again to resume. Tap the Timer Reset icon to stop the timer and reset the time to zero.
Calendar Explore the Calendar by swiping left or right to see the previous or next month. Swipe up or down to see the previous or next year.
Time Master This activity will help you learn how to tell the time. • Tap on the clock or the owl to hear the time spoken. The owl tells the
time in both analogue and digital modes.
21
• Tap the Hour icon or Minute icon to select the time you would like the owl to say.
• Tap the Plus or Minus icons to adjust the time.
Downloads Downloads is where the Download Manager and any content downloaded from Learning LodgeTM will appear. To access downloadable content you first have to register an account with VTech's Learning LodgeTM. Downloading Learning LodgeTM ContentFollow these steps to download Learning LodgeTM content:1. Connect the Kidizoom® Smart Watch DX2 to a computer using the
included Micro-USB Cable.2. Click the Download Website link in the drive VTECH 1938 that
appears on your computer, or visit www.vtech.co.uk/download.3. Download and install the correct Learning LodgeTM software for your
operating system.4. Launch the Learning LodgeTM application and find all the great extra
content for your Kidizoom® Smart Watch DX2!Note: For further details about downloading content from the Learning LodgeTM, please refer to the online help section at www.vtech.co.uk/support.Download ManagerHere you can view the memory size of each download or delete unwanted content to free up memory.To delete downloads, scroll up or down to select the application to remove and then tap the Delete icon to display the Delete Menu.Note: If the downloadable content is accidentally deleted, you may connect to the Learning LodgeTM to re-download the applications.
16. Settings Swipe left or right to scroll through the options:Volume • Tap the Up or Down icons to set the system volume.Brightness • Tap the Up or Down icons to set the screen's brightness.
22
Date • Swipe up or down on the day, month and year to set the date.• Tap the Date Format icon to change the date format (DD/MM/YYYY
or MM/DD/YYYY). • Tap the green tick icon to save.Time • Swipe up or down on the hours, minutes, or AM/PM (If in 12-hour
mode) to set the time. • Tap the green tick icon to save.3D Effects • Tap On/Off to enable or disable the 3D effects feature.Note: If the watch enters Power Saving Mode, the screen will dim and the 3D effect may not be shown.
Smart Wake Up • When Smart Wake Up is enabled, you can double-tap on the screen
to wake up the watch.• Tap On/Off to enable or disable this feature.
Wallpaper • Tap the left or right arrow icons to change the wallpaper.• Tap the green tick icon to save your selection.Advanced Settings• Memory See a summary of memory usage or reformat the memory.Note: Formatting will erase all data in the memory, including all photos, videos, voice files, photo clock faces and downloaded apps.• Image Display (Aspect Ratio) All photos and videos are saved at 4:3 ratio, but you can select from two different aspect ratios for displaying the image in the preview and playback screens:
Cropped: Image appears to fully fill the screen with the left and right sides cut off.Fit Screen: Image scaled to fit the screen, with the whole image displayed.
23
• Video Resolution There are two resolution options:
160 X 120: The video size is smaller and you can record and save more videos.320 X 240: The video quality is better and takes up more memory, so fewer videos can be saved.
• Auto Screen Off Allows you to set an Auto Screen Off timer. Tap the left and the right arrows to set the time, then tap the green tick icon to confirm.Selecting Disable Auto Screen Off will not turn off the screen, but the screen will dim if there is no input for 30 seconds in Clock Display Mode to save power. At this time, operation of the watch will be limited to showing the time. No other functions will be operational, including 3D clock face effects, until the watch wakes up. Tip: If the Auto Screen Off time is set to one of the longer options, battery consumption will increase and the time the battery lasts will decrease. • Indoor Light Frequency Use this setting to set the AC power frequency when travelling. If this is not set correctly, you may see flickering on the preview screen and photos and videos captured in indoor environments.• Parental Control Access these settings to either disable games or set a daily time limit. By default there is no time limit set, you can choose a limit of 15, 30, 60 or 90 minutes per day. Once a time limit is reached, games will not be accessible until the following day. When games are disabled, icons will appear in the Main Menu in a slightly different configuration.Tip: This feature is designed for parents of children who cannot yet read, as access to the setting is granted by following simple, on-screen instructions.Note: The time limit will reset if the date or time settings are changed.• Factory Reset Factory Reset will erase content stored in the memory and reset all system settings to factory defaults.
24
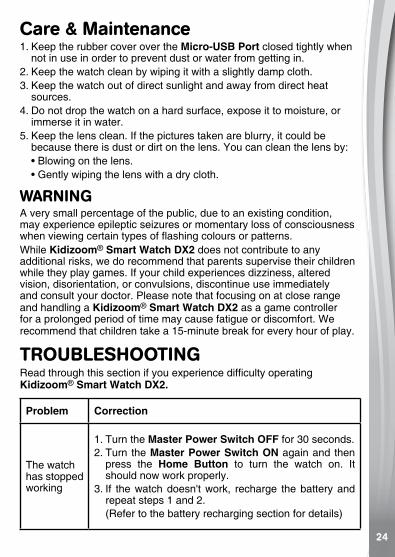
Care & Maintenance1. Keep the rubber cover over the Micro-USB Port closed tightly when
not in use in order to prevent dust or water from getting in.2. Keep the watch clean by wiping it with a slightly damp cloth.3. Keep the watch out of direct sunlight and away from direct heat
sources.4. Do not drop the watch on a hard surface, expose it to moisture, or
immerse it in water.5. Keep the lens clean. If the pictures taken are blurry, it could be
because there is dust or dirt on the lens. You can clean the lens by: • Blowing on the lens. • Gently wiping the lens with a dry cloth.
WARNINGA very small percentage of the public, due to an existing condition, may experience epileptic seizures or momentary loss of consciousness when viewing certain types of flashing colours or patterns.While Kidizoom® Smart Watch DX2 does not contribute to any additional risks, we do recommend that parents supervise their children while they play games. If your child experiences dizziness, altered vision, disorientation, or convulsions, discontinue use immediately and consult your doctor. Please note that focusing on at close range and handling a Kidizoom® Smart Watch DX2 as a game controller for a prolonged period of time may cause fatigue or discomfort. We recommend that children take a 15-minute break for every hour of play.
TROUBLESHOOTINGRead through this section if you experience difficulty operating Kidizoom® Smart Watch DX2.
Problem Correction
The watch has stopped working
1. Turn the Master Power Switch OFF for 30 seconds.2. Turn the Master Power Switch ON again and then
press the Home Button to turn the watch on. It should now work properly.
3. If the watch doesn't work, recharge the battery and repeat steps 1 and 2.
(Refer to the battery recharging section for details)

25
Screen is not working correctly
1. Turn the Master Power Switch OFF for 30 seconds.2. Turn the Master Power Switch ON again and then
press the Home Button to turn the watch on. The screen should now function normally.
Image taken is not clear
1. Make sure the lighting conditions of the shooting environment are good.
2. Look to see if the camera lens is clean. If you find some dust or dirt on it, please see the steps to clean the lens in Care and Maintenance.
Cannot connect the watch to a computer
1. Ensure that the connections of the cable between the watch and the computer are good, and review the Connecting to a Computer section of this guide.
2. Turn the Master Power Switch OFF for 30 seconds.Turn the Master Power Switch ON and reconnect the watch and computer.
Cannot view videos or photos loaded from a computer
See if the files are in the correct directories on the Kidizoom® Smart Watch DX2. Photos should be put in the DOWNLOAD\PHOTO folder, and videos should be put in the DOWNLOAD\VIDEO folder on Kidizoom® Smart Watch DX2 when it is connected to a computer.Kidizoom® Smart Watch DX2 only supports the formats below:• Photos in Standard Baseline JPEG• Video in AVI (motion JPEG) created by Kidizoom® Smart Watch DX2
Technical SupportIf the problem persists, please call our Consumer Services Department on 01235 546810 (from UK) or +44 1235 546810 (outside UK), and a service representative will be happy to help you.
Battery disposal/recyclingAs a responsible distributor, VTech is committed to ensuring the correctdisposal and reducing the environmental damage they can cause.VTech offers a returns program for products with inaccessible batteries (i.e. built-in Lithium Polymer batteries). Please email [email protected] with the subject "battery disposal" to obtain a returns form.

26
IMPORTANT NOTE:Creating and developing VTech® products is accompanied by a responsibility that we take very seriously. We make every effort to ensure the accuracy of the information, which forms the value of our products. However, errors sometimes can occur. It is important for you to know that we stand behind our products and encourage you to call our Consumer Services Department on 01235 546810 (from UK) or +44 1235 546810 (outside UK) with any problems and/or suggestions that you might have. A service representative will be happy to help you.
27

TM & © 2017 VTech Holdings Limited.All rights reserved.
Printed in China.91-003342-007 UK
Visit our website for moreinformation about our products,downloads, resources and more.
www.vtech.co.uk