part 1: retrieve files using microsoft activesyncgpshort.uga.edu/instructions/gis/guide for viewing...
TRANSCRIPT
Guide for Viewing and Editing Inventory Data (.dbf files)
The purpose of this tutorial is to very basically instruct you how to view and/or edit your data
from a tree inventory. This tutorial is for people working on projects in conjunction with the De-
partment of Horticulture at the University of Georgia. Those not involved with UGA have per-
mission to access and use this tutorial for educational purposes. Please note this instruction is
specifically based on a shapefile used while collecting data in the field using ArcPad. In general,
one may refer to this tutorial to learn how to view and edit a database (.dbf) file using Excel.
Part 1: Retrieve Files Using Microsoft ActiveSync
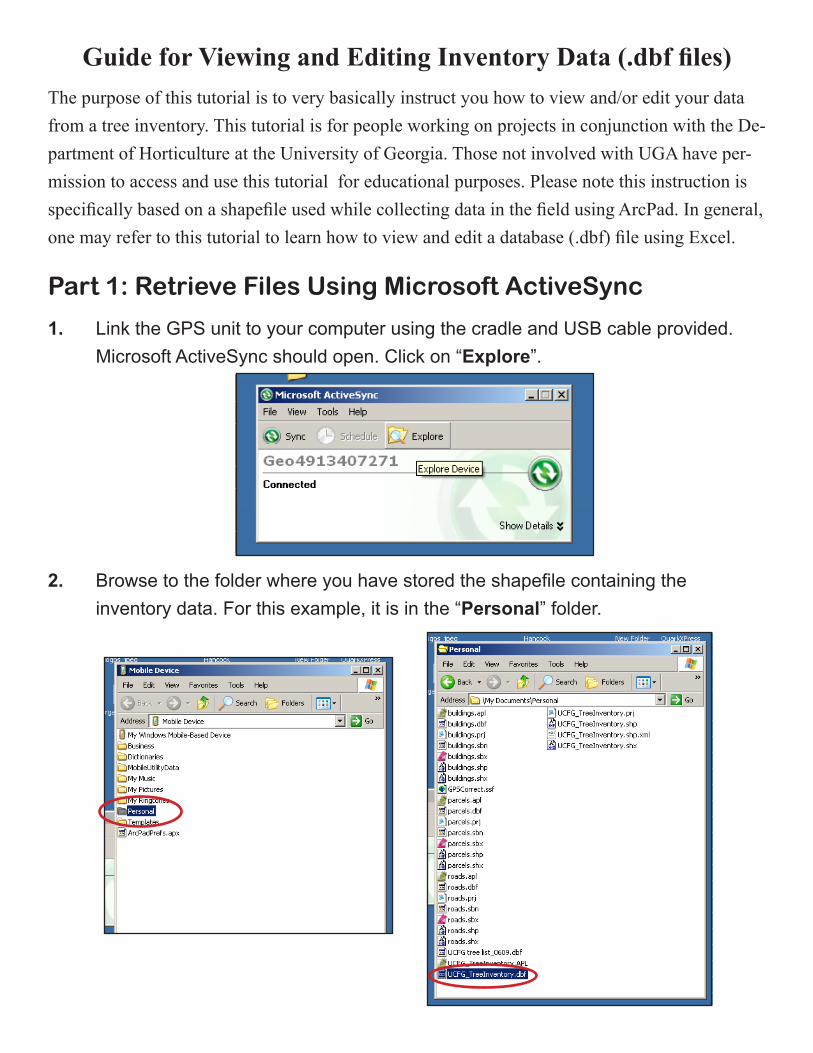
1. Link the GPS unit to your computer using the cradle and USB cable provided.
Microsoft ActiveSync should open. Click on “Explore”.
2. Browse to the folder where you have stored the shapefile containing the
inventory data. For this example, it is in the “Personal” folder.

2. Copy the .dbf file from the shapefile you
used to collect data. In this example, the tree
inventory was conducted using a shapefile called
“UCFG_TreeInventory”.
The file being copied is “UCFG_TreeInventory.dbf”.
Paste the file in a location of your chosing.
1. Open Microsoft Excel.
NOTE: A database file will open in both Excel 2007 and Excel 97-2003. Excel 2007
will not allow you to save your data as a .dbf file. You will have to save it as an Excel
spreadsheet (.xls). Excel 97-2003 will allow you to save your data as a .dbf or an Excel
spreadsheet (.xls). If you plan on editing the data and returning it to the shapefile
format for use by ArcMap, use Excel 97-2003. These items will be addressed further in
the tutorial.
Part 2: Viewing in Excel
2. Open your data by double clicking on
the file, or navigate to it through the
“Open” command in Excel.
3. Click on the “Start” button and scroll
to “Open”.
Start Button

4. If you navigate to it from Excel, browse to the file when the “Open” window
opens. You will not be able to view it unless you select “All Files (*.*)” from the
“Files of Type” dropdown list. For this tutorial, the file has been saved on the
desktop.
5. Select the file and click on “Open”.

When the file opens, it will look like this in both Excel 97-2003 and Excel 2007:
You now have spreadsheet that can be edited like any other Excel file. Here, the
column widths have been changed to view the data clearly:
To save your work in Excel 97-2003, go to Part 3.
To save your work in Excel 2007, go to Part 4.
If you are not interested in editing and only wanted to view your data, there is no
need to save. Just close Excel.
a.)TO SAVE AS .xls: In the “Save as type:” field, scroll up to the top of the list
and select “Microsoft Office Excel Workbook (*.xls)”. After you have chosen a
type, click on “Save”.
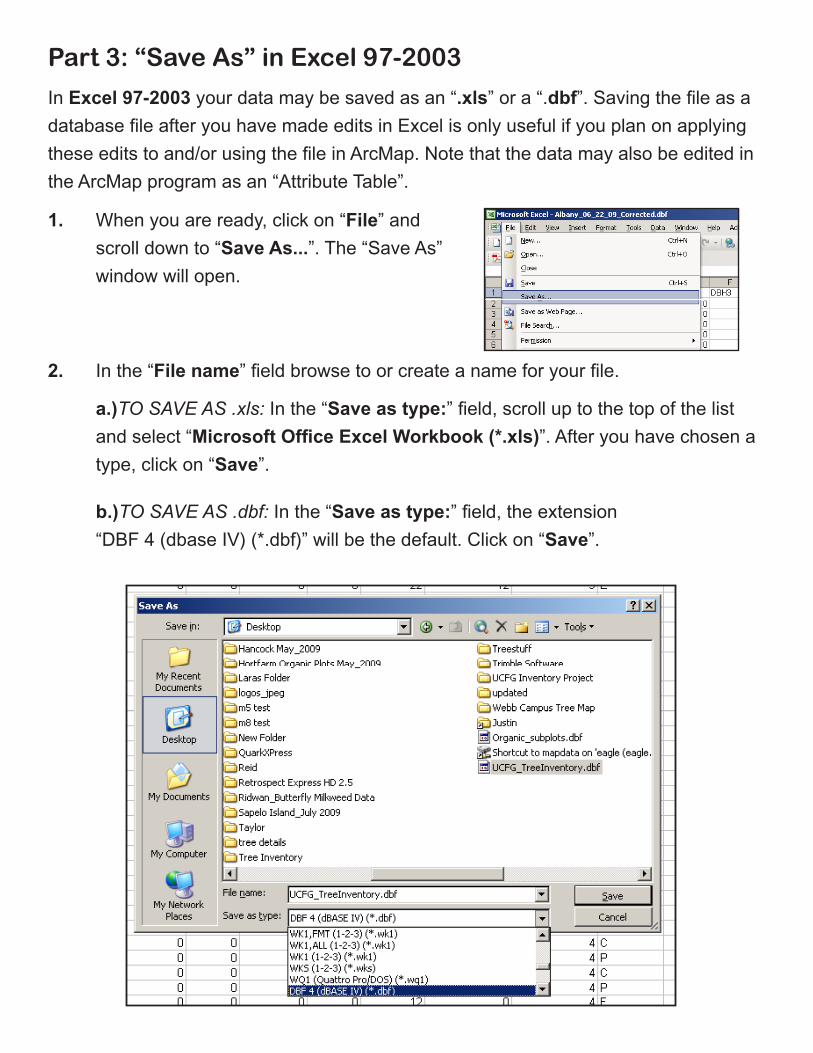
In Excel 97-2003 your data may be saved as an “.xls” or a “.dbf”. Saving the file as a
database file after you have made edits in Excel is only useful if you plan on applying
these edits to and/or using the file in ArcMap. Note that the data may also be edited in
the ArcMap program as an “Attribute Table”.
Part 3: “Save As” in Excel 97-2003
1. When you are ready, click on “File” and
scroll down to “Save As...”. The “Save As”
window will open.
2. In the “File name” field browse to or create a name for your file.
b.)TO SAVE AS .dbf: In the “Save as type:” field, the extension
“DBF 4 (dbase IV) (*.dbf)” will be the default. Click on “Save”.
Part 4: “Save As” in Excel 2007
For Excel 2007, Microsoft removed the option to save a file as a “.dbf”. If you do not
need to use ArcMap to organize your data, then saving the file as an Excel
spreadsheet will not pose a problem. If you do not have Excel 97-2003 and need to
keep the data in .dbf format, you may conduct simple edits in the ArcMap “Attribute
Table”.
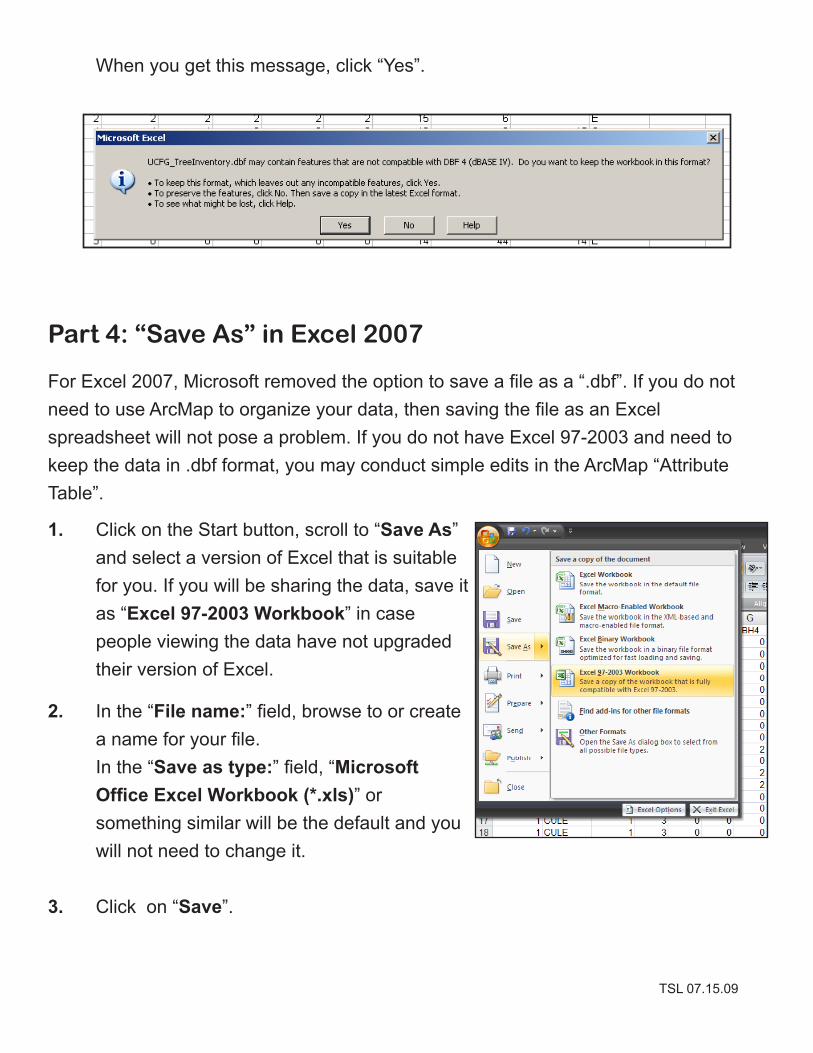
1. Click on the Start button, scroll to “Save As”
and select a version of Excel that is suitable
for you. If you will be sharing the data, save it
as “Excel 97-2003 Workbook” in case
people viewing the data have not upgraded
their version of Excel.
2. In the “File name:” field, browse to or create
a name for your file.
In the “Save as type:” field, “Microsoft
Office Excel Workbook (*.xls)” or
something similar will be the default and you
will not need to change it.
3. Click on “Save”.
When you get this message, click “Yes”.
TSL 07.15.09