part number: ptr07-47100
TRANSCRIPT

TOYOTA PRIUS 2010 - PLUS LOWERING SPRINGS Preparation
Page 1 of 12 pages Issue: D 04/03/2015
Part Number: PTR07-47100
Kit Contents Item # Quantity Reqd. Description 1 2 Front Spring 2 2 Rear Spring 3 2 Nut 4 1 Instructions
Hardware Bag Contents Item # Quantity Reqd. Description 1 2 3
Additional Items Required For Installation Item # Quantity Reqd. Description 1 PTR07-47100-
AA Spring Spacer (4 required) (PPO Only)
2 Nylon Tie 8-1/2" L, 0.30” W, 120# Tensile Strength (PPO Only)
3
Conflicts
Recommended Tools Personal & Vehicle Protection
Notes
Fender Covers 2 Safety Glasses
Special Tools Notes Spring Compressor Tall Jack Stand Edge Trim
Installation Tools Notes Torque Wrench 3/8” & ½” Drive Sockets, 3/8” Drive 10, 14, 17mm Sockets, 1/2” Drive 17, 19, 21, 22mm ½” Impact Gun Only for removing fasteners 3/8” Air Ratchet Only for removing fasteners Nylon Pry Tool
Special Chemicals Notes
General Applicability Prius Sedan
Recommended Sequence of Application Item # Accessory 1 PLUS Springs 2 PLUS Rear Sway Bar 3
*Mandatory
Vehicle Service Parts (may be required for reassembly) Item # Quantity Reqd. Description 1 2 90177-14005 Nut, Front Shock 2 3
Legend STOP: Damage to the vehicle may occur. Do not
proceed until process has been complied with.
OPERATOR SAFETY: Use caution to avoid risk of injury.
CAUTION: A process that must be carefully observed in order to reduce the risk of damage to the accessory/vehicle and to ensure a quality installation.
TOOLS & EQUIPMENT: Used in Figures calls out the specific tools and equipment recommended for this process.
REVISION MARK: This mark highlights a change in installation with respect to previous issue. SAFETY TORQUE: This mark indicates that torque is related to safety.

TOYOTA PRIUS 2010 - PLUS LOWERING SPRINGS Procedure
Page 2 of 12 pages Issue: D 04/03/2015
Care must be taken when installing this accessory to ensure damage does not occur to the vehicle. The installation of this accessory should follow approved guidelines to ensure a quality installation. These guidelines can be found in the "Accessory Installation Practices" document. This document covers such items as:-
Vehicle Protection (use of covers and blankets, cleaning chemicals, etc.). Safety (eye protection, rechecking torque procedure, etc.). Vehicle Disassembly/Reassembly (panel removal, part storage, etc.). Electrical Component Disassembly/Reassembly (battery disconnection, connector removal, etc.).
Please see your Toyota dealer for a copy of this document.
1. Remove the Cowl.
(a) Install a brake jack tool.
(b) Raise the hood.
(c) Place fender covers over fenders.
(d) Remove the windshield wiper arms.
(1) Remove the wiper arm head caps with a
nylon pry tool (Fig. 1-1).
(2) Remove the 2 nuts and pull the wiper
arms off of the wiper drive studs (Fig. 1-
2).
Fig. 1-1
Nylon pry tool
Fig. 1-2
14mm socket & ratchet

TOYOTA PRIUS 2010 - PLUS LOWERING SPRINGS Procedure
Page 3 of 12 pages Issue: D 04/03/2015
(e) Remove the cowl side ventilator sub-
assemblies.
(1) Use a pry tool to disengage the claw and
guide (<A> Fig. 1-3).
(2) Disengage the guide <B> and remove the
cowl side ventilator sub-assembly LH
(Fig. 1-3).
(f) Remove the cowl cover.
(1) Remove the 2 clips (Fig. 1-4).
Fig. 1-3
Nylon pry tool
Fig. 1-4
Nylon pry tool

TOYOTA PRIUS 2010 - PLUS LOWERING SPRINGS Procedure
Page 4 of 12 pages Issue: D 04/03/2015
(2) Disengage the 5 claws and 3 guides (<A>
Fig. 1-5).
(3) Pull out the cowl top ventilator louver
sub-assembly (Fig. 1-5).
(g) Protect the lower edge of the windshield with
tape or edge trim.
(h) Use a pry tool to remove the two wire
harness plastic fasteners (*1 Fig. 1-6).
Fig. 1-5
Nylon pry tool
Fig. 1-6
Nylon pry tool

TOYOTA PRIUS 2010 - PLUS LOWERING SPRINGS Procedure
Page 5 of 12 pages Issue: D 04/03/2015
(i) Remove the wiper link / motor assembly.
(1) Remove the 4 screws (Fig. 1-7).
(2) Slide the assembly to the right to
disengage the rubber locating grommet
(Fig. 1-7).
(j) Place the wiper motor assembly on a
protective pad or blanket on top of the
engine.
(k) Remove the cowl pan.
2. Remove the Front Strut Assembly.
(a) Remove the front wheels.
(b) Separate the front stabilizer link from the
strut assembly. If the ball joint spins use a
6mm Allen wrench to hold the center stud in
place (Fig. 2-1).
(c) Separate the front flexible hose and speed
sensor wire (Fig. 2-2).
Fig. 1-7
10mm socket & ratchet
Fig. 2-1
17mm wrench & 6mm Allen wrench
Fig. 2-2
17mm wrench & 6mm Allen wrench

TOYOTA PRIUS 2010 - PLUS LOWERING SPRINGS Procedure
Page 6 of 12 pages Issue: D 04/03/2015
(d) Disconnect the strut assembly from the
knuckle (Fig. 2-3).
CAUTION: Take careful note of the orientation
and location of these bolts so that they can be
reinstalled the same way.
(e) Remove the strut assembly.
(1) Remove the front suspension support
dust cover.
(2) Loosen the 3 nuts fastening the strut to
the fender apron (Fig. 2-4).
(3) Support the weight of the strut assembly,
then remove the top nuts by hand and
remove the strut assembly.
3. Remove the OE Spring.
(a) Compress the spring in a spring compressor.
(b) Remove the upper nut, coil spring seat,
bumper and insulator (Fig. 3-1).
(c) Remove the spring.
Fig. 2-3
22mm socket & wrench and ratchet
Fig. 3-1
19mm socket & ratchet
Fig. 2-4
14mm socket & ratchet

TOYOTA PRIUS 2010 - PLUS LOWERING SPRINGS Procedure
Page 7 of 12 pages Issue: D 04/03/2015
4. Install the New Spring.
(a) Place the new spring over the shock absorber
(Fig. 4-1).
(1) The spring wrap with the slightly smaller
diameter should be installed in the
upward direction and the TRD logo
should read right side up.
(2) Fit the lower end of the coil spring into
the pocket of the shock absorber lower
seat (Fig. 4-1).
(b) PPO Only: Install two supplied spring
spacers per strut.
(1) Fasten one nylon tie around each spacer.
(2) Cut the excess material protruding from
the nylon tie fastener flush to the surface
of the fastener.
(c) Install the front spring bumper onto the coil
spring seat upper (Fig. 4-2).
(d) Install the coil spring seat upper with the
strut mount bearing and spring bumper onto
the shock absorber (Fig. 4-2).
(e) Install a new shock absorber nut.
(1) Do not force the nut causing the coil
spring seat to rotate.
(2) The nut will be fully tightened later, once
the strut assembly is reinstalled in the car.
Fig. 4-2
Fig. 4-1
Spring compressor
TOYOTA PRIUS 2010 - PLUS LOWERING SPRINGS Procedure
Page 8 of 12 pages Issue: D 04/03/2015
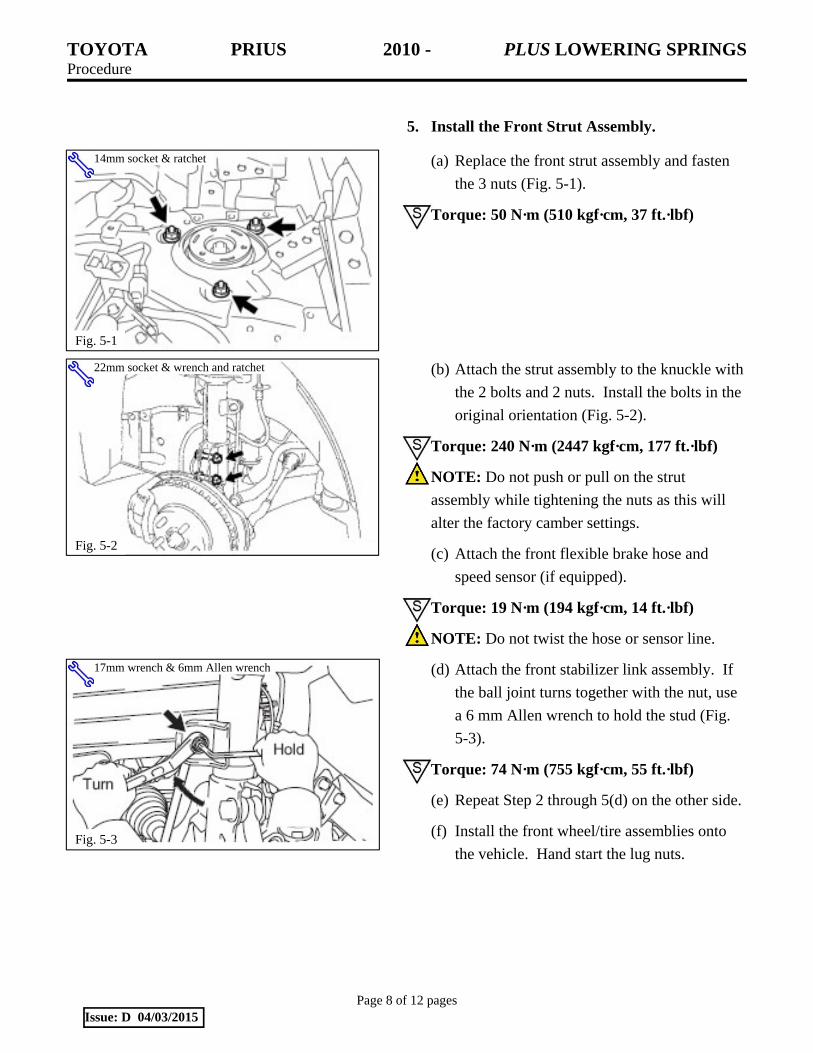
5. Install the Front Strut Assembly.
(a) Replace the front strut assembly and fasten
the 3 nuts (Fig. 5-1).
Torque: 50 N·m (510 kgf·cm, 37 ft.·lbf)
(b) Attach the strut assembly to the knuckle with
the 2 bolts and 2 nuts. Install the bolts in the
original orientation (Fig. 5-2).
Torque: 240 N·m (2447 kgf·cm, 177 ft.·lbf)
NOTE: Do not push or pull on the strut
assembly while tightening the nuts as this will
alter the factory camber settings.
(c) Attach the front flexible brake hose and
speed sensor (if equipped).
Torque: 19 N·m (194 kgf·cm, 14 ft.·lbf)
NOTE: Do not twist the hose or sensor line.
(d) Attach the front stabilizer link assembly. If
the ball joint turns together with the nut, use
a 6 mm Allen wrench to hold the stud (Fig.
5-3).
Torque: 74 N·m (755 kgf·cm, 55 ft.·lbf)
(e) Repeat Step 2 through 5(d) on the other side.
(f) Install the front wheel/tire assemblies onto
the vehicle. Hand start the lug nuts.
Fig. 5-1
14mm socket & ratchet
Fig. 5-2
22mm socket & wrench and ratchet
Fig. 5-3
17mm wrench & 6mm Allen wrench

TOYOTA PRIUS 2010 - PLUS LOWERING SPRINGS Procedure
Page 9 of 12 pages Issue: D 04/03/2015
(g) Use a torque wrench to tighten the lug nuts in
sequence 1 through 5 to 103N·m (76 ft-lbf)
(Fig. 5-4).
Torque: 103N·m (1,050 kgf·cm, 76 ft.·lbf)
(h) Re-torque all of the lug nuts in same the 1-5
sequence (Fig. 5-5).
Torque: 103N·m (1,050 kgf·cm, 76 ft.·lbf)
CAUTION: DO NOT USE AN IMPACT
WRENCH TO INSTALL OR REMOVE
WHEEL LOCKS.
(i) With the vehicle still on the lift, use a digital
torque wrench to measure the torque of each
lug nut/lock and record it on the Torque
Audit Sheet (Fig. 5-5). (PPO installation
only. Does not apply to DIO installation.
(j) Tighten the upper shock absorber nuts (Fig.
5-6).
Torque: 47 N·m (479 kgf·cm, 35 ft.·lbf)
(k) Install the front suspension support dust
cover.
Fig. 5-5
Measure Torque and Document (All Lugs/Locks)
2xFig. 5-4
Torque 2 Cycles (All Lugs/Locks)
Fig. 5-6
19mm socket & ratchet

TOYOTA PRIUS 2010 - PLUS LOWERING SPRINGS Procedure
Page 10 of 12 pages Issue: D 04/03/2015
6. Remove the Rear Springs.
(a) Disconnect the lower shock absorber eye
from the axle beam (Fig. 6-1).
(1) Support the shock absorber mount with a
tall jack stand.
(2) Remove the bolt.
CAUTION: The nut has a locking feature.
Remove the bolt and nut by turning the
BOLT while the nut is held in place.
(3) Only work on one side of the vehicle at a
time to prevent the axle beam from
swinging too low and putting excess
tension on the beam axle bushings.
(b) Pull down on the beam axle and lift the
bottom of the spring out of the spring seat to
remove the spring.
7. Install the New Springs.
(a) Install the rear spring insulators.
(1) Confirm the coil spring insulator lower is
seated properly on the beam axle.
(2) Install the coil spring insulator upper so
that the pocket fits onto the end of the
coil spring (Fig. 7-1).
(b) Install the new coil spring onto the axle
beam.
(1) Position the tightly wound coils facing
the top of the vehicle.
Fig. 6-1
17mm socket & wrench and ratchet
Fig. 7-1
TOYOTA PRIUS 2010 - PLUS LOWERING SPRINGS Procedure
Page 11 of 12 pages Issue: D 04/03/2015
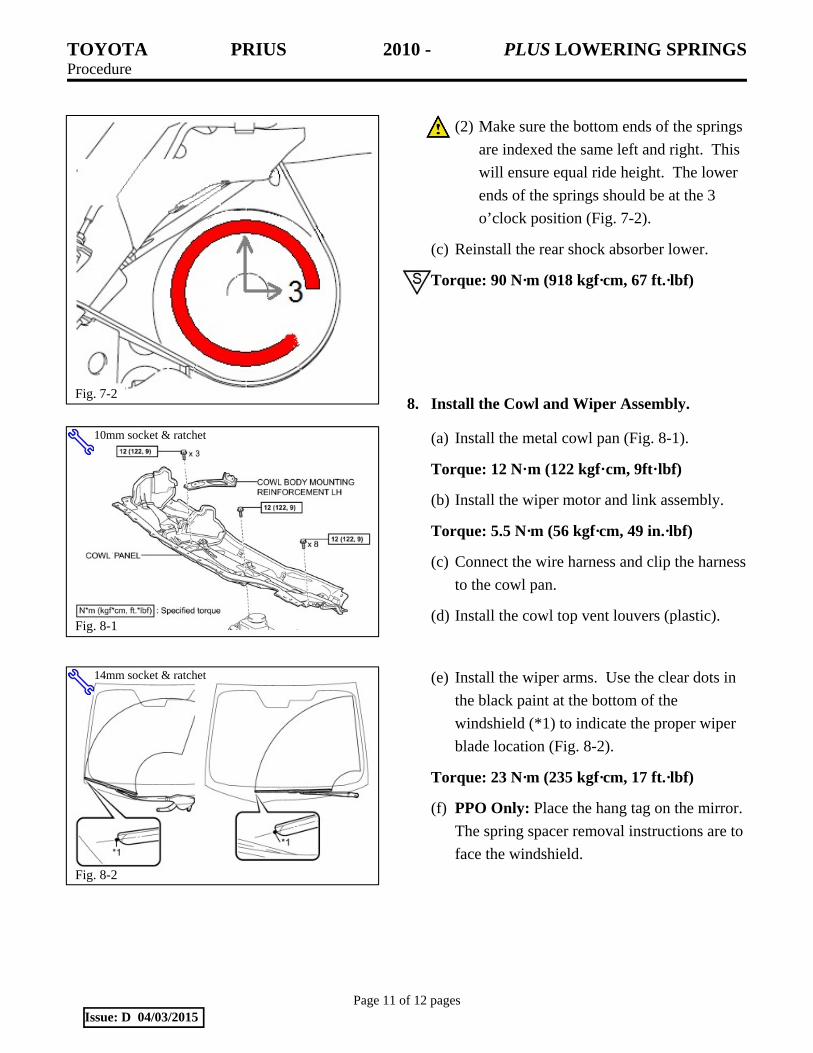
(2) Make sure the bottom ends of the springs
are indexed the same left and right. This
will ensure equal ride height. The lower
ends of the springs should be at the 3
o’clock position (Fig. 7-2).
(c) Reinstall the rear shock absorber lower.
Torque: 90 N·m (918 kgf·cm, 67 ft.·lbf)
8. Install the Cowl and Wiper Assembly.
(a) Install the metal cowl pan (Fig. 8-1).
Torque: 12 N·m (122 kgf·cm, 9ft·lbf)
(b) Install the wiper motor and link assembly.
Torque: 5.5 N·m (56 kgf·cm, 49 in.·lbf)
(c) Connect the wire harness and clip the harness
to the cowl pan.
(d) Install the cowl top vent louvers (plastic).
(e) Install the wiper arms. Use the clear dots in
the black paint at the bottom of the
windshield (*1) to indicate the proper wiper
blade location (Fig. 8-2).
Torque: 23 N·m (235 kgf·cm, 17 ft.·lbf)
(f) PPO Only: Place the hang tag on the mirror.
The spring spacer removal instructions are to
face the windshield.
Fig. 7-2
Fig. 8-1
10mm socket & ratchet
Fig. 8-2
14mm socket & ratchet

TOYOTA PRIUS 2010 - PLUS LOWERING SPRINGS Checklist - these points MUST be checked to ensure a quality installation.
Check: Look For:
Page 12 of 12 pages Issue: D 04/03/2015
Accessory Function Checks
Vehicle Function Checks
Confirm wipers operate properly
All fasteners torqued properly
Proper movement and no windshield contact.
Perform a torque audit
Vehicle Appearance Check
After accessory installation and removal of protective cover(s), perform a visual inspection.
Ensure no damage (including scuffs and scratches) was caused during the installation process. (For PPO installations, refer to TMS Accessory Quality Shipping Standard.)