partner portal next
TRANSCRIPT

Partner Portal NEXT VIDEOGRAPHER TUTORIAL GUIDE
Confidential Q1 – 2021 – V.1.1

Veritext Proprietary & Confidential Information – Not for Distribution or Reproduction 01/21 1
Introduction As part of our dedicated commitment to the reporters, videographers, agencies and interpreters that we work with, Veritext strives to continue to develop and improve our technological offerings to best support our partners. The goals of the Veritext Partner Portal re-design were to improve the platform’s stability, enhance the user experience by simplifying workflow and to introduce new features that will strengthen your ability to provide quality service. In addition to these design enhancements, the re-designed foundation of the portal will allow us to more easily implement new features and updates. The Partner Portal will continue to develop substantially in the months and years to come and we look forward to offering new modules and enhancements that will provide an even more positive and defining experience for the partners we work with. We are very grateful to the reporters, videographers and team members that worked tirelessly, in close collaboration to make this re-design possible and are very thankful for the meaningful relationships we share with our partners across the country.
Support Video tutorials, helpful tips, FAQ information and additional supporting documentation are available via the “Help” and “Tutorial” sections of the portal which may be accessed by clicking the icons on the top right of the Partner Portal. When submitting an e-mail ticket to the Veritext Partner Portal Support team, please include as much detailed information as possible. It will be much easier for the team to provide you assistance if you can provide specific information regarding the issue. Vague or unclear inquiries will take much longer to resolve. Please include the following information in your e-mail (when available):
- Assignment number - Include the specific nature of your inquiry in the subject line - Include “URGENT” in the subject line for urgent matters - A detailed description of the issue, including the assignment number if applicable - Include screenshots of the issues when possible
E-mail Support: [email protected] Phone Support: 866-642-9574 (Option 2) Contact your local office for general questions that aren’t technically specific.

Veritext Proprietary & Confidential Information – Not for Distribution or Reproduction 01/21 2
Table of Contents
INTRODUCTION ..................................................................................................................... 1
SUPPORT ............................................................................................................................... 1
CHAPTER 1 – CREATING AN ACCOUNT ................................................................................... 3
CHAPTER 2 – THE DASHBOARD .............................................................................................. 4
1. PARTNER NEWS ....................................................................................................................... 4 2. YOUR JOBS ............................................................................................................................. 5 3. ASSIGNMENT DETAILS/PROGRESS STATUS ..................................................................................... 6 4. CALENDAR .............................................................................................................................. 6 5. SEARCH .................................................................................................................................. 8 6. USER MENU ........................................................................................................................... 8
CHAPTER 3 – REVIEWING AN ASSIGNMENT ........................................................................... 8
CHAPTER 4 - SUBMITTING AN ASSIGNMENT ........................................................................ 10
1. ROUGHS .................................................................................... ERROR! BOOKMARK NOT DEFINED. 2. WITNESSES ........................................................................................................................... 11 3. ATTORNEYS PRESENT .............................................................................................................. 11
DUPLICATE APPEARANCES ....................................................................................................... 15 4. ORDERS ............................................................................................................................... 16 5. REVIEW ALL ORDERS & SEND ................................................................................................... 19 6. FILES ................................................................................................................................... 21
CHAPTER 5 – FINANCIALS ..................................................................................................... 23
CHAPTER 6 – MOBILE ........................................................................................................... 25

Veritext Proprietary & Confidential Information – Not for Distribution or Reproduction 01/21 3
CHAPTER 1 – Creating an Account
• Navigate to www.veritext.com and select “Log on to Partner Portal” on the top right • Select “Click here to register” • Enter the desired username, password, Tax ID/Social Security Number. • Select “Register for Portal”. • Google Chrome is the recommended web browser for the Veritext Partner Portal

Veritext Proprietary & Confidential Information – Not for Distribution or Reproduction 01/21 4
CHAPTER 2 – The Dashboard The re-designed Dashboard provides an easily understandable overview of all your current, upcoming and historical activities with Veritext. More detailed information regarding assignments can be accessed by clicking a blue case name, anywhere on the site and a list view of your assignment can be easily accessed by clicking a category in the center of the page.
1. Partner News – Stay up to date with industry news, Veritext announcements and upcoming opportunities. During the Beta test we will communicate updates, fixes and important information. You can toggle the News display on and off using the slider at the top-right: Display On:
Display Off:

Veritext Proprietary & Confidential Information – Not for Distribution or Reproduction 01/21 5
2. Your Jobs – All the jobs you are assigned to, divided by assignment category. If you have multiple jobs, the number of jobs will be represented in the parenthetical. Clicking a category will redirect you to a list view displaying jobs that fall within that category. Options for sorting the display are available in the Sort By menu. You can see more complete details of the assignment by clicking the blue linked job info (required to understand full assignment details).
To Accept Jobs - Select the To Accept assignment category from Your Jobs. Accept or Decline assignments by clicking the buttons, respectively. Additional information regarding the assignments can be accessed by selecting the blue linked job info.

Veritext Proprietary & Confidential Information – Not for Distribution or Reproduction 01/21 6
3. Assignment Details/Progress Status – The basic information for the jobs in the selected assignment category will display, along with the job’s Progress Status.
Explanation of Work in Progress Statuses In Progress Due Now Complete
Witness Day of Job Onward On Due Date & Past Due Date Witness Saved Orders Day of Job Onward On Due Date & Past Due Date Job Sent Exhibits Day of Job Onward 3 business days after the
assignment or earlier if expedited
Exhibits Uploaded
Files Day of Job Onward On Due Date & Past Due Date Job Sent with Files Invoices Day of Job Onward After Due Date (IC)
After Due Date (Agency) First Invoice Billed (IC)
Invoice Uploaded (Agency)
4. Calendar – a new view in PortalNext, the Calendar displays Jobs and Availability (depending upon release; may not be available for all users).

Veritext Proprietary & Confidential Information – Not for Distribution or Reproduction 01/21 7
a. Expand - change to full screen mode using the four-pointed arrow. Close using the “X” button.
b. Add Event - to add Availability to the Calendar, select Add Event.
1. Select the applicable Availability category: Unavailable = unable to work at all; Limited Availability =
may be able to take an assignment if it meets specified criteria (e.g. job must end by 2 PM). 2. Enter Title description of event. 3. Enter Date Range. All Day is selected by default; uncheck to enable time editing. 4. Select Repeat occurrence if you’d like to enter a reoccurring event. 5. Submit to save.
c. Scroll - use arrows to navigate between date ranges.

Veritext Proprietary & Confidential Information – Not for Distribution or Reproduction 01/21 8
d. View - switch between Month View (displayed above) and List view (below):
e. Filters - Check or uncheck Filters to hide/show Event categories.
5. Search - enter search term or job number to navigate to specific jobs.
6. User Menu - select the user Icon to display additional menu options, including Tutorial/Help resources,
Payments, and Passwords.
Chapter 3 – Reviewing an Assignment

Veritext Proprietary & Confidential Information – Not for Distribution or Reproduction 01/21 9
Whenever you click a Case Name or Job Number from anywhere in the portal you will be taken to the Assignment Details page. Assignment details contain all the information needed to perform the assignment and houses all the processes for turning in and completing the assignment (See “Assignment Details – Turn In” below).
1. Job Info – Basic information regarding the assignment, including Status, Job Date, and Due Date. Expedited job delivery will appear in red. If you’ve not yet Accepted, you can Accept/Decline jobs.
2. Case Information – Information regarding the client, case and proceeding. 3. Location – Job Location. Select the Get Directions link to launch Google Maps. 4. Services – Required services for the assignment. 5. Service Provider – Partners assigned to the job. This box will show you, and any other partners assigned to
the job, e.g., reporters, videographers or interpreters and his/her name. 6. Notes – Notes from Veritext regarding the assignment. Add your own notes by clicking Add on the top right
corner of the box. These notes will be displayed for Veritext staff on the office system as well. 7. Menu – Locate additional features:
a. View Financials b. Print Job Details c. Word Dictionary d. Office Info e. Transcript Info

Veritext Proprietary & Confidential Information – Not for Distribution or Reproduction 01/21 10
Chapter 4 - Submitting an Assignment All the steps required to submit an assignment are also located on the assignment details page, under the Assignment Detail cards. Each of the processes (1 – 5 below) are explained in additional detail later in the manual.
To edit a card, select the blue button to the right of the title. To close a card, select the “X”.
1. Roughs -- The Rough card allows a reporter to upload and email roughs to counsel, this is not used for video. 2. Witness -- The witness card allows you to add new witnesses by selecting Add on the top right corner of the
card. You can also edit existing witness information by selecting a witness name. 3. Attorneys Present – Veritext Partners should input any attorney that was present at the deposition as an
Attorneys Present. All “Attorneys” that did not order work product at the time of the proceeding will be automatically e-mailed by Veritext asking if they would like to purchase a copy of the work product at the time it becomes available. Any attendee that is added to the assignment and that has work product associated with it will automatically generate an Order for that attendee.
4. Orders – Veritext partners can create, duplicate, edit or delete orders on the orders section of the assignment details page.
5. Files – Files that have already been uploaded (by you or Veritext) will be separated into different File Type categories. You can upload files by clicking Upload Files on the top-left of the Files card.
6. Review All Orders & Send – Once all witnesses, attendees, files and orders have been added, the Veritext Partner should click Review All Orders & Send at the top of the page to review all their completed information for one last time and to submit the assignment to Veritext for production and/or billing.

Veritext Proprietary & Confidential Information – Not for Distribution or Reproduction 01/21 11
Orders should be submitted in order (1-5), per below:
1. Witnesses – To add witness, select “Add” button. To edit witness, select name. a. Select Venue. b. Enter/Edit Witness Info, if necessary. Select Expertise, if applicable. c. Skip the Job Info section, this is to be filled out by the court reporter. d. Video
i. Enter No. of Media Units. ii. Enter Master Type. iii. Enter Actual Start Time and Actual End Time. iv. Enter Hours on Record and Minutes on Record.
2. Attorneys Present – All attorneys that were present at the deposition (regardless of ordering work product) should be added to the Attorneys Present section. The Attorneys Present section should ONLY include attorneys and should NOT include anyone else present at the proceeding. Non-ordering attorneys that are added to Attorneys Present section will be e-mailed after you have turned in the assignment requesting whether they would like to purchase work product, potentially generating additional copy sales for you. Adding an attendee with a Product Ordered will automatically generate an order for that attendee. [NOTE: Copy is only available if there are multiple jobs within the same case.]

Veritext Proprietary & Confidential Information – Not for Distribution or Reproduction 01/21 12
To add an Attorney Present, select Add button. [Copy is explained below.] a. Search Law Firms and Attorneys by typing a name. Building icon represents Law Firm entries. Person
icon represents Contact entries.
Use the Filters to narrow to only Law Firms, or only Attorneys.
If you select a Law Firm, you will be presented with the available Contacts within that Firm, and the Law Firm filter will be grayed out. Use the Arrow to go back to main Search results.

Veritext Proprietary & Confidential Information – Not for Distribution or Reproduction 01/21 13
b. Select the appropriate Attorney record or Add New Firm/Attorney. (If the attorney email is not in the system, you will need to add it.) Select the Products Ordered by Attorney.
Then, Add Attendee.
Once successfully added, the Attorney will show under Attorneys Present. If “Video” was selected as Products Ordered, an Order will also be created under Orders.

Veritext Proprietary & Confidential Information – Not for Distribution or Reproduction 01/21 14
If you need to update an Attendee to include an Order, select the name under Attorneys Present and update the Products Ordered, and select Edit Attendee. Remove Attendee is only available if there is “Nothing” associated with the Attorney.
c. Adding a New Firm or New Attorney (if applicable) – After thoroughly searching for the firm or attorney, you can add a new firm/attorney by selecting the Add New Law Firm button from the main Search or Add New Attorney once a Firm has been selected. Enter all required fields (denoted with an asterisk) and Add New.

Veritext Proprietary & Confidential Information – Not for Distribution or Reproduction 01/21 15
Duplicate Appearances To duplicate Attorneys Present from a job in the same case, select Copy. Copy only works if you are assigned to other jobs within the same case; you cannot currently copy Attorneys from unrelated cases.
Select the applicable job from the dropdown.
Select the applicable parties to duplicate, then Copy.

Veritext Proprietary & Confidential Information – Not for Distribution or Reproduction 01/21 16
3. Orders – if you selected a Product Ordered for any Attorneys Present, a corresponding Order will have been created under Orders. In addition, any Orders entered by the Veritext Office will be listed here. Orders entered by you via Portal will be designated as a “Portal Order”; Orders entered by the Veritext Office will be designated as a “Pre-Order” or “Manual Order”. “Pre-Orders” cannot be deleted, only edited. If there is not an Order available for an ordering party, Add the contact under Attorneys Present. To remove an Unsent Portal Order, select the name under Orders then Delete. To edit an Unsent Order, select the name then Edit.
The Editing Order window will open:

Veritext Proprietary & Confidential Information – Not for Distribution or Reproduction 01/21 17
a. To edit the Attorney appearing on behalf of a Firm, select Change and follow the same process as you would to add Attorneys Present.
b. If applicable, select Shipping Info > Address for any physical products to be delivered to the Firm, e.g., Hard copy transcripts, DVD videos, etc. Select Ship to a different address to activate the address box below.
c. If applicable, enter any Notes • This where you would indicate if an attorney has requested a specific video format

Veritext Proprietary & Confidential Information – Not for Distribution or Reproduction 01/21 18
d. Select Add to the right of Details.
If there are multiple witnesses, select the checkbox next to the Witnesses you would like to edit. You can edit simultaneously (by checking both boxes), or independently (by checking one box at a time).
Edit Order Details:
1. Select a Product Ordered. 2. Select a Product Shipped. 3. Select Delivery Days. 4. Select Designation, if applicable. 5. Deliverables: If an attorney has requested a specific video format, this should be indicated in the
Notes section of the order 6. Once complete, Save order. (Save is only enabled upon selection of required fields.)

Veritext Proprietary & Confidential Information – Not for Distribution or Reproduction 01/21 19
e. Upon Save of Order Details, you will see an Order Details summary of selected options. Review the Order(s). If changes are needed, you can select Edit to update, or Remove to delete. Order Save will enable at top-right. Save to add Order to Job.
Once Order has saved successfully, you will receive a prompt. You can go Back to Job, Add New Order, or Review All Orders & Send.
4. Review All Orders & Send – you can access Review All Orders & Send using the prompt dialogue above, or from the Assignment Details screen at top-right.

Veritext Proprietary & Confidential Information – Not for Distribution or Reproduction 01/21 20
Review Order(s) A summary of the orders you have entered will be presented on the Order Summary page. Unsent Orders will be listed first.
Once you have validated that all the orders and information is correct, click the green Send Job button on the top right to submit all the information to Veritext for production and/or billing.
A confirmation dialogue will appear. Select Yes to proceed with Sending.
Once Order has Sent successfully, you will receive a prompt. You can go Back to Job, Go To Financials, or Return to Dashboard.
Veritext Proprietary & Confidential Information – Not for Distribution or Reproduction 01/21 21
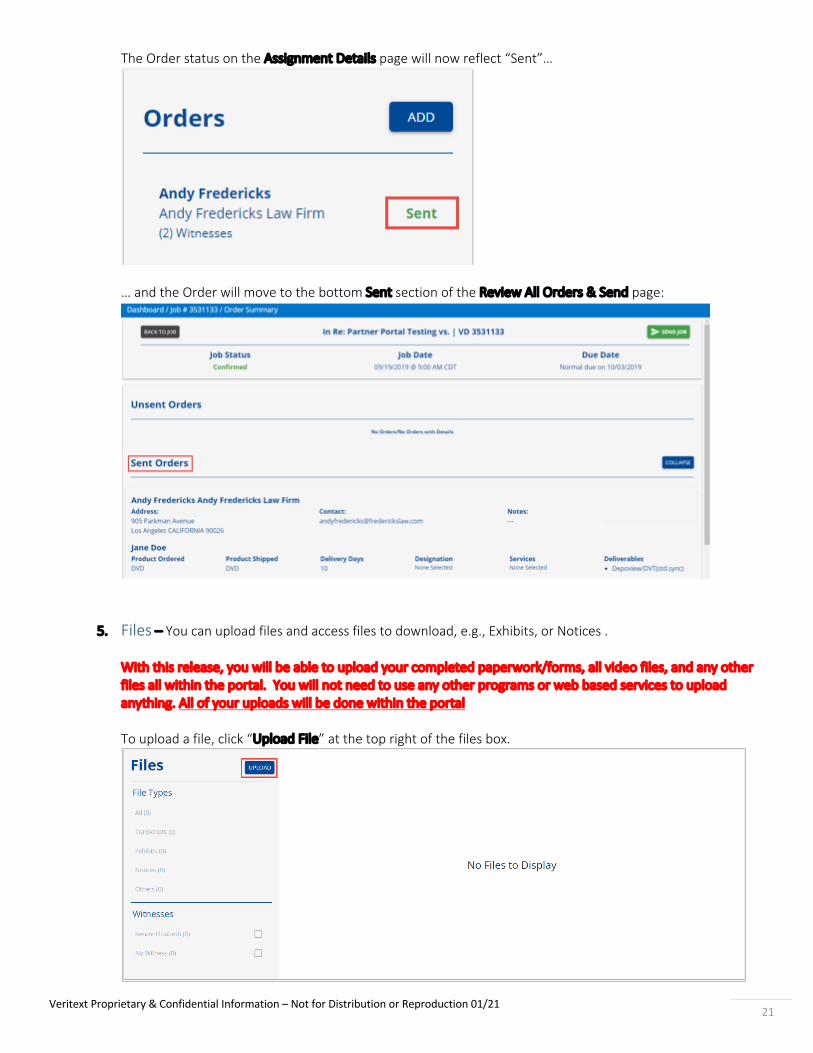
The Order status on the Assignment Details page will now reflect “Sent”…
… and the Order will move to the bottom Sent section of the Review All Orders & Send page:
5. Files – You can upload files and access files to download, e.g., Exhibits, or Notices .
With this release, you will be able to upload your completed paperwork/forms, all video files, and any other files all within the portal. You will not need to use any other programs or web based services to upload anything. All of your uploads will be done within the portal To upload a file, click “Upload File” at the top right of the files box.

Veritext Proprietary & Confidential Information – Not for Distribution or Reproduction 01/21 22
Select the appropriate File Type. Depending on the File Type, you may also have to select the corresponding Witness.
Once your chosen a selection for the required fields, drag the file into the upload box, or select the File Dialog button to Browse to the file location. Once the File has been successfully uploaded, the progress bar turns green and “Successfully Uploaded” text displays. To Upload more files, select Return to File List.
Once the Files have been uploaded, you can browse using the File Type menu at the left. You can Filter results by Witness. Number of files available per category are indicated in parenthesis.

Veritext Proprietary & Confidential Information – Not for Distribution or Reproduction 01/21 23
To download files, check the boxes for the individual items - or choose Select All Files - then Download.
CHAPTER 5 – Financials The job financials section is used to create an invoice for your assignments that will be submitted to Veritext for payment and to upload receipts for reimbursable expenses. Please note that job financials are for individual assignments. To access Financials, from the Assignment Details screen, Select the 3 dots at the top right of the sreen and select the $ icon.
1. Job Financials -- You can add line items to your invoice by selecting Add Expense. A side-bar will open. Fill out
the fields and select Create or Create & Add Another.
All video assignments must have, at a minimum, the Video – Initial Services and Video – Additional Hours (when applicable) fields entered along with the appropriate quantity and rate. Alternatively, if the proceeding did not go forward the Video – Cancellation must be entered instead. The Orders field must also be filled out with a minimum of “1” entered.
Veritext Proprietary & Confidential Information – Not for Distribution or Reproduction 01/21 24
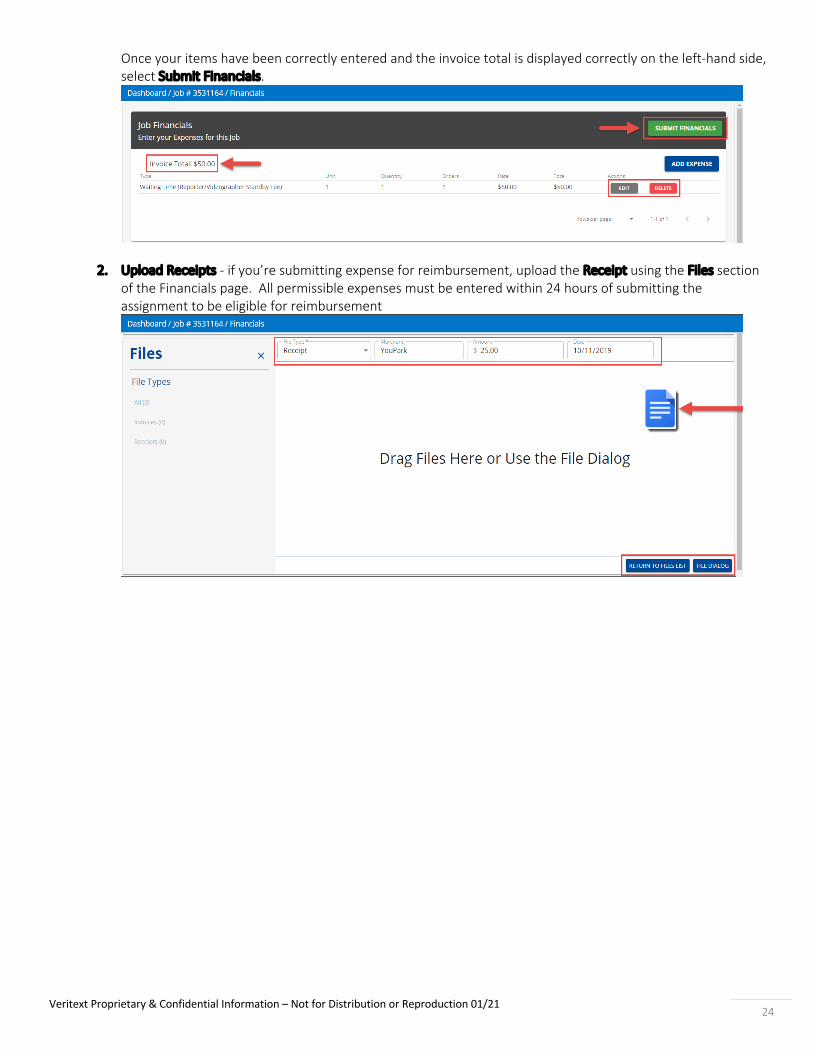
Once your items have been correctly entered and the invoice total is displayed correctly on the left-hand side, select Submit Financials.
2. Upload Receipts - if you’re submitting expense for reimbursement, upload the Receipt using the Files section of the Financials page. All permissible expenses must be entered within 24 hours of submitting the assignment to be eligible for reimbursement

Veritext Proprietary & Confidential Information – Not for Distribution or Reproduction 01/21 25
CHAPTER 6 – Mobile PortalNEXT is enabled for mobile using your browser of choice (Veritext recommends Chrome). Features on mobile, work the same as on a desktop browser.
1. From your browser, go to www.veritext.com and navigate to Partner Portal, or bookmark the Portal page (https://portal.veritextllc.com/#/login). Log In.
2. To review/accept assignment, select approrpriate Job Status, and Sort By. Click on job to view Assignment Details. Select Accept/Decline buttons from Dashboard or Details view.

Veritext Proprietary & Confidential Information – Not for Distribution or Reproduction 01/21 26
3. Use the three-dot menu in the upper-right to access more options. Use the green arrow button to Send & Review Jobs.