parts list level cases are critical for end installation
TRANSCRIPT

NOTE: Make sure merchandisershave been leveled according to theinstallation instructions. Carefullyunpack and inspect the End Kit,making sure there is no breakage ordamage.
ALL ENDS:Follow Steps 1-6 (pages 2 - 5) ofthis instruction before going toStep 7 — Solid Ends (Page 6) or Step 7a — Plastic Ends with GlassInsert (Page 10).
Installing Solid End or Plastic End with Glass
on Excel Service Merchandisers Fresh Meat, Deli and Fish Merchandiser
March 2012
P/N 0518271_C
1
SOLID ENDS (ONLY)
PARTS LIST
Item Quantity Description
No.1. 1 Gasket 1/2 x 11/2 x 146 2. 1 Silicone3. 1 Top Gasket Pad4. 1 Solid End Assembly5. 2 Spacers6. 2 Cap Screw 5/16 - 18 x 11/47. 3 Cap Screw 5/16 - 18 x 21/28. 10 Flat Washer 5/16
9. 5 Lock Washer 5/16
10. 5 Hex Nut 5/16 - 18 11. 2 Cap Plug12. 5 Plug Button13. 1 End Splashguard Retainer 14. 4 Hex Washer Head Screw #10 - 16 x 3/4
©2012 HUSSMANN CORPORATION • BRIDGETON, MO 63044-2483 U.S.A.U.S. & CANADA 1-800-922-1919 • MEXICO 1-800-890-2900 • WWW.HUSSMANN.COM
Level casesare critical
for endinstallationand glass
alignment!
P/N_0518271_C

1 Remove items below:A. Shelves if installed,B. Display Pans,C. Rear Pan Bracket,D. Rear Panel and Discharge Grille E. Front Return Air Grillefrom merchandiser. See Figure 1.
2
Figure 1. Removing Items from the Merchandiser
A
REMOVING ITEMS FROM THE
MERCHANDISER
B
C
D
E
P/N 0518271_C
U.S. & CANADA 1-800-922-1919 • MEXICO 1-800-890-2900 • WWW.HUSSMANN.COM

3
P/N 0518271_C
2Apply 1 1/2 in. (38 mm) Gasket (Item – 1) to rear foam panel asshown. See Figure 2. Detail A.
•Do not stretch gasket
•Remove paper backing aftergasket has been applied.
Figure 2. Applying 1 1/2 in. Gasket to the Merchandiser
Apply 1 1/2 in. (38 mm) gasket
1
GASKETING AND SEALING PROCEDURE
DETAIL A.
Service Merchandiser End Instruction
HUSSMANN CORPORATION • BRIDGETON, MO 63044-2483 U.S.A. • WWW.HUSSMANN.COM
GasketGasket
1

4
P/N 0518271_C
U.S. & CANADA 1-800-922-1919 • MEXICO 1-800-890-2900 • WWW.HUSSMANN.COM
3Before installing end, make sure to apply a 1/2 inch bead ofclear Silicone (Item– 2) alongthe entire perimeter of thecase as shown in Figure 3.
4In addition, apply silicone around the perimeter of thefront joining hole and over thetop of the frame. See Figure 3,Details B and C.
Apply siliconeto areas indicated 2
Figure 3. Applying Silicone
Silicone
2
Silicone
DETAIL C.
2
DETAIL B.

P/N 0518271_CService Merchandiser End Instruction
5Install the Top Gasket Pad
(Item – 3) See Figure 4, Detail D.
6Apply Silicone (Item – 2) onto the top face of the Top GasketPad (Item – 3). See Figure 4,Details D, E and F.
Silicone
Figure 4. Applying Top Gasket Pad
TopGasketPad DETAIL D.
3
DETAIL E.
Silicone 2
5HUSSMANN CORPORATION • BRIDGETON, MO 63044-2483 U.S.A. • WWW.HUSSMANN.COM
DETAIL F.
2

7Place and fasten the Solid End Assembly (Item – 4)using Spacers (Item – 5), Cap Screws (Items – 6 & 7),
Flat Washers (Item – 8),Lock Washers (Item – 9) Hex Nut (Item – 10)
Cap Plug (Item – 11) andPlug Button (Item – 12).See Figure 5.
P/N 0518271_C
U.S. & CANADA 1-800-922-1919 • MEXICO 1-800-890-2900 • WWW.HUSSMANN.COM6
Figure 5. Fastening End Assembly
5/16 x 18 x 1 1/4 (Item– 6)
5/16 x 18 x 2 1/2 (Item– 7)
Cap Screws; A and BA
B
Cap Screw Sizes and Locations

7
P/N 0518271_CService Merchandiser End Instruction
HUSSMANN CORPORATION • BRIDGETON, MO 63044-2483 U.S.A. • WWW.HUSSMANN.COM
SEALING THE INTERIORBOTTOM OF THE CASES
8Apply a continuous bead of Silicone (Item – 2) to thejoint. Smooth and even out silicone so that there are nogaps or ridges in the case joint.
Figure 6. Sealing the End
Back of Case
Seal Here
DETAIL J.

P/N 0518271_C
U.S. & CANADA 1-800-922-1919 • MEXICO 1-800-890-2900 • WWW.HUSSMANN.COM8
INSTALLINGSPLASHGUARDASSEMBLY
9Attach Slashguard Retainers(Item – 13) to the side of frontand back legs as shown usingScrews (Item – 14). Push thelower edge of the splashguardtoward the bottom of thebracket until it snaps intoplace. See Figure 7 and Detail G.
Figure 7. Installing Splashguard Assembly
Side
Front
DETAIL G

Installing Plastic End with Glass
on Excel Service Merchandisers
9HUSSMANN CORPORATION • BRIDGETON, MO 63044-2483 U.S.A. • WWW.HUSSMANN.COM
PLASTIC WITH GLASS ENDS (ONLY)
PARTS LIST
Item Quantity Description
No.1 1 Gasket 1/2 x 11/2 x 146 2 1 Silicone3 1 Top Gasket Pad4 1 Plastic Glass End Assembly5 1 Glass6 2 Spacers7 1 Cap Screw 1/4 - 20 x 3/48 1 Cap Screw 1/4 x 20 x 19 3 Cap Screw 1/4 x 20 x 2
10 10 Flat Washer 1/4
11 3 Lock Washer 1/412 2 Hex Nut 1/4
13 2 Plug Button14 2 Cap Plug15 1 End Splashguard Retainer16 4 Hex Washer Head Screw #10 - 16 x 3/417 1 End Bumper Retainer18 2 Truss Head Sheet Metal Screw #10 - 24 x 3/819 1 Wrap-around End Bumper
Follow Steps 1-6 in the Solid Endsection of this instruction beforegoing on to Step 7a:
REMOVING ITEMS FROM THE CASE.
GASKETING AND SEALING PROCEDURE.
Level casesare critical
for endinstallationand glass
alignment!

10
P/N 0518271_C
U.S. & CANADA 1-800-922-1919 • MEXICO 1-800-890-2900 • WWW.HUSSMANN.COM
7aPlace and fasten the Plastic End Assembly (Item – 4) using Spacers (Item – 6), Cap Screws (Items – 7, 8 and 9), Flat Washers (Item – 10 ),
Lock Washers (Item – 11), Hex Nut (Item – 12),Plug Button (Item –13 ) and Cap Plug (Item – 14 ). See Figure 5a.
Place Glass (Item – 5)over rubber spacers in grooveon plastic end.Fasten with screws provided asshown in Figure 5a Detail.
Figure 5a. Installing the Plastic End, and Glass to the Case
ATTACHING THE PLASTIC ENDWITH GLASS TO THE CASE
1/4 – 20 x 3/4 (Item – 7)
1/4 – 20 x 1 (Item – 8)
1/4 – 20 x 2 (Item – 9)
A
B
C
Cap Screw Sizes and Locations
11
P/N 0518271_CService Merchandiser End Instruction
HUSSMANN CORPORATION • BRIDGETON, MO 63044-2483 U.S.A. • WWW.HUSSMANN.COM
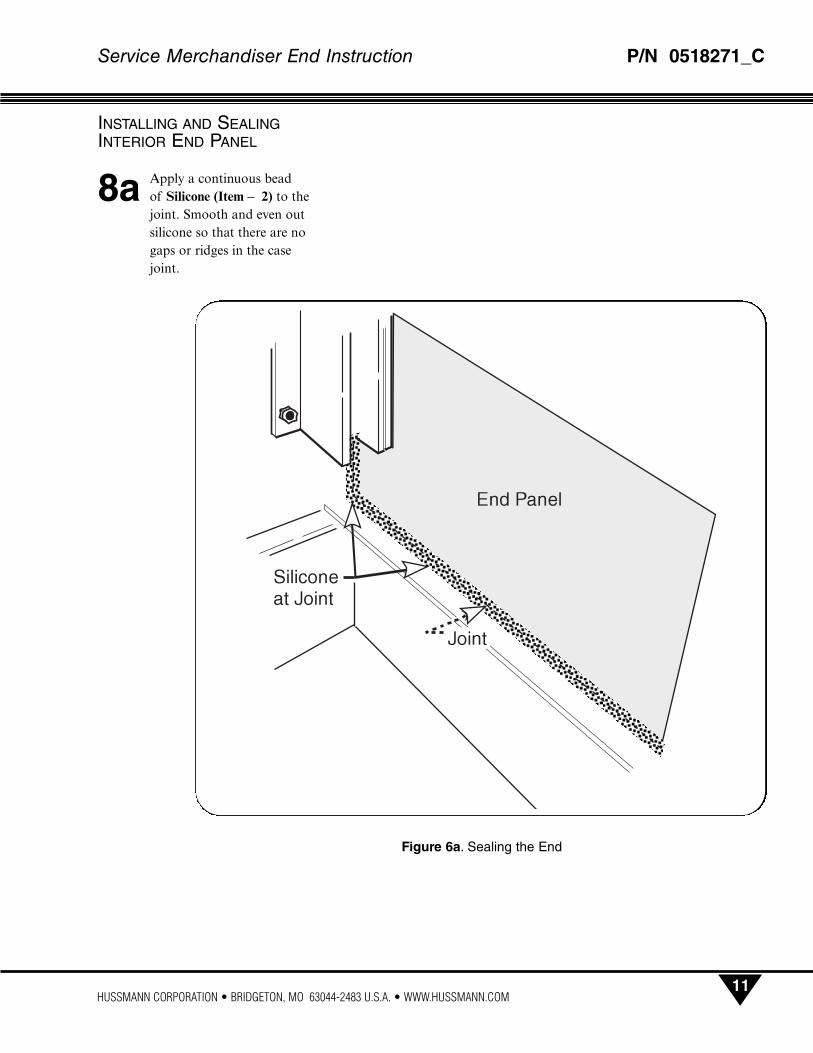
INSTALLING AND SEALINGINTERIOR END PANEL
8aApply a continuous bead of Silicone (Item – 2) to thejoint. Smooth and even out silicone so that there are no gaps or ridges in the case joint.
Figure 6a. Sealing the End

INSTALLING SPLASHGUARDAND LOWER END PANEL
9aAttach the End SplashguardRetainers (Item – 15) to the side of front and back legs as shown using Screws (Item – 16). Push the lower edge of the splashguard toward the bottom of the bracket until it snaps into place.
12
P/N 0518271_C
U.S. & CANADA 1-800-922-1919 • MEXICO 1-800-890-2900 • WWW.HUSSMANN.COM
Figure 7a. Installing Splashguard and Lower End Panel
Side
Front
15
16

13
P/N 0518271_CService Merchandiser End Instruction
HUSSMANN CORPORATION • BRIDGETON, MO 63044-2483 U.S.A. • WWW.HUSSMANN.COM
INSTALLING BUMPERRETAINER AND BUMPER
10aFasten End Bumper Retainer (Item – 17 ) to the end with Screws (Item – 18). See Figure 8a.
11aSnap Wrap around CornerBumper (Item – 19 ) on to end and front of case. See Figure 9a.
12aRe-install in reverse order, all items that were removed in Step 1.
Do not over tighten screws as
this may cause inserts to
come loose.
Figure 8a. Installing Bumper Retainer
Figure 9a. Installing Corner Bumper
19