patch for suse linux enterprise - user's guide · suse linux enterprise server 12 on ibm...
TRANSCRIPT

BigFix PatchPatch for SUSE Linux
Enterprise - User's Guide

Special notice
Before using this information and the product it supports, read the information in Notices
(on page 106).

Edition notice
This edition applies to version 9.5 of BigFix and to all subsequent releases and
modifications until otherwise indicated in new editions.

Contents
Special notice................................................................................................................................ 2
Edition notice............................................................................................................................... 3
Chapter 1. Overview.......................................................................................................... 1
What's new in this update release....................................................................................... 1
Supported platforms and updates.......................................................................................4
Supported Novell repositories.............................................................................................. 6
Site subscription..................................................................................................................12
Patching method................................................................................................................. 13
Chapter 2. Using the download plug-in........................................................................... 15
Manage Download Plug-ins dashboard overview.............................................................16
Registering the SCC download plug-in.............................................................................. 19
Configuring the basic SCC download plug-in settings..................................................... 22
Configuring the advanced SCC download plug-in settings..............................................25
Unregistering the SCC download plug-in...........................................................................28
Upgrading the SCC download plug-in................................................................................29
Extending the SCC download plug-in.................................................................................30
Chapter 3. Using the download cacher............................................................................38
SCC download cacher usage information.........................................................................38
Using the SCC download cacher for air-gapped environments....................................... 46
Caching packages on the sha1 folder...............................................................................48
Caching packages on the local cache folder....................................................................49
Chapter 4. Using BigFix Patch for SUSE Linux Enterprise................................................ 51
Patching using Fixlets.........................................................................................................51

Contents | v
Chapter 5. Multiple-Package Baseline Installation...........................................................55
Installing multiple packages in a baseline........................................................................ 58
Creating a search filter for zypper patches.......................................................................61
Chapter 6. Custom repositories management..................................................................63
SLE Custom Repository Management dashboard............................................................64
Adding a repository or SMT............................................................................................... 66
Registering endpoints to a repository or SMT.................................................................. 68
Unregistering endpoints from a repository or SMT.......................................................... 70
Deleting repositories or SMTs............................................................................................71
Importing repositories or SMTs......................................................................................... 71
Installing packages from a custom repository................................................................. 72
Chapter 7. SLE Btrfs snapshot management................................................................... 75
SLE Btrfs Snapshot Management dashboard overview...................................................75
Rolling back a snapshot..................................................................................................... 77
Chapter 8. Support..........................................................................................................80
Chapter 9. Troubleshooting............................................................................................. 81
Chapter 10. Frequently asked questions......................................................................... 92
Notices.......................................................................................................................................106

Chapter 1. Overview
The BigFix Patch solution, which includes deploying a multi-purpose, lightweight agent to
all endpoint devices, supports a wide variety of device types ranging from workstations and
servers to mobile and point-of-sale (POS) devices.
The information in this guide applies to SUSE Linux™ Enterprise Desktop for x86 and x86-64,
and SUSE Linux Enterprise Server for x86, x86-64, and s390x.
What's new in this update releaseThis release of BigFix Patch for SUSE Linux Enterprise provides extended support to include
SUSE Linux Enterprise Server 12 on IBM PowerPC 64-bit Little Endian (LE).
Table 1. What's new
Enhancement
or Feature Description Resources
SUSE Linux Enterprise
Server 11 PPC64BE
support
The content for SUSE Linux Enterprise Server
11 on IBM PowerPC 64-bit Big Endian (BE) is
published in the Patches for SLE 12 PPC64BE
site. This site is SLE's default package
manager, and contains content from the
following channels for SLES 11 PPC64BE
systems:
• SLES11-Pool
• SLES11-Updates
• SLES11-SP1-Pool
• SLES11-SP1-Updates
• SLES11-SP2-Pool
• SLES11-SP2-Updates
• SLES11-SP3-Pool
• SLES11-SP3-Updates

BigFix Patch Patch for SUSE Linux Enterprise - User's Guide | 1 - Overview | 2
Enhancement
or Feature Description Resources
• SLES11-SP4-Pool
• SLES11-SP4-Updates
SUSE Linux Enterprise
Server 12 PPC64LE
support
The content for SUSE Linux Enterprise Server
12 on IBM PowerPC 64-bit Little Endian
(LE) is published in the Patches for SLE
12 PPC64LE site. This site is SLE's default
package manager, and contains content from
the following channels for SLES 12 PPC64LE
systems:
• SLES12-SP0-Pool
• SLES12-SP0-Updates
• SLES12-SP1-Pool
• SLES12-SP1-Updates
• SLES12-SP2-Pool
• SLES12-SP2-Updates
• SLES12-SP3-Pool
• SLES12-SP3-Updates
Ensure that you update the SCC download
plug-in from the Manage Download Plug-ins
dashboard.
Supported platforms
and updates (on
page 4)
Supported Novell
repositories (on page
6)
Previous updates
Table 2. Previous updates
Enhancement
or Feature Description Resources
SCC download plug-in
enhancements
The SCC Download Plug-in now has the ability
to use packages that are cached by the SCC
Download Cacher’s download_dir (referred to
Using the download
plug-in (on page
15)
BigFix Patch Patch for SUSE Linux Enterprise - User's Guide | 1 - Overview | 3
Enhancement
or Feature Description Resources
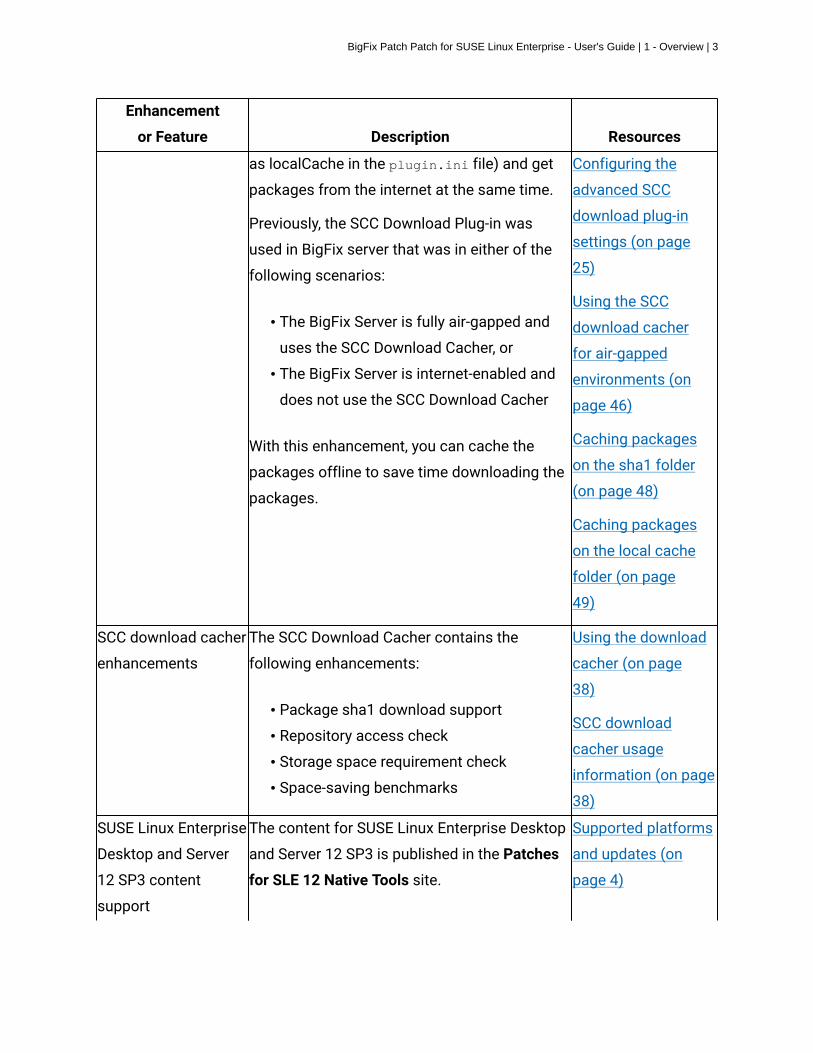
as localCache in the plugin.ini file) and get
packages from the internet at the same time.
Previously, the SCC Download Plug-in was
used in BigFix server that was in either of the
following scenarios:
• The BigFix Server is fully air-gapped and
uses the SCC Download Cacher, or
• The BigFix Server is internet-enabled and
does not use the SCC Download Cacher
With this enhancement, you can cache the
packages offline to save time downloading the
packages.
Configuring the
advanced SCC
download plug-in
settings (on page
25)
Using the SCC
download cacher
for air-gapped
environments (on
page 46)
Caching packages
on the sha1 folder
(on page 48)
Caching packages
on the local cache
folder (on page
49)
SCC download cacher
enhancements
The SCC Download Cacher contains the
following enhancements:
• Package sha1 download support
• Repository access check
• Storage space requirement check
• Space-saving benchmarks
Using the download
cacher (on page
38)
SCC download
cacher usage
information (on page
38)
SUSE Linux Enterprise
Desktop and Server
12 SP3 content
support
The content for SUSE Linux Enterprise Desktop
and Server 12 SP3 is published in the Patches
for SLE 12 Native Tools site.
Supported platforms
and updates (on
page 4)

BigFix Patch Patch for SUSE Linux Enterprise - User's Guide | 1 - Overview | 4
Enhancement
or Feature Description Resources
Ensure that you update the SCC download
plug-in from the Manage Download Plug-ins
dashboard.
Supported Novell
repositories (on page
6)
SUSE Linux Enterprise
Server 12 on System z
content support
The content for SUSE Linux Enterprise Server
12 on System z is published in the Patches for
SLE 12 on System z site.
Ensure that you update the SCC download
plug-in from the Manage Download Plug-ins
dashboard.
Supported platforms
and updates (on
page 4)
Supported Novell
repositories (on page
6)
Supported platforms and updatesBigFix Patch supports a wide range of SUSE Linux Enterprise platforms and updates.
BigFix provides Fixlet content for Novell updates that are under general support. If you
acquired the Long Term Service Pack Support (LTSS) and require such content, contact IBM
Professional Services.
Table 3. Supported platforms and patches for BigFix Patch
Supported platforms and patches are listed below:
Fixlet Site NameSupported
Platform Version
Supported
ArchitectureType of Update
SUSE Linux Enterprise
Desktop 15
x86_64Patches for SLE 15
SUSE Linux Enterprise
Server 15
x86_64
Patches for SLE 12
Native Tools
SUSE Linux Enterprise
Desktop 12 (SP1, SP2,
SP3, and SP4)
x86_64
See Supported Novell
repositories (on page
6) to view the list
of Novell repositories
that contain the
supported packages.

BigFix Patch Patch for SUSE Linux Enterprise - User's Guide | 1 - Overview | 5
Fixlet Site NameSupported
Platform Version
Supported
ArchitectureType of Update
SUSE Linux Enterprise
Server 12 (SP1, SP2,
SP3, and SP4)
x86_64
Patches for SLE 12 on
System z
SUSE Linux Enterprise
Server 12 (SP1, SP2,
SP3, and SP4)
s390x
Patches for SLE 12
PPC64LE
SUSE Linux Enterprise
Server 12 (SP1, SP2,
SP3, and SP4)
ppc64le
Patches for SLE 11
PPC64BE
SUSE Linux Enterprise
Server 11 (SP1, SP2,
SP3, and SP4)
ppc64be
SUSE Linux Enterprise
Desktop 11 (SP1, SP2,
SP3, and SP4)
x86 and x86_64Patches for SLE 11
Native Tools
SUSE Linux Enterprise
Server 11 (SP1, SP2,
SP3, and SP4)
x86 and x86_64
Patches for SLE 11 on
System z Native Tools
SUSE Linux Enterprise
Server 11 (SP1, SP2,
SP3, and SP4)
s390x
Patching Support Previously listed
supported platform
versions.
NA NA
Notes:
• The Patches for SLE11 System Z site was deprecated on June 31, 2017. This site is
being replaced by the Patches for SLE 11 on System z Native Tools site. BigFix Patch
no longer provide content and support for the Patches for SLE11 System Z site beyond
the stated date.

BigFix Patch Patch for SUSE Linux Enterprise - User's Guide | 1 - Overview | 6
• The Patches for SLE11 site was deprecated on January 31, 2016. BigFix Patch no
longer provides content and support for this site. The deprecated site is no longer
available on the License Overview dashboard. For more information, see https://
ibm.biz/BdHVQz.
• The Patches for SLE10 and Patches for SLE10 System Z sites were deprecated on
September 30, 2016. Patch content for any new SUSE updates that are released after
the site deprecation date for SUSE Linux Enterprise 10 (x86, x86_64, and s390x) are not
supported. For more information, see https://ibm.biz/Bdr3RD.
To install the patches for x86, x86_64, and s390x, subscribe to the appropriate sites
and register the SCC download plug-in on the BigFix server. For more information about
registering the SCC download plug-in, see Registering the SCC download plug-in (on page
19).
BigFix generates Fixlet content based on the SUSE advisories published through the Patch
Finder at https://download.suse.com/patch/finder/. This source channel also provides
advisories through a patch notification mailing list.
Important: BigFix does not generate content for packages that are released without an
official patch update announcement through Patch Finder. In cases where you require such
content, contact the IBM Professional Services. See the list of Lab Services Contacts at
http://ibm.biz/PPSBigFix.
Supported Novell repositoriesBigFix Patch for SUSE Linux Enterprise supports the packages in several Novell repositories.
SUSE Linux Enterprise Server and Desktop 15
The following table lists the repositories that contain the supported packages for the
Patches for SLE 15 site.

BigFix Patch Patch for SUSE Linux Enterprise - User's Guide | 1 - Overview | 7
Table 4. Supported Novell repositories and packages for SUSE Linux Enterprise Server and
Desktop 15
Operating System and Service Pack Level Repository Name
SLE-Module-Basesystem15-Pool
SLE-Module-Basesystem15-Updates
SLE-Module-Desktop-Applications15-Pool
SLE-Module-Desktop-Applications15-Updates
SLE-Product-SLED15-Pool
SUSE Linux Enterprise Desktop 15
SLE-Product-SLED15-Updates
SLE-Module-Basesystem15-Pool
SLE-Module-Basesystem15-Updates
SLE-Module-Server-Applications15-Pool
SLE-Module-Server-Applications15-Updates
SLE-Product-SLES15-Pool
SUSE Linux Enterprise Server 15
SLE-Product-SLES15-Updates
SUSE Linux Enterprise Server and Desktop 12
The following table lists the repositories that contain the supported packages for the
Patches for SLE 12 Native Tools site.
Table 5. Supported Novell repositories and packages for SUSE Linux Enterprise Server and
Desktop 12
Operating System and Service Pack Level Repository Name
SUSE Linux Enterprise Desktop 12 SP4 SLED12-SP4-Pool
SLED12-SP4-Updates
SUSE Linux Enterprise Server 12 SP4 SLES12-SP4-Pool
SLES12-SP4-Updates
SUSE Linux Enterprise Desktop 12 SP3 SLED12-SP3-Pool
SLED12-SP3-Updates
SUSE Linux Enterprise Desktop 12 SP2 SLED12-SP2-Pool
SLED12-SP2-Updates
SUSE Linux Enterprise Desktop 12 SP1 SLED12-SP1-Pool
SLED12-SP1-Updates

BigFix Patch Patch for SUSE Linux Enterprise - User's Guide | 1 - Overview | 8
Operating System and Service Pack Level Repository Name
SUSE Linux Enterprise Desktop 12 SLED12-Pool
SLED12-Updates
SUSE Linux Enterprise Server 12 SP3 SLES12-SP3-Pool
SLES12-SP3-Updates
SUSE Linux Enterprise Server 12 SP2 SLES12-SP2-Pool
SLES12-SP2-Updates
SUSE Linux Enterprise Server 12 SP1 SLES12-SP1-Pool
SLES12-SP1-Updates
SUSE Linux Enterprise Server 12 SLES12-Pool
SLES12-Updates
SUSE Linux Enterprise Server 12 on z systems
The following table lists the repositories that contain the supported packages for the
Patches for SLE 12 on System z site.
Table 6. Supported Novell repositories and packages for SUSE Linux Enterprise Server 12
on System z
Operating System and Service Pack Level Repository Name
SUSE Linux Enterprise Server 12 SP4 on System zSLES12-SP4-Pool
SLES12-SP4-Updates
SUSE Linux Enterprise Server 12 SP3 on System zSLES12-SP3-Pool
SLES12-SP3-Updates
SUSE Linux Enterprise Server 12 SP2 on System zSLES12-SP2-Pool
SLES12-SP2-Updates
SUSE Linux Enterprise Server 12 SP1 on System zSLES12-SP1-Pool
SLES12-SP1-Updates
SUSE Linux Enterprise Server 12 on System z SLES12-Pool
SLES12-Updates
SUSE Linux Enterprise Server 11
The following table lists the repositories that contain the supported packages for the
Patches for SLE 11 PPC64BE site.

BigFix Patch Patch for SUSE Linux Enterprise - User's Guide | 1 - Overview | 9
Table 7. Supported Novell repositories and packages for SUSE Linux Enterprise Server 11
on PPC64 Big Endian
Operating System and Service Pack Level Repository Name
SUSE Linux Enterprise Server 11 SP4 SLE11-Public-Cloud-Module
SLE11-Security-Module
SLE11-Extras
SLE11--SP4-Pool
SLE11-SP4-Updates
SUSE Linux Enterprise Server 11 SP3 SLE11-Public-Cloud-Module
SLE11-Security-Module
SLE11-Extras
SLE11--SP1-Pool
SLE11-SP1-Updates
SLE11-Extras
SLE11--SP2-Core
SLES11-SP2-Updates
SLE11-SP3-Pool
SLE11-SP3-Updates
SUSE Linux Enterprise Server 11 SP2 SLE11-Extras
SLE11-SP1-Pool
SLES11-SP1-Updates
SLE11--SP2-Core
SLE11-SP2-Updates
SUSE Linux Enterprise Server 11 SP1 SLES11-Pool
SLES11-SP1-Pool
SLES11-SP1-Updates
SUSE Linux Enterprise Server 11 SLES11-Pool
SLES11-Updates
SLE11-Extras
SLE11-SP1-Pool

BigFix Patch Patch for SUSE Linux Enterprise - User's Guide | 1 - Overview | 10
SUSE Linux Enterprise Server 12
The following table lists the repositories that contain the supported packages for the
Patches for SLE 12 PPC64LE site.
Table 8. Supported Novell repositories and packages for SUSE Linux Enterprise Server 12
on PPC64 Little Endian
Operating System and Service Pack Level Repository Name
SUSE Linux Enterprise Server 12 SP4 SLES12-SP4-Pool
SLES12-SP4-Updates
SUSE Linux Enterprise Server 12 SP3 SLES12-SP3-Pool
SLES12-SP3-Updates
SUSE Linux Enterprise Server 12 SP2 SLES12-SP2-Pool
SLES12-SP2-Updates
SUSE Linux Enterprise Server 12 SP1 SLES12-SP1-Pool
SLES12-SP1-Updates
SUSE Linux Enterprise Server 12 SLES12-SP0-Pool
SLES12-SP0-Updates
SUSE Linux Enterprise Server and Desktop 11
The following table lists the repositories that contain the supported packages for the
Patches for SLE 11 Native Tools site.
Table 9. Supported Novell repositories and packages for SUSE Linux Enterprise Server and
Desktop 11
Operating System and Service Pack Level Repository Name
SUSE Linux Enterprise Server 11 SP4 SLES11-SP4-Pool
SLES11-SP4-Updates
SLE11-Public-Cloud-Module
SLE11-Security-Module
SUSE Linux Enterprise Server 11 SP3 SLES11-SP3-Pool
SLES11-SP3-Updates
SLE11-Public-Cloud-Module
SLE11-Security-Module

BigFix Patch Patch for SUSE Linux Enterprise - User's Guide | 1 - Overview | 11
Operating System and Service Pack Level Repository Name
SUSE Linux Enterprise Server 11 SP2 SLES11-SP1-Pool
SLES11-SP1-Updates
SLES11-SP2-Core
SLES11-SP2-Updates
SUSE Linux Enterprise Server 11 SP1 SLES11-SP1-Pool
SLES11-SP1-Updates
SUSE Linux Enterprise Server 11 SLES11-Pool
SLES11-Updates
SLES11-Extras
SUSE Linux Enterprise Desktop 11 SP4 SLED11-SP4-Pool
SLED11-SP4-Updates
SUSE Linux Enterprise Desktop 11 SP3 SLED11-SP3-Pool
SLED11-SP3-Updates
SUSE Linux Enterprise Desktop 11 SP2 SLED11-SP1-Pool
SLED11-SP1-Updates
SLED11-SP2-Core
SLED11-SP2-Updates
SUSE Linux Enterprise Desktop 11 SP1 SLED11-SP1-Pool
SLED11-SP1-Updates
SUSE Linux Enterprise Desktop 11 SLED11-Pool
SLED11-Updates
SLED11-Extras
SUSE Linux Enterprise Server 11 on z systems
The following table lists the repositories that contain the supported packages for the
Patches for SLE 11 on System z Native Tools site.
Table 10. Supported Novell repositories and packages for SUSE Linux Enterprise Server 11
on System z
Operating System and Service Pack Level Repository Name
SUSE Linux Enterprise Server 11 SP4 on System zSLES11-SP4-Pool
SLES11-SP4-Updates
BigFix Patch Patch for SUSE Linux Enterprise - User's Guide | 1 - Overview | 12
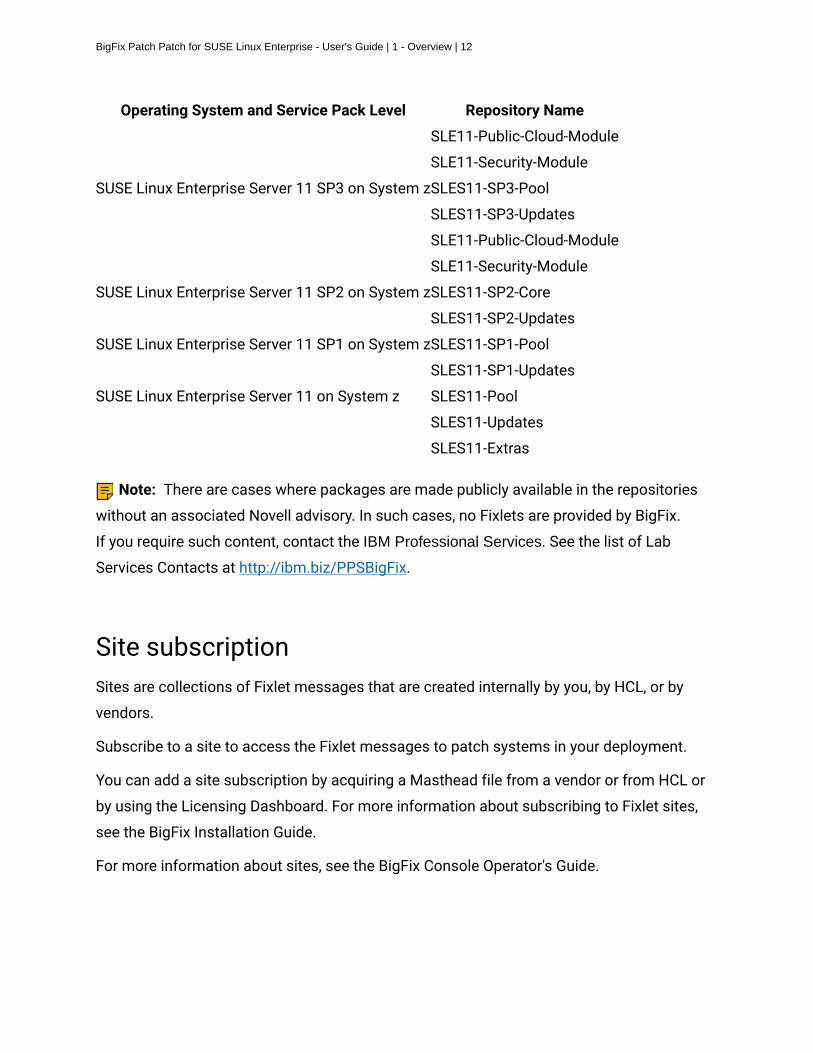
Operating System and Service Pack Level Repository Name
SLE11-Public-Cloud-Module
SLE11-Security-Module
SUSE Linux Enterprise Server 11 SP3 on System zSLES11-SP3-Pool
SLES11-SP3-Updates
SLE11-Public-Cloud-Module
SLE11-Security-Module
SUSE Linux Enterprise Server 11 SP2 on System zSLES11-SP2-Core
SLES11-SP2-Updates
SUSE Linux Enterprise Server 11 SP1 on System zSLES11-SP1-Pool
SLES11-SP1-Updates
SUSE Linux Enterprise Server 11 on System z SLES11-Pool
SLES11-Updates
SLES11-Extras
Note: There are cases where packages are made publicly available in the repositories
without an associated Novell advisory. In such cases, no Fixlets are provided by BigFix.
If you require such content, contact the IBM Professional Services. See the list of Lab
Services Contacts at http://ibm.biz/PPSBigFix.
Site subscriptionSites are collections of Fixlet messages that are created internally by you, by HCL, or by
vendors.
Subscribe to a site to access the Fixlet messages to patch systems in your deployment.
You can add a site subscription by acquiring a Masthead file from a vendor or from HCL or
by using the Licensing Dashboard. For more information about subscribing to Fixlet sites,
see the BigFix Installation Guide.
For more information about sites, see the BigFix Console Operator's Guide.

BigFix Patch Patch for SUSE Linux Enterprise - User's Guide | 1 - Overview | 13
Patching methodBigFix offers more flexibility to the patch management solution by using native tools.
The Fixlets for all SUSE content use zypper, the default package manager for SUSE Linux
Enterprise. Zypper gives you more flexibility in terms of patch deployment and in providing
results that are suitable for SUSE Linux Enterprise solutions. It uses a command-line
interface and simplifies the process of installing, uninstalling, updating, and querying
software packages. It is based on ZYpp, also known as libzypp. For more information about
Zypper, see the documentation at http://www.suse.com or see the Novell Support website
at https://www.novell.com/support/.
Zypper reduces dependency issues, improves performance, and is more reliable in terms
of installing security patches. This method also allows you to use custom repositories for
patching. For more information about custom repository support, see Custom repositories
management (on page 63).
The Zypper approach is introduced to replace the EDR utilities that Patch Management for
SUSE Linux Enterprise previously used. The following native tools sites are available for you
to use:
• Patches for SLE 12 Native Tools
• Patches for SLE 12 on System z
• Patches for SLE 12 PPC64LE
• Patches for SLE 11 Native Tools
• Patches for SLE 11 on System z Native Tools
Zypper utility configuration settings
The native tools sites use all the settings in /etc/zypp/zypp.conf.
The following Zypper configuration settings are set to values that come from
another file, which is dynamically created during Fixlet execution:
• cachedir

BigFix Patch Patch for SUSE Linux Enterprise - User's Guide | 1 - Overview | 14
• configdir
• metadatadir
• packagesdir
• reposdir
• repo.add.probe
• repo.refresh.delay
• solvfilesdir
Identifying file relevance with Native tools content
The native tools captures file relevance in the same way as EDR. Both
methods check for the relevance clause exist lower version of a
package, but not exist higher version of it. If both tools are applied to
the same deployment, the relevance results are the same.

Chapter 2. Using the download plug-in
The download plug-in is an executable program that downloads relevant packages directly
from the patch vendor. Fixlets use an internal protocol to communicate with the download
plug-in to download files. These Fixlets are based on updates made by the vendor.
For the Fixlet to be able to use the protocol, register the download plug-in on the BigFix
server. Use the Manage Download Plug-ins dashboard to register the appropriate plug-in.
Notes:
• Download plug-ins support basic authentication only.
• The BigFix server and the BigFix client must be on the same version to avoid a null
error.
To install SUSE patches for x86, x86_64, and s390x endpoints, you must register the SUSE
Customer Center (SCC) download plug-in on the BigFix server. For more information,
see Registering the SCC download plug-in (on page 19). The SCC download plug-in is
required for the SUSE Linux Enterprise Fixlet sites.
The SCC download plug-in uses SCC to download and cache patches from a vendor's
website to the BigFix server. It does not parse data from the vendor website, therefore
removing its dependency on the vendor's errata page format. It retrieves package data
directly from the vendor, which improves the accuracy and reliability of package dependency
resolution and repository support.
Note: The SCC download plug-in does not work when the Require SHA-256 Downloads
option in the BigFix Administration tool is enabled. When this option is enabled, all
download verification use only the SHA-256 algorithm. However, there are certain SUSE
repository metadata from the vendor, which do not contain SHA-256 values for packages in
the repository that are used by the plug-in.
Consider disabling the Require SHA-256 Downloads option to successfully deploy a
patch. Security and package integrity is not compromised as another layer of checking and
verification is done using the GPG signature of the package. For more information about
BigFix Patch Patch for SUSE Linux Enterprise - User's Guide | 2 - Using the download plug-in | 16
the download option, see BigFix Platform Installation Guide at https://help.hcltechsw.com/
bigfix/9.5/platform/Platform/Installation/c_security_settings.html.
The download plug-in is highly extensible and robust, enabling such possibilities:
• Customize available repositories through a user extensible repository list.
• Installation and dependency resolution can easily be extended to all repositories, not
just those that are shipped out of the box.
• Functionalities can easily be extended by customers and service teams.
• Eliminates dependencies on utilities such as bzip2, expect, and similar.
It improves performance related to downloading large numbers of packages, which
consequently shortens the turnaround time for patching.
Manage Download Plug-ins dashboard overviewUse the Manage Download Plug-ins dashboard to oversee and manage download plug-ins in
your deployment.
You can use the Manage Download Plug-ins dashboard to register, unregister, configure, and
upgrade the download plug-ins for different patch vendors.
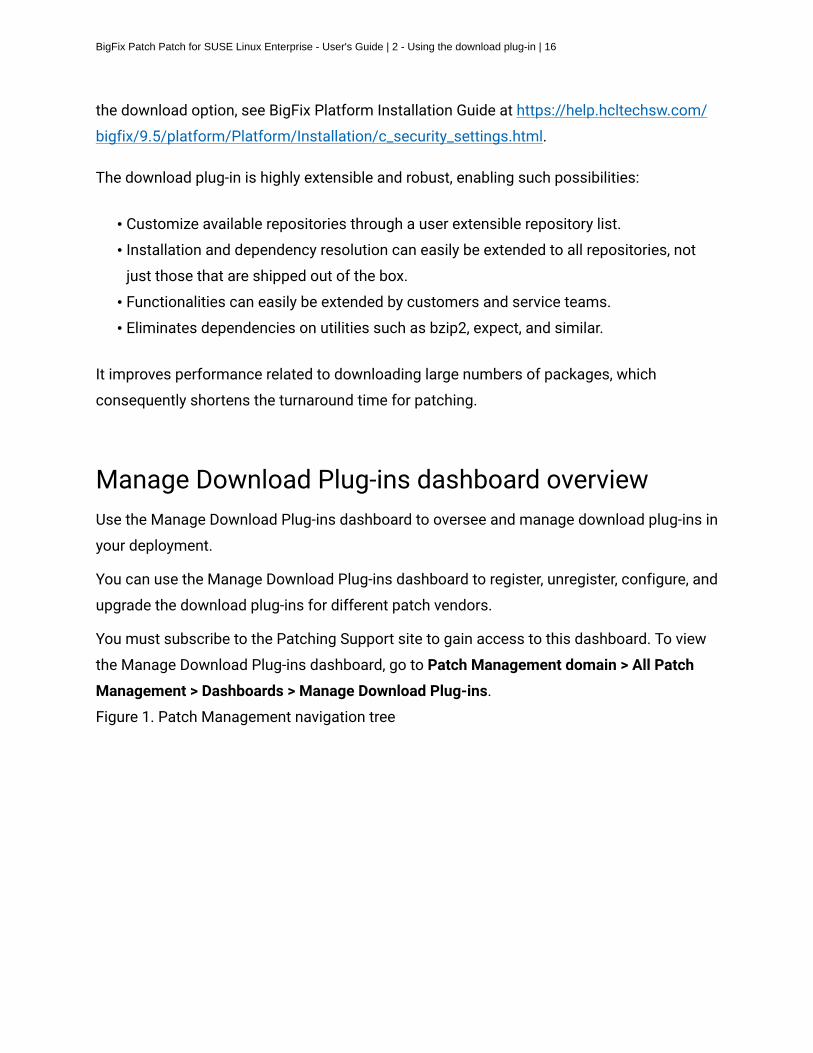
You must subscribe to the Patching Support site to gain access to this dashboard. To view
the Manage Download Plug-ins dashboard, go to Patch Management domain > All Patch
Management > Dashboards > Manage Download Plug-ins.
Figure 1. Patch Management navigation tree

BigFix Patch Patch for SUSE Linux Enterprise - User's Guide | 2 - Using the download plug-in | 17
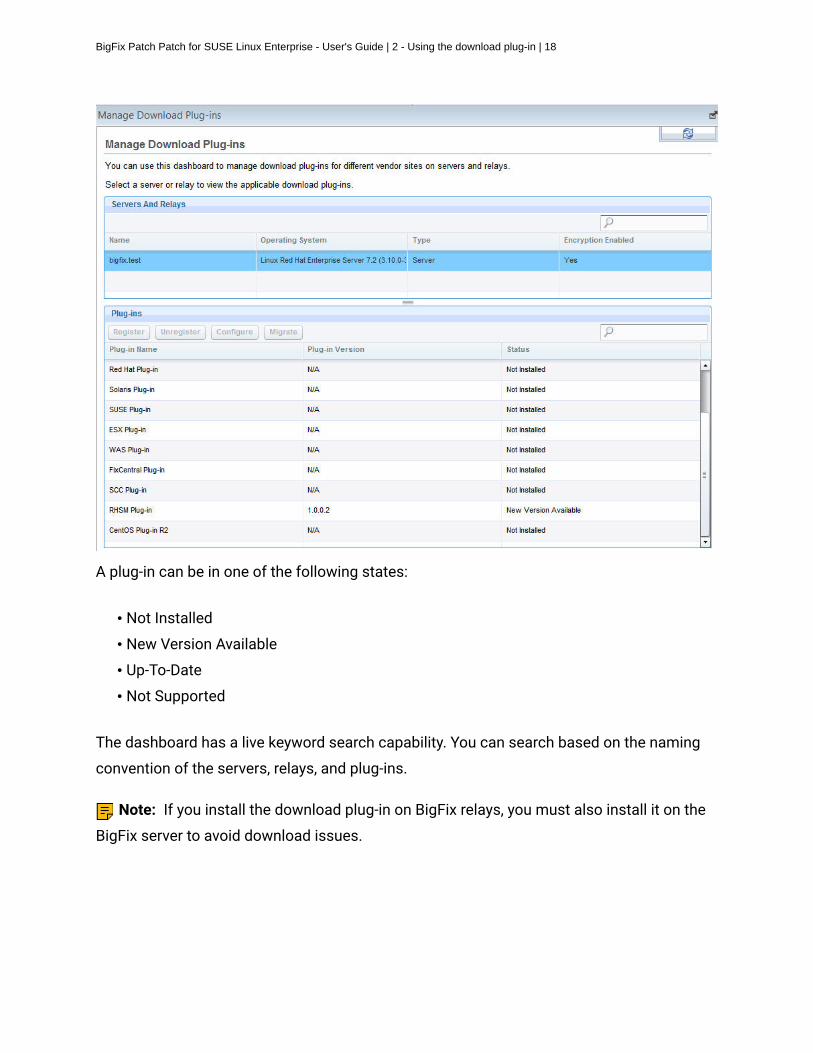
The dashboard displays all the servers and windows-only relays in your deployment. Select
a server or relay to view all the plug-ins for that computer. The dashboard shows you also
the version and status for each plug-in in one consolidated view.
Figure 2. Manage Download Plug-ins dashboard
BigFix Patch Patch for SUSE Linux Enterprise - User's Guide | 2 - Using the download plug-in | 18
A plug-in can be in one of the following states:
• Not Installed
• New Version Available
• Up-To-Date
• Not Supported
The dashboard has a live keyword search capability. You can search based on the naming
convention of the servers, relays, and plug-ins.
Note: If you install the download plug-in on BigFix relays, you must also install it on the
BigFix server to avoid download issues.

BigFix Patch Patch for SUSE Linux Enterprise - User's Guide | 2 - Using the download plug-in | 19
Registering the SCC download plug-inUse the Manage Download Plug-ins dashboard to register the SCC download plug-in on the
BigFix server to install SUSE patches on x86, x86_64, and s390x endpoints.
You must complete the following tasks:
• Ensure that the BigFix server and the BigFix client are on the same version to avoid a
null error.
• Ensure that the Require SHA-256 Downloads option in the BigFix Administration Tool
is not enabled to prevent the SCC Plug-in from failing. For more information about the
SCC Plug-in, see Using the download plug-in (on page 15).
• For Linux BigFix servers, install the following packages and their dependencies:
◦ GLIBC version 2.2.5 or later
◦ GLIBC version 2.3 or later
◦ GNU/Linux kernel version 2.6.31 or later
• Enable HTTPS access on the following URLs on port 443.
◦ https://scc.suse.com:443
◦ https://updates.suse.com:443
• Subscribe to the Patching Support site to gain access to the Manage Download Plug-
ins dashboard.
• Activate the Encryption Analysis for Clients analysis, which is available from the BES
Support site.
• Activate the Download Plug-in Versions analysis, which is available from the Patching
Support site.
• If you want to encrypt endpoints, deploy the Enable Encryption for Clients Fixlet, which
is available from the BES Support site.
1. From the Patch Management domain, click All Patch Management > Dashboards >
Manage Download Plug-ins dashboard.
2. From the Servers and Relays table, select the server on which the download plug-in is to
be registered.
BigFix Patch Patch for SUSE Linux Enterprise - User's Guide | 2 - Using the download plug-in | 20
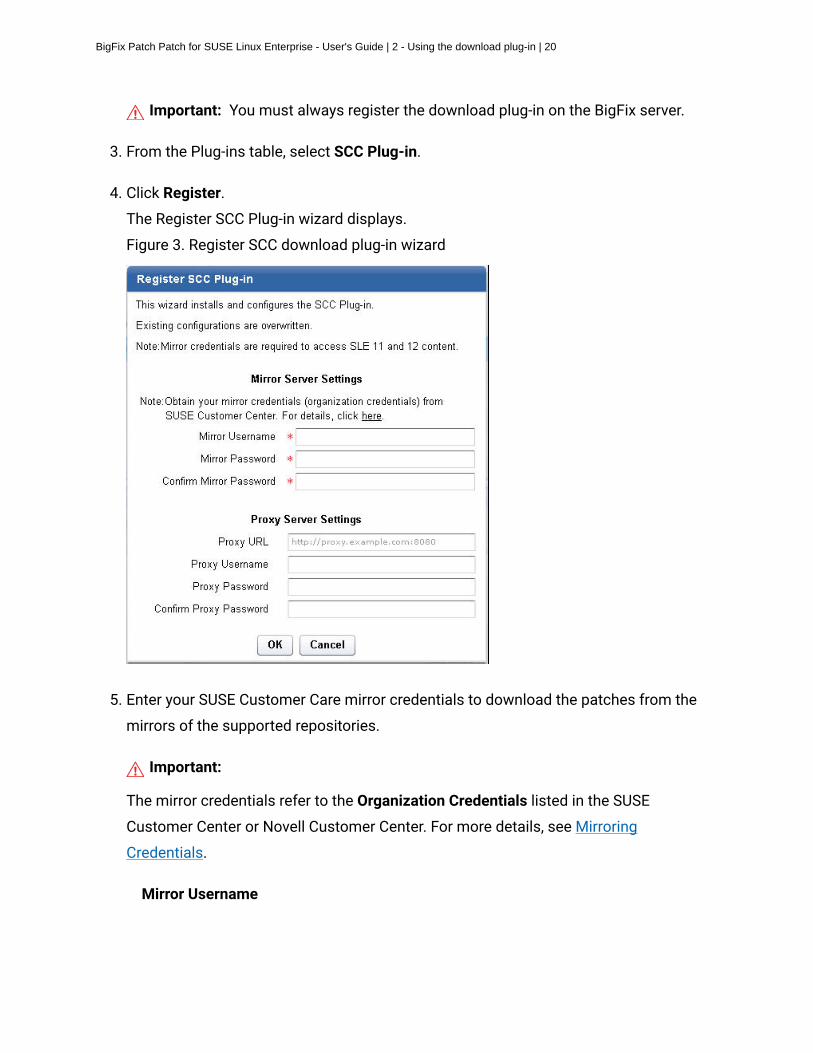
Important: You must always register the download plug-in on the BigFix server.
3. From the Plug-ins table, select SCC Plug-in.
4. Click Register.
The Register SCC Plug-in wizard displays.
Figure 3. Register SCC download plug-in wizard
5. Enter your SUSE Customer Care mirror credentials to download the patches from the
mirrors of the supported repositories.
Important:
The mirror credentials refer to the Organization Credentials listed in the SUSE
Customer Center or Novell Customer Center. For more details, see Mirroring
Credentials.
Mirror Username

BigFix Patch Patch for SUSE Linux Enterprise - User's Guide | 2 - Using the download plug-in | 21
Your organization user name to access the mirror of the supported SUSE
repositories.
Mirror Password
Your organization password to access the mirror of the supported SUSE
repositories.
Confirm Mirror Password
Your mirror password for confirmation.
6. Enter the proxy parameters if the downloads must go through a proxy server.
Note: Only basic authentication is supported. Ensure that the proxy is configured to
work with the Transport Layer Security (TLS) protocol.
Proxy URL
The URL of your proxy server. It must be a well-formed URL that contains
a protocol and a host name. The URL is usually the IP address or DNS
name of your proxy server and its port, which is separated by a colon. For
example: http://192.168.100.10:8080.
Proxy Username
Your proxy user name if your proxy server requires authentication. It is
usually in the form of domain\username.
Proxy Password
Your proxy password if your proxy server requires authentication.
Confirm Proxy Password
Your proxy password for confirmation.
7. Click OK.
The Take Action dialog displays.
8. Select the target computer.

BigFix Patch Patch for SUSE Linux Enterprise - User's Guide | 2 - Using the download plug-in | 22
9. Click OK.
You successfully registered the SCC download plug-in. The plugin.ini configuration file is
created in the following locations:
On Windows systems
%PROGRAM FILES%\BigFix Enterprise\BES Server
\DownloadPlugins\SCCProtocol
On Linux systems
/var/opt/BESServer/DownloadPlugins/SCCProtocol
Configuring the basic SCC download plug-in settingsUse the Manage Download Plug-ins dashboard to configure the basic properties, such as
mirroring and proxy settings, of the SUSE Customer Center (SCC) download plug-in.
Note: Ensure that the BigFix server and the BigFix client are on the same version to
avoid a null error.
The scope of this task only covers the basic SCC plug-in configuration from the BigFix
console. To configure the advanced settings for the SCC plug-in, you must edit the
plugin.ini file. For details about how to do this, see SCC download plug-in advanced
configuration (on page 25).
You might want to take note of your existing configuration for the download plug-in. Existing
configurations are overwritten when you configure the download plug-in.
1. From the Patch Management domain, click All Patch Management > Dashboards >
Manage Download Plug-ins dashboard.
2. From the Servers and Relays table, select the server on which the download plug-in is to
be configured.
3. From the Plug-ins table, select SCC Plug-in.

BigFix Patch Patch for SUSE Linux Enterprise - User's Guide | 2 - Using the download plug-in | 23
4. Click Configure.
The Configure SCC Plug-in wizard displays.
Figure 4. Configure SCC download plug-in wizard
5. Enter your SUSE Customer Care mirror credentials to download the patches from the
mirrors of the supported repositories.
Important:
The mirror credentials refer to the Organization Credentials listed in the SUSE
Customer Center or Novell Customer Center. For more details, see Mirroring
Credentials.
Mirror Username
Your user name to access the mirror of the supported SUSE repositories.
Mirror Password
Your password to access the mirror of the supported SUSE repositories.

BigFix Patch Patch for SUSE Linux Enterprise - User's Guide | 2 - Using the download plug-in | 24
Confirm Mirror Password
Your mirror password for confirmation.
6. Enter the proxy parameters if the downloads must go through a proxy server.
Note: Only basic authentication is supported. Ensure that the proxy is configured to
work with the Transport Layer Security (TLS) protocol.
Proxy URL
The URL of your proxy server. It must be a well-formed URL that contains
a protocol and a host name. The URL is usually the IP address or DNS
name of your proxy server and its port, which is separated by a colon. For
example: http://192.168.100.10:8080.
Proxy Username
Your proxy user name if your proxy server requires authentication. It is
usually in the form of domain\username.
Proxy Password
Your proxy password if your proxy server requires authentication.
Confirm Proxy Password
Your proxy password for confirmation.
7. Click OK.
The Take Action dialog displays.
8. Select the target computer.
9. Click OK.
You successfully configured the SCC download plug-in.

BigFix Patch Patch for SUSE Linux Enterprise - User's Guide | 2 - Using the download plug-in | 25
Configuring the advanced SCC download plug-insettingsFor advanced configurations, manually edit the SCC download plug-in configuration file
called plugin.ini.
The plugin.ini file is automatically created when the download plug-in is registered from
the Manage Download Plug-in dashboard. It contains the settings for logging and caching,
as well as custom configurations for extending the repository list file.
On Linux systems, the file is in the root directory tree occupied by the download plug-in. For
example, /var/opt/BESServer/DownloadPlugins/SCCProtocol.
On Windows systems, the file is in the BigFix server installation directory. For example,
%PROGRAM FILES%\BigFix Enterprise\BES Server\DownloadPlugins
\SCCProtocol.
Figure 5. Example of the SCC download plug-in configuration file
[Logger]
file = logs/SCCPlugin.log
level = INFO
[UA]
mirrorUsername = 1234
mirrorPassword = NTY3OA==
proxy =
proxyUser =
proxyPass =
primaryRepoListFile = C:\Program Files (x86)\BigFix Enterprise\BES Server\
GatherDBData\gather\Patching Support\CurrentSiteData/
DLSuSERepoList.json

BigFix Patch Patch for SUSE Linux Enterprise - User's Guide | 2 - Using the download plug-in | 26
extendedRepoListFile =
onlyUseExtendedRepoListFile = no
localCache =
localCacheOnly = no
Note: The plugin.ini is divided into sections, which are denoted by square brackets.
Ensure that the options are under the correct sections. Moving the options to a different
section might result in errors.
Either an absolute path or relative path can be used in the options that require a path:
file, primaryRepoListFile, extendedRepoListFile, and localCache. Relative paths are
relative to the download plug-in executable directory. By default, the executable file is in the
DownloadPlugins\SCCProtocol folder.
Setting the logging level
The logging level determines the amount of detail that is written to the SCCPlugin.log file.
The available logging levels are as follows:
ERROR
Contains errors related to the execution of the download plug-in, which might
indicate an impending fatal error.
WARNING
Contains information about failed downloads, and reasons for failure.
INFO
Contains general information outlining the progress and successful
downloads, with minimal tracing information.
DEBUG
Contains fine-grained information used for troubleshooting issues. This is the
most verbose level available.

BigFix Patch Patch for SUSE Linux Enterprise - User's Guide | 2 - Using the download plug-in | 27
You can change the logging level option from the [Logger] section of the plugin.ini file.
[Logger]
file = logs/SCCPlugin.log
level = INFO
For example, if the logging is set to INFO, the logger outputs any logs for that level and any
level above it. In this case, it outputs the INFO, WARNING, and ERROR logs.
Note: Setting the logging level to DEBUG increases the amount of information to
log, which might impact performance. Only increase the logging level to DEBUG when
investigating an issue, and switch back to INFO or WARNING after the issue is resolved.
Adding an extended repository list file
The SCC download plug-in can be configured to work with repositories that are not officially
supported by BigFix, such as LTSS content, if required.
For more information about configuring the download plug-in to support such repositories,
see Extending the SCC download plug-in (on page 30).
Setting the download cache
You can use the download cacher tool to download the packages and metadata to a
location that you specify.
Sha1 download capability on air-gapped environments
The download cacher tool is mainly designed to be used for air-gapped
environments, which require secure networks and therefore do not have
access to the internet to download the files directly from the vendor site.
The sha1 download capability improves performance by caching the packages
directly on the BigFix server's sha1 folder.
For information, see Using the SCC download cacher for air-gapped
environments (on page 46).
Sha1 download capability on an internet-enabled BigFix server

BigFix Patch Patch for SUSE Linux Enterprise - User's Guide | 2 - Using the download plug-in | 28
This method is considered best practice for caching packages on
environments with a BigFix server that is internet-enabled. The sha1 download
capability improves performance by caching the packages directly on the
BigFix server's sha1 folder.
For information, see Caching packages on the sha1 folder (on page 48).
Without the sha1 download capability on an internet-enabled BigFix server
If for some reason you choose not to use the sha1 download capability to
cache packages on the BigFix server's sha1 folder, you can use the local
cache. For information, see Caching packages on the local cache folder (on
page 49).
Unregistering the SCC download plug-inUse the Manage Download Plug-ins dashboard to unregister the SCC download plug-in.
1. From the Patch Management domain, click All Patch Management > Dashboards >
Manage Download Plug-ins dashboard.
2. From the Servers and Relays table, select the server on which the download plug-in is to
be unregistered.
3. From the Plug-ins table, select SCC Plug-in.
4. Click Unregister.
Figure 6. Unregister the SCC download plug-in

BigFix Patch Patch for SUSE Linux Enterprise - User's Guide | 2 - Using the download plug-in | 29
The Take Action dialog displays.
5. Select the target computer.
6. Click OK.
You successfully unregistered the SCC download plug-in.
Upgrading the SCC download plug-inUse the Manage Download Plug-ins dashboard to upgrade the SCC download plug-in to the
latest version available.
1. From the Patch Management domain, click All Patch Management > Dashboards >
Manage Download Plug-ins dashboard.
2. From the Servers and Relays table, select the server on which the download plug-in is to
be upgraded.
3. From the Plug-ins table, select SCC Plug-in.
4. Click Upgrade.
The Take Action dialog displays.

BigFix Patch Patch for SUSE Linux Enterprise - User's Guide | 2 - Using the download plug-in | 30
5. Select the target computer.
6. Click OK.
You now have the latest version of the SCC download plug-in installed.
Extending the SCC download plug-inYou can configure the SCC download plug-in to download and cache packages from
repositories that are not officially supported by BigFix. The SCC download plug-in can
resolve package dependency for unsupported SUSE repositories, allowing the installation of
unsupported dependent packages. This allows you to use BigFix to deploy packages from
repositories that are not shipped out of the box, such as Long Term Service Pack Support
(LTSS) or debuginfo repositories.
Before you begin, you must complete the following tasks:
• Ensure that appropriate licenses are registered and that your SUSE subscription is
active.
• Review the BigFix Patch for SUSE support information and verify the list of supported
repositories:
◦ Supported platforms and updates (on page 4)
◦ Supported Novell repositories (on page 6)
Creating an extended repository list file
The SCC download plug-in can use an extended repository list file, which contains additional
repositories for both base and extension products that are included in your subscription.
The extended repository list file must meet the following criteria:
• It must be a valid .json file.
• It must be accessible to the SCC download plug-in. Ensure that the Administrator or
root user can read the file.
• It must contain the following format:

BigFix Patch Patch for SUSE Linux Enterprise - User's Guide | 2 - Using the download plug-in | 31
{
"<OS_key>":[
{"name": "<name>", "distro_target": "<distro_target>"},
{"name": "<name>", "distro_target": "<distro_target>"}
],
"<OS_key_1>: [
{"name": "<name>", "distro_target": "<distro_target>"}
]
}
Note: It uses the same format as the DLSuSERepoList.json file, which is set for
repoListFile in the plugin.ini file.
You must replace the placeholders, which are enclosed in angle brackets <>, with the actual
values.
OS_key
To use the unsupported repositories with the BigFix SUSE Patching content,
use the following OS keys as listed in the DLSuSERepoList.json file:
• sles-12-x86_64-sp3
• sled-12-x86_64-sp3
• sles-12-x86_64-sp2
• sled-12-x86_64-sp2
• sles-12-x86_64-sp1
• sled-12-x86_64-sp1
• sles-12-x86_64-sp0
• sled-12-x86_64-sp0
• sles-12-s390x-sp3
• sles-12-s390x-sp2
• sles-12-s390x-sp1
• sles-12-s390x-sp0
• sles-12-ppc64le-sp0

BigFix Patch Patch for SUSE Linux Enterprise - User's Guide | 2 - Using the download plug-in | 32
• sles-12-ppc64le-sp1
• sles-12-ppc64le-sp2
• sles-12-ppc64le-sp3
• sles-11-x86_64-sp4
• sles-11-x86-sp4
• sled-11-x86_64-sp4
• sled-11-x86-sp4
• sles-11-x86_64-sp3
• sles-11-x86-sp3
• sled-11-x86_64-sp3
• sled-11-x86-sp3
• sles-11-x86_64-sp2
• sles-11-x86-sp2
• sled-11-x86_64-sp2
• sled-11-x86-sp2
• sles-11-x86_64-sp1
• sles-11-x86-sp1
• sled-11-x86_64-sp1
• sled-11-x86-sp1
• sles-11-x86_64-sp0
• sles-11-x86-sp0
• sled-11-x86_64-sp0
• sled-11-x86-sp0
• sles-11-s390x-sp4
• sles-11-s390x-sp3
• sles-11-s390x-sp2
• sles-11-s390x-sp1
• sles-11-s390x-sp0
This might not be the full list as later versions of the download plug-in are
released. To get the latest and complete copy of the repository list, complete
the following actions:

BigFix Patch Patch for SUSE Linux Enterprise - User's Guide | 2 - Using the download plug-in | 33
1. Check whether your endpoints are registered to the latest download plug-
in. The Manage Download Plug-ins dashboard indicates when the plug-in
is up-to-date or when a new version is available.
2. View the DLSuSERepoList.json file from the following locations:
On Windows Systems
%PROGRAM FILES%\BigFix Enterprise\BES
Server\GatherDBData\gather\Patching Support
\CurrentSiteData
On Linux Systems
/var/opt/BESServer/gatherDBData/gather/
Patching Support/CurrentSiteData
Important: Use the correct OS key for each repository to avoid download
and dependency resolution issues.
name
You can retrieve the name from the SUSE Customer Center, see Retrieving the
repository information (on page 33).
distro_target
You can retrieve the distribution target name from the SUSE Customer Center,
see Retrieving the repository information (on page 33).
Retrieving the repository informationTo retrieve repository information from the SUSE Customer Center, complete the following
steps:
1. Log in to the SUSE Customer Center at https://scc.suse.com.
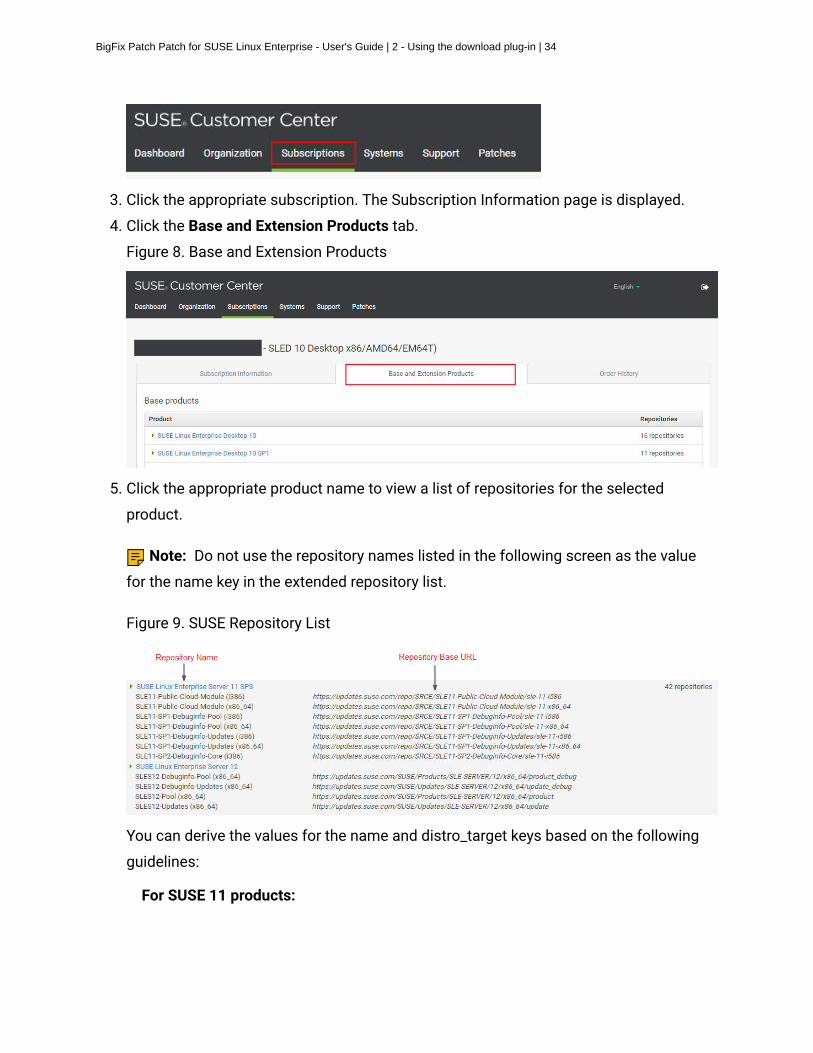
2. Click the Subscriptions tab.
Figure 7. Subscriptions
BigFix Patch Patch for SUSE Linux Enterprise - User's Guide | 2 - Using the download plug-in | 34
3. Click the appropriate subscription. The Subscription Information page is displayed.
4. Click the Base and Extension Products tab.
Figure 8. Base and Extension Products
5. Click the appropriate product name to view a list of repositories for the selected
product.
Note: Do not use the repository names listed in the following screen as the value
for the name key in the extended repository list.
Figure 9. SUSE Repository List
You can derive the values for the name and distro_target keys based on the following
guidelines:
For SUSE 11 products:
BigFix Patch Patch for SUSE Linux Enterprise - User's Guide | 2 - Using the download plug-in | 35
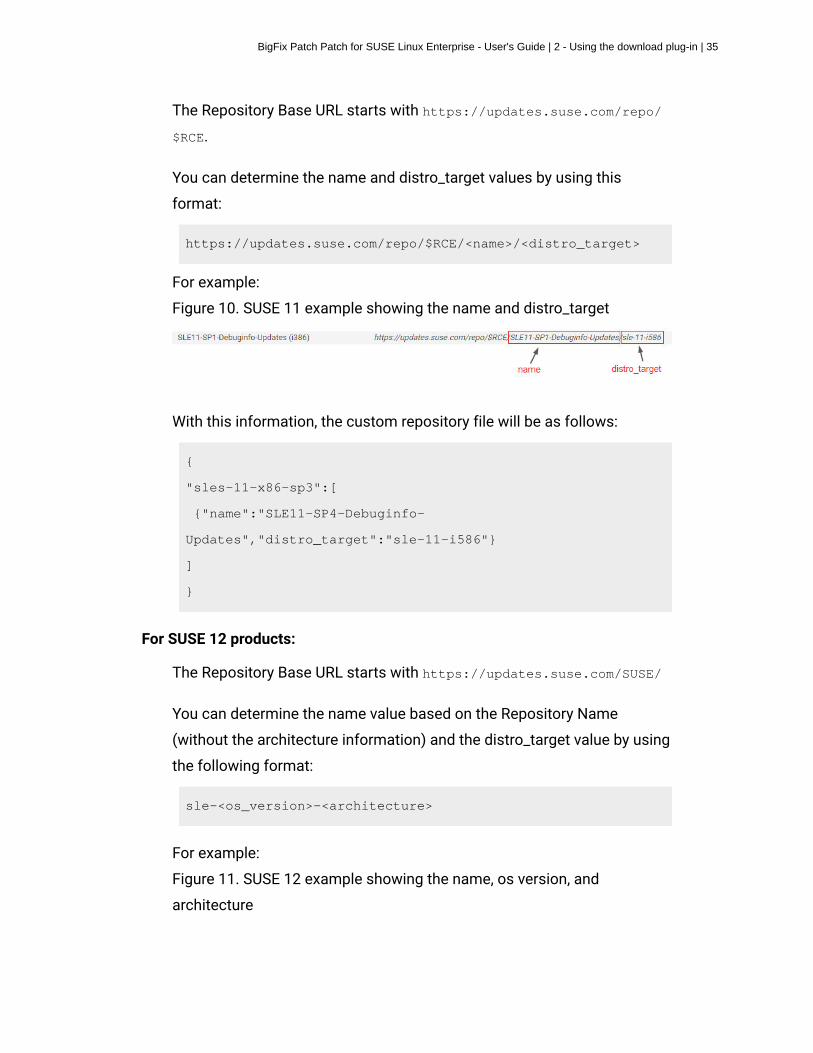
The Repository Base URL starts with https://updates.suse.com/repo/
$RCE.
You can determine the name and distro_target values by using this
format:
https://updates.suse.com/repo/$RCE/<name>/<distro_target>
For example:
Figure 10. SUSE 11 example showing the name and distro_target
With this information, the custom repository file will be as follows:
{
"sles-11-x86-sp3":[
{"name":"SLE11-SP4-Debuginfo-
Updates","distro_target":"sle-11-i586"}
]
}
For SUSE 12 products:
The Repository Base URL starts with https://updates.suse.com/SUSE/
You can determine the name value based on the Repository Name
(without the architecture information) and the distro_target value by using
the following format:
sle-<os_version>-<architecture>
For example:
Figure 11. SUSE 12 example showing the name, os version, and
architecture

BigFix Patch Patch for SUSE Linux Enterprise - User's Guide | 2 - Using the download plug-in | 36
With this information, the custom repository file will be as follows:
{
"sles-12-x86_64-sp0":[
{"name":"SLES12-Debuginfo-Updates",
"distro_target":"sle-12-x86_64"}
]
}
Updating the SCC download plug-in configuration fileConfigure the SCC Download Plug-in to use an extended repository list file. The plugin.ini
configuration file is overwritten when the SCC download plug-in is unregistered or
configured from the Manage Download Plug-in dashboard. Any change that you make in the
configuration file is lost, therefore take note of the previous changes.
1. Use a text editor to open the plugin.ini file from the following locations:
On Windows systems
%PROGRAM FILES%\BigFix Enterprise\BES Server
\DownloadPlugins\SCCProtocol
On Linux systems
/var/opt/BESServer/DownloadPlugins/SCCProtocol
2. In the extendedRepoListFile field, enter the absolute path or relative path to the
extended repository list file. If it is set to a relative path, the path must be relative to the
location of the SCC download plug-in executable.
For example:
extendedRepoListFile = C:\Program Files (x86)\BigFix Enterprise\

BigFix Patch Patch for SUSE Linux Enterprise - User's Guide | 2 - Using the download plug-in | 37
BES Server\DownloadPlugins\SCCProtocol
\<extendedRepoList>.json
3. If you want set the SCC Download Plug-in to only use the extended repository list, set
the onlyUseExtendedRepoListFile field to yes.
For example:
onlyUseExtendedRepoListFile= yes
If you want to set SCC Download Plug-in to use both repository list files, configure the
setting to no. In cases where the same OS key is used in both files, the repositories will
be combined.
4. Save the file.

Chapter 3. Using the download cacher
The download cacher is a standalone command-line tool that is designed to download and
cache files required for caching. The pre-cached files can be used by the download plug-in
to patch the endpoints.
The download cacher is designed to be used for air-gapped environments. Use this tool to
download and cache a large number of packages that are required by the Fixlets. By pre-
caching the files, execution of actions are faster because you do not need to download the
files from the Internet before distributing them to BigFix clients.
Note: If the BigFix server has access to the Internet, use the download plug-in. You must
register the download plug-in from the Manage Download Plug-ins dashboard. For more
information, see Registering the SCC download plug-in (on page 19).
You can access the tool by downloading and running it manually.
SCC download cacher usage informationUse the SUSE Customer Center (SCC) download cacher to download and cache SUSE
patches in air-gapped environments. This tool supports the Patches for SLE 12 Native
Tools, Patches for SLE 12 on System z, Patches for SLE 11 Native Tools, and Patches for
SLE 11 on System z Native Tools sites.
The SCC download cacher accesses the following URLs:
• https://scc.suse.com:443
• https://updates.suse.com:443
• http://sync.bigfix.com:80
Note: To avoid download errors, ensure to configure your whitelist, firewall, or proxy to
allow traffic through the listed hosts and ports.
You can run the SCC download cacher on a Windows system or a Linux system. For
information about requirements, see IBM BigFix 9.5 - System Requirements.

BigFix Patch Patch for SUSE Linux Enterprise - User's Guide | 3 - Using the download cacher | 39
The latest SCC download cacher is available from the BigFix Support site.
• For Windows systems, download the tool at http://software.bigfix.com/download/bes/
util/SCCDownloadCacher.exe.
• For Linux systems, download the tool at http://software.bigfix.com/download/bes/util/
SCCDownloadCacher-linux.tar.gz. This tool is supported on x86-64 (64-bit) systems.
Note: To use the tool successfully, ensure to install the following packages and
their dependencies:
◦ GLIBC version 2.2.5 or later
◦ GLIBC version 2.3 or later
◦ GNU/Linux kernel version 2.6.31 or later
Note: For illustration purposes, this section indicates the steps to run the SCC download
cacher in Windows. However, the parameters and subcommands to run the SCC download
cacher are the same for both Windows and Linux systems.
You can run the tool SCCDownloadCacher.exe to perform additional operations. To run this
tool from the command prompt, use the following command:
SCCDownloadCacher.exe [-h] --mirrorUser <username> --mirrorPass <password>
[parameters...] {subcommand} [-h] [subparameters...]
where:
-h
Specifies the help message of a command instead of running the command.
--mirrorUser username
Specifies the SCC mirror user name. This value is required.
Note: You can get the mirror credentials for your organization from SUSE
Customer Center. For more information, see Mirroring Credentials.
--mirrorPass password
Specifies the SCC mirror password. This value is required.

BigFix Patch Patch for SUSE Linux Enterprise - User's Guide | 3 - Using the download cacher | 40
parameters
Specifies the optional parameters to be used to configure the download
cacher.
--proxyServer
Specifies the URL of the proxy server to use. It must be a
well-formed URL that contains a protocol and a host name.
The URL is usually the IP address or DNS name of your proxy
server and its port, which is separated by a colon. For example:
http://192.168.100.10:8080.
--proxyUser
Specifies the proxy user name if your proxy server requires
authentication. It is usually in the form of domain\username.
--proxyPass
Specifies the proxy password if your proxy server requires
authentication.
Only basic authentication is supported. Ensure that the proxy
is configured to work with the Transport Layer Security (TLS)
protocol.
--download_dir
Specifies the directory where the files are cached.
If this parameter is not defined, the files are downloaded to the
directory that is relative to the download cacher executable
directory.
--sha1_download_dir
Specifies the directory where the files are cached with a sha1
filename into a single flat directory. The cacher downloads all

BigFix Patch Patch for SUSE Linux Enterprise - User's Guide | 3 - Using the download cacher | 41
packages from all repositories (keys) as files in the specified
directory.
Only the packages are stored in the sha1_download_dir. Each
repository metadata is stored in the download_dir, and the SUSE
Repository directory structure is maintained.
Note: When using this parameter, consider the cache limit of
the BigFix server's sha1 file folder.
Space-saving benchmarks are established with the use of
the --sha1_download_dir through the check-storagereq
subcommand. Using --sha1_download_dir have shown
significant decrease in storage size, download size, and
time when caching multiple repositories of the same SUSE
version. This is because many packages are duplicated among
repositories with the same SUSE version (for example, sles-12-
x86_64-sp2, sles-12-x86_64-sp1, sled-12-x86_64-sp1). Space is
not saved if you only cache a single repository for each SUSE
version (for example, sles-12-x86_64-sp2, sles-11-x86_64-sp2).
Sample results:
SCCDownloadCacher.exe --mirrorUser username --
mirrorPass password
check-storagereq --key sles-12-x86_64-sp2,sles-12-
x86_64-sp1,sled-12-x86_64-sp1
For Repo Keys: ['sles-12-x86_64-sp2', 'sles-12-
x86_64-sp1', 'sled-12-x86_64-sp1']
Total Repo Metadata size:
150 MB
Total Packages count: With sha1 (Without sha1)
13219 (22015)
Total Packages size: With sha1 (Without sha1)

BigFix Patch Patch for SUSE Linux Enterprise - User's Guide | 3 - Using the download cacher | 42
37 GB (61 GB)
Total Repo Metadata & Packages size: With sha1
(Without sha1)
37 GB (61 GB) [39 % saved]
--redownload
Specifies the flag to re-download and overwrite existing RPM
files that are in the download directory.
If this parameter is not defined, RPM files are not re-downloaded.
However, metadata are, by default, downloaded and overwritten.
--redownload
Specifies the flag to re-download and overwrite existing RPM
files that are in the download directory.
If this parameter is not defined, RPM files are not re-downloaded.
However, metadata are, by default, downloaded and overwritten.
--help
Specifies the full description and help of a command instead of
running the command.
subcommand subparameter
Specifies the subcommand and subparameters to be used to run the
download cacher.
Note: The subcommand and subparameter names are case-sensitive.
The subparameter varies for each subcommand as follows:
showKeys
Outputs the list of OS keys for the supported repositories in the
<cacher directory>\logs\SCCDownloadCacher.log

BigFix Patch Patch for SUSE Linux Enterprise - User's Guide | 3 - Using the download cacher | 43
file. An OS key indicates the SUSE operating system version,
architecture, and service pack of a single SUSE repository.
The syntax to run this subcommand is:
SCCDownloadCacher.exe --mirrorUser <username> --
mirrorPass <password>
[parameters] showKeys
buildRepo
Builds a local mirrored repository and downloads all the relevant
files based on the specified OS key.
The syntax to run this subcommand is:
SCCDownloadCacher.exe --mirrorUser <username> --
mirrorPass <password>
[parameters] buildRepo --key <OS_key1,OS_key2,…>
where:
--key OS_key1,OS_key2,…
Specifies the SUSE operating system version,
architecture, and service pack. Entries must be
separated by a comma and must not include
spaces. It must use the following format:
<product>-<version_number>-
<architecture>-<sp_level>
For example, --key sles-12-x86_64-
sp0,sles-11-x86-sp4.
downloadMetadataOnly
Downloads the metadata of the specified OS keys.

BigFix Patch Patch for SUSE Linux Enterprise - User's Guide | 3 - Using the download cacher | 44
The syntax to run this subcommand is:
SCCDownloadCacher.exe --mirrorUser <username> --
mirrorPass <password>
[parameters] downloadMetadataOnly --
key <OS_key1,OS_key2,…>
where:
--key OS_key1,OS_key2,…
Specifies the SUSE operating system version,
architecture, and service pack. Entries must be
separated by a comma and must not include
spaces. It must use the following format:
<product>-<version_number>-
<architecture>-<sp_level>
For example, --key sles-12-x86_64-
sp0,sles-11-x86-sp4.
downloadPkg
Downloads the listed RPM files for the specified OS key.
The syntax to run this subcommand is:
SCCDownloadCacher.exe --mirrorUser <username> --
mirrorPass <password>
[parameters] downloadPkg --key <OS_key1,OS_key2…>
--pkg <pkg1,pkg2,…>
where:
--key OS_key1,OS_key2,…
Specifies the SUSE operating system version,
architecture, and service pack. Entries must be

BigFix Patch Patch for SUSE Linux Enterprise - User's Guide | 3 - Using the download cacher | 45
separated by a comma and must not include
spaces. It must use the following format:
<product>-<version_number>-
<architecture>-<sp_level>
For example, --key sles-12-x86_64-
sp0,sles-11-x86-sp4.
--pkg pkg1,pkg2,…
Indicates the package name.
Each entry must be separated by a comma and
must not include spaces. For example, --pkg
liblcms1-1.17-77.12.1.x86_64.rpm,liblcms1-32bit-1.17-77.12.1.x86_64.rpm.
downloadByPatchId
Downloads files based on the patch ID for one or more OS keys.
The syntax to run this subcommand is:
SCCDownloadCacher.exe --mirrorUser <username> --
mirrorPass <password>
[parameters] downloadByPatchId --
key <OS_key1,OS_key2…>
--patch_id <patch_id1,patch_id2,…>
where:
--key OS_key1,OS_key2,…
Specifies the SUSE operating system version,
architecture, and service pack. Entries must be
separated by a comma and must not include
spaces. It must use the following format:

BigFix Patch Patch for SUSE Linux Enterprise - User's Guide | 3 - Using the download cacher | 46
<product>-<version_number>-
<architecture>-<sp_level>
For example, --key sles-12-x86_64-
sp0,sles-11-x86-sp4.
--patch_id patch_id1,patch_id2,…
Indicates the patch ID of a Fixlet, which is the first
six digits in the Fixlet title.
Each entry must be separated by a comma and
must not include spaces. For example, --patch_id
100601,100602.
Using the SCC download cacher for air-gappedenvironmentsYou can use the SCC download cacher for air-gapped environments by using the buildRepo
subcommand to download all patches for a repository to a specified directory.
• Ensure you have access to the BigFix supported SUSE base repositories and sub-
repositories. To check, run the subcommand check-allrepos.
• Ensure you have enough space to download the repository metadata and packages. To
check for the required storage space, run the subcommand check-storagereq.
• Increase the BigFix server’s sha1 folder size limit by doing the following steps:
1. From the BigFix console, right-click the computer and select Edit Computer
Setting.
2. Increase the _BESGather_Download_CacheLimitMB size.
The suggested size is the current BigFix server’s sha1 folder size plus the size of
sha1_download_dir.

BigFix Patch Patch for SUSE Linux Enterprise - User's Guide | 3 - Using the download cacher | 47
If the size of the sha1_download_dir cannot be determined beforehand the
suggested size of the sha1_download_dir is a minimum of 50GB per repository.
Note that the minimum size of 50GB might increase over time.
1. Use the buildRepo subcommand with the SCCDownloadCacher.exe file to download all
patches for a repository to a specified directory. For example:
SCCDownloadCacher.exe --mirrorUser username --mirrorPass password
--download_dir C:\downloads --sha1_download_dir C:\sha1_downloads
buildRepo --key sles-12-x86_64-sp0,sles-11-x86-sp4
In this example, the download cacher tool downloads the packages to
sha1_download_dir and the repository metadata to download_dir for both the "sles-12-
x86_64-sp0" and "sles-11-x86-sp4" repositories.
2. Transfer the download_dir to the air-gapped BigFix server and the sha1 files in
sha1_download_dir to the BigFix Server’s sha1 fold.
3. Open the configuration file of the SCC download plug-in called plugin.ini. Configure
the plugin.ini file with the following settings so that the SCC download plug-in
retrieves the required packages from the directory instead of trying to retrieve the
packages online.
localCache = <download_directory_specified_for_the_--
download_dir_parameter>
localCacheOnly = yes
Tip: Use the showKeys command to show the list of OS keys for the
currently supported repositories in the <cacher directory>\logs
\SCCDownloadCacher.log file :
SCCDownloadCacher.exe --mirrorUser <username> --mirrorPass <password>
[parameters] showsKeys

BigFix Patch Patch for SUSE Linux Enterprise - User's Guide | 3 - Using the download cacher | 48
Caching packages on the sha1 folderYou can use the SCC Download Cacher to cache packages directly on an internet-enabled
BigFix server's sha1 folder to improve performance during the Fixlet deployment.
• Ensure you have access to the BigFix supported SUSE base repositories and sub-
repositories. To check, run the subcommand check-allrepos.
• Ensure you have enough space to download the repository metadata and packages. To
check for the required storage space, run the subcommand check-storagereq.
• Increase the BigFix server’s sha1 folder size limit by doing the following steps:
1. From the BigFix console, right-click the computer and select Edit Computer
Setting.
2. Increase the _BESGather_Download_CacheLimitMB size.
The suggested size is the current BigFix server’s sha1 folder size plus the size of
sha1_download_dir.
If the size of the sha1_download_dir cannot be determined beforehand the
suggested size of the sha1_download_dir is a minimum of 50GB per repository.
Note that the minimum size of 50GB might increase over time.
This task enables the BigFix Server to leverage the internet to ensure that the necessary
files, such as the repository metadata and packages, are available during Fixlet deployment.
1. Use the buildRepo subcommand with the SCCDownloadCacher.exe file to download
packages from a repository to the BigFix server's sha1 folder. For example:
SCCDownloadCacher.exe --mirrorUser username --mirrorPass password
--download_dir C:\downloads --sha1_download_dir
C:\Program Files (x86)\BigFix Enterprise\BES Server\wwwrootbes\bfmirror
\downloads\sha1
buildRepo --key sles-12-x86_64-sp0, sles-11-x86-sp4
BigFix Patch Patch for SUSE Linux Enterprise - User's Guide | 3 - Using the download cacher | 49
In this example, the download cacher tool downloads the packages directly to the
BigFix server's sha1 folder.
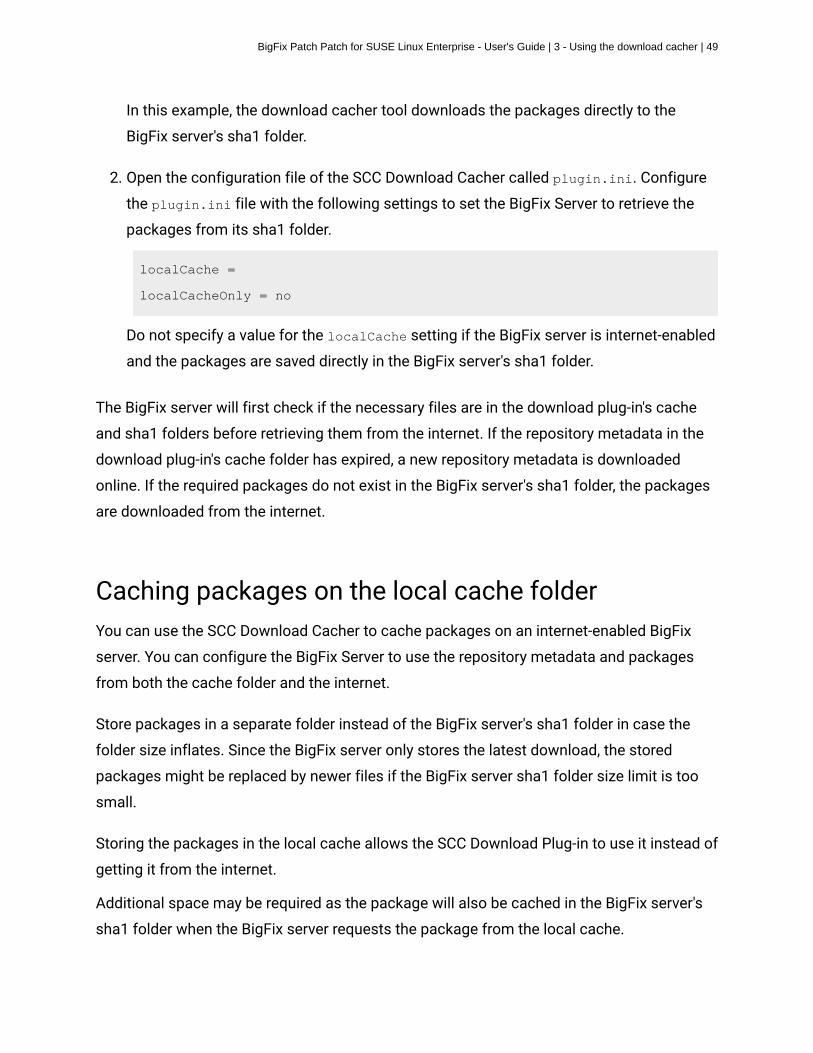
2. Open the configuration file of the SCC Download Cacher called plugin.ini. Configure
the plugin.ini file with the following settings to set the BigFix Server to retrieve the
packages from its sha1 folder.
localCache =
localCacheOnly = no
Do not specify a value for the localCache setting if the BigFix server is internet-enabled
and the packages are saved directly in the BigFix server's sha1 folder.
The BigFix server will first check if the necessary files are in the download plug-in's cache
and sha1 folders before retrieving them from the internet. If the repository metadata in the
download plug-in's cache folder has expired, a new repository metadata is downloaded
online. If the required packages do not exist in the BigFix server's sha1 folder, the packages
are downloaded from the internet.
Caching packages on the local cache folderYou can use the SCC Download Cacher to cache packages on an internet-enabled BigFix
server. You can configure the BigFix Server to use the repository metadata and packages
from both the cache folder and the internet.
Store packages in a separate folder instead of the BigFix server's sha1 folder in case the
folder size inflates. Since the BigFix server only stores the latest download, the stored
packages might be replaced by newer files if the BigFix server sha1 folder size limit is too
small.
Storing the packages in the local cache allows the SCC Download Plug-in to use it instead of
getting it from the internet.
Additional space may be required as the package will also be cached in the BigFix server's
sha1 folder when the BigFix server requests the package from the local cache.

BigFix Patch Patch for SUSE Linux Enterprise - User's Guide | 3 - Using the download cacher | 50
1. Use the buildRepo subcommand with the SCCDownloadCacher.exe file to download
packages from a repository to the BigFix server's sha1 folder. For example:
SCCR2DownloadCacher.exe --mirrorUser username --mirrorPass password
--download_dir C:\downloads buildRepo --key sles-12-x86_64-sp0,
sles-11-x86-sp4
In this example, the download cacher tool downloads the packages to the specified
download folder.
2. Open the configuration file of the SCC Download Cacher called plugin.ini. Configure
the plugin.ini file with the following settings:
localCache = <location of the transferred download_dir>
localCacheOnly = no
With this setting, the BigFix server first checks the repository metadata in the download
plug-in's cache folder. If it has not expired, the BigFix server will use that metadata.
Otherwise, the BigFix server will get the repository metadata from the internet. As for
the packages, the BigFix server initially checks if the packages exist in the sha1 folder,
then proceeds to the localCache before it goes to the internet.

Chapter 4. Using BigFix Patch for SUSE LinuxEnterprise
BigFix Patch provides a simplified patching process for downloading and installing patches
that are relevant to a target endpoint. Use the Fixlets on the Patching Support and the
various Patches for SUSE Linux Enterprise Fixlet sites to apply patches to your deployment.
For information about the available Fixlet sites for SUSE Linux Enterprise, see Supported
platforms and updates (on page 4).
Patch content caching must be done through the download plug-in unless you are using
an air-gapped environment or a custom repository. For more information, see the following
topics:
• Using the download cacher (on page 38)
• Using the download plug-in (on page 15)
• Custom repositories management (on page 63)
Patching using FixletsYou can apply SUSE Linux patches to your deployment by using the Fixlets on the Patches
for SLE sites.
• For x86, x86_64, and s390x SUSE patches, register the SCC download plug-in. For more
information about the download plug-in, see Using the download plug-in (on page 15).
• Subscribe to the appropriate sites.
• Activate the necessary analysis from the subscribed sites.
• Ensure that the required compression utilities are installed on the endpoints. The
following packages must be installed on the endpoints:
◦ zlib
◦ zypper
• Ensure that /var directory is not mounted as noexec to prevent issues during Fixlet
deployment.

BigFix Patch Patch for SUSE Linux Enterprise - User's Guide | 4 - Using BigFix Patch for SUSE Linux Enterprise | 52
• If you are using custom repositories, run the Enable custom repository support - SUSE
Linux Enterprise task prior to deploying any Fixlets.
• You can activate the Endpoint Dependency Resolution - Deployment Results analysis
to view the patch deployment results.
The possible actions that you can make on a Fixlet depend on the patch type. For example,
patch Fixlets provide an option to deploy a test run prior to applying the patch. Kernel
updates provide the option to upgrade or install all kernel packages. The default behavior
for kernel updates is to install packages side by side. Additionally, each kernel update Fixlet
provides the ability to test each of these options.
Note: The upgrade option in Kernel updates replaces existing kernel packages with later
versions. The install option installs the later kernel packages next to the previous versions.
1. From the Patch Management domain, click OS Vendors > SUSE Linux Enterprise, and
navigate to the patch content using the domain nodes.
Figure 12. Patch Management navigation tree
2. In the content that is displayed in the list panel, select the Fixlet that you want to deploy.
The Fixlet opens in the work area.
3. Click the tabs at the top of the window to review details about the Fixlet.
4. Click Take Action to deploy the Fixlet.
• You can start the deployment process.

BigFix Patch Patch for SUSE Linux Enterprise - User's Guide | 4 - Using BigFix Patch for SUSE Linux Enterprise | 53
Figure 13. Take action to start the deployment process
• You can deploy a test run prior to applying the patch. View the Deployment Results
analysis to determine if the dependencies have been successfully resolved and if
an installation is successful.
Figure 14. Take action to deploy a test

BigFix Patch Patch for SUSE Linux Enterprise - User's Guide | 4 - Using BigFix Patch for SUSE Linux Enterprise | 54
• You can view the Novell bulletin for a particular Fixlet, select the Click here to view
the patch page action to view the patch page.
Figure 15. Take action to view patch page
You can also click the appropriate link in the Actions box.
5. You can set more parameters in the Take Action dialog.
For detailed information about setting parameters with the Take Action dialog, see the
BigFixConsole Operator's Guide.
6. Click OK.

Chapter 5. Multiple-Package BaselineInstallation
BigFix Patch provides a solution to combine the installation of updates for multiple
packages in a baseline into a single task, which can reduce the execution time of the
baseline.
Baselines can help you gather multiple Fixlets into groups, which you can apply immediately
to any set of target computers. It is a powerful way to deploy a group of actions across
an entire network. However, each Fixlet in a baseline creates a separate zypper update
transaction when the baseline is run. A single baseline can have numerous zypper calls,
which can severely impact performance as it increases the time taken to complete all the
transactions.
The multiple-package baseline installation solution helps address the poor performance
that is due to the dependency resolution and package installation that is done separately for
each Fixlet. This solution requires you to enable the feature at the start of the baseline and
append the installation task to install the relevant packages from a single zypper call.
Use the Enable the Multiple-Package Baseline Installation feature task or the Enable the
Multiple-Package Baseline Installation feature task to set the flag that instructs Fixlets
to add packages to a list instead of installing them. The flag is cleared after the baseline
is completed. You must add the appropriate task at the start of the baseline to allow the
installation of multiple packages from a single command.
A multiple-package installation task is made available for each SUSE distribution, operating
system version, service pack level, and architecture. You must add the appropriate
installation task at the end of your baseline to complete the dependency resolution,
download the packages, and then install them on the endpoints.
Note: The multiple-package baseline installation feature does not support the pre-cache
option Start download before all constraints are met in Take Action.
Important: The Enable the Multiple-Package Baseline Installation feature and Multiple-
Package Baseline Installation tasks must exist in the same baseline.

BigFix Patch Patch for SUSE Linux Enterprise - User's Guide | 5 - Multiple-Package Baseline Installation | 56
Available from the Patches for SLE 12 Native Tools site:
• Multiple-Package Baseline Installation - SLES 12 - x86_64 - SP0
• Multiple-Package Baseline Installation - SLED 12 - x86_64 - SP0
• Multiple-Package Baseline Installation - SLES 12 - x86_64 - SP1
• Multiple-Package Baseline Installation - SLED 12 - x86_64 - SP1
• Multiple-Package Baseline Installation - SLES 12 - x86_64 - SP2
• Multiple-Package Baseline Installation - SLED 12 - x86_64 - SP2
• Multiple-Package Baseline Installation - SLES 12 - x86_64 - SP3
• Multiple-Package Baseline Installation - SLED 12 - x86_64 - SP3
Available from the Patches for SLE 12 on System z site:
• Multiple-Package Baseline Installation - SLES 12 - s390x - SP0
• Multiple-Package Baseline Installation - SLES 12 - s390x - SP1
• Multiple-Package Baseline Installation - SLES 12 - s390x - SP2
• Multiple-Package Baseline Installation - SLES 12 - s390x - SP3
Available from the Patches for SLE 12 PPC64LE site:
• Multiple-Package Baseline Installation - SLES 12 - ppc64le - SP0
• Multiple-Package Baseline Installation - SLES 12 - ppc64le - SP1
• Multiple-Package Baseline Installation - SLES 12 - ppc64le - SP2
• Multiple-Package Baseline Installation - SLES 12 - ppc64le - SP3
Available from the Patches for SLE 11 Native Tools site:
• Multiple-Package Baseline Installation - SLES 11 - x32 - SP0
• Multiple-Package Baseline Installation - SLED 11 - x32 - SP0
• Multiple-Package Baseline Installation - SLES 11 - x86_64 - SP0
• Multiple-Package Baseline Installation - SLED 11 - x86_64 - SP0
• Multiple-Package Baseline Installation - SLES 11 - x32 - SP1
• Multiple-Package Baseline Installation - SLED 11 - x32 - SP1
• Multiple-Package Baseline Installation - SLES 11 - x86_64 - SP1

BigFix Patch Patch for SUSE Linux Enterprise - User's Guide | 5 - Multiple-Package Baseline Installation | 57
• Multiple-Package Baseline Installation - SLED 11 - x86_64 - SP1
• Multiple-Package Baseline Installation - SLES 11 - x32 - SP2
• Multiple-Package Baseline Installation - SLED 11 - x32 - SP2
• Multiple-Package Baseline Installation - SLES 11 - x86_64 - SP2
• Multiple-Package Baseline Installation - SLED 11 - x86_64 - SP2
• Multiple-Package Baseline Installation - SLES 11 - x32 - SP3
• Multiple-Package Baseline Installation - SLED 11 - x32 - SP3
• Multiple-Package Baseline Installation - SLES 11 - x86_64 - SP3
• Multiple-Package Baseline Installation - SLED 11 - x86_64 - SP3
• Multiple-Package Baseline Installation - SLES 11 - x32 - SP4
• Multiple-Package Baseline Installation - SLED 11 - x32 - SP4
• Multiple-Package Baseline Installation - SLES 11 - x86_64 - SP4
• Multiple-Package Baseline Installation - SLED 11 - x86_64 - SP4
Available from the Patches for SLE 11 on System z Native Tools site:
• Multiple-Package Baseline Installation - SLES 11 - s390x - SP0
• Multiple-Package Baseline Installation - SLES 11 - s390x - SP1
• Multiple-Package Baseline Installation - SLES 11 - s390x - SP2
• Multiple-Package Baseline Installation - SLES 11 - s390x - SP3
• Multiple-Package Baseline Installation - SLES 11 - s390x - SP4
These tasks must be run at the end of the baseline to do dependency resolution and
package installation for the entire baseline in a single instance.
You can also do a dry run of the installation to preview the changes on the packages to
avoid broken dependencies, which might be due to undesired packages updates. The test
action outputs to the following files at /var/opt/BESClient/EDRDeployData:
PkgToInstallList.txt file
This file contains packages that are to be installed after a dependency check.
PkgToRemoveList.txt file
This file contains the packages that are to be removed from the target SUSE
endpoint.

BigFix Patch Patch for SUSE Linux Enterprise - User's Guide | 5 - Multiple-Package Baseline Installation | 58
BigFix Patch also provides the following content to facilitate the installation:
Delete SUSE 12 Package List File for Multiple-Package Baseline Installation
Deletes the package list file on targeted the SUSE Linux Enterprise 12 (x86_64,
s390x, and ppc64le) computers.
Add this task at the beginning of the baseline to avoid issues that might be
related with resolving dependencies for the packages.
Delete SUSE 11 Package List File for Multiple-Package Baseline Installation
Deletes the package list file on the targeted SUSE Linux Enterprise 11 (x86,
x86_64, and s390x) computers.
Add this task at the beginning of the baseline to avoid issues that might be
related to resolving dependencies for the packages.
For detailed information about using the multiple package installation feature, see Installing
multiple packages in a baseline (on page 58).
Installing multiple packages in a baselineThe multiple-package baseline installation feature helps you to save time when deploying
Fixlets with multiple unique packages from a baseline.
• As older versions of zypper cannot resolve dependency conflict issues, ensure that
you patch zypper with the latest update. By doing so, you can ensure that Fixlets for
SUSE Linux Enterprise release packages, such as sled-release-12-5.1.x86_64.rpm
or sles-release-12-5.1.x86_64.rpm, can be installed successfully in the baseline.
For details about how to search for certain Fixlets with the zypper patch update, see
Creating a search filter for zypper patches (on page 61).
• Set the client download precache size to at least 2GB. Use the
_BESClient_Download_PreCacheStageDiskLimitMB setting to set the suggested size
for the precache.

BigFix Patch Patch for SUSE Linux Enterprise - User's Guide | 5 - Multiple-Package Baseline Installation | 59
• Set the client download cache size to at least 2GB. Use the
_BESClient_Download_DownloadsCacheLimitMB setting to set the suggested size for
the cache.
• Ensure that you have at least 4GB of free disk space on each endpoint.
To run a single zypper call to install or update packages for all Fixlets in the baseline, you
must add the task to enable the feature and add the appropriate multiple-package baseline
installation task into the baseline. For a list of the available tasks, see Multiple-Package
Baseline Installation (on page 55).
Notes:
• Packages with broken dependencies are skipped whenever possible. Packages
with dependency issues with a SUSE product, such as SLED-12-0.x86_64, cannot be
skipped. Another scenario where packages are not skipped is when dependency errors
occur during installation, as indicated by the following error message: File conflicts
happen when two packages attempt to install files with the same name but
different contents. In such cases, the installation is canceled and no patches will be
installed on the endpoints.
• The multiple-package baseline installation feature does not support the pre-cache
option Start download before all constraints are met in Take Action.
Important: The Enable the Multiple-Package Baseline Installation feature and Multiple-
Package Baseline Installation tasks must be added in the same baseline in order for
this feature to work. Also, the order of the tasks and Fixlets are crucial to the baseline
installation, therefore take careful note of the steps as they must be taken in the correct
order.
1. Create a baseline.
Highlight the Fixlets from a Fixlet site and select Add to New Baseline from the context
menu. You can also select Create New Baseline from the Tools menu.
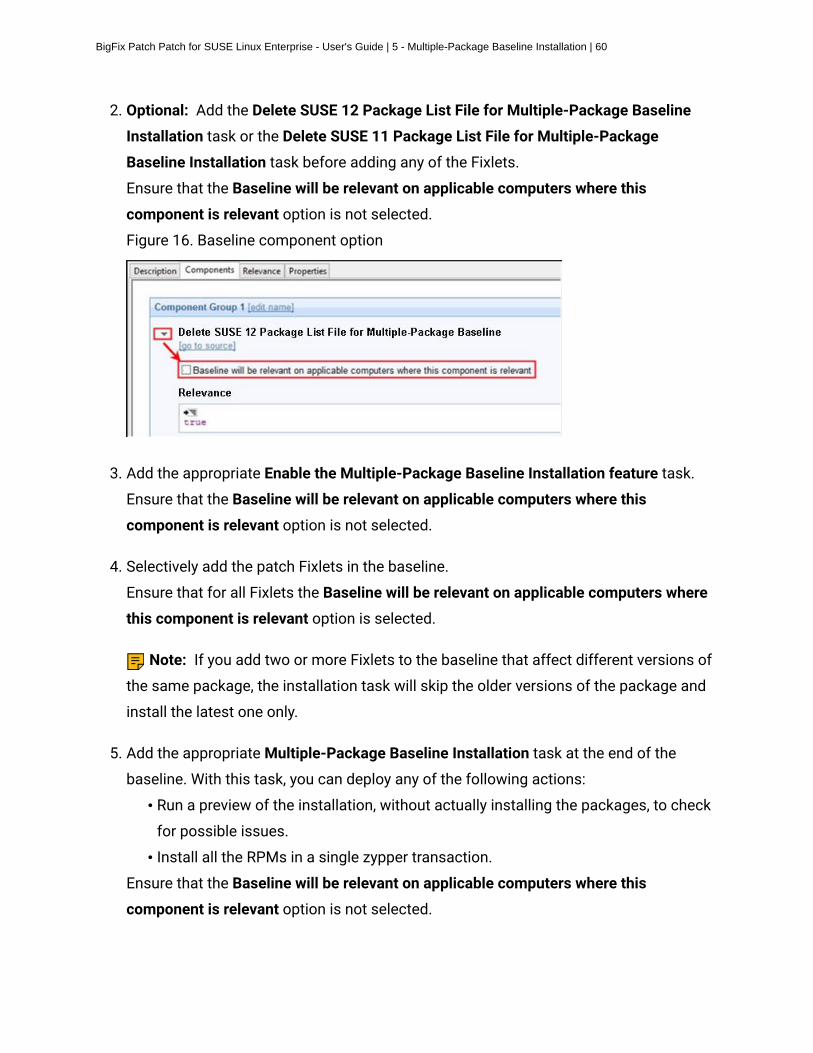
BigFix Patch Patch for SUSE Linux Enterprise - User's Guide | 5 - Multiple-Package Baseline Installation | 60
2. Optional: Add the Delete SUSE 12 Package List File for Multiple-Package Baseline
Installation task or the Delete SUSE 11 Package List File for Multiple-Package
Baseline Installation task before adding any of the Fixlets.
Ensure that the Baseline will be relevant on applicable computers where this
component is relevant option is not selected.
Figure 16. Baseline component option
3. Add the appropriate Enable the Multiple-Package Baseline Installation feature task.
Ensure that the Baseline will be relevant on applicable computers where this
component is relevant option is not selected.
4. Selectively add the patch Fixlets in the baseline.
Ensure that for all Fixlets the Baseline will be relevant on applicable computers where
this component is relevant option is selected.
Note: If you add two or more Fixlets to the baseline that affect different versions of
the same package, the installation task will skip the older versions of the package and
install the latest one only.
5. Add the appropriate Multiple-Package Baseline Installation task at the end of the
baseline. With this task, you can deploy any of the following actions:
• Run a preview of the installation, without actually installing the packages, to check
for possible issues.
• Install all the RPMs in a single zypper transaction.
Ensure that the Baseline will be relevant on applicable computers where this
component is relevant option is not selected.

BigFix Patch Patch for SUSE Linux Enterprise - User's Guide | 5 - Multiple-Package Baseline Installation | 61
Before running the baseline, ensure that you meet the following requirements:
• The repositories that are registered on the endpoint must contain the target packages
and all the required dependency packages.
• Allow enough time for a Fixlet, which is using the multiple-package installation method,
to complete all zypper transactions and refresh the status on the endpoints before
individually deploying the same Fixlet.
• Do not run multiple baselines from the same site on the same endpoint.
• Follow the Baseline Best Practices documented in the following technote: http://
www-01.ibm.com/support/docview.wss?uid=swg21636385
Note: When you deploy the baseline, the initial sub-action status for all the patch Fixlets
will show that they failed. This is the expected behavior. The process for downloading
and installing the packages in the baseline is not done at the Fixlet action level, but in the
Multiple-Package Baseline Installation task. When the baseline completes, the baseline
sub-action status of the Fixlets will reflect the final state of each patch installation.
Creating a search filter for zypper patchesCreate a custom filter in the BigFix console to identify which Fixlets contain zypper patch
updates. Install the latest zypper patch update to ensure that the multiple-package baseline
installation feature runs successfully.
1. In the BigFix console, press CRLT+F or click Edit > Find to open the custom Filter dialog.
2. In the Create Filter dialog box, enter a name for your new filter in the Name field.
3. In the Include list, select Fixlets.
4. In the with list, select all of the following properties.
5. From the properties list, select Relevance, then select contains and enter exists
package "zypper".
6. Select the + symbol to add another filter.
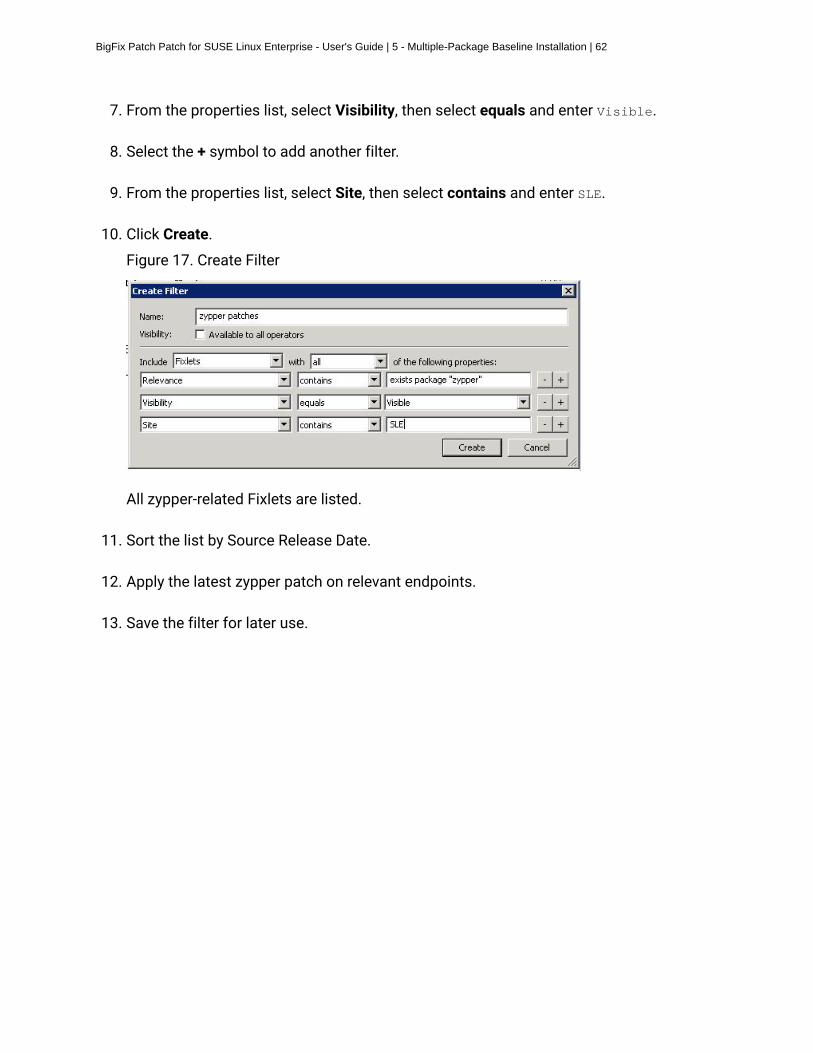
BigFix Patch Patch for SUSE Linux Enterprise - User's Guide | 5 - Multiple-Package Baseline Installation | 62
7. From the properties list, select Visibility, then select equals and enter Visible.
8. Select the + symbol to add another filter.
9. From the properties list, select Site, then select contains and enter SLE.
10. Click Create.
Figure 17. Create Filter
All zypper-related Fixlets are listed.
11. Sort the list by Source Release Date.
12. Apply the latest zypper patch on relevant endpoints.
13. Save the filter for later use.

Chapter 6. Custom repositories management
You can set up your custom repositories and Subscription Management Tool (SMT) to
manage patches for SUSE Linux Enterprise version 11 and later. This solution allows for
multiple repositories and SMTs on the entire deployment.
With the custom repository support, SUSE Linux Enterprise Fixlets can use Zypper to
directly download packages from custom repositories instead of going through the Novell
Customer Center. Bandwidth throttling is not supported in a custom repository architecture.
Using custom repositories can give you the flexibility to control what can be deployed to
the endpoints in your deployment. For example, you can deploy custom software that you
are hosting in your custom repositories, then use the Install packages by using Zypper task
from the Patching Support site to install software on the endpoints. For more information,
see Installing packages from a custom repository (on page 72).
Integrating your custom repository or SMT solutions is made easy with the use of the SLE
Custom Repository Management dashboard.
Important: You must register the SCC download plug-in when using custom repositories
to avoid download errors. The download plug-in can be registered through the Manage
Download Plug-ins dashboard.
Differentiating between repository typesThe custom support covers both repository and SMT. You can register endpoints to a
repository or to an SMT server.
Note: The SLE Custom Repository Management dashboard refers to SMT as one of the
repository types for identification purposes only. The dashboard does not affect how SMT
works.
Ensure that both types of repository are updated. Actions might fail if the packages are not
available.
Repository
BigFix Patch Patch for SUSE Linux Enterprise - User's Guide | 6 - Custom repositories management | 64
This type refers to standard software repositories, which are storage locations
that contain a collection of packages and metadata. These repositories can be
on online servers, CDs, DVDs, or on other media.
The SLE Custom Repository Management dashboard does not add physical
repositories; you must do this action separately.
SMT
With the SMT, enterprise customers can optimize the management of SUSE
Linux Enterprise software updates and subscription entitlements. SMT
provides a repository and registration target that is synchronized with the
Novell Customer Center.
For more information about SMT, see the SUSE documentation at https://
www.suse.com/documentation/smt11/.
SLE Custom Repository Management dashboardUse the SLE Custom Repository Management dashboard to easily integrate your existing
custom repository or Subscription Management Tool (SMT) solutions with the BigFix
patch management solution. Only endpoints on SUSE Linux Enterprise Desktop and Linux
Enterprise Server versions 11 and 12 are supported in this dashboard.
The SLE Custom Repository Management dashboard allows the SUSE Linux Enterprise
Fixlets to use Zypper for downloads instead of using the standard BigFix downloading
infrastructure. The dashboard also allows you to register your custom repositories to use
the Zypper commands when installing packages on the endpoints.
To access the dashboard, subscribe to the Patching Support site. From the Patch
Management domain, click All Patch Management > Dashboards > SLE Custom Repository
Management. Activate the Repository Configuration - SUSE Linux Enterprise analysis to
view the content in the dashboard.

BigFix Patch Patch for SUSE Linux Enterprise - User's Guide | 6 - Custom repositories management | 65
Important: Your custom repositories must be pre-configured with the required metadata
and headers before you use the dashboard.
Use the SLE Custom Repository Management dashboard to perform the following actions
for patch management:
• Register and unregister endpoints to a repository (custom repositories or SMT servers)
• Add, delete, and import custom repositories and SMT servers to the repository
dashboard list
Figure 18. SLE Custom Repository Management dashboard

BigFix Patch Patch for SUSE Linux Enterprise - User's Guide | 6 - Custom repositories management | 66
Note: The SLE Custom Repository Management dashboard does not support the
creation of a physical repository server or SMT. You must create the repository separately.
For more information about creating repositories, see the following resources:
• SUSE Linux Enterprise Desktop 11 Deployment Guide at https://www.suse.com/
documentation/sled11/book_sle_deployment/data/sec_y2_sw_instsource.html
• SUSE Linux Enterprise Server 11 Deployment Guide at https://www.suse.com/
documentation/sles11/book_sle_deployment/data/sec_y2_sw_instsource.html
• SUSE Linux Enterprise Desktop 12 Deployment Guideat https://www.suse.com/
documentation/sled-12/book_sle_deployment/data/book_sle_deployment.html
• SUSE Linux Enterprise Server 12 Deployment Guide at https://www.suse.com/
documentation/sles-12/book_sle_deployment/data/book_sle_deployment.html
Important: You must register the SCC download plug-in when using custom repositories
to avoid download errors. The download plug-in can be registered through the Manage
Download Plug-ins dashboard.
Adding a repository or SMTAdd a custom repository or a Subscription Management Tool (SMT) server into the
dashboard repository list so that you can register and connect it to endpoints.
Activate the Repository Configuration - SUSE Linux Enterprise analysis to populate the
dashboard with endpoint and repository information.
1. From the SLE Custom Repository Management dashboard, click the Repositories tab.
2. Click Add.
3. From the Add a New Repository dialog, select the repository type that you want to add.
Note: Ensure that the repository settings match the repository server configuration.
• If you are adding a standard repository, enter values for the following fields:

BigFix Patch Patch for SUSE Linux Enterprise - User's Guide | 6 - Custom repositories management | 67
Repository Name
Specifies the repository name to use in your BigFix deployment.
Repository URL
Specifies the URL to access the repository.
Figure 19. Adding a repository
• If you are adding an SMT server, enter values for the following fields:
SMT Server Name
Specifies the SMT server name to use in your BigFix deployment.
SMT Server URL
Specifies the SMT Server URL in the form of https://<servername>/
center/regsvc on a default setup. For example, https://
smt12.example.com/center/regsvc.
clientSetup4SMT script URL
The clientSetup4SMT script URL is generated automatically when
you enter the SMT Server URL. Typically, it is in the form of https://
<servername>/repo/tools/clientSetup4SMT.sh.
Note: The generated script URL can be accessed directly in a
browser to check its validity. If it is valid, download a copy of the
clientSetup4SMT.sh file.
Figure 20. Adding an SMT

BigFix Patch Patch for SUSE Linux Enterprise - User's Guide | 6 - Custom repositories management | 68
Note: When you enter the SMT Server URL, the clientSetup4SMT script URL is
generated automatically. This script is provided with SMT to configure endpoints to use
the SMT server or to reconfigure it to use a different SMT server.
4. Click Save.
To connect the added repository to an endpoint, see Registering endpoints to a repository or
SMT (on page 68).
If you want to add all the known existing repositories of an endpoint, both SMTs and
standard repositories, to the dashboard list, use the Import feature. For more information,
see Importing repositories or SMTs (on page 71).
Registering endpoints to a repository or SMTUse the SLE Custom Repository Management dashboard to connect your repositories and
SMTs to endpoints.
• Ensure that the repository settings match the repository server configuration.
• Activate the Repository Configuration - SUSE Linux Enterprise analysis.
• For SUSE Linux Enterprise Server 12 and SUSE Linux Enterprise Desktop 12, if an
endpoint is already registered to an SMT, unregister it from the SMT before registering
it to a new SMT server.
1. From the SLE Custom Repository Management dashboard, click the Endpoints tab.

BigFix Patch Patch for SUSE Linux Enterprise - User's Guide | 6 - Custom repositories management | 69
2. Select the endpoints that you want to register to a repository or SMT from the first
table. The repositories or SMTs of the selected endpoints are listed in the second table.
Note: When a repository is named as unspecified, it means that it is not listed in the
Repository list of the dashboard.
3. Click Register a new repository.
4. From the Register a New Repository dialog, select a repository or an SMT and click
Next.
Figure 21. Registering an endpoint to a repository
Note: An endpoint can be registered to only one SMT at a time. For SUSE Linux
Enterprise Server 11, registering a different SMT overrides the registration with the
existing SMT. For SUSE Linux Enterprise Server 12, the existing SMT does not get
overridden with the new SMT. You must unregister the existing endpoint before
registering it to a new SMT.
• If you selected a repository, you can add more configuration information from the
available options.
Probe given URI
Checks the given repository upon registration.
Enable autorefresh of the repository
Automatically refreshes the repository before reading the metadata
from the database.
Additional Fields

BigFix Patch Patch for SUSE Linux Enterprise - User's Guide | 6 - Custom repositories management | 70
Use the field to add more configuration information for the
repository. For example, if you use a repository that is not a mirror
of the vendor site, enter gpgcheck=0 to prevent a patch from failing
because the files cannot be opened.
Figure 22. Additional configuration fields when registering endpoints
to a repository
• If you selected an SMT, enter the location of the clientSetup4SMT Script.
5. Click Save. This information is saved in the Zypper configuration files.
6. From the Take Action dialog, select the computers and click OK to deploy the action.
Run the Enable custom repository support - SUSE Linux Enterprise task prior to deploying
any Fixlets.
Unregistering endpoints from a repository or SMTUse the SLE Custom Repository Management dashboard to unregister endpoints from
repositories or SMTs that are no longer relevant.
When you unregister a repository, the Zypper services and repositories from the endpoint
that you selected are removed.

BigFix Patch Patch for SUSE Linux Enterprise - User's Guide | 6 - Custom repositories management | 71
The Zypper configuration file is not deleted, but disabled when an endpoint is unregistered
from a standard or SMT repository.
If you unregister an endpoint from an SMT repository, you must log in to the SMT server and
delete the selected computer manually.
1. From the SLE Custom Repository Management dashboard, click the Endpoints tab.
2. Select the endpoints that you want to unregister a repository from.
3. Click Unregister a new repository.
4. From the Unregister a New Repository dialog, select a repository and click Save.
5. From the Take Action dialog, select the computers and click OK to deploy the action.
Deleting repositories or SMTsTo manage the dashboard repository list more easily, delete the repositories or SMTs that
no longer exist in your deployment.
1. From the SLE Custom Repository Management dashboard, click the Repositories tab.
2. Select the repositories that you want to delete and click Delete. A delete confirmation
dialog displays.
3. Click Yes to confirm and proceed with the deletion of the selected repositories.
The selected repositories are removed from the list.
Importing repositories or SMTsUse the Import feature of the SLE Custom Repository Management dashboard to add all the
known existing repositories of an endpoint to the list of repositories in the dashboard.
Activate the Repository Configuration - SUSE Linux Enterprise analysis.
1. From the SLE Custom Repository Management dashboard, click the Repositories tab.
2. Click Import.

BigFix Patch Patch for SUSE Linux Enterprise - User's Guide | 6 - Custom repositories management | 72
3. From the Import Existing Repositories dialog, select the repositories or SMTs that you
want to add in the dashboard repository list.
4. Enter a name for the repository.
5. Click Save.
The repositories or SMTs are now imported and added to the list in the dashboard.
Installing packages from a custom repositoryBigFix provides a task to easily install and update custom packages on SUSE Linux
Enterprise version 11 and later endpoints that are registered to custom repositories.
• Subscribe to the Patching Support site to access the installation task named as Install
packages by using zypper.
• Configure a custom repository from the SLE Custom Repository Management
dashboard. For more information, see Custom repositories management (on page
63).
• Register the SCC download plug-in through the Manage Download Plug-ins dashboard.
The data generated by the download plug-in may not be used, but it is crucial that you
register the plug-in to avoid download errors.
• Ensure that the configured repository is up-to-date and contains the required packages
and metadata.
Use the Install packages by using zypper task to install or update the packages on
endpoints.
You can use the package name or Common Vulnerabilities and Exposures (CVE) ID number
to specify the selected packages for installation.
You can also update all the installed packages on the endpoint with later available versions
that are in your custom repository.
The Zypper commands for each of the available actions are as follows:
zypper install <package_name1> <package_name2>

BigFix Patch Patch for SUSE Linux Enterprise - User's Guide | 6 - Custom repositories management | 73
Updates or installs a package with a specific name. Multiple package update
or installation is acceptable. Use a space to separate the package names.
zypper update
Updates all the installed packages on the endpoint.
zypper patch --cve=<cve_number>
Updates a package with a specific CVE ID number. The task fails if no CVE ID
number is specified and it only accepts a single CVE reference.
This action requires Zypper version 1.5.3-3.2.
zypper patch --date=<YYYY-MM-DD>
Installs all patches that were issued until the specified date.
This action requires Zypper version 1.5.3-3.2.
Command options are supported as extra flags for the zypper install and zypper update
commands only. For detailed usage information, see the zypper man page.
This task also provides actions to test the packages for installation, without installing the
packages on the endpoints.
1. From the Patch Management domain, click All Patch Management > Fixlets and Tasks.
2. Select the Install packages by using zypper task to install custom packages on
endpoints.
3. In the Task pane, review the description and follow the instructions in the Actions box
to deploy an action.
4. Depending on the action that you selected, provide the necessary information and click
OK.
Note: To update all installed packages on the endpoint, select the action to install
packages, but do not specify any package name.

BigFix Patch Patch for SUSE Linux Enterprise - User's Guide | 6 - Custom repositories management | 74
5. In the Take Action pane, select the endpoints on which the packages are to be installed
or updated.
6. Click OK.

Chapter 7. SLE Btrfs snapshot management
View and manage SLE Btrfs snapshots from the BigFix console. Snapshot management
uses Snapper's ability to roll back Btrfs file system snapshots. This feature works with SUSE
Linux Enterprise version 11 SP2 and later.
Btrfs is a new copy-on-write file system that supports file system snapshots of subvolumes.
Subvolumes can be in the form of one or more separately-mountable file systems within
each physical partition. A snapshot is a copy of the state of a subvolume at a certain time. It
is essentially a clone of the subvolume. For more information about Snapper, see the SUSE
product documentation at https://www.suse.com/documentation/sles11/book_sle_admin/
data/cha_snapper.html.
Note: For SUSE Linux Enterprise version 11 SP2 systems, snapshots can be taken only if
the partitions are subvolumes and contain the snapper configuration.
SLE Btrfs Snapshot Management dashboard overviewUse the SLE Btrfs Snapshot Management dashboard to manage Btrfs file system snapshots
for SLE endpoints in your deployment.
Note: You must use BigFix client version 9.2.1 or later to be able to use this dashboard.
BigFix provides the SLE Btrfs Snapshot Management dashboard to view the list of Btfrs file
system snapshots of an endpoint from the console. The rollback feature allows you to reset
the system to the state at which a snapshot was taken.
Consider the following scenario to better understand what the rollback feature does.
Patching the application server on the endpoint that hosts your web application is a good
practice. After a typical day of patching, you started noticing some issues with the system.
These issues occurred only after a particular patch was deployed. Using the dashboard, you
can easily roll back the system to an earlier state that does not have such issues.
BigFix Patch Patch for SUSE Linux Enterprise - User's Guide | 7 - SLE Btrfs snapshot management | 76
To access the dashboard, subscribe to the Patching Support site. From the Patch
Management domain, click All Patch Management > Dashboards > SLE Btrfs Snapshot
Management.
Activate the SLE Btrfs Snapshots analysis to retrieve the endpoints and the Btrfs file
system snapshot information and display them on the dashboard. This analysis is also
used to generate a log, which records the results of the rollbacks that are taken in the SLE
Btrfs Snapshot Management dashboard. The log is located in the directory /var/opt/
BESClient/EDRDeployData.
The dashboard lists endpoints and their corresponding snapshot history. Each snapshot
displays the following metadata:
Snapshot ID
Unique ID number of the snapshot.
Snapshot Date and Time
Start date and time of the snapshot in coordinated universal time (UTC).
Type
The type of snapshot. There are three different types of snapshots: pre, post,
and single.
Pre Snapshot Number
This metadata is applicable only to post snapshot type. It specifies the
number of the corresponding pre snapshot.
Cleanup
Algorithm to clean up old snapshots. There are three different cleanup
algorithms: number, time line, and empty-pre-post.
Description
A description of the snapshot.
Note: Ensure that you provide a meaningful description during the
snapshot creation. This helps to identify the purpose of the snapshot.

BigFix Patch Patch for SUSE Linux Enterprise - User's Guide | 7 - SLE Btrfs snapshot management | 77
For information about the snapshot metadata, see the topic about Manually Creating and
Managing Snapshots in the SUSE product documentation.
Figure 23. SLE Btrfs Snapshot Management dashboard
The dashboard also offers filtering options to ease searching by using the computer name.
To enable the rollback feature, ensure that /var/opt/BESClient/* directories are
excluded from the snapshots by running the Exclude Client Directories From Snapshots
task.
Rolling back a snapshotUse the rollback option in the SLE Btrfs Snapshot Management dashboard to restore
endpoints to a previous system state. The rollback feature allows you to reset system files
of an endpoint that were not configured correctly by rolling back to a different snapshot.

BigFix Patch Patch for SUSE Linux Enterprise - User's Guide | 7 - SLE Btrfs snapshot management | 78
Ensure that you meet the following requirements:
• Use BigFix server and console version 9.0 or later.
• Use BigFix client version 9.2.1 or later.
• Use SUSE Linux Enterprise Desktop and SUSE Linux Enterprise Server 11 SP2 or later.
• Subscribe to the Patching Support site.
• Exclude /var/opt/BESClient/* directories from the snapshots. To exclude data
directories when taking snapshots, run the Exclude Client Directories From Snapshots
task. This task creates the necessary directories and files to exclude the /var/opt/
BESClient/* directories when taking snapshots.
Consider the following limitations of the rollback feature:
• Configuration changes in the directory on the bootloader cannot be rolled back.
• Kernel installations require manual deletion of the boot entry for a Kernel. Hence,
complete rollback is not possible for Kernel installations.
• Excluded mount points and ext3 file systems cannot be rolled back.
1. From the Patch Management domain, click All Patch Management > Dashboards > SLE
Btrfs Snapshot Management.
2. Select the endpoint whose snapshot history you want to view.
3. Select the snapshot that you want to roll back and click Rollback.
Note: Completely reverting to the pre-snapshot affects the changes made by
processes other than YaST or Zypper. Therefore, review the changes between the
current system state and a snapshot before starting the rollback.
The Rollback Up To Snapshot window opens.
4. Optional: You can specify file names as additional parameters for the rollback. Click
Apply.
Note: If you do not specify any file names, all changed files are restored.

BigFix Patch Patch for SUSE Linux Enterprise - User's Guide | 7 - SLE Btrfs snapshot management | 79
5. From the Take Action window, select the computer and click OK to run the action.
To verify the rollback, check the snapper_rollback.log file located at /var/opt/
BESClient/EDRDeployData.

Chapter 8. Support
For more information about this product, see the following resources:
• Knowledge Center
• BigFix Support Center
• BigFix Support Portal
• BigFix Developer
• IBM BigFix Wiki
• HCL BigFix Forum

Chapter 9. Troubleshooting
When problems occur, you can determine what went wrong by viewing messages in the
appropriate log files that provide information about how to correct errors.
Log files
Enhanced logging with clearer error reporting and error handling to improve
troubleshooting.
SCCPlugin.log
Lists the results of the downloads related to the execution of the SCC
download plug-in. The amount of information depends on the logging level.
The log can be found in the following locations:
• On Windows systems: %PROGRAM FILES%\BigFix Enterprise\BES
Server\DownloadPlugins\SCCProtocol
• On Linux systems: /var/opt/BESServer/DownloadPlugins/
SCCProtocol
The following log files can be found in the client folder in the directory /var/opt/
BESClient/EDRDeployData.
EDR_DeploymentResults.txt
Lists the results of the EDR deployment and the Zypper output. The log file
indicates if the normal Zypper process is used for either a standard repository
or SMT.
register-repo.log
Lists the results of the repository registration action of the SLE Custom
Repository Management dashboard.
register-SMT.log

BigFix Patch Patch for SUSE Linux Enterprise - User's Guide | 9 - Troubleshooting | 82
Lists the results of the SMT registration action of the SLE Custom Repository
Management dashboard.
unregister-repo.log
Lists the results of the unregister repository action of the SLE Custom
Repository Management dashboard.
unregister-SMT.log
Lists the results of the unregister SMT action of the SLE Custom Repository
Management dashboard.
snapper_rollback.log
Lists Btrfs snapshot rollback feature that is available from the SLE Btrfs
Snapshot Management dashboard.
Download plug-in logging levels
The logging level determines the amount of detail that the SCC download plug-in writes to
the log files. Set the logging level in the %PROGRAM FILES%\BigFix Enterprise\BES
Server\DownloadPlugins\SCCProtocol\plugin.ini file.
Note: Logging level values are case-sensitive.
The following logging levels are listed in order of increasing amount of information logged:
ERROR
Contains errors related to the execution of the download plug-in, which might
indicate an impending fatal error.
WARNING
Contains information about failed downloads, and reasons for failure.
INFO
Contains general information outlining the progress and successful
downloads, with minimal tracing information.
DEBUG

BigFix Patch Patch for SUSE Linux Enterprise - User's Guide | 9 - Troubleshooting | 83
Contains fine-grained information used for troubleshooting issues. This is the
most verbose level available.
Note: Setting the logging level to DEBUG increases the amount of information to log,
which might have an impact on performance. You must only increase the logging level to
DEBUG when investigating an issue.
Common <type> tag errors found in the EDR_DeploymentResults.txt file
The most common <type> tag errors that are found in the EDR_DeploymentResults.txt file
are as follows:
No solution (noSolution)
This error means that the requested target packages cannot be installed on
the system, because there are conflicts between the target packages and the
existing packages on the system.
Incomplete baseline (incompleteBaseline)
This error might appear if third-party packages are fulfilling dependencies and
are not recognized by the resolver.
If the <type>incompleteBaseline</type> tag is found in the
EDR_DeploymentResults.txt file and <name>name of RPM</name> tag is NOT
in the /var/opt/BESClient/EDR_UnsupportedPackages.txt file, then
you must install the RPM separately.
However, if the RPM is in the EDR_DeploymentResults.txt file, you must
downgrade to a version that is supported. You can use the <sanityCheckError>
tag from the EDR_DeploymentResults.txt file to identify what version of
RPM is supported. You can only proceed with patching the system when the
supported RPM version is installed.
Forbidden package list error (packageInForbiddenList)
This error is caused by a package on the target, which is listed in the forbidden
package list. You must remove the package from the forbidden package list to
successfully run the Fixlet.

BigFix Patch Patch for SUSE Linux Enterprise - User's Guide | 9 - Troubleshooting | 84
Empty solution (EmptySolution)
This error means that the resolver cannot find a solution with the given set of
information. For example, the packages that are installed on the system or
the packages that it is trying to install. To resolve this error, it is often better
to have the system as standard as possible. Installing additional third-party
software and removing packages from the base operating system can make
this more difficult for the resolver to resolve all dependencies. It is suggested
to move toward using the Native Tools site instead.
Issues when the custom repository is not a mirror of the vendor
When you use a custom repository that is not a mirror of the vendor site, it is possible that
the default gpgcheck is being done as part of the installation. The GPG signature files might
not be included in the repository. The files are not checked for authenticity and might cause
the installation to fail.
To resolve this issue, ensure that when you register the endpoints in the SLE Custom
Repository Management dashboard, you add gpgcheck=0 to Additional Fields.
Cannot connect to the mirror server
One of the possible reasons for not being able to connect to the mirror server could be due
to an authentication error. Check the SCCPlugin.log found in %PROGRAM FILES%\BigFix
Enterprise\BES Server\DownloadPlugins\SCCProtocol on Windows systems,
and /var/opt/BESServer/DownloadPlugins/SCCProtocol on Linux systems.
The log typically contains error code 401 when issue with authentication occur, as
described in the sample log:
Searching package details...
URL: https://scc.suse.com/connect/organizations/repositories?page=1 |
STATUS: 401 Incorrect Login Credentials for
https://scc.suse.com/connect/organizations/repositories?page=1
Could not find token for authentication to mirror URL.

BigFix Patch Patch for SUSE Linux Enterprise - User's Guide | 9 - Troubleshooting | 85
To resolve this issue, reconfigure the download plug-in and ensure that the mirror server
credentials (organization credentials) is correct. You can get the mirror credentials for your
organization from SUSE Customer Center or Novell Customer Center. The credentials are
identical. For more information, see Mirroring Credentials.
Novell account lockout
Account lockouts are common but temporary. Contact Novell Support if you get locked out
of your account.
One possible reason for an account lock out is due to invalid credentials. Ensure that you
use the mirror server configuration from Novell when you register or configure the download
plug-in. The mirror credentials refer to the Organization Credentials listed in the in the SUSE
Customer Center or Novell Customer Center. For more details, see Mirroring Credentials.
Error deploying Fixlets from custom sites
The Fixlet site name is hardcoded in the relevance of the Fixlets because the relevance can
only accept one value. When you deploy Fixlets from a custom site, the Fixlets would fail
because they are still referencing to the original Fixlet site. To resolve this issue, ensure that
your endpoints are subscribed to the original Fixlet site so that they can grab all the relevant
site files.
If you do not want to stay subscribed to the original Fixlet site, but be able to deploy custom
Fixlets successfully, complete the following steps:
1. Make a custom copy of the necessary site files.
2. Host the site files either in your own custom site or online.
3. Modify the custom Fixlet appropriately.
Package installation using a custom repository failed
If you get the error message: Install Failure: zypper -n install - Error:
Consider the following steps to troubleshoot the issue:
BigFix Patch Patch for SUSE Linux Enterprise - User's Guide | 9 - Troubleshooting | 86
1. Ensure that the custom repository is enabled. To check, the Disable custom repository
support - SUSE Linux Enterprise task (ID#16) in the Patching Support site must be
relevant to the endpoint.
2. The endpoint must has the required repositories. To check, run zypper repos.
3. Ensure that the latest site is gathered.
4. Run a Fixlet from a site and collect the following logs when the action is completed:
• The Client log is located at /var/opt/BESClient/__BESData/__Global/
Logs.
• The EDR_DeploymentResults.txt log is located at /var/opt/BESClient/
EDRDeployData.
5. If the EDR_DeploymentResults.txt log file shows that the zypper command interprets
each string after InstallPackages.sh -f as a package to install, check whether the bc
package is installed on the endpoint. To check, run any of the following commands:
which bc
or
rpm -q bc
Missing prerequisite packages
Patching issues might occur when the endpoints are not installed with the necessary utility.
Ensure that the zlib and zypper packages are installed on the endpoints.
Possible issues with the SCC Download Plug-in
Insufficient Permissions to Write to Cache
Symptoms: When the SCC Download Plug-in attempts to cache a package,
you get the message in the download plug-in log (by default, it is located at
<BES Server Directory>\DownloadPlugins\SCCProtocol): ERROR :
Insufficient permissions to write cache. Please check your plugin
cache directory permissions.

BigFix Patch Patch for SUSE Linux Enterprise - User's Guide | 9 - Troubleshooting | 87
Causes: The BigFix Server account does not have permission to write to
the directory where the download plug-in is trying to cache the repository
metadata.
Resolving the problem: Check the download plug-in cache directory
permissions. Make sure that the BigFix Server user ('Administrator' on
Windows, 'root' on Linux) has permission to write to cache directory.
Cache Drive Does not Exist
Symptoms: When the SCC Download Plug-in attempts to cache a package,
you get the message in the download plug-in log: ERROR : Cache device not
ready.
Causes: The download plug-in cache directory is pointing to a drive that does
not exist on the BigFix server.
Resolving the problem: Update the plugin.ini file to point to the correct
cache path.
Cache Drive is Full
Symptoms: When the SCC Download Plug-in attempts to cache a package,
you get the message in the download plug-in log: ERROR : Insufficient
space left on cache device.
Causes: The drive where the cache is being written to is full.
Resolving the problem: Increase the free disk space on the cache device.
Package is not Found
Symptoms: The download plug-in log outputs the message ERROR CODE 252:
Package is not found in the reposource.
Causes: There can be numerous possible causes for such an error, here are a
few:

BigFix Patch Patch for SUSE Linux Enterprise - User's Guide | 9 - Troubleshooting | 88
• Novell might have removed the package from their repository.
• The package has been superseded.
• There are metadata issues on the endpoint.
• A cross dependency exists between third-party packages.
Resolving the problem: Retrieve the EDR logs (/var/opt/BESClient/
EDRDeployData) and client logs (/var/opt/BESClient/__BESData/
__Global/Logs) from the endpoints, and contact HCL BigFix Support.
Download errors due to network configuration
Downloads may fail due to network configuration, such as proxy or firewall, preventing
traffic through the URLs that are accessed by the SCC download plug-in or the SCC
download cacher.
If you encounter such issues, check the following configuration:
• The BigFix server whitelist, <BigFix server installation>\Mirror Server
\Config\DownloadWhitelist.txt must contain the following entry:
SCCProtocol://.*
• The following URLs must be accessible from the BigFix server, and from the endpoints
running the SCC download cacher:
◦ https://scc.suse.com:443
◦ https://updates.suse.com:443
◦ http://sync.bigfix.com:80
Prefetch plug-in error
If you have taken an action on a Fixlet that failed on a line with execute prefetch plug-
in in the Actionscript. Subsequent calls to the same prefetch plug-in from any Actionscript
might fail on the endpoint. The script might have been blacklisted, causing the prefetch
plug-in error.
To verify, check the client log. You will see either of the following messages for the Fixlet
action executing the prefetch plug-in:

BigFix Patch Patch for SUSE Linux Enterprise - User's Guide | 9 - Troubleshooting | 89
execute prefetch plug-in' didn't complete within 300 seconds. Black listing
plug-ins
matching the sha1 hash of 'name of 'bash' until agent is restarted.
Execute prefetch plug-in attempting to reuse plug-in which took too long
earlier.
To resolve this issue, do the following actions:
1. Restart the BigFix client to clear the blacklist.
2. Set the _BESClient_ActionManager_PrefetchPlugInTimeoutSeconds client
configuration setting with sufficient time for the patch to install and resolve
dependencies. This client setting indicates how long the client should wait before
blacklisting the script. You can use the Change Timeout for Prefetch Plugins task,
available from the Patching Support site, to set the setting to 30 minutes (1800
seconds).
Note: The _BESClient_ActionManager_PrefetchPlugInTimeoutSeconds setting
varies based on the endpoint and the Fixlet being installed. To get the desired value,
take the slowest endpoint and increase the setting to a high number, such as 3,000
seconds, then run a large Fixlet and see how long it takes. You can then take that
number and multiple it by two. Alternatively, set the client setting to 600 seconds and
adjust it accordingly if the suggested value does not work for you.
Error when /var is mounted as noexec
All available Fixlets use an executable that by default runs directly from the /var directory,
a partition on the endpoint. The Fixlets will not work when /var is set with the noexec
option, regardless of whether the SCC Download Plug-in or Custom Repository solution is
used. Therefore, ensure that the /var directory is not set with the noexec option by doing
the following steps:
1. Check the client log to see if the prefetch plug-in returned the exit code 126.
2. Run mount as the root user to check the mount option that is currently used:

BigFix Patch Patch for SUSE Linux Enterprise - User's Guide | 9 - Troubleshooting | 90
[root@host ~]# mount
/dev/mapper/vg_data-lv_root on / type ext4 (rw)
proc on /proc type proc (rw)
sysfs on /sys type sysfs (rw)
devpts on /dev/pts type devpts (rw,gid=5,mode=620)
tmpfs on /dev/shm type tmpfs (rw)
/dev/sda1 on /boot type ext4 (rw,nodev)
/dev/mapper/vg_data-lv_var on /var type ext4 (rw,noexec,nosuid,nodev)
none on /proc/sys/fs/binfmt_misc type binfmt_misc (rw)
If /var is set to noexec, you must take one of the following actions:
• Remove the noexec mount option.
• Move /var/opt/BESClient to a different partition, which is not noexec, and create a
symbolic link to it in its place.
• Run the Set the path for _BESClient_LinuxPatch_executable_directory Fixlet and
specify an alternative directory to run the executable for patching. The directory path
must be a valid, absolute path name. It can contain only alphanumeric characters,
forward slashes, and underscores.
Dashboard content display issue
Some of the dashboards in the BigFix console on Windows might not display correctly if
the Adobe Flash Player is not installed or outdated. To ensure that the dashboard display
correctly, the Flash Player for Internet Explorer must be updated to version 12 or higher.
For more information, see troubleshooting technote at http://www-01.ibm.com/support/
docview.wss?uid=swg21979771.
Null error when configuring BigFix Patch download plug-ins
When the BigFix server and the BigFix client on the BigFix server do not have the same
version, users might encounter a null error. The error occurs because BigFix server 8.x and
9.x versions handle encryption differently. The version of the client on the BigFix server is

BigFix Patch Patch for SUSE Linux Enterprise - User's Guide | 9 - Troubleshooting | 91
used to determine the BigFix server version and it is assumed that the version is the same
for the BigFix server and the client on the BigFix server.
Ensure that the version of the BigFix server and BigFix client on the BigFix server match to
avoid null errors when configuring the download plug-in. At a minimum, the version must be
on the same major version level, for example 8.x or 9.x.
EDR_DeploymentResults.txt reports package cannot be found
This is caused due to an outdated cache, and it needs the latest metadata. The cache
gets cleared on its own after a certain period of time, but sometimes new content appears
before the cache is erased automatically. You can manually clear the cache to see if the
issue gets fixed.
The cache is located in the SCC download plugin folder. If you are using version 1.1.0.0
or higher of the SCC download plugin and would like to clear the cache on every execution,
you can modify the plugin.ini file by adding the following lines: [Experimental]
alwaysClearCache = 1

Chapter 10. Frequently asked questions
To better understand Patch Management for SUSE Linux Enterprise, read the following
questions and answers.
The Manage Download Plug-ins dashboard is not reflecting any data. What do I do?
Here are some steps you can do to troubleshoot the issue:
• Gather the latest Patching Support site.
• Activate the Download Plug-in Versions analysis, available from the
Patching Support site.
• Clear the BigFix console cache.
• Ensure the Adobe Flash Player for Internet Explorer, which is installed on
the system where the BigFix console, is up-to-date. For more information,
see the troubleshooting technote at http://www-01.ibm.com/support/
docview.wss?uid=swg21979771.
What are superseded patches?
Superseded Fixlets are Fixlets that contain outdated packages. If a Fixlet® is
superseded, then a newer Fixlet exists with newer versions of the packages.
The newer Fixlet ID can be found in the description of the superseded Fixlet.
How do I deal with missing patches?
IBM® only provides Fixlet content for patches that are available in Novell
Patch Finder and in the supported repositories. For details, see Supported
Novell repositories.
Is there a minimum version of Zypper to install security patches using the CVE
number?
Yes, you must at least use Zypper version 1.5.3-3.2.
What packages do I need to install on the clients before patching?
The prerequisite packages that must be installed on the endpoints are zlib and
zypper.

BigFix Patch Patch for SUSE Linux Enterprise - User's Guide | 10 - Frequently asked questions | 93
What do I do when an action reports back with an installation failure?
Check to see if the conflict is caused by a vendor-acquired package. These
must be removed for the installation to occur.
I am locked out from my Novell account. What do I do?
One possible reason for an account lock out is due to invalid credentials.
Ensure that you use the mirror server configuration from Novell when you
register or configure the download plug-in. Account lockouts are common but
temporary. Contact Novell Support if you get locked out of your account.
Why is my action reporting back as a failed download?
Make sure you update the download plug-in to the latest version and register it
with the correct credentials.
The client logs contains a prefetch plug-in error that prevents the Fixlet from
completing successfully. What is causing the error? What should I do?
The ActionScript that was running on the endpoint might have been
blacklisted, causing the prefetch plug-in issue.
To resolve this issue, restart the BigFix client to clear the
blacklist. To prevent the script from being blacklisted, set the
_BESClient_ActionManager_PrefetchPlugInTimeoutSeconds client
configuration setting with sufficient time to process the patch. For more
information, see Prefetch plug-in error (on page 88).
I am not able to patch an Fixlets on endpoints with the /var directory mounted as
noexec. What do I do?
For the workaround, see Error when /var is mounted as noexec (on page 89).
How do I verify if the SCC download plug-in was registered correctly?
Run a Fixlet with an action task to verify if the download plug-in is registered
correctly. Verify that the patch download is successful. Otherwise, you might
need to unregister the download plug-in and register it again.

BigFix Patch Patch for SUSE Linux Enterprise - User's Guide | 10 - Frequently asked questions | 94
How do I register a download plug-in? Do I use the register download plug-in task or
the Manage Download Plug-in dashboard?
To register a download plug-in, you must use the Manage Download Plug-
in dashboard in the Patching Support site. Existing register download plug-
in tasks are being deprecated. To learn more about plug-in registration, see
Registering the SUSE download plug-in or Registering the SCC download plug-
in (on page 19).
Note: You must also use the Manage Download Plug-in dashboard to
unregister and configure download plug-ins. For more information about the
dashboard, see the topic on Manage Download Plug-ins dashboard in the
BigFix content in HCL Knowledge Base.
Which file could tell me why the mirror server is not working?
To check whether the issue is due to an incorrect URL or mirror server
credentials, check the plugin.ini file at <BES Server directory>/
DownloadPlugins/SCCProtocol.
Can I configure the SCC Download Plug-in to only use the extended repository list?
Yes, you can by setting the onlyUseExtendedRepoListFile flag in the
plugin.ini to yes.
I am not able to install any packages since I upgraded to the SCC Plug-in. All tasks
result in the following line: Failed add prefetch item {concatenation " ; " of lines of file
(parameter "EDR_PkgRequest")}. What is wrong?
The BigFix Enhanced Security option -requireSHA256Downloads or Require
SHA-256 Downloads option in the BigFix Administration tool might be
enabled. This option configures all download verification to use only the
SHA-256 algorithm. The SCC download plug-in might fail due to certain SUSE
repository metadata, which do not contain SHA-256 values for the packages in
the repository, that are used by the plug-in.
Consider disabling the Require SHA-256 Downloads option to successfully
deploy a patch. Security and package integrity is not compromised as

BigFix Patch Patch for SUSE Linux Enterprise - User's Guide | 10 - Frequently asked questions | 95
another layer of checking and verification is done using the GPG signature
of the package. For more information about the download option, see
BigFix Platform Installation Guide at https://www.ibm.com/support/
knowledgecenter/SSQL82_9.5.0/com.ibm.bigfix.doc/Platform/Installation/
c_security_settings.html.
Where should I save the extended repository list file?
The file can be stored in any location the download plug-in has access to. You
must ensure that the BigFix Server has permissions to access the location.
I have a subscription for extension products, such as the SUSE Linux Enterprise
Software Developer Kit 12, can I configure the SCC Download Plug-in to access their
assigned repositories?
Yes, you can. For more information, see Extending the SCC download plug-in
(on page 30).
What happens if I edit the DLSuSERepoList.json file with more repositories?
The changes that you make will be deleted when BigFix refreshes the Patching
Support site as the file will be overwritten.
Can I reconfigure the SCC download plug-in proxy after registration?
Yes, you can update the proxy settings and mirror credentials by configuring
the download plug-in from the Manage Download Plug-ins dashboard.
Will the SCC download plug-in configuration file (plugin.ini) be overwritten when
there is a newer version of the download plug-in?
No, the configuration file will not be overwritten. The only time the
configuration file is overwritten is when the download plug-in is reconfigured.
Where can I find the log for the SCC Download Plug-in? What are the possible log
levels
Logging is controlled by the plugin.ini file. It is located with the download
plug-in executable. By default, it is located in %PROGRAM FILES%\BigFix
Enterprise\BES Server\DownloadPlugins\SCCProtocol on
Windows systems. On Linux system, it is in /var/opt/BESServer/

BigFix Patch Patch for SUSE Linux Enterprise - User's Guide | 10 - Frequently asked questions | 96
DownloadPlugins/SCCProtocol. The log file is rotated on a daily basis,
which means that a new log file is created and the old log file is renamed with
the date that it is created from.
Can I set the log level for the SCC Download Plug-in?
You can set the download plug-in to generate log messages depending on
level of information that you need.
The logging level determines the amount of detail that the SCC download
plug-in writes to the log files. Set the logging level in the %PROGRAM
FILES%\BigFix Enterprise\BES Server\DownloadPlugins
\SCCProtocol\plugin.ini file.
Note: Logging level values are case-sensitive.
The following logging levels are listed in order of increasing amount of
information logged:
ERROR
Contains errors related to the execution of the download plug-in,
which might indicate an impending fatal error.
WARNING
Contains information about failed downloads, and reasons for
failure.
INFO
Contains general information outlining the progress and
successful downloads, with minimal tracing information.
DEBUG
Contains fine-grained information used for troubleshooting
issues. This is the most verbose level available.
Note: Setting the logging level to DEBUG increases the
amount of information to log, which might have an impact on

BigFix Patch Patch for SUSE Linux Enterprise - User's Guide | 10 - Frequently asked questions | 97
performance. You must only increase the logging level to DEBUG
when investigating an issue.
When troubleshooting, what do the exit codes mean?
Exit codes 251 and 252 require you to contact HCL BigFix Support as the
nature of the issue is unexpected and might be unique to your environment.
Ensure that you provide the appropriate download plug-in log from %PROGRAM
FILES%\BigFix Enterprise\BES Server\DownloadPlugins
\SCCProtocol and the deployment log from /var/opt/BESClient/
EDRDeployData.
The other exit codes are based on the official Zypper exit codes. To view the
definition, run zypper man from the command prompt.
Is there a way to keep the EDR logs from being deleted?
Edit the actionscript of the Fixlet and set debug_level in the action to 10 to
keep the logs.
An action failed and the EDR logs do not give any information about the failing action.
How do I troubleshoot?
In the Fixlet action, set the debug_level to 10 to retrieve more information for
debugging, and rerun the Fixlet.
An action failed and the logs contain Zypper-specific errors. How do I troubleshoot?
For more information about Zypper and errors that are related to it, see the
Zypper documentation at http://www.suse.com and the Zypper-related articles
in the Novell Customer Center.
What are the configuration settings that Zypper use?
The SUSE Fixlet sites use all the Zypper settings in /etc/zypp/zypp.conf.
The following Zypper configuration settings are set to values that come from
another file, which is dynamically created during Fixlet execution:
• cachedir

BigFix Patch Patch for SUSE Linux Enterprise - User's Guide | 10 - Frequently asked questions | 98
• configdir
• metadatadir
• packagesdir
• reposdir
• repo.add.probe
• repo.refresh.delay
• solvfilesdir
Which versions of BigFix support custom repositories for SUSE?
BigFix V8.2 and later support custom repositories for SUSE Linux Enterprise
Desktop and SUSE Linux Enterprise Server versions 11 and 12.
What is a custom repository?
The term custom repository refers to any software repository that is not
natively supported by the Novell Customer Center. Custom repositories give
you the benefit of being able to control exactly what is in the repository. In the
SLE Custom Repository Management dashboard, the term custom repository
can refer to a repository or the Subscription Management Tool (SMT).
What is the purpose of a repository?
A repository is a storage location that contains a collection of packages and
metadata for the available packages. These repositories can be on online
servers, CDs, DVDs, or on other media.
What is SMT?
SMT stands for Subscription Management Tool. It provides a repository and
registration target that is synchronized with Novell Customer Center. With the
SMT, enterprise customers are able to optimize the management of SUSE
Linux Enterprise software updates and subscription entitlements. For more
information about SMT, see https://www.suse.com/documentation/smt11/.
What version of Zypper is required to use the SLE Custom Repository Management
dashboard?

BigFix Patch Patch for SUSE Linux Enterprise - User's Guide | 10 - Frequently asked questions | 99
No minimum requirement. All Zypper versions that are used in SUSE Linux
Enterprise version 11 works.
How do I create a repository?
To learn about creating repositories, see the SUSE documentation:
• SUSE Linux Enterprise Desktop 11 Deployment Guide at https://
www.suse.com/documentation/sled11/book_sle_deployment/data/
sec_y2_sw_instsource.html
• SUSE Linux Enterprise Server 11 Deployment Guide at https://
www.suse.com/documentation/sles11/book_sle_deployment/data/
sec_y2_sw_instsource.html
• SUSE Linux Enterprise Desktop 12 Deployment Guideat https://
www.suse.com/documentation/sled-12/book_sle_deployment/data/
book_sle_deployment.html
• SUSE Linux Enterprise Server 12 Deployment Guide at https://
www.suse.com/documentation/sles-12/book_sle_deployment/data/
book_sle_deployment.html
Can I reconfigure a repository that I previously configured?
Yes, you can reconfigure a previously configured repository by using the
clientSetup4SMT.sh script. It is provided with SMT to configure endpoints to
use the SMT server or to reconfigure it to use a different SMT server.
From the logs, can I tell if I am using the normal Zypper process to the SMT or
repository in the log?
Yes, the log indicates if the normal Zypper process is used for either a
standard repository or SMT.
What is the difference between registering a repository and importing a repository?
Use the import feature if you have existing repositories that are not included
in the Repositories list in the dashboard. Use the register feature if you already
have a repository in the Repository list, but you still need to link the repository
with the endpoint.

BigFix Patch Patch for SUSE Linux Enterprise - User's Guide | 10 - Frequently asked questions | 100
What happens when the repository does not contain the package?
When a package is not found, the Fixlet fails. You can troubleshoot from /
var/opt/BESClient/EDRDeployData/EDR_DeploymentResults.txt,
which is where the Zypper output is logged.
What happens if there are issues with the custom repository solution?
You can revert to the standard BigFix server solution by running the Disable
custom repository support - SUSE Linux Enterprise task.
How are dependencies resolved?
Dependencies are resolved by Zypper.
Are the repositories that are listed in the second table of the Endpoints tab in the SLE
Custom Repository Management dashboard used in sequence?
There is no sequence in the repositories that are listed in the Endpoints tab,
even if you specified the priority as an extra note when you registered the
repository. When Zypper queries the repositories, the repository that first gets
the fetch query replies, including the package and its dependencies.
Through the SLE Custom Repository Management dashboard, I deployed a patch by
using a custom repository that is not a mirror of the vendor site. The deployment
action failed and the logs indicate that the files cannot be opened. What must I do?
When you use a custom repository that is not a mirror of the vendor site, it is
possible that the default gpgcheck is being done as part of the installation.
The GPG signature files might not be included in the repository. The files are
not checked for authenticity and might cause the installation to fail. To resolve
this issue, ensure that when you register the endpoints in the SLE Custom
Repository Management dashboard, you add gpgcheck=0 to Additional Fields.
Can I install several custom packages using the installation tasks?
Yes, you can install several custom packages with the available tasks. Use a
space to separate the package names.
Is bandwidth throttling available in a custom repository architecture?

BigFix Patch Patch for SUSE Linux Enterprise - User's Guide | 10 - Frequently asked questions | 101
Bandwidth throttling is not supported in a custom repository architecture
because it is outside the BigFix infrastructure.
I tried deploying Fixlets from a custom site, but it failed. Why is that? What should I
do?
The Fixlet site name is hardcoded in the relevance of the Fixlets because the
relevance can only accept one value. Therefore, if you want to deploy custom
Fixlets, ensure that your endpoints are subscribed to the original Fixlet site so
that they can grab all the relevant site files.
If you do not want to stay subscribed to the original Fixlet site but be able to
deploy custom Fixlets successfully, complete the following steps:
1. Make a custom copy of the necessary site files.
2. Host the site files either in your own custom site or online.
3. Modify the custom Fixlet appropriately.
How can I install custom packages that are on the custom repository?
You can use the Install packages by using Zypper task that is in the Patching
Support site.
For more information, see Installing packages from a custom repository (on
page 72).
If I update Zypper to 1.5.3-3.2 or later on SUSE Linux Enterprise 11.0, can I install
patches using the CVE number?
Yes, if you are using zypper-1.5.3-3.2 then you can install patches using the
CVE number.
What versions of SUSE Linux Enterprise are supported in the SLE Custom Repository
Management dashboard?
The SLE Custom Repository Management dashboard supports SUSE Linux
Enterprise Desktop and Linux Enterprise Server versions 11 and 12.

BigFix Patch Patch for SUSE Linux Enterprise - User's Guide | 10 - Frequently asked questions | 102
For SUSE Linux Enterprise 12, why do I need to unregister the repository or SMT
before registering an endpoint to a new SMT?
The new registration information does not overwrite the old registration
information for SUSE Linux Enterprise 12, hence you must unregister the
endpoint by using the SLE Custom Repository Management dashboard before
registration.
For SUSE Linux Enterprise 12, do I need to delete any files before registering an
endpoint to a new SMT?
You must delete the following files if you do not use the SLE Custom
Repository Management dashboard when unregistering the endpoints:
• /etc/SUSEConnect
• /etc/zypp/credentials.d/*
Can I perform a rollback on systems with mixed file systems such as ext3 and btrfs?
The SLE Btrfs Snapshot Management dashboard supports Btrfs file systems
only. Mixed files systems such as .ext3 and btrfs cannot be rolled back.
Where can I find information about the Exclude /var/opt/BESClient/* Directory From
Snapshots task?
The log file is located in the directory /etc/snapper/filters/
logfiles.txt.
Which log can I use to troubleshoot the snapshot rollback feature?
Use the snapper_rollback.log file located in the directory var/opt/
BESClient/EDRDeployData.
Which directories need to be excluded from the snapshots to enable rollback?
To enable the rollback feature from the SLE Btrfs Snapshot Management
dashboard, the /var/opt/BESClient/* directories must not be included
when taking snapshots.
Where can I find more information about snaphots?

BigFix Patch Patch for SUSE Linux Enterprise - User's Guide | 10 - Frequently asked questions | 103
See the SUSE Documentation at https://www.suse.com/documentation/
sles11/book_sle_admin/data/cha_snapper.html.
SUSE Linux Enterprise 12 endpoints are not displayed in the SLE Btrfs Snapshot
Management dashboard. Why is that?
The agents for SUSE Linux Enterprise Server or Desktop version 12 are
currently available only in BigFix V9.2. Ensure that you are using the specified
version.
The baseline that I ran with the multiple-package installation task completed
successfully, but why does it still show as relevant.
It might be due to the Fixlet components that failed to install the packages
with broken dependencies. The Multiple-Package Baseline Installation
task, by default, ignores broken dependencies to allow packages without
dependency issues to successfully be applied on the target endpoint.
I ran a baseline with the Multiple-Package Baseline Installation task. How can I view
the list of Fixlets that failed in that baseline?
You can monitor of the overall progression of the deployment of the baseline
and view the status of each sub-action in detail by using the View Action Info
dialog.
To access this dialog:
1. Click the Action icon in the navigation tree.
2. Select an action in the Actions List Panel.
3. Select the Computers tab in the Work Area.
4. Right-click any computer in the list.
5. Either select Show Action Info from the context menu or select Show
Action Info from the Edit menu.
For more details about the failed Fixlets, check the client log on the target
endpoints at /var/opt/BESClient/__BESData/__Global/Logs.

BigFix Patch Patch for SUSE Linux Enterprise - User's Guide | 10 - Frequently asked questions | 104
When deploying multiple Fixlets in a baseline, is it possible to skip the broken
dependencies and continue with the installation for the rest of the packages?
The Multiple-Package Baseline Installation task skips packages with broken
dependencies whenever possible. Packages with dependency issues with
a SUSE product, such as SLED-12-0.x86_64, cannot be skipped. Another
scenario where packages are not skipped is when dependency errors
occur during installation, as indicated by the following error message: File
conflicts happen when two packages attempt to install files with
the same name but different contents. In such cases, the installation is
canceled and no patches will be installed on the endpoints.
What are the possible causes of failure using the multiple-package baseline
installation method?
The Fixlets might have failed to install due to the following reasons:
• A custom site contained multiple baselines with the multiple-package
baseline installation task running at the same time.
• Two or more Fixlets required an update to multiple versions of the same
package.
• Two or more Fixlets required an update to the same package
dependencies.
• A Fixlet was immediately deployed after a baseline ran the multiple-
package installation method. Not enough time was allowed to complete
all zypper transactions and refresh the status on the endpoints for the
multiple-package installation.
• The zypper tool have not been patched, but a SUSE release package is
included in the baseline.
• The Enable the Multiple-Package Baseline Installation feature task must
be in the same baseline as the rest of the content. It should be added
before the patch Fixlets and multiple-package installation tasks.
• The Multiple-Package Baseline Installation feature only works when both
the enable and installation tasks exist in the same baseline. For more
information, see Installing multiple packages in a baseline (on page 58).

BigFix Patch Patch for SUSE Linux Enterprise - User's Guide | 10 - Frequently asked questions | 105
• The Enable the Multiple-Package Baseline Installation feature task must
be added after any of these cleanup tasks: Delete SUSE 11 Package List
File for Multiple-Package Baseline Installation or TROUBLESHOOTING:
SUSE 11 Patching Deployment Logs - Cleanup.
• The installation task with the correct SUSE distribution, operating system
version, service pack level, and architecture must be added at the end of
the baseline.
My endpoints are on air-gapped environment, how should I configure BigFix to patch
these endpoints?
For air-gapped environments, ensure to mirror the supported SUSE
repositories that host the packages needed to patch the endpoints. To do this,
use the SCC download cacher to build the local repository on a location which
the BigFix server has access to. This location is known as the local cache.
Note: The local cache must contain all the required repositories to avoid
dependency resolution issues.
Configure the download plug-in configuration file, plugin.ini, to use the local
cache when downloading files during deployment. Follow these steps:
1. Set the local cache configuration, localCache, to the location of the files
that were downloaded using the download cacher tool.
Note: This location must be accessible to the BigFix server.
2. Set the localCacheOnly flag to yes. to download files from the download
cache only and not from the vendor site.

Notices
This information was developed for products and services offered in the US.
HCL may not offer the products, services, or features discussed in this document in other
countries. Consult your local HCL representative for information on the products and
services currently available in your area. Any reference to an HCL product, program, or
service is not intended to state or imply that only that HCL product, program, or service may
be used. Any functionally equivalent product, program, or service that does not infringe any
HCL intellectual property right may be used instead. However, it is the user's responsibility
to evaluate and verify the operation of any non-HCL product, program, or service.
HCL may have patents or pending patent applications covering subject matter described
in this document. The furnishing of this document does not grant you any license to these
patents. You can send license inquiries, in writing, to:
HCL
330 Potrero Ave.
Sunnyvale, CA 94085
USA
Attention: Office of the General Counsel
For license inquiries regarding double-byte character set (DBCS) information, contact the
HCL Intellectual Property Department in your country or send inquiries, in writing, to:
HCL
330 Potrero Ave.
Sunnyvale, CA 94085
USA
Attention: Office of the General Counsel
HCL TECHNOLOGIES LTD. PROVIDES THIS PUBLICATION "AS IS" WITHOUT WARRANTY
OF ANY KIND, EITHER EXPRESS OR IMPLIED, INCLUDING, BUT NOT LIMITED TO, THE
IMPLIED WARRANTIES OF NON-INFRINGEMENT, MERCHANTABILITY OR FITNESS FOR A
PARTICULAR PURPOSE. Some jurisdictions do not allow disclaimer of express or implied
warranties in certain transactions, therefore, this statement may not apply to you.

This information could include technical inaccuracies or typographical errors. Changes
are periodically made to the information herein; these changes will be incorporated in new
editions of the publication. HCL may make improvements and/or changes in the product(s)
and/or the program(s) described in this publication at any time without notice.
Any references in this information to non-HCL websites are provided for convenience only
and do not in any manner serve as an endorsement of those websites. The materials at
those websites are not part of the materials for this HCL product and use of those websites
is at your own risk.
HCL may use or distribute any of the information you provide in any way it believes
appropriate without incurring any obligation to you.
Licensees of this program who wish to have information about it for the purpose of
enabling: (i) the exchange of information between independently created programs and
other programs (including this one) and (ii) the mutual use of the information which has
been exchanged, should contact:
HCL
330 Potrero Ave.
Sunnyvale, CA 94085
USA
Attention: Office of the General Counsel
Such information may be available, subject to appropriate terms and conditions, including in
some cases, payment of a fee.
The licensed program described in this document and all licensed material available for
it are provided by HCL under terms of the HCL Customer Agreement, HCL International
Program License Agreement or any equivalent agreement between us.
The performance data discussed herein is presented as derived under specific operating
conditions. Actual results may vary.
Information concerning non-HCL products was obtained from the suppliers of those
products, their published announcements or other publicly available sources. HCL has not
tested those products and cannot confirm the accuracy of performance, compatibility or

any other claims related to non-HCL products. Questions on the capabilities of non-HCL
products should be addressed to the suppliers of those products.
Statements regarding HCL's future direction or intent are subject to change or withdrawal
without notice, and represent goals and objectives only.
This information contains examples of data and reports used in daily business operations.
To illustrate them as completely as possible, the examples include the names of individuals,
companies, brands, and products. All of these names are fictitious and any similarity to
actual people or business enterprises is entirely coincidental.
COPYRIGHT LICENSE:
This information contains sample application programs in source language, which illustrate
programming techniques on various operating platforms. You may copy, modify, and
distribute these sample programs in any form without payment to HCL, for the purposes
of developing, using, marketing or distributing application programs conforming to the
application programming interface for the operating platform for which the sample
programs are written. These examples have not been thoroughly tested under all conditions.
HCL, therefore, cannot guarantee or imply reliability, serviceability, or function of these
programs. The sample programs are provided "AS IS," without warranty of any kind. HCL
shall not be liable for any damages arising out of your use of the sample programs.
Each copy or any portion of these sample programs or any derivative work must include a
copyright notice as follows:
© (your company name) (year).
Portions of this code are derived from HCL Ltd. Sample Programs.
TrademarksHCL Technologies Ltd. and HCL Technologies Ltd. logo, and hcl.com are trademarks or
registered trademarks of HCL Technologies Ltd., registered in many jurisdictions worldwide.
Adobe, the Adobe logo, PostScript, and the PostScript logo are either registered trademarks
or trademarks of Adobe Systems Incorporated in the United States, and/or other countries.

Java and all Java-based trademarks and logos are trademarks or registered trademarks of
Oracle and/or its affiliates.
Microsoft, Windows, Windows NT, and the Windows logo are trademarks of Microsoft
Corporation in the United States, other countries, or both.
Linux is a registered trademark of Linus Torvalds in the United States, other countries, or
both.
UNIX is a registered trademark of The Open Group in the United States and other countries.
Other product and service names might be trademarks of HCL or other companies.
Terms and conditions for product documentationPermissions for the use of these publications are granted subject to the following terms and
conditions.
Applicability
These terms and conditions are in addition to any terms of use for the HCL website.
Personal use
You may reproduce these publications for your personal, noncommercial use provided that
all proprietary notices are preserved. You may not distribute, display or make derivative work
of these publications, or any portion thereof, without the express consent of HCL.
Commercial use
You may reproduce, distribute and display these publications solely within your enterprise
provided that all proprietary notices are preserved. You may not make derivative works of
these publications, or reproduce, distribute or display these publications or any portion
thereof outside your enterprise, without the express consent of HCL.

Rights
Except as expressly granted in this permission, no other permissions, licenses or rights are
granted, either express or implied, to the publications or any information, data, software or
other intellectual property contained therein.
HCL reserves the right to withdraw the permissions granted herein whenever, in its
discretion, the use of the publications is detrimental to its interest or, as determined by HCL,
the above instructions are not being properly followed.
You may not download, export or re-export this information except in full compliance with
all applicable laws and regulations, including all United States export laws and regulations.
HCL MAKES NO GUARANTEE ABOUT THE CONTENT OF THESE PUBLICATIONS. THE
PUBLICATIONS ARE PROVIDED "AS-IS" AND WITHOUT WARRANTY OF ANY KIND, EITHER
EXPRESSED OR IMPLIED, INCLUDING BUT NOT LIMITED TO IMPLIED WARRANTIES OF
MERCHANTABILITY, NON-INFRINGEMENT, AND FITNESS FOR A PARTICULAR PURPOSE.