patient handling guidebook
TRANSCRIPT

PATIENT HANDLING
GUIDEBOOK
Workplace Safety December 2020

Royal Victoria Regional Health Centre - 2 - Patient Handling Guidebook Barrie, Ontario Updated July 2020
Table of Contents Page 1. Introduction 3 2. Risk Factors for Staff Members 3-4 3. Definitions 4-5 4. Mobility Assessment 6
Patient Factors 7 Caregiver Factors 7 Equipment Factors 8 Environmental Factors 8
5. Principles of Correct Body Mechanics 9 6. Process for Safe Patient Handling 9-10 7. Patient Handling Equipment Options 11
Slider Sheets 12-13 Slide Sheet/Tubes 12-13 One-Way Slides 12-13 Rollboards/Slider Boards 14-15 Transfer Boards 14-15 Pivot Discs 16 Quick Move/Arjo Stedy 17 Sara Plus 18 Air Pal 19 Mechanical Lift 20 Slings 21
8. Patient Handling Algorithms Lateral Transfer (lying) 24 Bed Repositioning 25 Lateral Transfer (sitting) 26 Pivot Transfer 27
9. Examples of Manual Repositioning/Transferring without Equipment
Repositioning a Patient in a Low Back Chair or Wheelchair with Two Caregivers
28
Repositioning a Patient in a Geriatric Chair with One Caregiver 28 Getting a Patient to a Sitting Position 27 Getting a Patient from Sitting to a Standing Position 27 Pivot Transfer Using One or Two Caregivers 28
10. Standing Transfer and Ambulation Checklists 31 11. Gait Aid Decision Tree 32 12. Patient Mobility and Equipment Decision Algorithm 33 13. SAFEMOB Project- Mobility Assessment Tool 34 14. Bariatric considerations 34 15. Patient Handling Equipment Sheet with Weight Capacities 35-37
Bariatric Equipment with Weight Capacities 38 16. References 39

Royal Victoria Regional Health Centre - 3 - Patient Handling Guidebook Barrie, Ontario Updated July 2020
1. Introduction
The goal of this Patient Handling Guidebook is to act as a resource for staff to assist with all patient handling activities. The ultimate goal is to reduce the risks (thus both number and severity of incidents) of work related musculoskeletal disorders (MSDs) for staff members. Some examples of MSDs include: low back pain, back strain, sciatica, carpal tunnel syndrome, rotator cuff injuries and epicondylitis (tennis elbow, golfer’s elbow). This guidebook will provide staff with information regarding:
• proper and safe body mechanics when performing patient handling tasks • how to perform a mobility assessment on a patient prior to initiating patient
handling tasks • types of patient handling equipment available within the Royal Victoria Regional
Health Centre • how to choose equipment or the number of caregivers required for safe patient
handling based on the task
2. Risk Factors for Staff All clinical staff who complete patient handling tasks are at greater risk of MSDs. Studies have shown that nursing is, unfortunately, among the group of occupations in North America at the highest risk of back injury. Excessive or cumulative exposure to one or more of the below risk factors can lead to a worker developing a MSD. Relying on decreasing only one of the factors is usually not enough to prevent MSDs. In addition, MSD development can occur related to gender, age, genetic causes and other factors. This guidebook only addresses the physical risk factors and not any psychosocial factors that may also be present. Force - Force is how much effort is exerted to move the patient. To decrease risk of MSD staff should:
• try to maintain patient handling forces that are required to less than 35 lbs (as recommended in 2007 by National Institute Occupational Health and Safety (NIOSH) )
• use available patient handling equipment to decrease levels of force required to complete tasks
• take responsibility to maintain a healthy level of strength and flexibility to perform all required job tasks
• remember that increasing speed usually increases the effort required to complete a task (i.e. how fast you try to complete a lateral sliding transfer or push a stretcher down the hall)

Royal Victoria Regional Health Centre - 4 - Patient Handling Guidebook Barrie, Ontario Updated July 2020
Repetition – Repetition is how often effort is given. To decrease risk of MSD staff should:
• break up physically demanding tasks or tasks that require sustaining one posture or similar postures for prolonged periods of time
• try to control force and posture and be aware of frequency even if you cannot control it
Posture – Posture is the position a person must maintain to complete patient handling tasks. To decrease risk of MSD staff should:
• ensure they are not working in awkward postures but in neutral postures • use good body mechanics when moving (as opposed to positions/forces that place
stress on the body)
3. Definitions Awkward Posture: Any fixed or constrained body position that overloads/stresses muscles, tendons, or joints. Generally, the more a joint deviates from the neutral position, the more the posture is considered to be “awkward” and the greater the risk of injury. Caregiver: The health care provider/employee who is directly involved with the patient to complete patient handling tasks (e.g., physiotherapist, nurse, rehabilitation assistant, occupational therapist, imaging technologist, etc.) Core Muscles: The muscles in your trunk that support the spine. The main muscle groups include the pelvic floor, diaphragm, abdominal muscles, and transverse abdominis. Ergonomics: The science of fitting the task to the worker by balancing the job demands with the capabilities of the person. The profession applies theory, principles, data, methods, and analysis to design in order to optimize human well-being and overall system performance. (Association of Canadian Ergonomists, 2006) Independent Mobility: Occurs when a patient requires no assistance or supervision and moves independently and safely. Lift: The procedure used to lift or carry the entire weight of a person or object. A lift is used to move a patient who is physically unable to help with the procedure. A lift should be performed mechanically using a lifting device. A lift should be completed manually only in emergency situations with at least two caregivers or if lifting a person weighing less than 35 lbs. Manual Handling: Occurs when a worker is required to move an object from one location to another either by lifting, pushing, pulling, dragging, or guiding with physical force without mechanical aide. Musculoskeletal Disorders (MSDs): Injuries and disorders of the musculoskeletal system. They may be caused or aggravated by various hazards or risk factors in the

Royal Victoria Regional Health Centre - 5 - Patient Handling Guidebook Barrie, Ontario Updated July 2020
workplace (e.g., force, repetition or posture). The musculoskeletal system includes: muscles, tendons, tendon sheaths, joints, spinal discs, ligaments, nerves, bursa and blood vessels. MSDs do not include musculoskeletal injuries or disorders that are the direct result of a sudden, single event involving an external source (e.g., a fall, violence, blunt force trauma or a motor vehicle accident). Neutral posture: The position in which muscles, tendons and joints function optimally and require the least amount of effort to maintain. Patient Care: Occurs when a caregiver is physically touching the patients to provide care (e.g. changing dressings, bathing, walking). The effort required by each caregiver should always be less than 35 lbs when completing patient care tasks (as NIOSH research). Patient handling: The procedure of ambulating, lifting, transferring, or repositioning a patient. The effort required by each caregiver should always be less than 35 lbs when completing patient handling tasks (as per NIOSH research). Repositioning: The procedure used to move a patient to a new position on the same surface. Repositioning is used to move a patient in a bed or a chair, when the patient is unable to move on his/her own due to physical or cognitive impairments. Set-up: When a patient requires assistance to set-up furniture, equipment or assistive devices to perform a task. Static Posture: A body position that requires sustained physical effort, without joint movement. Supervision: Occurs when a patient requires only verbal reminders of assistance. (i.e. no physical, hands-on assistance is required). This patient may also require some set-up of furniture, equipment or assistive devices. Transfer: The procedure used to assist a patient, who can bear some weight to move from one surface to another. A transfer should be used to move a patient who is mentally able to help, cooperative, and can bear some weight. Patients should be encouraged to help as much as possible.
Royal Victoria Regional Health Centre - 6 - Patient Handling Guidebook Barrie, Ontario Updated July 2020
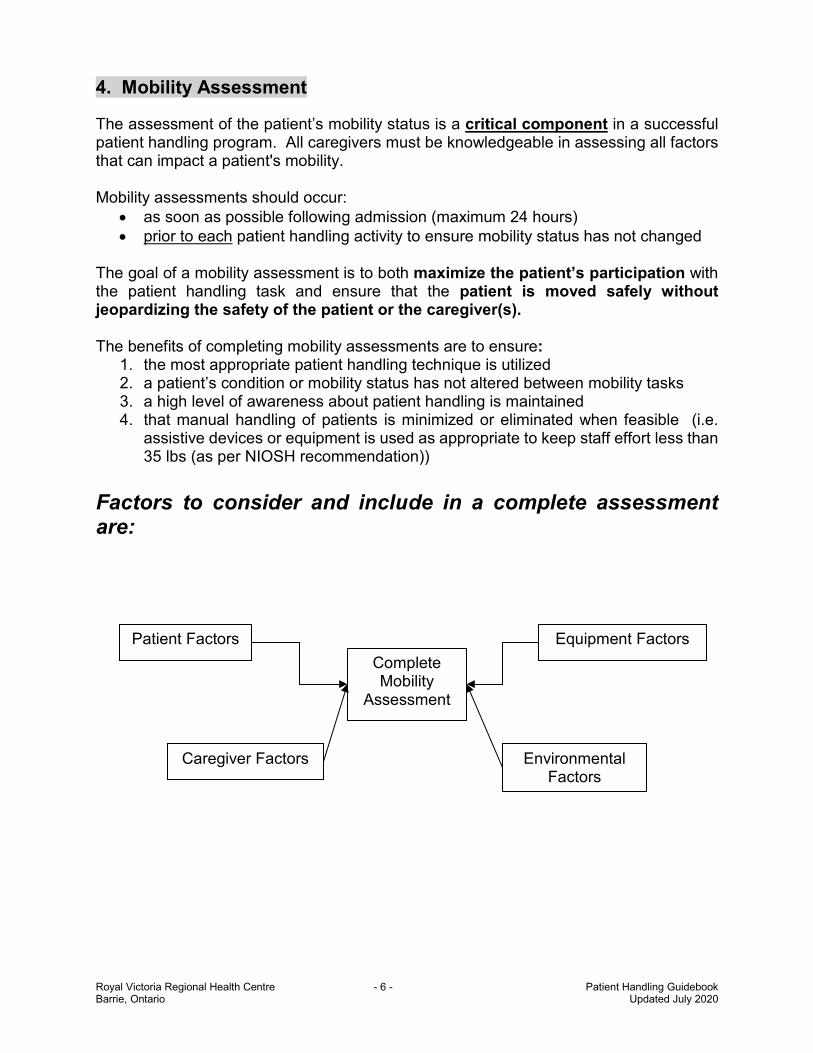
4. Mobility Assessment The assessment of the patient’s mobility status is a critical component in a successful patient handling program. All caregivers must be knowledgeable in assessing all factors that can impact a patient's mobility. Mobility assessments should occur:
• as soon as possible following admission (maximum 24 hours) • prior to each patient handling activity to ensure mobility status has not changed
The goal of a mobility assessment is to both maximize the patient’s participation with the patient handling task and ensure that the patient is moved safely without jeopardizing the safety of the patient or the caregiver(s). The benefits of completing mobility assessments are to ensure:
1. the most appropriate patient handling technique is utilized 2. a patient’s condition or mobility status has not altered between mobility tasks 3. a high level of awareness about patient handling is maintained 4. that manual handling of patients is minimized or eliminated when feasible (i.e.
assistive devices or equipment is used as appropriate to keep staff effort less than 35 lbs (as per NIOSH recommendation))
Factors to consider and include in a complete assessment are:
Patient Factors Equipment Factors
Caregiver Factors Environmental Factors
Complete Mobility
Assessment

Royal Victoria Regional Health Centre - 7 - Patient Handling Guidebook Barrie, Ontario Updated July 2020
PATIENT FACTORS
• Patient’s weight-bearing capacity and limitations (based on physician orders) and ability
• Diagnosis, wounds, tubes, or surgical sites • Communication abilities (hearing, understanding and expression) • Alertness • Pain level • Behaviour (e.g. agitated or aggressive, fear, cooperation) • Range of Motion (ROM) and joint mobility (stiffness and flexibility) • Strength • Balance • Physical Factors relating to the Patient that can influence the transfer
(weight, height, balance, co-ordination, vision, sensation, clothing, footwear) CAREGIVER FACTORS 1. Caregiver knowledge
• Ability to understand and recognize the various signs and symptoms associated with:
o different medical conditions and surgical procedures o effects of medications
• Ability to assess all patient factors (as above) • Ability to obtain information from the medical record to assess for information that
will affect the patient’s mobility (thus, all information must be accurately documented in the patient’s chart/profile so it can be communicated to all caregivers)
• All caregivers must be knowledgeable regarding: o Types of safe patient handling techniques and procedures o Types of patient handling equipment available o Proper body mechanics
2. Physical Condition of the Caregiver
• Communicate to co-workers regarding caregiver limitations that may affect the safe completion of the patient handling task. All physical conditions may vary at different times of the day and can affect safe task performance. Examples include:
o general health o fitness o alertness o strength o fatigue
3. Shift Work • The number of caregivers available may vary from shift to shift • The frequency of patient handling may vary by the shift
Royal Victoria Regional Health Centre - 8 - Patient Handling Guidebook Barrie, Ontario Updated July 2020
• The caregivers may have difficulties maintaining their sleep and activity patterns due to the design of the shifts (e.g., rotating counter clockwise, too rapid/slow rotation)
4. Teamwork with other staff
• To ensure that the planned patient handling activity is the safest and most appropriate, caregivers need to assess, plan, and communicate their intentions and work together at a safe speed
5. Clothing
• Appropriate footwear with non-slip soles give stability and decreases the risk of slips and falls
• Appropriate clothing that allows unrestricted movement during the procedures • Avoid dangling jewelry (e.g. necklaces, bracelets or hanging earrings) that may
become a risk factor due to entanglement)
6. Approach/communication with Patients • Training regarding communication strategies and approaches with patients must
be provided to all caregivers to ensure consistency of explanation of procedures to reassure the patient
• Always encourage the patient to participate as much as safely possible EQUIPMENT FACTORS
• Medical devices attached to the patient (e.g. catheter bags, intravenous tubing, or prostheses)
• Fit of the equipment with respect to the patient • Fit of the equipment with respect to the environment • Ease of use of the equipment • Training/knowledge on use of equipment • Availability of the equipment • Repair and condition of equipment • Accessible and convenient storage location for equipment (should be within 15
metres of where it will be required) ENVIRONMENTAL FACTORS
• Colours and patterns (consider vision issues for geriatric patients (e.g. wall, furniture, floor colour and contrast)
• Layout • Space and clutter • Lighting and reflection of light on surfaces • Temperature (be aware of contrasts between room and hall and in and out of bed) • Obstacles • Floor (consider vision issues of geriatric patients (e.g. shiny surfaces))

Royal Victoria Regional Health Centre - 9 - Patient Handling Guidebook Barrie, Ontario Updated July 2020
5. Principles of Correct Body Mechanics
• Assess the load • Keep your back straight to maintain the three “S curves of your spine” (neutral
posture) • Bend your knees and lift with your legs • Activate your core muscles when lifting • Keep the object/person you are lifting close to your body • Synchronize your movement with co-worker(s) • Keep the load between knee and shoulder height • Keep your feet shoulder width apart to provide a stable base of support • Turn your entire body or shift weight from foot to foot instead of twisting • Push instead of pull a wheeled object as you can maintain more neutral posture
when pushing • If you need to pull a wheeled object – try to alternate pulling with your right then
your left arm to ‘balance’ the physical demands on your body or walk beside the object to decrease stress on the shoulder
• Know and respect your own limits and the limits of your co-workers 6. Process for Safe Patient Handling 1. Caregiver Caregivers must complete the following tasks to prepare for a patient handling task:
• complete a mobility assessment prior to each patient handling task (see section 4: assessing the patient, caregiver, environment and equipment)
• choose the patient handling task that will have the lowest risk of injury for the caregiver while maintaining the patient’s optimal mobility. Any refusal by a patient to use a mechanical lift or repositioning device shall be resolved by the team caring for the patient in conjunction with the patient and family such that neither the patient nor employees are put at risk for injury.
• utilize correct body mechanics (as in section 5) • communicate - discuss and plan the procedure with the patient and other
caregivers (determine who is the leader and who is the assistant during the task) • encourage the patient to assist as much as possible • ensure the patient is wearing shoes or non-slip slippers on a foot they will be
weight-bearing through • give short, simple commands and instructions to the patient • never grasp the patient under the arm • be prepared for the unexpected • postpone the task if the patient is resistant, uncooperative or aggressive/agitated • ensure the patient is transferred the shortest distance possible • move the patient in stages if a patient handling task is awkward or physically
demanding

Royal Victoria Regional Health Centre - 10 - Patient Handling Guidebook Barrie, Ontario Updated July 2020
• do not attempt to catch a falling object/patient but attempt to slowly lower, bending your knees and avoid twisting
• If the patient falls to the floor and is unable to get up independently, use a mechanical lift to assist
• keep forces required by each caregiver to less than 35 lbs • communicate the mobility task to other staff via documentation procedures
2. Patient The caregiver should ensure:
• the patient is encouraged to help as much as safely possible • the patient’s dignity is preserved and respected • the patient wears proper clothing and non-slip footwear • the patient places his/her hands on the caregiver’s forearms, shoulders, hips or on
a piece of equipment (that is, patient should not put his/her around the caregiver’s neck)
• the patient’s IV tubes and poles, urine bags and safety belts are positioned so they are safe for the patient and do not interfere with the transfer
3. Environment To prepare the environment, caregivers should ensure:
• the path of the transfer is clear and free of obstacles • furniture is arranged to allow easy access • there are no spills on the floor • the lighting is adequate • that noises are kept to a minimum to avoid distraction and confusion
4. Equipment To prepare the equipment, caregivers should:
• check equipment for safety prior to each use, tag defective equipment and contact appropriate individuals for repair
• ensure that devices such as slings, belts or disks are in good working order and the correct size for the patient prior to each use
• be aware of the load limits of all patient handling equipment (e.g. mechanical lifts, gait aids, beds)
• ensure that battery-operated equipment (e.g. lift) is charged • never use equipment for a purpose it is not designed for (e.g. transporting a patient
to another room either on a rollator walker or a floor lift/sling) • ensure that all equipment is positioned and used correctly • set the bed at the optimum height for the caregiver(s) and the patient • lock all of the wheels on the equipment in use unless otherwise indicated (e.g. the
brakes on the floor lift should not be locked while in use) • ensure that the bed rails are lowered when necessary • remove the wheelchair arm and leg rests when necessary

Royal Victoria Regional Health Centre - 11 - Patient Handling Guidebook Barrie, Ontario Updated July 2020
7. Patient Handling Equipment Options The correct equipment choice and proper use is necessary for all patient handling activities to eliminate or reduce unnecessary manual handling. This will decrease the risk of injury to caregivers and patients. There is a wide variety of patient handling equipment and devices available. Familiarity with the various types of equipment and their uses helps the caregiver select the most appropriate piece of equipment for handling patients. The use of transfer devices should:
• Ensure a safe and secure patient transfer. • Reduce the intensity of biomechanical stresses placed on caregivers during patient
transfers on the caregivers. • Reduce the physical demands of the task, such as pushing or pulling. • Provide better control when performing a patient handling task. • Permit the caregiver to assume a position with better leverage and to maintain a
safe posture. • Allow the patient to participate as much as possible.
Equipment Options At RVH:
• Slider/Draw Sheets
• Slide Sheets/Tubes
• One Way Slides
• Rollboards
• Slider boards (red/white boards)
• Pivot Discs
• Arjo Sara Stedy and UltraMove (Sally)
• Air Pal
• Mechanical Lifts o Floor o Portable Ceiling o Fixed Ceiling
Royal Victoria Regional Health Centre - 12 - Patient Handling Guidebook Barrie, Ontario Updated July 2020
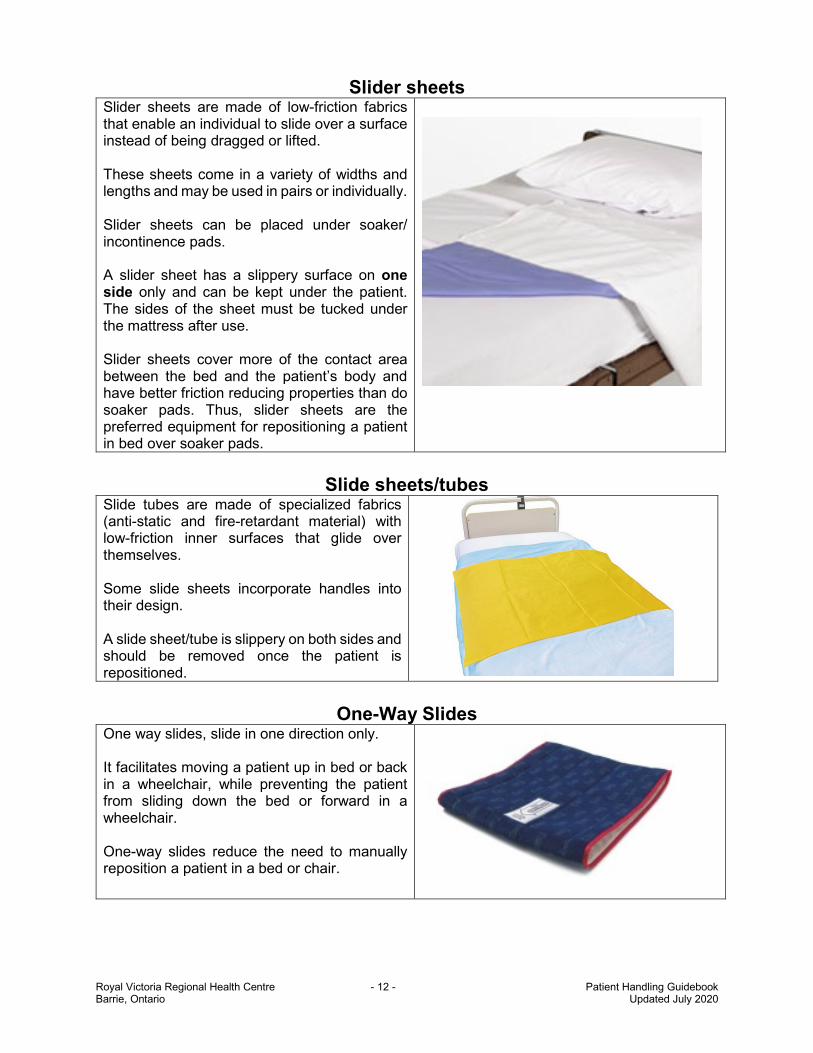
Slider sheets Slider sheets are made of low-friction fabrics that enable an individual to slide over a surface instead of being dragged or lifted. These sheets come in a variety of widths and lengths and may be used in pairs or individually. Slider sheets can be placed under soaker/ incontinence pads. A slider sheet has a slippery surface on one side only and can be kept under the patient. The sides of the sheet must be tucked under the mattress after use. Slider sheets cover more of the contact area between the bed and the patient’s body and have better friction reducing properties than do soaker pads. Thus, slider sheets are the preferred equipment for repositioning a patient in bed over soaker pads.
Slide sheets/tubes
Slide tubes are made of specialized fabrics (anti-static and fire-retardant material) with low-friction inner surfaces that glide over themselves. Some slide sheets incorporate handles into their design. A slide sheet/tube is slippery on both sides and should be removed once the patient is repositioned.
One-Way Slides
One way slides, slide in one direction only. It facilitates moving a patient up in bed or back in a wheelchair, while preventing the patient from sliding down the bed or forward in a wheelchair. One-way slides reduce the need to manually reposition a patient in a bed or chair.

Royal Victoria Regional Health Centre - 13 - Patient Handling Guidebook Barrie, Ontario Updated July 2020
Uses for slider sheets, slide sheets or tubes and one way slides: • Repositioning patients, for example:
o up in bed o from the side to the centre of the bed or vice versa o into side lying
• Transfer patients from one surface to another, such as from a bed to a stretcher (when used in conjunction with other devices, such as slider boards)
• Transfer patients from lying to sitting and vice versa • Aid for range of motion (ROM) and strengthening exercise
Advantages of slider sheets, slide sheets or tubes and one way slides: • Simple and versatile • Easy to store • Prevent manual lifting of patients • Slider/draw sheets can be left under the patient • Reduces the forces required to move patients • Reduces awkward postures of caregivers when used correctly • More comfortable for patients than transfer boards
Disadvantages of slider sheets, slide sheets or tubes and one way slides: • Inappropriate use may put caregivers at a high risk of MSD (for example, larger patients who cannot offer
sufficient assistance resulting in the caregiver applying greater than 35 lbs of force or when proper technique is not used a slide may turn into a lift)
• Pain for patients who have pressure sores or other sources of sensitivity • Potential for skin breakdown • Time-consuming infection control procedures for cleaning equipment when the same sheet is used for more
than one patient without time to send it to laundry • Unable to bridge gaps between surfaces (may need to use in conjunction with transfer or slider boards) • Two or more caregivers may still be required for the reposition or transfer • Additional effort and handling tasks may be required to position and remove slide tube or sheets
Operation Tips for slider sheets, slide sheets or tubes and one-way slides: • Lock the bed/chair/stretcher brakes • Adjust the height of the bed/stretcher to accommodate all caregivers • Lower the bed/stretcher rails • Lower the head of the bed/stretcher if repositioning up the bed/stretcher to allow gravity to assist • The caregivers should position themselves on either side of the bed • If using a slider sheet roll it close to the patient • If using a slide tube or sheet then use a draw sheet on top and grip it close to the patient • Ensure that the draw/slider sheet is taut before moving the patient to prevent jerking the patient • Keep part of your hand in contact with the surface to ensure a sliding motion, not a lifting motion • Avoid shrugging the shoulders while moving the patient, as this produces a lifting not sliding technique • Use core muscles, a wide base of support and weight shifting strategies to assist with manually moving
patients • Communicate with the patient and other staff to complete the move together

Royal Victoria Regional Health Centre - 14 - Patient Handling Guidebook Barrie, Ontario Updated July 2020
Rollboards/Slider Boards Rollboard/Slider boards are used to reduce friction and bridge gaps when sliding patients between two horizontal surfaces such as between a bed and stretcher. Large patients and patients with sensitive skin may find using these items uncomfortable. If possible, the use of a mechanical lift is recommended instead of a rollboard/slide/transfer board.
Slider boards are made of wood or plastic and can be used in conjunction with slider sheets/tubes. Slider boards have rounded edges and a smooth, even surface on the top with non-skid inserts on the other side to permit stability. Some models have two handles on either side of the board.
Red slider board
Rollboard inner core is made of flexible, kink-resistant plastic covered with coated glass-fibre fabric. Top roll material is made of nylon with a special coating on one side and is tear-resistant. Some boards have rollers, while others have fabric or vinyl coverings designed to further reduce friction.
Rollboard
Transfer boards
Transfer boards are designed for seated lateral transfers. They are often tapered at each end and can be used to bridge a gap such as when transferring between a bed and a wheelchair or commode. Transfer boards are suitable only for those patients who can help power themselves by sliding along the board with guidance from a knowledgeable caregiver. Patients with good sitting balance should be encouraged to use their arms and legs to move themselves.
Boards are often made of a low-friction material (wooden or plastic acrylic fiberglass board) with a smooth lacquer finish or with moveable sliding sections. When using smooth transfer boards, to ease the sliding along the board, it is best if the patient is wearing clothing on his/her lower body. Be careful when using slide/transfer boards with sliding sections because these sliding sections may cause pinching.

Royal Victoria Regional Health Centre - 15 - Patient Handling Guidebook Barrie, Ontario Updated July 2020
Uses for Rollboards/ Slider/Transfer Boards • To bridge gaps between two surfaces to facilitate patient transfer, such as between bed and wheelchair,
wheelchair and toilet, chair and wheelchair, wheelchair and car, bed and stretcher
Advantages for Rollboards/ Slider/Transfer Boards • Sliding patients to avoid manually lifting them • Some patients may be able to transfer independently • Reduces the forces required to move patients • Reduces awkward postures if used correctly • Easy to clean • Boards are available in a range of widths, lengths, and curves for various types of transfers
Disadvantages for Rollboards/ Slider/Transfer Boards • Inappropriate use may put caregivers at a high risk of MSD (for example, larger patients who cannot offer
sufficient assistance resulting in the caregiver applying greater than 35 lbs of force, or when proper technique is not used, a slide may turn into a lift)
• Pain for patients who have pressure sores or other sources of sensitivity • Skin breakdown for some patients • Some slide/transfer boards do not sufficiently reduce friction • Two approximately equal-height surfaces are needed for easy and safe transfer • For seated transfers with transfer boards, patients must be able to maintain sitting balance. • Many boards have no handles for positioning or carrying the board • Two or more caregivers may still be required for the reposition or transfer • Caregivers must be careful to be aware of proper body mechanics and not adopt awkward postures or twist
during patient handling activities • Fingers may be pinched under board edges
Tips for Rollboards/ Slider/Transfer Boards • Lock the brakes on all wheeled equipment (bed/chair/stretcher) • Adjust the height of the bed/stretcher so that each caregiver is comfortable
• if able, ensure the receiving surface is a little bit lower to allow gravity to assist but avoid a difference of more than 2.5 centimetres as this may be too jarring for the patient and make it difficult for the patient to assist/control the movement
• When applicable, place the receiving surface to the patient’s stronger side • Lower the bed/stretcher rails or remove arm/foot rests from equipment as able • The patient should be positioned close to the edge of the surface they are transferring from • Use a flat sheet or slider sheet directly under the patient to ease the transfer because it will provide the
caregivers with something to grasp onto when pulling/pushing the patient. Do not use a fitted (stretch material) sheet to transfer as it increases the force required by the caregiver
• Ensure that the draw sheet is taut and grip it close to the patient • Place the rollboard / slider/ transfer board partially under the patient • Allow the patient to assist sliding across the board as much as possible • Keep part of hand in contact with the surface to ensure a sliding motion, not a lifting motion • Avoid shrugging the shoulders while moving the patient, as this produces a lifting not a sliding technique. • Use good body mechanics (core muscles and a wide base of support) and weight shifting strategies to
assist with manually moving the patients • Communicate with the patient and other caregivers to complete the move together

Royal Victoria Regional Health Centre - 16 - Patient Handling Guidebook Barrie, Ontario Updated July 2020
Pivot Discs Pivot Discs allow the caregiver to turn (pivot) the patient while in a standing position from one direction to another. Appropriate Use for Pivot Discs
• To transfer a patient from one seated surface to another (e.g. bed/chair, toilet/wheelchair, bed/commode, etc.)
• Patients must have sufficient ability (strength and balance) to stand with minimal assistance (if using 2 caregivers) on at least 1 leg
Advantages for Pivot Discs
• Patient is not required to take any steps • Reduces the forces required to move patients • Reduces awkward postures if used correctly • Simple to use • Patient is able to weight bear though his/her arms
Disadvantages for Pivot Discs • Inappropriate use may put patients at risk of a fall • Inappropriate use may put caregivers at a risk of MSD
(e.g. trying to support a patient or catch a patient who is losing his balance)
• Patients must be able to follow instructions to avoid injury to the caregiver or patient
• Patient must be able to transition from sitting to standing
Tips for Pivot Discs • Tip the pivot disc towards caregiver (on its wheels) to move it • Position pivot disc closely in front of the patient • Place front of receiving surface (commode, chair, bed, wheelchair) near the edge of the
base of the turning disc, at a 90 degree angle to the surface on which the patient is sitting • Position the patient’s feet flat on the centre of the disc • Adjust the knee support contact to just below the patient’s knees • Have the patient reach for the handle with both hands (if able) to assist standing • Caregiver stands facing the patient and places one foot firmly on the brake pedal and
hands on the handle to balance the pivot disc (a second caregiver may provide minimal assistance if required)
• Have the patient stand • Use a smooth movement to pivot the patient toward the receiving surface • Have the patient reach back for the receiving surface before sitting down

Royal Victoria Regional Health Centre 17 Patient Handling Guidebook Barrie, Ontario Updated July 2020
Ultra Move(Sally) and Arjo Stedy
This equipment allows the caregiver to move the patient from one seated surface to another. The caregiver may also transport a patient over short distances.
Appropriate Use of Ultra Move (Sally) and Arjo Sara Stedy
• To transfer a patient from one seated surface to another (e.g. bed/chair, toilet/wheelchair, bed/commode, etc.)
• Patients must have sufficient ability (strength and balance) to stand briefly with minimal assistance (if using 2 caregivers)
• Transport a patient from one seated surface to another that cannot be placed physically adjacent to one another (there is a belt available to further support the patient during transport)
Advantages for Ultra Move (Sally) and Arjo Sara Stedy
• Reduces the forces required to move patients • Reduces awkward postures if used correctly • Simple to use • Able to transport the patient as well as transfer • Patient is only required to stand momentarily
Disadvantages for Ultra Move (Sally) and Arjo Sara Stedy • Inappropriate use may put patients at risk of a fall • Inappropriate use may put caregivers at a risk of MSD (e.g.
trying to support a patient or catch a patient who is losing his balance)
• Patients must be able to follow instructions to avoid injury to the caregiver or patient
• Some patients may not fit comfortably between the side supports of the equipment
• Sometimes the equipment does not fit well under some beds or stretchers
Operating Tips for Ultra Move and Arjo Sara Stedy
• Position ultra move/ sara stedy in front of the patient • Position feet flat on the plate • Adjust the knee support contact to just below the patient’s knees (if adjustable) • Caregiver should apply the brakes on the equipment • Caregiver places both hands on the handle to prevent the equipment from moving • Have the patient reach for the handle with both hands (if able) to assist standing • Have the patient stand (a second caregiver may provide minimal assistance to help the patient stand,
if needed) • Once standing, the seat pads can be rotated into place allowing the patient to comfortably sit • The patient can then be transported to the destination surface

Royal Victoria Regional Health Centre 18 Patient Handling Guidebook Barrie, Ontario Updated July 2020
Arjo Sara Plus This equipment allows the caregiver to move the patient from one seated surface to another. The caregiver may also: • transport a patient over short distances • initiate ambulation for patients with limited strength and balance Maximum Patient Weight is 190kg (420 lbs). Appropriate Use of Sara Plus
• To transfer a patient from one seated surface to another (e.g. bed/chair, toilet/wheelchair, bed/commode, etc.)
• Patients must have sufficient ability (strength and balance) to attempt standing
• Transport a patient from one seated surface to another that can not be placed physically adjacent to one another
• To ambulate patients with low endurance or balance due to increase support offered
Advantages for Sara Plus • Reduces the forces required to move patients • Reduces awkward postures if used correctly • Able to transport the patient as well as transfer • Patient is only required to stand momentarily • Can use as a platform walker for patient who are beginning to
ambulate Disadvantages for Sara Plus
• Inappropriate use may put patients at risk of an injury • Inappropriate use may put caregivers at a risk of MSD • Patients must be able to follow instructions to avoid injury to
the caregiver or patient • Does not work well for patients with low shoulder tone (e.g.
stroke patients) • Some patients may not fit comfortably between the side
supports of the equipment • Sometimes the equipment does not fit well under some beds
or stretchers
Operating Tips for Sara Plus
• Position Sara Plus in front of the patient and spread the legs as required to access the patient • Position feet flat on the plate or without the plate if attempting ambulation • Adjust the knee support so the contact is just below the patient’s knees • Caregiver should apply the brakes on the equipment • Select the appropriate sized belt (the belt must at least reach the coloured line in the Velcro when
wrapped around the patient’s waist) and apply with the loops on the outside of the belt • Attach the sling to the lift and take all slack out of the ropes • Instruct the patient to reach for the handles with both hands and lean forward on their forearms • Caregiver will slowly raise the platform (using the mechanical hand control) while the patient attempts
to stand • Once standing, the patient can then be transported to the destination surface or if attempting to
ambulate, the patient can begin once balance is obtained

Royal Victoria Regional Health Centre 19 Patient Handling Guidebook Barrie, Ontario Updated July 2020
Air Pal The Air Pal comes with a transfer ‘sheet’ and pump that inflates the sheet part. Incoming air from the pump ‘lifts’ the patient as air is released through the perforated underside of the ‘sheet’ (like an air hockey table or hovercraft), creating a cushion of air that allows one or two staff members to perform a task that typically requires four to eight people.
Uses for Air Pal • Horizontal transfers (e.g. bed/stretcher, stretcher/imaging table) • Repositioning
Advantages for Air Pal • Sliding patients to avoid manually lifting them • Air Pal sheets do not need to be removed and can be left under the patient • Significantly reduces the forces required to move patients • Reduces awkward postures if used correctly • More comfortable for patients than transfer boards • Less risk of skin breakdown as compared to slider sheets, tubes or boards
Disadvantages for Air Pal • More equipment to use with the air pump and sheet • Time-consuming infection control procedures required for cleaning equipment when the
using the same sheet for multiple patients • Air Pal sheets may need to be used with the slider board to bridge large gaps between
surfaces • Two or more caregivers required for use • The use of these sheets may involve additional effort and handling tasks to position and
remove them • Sometimes the patients are unsteady on a fully inflated air pal sheet
Operating Tips for Air Pal Use
• Place the sheet under the patient with the ‘holes’ facing down • Ensure all patient lines and tubes will not be disturbed during the transfer • Ensure that the pump will not disconnect from the sheet during the transfer • Prior to turning on the pump to fill the sheet with air, be sure that the caregivers are
holding on to the sheet and are close to the patient • Avoid shrugging the shoulders while moving the patient, as this produces a lifting not
sliding technique • Use good body mechanics (core muscles and a wide base of support) and weight shifting
strategies to assist with manually moving the patients • Communicate with the patient and other staff to complete the move together

Royal Victoria Regional Health Centre 20 Patient Handling Guidebook Barrie, Ontario Updated July 2020
MECHANICAL LIFTS Lifts are carried out on patients who are physically unable to bear weight or are cognitively unable to assist with the manoeuvre. An assistive device (floor lift, portable ceiling lift or fixed ceiling lift) should be used to move the entire body weight of the patient.
.
The purpose of using a lifting device is to ensure the: 1. Patient is secure and safe 2. Caregiver is safe by:
• Reducing the intensity of biomechanical stresses • Reducing the physical demands of the task (e.g. pulling
and pushing) • Eliminating or reducing manual lifting required
Lifting device types – TOLLOS brand • Ceiling lifts – (Cirrus or Pinnacle / fixed ceiling lifts on one track) • Portable lifts – (Stratus / ceiling lifts that move track to track) • Floor lifts (Ultralift) You should use a lifting device when a patient is: •Not physically able to move themselves •Not cognitively able to help with patient handling task •Unable to bear weight using at least one leg •Unable to maintain balance while standing/sitting •Unable to move/straighten his/her joints due to severe pain, contracture or contraindications •Not able to give consistent effort/ display consistent capabilities
Examples of conditions or factors which may require a mechanical lifting device to be used are: patient’s size and weight poor sitting balance physical ability of caregiver significant loss of muscle tone poor head or trunk control lack of available caregivers Examples of patient ‘moves’ which may require a mechanical lifting device: Bed ↔ Chair Repositioning in bed Toileting Chair ↔ Chair Bed ↔ Stretcher Lift patient from floor Operation tips for the mechanical lifts: • All lifts power on and off with the red button • Hand control – controls the up and down of the spreader bar (where the sling attaches) and the
spread of the legs on the base of floor lift • Weight capacity – all have a maximum 600lb capacity (bariatric have 750lbs capacity)you can verify
on lift sticker (on some floor lifts check location of pin on boom as this changes between 250/350/600 lb capacity)
• Visual and Audio battery alarms – full power has 3 green light bars, when flashing red or beeping please return lift to charger or plug in to charge ASAP, all lifts should be charging when not in use
• Manual lowering devices – use if power goes out and patient up in lift/sling (i.e. emergency) o for ceiling lift pull red strap and gravity will assist to lower o for floor lift open the hinge on the lift motor and turn to lower
• Scale available on the floor lift or portable ceiling lift attachment - directions on how to use on side of scale (i.e. “0” scale with sling first)
For more detail on lift operation please refer to the T.H.E. Medical Operating Instructions for each lift (Cirrus, Stratus, Pinnacle and Ultralift) available on the RVH Intranet/Training Materials

Royal Victoria Regional Health Centre 21 Patient Handling Guidebook Barrie, Ontario Updated July 2020
SLINGS
The slings associated with a lifting device are a critical component in ensuring a lift is utilized effectively and safely. The size and physical/cognitive condition of the patient(s) being lifted in the slings must be considered to ensure there is a proper fit between the patient and the sling. Sling types available at RVH: Full Length Repositioning – used to reposition a patient in bed or to transfer from bed to stretcher.
This sling will not put the hip in as much flexion as the Combi sling. This sling should be left under a patient (after consultation with the team regarding risks versus benefits) if the patient requires frequent repositioning, to decrease risk of injury to staff.
Combi - The split leg sling is easier to position underneath patients when they are seated because it is not placed underneath the patient’s buttocks. The trunk portion of the sling is positioned behind the back of the patient and then a wide leg section of the sling is positioned underneath each thigh. Securing the straps to the lifting device, position the patient’s legs either opened (uncrossed leg straps) or closed (crossed leg straps).
Long Seat – A long seat sling positions the patient in a semi-reclined position. Its special design ensures the security of the patient being lifted (often used with amputees). Rollar Bands - Two broad bands of padded straps used to roll the patient or a single band can be used to support a limb. Each sling type is identified on a label which includes information regarding:
•Weight limit •Type •Size •Date of 1st use The size of a sling affects the fit, comfort, and safety of the patient and can be identified by the colour of the ribbing on the edge of the sling (see next page for more details) Cleaning and care instructions (See Infection Control Instructions) – must be washed between each patient use then hung to dry or tumbled on low heat so that the sling will not be damaged. For details on how to choose and apply the slings please refer to the T.H.E. Medical Sling Application Guide available on the RVH Intranet/Training Materials.

Royal Victoria Regional Health Centre 22 Patient Handling Guidebook Barrie, Ontario Updated July 2020
Sling Sizing Guideline
COMBI
MODEL NUMBER
NEW NAME PIPING MAXIMUM
WEIGHT Approximate
Patient Weight Range
OLD NAME PIPING MAXIMUM WEIGHT
T015CPF Small - S Red 400 lbs 75-124 lbs Pediatric - CP White 400 lbs
T015CF Medium - M Yellow 400 lbs 125-174 lbs Regular Same as sling
fabric 400 lbs
T015CXF Large - L Green 600 lbs 175-249 lbs Oversize - XL Black 600 lbs
T015CXXF Extra
Large - XL
Blue 1000 lbs 250-399 lbs Double Oversize - XXL Burgundy 1000 lbs
T015CXXXF Extra Extra
Large - XXL
Orange 1000 lbs 400-759 lbs Triple Oversize - XXXL Orange 1000 lbs
Bariatric Black 800+ N/A N/A
LONG SEAT
NEW NAME PIPING MAXIMUM
WEIGHT Approximate
Patient Weight Range
OLD NAME OLD PIPING MAXIMUM WEIGHT
N/A N/A Pediatric - CP White 400 lbs
T015LPF Small - S Red 400 lbs 75-124 lbs Medium NEW T015LP Yellow 400 lbs
T015LF Medium - M Yellow 400 lbs 125-174 lbs Large Red 600 lbs
T015LXF Large - L Green 600 lbs 175-249 lbs Oversize - XL Black 600 lbs
T015LXXF Extra
Large - XL
Blue 600 lbs 250-399 lbs Double
Oversize - XXL
Burgundy 1000 lbs
T015LXXXF Extra Extra
Large - XXL
Orange 1000 lbs 400-759 lbs Triple
Oversize - XXXL
Orange 1000 lbs
Bariatric Black 1000 lbs 800+ N/A N/A

Royal Victoria Regional Health Centre 23 Patient Handling Guidebook Barrie, Ontario Updated July 2020
Sling Sizing Guideline
REPOSITIONING SLING
NEW NAME PIPING MAXIMUM
WEIGHT Approximate
Patient Weight Range
OLD NAME OLD PIPING MAXIMUM WEIGHT
TO17LX Full
length mesh
or fabric Green 600 lbs 125-399 lbs Full length
mesh or fabric Green 600 lbs
TO17LXB Bariatric Black 1000 lbs 399-600 lbs Bariatric Black 1000 lbs

Royal Victoria Regional Health Centre 24 Patient Handling Guidebook Barrie, Ontario Updated July 2020
Patient Handling Algorithms
LATERAL TRANSFER (Lying) Algorithm (i.e. stretcher ↔ bed, stretcher ↔imaging/OR table)
Can patient
assist with lying
lateral
Allow Patient to assist as able
Assist as required keeping forces required to less than 35lbs for each
caregiver
Equipment options: • Rollboard • Slider Board
Can staff complete
lateral transfer and maintain force/effort
required to less than 35 lbs?
Ensure you have enough staff assisting to maintain forces of less than 35 lbs for
each caregiver
Equipment options: • Rollboard • Slider Board
Use Mechanical Lift (floor, portable ceiling or fixed ceiling)
Use sling
(combi, repositioning or amputee)
Use Air Pal
YESe
NO
YES
NO

Royal Victoria Regional Health Centre 25 Patient Handling Guidebook Barrie, Ontario Updated July 2020
Bed Repositioning Algorithm (i.e. up in bed, side ↔ side, turning)
Can patient reposition in bed without
physical assistance?
Allow patient time to reposition in bed.
Assist with repositioning pillows as needed.
Assist with positioning as needed (i.e. head of bed down to allow gravity to assist)
Equipment options: • Slider sheet • Slide tube • Overbed trapeze
Can staff assist with
repositioning and maintain force/effort
required to less than 35 lbs?
within
Allow patient to assist as able
Ensure you have enough staff assisting to maintain forces of less
than 35 lbs for each caregiver
Equipment options: • Slider sheet • Slide tube • Rollboard • Overbed trapeze
Use Mechanical Lift (floor, portable ceiling or fixed ceiling)
Use sling
Repositioning – for frequent use or large patients Combi – for infrequent use
Rollar bands – for turning only Amputee – for amputee patients
YES
NO
YES
NO
Is frequent repositioning
required?
YES
NO

Royal Victoria Regional Health Centre 26 Patient Handling Guidebook Barrie, Ontario Updated July 2020
Lateral Transfer (Sitting) Algorithm (i.e. chair ↔ chair, chair ↔ commode, sitting on side of bed ↔ chair/commode)
Can patient assist with
seated lateral
transfer?
Allow Patient to assist as able
Assist as required keeping forces required to less than 35lbs for each caregiver
Equipment options:
• Transfer Board with or without slider sheet/slide tube
YESe
NO
Use Mechanical Lift (floor, portable ceiling or fixed ceiling)
Use sling
(combi or amputee)
Can staff assist with
repositioning and maintain force/effort
required to less than 35 lbs?
Assist patient keeping forces required to less than 35lbs for each caregiver
Equipment options:
• Transfer Board with or without slider sheet/slide tube
NO
YESS
Royal Victoria Regional Health Centre 27 Patient Handling Guidebook Barrie, Ontario Updated July 2020
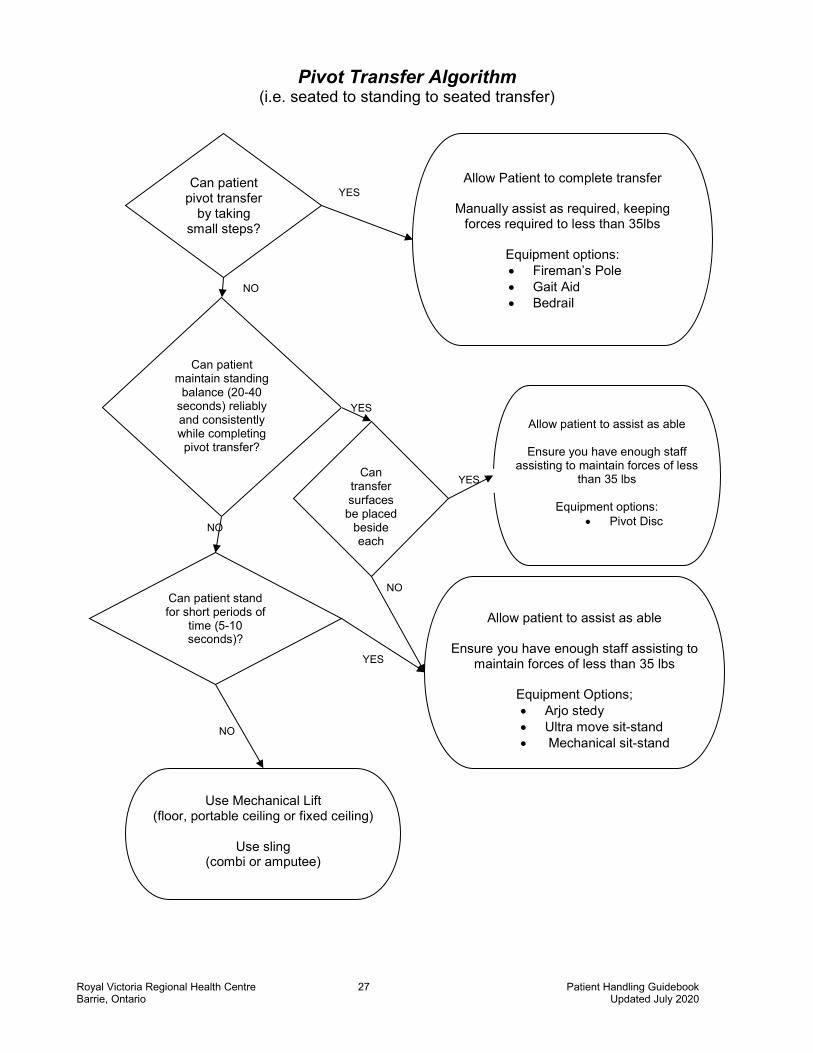
Pivot Transfer Algorithm (i.e. seated to standing to seated transfer)
Can patient pivot transfer
by taking small steps?
Allow Patient to complete transfer
Manually assist as required, keeping forces required to less than 35lbs
Equipment options: • Fireman’s Pole • Gait Aid • Bedrail
Can patient maintain standing
balance (20-40 seconds) reliably and consistently while completing pivot transfer?
Allow patient to assist as able
Ensure you have enough staff assisting to maintain forces of less
than 35 lbs
Equipment options: • Pivot Disc
Use Mechanical Lift (floor, portable ceiling or fixed ceiling)
Use sling
(combi or amputee)
YES
NO
YES
NO
Can patient stand for short periods of
time (5-10 seconds)?
NO
YES
Allow patient to assist as able
Ensure you have enough staff assisting to maintain forces of less than 35 lbs
Equipment Options; • Arjo stedy • Ultra move sit-stand • Mechanical sit-stand
Can transfer surfaces
be placed beside each
YES
NO

Royal Victoria Regional Health Centre 28 Patient Handling Guidebook Barrie, Ontario Updated July 2020
9. Examples of Procedures for Manual Repositioning/Transferring without Equipment
A. Repositioning a Patient in a Low Back Chair or Wheelchair with Two Caregivers You can use this procedure to reposition a patient who has slid forward in the chair or bent over the armrest of a chair or wheelchair and is unable to correct this posture. This procedure is suitable only for a chair with a low back or a removable back support. It is not suitable for a recliner chair.
1. One caregiver is the leader and the other is the assistant. 2. Explain to the patient what you are going to do and what they must do to help. 3. Lock the wheels of all equipment in use. 4. Remove the foot rests and the back/head rest where applicable. 5. Bend the patient's knees to approximately 80 degrees, if possible. Place the patient’s
feet slightly apart. 6. Remove the patient's seat belt or tray, where applicable. 7. Leader: Stand behind the chair and assume a bent knee walk stance. 8. Assistant: Stand in front of the patient and assume a bent knee walk stance. 9. Ask the patient to fold his/her arms. If he/she is unable to do this, assist him/her. 10. Leader: Stand behind the patient, lean them forward and grasp the patient's
forearms by placing your hands/arms under the patient's arms, between the patient's arms and chest.
11. Assistant: Place your arms under the patient's knees. 12. The caregivers should activate their core muscles. 13. Together count “1, 2, 3, up”. On the command “up”, the caregivers slide the patient
up/back in the chair using the muscles in their legs to power the movement. 14. Replace the footrests, seat belt, tray and back/head rest, where applicable. 15. Ensure the patient is comfortable, safe and well supported.
B. Repositioning a Patient in a Geriatric Chair with One Caregiver You can use this procedure to reposition a patient who has slid forward or bent over the armrest of a chair or wheelchair and is unable to correct this posture.
1. Explain to the patient what you are going to do and what he/she must do to help. 2. Lock the wheels of all equipment in use. 3. Bend the patient's knees approximately to 80 degrees, if possible. Place the patient’s feet slightly apart. 4. Remove the patient's seat belt or tray where applicable. 5. The caregiver should stand in front of patient with the knees bent slightly. The caregiver should brace his/her knees up against the patient’s legs. 6. The caregiver places his/her hands on the patient’s iliac crests. 7. Shift the patient’s buttock toward the back of the chair by raising one hip then the other (bum walk). Apply gentle pressure on the patient’s legs to assist in shifting him/her backward. Ask the patient to assist when possible. 8. Ensure that the patient is comfortable.

Royal Victoria Regional Health Centre 29 Patient Handling Guidebook Barrie, Ontario Updated July 2020
C. Getting a Patient to a Sitting Position You can use this procedure to reposition a patient from a supine to sitting position. This procedure requires one or two caregivers. 1. Explain to the patient what you are going to do and what he/she must do to help. 2. The caregiver(s) should be positioned at the patient’s shoulder level, facing the patient. 3. With the patient lying on his/her back, ask them to bend his/her hips and knees. If he/she is unable to do this, assist with the procedure. Ask the patient to roll on the side to face the caregiver. If he/she is unable to do this, assist by placing one hand on the back of the shoulder and the other one on the backside of the hip and gently assist them to roll toward the caregiver. Be careful not to pull on the arm of a stroke survivor. 4. Place one hand under the patient’s shoulder (the one that is against the bed) and the other one on top and behind the knees. Bring the knees and lower legs over the edge of the bed then place your hand on the patient’s hip. 5. Ask the patient to push down on the bed with the hand/arm that is up and to assist as able. 6. Together in one movement, pivot the patient into a sitting position. Support the patient throughout the procedure. Remain close to the patient. Support him/her from the shoulders until he/she is well balanced in the sitting position. 7. One can also use the assistance of the mechanical bed and raise the head of the bed as the lower legs are moved off the bed and the patient is moved to sitting. D. Getting a Patient from Sitting to a Standing Position You can use this procedure to reposition a patient from a sitting to a standing position. This procedure requires one or two caregivers. 1. Explain to the patient what you are going to do and what he/she must do to help. 2. Position the bed so that the patient’s feet are flat on the floor. Facing the patient, ask him/her to move to the edge of the bed. If the patient is unable to do this, assist him/her to move as close to the edge of the bed or chair as possible. The patient can do this by alternatively moving his/her buttocks (bum walk). Support the patient through the procedure. 3. Ensure that the patient's knees are bent 80°- 90°. 4. The caregiver should face the patient and block his/her weaker foot or both feet. To block the patient’s foot/feet, the caregiver should place their feet in front or on either side of the patient’s foot/feet. The caregiver should block the patient's knee(s) with their knees on either side of the patient’s. 5. The caregiver should place his/her hands around the patient's waist, above the sacrum area or under the buttocks. 6. Ask the patient to look up and place his/her hands on the caregiver’s forearms, shoulders, hips or push up from the bed if able. 7. On the count of three, the caregiver should assist the patient to straighten his/her hips and knees by gently putting pressure on the sacrum with his/her hands and blocking the patient’s knees with his/her knees. 8. To prevent the patient from losing his/her balance, the caregiver should ensure that the patient is standing straight up and is not leaning forward.

Royal Victoria Regional Health Centre 30 Patient Handling Guidebook Barrie, Ontario Updated July 2020
E. Pivot Transfer Using One or Two Caregivers You can use this procedure to transfer a patient under the following conditions: • patient is able to take small steps with both feet or hop on one leg • patient requires assistance to transfer to equipment (e.g., wheelchair, recliner, or commode
chair) This procedure requires two caregivers when the patient is unpredictable or requires more support/assistance, otherwise one is sufficient. Example Bed to Wheelchair: 1. Clear all obstacles from the path of the transfer. 2. Explain to the patient what you are going to do and what he/she must do to help with the procedure. 3. Ensure all necessary equipment is available, in good working order and the correct size. 4. Position the wheelchair parallel or at a slight angle to the bed on the side on which the transfer is performed, preferably the patient's stronger side if applicable. 5. Ask the patient to sit on the edge of the bed. If he/she is unable to do this, assist him/her to a sitting position (as above Getting a Patient to a Sitting Position). 6. Lock all wheels on the equipment in use. 7. Position the leg rests so that they do not interfere with the transfer. Leave the armrests in place. 8. Stand on the patient's weaker side facing the patient. 9. Stabilize the patient's weaker foot with your foot and the weaker knee with your knees, if necessary. If two caregivers are involved, have the other caregiver stand between the wheelchair and the bed. Grasp either side of the patient’s sacral area. 11. Support the patient around his/her hips. 12. Ask the patient to look up and lean forward and push up from the bed with his/her hands. 13. Count “1, 2, 3, stand.” On the command “stand,” stand up together. 14. Ask the patient to turn toward his/her stronger side by taking small steps. 15. Before the patient sits, ask him/her to reach back and grasp the armrests of the wheelchair if able. 16. Assist the patient to sit in the wheelchair. 17. Ensure the patient is comfortable, safe and well supported.

Royal Victoria Regional Health Centre 31 Patient Handling Guidebook Barrie, Ontario Updated July 2020
10. Standing Transfer Checklist Before proceeding with any patient handling activity check (EACH TIME): • If the patient is medically safe to move • The weight bearing status • That there are no precautions or restricted activity • The patient’s pre-admission mobility status ______________________________________ COGNITION: Can the patient… Understand and follow instructions appropriately and cooperatively? STRENGTH: Can the patient….
BALANCE: Can the patient…. Sit upright on the edge of the bed without help (when feet are flat on the floor)? If YES to above a standing transfer can be attempted.
Ambulation Checklist - if all above is ok then next:
Ensure the patient can maintain safe standing balance. Check if the patient can march on the spot. Proceed with choosing the correct gait aid using the gait aid decision tree.
In bed: lift each leg up off the bed and hold for 5 seconds?
In sitting: hold up each foot, knee straight for 5 seconds? OR

Royal Victoria Regional Health Centre 32 Patient Handling Guidebook Barrie, Ontario Updated July 2020
Is the patient able to use or does the patient require two arms for balance?
Does the patient need to use arms for support?
Does the patient need to use arms for support?
NO YES
Four wheeled walker or rollator
Front-wheeled walker with auto-
stops
Front-wheeled walker
Standard walker
Offset Cane
Quad Cane
Hemi Walker
Standard Cane
OccasionallyNo Constantly No Occasionally Frequently ConstantlyFrequently
Gait Aid Decision Tree* assumes all patients are AAT and are able to weight bear fully through both arms and legs
* if in doubt choose the standard walker (no wheels) and get a physio consult
* Weight capacity for most equipment is 250lbs* for all gait aids, handle should be at wrist level when the patient is standing straight
10. Gait Aid Decision Tree

Royal Victoria Regional Health Centre 33 Patient Handling Guidebook Barrie, Ontario Updated July 2020
Patient Mobility and Equipment Decision Algorithm
Will patient be moved in lying on/to/from a surface of
the same height (e.g. reposition in bed, bed to
stretcher, etc.)?
Patient Mobility and Equipment Decision Algorithm
Can patient weight bear through at least one leg and both arms or both legs?
ANDCan the patient follow and
understand directions?
Before proceeding with any patient handling task:• Ensure the patient is medically safe to move• There are no precautions or restricting activity orders (e.g., hip precautions, weightbearing
restrictions, bed rest orders, etc.)
Is there enough assistance
from the patient and/or staff to maintain each
staff’s effort to less than 35 lbs?
Does the patient have good sitting balance?
Does the patient have sufficient arm and leg range of
motion?
Does the patient have sufficient
strength to allow safe transfer?(i.e. straight leg raise or
leg extension in sitting)
Can patient maintain standing balance
(20-40 seconds) reliably and consistently while completing
pivot transfer?
Does the patient have enough strength to take steps and maintain standing
balance reliably?
SLIDING DEVICE PROCEDURE
• Slider board• Slider tube• Roller board
With at least 2 care providers
MECHANICAL LIFT PROCEDURE
Use appropriate sling and at least 2 care providers
TRANSFER PROCEDURE
• Sara Plus• “Sally sit-stand”
YES YES
NO
NO
YES
YES
YES
NO
NO
YES
YES
NO
YES NO
NO
TRANSFER PROCEDURE• Fireman’s pole• Gait aid (rollator, walker,
cane * see Gait Aid Decision Tree to assist with decision)
• Staff also need to determine assistance of 1-2, supervision or independent
TRANSFER PROCEDURE
• “Sally sit-stand”• Pivot disc
NO

Royal Victoria Regional Health Centre 34 Patient Handling Guidebook Barrie, Ontario Updated July 2020
SAFEMOB Project- Mobility Assessment Tool
This tool was created to guide physiotherapists with respect to mobilizing acute patients. It is relevant to all front-line clinical employees.
safe prescription of mobilizing patients.p
BARIATRIC PATIENT CONSIDERATIONS When completing patient handling tasks with bariatric patients, the same principles apply. Specifically, caregivers need to consider the amount of assistance the patient requires and always obtain the equipment and assistance needed in order to maintain their physical exertion below 35 lbs/16 kg to meet best practice. There are bariatric ceiling lifts available throughout the building that have a weight capacity of 750lbs. These are available on Surgery 3 room #5, ICU room #17, Specialized Senior’s Care room #22 and room #6 Cancer Palliative, Respiratory and the Cardiac Renal units. These lifts have the power traverse feature. Room 6 on Cancer Palliative, Respiratory and the Cardiac Renal units all have access to appropriate load limits for visitor chairs and patient toilets. Bariatric Beds are available and can be accessed by contacting the PT/OT or Resource Nurse on the unit.

Royal Victoria Regional Health Centre 35 Patient Handling Guidebook Barrie, Ontario Updated July 2020
PATIENT HANDLING EQUIPMENT INFORMATION SHEET
WALKERS *Weight capacity can vary- look for label or assume lowest weight capacity
Standard Walker
250-300 lbs.*
Two Wheeled Walker (2WW)
250-300 lbs.*
Four Wheeled Walker (4WW)
250-300 lbs.*
Rollator Walker
250-330 lbs.*
Platform Walker
330 lbs.
RoWalker 400 ** ICU ONLY**
400 lbs.
TRANSFER EQUIPMENT Pivot Disc
300 lbs.
Ultra- Turn
350 lbs.
Sara Stedy
265 lbs.
Ultramove (‘Sally’)
375 lbs.
Liko RollOn ** ICU ONLY**
350 lbs.
Sara Plus
420 lbs. LIFTS

Royal Victoria Regional Health Centre 36 Patient Handling Guidebook Barrie, Ontario Updated July 2020
Ceiling Lift (Portable)
600 lbs.
Ceiling Lift (Fixed)
600 lbs.
Bariatric Lift (Fixed)
( with Power Traverse)
750 lbs.
Floor Lift
600 lbs.
Unit – room # Can Pal - #6 Cardiac Renal -#6 Resp - #6 Surgery 3 - #5 ICU - #17 SSC - #22
OTHER HOSPITAL EQUIPMENT Patient Recliner (AGM Medical)
300 lbs.
Patient Recliner (Hill Rom Art of Care)
300lbs.
Champion Recliner (with foot tray)
300 lbs.
(seat width 22.75”)
Standard Commode
400 lbs.
Visitor Chair (With/Without Armrests)
(Widths vary 18”to 26”)
500 lbs.
Transport Chair (Staxi)
600 lbs.
Wheelchair- Logistics (Airgo ProCare IC)
(Widths: 18” and 20”) 300 lbs.
BARIATRIC EQUIPMENT Bariatric crutches
1000 lbs.
Broda Bariatric Commode/Shower Chair
650 lbs.
Bariatric Rollator Walker
440 lbs.
Bariatric Wheelchair
600 lbs.

Royal Victoria Regional Health Centre 37 Patient Handling Guidebook Barrie, Ontario Updated July 2020
Bariatric Recliner Chair
660 lbs.
(long handle to recline)
Motorized Bariatric Lift Chair/Recliner
750 lbs.
Bariatric Champion Recliner
500 lbs.
(seat width 26.75”)
BEDS BARIATRIC BEDS
Call logistics to obtain REGULAR BEDS
Compella Bariatric Bed
1000 lbs.
Total Care Bariatric Plus
500 lbs.
Centrella bed
650 lbs.
Versa Care
500 lbs.
Clinitron
350 lbs.

Royal Victoria Regional Health Centre 38 Patient Handling Guidebook Barrie, Ontario Updated July 2020
For more information on beds search “Wound Care Resource Binder” in Sharepoint, see pages 63-65.

Royal Victoria Regional Health Centre 39 Patient Handling Guidebook Barrie, Ontario Updated July 2020
References
Guideline for nursing homes, Ergonomics for the prevention of Musculoskeletal Disorders,
Occupational Health and Safety Administration (OSHA). Health Care Health and Safety Association’s “Handle with Care Clinical Nursing Skills and
Techniques”. Perry and Potter, Sixth Edition, Chapter 10. Lakeridge Health, Musculoskeletal Injury Prevention (MIPP) Policy and Procedures, June 2015 Peterborough Regional Health Care Centre Quick Reference Sheets, 2009. SAFEMOB Project. http://physicaltherapy.med.ubc.ca/physical-therapy-knowledge-broker/safemob-project/ Accessed March 28, 2017 Safe Patient Handling Training for Schools of Nursing Curricular Materials, Thomas R.
Waters, Ph.D., (NIOSH), Audrey Nelson, Ph.D., (VHA), Nancy Hughes, Ph.D., (ANA), Nancy Menzel, Ph.D., (University of Las Vegas, NV), 2009.
Southlake Regional Health Centre Minimal Lift Safe Lifting Program (SLP) Learning Package,
version May 2007. The Ottawa Hospital. Save Your Back – A Guide to Safe Patient Handling. Transfer Assist Devices for Safer Handling of Patients, A guide for Selection and safe Use,
Worksafe BC, Workers’ Compensation Board of BC. Waters T. (2007) When is it safe to manually lift a patient? American Journal of Nursing. Vol.
107(8): 53-59. Waters, Ph.D., (NIOSH), Audrey Nelson, Ph.D., (VHA), Nancy Hughes, Ph.D., (ANA), Nancy
Menzel, Ph.D., (University of Las Vegas, NV), 2009.