payables - epicor · payables documentation updates date description where changed 7/19/04 a new...
TRANSCRIPT

PAYABLES DOCUMENTATION UPDATES Date Description Where Changed
7/19/04 A new Sort Options window appears to sequence vendor invoices by vendor invoice number, PO number, or invoice date when you browse vendor invoices on the Edit/Delete Payables screen.
New PowrDrill options have been added to the View Payables screen. You can now sequence vendor invoices by vendor invoice number, purchase order number, or invoice date.
In the “Payables” chapter, in the “Edit or Delete a Payable” section (page 37)
In the “Payables” chapter, in the “View Payables” section (page 74)

PAYABLES EXTERNAL DISBURSEMENTS
AYABLES

iii
The documentation in this publication is provided pursuant to a Sales and Licensing Contract for the Prophet 21® System entered into by and between Prophet 21 and the Purchaser to whom this documentation is provided (“License Agreement”). In addition, the licensed software to which this documentation refers may be supported in accordance with a customer support agreement by and between the same parties (“Support Agreement”). All warranties, conditions of use, transfer restrictions, and other provisions in the License Agreement or Support Agreement which are applicable to Licensed Software, are applicable to this publication. In addition, this publication may include inadvertent technical inaccuracies or typographical errors for which Prophet 21 is not responsible. Changes may be periodically made to this publication; these changes will be incorporated in new editions of the publication. Any questions about the material contained in the publication should be addressed to the Prophet 21 Customer Support Department at http://customer.p21.com.
Nothing in this statement amends or extends the terms of your agreement with Prophet 21, including any warranties that might be included in our products. Warranties for such agreements are set forth in your agreement with Prophet 21.
Improvements and/or changes to the Licensed Software described in this publication may be made by Prophet 21 at any time without notice.
DOCUMENTATION CONVENTIONS ♦ The eyeglass symbol (�) indicates a field on which you can browse. ♦ The star (�) indicates the default for a field. ♦ To allow for the widest possible parameters when printing a report or performing a
function, accept the defaults for all of the parameter fields. To accept the defaults, either escape through all the fields, or press [Enter] without specifying any values. Generally, samples in the documentation are shown using the default values.
♦ Start and End parameters define the limits to a range of information you will print on a report. If information does not appear on a report, it may be because the information was excluded from the Start, End range.
♦ For a detailed explanation on how maintenance screens function, refer to the Tour Guide manual.
♦ Use the search tool in Adobe Acrobat Reader 4.05c or higher to find which manual describes a specific module, job, or function.
7/22/04
Prophet 21 Acclaim Version 15 The Prophet 21 System and Prophet 21 Acclaim are registered trademarks, and Prophet 21 and ScratchPad are trademarks of Prophet 21.
All other trademarks and registered trademarks are the property of their respective companies.

iv
Table of Contents
1 PAYABLES ______________________________________________________ 6
A Payables Snapshot _________________________________________________ 7
Getting Started ______________________________________________________ 8 Answers to Commonly Asked Questions _________________________________ 8 XL vs. Acclaim ____________________________________________________ 10 How Payables and Ledger Work Together ______________________________ 11 Converting Payables _______________________________________________ 12 Going Live on Acclaim Payables (New Users)____________________________ 14 Setting Up the User Options__________________________________________ 16 Company Options _________________________________________________ 17 Branch Defaults ___________________________________________________ 22 Vendor Options ___________________________________________________ 23 Days Instead of Dates ______________________________________________ 28
Step-by-Step _______________________________________________________ 29 STEP 1: Entering Invoices into the System______________________________ 29 To Enter a Credit __________________________________________________ 37 To Enter a Quick Check _____________________________________________ 38 To Enter a Recurring Invoice _________________________________________ 39 STEP 2: Printing the Expense Journal _________________________________ 41 STEP 3: Printing the Payables Due Report______________________________ 43 STEP3-B: Printing the Payables Due Report ____________________________ 45 STEP 4: Releasing Payables ________________________________________ 45 STEP 5: Printing the Anticipated Cash Disbursement Report________________ 52 STEP 6: Printing Payables Checks and Check Register____________________ 53 STEP 7: Printing the Unreconciled Check List and Reconciling Checks________ 62 STEP 8: Viewing Information ________________________________________ 72 STEP 9: Purging Information from the System ___________________________ 84
Reference Information________________________________________________ 85 The Management Reporting Options ___________________________________ 85 How to Use the Security Options ______________________________________ 87 Balancing Payables ________________________________________________ 88 Troubleshooting Payables ___________________________________________ 89 Closing Procedures ________________________________________________ 89
Glossary __________________________________________________________ 91 Glossary of Terms _________________________________________________ 91

v
Glossary of Fields _________________________________________________ 94
Appendices ________________________________________________________ 99 Appendix 1: How to Reconcile Material Receipts and Vendor Returns and Print the Payables Discrepancy Journal________________________________________ 99 Appendix 2: How to Confirm Direct Shipments __________________________ 115 Appendix 3: How to Pay Vendors by Credit Card ________________________ 120 Appendix 4: Material Received After Payable Entry ______________________ 130
2 EXTERNAL DISBURSEMENTS ____________________________________ 162 Company-Wide vs. Payables Group: Overview __________________________ 162
Date and Cash Account Number Entry __________________________________ 163
Main Menu _______________________________________________________ 164
Enter External Cash Disbursements ____________________________________ 164 Posting Screen___________________________________________________ 165
Reconcile Checks __________________________________________________ 166 Reconcile a Check ________________________________________________ 166 Reconcile a Range of Checks _______________________________________ 167 Print a List of Unreconciled Checks ___________________________________ 168
Print a List of Checks That Have Been Issued ____________________________ 169
Print a Daily External Cash Disbursements Journal ________________________ 169 Daily External Cash Disbursements Journal: Sample _____________________ 170 Daily External Disbursements Expense Summary: Sample_________________ 171
Print a Monthly External Cash Disbursements Journal ______________________ 171 Monthly External Cash Disbursements Journal: Sample ___________________ 172 Monthly External Disbursements Expense Summary: Sample ______________ 173
Set External Disbursements Defaults ___________________________________ 174
Appendices _______________________________________________________ 175 Appendix 1: Closing Procedures _____________________________________ 175

6
Before you begin using the PAYABLES module, it is important that you read the “Getting Started” section of this manual. “Getting Started” includes information on the following:
♦ Answers to commonly asked questions ♦ Major differences between XL and Acclaim™ PAYABLES ♦ The PAYABLES interface ♦ How PAYABLES and LEDGER work together ♦ Going Live on PAYABLES ♦ Converting XL Payables to Acclaim PAYABLES ♦ Setting up the User Options
Once you have read Getting Started and followed the instructions contained in that section, you are ready to read the “Step-by-Step” section. This section is a guide to how to use the PAYABLES module and explains how to perform the following steps:
♦ Entering an invoice ♦ Printing the Expense Journal ♦ Printing the Payables Due Report ♦ Releasing payables ♦ Printing the Anticipated Cash Disbursement Report ♦ Printing checks and the Check Register ♦ Printing the Unreconciled Check List and reconciling your checks ♦ Purging information from the system
The steps included in the “Step-by-Step” section are the steps PAYABLES users usually take to move a vendor invoice through the system. Remember, you may find that you need to customize the suggested process to suit the needs of your business.
Note: There are two appendices found at the back of the “Step-by-Step” section, both providing detailed information on PAYABLES features some users choose not to use. It is for this reason that these two features (Material Receipts Reconciliation and Confirm Direct Shipments) were not included as steps in the “Step-by-Step” section. If you plan on using either or both of these features, you should read these appendices.
The “Step-by-Step” section does not cover all of the things you can do in the PAYABLES module, only the steps that you must complete to move the vendor invoice through the system. PAYABLES also provides the ability to print many other reports and journals, to view historical and current information, and to set up security for each user on your system. The “Reference Information” section of this manual contains information on these areas of PAYABLES.
AYABLES

1 PAYABLES
7
PAYABLES
Finally, this manual contains two glossaries: a Glossary of Terms that are commonly used in Accounts Payable, and a Glossary of Fields that exist in the PAYABLES screens. These two glossaries are followed by an Index. You can use the glossaries and Index to obtain quick answers to any questions you have about a field, a term, or a particular option.
A PAYABLES SNAPSHOT The PAYABLES module was designed to organize your company’s vendor invoices and to generate and print checks as payment against those invoices. This document provides you with detailed examples of how, when, and why to use each option in the PAYABLES module. The diagram below traces the steps you take to move a vendor’s invoice through the PAYABLES process.
Each step shown in this diagram is explained in detail in the section labeled “Step-by-Step.”
�It is important to note that the steps shown in the diagram are listed in a suggested order. You may find that you need to customize the process to suit your needs.
Enter Vendor’s Invoice
Print the Expense Journal
Print the Payables Due Report
Release Payments
Print the Anticipated Cash Disbursements Journal
Print Checks and Check Register
Print the Unreconciled Check List and Reconcile Checks
Confirm Direct Shipments **
Reconcile Material Receipts and Print the Discrepancy Journal *
Unrelease Payments
Purge Committed History from the System
Void Checks
* - see Appendix 1
** - see Appendix 2

1 PAYABLES
8
PAYABLES
GETTING STARTED
ANSWERS TO COMMONLY ASKED QUESTIONS The following pages show questions that are commonly asked about the PAYABLES module and their answers.
1. Can you reconcile a receipt or return more than once?
Only if you are reconciling the receipt/return in multiple parts. When you are reconciling part of a receipt/return, you set the Complete? field in the Material Receipts Reconciliation/Vendor Confirmation Reconciliation screen to No. The Complete? field is only set to Yes when you reconcile the entire receipt/return or the final part of the receipt/return. Once the Complete? field is set to Yes, the receipt/return cannot be reconciled any further.
2. Can you test print a check?
Yes. Using the Check Print options, you can test print an actual check to make sure that your checks are lined up, etc. When you test print a check, that check is automatically voided.
3. Can you edit incorrect payable amounts or payables that have been allocated to the wrong G/L accounts?
Yes. As long as you haven’t released the payable or posted the payable by committing the Expense Journal, you can edit the payable amount and the G/L allocation accounts using the Edit/Delete Payable option.
4. Can you void printed checks?
Yes. You can void any check, even those that have been committed on the Check Register.
5. Can you enter dollar discounts instead of percentage discounts?
Yes. You can enter discounts as either dollar amounts or percentages when entering or editing payables. In addition, discounts can be applied to portions of an invoice amount, and these portions of the invoice amount can then be allocated to specific G/L accounts, allowing you to indirectly apply discounts to specific accounts.
6. Can you reconcile a range of checks?
Yes. Using the Check Processing options, you can reconcile a range of checks.
7. Can you change vendor discounting terms from within the PAYABLES module?

1 PAYABLES
9
PAYABLES
Yes. When entering or editing payables, you can edit the payee information, which includes the vendor discounting terms, address, etc. However, these changes apply only to the payable being entered/edited.
8. What reports are used to determine what payables are (were) due on a given day?
The Payables Due Report tells you what open payables are due by a specific date, and the Payables Open Detail Report tells you what payables were due on a specific date for which checks were not printed.
9. How do I release credit payables?
First you enter the credit payable. Because the system will not write negative checks, the system holds the credit payable until you have entered regular payables that equal or exceed the credit payable(s) amount. Once the credit payable(s) amount is offset by a regular payable(s) amount, you can release both the credit and debit invoices, and the system will allow you to print a check for the difference.
10. How do I handle vendor rebates?
The easiest way to handle vendor rebates is to set up a G/L Rebate Account, and then allocate vendor rebates to this account during the payables entry process.
11. Can I perform Direct Ship Confirmation before entering a payable for the Direct Ship invoice?
Yes. Since Direct Ship Confirmation and New Payables Entry are separate steps under the Invoice Processing Options, if a customer notifies you of receipt of Direct Ship material before you receive the corresponding vendor invoice, you can still go ahead and perform Direct Ship Confirmation.
12. Can I perform Material Receipts Reconciliation as a separate step from New Payables Entry?
Yes. Since Material Receipts Reconciliation and New Payables Entry are separate steps under the Invoice Processing Options, you don't have to Reconcile Material Receipts in the same step as New Payables Entry. In order to reconcile via the menu option, the vendor invoice must already be entered in the system against the desired PO.
13. Will non-stock and direct ship cost changes update the customer’s order?
Yes. The Company, Inventory Control option called "Non-stock Cost Update Options" dictate non-stock cost changes. This determines whether cost edits for non-stock direct ship (DS), local pick-up (LPU) or backordered items that are made in either Exp-purchase, Purchase or Payables update the order cost for these non-stock items.
Similarly, there is a Company, Inventory Control option called "Cost DS Items via PO Options" which dictates which cost is used for direct ship (DS) stock items on customer orders. You may allow the normal order costing hierarchy for your DS stock items, or you may pass on your special PO cost to the customer for direct ship items.

1 PAYABLES
10
PAYABLES
14. Will my JCMs work with Acclaim?
No. JCMs cannot access any Acclaim module. They must be modified.
15. Is the NOTEPAD module integrated with Acclaim?
No. Not at this time.
SAMPLE REPORTS & JOURNALS
The Accounting Reports and Journals manual provides you with reference information about all of the forms, reports, and journals that can be printed within the Ledger, Payables, and Receivables modules. A sample is shown for each form, report, or journal. A description of each column is provided (including what kind of information can be shown within it).
XL VS. ACCLAIM
MAJOR DIFFERENCES BETWEEN XL AND ACCLAIM PAYABLES
This section outlines the major differences between XL and Acclaim PAYABLES. If you are a Prophet 21® user who has worked with XL Payables, you should read this section before you begin using Acclaim PAYABLES.
1. When entering a vendor invoice in Acclaim PAYABLES, the system does not automatically generate a payable number as it did in XL. In Acclaim PAYABLES, the key to identifying a vendor invoice is the combination of the Vendor Code and the Vendor Invoice Number. In XL, users would write the system generated payable number on the invoice to show that it had been recorded in the system. It is now up to the user to determine another method of indicating whether or not a vendor invoice has been entered. One way to do this might be to stamp each invoice with a date, indicating when the invoice was entered. The Allow Duplicate Invoice#s is a Payables company option that, depending on the setting, either prevents you from entering a duplicate invoice number for the same vendor, or allows you to enter a duplicate invoice number by displaying the word DUPLICATE on the invoice.
When the Allow Duplicate Invoice#s is set to Yes, the system displays a DUPLICATE message next to the invoice date field on the New Payable screen, when you enter a payable with the same invoice number as another payable for the same vendor.
When the Allow Duplicate Invoice#s is set to No, the system displays the following message: “Vendor invoice# already in use; please enter a unique invoice#” when you enter a payable with the same invoice number as another payable for the same vendor. You cannot continue until you enter a unique invoice number.
2. When entering a vendor’s invoice in Acclaim PAYABLES for a purchase order, note that the system uses the External PO Number as the default Vendor Invoice#. This can be overridden. If there is no External PO Number, the system uses the date and time as a default.

1 PAYABLES
11
PAYABLES
3. In Acclaim PAYABLES, there is no longer a sequential “system generated” check number. The system now uses the MICR sequence number found printed on your checks as the check number. The first time you print checks for a particular account, specify the starting MICR sequence number in order for it to be correctly recorded on the Check Register, Unreconciled Check List, etc. Once you have printed checks for a given cash account, the system knows to default to the next number in the sequence.
4. Acclaim PAYABLES does not have a Daily or a Monthly Expense Journal. Instead, the Expense Journal is maintained perpetually. At the end of your accounting period, you can commit a range of entries on the Expense Journal so that your Expense Journal Autobatch is created. Prophet 21 does not suggest committing the Expense Journal on a daily basis, since that limits the ability to edit and delete the payable.
5. In Acclaim PAYABLES, there is no longer a need for the MP (Multiple Payable) feature. Use the Recurring Invoice feature, available from the Invoice Processing menu, in its place.
6. In Acclaim PAYABLES, there is no longer a need for the Auto Accrual feature that was available in XL Payables. Instead, you can specify a posting date in a prior month to handle payables that belong in the previous accounting period. When the Expense Journal is committed, for example, a batch is created for each period for which the system finds expenses entered.
7. In Acclaim PAYABLES, default Ledger account numbers can be set up on a Vendor-Branch, Vendor, Branch, Group, or Company-wide basis.
HOW PAYABLES AND LEDGER WORK TOGETHER PAYABLES is fully integrated with the Ledger to handle all of your payables processing needs. The following reports have the ability to autobatch to the Ledger: The Expense Journal, the Check Register, the Payables Discrepancy Journal, and the Unreconciled Receivings List.
The Expense Journal
The Expense Journal is used to record the accounting entries that will create the payable on the General Ledger. Specifically, when entering a vendor invoice, you would need to debit your Inventory account or your Expense account, and credit the Payables account. At the end of the accounting period, you have the ability to create autobatches for all of the entries on the Expense Journal for a specific range of posting dates. The Ledger allocations from the Expense Journal override those autobatch defaults.
The Check Register
The Payables Check Register is used to record the changes in your Cash and Payables accounts when you print checks. Specifically, you would debit the Payables account for the chosen entries on the Check Register and credit the appropriate Cash and Discount accounts.
The Voided Check Register
The Voided Check Register is used to record voided checks. When the Voided Check Register is posted to the Ledger, reversing entries are created for any checks that were previously posted and appear on the Voided Check Register.
The Payables Discrepancy Journal

1 PAYABLES
12
PAYABLES
The Payables Discrepancy Journal is used to record the difference between the Material Received amount and the vendor invoice (if Material Receipts Reconciliation is enabled). It is also used to record the difference between the Vendor Return amount and the vendor confirmation. Depending on the sign of the discrepancy, the appropriate Inventory account, as well as the Payables Discrepancy account, could be debited or credited.
The Unreconciled Receivings List
The Unreconciled Receivings List is used to record the value of material that was received into the system for which there has been no vendor’s invoice entered. Depending upon how you choose to handle payables at month-end close, the value on this report can be used to debit your Inventory account and credit an Accrued Payables account when the entries on the report are committed. it is important to note that when the Unreconciled Receivings List autobatch is posted, the system creates a reversing entry in the following accounting period. This is due to the fact that you will be entering in the vendor invoices for those payables during the following period.
CONVERTING PAYABLES
XL TO ACCLAIM PAYABLES: STEPS TO A SUCCESSFUL CONVERSION
Follow these directions to ensure a successful conversion from XL to Acclaim PAYABLES. Remember, the best time to convert your system is at the end of the accounting period, because most of the reports and journals that you are required to print and clear for the conversion are empty anyway.
Progress Version 7 must be loaded on the system in order to perform the conversion.
1. Make a total copy of your system. Save this tape. If something goes wrong during the conversion process, Prophet 21 will need it to fix the problem.
2. Print and clear the Daily Expense Journal.
3. Print and clear the Monthly Expense Journal. Run the report in both PAYEE and ACCT# sequence.
4. Print and clear the Daily Auto Accrual Journal.
5. Print and clear the Monthly Auto Accrual Journal. Run the report in both PAYEE and ACCT# sequence.
6. Print and clear the Payables Discrepancy Journal (if enabled)
7. Print the Cash Disbursements Journal to make sure that there are no unprinted checks. If there are, print them. Unprinted checks cannot be converted and will be lost.
8. Print and clear the Payables Check Register.
9. If Check Reconciliation is enabled, print a Check Reconciliation list. Unreconciled check information cannot be converted and will be lost. The hard copy of the Check Reconciliation list is needed to reconcile checks on XL Payables after the conversion.

1 PAYABLES
13
PAYABLES
10. Print a Payables Due Report using the default parameters to make certain that every open payable is included on the report. You will use the hard copy of this report to make sure that all of your payables converted to Acclaim.
11. Print the Unreconciled Receivings Report. You will use the hard copy of this report to make sure that all unreconciled receivings converted to Acclaim.
12. Print and clear the Unreconciled Receivings Auto Accrual Journal.
13. Enable the Acclaim PAYABLES feature in the COMPANY Accounting Options.
14. You are now ready to convert to Acclaim PAYABLES. The system must be running and the servers must be stopped. Run the job PROSHUTDOWN to stop the servers. Run the job P21PRO-AP to convert to Acclaim PAYABLES.
15. Once the conversion is complete, run PROSTARTUP at the Job prompt to start the servers.
16. Set up the Company G/L defaults. See page 17 for more information.
17. In Acclaim PAYABLES, print the Payables Due Report with the parameter screen set up as shown:
Check the Acclaim Payables Due Report against the XL Payables Due Report. If the two reports do not match, call Prophet 21.

1 PAYABLES
14
PAYABLES
18. In Acclaim PAYABLES, print the Unreconciled Receivings Report with the parameter screen set up as shown below:
Check the Acclaim Unreconciled Receivings Report against the XL Unreconciled Receivings Report. If the two reports do not match, call Prophet 21.
Note: Run P21-PAYABLE to view all payable history that existed prior to the conversion. Any partial payment made in XL PAYABLES appears with conversion batch ZZZZZZZZZZZZ in Acclaim PAYABLES.
CONVERSION DUMP ACCOUNT
When XL payables are converted to Acclaim payables, the system creates a conversion dump account to which is posted the XL payables amounts. The account number of this conversion account consists of all Xs, Ys, or Zs. This account appears in the Cash Disbursements autobatch and on the Cash Disbursements Report. Before posting to the Ledger, the autobatch should be edited so that postings are made to the proper AP accounts. This account appears in the Cash Disbursements autobatch until all XL payables are paid.
Notes: Remember to continually edit this account until all XL payables are paid.
Do not use conversion dump accounts as default accounts in Payables. Only valid account payable accounts should be used as default accounts.
GOING LIVE ON ACCLAIM PAYABLES (NEW USERS) The following steps are only necessary for new users who have not had data converted and were not previously on XL Payables. If you have had data converted, or if you were previously on XL Payables, do not follow these instructions. Instead, proceed to the “Setting Up the User Options” section on page 16.
1. If your company has been experimenting with the Acclaim PAYABLES package before going live, it is important that you run a job to clear this “play” data from the system.

1 PAYABLES
15
PAYABLES
The instructions below describe how to reset Acclaim PAYABLES completely. All data, G/L Default Accounts, and Payables Company Options will be cleared when you perform these steps.
A. Run the job PROSHUTDOWN to shut down the servers. The system must be running (UTILITY COMMAND...GO).
B. Run the job P21PRO-AP. The system will prompt you to proceed with the reset. Enter an Y at this prompt.
C. After the reset is complete, run PROSTARTUP at the Job prompt to turn the servers on.
2. The next step is to disable the autobatch defaults in the Ledger that create batch entries for the Payables Expense Journal. To do this, edit the Autobatch? field in the A/P Expense Autobatch Defaults screen to say No:
+----------------------- A/P EXPENSE AUTOBATCH DEFAULTS -----------------------+ | Default Level: Company Autobatch?: No Exclude?: No | | Branch/Group: Batch Number: 0000000 Source: EXP | | | | Desc: A/P Expense autobatch created %date% | | | | | | | | Account # | | A/P: 00-00-000-000 | +------------------------------------------------------------------------------+
You might have to do this in several places if you have different autobatch defaults set up for different branches or groups.
3. The next step is to separate the payables that you have into two groups:
A. Invoices that have already been entered and posted to the Ledger on your prior system.
B. Invoices that have not been entered at all on your prior system.
4. Enter those vendor invoices in group A (those that were posted to the Ledger on your prior system), into Prophet 21 Acclaim PAYABLES. Be sure to use the same Ledger account numbers as you used in the prior system. This is important because even though you are not going to be posting these payables to the Prophet 21 Acclaim Ledger (you’ve already posted them to your prior ledger), PAYABLES will allow you to view history for these payables. Entering them with the proper account numbers will ensure that the history for these payables is accurate.
5. Print a Payables Due Report. If the totals on the report do not match the open accounts on your prior system, use the Edit/Delete Payable option to fix the mistakes.
6. Once your payables are in balance, print the Expense Journal, in both ACCT# and PAYEE sequence, with the remaining parameters set to the default values, Q-MODE on, and the Commit? field set to YES. Note that no autobatch will be created when you do this (because you disabled the Expense Journal Autobatch Defaults in step 1), and that there is no need for one, because these payables were already recorded in your prior Ledger.

1 PAYABLES
16
PAYABLES
7. Go back into the A/P Expense Autobatch Defaults screen in the Ledger. Edit the Autobatch? field to show Yes.
8. You can now enter the new invoices (those in group B).
SETTING UP THE USER OPTIONS The PAYABLES User Options control how the module functions, what default information is entered automatically into fields throughout PAYABLES, and which optional features are enabled. During many procedures, the system refers to the defaults and choices you set up here. Because of this, the User Options should be set up before any work in PAYABLES occurs.
The purpose of entering defaults is to reduce the amount of work that you have to do by reducing the number of times you have to type in “common” entries (such as account numbers or entry/batch IDs). You can override the default responses and default accounts you set up on any of these levels when you are using the PAYABLES module itself.
The User Options are set up on six different levels: Company, Group, Branch, Vendor, Vendor/Branch and Session. When the system is looking for default information, it searches these levels of defaults in the following order.
Session Defaults
Vendor/Branch Defaults
Branch Defaults
Group Defaults
Company Defaults
Vendor Defaults

1 PAYABLES
17
PAYABLES
COMPANY OPTIONS The Company Options determine which features are enabled in the Payables module. You can also set up the broadest level of default Ledger accounts.
Payable Group Processing . . . determines if payables can be viewed on a group wide or company wide basis.
★ Yes - the system “separates” the payables entered for different payables groups. When this option is set to YES, you must set up G/L Defaults under the Group options. No - the system does not separate payables by group, but instead allows company-wide access to payables.
Direct Bill . . . determines if the Direct Bill option is enabled.
★ YES – the Direct Bill feature is enabled and you can record direct ship customer orders. A receivable is not created for orders where your vendor invoices your customer directly for material. NO – the Direct Bill feature is not enabled and the system will create an invoice for all confirmed direct ships.
Unique Entry ID . . . determines if you need a unique entry ID to enter payables. YES – payables must be entered with a non-existing Entry ID.
★ NO – payables can be entered using existing Entry IDs
Entry ID . . . Entry IDs are used to identify and gather together groups of

1 PAYABLES
18
PAYABLES
payables. You are prompted to enter an Entry ID each time you enter a payable.
Check Reconciliation . . . determines if the Unreconciled Check List option under the Management Reporting menu is enabled and accessible.
Check Stub Detail Report . . . determines how additional check details print. Yes – all details that do not fit onto a first check stub are consolidated into a Check Stub Detail Report, which should be printed each time checks are printed.
★ No – details that do not fit onto the first check stub are printed on the next check stub. The check is printed with an amount of zero and it is voided in the system.
Company Header on Check . . . determines how much company information prints on checks. ★ Yes – the company header (which is the company name and
address taken from the company information record) is printed on all PAYABLES checks. No - the company header is not printed on PAYABLES checks.
Check # on Check . . . determines if check numbers print on each check. ★ Yes – the check number is printed on PAYABLES checks.
No – check numbers do not print on PAYABLES checks. This setting is intended for users who have checks preprinted with check numbers, to prevent the unnecessary duplication of the check number on the check.
Check Format . . . determines the size of the check printed. A – the system will print checks that are set up for a 7 and 1/3 inch check form
★ B – the system will print checks that are set up for a 7-inch check form.
Memo on Check . . . determines if memos print on checks. ★ Yes – the system prints any memos that have been entered on
the check. No – the system does not print any memos that have been entered on the check.
Address 3 on Check . . . determines if the third address line prints on checks.
Country on Check . . . determines if the country information prints on checks.

1 PAYABLES
19
PAYABLES
Invoice During Receipt . . . determines how invoices are generated. YES – an invoice is automatically generated when material is received. As long as the invoices are not committed on the Expense Journal, they can be edited or deleted. This is helpful for COD situations. It is important to note that the system uses the Entry ID entered in the Company options as a default.
★ NO – invoices must be entered through the PAYABLES module when they are received.
Allow Duplicate Invoice #s . . . determines which message indicating a duplicate invoice number has been entered appears. ★ YES – the system displays a DUPLICATE message next to the
invoice date field on the New Payable screen, when you enter a payable with the same invoice number as another payable for the same vendor. NO – the system displays the following message: “Vendor invoice# already in use; please enter a unique invoice#” when you enter a payable with the same invoice number as another payable for the same vendor. You cannot continue until you enter a unique invoice number.
Comment # . . . sets up a default Comment number. Comment numbers are used to classify types of payables and as a means of delimiting reports. Whenever you are prompted for a comment number, the field will default to the number you enter here (or in the Vendor Payable Defaults).
Federal ID . . . the federal taxpayer’s number assigned to a vendor by the government. The ID number you enter here is used as the default throughout the system and prints on 1099 forms.
View Material Receipts . . . determines if the Material Receipts option is enabled. ★ Yes – the Material Receipts option under the View menu is
enabled and can be accessed. No – the Material Receipts option under the View menu is disabled and cannot be accessed.
Material Reconciliation . . . determines if Material Reconciliation is enabled. ★ Yes – the Material Receipts Reconciliation option under the
Invoice Processing menu is enabled and can be accessed. You must specify variation limits for Receiving, Invoice, and Item amounts. These limits are dollar amounts or percentages, based on the setting of the Reconcile Method field. If the variance is greater than the limit, the system prompts you to describe the variance.

1 PAYABLES
20
PAYABLES
No – the Material Receipts Reconciliation option under the Invoice Processing menu cannot be accessed. This option must be enabled to use Vendor Confirmation Reconciliation.
Invoice . . . determines the acceptable variance on an invoice.
Receiving . . . determines the acceptable variance on a receiving.
Item . . . determines the acceptable variance on a line item.
Release Unreconciled Payables . . . determines if payables must be reconciled before they are released. ★ Yes – payables do not have to be reconciled before they are
released. No – the Release Unreconciled Invoices option in Vendor Defaults determines whether payables must be reconciled through the Material Receipts Reconciliation option before they are released.
Reconcile Amt . . . allows you to specify whether the system looks at the INVOICE amount or the NET amount to determine if there is a variance that needs to be reconciled. If you would like the cost of freight and other charges to get moved into the moving average cost, reconcile against the INVOICE amount.
Auto Reconcile . . . determines if the system automatically reconciles variances. ★ Yes – the system automatically attempts to reconcile against
either the INVOICE or NET amount (see above). If a variance is found, use the OPTIONS key to choose to reconcile receipts to the invoice. No – the system automatically places you in the Reconciliation screen before the actual invoice is entered.
Reconcile Method . . . allows you to specify how the system determines if an invoice falls within acceptable variance limits.
Percent – the values in the Invoice, Receiving or Item fields are used as percentages.
★ Amount – the values in the aforementioned fields are used as dollar amounts.
Zero Cost Var Desc . . . description the system uses when it finds a nonstock item
with a $0.00 cost. This field should be left blank if you wish to investigate the reconciliation of nonstock items with zero cost.

1 PAYABLES
21
PAYABLES
For more information on when this description is used, refer to the “Match Unreconciled Payables” section on page 145.
Using Defaults Press the [Options] key to access the Additional Options menu.
Use the Defaults option, which is available on the Company, Branch, Vendor, Group, and Vendor/Branch levels of the User Options, to set up default Ledger accounts. This list of accounts is accessed by the system when it is searching for a default account for the following:
+--------------------------- Default G/L Accounts ---------------------------+
| |
| Cash: |
| Inv/Service: |
| Nonstock: |
| DS: |
| 1st Default: |
| 2nd Default: |
| 3rd Default: |
| 4th Default: |
| 5th Default: |
| 6th Default: |
| Discount: |
| A/P: |
| Discrepancy: |
+----------------------------------------------------------------------------+
The best way to use the Defaults option is to set up your Company accounts first. These will be the accounts that you expect to be using in most situations. Any exceptions should be set up on the appropriate level (Branch, Group, or Vendor/Branch). For example, if you use the same set of Ledger accounts for all branches except for branch 3, you would enter one set of accounts through the Company Options, and a different set of accounts for branch 3 through the Branch Options. The set entered through the Company Options would be used in all situations except when you are entering a payable for branch 3. This example also applies to “special” groups and vendors.
A General Ledger account must be entered in every field except for the 1st through 6th Default fields. Even if you do not use the Material Receipts Reconciliation option, an account must be entered in the Discrepancy field.
Once you have entered your default accounts, press the [Go] key to save the information and to quit the screen.
For those who have the Company option for Alternate Regions enabled (check Company/Options/Accounting), do not set up Company Wide Account Defaults. Instead, you will need to set this up on the Group Level for all groups set up in the Company.

1 PAYABLES
22
PAYABLES
GROUP DEFAULTS
A branch or a combination of branches constitutes a Payables Group. Payables Groups are defined in the COMPANY module. If you are handling payables on a group basis, you must set up defaults on a group level. Default Ledger accounts can be set up for each group defined in your system.
+-------------------------- Group Payable Defaults --------------------------+ | | | Group#: Name: | | | | | | | | | | | | | | | | | | | | | +----------------------------------------------------------------------------+
Once an existing Group# has been entered, the system displays the Ledger Default Accounts screen and prompts for specific account numbers. This screen is the same as the one shown in Using Defaults.
BRANCH DEFAULTS The Branch Payable Defaults screen allows you to set up Ledger Default Accounts for each branch defined in your system.
+------------------------- Branch Payable Defaults --------------------------+ | | | Branch#: | | Name: | | | | | | Group: | | | +----------------------------------------------------------------------------+
Once an existing Branch# has been entered, the system prompts for a default Group ID. You can use the [Options] key to display the Ledger Default Accounts screen and enter specific account numbers for this branch. The Group ID you enter here is used for invoicing during material receipt. This screen is the same as the one shown in Using Defaults.

1 PAYABLES
23
PAYABLES
VENDOR OPTIONS The Vendor Options allow you to override the setting (enabled or disabled) of features set up in the Company Options for certain special vendors. In addition, G/L accounts can be specified for each vendor that is defined on your system.
All of the options described in the “Company Options” section are also available in the Vendor Options screen. In addition, you are prompted to set the following fields:
The current Initial Status types of Hold, Auto-Hold, and Ready have been slightly modified and expanded. The system uses these new status types to apply not only to the release, but also to expense the payable. These are PO Pend (purchase order number is pending, will not expense or release), Hold Exp (payable on hold, will not expense or release), Hold Rel (payable on hold, will expense but will not release), Auto-Hold (do not auto-reconcile payable), Ready (payable ready to be expensed and/or released).
The Initial Status and Status after Reconciliation default options have replaced the Status parameter. The valid settings for the Initial Status default are Hold Exp, Hold Rel, Auto-Hold, and Ready. The Status After Reconciliation default has the status types of None, Hold Rel, Auto-Hold, and Ready. The status of the payable defaults initially to the setting of the Initial Status default, and when the payable is reconciled, the following takes place:
1. If the vendor default is set to None, then the status of the payable is not changed and must be manually updated by the user.
2. If the vendor default is set to Hold Rel, the status of the payable will change to Hold Rel if it is currently Hold Exp. Otherwise, no change in the status occurs.
3. If the vendor default is set to Auto-Hold, the status of the payable changes to Auto-Hold if it is currently Hold Rel or Hold Exp. Otherwise, no change in the status will occur.

1 PAYABLES
24
PAYABLES
4. If the Status after Reconciliation field from the Vendor record is set to Ready, the status of the payable changes to Ready.
When the custom software is installed, the current vendor default settings are updated in the following manner: the Initial Status retains the current status setting, with the exception of Hold. This will be changed to Hold Rel. The Status after Reconciliation parameter defaults to None. New vendors created after the custom software is installed will still default to Ready for Initial Status, and None for Status after Reconciliation. Both fields are available for Fast Edit.
Note: If a reconciled payable becomes unreconciled, the Status type of the payable remains as it is currently set.
If a payable is entered and a PO is not referenced and the vendor is an Item Type vendor, the system defaults the status to PO Pend. Otherwise, the system defaults to the setting in the Vendor Payables Defaults for Initial Status.
The Reference field is used to group specific types of vendors together and therefore limit payable releases. Examples of reference descriptions are electric, plastics, hardware, and abrasives. These descriptions are user-defined and are not set up in the system.
The 1099 Box field indicates in which box information prints on the 1099 form.
The 1099 Type field can be set to MISC or INT. If this field is set to MISC, a miscellaneous 1099 form is used for this vendor. If this field is set to INT, a 1099 interest form is used for this vendor.

1 PAYABLES
25
PAYABLES
Vendor/Branch Options
There are two Additional Options available from the Vendor Payable Defaults screen: Defaults and Branch. To access these options, press [Options] and choose the appropriate option from the menu. The Defaults option works as described in the “Company Options” section.
The Branch option allows you to set up different A/P accounts for the same vendor, depending on the branch. In other words, you could set up one set of default accounts for Market Tool & Supply Co. on Branch 1, and a completely different set for the same vendor on Branch 2. The system automatically uses the proper set of defaults based on the applicable branch.
When you access the Vendor/Branch Payable Defaults screen, the system prompts you for a Branch#:
+--------------- Vendor/Branch Payable Defaults ----------------+
| |
| |
| Vendor: MARKET |
| Name: MARKET TOOL & SUPPLY COMPANY |
| |
| Branch#: 1 |
| Name: MAIN STREET BRANCH |
| |
| |
| |
+---------------------------------------------------------------+
Once you have entered a valid Branch#, the system displays the Default G/L Accounts screen, which functions as usual.
Note for users who converted to Acclaim PAYABLES from XL PAYABLES:
The XL VENDOR module allows you to set up default ledger accounts for each of the vendors defined on your Prophet 21 System. When you converted from XL to Acclaim, the system transferred this information to the Acclaim PAYABLES Vendor Options. In other words, any default accounts you set up for a specific vendor through the VENDOR module in XL, are shown on and can be edited through, the Vendor Default accounts screen.
Important! This only occurs because of the conversion process. If you are enabled for Acclaim Payables initially, the system does not transfer the default GL account number that is placed in the vendor record to the Vendor Options in Acclaim Payables. If specific account information is needed for specific vendors, you must set this up manually in the Vendor Options.

1 PAYABLES
26
PAYABLES
Vendor Fast-Edit
Vendor Fast Edit allows you to quickly edit vendor defaults. When the "Vendor Fast Edit" option is selected, the following parameters display.
+-------- Vendor Fast Edit ---------+ | | | Start Vendor: | | Ending Vendor: | | Value: | +-----------------------------------+
Enter a Start and Ending Vendor at the prompts. The editing you perform will apply only to the vendors included in this range.
You can determine whether the Values that you enter while editing are fixed or variable. If this field is set to FIXED, a field is edited only once, and that change applies to all the vendors included in the vendor range. If this field is set to VARIABLE, then the system steps through each vendor one at a time, allowing you to make individual vendor changes. You select the fields that you intend to edit by entering YES at the field.
+------------------------- Vendor Fast Edit Fields --------------------------+ | Release Status?: | | Comment#?: | | Material Reconciliation?: | | Invoice?: | | Receiving?: | | Item?: | | Override Company Defaults?: | | Release Unreconciled Invoices?: | | Invoice During Receipt?: | | Reference?: | | 1099 Box?: | | Federal ID?: | | 1099 type?: | +----------------------------------------------------------------------------+
Fixed
New values can only be entered for those fields specified for editing and for which editing is allowed. After entering the new field values and pressing [Go], a dialog box appears. A message confirming the fixed fast edit appears while the new field values are being added to the accounts in the range. An appropriate message displays when the editing is finished.
Variable
The vendors included in the range appear one at a time. The old values appear as defaults for the selected fields. New values can only be entered for those fields specified for editing and for which editing is allowed.
You can quit at any time, and changes made to previously edited vendors, but not the current vendor, are saved. The old values in the current vendor record are restored.

1 PAYABLES
27
PAYABLES
Vendor Default Account Fast-Edit
The Default Account Fast Edit functions just as the Vendor Fast Edit does. The Vendor Fast Edit screen is the same as the one described in the “Vendor Fast Edit” section.
+-------- Vendor Fast Edit ---------+ | | | Start Vendor: | | Ending Vendor: | | Value: | +-----------------------------------+
Enter a Start and Ending Vendor at the prompts. The editing you perform will apply only to the accounts included in this range.
You can determine whether the Values that you enter while editing are fixed or variable. If this field is set to FIX, a field is edited only once, and that change applies to all the accounts included in the account range. If this field is set to VARIABLE, then the system steps through each account one at a time, allowing you to make individual account changes. You select the fields that you intend to edit by entering YES at the field:
+--------------------- Default Account Fast Edit Fields ---------------------+ | Cash?: | | Inv/Service?: | | Nonstock?: | | Direct Ship?: | | 1st Default?: | | 2nd Default?: | | 3rd Default?: | | 4th Default?: | | 5th Default?: | | 6th Default?: | | Discount?: | | A/P?: | | Discrepancy?: | +----------------------------------------------------------------------------+
See Fixed and Variable for more information.
ENTRY ID MAINTENANCE
The Entry ID option allows you to create or delete a batch/group. Enter an Entry ID and Description.

1 PAYABLES
28
PAYABLES
SESSION DEFAULTS
The Session Defaults allow you to specify the default Branch and Payables Date.
+------------------------ Payables Session Defaults -------------------------+ | | | | | Payable Date: | | Branch #: Branch Name: | | Group #: Group Name: | | Region #: Region Name: | | | | | | | | | | | | | | | | | +----------------------------------------------------------------------------+
Each time you enter the PAYABLES module you should redefine the Session Defaults. The system prompts for a Payable Date and a default Branch and Group number. These defaults will be used for the current session only, and should be reset each time you use PAYABLES if you are entering in invoices for different branches or groups.
DAYS INSTEAD OF DATES On all of the parameter screens in Check Processing, Management Reporting, and Purging (e.g., Payables Release, Print Checks, Expense Journal, and Vendor Invoice History Deletion) the system allows you to enter a number of days instead of a specific date. Use the plus (+) and minus (-) characters to indicate the direction of time, and enter a specific number of days from today’s date, not the default date that appears in the date fields. Based on the input in terms of days, the system calculates a date and inserts it in the date field of the parameter screen. For more information on entering days instead of dates in these fields, refer to the System Utilities manual.

1 PAYABLES
29
PAYABLES
STEP-BY-STEP The following diagram traces the steps you take to move a vendor invoice through the PAYABLES process. The solid lines in the diagram indicate the necessary steps, while the dotted lines show the steps that you can choose to include depending upon your particular circumstances.
All the steps shown in this diagram are described in detail on the following pages.
STEP 1: ENTERING INVOICES INTO THE SYSTEM The PAYABLES module allows you to enter four different types of payables: Regular, Credit, Quick Check, and Recurring. A Regular payable is one that the system will run through the normal payables process (i.e. be entered, released, and printed as a check). A Credit payable is used to correct situations where you were over billed (i.e., you received the wrong item or you were billed for something you never received). A Quick Check is a payable for which an invoice is entered and a check is printed all in the same session. A Recurring invoice is one that you expect to receive more than one time. For example, if you rent your building, you will pay rent every month. If you set up the vendor invoice as a recurring entry, you will not have to enter it every month. A recurring invoice can also be used for special terms invoices where you have multiple payments.
Enter Vendor’s Invoice
Print the Expense Journal
Print the Payables Due Report
Release Payments
Print the Anticipated Cash Disbursements Journal
Print Checks and Check Register
Print the Unreconciled Check List and Reconcile Checks
Confirm Direct Shipments **
Reconcile Material Receipts and Print the Discrepancy Journal *
Unrelease Payments
Purge Committed History from the System
Void Checks
* - see Appendix 1
** - see Appendix 2
Cancel Reconciliation

1 PAYABLES
30
PAYABLES
Steps 1-A through 1-C describe how to enter a Regular payable. Credit, Quick Check, and Recurring payables are entered in much the same way. Any special information describing these other types of payables is included in the sections following Step 1-B, labeled “To Enter a Credit,” “To Enter a Quick Check,” and ”To Enter a Recurring Invoice.”
STEP 1-A: THE ENTRY ID SCREEN
Before you enter invoice information, the system prompts you for an Entry ID and Description, which can be used to identify the payables you enter during each session.
The Entry ID field is user-defined. You should set up certain conventions to govern what information is stored in the Entry ID field. For example, you could enter the User ID of the person who is entering the payable, the date of entry, an entry sheet control number, or any combination of these things. Later, when you are ready to release payments and print certain journals, you will be able to limit processing to those payables with a certain Entry ID or range of Entry IDs.
The Payable Type field can be set to REGULAR, CREDIT, or QUICK CHECK. See Step 1-B for continued instructions on entering REGULAR payables. See the sections following Step 1-B for more information on entering CREDITs or QUICK CHECKs, and for more information on entering Recurring Invoices.
STEP 1-B: THE NEW PAYABLE SCREEN
After you have specified a Payable Type, the New Payable screen displays. This screen looks similar to the one shown that follows, regardless of the type of payable you are entering:
�If you are entering a Credit (see To Enter a Credit), this screen prompts for a Return# instead of a PO#.

1 PAYABLES
31
PAYABLES
The New Payable screen is divided into two parts. The upper frame shows the invoice information, and the lower frame shows distribution account information. The system does not require you to fill out every field to save the record. As long as you enter the Vendor, PO#, Invoice#, Invoice Date, Invoice Amt, Net Amt, and press the [Go] function key, the system will save the payable. If the Allow Duplicate Invoice#s payables company option is set to YES, and you enter a payable with the same invoice number as another payable for the same vendor, the word DUPLICATE appears next to the Inv Date field, as shown on the previous screen.
When you enter the screen, only the Vendor and PO# fields (in the upper portion of the screen) are activated. You must enter either the vendor code or the PO number before the remaining fields can be accessed. To enter an invoice not associated with a purchase order, enter the Vendor code and leave the PO# field blank.
You can use the Browse [F3] key to search for a Vendor code or a PO#. You can also create a temporary vendor by entering a unique vendor code at the Vendor prompt (this is one that does not already exist in the vendor database). The system will ask you if you want to create a new vendor. If you answer YES, you will be placed in the Payee Information screen.
Using the External PO# in the PO# Field
The previous page describes how to enter a vendor invoice into the system if you know the Vendor code and the PO#. If you do not know the PO#, there is another way to access the purchase order record: enter the External PO# in the PO# field. This field holds up to 12 characters.
First, enter the vendor code in the Vendor field as usual. Next, enter an External PO# (make sure it exists in the system on a PO for this vendor) in the PO# field. The system will search for the record and display it on the screen.
Note that if you enter an External PO# that does not exist for the current vendor, the system will not accept the entry and will prompt you to enter another PO#.
The Vend Inv# is another field that is used to identify payables. This field defaults to the external PO number, which is truncated if it exceeds the 18-character limit for the field. If no external PO number exists, the Vend-Inv# field defaults to the current date and time.
The Inv Date field defaults to the date set in the PAYABLES Session Defaults, but can be edited. If you edit this field, the payable due and discount dates will be automatically recalculated by the system, based on the vendor’s terms set up in the VENDOR module.
Set the Final Bill field to YES to indicate that the original purchase order is complete (all the material has been received). Set this field to NO if all the material on the PO has not been received. If reconciling material, the system defaults this field accordingly.
The total amount owed to the vendor is shown in the Invoice Amt field. If a PO exists for this payable, the Invoice Amt field defaults to the total value of the material received. The Paid field shows the amount you have already paid toward this invoice.
The Net field shows the amount (if any) that is eligible for discount. If a PO exists for this payable, the Net field, like the Invoice Amt field, defaults to the total value of the material received.

1 PAYABLES
32
PAYABLES
Using Invoice Amt and Net if There are Freight Charges
Sometimes, the actual invoice amount differs from the PO amount because a freight charge (or some other type of charge that is not eligible for discount) was added to the invoice. If this is the case, you can use the Invoice Amt and Net fields in such a way that the portion of the payable that is ineligible for discount (the exception amount) is automatically put in a batch for posting to the Ledger first default account*. This can be set up as the Freight account. If no first default account exists, nothing is done with the exception amount. The system will always apply the difference between the Invoice Amt and Net to the first default account.**
If a PO exists for the payable you are entering, the Invoice Amt and Net fields automatically default to the total value of the material received. Usually, freight charges are not known at the time the PO is generated, so they are not included in the total PO amount. This causes a discrepancy between the total received amount and the Inv Amount. For example:
You receive an invoice for $110, ten of which is for freight charges. When you enter the vendor and PO number in the Payment Entry screen, the system fills in the Invoice Amt and Net fields with $100, the total received amount.
To correct the discrepancy in this example, and to automatically allocate the $10 freight charge to the first default account, edit the Invoice Amt field to show $110. Leave the Net field showing $100 (this is the amount eligible for discount).
The system knows that the discrepancy between the Invoice Amt and Net fields is the exception amount, and that this amount should be assigned to the Ledger first default account. In this case, we would have to be sure that the first default account is designated as the Freight account.
*Note: Although the exception amount is automatically put into the first default account, this is only a default and can be changed by editing the distribution lines at the bottom of the screen.
**Note: If there is no first default account set up, this results in an unbalanced payable which must be balanced by changing the gross or distribution amounts.
The Description field holds a brief description of the payable, or this transaction’s history. The Unrec Comm (unreconciled comment) field helps to track unreconciled payables. This field appears in Payable Entry and in Payable Edit/Delete. Start and End Unrec Comm parameters are found on the Match Unreconciled Payables parameter screen, the Unreconciled Payables Report parameter screen, and on the Payables Aged Report parameter screen.
The Post Date is the date the payable should be posted to the Ledger. This field defaults to the date specified in the PAYABLES Session Defaults, but can be edited. If you edit the date to a date in another period, the system creates a batch that will be posted to that period when the Expense Journal is committed.
TIP

1 PAYABLES
33
PAYABLES
Why is the Post Date Field Important?
The Post Date field holds the date that the payable should be included in the Expense Journal autobatch in the Ledger. If material is received in one period and the invoice for that material isn’t received until the next, this field can be set so that the payable is expensed during the proper period.
The Due Date is the date by which the invoice must be paid. The Disc Date is the date by which the invoice must be paid if you are to take advantage of a cash discount offered by the vendor. The Due Date and Disc Date are calculated using the net and discount terms from the vendor record, and the invoice date. The due dates and discount dates are recalculated whenever the invoice date or any of the net and discount terms are changed, unless the Due Date and Disc Date fields have been directly edited in this screen.
The Avail Disc field shows the amount you can take as a cash discount if you pay the invoice by the Disc Date. The Avail Disc amount is calculated automatically by the system using the specified discount percentage of the amount in the Net Amt field. Editing this field to an amount other than the calculated discount will override the discount to be taken.
Use the Comment number field to identify problem payables. You have the ability to assign a two-digit comment number to a payable and then run payables reports for a range of comment numbers. You can use the comment number feature to indicate disputed payables, or priority payables that should not be overlooked. The Comment number field defaults to the value assigned in the vendor record.
The Status of the payable can be READY, or HOLD. If this field is set to READY, the system will allow you to automatically release the payable. If this field is set to AUTO-HOLD, the payable must be edited and released individually (in other words, the payable cannot be automatically released). If this field is set to HOLD, the payable cannot be released until the status of that payable is changed. This field defaults to the setting of the Release Status field, found in the Vendor User Options screen.
The Reconciled? field is only shown if you have specified a PO#, and then only if the Material Reconciliation feature is enabled. YES indicates that the material on the PO has been reconciled, and NO indicates that a reconciliation needs to be done. The setting of the field could change if the invoice amount changes (if variance goes beyond or comes within the preset limits).
The Branch field identifies the branch to which the expense is recorded on the Expense Journal. This field defaults to the branch associated with the selected Purchase Order. If there is no branch associated with the selected Purchase Order, this field will default to the branch in Session Defaults.
The Disc% field defaults to the discount set up in the vendor terms, found in the VENDOR module.
Once you have completed the fields in the upper frame of the screen, take a look at the distribution accounts listed in the lower frame. If the distribution accounts and amounts are correct, press the [Go] key to accept the payable. The system then prompts you to enter another invoice.
If the distribution accounts or amounts shown in the lower frame are incorrect, you need to edit them. See the next section for specific instructions on how to do so.
TIP

1 PAYABLES
34
PAYABLES
Distribution Amounts (The Lower Frame)
The accounts listed in the lower frame of the New Payables screen show the cash accounts that are debited to pay the invoice. The accounts shown here are the default accounts as set up in the User Options.
Each line shows an account number, account name, and the amount to be debited or credited to the account. The Balance is shown in the upper right hand corner of the frame:
Seq Account Balance: 0.00 1 00-12-112-112 ACCOUNTS PAYABLE ACCT#1 -1,000.00 2 00-13-113-113 ACCOUNTS PAYABLE ACCT#2 1,000.00
Each Ledger account shown here will be updated when this payable is released.
You can change the accounts that are tied to your new payable, or the way the amounts are distributed by entering the lower frame and using some special editing keys. To gain access to the lower frame when your cursor is in the upper frame, press the [Tab] key several times. Once you are in the lower frame, the cursor highlights the individual Sequence numbers for each account. From here, you use the following commands to change the distribution accounts: NEW: CTRL-N, EDIT: RETURN, DELETE: CTRL-D. Each of these commands is described on the following pages. To return to the upper frame, press the [Tab] key.
NEW: Adding New Accounts to the Distribution List
1. To add a New account to the distribution list, place your cursor (using the arrow keys) in the list where you wish to add the account distribution line.
2. Press the [Ctrl] key and the [N] key simultaneously. The system inserts a new distribution line before the line where your cursor is now sitting.
3. The system prompts for an account number (you can enter one or use the [Browse] key to search for one) and then the amount to be debited or credited to the account. Note that when you are in the amount column, you can press the [B] key to have the system automatically balance the payable.
4. Once you have entered the information, press the [Go] key to continue. You can enter another new account at this time or press the [Quit] key to stop adding accounts to the distribution list.
EDIT: Changing Existing Distribution Accounts
1. To Edit an existing distribution account line, first select the line you wish to edit using your arrow keys.
2. Press the [Enter] key. The system draws an underline beneath the account you have chosen to edit, indicating that you can change the information that is held in this distribution line. You can edit the distribution account information until the payable has been committed on the Expense Journal.
3. You can enter a new account number or use the [Browse] key to choose from a list of available accounts. If you wish to change only the amount, press the [Enter] key and the cursor is

1 PAYABLES
35
PAYABLES
automatically placed in the amount column. Edit the amount as necessary. Note that when you are in the amount column, you can press the [B] key to have the system balance the payable automatically.
4. Once you have edited the information, press the [Enter] key to continue.
DELETE: Removing Existing Distribution Accounts
1. To Delete an existing distribution account line, first select the line you wish to delete using your arrow keys.
2. Press the [Ctrl] key and the [D] key simultaneously. The system displays a warning message asking if you want to delete the selected distribution line.
3. Press the [Y] key or use the arrow keys to select [Yes] and press the [Enter] key. The distribution line is deleted. If you wish to keep this distribution line, press the [N] key or use the arrow key to select [No] and press [Enter].

1 PAYABLES
36
PAYABLES
Using Edit Payee, View PO, Reconcile, View Receipts, and Confirm DS There are several Additional Options available from the New Payable screen: Edit Payee Information, View PO Information, Reconcile Material Receipts, View Receipts, and Confirm DS (Direct Shipments). To access these options, press the [Options] key and select the appropriate feature from the menu.
The Payee Information screen can be accessed in two ways: one, if the vendor you specified in the New Payable screen did not exist, or two, by using the Edit Payee option. The information you enter in this screen is virtually the same as the information you would normally enter through the Vendor module. Any vendor you create here will be added to the vendor database and can be accessed as usual. If you choose to mark the vendor as temporary (by setting the Temporary field to YES), the system will automatically assign to it Class Number 99. Later, this class number will serve as an indication to you that this vendor record was created “on the fly.” See also, Editing Payee Information and Creating New Vendors.
If you need to compare the invoice amount to the amount on your purchase order, or if you want to see if you actually received the material you are being billed for, use the View PO option. The information shown in this screen is for viewing purposes only and cannot be edited. (See “Viewing Information” in the reference section of this manual for more information.)
The Reconcile Material Receipts screen can be accessed in two ways: one, from the Invoice Processing menu, and two, through the Reconcile option. This option is explained in great detail later in the PAYABLES manual (see the section labeled “How to Reconcile Material Receipts” for more information).
If you need to see detailed information regarding what and how many items you have received against the purchase order, use the View Receipts option. This information is for viewing purposes only and cannot be edited. (See “Viewing Information” in the reference section of this manual for more information.)
The Confirm Direct Shipments screen can be accessed in two ways: one, from the Invoice Processing menu, and two, through the Confirm DS option. This option is explained in great detail later in the PAYABLES manual (see the section labeled “How to Confirm Direct Shipments” for more information).
STEP 1-C: EDITING AND DELETING PAYABLES
If you find that you have entered a payable incorrectly, you can use the Edit/Delete Payable option (available from the Invoice Processing main menu) to either change the payable record or to remove it from your system entirely. You can edit or delete a payable record as long as the payable has not been committed on the Expense Journal. The following are common questions related to editing and deleting payables, and their answers:
1. What is the Expense Journal? The Payables Expense Journal keeps a detailed listing of all the vendor invoices, their dollar amounts, and account distribution information. You can print this journal (with the Commit field set to NO) and use it to check all of the payables you entered into

1 PAYABLES
37
PAYABLES
the system. If you find payables that are incorrect, use the Edit/Delete Payable option to make any necessary changes.
2. What does it mean if a payable has been committed on the Expense Journal? When the Expense Journal is committed, the system creates an autobatch (called EXP) to post expenses (i.e., your payables) to the Ledger. An autobatch is a posting batch that is automatically created by printing and committing various registers in the system.
3. Why can’t I edit or delete payables that have been committed on the Expense Journal? Information that has been “committed” is considered to be historical, rather than current. You can print reports and view this historical information, which will remain in the system until it is purged, but the system does not permit you to edit it. After committing the Expense Journal, you can only edit the payable Description, Due Date, and Discount Date. For this reason, you should use great care when committing information to history, and appoint a specific time to do it each period (such as month-end).
Edit or Delete a Payable
This section describes how to edit or delete a payable that already exists in the system. This procedure can be used to edit any type of payable (Regular, Credit, Quick Check, or Recurring*) and to delete any type of payable except the Recurring type, for which you must use a completely separate option. To edit or delete a payable, you must complete the following:
1. Select Edit/Delete Payable from the Invoice Processing Menu.
2. The Edit/Delete Payable screen displays. Enter the Vendor ID and the Vendor Inv# at the prompts; the remaining fields in the screen are filled in by the system. A message displays asking if you want to delete the payable. Choose YES to delete and NO to edit. Note: To make it easier to choose a specific invoice, you can press [F3] on the Vendor Inv# field to display the Invoice Browse window, showing all invoices of this vendor. Press [F6] while viewing the Browse window to display Sort Sequence options. You can display the invoices by invoice number, PO number, or invoice date.
3. If you choose to edit the payable, you can change any of the fields in the screen to which the system allows you access.
4. Once you have finished editing the payable, press the [Go] key to save it. You can edit another payable by entering another Vendor code and Vendor Inv# at this time.
An invoice can only be edited or deleted if it has not been released for payment or committed on the Expense Journal.
TO ENTER A CREDIT If you send material back to the vendor because you received the wrong thing, or you were billed for something you never received, you can enter a credit payable to correct the mistake. Conveniently, credits can be released with regular payables so that actual payment amounts are less.
This section describes how to enter a Credit payable into the system. The process of entering a credit is very similar to entering a regular invoice. When you enter a credit payable, you must complete the following steps:
�* When editing a payable that was created by a Recurring invoice, the individual vendor invoice is considered separate from the recurring invoice, which will not be changed.

1 PAYABLES
38
PAYABLES
1. Select New Payable (Group) from the Invoice Processing Menu.
2. On the Entry ID screen, you are prompted to enter the Entry ID and the Payable Type. Enter or [Browse] for and select an Entry ID, set the Payable Type field to CREDIT, and press the [Go] function key.
3. When the New Payable screen displays, it will look almost identical to the way it looks when you enter a REGULAR payable. The only difference is that you are prompted to enter a Return# instead of a PO#. The remaining fields in this screen work as described in the “Enter a Regular Payable” section of this manual.
4. Just as when you enter a regular payable, the system requires you to enter a minimum amount of information to save the payable record. The required fields are: Vendor, Return#, Invoice#, Invoice Date, Invoice Amt, and Net Amt. Fill in the remaining fields in the screen as is customary for your business. You must enter all values with a minus (-) sign to indicate a credit.
5. If necessary, you can reconcile Vendor Confirmations through the Material Receipts Reconciliation options as described in Appendix 1 of this manual.
6. Once you have completed the necessary fields in the New Payable screen, press the [Go] function key to save the payable record.
TO ENTER A QUICK CHECK If you need to enter an invoice and print a check in a hurry, enter a Quick Check payable. Doing so allows you to enter the invoice and print the check in the same session.
The process of entering a quick check is very similar to entering a regular invoice. First, select the New Payable option from the Invoice Processing menu. You will be prompted to enter the Entry ID and the Payable Type. Set the Payable Type to QUICK CHECK.
This section describes how to enter a Quick Check payable into the system. The process of entering a quick check is very similar to entering a regular invoice. When you enter a quick check payable, you must complete the following steps.
1. Select New Payable (Group) from the Invoice Processing Menu.
2. On the Entry ID screen, you are prompted to enter the Entry ID and the Payable Type. Enter or [Browse] for and select an Entry ID, set the Payable Type field to QUICK CHECK, and press the [Go] function key.
3. When the New Payable screen displays, it will look exactly the way it looks when you enter a REGULAR payable. The fields in this screen work as described in the “Enter a Regular Payable” section of this manual. Complete the information in the New Payable screen and press [Go].

1 PAYABLES
39
PAYABLES
4. The system prompts you for a check number:
+------------------- Check Number --------------------+ | | | Please enter a number for this check: 00000001 | | | | | +-----------------------------------------------------+
The check number defaults to one after the last check printed, but you can enter any check number. Once you have done so, the printer options display and the check can be printed. Once printed, the vendor invoice is recorded on the Expense Journal and the check will be displayed on the Check Register.
TO ENTER A RECURRING INVOICE A recurring invoice is one that you expect to receive over and over again. For example, if you rent your building, you pay rent every month. If you set up the vendor invoice as a recurring entry, you do not have to enter it into the system every month, because the individual payables are created by the Prophet 21 System automatically. A recurring invoice can also be used when you receive special terms invoices with multiple payments.
When you enter a recurring invoice, the system automatically creates all the vendor invoices that should be generated based on the terms you entered. For example, if you create a recurring invoice to pay your rent bill, which comes once every month for a year, the system generates 12 vendor invoices. These invoices are held inside the system until it is necessary for you to pay them.
This section describes how to enter a Recurring Invoice into the system. When you enter a recurring invoice, you must complete the following steps.
1. Select Recurring Invoice Entry from the Invoice Processing Menu.
2. On the Entry ID screen, enter or select an Entry ID.
3. On the New Recurring Invoice Screen, fill in the Vendor, PO#, Invoice#, Start Date, Total Payments, Frequency, Invoice Amt, Net Amt and press the [Go] function key for the system to save the payable record.
Step 3 requires more explanation, and is described in detail in the section that follows.

1 PAYABLES
40
PAYABLES
THE NEW RECURRING INVOICE SCREEN
After you have accepted the Group screen, the New Recurring Invoice screen displays. This is the screen where you will enter all pertinent invoice information to generate the proper number of payables for the recurring invoice.
+--------------------------- New Recurring Invoice ----------------------------+ | Vendor: MARKET TOOL AND SUPPLY CO Disc Terms: Inv 10,0 | | PO#: 1022222 Ext PO#: JANUARY ORDER Net Terms: Inv 0,0 | | | | Vendor Inv#: MARKET JANUARY Disc Days: 5 Avail Disc: 12.00 | | Start Date: 01/24/94 Due Days: 5 Disc%: 1.00 | | Total Pymts: 12 Period: MONTH Comment: 0 | | Invoice Amt: 1,200.00 Frequency: 1 Status: Ready | |
: 1 | |Desc: | +------------------------------------------------------------------------------+ Seq Account Balance: 1 00-12-112-112 ACCOUNTS PAYABLE ACCT#1 -1,200.00 2 00-13-113-113 ACCOUNTS PAYABLE ACCT#2 1,200.00
The New Recurring Invoice screen (like the New Payable screen) is divided into two parts. The upper frame shows the invoice information, and the lower frame shows distribution account information. Refer to the section on the New Payable screen for more information on some of the fields and on the distribution account information.
The fields described below are seen and used only when entering, editing, or deleting a recurring invoice.
The Start Date indicates the month, day, and year that the first recurring invoice should be implemented.
The Total Pymnts will be used by the system to generate a specified number of vendor invoices for the recurring invoice. This field defaults to 12.
Some vendors give a discount if they receive payment for orders early, and the Disc Days indicates the number of days between the invoice date and the time that it should be paid so that your company benefits from the discount. The Due Days indicates the number of days between the invoice date and the time that the payable is actually due. See the example that follows.
Example: Disc Days and Due Days If the Start Date is set to 01/01/95, the Disc Days is 4, and the Due Days is 9, then the Disc Date is 01/05/95 and the Due Date is 01/10/95. The next month the Invoice Date is 02/01/95, the Disc Date is 02/05/95, and the Due Date is 02/10/95.
The Period can be set to DAY, WEEK, MONTH, QUARTER, and YEAR. The Frequency field should be set to a non-zero number. It will be multiplied by the value in the Period field to indicate the length of time
For
example:

1 PAYABLES
41
PAYABLES
between invoices. The Period field defaults to MONTH and the Frequency to 1. The system automatically calculates the Disc % according to the vendor’s terms set up in the vendor record.
The Invoice Amt field holds the invoice amount for each of the recurring invoices that the system will generate.
When the recurring invoice is accepted, the system automatically creates all the vendor invoices that should be generated based on the Start Date, Disc Days and Due Days. The system will post the expense to the correct period. For example, if you create a recurring invoice to pay your rent bill, which comes once every month for a year, the system generates 12 vendor invoices. The Invoice Number is incremented by one for each of the new invoices, and the amounts are automatically calculated for each. When the last of the vendor invoices is purged from history, the recurring invoice that created it will be automatically deleted.
Once you have completed the information in this screen, press the [Go] key to generate the payables for this recurring invoice.
Editing or Deleting an Invoice that was Created by a Recurring Invoice Use the Edit Payable option (available from the Invoice Processing menu) to edit a vendor invoice that was created by a recurring invoice. The individual vendor invoice is considered separate from the recurring invoice, which will not be changed.
The Delete Recurring Invoice option is also available from the Invoice Processing menu. When you select this option, the system will prompt you for a Vendor code and PO#, and then display the appropriate recurring invoice. Once the information is displayed, you will be prompted to delete it.
If a recurring invoice is deleted, the system automatically deletes all vendor invoices that were created by the recurring invoice. If an invoice has been released or posted to history, it is considered separate from the recurring invoice, and the invoice is not deleted.
STEP 2: PRINTING THE EXPENSE JOURNAL The PAYABLES Expense Journal does the following things:
1. It keeps a detailed listing of all the vendor invoices, their dollar amounts, and account distribution information. You can print this journal and use it to check all of the payables you entered into the system. If you notice any mistakes, you can use the Edit/Delete Payable option to correct them.
2. When committed, the Expense Journal creates an autobatch (called EXP) to post the expenses to the Ledger. An autobatch is a posting batch that is automatically created by printing and committing various registers in the system. (IMPORTANT: see Tip: Committing the Expense Journal to History)
TIP
�Q-MODE must be ON to commit information to history.

1 PAYABLES
42
PAYABLES
Setting Up Autobatch Defaults in G/L You can use the Autobatch Defaults in the LEDGER module to maintain control over automatic posting to the ledger. You can indicate the areas in the system where autobatching is permitted and set up defaults for creating autobatches. One or more autobatches can be automatically created when monthly reports are committed.
STEP2-A: SETTING THE REPORT PARAMETERS
When you print an Expense Journal, the system prompts you to enter the following report parameters:
If the Report Sequence field is set to PURCHASE, the report will be sequenced by vendor. If this field is set to ACCT#, the report will be sequenced by Ledger distribution account number. If this field is set to PAYEE, the report will be sequenced by the vendor to whom the checks are written. (In most cases, the checks are written to either the master vendor or the buy group vendor.)
The Start and End parameters allow you to limit the report or journal to a particular range. The Expense Journal parameter screen prompts you for a Start and End Vend-Invoice#, Entry ID, Acct#, Posting Date, and Comment #. When printed, the Expense Journal will show only those payables that fall within the ranges you enter in these fields.
The Acct# Mask field only appears if the Report Sequence field is set to ACCT#. This field limits the report to all accounts that have specific characters in the same position in their account numbers. The “@” character acts as a “wild card,” which represents any and all characters.
For example, if you want to limit the report to all accounts that have 440 in the 5th – 7th positions of the account number, enter the following in the Acct# Mask field: @@-@@-440-@@@.
TIP

1 PAYABLES
43
PAYABLES
If you do not want to limit the report by account mask, accept the default of @@-@@-@@@-@@@ in the Acct# Mask field. If you want to commit the Expense Journal, you must accept the default of all “@” characters in the Acct# Mask field. The report cannot be committed unless the account range is open.
If the Page Format field is set to FULL, a fully detailed report with a new vendor/ account on every page is printed. If this field is set to MULTIPLE, a fully detailed report with multiple vendors/accounts per page is printed. If this field is set to BRIEF, totals for each vendor/account are printed. If this field is set to SUMMARY, only totals are printed.
When the Commit field on the Expense Journal parameter screen is set to YES, the information is taken from the journal and committed to history. An autobatch is created in the Ledger if enabled. By setting the Report Type to HISTORY, you can still print the information you committed to history. If the Commit field is set to NO when you print the Expense Journal, the information it contains will still be there the next time you print it.
Q-MODE must be enabled to commit information to history. To turn Q-MODE on, press the OPTIONS key when you are in any menu screen. Select the Q-MODE option and press [Enter] to activate.
Committing the Expense Journal to History Question: Can you edit payable amounts and G/L accounts after the Expense Journal has
been committed to history?
Answer: Information that has been “committed” is considered to be historical, rather than current. You can print reports and view this historical information, which will remain in the system until it is Purged, but the system does not permit you to edit it. After committing the Expense Journal, you can only edit the payable Description, Due Date, and Discount Date. For this reason, you should use great care when committing information to history, and appoint a specific time to do it each period (such as month-end).
STEP2-B: PRINTING THE REPORT
Once you have entered all the report parameters, press the [Go] key to print the report. The system will prompt you to choose a printer option.
STEP 3: PRINTING THE PAYABLES DUE REPORT Prior to releasing invoices for payment, you should print a Payables Due Report. This report will show you all of those invoices that are due, or which will become due within a certain time period. Review this report and use it to decide which invoices to pay right away.
TIP

1 PAYABLES
44
PAYABLES
STEP3-A: SETTING THE REPORT PARAMETERS
When you print a Payables Due Report, the system will prompt you to enter the following report parameters:
Period in Days . . . determines what invoices are due within three time periods. For example, the defaults for Period 1, Period 2, and Period 3 are 7. When the report is printed with these defaults set, it shows which invoices are due now, and which will be due within 7 days, 14 days, and 21 days.
Report Sequence . . . determines in what order the report prints. This parameter comes into play when using Vendor Buy Groups. Payee – Information is printed in order of vendor code of the master vendor (Buy Group master). Purchase – Information is displayed in order of the purchasing vendor (Buy Group member).
Vendor Start/End . . . determines the range of Vendors shown on the report.
Vendor Class Start/End . . . determines the range of Vendor Classes shown on the report.
Payable Comment # Start/End . . . determines the range of Payable Comment Numbers shown on the report.
Date Type . . . determines the date type shown on the report. Invoice – All payables with a date type of Invoice print.
★ Posting – All payables with a date type of Posting print.

1 PAYABLES
45
PAYABLES
Date Start/End . . . determines the range of payable due dates shown on the report.
Currency Start/End . . . determines the range of Foreign Currency shown on the report. You must have the Foreign Currency optional package for this field.
Page Format . . . determines the format of the report. Full – a fully detailed report with a new vendor/ account on every page prints.
★ Multiple – a fully detailed report with multiple vendors/accounts per page prints. Brief – a short, non-detailed report prints. Summary – only totals are print.
Amount Type . . . determines if gross or net amounts due are shown. INV – the report shows invoice (gross) amounts. NET – the report shows net amounts.
Report Date . . . determines how the payables due shown on the report are aged.
DISC – The payables are aged by discount dates. ★ DUE – the payables are aged by due dates.
Entry ID Start/End . . . determines the range of employee entry IDs for whom
payables due display.
STEP3-B: PRINTING THE PAYABLES DUE REPORT Once you have entered all the report parameters, press the [Go] key to print the report. The system will prompt you to choose a printer option.
STEP 4: RELEASING PAYABLES The Payable Release option allows you to select invoices in the system which are due, or which will soon become due (based upon certain Payment Release parameters), and then release them for payment. When you release a payable, you are allocating funds to pay off the vendor invoice that corresponds to that payable. Once a payable has been released, you can print a check for it.
The Payment Release Parameters, described in Step 4-A, allow you to limit the payables you release. Every payable that fits the parameters you specify is then displayed on a Payment Summary screen, shown in Step 4-B. You can either simultaneously release all of the payables shown on the summary, or step through the individual payables, editing and releasing them as you go. If you choose to step through the payables, the system displays details for each on the Edit Payments screen, as described in Step 4-C.

1 PAYABLES
46
PAYABLES
STEP 4-A: ENTERING THE PAYMENT RELEASE PARAMETERS
The Payment Release Parameters allow you to limit the payables you release:
The parameters on this screen are divided into three sections: VENDOR PARAMETERS, RELEASE PARAMETERS, and PAYABLE PARAMETERS. All of the VENDOR PARAMETERS are self explanatory, but some of the RELEASE and PAYABLE PARAMETERS are more complicated. The fields that require it are explained below in greater detail.
The Release Date is the date when the release should be carried out. This field defaults to the Session Defaults Payable Date, but can be edited. This date is the same as the Check Date that prints on the Anticipated Cash Disbursement Journal and refers to the check date parameters when printing checks.
You are prompted for a Min Check Amt if you are performing an automatic release.
The Cash Account field defaults to the cash account as determined by the hierarchy search of Ledger accounts. You can override the default by using the [Browse] key and selecting another account.
The Automatic Release field allows you to specify whether you want to view each payable that matches the parameters individually and approve the release of each. If you enter NO in this field, the system displays a summary screen that shows all payables that match the parameters and allows you to make any necessary edits. If you enter YES in this field, the system will automatically release all payables that match the parameters.
The Max Amt/Payable field allows you to specify the maximum payable amount that can be released during this session. Any payable with an amount greater than the amount you specify here is automatically excluded by the system and will not be released. If Max Amt/Payable is set to zero, the system assumes that there is no limit on payable amount.
The Min Disc % field allows you to specify the minimum discount percentage allowable for this session. Any payable with a discount percentage less than the percentage you specify here is automatically excluded by the system and will not be released. This field defaults to zero, but can be edited (field must be set to a positive value).

1 PAYABLES
47
PAYABLES
The Min Disc Amt field allows you to specify the minimum discount amount allowable for this session. Any payable with a discount amount less than the amount you specify here is automatically excluded by the system and will not be released. This field defaults to zero, but can be edited (field must be set to a positive value).
You can specify whether to Include Credits in the release. Set this field to ALL to include all credits that exist in the system. Set this field to CURRENT to include all credits that match the other Payment Release Parameters. Set this field to NONE to exclude all credits.
There are two Ending Date Type fields, which can be set to DUE, DISC, INV, or NONE. You can also specify a 1st and 2nd Invoice Date. The release will include all payables with dates that fall on or before the dates specified in these fields. Setting the Ending Date Type field to DUE will cause the system to look at only those payables whose Due Date falls on or before the first or second date specified. Setting this field to DISC will cause the system to look at those payables whose Due Date or Disc Date falls on or before the Date specified, but falls after the Session Default Date.
Note: When releasing by discount date, the system will not release a payable whose discount date has past the Session Default Date. (Meaning that the Session Default Date is greater than the payable discount date.) This occurs because the system is assuming you are only releasing payables on which you can take a discount. If the discount date is past due, then a discount should not be rewarded.
Setting the Ending Date Type to INV will cause the system to look at only those payables whose Invoice Date falls on or before the Date specified. Setting this field to NONE tells the system that you are not limiting payables to be released according to Due Date, Discount Date, or Invoice Date.
The first and second Ending Date Type and Dates fields work in conjunction with each other. For example, to release all invoices whose discount date or due date can be taken up to 06/20 or release all invoices whose due date is 06/25, you would do this in two different release sessions. Specify only one Ending Date Type and Date.

1 PAYABLES
48
PAYABLES
STEP 4-B: THE PAYMENT SUMMARY
The Payment Summary screen follows the Payment Release Parameter screen, and shows you a summary, listed by vendor, of all the payables that match the parameters you specified. The Payment Summary screen is shown as follows:
+----------------------------- Payment Summary ------------------------------+ | +-------------------------------------------------------------------+ | | |ID Name Open Released Net | | | |------ --------------- -------------- -------------- --------------| | | |MARKET MARKET TOOL & S 1,000.00 0.00 0.00| | | | | | | | | | | | | | | | | | | | | | | | | | | | | | | +-------------------------------------------------------------------+ | | | | TOTALS: 1,000.00 0.00 0.00 | | | | | | | +----------------------------------------------------------------------------+
At this point, you can either edit individual vendors by highlighting a summary line and pressing [Go] (see the section of this document labeled “Using Edit, Vendor, and All” for more detail), [Enter], or you can press [Options] to display a list of additional options.

1 PAYABLES
49
PAYABLES
Using Edit, Vendor, and All There are three Additional Options available from this screen: Edit, Vendor, and All. To access them, press the [Options] key. Choose Edit to edit individual vendor payments through the Edit Payments screen. Choose Vendor to release all payables for the highlighted vendor. Choose All to automatically release all the payables that match the parameters. Choose Undo to unrelease the payables that match the parameters.
See Step 6 for additional information on the Undo option.
STEP 4-C: EDITING PAYMENTS (PREVIEWING RELEASES) AND RELEASING PAYABLES
When you select a vendor from the Summary screen, the Release Payables screen shows you the details for each payable that matches the parameters you entered in Step 4-A:
+---------------------------- Release Payables ------------------------------+ | Acct#: 00-11-111-101 Name: ACCOUNTS PAYABLE CASH AC #1 | | | | ID: MARKET Check Date: 01/24/94 1,000.00 | | Pay to: MARKET TOOL & SUPPLY COMPANY | | Addr: ATTN: BOB MARKET | | 11 SAMPLE STREET Check: 1 of: 1 | | YARDLEY PA 99999 | | Memo: PAYMENT FOR JANUARY ORDER | | | | +------------------------------Invoices-------------------------------+ | | |Invoice# Seq# Open Amt Release Amt Discount Amt| | | |------------------ ----- -------------- -------------- --------------| | | |10000000 1 1,000.00 0.00 0.00| | | | | | | | | | | | | | | +---------------------------------------------------------------------+ | +----------------------------------------------------------------------------+�
The Release Payable screen is divided into two parts. The upper portion of the screen shows a preview of the check that will be printed for this payable. The check amount shown on the preview is the Release Amount, and will change if edited in the lower portion of the screen.
The upper portion of the screen also shows the Acct# field. This field holds the account number of the cash account from which funds to pay the invoice should be taken. This field defaults to the cash account for the vendor, branch, group, or company. The account name displays to the right of the account number.

1 PAYABLES
50
PAYABLES
The lower portion shows an Invoice frame. To edit a payable, use your cursor keys to select the invoice and then press [Go] or [Enter] to display the Edit Invoice screen:
+----------------------------Edit Invoice-----------------------------+ |Invoice# Seq# Open Amt Release Amt Discount Amt| |------------------ ----- -------------- -------------- --------------| |1000000 1 1,000.00 0.00 0.00| +---------------------------------------------------------------------+
You can edit the Release and Discount Amts, or you can press [Ctrl][P] to automatically release the Open Amt. The Release Amt is the amount to be released in this field. The amount entered in the Discount Amt field will be subtracted from the Release Amt to get the Net (actual) amount of the check. The Open Amt is the total amount you still owe toward the invoice.

1 PAYABLES
51
PAYABLES
Using New, Previous Check, Next Check, Previous Vendor, Next Vendor, Release All, Undo, Edit, and Invoice There are a number of Additional Options available from this screen. To access them, press the [Options] key.
New allows you to create a new check for the current vendor. The check is created with an initial amount of zero. The Invoice frame allows you to browse the existing payables for the current vendor; you can select any of them for release towards this check.
Choose the Previous Check option to view previous checks for the current vendor. If there are no previous checks, the system displays the message “This is the first disbursement.”
Next Check allows you to view the next check for the current vendor or to create a new check. If there are no more checks, the system displays the message “This is the last disbursement.” If a vendor’s payee information was edited during the payable entry, the system creates a separate check for that payable.
Previous Vendor allows you to view checks for the previous vendor on the summary screen. If there are no previous vendors, the system displays the message “This is the first vendor.”
Choose the Next Vendor option to view checks for the next vendor on the summary screen. If there are no more vendors on the summary, the system displays the message “This is the last vendor.”
You can Release All payables for the selected vendor.
Choose the Undo option to undo all releases made during the current session.
Choose Edit to edit the header information of the payable. The system allows you to edit the Check Date and Memo. The Check Date field defaults to the Payable Date in the Session Defaults but can be edited. The check Memo field should be used to hold a description of the payment. To print the memo on the check, set the Payables Company Option, Memo on Check, to Yes.
Choose Invoice to view vendor invoice information for the selected invoice. See the section labeled “Viewing Payables Information” in the reference section of this manual for more information.
After a payable has been released, you can undo the release, edit the release, and print a check.
Any credit invoices that fall within the release parameters are released if you are using the auto-release function. The system will not print a credit check, but will hold the released credits until there are invoices for which a positive check will be printed. Note that invoices are applied to credits that are previously released. When printing checks, the system considers the check date to be the original release date of the oldest release of any invoice on a check.

1 PAYABLES
52
PAYABLES
Before you print checks, however, you should review the payments that are going out by printing the Anticipated Cash Disbursements report.
STEP 5: PRINTING THE ANTICIPATED CASH DISBURSEMENT REPORT The Anticipated Cash Disbursement Report shows all of the open disbursements (unprinted checks) that exist for a range of cash accounts and vendors. The disbursements print by cash account in vendor and invoice number sequence; the report shows each invoice date, due date, gross amount, discount amount, and net amount. Totals for each cash account are also shown.
STEP5-A: SETTING THE REPORT PARAMETERS
When you print an anticipated cash disbursement report, the system will prompt you to enter the following report parameters:
+------------------- Anticipated Cash Disbursement Report -------------------+ | | | Start Cash Acct#: | | End Cash Acct#: | | Start Vendor: | | End Vendor: | | Start Release Date: | | End Release Date: | | Page Format: | | | | | | | | | | | | | | | | | | | +----------------------------------------------------------------------------+
The Start and End parameters allow you to limit the report or journal to a particular range. The Anticipated Cash Disbursement Report parameter screen prompts you for a Start and End Cash Acct#, Vendor, and Release Date. When printed, the Cash Disbursement Report will show only those payables that fall within the ranges you enter in these fields.
STEP5-B: PRINTING THE ANTICIPATED CASH DISBURSEMENT REPORT
Once you have entered all the report parameters, press the [Go] key to print the report. The system will prompt you to choose a printer option.
This report will show you what will print on each check. Review the report carefully to be sure that the amounts and payees are correct. If everything is correct, go on to the next step and print the checks. If you find a mistake and you need to unrelease a payable or edit the amount released, see STEP 5-C.

1 PAYABLES
53
PAYABLES
STEP5-C: UNRELEASING PAYABLES
You can correct mistakes you find on the Anticipated Cash Disbursement Report, by unreleasing the incorrect payable, editing the payable, and then rereleasing it.
To unrelease a payable, select the Payable Release option from the Check Processing menu. When the Payment Release Parameters display, set the parameters to include the payable you are trying to correct and set the Auto Release field to NO. Undo or Edit the payable.
Using Undo and Edit The Undo command is an Additional Option available from the Payment Summary screen. To use Undo, you must first specify the Payment Release Parameters so that the Payment Summary screen (Auto Release must be set to NO to see the Summary screen) will include the payable or payables you want to unrelease. Once you have done this, and the Payment Summary screen displays the payable you want to edit, highlight it, press the [Options] key, and select Undo. All the payables shown in the Payment Summary screen will be unreleased.
The Edit command is also an Additional Option available from the Payment Summary screen. Like Undo, to use Edit you must first specify the payment Release Parameters so that the Payment Summary screen will include the vendor(s) you want to edit. Once you have done this, highlight the payable you want to edit, and do one of the following: press [Enter] or press [Options] and choose Edit. In either case, the Payment Release screen (as shown in Step 4-C) displays. You can edit the Release and Discount amounts for the payable as necessary or press the [Options] key to undo the vendor’s payables.
STEP 6: PRINTING PAYABLES CHECKS AND CHECK REGISTER A check can be printed for any payable that has been released. Be sure that you have printed and reviewed the Anticipated Cash Disbursements Journal before you actually print checks. Remember, after you print a check you can still void it before you commit it on the Check Register.

1 PAYABLES
54
PAYABLES
STEP 6-A: PRINTING PAYABLES CHECKS
A check can be printed for any payable that has been released for payment. The Print Payable Checks screen is shown as follows:
To limit the checks that are printed, you can specify a Start and End Vendor code, and a Start and End Date (check date). The actual check date that prints on the check is the Session Default date.
The Cash Account field holds the account number. This field defaults to the branch, group, or company default cash account, if there are open disbursements for that account. You can enter a different account by typing in a new account number or browsing for another account number.
When assigning a Start Check#, the system looks for the highest check number in check history and always uses the next number in the sequence as the default. This number can be edited to any number that does not already exist in the check history for this cash account.
Checks with a zero amount are generated when an invoice and an offsetting credit are released together. Set the Suppress Zero $Checks? field to YES to suppress the printing of checks with zero amounts. Set this field to NO if you want to print checks with zero amounts.
To print the description entered during Payable Entry, set the Print Description field to YES. Set this field to NO if you do not want the description to print.
Note: Before Acclaim 12.03.01, several characters of the payables description would get cut off when printing checks using the JetForm software. This has now been corrected but you must first upload a new check form that contains the mappings for the payables description. For more information on obtaining the new check form, contact the Third Party Support Department.
Once you have entered the parameters, press [Enter] to print the checks. You can print a test check by pressing the [Options] key, selecting the Test Check option, and choosing a printer.

1 PAYABLES
55
PAYABLES
SAMPLE: PAYABLES CHECK (USING FORMAT A & OPTIONAL FORMS DESIGN SOFTWARE)

1 PAYABLES
56
PAYABLES
STEP 6-B: PRINTING THE CHECK REGISTER
The PAYABLES Check Register does the following things:
1. It records the cash account number, check number, the payee, and the gross, discount, and net amounts for the checks. You can print this register and use it to review all of the checks that were printed. If you notice any mistakes, you can use the Void Check option to correct them.
2. When committed, the Check Register creates an autobatch (called CD) to post the appropriate debits and credits to the Ledger. An autobatch is a posting batch that is automatically created by printing and committing various registers in the system. (IMPORTANT: See Tip: Committing the Check Register to History.)
After checks have been printed and the check register has been reviewed, the next step is to send checks to the vendor. As usual, the checks will be cashed and returned to you with your bank statement.
The Check Register screen is shown as follows:
Vendor Start, End ��
. . . range of vendors for which checks are printed on the check register.
Check Date Start, End
. . . range of check dates for which checks are printed on the check register.
Cash Acct# Start, End ��
. . . range of cash accounts for which checks are printed on the check register.

1 PAYABLES
57
PAYABLES
Report Type . . . determines which checks will print on the Check Register. When this field is set to ★ CURRENT – only current entries (checks that have not been committed to history) will
print on the Check Register. HISTORY – only committed entries (checks that have been committed to history) will print on the Check Register. BOTH – all entries will print on the Check Register.
Include Payables
. . . determines whether payables detail will appear on the Check Register. When this field is set to
Yes – extra payables detail is included on the Check Register. In addition to the check number, payee, pay-to information, check date, group number, and gross, discount, and net amounts, this extra detail includes the vendor-invoice number, the invoice date, and the current payments for the gross, discount, and net amounts.
★ No – no extra payables detail is included on the Check Register. The information included on the Check Register will only include the check number, payee, pay-to information, check date, group number, and gross, discount, and net amounts.
Commit . . . commits the Check Register.
When this field is set to Yes – the information on the Check Register is committed to history. You can still view this information after you have committed it to history. Important! Once the register is committed to history, you can no longer reprint the checks that had been on that register.
★ No – the information on the Check Register is not committed to history and will appear the next time you print the Check Register.
Note: Q-Mode must be activated to commit the Check Register.

1 PAYABLES
58
PAYABLES
Committing the Check Register to History Question: Can you Void Checks or change distribution accounts after the Check Register
has been committed to history?
Answer: You can void a check for a payable that has been committed to history through the Check Register. The system adds the voided check to the Voided Check Register (as long as the autobatch default is enabled), which will be posted to the Ledger through the VOID autobatch. The VOID batch will debit (increase) cash and credit (increase) payables. All vendor invoices paid by this check will now be returned to open payables for this vendor. Take great care when committing information to history, and appoint a specific time to do it each period (such as month-end).
Once you have entered all the report parameters, press the [Go] key to print the report. The system will prompt you to choose a printer option.
STEP 6-C: REPRINTING AND VOIDING CHECKS
The Check Processing menu contains options to Reprint and Void Checks. If checks are destroyed or damaged, you can use the Reprint Checks option to print them again. If you make a mistake, (i.e. print a check for the wrong amount or payable to the wrong vendor), you can use the Void Check option to correct that mistake.
Reprinting Checks
If your printer fails or jams and checks are destroyed, you can reprint them. The Reprint Payable Checks screen is very similar to the Print screen:
+-------------------------- Reprint Payable Checks --------------------------+ | | | | | Start Check #: | | End Check #: | | Cash Account: | | Resequence?: | | New Start Check #: | | | | | | | | | | | | | +----------------------------------------------------------------------------+
To limit the checks that are printed, you can specify a Start and End Check #. For example, if the printer jammed and destroyed checks 100 through 200, you would enter 100 as the starting check number, and 200 as the ending check number. Just as in the Print screen, you must specify a Cash Account.
TIP

1 PAYABLES
59
PAYABLES
If the Resequence field is set to NO, the checks you are reprinting will be printed with the original check numbers. If this field is set to YES, the checks will be assigned new check numbers. The original check numbers appear on the Check Register as voided.
The New Start Check # field is only accessible if the Resequence field is set to YES. Enter the new starting check number in this field.
Note: You cannot reprint a check after the Check Register, on which it was displayed, is committed to history.
Using Test There is one Additional Option available from the Reprint Checks screen: Test. This option is used to print a test check. You can print the test check to the terminal to see how the information will display, or you can send it to a printer.
Voiding Checks
If you make a mistake (i.e. print a check for the wrong amount or payable to the wrong vendor), you can Void Checks, correct the problem, and then Print a new check.
When you void a check, the default Cash Account number displays. You can type in a different account number at this time or you can use the [Browse] key to search for another. The Account Name displays below the number. A summary of all checks printed for that account that have not been committed to history is displayed below the Cash Account field:
+------------------------------- Void Checks --------------------------------+ | Cash Account: 00-12-112-112 | | Account Name: ACCOUNTS PAYABLE ACCT#1 | | | | +----------------------------------------------------------------------+ | | | Check # Date Vendor Vendor Name Check Amount| | | |-------- -------- ------ ------------------------------ --------------| | | | 0000001 01/30/94 MARKET MARKET TOOL & SUPPLY COMPANY 1,000.00| | | | | | | | | | | | | | | | | | | | | | | | | | | | | | | | | | | +----------------------------------------------------------------------+ | | | +----------------------------------------------------------------------------+
To locate a particular Check # or Vendor, use the arrow keys or the Page Up and Page Down keys to scroll through the list. You can also type a string of characters and the system will search for that string.

1 PAYABLES
60
PAYABLES
To void a check, locate it in the list, highlight it and press [Enter]. Voiding a check does not remove the payable from the system; instead, voiding returns the payable to the “released” status it held before you printed the check. A new check must be printed to pay off the invoice.
Using Void, Unrelease, and Toggle There are three Additional Options available from this screen: Void, Unrelease, Toggle. To access these options, use the [Options] key.
Use Void to void the highlighted check. Voiding a check does not remove the payable from the system; instead, voiding returns the payable to the “released” status it held before you printed the check. You can edit the release through the Payable Release option. A new check must be printed to pay off the invoice. You can void without using this option by highlighting the appropriate check and pressing [Enter].
Use Unrelease to void the check and unrelease the payable. Voiding returns the payable to the “released” status it held before you printed the check. The Unrelease option allows you to return the payable to an even earlier stage, before release. The payable must be re-released and a new check must be printed to pay off the invoice.
Use Toggle to change the way that the check list is sorted. You can sort the list by Vendor code or by Check #.
USING THE VOIDED CHECK REGISTER
The Voided Check Register does two things:
1. It keeps a detailed listing of all checks that were voided after being committed on the Check Register.

1 PAYABLES
61
PAYABLES
2. When committed, the Voided Check Register creates an autobatch, if enabled, (called VOID) to post to the Ledger. An autobatch is a posting batch that is automatically created by printing and committing various registers in the system. When the Voided Check Register is committed and the corresponding VOID autobatch is posted to the Ledger, reversing entries are created for any checks that were previously posted.
Setting Up Autobatch Defaults in G/L You can use the Autobatch Defaults in the LEDGER module to maintain control over automatic posting to the ledger. You can indicate the areas in the system where autobatching is permitted and set up defaults for creating autobatches. One or more autobatches can be automatically created when monthly reports are committed.
Setting the Report Parameters
When you print a Voided Check Register, the system prompts you to enter the following report parameters:
+-------------------------- Voided Check Register ---------------------------+ | | | Start Vendor: | | End Vendor: | | Start Check Date: | | End Check Date: | | Start Cash Acct#: | | End Cash Acct#: | | Report Type: | | Commit: | | | | | | | | | | | | | | | | | +----------------------------------------------------------------------------+
Using the start and end parameters you can limit the checks that are printed on the register. You can specify a Start and End Vendor code, Check Date, and Cash Account #. You can use the [Browse] key for the Vendor and Cash Account # fields. Only those checks that match the parameters will print on the report.
The Report Type field can be set to CURRENT, HISTORY, or BOTH. If this field is set to CURRENT, only current entries (checks that have not been committed to history) will print on the report. If this field is set to HISTORY, only committed entries (checks that have been committed to history) will print on the report. If this field is set to BOTH, all entries will print on the report.
To commit the Voided Check Register, set the Commit field on the Void Check Register parameter screen to YES. All of the information on the register is placed into history. You can still View information you have committed to history. If the Commit field is set to NO when you print the Voided Check Register, the information it contains has not been committed from the register and will still be there as current information the next time you print it.
TIP

1 PAYABLES
62
PAYABLES
Once you have entered all the report parameters, press the [Go] key to print the report. The system will prompt you to choose a printer option.
STEP 6-D: PRINTING THE CHECK STUB DETAIL REPORT
The Check Stub Detail Report is generated by the system only if the Print Check Detail Report Company Option is set to YES. If this is the case, all of the check details for a vendor are consolidated into a Detail Check Report. The message “See Attached For Details” prints on each check stub for which there are too many details. If you use the Detail Check Report option, it should be printed each time checks are printed.
The Detail Check Report screen is shown as follows:
A separate Detail Check Report must be printed for each cash account. The default Cash Account displays here, but you can override it by entering a new account number or using the [F3] key to search for an account. Enter a Start and End Check Number at the prompts for the most recent check run. The report will show only those details that fall within this range of check numbers for the specified account. To print the description entered during Payable Entry, set the Print Description field to Yes.
STEP 7: PRINTING THE UNRECONCILED CHECK LIST AND RECONCILING CHECKS
All unreconciled checks appear on the Unreconciled Check List. Whenever you receive a bank statement, you should compare the check numbers and amounts with those on the Unreconciled Check List. All matches should be reconciled through the Check Reconciliation option. If there is a discrepancy between the bank statement and the Unreconciled Check List, the controversial entry should not be reconciled, and the matter should be investigated.
�See the PAYABLES Company Options for more information.

1 PAYABLES
63
PAYABLES
STEP 7-A: SPECIFYING THE REPORT PARAMETERS
When you print an Unreconciled Check List, the system will prompt you to enter the following list parameters:
+------------------------- Unreconciled Check List --------------------------+ | | | Start Vendor: | | End Vendor: | | Start Check Date: | | End Check Date: | | Start Cash Acct#: | | End Cash Acct#: | | Start Check#: | | End Check#: | | Reconciled: | | | | | | | | | | | | | | | +----------------------------------------------------------------------------+
The Start and End parameters allow you to limit the report or journal to a particular range. The Unreconciled Check List parameter screen prompts you for a Start and End Cash Acct#, Vendor, and Check Date. If the report should show reconciled checks, set the Reconciled field to YES. If the report should show only unreconciled checks, set the Reconciled field to NO.
When printed, the Unreconciled Check List will show only those payables that fall within the ranges you enter in these fields.
Printing the Report
Once you have entered all the report parameters, press the [Go] key to print the report. The system will prompt you to choose a printer option.

1 PAYABLES
64
PAYABLES
STEP 7-B: RECONCILING CHECKS
Checks that match the Unreconciled Check List should be reconciled in the system. The Check Reconciliation screen is shown as follows:
The Cash Account field holds the account number. The statement you received from the bank will list each check written against that account for the month. Enter the range of check numbers in the Start and End Check Number fields.
The End Statement Date field indicates the ending date of the bank statement. This field allows you to omit from reconciliation the checks that you printed after the statement date.
The Session Total field keeps a running total of all checks reconciled within the current session.

1 PAYABLES
65
PAYABLES
Once these fields have been entered and you accept this screen, the system displays a list of all checks printed for the specified account and within the specified range of check numbers:
The list shows each Check #, Date, Vendor code, Vendor Name, Check Amount, and whether or not this check has been reconciled. The Check Reconciliation Report only lists those checks that appear on your most recent statement, i.e., checks dated on or before the date entered in the End Statement Date field on the Check Reconciliation Report parameters screen.
The Rec column shows either a YES or a NO, indicating whether or not you have reconciled the check. To toggle from NO to YES or back again, highlight the appropriate check and press [Enter].
To accept the checks selected for reconciliation, press the [Go] key and the system prompts you to accept. To cancel all reconciliations, press the [Quit] key. You can then respecify a new Starting and Ending Check # and/or a different Cash Account.

1 PAYABLES
66
PAYABLES
Using Check, All, Undo, and Toggle There are four Additional Options available from the Check Reconciliation screen: Check, All, Undo, and Toggle. To access these options, press the [Options] key.
The Check option allows you to reconcile the highlighted check. When you reconcile, you indicate that you have compared the bank statement with your records and determined that there is no discrepancy for this particular check. You can reconcile without using this option by highlighting the appropriate check and pressing [Enter].
The All option allows you to reconcile all the checks within the selected range. When you reconcile, you indicate that you have compared the bank statement with your records and determined that there is no discrepancy for these particular checks.
The Undo option allows you to unreconcile all the checks within the selected range.
The Toggle option allows you to toggle the way that the check list is sorted. You can sort the list by Vendor code or by Check #.
STEP 7-C: CANCEL RECONCILIATION
To cancel a reconciliation, Q-Mode must be enabled. Select Cancel Reconciliation from the Check Processing menu in the Accounts Payable module.

1 PAYABLES
67
PAYABLES
The Cancel Reconciliation screen appears:
Cash Account �
. . . account number from which the check is drawn.
Vendor Start/End �
. . . range of vendors from which you wish to cancel check reconciliations.
Check Number Start/End
. . . range of check numbers for which you wish to cancel reconciliations.
Check Date Start/End
. . . range of check dates for which you wish to cancel reconciliations.
Session Total . . . running total of all cancelled reconciliations within the current session.
Once these fields have been entered and you accept this screen, the system displays a list of all checks reconciled for the specified account and within the specified range of check numbers and dates:
Check # . . . check number to be unreconciled.

1 PAYABLES
68
PAYABLES
Date . . . date the check reconciliation was reconciled.
Vendor . . . vendor code of the vendor on the check.
Vendor Name . . . name of the vendor on the check.
Check Amount . . . amount of the check.
Rec . . . indicates whether or not the check is reconciled.
This column shows either YES or NO. To cancel the reconciliation, toggle from YES to NO by pressing [Enter].
There are four additional options available from the Cancel Reconciliation screen: Check, All, Undo, and Toggle. To access these options, press the PowrDrill key [F6].
Check . . . cancel the reconciliation of the highlighted check. You can cancel the reconciliation without using this option by highlighting the appropriate check and pressing [Enter].
All . . . cancel the reconciliation of all the checks within the selected range.
Undo . . . re-reconcile all the checks within the selected range.
Toggle . . . toggle the way that the list is sorted. You can sort the list by Vendor code or by Check #.
Cancelled Reconciliation Register
The Cancelled Reconciliation Register is available to view any necessary information regarding the canceling of a reconciliation.

1 PAYABLES
69
PAYABLES
To access the Cancelled Reconciliation Register, Q-Mode must be enabled. Select Cancelled Reconciliation Register from the Check Processing menu in the Accounts Payable module.
The Cancelled Reconciliations Register parameter screen appears:

1 PAYABLES
70
PAYABLES
Vendor Start/End �
. . . range of vendors from which you wish to view cancelled check reconciliations.
Check Date Start/End
. . . range of check dates for which you wish to view cancelled reconciliations.
Cash Account Start/End �
. . . range of account numbers from which you wish to view cancelled check reconciliations.
Check # Start/End
. . . range of check numbers you wish view cancelled check reconciliations.
Report Type
. . . select report type to view. ★ Current – only the current reason for cancellation is shown.
History – only the first reason for cancellation is shown. Both – both the current reason for cancellation and the previous reason are shown.
Commit . . . allows you to commit the report information to history. ★ NO – The information on the register is not placed into history. The information will
still be there as current information the next time you print the report. YES – All of the information on the register is placed into history.
Foreign Currency Options Currency Start/End
. . . allows you to view the cancelled reconciliations for checks drawn on foreign currency. This field is only available if you have Foreign Currency enabled.

1 PAYABLES
71
PAYABLES
Once the parameters have been entered and you accept this screen, the system displays the cash account under which the check was written; the payee and name; the check date; the number of times the check has been unreconciled; the check amount; and the branch and group numbers. The reason(s) for the cancellation, the date the check was cancelled, and the user ID of the person who cancelled the reconciliation are shown following this information:
Sample: The Cancelled Reconciliation Register (printed to the Viewer)
Foreign Currency
If you have Foreign Currency enabled and the vendor has a foreign currency, the Net amount displays on the first line in the vendor’s currency; the second line shows the net amount in the home currency.
Foreign Currency

1 PAYABLES
72
PAYABLES
Cash account totals and branch totals display in the home currency. A foreign currency breakdown by branch shows after the branch totals.
For more information on Foreign Currency, refer to the Foreign Currency manual.
STEP 8: VIEWING INFORMATION There are five options available from the View menu. These allow you to see, but not edit, Material Receipts, Vendor Confirmations, Payables, Payables by Purchase Vendor, and Disbursements. The View PO and View Payee options (which can be accessed through Additional Options throughout the system) are also described in this section of the manual.
MATERIAL RECEIPTS
The Material Receipts option allows you to select a purchase order and view the material that has been received against it. Details are shown for each receipt on the purchase order and for each item on the receipt.
+-------------------------- Material Receipt View ---------------------------+ | Vendor: MARKET Name: MARKET TOOL & SUPPLY COMPANY NS Prod Grp: 0 | | PO#: 1022222 Ext PO#: JANUARY ORDER | | | | +-------------------------- Receipts ---------------------------+ | | | Rcpt # Rcv Date Invt Items NS Items Ext Price| | | | ------ -------- ---------- -------- --------------| | | | 0001 01/25/94 1 0 1,000.00| | | | | | | | | | | +---------------------------------------------------------------+ | | +---------------------------- Items ----------------------------+ | | |Line# Item Code Rcv Qty Ext Price| | | |----- --------------------------- -------------- --------------| | | | 0001 ITEM 100.00 1,000.00| | | | | | | | | | | | | | +-----+---------------------------------------------------------------+------+

1 PAYABLES
73
PAYABLES
Enter a PO# or a Vendor code at the prompts. Once one of these fields has been specified, the remaining fields in the screen are filled in. There are two frames shown here, a Receipt frame and an Item detail frame.
To view more item details, select a receipt and press [Enter]. The Receipt Item Details screen displays:
+------------------------- Receipt Item Details -------------------------+ | | | PO#: 1022222-0001 Received: 100.00 | | Item: ITEM Unit Size: 1.0000 | | Desc: ITEM DESCRIPTION 1 Cost: 10.0000 | | ITEM DESCRIPTION 2 Multiplier: 1.0000 | | Ext Cost: 1,000.00 | +------------------------------------------------------------------------+
The Receipt Item Details screen shows information specific to the receipt you selected. To return to the Material Receipt View screen, press the [Go] or [Quit] key.
Using Previous PO, Next PO, Previous Vendor, and Next Vendor There are four Additional Options available from this screen: Previous PO, Next PO, Previous Vendor, and Next Vendor. To access these options, press the [Options] key and select the option you want to use. You can view the receipts for the Previous and Next PO, and the receipts for the Previous and Next Vendor.
VENDOR CONFIRMATIONS
The Vendor Confirmations option allows you to select a vendor return and view the material that was confirmed as returned. Details are shown for each confirmation on the return and for each item on the confirmation.
+------------------------- Vendor Confirmation View -------------------------+ | Vendor: MARKET Name: MARKET TOOL & SUPPLY COMPANY NS Prod Grp: 1 | | Ret#: 1022222 Ext Ret#: RETURN-123456 | | | | +------------------------ Confirmations -------------------------+ | | | Conf # Conf Date Invt Items NS Items Ext Price| | | | ------ --------- ---------- -------- --------------| | | | 0001 02/18/94 1 0 1,000.00| | | | | | | | | | | +----------------------------------------------------------------+ | | +----------------------------- Items-----------------------------+ | | | Line# Item Code Conf Qty Ext Price| | | | ----- --------------------------- -------------- --------------| | | | 0001 ITEM 100.00 1,000.00| | | | | | | | | | | | | | +-----+----------------------------------------------------------------+-----+

1 PAYABLES
74
PAYABLES
Enter a Vendor code or a Ret# at the prompts. Once one of these fields has been specified, the remaining fields in the screen are filled in. There are two frames shown here, a Receipt frame and an Item detail frame.
To view more item details, select a receipt and press [Enter]. The Receipt Item Details screen displays:
+---------------------- Confirmation Item Details -----------------------+ | | | Ret#: 1022222-0001 Received: 100.00 | | Item: ITEM Unit Size: 1.0000 | | Desc: ITEM DESCRIPTION 1 Cost: 10.0000 | | ITEM DESCRIPTION 2 Multiplier: 1.0000 | | Ext Price: 1,000.00 | +------------------------------------------------------------------------+
The Confirmation Item Details screen shows information specific to the return you selected. To return to the Confirmation View screen, press the [Go] or [Quit] key.
Using Previous Return, Next Return, Previous Vendor, and Next Vendor There are four Additional Options available from this screen: Previous Return, Next Return, Previous Vendor, and Next Vendor. To access these options, press the [Options] key and select the option you want to use. You can view the receipts for the Previous and Next Return, and the receipts for the Previous and Next Vendor.
View Payables
The Payables option allows you to select an invoice and view vendor invoice information. You can view Payable, Purchase Order and Receipt information through this option.
The View Payables screen prompts you for a vendor code, invoice number, or purchase order number. A list of all payables in the system is displayed for the information you specified:

1 PAYABLES
75
PAYABLES
Using the PowrDrill
On the View Payables screen (or View Payables by Purchase Vendor screen), a vendor code, invoice number, or PO is entered and then the list of available invoices for that vendor is displayed. Previously, there had been a PowrDrill option (View) to view the list in order of vendor invoice or PO number. This View option has been replaced with three different options: Vendor Invoice #, PO #, and Invoice Date. These options allow you to index the list of payables by either the vendor invoice number, PO number, or invoice date.
Once the list is displayed, you can press [F6] and select a different index option, which remains in effect until another index option is chosen, or until you press [F4] to change vendors.
New viewing options are
shown on the PowrDrill.

1 PAYABLES
76
PAYABLES
The Index by Invoice Date browse displays invoices from the least recent to the most recent (oldest date to newest date). The data is indexed by invoice date and vendor invoice number. Key resolution will be available for each of the view options.
Specifying the Payable
To view payables details, select a payable and press [Enter]. The Vendor Invoice Information screen for that payable displays:
This screen shows the Invoice amount, as it was entered through the New Payable option.
The Prepaid field holds the amount (if any) that was paid to the vendor before the invoice was entered into the system.
Prepaid Amounts Material costing $100 is delivered to your company and you pay the delivery man $60 of the $100 total. When you receive the invoice, you are charged only for the balance that you owe to the vendor, $40. In this example, the Invoice field would show $40, and the Prepaid field would show the amount you paid on delivery, $60.
The Released field shows the amount that has actually been released for payment.
The Invoice Date shown here was entered in the New Payable screen. The default for the Invoice Date was the Payables Date set in the Session Defaults
For
example:

1 PAYABLES
77
PAYABLES
The Due Date and Disc Date are calculated using the net and discount terms from the vendor record, and the invoice date. The due dates and discount dates are recalculated whenever the invoice date or any of the net and discount terms are changed.
The Posting Date is the date on which the payable will be posted to the General Ledger.
The History? field indicates whether or not the information you are viewing has been committed to history. If this field is set to NO, the information is current and active in the system. If this field is set to YES, the information is historical.
The Complete? field indicates whether or not the invoice you are viewing has gone through the entire PAYABLES process.
The Unrec Comment# (unreconciled comment number) field is displayed and aids in tracking unreconciled payables. You can assign any payable an unreconciled comment number in either the New Payable or Edit/Delete Payable screen.
Using Order, Receipt, Vendor, and Toggle Using the Additional Options, you can view Purchase Order Information, view Material Receipt Information, view Payee (Vendor) Information, and Toggle account and payment information. The Receipt option functions the same way as described above (see “Material Receipts” in this section). The Order and Vendor options are described at the end of this section. The Toggle option is described below.
If you choose the Toggle option, the G/L Distributions frame on the Vendor Invoice Information screen is replaced with a Payments frame:
+------------------ Payments -------------------+
| Check# Date Release Amt Net Amount|
|-------- -------- -------------- --------------|
| 0000001 01/24/94 00.00 1,000.00|
| |
| |
| |
+-----------------------------------------------+
The Payments frame shows each payment (in check number sequence) made against the vendor’s invoice. Choose the Toggle option again to return to the G/L Distributions frame.
PAYABLES BY PURCHASE VENDOR
The Payables by Purchase Vendor option allows you to select an invoice and view vendor invoice information for purchase vendors.
The View Payables by Purchase Vendor option first prompts you for a vendor code, a vendor invoice number, or a purchase order number. If you enter a vendor code, the system lists all invoices for that vendor and places

1 PAYABLES
78
PAYABLES
the cursor on the first vendor in the list. If you enter a vendor invoice number, the system will find the vendor for the specified invoice and list all invoices for that vendor. The system will place the cursor on the selected invoice. If you enter a purchase order number, the system will find the vendor for the specified purchase order and list all invoices for that vendor. The system will place the cursor on the selected purchase order.
+------------------------------ View Payables -------------------------------+ | Vend/Inv: INDVEN INDUSTRIAL SUPPLY VENDOR Bal: 1,999.99 | | | | Vendor Invoice # Seq# PO# Date Orig Amount Open Amount | | ------------------ ----- -------- -------- -------------- -------------- | | INDVEN 8909732 1 1098745 07/24/97 1,000.00 1,000.00 | | | | | | | | | | | | | | | | | | | +----------------------------------------------------------------------------+
To view payables detail, select a payable and press [Enter]. The Vendor Invoice Information screen for that payable displays:
+------------------------ Vendor Invoice Information ------------------------+ | | | Vendor: INDVEN INDUSTRIAL SUPPLY VENDOR | | PO#: 1098745 Ext PO#:8909732 ORDER | | | | Invoice#: Invoice #1 Seq#: 1 | | | | Invoice: 1,000.00 Invoice Date: 07/24/97 Posting Date: 07/24/97 | | Prepaid: 0.00 Discount Date: 08/03/97 History?: No | | Released: 0.00 Due Date: 07/24/97 Complete?: No | | | | +--------------------- G/L Distributions ----------------------+ | | |Sq Account # Account Name Amount| | | |-- ------------- ------------------------------ --------------| | | | 1 00-12-112-112 ACCOUNTS PAYABLE -1,000.00| | | | 2 00-13-113-113 INVENTORY 1,000.00| | | | | | | | | | +------+--------------------------------------------------------------+------+
This screen shows the Invoice amount, as it was entered through the New Payables option.
The Prepaid field holds the amount (if any) that was paid to the vendor before the invoice was entered into the system.
The Released field shows the amount that has actually been released for payment.
The Invoice Date displays the date entered in the New Payables screen. The default for the Invoice Date is the Payables Date set in the Sessions Defaults.

1 PAYABLES
79
PAYABLES
The Due Date and Disc Date are calculated using the net and discount terms from the vendor record, and the invoice date. The due dates and discount dates are recalculated whenever the invoice date or any of the net and discount terms are changed.
The Posting Date is the date on which the payable will be posted to the General Ledger.
The History? Field indicates whether or not the information you are viewing has been committed to history. If this field is set to NO, the information is current and active in the system. If this field is set to YES, the information is historical.
The Complete? field indicates whether the invoice you are viewing has gone through the entire Payables process.
Using Order, Receipt, Vendor, and Toggle Using the Additional Options, you can view Purchase Order Information, view Material Receipt Information, view Payee (Vendor) Information, and Toggle account and payment information. The Receipt option functions the same way as described above (see “Material Receipts” in this section). The Order and Vendor options are described at the end of this section. The Toggle option is described below.
If you choose the Toggle option, the G/L Distributions frame on the Vendor Invoice Information screen is replaced with a Payments frame:
+------------------ Payments -------------------+
| Check# Date Release Amt Net Amount|
|-------- -------- -------------- --------------|
| 0000001 07/24/97 00.00 1,000.00|
| |
| |
| |
+-----------------------------------------------+
The Payments frame shows each payment (in check number sequence) made against the vendor’s invoice. Choose the Toggle option again to return to the G/L Distributions frame.

1 PAYABLES
80
PAYABLES
DISBURSEMENTS
The Disbursements option allows you to view check information for the selected vendor and check number. The View Checks screen prompts you for a Cash Account. All disbursements are shown for that account:
+------------------------------- View Checks --------------------------------+ | Cash Account: 00-12-112-112 | | Name: ACCOUNTS PAYABLE ACCT#1 | | | |+-------------------------------------------------------------------------+ | || Check # Date Vendor Vendor Name Net Amount Vd| | ||-------- -------- ------ ------------------------------ -------------- --| | || 0000001 01/24/94 MARKET MARKET TOOL & SUPPLY COMPANY 1,000.00 * | | || | | || | | || | | || | | || | | || | | || | | || | | |+-------------------------------------------------------------------------+ | | | +----------------------------------------------------------------------------+
To view more details, select a check and press [Enter]. The Check Details screen displays for the check you selected:
+-------------------------------- View Check --------------------------------+ | Acct#: 00-12-112-112 ACCOUNTS PAYABLE ACCT#1 | | | | ID: MARKET Check Date: 01/24/94 | | Pay to: MARKET TOOL & SUPPLY COMPANY | | Addr: ATTN: BOB MARKET 1,000.00 | | 11 SAMPLE STREET | | YARDLEY PA 99999 | | Memo: PAYMENT FOR JANUARY ORDER | | Check #: 00000001 | | +------------------------ Check Details -------------------------+ | | |Vendor Invoice # Release Amount Discount Amount Net Amount| | | |------------------ -------------- --------------- --------------| | | |MARKET 1000000 1,000.00 0.00 1,000.00| | | | | | | | | | | | | | | +----------------------------------------------------------------+ | +----------------------------------------------------------------------------+
The upper portion of the View Check screen shows a preview of the check itself. The Check Details are shown in a frame at the bottom of the screen. Check Details include the Vendor, Invoice #, Release Amount, Discount Amount, and Net Amount.

1 PAYABLES
81
PAYABLES
Using Check, Vendor, Toggle, Next Check, Previous Check, and Invoice The View Disbursements screen has two different sets of Additional Options. The first set, accessed from the summary screen (the first screen), allow you to view Check information (the second screen), view Vendor information, and Toggle the sequence of the checks on the summary screen. The checks can be sorted by vendor or check number.
The second set of Additional Options is accessed from the detail screen (the second screen). These options allow you to view the Next check, Previous check, and to view the vendor Invoice information.
VIEWING PURCHASE ORDER INFORMATION
The option to View Purchase Order Information is not available from the main View menu. Purchase Order Information can be accessed from several of the Additional Options menus throughout the PAYABLES module. Use this option to compare the invoice amount to the amount on your purchase order, or if you want to see if you actually received the material you are being billed for.
The Purchase Order Information screen is shown below:
+------------------------ Purchase Order Information ------------------------+ | | | PO#: 1022222 External PO#: JANUARY ORDER | | | | Instructions: DELIVER NO LATER THAN 4:30 PM | | | | | | PO Amount: 1,000.00 PO Date: 01/01/94 | | Rec Amount: 1,000.00 Last Receipt: 01/24/94 # of Recvs: 1 | | Inv Amount: 1,000.00 Last Invoice: 01/24/94 # of Invs: 1 | +----------------------------------------------------------------------------+
The information shown in this screen is for viewing purposes only and cannot be edited. The PO Amount, Received Amount, Invoice Amount, PO Date, Last Receipt date, Last Invoice date, # of Receives, and # of Invoices are shown.
VIEWING PAYEE (VENDOR) INFORMATION
The option to View Payee Information is not available from the main View menu. Payee Information can be accessed from several of the Additional Options menus throughout the PAYABLES module.

1 PAYABLES
82
PAYABLES
The Payee Information screen is shown below:
+---------------------------- Payee Information -----------------------------+ | | | Payee Code: MARKET | | Payee#: MARKET | | Name: MARKET TOOL & SUPPLY COMPANY | | Address 1: ATTN: BOB MARKET | | Address 2: 11 SAMPLE STREET | | City: YARDLEY Telephone: 999-999-9999 | | State: PA Fax: 999-999-9999 | | Zip: 99999 | | | | Discount Terms Net Terms 1099 Information | | Auto Discount?: No Date: Inv 1099 Type: None | | Discount %: 0.00 Day 1: 0 1099 Box: 1 | | Date: Inv Day 2: 0 Federal ID: 000-00-0000 | | Day 1: 0 Months: 0 | | Day 2: 0 Temporary: no | | Months: 0 | +----------------------------------------------------------------------------+
The Payee Information screen shows a summary of the information held within the vendor record for this payee. You can edit any field in the screen. Once you have made the necessary changes, press the [Go] key to save the information and return to the New Payables screen. To cancel the process without saving changes, press the [Go] key.
The field descriptions for the Payee Information screen are listed below:
The Payee Code (sometimes called the Vendor Code in some parts of the system) is a unique six-character ID that identifies a vendor.
The Payee# (sometimes called the Vendor # in some parts of the system) is also a six-character field, providing a secondary means of identifying a vendor. The Payee# is used during item related activities such as purchasing and electronic pricing services. The Payee# is also used to sort various reports.
The Name is the vendor’s send-to name. The Address 1 and 2, City, State, Zip, Telephone, and Fax fields hold the vendor’s send-to address, city, state, zip code, telephone number, and fax number.
The Auto Discount field allows you to specify whether an automatic discount should be taken in PAYABLES. Set this field to Yes and the discount is automatically taken. Set this field to No and the discount is taken, but only in accordance with the vendor’s terms. If you exceed the limit of the vendor’s terms, the system does not allow the discount.
The Discount % field holds the discount percentage you will receive when you pay the invoice promptly. This percentage (if any) is determined by the vendor.
The Discount Date field specifies the method of discount date calculation. Set this field to INV and payment must be made within a specified number of days from the time the invoice was presented in order to qualify for the discount. Set this field to PROX and payment must be made before a particular day (or days) in the month in order to qualify for the discount.

1 PAYABLES
83
PAYABLES
The Date field can also be set to PRNN. Use this option and the system uses the Months field to identify the number of months ahead that the Due or Disc date should be calculated according to PROX terms. For example:
Discount Terms Net Terms
Date: PRNN Date: PRNN
Day 1: 10 Day 1: 25
Months: 2 Months: 2
If the Invoice Date is 6/20/95, the Disc Date is 9/10/95, and the Due Date is 9/25/95.
The Day 1 field is a 2 digit field that is used in conjunction with the Date field. If the Date field is set to INV, then Day 1 represents the number of days within which the invoice must be paid in order to qualify for the discount. If the Date field is set to PROX, then Day 1 represents the day in the month before which the invoice must be paid in order to qualify for the discount.
When PROX terms specify a Day 1 but not a Day 2 (e.g. 10th PROX), the discount date is set to Day 1 of the following month. For example, with Date set to PROX and Day 1 set to 10, the following discount dates would be used:
Invoice Date 04/27/92 Discount Date 05/10/92
Invoice Date 05/05/92 Discount Date 06/10/92
The Day 2 field is used only if the Date field is set to PROX. It represents a possible alternate day in the month before which payment must be made in order to qualify for the discount.
When PROX terms specify both a Day 1 and a Day 2 (e.g. 10th, 25th PROX), the discount date is set to Day 1 of the following month if the entry date is in the range 16 through 31. The discount date is set to Day 2 of the same month if the entry day is in the range 1 through 15. For example, with Date set to PROX, Day 1 set to 10, and Day 2 set to 25, the following discount dates would be used:
Invoice Date 04/27/92 Discount Date 05/10/92
Invoice Date 05/05/92 Discount Date 05/25/92
The Date field determines the method of invoice due date calculation. Set this field to INV and payment is due within a specified numbers of days from the time the invoice was presented. Set this field to PROX and payment is due before a particular day (or days) in the month.
The Day 1 field is a 2 digit field that is used in conjunction with the Date field. If the Date field is set to INV, then Day 1 represents the number of days within which the invoice must be paid. If the Date field is set to PROX, then Day 1 represents the day in the month before which the invoice must be paid. When PROX terms specify a Day 1, but not a Day 2, (e.g., 10th PROX), the discount date is set to Day 1 of the following month. For example with Date set to PROX and Day 1 set to 10, the following due dates would be used:

1 PAYABLES
84
PAYABLES
Invoice Date 04/27/92 Discount Date 05/10/92
Invoice Date 05/05/92 Discount Date 05/25/92
Day 2 is a 2 digit field. It is used only if the Date field is coded PROX. It represents a possible alternate day in the month before which the invoice must be paid.
When PROX terms specify both a Day 1 and a Day 2 (e.g., 10th, 25th PROX), the due date is set to Day 1 of the following month if the invoice date falls between the 11th and the 31st of the month. The due date is set to Day 2 of the same month is the invoice date falls between the 1st and the 15th of the month. For example, with Date set to PROX, Day 1 set to 10, and Day 2 set to 25, the following due dates would be used:
Invoice Date 04/27/92 Discount Date 05/10/92
Invoice Date 05/05/92 Discount Date 05/25/92
The 1099 Type field can be set to MISC or INT. If this field is set to MISC, a miscellaneous 1099 form is used for this vendor. If this field is set to INT, a 1099 interest form is used for this vendor.
The 1099 Box field indicates in which box information prints on the 1099 form.
The Federal ID number is the federal taxpayer’s number assigned to a vendor by the government. The ID number you enter here is used as the default throughout the system and prints on 1099 forms.
Any vendor you create here is added to the vendor database and can be accessed as usual. If you choose, you can mark the vendor as temporary, by setting the Temporary field to YES. The system automatically assigns to it comment number 99. Later, this comment number serves as an indication to you that this vendor record was created “on the fly”.
STEP 9: PURGING INFORMATION FROM THE SYSTEM The amount of history that can be stored on your system depends upon available disk space. If the disk gets full, Purchase Order, Vendor Return, Payables, and Check History can be purged (deleted from the system) at
Editing Payee Information and Creating New Vendors An Additional Option called Edit Payee is available from the New Payable screen. This option allows you to edit the information shown in the Payee Information screen.
If you are entering an invoice for a vendor who does not already have a code in your Prophet 21 System, you can create a new vendor record from the Vendor field on the New Payable screen. Simply enter a unique code for the new vendor and press [Enter] (you will know if a code is already in use if the system displays a vendor name once you press the [Enter] key). If the code is unique, the system warns you (through a pop-up message) that the vendor does not exist and asks whether or not you want to create a new vendor. Press the [Y] key or use the arrow keys to select [Yes] and press [Enter]. The Payee Information screen displays.
�Q-MODE must be enabled to PURGE history.

1 PAYABLES
85
PAYABLES
any time. History that has been purged cannot be retrieved, so you should print a hard copy of the information before you purge it.
Another reason to purge information is to keep your system organized and uncluttered. Once information has been purged from the system it is no longer included on browses, views, or reports. Removing all unnecessary records of purchase orders, vendor returns, payables, and checks from your system will make it easier for you to find the information you seek.
Are File Systems Full? The Prophet 21 Acclaim application uses several Progress® databases. In order to protect the information in these databases, they must be backed up every day. A Prophet 21 job called PROBACKUP* backs up your Acclaim files automatically.
The PROSHUTDOWN job ensures that all CLIENT processes are properly closed and that servers are shut down correctly.
The system checks to see if file systems are full whenever PROBACKUP and/or PROSHUTDOWN are run. If file systems are more than 75% full, a warning message prints to the screen.
* This job should be added to your Prophet 21 JCM (Goodbye) used to back up your Prophet 21 files on a daily basis. It is important to remember that you cannot purge information that has not been committed to history. Information is committed to history by committing five different journals: the Expense Journal, the Discrepancy Journal (only if Material Receipts Reconciliation is enabled), the Check Register, the Voided Check Register, and the Unreconciled Check Report. Refer to the sections of this manual pertaining to these journals for more information on “committing” information to history.
Each of the Purging Options (Purchase Order, Vendor Return, Payables, and Check History) requires you to specify purge parameters before any deletion takes place. Once this is done, the system automatically deletes the history that falls within the bounds of your parameters. Anything that is still active in the system will not be purged!
Note: If alternate accounting is enabled, only the checks assigned to the region indicated in the Session Defaults of the Payables User Options are purged.
REFERENCE INFORMATION
THE MANAGEMENT REPORTING OPTIONS Most of the reports and journals in the PAYABLES module are printed from the Management Reporting menu. This menu allows you to print an Expense Journal, an Anticipated Cash Disbursement Report, a Discrepancy Journal, a Payables Due Report, a Future Due Report, a Balance Report, an Aged Report, a Payables Open Detail Report, an Unreconciled Receivings List, and 1099 Forms.

1 PAYABLES
86
PAYABLES
The following journals and reports are explained in other areas of this manual:
The Expense Journal is a detailed listing of all the vendor invoices (and their dollar amounts) that were entered during a specific time period. This list is usually printed after payables are entered into the system, so that you can check the new information. You can use the Edit/Delete Payable option on the Invoice Processing menu to make any necessary changes to payable information. Once the Expense Journal has been committed to history, only limited editing can take place. See page 37 for more information.
The Anticipated Cash Disbursement Report shows all of the open disbursements (unprinted checks) that exist for a range of cash accounts and vendors. The disbursements print by cash account in vendor and invoice number sequence. The report shows each invoice date, due date, gross amount, discount amount, and net amount. Totals for each account are also shown. See page 52 for more information.
When material is received against a purchase order, it is entered on the system and a value representing its worth is posted to the G/L Inventory account. Sometimes the value on the purchase order (the expected amount), and the actual value of the received material (the invoice amount) are different. The Discrepancy Journal shows the difference between these two amounts, and any description that was entered to explain the variance. See page 112 for more information.
Prior to releasing invoices for payment, you should print a Payables Due Report. This report will show you all of those invoices that are due, or which will become due within a certain time period. The Future Due Report is very similar to the Due Report, except that it shows those payables that are not yet due.
The Balance Report shows the balance owed on open payables. The invoice amount, discount percentage, discount amount, and actual net amount are shown for each payable included on the report.
The Aged Report shows all open payables that fall within specific parameters. When you enter the parameters for this report, you must specify three Period in Days fields. You can set these to show what invoices are due within three time periods. For example, the defaults for Period 1, Period 2, and Period 3 are 30. When the report is printed with these defaults set, it shows which invoices are due now, which invoices are due in the future, and which were due within 30 days, 60 days, 90 days, and over 90 days ago.
The Payables Aged Report has a parameter called Include Credits. Any one of three values can be entered for this field. ALL includes all payables with an invoice amount that is less than $0.00, regardless of the invoice date. CURRENT includes payables with an invoice amount that is less than $0.00 and that have an invoice date that falls within the invoice date parameters. NONE does not include any payable that has an invoice amount less than $0.00 (credits are ignored). Regardless of this parameter, payables that are not credits are always shown if their invoice date falls within the invoice date parameter range. Also, a payable that has a comment number that falls outside the comment number parameter range is not included on the report.
The Payables Open Detail Report shows you all open payables that exist or existed as of a given day. Information is listed for all open payables included in the parameters. For each payable the report shows the posting, invoice, and due date, the open, discount, and net amounts, and the purchase order number.
If you have the “Material Reconciliation” option enabled in the PAYABLES Company Options, the system will require you to reconcile all receipts whose invoice amounts don’t match the PO amounts. To reconcile a receipt, you must note any discrepancy between the purchase order and the vendor invoice. The Unreconciled Receivings List is a list of all received purchase orders that have NOT yet been reconciled with the vendor invoice.
You can also print both Interest and Miscellaneous Income 1099 Forms for any vendor. All vendors for which a 1099 should be printed must be set up with a Federal ID Number, a 1099 Box (such as Rents, Royalties, etc.),

1 PAYABLES
87
PAYABLES
and a 1099 form type (Interest or Miscellaneous). In addition, when you print 1099s the system prompts you for a Minimum Amount. If the interest or miscellaneous income amount is less than this Minimum Amount, the system will not print a 1099 form for this vendor.
Note: When printing 1099 forms, the printer must be set to print 12 characters per inch. Most areas of the system use 10 characters per inch. If the 10 characters per inch setting is used for this feature, the information will appear out of alignment.
The Credit Card Balance Report tracks the open balance for credit card vendors, reflecting the payments made by credit card, and any payables that have been entered for the credit card vendor. This report is to be used in conjunction with the Payables Aged Report. For more information on this report, refer to the “Credit Card Balance Report” section starting on page 124.
The Credit Card Detail Report displays all credit card transactions within the range values of the parameters. Transactions include purchase orders paid by credit card, and payments made to the credit card vendor. For more information on this report, refer to the “Credit Card Balance Report” section starting on page 126.
HOW TO USE THE SECURITY OPTIONS The PAYABLES Security Options allow you to apply a security setting to each menu option within the module. The Menu Security screen is shown as follows:
+-------------------------- Progress Menu Security --------------------------+ | Menu Name: | |----------------------------------------------------------------------------| | | | | | | | | | | | | | | | | | | | | | | | | | | | | | | +----------------------------------------------------------------------------+
When you enter the Security Options screen, the system prompts you for a Menu Name. If you [Browse] at this prompt, a list of all the top level menus is displayed. The Menu Name Browse appears as follows:

1 PAYABLES
88
PAYABLES
+----------------------------------------------------+ | Selection: | |----------------------------------------------------| | Menu Name Menu ID | | ----------------------------------- ---------- | | A/P Main Menu 1 | | Invoice Processing Menu 2 | | Check Processing Menu 3 | | Management Reporting Menu 4 | | View Options Menu 5 | | Purge Options Menu 6 | | User Options Menu 7 | | | | | +----------------------------------------------------+
Select the menu on which the option appears and press [Enter]. For example, to set security for the Invoice Processing option you would have to select Main Menu.
The Menu Choice Browse for the Main Menu appears as follows:
+--------------------------------------------------+ |Menu Choice Security Level| |----------------------------------- --------------| |Invoice Processing ... | |Check Processing ... | |Management Reporting ... | |View Options ... | |Purge Options ... | |User Options ... | |Security | | | | | | | | | | | | | +--------------------------------------------------+
Select the appropriate option. The system will prompt you for a security setting between 0 and 9999. The security setting you apply here corresponds to the Security Clearances defined in the USER-BASE Edit User Logon Information option.
BALANCING PAYABLES In order to balance Payables, perform these calculations at the end of each month:
♦ Take the total open payables value (the OPEN PYB column value) from the Payables Aged Report from the previous month.
♦ ADD the total expense amount (the TOTAL EXPENSE column) from the Payables Expense Journal from the current month.

1 PAYABLES
89
PAYABLES
♦ SUBTRACT the gross amount value (the GROSS-AMT column) from the current Payables Check Register.
♦ SUBTRACT the gross amount value (the GROSS-AMT column) from the current Anticipated Cash Disbursements Journal.
♦ ADD the gross amount total (the GROSS-AMT/BRANCH TOTALS column) from the Voided Check Register.
♦ EQUALS the total open payables value (the OPEN PYB column figure) from the Payables Aged Report for the current month.
Note: All reports used are printed from the month-end procedures of the current month, so the reports show the total month-end amounts. Remember to keep the Payables Aged Reports over time since the prior month’s report is needed at the beginning of this calculation.
TROUBLESHOOTING PAYABLES If the Payables Aged Report does not balance from one month to the next, investigate these areas:
♦ Check that all applicable reports are included in the calculation.
♦ Make sure that all reports are run at the same time (the same day-end) of the month.
♦ Check that the correct amounts are used from each report.
♦ Check that the amounts are added and subtracted correctly.
♦ Make sure all reports are printed without parameter limitations.
♦ Verify that all applicable reports are cleared or committed at the end of each month.
CLOSING PROCEDURES
MONTH-END PROCEDURES
At the end of each month or period, run the following procedures. Keep in mind that if you use “company” payables processing, Q-MODE must be activated to commit journals and registers to the Ledger. If you use “group” processing, activating Q-MODE is unnecessary to commit information for a particular group. Only the default group’s data will be committed. In fact, if Q-MODE is activated for “group” processing, all information is committed for all groups.
1. Print the Expense Journal in “Payee” and “Account #” sequence for the desired period, and then commit the journal.
2. Print the Payables Check Register and then commit the register.
3. Print the Voided Check Register and then commit the register.

1 PAYABLES
90
PAYABLES
4. If it is enabled on your system, print an Unreconciled Receivings List and then commit the list.
5. If it is enabled on your system, print the Payables Discrepancy Journal and then commit the journal.
6. Print an Aged Payables Report. Complete your own parameters.
7. Print a Payables Due Report that includes “all” open payables. To do this, set up the parameter screen on your system as shown below:
YEAR-END PROCEDURES
At the end of the year, perform these steps to close the accounting year in PAYABLES. Keep in mind that if you use “company” payables processing, Q-MODE must be activated to commit journals and registers to the Ledger. If you use “group” processing, activating Q-MODE is unnecessary to commit information for a particular group. Only the default group’s data will be committed. If Q-MODE is activated for “group” processing, all information is committed for all groups.
Attention! If you print 1099 forms, print these before performing the year-end reset in the VENDOR module. Resetting year-to-date information in the VENDOR module erases all information used for the 1099 forms.
1. Perform the month-end procedures.

1 PAYABLES
91
PAYABLES
2. Print the Payables Due Report using the below example as a guide. You need to include all open payables as of the end of your accounting year.
3. If it is necessary to print 1099 forms, print these forms twice - once with the Form Type field set to MISC and the second time with this field set to INT. Remember that your 1099 information is reset in the system when the YTD reset option is completed in the VENDOR module.
GLOSSARY
GLOSSARY OF TERMS 1099: A tax form sent from one party to another that accounts for income earned by the
recipient of the 1099 from the sender of the 1099.
Account: When payables are entered, they are allocated against specific accounts in the LEDGER module. These accounts are used to track and group different types of payables, expenses, etc.
Automatic Release: A field in the Payments Release Parameter screen that controls whether or not you can review individual payments before release. If this field is set to Yes, you cannot review individual payments before release; all payments meeting the remaining parameters are released automatically.
Group: A label assigned when a payable is first entered that can be used identify that payable or a group of payables.

1 PAYABLES
92
PAYABLES
Credit: If you send material back to the vendor because you received the wrong thing, or you were billed for something you never received, you must enter a payable whose Type is CREDIT. Credits can be released with regular payables so that the actual payment amount is less. The process of entering a credit is very similar to entering a regular invoice.
Default Accounts: Default G/L Accounts are set up within the PAYABLES module so that as new payables are entered, these payables can be applied to these default accounts. Setting up these accounts in the LEDGER module and setting up the proper Default G/L Accounts in the PAYABLES module makes entering payables much easier.
Default Hierarchy: The User Options are set up on five different levels: Company, Group, Branch, Vendor, and Session. When the system is looking for default information, it searches these levels of defaults in the following order: Session, Vendor/Branch, Group, Branch, and then Company.
Direct Bill: A process in which your vendor directly bills your customer for Direct Shipments, cutting you out as the middle man in the billing process. See also Direct Ship.
Direct Ship Confirmation:
The process of officially acknowledging that one of your customers has received material bought from you, material that you had purchased from one of your vendors and shipped directly to the customer.
Direct Ship: Direct Shipments apply to material received by one of your customers that the customer bought from you, but in order to fill the order, you had to purchase the material from one of your vendors, who then shipped the material directly to your customer.
Discrepancy: A difference in quantity or amount between expected and actual invoice amounts. The same as a variance.
Group Processing: A branch or a combination of branches constitutes a Payables Group. When the Payable Group Processing option is set to YES, the system “separates” the payables entered for different payables groups. In other words, if you work out of Branch 1, and that is a part of Group 1, the system will not allow you access to information associated with any group other than Group 1. When this option is set to NO, the system does not separate payables by group, but instead allows company-wide access to payables.
Material Receipts Reconciliation:
The process of accounting for variances between an invoice amount and the amount of material actually received.
Multiplier: A figure that is applied to PO or invoice line items that either raises or lowers the item prices.
Parameter Forwarding
All parameter screens in Payables now default to parameter forwarding. Whenever a value is entered in a Start field on a parameter screen, the End field now defaults to that same value. This functionality applies to any report or other feature where Start and End parameters are present.
The following main menu options have been included in parameter forwarding:

1 PAYABLES
93
PAYABLES
Check Processing, Management Reporting, and Purge Options. Any of these sections that offer a parameter screen with Start and End parameters have had parameter forwarding added to them.
Payable: An amount of money owed to one of your vendors that corresponds to one or more invoices.
Payee: Someone (most likely one of your vendors) to whom you issue a payment.
Post: When payments are actually received or made for a payable, they are “posted” to or against Ledger accounts.
Purge: Removing payables history information from your system. Active payables information cannot be purged from your system, as this could result in the loss of income.
Quick Check: An A/P option which allows you to enter a payable for an invoice and print a check for the invoice in the same session.
Reconcile: To account for a variance in the cost of an item or a range of items purchased and received from one of your vendors.
Recurring Invoice: An invoice that is received on a revolving basis for goods or services received on an ongoing basis, such as an invoice for building rent.
Release: An actual payment made against a payable. You are “releasing” payment.
Security: Menus in the PAYABLES module are assigned specific security levels, just as users are assigned specific security clearances in the USER-BASE module. These levels correspond; unless a user meets a PAYABLES menu’s security level, the user cannot access that menu. This is useful for restricting access to the Check Printing options, etc.
Status: The status for a payable applies to whether or not that payable is ready for release. See also Payable, Release.
Variance: A difference in quantity or amount between expected and actual invoice amounts. The same as a discrepancy.
Void: To nullify a payment, usually done by invalidating a check. Voiding a check does not remove a payable from the system; instead, voiding returns the payable to the “released” status it held before you printed the check.

1 PAYABLES
94
PAYABLES
GLOSSARY OF FIELDS Many of the fields in the PAYABLES module are listed and explained in this Glossary. If you fail to find an explanation for a particular field in this Glossary, try using the [Help] function key from the appropriate PAYABLES screen.
Amount Type: This is a report parameter field. The Amount Type field, found on the Due Report parameter screen, indicates whether the report shows invoice (gross) amounts or net amounts (gross amount - discount amount).
Automatic Release: The Automatic Release field allows you to specify whether you want to view each payable that matches the parameters individually and approve the release of each.
Entry ID: This is used to identify the payables you enter during each session. You should set up certain conventions to govern what information is stored in the Entry ID field. For example, you could enter the User ID of the person who is entering the payable, the date of entry, an entry sheet control number, or any combination of these things.
Check Format: This is a PAYABLES Company Option. The Check Format field can be set to A, or B. If this field is set to A, the system will print checks that are set up for a 7 and 1/3 inch check form. If this field is set to B, the system will print checks that are set up for a 7 inch check form.
Check Reconciliation:
This is a PAYABLES Company Option. When the Check Reconciliation option is set to YES, the Unreconciled Check List option under the Management Reporting menu is enabled and accessible. When this option is set to NO, the Unreconciled Check List option under the Reports menu is disabled and cannot be accessed.
Check Stub Detail Report:
This is a PAYABLES Company Option. When the Check Stub Detail Report option is set to YES, all details are consolidated into a Check Stub Detail Report, which should be printed each time checks are printed. When this option is set to NO, details that do not fit onto the first check stub are printed on the next check stub. The check is printed with an amount of zero and it is voided in the system.
Comment #: This field is found in the PAYABLES Company Options, Vendor Defaults, and on the New Payable screen. Use the Comment number field to identify problem payables. You can assign a two-digit comment number to a payable and then run payables reports for a range of comment numbers. You can use the comment number feature to indicate disputed payables, or priority payables that should not be overlooked. The Comment number field defaults to the value assigned in the Vendor Defaults; if none has been specified, this field defaults to the value assigned in the PAYABLES Company Options.

1 PAYABLES
95
PAYABLES
Commit: The Commit field (only available on the Payables Discrepancy Journal, the Expense Report, the Check Register, the Voided Check Register, the Direct Ship Confirmation Register and the Unreconciled Receivings Report) allows you to move information into history. Information that has been “committed” is considered to be historical, rather than current. You can print reports and view this historical information, but the system does not permit you to edit it. For this reason, you should use great care when committing information to history. Historical information remains in your system until it is purged.
Company Header on Check:
This is a PAYABLES Company Option. When the Company Header on Check option is set to YES, the company header (which is the company name and address taken from the company information record) is printed on all PAYABLES checks. When this option is set to NO, the company header is not printed on PAYABLES checks.
Date Type: This is a report parameter field. The Date Type field, found on the Due Report parameter screen, indicates whether the report is printed by invoice or posting date.
Direct Bill: This is a PAYABLES Company Option. When the Direct Bill option is set to YES, you can record direct ship customer orders. A receivable is not created for orders where your vendor invoices your customer directly for material. When this option is set to NO, the Direct Bill feature is not enabled and you must bill all direct shipments.
Disc Days: This field, found in the Recurring Invoice screen, indicates the number of days between the time the invoice is received and the time that it should be paid so that your company benefits from the discount.
Discount Date: The last possible date a payable can be paid for you to still receive an early payment discount.
Due Date: The date by which a payable must be paid or settled.
Due Days: This field, found in the Recurring Invoice screen, indicates the number of days between the time when the invoice is received and the time that the payable is actually due.
Ext Price: The extended price for each receipt on a purchase order.
Federal ID: This is a PAYABLES Company Option. The Federal ID number is the federal taxpayer’s number assigned to a vendor by the government. The ID number you enter here is used as the default throughout the system.
Final Bill?: You can receive an invoice for only part of a shipment. The Final Bill? field Indicates whether or not you expect to receive another invoice for a particular receipt.

1 PAYABLES
96
PAYABLES
Form Type: This field, found on the 1099 Form parameter screen, indicates whether the form type is miscellaneous or interest.
Frequency: This field, found in the Recurring Invoice screen, is multiplied by the value in the Period field to indicate the length of time between invoices.
History?: The History? field, usually seen in View screens, indicates whether or not the information you are viewing has been committed to history.
Include Credits: This is a Release Parameter. This field allows you to specify whether to Include Credits in a release.
Inv Amount: The amount for which you are being billed.
Invoice Amt This field, found in the New Payable screen, shows the total amount owed to the vendor.
Invoice Date: The actual date on the vendor’s invoice. This is the date the system uses (in conjunction with the Net and Discount Terms) to determine the Due and Discount Dates.
Invoice During Receipt:
This is a PAYABLES Company/Vendor Option. When the Invoice During Receipt option is set to YES, an invoice is created through the MATERIAL module when material is received. This is helpful for COD situations. When this option is set to NO, invoices must be created through the PAYABLES module, not through MATERIAL.
Invt Items: The number of inventory (stock) items on a receipt.
Last Invoice: The date of the last invoice received for this purchase order.
Last Receipt: The date of the last receipt for this purchase order.
Material Receipt Reconciliation:
This is a PAYABLES Company Option. When the Material Reconciliation option is set to YES, the Material Receipts Reconciliation option under the Invoice Processing menu is enabled and can be accessed. You must specify variation limits for Receiving, Invoice, and Item amounts. When this option is set to NO, the Material Receipts Reconciliation option under the Invoice Processing menu cannot be accessed.
Max Amt/Payable: This is a Release Parameter. Any payable with an amount greater than the amount you specify in this field is automatically excluded by the system and will not be released.
Min Amount: This is a report parameter field found on the 1099 Form parameter screen. To print a 1099 for a vendor, the YTD total must be greater than the Minimum Amount. This field defaults to $600 for MISC type forms and $10 for INT type forms.
1 PAYABLES
97
PAYABLES
Min Check Amt: This is a Release Parameter. Any payable with an amount less than the amount you specify in this field is automatically excluded by the system and will not be released.
Min Disc %: This is a Release Parameter. Any payable with a discount percentage less than the percentage you specify in this field is automatically excluded by the system and will not be released.
Min Disc Amt: This is a Release Parameter. Any payable with a discount amount less than the amount you specify in this field is automatically excluded by the system and will not be released.
NS Items: The number of non-stock items on a receipt.
Open Amount: The total amount you owe toward an invoice.
Open Reconciliations:
This is a report parameter field. The Page Format field determines whether or not the Discrepancy Journal will include those reconciliations that have not been completed yet (i.e. cannot be closed out).
Override Company Defaults:
This is a PAYABLES Vendor Option. When the Override Company Defaults option is set to YES, the variation limits you specified for Material Reconciliation will override the defaults you set up on the Company level. When this option is set to NO, the variation limits on the Company level will be used for this vendor. This field will only be available if the Material Reconciliation option is set to YES.
Page Format: This is a report parameter field. The Page Format field determines the level of detail that is shown on the report.
Paid: This field, found in the New Payable screen, shows the amount you have already paid toward the invoice.
Payable Group Processing:
This is a PAYABLES Company Option. When the Payable Group Processing option is set to YES, payables are handled on a Payables Group basis. A branch or a combination of branches constitutes a Payables Group. When this option is set to NO, payables are handled on a company-wide basis.
Period: This field, found in the Recurring Invoice screen, can be set to DAY, WEEK, MONTH, QUARTER, and YEAR.
PO Amount: The total amount on the purchase order.
PO Date: The date on your purchase order.
Post Date: The date that a payable should be posted to the Ledger.
Prepaid: The amount (if any) that was paid to the vendor before the invoice was entered into the system.
Rcv Date: The date that the material was received into inventory.

1 PAYABLES
98
PAYABLES
Rec Amount: The total value of the material received against the purchase order.
Rec: This field, found on the Check Reconciliation screen, shows either a YES or a NO, indicating whether or not you have reconciled a check.
Reconciled?: Indicates whether or not an invoice must be reconciled through the Material Receipts Reconciliation option.
Reference (Release Parameter):
This is a release parameter. The Vendor Reference field allows you to group vendors by specific criteria and then release payments for a range of these References. For example, to release payments for just your service vendors, you could assign them the Reference “Service.”
Reference: This is a PAYABLES Vendor Option. The Vendor Reference field allows you to group vendors by specific criteria and then release payments for a range of these References. For example, to release payments for just your service vendors, you could assign them the Reference “Service”. Using the Start and End Reference fields on the Payment Release parameter screen, you could then limit the release to only those vendors with this Reference.
Release Amount: The amount that you have already released to be paid toward an invoice.
Release Date: This is the date when a release should be carried out.
Release Unreconciled Payables?
This is a PAYABLES Company Option. When the Release Unreconciled Payables? option is set to YES, payables do not have to be reconciled before they are released. When this option is set to NO, the Release Unreconciled Invoices option in Vendor Defaults determines whether payables must be reconciled through the Material Receipts Reconciliation option before they are released.
Release Unreconciled Payables?:
This is a PAYABLES Vendor Option. When the Release Unreconciled Payables? option is set to YES, all payables must be reconciled through the Material Receipts Reconciliation option before they are released. When this option is set to NO, payables do not have to be reconciled before they are released. This field will only be available if the Material Reconciliation option is set to YES.
Report Date: This is a report parameter field. The Report Date field, found on the Due Report parameter screen, indicates whether the report shows discount or due dates.
Report Sequence This is a report parameter field. The Report Sequence field determines the sequence in which the report prints (i.e., by payee, account number, etc.).
Report Type: This is a report parameter field. The Report Type field determines whether current, historical, or both types of entries will print on a report.
Resequence: This field, found on the Reprint Checks screen, determines whether or not the checks you are reprinting will be printed with the original check numbers.

1 PAYABLES
99
PAYABLES
Start Date: This field, found in the Recurring Invoice screen, indicates the month, day, and year that the recurring invoice should first be implemented.
Status: The Status field indicates whether or not a payable is ready to be released. See the Vendor User Options for more information.
Suppress Zero $ Checks:
Checks with a zero amount are generated when an invoice and an offsetting credit are released together. This field, found in the Print Checks screen, allows you to suppress the printing of checks with zero amounts.
Temporary: This field is found in the Payee Information screen. A vendor that has been marked as Temporary is automatically given a comment number of 99, so that it can be identified later as a vendor that was created “on the fly”.
Total Pymnts: This field, found in the Recurring Invoice screen, is used by the system to generate a specified number of vendor invoices for a recurring invoice.
Unique Batch ID: This is a PAYABLES Company Option. When the Unique Batch ID option is set to YES, payables must be entered with a non-existing Entry ID. When this option is set to NO, payables can be entered using existing Batch IDs. You are prompted for a default Entry ID.
View Material Receipts:
This is a PAYABLES Company Option. When the View Material Receipts option is set to YES, the Material Receipts option under the View menu is enabled and can be accessed. When this option is set to NO, the Material Receipts option under the View menu is disabled and cannot be accessed.
APPENDICES
APPENDIX 1: HOW TO RECONCILE MATERIAL RECEIPTS AND VENDOR RETURNS AND PRINT THE PAYABLES DISCREPANCY JOURNAL
MATERIAL RECEIPTS RECONCILIATION
When material is received against a purchase order, it is entered into the system and a value representing its worth is added to your inventory. Sometimes, the value on the purchase order (the expected amount) and the actual value of the received material (the invoice amount) are different. The Material Receipts Reconciliation option allows you to track the discrepancy between these two amounts and to limit the amount of variance that is accepted. Later, you can use the Payables Management Reporting options to print a Discrepancy Journal showing this variance.
The Material Receipts Reconciliation screen is extremely flexible, allowing you to account for discrepancies between expected and invoiced amounts on three different levels: the total variance for the invoice, the total variance for the receipt, and the total variance for a particular item on a receipt. When reconciling on the invoice level, the moving average cost of the item is not updated. If a variance exists, it will be recorded on the Discrepancy Journal. If reconciling on either the item or receipt level, the moving average cost is updated. When moving average cost is updated as a result of a payable discrepancy, the system makes a code 95 entry on

1 PAYABLES
100
PAYABLES
the Cost Change Register. Note that a Variance Description must be entered when reconciling on any level in order for the system to consider the receipt reconciled.
The Material Receipts Reconciliation screen appears as follows:
The screen is divided into three frames. The frame at the top of the screen shows invoice totals. The second frame shows totals for each receipt on the invoice. The frame at the bottom of the screen shows each item on the receipt that is highlighted in the center frame.
This is the Invoice frame.
This is the Receipt frame.
This is the Item frame.

1 PAYABLES
101
PAYABLES
Reconciliation by Amount or Percentage The PAYABLES Company Options include a Reconcile Method field, which allows you to specify how the system determines if an invoice, receipt, or item falls within acceptable variance limits. Those invoices, receipts, and items that do not fall within the defined limits must be reconciled.
If the field is set to AMOUNT, “acceptable variance” for an invoice, receipt, or item is based upon a single dollar figure. For example, if the item level variance limit is $1, the maximum allowable variance for any item is $1, regardless of the item’s cost.
If the field is set to PERCENT, “acceptable variance” for an invoice, receipt, or item is a percentage of the expected amount instead of a single dollar figure. For example, if the item level variance limit is 10%, the maximum allowable variance for a $10 item is $1, whereas the maximum variance for a $20 item is $2.
The examples in this manual are written as if the Reconcile Method field is set to AMOUNT. The software functions in a similar manner if you are using the PERCENT method.
How you use this depends heavily on the reason behind the reconciliation itself. Why is there a variance between the invoiced and expected amounts? Was there a price change for a particular item? Was the freight charge higher than you expected it to be? Did the invoice charge you for only part of the items you received? If so, will you receive another invoice?
There are many possible scenarios, but some of the most common are described here.
1. The invoice amount does not match the PO amount, because the prices of items on the PO have changed, or there is an extra charge (perhaps a late fee).
2. The invoice amount does not match the PO amount, because you are being billed for only part of the shipment. If you are going to be billed for the rest of the order later, there will be no variance. If you are NOT going to be billed for the rest of the shipment, there IS a variance that must be explained.
3. There are multiple receivings on the PO and you are only being billed for one of them.
The first two examples are based upon the following scenario. The third is based on another scenario, which is described in that section of the documentation.
You cut a purchase order for 125 of an item from the Market Tool and Supply Co. Each item is $8. The total PO amount is $1000.

1 PAYABLES
102
PAYABLES
If Prices Have Changed
You receive 125 items from the Market Tool and Supply Co. When you receive the invoice, you see that the total invoice amount is $1125. The invoice indicates that items now cost $9 each, instead of $8. You enter a new payable for this invoice. The Invoice Amount field on the New Payable screen automatically defaults to the total PO amount (as usual), which is $1000. You see the discrepancy, so you edit the Invoice Amount field to show $1125. The Reconciled? field in the right of the screen is now set to NO, because the system has noticed a variance.
Reconcile Amt The Reconcile Amt field in the User Company Options screen allows you to specify whether the system reconciles against the INVOICE or NET amount. The examples in this section are written as if the Reconcile Amt field is set to INVOICE.
Before this payable can be released, you must use the Reconcile additional option (press the PowrDrill key [F6] and choose Reconcile) to account for the variance between the PO and invoice amounts.
The system notes the discrepancy of the payable.

1 PAYABLES
103
PAYABLES
Press [Enter] to access the Material Receipts Reconciliation screen:
When you enter the screen, your cursor is in the Invoice frame’s Variance Description field. The Item frame always displays details for all the items included in the highlighted receipt. If there is more than one receipt on the invoice, you will have to select the one that applies to this invoice before you could go on. This example shows only one receipt.
Because the price of the item has changed (items now cost $9 instead of $8), the discrepancy lies at the item level, and the next step is to edit the Line Item Details. To do this, press [Tab] twice; the cursor moves from the Receipt frame to the Item frame. Select the item to edit (our example shows only one) and press [Enter]. The Line Item Details screen displays for that item.
When you first access the Line Item Details screen, you will notice that some of the fields are underlined. This indicates that the field can be edited. The Unit Cost field in the Invoiced column shows $8. For this example, you would edit this field to show $9. The system uses this new cost to recalculate the Ext Cost so that it shows $1125. The system prompts you for a Variance Description, you enter “Price change”.
If the variance amount exceeds
the Variance Limit in the
Vendor/ Company
Options, you must enter a
Variance Description in
order for the Reconciled?
field to be set to YES.

1 PAYABLES
104
PAYABLES
Variance Description A Variance Description must be entered when the variance exceeds the dollar amount set for Item in the User Company Options.
Once you have finished editing the screen, it appears as follows:

1 PAYABLES
105
PAYABLES
After you exit this screen by pressing [Enter], the main Material Receipts Reconciliation screen is updated with new item information.
The Original column in the Receipt frame stays the same (it always will). The Expected and Invoiced columns in the Receipt frame change to the sum of the INVOICED items in the item frame, now $1125. The Variance amount and Description are carried over from the Item Detail screen.
The variance for the total invoice is now zero. If the variance is more than the dollar amount set on the Receipt level (in the User Company Options), a Variance Description must be entered.
The Reconciled? field on the New Payable screen now says YES.

1 PAYABLES
106
PAYABLES
If the Invoice Charges for Part of the Shipment
You receive 125 items from the Market Tool and Supply Co. When you receive the invoice, you see that the total invoice amount is $800. You enter a new payable for this invoice. The invoice amount field on the New Payable screen automatically defaults to the total PO amount, which is $1000. You notice the discrepancy, and edit the Invoice Amount field to show $800. The invoice indicates that you are only being charged for 100 items now, and that next month you will receive an invoice for $200 for the last 25 items. The Reconciled? field in the right of the screen is now set to NO, because the system has noted a variance.
There is a discrepancy between the
Invoice and Net Amounts.

1 PAYABLES
107
PAYABLES
Before this payable can be released, you must use the Reconcile additional option to account for the variance between the PO and invoice amounts. When you access the Material Receipts Reconciliation screen, it appears as follows.
The invoice you received only charged you for 100 of the 125 items you ordered and received. The discrepancy lies in the item quantity. To reconcile it, you have to edit the item details.

1 PAYABLES
108
PAYABLES
As stated in the first example, in the Line Item Details screen, only those fields that are underlined can be edited. When the screen displays, the Invoiced Quantity field shows 125. Because you are only being billed for 100 items (on this invoice), you need to edit this field:
The system automatically recalculates the Ext Cost and Ext Price to show $800.00. Since you know you are going to receive another invoice (one for $200), you can leave the Complete? field set to NO. This tells the system to keep this line item open to complete the reconciliation at a later time. You are prompted for a Variance Description. Enter “Qty Change”.
After you exit this screen, the main Material Receipts Reconciliation screen is updated with new item information.
�What if you set the Complete? field to YES? See the “Answers to Other Questions” section on page 110 to find out.

1 PAYABLES
109
PAYABLES
The Original amount in the Receipt frame still shows $1000 (as it always will). The Expected amount and the Invoiced amount in the Receipt frame shows the total of the invoiced items ($800). The Expected and Invoiced amounts in the Item frame also shows $800, because this invoice applies only to 100 of the items (an $800 value).
The total of the invoiced receipt is carried to the total Expected amount in the Invoice Frame. Therefore, the variance for the total invoice is now zero.
When you receive the invoice for the last 25 items (for $200), you will enter a new payable for the same PO. The system will expect you to enter an invoice for $200, so you will not have to reconcile the payable unless the invoice amount varies from this expected amount.

1 PAYABLES
110
PAYABLES
MULTIPLE RECEIPTS
In this example, you have a PO of $900.00 with 2 receipts: the first for $400.00 and the second for $500.00. You’ve received all the material on the PO and now you get an invoice for $407.25: $400.00 for the first receipt and $7.25 for freight charges. The New Payable screen for this invoice would appear as follows:
Notice that the Reconciled? field is set to NO. This is because the Invoice Amt and Net Amt fields automatically default to the total value received (which would be $900.00 in this case). You would override those values with $407.25 in the Invoice Amt field and $400.00 in the Net Amt field. Press the PowrDrill key ([F6]) and select the Reconcile option. The following screen displays:
If you are entering a credit (see To Enter a
Credit), this screen prompts for a Return#
instead of a PO#.
Because your User Company Option for Reconcile Amt is set to NET, these values for the receipt appear.

1 PAYABLES
111
PAYABLES
The proper way to reconcile this invoice is to let the system know that you are being invoiced for the first receipt, and that it should leave the second receipt open for now, because there is no bill for that material yet. The way to do this is to access the Receipt frame (press the [Enter] or [Tab] key at the Var Desc field) and then use the arrow keys to select the second receipt. Press the [F6] key and select the option to Omit Receipt.
Omit, when reconciling receipts, means “ignore.” In the above example, since the second receipt was selected when you press the PowrDrill or [F6] key, the system automatically zeros out the Expected and Invoiced values for the items of the second receipt as well as the Expected and Invoiced value of the receipt itself. The screen now appears as follows:
Now that the invoice has been reconciled at the receipt level, there is no longer a Variance.
As long as all is correct, we can press the [Go] key to accept the reconciliation. Press the [Quit] key to undo all that has been done, and any changes that have been made will not be saved.
ANSWERS TO OTHER QUESTIONS
What if Complete? was Set to YES?
In the preceding example, you told the system to expect a second invoice by entering a NO in the Complete? field. If you had specified YES in the Complete? field, the system would have assumed that you were not

1 PAYABLES
112
PAYABLES
being charged for the remainder of the items, and the variance between the Expected and Invoiced amounts would have been $200. The system would have prompted you for a variance description.
What if there is Variance for More than One Reason?
It is possible that you could receive an invoice with an amount that varies from your Expected amount for more than one reason. For example, an invoice could show variance because of an item price change AND because you are being charged a late fee. In this situation, you would reconcile the item price change through the Item frame, and the late fee through the Invoice frame.
Is there a limit as to how many line-items can be reconciled on a material receipt?
The system will allow the reconciliation of up to 250 line-items per receipt.
VENDOR CONFIRMATION RECONCILIATION
If you have read and understood the Material Receipts Reconciliation examples on the previous pages, understanding Vendor Confirmation Reconciliation will be easy for you. Material Receipts Reconciliation and Vendor Confirmation Reconciliation function the same way, with two exceptions: when reconciling vendor confirmations, no entries are made in the Cost Change Register, and Moving Average Costs are not updated. No entry is made on the Cost Change Register since the Moving Average Cost is not updated. And Moving Average Cost is not updated since the vendor may not necessarily give you back what you paid for this item.
When you return material to a vendor, you generate a vendor return and the system calculates a value representing the worth of the material. This value is the amount you expect to be credited for the return (the expected amount). Sometimes, the actual value of the material (the invoiced amount - determined by the vendor) is different. Use Vendor Confirmation Reconciliation to track the discrepancy between the expected and invoiced amounts. Discrepancies and the reasons behind them are recorded the Payables Discrepancy Journal.
When you reconcile vendor confirmations, the system displays the Vendor Confirmation Reconciliation screen:
+--------------------- Vendor Confirmation Reconciliation----------------------+ | Vendor: Expected: | |Invoice#: Invoiced: | | Ret#: Variance: | |Var Desc: | +------------------------------------------------------------------------------+ +Conf Original Expected Invoiced Variance Desc + | | | | | | +------------------------------------------------------------------------------+ +Item Code Expected Invoiced Variance Desc + | | | | | | | | | | | | +------------------------------------------------------------------------------+
�INVOICE frame�
�CONFIRMATION frame�
�ITEM frame�

1 PAYABLES
113
PAYABLES
As usual, the screen is divided into three frames. Notice that the labels are slightly different on this screen: the Return# displays instead of the PO# and the Confirmation number displays in place of the Rcpt field.
The frame at the top of the screen shows invoice totals. The second frame (in the middle) shows totals for each confirmation on the return. The frame at the bottom of the screen shows each item on the confirmation that is highlighted in the center frame.
Line Item Details Screen
If you choose to edit at the item level, the Line Item Details screen displays as usual (access this screen by pressing [Tab] twice):
+---------------------------- Line Item Details ----------------------------+ |Code: Line Item #: | | Confirmation Lines: | | Open Quantity: | | | | Expected Invoiced | | Unit Cost: Unit Cost: | | Unit Size: | | Quantity: Quantity: Complete?: | | Multiplier: Multiplier: | | Ext Price: Ext Cost: | | | |Var Desc: | +---------------------------------------------------------------------------+
The number of Confirmation Lines displays in place of the number of Receipt Lines. All else functions as described in the Material Receipts Reconciliation section.
Confirmation Details
The system displays a Receipt Details screen when you reconcile a material receipt at the receipt level. Similarly, it displays a Confirmation Details screen when you reconcile a vendor confirmation at the confirmation level:
+---------------------------- Confirmation Details ----------------------------+ |Conf Original Expected Invoiced Variance Cnf Date Compl? | | | |Var Desc: | +------------------------------------------------------------------------------+
The Confirmation number displays in place of the Receipt number, and the Cnf (confirmation) Date displays in place of the Rct Date. All else functions as described in the Material Receipts Reconciliation section.

1 PAYABLES
114
PAYABLES
ADDITIONAL OPTIONS
The Additional Options are labeled differently when you reconcile a vendor confirmation. Functionality of each option, however, remains the same. The following table shows the name of the Additional Option when reconciling a material receipt versus a vendor confirmation:
Material Receipts Reconciliation Vendor Confirmation Reconciliation
Reconcile Reconcile Reconcile Receipt Reconcile Confirmation Reconcile All Reconcile All Omit Omit Omit Receipt Omit Confirmation Omit All Omit All
PRINTING THE PAYABLES DISCREPANCY JOURNAL
The Discrepancy Journal shows the difference between the Expected and Invoiced amounts and any description that was entered to explain the variance. This journal can be printed at any time, but should be printed and committed to history (using the Commit field) at the end of an accounting period.
The Discrepancy Journal screen is shown as follows:
The Start and End Vendor, Vend Inv#, and Inv Date allow you to limit the Payables Discrepancy Journal to a particular range of vendors, vendor-invoice numbers, and invoice dates.
Set the Open Reconciliations field to YES to include those reconciliations that have not been completed yet (i.e. cannot be closed out). If you set Open Reconciliations to NO, the Discrepancy Journal will show only completed reconciliations.
To include reconciliations on the Discrepancy Journal, set the Include Requisitions field to YES. To exclude reconciliations on the Discrepancy Journal, set this field to NO.
�Q-MODE must be ON to commit information to history.

1 PAYABLES
115
PAYABLES
To commit the Discrepancy Journal, set the Commit field on the Discrepancy Journal parameter screen to YES. All of the information on the journal is placed into history. You can still view the information you have committed to history. You can also still edit the distribution account information on any payable. If the Commit field is set to NO when you print the Discrepancy Journal, the information it contains has not been committed from the journal and will still be there the next time you print it.
Once you have entered all the report parameters, press the [Go] key to print the report. The system will prompt you to choose a printer option.
APPENDIX 2: HOW TO CONFIRM DIRECT SHIPMENTS When material is shipped directly from your vendor to your customer, it is never received into your system as inventory, but you still receive an invoice for it from your vendor. The vendor’s invoice acts as a shipping confirmation for these direct shipments. The shipment information on these invoices must be entered into the system through the Direct Ship Confirmation option.
The Direct Ship Confirmation option allows you to track the cost of material that was shipped directly to your customer, and also any other charges, such as freight, phone, and commission. Each line item on the order is confirmed individually, so that you can track partial shipments, or cost and price changes. If the order is not a direct bill, this process automatically generates the invoice for your customer, which can be printed through the Invoice module. You can do this even if you have not received an invoice from your vendor.
The following is an example of a direct ship confirmation:
Your customer, Stauffer Hardware, sends you an order for 8 items that they need right away. You do not have the items in stock, so to save time you order the items from A&M Supply and have them shipped directly to Stauffer Hardware. Because the order is a direct ship, you never receive the items into inventory. You do, however, receive an invoice for $97.50 (the total cost of the items). The invoice indicates that A&M Supply is not sending an invoice to Stauffer Hardware. You must do two things with the vendor invoice you receive: ♦ Enter it as a new payable
♦ Confirm the direct shipment

1 PAYABLES
116
PAYABLES
You already know how to enter the vendor’s invoice through the New Payable option. The Confirm Direct Shipments option can be accessed through the New Payable screen or from the Invoice Processing menu itself. You are prompted for the Vendor code and PO#; the remaining fields are filled automatically by the system:
Notice the Direct Bill? field. It defaults to NO, which is appropriate in this case because A&M Supply indicated that they were not going to bill Stauffer Hardware for the items. If A&M Supply billed Stauffer Hardware directly for the order, you would set this field to YES and your Prophet 21 System would not generate a receivable for the order. The Direct Bill? default is set in the User Company Options. The Item Details frame shows that the Open Qty of items is 8, and that the Confirm Quantity is zero. In this example, you would edit the Confirm Qty to show the quantity you were billed for or confirm what was shipped to your customer.

1 PAYABLES
117
PAYABLES
To do so, press [Ctrl][D] to access the Item Details frame. To edit the details for the items, highlight the item and press [Enter]. The Direct Ship Item Details display. Edit the Confirmed Qty:
Because the invoice bills you for all 8 items, you enter the Confirmed Qty as 8. Edit the Complete? field to show YES, because the order is complete. To confirm all items and shipped quantities without stepping through each item, press the [Options] key and select Confirm All Items. If less than 8 items had been shipped to your customer, you would enter the quantity shipped and set the Complete? field to NO. This tells the system that you want the item to remain open so that you can confirm it at a later time. You can also edit the Unit Cost and Ext Cost fields to reflect any vendor invoice changes.
Once you return to the main Direct Ship Confirmation screen it is updated with the new information entered in the detail screen. The system carries over the total of the freight amount and the material amounts to the Invoice Amount. The total of the material amounts are carried over to the Net Amount. Because miscellaneous and phone charges are generally charged to the customer and are not charges that the vendor incurs, you do not see these charges included on the vendor's invoice. All amounts can be edited at this point.
To complete the confirmation process, accept the main screen.
After you accept this screen, the New Payables screen reappears. The system indicates the direct ship payable with the message, **DS CONFIRM**.

1 PAYABLES
118
PAYABLES
The invoice and net amounts on the New Payables screen default from the Direct Ship Confirmation screen. The invoice amount includes the freight cost and the cost of the confirmed items. The net amount includes just the cost of the confirmed items.
On the bottom portion of the screen, the invoice amount is listed in the Accounts Payables account, the net amount is listed in the Direct Shipment account, and the difference, which is the freight amount, is listed in the first default account. In the example above, the first default account is called “Freight Expense.”
Note: You can set up these default accounts in the Payables company options.
PRINTING THE DS CONFIRMATION REGISTER?
The DS (Direct Ship) Confirmation Register, which can be printed from the Management Reporting menu, shows each direct shipment item that has been “confirmed” as shipped through the Prophet 21 system. It can also display unexpensed direct ship confirmations (those for which a payable has not yet been entered). The Register allows you to track the cost of material that was shipped directly to your customer, and also any other charges, such as freight, phone, and miscellaneous. Each line item on the order is shown individually, so that you can track partial shipments, or cost and price changes.
The system indicates the
direct ship payable.

1 PAYABLES
119
PAYABLES
The Direct Ship Confirmation Register screen is shown as follows:
If the Report Sequence field is set to PO, the report will be sequenced by purchase order number. If this field is set to VENDOR, the report will be sequenced by vendor.
Enter a Start and Ending Vendor, PO#, and Ship Date at the prompts. The Register includes only the vendors, PO#s, and Ship Dates included in these ranges.
The Report Type field determines whether CURRENT, HISTORY, or BOTH types of entries will print on the Register. If the Report Type is set to CURRENT, the Commit? field (see below) can be edited.
When the Commit field on the Direct Ship Confirmation Register parameter screen is set to YES, the report will first print for your review. After the information is displayed, the system will ask if you wish to commit this journal to history. If you answer YES, the information is taken from the register and committed to history. This information can still be seen on this report, if the Report Type field is set to History or Both. If the Commit field is set to NO when you print the Direct Ship Confirmation Register, the information it contains will still be there as current information the next time you print it.
Q-MODE must be enabled to commit information to history. To activate Q-MODE, press the OPTIONS key when you are in any menu screen. Select the Q-MODE option and press [Enter] to activate.
The Only Unexpensed DS Confs field determines whether unexpensed direct ship confirmations display on the register. If Yes is entered, only those confirmations for which no payable with that purchase order number exists are displayed. If No is entered, all confirmations are shown.
Because there is no direct link between direct ship confirmations and payables, the system tests to see if any payable has been entered that references the direct ship purchase order number. If the system cannot find a payable for a direct ship confirmation, the confirmation is considered unexpensed and is printed on the report when the Only Unexpensed DS Confs parameter is set appropriately. Otherwise if the payable exists for the direct ship purchase order, the confirmation is considered expensed and is not shown on the report when the Only Unexpensed DS Confs parameter is set to display unexpensed confirmations.

1 PAYABLES
120
PAYABLES
Once you have entered all the report parameters, press the [Go] key to print the report. The system will prompt you to choose a printer option.
SAMPLE: DIRECT SHIP CONFIRMATION REGISTER WITH UNEXPENSED DIRECT SHIP CONFIRMATIONS
APPENDIX 3: HOW TO PAY VENDORS BY CREDIT CARD Credit cards can now be specified as a payment type when entering payables. Therefore, printing checks can be prevented. A new report can be run to show payables released via credit card.
VENDOR
In Vendor Maintenance, the new CCRD value for the Type field has been added to identify those vendors that are a credit card vendor, meaning vendors who actually supply credit cards. These vendors, such as American Express, VISA, Discover, or MasterCard, should be set up with payment type CCRD.
The Type field offers the new
value of CCRD for credit card
vendors.

1 PAYABLES
121
PAYABLES
A credit card balance field is also present for these vendors. This balance reflects what is due, minus any current payments or charges (current by period) that should be calculated into the total due the credit card vendor. This balance field is available for editing, and is also updated from the Expense Journal. The initial balance, or accrued charges, on the credit card should be entered here. The difference between this field and the balance shown in Ledger for the credit card account should be the initial balance. This balance will be displayed in a new Payables report, so that in conjunction with the Payables Aged Report, you should be able to balance your payables.
Note: If you have the Foreign Currency optional package enabled, the Balance field should be edited in the home currency, not in the currency of the vendor.
LEDGER
A liability account for credit card transactions should be set up for each credit card vendor. This account would be used when a vendor is paid by credit card (instead of the Accounts Payable account), and when the credit card vendor is paid (as the Inventory/Service account).
An additional account should also be created for any finance charges that may be included in a credit card bill.
Important! If you use alternate accounting regions, the accounts for credit card transactions and finance charges should be set up in each region with the SAME account numbers.
A Credit Card Balance field is displayed for credit card vendors.

1 PAYABLES
122
PAYABLES
PAYABLES
Vendor Defaults
Defaults should be set up on the vendor level for all credit card vendors. The default inventory/service account should be set to the credit card account assigned to this vendor in the Ledger module. It is also recommended that an account be created and set in the 1st Default field to capture finance charges that may apply to the credit card.
Defaults for non-credit card vendors should not use these accounts.
Note: If you use alternate accounting regions, this account needs to be set up in the vendor-branch ledger account defaults for ALL branches.
The Inventory/Service account
is set to the credit card account
assigned to this vendor in the
Ledger module.

1 PAYABLES
123
PAYABLES
Invoice Processing – New Payable
The new Payable Type of Credit Card has been created for entering an invoice to be paid by credit card.
If you have more than one credit card vendor and are selecting Credit Card as the Payable Type, you need to select the appropriate credit card vendor from a browse so the system knows which credit card account to use.
Note: If there is only one vendor in the system with a Type value of CCRD, the browse does not appear.
Once a specific credit card vendor is chosen, the appropriate credit card account (by vendor) will be used instead of the Accounts Payable account. The payable is available for editing until the Expense Journal is committed. After that, the payable cannot be edited. The payable will not be available for payable release. After the Expense Journal is committed, the payable is closed.
Paying the Credit Card Vendor
To pay the credit card vendor, enter a payable that has a Payable Type of either Regular or Quick Check. Do not use the Credit Card payable type, unless you are paying one credit card with another. The credit card account, as set up in the vendor defaults, is used as the Inventory/Service account. The account set up to handle finance charges, if set in the vendor defaults as the 1st Default account, is used for any discrepancies between the invoice amount and the net amount. The Invoice Amount should be the total amount including any finance charges. The Net Amount should be the total purchase amount, or the total excluding any finance charges. These payables are also displayed on the Expense Journal to be committed to history.
Once the Expense Journal is committed, the vendor’s credit card balance amount is updated. The balance reflects the amount in the credit card account set up for the credit card vendor, unless it has been edited.
Since the credit card type payables (those being paid by credit card) are paid, they will not show on the Payables Aged Report. The credit card vendors’ payables do show on the Payables Aged Report once they are
The new Payable Type of
Credit Card has been created.

1 PAYABLES
124
PAYABLES
entered. To accurately display what is owed, a new Credit Card Balance Report has been created. This report should be used in conjunction with the Payables Aged Report to determine what needs to be paid.
Credit Card Balance Report
The Credit Card Balance Report tracks the open balance for credit card vendors, reflecting the payments made by credit card, and any payables that have been entered for the credit card vendor. This report is to be used in conjunction with the Payables Aged Report.
The Credit Card Balance Report displays the credit card vendor (with general information about the vendor), the balance amount for the vendor (as defined in the Vendor Maintenance screen and maintained by the Expense Journal), and the credit card account set up for that vendor. Any payables paid by that credit card during the current month (current regarding the Expense Journal) are displayed in the second section of the report. A subtotal is displayed and reflects the current vendor balance plus these payables.
Note: The subtotal is displayed in the home currency if you have the Foreign Currency optional package enabled.
The report section following the payables paid by credit card shows any new payables entered to reduce the balance owed to that credit card vendor. The amounts associated with these payables are subtracted from the subtotal. After this section is displayed, a Total Open Amount is shown. This amount reflects the subtotal minus any payables entered for the credit card vendor. The Total Open Amount provides the open credit card balance. This report, together with the Payables Aged Report, gives you an accurate look at what is currently open on the system.
A branch summary displays at the end of the report. The Credit Card Balance Report can also be generated for a range of credit card vendors.
Note: If the Foreign Currency optional package is enabled, a currency breakdown appears at the end of the report.
To run the Credit Card Balance Report, choose the Management Reporting option from the Payables main menu. Then select the Credit Card Balance Report option.

1 PAYABLES
125
PAYABLES
The Credit Card Balance Report parameter screen appears:
Vendor Start/End �
. . . specifies the credit card vendors on which to run the report. A Credit Card Vendor browse can be accessed on either the Start or End field.
Page Format . . . determines the report format of the report. Full – All information concerning the payables paid by that credit card in the current month is shown, along with the payables entered against the credit card. Line-item detail is shown for each payable.
★ Multiple – All information as shown on the Full report appears for the Multiple format, but multiple credit card vendors appear on the same page if applicable. Brief – Only subtotals and total open amounts are shown on the report for each credit card vendor. Summary – Only total open amounts by branch are shown. No credit card vendor payable detail is shown.
Complete the parameters and a report similar to the following is generated.

1 PAYABLES
126
PAYABLES
Sample: Credit Card Balance Report (Multiple Page Format)
Note: If the Foreign Currency optional package is enabled, the account balance displays in the home currency. The payables display in the foreign currency (if the vendor is a foreign vendor) and also show the converted amount in the home currency. The subtotal and total open appear in the home currency. In the summary section, the branch total displays in the home currency, with a foreign currency breakdown.
Credit Card Detail Report
The Credit Card Detail Report displays any credit card transactions within the range of the parameters. Transactions include purchase orders paid by credit card, and payments made to the credit card vendor.

1 PAYABLES
127
PAYABLES
To run the Credit Card Detail Report, choose Management Reporting from the Payables main menu; then select the Credit Card Detail Report option.
The Credit Card Detail Report parameter screen appears.
Vendor Start/End �
. . . indicates the range of vendors on which to generate the report.
Account Start/End �
. . . specifies the range of ledger accounts on which to generate the report. This is restricted to the accounts that are defined as the Inventory/Service account defaults for the credit card vendors.
Vend-Inv# . . . determines the range of vendor invoice numbers on which to run the report.

1 PAYABLES
128
PAYABLES
� Date Start/End
. . . indicates the start and end date for the report. Only those transactions that occurred on and within the posting dates indicated are reported.
Comment Start/End
. . . specifies the range of comments on the transactions that are reported.
Payable Type �
. . . indicates the specific type of payable that is reported. Regular – Payables entered for payment of purchase orders or requisitions are reported, only as they apply to payables entered to pay credit card vendors.
Note: The only regular payables that display are payables entered to pay the credit card vendors. This report shows details surrounding the accounts set up for the credit card vendor as the Inv/Service defaults. This account should only be applicable for regular payments entered for the credit card vendor.
Credit – Payables entered to correct overcharges, such as being billed for damaged material, or material never received, are reported, only as they apply to payables entered to pay credit card vendors. Quick Check – Payables entered and paid in one step are reported, only as they apply to payables entered to pay credit card vendors. Credit Card – Payables entered as credit card payments are reported.
★ All – All payable types are reported.
Foreign Currency Options
Currency Start/End
. . . indicates the range of foreign currencies that are reported. These options appear only if the Foreign Currency optional package is enabled.
Report Options
Page Format �
. . . determines the report format of the listing. Full – All information concerning the payables is shown. Line-item detail is shown for each payable.
★ Multiple – All information as shown on the Full report appears for the Multiple format, but multiple vendors appear on the same page if applicable. Brief – Only vendor totals are shown on the report for each vendor. Summary – Only total open amounts by branch are shown. No vendor payable detail is shown.
Report Type �
. . . determines which payables are reported. ★ Current – Only current payables (those not committed to history) are printed on
the report. History – Only committed payables (those payables already committed to history) are printed on the report. Both – Both current and historical payables are shown on the report.

1 PAYABLES
129
PAYABLES
When the parameters are completed, press [F2] to generated the Credit Card Detail Report.
Sample: Credit Card Detail Report (Multiple Page Format)
The Credit Card Detail Report includes information on each vendor, the posting, due, and discount dates, vendor invoice number, purchase order number (if available), gross amount of the invoice, payable type, and the credit card vendor if the payable was paid by a credit card. N/A displays in the CC Vend column if the payables was not paid by a credit card. All amounts that were distributed to a credit card account and the accounts affected for each payable are shown.
Note: If the Foreign Currency optional package is enabled, the gross amount of the foreign currency payable is displayed in the home currency and the currency associated with the payable.
For each vendor, the total of the payables displays either after the details (in the Full or Multiple page format), or in the header (in the Brief page format). A branch summary is listed at the end of the report.
A foreign currency breakdown is also included at the end of the report if the Foreign Currency optional package is enabled.

1 PAYABLES
130
PAYABLES
APPENDIX 4: MATERIAL RECEIVED AFTER PAYABLE ENTRY Material receipts will now be “matched up” with vendor invoices for material received after the payable has been entered. A payable is updated with a PO number if the purchase order is invalid. Also, unreconciled payables are now tracked.
PAYABLES DEFAULTS
Company Options
The Zero Cost Variance Description field has been added to the Payable Company Options screen to display a default variance description for nonstock items that have a zero cost. To access this field, choose User Options from the main menu of Payables, and select the Company Options from the User Options menu:
The Zero Cost Var Desc field appears on the Payable Company Options screen:
Zero Cost Var Desc
. . . description the system uses when it finds a nonstock item with a $0.00 cost. This field should be left blank if you wish to investigate the reconciliation of
The Zero Cost Var Desc field has been added to the Payables
Company Options.

1 PAYABLES
131
PAYABLES
nonstock items with zero cost. For more information on when this description is used, refer to the “Match Unreconciled Payables” section on page 145.
Vendor Options
The Vendor Payable Defaults screen has also been changed. To access this screen, select Vendor Options from the User Options menu:
The current release status types of Hold, Auto-Hold, and Ready have been slightly modified and expanded. The system uses these new status types to apply not only to the release, but also to expense the payable. These are PO Pend (purchase order number is pending, will not expense or release), Hold Exp (payable on hold, will not expense or release), Hold Rel (payable on hold, will expense but will not release), Auto-Hold (do not auto-reconcile payable), Ready (payable ready to be expensed and/or released).
The Initial Status and Status after Reconciliation default options have replaced the Status parameter. The valid settings for the Initial Status default are Hold Exp, Hold Rel, Auto-Hold, and Ready. The Status After Reconciliation default has the status types of None, Hold Rel, Auto-Hold, and Ready. The status of the payable defaults initially to the setting of the Initial Status default, and when the payable is reconciled, the following takes place:
1. If the vendor default is set to None, then the status of the payable is not changed and must be manually updated by the user.
2. If the vendor default is set to Hold Rel, the status of the payable will change to Hold Rel if it is currently Hold Exp. Otherwise, no change in the status occurs.
3. If the vendor default is set to Auto-Hold, the status of the payable changes to Auto-Hold if it is currently Hold Rel or Hold Exp. Otherwise, no change in the status will occur.

1 PAYABLES
132
PAYABLES
4. If the Status after Reconciliation field from the Vendor record is set to Ready, the status of the payable changes to Ready.
When the custom software is installed, the current vendor default settings are updated in the following manner: the Initial Status retains the current status setting, with the exception of Hold. This will be changed to Hold Rel. The Status after Reconciliation parameter defaults to None. New vendors created after the custom software is installed will still default to Ready for Initial Status, and None for Status after Reconciliation. Both fields are available for Fast Edit.
Note: If a reconciled payable becomes unreconciled, the Status type of the payable remains as it is currently set.
If a payable is entered and a PO is not referenced and the vendor is an Item Type vendor, the system defaults the status to PO Pend. Otherwise, the system defaults to the setting in the Vendor Payables Defaults for Initial Status.

1 PAYABLES
133
PAYABLES
VENDOR
These new status type settings are available on the Vendor Maintenance screen in the Vendor module.
Further information on the Vendor Maintenance parameters can be found in the Vendor Information manual.
PAYABLES INVOICE PROCESSING
New Payable
Payables entered for a specific purchase order prior to the receipt of the material are difficult to identify for reconciliation. However, the payable can still be created and, once the material is received, reconcile the material and continue to process the payable.
When a payable is entered and the material has not yet been received, the payable should NOT be reconciled. In this way, the system knows which payables are anticipating material receipts. With this in mind, the system uses the new status types for Initial Status and Status after Reconciliation. Upon entry, the payable’s status defaults to the setting in the Initial Status parameter. When the payable is reconciled, the status is updated based on the value in the Status after Reconciliation field.
The new status options appear in
Vendor Maintenance.

1 PAYABLES
134
PAYABLES
If a payable is entered, and a PO is not referenced, and the vendor is an Item Type vendor, the system defaults the status to PO Pend (see the “Update PO on Payable” section on page 142). Otherwise, the system defaults to the setting in the Vendor Payables Defaults for Initial Status. You can manually edit this field.
Invoiced Items
If the payable is unreconciled because all the material has not yet been received, you will need to select the items for which you are being billed. This is done so that when the material is received, you do not need to refer back to the paper invoice for cost or quantity changes. You should select the items from the purchase order for which you were invoiced, and enter any quantity or cost changes from the purchase order. This is the information that the system shall use during the “Match Unreconciled Payables” option.

1 PAYABLES
135
PAYABLES
To select these items, use the PowrDrill option from the Payable Entry and Edit/Delete Payable screen. The option is entitled Invoiced Items. When the payable is saved and there is no invoiced item information for the payable (with a valid non-DS purchase order number), the Invoiced Items screen is automatically displayed for you to select items. This shall only occur during Payable Entry; the screen does not automatically display when editing payables.
Note: If the payable is reconciled, the invoiced item information is captured from the reconciliation information if you have not already selected it. If an item is reconciled against the payable, and the invoiced items are manually selected/deselected, an invoiced item record is created for the reconciled item, even if it were deselected. This only occurs during payable entry. If an item is later reconciled against the payable (payable edit or material receipts reconciliation screen), the information is not captured for the invoiced items.
When the Invoiced Items option is selected, you are able to select the items for which you are being invoiced.
The information per item (unit cost, quantity, multiplier, unit size, etc.) is determined by the following. Keep in mind that this happens when the payable is being either entered or edited:
1. If the item has not yet been received, the information defaults to the information on the purchase order. The invoiced quantity defaults to the total PO quantity minus any quantity that has already been selected as an invoiced quantity for another invoice for this purchase order.
2. If the item has been received, one of three scenarios apply:
A. The item was received and reconciled against another invoice. In this case, it is not important as what was received, and the system defaults the information to what is left on the purchase order. (PO quantity – selected invoice quantity against other invoices for this PO)
B. The item was received and reconciled against this invoice. In this case, the item reconciliation information is known and the system defaults the information to these values (reconciled quantity, reconciled unit cost, etc.).

1 PAYABLES
136
PAYABLES
C. The item was received and was omitted from this invoice. In this case, it is known that this item is not associated with this invoice, so we can default the quantity to 0.00. The other information will be what appears for the reconciliation. For example, from the Material Receipts Reconciliation screen, select this item. The quantity should appear as 0.00, and the cost and multiplier carries over from the purchase order, but can be edited. This cost information is the default for the invoiced item information.
The screen of Invoiced Items appears similar to the following:
Vendor . . . the payable vendor.
Inv # . . . vendor invoice number.
PO # . . . purchase order number.
Amt . . . net amount of the invoice.
Item . . . item code of the item on the purchase order.
Line . . . line-item sequence number of the purchase order item.
Unit Cost . . . cost of the item by unit.
Qty . . . quantity ordered on the purchase order.
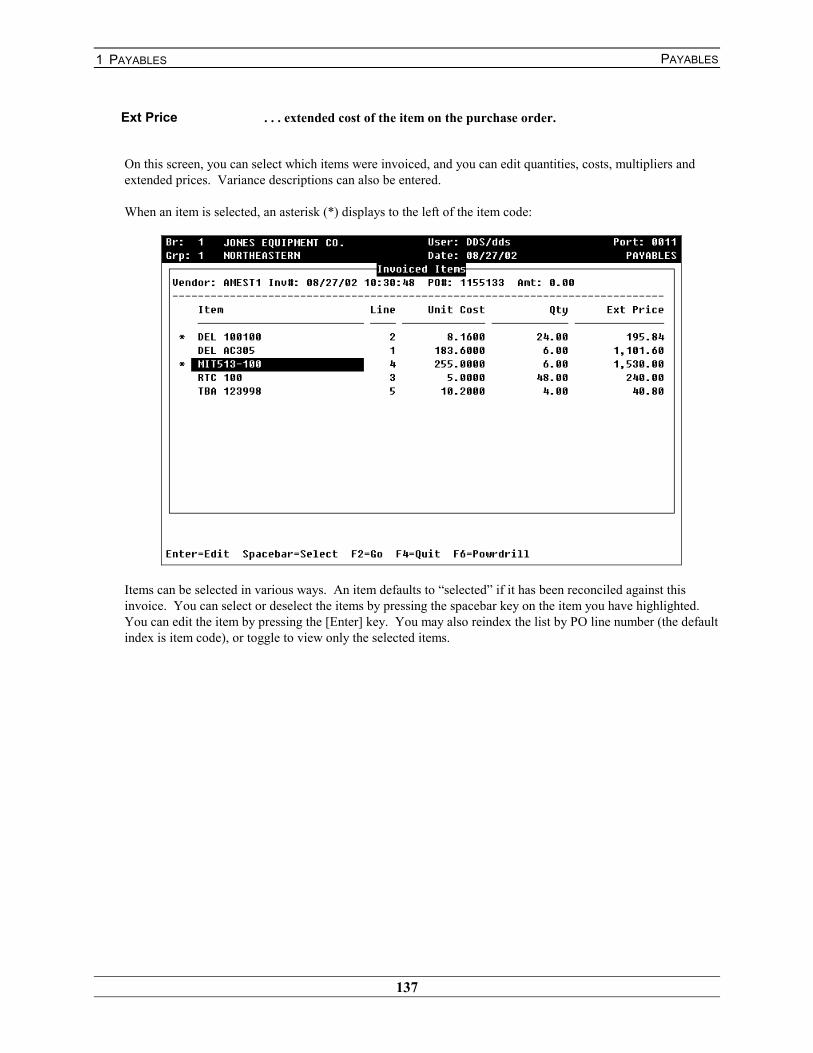
1 PAYABLES
137
PAYABLES
Ext Price . . . extended cost of the item on the purchase order.
On this screen, you can select which items were invoiced, and you can edit quantities, costs, multipliers and extended prices. Variance descriptions can also be entered.
When an item is selected, an asterisk (*) displays to the left of the item code:
Items can be selected in various ways. An item defaults to “selected” if it has been reconciled against this invoice. You can select or deselect the items by pressing the spacebar key on the item you have highlighted. You can edit the item by pressing the [Enter] key. You may also reindex the list by PO line number (the default index is item code), or toggle to view only the selected items.

1 PAYABLES
138
PAYABLES
The applicable keystrokes are listed at the bottom of the screen. The PowrDrill displays additional options:
Edit Item
When the Edit Item option is selected, the Invoiced Item Details screen appears, that is similar to the Item Detail window of the Material Receipts Reconciliation screen:
At the top of the window, the Item Code, PO Line Number, Item Descriptions 1 and 2, the Available Quantity, and the Contract Number appear. If this item references an EDI document, the item code from the EDI

1 PAYABLES
139
PAYABLES
document appears in the EDI Code field. The Available Quantity is calculated as the quantity on the purchase order, minus any quantity that has been reconciled against another invoice. It reflects the amount that is available to be invoiced against this payable.
On the left side of the window are the purchase order columns, displaying the PO values from the purchase order. The Unit Cost, Unit Size, Total PO Quantity, Multiplier, and Extended Cost from the purchase order are displayed here. On the right side of the window, the information from the invoiced item appears. You can edit any of these fields: the Unit Cost, Quantity, Multiplier, Extended Price, and Variance Description.**
** For nonstock items, if the cost on the purchase order is 0.00, the system will check the selling price of the item from the order. If the selling price is either 0.00 or no charge, or the selling price is greater than or equal to the invoiced cost of the item, the item can be reconciled, regardless of the allowable item variance limits. A variance description is still required, but this can be defaulted from the Zero Cost Var Desc value in the Payables Company Options. If this variance description is blank, the item still requires a variance description and is not be available to be reconciled. This description defaults when the invoiced item information is created. You should blank out this description if you wish to investigate this item.
When [F2] is pressed on this screen, the changes are saved and the item will be “selected” when returning to the list, if the quantity is greater than zero. Press [F4] to exit from the window without saving changes.
Select Item
When the Select Item option is chosen, an asterisk (*) is placed in front of the item code without changing the quantity or cost information, if the quantity is greater than zero.
Select All
Choosing the Select All option places an asterisk before all items with a quantity greater than zero without changing the quantity or the cost information.
Omit Item
The Omit Item option removes the asterisk before the item code and deselects it.
Omit All
When the Omit All option is chosen, all items are deselected. The system removes the asterisk in front of the item codes.
View
Choosing the View option causes the system to reindex the list of items by either PO Line or Item Code, depending on which view is currently being shown. When indexed by PO Line, the line number is highlighted; when indexed by Item Code, the item code is highlighted.
Toggle
When Toggle is selected, the system displays either all items or just the selected ones, depending on the toggle setting that is currently being viewed.

1 PAYABLES
140
PAYABLES
Note: An item cannot be selected if the quantity is zero.
Press [F2] to save the selected invoiced items and exit the screen. Press [F4] to exit the screen and not save changes.
Note: The information for the invoiced items of EDI documents will be saved directly from the document. For more information on this, refer to the custom documentation entitled, “EDI Payables Enhancements.”
When a payable is edited, the Material Receipts Reconciliation is edited, or the Match Unreconciled Payable option is run, the system defaults any unreconciled material to the invoiced item information (as needed). Any time the Material Receipts Reconciliation screen is entered, aside from entering a new payable, you should see any unreconciled items default to the invoiced items information entered with the payable. The Zero Cost Var Desc value will also be applied when applicable (if editing a zero cost item, see the prior paragraphs for details on when this applies).
Edit/Delete Payable
To edit or delete a payable, choose the Edit/Delete Payable option from the Payable’s Invoice Processing menu. If a payable is being edited, PO Pend is only a valid status type if there is no valid PO number, the payable has not been expensed, and no portion of the payable has been released.
When a payable is edited and the Material Receipts Reconciliation is edited, the system defaults any unreconciled material to the invoiced item information (as needed).
Material Receipts Reconciliation
When a payable is edited, or just the Material Receipts Reconciliation is edited, the system defaults any unreconciled material to the invoiced item information (as needed). Any time the Material Receipts Reconciliation screen is entered, aside from entering a new payable, you should see that any unreconciled items default to the information from the invoiced items entered with the payable. The Zero Cost Var Desc value will also be applied when applicable (if editing a zero cost item, see the “Invoiced Items” section on page 134).
In addition, a new PowrDrill option is available, called Inv Items. When this PowrDrill is selected, the invoiced item information for the invoice is viewed. For more information on this, refer to the “Payables View” section on page 160.

1 PAYABLES
141
PAYABLES
The New Invoice Items PowrDrill on the Material Receipts Reconciliation Screen
Viewing Invoiced Item Information after the Inv Items PowrDrill is Selected

1 PAYABLES
142
PAYABLES
Update PO on Payable
When a payable is entered for an Item type vendor and a valid PO is not referenced, the status type defaults to PO Pend. As mentioned above, this status can be edited. However, do not edit this status if you want to return to this payable and update the PO information.
A new option, Update PO on Payable, has been added to the Invoice Processing menu:
If a payable is entered and should be tied to a specific purchase order, but that information is not immediately available, the payable can still be entered without a PO number and with a status of PO Pend. Then, once you have determined what the PO number should be, you can use this option to apply the PO to the payable, and the system will update the necessary information.
Note: You will only be able to update the PO on a payable that does not already specify a PO number. If an erroneous (but valid) PO number was entered for the payable, this payable will have to be deleted and reentered. It will not be available for update with this option.
Once this option is selected, a parameter screen displays for you to determine the range of invoices pending a PO that can be updated.

1 PAYABLES
143
PAYABLES
For each payable within the range of the prior screen’s parameters (and within the payables group if payables group processing is enabled and Q-Mode is not enabled), a list of the payables pending a PO number displays:
The vendor invoice number, sequence number, vendor code, invoice date, description (first 20 characters) and the invoice amount displays on this list to help you to identify the payable that needs to be updated. Once you select a payable, a window appears to allow you to enter the correct PO number. This window displays the selected vendor code and vendor invoice, as well as prompt the user for the PO number. A browse of all available POs, requisitions, and stage POs (if enabled) is available per invoice. (A vendor return browse appears if the payable is a credit.) Only purchase orders for which the purchasing branch is within the payables group will be valid (the same rule as applies to new payable entry).

1 PAYABLES
144
PAYABLES
All purchase order numbers entered here will be applied when you accept the changes and exit the screen by pressing [F2]. When a purchase order is entered for an invoice, that invoice is starred (*) to show that a purchase order has been entered.
You can also press [F6] on the Update PO on Payable screen to display the following PowrDrill:
Update . . . displays the Enter PO Number window, previously described.
Payable . . . shows the Vendor Invoice Information view screen.
Edit/Delete . . . edit or delete the payable via the Edit/Delete Payable screen. If a purchase order has been entered for the payable, you will receive a warning when this option is selected. To continue using this function, this PO number will be permanently assigned to the payable and cannot be changed after that. You decide whether or not to continue.

1 PAYABLES
145
PAYABLES
View . . . displays the payables. You can select to index this list by vendor invoice number or by vendor code. The default is vendor number. Pressing the [Tab] key acts like a toggle between the two index types.
Toggle . . . switches the view between payables for which PO numbers have been entered, and all payables on the list.
When you save and exit this screen, the PO number will be applied to the payable and the appropriate information (paid to date, number of payables, last invoice date, etc.) is updated. The status of the payable will change from Po Pend to whatever is set up in the vendor defaults for Initial Status. The payable will become unreconciled, unless it is a direct shipment purchase order, a variance description exists on the invoice level, or the variance on the invoice level is within the allowable limits, in which case it will be reconciled. Final Bill will be set to No.
Match Unreconciled Payables
The option, Match Unreconciled Payables, on the Invoice Processing menu allows you to list and reconcile unreconciled payables for which material has been received.

1 PAYABLES
146
PAYABLES
When this option is selected, the Match Unreconciled Payables parameter screen appears:
More information on any of the parameters can be found in the report sections of this manual.
Once the parameters are set, the system will find any unreconciled payables within this range of parameters (and within the payables group if payables group processing is enabled and Q-Mode is not enabled) and search for incomplete material receipts for that purchase order to match, based on the invoiced items.
The system determines whether a match is present by the following method:
1. First, the system uses the invoiced item information to determine what quantity of each invoiced item is needed. This will be calculated as the quantity of the invoiced item minus whatever quantity of that item has already been reconciled against the payable. For example, an invoice comes in for 10 pieces of item ABC. Two pieces are available at the time and are reconciled against this invoice. The system will calculate that 8 pieces are still needed.
2. Second, the system determines what quantity of the invoiced item was received but not yet reconciled against an invoice (by item code and PO line number). For example, Receipt 1 had 2 pieces of item ABC, and this was reconciled against the invoice. Receipt 2 has 15 pieces of ABC, and 5 pieces were reconciled against another invoice. The system will calculate that 10 pieces are available to be reconciled.
3. Then, the system will compare what is needed to what is available. If the quantity available equals or exceeds the quantity needed, that item is considered “matched.” If the quantity available is less than the quantity needed, that item is considered “not matched.”
In addition, if an item is “matched,” the system checks the extended price of the invoiced item (invoiced quantity * invoiced cost * invoiced multiplier / PO size) to the extended price of the received item (received quantity * received cost * received multiplier / receiving size). If the difference is within the allowable item variance limits, then the item does not require a variance description* and is available to be reconciled. If the difference is outside of the allowable item variance limits, the item will require a variance description, and it will not be available to be reconciled.

1 PAYABLES
147
PAYABLES
4. The system continues this process for each invoiced item. After all the items have been tested, the system checks to see if all items have been “matched.” If all items have been “matched,” then the invoice will be considered “matched.” If any item is “not matched,” then the invoice will be considered “not matched.”
In addition, if the invoice is “matched,” the system checks to see if a variance description is required before it can be reconciled. If any single item requires a variance description to be reconciled, a variance exists on the receipt level, or the difference between the payable amount (invoice amount or net amount, depending on the Reconcile Amt company option) and the total extended price of the items available to be reconciled is outside of the allowable invoice variance limits, then the invoice will display as needing a variance description. If none of the items require a variance and any difference between the amount to be reconciled against (invoice amount or net amount, depending on the Reconcile Amt company option) and the total extended price of the items available to be reconciled is within the allowable invoice variance limits, the invoice will not require a variance description and will be available to be reconciled without further manual intervention.
Notes: A variance description can be manually entered with the invoiced item information. When the item is matched and tested for a variance, and a description already exists for the invoiced item, this description is automatically applied when the item is reconciled. Payables that have been reconciled, even if reconciled on the invoice level, are not included. In addition, payables for which no material is available also are also not included.
Once all the payables have been checked for available material or receipts, the system displays a list of the vendor invoices, vendor codes, purchase order numbers, invoice dates, invoice amounts, whether or not a match was found (Status column), and whether a variance needs to be investigated.
When a “Match” is displayed, specific items have been found to correspond with the invoiced items. If this invoice is reconciled without editing, the items will be reconciled against the invoice in the order that they were received (i.e. ten item ABCs were invoiced, and there are 4 on Receipt 1, 4 on Receipt 2, 8 on Receipt 3, and 2 on Receipt 4. Although some combinations of receipts equal the 10 ABCs that were invoiced, 4 on Receipt 1, 4 on Receipt 2, and 2 on Receipt 3 will be reconciled).

1 PAYABLES
148
PAYABLES
Note: If there is a contract number associated with an item on the PO, this will be stored (if available) with the invoiced item information. When the system is matching on item codes, it will check both the item code and the PO line number. If the system can match on both of these fields, then the contract number should be the same as well.
Accepting Reconciliations
After the Match Unreconciled Payables List is displayed, there are a few options in how reconciliations are accepted:
1. You can select an invoice which will take you to the Material Receipts Reconciliation screen. If there is a match, those specific receipts or items that created the match will display as reconciled, with newly received material, assuming the invoiced item information and any other receipts will be omitted. You can then accept the reconciliation, edit the reconciliation, or exit the screen without saving anything.
If an invoice has been reconciled via the Material Receipts Reconciliation screen, it cannot be unreconciled via the PowrDrill options (see the following). If the invoice should be unreconciled, you will need to manually unreconcile the invoice via the Material Receipts Reconciliation screen.
If an invoice is edited via the Material Receipts Reconciliation screen, any other invoices in the list will be re-evaluated to determine if a match exists based on the newly reconciled items.
2. If you choose to not review the invoices/receipts, you can press [F6] to use the PowrDrill to access additional options:
Reconcile Pay . . . reconciles the matched material against the invoice that is currently selected (without entering the Material Receipt Reconciliation screen). This changes the status to “Reconciled” if no variance is found. If a variance is determined to exist (as noted by the last column), a variance description is necessary before the invoice can be reconciled, and the invoice remains as matched.
Reconcile All . . . reconciles the matched material against all invoices that have a status of “Match.” This also changes the status to “Reconciled” if no variance is found. If a variance is determined to exist (as noted by the last column), a variance description is necessary before the invoice can be reconciled, and the invoice remains as matched.
Unreconcile Pay . . . unreconciles a single invoice if it displays as Reconciled but it should not be. The status is changed back to its original state – “Match” or “No Match.” The link

1 PAYABLES
149
PAYABLES
between the material and the invoice is also removed. This option does not unreconcile any invoices that have been manually edited and reconciled (via the Material Receipts Reconciliation screen). Any invoices manually edited and reconciled must be unreconciled via the Material Receipts Reconciliation screen.
Unreconcile All . . . unreconciles all invoices if they should not be reconciled. This action also updates the status of the invoices and removes all links between the material and the invoices on the list. This option does not reconcile any invoices that have been manually edited and reconciled (via the Material Receipts Reconciliation screen). Any invoices manually edited and reconciled must be unreconciled via the Material Receipts Reconciliation screen.
Note: If an item has been reconciled against an invoice, that reconciliation information is not changed to anything from the invoiced item record. Only material received but not yet invoiced will assume the information from the invoiced items.
Mat Rcpt . . . accesses the Material Receipts Reconciliation screen.
Edit/Delete . . . accesses the Edit/Delete Payable screen for this invoice.
View . . . toggles the sort index between sorting by vendor invoice number and purchase order number.
Toggle . . . toggles between showing matched invoices only or all invoices.
Once any of the above actions are performed, the list is refreshed/redisplayed. Any invoice that has been reconciled or unreconciled (back to Match or No Match) displays in the status column.
Upon leaving this list of invoices, any invoice that has been reconciled will have its reconciled and status flag be updated, as necessary, and a matched flag will appropriately be set. This signifies that the system matched this invoice; this is not set for those invoices reconciled via the Material Receipts Reconciliation option. Also, any processing regarding the items (moving average cost update, cost change, FIFO, etc) will occur.
Note: This matched flag is also used in the Reconciled Payables Report (see the “Management Reporting” section on page 151 for more information), to run the report only for those invoices that were reconciled from the match list (but not edited in Material Receipts Reconciliation). In addition, for any payable that is matched and reconciled, if it is later unreconciled (via Edit/Delete Payable or Material Receipts Reconciliation), this matched flag will be reset.
Material Receipts Reconciliation Screen for a Matched Invoice with a Variance
The following is an example of the Material Receipts Reconciliation screen for a matched invoice with a variance. Notice that the new items assume the invoiced item information.

1 PAYABLES
150
PAYABLES
1. A vendor invoice is entered prior to the material receipt ($1,266.30). Two receipts, total received items on both receipts match invoiced items, with variances on some items. If the invoice is selected from the list, the Material Receipts Reconciliation screen appears as follows:
2. If you select one of the items with a variance, you’ll see that the cost, quantity, and multiplier from the invoiced item information are automatically populated in the Invoiced fields. A Variance Description needs to be entered for the items with a variance outside the limits set in the Company and Vendor Defaults, since no variance description was entered when the invoiced item information was set up.

1 PAYABLES
151
PAYABLES
LEDGER
A new autobatch is available entitled UPAC for the Unreconciled Payables Accrual Autobatch. This autobatch is created when the Unreconciled Payables List is committed. For more information on this, see the next section, “Management Reporting.” An accrual account is mandatory for this autobatch. The affected inventory account is the inventory account that was debited when the payables was expensed. When this autobatch is created, the accrual account will be debited, and the inventory account will be credited.
Similar to the Uninvoiced Material Accrual Autobatch, a reversal batch will also be created when the autobatch is posted.
MANAGEMENT REPORTING
Unreconciled Payables List
The Unreconciled Payables List is similar to the Unreconciled Receivings List. This report creates the UPAC autobatch. For more information on the UPAC autobatch, refer to the prior “Ledger” section. The listing includes payables that have been expensed but have not been reconciled (thus affecting the inventory account/s).
The Unreconciled Payables List will be committed to balance the Ledger while you are waiting for material to be received and reconciled. Like the Unreconciled Receivings List, this journal adjusts the inventory account and an accrual account. For expensed (committed on Expense Journal) and unreconciled payables, the inventory account (and nonstock account, if applicable) of the payable is credited and an accrual account is debited for any amount that has been expensed but not reconciled (unreconciled amount). An entry can be removed from this list by reconciling the payable.
For example, if you enter a $500 payable, and no material is received or reconciled against that payable, and the payable is committed on the Expense Journal, then the $500 will post as a credit to the inventory account

1 PAYABLES
152
PAYABLES
and a debit to the accrual account. If you enter a $500 payable and $300 worth of material is received but not reconciled against the payable, and the payable is committed on the Expense Journal, then the $500 will post as a credit to the inventory account and a debit to the accrual account ($300 will be posted through the Unreconciled Receivings List). If you enter a $500 payable and $300 worth of material is received and reconciled against the payable, and the payable is committed on the Expense Journal, then $200 (unreconciled amount) will post as a credit to the inventory account and a debit to the accrual account.
To run the Unreconciled Payables List, choose the Management Reporting option from the Payables main menu, and then choose the Unreconciled Payables List option on the Management Reporting menu:
The Unreconciled Payables Report parameter screen appears:

1 PAYABLES
153
PAYABLES
This report can be generated by Payee or Purchase vendor, by start and end vendor, vendor invoice, purchase order number, and invoice date parameters. The Unrec Comment (unreconciled comment) fields limit the range of unreconciled payables that appear by the Unreconciled Comment number assigned to them on the New Payable and Edit Payable screens. Page Format can be Brief, Multiple, Full, or Summary sequence, and the listing can be committed as of a particular batch date. When committed, the UPAC batch will be created.
Note: This report is also integrated with foreign currency. If foreign currency is enabled, Start and End Currency parameters will also appear.
In Full or Multiple sequence, this report displays the vendor code and vendor name. For each unreconciled and expensed payable for this vendor, the listing shows the vendor invoice number, the PO number, the unreconciled comment number, the invoice date, and the invoice amount. The stock amount (the amount that was posted to the default Inventory account) is displayed, as well as the unreconciled stock amount, and the stock inventory account number. If there is a separate account for nonstock inventory, a second line displays the nonstock amount (the amount that was posted to the default nonstock account), the unreconciled nonstock amount, and the nonstock account number. The stock and nonstock amount appear in the net amount column.
Sample: Unreconciled Payables List in Multiple Format
For each vendor, the total invoice, net, and unreconciled amounts display. An account summary shows the account number, name, and unreconciled amount to be posted to the UPAC autobatch. A branch summary, with the total unreconciled payables, total invoice amount, total net amount, and total unreconciled amount per branch appears after the account summary.
When the report is generated in the Brief format, only the vendor totals are displayed per vendor, and the account and branch summaries are also shown. When run in the Summary format, only the account and branch summaries display.
Note: This report is integrated with the Foreign Currency optional software. If Foreign Currency is enabled, and the payable is in a foreign currency, the invoice, net, and unreconciled amounts will display in both the foreign currency and the home currency (with appropriate currency labels). If the payable is in the home currency, only the home currency will display (with appropriate currency label). For vendor subtotals, totals will display for each applicable currency. A Foreign Currency Breakdown will be available for the account summary and after the branch summary.

1 PAYABLES
154
PAYABLES
Receipt and Invoice Comparison Report
The Receipt and Invoice Comparison Report displays the details regarding unreconciled invoices and available material receipts.
To access and generate this report, select the Receipt and Invoice Comparison Report option from the Management Reporting menu:
The Receipt and Invoice Comparison Report parameters screen appears:
The parameters for the report include a Report Sequence (PO or Vendor [purchase vendor]), Start and End Purchase Vendor, Start and End Buy Group Vendor, Start and End PO number, Start and End PO Date, and

1 PAYABLES
155
PAYABLES
Start and End External PO, and Include Line Items. The Include Line Items parameter, if set to yes, displays the invoiced items per invoice (Item Code, Description 1, Invoiced Quantity, Cost, Extended Price, and PO Line), and the available line-items per receipt (Item Code, Description 1, Available Quantity [Received – Reconciled], Cost, Extended Price, and PO Line). This field defaults to No.
Start and End Purchase Vendor parameters refer to the vendor on the PO; Start and End Buy Group Vendor parameters refer to the buy group master vendor - the vendor on the payable. If a vendor is a member of a Buy Group, the member vendor must fall in the range of the Start and End Purchase Vendor parameters and its buy group master must fall in the range of the Start and End Buy Group Vendor parameters to be included on the report. If a vendor is not a member of a buy group, the vendor must be in the range of both the Start and End Purchase Vendor parameters and the Start and End Buy Group Vendor parameters to be included on the report.
For example, if 3M is a buy group vendor, the report can be run with the Purchase Vendor parameters wide open and the Buy Group Vendor Start and End parameters both set to 3M. This will capture all POs entered for 3M and any of its members. All other vendors will be excluded.
Note: This report is also integrated with the Foreign Currency optional package. If Foreign Currency is enabled, Start and End Currency parameters also display.
For any specific purchase order, the report displays any unreconciled payables and available receipts. At a glance, you see what receipts exist for a purchase order, and what vendor invoices have been entered. With this report, you can determine if the appropriate receipts have come in for an invoice and go reconcile that payable. A PO is only included on the report if there is at least one unreconciled payable against that PO and an available receiving for it. The PO number, PO vendor, PO vendor name, PO date, external PO, and master vendor (if the vendor is in a buy group, this will be the master vendor; otherwise, it is the PO vendor) will display.
Any unreconciled payable against a purchase order within the range (and within the payables group if Payables Group Processing is enabled and Q-Mode is disabled) displays on the report. The Vendor Invoice Number, Sequence Number, Invoice Date and Posting Date appear. In addition, the net amount, the invoice amount, and the variance per payable will also display. The total payable amounts (Net, Invoice, Variance) display per purchase order.
All the available material receipts for the purchase orders within the range displays. A material receipt is available if all of the lines received have not been completed – that is, there is some line on that receipt that can still be reconciled against a payable – or the receipt is complete but has been fully reconciled against a payable that appears on the report (an unreconciled payable). If the receipt is complete, a banner (** COMPLETE **) displays beside the receipt date. The total received value and the total incomplete value of the material is displayed. The total receipt amounts (received value, incomplete value) display per purchase order.
Note: If a payable exists for a purchase order within the range and the payable is reconciled, both the payable and any material receipts reconciled against that payable will be excluded from the report.
Tip! To run this report for a specific branch, limit the PO numbers to only include POs within that branch; i.e. for Branch 1, run report for POs 1000000 to 1999999, for Branch 2, POs 2000000 to 2999999, etc.
If the Include Line Items parameter is set to Yes, the available invoiced items displays for each invoice. If the invoiced item has been fully reconciled (Quantity Reconciled equals or exceeds Quantity Invoiced), it will not display. Otherwise, the Item Code, Unreconciled Quantity (Invoiced Quantity – Reconciled Quantity), Unit Cost, Extended Price (of unreconciled quantity), PO Line, and Item Description 1 appear.

1 PAYABLES
156
PAYABLES
If the Include Line Items parameter is set to Yes, the available line-items per receipt display on the report as well. If the receipt is complete (all lines are complete), then no lines display. If a line is complete, it does not display. If a line is not complete, the Item Code, Available Quantity (Received Quantity – Reconciled Quantity), Unit Cost, Extended Price (of available quantity), PO Line, and Item Description 1 display.
Requisitions, vendor returns, and credits are also displayed if the above conditions exist. The requisition and return information are shown after the PO information has displayed. When the report is run, all the purchase orders within the range display their invoices and receipts. After a page break, all the requisitions are shown. After another page break, the vendor returns within the range display their invoices and receipts. The headings will change slightly (Req#, Req-Date, and Ext Req for requisitions, and Ret#, Ret-Date, and Ext Ret for returns instead of PO#, PO-Date and Ext PO, respectively). For vendor returns, a banner (** VENDOR RETURN **) appears to signify that it is the vendor return section.
Sample: Receipt and Invoice Comparison Report
Note: This report is integrated with the Foreign Currency optional package. If Foreign Currency is enabled, and the payable and/or receipt is in a foreign currency, the payable amounts (net, invoice, variance), receipt amounts (received value, incomplete value), and item amounts (cost, extended price) display in both the foreign currency and the home currency (with appropriate currency labels). If the payable or receipt is in the home currency, only the home currency displays (with appropriate currency label).
Reconciled Payables Report
In addition, a new report displays reconciled payables and the receipts that were reconciled against them.

1 PAYABLES
157
PAYABLES
To access and generate this report, select the Reconciled Payables Report option from the Management Reporting menu:
The Reconciled Payables Report parameter screen appears:
The following parameters are available: Report Sequence (Payee or Purchase), Start and End Vendor, Start and End Vendor Class, Start and End Vendor Invoice, Start and End Posting Date, Start and End PO Number, Start and End Comment Number, Matched Invoices, and Include Line Items. The Include Line Items parameter, if set to yes, displays the reconciled line-items per receipt (Item Code, Description 1, Reconciled Quantity, Cost, Extended Price, and PO Line). This defaults to No. When Matched Invoices is set to Only, only those payables that were reconciled via the Match Unreconciled Payables option (Reconcile Single or Reconcile All) are included on the report. Any payables reconciled during payable entry or via the Material Receipts

1 PAYABLES
158
PAYABLES
Reconciliation screen (including those on the Match Unreconciled Payables list that were manually reconciled) are not displayed when this parameter is set to Only. The other options for this parameter are Yes (all reconciled payables within the parameter ranges will be displayed regardless of their reconciliation method), or No (none of the Match Unreconciled Payables reconciliations will display). This defaults to Yes.
Note: This report is also integrated with the Foreign Currency optional package. If Foreign Currency is enabled, Start and End Currency parameters are shown.
This report displays the Vendor Code, Vendor Name, Vendor Invoice Number, Invoice Date, Post Date, PO Number, Comment Number, Net Amount and Invoice Amount per payable. Also, for each receipt reconciled against this payable, the Receipt Number, Receipt Date, Original Amount, and Invoiced Amount are shown. If the receipt is not available, the banner “** NO RECEIPT **” appears. All reconciled payables referencing a PO within the range of parameters is included. Any payable that has been reconciled that is not tied to a PO is not included in the report.
Sample: Reconciled Payables Report
Note: This report is integrated with the Foreign Currency optional package. If Foreign Currency is enabled, and the payable and/or receipt is in a foreign currency, the net and invoice amounts of the payable, and the original and invoiced amounts of the receipt display in both the foreign currency and the home currency (with the appropriate currency labels). If Include Line Items is set to Yes, the unit cost and extended price of the items also display in both the foreign currency and the home currency. If the payable or receipt is in the home currency, only the home currency will be shown (with appropriate currency label).

1 PAYABLES
159
PAYABLES
Aged Report
The Aged Report parameters have been changed to include a Status parameter. This parameter reflects the status of the payable. The options for this parameter are: All, PO Pend, Hold Exp, Hold Rel, Auto-Hold, and Ready. (Note: If the payable is released, it will not display on this report.) If All is selected, all payables display on the report regardless of their status. Because this is how the report is currently run, this is the default. If a specific status is selected, only those payables with that status display on the report. The status of the payable does not appear on the report.
Start and End Unreconciled Comment Number fields have been added to the Payables Aged Report parameter screen to aid in tracking unreconciled payables. An unreconciled comment number can be assigned to the payable on either the New Payable or Edit/Delete Payable screen.
A new Statusfield has been
added.
Report on unreconciled payables by a range of unreconciled comment numbers.

1 PAYABLES
160
PAYABLES
PAYABLES VIEW
From both the Payables and Payables By Purchase Vendor View screens, you can use the PowrDrill to view the invoiced items that were set up when the payable was entered/edited.
When the Inv Item option is selected, the Invoiced Items View screen appears. This is only a view screen and the information cannot be edited. Only those items that were selected are shown.

1 PAYABLES
161
PAYABLES
You can press [Enter] on a selected item to display the Invoiced Item Details View screen:

162
The EXTERNAL DISBURSEMENT module enables you to enter external cash disbursements into the system. Entry into the module requires the cash account number. This cash account is the General Ledger cash account to which cash is deposited.
The Enter option enables you to enter external cash disbursements. A payroll check to the bank would be one example of an External Disbursement. You are prompted for payer, check number, and date of transaction. The system automatically specifies the cash account number and you enter the amount of the check. You enter subsequent account numbers and usually debits are posted to the amount of the check. A running tally of debits and credits is displayed. An exit from posting is only possible if the debits and credits balance.
The Daily and Monthly Cash Disbursements Journals can be printed. The Daily Journal lists each check written. Entries are in order by date and check number. The Monthly Journal lists each General Ledger account and shows all of the activity that took place in that account during the month. Entries are in order by account number, payee, and check number. Following the Monthly Journal, an expense summary is printed. This module enables clearing of both journals. After clearing the Monthly Cash Disbursements Journal, a request is made to automatically post the account totals in the expense summary to the General Ledger.
COMPANY-WIDE VS. PAYABLES GROUP: OVERVIEW External Disbursements can be handled on a company-wide or Payables Group basis. This is determined by the RECEIVABLES/PAYABLES field in the Accounting Options section of the Company Record.
COMPANY-WIDE
♦ External cash disbursements can be entered at any branch.
♦ Checks can be reconciled at any branch.
♦ A list of all checks issued can be printed.
♦ When both the Daily and Monthly External Cash Disbursements Journal are printed, all branches are shown. Branch and company totals are included. It is necessary to use Q-Mode to enable any clearing. The journals are then cleared for all branches.
XTERNAL ISBURSEMENTS

2 EXTERNAL DISBURSEMENTS
163
PAYABLES
♦ The Branch Default can be changed to reflect any branch within the entire company.
PAYABLES GROUP
A branch or a combination of up to 15 branches constitutes a Payables Group. Payables Groups are set up in the Company Record.
♦ External cash disbursements can be entered at any branch within the group.
♦ Checks can be reconciled at any branch within the group.
♦ A list of all checks issued at any branch within the group can be printed.
♦ When both the Daily and Monthly Cash Disbursements Journal are printed, just those branches within the group are shown. Branch and company totals are included. You must be in Q-Mode to enable any clearing. The journals are cleared for all branches within the group.
♦ The Branch Default can be changed to reflect any branch within the group.
DATE AND CASH ACCOUNT NUMBER ENTRY
EXTERNAL DISBURSEMENTS 1 DATE MM/DD/YY (MM/DD/YY) 2 CASH ACCT 9999999999 ACCT NAME XXXXXXXXXXXXXXXXXXXXXXXXXXXXXX FIELD:
DATE is the date that check was issued. The date is automatically set to the date specified on the External Disbursements Defaults screen unless modified.
CASH ACCOUNT is the General Ledger Cash Account from which checks are being paid. The Account Name is shown for verification.
When prompted for the Cash Account, you can use the General Ledger Account# Scan.
If alternate accounting regions are used, only the cash account from the current accounting region may be referenced.
Upon entry of a valid account, the ACCOUNT NAME is shown for verification.
Some General Ledger accounts may be classified as confidential. The Account Name will not print for any confidential General Ledger account. A series of 30 asterisks (*) will print in place of the Name.

2 EXTERNAL DISBURSEMENTS
164
PAYABLES
MAIN MENU This menu appears if the CHECK RECONCILIATION option is set to No in the Company Record.
If a branch default has not been set during LOGON, choosing any option automatically displays the External Disbursements Defaults screen.
If External Disbursements are being handled on a Payables Group basis, and the branch specified on the External Disbursements Default screen does not belong to a valid Payables Group, choosing any option displays the following message and you will be unable to continue. At this point, only the External Cash Disbursements Default option can be chosen.
Branch not a member of a payable group -- group processing illegal!!!
Each of these options is described in detail on the following pages.
ENTER EXTERNAL CASH DISBURSEMENTS
POSTING 1 PAYEE XXXXXXXXXXXXXXXXXXXXXXXX 2 CHECK # 999999 3 DATE MM/DD/YY (MM/DD/YY) 4 COMMENT# 99 FIELD:
You are prompted for a payee, a check number, and the date of the transaction.
The check # will be prefixed with 2 digits to indicate the branch on both the Daily and Monthly External Cash Disbursements Journals. The branch is automatically set to the Branch specified in the External Disbursements Defaults.

2 EXTERNAL DISBURSEMENTS
165
PAYABLES
You may enter a Comment number. The Comment number may be any number between 0 to 99. This number may be used to restrict the printing of the Daily and Monthly Journals.
The TERMINATE response at the Field prompt automatically displays the cash account number and prompts you for a dollar amount. The Posting screen is shown as follows.
POSTING SCREEN
POSTING CHECK # 99999999 DEBITS 99999999.99 CREDITS 99999999.99 ACCT # NAME AMOUNT 1 9999999999 XXXXXXXXXXXXXXXXXXXXXXXXXXXXXX 2 99999999.99 3 9999999999 XXXXXXXXXXXXXXXXXXXXXXXXXXXXXX 4 99999999.99 5 9999999999 XXXXXXXXXXXXXXXXXXXXXXXXXXXXXX 6 99999999.99 FIELD:
The first Account number is automatically the one specified as the Cash Account. You enter the amount of the check.
The first Account number can only be changed if that field has been accessed from the Field prompt.
This change is for the current posting only. The first Account number is automatically specified as the original Cash Account for subsequent postings.
You enter subsequent Account numbers and usually post debits to the amount of the check.
If alternate accounting regions are used, only General Ledger accounts from the current accounting region may be referenced.
Some General Ledger accounts may be classified as confidential. The Account Name will not print for any confidential General Ledger account. A series of 30 asterisks (*) will print in place of the Name.
A running tally of Debits and Credits is displayed. An exit from Posting is only possible if the Debits and Credits balance.

2 EXTERNAL DISBURSEMENTS
166
PAYABLES
RECONCILE CHECKS
The Check option is used to reconcile a check and delete the entry from the Check Reconciliation List.
The Range option is used to reconcile a range of checks and delete their entries from the Check Reconciliation List.
The Print unreconciled option is used to print a list of unreconciled checks.
Each of these options is described in detail on the following pages.
RECONCILE A CHECK
CHECK RECONCILIATION 1 CHECK # 9999999 PAYEE: XXXXXXXXXXXXXXXXXXXXXXXX DATE: MM/DD/YY 2 NET AMT 99999999.99 FIELD:
This option is used to reconcile a check and delete the entry from the Check Reconciliation List. Deletion occurs automatically when the check has been reconciled.
You are prompted for the check number of the unreconciled check. The check number should appear in the Check Reconciliation List.
The system displays the Payee and the Date that the check was issued for verification.
NET AMT is the dollar amount paid by the bank. It must be entered as a negative amount. Otherwise, the message INCORRECT AMOUNT is displayed at FIELD and you will be unable to continue.
The system compares the dollar amount entered with the dollar amount in the Check Reconciliation List.
If the dollar amounts match, the system displays the message ENTRY DELETED. The entry is then automatically deleted from the Check Reconciliation List. If the dollar amounts do not match, the system displays the message INCORRECT AMOUNT below FIELD. You are prompted for another check number. The Check Reconciliation List entry is left unchanged. At this point, you may continue making entries.

2 EXTERNAL DISBURSEMENTS
167
PAYABLES
RECONCILE A RANGE OF CHECKS
RECONCILE A RANGE OF CHECKS CHECK NUMBERS 1 START 2 END FIELD: Proceed (Y N):
Reconciliation will not occur until a Y is entered at the Proceed? prompt; the following messages appear:
Processing... NUMBER OF ENTRIES DELETED: 9999
A processing message is displayed to indicate that check reconciliation is in progress. Reconciled checks are deleted from the Check Reconciliation List. Upon completion, the number of deleted checks is displayed.

2 EXTERNAL DISBURSEMENTS
168
PAYABLES
PRINT A LIST OF UNRECONCILED CHECKS
CHECK RECONCILIATION LIST 1 START DATE (MM/DD/YY) 2 END DATE (MM/DD/YY) 3 START CHECK # 4 END CHECK # FIELD:
A sample list is shown as follows.
An entry is made on the Unreconciled Checks List each time a new external disbursements check is issued.
List can be limited to those external disbursements checks issued within the specified Starting and Ending Dates.

2 EXTERNAL DISBURSEMENTS
169
PAYABLES
PRINT A LIST OF CHECKS THAT HAVE BEEN ISSUED
The list is sequenced by check number.
The list is cleared whenever the Monthly Journal is cleared.
PRINT A DAILY EXTERNAL CASH DISBURSEMENTS JOURNAL
STARTING COMMENT #... ENDING COMMENT #... "OK" "RPT" OR "QUIT"...
Two journals (Daily or Monthly) cannot be run on different terminals simultaneously. From the moment any journal option is selected on a terminal, the message ONLY ONE TERMINAL MAY RUN JOURNAL AT A TIME is displayed if any journal option is selected on another terminal.
You may restrict the printing of the Daily External Cash Disbursements Journal by entering Starting and Ending Comment numbers. The journal will only list checks whose Comment numbers fall within the parameters specified.

2 EXTERNAL DISBURSEMENTS
170
PAYABLES
DAILY EXTERNAL CASH DISBURSEMENTS JOURNAL: SAMPLE
The Daily Journal lists each cash disbursement. Entries are in order by Branch, Date, and Payee. Branch and company totals are included.
#TRANS is the number of payments.
Some General Ledger accounts may be classified as confidential. The Account Name will not print for any confidential General Ledger account. A series of 30 asterisks (*) will print in place of the Name.
An Expense Summary follows the printing of the journal. A sample is shown as follows.

2 EXTERNAL DISBURSEMENTS
171
PAYABLES
DAILY EXTERNAL DISBURSEMENTS EXPENSE SUMMARY: SAMPLE
If alternate accounting regions are used, the accounting region associated with each General Ledger account is shown.
USE DUE CAUTION IN "CL"EAR OF JOURNAL... DAILY JOURNAL CLEARED
The invitation to CLEAR the journal is presented after the journal has finished printing. The journal is not cleared until you enter CL. You must be in Q-MODE in order to clear the journal.
You must print and clear the Daily External Cash Disbursements Journal in order to clear the Monthly External Cash Disbursements Journal. If you do not clear the daily journal, the system will prevent you from clearing the monthly journal.
PRINT A MONTHLY EXTERNAL CASH DISBURSEMENTS JOURNAL
STARTING COMMENT #...0 ENDING COMMENT #...99 "OK" "RPT" OR "QUIT"...OK
Two journals (Daily or Monthly) cannot be run on different terminals simultaneously. From the moment any journal option is selected on a terminal, the message ONLY ONE TERMINAL MAY RUN JOURNAL AT A TIME is displayed if any journal option is selected on another terminal.

2 EXTERNAL DISBURSEMENTS
172
PAYABLES
You may restrict the printing of the Monthly Cash Disbursement Journal by entering Starting and Ending Comment numbers. The journal will only list checks whose Comment numbers fall within the parameters specified.
MONTHLY EXTERNAL CASH DISBURSEMENTS JOURNAL: SAMPLE
The Monthly Journal lists each G/L Account and shows all the activity that took place in that account during the month.
Entries are in order by Branch, Account #, Payee, and Check number.

2 EXTERNAL DISBURSEMENTS
173
PAYABLES
Some General Ledger accounts may be classified as confidential. The Account Name will not print for any confidential General Ledger account. A series of 30 asterisks (*) will print in place of the Name.
An Expense Summary follows the printing of the journal. A sample is shown as follows.
MONTHLY EXTERNAL DISBURSEMENTS EXPENSE SUMMARY: SAMPLE
USE DUE CAUTION IN "CL"EAR OF JOURNAL... MONTHLY JOURNAL CLEARED POST G/L ACCTS? "YES" OR "NO"...
The Expense Summary is used for posting to the General Ledger. There is a set of branch and company totals at the end.
If alternate accounting regions are used, the accounting region associated with each General Ledger account is shown.
The invitation to CLEAR the journal is presented after the journal has finished printing, if you have cleared the Daily External Disbursements Journal. Only those entries within the specified print parameters can be cleared. The journal is not cleared until you enter CL.
After clearing the journal, an External Disbursements batch is automatically created in the General Ledger for those entries within the specified print parameters if autobatching is enabled for External Disbursements on the Autobatch Default Options in the LEDGER module. You can review, edit, and post the batch via the LEDGER module. If necessary, refer to Ledger manual for a detailed explanation of autobatch posting to the General Ledger.

2 EXTERNAL DISBURSEMENTS
174
PAYABLES
SET EXTERNAL DISBURSEMENTS DEFAULTS
EXTERNAL DISBURSEMENTS DEFAULTS 1 BRANCH # 99 XXXXXXXXXXXXXXXXXXXXXXXXXX PAYB GRP 9999 XXXXXXXXXXXXXXXXXXXXXXXXXX REGION # 99 XXXXXXXXXXXXXXXXXXXXXXXXXX 2 DATE MM/DD/YY (MM/DD/YY) 3 CASH ACCT 9999999999 (9999999999) ACCT NAME XXXXXXXXXXXXXXXXXXXXXXXXXXXXXX FIELD:
If a branch default has not been set during LOGON, the following message is displayed at FIELD and you will be unable to continue.
BRANCH DEFAULT MUST BE SET BEFORE CONTINUING!!!
BRANCH indicates the branch handling external disbursements. The PAYB GROUP to which the branch belongs is displayed.
Region information only appears if the Alternate Accounting Region feature is enabled in the Company Accounting Options.
The accounting region is changed accordingly when the branch is edited.
The CASH ACCOUNT must exist in the accounting region associated with the branch.
If the branch is edited, and the specified cash account does not exist in the accounting region of the new branch, you will be unable to continue until a new cash account is specified.
DATE determines the month into which postings will be made. The date automatically defaults to the current date unless modified.

2 EXTERNAL DISBURSEMENTS
175
PAYABLES
APPENDICES
APPENDIX 1: CLOSING PROCEDURES
DAILY CLOSING PROCEDURES
♦ Print and clear the Daily External Cash Disbursements Journal. Make sure the journal's totals balance to your adding machine tape total before you clear the journal. Make sure that the print quality of the journal is good also, as you will be unable to reprint the journal once it is cleared.
MONTHLY CLOSING PROCEDURES
♦ Print and clear the Daily External Cash Disbursements Journal.
♦ Print and clear the Monthly External Cash Disbursements Journal. Check to see that the journal is in balance. If out of balance, make manual corrections before clearing the journal.
When the journal is cleared, if autobatching is enabled for External Disbursements, an External Disbursements batch is automatically created in the General Ledger. You can review, edit, and post the batch via the LEDGER module. Refer to the appendices in the Ledger manual for a detailed explanation of autobatch posting to the General Ledger. If autobatching is not enabled for External Disbursements, you are invited to automatically post the figures in the Expense Summary to the General Ledger after the journal is cleared.
POST G/L ACCTS? "YES" OR "NO"...
If you do not wish to automatically post, answer the question NO. If you answer YES, the system will step through the posting parameters and then transfer those figures to the General Ledger.