payment center - huntington
TRANSCRIPT
1 PAYMENT CENTER USER GUIDE MARCH 2021
Payment Center USER GUIDE

2 PAYMENT CENTER USER GUIDE MARCH 2021
Contents
Welcome 4
SECTION 1: GETTING STARTED
Logging In 6
SECTION 2: THE DASHBOARD
Widgets 8 Personalizing the Dashboard 9
SECTION 3: CLIENT ADMINISTRATION
Add a User 11 Modify a User or Add a Role to a User 12 Approve a User 18 Create a New Role 20 Role Maintenance 22 Approve a New Role 30 Audit Information 33
SECTION 4: PAYMENT MANAGEMENT
Accessing Payment Management 36 Views 37 Create Payment Function 39 ACH Payments 37 Freeform Wire Payments 39 Real-Time Payments (RTP®)
The Challenge Process 47 48
Payment From a Template 49 Possible Duplicate Warning Feature 50 Scheduled Payments 51 Import Payments 53 Detail Import Map 55 Approve Payments 59
SECTION 5: TEMPLATES
Creating Templates 61
SECTION 6: REPORTING
Using List Views for Reporting 65 Viewing Reports 70 Filtering Reports 71 Exporting and Printing Reports 74
SECTION 7: ALERTS
Balance and Transaction Alerts 76

3 PAYMENT CENTER USER GUIDE MARCH 2021
SECTION 8: APPENDIX
Appendix A: Report Definitions 80 Appendix B: Alert Definitions 81 Appendix C: Payment Type Definitions 83 Appendix D: Field Definitions 85 Appendix E: Status Definitions 87 Appendix F: List View Definitions 88
SECTION 9: SUPPORT
Customer Service 90 e-Learning 90
4 PAYMENT CENTER USER GUIDE MARCH 2021
Welcome
Welcome to the Huntington Payment Center User Guide Payment Center is a single online portal, accessed via Huntington Business Online, that gives you a fully integrated solution for managing your Wire transfer transactions, ACH transactions, Real-Time Payments, or all three. Payment Center can help make the day-to-day management of these important services more simple, intuitive, powerful, and secure.
Although this system is easy to use and intuitive, we understand that there will still be a learning curve. From customer feedback, we have created this Payment Center User Guide to help familiarize you with the system and to serve as an ongoing reference as you explore new capabilities in the future.
HIGHLIGHTS OF PAYMENT CENTER:
FLEXIBLE DESIGN Payment Center gives you multiple ways to accomplish routine tasks thanks to simple, intuitive navigation.
CONVENIENT MONITORING A Payment Summary view appears right on your Payment Center Dashboard to help you review the status of Wire transactions, Real-Time Payments, or ACH batches.
ROLE-BASED ENTITLEMENTS Define a group of specific entitlements as a Role and apply that Role to multiple Users. When you change a Role definition, it applies to each User in that Role.
FOCUSED SEARCH CAPABILITIES Perform a detailed search for a single transaction or use filters to search through ACH batches or to find particular line of items of a payment.
VERSATILE REPORTING Meet most reporting needs by using various List View widgets that can be filtered and customized to include your reporting criteria. A menu of standard report formats is available to meet your basic reporting needs efficiently. You also have flexibility in filtering and exporting data into multiple formats such as Excel, CSV, PDF, Word, and more for analysis and presentation.
MULTIPLE ALERT OPTIONS Establish settings that notify you when payments require approval or have been rejected, as well as reminders when an action should be taken or a decision is needed.
FRAUD MITIGATION Audit Reports offer the power both to identify changes to Users’ capabilities and to show changes to templates or payment details, and the Users who made those changes.

5 PAYMENT CENTER USER GUIDE MARCH 2021
SECTION 1
Getting Started

6 PAYMENT CENTER USER GUIDE MARCH 2021
Logging in 1. Visit huntington.com. 2. Select Commercial in the Online Services section. 3. Enter your Company ID, User ID, Password, then click Log In.
4. The following login screen will appear:
5. Enter your Token Number and click Continue. 6. Select Payments & Transfers from the main menu. Then select Payment Center from the sub-menu.

7 PAYMENT CENTER USER GUIDE MARCH 2021
SECTION 2
The Dashboard

8 PAYMENT CENTER USER GUIDE MARCH 2021
Widgets When you log in to Payment Center, you land on the Dashboard, the home page of Payment Center. This is the central control panel for launching activities that you perform on a regular basis. It can be personalized to help you work efficiently.
If your browser zoom settings are at 98% or higher, you will see the main menu navigation on the left-hand side of the screen. If not, the main menu options will be across the top of the screen.
A group of widgets can be placed on the Dashboard that allow you to quickly access the Payment Center functions that you use the most. Some widgets are available when you first log in. You can personalize your Dashboard by adding or removing widgets.
1 My Notifications Widget: A list of notifications based upon the services available 2 Reports Management Widget: A list of predefined reports available ↓Scroll down the page to view additional widgets↓
3 Account Summary Widget: Advanced Reporting workspace for balances and transactions 4 Payments List Widget: A list to manage Payments
1 2
3
4

9 PAYMENT CENTER USER GUIDE MARCH 2021
Personalizing the Dashboard The Dashboard can be customized to your specific preferences to best suit your daily needs and tasks to remain productive and efficient.
When you first log in to Payment Center, you will see pre-installed widgets. To add, resize, remove, or rearrange the widgets, follow these steps:
1. To add a widget, select Add Widget at the top-right of the Dashboard
2. A list will open with all the available widgets. Select a widget by clicking on it, and the system will add the selected widget at the bottom of the screen in full size. To view the added widget, scroll down the page to the bottom.
Note: depending on your Role and the services set up for your organization, you might not see all of the options shown above.
3. To remove or resize a widget, select the gear icon ( )on the right-hand side of the screen, then select Remove or Resize from the list. Resize will either make the widget full-size or half-size depending upon the size the widget was prior to resizing.
4. To rearrange the widgets, simply drag and drop. Hover over the title of the widget you want to move, and when the cursor changes from an arrow to a cross, click and then drag the widget up or down the page to the desired position.
10 PAYMENT CENTER USER GUIDE MARCH 2021
SECTION 3
Client Administration

11 PAYMENT CENTER USER GUIDE MARCH 2021
Add a User If you are a primary User with access to Administration (an Admin), you will be able to create, modify, and delete Users and Roles.
To assign permissions for your Users, you will need to establish Roles. (Each Role is a set of permissions that can be assigned to one or more Users, which will make the permissioning process much easier to define and maintain.) Note that if no Roles exist, you must create a new Role before setting up a new User. To establish new Roles, see page 20.
CREATE A NEW USER
1. Admins must first add new Users via Business Online. This can be done by an Admin within the Administration Tab of Business Online.
2. While adding the User, entitle them to use Payment Center on the User Service Permissions screen. This creates a new set of options within Payment Center to modify Roles and permissions.
3. Click Save at the bottom of the screen after adding your User and making entitlements. For additional help adding Users in Business Online, see the Business Online User Guide.

12 PAYMENT CENTER USER GUIDE MARCH 2021
Modify a User or Add a Role to a User To make changes to a User’s information or permissions, follow these steps:
1. In Payment Center, select Administration, then User Maintenance from the main menu.
2. The following screen appears:
3. Choose Modify from the Action drop-down list. 4. The following screen appears:

13 PAYMENT CENTER USER GUIDE MARCH 2021
5. To change or add an existing Role to a User, select the Assign Roles tab.
6. The following screen appears allowing you to change the User’s Roles. (Note that this User is currently assigned as an Admin.)

14 PAYMENT CENTER USER GUIDE MARCH 2021
↓Scroll down the page to assign or change a Role↓
7. A new User will not have a Role assigned as in the above screen shot. Any Roles appearing in the Selected items column are Roles that are currently assigned. Below, the AdminRole is assigned to the User.
This screen can be used to: • Copy Roles From an Existing User • Add an Existing Role • Change the User’s Role

15 PAYMENT CENTER USER GUIDE MARCH 2021
8. On this screen you can Copy Roles From an Existing User by using the drop-down box and selecting a User that has the proper Role(s). This can be done even if the User already has a Role assigned. Each User can have multiple Roles.
9. Select the User to copy from the drop-down list which will place that User’s Role(s) into the Selected Items column.
10. Click Update to save all User modifications.

16 PAYMENT CENTER USER GUIDE MARCH 2021
11. The User Maintenance screen will appear with a confirmation.
12. In the screen shot above, notice the User is in a Modified status. To approve the User, see the Approve a User section in this guide on page 18.
13. To change or add a User’s Role, click the check boxes in front of the Roles and the buttons on the bottom of the screen.
Add a Role by selecting the check box next to the Role under the Available items column and select Move all items.
Remove a Role by selecting the check box next to the Role under the Selected items column and select Remove all items.
14. Once the Selected items column contains the desired Role(s), click Update to save all User modifications.

17 PAYMENT CENTER USER GUIDE MARCH 2021
15. The User Maintenance screen will appear with a confirmation.

18 PAYMENT CENTER USER GUIDE MARCH 2021
Approve a User Users must be approved before they become active. Typically, a second User with approval permission will need to approve Roles. However, some Users have approve-own permissions.
To approve a User, follow these steps:
1. Select Administration, then User Maintenance from the main menu. 2. The following screen appears:
3. Select Users Requiring Approval from the drop-down menu.
19 PAYMENT CENTER USER GUIDE MARCH 2021
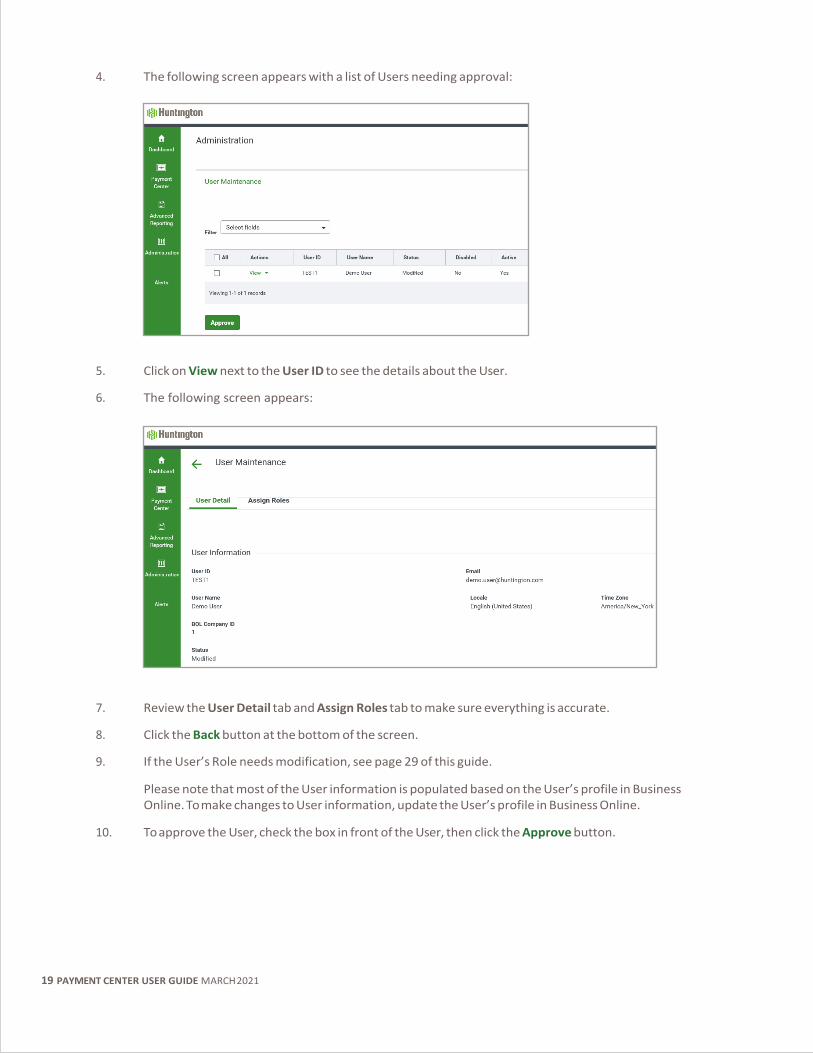
4. The following screen appears with a list of Users needing approval:
5. Click on View next to the User ID to see the details about the User.
6. The following screen appears:
7. Review the User Detail tab and Assign Roles tab to make sure everything is accurate.
8. Click the Back button at the bottom of the screen.
9. If the User’s Role needs modification, see page 29 of this guide.
Please note that most of the User information is populated based on the User’s profile in Business Online. To make changes to User information, update the User’s profile in Business Online.
10. To approve the User, check the box in front of the User, then click the Approve button.

20 PAYMENT CENTER USER GUIDE MARCH 2021
Create a New Role Roles provide Users with access to specific functions and data within Payment Center. A Role can provide access to any function or data to which the company has access.
To create a Role, follow these steps:
1. Select Administration, then Role Maintenance from the main menu. 2. The following screen appears:
3. Click on Add New Role.
4. The following pop-up screen appears:
5. Enter all information about the new Role:
Select a Company: Select your BOL Company ID. Role Name: Enter a name for the new Role, such as “Approver.” No spaces can be used. Role Description: Enter a brief description.

21 PAYMENT CENTER USER GUIDE MARCH 2021
6. Click Continue. 7. The following pop-up screen appears:
8. Select the applicable payment types for the Role and select Continue. If the Role doesn’t require payment access, select Cancel.
9. You will be directed to the Role Maintenance page where you can establish Entitlements (see the next page).

22 PAYMENT CENTER USER GUIDE MARCH 2021
Role Maintenance The Role Maintenance screen consists of four tabs:
PAYMENTS TAB: Contains all entitlements for payment-related actions. REPORTING TAB: Contains all entitlements for available reports.
ADMINISTRATION TAB: Contains all entitlements for administrative (User and Role maintenance) actions.
ALERTS TAB: Contains entitlements to Alert actions.

23 PAYMENT CENTER USER GUIDE MARCH 2021
PAYMENTS TAB:
PAYMENT TYPES: Select the payment type(s) to assign to the Role.
APPROVAL LIMITS: Used to assign approval limits to the Role.
Transaction Limit: Dollar amount allowable for each individual transaction.
Batch Limit: Dollar amount allowable for each batch (applies only to ACH payment types).
Daily Limit: Dollar amount allowable for all payments approved for a single date (cumulative for the day).
PAYMENT SETTINGS
This section represents what is allowable when creating payments. All payment types enabled for your company are listed here. Within each payment type, select the entry methods and actions allowable for this Role.
Must select beneficiaries from Contact Center for: Require that Users with this Role select beneficiaries from the Beneficiary Address Book when creating Payments or Templates.
Assigned Permissions: Defaults to “By Each Payment Group,” allowing the Admin to entitle permissions across all payment types for each payment group. Payment Groups are ACH, Real-Time Payments, and Wires. If “By Each Payment Type” is selected, entitlements may be uniquely defined for each payment type (for example, Payroll, Cash Disbursement, Real-Time Payments, Domestic Wires, etc.).
Select a Payment Group: Tabs for ACH, Real-Time Payments, and Wires. Set payment and Template permissions per tab.
PAYMENT PERMISSIONS
Assign all payment permissions: If box is checked, all payment permissions will be assigned.
Assign all Template permissions: If box is checked, all Template permissions will be assigned.
PAYMENT ENTRY METHODS:
Freeform: Manually perform the action on a payment.
Templates: Use a predefined Template for a payment.
Imports: Import a file for a payment.
ACTIONS:
Approve: Allows a User to approve and unapprove an entered payment.
Number of Signatures: Number of approvals applied when a User with this Role approves a payment.
Approve Own: Allows a User to approve a payment he/she created (this option is not visible/available when Dual Authorization is required).
Auto-Approve: When Auto-Approve is on, a payment will automatically be in an “approved” status when the User creates the payment.
Allow for Credits: Restrict Imports for Credit Only transactions for the User. This option only pertains to using Nacha File Import feature for ACH imports.
Allow for Debits: Restrict Imports for Debits Only transactions for the User. This option only pertains to using Nacha File Import feature for ACH imports.

24 PAYMENT CENTER USER GUIDE MARCH 2021
Manage: Allows a User to create, modify, repair, delete or undelete.
Modify: Allows a User to modify an imported payment that is in an “entered” or “needs repair” status.
View: Allows a User to view a payment.
Repair: Allows a User to repair payments that were imported from a file that could not be processed.
Reverse: Allows a User to reverse an ACH payment if this feature is entitled to the customer.
TEMPLATE SETTINGS
This section represents what is allowable when creating Templates. All payment types enabled for your company are listed here. Within each payment type, select the entry methods and actions allowable for this Role.
Assign all Template permissions: If this box is checked, all Template permissions will be assigned.
TEMPLATE ENTRY METHODS:
Freeform: Manually perform the action on a Template.
Import: Import a file for a Template.
ACTIONS:
Approve: Allows a User to approve and unapprove an entered Template.
Number of Signatures: Number of approvals applied when a User with this Role approves a Template.
Approve Own: Allows a User to approve a Template he/she created (this option is not visible/ available when Dual Authorization is required).
Auto-Approve: When Auto-Approve is on, a Template will automatically be in an “approved” status when the User creates the Template.
Modify: Allows a User to modify an imported Template that is in an “entered” or “needs repair” status.
Repair: Allows a User to repair payments that were imported from a file that could not be processed.
View: Allows a User to view a Template.
DATA RESTRICTIONS:
ACH Company ID: Restrict Users with this Role to only the selected ACH Originator IDs and offset accounts.
Bank Accounts: Restrict Users with this Role to only the selected RTP-entitled and/or Wire-entitled accounts.
Restricted Templates: Allow Users with this Role access to restricted Templates.
REPORTING TAB:
Balance and Transactions: This section contains which Reports and Export types are allowable for Users with this Role. Full report definitions are available in Appendix B.

25 PAYMENT CENTER USER GUIDE MARCH 2021
Assign all current & future accounts allows the Role to be limited to specific accounts, or if this box is checked, allows access to all current accounts and any account added later.
Select the Balance and Transaction Permissions and Report(s) to assign to the Role.
Current Day: Cash Position Report Current Day Availability Report Current Day Images Permission Current Day Summary Permission Current Day Transactions Permission Balance and Transaction Account Scorecard Report
Previous Day: Previous Day Images Permission Previous Day Summary Permission Previous Day Transactions Permission Account Statement Report
Select which Export actions are allowable for Users with this Role.
EXPORT FORMATS:
BAI Format Provides transaction data in a BAI file format for the accounts and date range selected by the User.
CSV Basic Format Provides balance and transaction data in a Comma Delimited file format for the accounts and date range selected by the User.
SWIFT MT942 Format Provides balance and transaction data in a SWIFT 942 file format for the accounts and date range selected by the User.
SWIFT MT940 Format Provides balance and transaction data in a SWIFT 940 file format for the accounts and date range selected by the User.
Quicken Format (OFX) * Provides transaction data in a Quicken (OFX) file format for the accounts and date range selected by the User.
QuickBooks (OFX) * Provides transaction data in a QuickBooks (OFX) file format for the accounts and date range selected by the User.
* Open Financial Exchange (OFX) is an industry standard format used for exchanging financial information between customers and financial institutions.
Legacy Reports Legacy Reports (ACH Return/NOC): This entitlement provides access to the ACH Return/NOC link under the Payment Management tab and provides access to the ACH Return/NOC widget. Access to this report also allows a user to enable an alert notifying users when an ACH Return/NOC has been received. When your company has an ACH Return or ACH Notification of Change, the instructions for finding the report on Business Online will be provided by a link in that widget.

26 PAYMENT CENTER USER GUIDE MARCH 2021
Assign all current & future accounts allows the Role to be limited to specific accounts, or if this box is checked, allows access to all current accounts and any account added later. Recurring Payment Exceptions Report Recurring Payment Exceptions Report: This entitlement provides access to the Recurring Payment Exceptions Widget which will indicate why a scheduled payment failed. Payment Reports ACH Company –Provides details pertaining to your Company’s ACH Company set up. Template Details –Provides details pertaining to a selected Template Code. Payment Details –Provides details pertaining to Payments meeting the selected criteria.
Admin Reports Roles –Provides details pertaining to the selected role(s) for your Company. User Permissions –Provides details pertaining to the selected user(s) for your Company. Company Details –Provides details pertaining to your Company.
Payment and Template Payment Background Processing Status Payment and Template Payment Background Processing Status – This widget notifies the user of the status of large uploaded files once they are processed.
ADMINISTRATION TAB
Beneficiary Address Book: Allows a User to view, manage and/or approve Beneficiary Address Book entries.
Assign all permissions: If this box is checked, all Beneficiary Address Book permissions will be assigned. View: Allows User to view entries in the Beneficiary Address Book. Manage: Add/Modify/Delete Beneficiary Address Book entries. Approve: Allows User to Approve other User’s additions and/or modifications Approve Own: Allows User to Approve their own additions and/or modifications Auto Approve: Automatically Approves additions and/or modifications made by the User
General Administration:
Assign all permissions: If this box is checked, all Import Map, Audit Activity, Maintain Confidential Import Settings and Alert Recipient Setup permissions will be assigned.
• Import Map:
View: Allows User to view import map history widget. Manage: Add/Modify/Delete Import maps.
• Audit Activity:
View: Allows User to view Audit Activity on the Audit Information tab.
• Maintain Confidential Import Settings:
View: Allows User to view entries in the Beneficiary Address Book. Manage: Add/Modify/Delete Beneficiary Address Book entries. Approve: Allows User to Approve other User’s additions and/or modifications Approve Own: Allows User to Approve their own additions and/or modifications Auto Approve: Automatically Approves additions and/or modifications made by the User
• Alert Recipient Setup: Allows a User to view and/or manage Recipients for Alerts.

27 PAYMENT CENTER USER GUIDE MARCH 2021
View: Allows User to view Alert Recipient Group Assignments/Settings and Recipients. Manage: Assign Email Recipients to a group, Add/Modify/Delete Email Recipients to a group,
Add/Modify/Delete Individual Email Recipients.
Payment Administration
Assign all permissions: If this box is checked, all Beneficiary Address Book permissions will be assigned.
• Payment Template Groups: View: Allows User to view Alert Recipient Group Assignments/Settings and Recipients. Manage: Assign Email Recipients to a group, Add/Modify/Delete Email Recipients to a group, Add/Modify/Delete individual Email Recipients.
User Administration Assign all permissions: If this box is checked, all User Administration permissions will be assigned View: Allows User to view User information and their role(s). Manage: Allows User to modify User role(s). Approve: Allows User to Approve another User that was not modified by them Approve Own: Allows User to Approve the modifications they made to other Users Auto Approve: Automatically Approves modifications made to Users
Role Administration Assign all permissions: If this box is checked, all Role Administration permissions will be assigned. View: Allows User to view entitlements on Roles. Manage: Add/Modify/Delete Roles. Approve: Allows User to Approve other User’s additions and/or modifications to Roles
Approve Own: Allows User to Approve their own additions and/or modifications to Roles Auto Approve: Automatically Approves additions and/or modifications made to Roles by the User
ALERTS TAB:
This section contains which Alert options are available for Users with this Role. The available alerts will change depending upon which products and services the company is entitled to in the company set up.
PAYMENT ALERTS:
Templates Awaiting Approval: Email notification sent when a Template has been created and is awaiting approval.
Payments Processed: Email notification sent when an RTP or Wire payment is received, confirmed or rejected by the bank.

28 PAYMENT CENTER USER GUIDE MARCH 2021
Transaction Processing Status Change for Payments: Email Notification sent when a payment changes status (Approved, Bank Confirmed, Bank Rejected, Bank rejected)
Rejected Payments: Email notification sent when payments are rejected by the approver.
Exchange Rate Needed: Email notification sent when there are wire payments that require the “Get Rate” action to obtain a real time rate.
Payment Cut-off Time Warning: Email notification sent when unapproved payments are within a specified timeframe prior to the cutoff.
Bank-Rejected Payments Today: Email notification sent when a payment is rejected by the bank.
Payments Failed Balance Check: Email notification sent when a payment cannot be sent to the bank for processing due to insufficient funds in the account. The system will check for available funds every 10 minutes until the cutoff time for the payment type.
Approval Window Passed: Email notification sent when payments were not approved prior to the cutoff time. The effective date needs to be adjusted to a valid business day and resubmitted for approval in order to be processed.
File Import Confirmation for Payments Email notification sent when payments are successfully or unsuccessfully uploaded.
Payments Awaiting Approval: Email notification sent when a payment has been created and is awaiting approval.
For the Alert to execute, the User who created the Alert must be an eligible approver for the payment. If the User who created the alert is NOT an eligible approver for the payment, none of the defined recipients will receive the Alert.
Payments Automatically Created: Email notification sent when payments are created automatically based on Scheduled Payment settings.
REPORTING ALERTS:
Closing Ledger Balance: Email is generated when the closing ledger balance meets specified criteria set by a User. Examples of alert criteria are Transaction Amount and Account Number.
Closing Available Balance: Email is generated when the closing available balance meets specified criteria set by a User.
Transaction Notification: Email is generated when a transaction is posted that meets certain criteria set by a User. Users may select transactions for Alerts from a full list of BAI codes and transaction types.
Summary Balance Notification: Email is generated when the available balance meets specified criteria set by a User.

29 PAYMENT CENTER USER GUIDE MARCH 2021
ADMINISTRATION ALERTS:
User Maintenance: Email notification when a User has been added or modified
Beneficiary Address Book Maintenance: Email notification when a change has been made to the Maintenance Beneficiary Address Book.
Role Maintenance: Email notification when a Role has been added or modified.
ACH Return/NOC Report Available: Email notification that an ACH Return and NOC Report (using the Legacy Reports feature) is available.

30 PAYMENT CENTER USER GUIDE MARCH 2021
Approve a New Role Roles must be approved before they become active. Typically, a second User with approval permission will need to approve Roles. However, some Users have auto-approval permissions.
To approve a Role, follow these steps:
1. Select Administration, then Role Maintenance from the main menu. 2. The following screen appears:
3. Select Roles Requiring Approval from the drop-down menu to the right of the screen.
31 PAYMENT CENTER USER GUIDE MARCH 2021
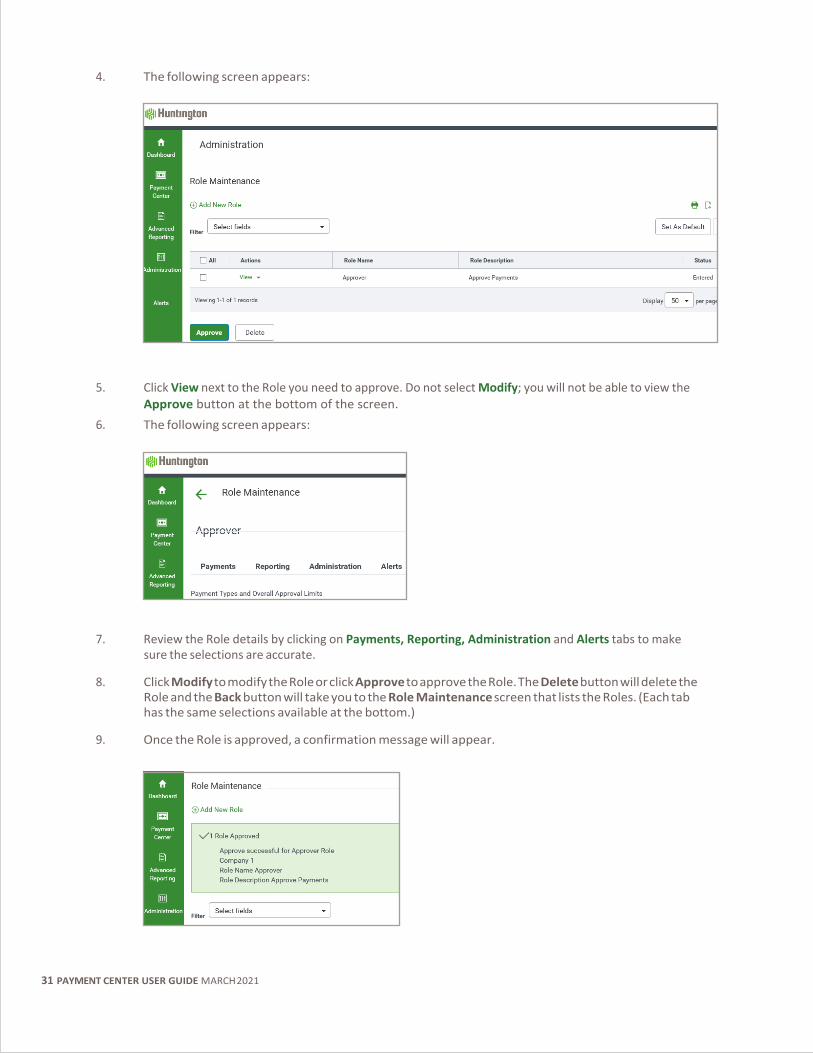
4. The following screen appears:
5. Click View next to the Role you need to approve. Do not select Modify; you will not be able to view the Approve button at the bottom of the screen.
6. The following screen appears:
7. Review the Role details by clicking on Payments, Reporting, Administration and Alerts tabs to make sure the selections are accurate.
8. Click Modify to modify the Role or click Approve to approve the Role. The Delete button will delete the Role and the Back button will take you to the Role Maintenance screen that lists the Roles. (Each tab has the same selections available at the bottom.)
9. Once the Role is approved, a confirmation message will appear.

32 PAYMENT CENTER USER GUIDE MARCH 2021
10. The Role can also be approved by using the Role Maintenance screen, checking the box next to the Role, and then selecting the Approve button.
11. You will receive a confirmation message. Select Yes if you want to approve the Role.

33 PAYMENT CENTER USER GUIDE MARCH 2021
Audit Information The Audit Information List View supplies a variety of information for your company, allowing you to filter the information that appears, as well as export and print the information.
Note: Only product, function, type, action modes, and entry methods with corresponding audit entries are available for selection.
Selecting and displaying Audit Information:
6. Select Audit Information from the Administration menu.
34 PAYMENT CENTER USER GUIDE MARCH 2021
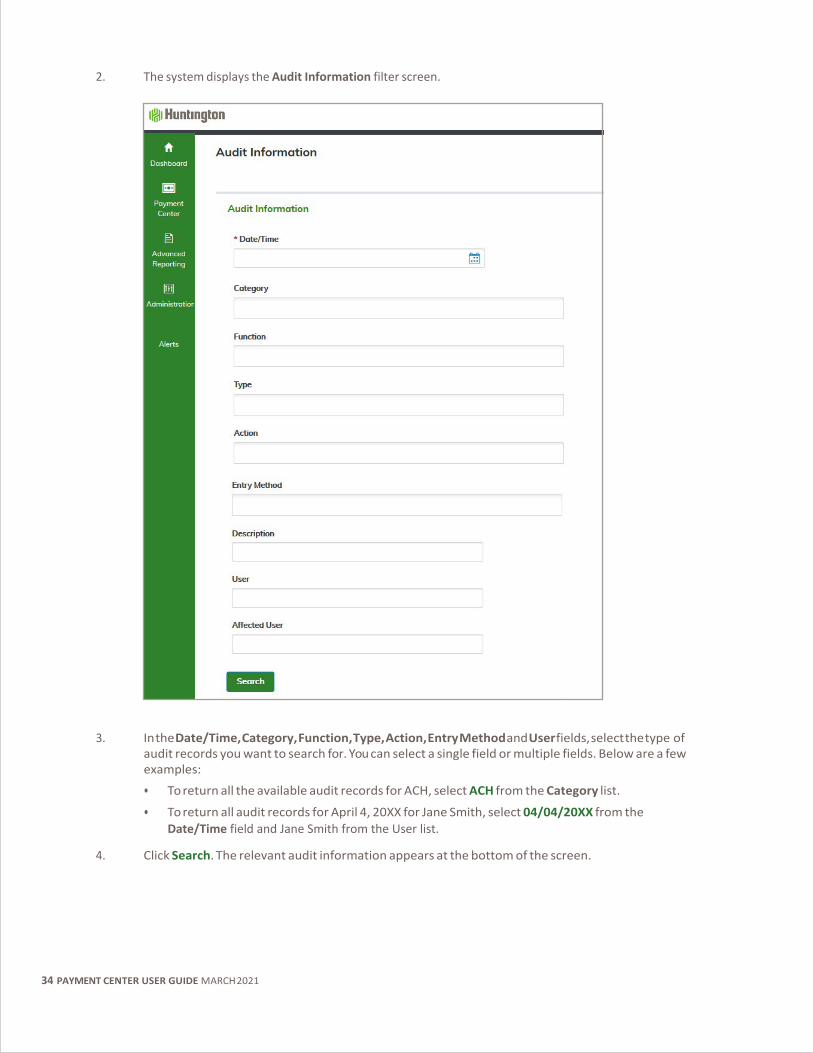
2. The system displays the Audit Information filter screen.
3. In the Date/Time, Category, Function, Type, Action, Entry Method and User fields, select the type of audit records you want to search for. You can select a single field or multiple fields. Below are a few examples:
• To return all the available audit records for ACH, select ACH from the Category list.
• To return all audit records for April 4, 20XX for Jane Smith, select 04/04/20XX from the Date/Time field and Jane Smith from the User list.
4. Click Search. The relevant audit information appears at the bottom of the screen.

35 PAYMENT CENTER USER GUIDE MARCH 2021
SECTION 4
Payment Management

36 PAYMENT CENTER USER GUIDE MARCH 2021
Accessing Payment Management The Payment Management List View widget shows transactions that you can view or take action on.
To access Payment Management, scroll to the Payments List on the Dashboard or select Payment Management from the main menu.
The following screen will appear:
By default, the list displays the columns you see above.

37 PAYMENT CENTER USER GUIDE MARCH 2021
Views The Payment Management list has several standard views that Users can select to view specific payments.
1. To change your view, select a new view from the drop-down menu.
The following views are available. See Appendix F for full definitions.
All Payments: Payments you are entitled to view Approval Window Passed: Payments requiring a new effective date Approved Payments: Payments with a status of Approved
Future Dated Payments: Payments with a transaction date that is greater than or equal to the next business date
Imported Payments: Payments created using File Import My Payments: Payments that you have created Needs Rates: FX Wires requiring a “Get Rate” action Payments Requiring Repair: Payments in “Needs Repair” status Payments Requiring Approval: Payments that require approval Payments Requiring My Approval: Payments that require my approval Possible Duplicate Payments: Payments that appear to be duplicates Rejected Payments: Payments with a status of Rejected
Two Week Look Back: Payments with an effective date in the past 14 days Upcoming Payments: Payments with an effective date greater than or equal to the
current day.

38 PAYMENT CENTER USER GUIDE MARCH 2021
2. To customize which columns are displayed on the Payment Management List screen, select the gear ( ) icon in the top right corner of the List View grid. The screen below will appear and you can select which columns of data you prefer to display.
Note: Some options pertain only to certain payment types. See the Reporting section of this guide for complete details for managing List Views.
3. Select Update to confirm.
4. Move columns by dragging and dropping the columns to create your desired order.
5. Create filters by using the Filters drop-down list on the Payment Management screen shown at the beginning of this section to select the desired criteria. For example, you can select payments where Status = Released.
6. To save your modified view, select the Save View button and enter a name for your List View. Then click the Go button.
7. Click the Set as Default button to select a default view.
8. Payments included in the Payments List may be exported or printed using the options found in the top right corner of the List View widget.

39 PAYMENT CENTER USER GUIDE MARCH 2021
Create Payment Function
ACH PAYMENTS
A variety of ACH payments such as payroll, tax, vendor, and cash concentration payments can quickly be created through the Create Payment function.
Payments can be created using four different methods:
Freeform Payment: Manually enter all of the payment details Copy From Existing: Create a new payment based on an existing payment Template: Create a payment based on a previously defined Template Import: Import all payment details from another source
FREEFORM ACH PAYMENTS
1. Access the Create Payment function by selecting the Add a New Payment option at the top of the Payments List widget. The following screen will appear:
2. Select the appropriate payment type from the Payment Type drop-down list.
3. Select Continue. If nothing happens upon clicking Continue, you may not be entitled to the select Payment Type.
4. A detail screen for the Payment Type will open displaying the fields applicable to the selected Payment Type.

40 PAYMENT CENTER USER GUIDE MARCH 2021
5. Enter the details of the transaction.
6. Select Add Another Beneficiary if you have more than one entry to include in the ACH batch/payment.
7. Select Submit to submit the payment or select Save for Later if you will be returning to this payment for further edits.
8. If you click on Submit, you will be taken back to the Payments List widget where you may print and/or export your payment details.
9. When the ACH Payment is approved to pay, an automatic balance check may be performed to verify that the account has adequate funds.
If the balance check fails: The system will check every 10 minutes until sufficient funds are verified, at which time the ACH payment will be deducted and processed during the next processing window.
ACH PROCESSING SCHEDULE
Final approval cutoff for standard ACH processing is 9:00 pm ET each day.
For Same Day ACH processing where the Effective Date is the current day’s date, ACH payments must be approved by 2:15 pm ET.
ACH Payments will be picked up six times throughout the day to be processed:
8:15 am, 12:00 pm, 2:30 pm, 4:15 pm, 7:45 pm and 9:15 pm (ET)
41 PAYMENT CENTER USER GUIDE MARCH 2021
FREEFORM WIRE PAYMENTS
DOMESTIC WIRE TRANSFERS
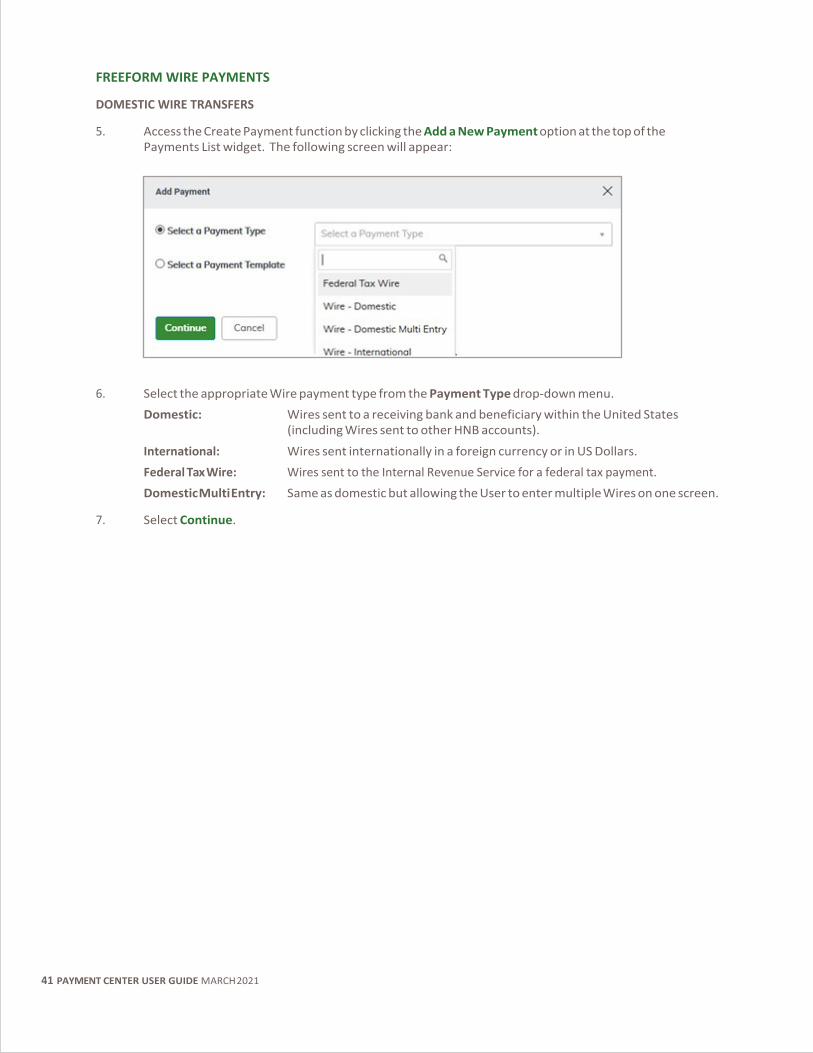
5. Access the Create Payment function by clicking the Add a New Payment option at the top of the Payments List widget. The following screen will appear:
6. Select the appropriate Wire payment type from the Payment Type drop-down menu. Domestic: Wires sent to a receiving bank and beneficiary within the United States
(including Wires sent to other HNB accounts).
International: Wires sent internationally in a foreign currency or in US Dollars. Federal Tax Wire: Wires sent to the Internal Revenue Service for a federal tax payment. Domestic Multi Entry: Same as domestic but allowing the User to enter multiple Wires on one screen.
7. Select Continue.

42 PAYMENT CENTER USER GUIDE MARCH 2021
4. A detail screen for each Payment Type will open displaying the applicable fields.

43 PAYMENT CENTER USER GUIDE MARCH 2021
5. Complete the Wire instructions [The following is a list of all required fields (except for Customer Ref); for information on optional fields, please consult Appendix D.]
Account Number: Enter the settlement account number or use the search icon to select the settlement account.
Customer Ref: This field is not required and information entered is not forwarded with the Payment. You can use it to store a Vendor ID, Customer ID, or other internal tracking documentation.
Name: The person or company to whom you are sending the Wire. Email: Use this field to generate an email notification to the Wire beneficiary. Account Number: The bank account number of the person or company to whom you are sending
the Wire.
Bank Code Type: This field will always default to ABA for a domestic Wire. Bank Code: The ABA of the bank to which you are sending the Wire. Effective Date: Defaults to current day for domestic Wires if prior to 5:30 pm ET (4:30 pm ET
for Federal Tax Wires).
Credit Amount: Amount of the Wire to be sent. Purpose of Wire: Use this field to describe the general purpose of the Wire, e.g, purchase of
goods.
6. Select Submit to submit the transaction or select Save for Later to return for further edits.
7. If you click Submit, you will be taken back to the Payments List widget where you may print and/or export your payment details.
8. When the Wire Payment is approved to pay, an automatic balance check verifies that the account has adequate funds.
If the balance check fails: The system will check every 10 minutes until sufficient funds are verified, at which time the Wire payment will be deducted and processed within 60 seconds.

44 PAYMENT CENTER USER GUIDE MARCH 2021
INTERNATIONAL WIRE TRANSFERS
When creating an international Wire, the credit currency will automatically default to the currency of the Beneficiary Bank country. If the credit currency is manually changed to reflect USD (US Dollars) as the currency, Huntington may convert the Wire to the currency of the Beneficiary Bank country unless customer has notified the bank not to do so. International Wires should only be sent in USD if the beneficiary account is a US Dollar denominated account at the foreign bank.
45 PAYMENT CENTER USER GUIDE MARCH 2021
Refer to domestic Wire section above for field definitions. Below are additional fields and other adjustments you will need to make in order to send international Wires:
Name Line 1/ Address Line 1: If the Beneficiary Name exceeds the number of allowable characters in the Name
field, you may use this field to include the full name. If used to continue the Beneficiary Name, use the Address Line 2 field to provide the street address of the beneficiary.
Country: This field is the country of the beneficiary and is required for all international Wires.
Account Type: When sending a Wire to a Beneficiary Bank that participates in the assignment of IBANs (most European countries), the Beneficiary Account Type must be IBAN and the Account field must contain a properly formatted IBAN. When sending a Wire to a Mexican Beneficiary Bank, the Beneficiary Account Type must be Other and the Account field must contain a properly formatted CLABE. In all other cases, Account Type should be Other.
Bank Code Type: This field will always default to SWIFT for an international Wire.
Bank Code: This field is the SWIFT code of the bank to which you are sending the Wire.
Effective Date: If your international Wire is submitted prior to 4:30 pm ET, this field will default to two business days hence (Wires to Canada default to one business day hence). It is important to confirm the accurate/desired Effective Date if you modify the default currency. International Wires sent in US Dollars may have the current date as the Effective Date, and may be future-dated up to 30 days in advance. Wires sent in a foreign currency may not be future-dated.
Charges: This field represents how Correspondent Bank fees should be collected. Beneficiary indicates that Correspondent Bank fees may be deducted from the amount of the Wire. Ours indicates that Correspondent Bank fees may be charged against the debit account.
Credit Amount: Amount of the Wire to be sent in the designated currency.
Debit Amount: Amount of the Wire to be debited from the sender’s account (always in USD).
Purpose of Wire: Use this field to describe the general purpose of the Wire, e.g, purchase of goods.
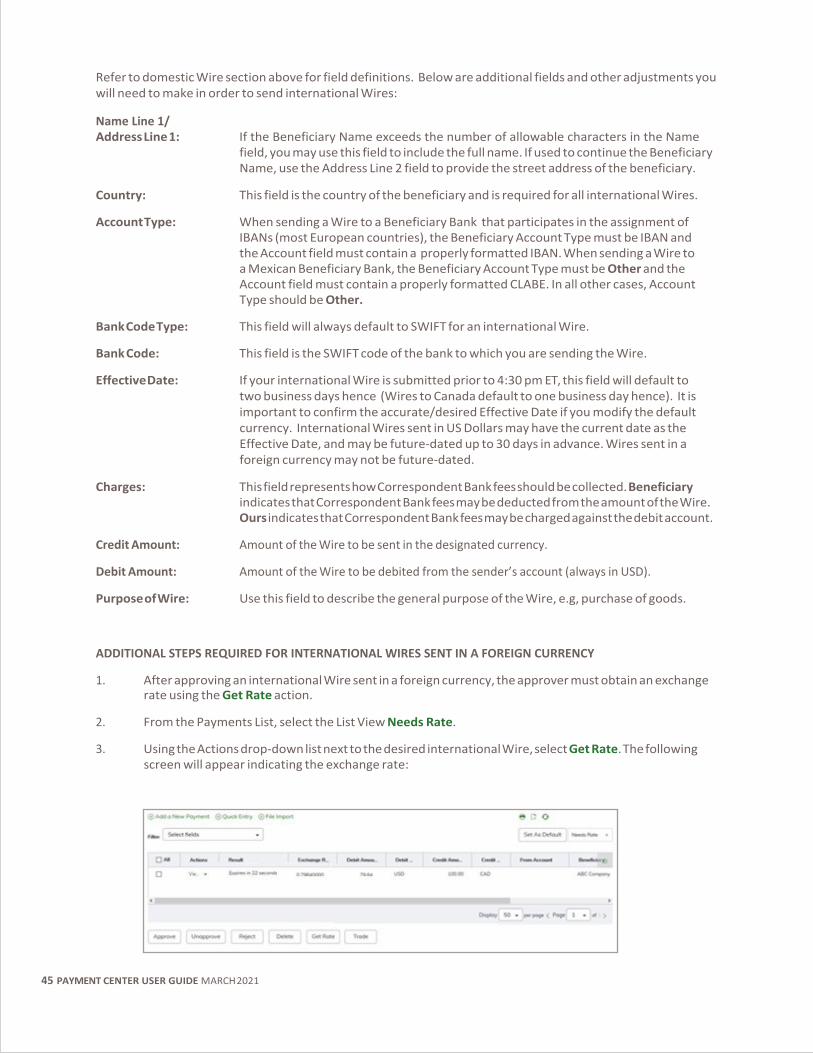
ADDITIONAL STEPS REQUIRED FOR INTERNATIONAL WIRES SENT IN A FOREIGN CURRENCY
1. After approving an international Wire sent in a foreign currency, the approver must obtain an exchange rate using the Get Rate action.
2. From the Payments List, select the List View Needs Rate.
3. Using the Actions drop-down list next to the desired international Wire, select Get Rate. The following screen will appear indicating the exchange rate:

46 PAYMENT CENTER USER GUIDE MARCH 2021
4. You will have 30 seconds to accept or reject the trade. If you accept, select Trade. If you decline, select Reject.
5. Once the Trade has been completed, the following screen will appear indicating the final contract ID number. The Trade/Wire is final at this point and will be released for processing.
WIRE PROCESSING SCHEDULE
Wire payments can be created and submitted 30 days in advance for an Effective Date (Effective Payment Date) in the future. The earliest a payment can be released in the morning is 7:30 am ET. The cutoff for the day is dependent on the Wire Type and is as follows:
• Federal Tax Wire: 4:30 pm ET
• International Wire: 4:30 pm ET
• Domestic Wire: 6:15 pm ET
• Drawdown Wire: 6:15 pm ET
If you are creating a Wire after the above cutoff times, the date will automatically default to the next business day.

47 PAYMENT CENTER USER GUIDE MARCH 2021
FREEFORM REAL-TIME PAYMENTS
Real-Time Payments may be entered from two different locations within the Payment Center application:
Payment Management Workspace as shown above for ACH and Wire Transfer payments. Real-Time Payments Workspace by selecting Real-Time Payments from the Payment Management menu.
1. Access the Create Payment function by clicking the New Payment option at the top of the Real-Time Payments widget.
2. A detail screen will open displaying the applicable fields.
3. Complete the RTP instructions [The following is a list of all required fields (except for Customer Ref); for information on optional fields, please consult Appendix D.]
From Account: Enter the settlement account number or use the search icon to select the settlement account. Beneficiary: The person or company to whom you are sending the RTP. Account Number: The bank account number of the person or company to whom you are sending the RTP. Bank Code: The ABA of the bank to which you are sending the RTP. Customer Ref: This field is not required, and information entered is not forwarded with the Payment. You can use it to store a Vendor ID, Customer ID, or other internal tracking

48 PAYMENT CENTER USER GUIDE MARCH 2021
documentation. Payment Date: Defaults to current day. Amount: Amount of the RTP to be sent.
4. Select Submit to submit the transaction or select Save for Later to return for further edits.
5. If you click Submit, you will be taken back to the Real-Time Payments List widget where you may print and/or export your payment details.
6. When the Real-Time Payment is approved to pay, an automatic balance check verifies that the account has adequate funds.
If the balance check fails: The system will check every 10 minutes until sufficient funds are verified, at which time the Real-Time Payment will be deducted and processed.
RTP PROCESSING SCHEDULE
RTP messages may be sent 24/7/365 and can be created and submitted 30 days in advance for an Effective Date (Effective Payment Date) in the future. There is no cutoff time given the 24/7/365 nature of this payment type.
THE CHALLENGE PROCESS
When a Real-Time Payment or Wire transaction is entered or approved, it is automatically sent to Huntington’s Fraud Monitoring system. The system will do one of four things:
1. Allow it. The transaction will go through. 2. Block it. The transaction will not go through. 3. Hold it. The transaction will undergo a manual review and later be Allowed or Blocked. 4. Challenge it. The challenge process allows Huntington to verify your identity and allows you to confirm
the transaction by receiving a call.
Important: You must select a phone you can answer directly. If you are unable to answer any of the phone numbers that appear on the list, a Business Online Administrator for your company must update your User Profile to include a phone number you can answer.

49 PAYMENT CENTER USER GUIDE MARCH 2021
PAYMENT FROM A TEMPLATE
Templates allow you to reuse commonly used payment information. Once a Template is created and approved, you can use the Template to create a payment.
1. Access the Create Payment function by selecting the Add a New Payment option at the top of the Payments List widget. The following screen will appear:
2. Choose Select a Payment Template.
3. You may choose a desired Template from the drop-down list using the type-ahead feature to narrow down the list if you know the name of the Template.
Note: Refer to the Templates section on page 56 of this guide to learn how to view/filter a complete list of Templates if you are not familiar with the name of the desired Template.
4. Once the desired Template has been selected from the drop-down list, select Continue.
5. The Create Payment screen displays and is populated with data from the Template.
6. Modify the details of the payment, if necessary.
Note: Fields that can be modified may vary depending on the payment type and Template selected.
7. Select Submit to submit the transaction or Save for Later to return to this payment later for further edits.
8. If you click Submit, you will be taken back to the Payments List widget where you may print and/or export your payment details.

50 PAYMENT CENTER USER GUIDE MARCH 2021
POSSIBLE DUPLICATE WARNING FEATURE
In order to protect Users from submitting erroneous payments, Payment Center reviews payment history to determine if a submitted payment appears to be a duplicate of another existing payment. The logic used depends on the payment type and therefore may vary.
1. If a payment is identified as a possible duplicate payment, the warning message below will be displayed upon submitting the payment.
2. Enter the reason in the box at the bottom of the warning message. The User approving the payment will also see the reason entered by the User submitting the payment.
3. Select Continue and the payment will be submitted, routing you back to the Payments List.
4. Upon approving the payment, the Approver will see a Possible Duplicate Payment warning message indicating the reason entered by the User who submitted the payment.
5. Select Continue and the payment will be approved, routing you back to the Payments List.

51 PAYMENT CENTER USER GUIDE MARCH 2021
SCHEDULED PAYMENTS
Schedule recurring payments by creating a Template and using the Schedule feature to automatically generate payments from that Template. The Template must be approved before the schedule becomes active. A payment created by a payment schedule will also need to be approved.
1. Select Payment Management from the Payment Center menu.
2. Scroll down to the Templates list.
3. Select Modify from the Actions drop-down menu for the Template you wish to schedule an automatic recurring payment.
4. Select Make Recurring at the bottom of the Template Detail screen.
5. The Schedule Payment screen displays:
In this example, a recurring payment will be scheduled that is generated once a week on Tuesdays. The payment will begin next week and recur five times.

52 PAYMENT CENTER USER GUIDE MARCH 2021
Range of Recurrence:
Start date: The first date on which you want this payment to be effective. For an ACH payment, the first scheduled payment will be executed one business day prior to the start date. For a Wire Payment, the first scheduled payment will be executed at 8:00 am ET on the start date.
Repeat every: Choose from Week(s) or Month(s). If Week(s) is selected, choose the day(s) of the week the payment should be executed. If Month(s) is selected, choose the day(s) of each month the payment should be executed.
Ends upon further notice: Select this option if this recurring payment should continue until stopped by an approved User.
End after occurrences: Select this option if this recurring payment should only occur for a certain number of times.
End by selected date: The date that the schedule engine will stop.
Non-business days: Select the option defining how you want the schedule to create payments should the effective date fall on a non- business day.
IMPORTANT NOTES REGARDING SCHEDULED PAYMENTS:
Once a payment is processed based on a recurring schedule, the next scheduled payment will be included in the Payments List until the next scheduled date is reached.
It is a best practice to add the Payments Automatically Created alert to notify Users when a payment has been created based on a recurring schedule.
The type of approval required for automatically created payments is dependent on the approving User’s Role(s). For example, if the User’s Role requires that a second User approve payments of this payment type, the automatically created payment will also require that a second User approve the payment.
The User that set up the recurring template will be the User the system recognizes as the payment initiator. If that User does not have the Approve Own entitlement, another User will need to approve the recurring payment.
If the User who initially approves the scheduled Template is deleted, the schedule will fail to execute the automatically created payment(s).

53 PAYMENT CENTER USER GUIDE MARCH 2021
IMPORT PAYMENTS
Payment files can be imported into the application using a variety of formats including Nacha (ACH only), CSV, and Detail Import Maps. The specific steps depend on the type of files you are importing.
In this example, a Nacha formatted file is used, but Wire payments or Templates may also be imported following the same process defined here.
NOTE: CTX payments are not a supported payment type for File Import
1. Navigate to the Payments List from the main menu and select File Import.
2. The following screen will appear. The list of formats available in the Format Section grid will vary depending on your company’s entitlements.
3. Select Nacha File Import from the list. The screen expands as shown below.
4. Indicate if the file should be imported as a Confidential Payment, preventing certain Users from viewing the resulting payment.
5. Indicate if the file should be imported as a Same Day Payment (pertains only to ACH payments). Please

54 PAYMENT CENTER USER GUIDE MARCH 2021
refer to the ACH Processing Schedule above to determine eligibility. 6. If you would like to test your file before importing it as a payment or Template, you may do so by
checking the box labeled Load the File in Test Mode.
7. Select Browse to browse your computer for the file to be imported.
8. Select File Import.
9. You will be returned to the Payments List.
10. Scroll down to the File Import History List View and identify the file just imported.
Note: Click the refresh icon to update the list if your file takes a few seconds to import.
11. Select View on the file you uploaded to review the details of the import for accuracy.
12. If the file was imported successfully, the payment will be listed on the Payments List. If the file did not import correctly, the import record will list the errors that occurred during the import process.
If the file was imported successfully, the payments will be listed on the Payments List with an Entered status and will be ready for approval. From this point forward, payments within the file are treated like files within the Payment Center system.
If the file was not imported successfully, you may either modify the payment or update the file and repeat the Import File process. The best option will depend on the reason for the failed import.

55 PAYMENT CENTER USER GUIDE MARCH 2021
DETAIL IMPORT MAP The Detail Import Map tool is used to create an import file in a format other than the pre-existing (standard) formats, such as CSV or Fixed Width file format. The Detail Import Map must be created before a User may use this feature to import a file. The Detail Import Map allows the customer to define the file layout, mapping and rules for the import.
NOTE: CTX payments are not a supported payment type for File Import
8. Select Import Settings from the Payment Center menu option.
9. The following screen will appear:
10. Select Add Import Map from the top of the List View.
11. The following screen will appear. The options displayed on this screen will vary depending on the Payment Type selected. In this example, the following steps pertain to a Payroll (ACH) map.

56 PAYMENT CENTER USER GUIDE MARCH 2021

57 PAYMENT CENTER USER GUIDE MARCH 2021
5. Select the Map Type: Delimited: A file with delimiters (e.g. commas, tab stops) between fields. The point where
each record ends is determined by a character, often a carriage return and/or line feed.
Fixed: A file where the format is specified by column widths. Each field is defined by its position in the record (starting position and ending position for each field).
Nacha: The National Automated Clearing House Association has standardized formats used by the industry that can be transmitted or imported to a financial institution. (Can only be used for ACH payments.)
6. Select the Payment Type from the drop-down subsection.
7. Input a Format Name to define the type of map and payment, such as PayrollSalary. This field will not allow spacing.
8. Enter a Description to further define the type of Detail Import Map you are creating.
9. Select the File Process by clicking on the drop-down menu: Append All: This setting will add all transactions in the file to the existing batch. Append New: This setting will compare the records in the file with the transactions already
entered in the batch. Only those transactions that DO NOT exist will be added to the batch.
Match & Update: This setting will compare the records in the file with the transactions already entered in the batch. Only matching transactions will be updated.
Replace All: This setting will replace all the transaction detail in the batch with the details in the file.
10. Select the Match Failure by clicking on the drop-down menu: Append to Batch: This setting will add records to the batch if they cannot be matched to an
existing record.
Fail Record: This setting will fail any records that cannot be matched. The file will continue to process.
Fail File: This setting will fail the entire file if any of the records cannot be matched.
11. Choose a Start Import at Row in the file where the import should start. This is the row where the actual data starts. If there is a header in row 1, then the data would start on row 2.
12. Select the String Delimiter used to indicate a string in the file. The default section is “Double Quote.” Note that this field is not visible for Fixed or Nacha map types.
13. Select the Field Delimiter used to indicate the end of a field in the file. The default selection is “Comma.” Note that this field is not visible for fixed or Nacha map types.
14. Select the Record Delimiter used to indicate the end of a record in the file. The default selection is [CR] [LF], which corresponds to carriage return or line feed. Note that this field is not visible for Nacha map types.
15. Select the Date Format used in the file. The default selection is MMDDYY.
16. If needed, choose how dates are separated in the Date Separator.
17. Choose an optimal field in the Implied Number of Positions that can be used to designate decimals in a numeric value in the file. For example, you would choose 3 if the number 1000000 should be interpreted as 1000.000. If a decimal separator is defined by a character as indicated below, you can leave this field blank.

58 PAYMENT CENTER USER GUIDE MARCH 2021
18. Enter the character used to indicate a decimal in the file in the Decimal Separator.
19. The values shown in the Credit (CR), Checking (C), Debit (DR), Savings (S), Yes/True (Y), and No/False (N) fields are the abbreviations used to represent these values in the file. These fields are case sensitive. If needed, you can change the default values.
20. The table at the bottom of the screen is used to indicate how the fields in your file will map to fields in the payment screen in Payment Center.
21. Select Save.

59 PAYMENT CENTER USER GUIDE MARCH 2021
Approve Payments After a payment is entered, it needs to be approved by an individual with approval permissions.
1. Select Payment Management from the Payment Center menu.
2. Select Payments Requiring Approval from the View drop-down menu.
3. The Payments List is updated to display only those payments that need approval.
4. Click on the check boxes next to those payments you wish to approve and pay. Huntington advises that each payment be reviewed in detail prior to approving.
5. Select Approve.
6. An approval confirmation screen will appear.
7. Select Yes.
8. If all approvals were successful, no further action is needed. If any of the payments you chose are not eligible for approval, a warning message will appear. Simply close the message, attempt to fix the errors, and submit the payments again.

60 PAYMENT CENTER USER GUIDE MARCH 2021
SECTION 5
Templates

61 PAYMENT CENTER USER GUIDE MARCH 2021
Creating Templates If you make repeated payments with the same account, beneficiary, or other information, you can use a Template to help make it easier to create payments. Templates are commonly used to make payments that are sent on a regular basis, such as payroll, rent, or vendor payments.
There are four ways to create Templates:
Option 1: Create a new Template from scratch.
Option 2: Copy an existing payment as a new Template. (Only freeform and imported payments can be copied to create a Template.)
Option 3: Copy an existing Template.
Option 4: Import Templates.
CREATING A TEMPLATE FROM SCRATCH
1. Select Payment Management from the Payment Center menu.
2. Scroll down to the Templates List.
3. Access the Create Template function by clicking the Add a New Template option at the top of the Payments List widget. The following screen will appear:
4. Select the appropriate Template Type from the Template Type drop-down menu.

62 PAYMENT CENTER USER GUIDE MARCH 2021
5. Select Continue. (If nothing happens upon clicking continue, you may not be entitled to the selected Template type.)
6. A detail screen will open displaying the fields applicable to the selected Template Type.
7. Enter all relevant information: Template Code: Enter a nickname for your Template. Template Description: Enter the full name for your Template. Signatures: If desired, you may indicate that more than the standard number of
approvals/signatures is required when this Template is used to create a payment.
Maximum Amount: You may indicate that this Template cannot be used to create a payment for more than the designated Maximum Amount.
Restrict: Choose whether to restrict the Template allowing only Users with Roles entitled to the Template to use the Template.
Lock Icon: If desired, you may choose to lock/unlock various fields in the Template preventing Users from modifying those fields when using the Template to create a payment .

63 PAYMENT CENTER USER GUIDE MARCH 2021
Note: The fields included in the rest of the Template Detail screen are the same as those found on the Payment Detail screen. They will vary based on the type of Template being created.
8. Select Save to submit the Template or select Save for Later to return for further edits.
9. If you click on Save, you will be taken back to the Templates List widget where you may print and/or export your payment details.
10. When the Template is approved, it may be used to create payments as shown in the Payment Management section of this guide.

64 PAYMENT CENTER USER GUIDE MARCH 2021
SECTION 6
Reporting

65 PAYMENT CENTER USER GUIDE MARCH 2021
Using List Views for Reporting Many functions in Payment Center are organized in various lists. (See Appendix F for all predefined lists currently available.) The list management techniques described below are consistent across all List Views.
Actions Drop List The Actions column allows you to take action on a single item in a list. Depending on the item, you can:
• View
• Modify
• Approve/Unapprove
• Delete
Navigating Through a List
The number of records and number of pages in a list is shown on the bottom of the screen. Select the arrows or the Page drop-down to navigate from one page to the next. Use the Display drop-down to select the number of records you want to appear on each page.
Selecting a Predefined View
Many lists have several predefined views that display records that meet specific criteria.

66 PAYMENT CENTER USER GUIDE MARCH 2021
To use a predefined view:
1. Use the View drop-down (usually on the right side of the screen), to select from the available predefined views.
2. Make your selection, and the displayed view will change accordingly.
Setting a Different View as the Default
Each list has a default view assigned. This is typically the view that displays records without any limiting criteria.
To set a new view as default:
1. Use the View drop-down to select the view from the list.
2. Select Set As Default. The selected view will be the default each time you return to this list.
Filtering a List
Use the filter function to limit the records shown in a list to records that meet specific criteria. Lists can be searched using the Quick Search or the Manage filters option. For simple searches, use the Quick Search. For more complex searches, select Manage filters.
Using Quick Search To filter the list with the Quick Search:
1. Click on the Select Fields drop-down.
2. Select the field you would like to use as a search criterion. If necessary, select an operator from the list.
3. Enter the search criteria.
4. Select Apply. The records that meet your specified criteria appear in the list.
5. If you wish to search the entire list again, select Clear All and enter a new search.
Using Manage Filters
To filter the list with the Manage filters option:
1. Click on the Select fields drop-down.
2. Select the field you would like to use as a search criterion. If necessary, select an operator such as is equal to or is greater than. If the field requires a date selection, use the calendar pop-up to select a date.
3. Enter the search criteria.
4. To filter on an additional field, select the Add another filter link, select an operator if necessary, and enter the search criteria.
5. Repeat steps 2 through 4 until you have selected as many filters as desired. If necessary, you can select the X to remove that filter.
6. When you have finished, select Apply to see the search results. The records that meet the criteria you specified will appear in the list. If you use the advanced filter again, the system will search all of the items in the original list (not the filtered list).
7. Select Clear to remove the filter.

67 PAYMENT CENTER USER GUIDE MARCH 2021
Saving a Filter as a New View
Once you filter a list, you can save it as a new view:
3. Filter the list as described above.
4. Use the View drop-down at the upper right of the screen to save the view. The view is saved in the list of available views.
5. If you want to delete this view in the future, select the trash can icon .
Sorting a List
A list can be sorted so that the order of the rows is reversed.
1. Click on a column header and the rows of data will be resorted according to that header. A blue down arrow appears in the column to indicate the sort order.
2. To return the rows to their original order, select the column header again.
Moving Columns
To move a column, simply drag and drop the column to the new position.
Adding or Removing Columns
If the list contains columns that can be added or removed, you will see the gear ( ) icon in the header row at the right side of the list.
To add or remove columns:
1. Select the gear icon. The available columns are displayed. The checked boxes indicate which columns currently appear in the list.
2. Simply check or uncheck the columns you would like to include/exclude in your list, and then select Update.

68 PAYMENT CENTER USER GUIDE MARCH 2021
Refreshing a List A number of lists feature a Refresh icon in the upper-right corner. Along with the icon is a notification of the most recent date and time.
When you select the icon, the list is refreshed, and the date and time are updated. This will be especially useful if you are working in a list for an extended period of time.
Exporting Lists
The data from some lists can be exported as follows:
6. Select the Export link, which appears at the left-hand top of the list screen. An export window appears.
7. Save the file to your desired location.
Printing Lists
Some lists can be printed:
1. Select the Print link. A report window appears containing data from your list.
2. Select the printer icon.
3. Your browser’s print dialog will appear.
4. Print the file using the instructions from your browser.
Printing Payments and Templates
Payments can be printed from the Payments List, while Templates are printed from the Templates List. In both cases, the Print option lets you print all or selected items in the list.
To print all Payments or Templates:
1. In the Payments or Templates List View widget, select Print.
2. The All Items option will be selected.
3. Choose the level of detail you want to print.
a. To print just a summary of available information, select the Summary Information radio button.
b. To print detail information, select the Transaction Details radio button. For ACH payments, held transactions will be excluded. However, for ACH Templates, held transactions will be included.
4. Select Print.
5. In the Print window, use the Export As drop-down to select the desired output, for example, Export as PDF.
To print selected Payments or Templates:
1. In the List View, check the boxes for the items you want to print.
2. Select Print.

69 PAYMENT CENTER USER GUIDE MARCH 2021
3. In the window that appears, choose the level of detail you want to print. a. To print just a summary of available information, select the Summary Information radio
button.
b. To print detail information, select the Transaction Details radio button. For ACH payments, held transactions will be excluded. However, for ACH Templates, held transactions will be included.
4. Select Print.
5. In the Print window, use the Export As drop-down to select the desired output, for example, Export as PDF.

70 PAYMENT CENTER USER GUIDE MARCH 2021
Viewing Reports The Reports Management widget shows all reports available to you.
Note: Most reporting needs are best met using List Views as illustrated in the prior section.
1. The default Dashboard displays the Reports Management widget upon logging in. If you would like to change the size of the widget, see page 9 for instructions.
2. The reports available will be listed (the reports included in the list may vary depending on your entitlements):

71 PAYMENT CENTER USER GUIDE MARCH 2021
Filtering Reports Filters allow you to further filter the report to meet your needs. Perhaps you require a Payment Detail report, but you only want the report to include certain parameters.
1. Once you have selected a report from the Reports Management menu, there are predefined filter criteria that will vary from one report to another. If you do not want to filter the results, you can run the report by selecting the Run Report button.
Note: If you find that a report does not offer the filter criteria you need, refer to the List View that includes the data on which you wish to report.

72 PAYMENT CENTER USER GUIDE MARCH 2021
2. The report criteria can be saved by checking the Save this Report box, then Run Report.

73 PAYMENT CENTER USER GUIDE MARCH 2021
3. A pop-up box will appear to enter information to save the report filter. Input the Filter Name, Filter Description and if desired check the Shared box. The Shared box will allow other Users to see the saved filtered report in their List View. Once all the criteria are entered, select Save, or, if you don’t need to save this filter, select Cancel.
4. Scroll down the page to view the output.
5. You will be routed back to the Reports Management widget where the newly created filtered report will be listed with the other reports.
6. If you no longer need the filtered report, select the Action menu next to View and delete the report. You can use the same menu to Modify the criteria.

74 PAYMENT CENTER USER GUIDE MARCH 2021
Exporting and Printing Reports
1. Once you select a report from the Reports Management widget and select Run Report, the report will render at the bottom of the screen. Scroll down to view the report.
2. Use the following icons as needed:
Zoom in and out on the report
Save the report
Print the report
Open the report in Adobe Acrobat Reader within Payment Center application
Export the report to PDF, CSV or Plain Text
For additional information regarding Reporting, consult the Advanced Reporting User Guide.

75 PAYMENT CENTER USER GUIDE MARCH 2021
SECTION 7
Alerts

76 PAYMENT CENTER USER GUIDE MARCH 2021
Balance and Transaction Alerts An Alert generates an automatic email message when certain events occur, such as when a payment is rejected, when a payment is automatically generated, or when there are payments awaiting approval. Alerts can also be generated based upon a specific time of the day. For Alert definitions, see Appendix B.
NOTE: Before establishing an Alert for multiple recipients, your recipients must be defined using the Email Recipients, Email Recipient Groups Settings, and Email Recipient Group Assignments in the Setup Menu.
Huntington recommends that you log in daily to review your activity as delivery of Alerts cannot be guaranteed. Alerts are not intended to be used to substitute daily monitoring of your account(s).
1. Select Alerts, then Alert Settings from the main menu.
2. The following screen will appear:
3. Click Add New Alert to add a new alert.
77 PAYMENT CENTER USER GUIDE MARCH 2021
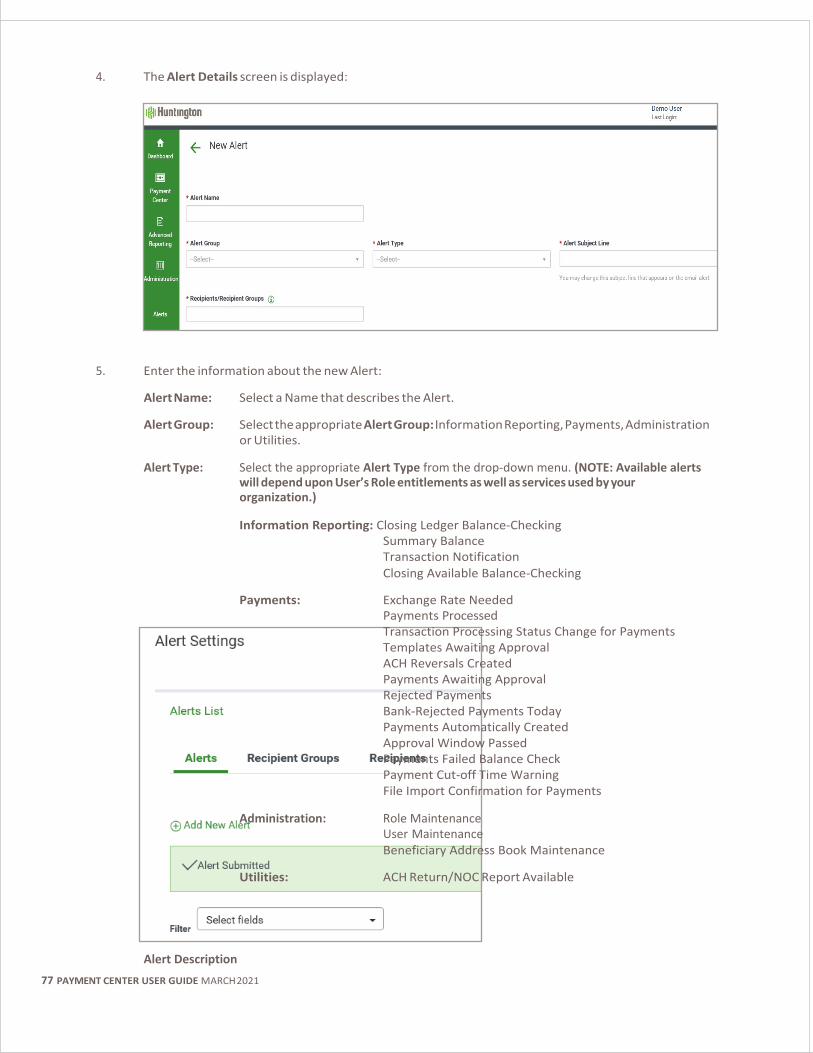
4. The Alert Details screen is displayed:
5. Enter the information about the new Alert:
Alert Name: Select a Name that describes the Alert.
Alert Group: Select the appropriate Alert Group: Information Reporting, Payments, Administration or Utilities.
Alert Type: Select the appropriate Alert Type from the drop-down menu. (NOTE: Available alerts will depend upon User’s Role entitlements as well as services used by your organization.)
Information Reporting: Closing Ledger Balance-Checking Summary Balance Transaction Notification Closing Available Balance-Checking
Payments: Exchange Rate Needed Payments Processed Transaction Processing Status Change for Payments Templates Awaiting Approval ACH Reversals Created Payments Awaiting Approval Rejected Payments Bank-Rejected Payments Today Payments Automatically Created Approval Window Passed Payments Failed Balance Check Payment Cut-off Time Warning File Import Confirmation for Payments
Administration: Role Maintenance User Maintenance Beneficiary Address Book Maintenance
Utilities: ACH Return/NOC Report Available
Alert Description

78 PAYMENT CENTER USER GUIDE MARCH 2021
(Subject Line): A description will default based upon the Alert Type. This description is what the Alert subject line will be when the recipient receives the Alert email.
Scheduled Alerts: Select Scheduled Hours from the drop-down menu Select Scheduled Minutes from the drop-down menu Select Time Zone from the drop-down menu
Recipient: Select a Recipient/Recipient Group from the drop-down list
6. Depending upon the Alert Type selected, there will be additional items that may be chosen. Be sure to limit selections since the Alerts are limited in the amount of information that can be provided at one time. If the recipient receives an Alert, they should log in to Payment Center to review the information.
Account Number: Select the account number(s) from the list for the Alert. Actions: Select the action(s) from the drop-down list. Balance Type: Select the appropriate balance type for the Alert to trigger. Time prior to cutoff time: Select how many hours and or minutes prior to cutoff time. Payment Status: Select the payment status desired from the drop-down list.
Payment Type: Select the payment type(s) the Alert will pertain to when triggered.
Debit/Credit Amount: Select a qualifier and enter an amount in the box to the right. Using the amount options may unintentionally limit the execution of the Alert thus they are seldom used.
Customer Reference: Applicable for check numbers. Transaction Type: Select the BAI code(s) desired from the drop-down list. Closing Ledger Balance: Select a qualifier and enter an amount in the box to the right. Closing Available Balance: Select a qualifier and enter an amount in the box to the right. Report ID: You can also leave this blank so the recipient can receive the Alert for
all report IDs.
7. Once all the desired parameters are correct for the Alert, select Save.
8. A confirmation message is displayed.
79 PAYMENT CENTER USER GUIDE MARCH 2021
SECTION 8
Appendix

80 PAYMENT CENTER USER GUIDE MARCH 2021
Appendix A: Report Definitions
ADMINISTRATION
REPORT NAME DESCRIPTION
Company Details Includes information about a BOL Company and the Roles that belong to the BOL Company.
Roles Includes entitlements assigned to each Role.
User Permissions Includes the Roles assigned to Payment Center User.
PAYMENT REPORTS
REPORT NAME DESCRIPTION
Payment Detail Includes all ACH and/or Wire payments with transaction details. Two Years of History
Template Detail Includes all ACH and/or Wire Templates with transaction details. Two Years of History
ACH Company Includes a list of all ACH companies.

81 PAYMENT CENTER USER GUIDE MARCH 2021
Appendix B: Alert Definitions
PAYMENT ALERTS
NAME DESCRIPTION
Approval Window Passed Email notification sent when payments were not approved prior to the cutoff time. The effective date needs to be adjusted to a valid business day and resubmitted for approval in order to be processed.
File Import Confirmation Email notification sent when payments are successfully or unsuccessfully uploaded.
Payments Awaiting Approval Email notification sent when a payment has been created and is awaiting approval.
For the Alert to execute, the User who created the Alert must be an eligible approver for the payment. If the User who created the alert is NOT an eligible approver for the payment, none of the defined recipients will receive the Alert.
Payments Balance Check Email notification sent when a payment cannot be sent to the bank for processing due to insufficient funds in the account. The system will check for available funds every 10 minutes until the cutoff time for the payment type.
Payment Cutoff Time Warning Email notification sent when unapproved payments are within a specified timeframe prior to the cutoff.
Rejected Payments Email notification sent when payments are rejected by the approver.
Templates Awaiting Approval Email notification sent when a Template has been created and is awaiting approval.
Transaction Processing Status Email notification sent when a payment changes status (approved, bank Change for Payments confirmed, bank rejected)
Payments Automatically Created Email notification sent when payments are created automatically based on Scheduled Payment settings.
Payments Rejected Today Email notification sent when a payment is rejected by the bank.
Payments Processed Email notification sent when an RTP or Wire payment is received, confirmed or rejected by the bank.
Exchange Rate Needed Email notification sent when there are Wire payments that require the ‘Get Rate’ action to obtain a real time rate.
ACH Return/NOC Report Email notification that an ACH Return and NOC Report (using the Legacy Reports feature) is available.

82 PAYMENT CENTER USER GUIDE MARCH 2021
ADMINISTRATIVE ALERTS
NAME DESCRIPTION
Beneficiary Address Book Email notification when a change has been made to the Maintenance Beneficiary Address Book.
User Maintenance Email notification when a User has been added or modified.
Role Maintenance Email notification when a Role has been added or modified.

83 PAYMENT CENTER USER GUIDE MARCH 2021
Appendix C: Payment Type Definitions
WIRE
NAME DESCRIPTION
Domestic Wire Any Wire sent to a domestic bank (even if the Beneficiary Bank is Huntington).
Federal Tax Wire Wire sent to the Internal Revenue Service for a same day tax payment.
International Wire Any Wire sent to a foreign bank regardless of currency.
Drawdown Wire Non-monetary message sent to request that funds be returned from another bank in response to the message.
ACH
NAME DESCRIPTION
Cash Concentration Debit transaction used to debit a business account at another bank to concentrate funds in a Huntington account. Typically used between accounts owned by the originator at multiple banks.
Cash Disbursement Credit transaction used to credit a business account at another bank to concentrate funds at a bank other than Huntington. Typically used between accounts owned by the originator at multiple banks.
Cash Concentration/Disbursement Allows for mixed credit and debit transactions in a single batch used to credit/debit business accounts at another bank. Typically used between accounts owned by the originator at multiple banks.
Consumer Collections Debit transaction used to debit a consumer account to collect payments.
Consumer Payments Credit transaction used to credit a consumer account to make payments.
Consumer Collections/Payments Allows for mixed credit and debit transactions in a single batch used to credit/debit consumer accounts to collect/ make payments.
Payroll Credit transaction used to credit consumer accounts for the purpose of payroll.
Corporate Collections Debit transaction used to debit a business account to collect payments.
Corporate Trade Exchange Credit transactions used to make payments to a vendor including formatted addenda information using industry-standard formats.
Corporate/Vendor Payments Credit transaction used to make payments to a vendor.

84 PAYMENT CENTER USER GUIDE MARCH 2021
NAME DESCRIPTION
International ACH Transaction Credit transaction sent to a bank outside of the United States.
Telephone-Authorized Collections Debit transaction used to debit a consumer account to collect payments whereby authorization to submit the collection was obtained by telephone.
Internet-Authorized Collections Debit transaction used to debit a consumer account to collect payments whereby authorization to submit the collection was obtained via the Internet.
Child Support Payments Credit transaction used to submit child support payments to any child support agency in the United States.
Tax Payments Credit transaction used to submit tax payments to any tax authority (federal, state, or municipal) in the United States.
Real-Time Payment Message Types
NAME DESCRIPTION
RTP Credit Any RTP Credit sent to a domestic bank (even if the Beneficiary Bank is Huntington) that is participating in the RTP network.

85 PAYMENT CENTER USER GUIDE MARCH 2021
Appendix D: Field Definitions NAME DESCRIPTION
Payment Type Defines the various payment types allowed to submit ACH/Wire transactions.
Freeform Payment ACH or Wire Transfer payment created without using a predefined Template.
Scheduled Payment An ACH or Wire payment that is scheduled to be created at a given frequency (for example, every two weeks on Wednesday with a Friday effective date).
Template A predefined and typically recurring payment that can be saved to be used over and over again. When using a Template to create a payment, the User may change the effective date and dollar amount(s) associated with the Template.
Create a Payment Phrase used to describe the action of creating either an ACH batch or Wire transaction. A User may choose to create a payment as a freeform payment or by using a Template.
Nacha File Import ACH function allows the User to import an ACH file using a file created in the industry standard Nacha format.
Detail File Import Import function allowing the User to import a file using a User-defined map.
Delimited Map A User-defined map used to import files into Payment Center. The format will include a delimiter between each field (for example, a comma) and the User may specify which field locations include which data elements.
Fixed Map A User-defined map used to import files into Payment Center. The format will include specific field lengths and data elements required for the file.
Beneficiary The consumer/business that is the recipient of a credit or debit transaction.
Beneficiary Address Book Payment Center’s internal listing of beneficiary information.
Purpose of Wire A required field in a Wire Transfer payment (freeform or Template) found in the Optional Information section of the Wire Payment Detail screen. The Purpose of Wire is used to help protect against fraud.
IBAN International Bank Account Number, provided by a bank servicing the beneficiary’s account in various European countries.
Charges Defines who should incur any intermediary bank fees assessed by the intermediary bank for an international Wire. Options are BEN (beneficiary) or OUR (originator). While this field is displayed on both international and domestic Wire Payment Detail screens, it only applies to international Wires. The default is BEN.
Roles Roles define the functions to which Users are entitled to perform. A single Role can be defined and assigned to multiple Users who should all have “like” access.
Entitlements A list of functional options that a Payment Center User is authorized to perform.
Clone Allows Admin Users to create a new Role by copying an existing Role, assigning a new ID/name to the new Role, and entitling the appropriate functions.
e-Learning Training tutorials designed to train and educate new Users on how to use Payment Center.

86 PAYMENT CENTER USER GUIDE MARCH 2021
NAME DESCRIPTION
Dashboard Customizable homescreen in Payment Center that allows the User to add, remove, and resize widgets based on each User’s business needs.
Filtering The process of refining or narrowing data and search requirements within Payment Center.
Legacy Entity ID Alternate identification for a party
Full Amount The sum of the gross amounts of all invoices being paid with this RTP
Discount Amount Includes the difference between the Full Amount and the Amount paid with this RTP. When an amount of this type is present, the Full Amount must also be present.
Memo 140 character field of freeform information that will be sent to the Beneficiary with the RTP.

87 PAYMENT CENTER USER GUIDE MARCH 2021
Appendix E: Status Definitions NAME DESCRIPTION
Entered When first created, a transaction can be submitted in an Entered status. Transactions in an Entered status are eligible for approval.
Incomplete Initiators can also save transactions in an Incomplete status, placing them in suspension until they can be completed and converted to an Entered status.
Needs Repair Transactions that have been flagged as needing repair (usually because of a validation error in file import) are marked Needs Repair.
Approved Once a transaction is completely approved, it is marked Approved and can be processed for release to the back office. If it is future- dated, it remains warehoused in Payment Center until the current date equals the transaction date, at which time it is released.
Approver Rejected Indicates the approver rejected the payment instead of approving it.
Deleted Deleted transactions are marked Deleted.
Released When the transaction is successfully extracted and sent to the back office for processing, it is marked Released.
Bank Received When an initial acknowledgment is received from the back office for a Wire or RTP payment, the transaction is marked Bank Received.
Bank Confirmed When a Wire payment has been released to Fed or SWIFT, the transaction is marked Bank Confirmed, and any SWIFT or Fed reference numbers associated with the confirmation message are saved with the transaction. When a final confirmation is received for an RTP message, the transaction has been posted/settled to the receiver’s account at the receiving bank. The Bank Confirmed status is an endpoint of both the Wire Transfer and RTP message workflows.
Rejected In the event that a Wire payment is rejected in the back office, it is marked Rejected. Any rejection code or reason associated with the rejection message is stored with the transaction. In the event that that an RTP payment is rejected by either the back office or the receiving bank, it is marked Rejected. Any rejection code or reason associated with the rejection message is stored with the transaction. The Rejected status is an endpoint of both the Wire Transfer and RTP message workflows.
Standard RTP Workflow Entered - Approved - Released - Bank Received - Bank Confirmed Standard ACH Workflow Entered - Approved - Released

88 PAYMENT CENTER USER GUIDE MARCH 2021
Appendix F: List View Definitions NAME DESCRIPTION
All Payments Includes all payments that a User is entitled to view. This list is the best resource to create payment-related reports.
Approval Window Passed Includes all payments that require a revised effective date because they were not approved prior to the cutoff time.
Future-Dated Payments Includes all payments with a transaction date that is greater than or equal to the next business date.
Imported Payments Includes all payments created using the File Import feature.
My Payments Includes payments that were created by the active User.
Needs Rate Includes international Wires sent in a foreign currency that require the Get Rate action to obtain a real-time rate.
Payments Requiring Repair Includes imported payments in a Needs Repair status.
Payments Requiring Approval Includes all payments that are awaiting approval.
Payments Requiring MY Approval Includes payments that are awaiting approval for which the active User is an eligible approver.
Possible Duplicate Payments Includes all payments that were identified as possible duplicates based on rules within the application.
Rejected Payments Includes all payments in a Rejected status.
Two Week Look Back Includes all payment with an effective date in the past 14 days.
Upcoming Payments Includes payments with an effective date greater than or equal to the current day.

89 PAYMENT CENTER USER GUIDE MARCH 2021
SECTION 9
Support

90 PAYMENT CENTER USER GUIDE MARCH 2021
Additional Services
CUSTOMER SERVICE:
We encourage you to contact us with any questions or concerns.
By phone: 800-480-4862, weekdays, 7:30 am to 6:00 pm ET.
By email: Email [email protected] or click on the “Contact Us” link at the top of each Business Online page.
Note: Please do not email if fraud is suspected.
e-LEARNING:
Additional video tutorials on how to use Advanced Reporting can be found in Business Online under the Home tab within the Resource Links section.
In the Resource Links section, click on Payment Center e-Learning. From there a new browser window will open with options to view different tutorials. Just click on the topic you want to view and watch the video.
RTP® is a registered service mark of The Clearing House Payments Company L.L.C.
The Huntington National Bank is Member FDIC. ⬢®, Huntington® and ⬢ Huntington.Welcome. ® are federally registered service marks of Huntington Bancshares Incorporated. © 2021 Huntington Bancshares Incorporated.