wiring accessories for a smarter home - clickinels.com accessories for a smarter home for the full...
TRANSCRIPT

Installation & Control Manual
Smart Box & Application
Wiring Accessories for a Smarter Home
For the full interactive experience use Adobe PDF Reader on your smart device
(Rev1.1)
Contents
Quick Install Guide
Control Menu

2www.click-smart.com
Congratulations on purchasing the Click Smart Box (CSB040), an element of the Click Smart control system.
This instruction manual provides information on installing and operating the smart box and applications.
Only perform the Click Smart installation after becoming thoroughly familiar with this manual and the system functions.
The applications enable control of Click Smart receivers mounted within range of the smart box using radio frequency.
The smart device (phone or tablet) must be on the same Wi-Fi network and within range of the router to ensure full functionality is achieved.
It is recommended only one smart device is used at a time to set up the smart box. Setup data sent from multiple smart devices may cause the smart box to malfunction.
Signal Range TestWe recommend prior to commencing with any Click Smart installation, a basic signal range test is carried out to test the transmission range through the variable building and furniture materials, as these can have an influence in how the system performs.
Each receiver is supplied with an ‘installation guidelines’ sheet to help ensure any potential installation issues are kept to a minimum. The installation guidelines sheet can be downloaded from www.click-smart.com/tech_specs.
When using the smart box for signal range testing, follow the installation procedures in this manual. We recommend either to add the plug-in receiver (RFSC-61) to the application and smart box and signal range test by controlling the socket throughout the property ensuring it operates successfully at each location, or to test all the receivers already installed and ensure they operate successfully.
In the event the receiver(s) do not operate in certain areas of the installation, the solution may be to install a signal repeater (RFRP-20/B).
If a signal repeater is required, follow the repeater installation leaflet supplied.
Before you begin
Shipping & DisposalProblem-free function of any Click Smart device also depends on the way it was shipped, stored and handled. If you notice any signs of damage, deformation, malfunction or missing parts, do not install and return it to the point of sale.
At the end of its service life, the product and its parts must be treated as electronic waste. Before starting the installation, make sure that all wires and connected parts are not under voltage. When assembling and performing maintenance, you must uphold safety regulations, standards, directives and special provisions for working with electrical equipment.
ContentsInstallation Check List Prev Page Next Page
Previous Next

3www.click-smart.com
Contents
Smart Box IntroductionWhat Is In The Box? ................................................................................... 5Smart Box Installation ................................................................................ 5
Preparation ................................................................................................... 6Receiver Information .................................................................................. 6Operating System ...................................................................................... 6Quick Installation Guide & Check List ........................................................ 7
Application Installation GuidePairing the Smart Box ................................................................................ 9Adding ‘Room’ names .............................................................................. 10Adding the receiver ‘Elements’ .................................................................. 11Creating ‘Scenes’ ..................................................................................... 13
Switching Receiver - Function Settings ...................................... 14 Dimming Receiver - Function Settings ....................................... 15 Shutter Receiver - Function Settings .......................................... 16
Manual Settings (From Within Application)Settings Menus ........................................................................................ 17Smart Box (Configuration) ........................................................................ 18
Elements .................................................................................................. 20 Rooms ...................................................................................................... 21Scenes ..................................................................................................... 22
Switching Receiver - Function Settings ...................................... 23 Dimming Receiver - Function Settings ....................................... 24 Shutter Receiver - Function Settings .......................................... 25
Time Schedules ........................................................................................ 26 Select Elements & Functions ..................................................... 27 Assign Day, Times & Function .................................................... 29 Amend, Remove & Copy Times ................................................. 32
Activate ....................................................................................... 33
Advanced Settings ................................................................................. 34Update, back up and restore data to the smart box. White background option. Application Control
Switching .................................................................................................. 36Dimming ................................................................................................... 37Shutter ...................................................................................................... 38Scenes ..................................................................................................... 39
Error Messages Setup ................................................................................................... 40 Control ................................................................................................. 41
Installation Check List Prev Page Next Page
Previous Next

4www.click-smart.com
Introduction
With the CSB040 Click Smart Box connected to your router (Ethernet cable), it then enables you to control your Click Smart wireless control system by smart phone or tablet devices utilising the Click Smart application.
The smart box communicates using the frequency 868MHz and enables the control of up to 40 Click Smart receivers from one location.
The Click Smart applications are available for Android and iOS devices, with the system offering the following functionality: - Switching appliances (lighting, sockets, garage doors, blinds, fans etc.) - Dimming lights (LED, energy-saving, halogen or incandescent) - Time delay settings (delayed switching off of light when leaving room) - Scenes (control multiple receivers with a single press) - Automated control of receivers when programming time schedules
Thanks to the bi-directional communication, the smart box enables the current status of individual receivers to be visible on the controlling smart devices.
During setup of the smart box, the IP address will be allocated automatically via DHCP (Dynamic Host Configuration Protocol) and then to static. The static IP will ensure the IP address does not change in the event of a power outage occurring.
The smart box can be powered using the plug-in adapter 10-27V DC (supplied) or via the USB power input (USB cable not supplied).
The package includes an antenna. If the smart box is mounted within a metal enclosure or to help improve the signal range, the antenna (AN-E) can be installed (purchase separately).
The maximum tightening torque for the antenna connector is 0.56 Nm.
The smart box transmits up to 100 metres in open space. If the signal is insufficient between the smart box and receivers the signal repeater (RFRP-20/B) can be used.
Attention:The minimum distance between the smart box and any receiver is one centimetre.
Smart Box & Application Parameters:• Maximum number of receivers - 40• Maximum number of rooms - 40• Maximum number of scenes - 20• Maximum number of receivers within a scene - 20• Maximum number of daily time schedule events - 4 x On & 4 x Off• Maximum number of receivers that can be added to a time schedule - 10• Maximum number of smart boxes controlled by one application - 6• Maximum number of smart devices controlling one smart box - 8
• It is designed for smart devices with Android 4.0 or iOS 9 and higher• Suitable for smart devices with a display resolution greater than 800 x 480• The application language follows the language set in the OS system
ContentsInstallation Check List Prev Page Next Page
Previous Next
Smart Box Introduction

5www.click-smart.com
1. Click Smart Box2. 230V~ Plug In Adaptor3. Ethernet Cable
What Is In The Box - CSB040
Smart Box Installation
Router
Smart Box
Click SmartReceivers
Connect the Smart Box to the power source and using the Ethernet cable connect it to your local router. Your local network (router) automatically assigns the smart box its IP address. Dynamic IP address assignment (DHCP) which is then set as static.
Download and install the ‘CLICK SMART’ application on to your smart phone or tablet:
• For Android devices: Download via Google Play.
• For iOS (Apple) devices: Download via the App Store.
Attention:To help improve the signal quality to and from the smart box, ensure the smart box is NOT mounted directly on or next to the router.
ContentsInstallation Check List Prev Page Next Page
Previous Next
Smart Box Installation
What Is In The Box?
6www.click-smart.com
Preparation - Receiver Information
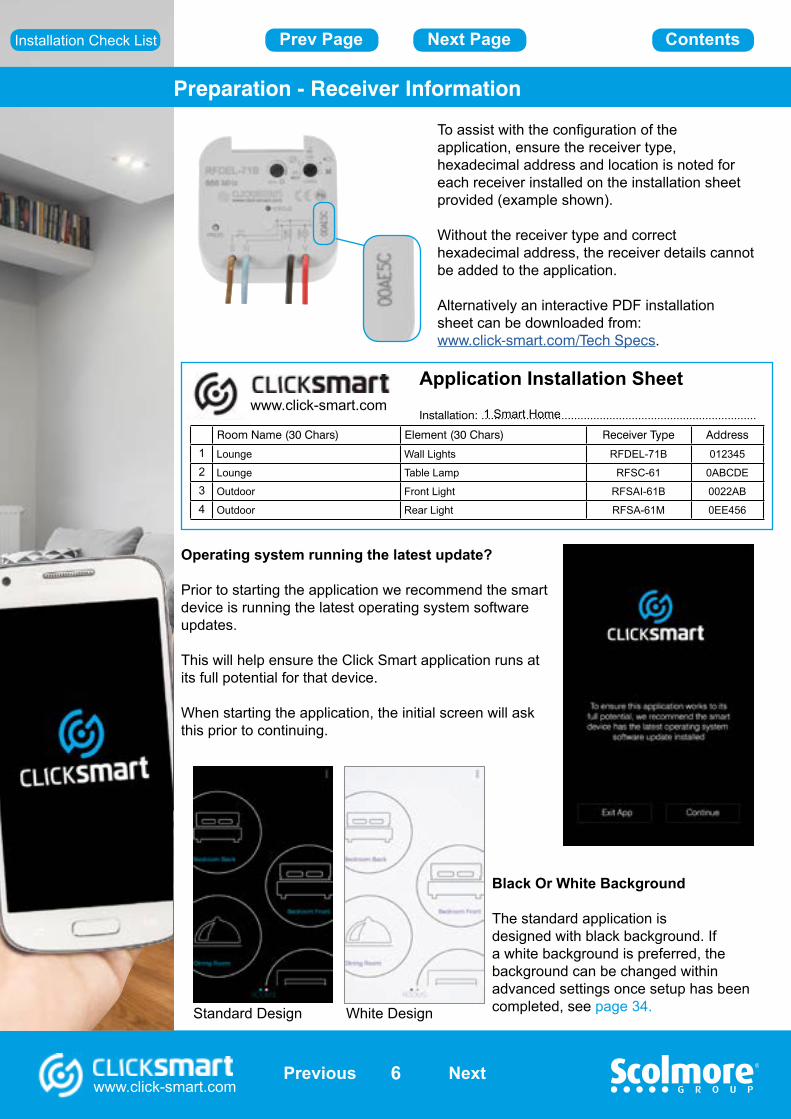
To assist with the configuration of the application, ensure the receiver type, hexadecimal address and location is noted for each receiver installed on the installation sheet provided (example shown).
Without the receiver type and correct hexadecimal address, the receiver details cannot be added to the application.
Alternatively an interactive PDF installation sheet can be downloaded from:www.click-smart.com/Tech Specs.
Room Name (30 Chars) Element (30 Chars) Receiver Type Address
1 Lounge Wall Lights RFDEL-71B 012345
2 Lounge Table Lamp RFSC-61 0ABCDE
3 Outdoor Front Light RFSAI-61B 0022AB
4 Outdoor Rear Light RFSA-61M 0EE456
www.click-smart.com
Application Installation Sheet
Installation: ......................................................................................1 Smart Home
Operating system running the latest update?
Prior to starting the application we recommend the smart device is running the latest operating system software updates.
This will help ensure the Click Smart application runs at its full potential for that device. When starting the application, the initial screen will ask this prior to continuing.
Standard Design White Design
Black Or White Background
The standard application is designed with black background. If a white background is preferred, the background can be changed within advanced settings once setup has been completed, see page 34.
ContentsInstallation Check List Prev Page Next Page
Previous Next
Preparation
Receiver Information
Operating System

7www.click-smart.com
Preparation - Quick Installation Guide & Check List
To assist in the setting up of the smart box and applications, we recommend the following process is followed.
Installation Sheet (printed copy supplied)
Document list of rooms, receivers, receiver type and receiver address page 6
Range Test
Carry out range test, (a repeater RFRP-20/B may be required) page 2
Smart Box Setup
Wire Smart Box to router using Ethernet cable page 5
Ensure both router and Smart Box are powered
Ensure the Smart device’s Wi-Fi is connected to the same router as the Smart Box page 5
Application Guide - Setup
Pair the Smart device app to the Smart Box page 9
Assign name to Smart Box page 9
Confirm pairing the Smart Box with grey circular icon turning blue page 9
Add room/location names and assign icon page 10
Add elements/receivers and assign its icon and room/location page 11
Create scenes (if required - can create scenes later if preferred) page 13
This manual is available to access from within the applications via the ‘Help’ links displayed within the ‘settings’ menus.
Once the smart box has been setup and operational, when pairing additional smart devices to the same smart box all the programmed data will automatically be uploaded.
ContentsPrev Page Next Page
Control Menu
Previous Next
Quick Installation Guide & Check List

8www.click-smart.com
Application Installation Guide
With the preparation completed, the application can be opened.
The initial screen is a reminder to ensure the latest operating system update is running on the smart device.
Exit to check the smart device settings or with the latest update running, Continue
The Welcome screen offers initial access to the easy setup application guide.
The guide allows the following features to be set up:
• Rooms - Add room names and icon• Elements - Add receivers, icon and assign the element to its room• Scenes - Select the elements and command to be operated with a single press
(can be setup afterwards if preferred)
Press ‘START’ to continue with the easy setup guide.
Alternatively if preferring to ‘Skip’ the guide, the rooms, elements and scenes can still be added and amended from within the application settings menu, although with slightly different menu layouts. See page 17 onwards.
The application guide will appear on initial start-up of the application and may appear when updating the app. Once setup, when the application is next started the guide will not appear and will go straight to the control screen.
The application guide can be accessed thereafter through the settings menu, see page 34.
Note: It is recommended only one smart device is used at a time to set up the smart box. Setup data sent from multiple smart devices may cause the smart box to malfunction.
Once the smart box has been setup and operational, when pairing additional smart devices to the same smart box all the programmed data will automatically be uploaded.
Note: There are minor variations between the Android and iOS applications with regards the information displayed, e.g. once the smart box is paired the Android version refers to the smart box IP address where iOS refers to the name assigned to the smart box.
ContentsInstallation Check List
Pairing The Smart Box
Add Rooms
Add/Assign Elements
Create Scenes
Prev Page Next Page
Previous Next
Application Installation Guide
9www.click-smart.com
Application Guide - Pairing The Smart Box
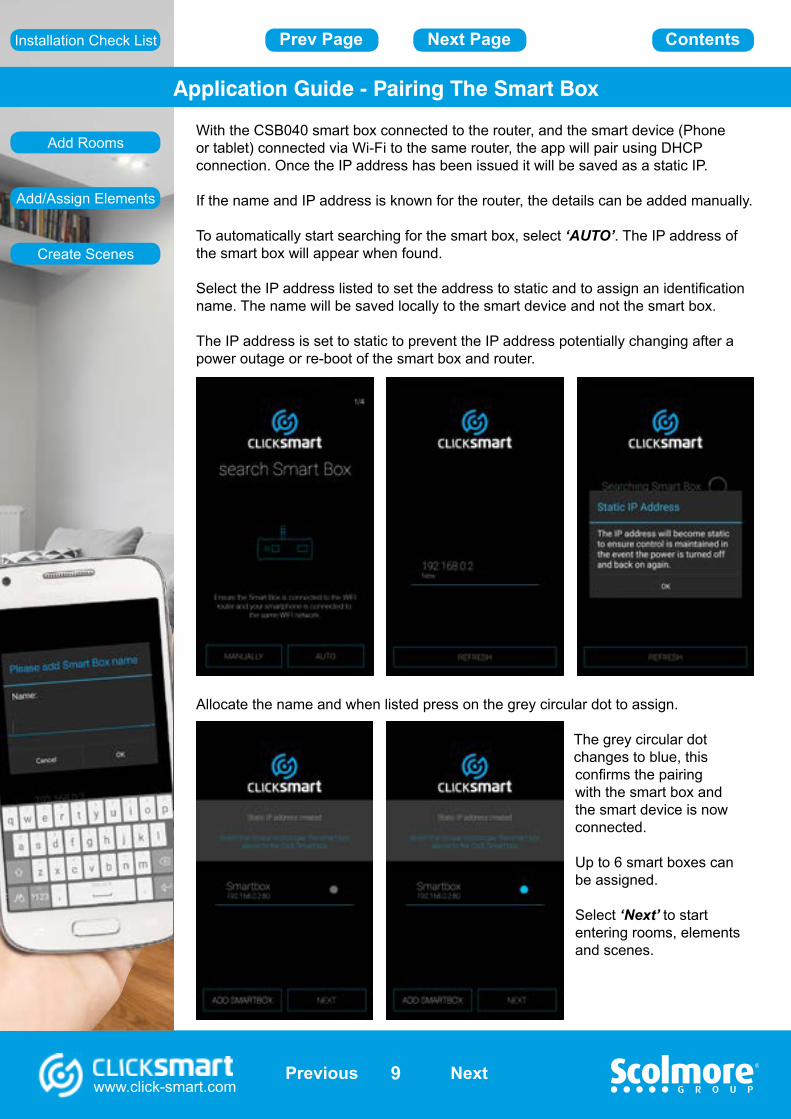
With the CSB040 smart box connected to the router, and the smart device (Phone or tablet) connected via Wi-Fi to the same router, the app will pair using DHCP connection. Once the IP address has been issued it will be saved as a static IP.
If the name and IP address is known for the router, the details can be added manually.
To automatically start searching for the smart box, select ‘AUTO’. The IP address of the smart box will appear when found.
Select the IP address listed to set the address to static and to assign an identification name. The name will be saved locally to the smart device and not the smart box.
The IP address is set to static to prevent the IP address potentially changing after a power outage or re-boot of the smart box and router.
Allocate the name and when listed press on the grey circular dot to assign.
The grey circular dot changes to blue, this confirms the pairing with the smart box and the smart device is now connected.
Up to 6 smart boxes can be assigned.
Select ‘Next’ to start entering rooms, elements and scenes.
ContentsInstallation Check List
Add Rooms
Add/Assign Elements
Create Scenes
Prev Page Next Page
Previous Next
Pairing the Smart Box
10www.click-smart.com
Application Guide - Adding ‘Rooms’
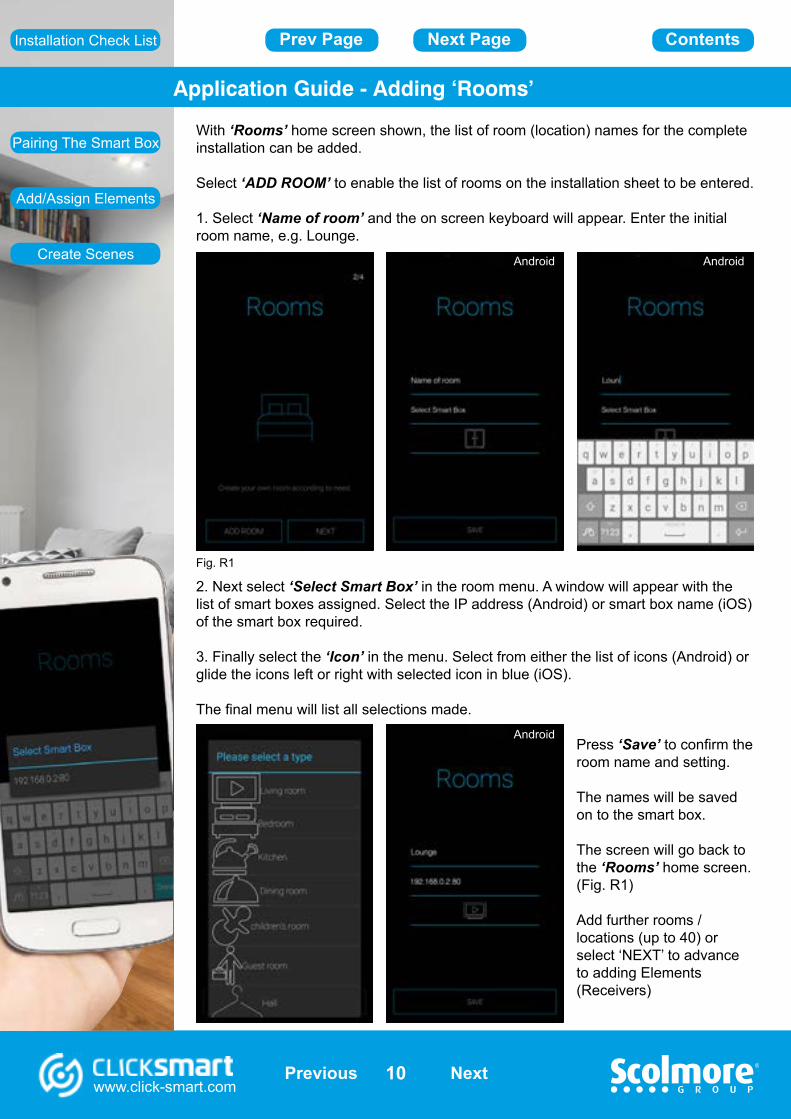
With ‘Rooms’ home screen shown, the list of room (location) names for the complete installation can be added.
Select ‘ADD ROOM’ to enable the list of rooms on the installation sheet to be entered.
1. Select ‘Name of room’ and the on screen keyboard will appear. Enter the initial room name, e.g. Lounge.
2. Next select ‘Select Smart Box’ in the room menu. A window will appear with the list of smart boxes assigned. Select the IP address (Android) or smart box name (iOS) of the smart box required.
3. Finally select the ‘Icon’ in the menu. Select from either the list of icons (Android) or glide the icons left or right with selected icon in blue (iOS).
The final menu will list all selections made.
Press ‘Save’ to confirm the room name and setting.
The names will be saved on to the smart box.
The screen will go back to the ‘Rooms’ home screen. (Fig. R1)
Add further rooms / locations (up to 40) or select ‘NEXT’ to advance to adding Elements (Receivers)
Fig. R1
Android Android
Android
ContentsInstallation Check List
Add/Assign Elements
Pairing The Smart Box
Create Scenes
Prev Page Next Page
Previous Next
Adding ‘Room’ names

11www.click-smart.com
Application Guide - Adding & Assigning ‘Elements’
With ‘Elements’ home screen shown, the elements (receivers and related appliance) for the complete installation can be added and also assigned to its room (location).
Select ‘ADD ELEMENTS’ to enter the menu and enable the list of elements/receiver on the installation sheet to be entered.
1. Select ‘Name of element’ on the menu and the on screen keyboard will appear. Enter the element/receiver appliance name, e.g. Table Lamp Lounge.
Fig. E1
2. Select the smart box IP address or name from the drop down list which appears.
3. Select ‘Enter receiver address’ and type in the address from the installation sheet. The letters can be entered in lower case.
Note: Ensure the address is correct as in the event an error is made the receiver will not operate.
Elements continue on next page
ContentsInstallation Check List
Create Scenes
Pairing The Smart Box
Add Rooms
Prev Page Next Page
Previous Next
Adding the receiver ‘Ele-ments’
12www.click-smart.com
Application Guide - Adding & Assigning ‘Elements’ cont’d
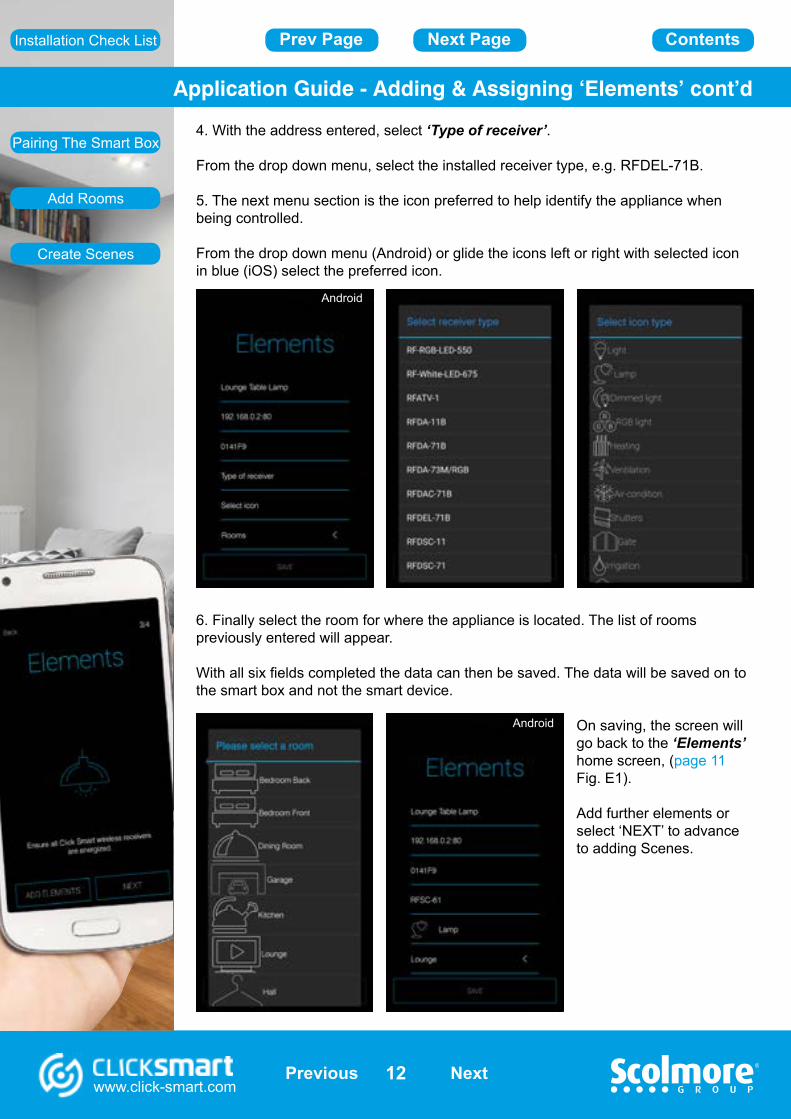
4. With the address entered, select ‘Type of receiver’.
From the drop down menu, select the installed receiver type, e.g. RFDEL-71B.
5. The next menu section is the icon preferred to help identify the appliance when being controlled.
From the drop down menu (Android) or glide the icons left or right with selected icon in blue (iOS) select the preferred icon.
6. Finally select the room for where the appliance is located. The list of rooms previously entered will appear.
With all six fields completed the data can then be saved. The data will be saved on to the smart box and not the smart device.
On saving, the screen will go back to the ‘Elements’ home screen, (page 11 Fig. E1).
Add further elements or select ‘NEXT’ to advance to adding Scenes.
Android
Android
ContentsInstallation Check List
Create Scenes
Pairing The Smart Box
Add Rooms
Prev Page Next Page
Previous Next

13www.click-smart.com
Application Guide - Creating Scenes
Creating scenes enables multiple elements (receivers) to be added with each element assigned its own function for that scene. With a single press all the set commands can be carried out.
Example. The scene ‘Reading’ could be set up so the main lounge lights are dimmed to 10% whilst the table lamp switches ‘OFF’ and the floor lamp (preferred for reading) is switched ‘ON’.
If necessary, ‘Scenes’ can be created or edited later if preferred.
To create scenes select ‘ADD SCENES’ to enter the Scenes menu or complete to finish the application guide setup.
1. Assign the scene a name.
2. Select the smart box to be assigned. Choose the elements and function settings.
Fig. S1
3. Choose from the list of receivers already added.
As each receiver/appliance is selected the function to be carried out will need to be assigned.
The following pages will explain about each setting for:• Switching receivers• Dimming receivers• Shutter receivers
ContentsInstallation Check List
Pairing The Smart Box
Add Rooms
Add/Assign Elements
Prev Page Next Page
Previous Next
Creating ‘Scenes’

14www.click-smart.com
Application Guide - Creating Scenes - continued
3a. Switching receiver selected.
Android - The initial screen starts up with time delay settings (see below) with standard switching ‘On’ and ‘Off’.
iOS - The initial screen starts up with the respective element selected icon, ‘On’ & ‘Off’ plus ‘More’ in the top right hand corner. By selecting ‘More’ the screen moves to the time delay settings.
To assign the setting:A. Standard switching (On or Off). Select the required option which will change the background to blue. Select back to save the setting and return back to the scene listing.
B. Time delay setting (1 hour maximum):The three settings relate to (hours, minutes & seconds).Delayed off (turns off after the set time has elapsed). Delayed on (turns on after the set time has elapsed).Add the required time for either delay option and press the ‘Set’ (Android) or ‘delayed’ (iOS) button to assign.
Select back to save the setting and return back to the scene listing.
Android iOS - Screen 1 iOS - Screen 2
The receiver / appliance setting on the scene listing will change.
A blue tick replaces the ‘X’, with additional icon (Android).
Select the blue tick to remove the selection from the scene or icon to change the receiver setting.
ContentsInstallation Check List
Add Rooms
Add/Assign Elements
Create Scenes
Prev Page Next Page
Previous Next
Switching Receiver - Function Settings
15www.click-smart.com
Application Guide - Creating Scenes - continued
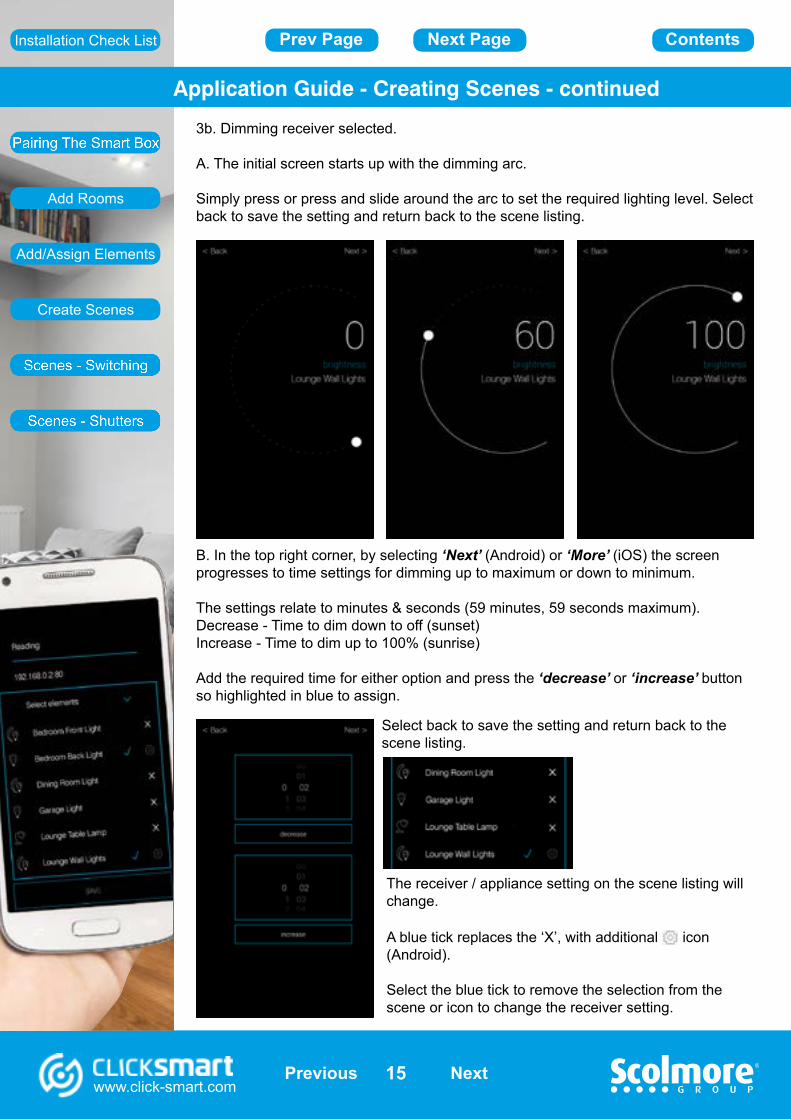
3b. Dimming receiver selected.
A. The initial screen starts up with the dimming arc.
Simply press or press and slide around the arc to set the required lighting level. Select back to save the setting and return back to the scene listing.
B. In the top right corner, by selecting ‘Next’ (Android) or ‘More’ (iOS) the screen progresses to time settings for dimming up to maximum or down to minimum.
The settings relate to minutes & seconds (59 minutes, 59 seconds maximum).Decrease - Time to dim down to off (sunset)Increase - Time to dim up to 100% (sunrise)
Add the required time for either option and press the ‘decrease’ or ‘increase’ button so highlighted in blue to assign.
Select back to save the setting and return back to the scene listing.
The receiver / appliance setting on the scene listing will change.
A blue tick replaces the ‘X’, with additional icon (Android).
Select the blue tick to remove the selection from the scene or icon to change the receiver setting.
ContentsInstallation Check List
Add Rooms
Add/Assign Elements
Create Scenes
Prev Page Next Page
Previous Next
Dimming Receiver - Function Settings
16www.click-smart.com
Application Guide - Creating Scenes - continued
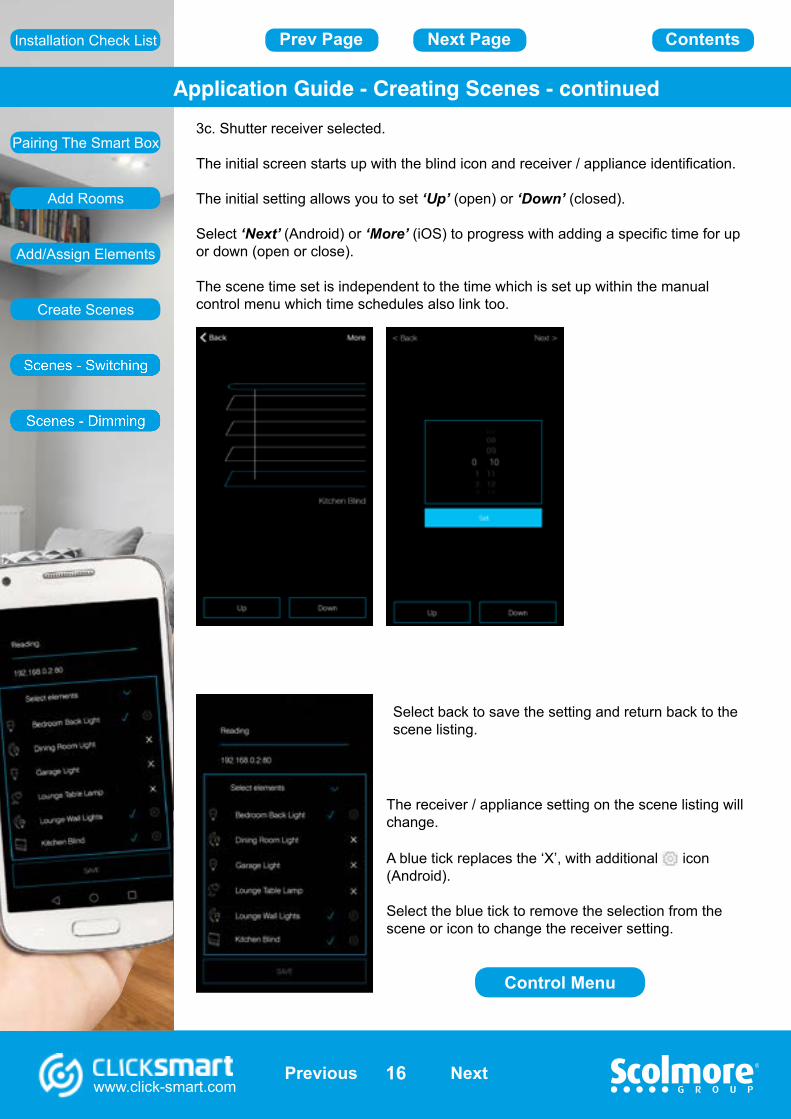
3c. Shutter receiver selected.
The initial screen starts up with the blind icon and receiver / appliance identification.
The initial setting allows you to set ‘Up’ (open) or ‘Down’ (closed).
Select ‘Next’ (Android) or ‘More’ (iOS) to progress with adding a specific time for up or down (open or close).
The scene time set is independent to the time which is set up within the manual control menu which time schedules also link too.
Select back to save the setting and return back to the scene listing.
The receiver / appliance setting on the scene listing will change.
A blue tick replaces the ‘X’, with additional icon (Android).
Select the blue tick to remove the selection from the scene or icon to change the receiver setting.
ContentsInstallation Check List
Pairing The Smart Box
Add Rooms
Add/Assign Elements
Create Scenes
Prev Page Next Page
Previous Next
Control Menu
Shutter Receiver - Function Settings

17www.click-smart.com
Application ‘Settings’ Menus
With the application guide completed, any additions or amendments to rooms, elements and scenes can be made by accessing the ‘Settings’ menu.
The Settings menu is accessed by pressing the three vertical dots in the top right hand corner of the app.
Pressing ‘help’ opens this PDF manual.
‘Exit’ offers the facility to exit the application (Android only).
The ‘Settings’ menu also enables access to the following features:
• Time Schedules - Automate receivers to switch, dim or open and close
• Advanced Settings - Go to page 34 for more information
ContentsInstallation Check List Prev Page Next Page
Previous Next
Application - Menu
Settings Menus
18www.click-smart.com
Settings Menu - Smart Box Settings
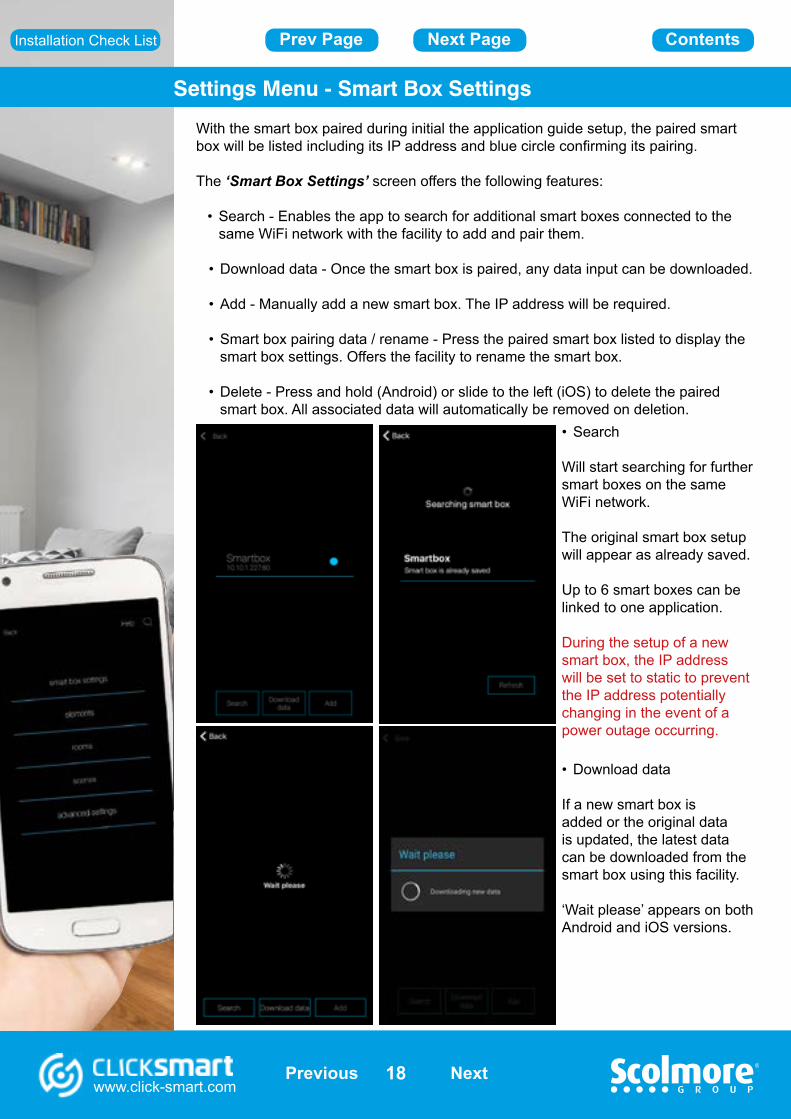
With the smart box paired during initial the application guide setup, the paired smart box will be listed including its IP address and blue circle confirming its pairing.
The ‘Smart Box Settings’ screen offers the following features:
• Search - Enables the app to search for additional smart boxes connected to the same WiFi network with the facility to add and pair them.
• Download data - Once the smart box is paired, any data input can be downloaded.
• Add - Manually add a new smart box. The IP address will be required.
• Smart box pairing data / rename - Press the paired smart box listed to display the smart box settings. Offers the facility to rename the smart box.
• Delete - Press and hold (Android) or slide to the left (iOS) to delete the paired smart box. All associated data will automatically be removed on deletion.
• Search
Will start searching for further smart boxes on the same WiFi network.
The original smart box setup will appear as already saved.
Up to 6 smart boxes can be linked to one application.
During the setup of a new smart box, the IP address will be set to static to prevent the IP address potentially changing in the event of a power outage occurring.
• Download data
If a new smart box is added or the original data is updated, the latest data can be downloaded from the smart box using this facility.
‘Wait please’ appears on both Android and iOS versions.
ContentsInstallation Check List Prev Page Next Page
Previous Next
Smart Box (Configuration)

19www.click-smart.com
• Add
If you know the IP address of the smart box it can be added manually along with its name.
Settings Menu - Smart Box Settings
• Smart box pairing data
Displays: • Smart box name• IP address• Port number• MAC address• Firmware version of the
smart box
The box name may be amended.
We recommend the IP address or port number is not altered as the smart box will loose its pairing.
• Delete
Press and hold (Android) or slide to the left (iOS) to delete the paired smart box.
All associated data will automatically be removed on deletion.
Android iOS
ContentsInstallation Check List Prev Page Next Page
Previous Next
Smart Box (Configuration)

20www.click-smart.com
Android iOS
Settings Menu - Elements
Accessing ‘Elements’ from within the application enables the initial information entered to be amended or deleted or new elements/receivers to be added.
From within the same menu time schedules can also be added. See page 26 for more information on adding time schedules.
To delete an element, press and hold (Android) or slide to the left (iOS) to delete the element and its settings. All associated data will be removed, e.g. from within scenes.
Example of previously installed elements and amendment screen.
New elements can also be added.
With the receiver data recorded on the original installation sheet add each piece of information, selecting the respective smart box and icon to help identify the light or appliance being controlled.
Press ‘Save’ to add the receiver details to the list of elements.
Android iOS
Note:
The new element(s) added will require assigning to the room(s) / location(s).
See “Rooms” on page 21
ContentsInstallation Check List Prev Page Next Page
Previous Next
Control Menu
Elements

21www.click-smart.com
Settings Menu - Rooms
Accessing ‘Rooms’ from within the application enables the initial information entered to be amended or deleted or new rooms/locations to be added.
Select the room and the list of elements will appear. Where elements were previously assigned to the room will have a tick.
Select edit to access the facility to change the room name or its icon.
To delete a room, press and hold (Android) or slide to the left (iOS). All associated data will be removed, e.g. from within scenes. Elements remain unaffected.
iOS
New rooms can also be added and elements assigned.
Add the room name, smart box and select the icon, (drop down list (Android) or slide bar (iOS)).
Press ‘Save’ to add the receiver details to the list of elements.
The required elements will then need to be assigned to the preferred room / location.
iOS
ContentsInstallation Check List Prev Page Next Page
Previous Next
Control Menu
Rooms

22www.click-smart.com
Settings Menu - Scenes
Accessing ‘Scenes’ from within the application enables the initial information entered to be amended or deleted or new scenes can be created.
Select the scene and the list of elements will appear. Where elements were previously assigned to the scene will have a tick.
To edit an element press on the element to select (iOS) or (Android) to access the function. Change the function and press ‘< back’ to return to the scene’s element list and press ‘Save’ to save the changes made.
To remove an element from a scene, press and hold (Android) or slide to the left (iOS). The element itself remains unaffected.
Android
New scenes can also be added and elements and their required function assigned.
Assign the scene name, smart box and then select elements. As each element is selected its function can be assigned. Press ‘Add’ to save the scene.
iOS
ContentsInstallation Check List Prev Page Next Page
Previous Next
Control Menu
Scenes

23www.click-smart.com
Settings Menu - Scenes - Switching Receiver Functions
Switching receiver selected.
Android - The initial screen starts up with time delay settings (see below) with standard switching ‘On’ and ‘Off’.
iOS - The initial screen starts up with the respective element selected icon, ‘On’ & ‘Off’ plus ‘More’ in the top right hand corner. By selecting ‘More’ the screen moves to the time delay settings (see below).
To assign the setting:A. Standard switching (On or Off). Select the required option which will change the background to blue. Select back to save the setting and return back to the scene listing.
B. Time delay setting (1 hour maximum):The three settings relate to (hours, minutes & seconds).Delayed off (turns off after the set time has elapsed). Delayed on (turns on after the set time has elapsed).Add the required time for either delay option and press the ‘Set’ (Android) or ‘delayed’ (iOS) button to assign.
Select back to save the setting and return back to the scene listing.
Android iOS - Screen 1 iOS - Screen 2
The receiver / appliance setting on the scene listing will change.
A blue tick replaces the ‘X’, with additional icon (Android).
Select the blue tick to remove the selection from the scene or press the icon to change the receiver setting.
ContentsInstallation Check List Prev Page Next Page
Previous Next
Control Menu
Switching Receiver - Function Settings

24www.click-smart.com
Dimming receiver selected.
A. The initial screen starts up with the dimming arc.
Simply press or press and slide around the arc to set the required lighting level. Select back to save the setting and return back to the scene listing.
Settings Menu - Scenes - Dimming Receiver Functions
B. In the top right corner, by selecting ‘Next’ (Android) or ‘More’ (iOS) the screen progresses to time settings for dimming up to maximum or down to minimum.
The settings relate to minutes & seconds (59 minutes, 59 seconds maximum).Decrease - Time to dim down to off (sunset)Increase - Time to dim up to 100% (sunrise)
Add the required time for either option and press the ‘decrease’ or ‘increase’ button so highlighted in blue to assign.
Select back to save the setting and return back to the scene listing.
The receiver / appliance setting on the scene listing will change.
A blue tick replaces the ‘X’, with additional icon (Android).
Select the blue tick to remove the selection from the scene or icon to change the receiver setting.
ContentsInstallation Check List Prev Page Next Page
Previous Next
Control Menu
Dimming Receiver - Function Settings

25www.click-smart.com
Settings Menu - Scenes - Shutter Receiver Functions
3c. Shutter receiver selected.
The initial screen starts up with the blind icon and receiver / appliance identification.
The initial setting allows you to set ‘Up’ (open) or ‘Down’ (closed).
Select ‘Next’ (Android) or ‘More’ (iOS) to progress with adding a specific time for up or down (open or close).
The scene time set is independent to the time which is set up within the manual control menu which time schedules also link too.
Select back to save the setting and return back to the scene listing.
The receiver / appliance setting on the scene listing will change.
A blue tick replaces the ‘X’, with additional icon (Android).
Select the blue tick to remove the selection from the scene or icon to change the receiver setting.
ContentsInstallation Check List Prev Page Next Page
Previous Next
Control Menu
Shutter Receiver - Function Settings

26www.click-smart.com
Settings Menu - Elements - Schedules
Creating and activating time schedules enables selected elements to be automated which in turn can provide additional security, e.g. simulated occupancy.
The schedules programmed are stored by the smart box so once setup and activated the smart phone or tablet does not need to be connected to the router / Wi-Fi .
Up to 4 time schedules can be setup per day with a 7 day cycle. Daily schedule: Switching: 4 x ON and 4 x OFF
• Dimming: 4 x ON (10% to 100%) and 4 x OFF • Shutter: 4 x UP and 4 x DOWN
Schedules setup for one day can easily be copied to other days of the week.
Up to 10 elements with the same function can be assigned to the same schedule. You cannot assign a mixture of switching, dimming and shutter elements to the same schedule, they must be setup independently.
Note: If more than one smart box is assigned through the same application, only elements with the same function and on the same smart box can be controlled together (up to a maximum of 10).
Once setup, the elements assigned to time schedules can easily be enabled / disabled to ‘AUTO’ mode. See “Activate” on page 33.
Note: Any elements set to ‘AUTO’ can still be over-ridden by locally controlled smart switches etc.The schedules if still in ‘AUTO’ mode will then over-ride the present status when the next time set has elapsed.
Schedules can easily be removed. Simply press and hold (Android) or slide to the left (iOS). All the assigned elements remain unaffected.
ContentsInstallation Check List Prev Page Next Page
Previous Next
Time Schedules

27www.click-smart.com
iOSiOS
Schedules - Create - Select Elements & Functions
To create time schedules simply add the schedule name, select the smart box and the required elements (must be of the same function, e.g. all switching receivers).
iOS
With the elements selected the ‘Functions available’ tab lists the functions that are available for the type of receiver selected (not used to assign to schedule). The actual function required is assigned when adding the schedule information.
Switching elements / receivers:
• RFSC-61, RFSA-61B, RFSAI-61B, RFSA-61M, RFSA-62B and RFSA-66M
• Functions: Select ON for times assigned and will automatically be off between schedules.
• Selecting ‘OFF’ will not display on the time bar.
iOS
Shutter elements / receivers:
• RFJA-12B/230V and RFJA-12B/24V
• Functions: Select UP (open) for times assigned and will automatically be down between schedules.
• Selecting ‘DOWN’ will not display on the time bar.
For dimming receivers see the following page.
iOS
ContentsInstallation Check List Prev Page Next Page
Previous Next
Select Elements & Functions

28www.click-smart.com
Schedules - Create - Select Elements & Functions - cont’d
iOS iOSiOS
Dimming elements / receivers:
RFDA-71B, RFDEL-71B and RFDAC-71B
Functions available: Four dimming levels (default 20, 50, 70 & 100%) allowing the desired level to be set for a specified time period. In between the assigned time schedules the light source will be off.
Selecting ‘DOWN’ will not display on the time bar.
Each of the four levels can be adjusted by pressing the level to be amended.
The control screen opens and the level can be adjusted in 10% increments. Press the ‘back’ (Android) or ‘X’ (iOS) to save and return to the function screen.
Once the elements have been selected, select ‘Next’ to assign the days, times and the element(s) function (dimmed level).
ContentsInstallation Check List Prev Page Next Page
Previous Next

29www.click-smart.com
Schedules - Create - Assign Day, Times & Function
Weekly overview screen
Select ‘New’ to open the input screen.
iOS iOSiOS
Day, time and function input screen
Dependant on the element type will depend on the input screen information displayed.
Enter the day, time from and time to then select the ‘ON’, ‘UP’ or dimmed level to undertake during the times set.
To select the function on Android devices, access the drop down menu.
Switching DimmingShutter
ContentsInstallation Check List Prev Page Next Page
Previous Next
Assign Day, Times & Function

30www.click-smart.com
Schedules - Create - Assign Day, Times & Function cont’d
Day, time and function input screen (switching elements)
With the day, times and ‘ON’ function added, pressing save will then display the weekly overview screen with the time selection displaying on the time bar.
Press ‘save’ on the time bar screen will then save all set times and functions.
iOS
Shutter
Switching
Day, time and function input screen (shutter elements)
With the day, times and ‘UP’ function added, pressing save will then display the weekly overview screen with the time selection displaying on the time bar.
Press ‘save’ on the time bar screen will then save all set times and functions.
ContentsInstallation Check List Prev Page Next Page
Previous Next

31www.click-smart.com
Schedules - Create - Assign Day, Times & Function cont’d
Day, time and function input screen (dimming elements)
With the day, times and dimmed levels added, pressing save will then display the weekly overview screen with the time selection displaying on the time bar.
Press ‘save’ on the time bar screen will then save all set times and functions.iOS
Dimming
When selecting the dimming level, each of the four percentages displays a different colour on the time bar:
0% - Nothing displayedLevel 1 - (20% default): GreenLevel 2 - (50% default): OrangeLevel 3 - (70% default): RedLevel 4 - (100% default): Blue
iOS
Dimming
iOS
iOS Android
ContentsInstallation Check List Prev Page Next Page
Previous Next

32www.click-smart.com
Schedules - Amend, Remove & Copy
Amend & remove times set
With the weekly overview screen open, press the coloured time bar which shows the ‘from’ and ‘to’ times. Slide up or down to adjust each time or press and ‘hold’ the opened time bar (fig. 1) to open the schedule setting (fig. 2).
Press ‘Delete’ (Android) or ‘Erase’ (iOS) to remove these times from the full schedule.
Copy times
With the weekly overview screen open, select the coloured time bar to copy.Select the days to copy ‘too’ which will change to white. All times for that day will be copied across.
Press ‘save’ to confirm the copy changes and then save on the weekly overview to save the changes to the smart box.
Fig. 1 Fig. 2
ContentsInstallation Check List Prev Page Next Page
Previous Next
Amend, Remove & Copy Times

33www.click-smart.com
Schedules - Activate
Once time schedules have been setup, for them to operate automatically the ‘AUTO’ setting within each element must be enabled.
To engage the ‘AUTO’ setting the element control screen must be accessed.
Exit the settings menu and enter the room and element to enable.
Press the ‘AUTO’ button and the button will turn blue to confirm activation.
Press ‘< back’ and the element will have a small time icon illustrated to confirm
the element has been set to run automatically.
To disable the automatic control, simply press the ‘AUTO’ button within the element’s control menu.
ContentsInstallation Check List Prev Page Next Page
Previous Next
Control Menu
Activate

34www.click-smart.com
Advanced Settings
Advanced settings provides access to the following features:
• Receive firmware updates notification Notifications will be sent with regards updates for the smart box.
• Turn on sync time in Smart Box In the event no broadband is available, enables synchronisation of the smart box time to the initial smart phone or tablet (UK time). If not connected to the broadband and not synchronised to the smart device, the time set on the smart box will start at 12.00 (midnight) with the date 01.01.16.
• Switch to white design Changes the background to white with dark grey and purple text / icons.
• Download latest firmware Download the latest smart box firmware update (CSb **.bin file).
• Update Smart Box Update the smart box with the latest firmware.
• Load/recover Smart Box settings Upload the saved settings / data to the smart box (**.bin file).
• Save/back up Smart Box settings Save the smart box settings / data to the smart device (**.bin file).
• Guide Start the application easy setup guide.
• ‘Version’ refers to the application software version presently running. CSa (Android), CSi (iOS).
Standard Design White Design
ContentsInstallation Check List Prev Page Next Page
Previous Next
Control Menu
Advanced Settings

35www.click-smart.com
Application Control
The control menus enables rooms, scenes and elements to be easily selected with the required element or scene then controlled.
The initial screen displays the rooms with icons, swipe left and the scenes (if setup) are then displayed.
The Click Smart receivers and smart box use bi-directional signals which allows the icons set up for each element to display its current status.
The current status will be displayed on all smart devices connected to the smart box.
In the event the screen does not refresh automatically, the status of the element(s) can be refreshed manually by swiping down the screen.
ContentsInstallation Check List Prev Page Next Page
Previous Next
Application Control

36www.click-smart.com
Icon pale grey outline. Receiver element is either not powered, out of range or address input is incorrect.
Icon white outline. Receiver element is within range with the output ‘Off’.
Icon with blue infill. Receiver element is within range with the output ‘On’.
Application Control - Switching
The current status icon of the switching receiver is displayed.
With all the Click Smart switching receivers having multifunctional settings, one of the following settings can be selected:
• ON or OFF• ‘Auto’ can only be enabled once time schedules have been setup which includes
this element/receiver.• *Time delay OFF - Turns off after the time set has elapsed• *Time delay ON - Turns on after the time set has elapsed
*When instigating either time delay function, the element’s icon will also display the ‘clock icon’ in the background during the time elapse.
iOS
ContentsInstallation Check List Prev Page Next Page
Previous Next
Switching

37www.click-smart.com
Application Control - Dimming
Icon blue outline. Receiver element is either not powered, out of range or address input is incorrect.
Icon with blue infill. Receiver element is within range with the output ‘Off’.
Icon with blue infill and white arc displayed. Receiver element is within range with the output ‘On’ or at dimmed level.
The current status icon of the dimming receiver is displayed.
With all the Click Smart dimming receivers having multifunctional settings, one of the following settings can be selected:
• Control to and from ON (100%) to OFF (0%) in 10% increments• ‘Auto’ can only be enabled once time schedules have been setup which includes
this element/receiver.• Decrease - Dims down to off over the set time• Increase - Dims up to 100% over the set time
When instigating either timed function, the element’s icon will display the icon with a blue outline during the time elapse.
ContentsInstallation Check List Prev Page Next Page
Previous Next
Dimming
38www.click-smart.com
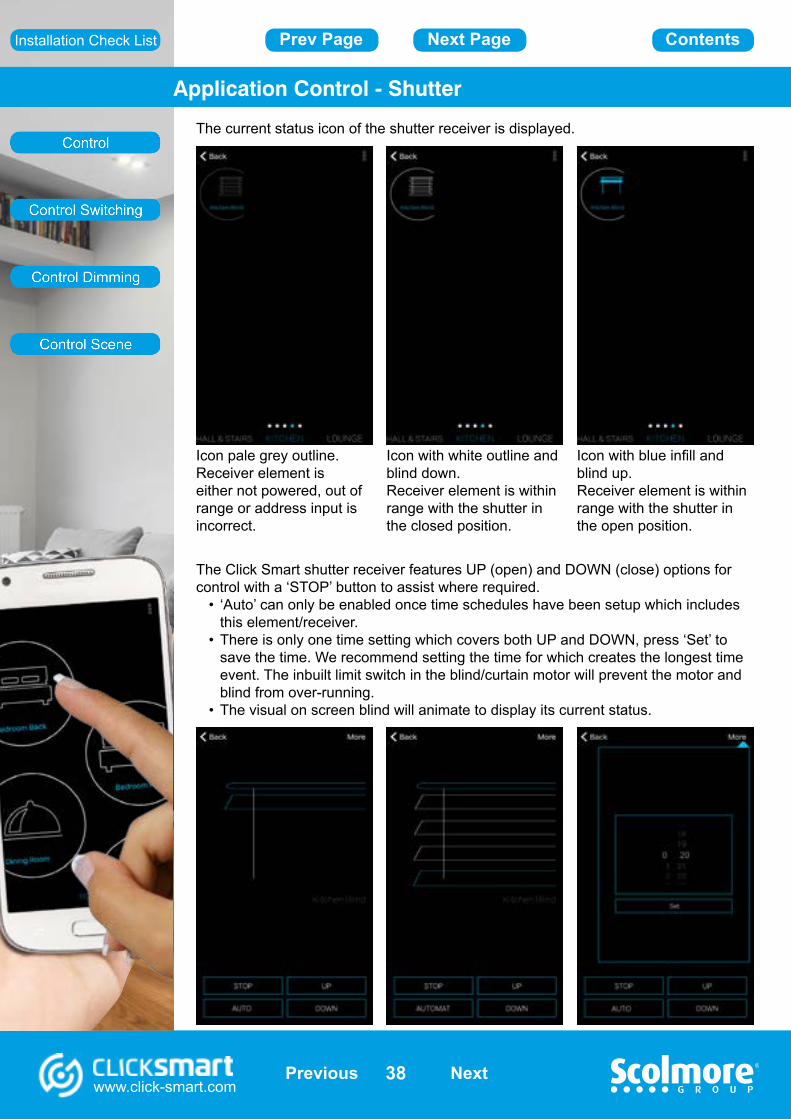
Application Control - Shutter
Icon pale grey outline. Receiver element is either not powered, out of range or address input is incorrect.
Icon with white outline and blind down. Receiver element is within range with the shutter in the closed position.
Icon with blue infill and blind up. Receiver element is within range with the shutter in the open position.
The current status icon of the shutter receiver is displayed.
The Click Smart shutter receiver features UP (open) and DOWN (close) options for control with a ‘STOP’ button to assist where required.
• ‘Auto’ can only be enabled once time schedules have been setup which includes this element/receiver.
• There is only one time setting which covers both UP and DOWN, press ‘Set’ to save the time. We recommend setting the time for which creates the longest time event. The inbuilt limit switch in the blind/curtain motor will prevent the motor and blind from over-running.
• The visual on screen blind will animate to display its current status.
ContentsInstallation Check List Prev Page Next Page
Previous Next
Shutter

39www.click-smart.com
Prior to activating any scenes we recommend all individual elements are working and their respective icons are showing the status change during control with minimal delay. This confirms the elements/receivers are all within range.
To instigate a scene simply press the required icon. The icon lines will turn blue briefly during the signal transmission.
Application Control - Scenes
ContentsInstallation Check List Prev Page Next Page
Previous Next
Scenes

40www.click-smart.com
Error Messages - Setup
During the setup and operation of the smart box and application, in the event of input or signal issues arising error messages may appear.
With regards the setup of the smart box and pairing to the application, the most common issues and corrective actions required are:
‘Searching for smart box’ Continuously searching
• Ensure the smart device Wi-Fi connection is to the same router as connected to the smart box.
‘Failed to add element’ Can occur when setting up elements/receivers.
• Ensure the receiver is correctly wired and powered up.• Check the receiver address has been recorded correctly and entered correctly in
to the application.
‘Failed to connect to element’ Can occur when setting up elements/receivers.
• The address trying to input may be duplicated. Check the elements and addresses already entered.
‘This device in not assigned to any time schedule’Occurs if the ‘Auto’ button is pressed without the element assigned to a schedule.
• A time schedule has not been setup for this element. Enter new schedule or assign to previously entered schedule.
If setup issues persist please contact our technical support team 01827 63454.
ContentsPrev Page Next Page
Previous Next
Error Messages
Setup

41www.click-smart.com
Error Messages - Control
During the use of the application to control the smart box and elements, in the event of issues arising error messages may appear.
The most common issues and corrective actions required are:
‘Failed to connect to element’ • If its the first time the element is controlled check the recorded and installed
receiver address are correct. • The element may not be powered, check supply and wiring.• The element may be outside the smart box signal range. This may be caused
by new furniture (e.g. mirror) between the smart box and receiver. Try moving the smart box a small distance to bypass the new furniture or install a repeater (RFRP-20/B) which will assist.
‘Cannot connect with smart box’ • Check the smart box and router are powered and connected together.• Check the smart phone or tablet is connected to the same Wi-Fi network as the
smart box.• Ensure the application smart box setup is connected to the required smart box and
the circle icon is coloured blue.
Visual - Element icon is not changing status on the application• Can occur if the signal between the element and smart box is weak. • Check that new furniture has not be moved to impair the signal between the
element and smart box. • May need to install a repeater (RFRP-20/B).• On the element being controlled, swipe down the application screen to refresh the
icon’s status.
If control issues persist please contact our technical support team 01827 63454.
ContentsPrev Page Next Page
Previous Next
Control

(Rev1.1)
United Kingdom Southern Ireland
Errors and Ommissions excluded. Specification is subject to change without notice.
Scolmore International LtdScolmore Park, LandsbergLichfield Road Industrial Estate Tamworth, StaffordshireB79 7XB
Web: click-smart.comTel: +44 (0) 1827 63454Fax: +44 (0) 1827 63362Email: [email protected]
18 Corrig RoadSandyford Industrial Estate DublinIreland D18 WV79
Web: clicklitehouse.ieTel: +353 (1) 2811 122Fax: +353 (1) 2811 224Email: [email protected]
Prev Page Contents