pega foundation for healthcare implementation guide · pega foundation for healthcare...
TRANSCRIPT

Pega Foundation for Healthcare
IMPLEMENTATION GUIDE 7.4

© 2018 Pegasystems Inc., Cambridge, MA
All rights reserved.
Trademarks
For Pegasystems Inc. trademarks and registered trademarks, all rights reserved. All other trademarks or service marks are property of their respective holders.
For information about the third-party software that is delivered with the product, refer to the third-party license file on your installation media that is specific to your release.
Notices
This publication describes and/or represents products and services of Pegasystems Inc. It may contain trade secrets and proprietary information that are protected by various federal, state, and international laws, and distributed under licenses restricting their use, copying, modification, distribution, or transmittal in any form without prior written authorization of Pegasystems Inc.
This publication is current as of the date of publication only. Changes to the publication may be made from time to time at the discretion of Pegasystems Inc. This publication remains the property of Pegasystems Inc. and must be returned to it upon request. This publication does not imply any commitment to offer or deliver the products or services described herein.
This publication may include references to Pegasystems Inc. product features that have not been licensed by you or your company. If you have questions about whether a particular capability is included in your installation, please consult your Pegasystems Inc. services consultant.
Although Pegasystems Inc. strives for accuracy in its publications, any publication may contain inaccuracies or typographical errors, as well as technical inaccuracies. Pegasystems Inc. shall not be liable for technical or editorial errors or omissions contained herein. Pegasystems Inc. may make improvements and/or changes to the publication at any time without notice.
Any references in this publication to non-Pegasystems websites are provided for convenience only and do not serve as an endorsement of these websites. The materials at these websites are not part of the material for Pegasystems products, and use of those websites is at your own risk.
Information concerning non-Pegasystems products was obtained from the suppliers of those products, their publications, or other publicly available sources. Address questions about non-Pegasystems products to the suppliers of those products.
This publication may contain examples used in daily business operations that include the names of people, companies, products, and other third-party publications. Such examples are fictitious and any similarity to the names or other data used by an actual business enterprise or individual is coincidental.
This information is the property of:
Pegasystems Inc. One Rogers Street Cambridge, MA 02142-1209 USA Phone: (617) 374-9600 Fax: (617) 374-9620 www.pega.com
Pega Foundation for Healthcare
Document: Implementation Guide
Software Version: 7.4
Updated: April 2018

CONTENTS
Application overview .................................................................................... 1
Implementation delivery methodology ......................................................... 2
Initiate stage ..................................................................................................... 3
Plan ............................................................................................................. 3
Setup ........................................................................................................... 3
Prepare ....................................................................................................... 3
Delivery stage ................................................................................................... 4
Prerequisites .................................................................................................... 4
Initiate stage .................................................................................................. 5
Step 1: Creating the baseline application ...................................................... 5
Running the New Application wizard ....................................................... 5
Results of running the New Application wizard ...................................... 6
Leveraging optional Healthcare applications .......................................... 6
Step 2: Loading sample data ........................................................................... 7
Step 3: Performing the gap analysis ............................................................... 7
Generating the Application Profile ........................................................... 7
Generating the Application document ..................................................... 8
Generating the Specification document .................................................. 8
Delivery stage ................................................................................................ 9
Defining requirements .................................................................................... 9
Step 1: Defining the case type modifications and attributes ..................... 10
Adding a new case type ........................................................................... 10
Mapping case type classes to a database table .................................... 10
Confirming the case type locking setting ............................................... 11
Step 2: Defining the data model ................................................................... 12
Pre-configured data types ....................................................................... 13
Pre-configured data pages ...................................................................... 15
Pre-configured REST Connector data pages .......................................... 16
Pre-configured FHIR®© REST Connector data pages ............................. 17
Step 3: Mapping the application data .......................................................... 19
Step 4: Defining common codes management requirements ................... 19
Step 5: Defining code set elastic search requirements .............................. 20

Step 6: Defining code group requirements ................................................. 20
Step 7: Defining integration .......................................................................... 21
Pre-configured REST APIs ........................................................................ 21
Pre-configured HL7 FHIR REST APIs ....................................................... 22
Pre-configured SOAP integration for MS Outlook Exchange ............... 23
Navigating to the pre-configured external data pages ......................... 23
Viewing REST API data model schema ................................................... 24
Pre-configured X12 5010 EDI message services.................................... 24
Step 8: Defining member PII data masking requirements ......................... 25
Step 9: Defining member PII by enabling HIPAA ......................................... 26
Step 10: Implementing Elastic search on HIPAA security policy ................ 26
Step 11: Defining the security model and organization structure ............. 28
Authentication schemes ................................................................................ 28
Defining your authentication scheme .................................................... 29
Defining your access groups ................................................................... 29
Defining access roles and privileges ...................................................... 29
Defining your organization structure ..................................................... 30
Defining operator attributes ................................................................... 30
Defining the operator work group ......................................................... 30
Defining operator skills ........................................................................... 31
Defining the operator calendar .............................................................. 31
Step 10: Customizing the user experience .................................................. 32
Designing the portals .............................................................................. 32
Designing the application skin and styles .............................................. 32
Designing for screen performance......................................................... 33
Step 11: Defining reporting requirements................................................... 33
Building features ......................................................................................... 35
Step 1: Integrating using REST APIs .............................................................. 35
Key rules in business request API execution ......................................... 36
Accessing the API data page and connect REST rules ........................... 36
Setting the endpoint URL of the source system .................................... 36
Extending the mapping ........................................................................... 37
Extending mapping using the MapToEntity pattern ............................. 37
Step 2: Integrating using HL7 FHIR REST APIs ............................................. 38
Key rules in business request API execution ......................................... 38
Accessing the FHIR®© API data page and connect REST rules .............. 39

Setting the endpoint URL of the source system .................................... 39
Setup Guide to Leverage FHIR APIs ........................................................ 39
Step 3: Integrating with Microsoft Outlook for scheduling appointments 39
Key rules ................................................................................................... 40
Impersonation .......................................................................................... 40
Creating an appointment ........................................................................ 41
Viewing and updating an existing appointment ................................... 42
Canceling an existing appointment ........................................................ 42
Step 4: Integrating and managing X12 EDI messages ................................ 42
X12 270 – Eligibility request and response message .................................. 43
Extending mappings ................................................................................ 43
Extending message validation ................................................................ 43
Extending eligibility processing .............................................................. 43
X12 276 – 277 – Claim status request and response message .................. 44
Extending mappings ................................................................................ 44
Extending processing .............................................................................. 44
Defining the X12 834 outbound filepath...................................................... 45
Step 5: Dynamic Class Referencing in the Code Management Layer ........ 45
Configuring DCR ....................................................................................... 45
Step 6: Managing custom code sets ............................................................. 46
Step 7: Managing code groups ..................................................................... 49
Step 8: Implementing Elastic search on code sets ...................................... 49
Using Elastic search ................................................................................. 50
Step 9: Implementing Elastic search on sample data objects .................... 50
Using Elastic search ................................................................................. 51
Step 10: Managing member PII data masking ............................................. 51
Step 11: Modifying the user interface .......................................................... 52
Determining which part of the user interface to modify ...................... 52
Locating the user interface element to change..................................... 52
Adding a new property to a section ....................................................... 52
Adding a new section............................................................................... 53
Updating the skin ..................................................................................... 53
Step 12: Creating reports .............................................................................. 54
Testing a new application ........................................................................... 55
Testing in the Build environment ................................................................. 55
Testing in the Test or Production environments......................................... 56

Testing in the UAT environment ................................................................... 56
Packaging a new application ...................................................................... 57
Merging application changes ........................................................................ 57
Packaging an application for migration ....................................................... 57
Importing the packaged application ............................................................ 58
Production maintenance and monitoring ................................................ 59
Business rule maintenance in the Production environment ..................... 59
Application monitoring .................................................................................. 59
Pega Platform application health monitoring ....................................... 59
Identifying and reporting issues ................................................................... 59
Pega Foundation for Healthcare Implementation Guide 1
Application overview Built for healthcare organizations, the Pega® Foundation for Healthcare provides a set of enterprise healthcare assets including pre-configured data models for commonly referenced healthcare objects and code sets, APIs for rapid integration with external systems of records, and support for industry-standard EDI and other message and transaction standards including HIPAA X12 5010 and HL7 FHIR©®. These assets provide you a platform for rapid configuration and deployment of SmartBPM™ healthcare solutions that deliver productivity, spur growth, and ensure compliance.
Healthcare organizations can leverage Pega Foundation for Healthcare to:
• Address new market opportunities in a fraction of the time required by more traditional development environments and accelerate the development of personalized solutions targeting your organization’s biggest challenges across your key domains of marketing, sales and onboarding, customer service, and operations.
• Develop applications that dramatically extend the capabilities of existing systems such as claims, billing, enrollment, membership, and provider networks.
• Revitalize legacy applications.
• Create and maintain your healthcare enterprise foundation layer of shared assets across your Pega application portfolio.
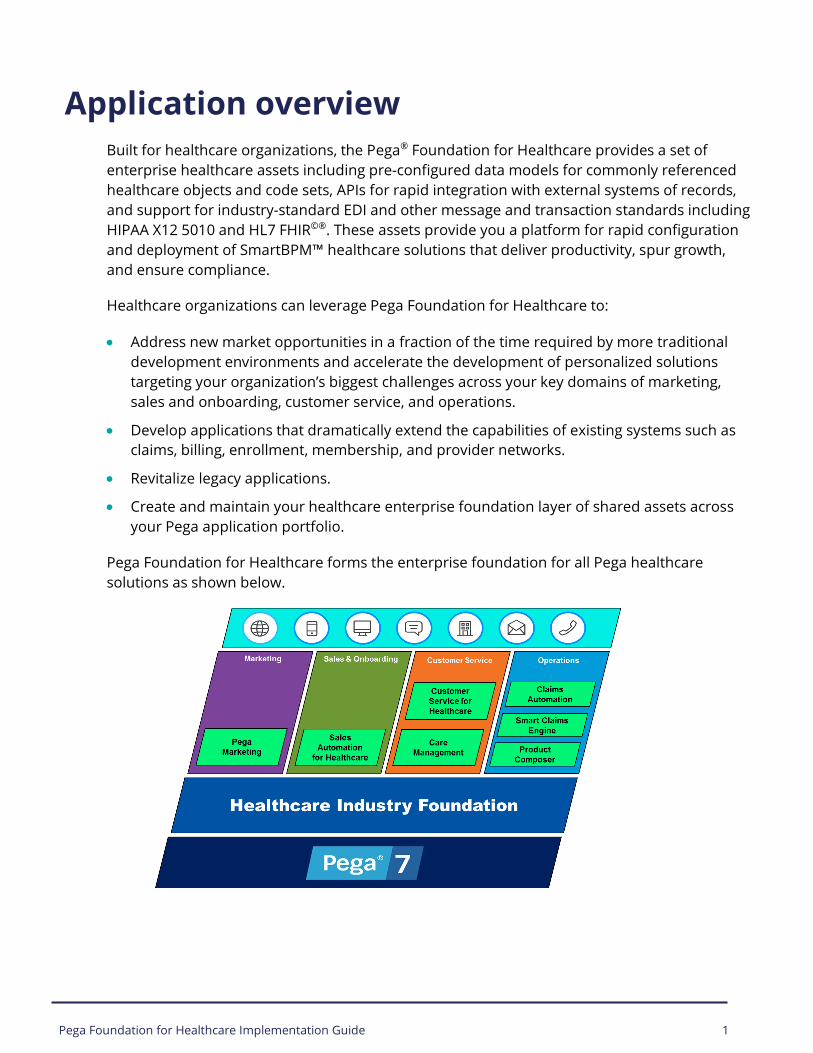
Pega Foundation for Healthcare forms the enterprise foundation for all Pega healthcare solutions as shown below.

Pega Foundation for Healthcare Implementation Guide 2
The Pega Foundation for Healthcare comprises of six application layers as described below. The separate application modules provide the flexibility for ease and speed of deployment so that you can only install and leverage what is needed for your envisioned use.
The following application bundles are included on your media:
• Pega HC Core Foundation – This is the core foundational application containing the healthcare data model, healthcare codes management, and common object API rules. It is the minimum default application required to be installed and is a pre-requisite for all the following optional application modules.
• PegaHC AGM – This application contains the rules for managing member complaints including grievances and appeals.
• Pega X12 5010 – This application contains all the HIPAA X12 EDI and NCPDP message processing rules.
• PegaHC FHIR®© – This application contains all the HL7® FHIR REST®© APIs for integrating with clinical data repositories.
• Pega HL7® – This application contains all the HL7® v2.2 support for managing Admission/Discharge/Transfer (ADT) inbound messages from third-party systems.
• PegaHC EWS – This application contains integration capabilities with Microsoft® Exchange Web Services for appointment scheduling.
Implementation delivery methodology Pegasystems recommends that you use an Agile delivery model, more specifically, a Scrum-based standard for a Pega application implementation. In the rare cases where a waterfall-
Pega Foundation for Healthcare Implementation Guide 3
based implementation methodology is better suited, Pegasystems recommends that you use Pega’s Iterative Waterfall approach. These two implementation methodologies help break down the work into a manageable scope of work that can be delivered into production faster. The Pegasystems delivery approach has two primary stages:
• Initiate
• Delivery
Initiate stage In the Initiate stage, the implementation teams build out the foundation or baseline of the application and prepare for the work that is necessary to configure the first production release and subsequent extension releases. Building a strong foundation to support expansion and reuse is core to the success of an implementation.
The Initiate stage is further organized into three sub-stages:
Plan Align the vision and roadmap to establish the foundation for the implementation. High-level tasks include:
• Defining the production release milestone
• Refining scope alignment
• Determining the implementation methodology
Setup Validate and review the Pega-provided features and capabilities with customer requirements and expectations. Tasks include:
• Establishing environments and processes
• Creating the baseline application
• Loading sample data
• Demonstrating the baseline application
• Performing a gap analysis
• Reviewing business needs and outcomes
Prepare Prepare for the delivery of the Pega Foundation for Healthcare. These topics are outside the scope of this guide and are not discussed further. Tasks include:
• Confirming resources

Pega Foundation for Healthcare Implementation Guide 4
• Enabling team members
• Establishing governance
At the conclusion of the Initiate stage, the scope of the work for the first production release is defined. For Scrum, the scope of the work is identified with an initial backlog. For Iterative Waterfall, a specification list and schedule are prepared and finalized.
Delivery stage The Delivery stage is dependent on the methodology selected during the Initiate stage. During this stage, the implementation team designs, builds, configures, and tests the application by using the selected implementation methodology (Scrum or Iterative Waterfall). The goal of the Delivery stage is to accomplish the tasks described in this document by organizing the Application Feature backlog so that the delivery team can configure the application incrementally with the final outcome of having a fully tested and performance-tuned application in production.
This guide provides information to support both implementation methodologies during the delivery stage.
Prerequisites Before you start your Pega Foundation for Healthcare deployment, be sure that you understand the following information:
• Support for various browser versions. Review the Platform Support Guide.

Pega Foundation for Healthcare Implementation Guide 5
Initiate stage The Initiate stage includes the following tasks:
• Creating baseline application
• Loading sample data
• Performing the gap analysis
Step 1: Creating the baseline application Before you create the baseline application, be sure that you install and test Pega Foundation for Healthcare. See the Pega Foundation for Healthcare 7.4 Installation Guide on the Pega Foundation for Healthcare product page.
Use the Application Wizard to create a new application built on Pega Foundation for Healthcare. The wizard creates the application structure for you. See Creating applications with the New Application wizard for an example on completing these fields.
Pegasystems recommends that you extend from the PegaHC_Core foundation application and include the optional applications (listed in the Application Overview section earlier) in your application rule based on your envisioned solution.
If your solution needs to leverage all of the optional add-on applications, Pega Foundation for Healthcare also provides a pre-configured application rule called PegaHC_Ext that can be leveraged for extension. This application has all of the applications configured in the appropriate order.
Finally, if you are creating a new application leveraging one of the Pega Healthcare Applications (e.g. Customer Service, Care Management etc.), you can skip this step and create your baseline application by following the steps included in the Implementation Guide of the said Healthcare Application.
Running the New Application wizard To create an application on Pega Foundation for Healthcare, use the New Application wizard.
1. Log in to the application as Administrator@MyHealthPlan using the password that you specified when you enabled this operator; to enable Pega-provided operators, see Enabling operators.
2. Click Application > New Application.
3. In the New Application wizard, click the application template that you want to use for your application.
Pega Foundation for Healthcare Implementation Guide 6
4. If the application template that you are looking for is not listed, click Search all types, and search for the application that you want to use as the built-on application. You can select from all applications in the system that are configured as built-on applications.
5. Click Use this application type.
6. Provide information for the following configuration options. The wizard pages might differ depending on the application template that you select.
− Select case types – Select the case types to include in your application. You can select some or all case types from the built-on application.
− Select data types – Select the data types to include in your application. You can select some or all data types from the built-on application.
− Select primary device – Select the type of device where your application will primarily be used. All applications are responsive and work on all devices.
− Select color scheme – Select a color scheme for your application.
− Name your application – Enter a name for your application.
− Optional: Advanced configuration – Specify additional configuration options. For more information, see Advanced settings.
7. Click Create new application.
8. Once the application is created, note the operator IDs created. Log out and then log in using the administrator ID created.
Results of running the New Application wizard The New Application wizard creates the application class structure for you. You can reuse the classes and rulesets created by the wizard in future applications that you create. As you implement this application and future applications, you can apply Reuse and Version Management principles to help you decide where in the class structure to create your rules to improve the maintainability and overall efficiency of your application.
For more information on the structure and rulesets generated by the wizard, see Understanding the class structure and rulesets generated by the Application Accelerator.
Leveraging optional Healthcare applications Pega Foundation for Healthcare contains the following optional applications on the media in addition to the core Pega Foundation for Healthcare application:
• PegaHCFhir – Application contains support for HL7 FHIR APIs to integrate with clinical systems like electronic health records (EHRs).
• PegaHL7 – Application contains support for managing HL7 ADT (Admission Discharge Transfer transactions from clinical systems.
• PegaX125010 – Application contains support for managing HIPAA X12 EDI transactions.

Pega Foundation for Healthcare Implementation Guide 7
• PegaHCEWS – Application contains support for Microsoft Exchange Web Services to integrate with Microsoft Outlook.
• PegHCAGM – Application contains capabilities to manage member complaints (appeals and grievances).
Add one or more of the above applications to the Built on Applications stack in your newly create application.
Note: Ensure that your administrator has installed the above applications from the Pega Foundation for Healthcare media.
Step 2: Loading sample data Pega Foundation for Healthcare provides sample data to support the Pega-provided demonstration application. It is recommended that customer-supplied sample data be loaded so that the gap analysis efforts are more meaningful for the client.
For more information, see “Importing sample data” in the Pega Foundation for Healthcare 7.4 Installation Guide on the Pega Foundation for Healthcare product page.
Step 3: Performing the gap analysis Review the application to perform a gap analysis and focus on identifying the specific requirements of your site. The following three documents define what is contained within your application:
• Application profile
An artifact that includes a collection of business-related information. The document includes processes, case types, reports, specifications, participants, collaborators, and actors that are associated with the implementation of your project.
• Application document
An artifact that includes specifications, process-flow snapshots, and requirements associated with your application.
• Specification document
An artifact that includes specifications and linked requirements details associated with your application.
Generating the Application Profile The Application Profile (AP) provides an inventory of specifications and requirements as it exists at a specific time. When you first generate an Application Profile, it shows the Pega-provided components.

Pega Foundation for Healthcare Implementation Guide 8
1. Log in to the application as the CoreAdministrator operator ID using the password that you specified when you enabled this operator; to enable Pega-provided operators, see Enabling operators.
2. Follow the steps in the Generating an application profile document topic in the Pega Platform 7.4 help.
Generating the Application document You can generate information about the rules that are already included with the application. This allows you to see what the application provides for you so that you can focus on identifying your site's specific requirements.
To document the rules provided by the application:
1. Log in to the application as the CoreAdministrator operator ID using the password that you specified when you enabled this operator; to enable Pega-provided operators, see Enabling operators.
2. Follow the steps in Generating an application document.
Tip: You can control the level of detail included in the Application Document by modifying the settings in the Options section. For more information, see the Pega Platform 7.4 help.
Generating the Specification document The Specification document provides an inventory of specifications and requirements as it exists at a specific time.
1. Log in to the application as the CoreAdministrator operator ID using the password that you specified when you enabled this operator; to enable Pega-provided operators, see Enabling operators.
2. Follow the steps in the Generating a specification document topic in the Pega Platform 7.4 help.

Pega Foundation for Healthcare Implementation Guide 9
Delivery stage The Delivery stage includes the following tasks:
• Defining requirements
• Building features
• Testing a new application
• Packaging a new application
Defining requirements To ensure that you stay on target for a successful deployment, use a structured approach for your implementation methodology. You will need to prepare for your implementation and determine key aspects of the design that will affect the behavior of your application. Defining requirements for an implementation includes these tasks:
• Reviewing extension requirements
• Refining customizations and determining the availability of required data and integrations
• Prioritizing, for example, revising the solution backlog, re-estimating effort for extensions and customizations, and confirming the project scope
Defining your requirements also involves DCO sessions and incorporating those requirements into the application design. During these sessions, you review each of the case types and process flows that the application already provides.
Update the Application Specifications with planned changes as described in the Pega Platform 7.4 help topic Application Specifications.
The Implementation Planning Workbook helps you capture decisions as you define your requirements. You can download the Implementation Planning Workbook from the Pega Foundation for Healthcare product page.
Follow these steps to define requirements:
1. Defining the case type modifications and attributes
2. Defining the data model
3. Mapping the application data
4. Defining common codes management requirements

Pega Foundation for Healthcare Implementation Guide 10
TITLE of INTERNAL DOCUMENT – Arial Bold 12 pt
5. Defining code set elastic search requirements
6. Defining code group management requirements
7. Defining integration
8. Defining member PII data masking requirements
9. Defining the security model and organization structure
10. Customizing the user experience
11. Defining reporting requirements
Step 1: Defining the case type modifications and attributes As a Foundation, your application does not include any predefined case types. A case is defined as a Service Case or a Service Request, which is a process that your staff will execute to service your customers. Each case contains one or more processes that will be extended or created to meet your business requirements. You can create new case types based on the needs of your application during your planning process.
Each case type has one or more processes associated with it. When you define a new case type, you provide stages for that case type. A stage is the first level of organizing work in your case type. Each stage has one or more steps.
Adding a new case type Create a new case type that meets your business requirements.
1. In the explorer panel, click Cases.
2. Click Add a case type.
3. Provide a name and description for the case.
4. Click Next.
5. Define the stages for the case type. For more information, see Creating a top-level case type.
6. Click Finish.
You will configure the steps for each stage at a later time.
Mapping case type classes to a database table When you run the New Application wizard to create your initial case types, a default class group mapping is created for each case type. You can change the class group setting for each case type to ensure that each case is mapped to a table name that conforms to your site's naming conventions.

Pega Foundation for Healthcare Implementation Guide 11
TITLE of INTERNAL DOCUMENT – Arial Bold 12 pt
Mapping a class to a physical database table impacts data storage and security decisions. If you expect the volume of the case types to be low, consider sharing the table with other case types. If access to instances of this case type needs to be restricted, create a separate class group for each case type.
For each class corresponding to the case type:
1. In the explorer panel, click App.
2. Right-click the class name and select Definition.
3. In the Settings section, review the This Class setting.
4. Determine whether the class is a class group or belongs to a class group. If the class belongs to a class group, determine to which class group it belongs.
5. In the Test Connection section, click Test Connection to determine the name of the table currently mapped to this class.
6. Determine the name of your database table.
7. Repeat these steps for each class in your application.
8. Record your decision in the Case type modifications planning worksheet.
Confirming the case type locking setting When you created your case types using the New Application wizard, you reviewed the case type settings for each case type. One of those settings is the locking behavior on the case, which affects concurrent access to cases.
Choose one of two types of locking:
• A case is opened
Allows one user at a time to open and work on a case.
• An action taken on case
Allows multiple users to work on a case at the same time.
Note: If you have already considered and set the locking behavior for each case type, you can skip this step.
Identifying the most appropriate lock setting for your application is important because it can affect the throughput of work in your application. For example, if user1 locks a case to work on it, then other users cannot work on the locked case until user1 unlocks the case or the lock expires according to the timeout period.
Contrary to this, if multiple users are allowed to work on a case simultaneously, the case content could be modified for one or more users while they work on the case. For example,
Pega Foundation for Healthcare Implementation Guide 12
TITLE of INTERNAL DOCUMENT – Arial Bold 12 pt
assume that user1 is working on a case then user2 opens the same case a few minutes later. When user1 saves changes to the case, user2 is notified of the changes and is enforced to accommodate changes done by user1 in the case.
Use the Case type modifications worksheet in the Implementation Planning Workbook to record your decisions during this procedure.
1. In the explorer panel, click Cases.
2. Click the first case type.
3. Click Locking in the case-wide settings.
4. Determine if the case should be locked when the case is opened or when an action is taken on the case.
5. Determine the lock timeout period for this case.
6. If you are certain at this point how locking should be handled for this case type, you can update this setting now.
7. Repeat these steps for each case type.
Step 2: Defining the data model Data modeling involves relating a conceptual model of how data items relate to each other in an application. The data model in the Pega Platform refers to a set of rules that work together to populate the data in your application. This data is displayed on the user interface to help the user process the case and can help automate decisions in your business processes. The following rule types constitute your data model:
• Data types
The data type is another name for a class in your application that holds data the application uses. A data type has one or more data pages and several property definitions associated with it.
• Properties
Properties define the format and visual presentation of data in your application.
• Data pages
Data pages define the content of a clipboard page. Data pages also control the loading of that data from a source system as shown here.

Pega Foundation for Healthcare Implementation Guide 13
TITLE of INTERNAL DOCUMENT – Arial Bold 12 pt
A related concept to data pages is integration. Integration controls how the data is retrieved from the systems of record to populate your application data pages. Data mapping rules determine how the data from the system of record corresponds to your application data model.
When planning your data model, work with the data modeling resource at your site to understand attributes of data types that need to be supported by your application.
Note: Pega Foundation for Healthcare is rarely the system of record for application data. Integrating your application data with your site's system of record is critical to the success of your deployment.
Pre-configured data types The Pega Foundation for Healthcare provides a comprehensive healthcare data model with many pre-configured Data Types and Data Pages for commonly used data objects that can be leveraged in your application. The following list highlights the key data types.

Pega Foundation for Healthcare Implementation Guide 14
TITLE of INTERNAL DOCUMENT – Arial Bold 12 pt
Accumulators - Header
Accumulators - Detail
Accumulators - Family
Accumulators - Ind
Address
Appointment
Appointment Schedule
Authorization (Service)
Bank Account
Benefit
Benefit - Coverage
Benefit - Definition
Benefit Plan
Broker
Broker Agency
Campaign
Census
Claim
Claim Line
Communication
Company
Contact
Disability
DRG Grouper
Drug
Eligibility Request
Emp Group Contract
Employment
Enrollment
Guardian
Issues
Lab Results (Clinical)
Languages
Measurements (Clinical)
Medical History (Clinical)
Member (Patient)
Notes
Observation (Clinical)
Observation Component
Payer
Payment
Plan Sponsor
Policy (Membership)
Population
Postal (Zip) Codes
Prescription (Clinical)
Product (Benefits)
Provider
Provider Affiliation
Provider Business Entity
Provider Certifications
Provider Malpractice Ins
Prov Post Grad Training
Provider Medical School
Provider Group / Facility
Provider Network
Provider - Practitioner
Provider Referral Circle
Provider Service Address
Prov Pricing Rate Sheet
Rating Area (Sales)
Risk (Clinical)
School
Service Area
Svc Definition - Benefits
Service (Healthcare)
SIC - Division
SIC - Group
SIC - Factor
Allergies
Attachements
Clinical Condition
Clinical Procedure
Device
Diagnostic Report
Episode of Care
Goal (Clinical)
Imaging Study
Immunization
Patient Medications
Subscriber
For additional information on all available data types and entity relationships, refer to the Pega Foundation for Healthcare Product Overview, Healthcare Object Model – ERD, and Healthcare Data Model – LIST documents on the Pega Foundation for Healthcare product page. Use the Data planning worksheet in the Implementation Planning Workbook to record your decisions during this procedure.
Pega Foundation for Healthcare Implementation Guide 15
TITLE of INTERNAL DOCUMENT – Arial Bold 12 pt
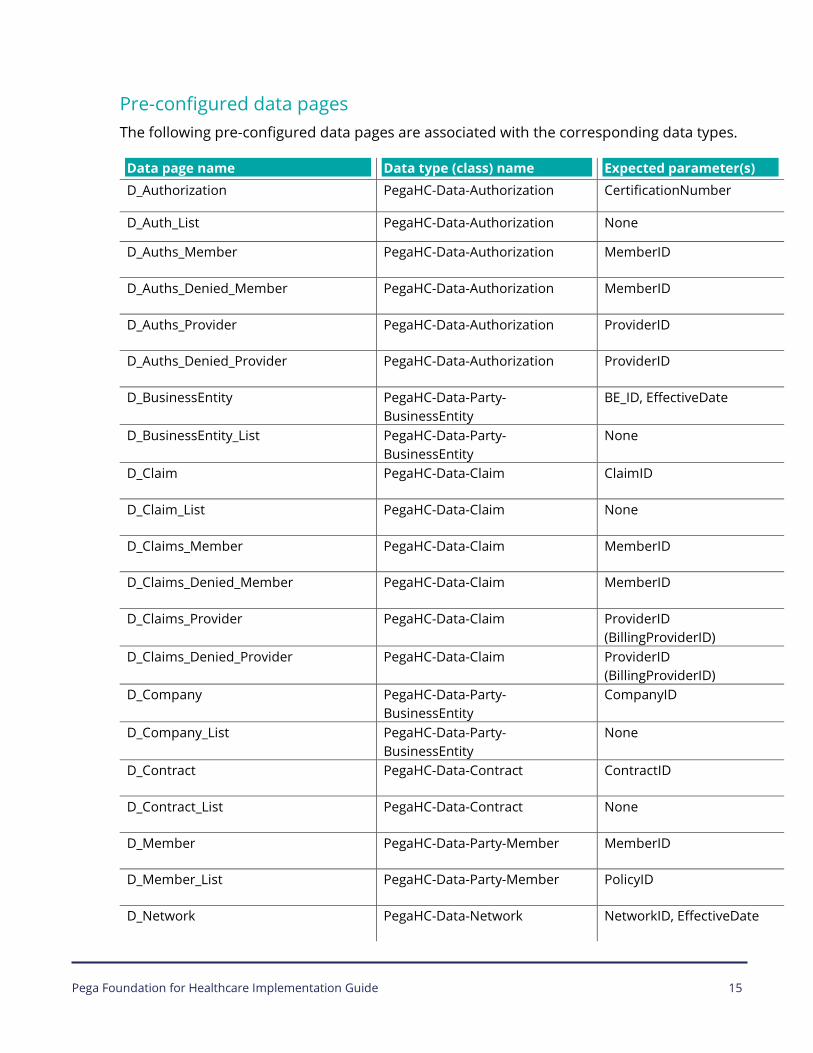
Pre-configured data pages The following pre-configured data pages are associated with the corresponding data types.
Data page name Data type (class) name Expected parameter(s) D_Authorization PegaHC-Data-Authorization CertificationNumber
D_Auth_List PegaHC-Data-Authorization None
D_Auths_Member PegaHC-Data-Authorization MemberID
D_Auths_Denied_Member PegaHC-Data-Authorization MemberID
D_Auths_Provider PegaHC-Data-Authorization ProviderID
D_Auths_Denied_Provider PegaHC-Data-Authorization ProviderID
D_BusinessEntity PegaHC-Data-Party-BusinessEntity
BE_ID, EffectiveDate
D_BusinessEntity_List PegaHC-Data-Party-BusinessEntity
None
D_Claim PegaHC-Data-Claim ClaimID
D_Claim_List PegaHC-Data-Claim None
D_Claims_Member PegaHC-Data-Claim MemberID
D_Claims_Denied_Member PegaHC-Data-Claim MemberID
D_Claims_Provider PegaHC-Data-Claim ProviderID (BillingProviderID)
D_Claims_Denied_Provider PegaHC-Data-Claim ProviderID (BillingProviderID)
D_Company PegaHC-Data-Party-BusinessEntity
CompanyID
D_Company_List PegaHC-Data-Party-BusinessEntity
None
D_Contract PegaHC-Data-Contract ContractID
D_Contract_List PegaHC-Data-Contract None
D_Member PegaHC-Data-Party-Member MemberID
D_Member_List PegaHC-Data-Party-Member PolicyID
D_Network PegaHC-Data-Network NetworkID, EffectiveDate

Pega Foundation for Healthcare Implementation Guide 16
TITLE of INTERNAL DOCUMENT – Arial Bold 12 pt
Data page name Data type (class) name Expected parameter(s) D_Network_List PegaHC-Data- Network None
D_Product PegaHC-Data-Product ProductNumber, EffectiveDate
D_Product_List PegaHC-Data-Product None
D_Policy PegaHC-Data-Policy PolicyNumber
D_Policy_List PegaHC-Data-Policy None
D_Practitioner PegaHC-Data-Party-Provider-Practitioner
PractitionerID
D_PractitionerByNPI PegaHC-Data-Party-Provider-Practitioner
NPI
D_Practitioner_List PegaHC-Data-Party-Provider-Practitioner
None
D_Provider PegaHC-Data-Party-Provider NPI
D_Provider_List PegaHC-Data-Party-Provider None
D_ProviderContract PegaHC-Data- ProviderContract ContractID, EffectiveDate
D_PContract_List PegaHC-Data- ProviderContract None
D_ProviderNetworksByContract PegaHC-Data-Network ContractID
D_ProvidersByNetwork PegaHC-Data-Party-Provider Network Name
D_PractitionersByNetwork PegaHC-Data- Party-Provider-Practitioner
Network Name
D_Payer PegaHC-Data-Party-Payer PayerID
D_Payer_List PegaHC-Data-Party-Payer None
D_Subscriber PegaHC-Data-Party-Subscriber SubscriberID
D_ServicingOrg PegaHC-Data-Party-Provider-ServicingOrg
ServicingOrgID (Provider ID)
D_ServicingOrgByNPI PegaHC-Data-Party-Provider-ServicingOrg
NPI
Pre-configured REST Connector data pages The following data pages are specifically configured for the REST Connector Integration rules (described in the Define Integration section):

Pega Foundation for Healthcare Implementation Guide 17
TITLE of INTERNAL DOCUMENT – Arial Bold 12 pt
REST Connector data page name Data type (class) name Expected parameter(s)
D_ConnectAuthorization PegaHC-Data-Authorization ID
D_ConnectMemberAuthorizations PegaHC-Data-Authorization MemberPolicyID
D_ConnectBenefitCoverage PegaHC-Data-Benefit-Coverage Claim
D_ConnectBusinessEntities PegaHC-Data-Party-BusinessEntity
TIN, EffectiveDate, EndDate
D_ConnectBusinessAffiliation PegaHC-Data-BusinessAffiliation
ID
D_ConnectPolicy PegaHC-Data-Policy ID
D_ConnectMemberPolicies PegaHC-Data-Policy MemberID, effectiveDate, endDate
D_ConnectMemberPoliciesByID PegaHC-Data-Policy MemberID, PolicyID, effectiveDate, endDate
D_ConnectProviderContract PegaHC-Data-ProviderContract ID, EffectiveDate, EndDate
D_ConnectContract PegaHC-Data-Contract ID
D_ConnectMember PegaHC-Data-Party-Member ID, effectiveDate, endDate
D_ConnectMemberNetworks PegaHC-Data-Network MemberID, PolicyID, effectiveDate, endDate
D_ConnectNetwork PegaHC-Data-Network ID
D_ConnectPayer PegaHC-Data-Party-Payer ID
D_ConnectGetPlanDetails PegaHC-Data-Plan ID, PlanName, EffectiveDate
D_ConnectPlanNetworks PegaHC-Data-Network planID, effectiveDate, endDate
D_ConnectProvider PegaHC-Data-Party-Provider NPI, TIN, effectiveDate, endDate
D_ConnectProviderNetworks PegaHC-Data-Network NPI, TIN, effectiveDate, endDate
D_ConnectRateSheet PegaHC-Data-RateSheet ID, EffectiveDate, EndDate
Pre-configured FHIR®© REST Connector data pages The following data pages are specifically configured for the FHIR REST Connector Integration rules (described in the Define Integration section):

Pega Foundation for Healthcare Implementation Guide 18
TITLE of INTERNAL DOCUMENT – Arial Bold 12 pt
REST Connector data page name Data type (class) name Expected parameter(s)
D_FHIRAllergy PegaHC-Data-Allergies ID, patient, onset
D_FHIRCarePlan PegaHC-Data-CarePlan ID, patient, date
D_FHIRClinicalCondition PegaHC-Data-ClinicalCondition ID, patient, category, clinicalStatus, onset
D_FHIRClinicalProcedure PegaHC-Data-ClinicalProcedure ID, patient, date
D_FHIRDevice PegaHC-Data-Device ID, patient, type, udi, lastUpdated
D_FHIRDiagnosticReport PegaHC-Data-DiagnosticReport ID, patient, date
D_FHIREncounter PegaHC-Data-Encounter ID
D_FHIREpisodeOfCare PegaHC-Data-EpisodeOfCare ID
D_FHIRFamilyHistory PegaHC-Data-MedicalHistory ID, patient
D_FHIRGoal PegaHC-Data-Goal ID, patient, date
D_FHIRImagingStudy PegaHC-Data-ImagingStudy ID
D_FHIRImmunization PegaHC-Data-Immunization ID, patient, date
D_FHIRMedicationDispense PegaHC-Data-PatientMedications
ID
D_FHIRMedicationOrder PegaHC-Data-PatientMedications
ID, patient, status, dateWritten
D_FHIRMedicationStatement PegaHC-Data-PatientMedications
ID, patient, status, dateWritten
D_FHIRMember PegaHC-Data-Party-Member ID, identifier, family, given, birthdate, gender, address, telecom
D_FHIRObservation PegaHC-Data-Observation ID, patient, code, date, issued
D_FHIRPractitioner PegaHC-Data-Party-Provider-Practitioner
ID
D_FHIRSchedule PegaHC-Data-Goal ID, actor, date, type
D_FHIRSlot PegaHC-Data-AppointmentSchedule
ID, schedule

Pega Foundation for Healthcare Implementation Guide 19
TITLE of INTERNAL DOCUMENT – Arial Bold 12 pt
Step 3: Mapping the application data The application data types provide a default set of properties for your use. You can add or remove properties from these data types depending on your requirements. You can also add new data types.
1. In the explorer panel, click Data.
2. Click the desired data type.
3. On the Data model tab, determine the properties to add, remove, or leave unchanged.
4. Repeat these steps for all other desired data types.
You can also use the Data planning worksheet to record any new data types needed by the application.
Step 4: Defining common codes management requirements Pega Foundation for Healthcare provides a comprehensive code set management solution for you to maintain your enterprise repository of standard code sets in Pega. Although not required, managing your code sets in Pega has the advantage of leveraging Pega rules and business processes for efficient use of your licensed code sets across your applications. If you choose not to maintain code sets in Pega Foundation for Healthcare, skip this step.
You must make an inventory of all code sets (standard as well as custom) that you chose to maintain in the Common Codes solution in Pega Foundation for Healthcare. The Common Codes solution comes pre-configured with capability to manage the following code sets. You can also extend the capabilities in the Common Codes solution to manage custom code sets not listed below.
• Admission Type • BETOS • Bill Type • CDT® • CPT® • Condition codes • DRG • DSM • Event Codes • Facility • Field Qualifier • Frequency • GCN • HCPCS
• ICD 10 to 9 Dx • ICD 10 to 9 Pcs • ICD 9 to 10 Dx • ICD 9 to 10 Pcs • ICD 9 Dx • ICD 9 Pcs • ICD 10 Dx • ICD 9 Pcs
• Modifier • NDC – Product/Package • Occurrence Date • Occurrence Span • Patient Relation • Patient Status • Place of Service • Point of Origin • Provider Specialty • Provider Taxonomy • Provider Type • Revenue • Service Types • Value Codes

Pega Foundation for Healthcare Implementation Guide 20
TITLE of INTERNAL DOCUMENT – Arial Bold 12 pt
Note: The above code sets do not come pre-loaded with data. You are required to upload your own licensed code set data using the upload capabilities provided in the solution.
For additional information, see the Healthcare Common Codes Business Use Case Guide and the Healthcare Common Codes Supported File Formats documents on the Pega Foundation for Healthcare product page. Use the Code Set planning worksheet in the Implementation Planning Workbook to record your decisions during this procedure.
Step 5: Defining code set elastic search requirements To improve the lookup performance of large code sets during business processing, Pega Foundation for Healthcare provides preconfigured Elastic search capabilities in the Common Codes solution that you can replicate in your business processes.
Regardless of whether you use common codes management solution to manage your code sets or will integrate with your existing code set systems, you must make an inventory of workflow process steps where you will require dynamic code set lookup. The Data and Work classes will need to be re-indexed to enable Elastic Search.
For additional information, refer to the Healthcare Common Codes Business Use Case Guide on the Pega Foundation for Healthcare product page. Use the Code Group planning worksheet in the Implementation Planning Workbook to record your decisions during this procedure.
Step 6: Defining code group requirements The common codes management solution provides the ability to create and maintain custom code groupings that can be used in business processes e.g. benefit definitions in product / benefit management, defining event conditions for identifying gaps in care from claims history in medical management etc.
Note: To leverage this capability, you will need to manage code set repositories in Pega Foundation for Healthcare using the common codes management solution.
If you choose not to maintain code sets in Pega Foundation for Healthcare, skip this step.
You must make an inventory of all code groups that will need to be configured and identify the code sets that will be leveraged for creating the custom code groups.
Use the Code Set Elastic Search planning worksheet in the Implementation Planning Workbook to record your decisions during this procedure.

Pega Foundation for Healthcare Implementation Guide 21
TITLE of INTERNAL DOCUMENT – Arial Bold 12 pt
Step 7: Defining integration You must inventory which external applications exist at your site and plan how to connect to them. Some common integration points for the Pega Foundation for Healthcare include interfaces to:
• Membership and enrollment systems of record
• Plan benefit and eligibility management systems
• Practitioner and provider system of records
• Provider networks and contracting systems
• Medical (utilization) management systems
• Claims system
• X12 EDI gateways/source systems
Tip: Identify integration points as early in your planning as possible. If a connection to an external data source is required and either the data itself does not exist or the interface to that data does not exist, you must account for the time to build the interface to this application.
Pre-configured REST APIs The Foundation provides following pre-configured REST APIs for commonly referenced Resources that can be used to connect with your source of truth systems.
REST API REST Connector data page name Data type (class) name
GetAuthorization D_ConnectAuthorization PegaHC-Data-Authorization
GetMemberAuthorizations D_ConnectMemberAuthorizations PegaHC-Data-Authorization
GetBenefitCoverage D_ConnectBenefitCoverage PegaHC-Data-Benefit-Coverage
GetPlanDetails D_ConnectGetPlanDetails PegaHC-Data-Plan
GetContract D_ConnectContract PegaHC-Data-Contract
GetMember D_ConnectMember PegaHC-Data-Party-Member
GetPayer D_ConnectPayer PegaHC-Data-Party-Payer
GetPolicy D_ConnectPolicy PegaHC-Data-Policy
MemberPolicies D_ConnectMemberPolicies PegaHC-Data-Policy
Pega Foundation for Healthcare Implementation Guide 22
TITLE of INTERNAL DOCUMENT – Arial Bold 12 pt
REST API REST Connector data page name Data type (class) name
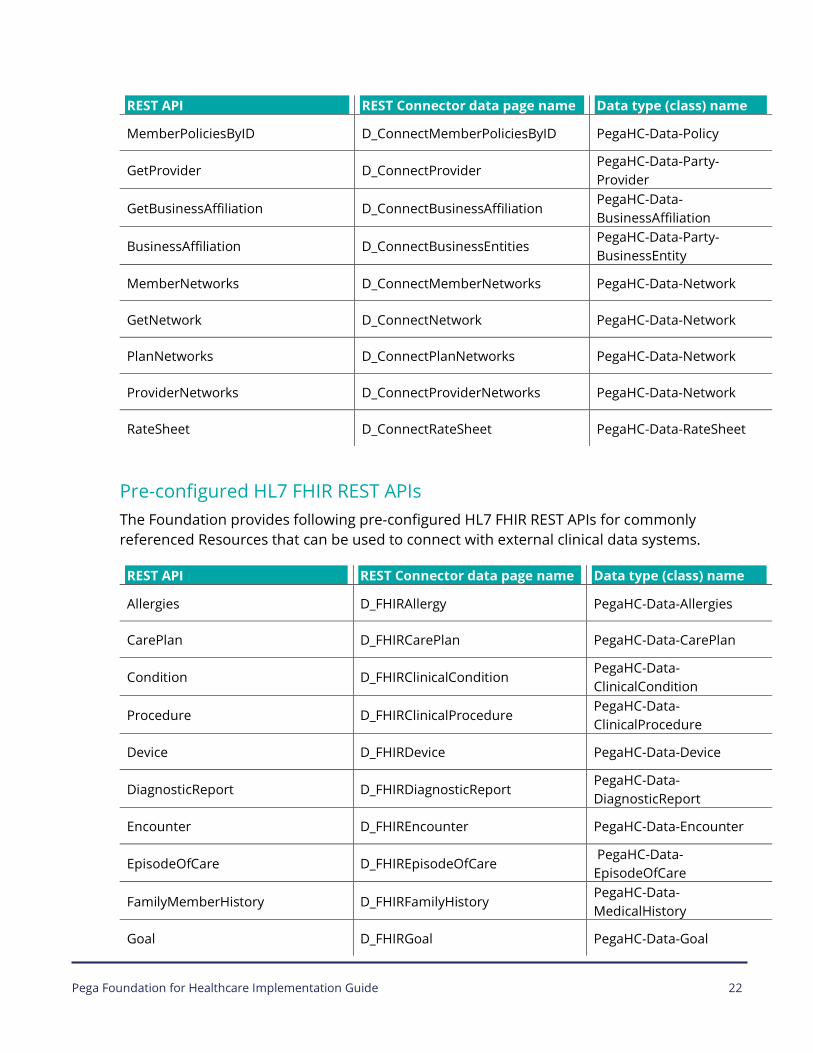
MemberPoliciesByID D_ConnectMemberPoliciesByID PegaHC-Data-Policy
GetProvider D_ConnectProvider PegaHC-Data-Party-Provider
GetBusinessAffiliation D_ConnectBusinessAffiliation PegaHC-Data-BusinessAffiliation
BusinessAffiliation D_ConnectBusinessEntities PegaHC-Data-Party-BusinessEntity
MemberNetworks D_ConnectMemberNetworks PegaHC-Data-Network
GetNetwork D_ConnectNetwork PegaHC-Data-Network
PlanNetworks D_ConnectPlanNetworks PegaHC-Data-Network
ProviderNetworks D_ConnectProviderNetworks PegaHC-Data-Network
RateSheet D_ConnectRateSheet PegaHC-Data-RateSheet
Pre-configured HL7 FHIR REST APIs The Foundation provides following pre-configured HL7 FHIR REST APIs for commonly referenced Resources that can be used to connect with external clinical data systems.
REST API REST Connector data page name Data type (class) name
Allergies D_FHIRAllergy PegaHC-Data-Allergies
CarePlan D_FHIRCarePlan PegaHC-Data-CarePlan
Condition D_FHIRClinicalCondition PegaHC-Data-ClinicalCondition
Procedure D_FHIRClinicalProcedure PegaHC-Data-ClinicalProcedure
Device D_FHIRDevice PegaHC-Data-Device
DiagnosticReport D_FHIRDiagnosticReport PegaHC-Data-DiagnosticReport
Encounter D_FHIREncounter PegaHC-Data-Encounter
EpisodeOfCare D_FHIREpisodeOfCare PegaHC-Data-EpisodeOfCare
FamilyMemberHistory D_FHIRFamilyHistory PegaHC-Data-MedicalHistory
Goal D_FHIRGoal PegaHC-Data-Goal

Pega Foundation for Healthcare Implementation Guide 23
TITLE of INTERNAL DOCUMENT – Arial Bold 12 pt
REST API REST Connector data page name Data type (class) name
ImagingStudy D_FHIRImagingStudy PegaHC-Data-ImagingStudy
Immunization D_FHIRImmunization PegaHC-Data-Immunization
MedicationDispense D_FHIRMedicationDispense PegaHC-Data-PatientMedications
MedicationOrder D_FHIRMedicationOrder PegaHC-Data-PatientMedications
MedicationStatement D_FHIRMedicationStatement PegaHC-Data-PatientMedications
Patient D_FHIRMember PegaHC-Data-Party-Member
Observation D_FHIRObservation PegaHC-Data-Observation
Practitioner D_FHIRPractitioner PegaHC-Data-Party-Provider-Practitioner
Schedule D_FHIRSchedule PegaHC-Data-Goal
Slot D_FHIRSlot PegaHC-Data-AppointmentSchedule
Pre-configured SOAP integration for MS Outlook Exchange The Foundation provides following pre-configured SOAP Web Services for Integrating with Microsoft Outlook Exchange.
Exchange Service description SOAP Service Data type (class) name Create Appointment CreateItem PegaHC-Data-Appointment
Update Appointment UpdateItem PegaHC-Data-Appointment
Cancel Appointment CreateItem PegaHC-Data-Appointment
User Availability GetUserAvailability PegaHC-Data-Appointment
Navigating to the pre-configured external data pages 1. Log in to the application as Administrator@MyHealthPlan using the password that you
specified when you enabled this operator; to enable Pega-provided operators, see Enabling operators.
2. Navigate to Designer Studio > Data Model > View external data entities.

Pega Foundation for Healthcare Implementation Guide 24
TITLE of INTERNAL DOCUMENT – Arial Bold 12 pt
Viewing REST API data model schema 1. Log in to the application as Administrator@MyHealthPlan using the password that you
specified when you enabled this operator; to enable Pega-provided operators, see Enabling operators.
2. Navigate to Designer Studio > Healthcare > Healthcare API > Business Requests entities.
3. Click on desired Resource Link to view the pre-configured REST methods as well as the schema data model associated with each Resource API.
For additional information, refer to the Healthcare API Technical Specifications and the Healthcare FHIR API Technical Specifications on the Pega Foundation for Healthcare product page. Use the Integration worksheet in the Implementation Planning Workbook to record your decisions on APIs any schema model changes needed for your application.
Pre-configured X12 5010 EDI message services The Foundation provides functionality to manage the intake of X12 5010 EDI Messages received from an EDI gateway or another external source. The following X12 EDI Message standards are supported:
X12 N 270Eligibility Request
X12 N 271Eligibility Response
X12 N 276Claim Status Request
X12 N 277Claim Status Response
X12 N 278Service Review and Response
X12 N 834Benefit Enrollment
X12 N835Claim Payment
X12 N837Claim
Pega Foundation for Healthcare Implementation Guide 25
TITLE of INTERNAL DOCUMENT – Arial Bold 12 pt
The capabilities include intake of the message file and parsing it according to the EDI implementation guide standards published for the message. The incoming file is parsed according to the EDI standard and the message is made available on the clipboard for further business processing.
Note: The parsing of each message file type shown above is complete according to the EDI Standard defined for the message and no further extension is needed. It is assumed that the message is compliant with the X12 5010 EDI Standard and has been validated against all WEDI SNIP validation edits for syntax validation, balancing validation, inter-segment validations etc. This is typically done by EDI Gateway systems.
For additional information, refer to the Healthcare X12 EDI Message Management Technical Specifications document on the Pega Foundation for Healthcare product page. Use the Integration worksheet in the Implementation Planning Workbook to record your decisions on any X12 EDI message intake requirements needed for your application.
1. Identify all integration points for your application.
2. Identify which data is needed from each system of record, if you have not already done so.
3. Determine whether an interface to that system of record already exists and how to connect to it.
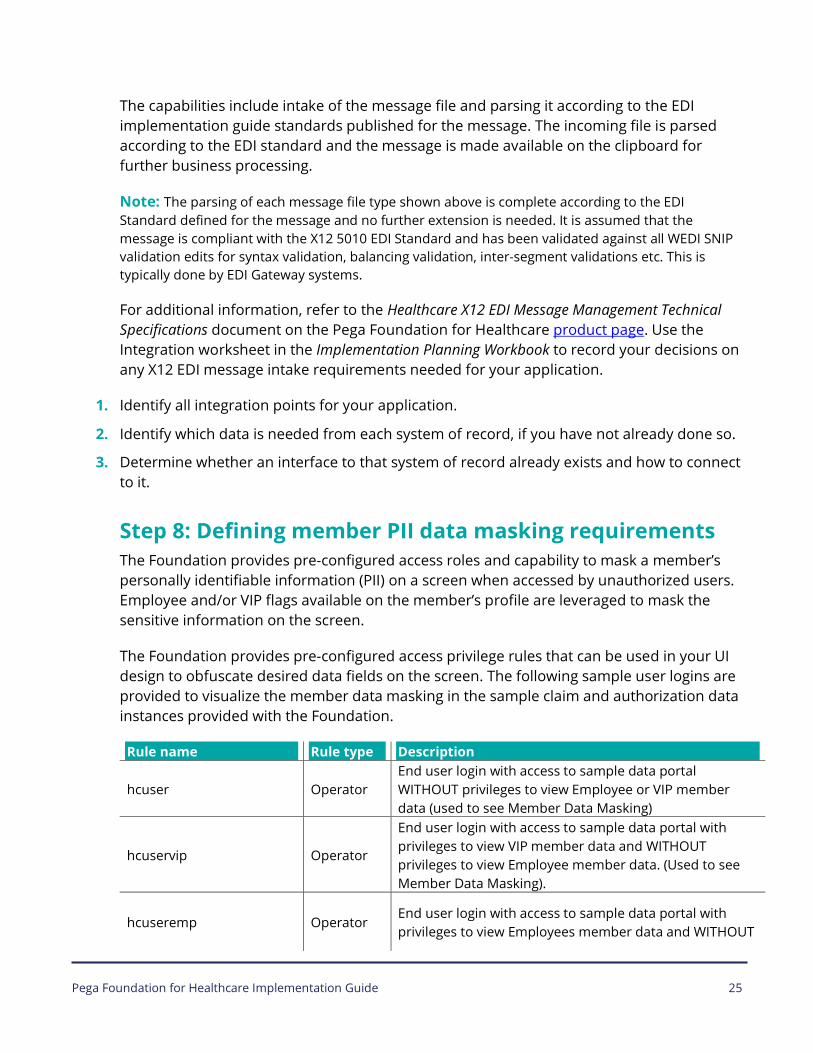
Step 8: Defining member PII data masking requirements The Foundation provides pre-configured access roles and capability to mask a member’s personally identifiable information (PII) on a screen when accessed by unauthorized users. Employee and/or VIP flags available on the member’s profile are leveraged to mask the sensitive information on the screen.
The Foundation provides pre-configured access privilege rules that can be used in your UI design to obfuscate desired data fields on the screen. The following sample user logins are provided to visualize the member data masking in the sample claim and authorization data instances provided with the Foundation.
Rule name Rule type Description
hcuser Operator End user login with access to sample data portal WITHOUT privileges to view Employee or VIP member data (used to see Member Data Masking)
hcuservip Operator
End user login with access to sample data portal with privileges to view VIP member data and WITHOUT privileges to view Employee member data. (Used to see Member Data Masking).
hcuseremp Operator End user login with access to sample data portal with privileges to view Employees member data and WITHOUT

Pega Foundation for Healthcare Implementation Guide 26
TITLE of INTERNAL DOCUMENT – Arial Bold 12 pt
privileges to view VIP member data. (Used to see Member Data Masking).
PegaHC:View_VIP_PII Role Access role with privilege to view VIP member data
PegaHC:View_Employee_PII Role Access role with privilege to view Employees member data
Use the Security model worksheet in the Implementation Planning Workbook to record your requirements regarding employee or VIP member data masking needs.
Step 9: Defining member PII by enabling HIPAA The Foundation provides capability to obfuscate a member’s personally identifiable information (PII) on a screen when accessed by unauthorized users by enabling HIPAA security policy. For additional information, refer to the Enabling HIPAA security application guide on the Pega Foundation for Healthcare Application.
The Application guide can be referenced from Records > Application Guide > Enabling HIPAA security.
Step 10: Implementing Elastic search on HIPAA security policy To enable the elastic search for properties that are obfuscate using HIPAA policy below Settings required in Search Landing Page:
Access the settings by logging into the system as an administrator and clicking Designer Studio > System > Settings > Search.

Pega Foundation for Healthcare Implementation Guide 27
TITLE of INTERNAL DOCUMENT – Arial Bold 12 pt
• Advanced search queries (Lucene syntax search queries) are not allowed on an object when Access Control Policies are defined in that class.
− In this case, it is recommended that you use full-text search (on Custom Search Properties) instead of searching with Lucene syntax.
− If ABAC is enabled for a property, it cannot be marked for full-text search. Therefore, if we want a property to be secured and use it in elastic search, that property should be used as a filter in a Report Definition. So, in the context of pxRetrieveSearchData, all the RD filters will be transformed into Elastic Search filters.

Pega Foundation for Healthcare Implementation Guide 28
TITLE of INTERNAL DOCUMENT – Arial Bold 12 pt
Step 11: Defining the security model and organization structure Security planning involves defining authorization and authentication strategies for your application.
• Authentication
Proves to the application that you are who you say you are.
• Authorization
Determines the functions that the application allows you to perform. This corresponds to access group and role configuration.
Security planning also involves setting up the organization structure and operator attributes.
The application provides a fine level of security in the form of access settings and denial rules. Many integration rules also incorporate authentication. For more information on the additional aspects of security, enroll in the Lead System Architect course on Pega Academy and cover the Security lessons corresponding to the following topics:
• Defining your authentication scheme
• Defining your organizational structure
• Defining operator attributes
Authentication schemes The Pega Platform offers the following authentication types:
• PRBasic
Based on passwords in the Operator ID data instances and the login form (defined by the HTML rule @baseclass.Web-Login, which your application can override).
• PRSecuredBasic
Similar to PRBasic but passes credentials using Secure Sockets Layer (SSL) using Basic HTTP authentication. The login form is defined by the HTML rule @baseclass.Web-Login-SecuredBasic, which your application can override.
• PRCustom
Supports access to an external LDAP directory or a custom authentication scheme.
• PRExtAssign
Supports external assignments (Directed Web Access).
• J2EEContext
Pega Foundation for Healthcare Implementation Guide 29
TITLE of INTERNAL DOCUMENT – Arial Bold 12 pt
Specifies that the application server in which the Pega Platform is deployed uses JAAS to authenticate users.
Defining your authentication scheme Your site can use a centralized, automated means of maintaining operator data instead of maintaining it manually in the Pega Foundation for Healthcare.
Use the Security model worksheet in the Implementation Planning Workbook to record your decisions during this procedure.
1. Discuss Authentication schemes with your site's security and application server teams.
2. Determine the appropriate authentication type.
For more information on authentication scheme planning, see Authentication in the Pega Platform.
Pega Foundation for Healthcare comes with a predefined set of access groups, roles, and privileges. You can use the application roles as a starting point, but you should create your own application-specific access groups and roles to avoid any future problems when upgrading.
Other rule types such as sections, flow actions, and activities use roles and privileges to allow access to these rules at run time.
Tip: You can review the Pega Foundation for Healthcare access groups and roles. Click Designer Studio > Org & Security > Groups & Roles > Access Groups or Designer Studio > Org & Security > Groups & Roles > Access Roles.
Defining your access groups Use the Security model worksheet in the Implementation Planning Workbook to record your decisions during this procedure.
1. Identify additional access groups needed for your application.
2. Identify portals associated with these access groups.
Defining access roles and privileges You can associate one or more roles to an access group. Roles are additive. The more roles that you add to an access group, the more authorization there is. Privileges can be associated with one or more roles.
Use the Security model worksheet in the Implementation Planning Workbook to record your decisions during this procedure.

Pega Foundation for Healthcare Implementation Guide 30
TITLE of INTERNAL DOCUMENT – Arial Bold 12 pt
1. Determine which roles are needed for your application. You can use the Pega Foundation for Healthcare roles as a starting point.
2. Determine if View_Employee_PII and / or View_VIP_PII are needed.
3. Determine which privileges to associate with each role.
4. Associate each role with an access group.
For more information, see Groups & Roles.
Defining your organization structure Leverage the organization structure for routing and reporting within the application. Typically, the application organization structure does not map operators exactly to the site's organization chart but instead, it maps the work that those operators do.
Tip: For design guidance, see the Organization section on the Pega Platform 7.4 help.
Use the Organization structure worksheet in the Implementation Planning Workbook to record your decisions during this procedure.
1. Click Designer Studio > Org & Security > Organization > Organizational Chart.
2. Review the existing structure.
3. Determine the organization, division, and unit levels of the hierarchy.
Defining operator attributes An operator's access group affects what the operator can do in the application. In addition to the access group, three fields in the operator record influence how the application handles assignment of work to the user:
• Work group
• Skills
• Calendar
Tip: In many implementations, it is more efficient for the application to set values on the operator record during the authentication process than it is to have an administrator manually maintain these records. These rules must be configured as part of the authentication mechanism for your site. For more information, see About Authentication Services.
Defining the operator work group The work group setting on the operator record affects how the application delivers work to the operator.

Pega Foundation for Healthcare Implementation Guide 31
TITLE of INTERNAL DOCUMENT – Arial Bold 12 pt
1. Review the Operator record.
2. Determine the rules for assigning a work group to an operator or the role that multiple operators hold.
Use the Organization structure worksheet in the Implementation Planning Workbook to record your decisions during this procedure.
1. Click Designer Studio > Org & Security > Organization > Operators.
2. Click the Operator ID.
3. On the Work tab, review the work group information for the operator record.
4. Determine your policy for assigning a work group to an operator or the role that multiple operators hold.
Defining operator skills Skill settings in the operator record affect how the application routes work to the operator. Skill settings also affect how the application gets the most appropriate work when using the Get Next Work feature. You must determine the skills that are appropriate for your application and operators.
Use the Organization structure worksheet in the Implementation Planning Workbook to record your decisions during this procedure.
1. Define the skills needed for the application.
2. Determine which operator records or roles should be associated with those skills.
Defining the operator calendar The application calendar affects date calculations within the application, such as the date between business days calculation, and the SLA goal and deadline date calculation.
Note: The calendar on the operator record is relevant only if you have users who are not working in the same time zone as the rest of the organization. Otherwise, the application uses the calendar on the organization record and you can skip this step.
Use the Organization structure worksheet in the Implementation Planning Workbook to record your decisions during this procedure.
1. Determine the calendar instances needed for your application.
2. Determine which operator roles need a distinct calendar.
3. Determine the operator location.
For more information, see About Calendar data instances.
Pega Foundation for Healthcare Implementation Guide 32
TITLE of INTERNAL DOCUMENT – Arial Bold 12 pt
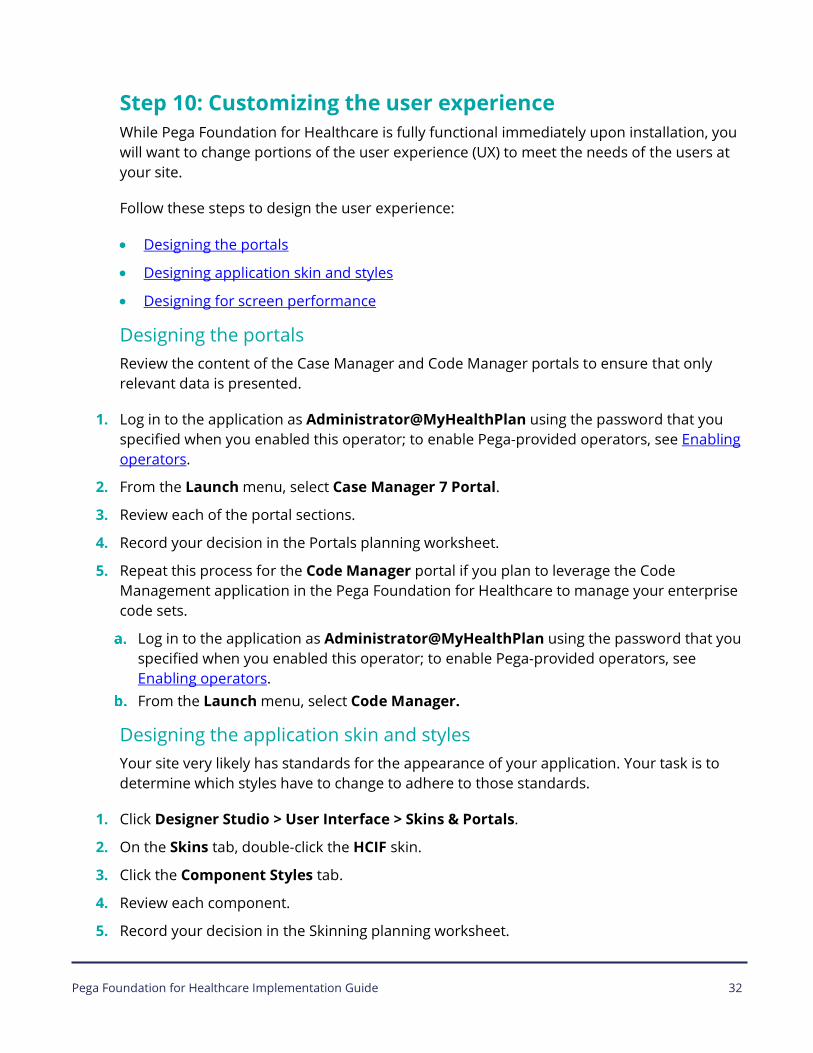
Step 10: Customizing the user experience While Pega Foundation for Healthcare is fully functional immediately upon installation, you will want to change portions of the user experience (UX) to meet the needs of the users at your site.
Follow these steps to design the user experience:
• Designing the portals
• Designing application skin and styles
• Designing for screen performance
Designing the portals Review the content of the Case Manager and Code Manager portals to ensure that only relevant data is presented.
1. Log in to the application as Administrator@MyHealthPlan using the password that you specified when you enabled this operator; to enable Pega-provided operators, see Enabling operators.
2. From the Launch menu, select Case Manager 7 Portal.
3. Review each of the portal sections.
4. Record your decision in the Portals planning worksheet.
5. Repeat this process for the Code Manager portal if you plan to leverage the Code Management application in the Pega Foundation for Healthcare to manage your enterprise code sets.
Log in to the application as Administrator@MyHealthPlan using the password that you specified when you enabled this operator; to enable Pega-provided operators, see Enabling operators.
From the Launch menu, select Code Manager.
Designing the application skin and styles Your site very likely has standards for the appearance of your application. Your task is to determine which styles have to change to adhere to those standards.
1. Click Designer Studio > User Interface > Skins & Portals.
2. On the Skins tab, double-click the HCIF skin.
3. Click the Component Styles tab.
4. Review each component.
5. Record your decision in the Skinning planning worksheet.

Pega Foundation for Healthcare Implementation Guide 33
TITLE of INTERNAL DOCUMENT – Arial Bold 12 pt
Note: As you are planning your application styles, you want to consider using mixins to provide incremental style changes. For more information, see Using mixins in the skin to drive consistency and efficiency.
Designing for screen performance You want your application to respond immediately as your end users interact with customers. As you design your user interface, determine:
1. Which business service level agreements exist. For example, the customer details must be available in one second or less while a representative is on the phone with the customer.
2. How long it takes backend systems to gather the data needed to display customer details.
3. Which fields the representatives absolutely need for the task that they need to perform.
4. If any network configuration could cause latency, for example, if there are representatives logged in through a corporate VPN or in a remote location.
Step 11: Defining reporting requirements Based on your login and portal, Pega Foundation for Healthcare provides numerous pre-configured reports to monitor case and work inventory as well as monitor workforce productive and quality. These standard reports are driven by the case and work object lifecycle infrastructure as well as the work and assignment-level service level rules for goals and deadlines used in managing the life cycle of a case.
Consider your reporting requirements early in the planning process. Before introducing a new report, answer these questions:
• Who needs the report?
• When do they need the report?
• What is the content of the report?
• Why do they need the report?
• Where will it be run? Will it be run in the Pega application, or using another reporting tool and source?
With reporting, you should plan your reporting needs ahead of time to give you most flexibility later on. To do this:
• Determine reporting architecture
• Review existing reports
• Identify key operational metrics
• Identify dashboard reports

Pega Foundation for Healthcare Implementation Guide 34
TITLE of INTERNAL DOCUMENT – Arial Bold 12 pt
• Determine which reports you will generate from the application, and which you will generate using a different reporting tool
• To record your decisions during this procedure, use the worksheet in "Reports" in the Implementation Planning Workbook
• To understand reporting requirements, read the Reporting Overview PDN article; the concepts in this article apply to all versions of the platform
• Review the description of each application-provided report, identify the expected volume of data, and determine how often each you expect to run each report
• Identify other reporting tools at your site

Pega Foundation for Healthcare Implementation Guide 35
TITLE of INTERNAL DOCUMENT – Arial Bold 12 pt
Building features Follow these steps to leverage and extend preconfigured data models, integration APIs, and other capabilities of the Pega Foundation for Healthcare to build you application features:
• Integrating using REST APIs
• Integrating using HL7 FHIR REST APIs
• Integrating with Microsoft Outlook for scheduling appointments
• Integrating and managing X12 EDI messages
• Dynamic Class Referencing in the Code Management Layer
• Managing custom code sets
• Managing code groups
• Implementing Elastic search on code sets
• Implementing the security model
• Managing member PII data masking
• Modifying the user interface
• Creating reports
Step 1: Integrating using REST APIs The Healthcare API infrastructure contains pre-configured specified endpoint URL and populates the returned result in data pages. The diagram below illustrates the flow of execution for a Payer Resource as an example:

Pega Foundation for Healthcare Implementation Guide 36
TITLE of INTERNAL DOCUMENT – Arial Bold 12 pt
Key rules in business request API execution Each pre-configured API in the Foundation has the following rules configured for it:
Rule name Rule type Usage D_Connect<Resource> e.g. D_ConnectPayer
Data Page Calls the connector and identifies the request and response mapping rules
Get<Resource> e.g. GetPayer
Connect REST Calls the REST Service using endpoint URL
MapRequestData Data Transform Maps the request data
MapResponseData Data Transform Maps the results data to data page
MapToEntity Data Transform Maps the results to the Payer object
Accessing the API data page and connect REST rules 1. Click Designer Studio > Data Model > View External Data Pages.
2. Expand the desired Resource Name.
Setting the endpoint URL of the source system The Endpoint URLs for all configured REST services are fetched through a dynamic settings data page called D_HCSettings. The data source configured to fetch the end point URL is a Data Transform rule called LoadHCSettings. This provides the flexibility to configure all end point URLs in one rule. For example, you could configure more than one end point URL for different membership or claims systems that support your business.

Pega Foundation for Healthcare Implementation Guide 37
TITLE of INTERNAL DOCUMENT – Arial Bold 12 pt
The LoadHCSettings data transform rule is configured with URLs for a test reference system used internally for testing the Healthcare APIs.
1. Locate the Data Page: LoadHCSettings
2. Copy and save the rule in your ruleset
3. Update the rule with Resource Name and end point URL for each desired API
Extending the mapping The Foundation provides an easy way for you to extend the pre-configured REST API mapping for each resource. Each mapping rule has a placeholder wrapper rule configured to extend the mapping as per your business needs. It is expected that the main mapping rule included in the wrapper rule is maintained as is to allow Pega to maintain backward compatibility with the Pega-provided mapping.
The next section shows the extension pattern provided.
Extending mapping using the MapToEntity pattern The Provider and Authorization APIs are configured using this extension pattern.
MapToEntityWrapper - Rather than implementing individual Data Transforms in each class of the object hierarchy, a single MapToEntityWrapper rule is configured @baseclass and is available across the entire system. This rule accepts a single Page Name parameter called Integration Page. This is defined on the “Pages & Classes” tab as being of type PegaHC-Int. As all incoming JSON request pages adhere to this contract, the run time parameters passed will be acceptable.
1. Open Data Transform rule: MapToEntityWrapper configured @baseclass. This rule provides two extension data transform placeholder rules in addition to the MapToEntity rule for the pre-configured mapping provided by the Foundation:
PreMapToEntity_EXT – Copy this rule into your ruleset at the appropriate PegaHC-Int resource class that requires pre-processing ahead of the standard mapping. You may need to create implementations of this rule when you have created subclasses of the PegaHC-Int domain entity that is being mapped and need to ensure that the appropriate custom class is instantiated at run-time via dynamic class injection (the Dynamic Class Referencing pattern). This allows for proper use of polymorphism throughout the system and minimizes the instances of override properties being created for each Page, Page List and Page Group property provided by the Foundation.
PostMapToEntity_EXT – Copy this rule into your appropriate resource class and extend for post-processing after the mapping is done.
2. Open Data Transform rule: MapToEntity configured at the PegaHC-Int class for each domain e.g. PegaHC-Int-Authorization. This rule provides the pre-configured mapping for

Pega Foundation for Healthcare Implementation Guide 38
TITLE of INTERNAL DOCUMENT – Arial Bold 12 pt
the Resource and its subpages. It provides a placeholder extension rule called MapToExtensionDetails_EXT.
Copy the MapToExtensionDetails_EXT into your ruleset for the desired Resource or its sub- page class to extend the mapping beyond what is pre-configured.
Step 2: Integrating using HL7 FHIR REST APIs The FHIR API infrastructure contains pre-configured specified endpoint URL and populates the returned result in data pages. The diagram below illustrates the flow of execution for a typical Resource as an example:
Key rules in business request API execution Each pre-configured FHIR API in the Foundation has the following rules configured for it:
Rule name Rule type Usage D_FHIR<Resource> e.g. D_FHIRMember
Data Page Calls the connector and identifies the request and response mapping rules
<ResourceName> e.g., Patient
Connect REST Calls the REST Service using endpoint URL
Map<Resource>RequestData Data Transform Maps the request data MapTo<Resource> e.g., MapToMembers
Data Transform Wrapper rule which calls the main mapping data transform rule
MapTo<Resource> e.g., MapToMemberDetails
Data Transform Mapping data transform which maps the results to the response

Pega Foundation for Healthcare Implementation Guide 39
TITLE of INTERNAL DOCUMENT – Arial Bold 12 pt
Accessing the FHIR®© API data page and connect REST rules 1. Click Designer Studio > Data Model > View External Data Pages.
2. Expand the desired Resource Name. The FHIR Resources are named with appropriate FHIR prefix.
Setting the endpoint URL of the source system The Endpoint URLs for all configured FHIR REST services are fetched through a dynamic settings data page called D_FHIRSettings. The data source configured to fetch the end point URL is a Data Transform rule called LoadFHIRSettings. This provides the flexibility to configure all end point URLs in one rule. For example, you could configure more than one end point URL for different membership or claims systems that support your business.
The LoadFHIRSettings data transform rule is configured with URLs for a test reference system used internally for testing the Healthcare APIs.
1. Locate the Data Page: LoadFHIRSettings.
2. Copy and save the rule in your ruleset.
3. Update the rule with Resource Name and end point URL for each desired API.
Setup Guide to Leverage FHIR APIs For additional information, refer to the Setup Guide to Leverage FHIR APIs application guide on the Pega Foundation for Healthcare Application.
The Application guide can be referenced from Records > Application Guide> Setup Guide to Leverage FHIR APIs.
Step 3: Integrating with Microsoft Outlook for scheduling appointments Pega Foundation for Healthcare has real-time integration with Microsoft Exchange, allowing a user to create a new Appointment in the application, and synchronize the appointment to Exchange.
All operators, members, and practitioners that an operator has read access to can be added to an Appointment as an attendee. There is also a search that allows finding the resources by any combination of name and email.
The user can create, update, and cancel the appointment, and also get the availability of the attendees/participants. Subsequent updates can be made to the appointment on Exchange using Outlook as well.

Pega Foundation for Healthcare Implementation Guide 40
TITLE of INTERNAL DOCUMENT – Arial Bold 12 pt
One can use the following data pages, the source of which is a SOAP connector, to handle the appointment scheduling feature:
Key rules DataPage Purpose Source(Connector)
D_CreateAppointmentInExchange To create an appointment in Exchange
CreateItem
D_UpdateAppointmentInExchange To update details of a scheduled appointment
UpdateItem
D_CancelAppointmentInExchange To cancel a scheduled appointment CreateItem
D_GetParticipantsAvailableSlots To get the availability of the participants
GetUserAvailability
Each of the above data pages requires the appointment details page to be sent as a parameter.
Impersonation To create an appointment and synchronize it with Exchange, the logged in user’s Exchange account must be impersonated by an impersonation account. Pega Foundation for Healthcare uses the impersonation account to create appointments on behalf of all of the application’s users. Only one impersonation account needs to be created, and can be used to impersonate as many exchange accounts as necessary. Impersonation enables the caller to perform operations by using the permissions that are associated with the impersonated account, instead of the permissions that are associated with the caller's account. With Exchange Impersonation, one account acts as another account. When an account is impersonated, the system logs the access as if the account that is specified in the header were acting on the system. The calling account must have the appropriate permissions to perform impersonation. After impersonation permissions have been established, the user who has impersonation permissions can make calls against the other user's account. The impersonated account is maintained in the Authentication Profile (“EWS_Integration_AuthProfile”).
Work with your Exchange administrator to set up impersonation for your version of Microsoft Exchange.
To establish impersonation configure the following rules:
Name Type Description
EWS_Integration_AuthProfile Authentication Profile Authentication required by remote service
EWS_Integration_SecurityProfile Security Profile WS-Security to communicate with the service. Would require changing

Pega Foundation for Healthcare Implementation Guide 41
TITLE of INTERNAL DOCUMENT – Arial Bold 12 pt
the key store referred to by the security profile.
All the connector rules and the exchange integration infrastructure can be found in the PegaHC-EWS ruleset.
The Foundation also provides reference workflows to create an Appointment, Add Participants, Update an Appointment, and Cancel an Appointment.
Creating an appointment 1. Log in to the application as the EWSUser operator ID using the password that you specified
when you enabled this operator; to enable Pega-provided operators, see Enabling operators.
2. Click Create Appointment
3. Enter Appointment Details:
Subject (Required) Body (Text) Select Start Date and Duration (Required) Select End Date and Duration (Required) Location Add Participants
− Logged in user is selected by default.
− Click Add Staff to add other operators of your workgroup - adds a row to the grid, with an auto-complete field that allows you to select one operator. The auto-complete drop-down list shows the Operator’s name and the email ID.
− Click Add Member to search for and add a member - adds a row to the grid, with an auto-complete field that allows you to select one member from the list of member records available in the application. The auto-complete drop-down list shows the Member’s name and the email ID.
− Click Add Practitioner to search for and add one or more practitioners - adds a row to the grid, with an auto-complete field that allows you to select one practitioner from the list of practitioner records available in the application. The auto-complete drop-down list shows the Practitioner’s name and the email ID.
4. Click Save.

Pega Foundation for Healthcare Implementation Guide 42
TITLE of INTERNAL DOCUMENT – Arial Bold 12 pt
Viewing and updating an existing appointment 1. Log in to the application as the EWSUser operator ID using the password that you specified
when you enabled this operator; to enable Pega-provided operators, see Enabling operators.
2. System displays user’s calendar with scheduled appointments
3. Select desired appointment from the calendar
4. Click Update to update the appointment – you can update the date, time frame, edit the participants.
5. Click Save to save the updated appointment.
Canceling an existing appointment 1. Log in to the application as the EWSUser operator ID using the password that you specified
when you enabled this operator; to enable Pega-provided operators, see Enabling operators.
2. System displays user’s calendar with scheduled appointments.
3. Select the desired appointment from the calendar.
4. Click Cancel to cancel the appointment.
Step 4: Integrating and managing X12 EDI messages Pega Foundation for Healthcare provides a pre-configured File Service rule instance called X12file.X12.X12Inbound that reads the X12 message input file and calls the activity X12ParseMessageStart to start the processing of the message file.
1. Configure an appropriate MQ or File Listener rule with all listener properties
2. Configure appropriate MQ / File Service rule to associate with the Listener rule (see example for File Service rule mentioned above
3. Ensure the Service rule calls the X12ParseMessageStart rule as the Activity
4. The parsed X12 message is available on the clipboard page specified Service rule e.g. X12Message
5. Extend the process to map to an appropriate work object as required
Note: The work object mapping for the X12 837 claim transaction is configured in Pega’s Healthcare Claims Repair and Smart Claims Engine applications. Similarly the mapping of the X12 278 Healthcare Service Review and Response is configured in the Care Management application.
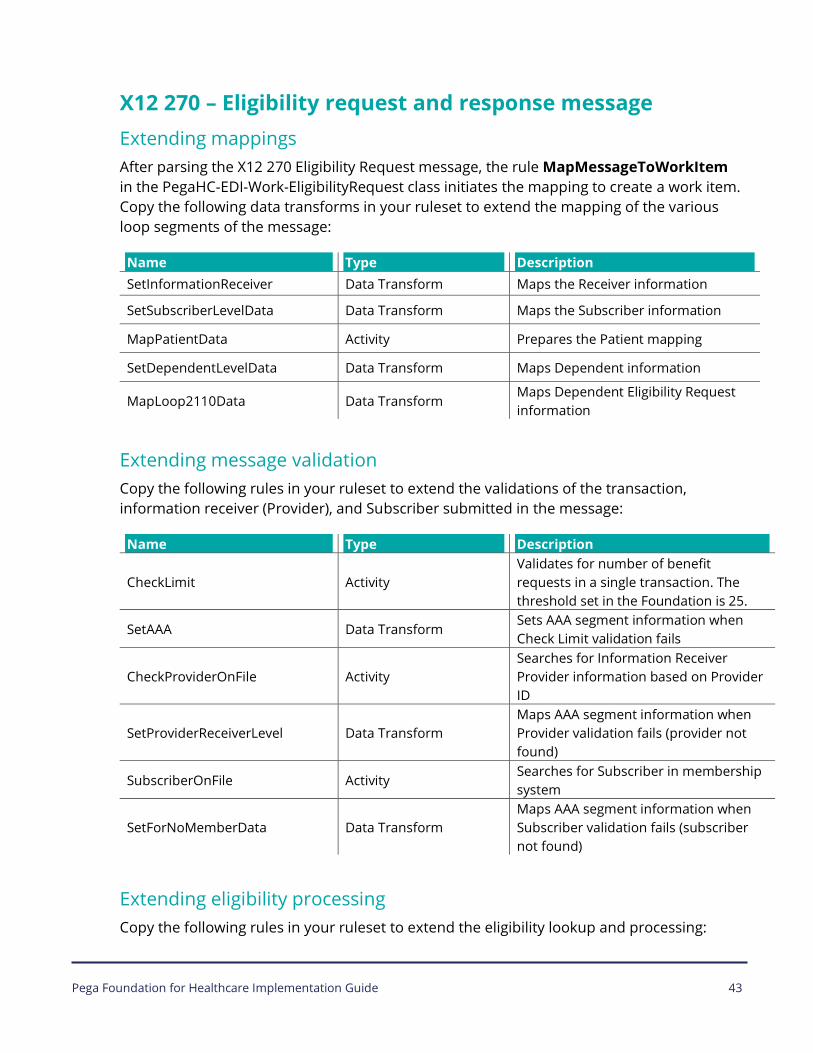
Pega Foundation for Healthcare Implementation Guide 43
TITLE of INTERNAL DOCUMENT – Arial Bold 12 pt
X12 270 – Eligibility request and response message Extending mappings After parsing the X12 270 Eligibility Request message, the rule MapMessageToWorkItem in the PegaHC-EDI-Work-EligibilityRequest class initiates the mapping to create a work item. Copy the following data transforms in your ruleset to extend the mapping of the various loop segments of the message:
Name Type Description SetInformationReceiver Data Transform Maps the Receiver information
SetSubscriberLevelData Data Transform Maps the Subscriber information
MapPatientData Activity Prepares the Patient mapping
SetDependentLevelData Data Transform Maps Dependent information
MapLoop2110Data Data Transform Maps Dependent Eligibility Request information
Extending message validation Copy the following rules in your ruleset to extend the validations of the transaction, information receiver (Provider), and Subscriber submitted in the message:
Name Type Description
CheckLimit Activity Validates for number of benefit requests in a single transaction. The threshold set in the Foundation is 25.
SetAAA Data Transform Sets AAA segment information when Check Limit validation fails
CheckProviderOnFile Activity Searches for Information Receiver Provider information based on Provider ID
SetProviderReceiverLevel Data Transform Maps AAA segment information when Provider validation fails (provider not found)
SubscriberOnFile Activity Searches for Subscriber in membership system
SetForNoMemberData Data Transform Maps AAA segment information when Subscriber validation fails (subscriber not found)
Extending eligibility processing Copy the following rules in your ruleset to extend the eligibility lookup and processing:

Pega Foundation for Healthcare Implementation Guide 44
TITLE of INTERNAL DOCUMENT – Arial Bold 12 pt
Name Type Description
ProcessBenefitRequest Activity Main activity rule that processes the eligibility information
OpenPolicyByIDNoDisplay Activity Searches for member’s policy by Policy Number submitted on the message
CheckPolicyOnServiceDate Data Transform Checks to see if the Policy is active on the requested service date in the message
ProcessPlan Activity Fetches Plan/Product based on Plan ID associated with Policy
ProcessBenefit Activity Fetches Plan Benefits
ProcessBenefitGroup Activity Searches for matching benefit coverage based on submitted service type code on the message
For additional information, refer to the Healthcare X12 EDI Message Management Technical Specifications on the Pega Foundation for Healthcare product page.
X12 276 – 277 – Claim status request and response message Extending mappings After parsing the X12 276 Claim Status Request message, the rule MapMessageToWorkItem in the PegaHC-EDI-Work-ClaimStatusRequest class initiates the mapping to create a work item. Copy the following data transforms in your ruleset to extend the mapping of the various loop segments of the message:
Name Type Description
SetServiceProviderLevel Data Transform Maps the requesting provider information
SetSubscriberLevelInfo Data Transform Maps the Subscriber information
SetDependentLevelData Data Transform Maps Dependent information
Extending processing Copy the following rules in your ruleset to extend the claim lookup and processing:
Name Type Description
OpenClaim Activity Searches for claim by submitted Payer Claim Control Number

Pega Foundation for Healthcare Implementation Guide 45
TITLE of INTERNAL DOCUMENT – Arial Bold 12 pt
Name Type Description
SetValueForCreateClaimRequest Activity Maps claim information from matched claim
SetClaimValues Activity Sets information is matching claim is not found
For additional information, refer to the Healthcare X12 EDI Message Management Technical Specifications on the Pega Foundation for Healthcare product page.
Defining the X12 834 outbound filepath Pega Foundation for Healthcare provides a pre-configured rules for creating 834 outbound file. To define the filepath user needs to update the data transform “FilePathParam” in class “PegaX12-Data-N834” with appropriate path where the file needs to be generated.
Step 5: Dynamic Class Referencing in the Code Management Layer Dynamic Class Referencing (DCR) is a pattern to avoid hardcoding of class names, flow names, workbasket names and soon at an application level so that the implementation layers can easily extend the application.
Pega Foundation for Healthcare has implemented the DCR approach using a data page and data transforms. Using this approach, any specialized layer that is built on the PegaHealthCodes layer, is saved as the data transform rules in the specialized layer ruleset in order to update the class names, flow names and add any additional property mappings. This approach will dynamically set the specialized layer’s class names, flow names and any other values to the appropriate clipboard pages at run time.
Configuring DCR Follow the steps to configure DCR:
1. Search for the Data Page: D_AppExtension and copy the above data page into your implementation ruleset.
2. Enter the field details as per your configuration settings. Enter Object type as PegaHealth-Codes-Data-AppExtension class or implementation class in the specialized layer extended class from PegaHealth-Codes-Data-AppExtension.
3. In the Data sources section:
Select Source type as Data Transform from the drop-down list. Select Data transform AppExtension from above selected or its parent classes. Update the properties in the Data transform as per your implementation layer settings.

Pega Foundation for Healthcare Implementation Guide 46
TITLE of INTERNAL DOCUMENT – Arial Bold 12 pt
Note: As a best practice, you can create a new class extending from PegaHealth-Codes-Data-AppExtension in the implementation layer and configure the Data Transfer rule in the implementation layer with only required properties to easily consume base layer settings coming in future releases.
Step 6: Managing custom code sets To configure a custom code set, you must create or modify the rules listed in the following table.
Rule type Name Details Data Class PegaHealth-Codes-Data-XXXX Create a data class that extends the
abstract class “PegaHealth-Codes-Data-”. Create the necessary properties.
DB Table <database table name> Create a table in the database
Database Table mapping <Pega Platform database mapping rule>
Map the data class to the DB table using an instance of “Data-Admin-DB-Table”
Parse Delimited Name space: ParseCode Record Type: ParseCode
Create parse delimited rule, in lines with the format of the incoming data in the code set file.
Decision Table GetCodeSetClass UPDATE this decision table by adding a row, to return the code set class.
Decision Table GetCodeSetDateFormat UPDATE this decision table by adding a row, to return the format of the effective and expiration dates in the codes.
Property CodeSetType UPDATE this property, present in the code set work type ‘PegaHealth-Work-CodeSet’, to have the appropriate value and label for the custom code set.
The following rules are optional and are for configuring additional features such as add a single code, delete a code, and Save edited code. Modify these rules for your custom code set depending on desired functionality.
Rule type Rule name Create or update Details Activity AddSingleCode Create Create this activity in the
code set data class, which sets the
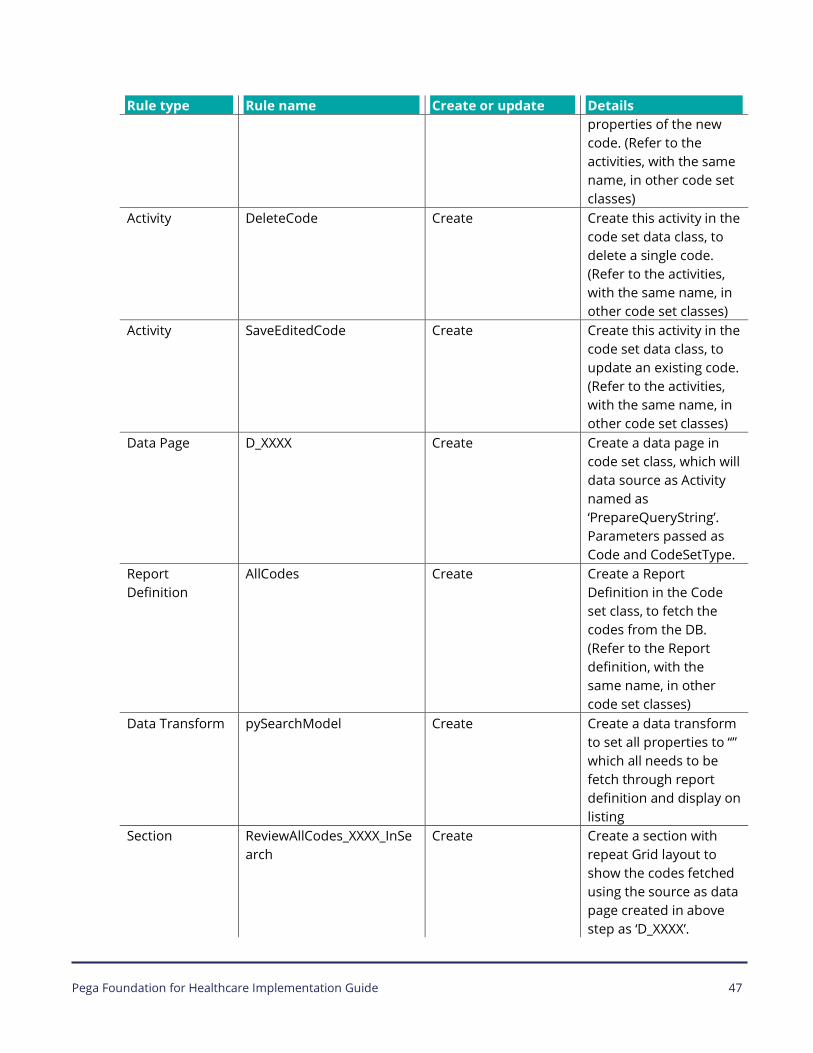
Pega Foundation for Healthcare Implementation Guide 47
TITLE of INTERNAL DOCUMENT – Arial Bold 12 pt
Rule type Rule name Create or update Details properties of the new code. (Refer to the activities, with the same name, in other code set classes)
Activity DeleteCode Create Create this activity in the code set data class, to delete a single code. (Refer to the activities, with the same name, in other code set classes)
Activity SaveEditedCode Create Create this activity in the code set data class, to update an existing code. (Refer to the activities, with the same name, in other code set classes)
Data Page D_XXXX Create Create a data page in code set class, which will data source as Activity named as ‘PrepareQueryString’. Parameters passed as Code and CodeSetType.
Report Definition
AllCodes Create Create a Report Definition in the Code set class, to fetch the codes from the DB. (Refer to the Report definition, with the same name, in other code set classes)
Data Transform pySearchModel Create Create a data transform to set all properties to “” which all needs to be fetch through report definition and display on listing
Section ReviewAllCodes_XXXX_InSearch
Create Create a section with repeat Grid layout to show the codes fetched using the source as data page created in above step as ‘D_XXXX’.

Pega Foundation for Healthcare Implementation Guide 48
TITLE of INTERNAL DOCUMENT – Arial Bold 12 pt
Rule type Rule name Create or update Details Section ReviewAllCodes_XXXX Create Create a section with
repeat Grid layout to show the codes fetched using the source as data page created in above step as ‘D_XXXX’.
Section ReviewAllCodes Update Include the section ‘ReviewAllCodes_XXXX’, to show conditionally, when the CodeSetType is the custom code set.
Section ReviewAllCodesInSearch Update Include the section ‘ReviewAllCodes_XXXX_InSearch’, to show conditionally, when the CodeSetType is the custom code set.
Activity PrepareForEditableDisplay Update Update this activity to create a page, which is used to show the parsed codes. (Refer the other steps, which are created for other code sets)
List EditList Create Create a list rule, with the properties of the code set. This rule will be used during ‘Edit in excel’. (Refer to List rules, with the same name, in other code set classes)
Data Transform RemoveCodeListPages Update Update to remove the Page that has the codes of the code set. This page was created in ‘PrepareForEditableDisplay’ and ‘OpenDefaults’ activities.
Activity ParseCodeSet Update This is the main activity that handles the parsing. If the custom code has any other dates, apart from effective and expiration dates, edit the java step

Pega Foundation for Healthcare Implementation Guide 49
TITLE of INTERNAL DOCUMENT – Arial Bold 12 pt
Rule type Rule name Create or update Details (with label ‘Format the Dates’) in this activity.
Control OpenWO Update Update the this control, which displays the label for the code set
Step 7: Managing code groups To configure a custom code set, you must create an open ruleset and create or modify the rules listed in the following table.
1. Log in to the application as Administrator@PegaHealthCodes using the password that you specified when you enabled this operator; to enable Pega-provided operators, see Enabling operators.
2. Create a new rule set, for example: MyCodeGroups version 01-01-01.
3. Add MyCodeGroups ruleset to the PegaHealthCodes application stack
4. Select Designer Studio > Healthcare > Configuration to navigate to the landing page.
5. Select MyCodeGroups ruleset and its version in the Code Group Settings and click Save.
6. For additional information, see the Managing Code Groups in the Foundation application guide on the Pega Foundation for Healthcare application.
The Application guide can be referenced from Records > Application Guide > Managing Code Groups in the Foundation.
Step 8: Implementing Elastic search on code sets To improve the lookup performance of large data sets such as code sets during business processing, a new search feature using Elastic has been implemented for the all the code sets.
You can easily extend the capability to other data objects by leveraging the best practice rule configurations highlighted in this section.
The Data and Work classes will need to be re-indexed to enable Elastic Search.
Follow the steps below to enable indexing.
1. Log in to the application as Administrator@PegaHealthCodes using the password that you specified when you enabled this operator; to enable Pega-provided operators, see Enabling operators.

Pega Foundation for Healthcare Implementation Guide 50
TITLE of INTERNAL DOCUMENT – Arial Bold 12 pt
2. Leverage nested data structure indexing by enabling specified dynamic system setting, to “true.”
3. Navigate to the System > Settings > Search page from your Designer Studio menu.
4. Check the Enable Indexing option and enable indexing for All Data and All Work.
Using Elastic search To use Elastic search, call the D_<CodeSetName> data page as your data source for either an auto-complete control or elsewhere in any other search field.
The above data page takes two parameters:
• Code – Data string to search for
• CodeSetType – Name of the code set that you want to search on
For all classes, you can perform the search for code and description (respective fields for HCPCS, CPT® and so on). It is defined through a search model that is a data transform pySearchModel created in each of the classes, which instructs the Elastic code the fields to enable for search.
Note: Although not advisable, but if more fields for search are required, they can be added to the pySearchModel and adequate data indexing is done. Note that adding too much data may significantly increase the Elastic index file causing potential poor performance.
The data source for the data page is the Activity as PrepareQueryString which prepares the query to be passed and calls the report definition. This Activity sets the properties based on the parameter that is passed and then calls the report definition rule by passing the query string to fetch the records for the specified code set type.
Step 9: Implementing Elastic search on sample data objects To improve the lookup performance of large data sets such as Members, claims, or providers during business processing, a new search feature using Elastic has been implemented for all the sample data objects.
You can easily extend the capability to other data objects by leveraging the best practice rule configurations highlighted in this section.
The Data classes will need to be re-indexed to enable Elastic Search.
Follow the steps below to enable indexing.
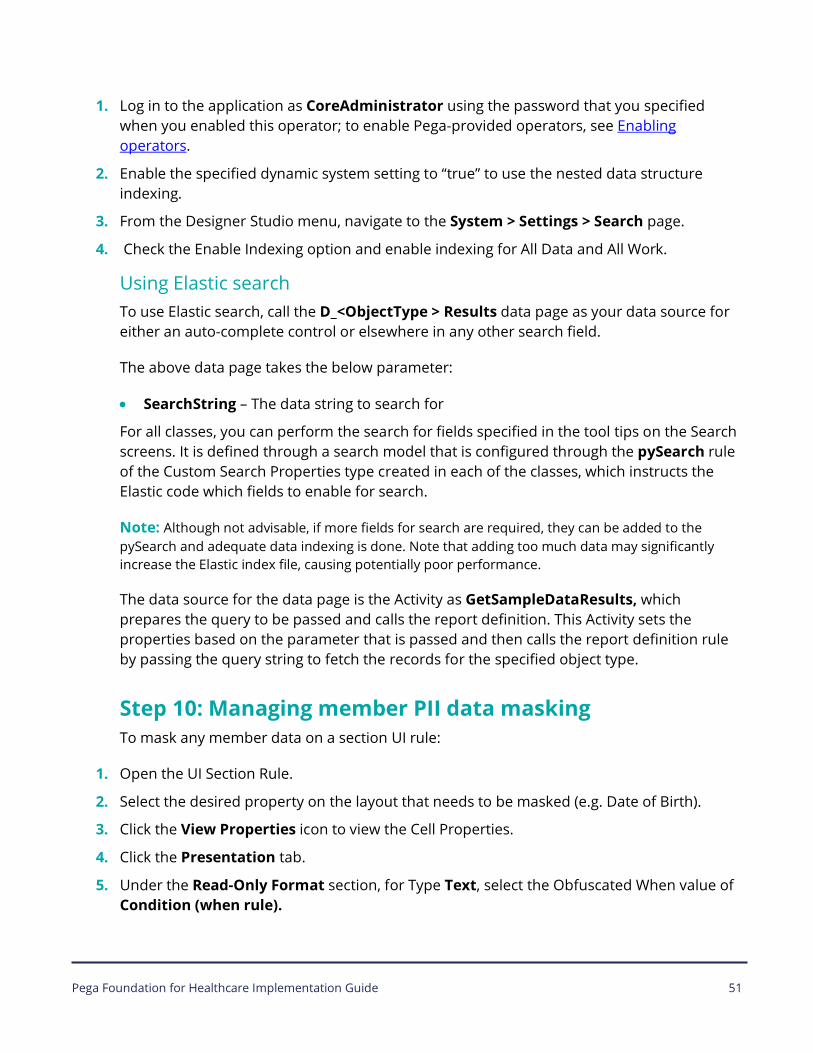
Pega Foundation for Healthcare Implementation Guide 51
TITLE of INTERNAL DOCUMENT – Arial Bold 12 pt
1. Log in to the application as CoreAdministrator using the password that you specified when you enabled this operator; to enable Pega-provided operators, see Enabling operators.
2. Enable the specified dynamic system setting to “true” to use the nested data structure indexing.
3. From the Designer Studio menu, navigate to the System > Settings > Search page.
4. Check the Enable Indexing option and enable indexing for All Data and All Work.
Using Elastic search To use Elastic search, call the D_<ObjectType > Results data page as your data source for either an auto-complete control or elsewhere in any other search field.
The above data page takes the below parameter:
• SearchString – The data string to search for
For all classes, you can perform the search for fields specified in the tool tips on the Search screens. It is defined through a search model that is configured through the pySearch rule of the Custom Search Properties type created in each of the classes, which instructs the Elastic code which fields to enable for search.
Note: Although not advisable, if more fields for search are required, they can be added to the pySearch and adequate data indexing is done. Note that adding too much data may significantly increase the Elastic index file, causing potentially poor performance.
The data source for the data page is the Activity as GetSampleDataResults, which prepares the query to be passed and calls the report definition. This Activity sets the properties based on the parameter that is passed and then calls the report definition rule by passing the query string to fetch the records for the specified object type.
Step 10: Managing member PII data masking
To mask any member data on a section UI rule:
1. Open the UI Section Rule.
2. Select the desired property on the layout that needs to be masked (e.g. Date of Birth).
3. Click the View Properties icon to view the Cell Properties.
4. Click the Presentation tab.
5. Under the Read-Only Format section, for Type Text, select the Obfuscated When value of Condition (when rule).

Pega Foundation for Healthcare Implementation Guide 52
TITLE of INTERNAL DOCUMENT – Arial Bold 12 pt
6. Select the IsDataMasked preconfigured when rule. This when rule uses the Member profile properties for VIP or Employee flags as well as logged in operator’s role to determine the masking logic.
Step 11: Modifying the user interface You can:
• Adding a new property to a section
• Adding a new section
• Updating the skin
Determining which part of the user interface to modify When you first access Pega Foundation for Healthcare, you will have access to the Case Manager and Code Manager Portal, where you will see a dashboard, which typically contains a dashboard menu at left. This dashboard is completely customizable and can display any data that you have integrated into your application.
Locating the user interface element to change To determine which user interface element to modify to implement your change, you can use the Live UI feature of Pega Platform.
1. Click Live UI
2. Select an element to observe.
When selected, Live UI gives you all the information about that UI element. You are able to see the sections and harnesses that an element is a part of.
3. Click the Magnifying glass icon to open that rule in Designer Studio and update it as needed.
Adding a new property to a section Pega Foundation for Healthcare uses standard Pega Platform user interface components, so the update process is the same as any Pega Platform application.
1. Click Live UI and determine the section that you want to modify.
2. Click the Magnifying glass icon to open the rule in Designer Studio.
3. In Application Explorer, locate the property that you want to add to the section and drag it onto the section where you want it to display.
4. Click Save as and then save the rule to the default Applies to class and make sure that the ruleset is for your application.

Pega Foundation for Healthcare Implementation Guide 53
TITLE of INTERNAL DOCUMENT – Arial Bold 12 pt
5. Click Create and open and click Save.
Adding a new section Pega Foundation for Healthcare uses standard Pega Platform user interface components, so the update process is the same as any Pega Platform application.
1. Click Live UI and determine the section that you want to add a section to.
2. Click the Magnifying glass icon to open the rule in Designer Studio.
3. In Application Explorer, locate the section that you want to add and drag it into the section where you want it to display.
4. Click Save as and save the rule to the default Applies to class. Make sure that the ruleset is for your application.
5. Click Create and open and then click Save.
Also, you can use When rules to update which layouts and sections are visible. This is helpful for a manager to see content that a non-manager should not be allowed to see.
To do this:
1. Click the Gear icon to configure the layout or section.
2. Change the Visibility to Condition.
3. Enter a When rule or conditional expression.
4. Click OK and then click Save.
Updating the skin You can update the look and feel of your application to reflect the color scheme of your company. The application takes advantage of the standard Pega 7 Platform skinning features within an application.
1. In Designer Studio, click ApplicationName > Open Application Skin.
2. Update the options as needed, and then click Save as.
Note::To learn more about skins, see Skin rules.
3. Click Create and open.
4. Click Save.
5. If you give your skin a different name, update the application to reflect it.
6. In Designer Studio, click ApplicationName > Open Application.
7. Change the Skin field to the skin that you created.
8. Click Save.

Pega Foundation for Healthcare Implementation Guide 54
TITLE of INTERNAL DOCUMENT – Arial Bold 12 pt
Step 12: Creating reports Pega provides several pre-configured reports that are customized for the various work objects, cases, and business processes used in the application. These reports give you complete control in managing your business. With real-time insights into case inventories and aging, you can respond with the agility needed to comply with your internal and external service level agreements as well as compliance mandates.
To create other reports, see Running reports from the Report Browser.

Pega Foundation for Healthcare Implementation Guide 55
TITLE of INTERNAL DOCUMENT – Arial Bold 12 pt
Testing a new application Testing a new application includes the following procedures:
• Testing in the Build environment
• Testing in the Test or Production environments
• Testing in the UAT environment
Testing in the Build environment Test a new application in the Build environment before migrating the new application to a Test or Production environment. Testing in the Build environment enables you to verify that basic functionality and interfaces work correctly and also that performance is acceptable.
1. Run functional tests to test specific features from the end-user perspective.
2. Run automated unit tests to test features such as security, eligibility, search, and loading of data.
3. Use the Performance tool (PAL) to measure the performance of the application. For information about the PAL tool, see About the Performance tool.
Prior to extending your site-specific Pega implementation, Pegasystems recommends that you establish a performance benchmark (baseline) using PAL. This allows subsequent, iterative performance tests against the established baseline to help identify any degradation in performance resulting from development efforts.
Use PAL to check the performance of the following:
Search Loading of components
Save the PAL test results so that you can compare them to future PAL test results to determine whether an application update has a performance impact.
4. Verify that the Pega-provided reports and your custom reports run successfully, and that they show your implementation layer data, rather than the default demonstration data. This can be an automated test.
5. Test all integrations, both independently and with associated integrations.
6. Test security. Test the most common roles to ensure that the required access groups are configured and point to the correct software version.

Pega Foundation for Healthcare Implementation Guide 56
TITLE of INTERNAL DOCUMENT – Arial Bold 12 pt
Testing in the Test or Production environments After you import the application to a Test or Production environment, test the application in the new environment to verify that it works correctly in that environment.
Note: The testing performed in the Test environment should include usability testing to ensure that the application meets the UI standard.
1. Verify that the source (Build environment) and destination (Test or Build environment) files are the same.
2. Run functional tests to test specific features from the end-user perspective.
3. Run automated unit tests to test features such as security, eligibility, search, and loading of data.
4. In the Test environment, run the Application Guardrails Compliance Score to ensure that the application meets guardrails.
5. Verify that the Pega-provided reports and your custom reports run successfully, and that they show your implementation layer data, rather than the default demonstration data. This can be an automated test.
6. Test all integrations, both independently and with associated integrations.
7. Verify that the integrations point to the correct system of record, and not to the system of record for the Build environment.
8. Test security. Test the most common roles to ensure that the required access groups are configured and point to the correct software version. Use these common roles in your smoke tests (see next step).
9. Run a smoke test to compare the source and destination environments. Verify that all tests that pass in the Build environment also pass in the Test or Production environment. If anything fails, compare the environments to determine whether a difference in environment could cause the test to fail. If the environment caused the failure, either fix the issue that caused the failure or adjust the test as appropriate for the new environment.
10. Run performance tests to verify that performance meets expectations. Pega recommends automated performance testing. Save the results so that you can compare them to future performance test results to determine whether an application update has a performance impact.
Testing in the UAT environment After you complete testing in a Test environment, it is common to perform User Acceptance Testing (UAT) in a designated UAT environment, which could be a Pre-production environment. UAT ensures that end users will be able to successfully complete work and meet business objectives.

Pega Foundation for Healthcare Implementation Guide 57
TITLE of INTERNAL DOCUMENT – Arial Bold 12 pt
Note: Organizations that use Scrum for application development will complete less formal UAT as part of each sprint cycle.
1. Verify the integrity of the UAT environment.
2. Have the end-users (or BAs acting the role of end-users) run scripts to test all scenarios including boundary and exception testing. The end-users (that is, the trainers, managers, and directors), do the following during UAT:
Verify that there are no major issues. Review changes in order to better understand the features.
Packaging a new application To migrate a new application to a different environment, you must first package the application so that it can be imported to the new environment.
Packaging and importing a new application includes the following procedures:
• Merging application changes
• Packaging an application for migration
• Importing the packaged application
Merging application changes If you developed your application features in separate branches, use the Merge Branches wizard to merge the branches before you package the application. The wizard shows any merge conflicts so that you can correct them before you merge the branches.
For information about how to use the Merge Branches wizard, see Merging branches.
Packaging an application for migration Before you can migrate a new application to a different environment, you must package the relevant data instances and rulesets into a product rule. The product rule is an instance of Rule-Admin-Product, and it is referred to as the RAP file.
1. Click Designer Studio > Application > Distribution > Package to start the Application Packaging wizard. For information about how to use that wizard, see Application Packaging wizard.
2. Complete each page of the Application Packaging wizard.
3. On the last page of the wizard, click Preview.
4. Review the contents of the generated RAP file.

Pega Foundation for Healthcare Implementation Guide 58
TITLE of INTERNAL DOCUMENT – Arial Bold 12 pt
5. On the last page of the wizard, click Modify to make any changes.
6. When the RAP file is complete, click Export. The wizard creates a .ZIP file in the ServiceExport directory on the current application server node.
Importing the packaged application To deploy a new application to a different environment, import the .ZIP file that contains the packaged application to the new environment.
1. Click Designer Studio > Application > Distribution > Import.
2. Use the Import Gadget to import the target .ZIP file. For detailed information about how to use that gadget, see Import wizard landing page.
For information about how to swap the database connection pointers to your Production database after an import to a Production environment, see the Pega Platform 7.4 Upgrade Guide.

Pega Foundation for Healthcare Implementation Guide 59
Production maintenance and monitoring Production maintenance and monitoring include the following:
• Application monitoring
• Identifying and reporting issues
Business rule maintenance in the Production environment As a manager, you can update Dialogs, Coaching Tips and Expert Skills in the Production environment using the Tools > Configuration option available in each process action of the case type. This feature allows managers to change these options without having to wait for a rule deployment.
Note: Skills instances need to be created in order for them to be available in the selection of available Expert Skills.
Managers can also create reports in the My Reports section of the portal. For more information, see Running reports from the Report Browser.
The manager can be given the ability to update other rule types in the Production environment. For example, the manager can update the Goals and Deadline for a certain case type. These rules must be delegated in the Designer Studio first. After the rule has been delegated, you can access it by clicking your operator profile > My rules. For more information on rule delegation, see Delegating a rule or data type.
Application monitoring Pega Platform application health monitoring In addition to your site's database and application server monitor tools that you already have in place, Pega Platform offers an application called Autonomic Events Services (AES). AES is an application that automatically monitors, retrieves, and organizes the alert data from one or more clustered systems throughout the enterprise. Pegasystems also provides the Predictive Diagnostic Cloud (PDC), which allows you to benefit from AES without installing it locally. PDC is a Software as a Service offering of AES.
Identifying and reporting issues As with any application, your users will encounter issues that they need to report as they begin to use the application. When deploying your application to the production environment, you must do the following:

Pega Foundation for Healthcare Implementation Guide 60
TITLE of INTERNAL DOCUMENT – Arial Bold 12 pt
1. Identify operational staff who will be responsible for responding to issues reported in the production environment.
2. Establish procedures with those resources to triage, respond to, and escalate issues.
3. Determine procedures for delivery of changes to the production environment.