pega platform 7 - community.pega.com · application server platform. to update from pega 7.1.x or...
TRANSCRIPT

PEGA PLATFORM
Pega Platform 7.4Upgrade Guide
TrademarksFor Pegasystems Inc. trademarks and registered trademarks, all rights reserved. All other trademarks orservice marks are property of their respective holders.
For information about the third-party software that is delivered with the product, refer to the third-partylicense file on your installation media that is specific to your release.
NoticesThis publication describes and/or represents products and services of Pegasystems Inc. It may containtrade secrets and proprietary information that are protected by various federal, state, and internationallaws, and distributed under licenses restricting their use, copying, modification, distribution, or transmittalin any form without prior written authorization of Pegasystems Inc.
This publication is current as of the date of publication only. Changes to the publication may bemade from time to time at the discretion of Pegasystems Inc. This publication remains the propertyof Pegasystems Inc. and must be returned to it upon request. This publication does not imply anycommitment to offer or deliver the products or services described herein.
This publication may include references to Pegasystems Inc. product features that have not been licensedby you or your company. If you have questions about whether a particular capability is included in yourinstallation, please consult your Pegasystems Inc. services consultant.
Although Pegasystems Inc. strives for accuracy in its publications, any publication may containinaccuracies or typographical errors, as well as technical inaccuracies. Pegasystems Inc. shall not be liablefor technical or editorial errors or omissions contained herein. Pegasystems Inc. may make improvementsand/or changes to the publication at any time without notice.
Any references in this publication to non-Pegasystems websites are provided for convenience only anddo not serve as an endorsement of these websites. The materials at these websites are not part of thematerial for Pegasystems products, and use of those websites is at your own risk.
Information concerning non-Pegasystems products was obtained from the suppliers of those products,their publications, or other publicly available sources. Address questions about non-Pegasystemsproducts to the suppliers of those products.
This publication may contain examples used in daily business operations that include the names ofpeople, companies, products, and other third-party publications. Such examples are fictitious and anysimilarity to the names or other data used by an actual business enterprise or individual is coincidental.
This document is the property of:
Pegasystems
One Rogers Street
Cambridge, MA 02142-1209
USA
Phone: 617-374-9600
Fax: (617) 374-9620
www.pega.com
Contents
Contents
Overview..................................................................................................................................................................................................... 6Related information....................................................................................................................................................................................6Differences between updates and upgrades..........................................................................................................................................6
Plan your deployment...............................................................................................................................................................................8Split-schema and single-schema configurations.................................................................................................................................... 9Apache Ignite client-server clustering topology..................................................................................................................................... 9Deployment methods...............................................................................................................................................................................10In-place and out-of-place upgrades....................................................................................................................................................... 10Environment considerations....................................................................................................................................................................11System requirements............................................................................................................................................................................... 11
UI-based tool requirements...................................................................................................................................................... 11Application server requirements.............................................................................................................................................. 11Database server requirements................................................................................................................................................. 12
Database connection information..........................................................................................................................................................12Upgrading from Pega 7.2.2: exporting the agent schedules for the standard Pega Platform agents...........................................13
Prepare your application server............................................................................................................................................................14Commit hotfixes........................................................................................................................................................................................14Port configuration.....................................................................................................................................................................................14Setting the JVM security parameter for LINUX or UNIX......................................................................................................................14Oracle WebLogic Server: Web SSO with encrypted assertions.......................................................................................................... 15
Preparing your database........................................................................................................................................................................ 16Backing up your system and database................................................................................................................................................. 17Optional: Increasing upgrade speed by removing old rulesets......................................................................................................... 17Verifying that your Oracle database is ready for localization............................................................................................................ 18Upgrades from Pega 7.3 on MSSQL: Preventing failures by renaming the pc_work_agile.pzPvStream column.......................... 18Upgrading multitenant systems from Pega 7.1.5 and later............................................................................................................... 18Upgrading from PRPC 6.1 SP2 and earlier: move system settings....................................................................................................19Upgrading from PRPC 5.4 and earlier: disabling indexing..................................................................................................................20Database users..........................................................................................................................................................................................20
IBM Db2 operating-system users.............................................................................................................................................21General user permissions......................................................................................................................................................... 21Microsoft SQL Server user permissions.................................................................................................................................. 22Oracle user permissions............................................................................................................................................................23PostgreSQL user permissions................................................................................................................................................... 27
Editing the setupDatabase.properties file.............................................................................................................................................28Database connection properties and script arguments....................................................................................................... 29Additional upgrade and update properties............................................................................................................................ 29
Upgrading a split-schema system......................................................................................................................................................... 31Disabling rule creation on the rules schema....................................................................................................................................... 32Create two new physical schemas on two databases.........................................................................................................................33Migrate scripts...........................................................................................................................................................................................33
Pega Platform Upgrade Guideiii
Contents
Migrating the existing rules schema......................................................................................................................................................35Migrating the rules schema when the system has access to both databases...................................................................35Migrating the rules schema when the system has access to one database...................................................................... 36
Upgrade methods for the migrated rules schema..............................................................................................................................38Upgrading the migrated rules schema by using the Installation and Upgrade Assistant.................................................38Upgrading the rules schema from the command line..........................................................................................................40
Migrating to the new rules schema.......................................................................................................................................................40Migrating to the new rules schema when the system has access to both databases...................................................... 41Migrating to the new rules schema when the system has access to one database at a time......................................... 42
Upgrading the data schema....................................................................................................................................................................43
Upgrading from a single-schema to split-schema configuration...................................................................................................... 45Upgrade with one database....................................................................................................................................................................45
Disabling rule creation on the rules schema......................................................................................................................... 46Create a new rules schema...................................................................................................................................................... 46Migrating the rules tables with one database....................................................................................................................... 46Upgrade methods for the migrated rules schema................................................................................................................47
Upgrade with two databases.................................................................................................................................................................. 50Disabling rule creation on the rules schema......................................................................................................................... 50Create two new blank rules schemas..................................................................................................................................... 51Migrating the rules tables......................................................................................................................................................... 51Upgrade the rules schema with two databases.................................................................................................................... 54Migrating and generating rules schema objects....................................................................................................................56
Upgrading the data schema....................................................................................................................................................................59
Post-upgrade configuration....................................................................................................................................................................60Upgrading from PRPC 6.1 SP2 and earlier: updating ruleset columns............................................................................................. 60For Docker, multiple VMs, or multiple NICs: Setting the public address..........................................................................................60Reconfiguring the application server.....................................................................................................................................................61
After out-of-place-upgrades on RedHat JBoss, IBM WebSphere, and Tomcat: Redefine default schemas..................... 61Redeploying the Pega Platform WAR or EAR files................................................................................................................. 63
For upgrades from Pega 7.x: Enabling rule creation on the production system.............................................................................71Upgrades from 7.2.2 and earlier: Port Apache logging file customizations to the new logging file.............................................. 71Restarting Pega Platform.........................................................................................................................................................................71Logging in and changing the administrator password........................................................................................................................72Locking and rolling ruleset versions...................................................................................................................................................... 72Optional: Upgrading from Pega 7.1.6 and earlier: Configuring the default search nodes and storage directory........................73Final Rules Conflict Report...................................................................................................................................................................... 75For upgrades from Pega 7.2.2 and earlier: Adopting APIs and rules for Pega Survey....................................................................75Scheduling column population jobs...................................................................................................................................................... 77Upgrading from Pega 7.2.2 or earlier: Upgrading access role names to enable notifications.......................................................78Upgrading from PRPC 5.4 and earlier: enabling the service-level agreement agent...................................................................... 78Upgrading from PRPC 5.4 and earlier: re-enabling indexing..............................................................................................................79Enabling access to environmental information....................................................................................................................................79Optional: Leveraging the current UI Kit rules.......................................................................................................................................79Enabling operators................................................................................................................................................................................... 80Running upgrade utilities........................................................................................................................................................................ 81Cleaning up unused tables......................................................................................................................................................................81For upgrades from Pega 7.x: Updating your custom applications....................................................................................................81Review log files..........................................................................................................................................................................................82Test your applications.............................................................................................................................................................................. 82Enabling server-side screen captures for application documents.....................................................................................................83
Configuring PhantomJS REST server security for including screen captures in an application document..................... 83Adding special privileges to access the Requester Management landing page.............................................................................. 84
Pega Platform Upgrade Guideiv
Contents
Upgrading from Pega 7.2.2: customizing the agent schedules for the standard Pega Platform agents.......................................85Updating the service email for Pulse email replies.............................................................................................................................85
Appendix A — Properties files............................................................................................................................................................... 86
Appendix B — Performing a single-schema upgrade......................................................................................................................... 87Single-schema upgrade methods...........................................................................................................................................................88
Upgrading a single schema by using the Installation and Upgrade Assistant (IUA).......................................................... 89Upgrading a single-schema from the command line............................................................................................................91
Appendix C — Optional: Generating and applying DDL..................................................................................................................... 93Generating the DDL file........................................................................................................................................................................... 96Applying the DDL file............................................................................................................................................................................... 96Editing the setupDatabase.properties file to bypass DDL generation.............................................................................................. 97
Appendix D — Installing user-defined functions................................................................................................................................ 98
Appendix E — Rolling restart and Apache Ignite client-server mode............................................................................................ 100Performing the rolling restart...............................................................................................................................................................100Deploying and starting the Apache Ignite servers............................................................................................................................ 101
Appendix F — Troubleshoot upgrade errors......................................................................................................................................103Upgrades from PRPC 5.4 and earlier: System-Work-Indexer not found in dictionary.................................................................. 103Resuming or restarting after a failed deployment............................................................................................................................ 103Recovering from a faulty split-schema migration..............................................................................................................................103
Running the migration script on Microsoft SQL Server, Oracle, or PostgreSQL.............................................................. 104Running the migration script on IBM Db2 for Linux, UNIX, or Windows, or IBM Db2 for z/OS..................................... 104
PEGA0055 alert — clocks not synchronized between nodes...........................................................................................................104
Pega Platform Upgrade Guidev

Overview
OverviewUse the Pega documentation to install, upgrade, or update your system.
This guide describes how to upgrade an existing instance of PRPC version 5.x, 6.x, or 7.x to Pega 7.4.
To install a new version of Pega Platform, see the Pega 7.4 Installation Guide for your database andapplication server platform. To update from Pega 7.1.x or Pega 7.2.x, see the Pega Platform Update Guide.
Caution: This release introduces new features and functionality that might cause compatibilityissues with your existing application. You might need to take additional actions before deploying.
Related informationThe Pega Discovery Network (PDN) at https://pdn.pega.com is Pega's online documentation andinformation site. To access the latest documentation, use the Support menu.
• Platform Support Guide — Lists the databases, drivers and application servers supported for thisrelease.
• Deployment guides — Includes the latest installation, upgrade, and update guides.
• Release notes — Include information about deploying the Pega Platform that supplement theinstructions in this guide. Review the release notes before you continue.
• Updated help files
• Multitenancy Administration Guide — Describes how to configure Pega Platform in multitenant modeafter deploying.
• Business Intelligence Exchange User Guide — Describes how to install the Business Intelligence Exchange(BIX) product. BIX is included in the full distribution image, but has a separate installer.
• System Management Application Reference Guide — Describes how to use the optional SystemManagement Application to monitor and control caches, agents, requesters, and listeners.
Differences between updates and upgradesAn update is a new distribution image that contains cumulative fixes and enhancements to the productsince Pega 7.0; it is not a full product release. In contrast, upgrades are full product releases. If you needto move from any version prior to Pega 7.0, you must upgrade. To move from any Pega 7.x version to themost current release, you can either update or upgrade.
The following list identifies the major differences between updates and upgrades. For more information,see PDN > Support to determine if you can update, or if you need the full upgrade:
• Many updates can be reversed. You can reverse an out-of-place, split-schema update on adevelopment system with Oracle Database, Microsoft SQL Server, or PostgreSQL. Upgrades and otherupdates cannot be reversed.
• Updates manage superseded hotfixes. The update process contains specialized error handling forsuperseded hotfixes. If your system contains a hotfix that is newer than the hotfix provided in theupdate, the update exits.
For information about how to force an update, see the Pega Platform Update Guide.
• Updates do not include updated help. The prhelp.war file is not included in an update. You candownload the file from the update page of the PDN or use the online version.
Pega Platform Upgrade Guide6
Overview
• Both the update and upgrade consist of a series of ANT targets, executed in sequence. However, theupdate process omits the following ANT targets:
• UpgradeJavaSyntax — This step upgrades snippets of Java code to be compatible with PegaPlatform.
• RemapDatabaseTables — This step maps some Data-Admin-DB-Tables to PegaDATA, which is notnecessary for Pega Platform.
• Updates do not include additional products. If your system includes Pega Web Mashup (formerlyInternet Application Composer (IAC)) or Business Intelligence Exchange (BIX), you can update PegaPlatform, and then use the upgrade distribution image to add just the latest version of the additionalproducts to your system.
Pega Platform Upgrade Guide7
Plan your deployment
Plan your deploymentPega Platform supports several configuration options that can affect the choices that you make during thedeployment. Before beginning, read this section thoroughly.
• Do not change your environment while you are deploying Pega Platform. For example, if you aremaking changes to your application server or database server, do so before you deploy Pega Platform.
• Choose a configuration type: single-schema or split-schema configuration. Pega recommends asplit-schema configuration. See Split-schema and single-schema configurations. For split-schemaconfigurations, choose whether you will maintain separate tablespaces for the data schema and rulesschema. This decision depends on your database configuration.
• Choose whether to use the standard product edition or the multitenancy edition. The multitenancyedition has different requirements, different run-time behaviors, and different administrativeprocedures from the standard edition. Before you select the multitenancy edition, review theMultitenancy Administration Guide on the PDN.
Upgrading and updating from one edition to another is not supported. The schema DDLs for the twoeditions are not compatible. For example, if you install the standard edition and later decide to use themultitenant edition, you must either drop and re-create the database or create a new database.
• For Apache Tomcat, choose a clustering topology: Hazelcast or Apache Ignite; standard embeddedmode or client-server mode. Embedded Hazelcast is the default clustering topology. If you want touse Apache Ignite clustering topology, enable Apache Ignite cluster protocol in the prconfig.xmlfile. You can use Apache Ignite embedded mode only for small clusters. To use Apache Ignite client-server mode, force the Pega Platform node to start in client mode and open ports for Apache Ignite.See Apache Ignite client-server clustering topology.
• Verify that the version of Business Intelligence Exchange (BIX) is the same as the version of PegaPlatform. BIX is included in the full distribution image, but has a separate installer. For informationabout installing BIX, see the Pega Platform BIX User Guide.
• Choose a deployment type: UI tool or command line. See Deployment methods.
• Choose whether to use Kerberos functionality. Kerberos is a computer network authentication protocolthat allows nodes communicating over a non-secure network to prove their identity to one another ina secure manner. If you enable Kerberos authentication, you must use the command line method todeploy Pega Platform. For more information, see your installation guide.
• Consult your database administrator to determine whether to have the deployment process makechanges directly to the database. You can either have Pega Platform apply changes directly to yourdatabase, or generate DDL files of changes for your database administrator to apply. For informationabout manually generating and applying DDL, see Appendix C — Optional: Generating and applyingDDL.
• Choose whether to cluster the Pega Platform nodes. Pega Platform supports clustered nodeswithout special configuration, but you will make different choices about ports, indexes, and clocksynchronization depending on your node configuration.
• Conduct a site-specific analysis of Pega Platform and any custom applications to determine the size ofyour database tablespace.
• Choose either dual-user or single-user configuration. In a dual-user configuration, an Admin useris granted full privileges, and a Base user is granted a smaller subset of privileges. In the single-user configuration, a single Base user is granted full privileges. For more information about userconfiguration, see your installation guide.
• If you are using the PostGIS extension on a PostgreSQL database, ensure that it has not been appliedto the Rules or Data schemas because it will cause the deployment to fail.
Pega Platform Upgrade Guide8
Plan your deployment
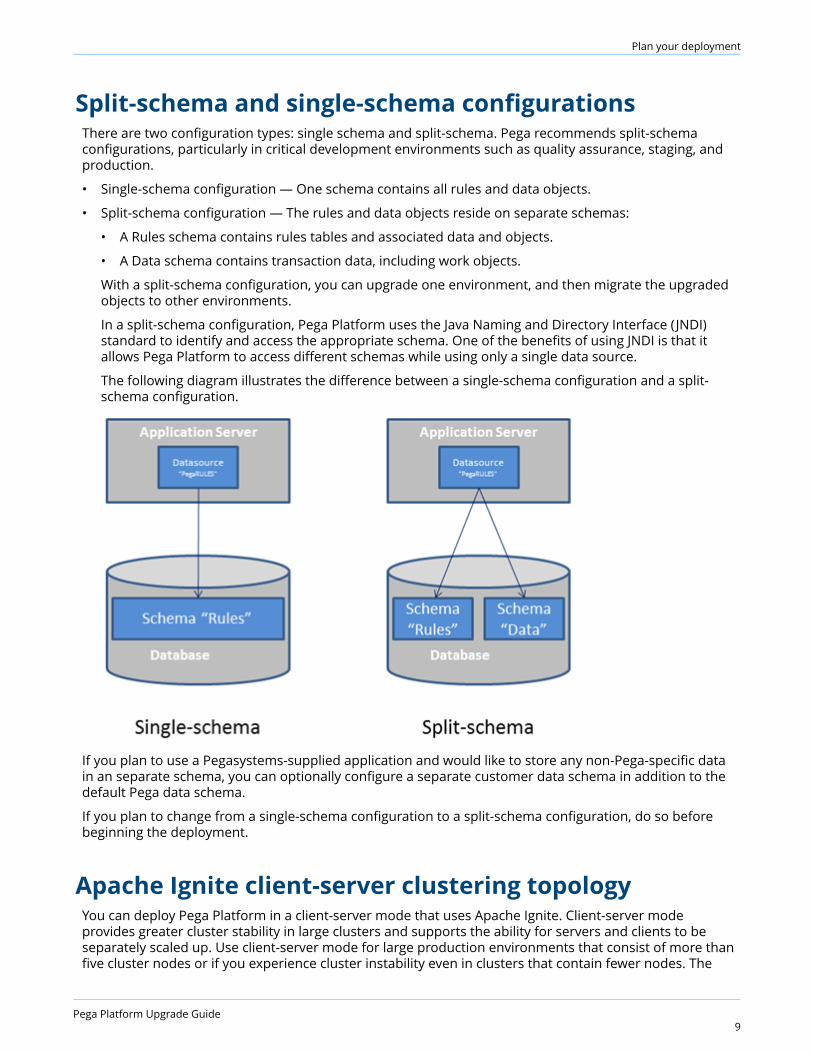
Split-schema and single-schema configurationsThere are two configuration types: single schema and split-schema. Pega recommends split-schemaconfigurations, particularly in critical development environments such as quality assurance, staging, andproduction.
• Single-schema configuration — One schema contains all rules and data objects.
• Split-schema configuration — The rules and data objects reside on separate schemas:
• A Rules schema contains rules tables and associated data and objects.
• A Data schema contains transaction data, including work objects.
With a split-schema configuration, you can upgrade one environment, and then migrate the upgradedobjects to other environments.
In a split-schema configuration, Pega Platform uses the Java Naming and Directory Interface (JNDI)standard to identify and access the appropriate schema. One of the benefits of using JNDI is that itallows Pega Platform to access different schemas while using only a single data source.
The following diagram illustrates the difference between a single-schema configuration and a split-schema configuration.
If you plan to use a Pegasystems-supplied application and would like to store any non-Pega-specific datain an separate schema, you can optionally configure a separate customer data schema in addition to thedefault Pega data schema.
If you plan to change from a single-schema configuration to a split-schema configuration, do so beforebeginning the deployment.
Apache Ignite client-server clustering topologyYou can deploy Pega Platform in a client-server mode that uses Apache Ignite. Client-server modeprovides greater cluster stability in large clusters and supports the ability for servers and clients to beseparately scaled up. Use client-server mode for large production environments that consist of more thanfive cluster nodes or if you experience cluster instability even in clusters that contain fewer nodes. The
Pega Platform Upgrade Guide9
Plan your deployment
number of nodes in the cluster that can lead to cluster instability depends on your environment, andswitching to client-server mode should be determined individually.
Client-server mode is a clustering topology that separates Pega Platform processes from clustercommunication and distributed features. Clustering technology has separate resources and uses adifferent JVM from Pega Platform.
• Client nodes - Pega Platform nodes that perform application jobs and call the Apache Ignite client tofacilitate communication between Pega Platform and the Apache Ignite servers.
• Servers - The stand-alone Apache Ignite servers that provide base clustering capabilities, includingcommunication between the nodes and distributed features. You must have at least three ApacheIgnite servers for one cluster.
For more information about enabling client-server mode, see Appendix E — Rolling restart and ApacheIgnite client-server mode.
Deployment methodsYou can deploy Pega Platform either with the UI tool or from the command line. This guide includesinstructions for both methods.
• Use the UI-based Installation and Upgrade Assistant to upgrade either the rulebase or the rulebaseand the schema. The Installation and Upgrade Assistant ( IUA ) leaves intact any customizations to thedatabase schema. You can run the IUA once to upgrade both the database schema and the rulebase,or use the command-line script to update the schema, and then run the IUA to upgrade only therulebase.
• Command line – Run scripts to deploy Pega Platform.
Regardless of which method you use, you might need to edit the setupDatabase.properties file thatcontrols the behavior of several scripts:
• The generateddl.bat or generateddl.sh script generates an SQL file that your databaseadministrator can use to apply schema changes to the database. You can run this script regardless ofwhether you use the IUA or the command-line script.
• The upgrade.bat or upgrade.sh script performs the following functions:
• Deploys the most recent version of Pega Platform.
• Specifies whether to generate a DDL file of changes to the database.
• Enables Kerberos authentication.
If you use the IUA to upgrade, you do not use the upgrade.bat or upgrade.sh script.
In-place and out-of-place upgradesIn an in-place upgrade, the existing schemas are updated, and no new schemas are created. Theseupgrades require significant downtime because they directly modify the schemas in production.
Note: If you are performing an in-place upgrade, do not use Pega Platform while the upgrade isrunning.
Out-of-place upgrades require a temporary upgrade schema that can reside either on the productiondatabase or on a second temporary database. The upgrade scripts run on the temporary schema. Afterthe upgrade is complete, a script moves the upgrades to the schemas in the production system. Thisminimizes the length of time during which the production system is unavailable. As a best practice, useout-of-place upgrades for split-schema configurations.
Pega Platform Upgrade Guide10
Plan your deployment
Environment considerationsConsider your application customization, libraries, database, and special site requirements beforecontinuing.
• Custom applications — If you are using any custom applications, confirm whether your customapplications are supported for this version of the Pega Platform. It might be necessary to upgrade yourversions of the custom applications to work with the new version of the Pega Platform.
• Customized Pega Platform database — If you made changes to the Pega Platform database schema,incorporate those changes into the database after you upgrade the database schema. In particular,you should merge any changes to triggers, views, or stored procedures that you made in the previousversion, and review any custom rules or work tables that you created. The upgrade procedure leavestables you have added to the schema in place, but you might need to modify the tables to matchchanges in Pega ' schema.
Also verify that schema references in triggers, stored procedures, and views correctly reflect the newschema names.
• Third-party or custom libraries — If you have integrated third-party or custom libraries into yoursystem, make sure you have a copy of them before upgrading. The upgrade might overwrite yourdeployed libraries.
• Special site requirements — Your site might have special deployment, integration, or securityrequirements. Schedule an early review of the upgrade procedure with the appropriate system anddatabase administrators.
System requirementsBefore you deploy, ensure that your system meets the following minimum requirements.
UI-based tool requirementsIf you plan to use the UI-based Installation and Upgrade Assistant, ensure that the system meets theseminimum system requirements in addition to all other requirements.
• Windows or Linux operating system
• 1.25 GB minimum available memory
• 10 GB minimum disk space plus at least 8 GB available space in the temporary directory of the root filesystem
• Java Platform, Standard Edition Development Kit ( JDK)
Application server requirementsInstall only Pega Platform on the application server. The application server must meet the minimumrequirements listed in the Platform Support Guide on the PDN and in this section.
• RedHat JBoss systems require a Web browser — required to deploy the Pega Platform applicationsfrom the Red Hat JBoss Management Console.
• Oracle systems require an Oracle JDBC type 4 driver, such as ojdbc7.jar. For more information aboutsupported drivers, see the Platform Support Guide.
• All systems require a supported 64-bit JDK. See the Platform Support Guide on the PDN for a list ofsupported versions.
Pega Platform Upgrade Guide11

Plan your deployment
IBM WebSphere Network Deployment requires that the deployment manager, the node agent, and theapplication servers are all on the same JDK version.
• 1 GB minimum free disk space. You might need additional storage space for debugging and logging.
• Memory requirements: Pega Platform runs in memory (heap) on Java Virtual Machines (JVMs). Ingeneral, all activity is distributed over multiple JVMs (nodes) on the application server.
• Standard suggested system heap size is 4 - 8 GB based on monitoring of memory usage andgarbage collection frequency.
• Larger heaps are advisable if your applications allow a high number of concurrent open tasks persession or cache a large collection of transaction or reference data.
• Do not deploy Pega Platform in an environment where the heap size exceeds the vendor-specificeffectiveness limit.
• Oracle and IBM JDKs use compression to minimize the cost of large heaps:
• Oracle - The compression option is labeled CompressedOOPS and is effective up to 32 GB.
• IBM - The compression option is labeled CompressedRefs and is effective up to 28 GB.
In current 64-bit JVMs, compression is enabled by default.
• The host application server memory size must be at least 4 GB larger than the Pega Platformheap size to allow space for the operating system, monitoring tools, operating system network filebuffering, and JVM memory size (-XMX option). The minimum host application server memory size is8 GB:
4 GB heap + 4 GB for native memory, operating system, and buffering
If the server does not have enough memory allocated to run Pega Platform, the system can hangwithout an error message. The correct memory settings depend on your server hardware, thenumber of other applications, and the number of users on the server, and might be larger thanthese recommendations.
Database server requirementsYour database server must meet the minimum requirements listed in this section and in the PlatformSupport Guide on the PDN.
For Oracle systems, also verify that your database server includes:
• 8 GB minimum RAM
• A supported version of the JDBC4 driver for your version of the database
• 10 GB minimum initial tablespace set to auto-extend
• 50 MB logfile size — This default size is sufficient for the initial installation, but will need to be resizedto run the application server workload.
• If you are using Oracle 11g, do not use the UCP (Universal Connection Pool) feature in your database.Oracle BUG 8462305 causes a failure when an application tries to call a stored procedure. This errorcauses Pega Platform to work incorrectly with a database that uses UCP. To determine if UCP is in use,check for the ucp.jar file in the classpath of the application server.
Database connection informationWhen you configure the data source resources, you need the correct database connection URL.To determine the database connection URL, obtain the following information from your databaseadministrator:
Pega Platform Upgrade Guide12
Plan your deployment
• Connection method — Service or SID
• Service or SID name
• Host name
• Port number
When you configure the application server, enter the connection string, pega.jdbc.url. Replace items initalics with the values for your system:
• To connect to Oracle — Use one of the following formats:
• jdbc:oracle:thin:@localhost:port/service-name
• jdbc:oracle:thin:@localhost:port:SID
• To connect to Microsoft SQL Server
url="jdbc:sqlserver:// server:port;DatabaseName= database;selectMethod=cursor; sendStringParametersAsUnicode=false"
• To connect to IBM Db2 for Linux, UNIX and Windows
jdbc:db2://server:port/database
• To connect to PostgreSQL —
jdbc:postgresql://server:port/database
Upgrading from Pega 7.2.2: exporting the agentschedules for the standard Pega Platform agentsIf you are upgrading from Pega 7.2.2 or later and used the Node Classification feature, export the agentschedules for the standard Pega Platform agents.
If you are upgrading from a version prior to Pega 7.2.2, skip this section.
If you did not use the Node Classification feature in Pega 7.2.2, skip this section.
Before you continue, export all the agent schedules that you customized for the standard Pega Platformagents. Any customizations that you made in Pega 7.2.2 are lost when you deploy the new version, andyou must manually update the agent schedules after the deployment. Use the exported .zip file as yourreference; the zip file cannot be imported to the new system.
To export the agent schedules, complete the following steps:
1. Create a product rule by clicking Records > SysAdmin > Product > +Create. For more information, seethe product rule help.
2. On the Contents tab, in the Individual instances to include section, select the Data-Agent-Queueclass.
3. Click Query to get the list of all the Data-Agent-Queue instances in the system.
4. Select the instances that you want to export.
5. Click Submit.
6. Click Save.
7. Click Create product file, and download the .zip file.
Pega Platform Upgrade Guide13
Prepare your application server
Prepare your application serverThis section describes how to prepare your application server for the upgrade.
Commit hotfixesBefore you deploy, commit any uncommitted hotfixes on your system. If there are uncommitted hotfixeswhen you deploy, the hotfixes will be overwritten and will not be included in the system. For informationabout committing hotfixes, see the help.
Port configurationBefore you configure your application server, ensure that the following ports are open and available:
• Search (Elasticsearch) — one TCP port in the range 9300-9399 (default 9300). This port is used forinternal node-to-node communication only, and should not be externally accessible.
• Cluster communication — leave open the port range 5701-5800. By default, the system begins withport 5701, and then looks for the next port in the sequence (5702, followed by 5703 and so on). Tooverride the default port range, set a different value for the initialization/cluster/ports setting in theprconfig.xml file.
• If you switch to Apache Ignite client-server clustering topology, you must additionally open ports in therange of 47100-47109 for Apache Ignite stand-alone server communication.
Pega Platform can include multiple servers, or nodes, and each node can contain multiple Java VirtualMachines (JVMs). The number of available ports in this range needs to be greater than or equal to thegreatest number of JVMs on any one node in the cluster. For example, if there are three JVMs on onenode, and seven JVMs on another node, there must be at least seven ports available.
Setting the JVM security parameter for LINUX or UNIXIf you use UNIX or LINUX, set security to urandom.
1. Open the configuration file or console for your application server:
• Apache Tomcat — setenv.bat or setenv.sh
• IBM WebSphere — Use the IBM WebSphere Administrative Console
• IBM WebSphere Application Server Liberty Core — jvm.options
• JBoss Red Hat EAP — standalone.conf or standalone.conf.bat
• Oracle WebLogic Server — setenv.bat or setenv.sh
2. Enter the following argument to set security to urandom:
-Djava.security.egd=file:///dev/urandom
3. Save the changes.
Pega Platform Upgrade Guide14
Prepare your application server
Oracle WebLogic Server: Web SSO with encryptedassertionsConfigure your Oracle WebLogic Server web SSO with encrypted assertions. Add the following JAR files tothe endorsed directory of the application server:
• xercesImpl-2.10.0.jar — This file is included in the Pega-image\scripts\lib directory.
• xml-apis-1.4.01.jar —This file is included in the Pega-image\scripts\lib directory.
• xalan-2.7.1.jar —Obtain this file from the Apache Software Foundation Xalan project. For moreinformation about the Apache Software Foundation Xalan project, see https://xalan.apache.org/.
Pega Platform Upgrade Guide15
Preparing your database
Preparing your databaseBefore you begin preparing your database, see the Platform Support Guide on the PDN to verify that yourdatabase is supported. Modify your Pega Platform database configuration to match these requirements:
• The target and source database must be at the same version.
• Enable Java in the database. For Microsoft SQL Server, enable CLR.
• Define an instance name.
• Configure your database server and application server to use the same time zone and characterencoding to avoid conflicts.
• Enable support for user-defined functions (UDF) installed by Pega Platform.
• Additional requirements for Oracle:
• If your system includes synonyms to Pega-supplied tables, drop the synonyms before you upgrade.If necessary, reapply the synonyms after the deployment is complete.
• Verify that the system includes:
• 8 GB minimum RAM.
• 10 GB minimum initial tablespace set to auto extend for the Rules user.
Note: The Rules user and the Data user can share the same tablespace. If you createseparate tablespaces for the Rules user and the Data user, base the size of the Data usertablespace on the estimated number of work objects in the application.
• 50 MB logfile size — This default size is sufficient for the initial upgrade, but will need to beresized to run the application server workload.
• If you are using Oracle 11g, do not use the UCP (Universal Connection Pool) feature in yourdatabase. Oracle BUG 8462305 causes a failure when an application tries to call a stored procedure.This error causes Pega Platform to work incorrectly with a database that uses UCP. To determine ifUCP is in use, check for the ucp.jar file in the classpath of the application server.
• Additional requirement for PostgreSQL: Ensure that Java is enabled in the database if you plan to useuser-defined functions (UDFs).
• Additional requirement for Microsoft SQL Server: Enable the common language run time (CLR) on thedatabase to enable user-defined functions (UDFs). To check whether CLR is enabled, run the followingscript:
select value from sys.configurations where name ='clr enabled'
If the return value is 1, CLR is enabled.
If you do not enable CLR, you can install the UDF later. See Appendix D — Installing user-definedfunctions.
• Additional requirement for IBM Db2 for Linux, UNIX, and Windows:
• Define Operating System-level users with the appropriate authorizations. See Database users.
• Increase the LOGFILSIZ parameter to at least 4096 pages before you upgrade the rulebase. Thedefault logfile size is 1000 pages.
Note: After making the change to the LOGFILSIZ parameter, restart the database to makesure the settings are loaded into the database correctly.
Pega Platform Upgrade Guide16
Preparing your database
Backing up your system and databaseUpdating or upgrading modifies both the data schema and the rules data; use a backup procedure thatpreserves both schemas. Back up the existing database, your applications, and the system.
1. Verify that all rules are checked in.
2. Shut down the Pega Platform application server.
3. Use your database utilities to back up the Pega Platform database.
4. If you edited any of the following Pega Platform configuration files in the APP- INF\classes directoryof an EAR deployment or the WEB-INF\classes directory of a WAR deployment, include these in thebackup:
• prbootstrap.properties
• prconfig.xml
• logging file: prlogging.xml or prlog4j2.xml
• web.xml
• pegarules.keyring or any other .keyring files
Note: For upgrades from PRPC 6.1 SP2 or earlier if you added System Settings to yourprbootstrap.properties or prconfig.xml files, convert them to Dynamic-System-SettingsData- instances. See Upgrading from PRPC 6.1 SP2 and earlier: moving system settings.
5. Back up any third-party or custom JAR files on your system. Redeploying the Pega Platform applicationsmight delete these from your application server.
Optional: Increasing upgrade speed by removing oldrulesetsIn most cases, removing older rules decreases the overall upgrade time. Running the cleanup scriptpermanently removes rules older than the current version from which you are upgrading. For example,if you are upgrading from PRPC 6.2 SP2 (06-02-20) to 7.4, cleanup removes rules of version 06-01-99 andolder.
Run the cleanup.bat or cleanup.sh script to generate an SQL script to clean up the rulebase. You caneither have the cleanup script automatically apply the SQL, or have your database administrator make thechanges.
Caution: Running this command after you complete the upgrade might delete needed rule sets.
1. Open the setupDatabase.properties file in the scripts directory of your distribution image:Directories.distributionDirectory\scripts\setupDatabase.properties
2. Configure the connection properties. See Properties file parameters for more information.
# Connection Information pega.jdbc.driver.jar=/path-to-the-database-JAR-file/DRIVER.jar pega.jdbc.driver.class=database driver class pega.database.type=database vendor type pega.jdbc.url=URL of the database pega.jdbc.username=Deployment user name pega.jdbc.password=password rules.schema.name=rules-schema-name
Pega Platform Upgrade Guide17

Preparing your database
data.schema.name=data-schema-name
3. Specify whether to automatically apply the SQL changes.
• To automatically remove the rules, set:run.ruleset.cleanup=true
• To have your database administrator apply the SQL script to remove the rules, set:run.ruleset.cleanup=false
4. Save and close the file.
5. Run cleanup.bat or cleanup.sh.
6. Optional: If you set run.ruleset.cleanup=false, give the SQL script to your database administratorto remove the rules.
Verifying that your Oracle database is ready forlocalizationOracle supports two types of character semantics, BYTE and CHAR. CHAR supports international charactersets.
Before you upgrade, verify that Oracle semantics is set to CHAR to support localization:
1. On the database server, open the file SPFILE BNAME.ora in the database directory.
2. Verify that the settings are as follows:
NLS_LENGTH_SEMANTICS=CHAR scope=both; NLS_CHARACTERSET=AL32UTF8; NLS_NCHAR_CHARACTERSET=AL16UTF16;
3. If the semantics settings differ, migrate the database character set. For more information, see yourOracle documentation and the PDN article Migrating Database Character Sets for Oracle.
Upgrades from Pega 7.3 on MSSQL: Preventing failuresby renaming the pc_work_agile.pzPvStream columnSkip this section if you are not using Microsoft® SQL Server® or if you are not upgrading or updating fromPega Platform 7.3.
In Pega Platform 7.3, the capitalization for the column name pc_work_agile.pzPvStream is incorrect. Thecorrect capitalization is pzPVStream. To prevent deployment failures, run the following command from theMicrosoft SQL Server Management Studio (SSMS) to rename the column:
EXEC sp_rename ‘data-schema-name.pc_work_agile.pzPvStream', 'pzPVStream', 'COLUMN'
Upgrading multitenant systems from Pega 7.1.5 andlaterFollow the steps in this section to upgrade or update a multitenant system from Pega 7.1.5 or later. Ifyou are upgrading or updating from a version prior to Pega 7.1.5, skip this section. If you do not have amultitenant system, skip this section.
Pega Platform Upgrade Guide18
Preparing your database
The multitenant table architecture requires an additional column, pzTenantID. Several tables are nowtenant-qualified; deploying the new version of Pega Platform automatically adds the multitenant columnto these tables.
SQL databases do not allow the addition of a non-null column to an existing table unless the table isempty. Therefore, if the tables contain data, upgrading or updating systems on those databases displaysan error "Table must be empty to add column" and the deployment fails. For most tables, truncating thedata is acceptable; however, the pr_data_admin_product table includes important data. Pega provides ascript to add the pzTenantID column to the pr_data_admin_product table without losing data.
To prepare the tables, follow these steps before you upgrade or update. The specific steps depend onyour starting version of the Pega Platform.
1. Log in to the data schema.
2. For upgrades from Pega 7.1.9 and earlier, add the column to the pr_data_admin_product table withouttruncating the data:
a) Navigate to the AdditionalUpgradeScripts directory:
Pega-image/ResourceKit/AdditionalUpgradeScripts/MT/719AndEarlier/
b) Run the script for your database:
database_mt_upgrade_tables.sql
3. For upgrades from Pega 7.2 and Pega 7.2.1, run the vendor-specific script:
a) Navigate to the AdditionalUpgradeScripts directory:
Pega-image/ResourceKit/AdditionalUpgradeScripts/MT/72And721/
b) Run the script for your database:
database_mt_upgrade_tables_d_a_tag_relevantrecord.sql
Upgrading from PRPC 6.1 SP2 and earlier: move systemsettingsIf you are upgrading from 6.1 SP2 or earlier, move any custom System Settings from the prconfig.xmlor prbootstrap.properties configuration files to the Dynamic System Settings (Data-Admin-System-Settings). Settings in env elements in your current prconfig.xml or prbootstrap.properties filescontinue to work, and this task can be done at any time.
Pega provides a utility to move the settings from the configuration files to Data-Admin-System-Settingsinstances. See "Upgrading Configuration Settings from Prior Versions to Version 6.2" in the ConfigurationSettings Reference Guide on the PDN for details. Note that the instructions on how to run this utility arethe same for Pega 7.4 as they are for version 6.2.
Moving these settings to the database has several advantages.
• Since the settings are stored as Data- instances, they can be read from the database by all nodesrunning your installation. All nodes will have the same setting values, unlike the values in theprconfig.xml file, which apply only to the node where that file is located.
• The values of the dynamic system settings can be viewed and modified from Designer Studio.Alternately, values stored in the configuration files must be changed by editing the file, which canrequire restarting the application nodes.
Pega Platform Upgrade Guide19
Preparing your database
Upgrading from PRPC 5.4 and earlier: disabling indexingIf you are upgrading from PRPC 5.5 or later, skip this section.
If you are upgrading from PRPC 5.4 or earlier, you must create a Dynamic System Setting to controlindexing; otherwise, the upgrade fails with the following error message:
Class not defined in dictionary: System-Work-Indexer aClassName
Before you upgrade, follow these steps to disable indexing.
1. In Designer Studio, click App.
2. Right-click SysAdmin and select +Create > Dynamic System Settings.
3. In the Short description field, enter index/dataEnabled.
4. In the Owning Ruleset field, enter the application name.
5. In the Setting Purpose field, enter index/dataEnabled.
6. Click Create and open.
7. In the Value field, enter false.
8. Click Save.
After you upgrade, follow the instructions in Upgrading from PRPC 5.4 and earlier: re-enabling indexing tore-enable indexing.
Database usersThis section describes deployment and runtime users and lists all required permissions.
• Upgrade users — These users perform actions only during the upgrade.
• Deployment user — The user who runs the upgrade. After the upgrade, you can remove this user.
• Oracle users — Because Oracle has a one-to-one relationship between users and schemas, if youhave a split-schema configuration, you must have separate users for the rules schema and the dataschema.
• Oracle rules schema owner — Only used to create the schema. The Oracle rules schema ownercan be associated with either individual tablespaces or a common tablespace. Pegasystemsrecommends separate tablespaces for each user in critical SDLC environments.
• The Oracle data schema owner is the Base runtime user.
• Run-time users — These users perform actions on the Pega Platform after the deployment. In a dual-user configuration, an Admin user is granted full privileges, and a Base user is granted a smallersubset. Pega recommends the dual-user configuration:
• Base user — The user who runs the Pega Platform. Most run-time operations use the Base user andassociated data source.
The Base user is the Oracle data schema user.
Because PostgreSQL does not permit two users to have the same schema owner privileges, theDeployment user is the same as the Admin user.
Pega recommends that you use the dual-user configuration with separate Admin and Base users;however, you can create a single Base user with both sets of privileges. If there is no separate Adminuser, the Pega Platform uses the Base user for all run-time operations.
Pega Platform Upgrade Guide20
Preparing your database
Note: If you have only a Base user, the system cannot perform automatic schema-changeoperations.
IBM Db2 operating-system usersSkip this section if you are not using IBM Db2 for Linux, UNIX, and Windows. All IBM Db2 users must alsoexist at the operating system level. Before you create the database user accounts, define the operating-system-level users and authorizations:
• Deployment user - This user must have Administrative privileges on the operating system. Forexample, in Windows this user is a member of the Administrators Group.
• Admin – This user must have Administrative privileges on the operating system. For example, inWindows this user is a member of the Administrators Group.
• Base – This user must not have Administrator privileges on the operating system. If the Base user isassociated with the operating systems Administrators group, the database reports an error.
Creating user accounts for IBM Db2 for Linux, UNIX, and WindowsCreate user accounts. The permissions needed for your database users depend on whether you have asplit-schema or a single-schema configuration, and whether you are using the recommended dual Admin/Base user configuration.
In a split-schema configuration, the Deployment user owns both the data and rules schemas until thedeployment is complete. After the deployment, the Admin user owns both schemas. If there is no Adminuser, the Base user owns the schemas after the deployment.
In a single-schema configuration, the Deployment user owns the single schema until the deployment iscomplete. After the deployment, the Admin user owns the schema. If there is no Admin user, the Baseuser owns the schema.
Use the Data Studio to create the Base user and Admin user accounts:
1. Ensure that the accounts are defined at the Operating System level.
2. In the Administration Explorer, expand the newly created database and the section named Usersand Groups.
3. Right click Users and select Add and Manage User.
4. In the General tab, enter the Name of the database user.
5. Select Privileges and select the appropriate privileges. For example, for the Base user, selectCONNECT and DATAACCESS. Keep the remaining default values.
Note: The Base user must not have Administrator privileges on the operating system. If theuser is associated with the operating systems Administrators group, the database reports anerror.
6. Execute the Change Plan.
Note: Repeat these steps if you are planning to use a dual Base and Admin user configuration.
7. Optional: If you have both a Base and Admin user, repeat these steps for the remaining user.
General user permissionsThe following table describes the general permissions for each user and the purpose of each permission.
Pega recommends the dual-user configuration. For a single-user configuration, the Base user alsorequires the permissions listed for the Admin user.
Pega Platform Upgrade Guide21
Preparing your database
Permission Deployment User Base User Admin User
Insert/select/update/delete ondata and rules tables
The deployment process savesinstances to data and rulestables.
User has basic read and writeaccess to data and rules tables.
Select data and rule schemametadata
The deployment process readsmetadata about tables andother objects to determine themost efficient way to accessand store data.
PegaRULES reads metadataabout tables and other objectsto determine the most efficientway to access and store data.
Execute stored procedures indata and rules schemas
The deployment process usesstored procedures for systemoperations.
PegaRULES uses storedprocedures for systemoperations.
Create/update/drop tables,indexes, and constraints in dataand rules schema
The deployment processinstalls the tables, indexes, andconstraints used by PegaRULES.
Various system managementtools allow you to create andmodify tables and indexes. Fordata schemas, various facilitiesin decisioning create short-livedtables to assist with strategyanalysis.
Create/update/drop views indata and rules schemas
The deployment processinstalls the views used byPegaRULES.
Various facilities in decisioningcreate short-lived views toassist with strategy analysis.Import also requires this whenimporting views.
Create/update/drop storedprocedures, triggers, andfunctions
The deployment processinstalls stored procedures,triggers, and functions used byPegaRULES.
Enable and disable triggers onrule tables
The installation and upgradeprocesses disable triggers inorder to save large amounts ofrecords more quickly.
Truncate rule and data tables Various tables must betruncated during a PegaRULESupgrade.
Grant object-level privileges onrules schema to data user
When the install and upgradeprocesses create tables andother objects in the rulesschema, they must grant theBase user access to theseobjects.
When system managementutilities create tables and otherobjects in the rules schema,they must grant the Base useraccess to these objects.
Note: If you plan to manually install the user-defined functions (UDFs) from Pega, the databaseuser who will install the UDFs cannot have the sysadmin role. Having the sysadmin role changesthe default schema name and causes installation problems. For more information about UDFs, seeInstalling user-defined functions.
Microsoft SQL Server user permissionsThe permissions needed for your database users depend on whether you have a split-schema or a single-schema system, and whether you are using the recommended dual Admin/Base user configuration.
Split-schema configuration
Pega Platform Upgrade Guide22

Preparing your database
Deployment User Base User * Admin User
Schemas owned by this user PegaDATA
PegaRULES
none PegaDATA
PegaRULES
Privileges CREATE TABLE
CREATE PROCEDURE
CREATE VIEW
CREATE ASSEMBLY
CREATE FUNCTION
SELECT ON SCHEMA data-schema
INSERT ON SCHEMA data-schema
UPDATE ON SCHEMA data-schema
DELETE ON SCHEMA data-schema
EXECUTE ON SCHEMA data-schema
SELECT ON SCHEMA rules-schema
INSERT ON SCHEMA rules-schema
UPDATE ON SCHEMA rules-schema
DELETE ON SCHEMA rules-schema
EXECUTE ON SCHEMA rules-schema
CREATE TABLE
CREATE PROCEDURE
CREATE VIEW
CREATE ASSEMBLY
CREATE FUNCTION
* Pega recommends the dual-user configuration. For a single-user configuration, the Base user alsorequires the permissions listed for the Admin user.
Single schema configuration
Deployment User Base User * Admin User
Schema owned by this user Pega schema none Pega schema
Privileges CREATE TABLE
CREATE PROCEDURE
CREATE VIEW
CREATE ASSEMBLY
CREATE FUNCTION
SELECT ON SCHEMA schema
INSERT ON SCHEMA schema
UPDATE ON SCHEMA schema
DELETE ON SCHEMA schema
EXECUTE ON SCHEMA schema
CREATE TABLE
CREATE PROCEDURE
CREATE VIEW
CREATE ASSEMBLY
CREATE FUNCTION
* Pega recommends the dual-user configuration. For a single-user configuration, the Base user alsorequires the permissions listed for the Admin user.
Oracle user permissionsUse either an SQL command or the Oracle Enterprise Manager to create users with the privileges androles listed in this section. Because Oracle maintains a one-to-one relationship between schemas anddatabase users, creating users also creates the schemas.
All Oracle database users require unlimited tablespace. For information about creating the users withunlimited tablespace privileges, see Creating Oracle users from an SQL statement. For information aboutusing the Oracle Enterprise Manager to create users and assign privileges and roles, see Creating Oracleusers by using the Enterprise Manager.
Pega Platform Upgrade Guide23

Preparing your database
Deployment user privileges and rolesThe Oracle rules schema owner requires only unlimited tablespace and is only used for deployment.
The Deployment user requires the following privileges and roles for all configurations:
• UNLIMITED TABLESPACE
• CREATE SESSION
• CREATE ANY TABLE
• ALTER ANY TABLE
• INSERT ANY TABLE WITH ADMIN OPTION
• SELECT ANY TABLE
• UPDATE ANY TABLE
• DELETE ANY TABLE
• CREATE ANY INDEX
• CREATE ANY PROCEDURE
• EXECUTE ANY PROCEDURE
• CREATE ANY VIEW
• CREATE ANY TYPE
• CREATE ANY TRIGGER
• ALTER ANY TRIGGER
• GRANT ANY OBJECT PRIVILEGE
• DROP ANY PROCEDURE
• DROP ANY TRIGGER
• DROP ANY TABLE
• DROP ANY VIEW
• DROP ANY INDEX
• ANALYZE ANY
• ANALYZE ANY DICTIONARY
• SELECT_CATALOG_ROLE (This is a role, not a privilege.)
Note: For custom applications, you must grant the SELECT_CATALOG_ROLE to theDeployment or Admin user. Some custom applications use triggers, so the user will need theSELECT_CATALOG_ROLE to drop triggers that read from the update cache and rule view tables.The deployment automatically drops custom triggers. Manually re-create custom triggers afteryou deploy Pega Platform.
• SESSIONS_PER_USER: When the upgrade begins to import rules, it opens multiple parallel connections.Consider setting SESSIONS_PER_USER to UNLIMITED to avoid an error similar to the following:
Exceeded simultaneous SESSIONS_PER_USER limit
Run-time users — privileges and rolesThe run-time users require different permissions depending on whether you have a dual-userconfiguration.
Pega Platform Upgrade Guide24
Preparing your database
Note: The run-time users of the rules and data schemas can share the same tablespace. If youcreate separate tablespaces for the rules schema and the data schema users, base the size of thetablespace on the estimated number of work objects in the application.
Dual-user configuration — Admin and Base usersIn a dual-user configuration, grant these privileges and roles:
• Admin user
• UNLIMITED TABLESPACE
• CREATE SESSION
• CREATE ANY TABLE
• ALTER ANY TABLE
• INSERT ANY TABLE WITH ADMIN OPTION
• SELECT ANY TABLE
• UPDATE ANY TABLE
• DELETE ANY TABLE
• CREATE ANY INDEX
• CREATE ANY PROCEDURE
• EXECUTE ANY PROCEDURE
• CREATE ANY VIEW
• CREATE ANY TYPE
• CREATE ANY TRIGGER
• ALTER ANY TRIGGER
• GRANT ANY OBJECT PRIVILEGE
• DROP ANY PROCEDURE
• DROP ANY TRIGGER
• DROP ANY TABLE
• DROP ANY VIEW
• DROP ANY INDEX
• ANALYZE ANY
• ANALYZE ANY DICTIONARY
• SELECT_CATALOG_ROLE (This is a role, not a privilege.)
• Base user—The Base user is the Oracle data schema owner.
• Basic read and write access to data and rules tables including rules resolution.
• UNLIMITED TABLESPACE
• CREATE SESSION
Single-user configuration— Base user onlyThe Base user is the Oracle data schema owner.
Pega Platform Upgrade Guide25
Preparing your database
Note: Pega recommends that you create an Admin user separate from the Base user; if you optfor a single Base user, the system cannot perform automatic schema-change operations.
• Basic read and write access to data and rules tables including rules resolution.
• UNLIMITED TABLESPACE
• CREATE SESSION
Creating Oracle users from an SQL statementUse SQL statements to create users. For information about using the Oracle Enterprise Manager to createusers and assign privileges and roles, see your Oracle documentation.
1. On the database server, run the following SQL statement to create users and grant the users unlimitedaccess to the default USERS tablespace.
ALTER USER <user> DEFAULT TABLESPACE USERS QUOTA UNLIMITED ON USERS;
2. Use the Oracle tools to assign the appropriate roles and privileges to this user.
3. Repeat steps 1 and 2 for the remaining users:
• Oracle schema users:
• For single schemas, create one Oracle schema user
• For split-schemas, create separate Oracle rules and data schema users.
• Deployment user
• Base user
• Admin user (for dual-user configurations)
Creating Oracle users by using the Enterprise ManagerFollow these steps to create a user:
1. Log in to the Enterprise Manager using the URL provided by the Database Configuration Assistant.The URL is usually in the form: https://host:5501/em
2. Enter the user name and password and click Login.
• User name = sys
• Password = password
3. Select Security > Users.
4. Select Actions > Create User. Accept the other defaults.
5. On the User Account step, enter the name and password for the user you are creating.
6. Click the right arrow.
a) If you created a dedicated tablespace, choose that tablespace from the menu.
b) Accept the other defaults.
7. Click the right arrow.
8. Select the privileges for this user and click OK.
9. Repeat these steps to configure the remaining users.
Pega Platform Upgrade Guide26
Preparing your database
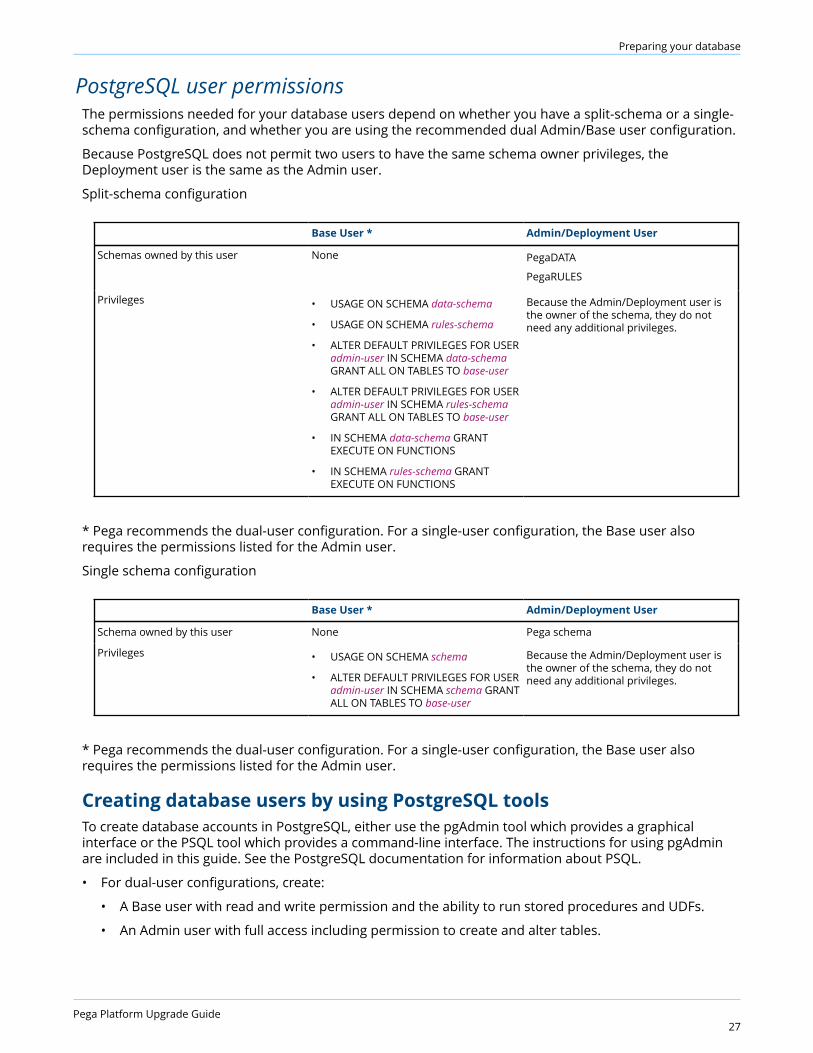
PostgreSQL user permissionsThe permissions needed for your database users depend on whether you have a split-schema or a single-schema configuration, and whether you are using the recommended dual Admin/Base user configuration.
Because PostgreSQL does not permit two users to have the same schema owner privileges, theDeployment user is the same as the Admin user.
Split-schema configuration
Base User * Admin/Deployment User
Schemas owned by this user None PegaDATA
PegaRULES
Privileges • USAGE ON SCHEMA data-schema
• USAGE ON SCHEMA rules-schema
• ALTER DEFAULT PRIVILEGES FOR USERadmin-user IN SCHEMA data-schemaGRANT ALL ON TABLES TO base-user
• ALTER DEFAULT PRIVILEGES FOR USERadmin-user IN SCHEMA rules-schemaGRANT ALL ON TABLES TO base-user
• IN SCHEMA data-schema GRANTEXECUTE ON FUNCTIONS
• IN SCHEMA rules-schema GRANTEXECUTE ON FUNCTIONS
Because the Admin/Deployment user isthe owner of the schema, they do notneed any additional privileges.
* Pega recommends the dual-user configuration. For a single-user configuration, the Base user alsorequires the permissions listed for the Admin user.
Single schema configuration
Base User * Admin/Deployment User
Schema owned by this user None Pega schema
Privileges • USAGE ON SCHEMA schema
• ALTER DEFAULT PRIVILEGES FOR USERadmin-user IN SCHEMA schema GRANTALL ON TABLES TO base-user
Because the Admin/Deployment user isthe owner of the schema, they do notneed any additional privileges.
* Pega recommends the dual-user configuration. For a single-user configuration, the Base user alsorequires the permissions listed for the Admin user.
Creating database users by using PostgreSQL toolsTo create database accounts in PostgreSQL, either use the pgAdmin tool which provides a graphicalinterface or the PSQL tool which provides a command-line interface. The instructions for using pgAdminare included in this guide. See the PostgreSQL documentation for information about PSQL.
• For dual-user configurations, create:
• A Base user with read and write permission and the ability to run stored procedures and UDFs.
• An Admin user with full access including permission to create and alter tables.
Pega Platform Upgrade Guide27
Preparing your database
• If you want to use one account, create a user with the same authority and privileges as the Admin userdescribed above.
To use the pgAdmin tool:
1. Launch the pgAdmin tool.
2. Double-click the PostgreSQL instance that you want to configure.
Note: You must enter the password for the administrator account that was configured whenPostgreSQL was installed.
3. Right-click Login Roles and select New Login Role.
4. In the Role Name field, enter the name for your database user.
5. On the Definition tab, enter the password for this user.
6. On the Role Privileges tab, grant permissions to this user. When using a single database user, youmust grant at least the Can create database objects permission.
7. Click OK.
8. To add a second database user, repeat steps 3 - 7.
Editing the setupDatabase.properties fileEdit the setupDatabase.properties file to configure deployment scripts.
Skip this section if your deployment meets all the following criteria:
• You will use the Installation and Upgrade Assistant.
• You will allow the Installation and Upgrade Assistant to automatically apply the schema changes anddo not need to create a DDL file.
• You will not enable Kerberos authentication.
If your deployment does not meet all these criteria, follow the steps in this section to edit thesetupDatabase.properties file. The setupDatabase.properties file controls scripts which performthe following tasks:
• Upgrade Pega Platform and enable Kerberos authentication. Use the upgrade.bat or upgrade.shscript.
• Generate a DDL file of schema changes. Use the generateddl.bat or generateddl.sh script. Youcan use the generateddl script regardless of whether you use the IUA or the command-line script.
• Generate user-defined functions. Use the generateudf.bat or generateudf.sh script.
• Migrate schemas. Use the migrate.bat or migrate.sh script.
1. Open the setupDatabase.properties file in the scripts directory of your distribution image:Directories.distributionDirectory\scripts\setupDatabase.properties
2. Specify the properties for your system. For each property, add the appropriate value after the equalsign. See Database connection properties and script arguments.
3. Optional: If you are repeating a failed upgrade, configure the resume property:
• To resume from the last successful step, set automatic.resume=true.
• To restart from the beginning, set automatic.resume=false.
4. Save and close the file.
Pega Platform Upgrade Guide28
Preparing your database
Database connection properties and script argumentsThe database connection properties in the setupDatabase.properties file specify the settings neededto connect to the database. The script arguments specify the same settings when you use command-linescripts.
Script argument Property Description
--driverJAR pega.jdbc.driver.jar Path and file name of the JDBC driver.
--driverClass pega.jdbc.driver.class Class of the JDBC driver
--dbType pega.database.type Database vendor type. Enter the correctdatabase vendor:
• IBM Db2 for Linux, UNIX, andWindows: udb
• Microsoft SQL Server: mssql
• Oracle: oracledate
• PostgreSQL or Enterprise DB:postgres
--dbURL pega.jdbc.url The database JDBC URL.
For more information, see Obtainingdatabase connection information.
--dbUser pega.jdbc.username User name of the Deployment user.
--dbPassword pega.jdbc.password Password of the Deployment user. Forencrypted passwords, leave this blank.
--adminPassword pega.admin.password For new installations only.
--rulesSchema rules.schema.name In a single schema environment, sets rulesschema and data schema.
In a split-schema configuration, sets therules schema only.
--dataSchema data.schema.name For split-schema configurations only, setsthe data schema name.
--customerDataSchema customerdata.schema.name An optional customer data schemaseparate from the default Pega dataschema.
user.temp.dir Optional: The location of the tempdirectory. Set this location to anyaccessible location.
For example, C:\TEMP.
--mtSystem multitenant.system Specifies whether this a multitenantsystem.
Additional upgrade and update propertiesThe properties in the setupDatabase.properties file help you to customize the upgrade or update.
The following table describes additional properties in the setupDatabase.properties file that youmight need to edit only for upgrades and updates.
Pega Platform Upgrade Guide29

Property Description
bypass.pega.schema To bypass both creating the upgrade schema and automaticallygenerating the user-defined functions, set bypass.pega.schemato true. This implies that the upgrade DDL is already applied.
To create the upgrade schema and automatically generate theUDFs, leave this property blank or set it to false.
bypass.udf.generation If you set bypass.pega.schema to false to create the upgradeschema, but still want to bypass automatically generating theuser-defined functions, set bypass.udf.generation to true.
rebuild.indexes Rebuilds database rules indexes after the rules load to improvedatabase access performance. If rebuild.indexes=false, youcan rebuild the indexes later by running the stored procedureSPPR_REBUILD_INDEXES. The amount of time this process addsto the upgrade depends on the size of your database.
update.existing.applications Set to true to run the Update Existing Applications utility. Runthe Update Existing Application utility to ensure that yourexisting applications take advantage of new functionality in PegaPlatform. Run the utility first on your development system andtest the changes. Then, run the utility again on the productionsystem. The specific actions required for your applicationdepend on your current version. You can also run this utilitylater from the Designer Studio. The default setting is false.
update.applications.schema Specifies whether to run the Update Applications Schema utilityto update the cloned rule, data, work, and work history tableswith the schema changes in the latest base tables as part of theupgrade or update.
You can also run this utility later from the prpcUtils.bat orprpcUtils.sh script, or from Designer Studio. The defaultsetting is false.
run.ruleset.cleanup Removes older rules. In most cases, removing older rulesdecreases the overall upgrade time. Running the cleanup scriptpermanently removes rules older than the current version fromwhich you are upgrading. For example, if you are upgradingfrom PRPC 6.2 SP2 (06-02-20) to 7.4, cleanup removes rules ofversion 06-01-99 and older.
reversal.schema.file.name Schema file name to be used for reversal.
automatic.resume If the upgrade or update fails, specifies whether the systemrestarts the upgrade or update from the step where the failureoccurred. The default value is true.
Upgrading a split-schema system
Upgrading a split-schema systemIf you have an existing split-schema configuration, follow the instructions in this section to upgrade. Therules schema upgrade occurs out-of-place, and the data schema upgrade occurs in place.
Note: To minimize downtime, use the High Availability features. For more information about HighAvailability, see the Pega Platform High Availability Administration Guide.
This upgrade involves four schemas:
• Data schema - your current data schema. This will be your data schema after the upgrade as well.
• Rules schema - your current rules schema. This schema will be replaced after the upgrade.
• Temporary upgrade schema - a temporary schema used for staging the upgrade. This will include therules and data tables during the upgrade.
• New rules schema- the new rules schema. This will become the rules schema after the upgrade.
The generic process for upgrading a split-schema configuration can be summarized in the following steps:
1. Disable rule creation on the rules schema. See Disabling rule creation on the rules schema.
2. Create blank schemas. If you are upgrading with one database, you need one blank schema. If you areupgrading with two databases, you need two blank schemas. See Create two new physical schemas ontwo databases.
3. Understand the migrate scripts and properties. See Migrate scripts.
4. Migrate only the rules from the current rules schema to the temporary upgrade schema. See Migratingthe existing rules schema.
5. Upgrade the temporary upgrade schema. See Upgrade methods for the migrated rules schema.
6. Migrate the upgraded temporary upgrade schema to the new rules schema. See Migrating to the newrules schema.
7. Shut down the existing system and then upgrade the data schema. See Upgrading the data schema.
The diagram below displays the schemas used in this scenario.
Pega Platform Upgrade Guide31
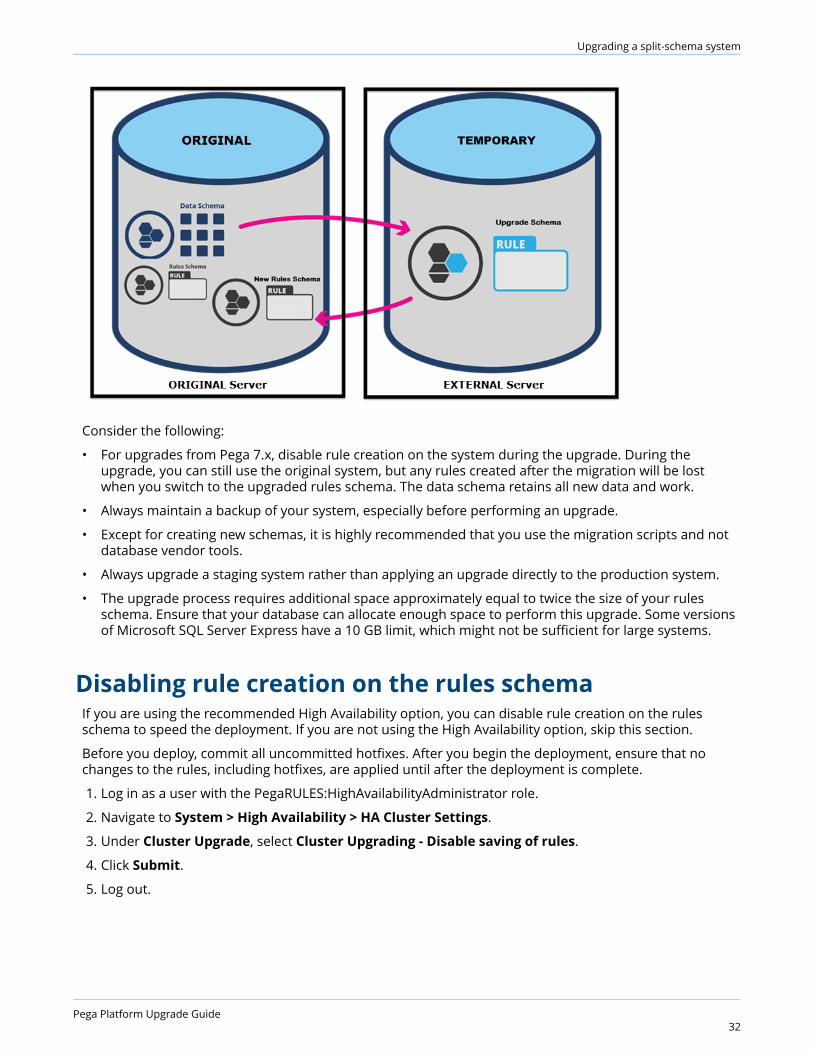
Upgrading a split-schema system
Consider the following:
• For upgrades from Pega 7.x, disable rule creation on the system during the upgrade. During theupgrade, you can still use the original system, but any rules created after the migration will be lostwhen you switch to the upgraded rules schema. The data schema retains all new data and work.
• Always maintain a backup of your system, especially before performing an upgrade.
• Except for creating new schemas, it is highly recommended that you use the migration scripts and notdatabase vendor tools.
• Always upgrade a staging system rather than applying an upgrade directly to the production system.
• The upgrade process requires additional space approximately equal to twice the size of your rulesschema. Ensure that your database can allocate enough space to perform this upgrade. Some versionsof Microsoft SQL Server Express have a 10 GB limit, which might not be sufficient for large systems.
Disabling rule creation on the rules schemaIf you are using the recommended High Availability option, you can disable rule creation on the rulesschema to speed the deployment. If you are not using the High Availability option, skip this section.
Before you deploy, commit all uncommitted hotfixes. After you begin the deployment, ensure that nochanges to the rules, including hotfixes, are applied until after the deployment is complete.
1. Log in as a user with the PegaRULES:HighAvailabilityAdministrator role.
2. Navigate to System > High Availability > HA Cluster Settings.
3. Under Cluster Upgrade, select Cluster Upgrading - Disable saving of rules.
4. Click Submit.
5. Log out.
Pega Platform Upgrade Guide32
Upgrading a split-schema system
Create two new physical schemas on two databasesTo use two databases for an out-of-place upgrade, create a new database and two new schemas, forexample:
• Create the temporary database of the same type and version as your current database.
• Create the temporary upgrade schema in the temporary database.
• Create the new rules schema in your original database.
Migrate scriptsThe migrate script, migrate.bat or migrate.sh migrates the rules objects from the existing schema to anew rules schema, and generates and applies rules schema objects after upgrading the new rules schema.Edit the migrateSystem.properties file to configure the migrate script. The Deployment user performsthe migrations.
Note: Pega strongly recommends that you use the migrate.bat or migrate.sh script toperform these steps. The use of vendor tools is not recommended.
The migrate script is designed to automate many aspects of the data movement process, including:
• Export of appropriate tables and data objects from the source system schema;
• Generation and application of DDL to the target system schema;
• Import of appropriate tables and data objects to the target system schema.
Common properties
The following common properties must be configured in the migrateSystem.properties file to log onto the databases used for each schema. If you are using one database for each schema, these propertieswill be the same for each step. However, if you are using different databases for the rules schema and thetemporary upgrade schema, these properties will be different, depending on which database the schemais hosted on.
The table below lists the common properties, their descriptions, and valid values. Source properties applyto the system being migrated from, and target properties apply to the system being migrated to. Set theproperties by adding the appropriate value after the equals sign in the properties file. Set the propertiesby adding the appropriate value after the equals sign in the properties file.
Property Description
pega.source.jdbc.driver.jar
pega.target.jdbc.driver.jar
The path to the JDBC JAR file. For databases that use multipleJDBC driver files (such as IBM Db2), specify semicolon-separatedvalues.
pega.source.jdbc.driver.class
pega.target.jdbc.driver.class
Valid values are:
• IBM Db2 for Linux, UNIX, and Windows and IBM Db2 for z/OS — com.ibm.db2.jcc.DB2Driver
• Microsoft SQL Server — com.microsoft.sqlserver.jdbc.SQLServerDriver
• Oracle — oracle.jdbc.OracleDriver
• PostgreSQL — org.postgresql.Driver
pega.source.database.type
pega.target.database.type
Valid values are: mssql, oracledate, udb, db2zos, or postgres.
Pega Platform Upgrade Guide33
Upgrading a split-schema system
Property Description
pega.source.jdbc.url
pega.target.jdbc.url
The database connection URL. For more information, seeObtaining database connection information.
pega.source.jdbc.username
pega.target.jdbc.username
Deployment user name.
pega.source.jdbc.password
pega.target.jdbc.password
Deployment user password.
Custom properties
The following properties are used during migration to configure custom settings.
Property Description
pega.source.jdbc.custom.connection.properties
pega.target.jdbc.custom.connection.properties
Any custom connection properties.
pega.source.data.schema
pega.target.data.schema
pega.source.rules.schema
pega.target.rules.schema
Used to correctly schema-qualify tables in stored procedures,views and triggers. These properties are not required ifmigrating before performing an upgrade.
pega.target.bypass.udf Set this property to bypass UDF generation on the system.
Migration directory properties
Set the directories for migration objects.
Property Description
pega.bulkmover.directory The full path to the directory where output from the bulkmover will be stored. This directory will be cleared whenpega.bulkmover.unload.db is run. This property must be set ifeither pega.bulkmover.unload.db or pega.bulkmover.load.db isset to true.
pega.migrate.temp.directory The full path to the temporary directory that is created by themigrate system utilities.
Operational properties
Use the following properties to migrate Rules objects. Set to true or false.
Property Description
pega.move.admin.table Migrate the admin tables required for an upgrade with the rulestables.
pega.clone.generate.xml Generate an XML document containing the definitions of tablesin the source system. It will be found in the schema directory ofthe distribution image.
pega.clone.create.ddl Create DDL from the generated xml document. This DDL can beused to create copies of rule tables found on the source system.
pega.clone.apply.ddl Apply the generated clone DDL to the target system.
Pega Platform Upgrade Guide34
Upgrading a split-schema system
Property Description
pega.bulkmover.unload.db Unload the data from the rules tables on the source system intothe pega.bulkmover.directory.
pega.bulkmover.load.db Load the data onto the target system from thepega.bulkmover.directory.
Rules schema object properties
This table describes operations to run when migrating upgraded rules:
Property Description
pega.rules.objects.generate Generate the rules schema objects (views, triggers,procedures, and functions). The objects will be created in thepega.target.rules.schema but will contain references to thepega.target.data.schema where appropriate.
pega.rules.objects.apply Apply the rules schema objects (views, triggers, procedures, andfunctions) to pega.target.rules.schema.
Migrating the existing rules schemaUse the migrate script to migrate the rules tables and other required database objects from the existingschema to the new rules schema.
You will also use the migrate script later to generate and apply rules objects after the upgrade, but theproperty settings will be different. The Deployment user performs the migrations.
Note: Pega strongly recommends that you use the migration script. The use of vendor tools tomanage this step is not recommended. If you do not use the migrate script to migrate the schema,there are additional manual steps required that are not documented here.
This process depends on whether the system has access to both the original and temporary databases.
Migrating the rules schema when the system has access to bothdatabasesIf the system has access to both the temporary and original databases, run the migrate script once tomigrate the rules schema.
1. Use a text editor to edit the migrateSystem.properties file in the scripts directory:Pega-image\scripts\migrateSystem.properties
2. Configure the source properties. See Properties file parameters for more information:
# Connection Information pega.source.jdbc.driver.jar=full path/DRIVER.jar pega.source.jdbc.driver.class=database driver class pega.source.database.type=database vendor type pega.source.jdbc.url=URL of database pega.source.jdbc.username=Deployment user name pega.source.jdbc.password=password pega.source.rules.schema=original rules schema name pega.source.data.schema=original data schema name
Pega Platform Upgrade Guide35
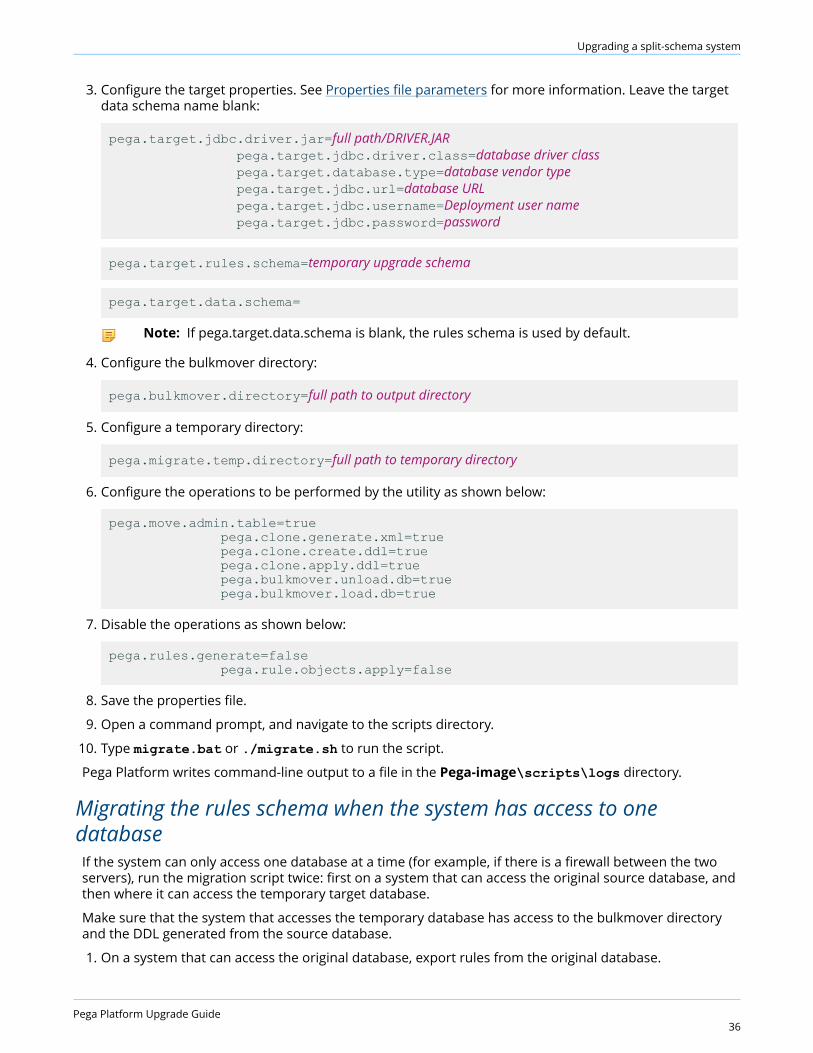
Upgrading a split-schema system
3. Configure the target properties. See Properties file parameters for more information. Leave the targetdata schema name blank:
pega.target.jdbc.driver.jar=full path/DRIVER.JAR pega.target.jdbc.driver.class=database driver class pega.target.database.type=database vendor type pega.target.jdbc.url=database URL pega.target.jdbc.username=Deployment user name pega.target.jdbc.password=password
pega.target.rules.schema=temporary upgrade schema
pega.target.data.schema=
Note: If pega.target.data.schema is blank, the rules schema is used by default.
4. Configure the bulkmover directory:
pega.bulkmover.directory=full path to output directory
5. Configure a temporary directory:
pega.migrate.temp.directory=full path to temporary directory
6. Configure the operations to be performed by the utility as shown below:
pega.move.admin.table=true pega.clone.generate.xml=true pega.clone.create.ddl=true pega.clone.apply.ddl=true pega.bulkmover.unload.db=true pega.bulkmover.load.db=true
7. Disable the operations as shown below:
pega.rules.generate=false pega.rule.objects.apply=false
8. Save the properties file.
9. Open a command prompt, and navigate to the scripts directory.
10. Type migrate.bat or ./migrate.sh to run the script.
Pega Platform writes command-line output to a file in the Pega-image\scripts\logs directory.
Migrating the rules schema when the system has access to onedatabaseIf the system can only access one database at a time (for example, if there is a firewall between the twoservers), run the migration script twice: first on a system that can access the original source database, andthen where it can access the temporary target database.
Make sure that the system that accesses the temporary database has access to the bulkmover directoryand the DDL generated from the source database.
1. On a system that can access the original database, export rules from the original database.
Pega Platform Upgrade Guide36
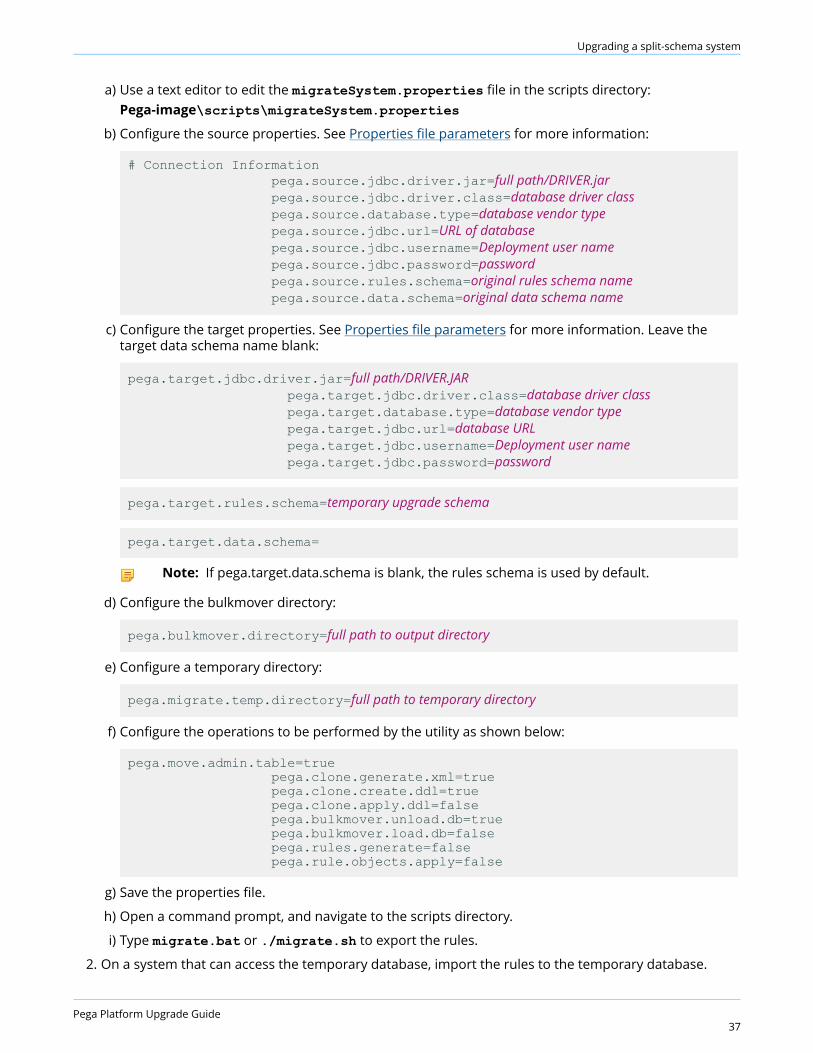
Upgrading a split-schema system
a) Use a text editor to edit the migrateSystem.properties file in the scripts directory:Pega-image\scripts\migrateSystem.properties
b) Configure the source properties. See Properties file parameters for more information:
# Connection Information pega.source.jdbc.driver.jar=full path/DRIVER.jar pega.source.jdbc.driver.class=database driver class pega.source.database.type=database vendor type pega.source.jdbc.url=URL of database pega.source.jdbc.username=Deployment user name pega.source.jdbc.password=password pega.source.rules.schema=original rules schema name pega.source.data.schema=original data schema name
c) Configure the target properties. See Properties file parameters for more information. Leave thetarget data schema name blank:
pega.target.jdbc.driver.jar=full path/DRIVER.JAR pega.target.jdbc.driver.class=database driver class pega.target.database.type=database vendor type pega.target.jdbc.url=database URL pega.target.jdbc.username=Deployment user name pega.target.jdbc.password=password
pega.target.rules.schema=temporary upgrade schema
pega.target.data.schema=
Note: If pega.target.data.schema is blank, the rules schema is used by default.
d) Configure the bulkmover directory:
pega.bulkmover.directory=full path to output directory
e) Configure a temporary directory:
pega.migrate.temp.directory=full path to temporary directory
f) Configure the operations to be performed by the utility as shown below:
pega.move.admin.table=true pega.clone.generate.xml=true pega.clone.create.ddl=true pega.clone.apply.ddl=false pega.bulkmover.unload.db=true pega.bulkmover.load.db=false pega.rules.generate=false pega.rule.objects.apply=false
g) Save the properties file.
h) Open a command prompt, and navigate to the scripts directory.
i) Type migrate.bat or ./migrate.sh to export the rules.
2. On a system that can access the temporary database, import the rules to the temporary database.
Pega Platform Upgrade Guide37

Upgrading a split-schema system
a) Copy the migrateSystem.properties file you created in step 1 to a system that can access thetemporary database.
b) Verify that the source, target, bulkmover, and temporary directory properties remain the same as instep 1.
c) Configure the operations to be performed by the utility as shown below:
pega.move.admin.table=true pega.clone.generate.xml=false pega.clone.create.ddl=false pega.clone.apply.ddl=true pega.bulkmover.unload.db=false pega.bulkmover.load.db=true pega.rules.generate=false pega.rule.objects.apply=false
d) Save the properties file.
e) Open a command prompt, and navigate to the scripts directory.
f) Run migrate.bat or ./migrate.sh to import the rules.
Pega Platform writes command-line output to a file in the Pega-image\scripts\logs directory.
Upgrade methods for the migrated rules schemaUse one of these methods to upgrade the migrated rules schema:
• Installation and Upgrade Assistant
• Command line script: upgrade.bat or upgrade.sh
Prior to loading the rulebase, the upgrade attempts to validate that each database table space has abuffer pool size large enough to accommodate the generated SQL DDL. The utility generates a report andstops if it finds any table space that requires an increased buffer pool size. The report identifies all tablespaces requiring an increased buffer pool size. Have the database administrator correct the table spacebuffer pool issues and rerun the tool.
Note: To minimize the time required to upgrade, run the upgrade from the same data center asthe database server.
Upgrading the migrated rules schema by using the Installation andUpgrade AssistantFor a UI-based upgrade experience, use the Installation and Upgrade Assistant.
Because of the large volume of data, run the IUA on the same network as the database server. If this isnot possible, run the tool on a system with fast, direct access to the database server. The Deploymentuser performs these steps.
The upgrade can last for several hours and the time can vary widely based on network proximity to thedatabase server.
1. Double-click the PRPC_Setup.jar file to start the IUA.
Note: If JAR files are not associated with Java commands on your system, start the IUA from thecommand line. Navigate to the directory containing the PRPC_Setup.jar file, and type java -jar PRPC_Setup.jar.
The IUA loads and the Pega icon is displayed in your task bar.
Pega Platform Upgrade Guide38
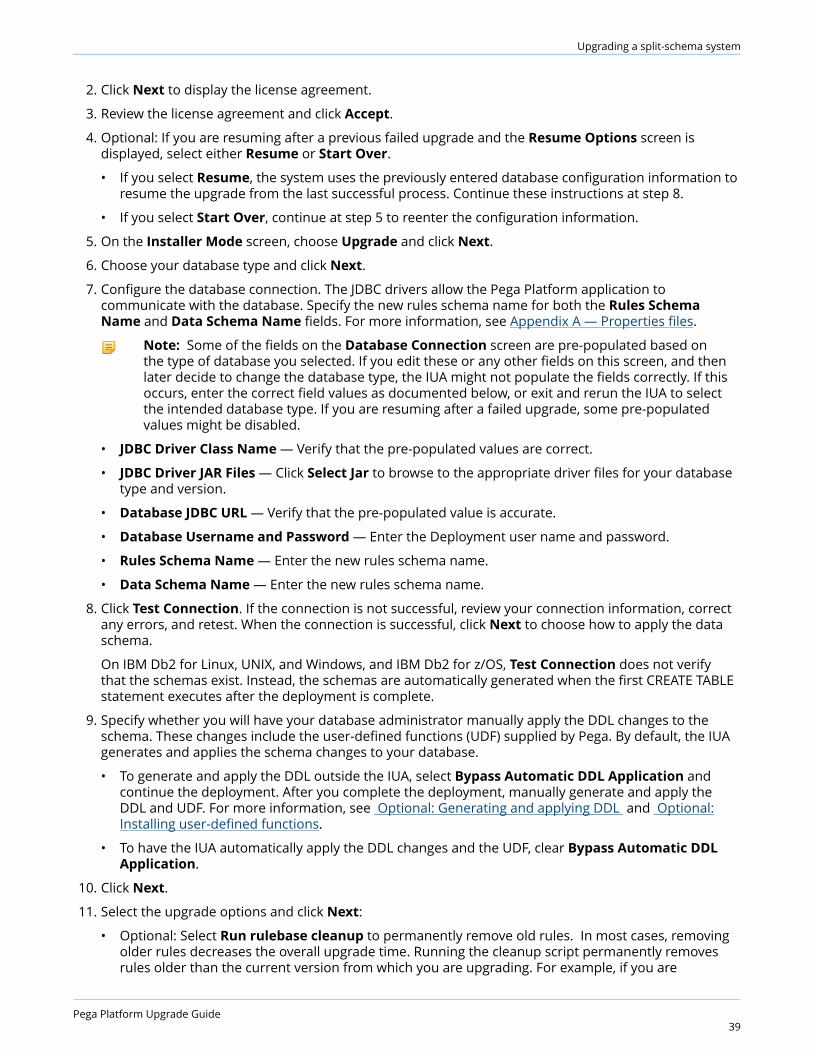
Upgrading a split-schema system
2. Click Next to display the license agreement.
3. Review the license agreement and click Accept.
4. Optional: If you are resuming after a previous failed upgrade and the Resume Options screen isdisplayed, select either Resume or Start Over.
• If you select Resume, the system uses the previously entered database configuration information toresume the upgrade from the last successful process. Continue these instructions at step 8.
• If you select Start Over, continue at step 5 to reenter the configuration information.
5. On the Installer Mode screen, choose Upgrade and click Next.
6. Choose your database type and click Next.
7. Configure the database connection. The JDBC drivers allow the Pega Platform application tocommunicate with the database. Specify the new rules schema name for both the Rules SchemaName and Data Schema Name fields. For more information, see Appendix A — Properties files.
Note: Some of the fields on the Database Connection screen are pre-populated based onthe type of database you selected. If you edit these or any other fields on this screen, and thenlater decide to change the database type, the IUA might not populate the fields correctly. If thisoccurs, enter the correct field values as documented below, or exit and rerun the IUA to selectthe intended database type. If you are resuming after a failed upgrade, some pre-populatedvalues might be disabled.
• JDBC Driver Class Name — Verify that the pre-populated values are correct.
• JDBC Driver JAR Files — Click Select Jar to browse to the appropriate driver files for your databasetype and version.
• Database JDBC URL — Verify that the pre-populated value is accurate.
• Database Username and Password — Enter the Deployment user name and password.
• Rules Schema Name — Enter the new rules schema name.
• Data Schema Name — Enter the new rules schema name.
8. Click Test Connection. If the connection is not successful, review your connection information, correctany errors, and retest. When the connection is successful, click Next to choose how to apply the dataschema.
On IBM Db2 for Linux, UNIX, and Windows, and IBM Db2 for z/OS, Test Connection does not verifythat the schemas exist. Instead, the schemas are automatically generated when the first CREATE TABLEstatement executes after the deployment is complete.
9. Specify whether you will have your database administrator manually apply the DDL changes to theschema. These changes include the user-defined functions (UDF) supplied by Pega. By default, the IUAgenerates and applies the schema changes to your database.
• To generate and apply the DDL outside the IUA, select Bypass Automatic DDL Application andcontinue the deployment. After you complete the deployment, manually generate and apply theDDL and UDF. For more information, see Optional: Generating and applying DDL and Optional:Installing user-defined functions.
• To have the IUA automatically apply the DDL changes and the UDF, clear Bypass Automatic DDLApplication.
10. Click Next.
11. Select the upgrade options and click Next:
• Optional: Select Run rulebase cleanup to permanently remove old rules. In most cases, removingolder rules decreases the overall upgrade time. Running the cleanup script permanently removesrules older than the current version from which you are upgrading. For example, if you are
Pega Platform Upgrade Guide39
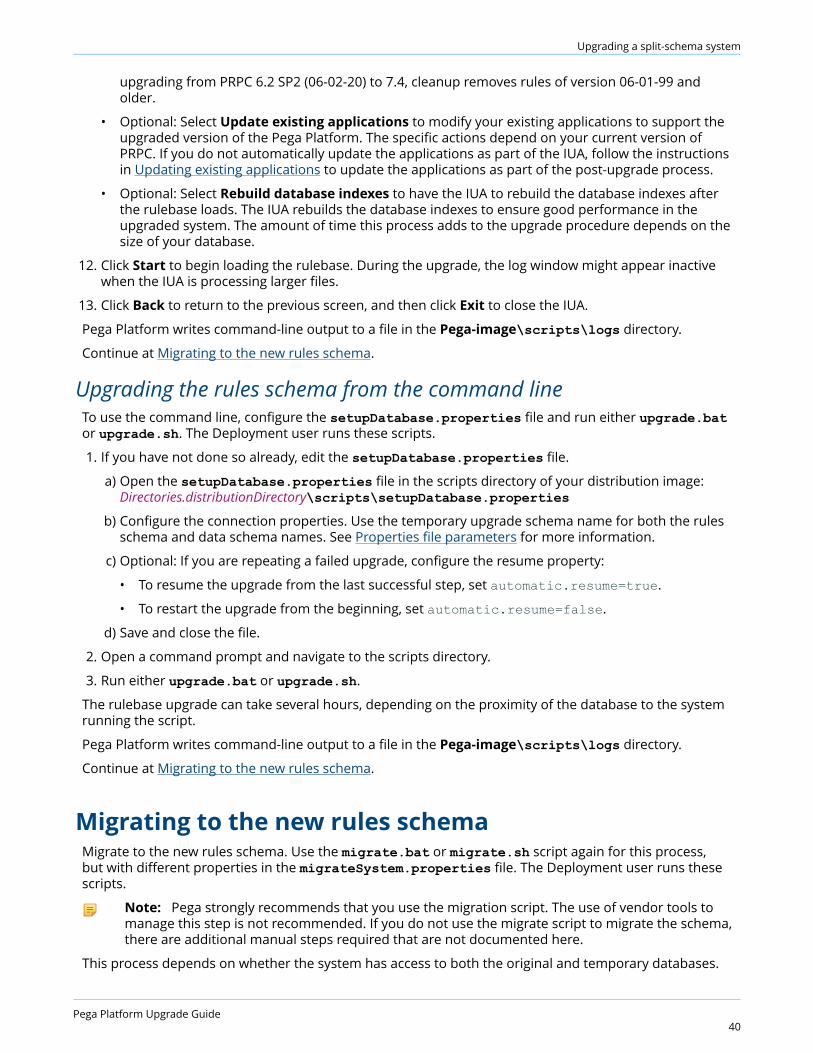
Upgrading a split-schema system
upgrading from PRPC 6.2 SP2 (06-02-20) to 7.4, cleanup removes rules of version 06-01-99 andolder.
• Optional: Select Update existing applications to modify your existing applications to support theupgraded version of the Pega Platform. The specific actions depend on your current version ofPRPC. If you do not automatically update the applications as part of the IUA, follow the instructionsin Updating existing applications to update the applications as part of the post-upgrade process.
• Optional: Select Rebuild database indexes to have the IUA to rebuild the database indexes afterthe rulebase loads. The IUA rebuilds the database indexes to ensure good performance in theupgraded system. The amount of time this process adds to the upgrade procedure depends on thesize of your database.
12. Click Start to begin loading the rulebase. During the upgrade, the log window might appear inactivewhen the IUA is processing larger files.
13. Click Back to return to the previous screen, and then click Exit to close the IUA.
Pega Platform writes command-line output to a file in the Pega-image\scripts\logs directory.
Continue at Migrating to the new rules schema.
Upgrading the rules schema from the command lineTo use the command line, configure the setupDatabase.properties file and run either upgrade.bator upgrade.sh. The Deployment user runs these scripts.
1. If you have not done so already, edit the setupDatabase.properties file.
a) Open the setupDatabase.properties file in the scripts directory of your distribution image:Directories.distributionDirectory\scripts\setupDatabase.properties
b) Configure the connection properties. Use the temporary upgrade schema name for both the rulesschema and data schema names. See Properties file parameters for more information.
c) Optional: If you are repeating a failed upgrade, configure the resume property:
• To resume the upgrade from the last successful step, set automatic.resume=true.
• To restart the upgrade from the beginning, set automatic.resume=false.
d) Save and close the file.
2. Open a command prompt and navigate to the scripts directory.
3. Run either upgrade.bat or upgrade.sh.
The rulebase upgrade can take several hours, depending on the proximity of the database to the systemrunning the script.
Pega Platform writes command-line output to a file in the Pega-image\scripts\logs directory.
Continue at Migrating to the new rules schema.
Migrating to the new rules schemaMigrate to the new rules schema. Use the migrate.bat or migrate.sh script again for this process,but with different properties in the migrateSystem.properties file. The Deployment user runs thesescripts.
Note: Pega strongly recommends that you use the migration script. The use of vendor tools tomanage this step is not recommended. If you do not use the migrate script to migrate the schema,there are additional manual steps required that are not documented here.
This process depends on whether the system has access to both the original and temporary databases.
Pega Platform Upgrade Guide40
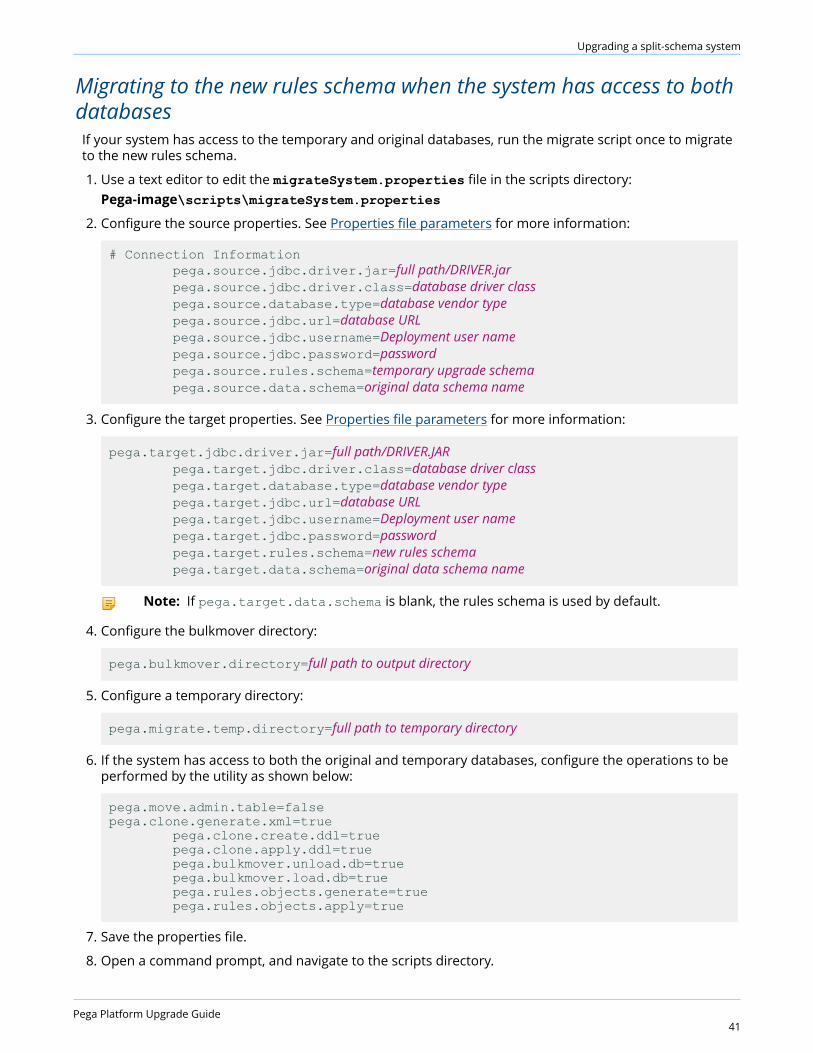
Upgrading a split-schema system
Migrating to the new rules schema when the system has access to bothdatabasesIf your system has access to the temporary and original databases, run the migrate script once to migrateto the new rules schema.
1. Use a text editor to edit the migrateSystem.properties file in the scripts directory:Pega-image\scripts\migrateSystem.properties
2. Configure the source properties. See Properties file parameters for more information:
# Connection Information pega.source.jdbc.driver.jar=full path/DRIVER.jar pega.source.jdbc.driver.class=database driver class pega.source.database.type=database vendor type pega.source.jdbc.url=database URL pega.source.jdbc.username=Deployment user name pega.source.jdbc.password=password pega.source.rules.schema=temporary upgrade schema pega.source.data.schema=original data schema name
3. Configure the target properties. See Properties file parameters for more information:
pega.target.jdbc.driver.jar=full path/DRIVER.JAR pega.target.jdbc.driver.class=database driver class pega.target.database.type=database vendor type pega.target.jdbc.url=database URL pega.target.jdbc.username=Deployment user name pega.target.jdbc.password=password pega.target.rules.schema=new rules schema pega.target.data.schema=original data schema name
Note: If pega.target.data.schema is blank, the rules schema is used by default.
4. Configure the bulkmover directory:
pega.bulkmover.directory=full path to output directory
5. Configure a temporary directory:
pega.migrate.temp.directory=full path to temporary directory
6. If the system has access to both the original and temporary databases, configure the operations to beperformed by the utility as shown below:
pega.move.admin.table=falsepega.clone.generate.xml=true pega.clone.create.ddl=true pega.clone.apply.ddl=true pega.bulkmover.unload.db=true pega.bulkmover.load.db=true pega.rules.objects.generate=true pega.rules.objects.apply=true
7. Save the properties file.
8. Open a command prompt, and navigate to the scripts directory.
Pega Platform Upgrade Guide41

Upgrading a split-schema system
9. Type migrate.bat or ./migrate.sh to run the script.
Pega Platform writes command-line output to a file in the Pega-image\scripts\logs directory.
Migrating to the new rules schema when the system has access to onedatabase at a timeIf the system can only access one database at a time (for example, if there is a firewall between the twoservers), run the migration script twice: first on a system that can access the original source database, andthen on a system that can access the temporary target database.
Make sure that the system that accesses the temporary database has access to the bulkmover directoryand the DDL generated from the source database.
1. On a system that can access the original database, export rules from the original database.
a) Use a text editor to edit the migrateSystem.properties file in the scripts directory:Pega-image\ scripts\migrateSystem.properties
b) Configure the source properties. See Properties file parameters for more information:
# Connection Information pega.source.jdbc.driver.jar=/path-to-the-database-JAR-file/DRIVER.jar pega.source.jdbc.driver.class=database driver class pega.source.database.type=database vendor type pega.source.jdbc.url=URL of database pega.source.jdbc.username=Deployment user name pega.source.jdbc.password=password pega.source.rules.schema=temporary upgrade schema pega.source.data.schema=original data schema name
c) Configure the target properties. See Properties file parameters for more information:
pega.target.jdbc.driver.jar=full path/DRIVER.JAR pega.target.jdbc.driver.class=database driver class pega.target.database.type=database vendor type pega.target.jdbc.url=database URL pega.target.jdbc.username=Deployment user name pega.target.jdbc.password=password pega.target.rules.schema=new rules schema pega.target.data.schema=original data schema name
Note: If pega.target.data.schema is blank, the rules schema is used by default.
d) Configure the bulkmover directory:
pega.bulkmover.directory=full path to output directory
e) Configure a temporary directory:
pega.migrate.temp.directory=full path to temporary directory
f) Configure the operations to be performed by the utility as shown below:
pega.move.admin.table=falsepega.clone.generate.xml=true pega.clone.create.ddl=true
Pega Platform Upgrade Guide42
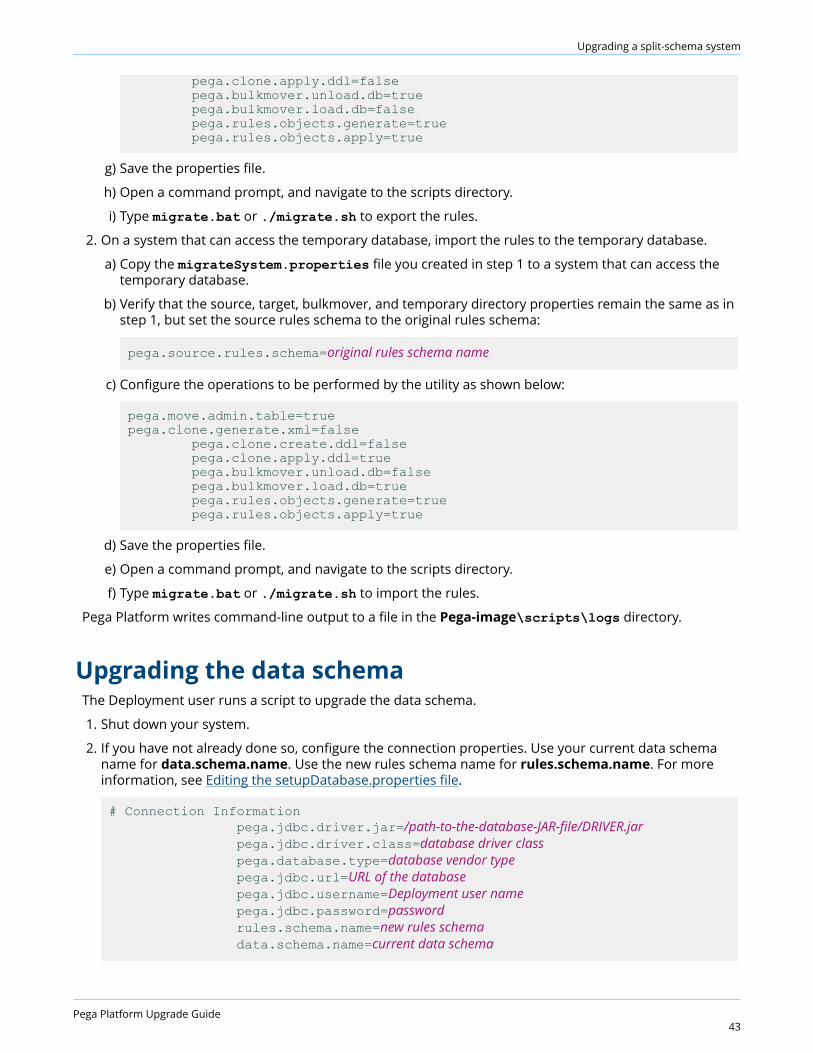
Upgrading a split-schema system
pega.clone.apply.ddl=false pega.bulkmover.unload.db=true pega.bulkmover.load.db=false pega.rules.objects.generate=true pega.rules.objects.apply=true
g) Save the properties file.
h) Open a command prompt, and navigate to the scripts directory.
i) Type migrate.bat or ./migrate.sh to export the rules.
2. On a system that can access the temporary database, import the rules to the temporary database.
a) Copy the migrateSystem.properties file you created in step 1 to a system that can access thetemporary database.
b) Verify that the source, target, bulkmover, and temporary directory properties remain the same as instep 1, but set the source rules schema to the original rules schema:
pega.source.rules.schema=original rules schema name
c) Configure the operations to be performed by the utility as shown below:
pega.move.admin.table=truepega.clone.generate.xml=false pega.clone.create.ddl=false pega.clone.apply.ddl=true pega.bulkmover.unload.db=false pega.bulkmover.load.db=true pega.rules.objects.generate=true pega.rules.objects.apply=true
d) Save the properties file.
e) Open a command prompt, and navigate to the scripts directory.
f) Type migrate.bat or ./migrate.sh to import the rules.
Pega Platform writes command-line output to a file in the Pega-image\scripts\logs directory.
Upgrading the data schemaThe Deployment user runs a script to upgrade the data schema.
1. Shut down your system.
2. If you have not already done so, configure the connection properties. Use your current data schemaname for data.schema.name. Use the new rules schema name for rules.schema.name. For moreinformation, see Editing the setupDatabase.properties file.
# Connection Information pega.jdbc.driver.jar=/path-to-the-database-JAR-file/DRIVER.jar pega.jdbc.driver.class=database driver class pega.database.type=database vendor type pega.jdbc.url=URL of the database pega.jdbc.username=Deployment user name pega.jdbc.password=password rules.schema.name=new rules schema data.schema.name=current data schema
Pega Platform Upgrade Guide43
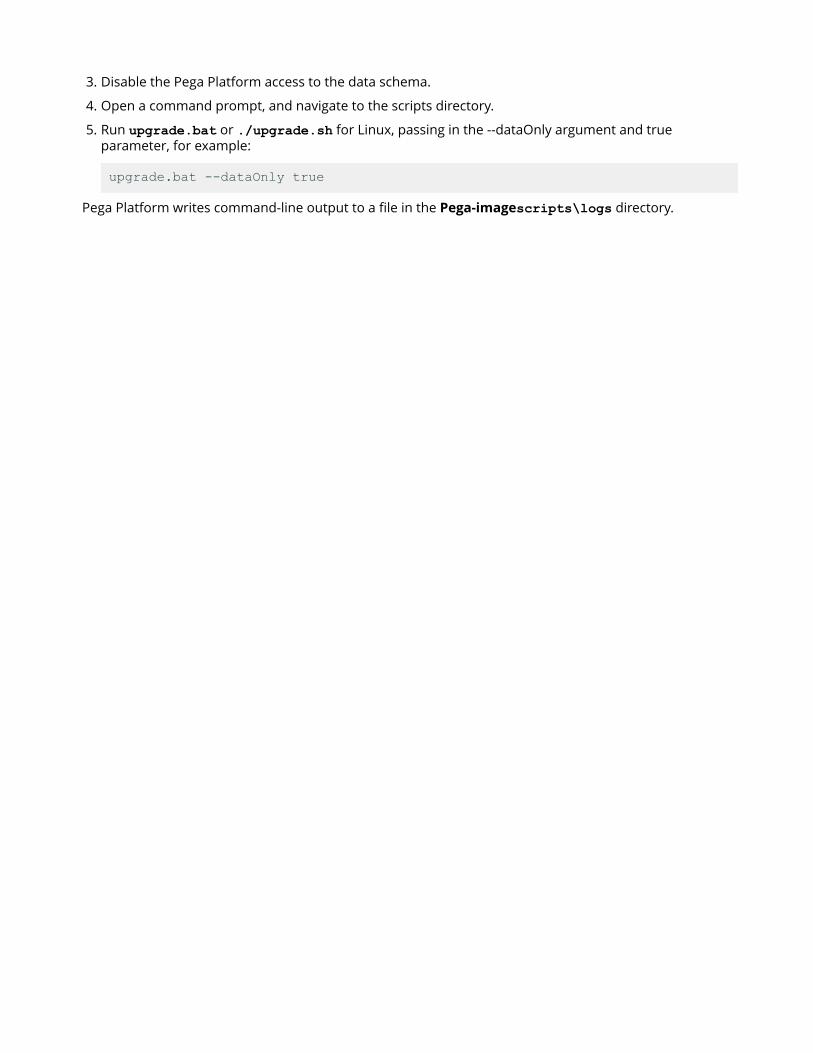
3. Disable the Pega Platform access to the data schema.
4. Open a command prompt, and navigate to the scripts directory.
5. Run upgrade.bat or ./upgrade.sh for Linux, passing in the --dataOnly argument and trueparameter, for example:
upgrade.bat --dataOnly true
Pega Platform writes command-line output to a file in the Pega-imagescripts\logs directory.
Upgrading from a single-schema to split-schema configuration
Upgrading from a single-schema to split-schema configurationIf you have a single schema, Pega recommends that you upgrade to a split-schema configuration. To keepyour single-schema configuration, see Appendix B — Performing a single-schema upgrade.
Your single schema currently includes both rules and data. After you split the schema, your system willhave two schemas: a data schema and a separate rules schema.
Note: To minimize downtime, use the High Availability features. For more information about HighAvailability, see the Pega Platform High Availability Administration Guide.
This upgrade involves three schemas:
• Current rules and data schema - your current single schema. This will be your data schema after theupgrade as well.
• Temporary upgrade schema - a temporary schema used for staging the upgrade. This will include therules and data tables during the upgrade.
• New rules schema- the new rules schema. This will become the rules schema after the upgrade.
The generic process for upgrading a split-schema configuration can be summarized in the following steps.The specific steps depend on whether your system has one database or two databases:
1. Disable rule creation on your original schema.
2. Create blank schemas. If you are upgrading with one database, you need one blank schema. If you areupgrading with two databases, you need two blank schemas.
3. Migrate only the rules from the existing single schema to the new rules or upgrade schema.
4. Upgrade the new rules schema.
5. Use the migrate script to generate the rules schema objects and establish the links between the newrules schema and the data schema. If you are upgrading with two databases you will also need tomigrate the upgraded schema to the new rules schema.
6. Shut down the existing system and then upgrade the data schema.
Upgrade with one databaseFor non-production systems, follow the instructions in this section to perform an out-of-place upgradewith one database. For production systems, use two different systems and databases. See Upgrading withtwo databases for details.
Note: The two-database approach allows you to take advantage of high availability features forupgrades that require minimal downtime.
1. If you are using the High Availability option, disable rule creation on the existing schema. See Disablingrule creation on the rules schema.
2. Unless you are using IBM Db2 for Linux, UNIX, and Windows, create a single schema. See Create a newrules schema. On IBM Db2 for Linux, UNIX, and Windows, the schema is automatically created whenthe first CREATE TABLE statement executes after the deployment is complete.
3. Migrate the rules tables to the new schema. See Migrating the rules tables with one database.
4. Use either the Installation and Upgrade Assistant, or the command line to upgrade the migrated rulesschema. See Upgrade methods for the migrated rules schema.
Pega Platform Upgrade Guide45
Upgrading from a single-schema to split-schema configuration
Disabling rule creation on the rules schemaIf you are using the recommended High Availability option, you can disable rule creation on the rulesschema to speed the deployment. If you are not using the High Availability option, skip this section.
Before you deploy, commit all uncommitted hotfixes. After you begin the deployment, ensure that nochanges to the rules, including hotfixes, are applied until after the deployment is complete.
1. Log in as a user with the PegaRULES:HighAvailabilityAdministrator role.
2. Navigate to System > High Availability > HA Cluster Settings.
3. Under Cluster Upgrade, select Cluster Upgrading - Disable saving of rules.
4. Click Submit.
5. Log out.
Create a new rules schemaUnless you are using IBM Db2 for Linux, UNIX, and Windows, or IBM Db2 for z/OS, create a blank schema.On IBM Db2 for Linux, UNIX, and Windows, and IBM Db2 for z/OS, the schema is automatically createdwhen the first CREATE TABLE statement executes after the deployment is complete.
Migrating the rules tables with one databaseUse the migrate script to migrate the rules tables and other required database objects from the existingrules schema to the new rules schema. You will also use this script later to generate and apply rulesobjects after the upgrade. The Deployment user performs the migrations.
Pega strongly recommends that you use the migration script. The use of vendor tools to manage this stepis not recommended. If you do not use the migrate script to migrate the schema, there are additionalmanual steps required that are not documented here.
1. Use a text editor to edit Pega-image\scripts\migrateSystem.properties.
2. Configure the source properties. See Properties file parameters for more information. Leave the sourcedata schema blank:
# Connection Information pega.source.jdbc.driver.jar=full path/DRIVER.jar pega.source.jdbc.driver.class=database driver class pega.source.database.type=database vendor type pega.source.jdbc.url=URL of database pega.source.jdbc.username=Deployment user name pega.source.jdbc.password=password pega.source.rules.schema=original single-schema name
3. Configure the target properties. See Properties file parameters for more information:
pega.target.jdbc.driver.jar=full path/DRIVER.JAR pega.target.jdbc.driver.class=database driver class pega.target.database.type=database vendor type pega.target.jdbc.url=database URL pega.target.jdbc.username=Deployment user name pega.target.jdbc.password=password pega.target.data.schema=new rules schema name pega.target.rules.schema=new rules schema name
Note: If pega.target.data.schema is blank, the rules schema is correctly used by default.
Pega Platform Upgrade Guide46
Upgrading from a single-schema to split-schema configuration
4. Configure the bulkmover directory:
pega.bulkmover.directory=full path to output directory
5. Configure a temporary directory:
pega.migrate.temp.directory=full path to temporary directory
6. Configure the operations to be performed by the utility as shown below:
pega.move.admin.table=true pega.clone.generate.xml=true pega.clone.create.ddl= true pega.clone.apply.ddl=true pega.bulkmover.unload.db=true pega.bulkmover.load.db=true pega.rules.objects.generate=false pega.rules.objects.apply=false
7. Save the script.
8. Open a command prompt, and navigate to the scripts directory.
9. Type migrate.bat or ./migrate.sh to run the script.
Pega Platform writes command-line output to a file in the Pega-image\scripts\logs directory.
Upgrade methods for the migrated rules schemaUse one of these methods to upgrade the migrated rules schema:
• Installation and Upgrade Assistant
• Command line script: upgrade.bat or upgrade.sh
Prior to loading the rulebase, the upgrade attempts to validate that each database table space has abuffer pool size large enough to accommodate the generated SQL DDL. The utility generates a report andstops if it finds any table space that requires an increased buffer pool size. The report identifies all tablespaces requiring an increased buffer pool size. Have the database administrator correct the table spacebuffer pool issues and rerun the tool.
Note: To minimize the time required to upgrade, run the upgrade from the same data center asthe database server.
Upgrading the migrated rules schema by using the UI toolUse the Installation and Upgrade Assistant to upgrade the migrated rules schema. Otherwise use theupgrade script.
Because of the large volume of data, run the IUA on the same network as the database server. If this isnot possible, run the tool on a system with fast, direct access to the database server. The Deploymentuser performs these steps.
Note:
Pega Platform writes command-line output to a file in the Pega-image\scripts\logs directory.
The upgrade can last for several hours and the time can vary widely based on network proximity to thedatabase server.
1. Double-click the PRPC_Setup.jar file to start the IUA.
Pega Platform Upgrade Guide47
Upgrading from a single-schema to split-schema configuration
Note: If JAR files are not associated with Java commands on your system, start the IUA from thecommand line. Navigate to the directory containing the PRPC_Setup.jar file, and type java -jar PRPC_Setup.jar.
The IUA loads and the Pega icon is displayed in your task bar.
2. Click Next to display the license agreement.
3. Review the license agreement and click Accept.
4. If you are resuming after a previous failed upgrade and the Resume Options screen is displayed,select either Resume or Start Over.
• If you select Resume, the system uses the previously entered database configuration information toresume the upgrade from the last successful process. Continue these instructions at step 8.
• If you select Start Over, continue at step 5 to reenter the configuration information.
5. On the Installer Mode screen, choose Upgrade and click Next.
6. Choose your database type and click Next.
7. Configure the database connection. The JDBC drivers allow the Pega Platform application tocommunicate with the database. Specify the new rules schema name for both the Rules SchemaName and Data Schema Name fields. For more information, see Appendix A — Properties files.
Note: Some of the fields on the Database Connection screen are pre-populated based onthe type of database you selected. If you edit these or any other fields on this screen, and thenlater decide to change the database type, the IUA might not populate the fields correctly. If thisoccurs, enter the correct field values as documented below, or exit and rerun the IUA to selectthe intended database type. If you are resuming after a failed upgrade, some pre-populatedvalues might be disabled.
• JDBC Driver Class Name — Verify that the pre-populated values are correct.
• JDBC Driver JAR Files — Click Select Jar to browse to the appropriate driver files for your databasetype and version.
• Database JDBC URL — Verify that the pre-populated value is accurate.
• Database Username and Password — Enter the Deployment user name and password.
• Rules Schema Name — Enter the new rules schema name.
• Data Schema Name — Enter the new rules schema name.
8. Click Test Connection. If the connection is not successful, review your connection information, correctany errors, and retest. When the connection is successful, click Next to choose how to apply the dataschema.
On IBM Db2 for Linux, UNIX, and Windows, and IBM Db2 for z/OS, Test Connection does not verifythat the schemas exist. Instead, the schemas are automatically generated when the first CREATE TABLEstatement executes after the deployment is complete.
9. Optional: Specify whether you will have your database administrator manually apply the DDL changesto the schema. These changes include the user-defined functions (UDF) supplied by Pegasystems. Bydefault, the IUA generates and applies the schema changes to your database.
• To generate and apply the DDL outside the IUA, select Bypass Automatic DDL Application andcontinue the deployment. After you complete the deployment, manually generate and apply theDDL and UDF. For more information, see Generating the DDL file and Appendix D — Installing user-defined functions.
• To have the IUA automatically apply the DDL changes and the UDF, clear Bypass Automatic DDLApplication .
10. Click Next.
Pega Platform Upgrade Guide48
Upgrading from a single-schema to split-schema configuration
11. Select the upgrade options and click Next:
• Select Run rulebase cleanup to permanently remove old rules. In most cases, removing older rulesdecreases the overall upgrade time. Running the cleanup script permanently removes rules olderthan the current version from which you are upgrading. For example, if you are upgrading fromPRPC 6.2 SP2 (06-02-20) to 7.4, cleanup removes rules of version 06-01-99 and older.
• Select Rebuild database indexes to have the IUA to rebuild the database indexes after therulebase loads. The IUA rebuilds the database indexes to ensure good performance in the upgradedsystem. The amount of time this process adds to the upgrade procedure depends on the size ofyour database.
• Select Update existing applications to modify your existing applications to support the upgradedversion of the Pega Platform. The specific actions depend on your current version of PRPC. If youdo not automatically update the applications as part of the IUA, follow the instructions in Updatingexisting applications to update the applications as part of the post-upgrade process.
12. Click Start to begin loading the rulebase.Upgrade logs display in the log window and are also stored in the Pega-image\scripts\logs directory.During the upgrade, the log window might appear inactive when the IUA is processing larger files.
13. Click Back to return to the previous screen, and then click Exit to close the IUA.
Upgrading the rules schema from the command lineTo upgrade from the command line, configure the setupDatabase.properties file and run eitherupgrade.bat or upgrade.sh. The Deployment user runs these scripts.
1. If you have not done so already, edit the setupDatabase.properties file.
a) Open the Directories.distributionDirectory file.
b) Configure the connection properties. Use the new rules schema name for both the rules schemaname and data schema name. For more information about the connection properties, see AppendixA — Properties files.
# Connection Information pega.jdbc.driver.jar=/path-to-the-database-JAR-file/DRIVER.jar pega.jdbc.driver.class=database driver class pega.database.type=database vendor type pega.jdbc.url=URL of the database pega.jdbc.username=Deployment user name pega.jdbc.password=password rules.schema.name=new-rules-schema-name data.schema.name=new-rules-schema-name
c) Optional: If you are repeating a failed upgrade, configure the resume property:
• To resume the upgrade from the last successful step, set automatic.resume=true.
• To restart the upgrade from the beginning, set automatic.resume=false
d) Save and close the file.
2. Open a command prompt and navigate to the scripts directory.
3. Run either upgrade.bat or upgrade.sh.
Pega Platform writes command-line output to a file in the Pega-image\scripts\logs directory.
Pega Platform Upgrade Guide49
Upgrading from a single-schema to split-schema configuration
Upgrade with two databasesAs an alternative to upgrading with one database, you can set up your temporary upgrade schema on adifferent database server, as shown below. Because the source and target systems are different configurethe common properties correctly to access each database.
Migrate rules objects from the data schema to another database to be upgraded (called the temporaryupgrade schema in the figure). Then migrate the updated rules from the upgrade schema into a new rulesschema on the database containing the data schema. After the upgrade, delete the temporary upgradeschema.
Caution: Ensure that no changes to the rules, including hotfixes, are applied until after theupgrade is complete.
These are the general steps for upgrading from a single schema to a split schema with two databases:
1. If you are using the High Availability option, disable rule creation on the existing schema. See Disablingrule creation on the rules schema.
2. Unless you are using IBM Db2 for Linux, UNIX, and Windows, create two schemas. See Create twonew blank rules schemas. On IBM Db2 for Linux, UNIX, and Windows, the schemas are automaticallycreated when the first CREATE TABLE statement executes after the deployment is complete.
3. Migrate the rules tables to the new rules schema. See Migrating the rules tables.
4. Use either the Installation and Upgrade Assistant, or the command line to upgrade the migrated rulesschema. See Upgrade the rules schema with two databases.
5. Migrate and generate the rules schema objects. See Migrating and generating rules schema objects.
6. Upgrade the data schema. See Upgrading the data schema.
Disabling rule creation on the rules schemaIf you are using the recommended High Availability option, you can disable rule creation on the rulesschema to speed the deployment. If you are not using the High Availability option, skip this section.
Pega Platform Upgrade Guide50
Upgrading from a single-schema to split-schema configuration
Before you deploy, commit all uncommitted hotfixes. After you begin the deployment, ensure that nochanges to the rules, including hotfixes, are applied until after the deployment is complete.
1. Log in as a user with the PegaRULES:HighAvailabilityAdministrator role.
2. Navigate to System > High Availability > HA Cluster Settings.
3. Under Cluster Upgrade, select Cluster Upgrading - Disable saving of rules.
4. Click Submit.
5. Log out.
Create two new blank rules schemasUnless you are using IBM Db2 for Linux, UNIX, and Windows, or IBM Db2 for z/OS, create two new blankrules schemas. On IBM Db2 for Linux, UNIX, and Windows, and IBM Db2 for z/OS, the schemas areautomatically created when the first CREATE TABLE statement executes after the upgrade is complete.
If you manually create the schemas, set the permissions for the new schemas to be identical to thepermissions for the existing schema. See your installation guide for information about user permissions.
• Create one new schema in the database you will use for your split-schema configuration.
• Create the second new schema in the temporary database.
Migrating the rules tablesUse the migrate script to migrate the rules tables and other required database objects from the existingschema (the data schema in the picture above) to the new rules schema. You will also use this script laterto generate and apply rules objects after the upgrade. The Deployment user performs the migrations.
Note: Pega strongly recommends that you use the migration script. The use of vendor tools tomanage this step is not recommended. If you do not use the migrate script to migrate the schema,there are additional manual steps required that are not documented here.
This process depends on whether the system has access to both the original and temporary databases.Follow the instructions in the correct section for your environment:
• If your system has access to both databases, see Migrating the rules tables when the system hasaccess to both databases.
• If your system has access to only one database, see Migrating the rules tables when the system hasaccess to one database.
Migrating the rules tables when the system has access to bothdatabasesIf the system can access both the original and temporary databases, run the migration script once tomigrate the rules tables to the new schema.
1. Use a text editor to edit Pega-image\scripts\migrateSystem.properties .
2. Configure the source properties. See Properties file parameters for more information:
# Connection Information pega.source.jdbc.driver.jar=full path/DRIVER.jar pega.source.jdbc.driver.class=database driver class pega.source.database.type=database vendor type pega.source.jdbc.url=URL of database pega.source.jdbc.username=Deployment user name pega.source.jdbc.password=password
Pega Platform Upgrade Guide51
Upgrading from a single-schema to split-schema configuration
pega.source.rules.schema=original data schema name
3. Configure the target properties. See Properties file parameters for more information. Leave the targetdata schema name blank:
pega.target.jdbc.driver.jar=full path/DRIVER.JAR pega.target.jdbc.driver.class=database driver class pega.target.database.type=database vendor type pega.target.jdbc.url=database URL pega.target.jdbc.username=Deployment user name pega.target.jdbc.password=password pega.target.rules.schema=new rules schema name pega.target.data.schema=
Note: If pega.target.data.schema is blank, the rules schema is correctly used by default.
4. Configure the bulkmover directory:
pega.bulkmover.directory=full path to output directory
5. Configure a temporary directory:
pega.migrate.temp.directory=full path to temporary directory
6. Configure the operations to be performed by the utility as shown below:
pega.move.admin.table=true pega.clone.generate.xml=true pega.clone.create.ddl=true pega.clone.apply.ddl=true pega.bulkmover.unload.db=true pega.bulkmover.load.db=true pega.rules.objects.generate=false pega.rules.objects.apply=false
7. Save the script.
8. Open a command prompt, and navigate to the scripts directory.
9. Run either migrate.bat or migrate.sh.
Continue at Upgrading the rules schema with two databases.
Migrating the rules tables when the system has access to onedatabaseIf the system can only access one database at a time (for example, if there is a firewall between the twoservers), run the migration script twice: first on a system that can access the original source database, andthen where it can access the temporary target database.
Make sure that the system that accesses the temporary database has access to the bulkmover directoryand the DDL generated from the source database.
1. On a system that can access the original database, export rules from the original database.
a) Use a text editor to edit Pega-image\scripts\migrateSystem.properties .
b) Configure the source properties. See Properties file parameters for more information:
# Connection Information
Pega Platform Upgrade Guide52
Upgrading from a single-schema to split-schema configuration
pega.source.jdbc.driver.jar=full path/DRIVER.jar pega.source.jdbc.driver.class=database driver class pega.source.database.type=database vendor type pega.source.jdbc.url=URL of database pega.source.jdbc.username=Deployment user name pega.source.jdbc.password=password pega.source.rules.schema=original data schema name
c) Configure the target properties. See Properties file parameters for more information. Leave thetarget data schema name blank:
pega.target.jdbc.driver.jar=full path/DRIVER.JAR pega.target.jdbc.driver.class=database driver class pega.target.database.type=database vendor type pega.target.jdbc.url=database URL pega.target.jdbc.username=Deployment user name pega.target.jdbc.password=password pega.target.rules.schema=new rules schema name pega.target.data.schema=
Note: If pega.target.data.schema is blank, the rules schema is correctly used by default.
d) Configure the bulkmover directory:
pega.bulkmover.directory=full path to output directory
e) Configure a temporary directory:
pega.migrate.temp.directory=full path to temporary directory
f) Configure the operations to be performed by the utility as shown below:
pega.move.admin.table=true pega.clone.generate.xml=true pega.clone.create.ddl=true pega.clone.apply.ddl=false pega.bulkmover.unload.db=true pega.bulkmover.load.db=false pega.rules.objects.generate=false pega.rules.objects.apply=false
g) Save the properties file.
h) Open a command prompt, and navigate to the scripts directory.
i) Run migrate.bat or ./migrate.sh to export the rules.
2. On a system that can access the temporary database, import the rules to the temporary database.
a) Copy the migrateSystem.properties file you created in step 1 to a system that can access thetemporary database.
b) Verify that the source, target, bulkmover, and temporary directory properties remain the same as instep 1.
c) Configure the operations to be performed by the utility as shown below:
pega.move.admin.table=true pega.clone.generate.xml=false pega.clone.create.ddl=false
Pega Platform Upgrade Guide53
Upgrading from a single-schema to split-schema configuration
pega.clone.apply.ddl=true pega.bulkmover.unload.db=false pega.bulkmover.load.db=true pega.rules.objects.generate=false pega.rules.objects.apply=false
d) Save the properties file.
e) Open a command prompt, and navigate to the scripts directory.
f) Run migrate.bat or ./migrate.sh to import the rules.
Continue at Upgrading the rules schema with two databases.
Upgrade the rules schema with two databasesNext, upgrade the migrated rules schema. Use one of these methods:
• Command line upgrade.bat or upgrade.sh script
• Installation and Upgrade Assistant
Prior to loading the rulebase, the upgrade attempts to validate that each database table space has abuffer pool size large enough to accommodate the generated SQL DDL. The utility generates a report andstops if it finds any table space that requires an increased buffer pool size. The report identifies all tablespaces requiring an increased buffer pool size. Have the database administrator correct the table spacebuffer pool issues and rerun the tool.
Note: To minimize the time required to upgrade, run the upgrade from the same data center asthe database server.
Upgrading the migrated rules schema by using the Installation andUpgrade AssistantFor a UI-driven upgrade, use the Installation and Upgrade Assistant to upgrade the migrated rulesschema.
Because of the large volume of data, run the IUA on the same network as the database server. If this isnot possible, run the tool on a system with fast, direct access to the database server. The Deploymentuser performs these steps.
Note:
Pega Platform writes command-line output to a file in the Pega-image\scripts\logs directory.
The upgrade can last for several hours and the time can vary widely based on network proximity to thedatabase server.
To run the IUA:
1. Double-click the PRPC_Setup.jar file to start the IUA.
Note: If JAR files are not associated with Java commands on your system, start the IUA from thecommand line. Navigate to the directory containing the PRPC_Setup.jar file, and type java -jar PRPC_Setup.jar.
The IUA loads and the Pega icon is displayed in your task bar.
2. Click Next to display the license agreement.
3. Review the license agreement and click Accept.
4. If you are resuming after a previous failed upgrade and the Resume Options screen is displayed,select either Resume or Start Over.
Pega Platform Upgrade Guide54
Upgrading from a single-schema to split-schema configuration
• If you select Resume, the system uses the previously entered database configuration information toresume the upgrade from the last successful process. Continue these instructions at step 8.
• If you select Start Over, continue at step 5 to reenter the configuration information.
5. On the Installer Mode screen, choose Upgrade and click Next.
6. Choose your database type and click Next.
7. Configure the database connection. The JDBC drivers allow the Pega Platform application tocommunicate with the database. Specify the new rules schema name for both the Rules SchemaName and Data Schema Name fields. For more information, see Appendix A — Properties files.
Note: Some of the fields on the Database Connection screen are pre-populated based onthe type of database you selected. If you edit these or any other fields on this screen, and thenlater decide to change the database type, the IUA might not populate the fields correctly. If thisoccurs, enter the correct field values as documented below, or exit and rerun the IUA to selectthe intended database type. If you are resuming after a failed upgrade, some pre-populatedvalues might be disabled.
• JDBC Driver Class Name — Verify that the pre-populated values are correct.
• JDBC Driver JAR Files — Click Select Jar to browse to the appropriate driver files for your databasetype and version.
• Database JDBC URL — Verify that the pre-populated value is accurate.
• Database Username and Password — Enter the Deployment user name and password.
• Rules Schema Name — Enter the new rules schema name.
• Data Schema Name — Enter the new rules schema name.
8. Click Test Connection. If the connection is not successful, review your connection information, correctany errors, and retest. When the connection is successful, click Next to choose how to apply the dataschema.
On IBM Db2 for Linux, UNIX, and Windows, and IBM Db2 for z/OS, Test Connection does not verifythat the schemas exist. Instead, the schemas are automatically generated when the first CREATE TABLEstatement executes after the deployment is complete.
9. Click Next.
10. Select the upgrade options and click Next:
• Optional: Select Run rulebase cleanup to permanently remove old rules. In most cases, removingolder rules decreases the overall upgrade time. Running the cleanup script permanently removesrules older than the current version from which you are upgrading. For example, if you areupgrading from PRPC 6.2 SP2 (06-02-20) to 7.4, cleanup removes rules of version 06-01-99 andolder.
• Optional: Select Rebuild database indexes to have the IUA rebuild the database indexes after therulebase loads. The IUA rebuilds the database indexes to ensure good performance in the upgradedsystem. The amount of time this process adds to the upgrade procedure depends on the size ofyour database.
• Optional: Select Update existing applications to modify your existing applications to support theupgraded version of the Pega Platform. The specific actions depend on your current version ofPRPC. If you do not automatically update the applications as part of the IUA, follow the instructionsin Updating existing applications to update the applications as part of the post-upgrade process.
11. Click Start to begin loading the rulebase.Upgrade logs display in the log window and are also stored in the Pega-image\scripts\logs directory.During the upgrade, the log window might appear inactive when the IUA is processing larger files.
Pega Platform Upgrade Guide55
Upgrading from a single-schema to split-schema configuration
12. Click Back to return to the previous screen, and then click Exit to close the IUA.
Upgrading the rules schema from the command lineTo use the command line, configure the setupDatabase.properties file and run either upgrade.bator upgrade.sh. The Deployment user runs these scripts.
1. If you have not done so already, edit the setupDatabase.properties file.
a) Open the setupDatabase.properties file in the scripts directory of your distribution image:Directories.distributionDirectory\scripts\setupDatabase.properties
b) Configure the connection properties. Use the temporary upgrade schema name for both the rulesschema and data schema names. See Properties file parameters for more information.
c) Optional: If you are repeating a failed upgrade, configure the resume property:
• To resume the upgrade from the last successful step, set automatic.resume=true.
• To restart the upgrade from the beginning, set automatic.resume=false.
d) Save and close the file.
2. Open a command prompt and navigate to the scripts directory.
3. Run either upgrade.bat or upgrade.sh.
The rulebase upgrade can take several hours, depending on the proximity of the database to the systemrunning the script.
Pega Platform writes command-line output to a file in the Pega-image\scripts\logs directory.
Continue at Migrating to the new rules schema.
Migrating and generating rules schema objectsUse the migrate script to migrate the temporary upgrade schema into the rules schema and generaterules schema objects. The Deployment user performs the migrations.
Pega strongly recommends that you use the migration script. The use of vendor tools to manage this stepis not recommended. If you do not use the migrate script to migrate the schema, there are additionalmanual steps required that are not documented here.
This process depends on whether the system has access to both the original and temporary databases.Follow the instructions in the correct section for your environment:
• If your system has access to both databases, see Migrating and generating rules schema objects whenthe system has access to both databases.
• If your system has access to only one database, see Migrating and generating the rules schema objectswhen the system has access to one database.
Pega Platform writes command-line output to a file in the Pega-image\scripts\logs directory.
Migrating and generating rules schema objects when the system hasaccess to both databasesIf the system can access both the temporary and original databases at the same time, run the migratescript once to migrate and generate the rules schema objects.
1. Use a text editor to edit Pega-image\scripts\migrateSystem.properties .
Pega Platform Upgrade Guide56
Upgrading from a single-schema to split-schema configuration
2. Configure the source properties. See Properties file parameters for more information. Leave the dataschema name blank.
# Connection Information pega.source.jdbc.driver.jar=/path-to-the-temporary-upgrade-schema-JAR-file/DRIVER.jar pega.source.jdbc.driver.class=database driver class pega.source.database.type=database vendor type pega.source.jdbc.url=URL of database pega.source.jdbc.username=Deployment user name pega.source.jdbc.password=password pega.source.rules.schema=temporary upgrade schema pega.source.data.schema=
3. Configure the target properties. See Properties file parameters for more information:
pega.target.jdbc.driver.jar=path-to-the-rules-schema-JAR-file/DRIVER.JAR >pega.target.jdbc.driver.class=database driver class pega.target.database.type=database vendor type pega.target.jdbc.url=URL-of-the-database pega.target.jdbc.username=Deployment user name pega.target.jdbc.password=password pega.target.rules.schema=new rules schema
4. Configure the target data schema. In this case, the target is the original schema on your single-schemasystem. This will become your data schema.
pega.target.data.schema=original single-schema name
5. Configure the bulkmover directory.
pega.bulkmover.directory=full path to output directory
6. Configure a temporary directory:
pega.migrate.temp.directory=full path to temporary directory
7. Configure the operations to be performed by the utility as shown below:
pega.move.admin.table=false pega.clone.generate.xml=true pega.clone.create.ddl=true pega.clone.apply.ddl=true pega.bulkmover.unload.db=true pega.bulkmover.load.db=true pega.rules.objects.generate=true pega.rules.objects.apply=true
8. Save and close the file.
9. Open a command prompt, and navigate to the scripts directory.
10. Type migrate.bat or ./migrate.sh to run the script.
Pega Platform Upgrade Guide57
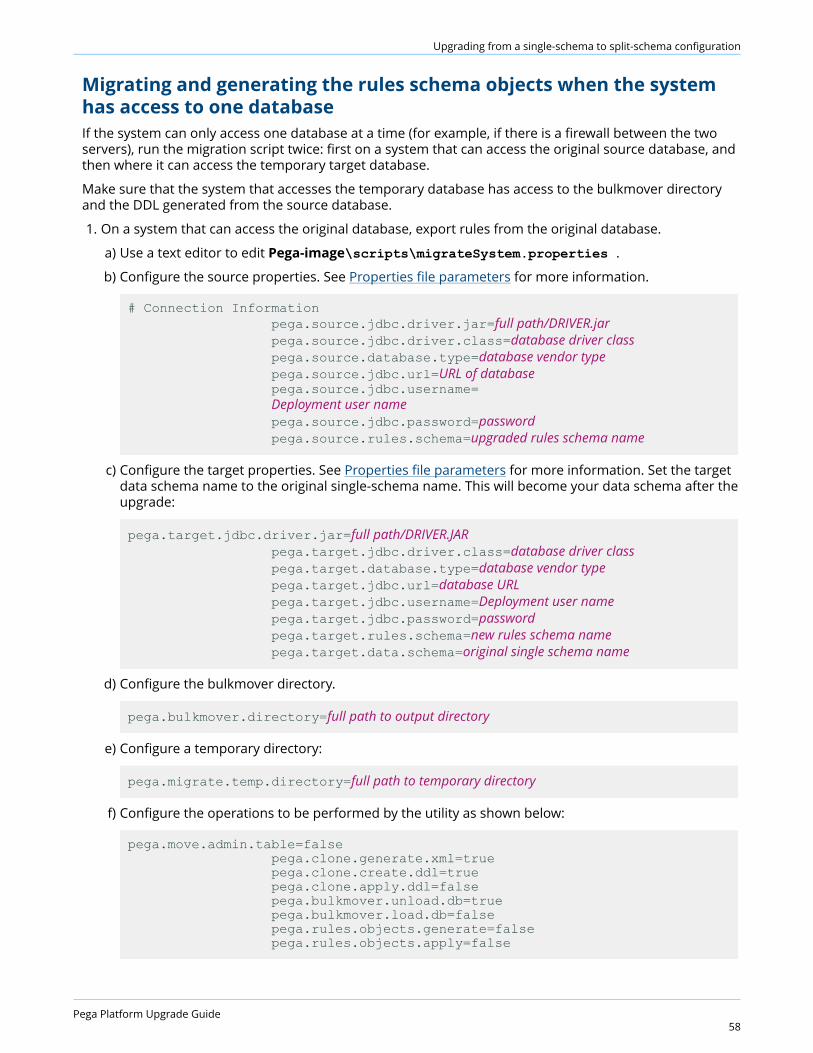
Upgrading from a single-schema to split-schema configuration
Migrating and generating the rules schema objects when the systemhas access to one databaseIf the system can only access one database at a time (for example, if there is a firewall between the twoservers), run the migration script twice: first on a system that can access the original source database, andthen where it can access the temporary target database.
Make sure that the system that accesses the temporary database has access to the bulkmover directoryand the DDL generated from the source database.
1. On a system that can access the original database, export rules from the original database.
a) Use a text editor to edit Pega-image\scripts\migrateSystem.properties .
b) Configure the source properties. See Properties file parameters for more information.
# Connection Information pega.source.jdbc.driver.jar=full path/DRIVER.jar pega.source.jdbc.driver.class=database driver class pega.source.database.type=database vendor type pega.source.jdbc.url=URL of database pega.source.jdbc.username= Deployment user name pega.source.jdbc.password=password pega.source.rules.schema=upgraded rules schema name
c) Configure the target properties. See Properties file parameters for more information. Set the targetdata schema name to the original single-schema name. This will become your data schema after theupgrade:
pega.target.jdbc.driver.jar=full path/DRIVER.JAR pega.target.jdbc.driver.class=database driver class pega.target.database.type=database vendor type pega.target.jdbc.url=database URL pega.target.jdbc.username=Deployment user name pega.target.jdbc.password=password pega.target.rules.schema=new rules schema name pega.target.data.schema=original single schema name
d) Configure the bulkmover directory.
pega.bulkmover.directory=full path to output directory
e) Configure a temporary directory:
pega.migrate.temp.directory=full path to temporary directory
f) Configure the operations to be performed by the utility as shown below:
pega.move.admin.table=false pega.clone.generate.xml=true pega.clone.create.ddl=true pega.clone.apply.ddl=false pega.bulkmover.unload.db=true pega.bulkmover.load.db=false pega.rules.objects.generate=false pega.rules.objects.apply=false
Pega Platform Upgrade Guide58
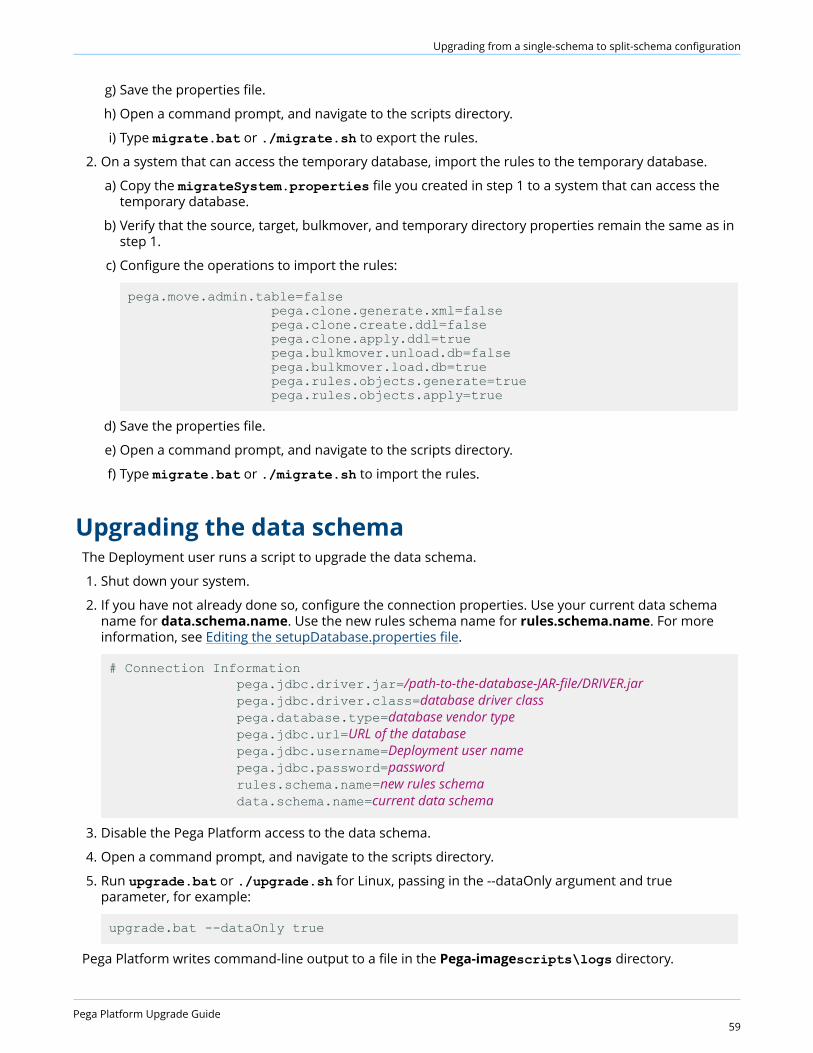
Upgrading from a single-schema to split-schema configuration
g) Save the properties file.
h) Open a command prompt, and navigate to the scripts directory.
i) Type migrate.bat or ./migrate.sh to export the rules.
2. On a system that can access the temporary database, import the rules to the temporary database.
a) Copy the migrateSystem.properties file you created in step 1 to a system that can access thetemporary database.
b) Verify that the source, target, bulkmover, and temporary directory properties remain the same as instep 1.
c) Configure the operations to import the rules:
pega.move.admin.table=false pega.clone.generate.xml=false pega.clone.create.ddl=false pega.clone.apply.ddl=true pega.bulkmover.unload.db=false pega.bulkmover.load.db=true pega.rules.objects.generate=true pega.rules.objects.apply=true
d) Save the properties file.
e) Open a command prompt, and navigate to the scripts directory.
f) Type migrate.bat or ./migrate.sh to import the rules.
Upgrading the data schemaThe Deployment user runs a script to upgrade the data schema.
1. Shut down your system.
2. If you have not already done so, configure the connection properties. Use your current data schemaname for data.schema.name. Use the new rules schema name for rules.schema.name. For moreinformation, see Editing the setupDatabase.properties file.
# Connection Information pega.jdbc.driver.jar=/path-to-the-database-JAR-file/DRIVER.jar pega.jdbc.driver.class=database driver class pega.database.type=database vendor type pega.jdbc.url=URL of the database pega.jdbc.username=Deployment user name pega.jdbc.password=password rules.schema.name=new rules schema data.schema.name=current data schema
3. Disable the Pega Platform access to the data schema.
4. Open a command prompt, and navigate to the scripts directory.
5. Run upgrade.bat or ./upgrade.sh for Linux, passing in the --dataOnly argument and trueparameter, for example:
upgrade.bat --dataOnly true
Pega Platform writes command-line output to a file in the Pega-imagescripts\logs directory.
Pega Platform Upgrade Guide59
Post-upgrade configuration
Post-upgrade configurationThis section describes additional tasks to perform after you finish upgrading the system.
Upgrading from PRPC 6.1 SP2 and earlier: updatingruleset columnsWhen upgrading from any release prior to PRPC 6.2, you must run additional scripts to update the rulesetcolumns.
1. Navigate to ResourceKit\AdditionalUpgradeScripts and locate the scripts for your database:
• database_rulesetversion_columns_data.sql
• database_rulesetversion_columns_rules.sql
For example, oracle_rulesetversion_columns_data.sql
2. Run the scripts:
• For split schema environments:
• Run database_rulesetversion_columns_data.sql against the data schema.
• Run database_rulesetversion_columns_rules.sql against the rules schema.
• For single schema environments, run both scripts against the single schema.
Depending upon the database platform and the size of the database the script might require significanttime and resources to execute.
For Docker, multiple VMs, or multiple NICs: Setting thepublic addressIf the cluster is set up in Docker, uses separate virtual machines (VMs), or multiple network interfaces(NICs), set the public address in the prconfig.xml file for each Pega Platform node.
1. Open the prconfig.xml configuration file in the prweb/WEB-INF/classes subdirectory of theapplication server directory. For more information, see the PDN article How to change prconfig.xml filesettings.
2. Modify the prconfig.xml file. Add the following setting to set the public address:<env name=" identification/cluster/public/address" value=" IP address " />
For example, if the IP address of the computer on which you run the Pega Platform node is10.254.34.210, add the following setting:
<env name=" identification/cluster/public/address" value="10.254.34.210" />
The new setting controls the address that is used by the Pega Platform node.
3. Save and close the prconfig.xml file.
4. Repeat steps 1 to 3 for the remaining nodes.
Pega Platform Upgrade Guide60
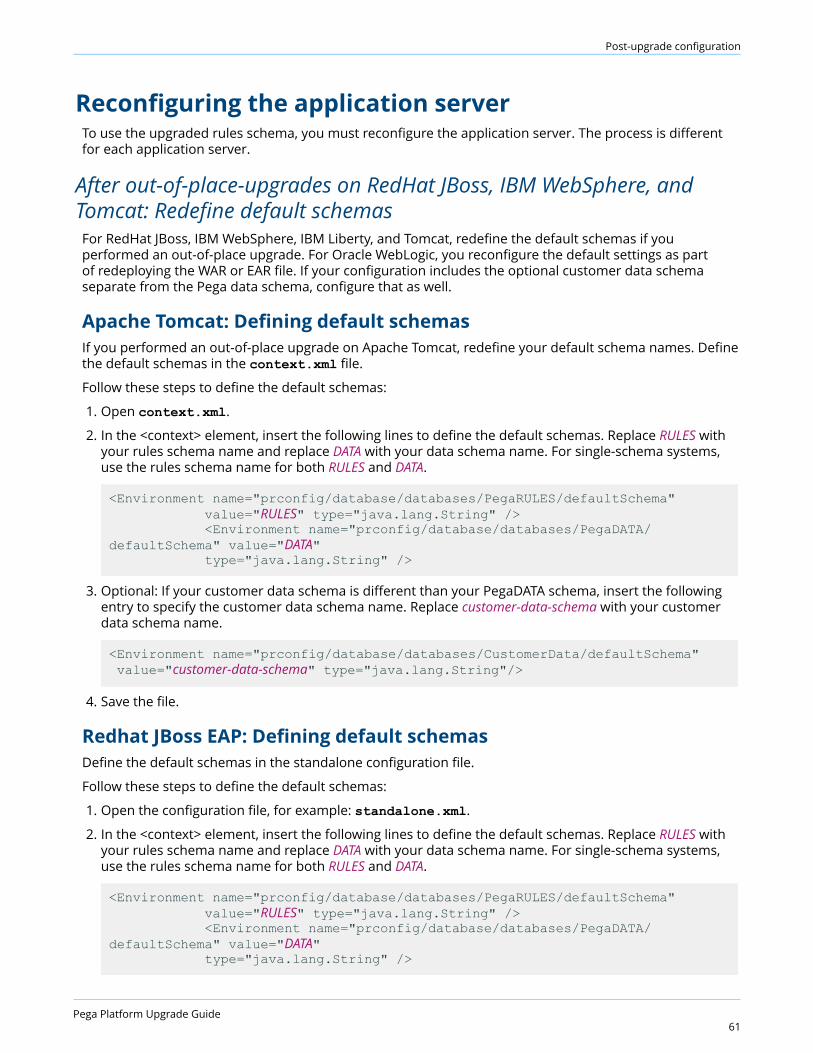
Post-upgrade configuration
Reconfiguring the application serverTo use the upgraded rules schema, you must reconfigure the application server. The process is differentfor each application server.
After out-of-place-upgrades on RedHat JBoss, IBM WebSphere, andTomcat: Redefine default schemasFor RedHat JBoss, IBM WebSphere, IBM Liberty, and Tomcat, redefine the default schemas if youperformed an out-of-place upgrade. For Oracle WebLogic, you reconfigure the default settings as partof redeploying the WAR or EAR file. If your configuration includes the optional customer data schemaseparate from the Pega data schema, configure that as well.
Apache Tomcat: Defining default schemasIf you performed an out-of-place upgrade on Apache Tomcat, redefine your default schema names. Definethe default schemas in the context.xml file.
Follow these steps to define the default schemas:
1. Open context.xml.
2. In the <context> element, insert the following lines to define the default schemas. Replace RULES withyour rules schema name and replace DATA with your data schema name. For single-schema systems,use the rules schema name for both RULES and DATA.
<Environment name="prconfig/database/databases/PegaRULES/defaultSchema" value="RULES" type="java.lang.String" /> <Environment name="prconfig/database/databases/PegaDATA/defaultSchema" value="DATA" type="java.lang.String" />
3. Optional: If your customer data schema is different than your PegaDATA schema, insert the followingentry to specify the customer data schema name. Replace customer-data-schema with your customerdata schema name.
<Environment name="prconfig/database/databases/CustomerData/defaultSchema" value="customer-data-schema" type="java.lang.String"/>
4. Save the file.
Redhat JBoss EAP: Defining default schemasDefine the default schemas in the standalone configuration file.
Follow these steps to define the default schemas:
1. Open the configuration file, for example: standalone.xml.
2. In the <context> element, insert the following lines to define the default schemas. Replace RULES withyour rules schema name and replace DATA with your data schema name. For single-schema systems,use the rules schema name for both RULES and DATA.
<Environment name="prconfig/database/databases/PegaRULES/defaultSchema" value="RULES" type="java.lang.String" /> <Environment name="prconfig/database/databases/PegaDATA/defaultSchema" value="DATA" type="java.lang.String" />
Pega Platform Upgrade Guide61
Post-upgrade configuration
3. Optional: If your customer data schema is different than your PegaDATA schema, insert the followingentry to specify the customer data schema name. Replace customer-data-schema with your customerdata schema name.
<Environment name="prconfig/database/databases/CustomerData/defaultSchema" value="customer-data-schema" type="java.lang.String"/>
4. Save the file.
IBM WebSphere: Defining default schemasIf you performed an out-of-place upgrade on IBM WebSphere, redefine your default schema names.Create binding identifiers to define the default values for the rules schema and the data schema.
1. In the IBM WebSphere Administrative Console, select Environment > Naming > Name SpaceBindings to display the Name space bindings page.
2. Create the rules schema binding identifier:
a) For the Scope, select server, and click New.
b) For the binding type, select String and click Next.
c) On the Step 2: Specify basic properties screen, enter the following values:
• Binding identifier: PegaRULESDefaultSchema
• Name in the name space relative to lookup name prefix: prconfig/database/databases/PegaRULES/defaultSchema
• String Value: the schema name of your rules schema.
d) Click Next.
e) On the Summary panel, click Finish.
f) Click Save in the Messages box at the top of the Name Space Bindings screen.
3. Repeat step 2 to create the data schema binding identifier, but specify the following properties on theStep 2: Specify basic properties screen:
• Binding identifier: PegaDATADefaultSchema
• Name in the name space relative to lookup name prefix: prconfig/database/databases/PegaDATA/defaultSchema
• String Value: the schema name of your data schema
4. Optional: For dual-user configurations, repeat step 2 to add a binding identifier for the Admin user onthe data schema. Specify the following properties on the Step 2: Specify basic properties screen:
• Binding identifier: PegaDATADataSourceAdmin
• Name in the name space relative to lookup name prefix: prconfig/database/databases/PegaDATA/dataSourceAdmin
• String Value: the JNDI name of the Admin data source for your data schema
5. Optional: For dual-user configurations, repeat step 2 to add a binding identifier for the Admin user onthe rules schema. Specify the following properties on the Step 2: Specify basic properties screen:
• Binding identifier: PegaRULESDataSourceAdmin
• Name in the name space relative to lookup name prefix: prconfig/database/databases/PegaRULES/dataSourceAdmin
• String Value: the JNDI name of the Admin data source for your rules schema
Pega Platform Upgrade Guide62
Post-upgrade configuration
6. Repeat step 2 to create the customer data schema binding identifier, but specify the followingproperties on the Step 2: Specify basic properties screen:
• Binding identifier: PegaCustomerdataDefaultSchema
• Name in the name space relative to lookup name prefix: prconfig/database/databases/CustomerData/defaultSchema
• String Value: the JNDI name of the Admin data source for your customer data schema
7. Click Save in the Messages box at the top of the Name Space Bindings screen.
Continue at IBM WebSphere default packages.
Redeploying the Pega Platform WAR or EAR filesRemove the existing Pega Platform core application files, including the System Management Applicationand help, from your application server and deploy the new files. Also redeploy any custom applications.
These are the core applications and file names:
Pega Platformprweb.war or prpc_j2ee14*.ear
System Management Applicationprsysmgmt.war
Helpprhelp.war
Note: When the server restarts after the applications deploy, the first node you bring up becomesthe default search node.
Note: Do not start the redeployed applications while the rulebase deployment is running. Bydefault, your application server might start the applications automatically when they are deployed.If you deploy and start the applications before creating the database, the applications generatean error and fail to start. This error is not harmful, and you can restart the application successfullywhen the database is available.
Apache Tomcat: Redeploying Pega PlatformDeploy Pega Platform, the help, and optionally the System Management Application.
1. Make sure that these applications are not running:
• prweb.war or the prpc_j2ee14_ws.ear file for your application server
• prhelp.war
• prsysmgmt.war
2. Remove each of the current versions of the applications.
a) In the Tomcat Web Application Manager page, find the row for each application and selectUndeploy.
b) In the WEBAPPS directory, delete any remaining folders or WAR files.
3. Copy these files from the Pega-image\archive\ directory to the Tomcat_home\webapps\ directory:
• prweb.war
• prsysmgmt.war
• prhelp.war
4. Restart the application server.
Pega Platform Upgrade Guide63
Post-upgrade configuration
5. After the applications are deployed, shut down the server and delete the prweb.war file from theTomcat_home\webapps\ directory to prevent Tomcat from redeploying the application each time theserver restarts.
6. Verify that any third-party or custom JAR files that you installed with the applications are still in placeon the application server. Restore any JAR files that were deleted when the Pega Platform redeployed.
IBM WebSphere: Redeploying Pega PlatformDeploy the Pega Platform application using the prweb.war or prpc_j2ee14_ws.ear file included in yourdistribution image.
The application server starts the application when it deploys. When the application starts, you might seeerror messages for missing resources and references. Ignore these messages; you supply these resourcesas you deploy. Stop the application after deploying.
When you restart the server after you deploy the application archives, the first node you bring upbecomes the default search node. If you are deployed in a multi-node environment, the search node isnode 1 and must be started first.
1. Make sure that these applications are not running:
• prweb.war or the prpc_j2ee14_ws.ear file for your application server
• prhelp.war
• prsysmgmt.war
2. Use the IBM WebSphere Administrative Console to remove each of the current versions of theapplications.
a) Navigate to Applications > Application Types > WebSphere Enterprise Applications to see a listof the installed applications. Select each of the applications and click Uninstall.
b) When you click Uninstall on a package, IBM WebSphere empties the ./installedApps/* directories.To complete the uninstall, delete the following directories:
• ./config/temp/*
• ./wstemp/*
• ./temp
3. Delete everything in the temporary directory. This is the directory that you specified for the JNDIlocation url/initialization/explicittempdir.
4. From the left frame of the IBM WebSphere Administrative Console, select Applications > NewApplication.
5. Click New Enterprise Application.
6. Click Browse and select prweb.war from the archives directory.
7. Click Open, and then click Next.
8. Select Detailed - Show me all installation options and parameters.This option allows you to review all the deployment options for the application, including the defaultbindings and resource mappings.
9. Click + to expand Choose to generate default bindings and mappings.
10. Complete this page.
• Check Generate Default Bindings.
• Check Use default virtual host name for Web and SIP modules.
Pega Platform Upgrade Guide64
Post-upgrade configuration
• Leave the other default settings unchanged, and click Next.
11. Scroll to the bottom on this page and click Continue to display a wizard where you can specifydeployment options.
This security file allows the Pega Platform to run when Java EE Security Checking is enabled.
This section of the deployment is a series of steps under the general heading of Install NewApplication.
12. For Step One, accept the defaults and click Next.
13. Continue through the next steps, either accepting the defaults, or customizing for your organization, asneeded.
14. In the Map context roots for Web Modules step, enter prclusterservice as the context root, andclick Next.
15. Locate the step where you Map resource references to resources.
16. In the Map resource references to resources step, there are three rows that include "explicittempdir"in the Resource Reference column. Use the find tool on your browser to find the correct rows for:
• EJB EngineCMT bean
• EngineBMT beans
• prweb.war module
17. For each of the three rows, change the value in the Target Resource JNDI Name field to the tempdirectory, for example url/initialization/explicittempdir.This maps the location you specified in the URL provider you created to the corresponding ResourceReference in the application, so that the application will use the location for the PegaTempDir. Use theBrowse button and Apply to change each of the three values.
18. Click Next.
Depending on your configuration, you might see a set of warnings related to missing resourcereferences. These warnings are informational. Review the warnings, and then continue.
Note: These are resource references that are defined in web.xml, the deploymentconfiguration files for the application, but not mapped to resource definitions in yourapplication. In the page, Map resources to references, they are mapped to the TargetResource JNDI Name url/pega/none, indicating that they are not used. Pegasystems providesthese references for Java EE compliance, but their use is optional. You can continue with thedeployment.
19. At the bottom of the Warnings page, click Continue.
20. Click Next as needed to continue through the remaining steps, accepting the defaults, or setting themto the requirements of your organization.
21. On the Summary page, click Finish.The system begins deploying the EAR file, which can take a few minutes. When the deploymentcompletes successfully, WebSphere displays a success message similar to the following: "ApplicationPega Platform installed successfully."
22. Click Save directly to the master configuration.
23. Stop the application.
Deploying the System Management Application and on-line help onIBM WebSphereIn addition to the Pega Platform application, you must also deploy the online help application,prhelp.war, and the System Management Application, prsysmgmt.war.
Pega Platform Upgrade Guide65
Post-upgrade configuration
For more details on the System Management Application, see the System Management ApplicationReference Guide on the PDN.
Complete the following steps to deploy prsysmgmt.war and prhelp.war.
1. In the Preparing for the application installation screen, select Local file system and click Browse toselect the prsysmgmt file.If you do not see the Preparing for the application installation screen, from the left frame, selectApplications > New Application.
2. Click Browse and navigate to select the application file, either prsysmgmt.war or prsysmgmt.earfrom the archives directory.
3. Click Open, and then click Next to begin the deployment.
4. Click Detailed - Show all installation options and parameters.
5. Expand Choose to generate default bindings and mappings.
6. Select Generate Default Bindings, and leave the other settings at their defaults.
7. Click Next. You might see some security warnings. These are informational only.
8. Click Continue to bypass the warnings. The Install New Application opens.
9. Accept the defaults and click Next until you get to the Map context roots for Web Modules step.
10. In the Map context roots for Web Modules step, enter prsysmgmt as the context root, and clickNext.
11. Accept the defaults and click Next on the remaining steps.
12. On the Summary page, click Finish.IBM WebSphere displays a message, Installing . . ., and updates it with information during thedeployment. When the deployment is complete, you see a success message.
13. Click Save to save the changes to the master configuration and return to the first page.
14. Repeat steps 2 - 13 to deploy prhelp.war using the same procedure as for prsysmgmt.war. Use thename of the file, prhelp, as the context root and deploy to the same server.
15. Verify that any third-party or custom JAR files that you installed with the applications are still in placeon the application server. Restore any JAR files that were deleted when the Pega Platform redeployed.
Oracle WebLogic Server: Redeploying Pega PlatformOracle WebLogic Server requires a Deployment Plan for split-schema configurations. When you restartthe server after you deploy the application archives, the first node you bring up becomes the defaultsearch node. If you are deployed in a multi-node environment, the search node is node 1 and must bestarted first.
Preparing to redeployBefore you redeploy, remove current versions of the applications and delete the temporary directory.
1. Make sure that these applications are not running:
• prweb.war or prpc_wls_jee4.ear
• prhelp.war
• prhelp.war
2. Remove each of the current versions of the applications.
a) Click Deployments to see the Summary of Deployments page.
b) Click Lock & Edit in the Change Center.
Pega Platform Upgrade Guide66
Post-upgrade configuration
c) Select each application, and click Delete.
3. Delete everything in the temporary directory. This is the directory that you specified for the JNDIlocation: url/initialization/explicittempdir
Configuring split-schema configurationsFor split-schema configurations, Oracle WebLogic Server uses a Deployment Plan to configure theJNDI setting in the application archive. A Deployment Plan is a user-configurable XML file that capturesenvironment-specific configuration properties. If you plan to use a split-schema configuration, followthese steps.
1. Create or edit a Deployment Plan.
2. Configure a specific directory structure for the Deployment Plan and the EAR/WAR archive.
3. Deploy (or redeploy) the application archive and Deployment Plan using the Oracle WebLogic Serveradministration console or the command line.
4. Verify that any third-party or custom JAR files that you installed with the applications are still in placeon the application server. Restore any JAR files that were deleted when the Pega Platform redeployed.
Editing the Oracle WebLogic Server Deployment PlanOracle WebLogic Server requires a Deployment Plan for split-schema configurations. The Pega Platformincludes a sample deployment plan that you can use for your environment.
The deployment plan is located in the following directory:
WAR: Pega-image\archives\prpc\weblogic\war\plan\Plan.xml
EAR: Pega-image\archives\prpc\weblogic\ear\plan\Plan.xml
1. Make a backup of the sample plan, in case you need to back out your changes.
2. Open Plan.xml in a text editor, and edit the sample plan with your values.
a) Locate the elements named defaultDataSchema and defaultRulesSchema. Add the values foryour schema in the <value> element, for example:
<variable>
<name>defaultDataSchema</name>
<value>DATA</value>
</variable>
<variable>
<name>defaultRulesSchema</name>
<value>RULES</value>
</variable>
Pega Platform Upgrade Guide67
Post-upgrade configuration
b) Locate the element named dataSourceAdminJndiName. Add the value for your administrativeJNDI datasource in the <value> element, for example:
<variable>
<name>dataSourceAdminJndiName</name>
<value>jdbc/AdminPegaRULES</value>
</variable>
3. Save Plan.xml.
Configuring the directory structureIf you plan to deploy the Oracle WebLogic Server archive and Deployment Plan using the Oracle WebLogicServer administration console, you must use a specific directory structure.
The Pega Platform includes a preconfigured structure. You do not must re-create the required directories.However, if you maintain your Oracle WebLogic Server EAR files (or WAR files) in a separate location, youmust replicate the proper directory structure.
For example: the directory structure for EAR file deployments is:
your_directory \app\prpc_wls_jee4.ear
your_directory \plan\Plan.xml
Note: The names of your_directory and the EAR file can change, but the deployment plan must benamed exactly Plan.xml and must be located in the your_directory \plan\ directory.
Deploying the archive by using the Deployment PlanTo deploy the Oracle WebLogic Server archive with a Deployment Plan using the administration console,log in to the console and deploy the archive.
However, instead of selecting the EAR or WAR file, select your_directory. For example, select either:
• WAR: Pega-image \archives\prpc\weblogic\war
• EAR: Pega-image \archives\prpc\weblogic\ear
Oracle WebLogic Server includes both the WAR or EAR file and the deployment plan, Plan.xml, when youselect the directory. You can also deploy the archive and deployment plan using the command line tool,weblogic.Deployer. For more information, see the Oracle WebLogic Server documentation.
Deploying single-schema configurationsThese instructions assume that the Pega Platform is installed on the default schema of the database user.If this is not the case, follow the instructions for Configuring split-schema configurations and specify thesame schema name for both the defaultDataSchema and defaultRulesSchema. Deploy either theWAR file or the EAR file.
Pega Platform Upgrade Guide68
Post-upgrade configuration
Deploying the Pega Platform WAR fileSkip this procedure if you are planning to deploy the Pega Platform EAR file.
1. In the Domain Structure section, click Deployments.
2. If Configuration editing is not enabled, click Lock & Edit to unlock the page. In the Deployments table,click Install.
3. In the Install Application Assistant, click the link upload your file(s).
4. Click the Browse button next to the Deployment Archive field and navigate to Pega-image\archives\prpc\weblogic\war\app\.
5. Select the prweb.war file and click Open.
6. When the file name is displayed in the Deployment Archive field, click Next.
7. Make sure the radio button next to prweb.war is selected and click Next.
8. Select Install this deployment as an application and click Next to display the optional settings page.
9. Make sure the Name is prweb and click Next to accept the defaults.
10. Select Yes, take me to the deployment's configuration screen and review the other settings. Then,click Finish to begin deploying the application.When the WAR file has deployed, you are returned to the application Settings page.
11. Review the Overview page to confirm that the settings are as expected.
12. Click on the Targets tab and verify that the target server is correct.
13. Click Save in the Assistant or Activate Changes in the Change Center to save the configuration.
14. In the Domain Structure panel, click Deployments again deploy prsysmgmt.war and prhelp.war.
Deploying the Pega Platform EAR fileSkip this procedure if you have deployed the Pega Platform WAR file.
1. In the Domain Structure panel, click Deployments.
2. If Configuration editing is not enabled, click Lock & Edit to unlock the page. Click Install.
3. Click upload your file(s).
4. Next to the Deployment Archive field, click the Browse button and use the file dialog to navigate tothe archives directory of the Pega Platform distribution image. Select the prpc_j2ee14_*.ear. Whenthe file name is displayed in the Deployment Archive field, click Next.
5. On the Install Application Assistant, confirm the upload path and that the radio button next to thearchive name is selected and click Next.
6. Select Install this deployment as an application and click Next to display the optional settings page:
7. Click Next to accept the defaults.
8. Select Yes, take me to the deployment's configuration screen and review the other settings. Then,click Finish to begin deploying the application.When the archive deploys, you return to the application’s Settings page.
9. Review the Overview page to confirm that the settings are correct.
10. Click on the Targets tab to verify that the target server for the application is correct.
11. Click on the Overview tab again, and click Save.
12. In Domain Structure, click on Deployments to return to the Summary of Deployments page.
13. Continue with the deployments of the prsysmgmt.war and prhelp.war applications.
Pega Platform Upgrade Guide69
Post-upgrade configuration
Deploying the System Management Application and helpRepeat the procedure described for prweb above to deploy the two other Pega Platform applications,prsysmgmt.war and prhelp.war. Do not start these applications after deployment.
Red Hat JBoss EAP: Redeploying Pega PlatformUse either the Red Hat JBoss Management Console or the command line to deploy the applications fromthe Pega-image \archives directory.
When you restart the server after you deploy the application archives, the first node you bring upbecomes the default search node. If you are deployed in a multi-node environment, the search node isnode 1 and must be started first.
Deploying from the Red Hat JBoss Management Console1. Make sure that these applications are not running:
• prweb.war or the EAR file for your application server
• prhelp.war
• prsysmgmt.war
2. Use your application server administrative utilities to remove each of the current versions of theapplications.
3. Delete everything in the temporary directory. This is the directory that you specified for the JNDIlocation url/initialization/explicittempdir.
4. Start the application server.
5. Log in to Management Console as a user with administrative rights.
6. Select Runtime view if not already selected.
7. Select Server > Manage Deployments.
8. Add and deploy each application file. Repeat this step for each of the three applications: PegaRules,System Management, and help:
a) Click Add and specify an application file.
b) Click Save.
c) Highlight the application and select En/Disable.
d) Click Confirm to deploy the application.
e) Repeat this step for the remaining applications.
9. Verify that any third-party or custom JAR files that you installed with the applications are still in placeon the application server. Restore any JAR files that were deleted when the Pega Platform redeployed.
Deploying from the command line1. Enter this command to deploy an application file:
$JBOSS_EAP_HOME/bin/jboss-cli.bat|sh –c
deploy Pega_HOME /archives/ file name
Pega Platform Upgrade Guide70
Post-upgrade configuration
quit
Where Pega_HOME is the home directory for the Pega Platform and file name is the name of the fileto deploy.
2. Repeat step 1 to deploy all three applications: prweb, SMA, and help.
3. Verify that any third-party or custom JAR files that you installed with the applications are still in placeon the application server. Restore any JAR files that were deleted when the Pega Platform redeployed.
For upgrades from Pega 7.x: Enabling rule creation onthe production systemIf you are upgrading from PRPC 5.x or PRPC 6.x, skip this section.
For upgrades from Pega 7.x, enable rule creation on the production system:
1. Log in as a user with the PegaRULES:HighAvailabilityAdministrator role.
2. Navigate to System > High Availability> HA Cluster Settings.
3. Under Cluster Upgrade, clear Cluster Upgrading - Disable saving of rules.
4. Click Submit.
5. Log out.
Upgrades from 7.2.2 and earlier: Port Apache loggingfile customizations to the new logging fileStarting with Pega 7.3, the Pega Platform uses the Apache Log4j 2 logging service. Prior to Pega 7.3,the Pega Platform used Apache Log4j 1. Because of the change to the logging service, the name of thelogging configuration file has changed from prlogging.xml to prlog4j2.xml and the format haschanged considerably. If you customized your prlogging.xml file, port the customizations to the newprlog4j2.xml file. If you do not edit the new prlog4j2.xml file, the Pega Platform uses the defaultprlog4j2.xml file and disregards your customized prlogging.xml file. For upgrades to systems thatwere using the default logging configuration, no changes are needed.
Pega Platform supports all appenders and layouts supported by Apache Log4j 2. The following commonly-customized appenders define the logging file locations, names, and archiving policy:
• RollingRandomAccessFile – Configures the PegaRULES.log file that includes all logs except alerts
• RollingRandomAccessFileAlert – Configures the PegaRULES-ALERT.log file that includes allperformance alerts
• RollingRandomAccessFileAlertSecurity – Configures the date and time-stamped PegaRULES-ALERTSECURITY log file that includes all security alerts
For more information about customizing these appenders, see the Apache Log4j 2 documentation.
Restarting Pega PlatformRestarting the Pega Platform
1. Stop and restart the application server.
Pega Platform Upgrade Guide71
Post-upgrade configuration
2. Ensure that all the Pega Platform applications have started.
• prweb.war or prpc_ *.ear file
• prhelp.war
• prsysmgmt.war
3. Access the Pega Platform through a browser. Enter the URL for the Pega Platform application:
http:// server:portnumber/context_root
For example: http://prpc-server:8080/prweb
4. Log in as [email protected].
The What’s New section of the page includes a welcome message and links to application developmenttools.
Logging in and changing the administrator passwordTo test the deployment and index the rules, log in to Pega Platform web application. For security, youmust change the administrator password.
1. Navigate to the PRServlet URL, replacing the server and port values with your specific values.
http://server:port/prweb
2. Use the following credentials to log in the first time:
• User ID — [email protected]
• Password — the password you set when you installed
After logging in, Pega Platform indexes the rules in the system to support full-text search. Duringthe index process, there might be a delay in the responsiveness of Pega Platform user interface. Theprocess usually takes from 10 to 15 minutes to complete depending on your system configuration.
If the index process ends without generating an error message, the deployment is successful.
3. Immediately after the index process completes, change the administrator password. Because thedefault password is widely published, it is important to protect your system after an installation bychanging the password. The new password must be at least 10 characters long.If the system does not prompt you to change your password, follow these steps:
a) From the Operator Menu located to the right of the Designer Studio header, select the Profile.
b) Click Change Password.
c) Verify the Current Password, and then enter and confirm the New Password.
d) Click Save.
Locking and rolling ruleset versionsAfter an upgrade, lock your existing rule set and roll them into new versions before continuingdevelopment. This ensures that future development is based on the upgraded rule sets and that yourapplications consistently reference the latest features.
Note: The upgrade process automatically updates any prerequisite for Pega-ProCom to thehighest version of the rule set in the system.
1. Select Designer Studio > Application > Structure >Other Applications .
Pega Platform Upgrade Guide72
Post-upgrade configuration
This page displays all applications in the system and lists the rule sets and rule set versions that makeup each application including those inherited from any built-on applications.
2. For each application, click Lock and Roll to display the application page.
3. Select + next to Prerequisites to see the ruleset version prerequisites for the application rule set. Clickthe name of the rule set version to open and modify its rule form.
4. Select the Lock box and select Update my application to include the new rule set versions.
5. Enter the Password for this rule set version and select the Roll box.
6. In the Roll to Version field, enter a new Rule Set Version or accept the default version whichincrements the current version by one.
7. In the NEW section of the Prerequisites you can modify the rule set prerequisites. By default, theyare the same as the current prerequisite. You can select different prerequisites, add additionalprerequisites, and/or delete prerequisites from the new list.
8. Click Run to apply the changes to your rule set.
9. Repeat these steps for each application in your system.
Optional: Upgrading from Pega 7.1.6 and earlier:Configuring the default search nodes and storagedirectoryIf you are upgrading from Pega 7.1.6 or earlier, you can manually build the Elasticsearch indexes andconfigure the search index host node settings to configure the default initial search node and indexstorage directory.
Starting in Pega 7.1.7, the underlying platform for full-text search transitioned from Lucene toElasticsearch. Elasticsearch provides a more robust, fault-tolerant search capability and does not requiremanual configuration of switchover activities. Existing search customizations through Pega Platform APIsare intact and used exactly the same way with Elasticsearch; only the search query generation changesfrom Lucene to Elasticsearch.
Indexing starts when you start the application server. The first node that starts after the deploymentbecomes the default initial search node. You can configure a different search node and can also configuremultiple search nodes.
The default index directory is PegaSearchIndex in your temporary directory. The contents of this directorymight be deleted. As a best practice, store your indexes in a more permanent location accessible to allsearch nodes.
Follow these steps to build the indexes, configure search nodes, and update the index directory:
1. Check your directory sizes. Ensure that the directories for all Elasticsearch host nodes have sufficientfree space to hold the Elasticsearch indexes.
• Ensure that the host node directories have sufficient free space to hold the Elasticsearch indexes.Elasticsearch indexes are approximately three times the size of the Lucene indexes.
• Ensure that the directory for the initial host node has sufficient space to initially hold both theLucene index and the Elasticsearch index.
2. Use the prpcUtils tool to reindex the rules:
a) On the node that you want to index, open the prpcUtils.properties file in thePega_HOME\scripts\utils directory.
Pega Platform Upgrade Guide73
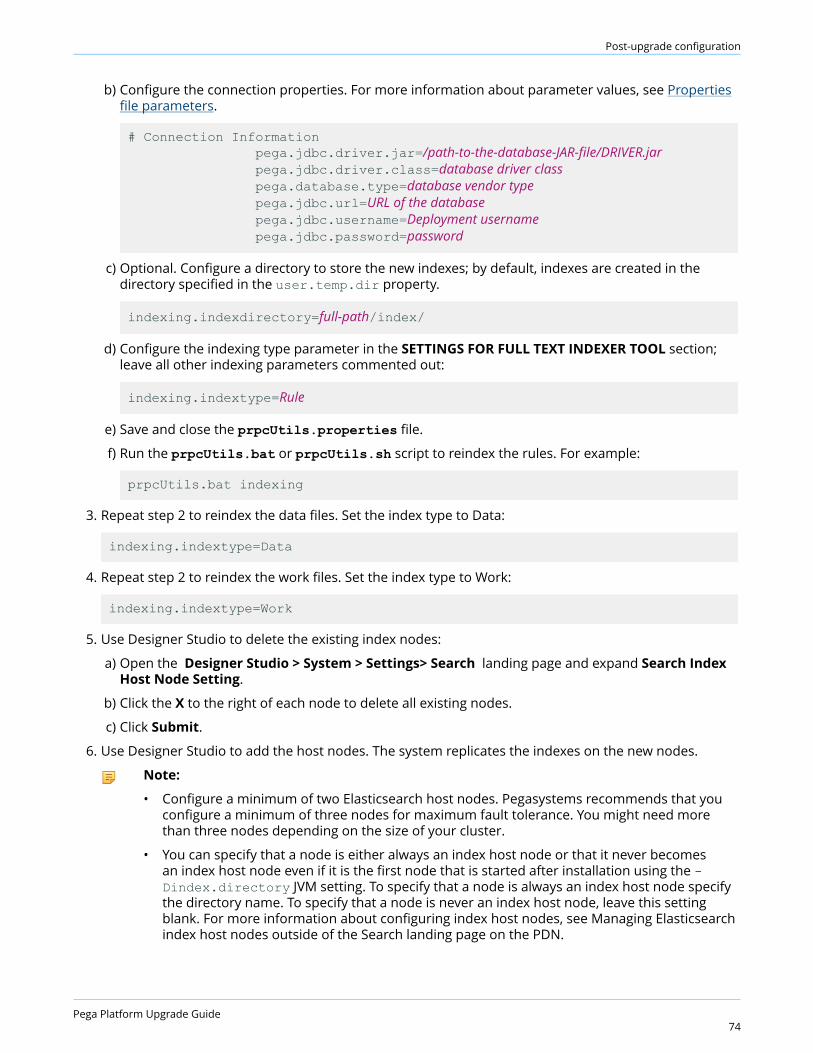
Post-upgrade configuration
b) Configure the connection properties. For more information about parameter values, see Propertiesfile parameters.
# Connection Information pega.jdbc.driver.jar=/path-to-the-database-JAR-file/DRIVER.jar pega.jdbc.driver.class=database driver class pega.database.type=database vendor type pega.jdbc.url=URL of the database pega.jdbc.username=Deployment username pega.jdbc.password=password
c) Optional. Configure a directory to store the new indexes; by default, indexes are created in thedirectory specified in the user.temp.dir property.
indexing.indexdirectory=full-path/index/
d) Configure the indexing type parameter in the SETTINGS FOR FULL TEXT INDEXER TOOL section;leave all other indexing parameters commented out:
indexing.indextype=Rule
e) Save and close the prpcUtils.properties file.
f) Run the prpcUtils.bat or prpcUtils.sh script to reindex the rules. For example:
prpcUtils.bat indexing
3. Repeat step 2 to reindex the data files. Set the index type to Data:
indexing.indextype=Data
4. Repeat step 2 to reindex the work files. Set the index type to Work:
indexing.indextype=Work
5. Use Designer Studio to delete the existing index nodes:
a) Open the Designer Studio > System > Settings> Search landing page and expand Search IndexHost Node Setting.
b) Click the X to the right of each node to delete all existing nodes.
c) Click Submit.
6. Use Designer Studio to add the host nodes. The system replicates the indexes on the new nodes.
Note:
• Configure a minimum of two Elasticsearch host nodes. Pegasystems recommends that youconfigure a minimum of three nodes for maximum fault tolerance. You might need morethan three nodes depending on the size of your cluster.
• You can specify that a node is either always an index host node or that it never becomesan index host node even if it is the first node that is started after installation using the -Dindex.directory JVM setting. To specify that a node is always an index host node specifythe directory name. To specify that a node is never an index host node, leave this settingblank. For more information about configuring index host nodes, see Managing Elasticsearchindex host nodes outside of the Search landing page on the PDN.
Pega Platform Upgrade Guide74
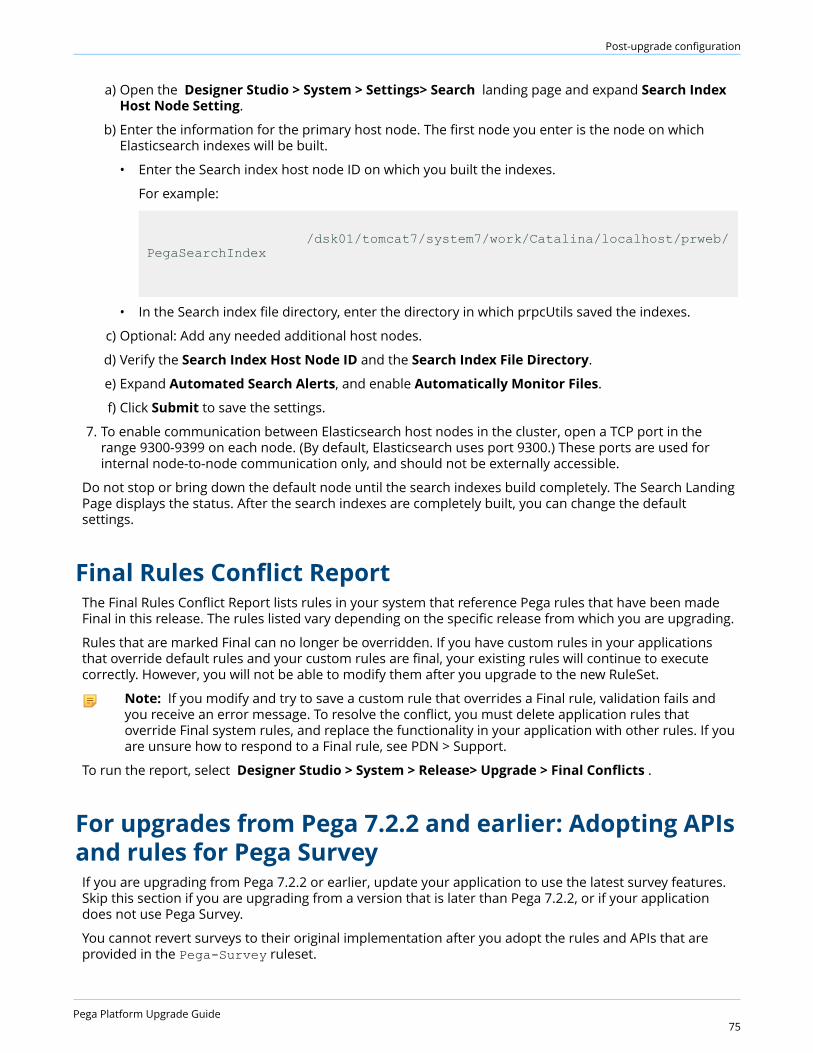
Post-upgrade configuration
a) Open the Designer Studio > System > Settings> Search landing page and expand Search IndexHost Node Setting.
b) Enter the information for the primary host node. The first node you enter is the node on whichElasticsearch indexes will be built.
• Enter the Search index host node ID on which you built the indexes.
For example:
/dsk01/tomcat7/system7/work/Catalina/localhost/prweb/PegaSearchIndex
• In the Search index file directory, enter the directory in which prpcUtils saved the indexes.
c) Optional: Add any needed additional host nodes.
d) Verify the Search Index Host Node ID and the Search Index File Directory.
e) Expand Automated Search Alerts, and enable Automatically Monitor Files.
f) Click Submit to save the settings.
7. To enable communication between Elasticsearch host nodes in the cluster, open a TCP port in therange 9300-9399 on each node. (By default, Elasticsearch uses port 9300.) These ports are used forinternal node-to-node communication only, and should not be externally accessible.
Do not stop or bring down the default node until the search indexes build completely. The Search LandingPage displays the status. After the search indexes are completely built, you can change the defaultsettings.
Final Rules Conflict ReportThe Final Rules Conflict Report lists rules in your system that reference Pega rules that have been madeFinal in this release. The rules listed vary depending on the specific release from which you are upgrading.
Rules that are marked Final can no longer be overridden. If you have custom rules in your applicationsthat override default rules and your custom rules are final, your existing rules will continue to executecorrectly. However, you will not be able to modify them after you upgrade to the new RuleSet.
Note: If you modify and try to save a custom rule that overrides a Final rule, validation fails andyou receive an error message. To resolve the conflict, you must delete application rules thatoverride Final system rules, and replace the functionality in your application with other rules. If youare unsure how to respond to a Final rule, see PDN > Support.
To run the report, select Designer Studio > System > Release> Upgrade > Final Conflicts .
For upgrades from Pega 7.2.2 and earlier: Adopting APIsand rules for Pega SurveyIf you are upgrading from Pega 7.2.2 or earlier, update your application to use the latest survey features.Skip this section if you are upgrading from a version that is later than Pega 7.2.2, or if your applicationdoes not use Pega Survey.
You cannot revert surveys to their original implementation after you adopt the rules and APIs that areprovided in the Pega-Survey ruleset.
Pega Platform Upgrade Guide75
Post-upgrade configuration
For each application that uses survey capabilities, repeat the following steps:
1. Remove the reference to the legacy PegaSurvey ruleset.
a. In the header of Designer Studio, click [Your application name] > Definition to open theApplication form.
b. In the Application rulesets section, delete the entry for the PegaSurvey ruleset.
c. Click Save.
2. Upgrade your overrides and custom rules that rely on standard rules that have been renamed.
a. Click Designer Studio > Application > Tools > Validation to open the tool that finds rules withinvalid references.
b. Click Validate an Application.
c. In the Select Application list, select the name of your application.
d. Click Run Validation.
e. Review the list of rules with invalid references, and resolve each invalid reference by performing oneof the following tasks:
• Redirect the invalid reference to a valid rule in the Pega-Survey ruleset.
Because only prefixes were added to the names of standard rules, you can inspect the ruleset fora rule name that is similar to your invalid reference.
• Recreate your override by copying the renamed version of the rule in the Pega-Survey ruleset.
Ensure that all references to your original override are redirected to your new override, beforeyou delete the original override.
f. Manually review and update your application for references, such as Java steps in an activity, thatare not detected by the validation tool.
3. Upgrade the rules that support the surveys in your application.
a. Click Designer Studio > System > Release > Upgrade > Validate to access tools for validation.
b. Click Revalidate and Save.
c. In the Update Rule Forms dialog box, enter values in the fields to perform validation on thefollowing classes:
• Rule-PegaQ-Question
• Rule-PegaQ-QuestionCollection
• Rule-PegaQ-QuestionGroup
• Rule-PegaQ-Questionnaire
For more information about the options that you can choose while running the Revalidate and Savetool, see the Pega Platform help.
4. Find the surveys in your application that run on an embedded page instead of the context, or primarypage, of the parent flow.
a. In the Application Explorer, expand Survey > Survey to display a list of surveys in your application.
b. Click a survey name to open the Survey form.
c. Click Actions > View references to find the flow that calls your survey.
d. Click the Open icon next to the flow name.
e. On the flow diagram, inspect the configuration of the Subprocess shape that calls your survey.
f. If the Define flow field is set to On embedded page, note the value in the Page property field.
Pega Platform Upgrade Guide76
Post-upgrade configuration
g. Repeat steps b through f for each survey in your application.
5. Customize the upgrade utility so that it finds and updates the correct pages for in-flight surveys.
If you do not have any surveys that run on embedded pages, you can skip this step.
a. Find the Work-.pyUpgradeSurveyProperties data transform by searching for it or by using theApplication Explorer.
b. Save a copy of the rule to an unlocked ruleset version in your application.
c. On the Definition tab of the Data Transform form, use the Update Page action to set the currentpage to the embedded page that you noted from step 3.
d. Enclose the Update Page action with a When action if only some surveys run on the embeddedpage.
e. Repeat steps c through d for each embedded page that you noted from step 3.
f. Click Save.
6. Run the upgrade utility for in-flight surveys.
a. Click Designer Studio > System > Release > Upgrade > Upgrade Tools .
b. Click Update Survey Work Objects.
c. In the Upgrade survey work objects dialog box, select the check box next to each class thatdefines a survey.
d. Click Run utility.
7. Update your references to deprecated APIs.
For more information about deprecated APIs and the APIs that supersede them, see the release notesfor version 7.3 of the Pega Platform.
Scheduling column population jobsUpgrading the Pega Platform exposes the pxApplication column on all Work object tables. Because theexpose process may temporarily degrade performance, it is a best practice to schedule this process to runduring off-peak hours.
You can specify a start time for the job and a timeout length. When the job reaches the end of thetimeout, it stops and restarts the next day at the same point. The job continues to recur until all tables areupdated. The number of times the job runs depends on the amount of data in your work tables.
For more information about scheduling jobs, see the help for agent schedule and Data-Agent-Queue.
Users must have the SysAdm4 role to schedule column population jobs.
1. Configure the start time for the column population:
a. In the Explorer panel, click Records > SysAdm > Agent Schedule.
b. Filter the list. In the Key Contains box at the top of the screen, enter Pega-ImportExport and clickRun.
c. Click any instance of Pega-ImportExport.
Note: You can edit any instance of Pega-ImportExport. Check the NODE NAME field forinformation about the node associated with each instance.
d. Click Advanced next to the pxAutomaticColumnPopulation activity line.
e. Enter the start time and schedule for the job and click OK.
Pega Platform Upgrade Guide77
Post-upgrade configuration
f. In the Column Pattern area, select Recurring.
g. Select Enabled.
h. Click Save.
2. Optional: Configure the timeout to set the maximum length of time the column population job will run.
a. In the Explorer panel, click Records > SysAdm > Dynamic System Settings.
b. In the Owning Ruleset field, click the filter icon, enter ImportExport, and click Apply.
c. Double-click AutomaticColumnOptimization/Timeout.
d. Enter the timeout value in minutes.
Note: The default setting is 120 minutes. Change the timeout to reflect the duration of youroff-peak schedule. For example, if your lowest usage occurs from 9 P.M. EST until 4 A.M. EST,start this job at 9 P.M. and have it run for 420 minutes.
e. Click Save.
Upgrading from Pega 7.2.2 or earlier: Upgrading accessrole names to enable notificationsWhen upgrading from any release prior to Pega 7.2.2, you must upgrade all the user access role names ofan application with specific classes so that users can receive notifications.
Update the user access role names for these classes:
• Data-Notification-Parameters
• Pega-Notification
• Data-Notification-Recipient
• Data-Preference-Operator
To save time, clone any access role name that contains the preceding classes and assign it to applicationusers instead of updating the access role names manually. For more information on how to clone anaccess role name, see the help.
To update access role names:
1. In the Records Explorer, click Security > Access Role Name.
2. Open the access role name that needs to be updated.
3. Click the Plus icon to open the Add Access Role Object dialog box.
4. In the Class field, enter the class name that you want to add to the access role name.
5. Under Access Control, enter 5 in all the fields to provide access to this access role name.
6. Click Save.
7. Perform steps 3 through 6 for each of the remaining classes.
Upgrading from PRPC 5.4 and earlier: enabling theservice-level agreement agentSkip this section if you are upgrading from PRPC 5.5 or later.
Pega Platform Upgrade Guide78
Post-upgrade configuration
To allow the new service-level agreement agent to process existing work objects constructed in PRPC 5.4,import the 54WorkAgentProcessing.jar file after the application server restarts.
1. Open your application in Designer Studio.
2. Navigate to Application > Distribution > Import.
3. Import the 54WorkAgentProcessing.jar file from the resource kit in the installation directory.
4. Save the application.
Upgrading from PRPC 5.4 and earlier: re-enablingindexingIf you are upgrading from PRPC 5.5 or later, skip this section.
If you are upgrading from PRPC 5.4 or earlier, you created the index/dataEnabled Dynamic System Setting(DSS) to disable indexing before the upgrade. (For more information, see Upgrading from PRPC 5.4 andearlier: disabling indexing.)
Because the upgrade is complete, follow these steps to enable indexing:
1. From Designer Studio, click Records > SysAdmin> Dynamic System Settings.
2. Select index/dataEnabled.
3. In the Value field, enter true.
4. Click Save.
Enabling access to environmental informationPrior to Pega 7.3, all roles included access to environmental information for the current node. Thisinformation can include version numbers of third-party platforms and JVM information. This accessappears as a flaw in some security audits. With Pega 7.3, the new @baseclass.pxViewSystemInfoprivilege controls access to environmental information. Only the PegaRULES:SysAdm4 role has thisprivilege by default.
After upgrading from any version prior to Pega 7.3, add the @baseclass.pxViewSystemInfo privilege toall system administrator roles that need access to environmental information.
1. Click Designer Studio > Org & Security > Tools > Security > Role Names.
2. In the pop-up window that displays roles, click the role that you want to update.
3. In the Designer Studio click the @baseclass class in the Access Class column.
4. In the Privileges section, click the Plus icon and select the pxViewSystemInfo privilege in the Namecolumn.
5. Enter 5 for the production level in the Level column. Production level 5 provides the highest security.
6. Click Submit.
7. Repeat steps 1 - 6 for each role that requires modification.
Optional: Leveraging the current UI Kit rulesThe UI Kit ruleset contains rules and skins that you can use for building or customizing user interfacesfor your applications. Employing the UI Kit ruleset provides you with the latest standard user interface
Pega Platform Upgrade Guide79

Post-upgrade configuration
elements, including templates and icons. Add the latest version of the UIKit application as a built-onapplication to take advantage of the latest features and styles.
Enabling operatorsPega Platform deployment security requires an administrator to enable new operators shipped with PegaPlatform and requires password changes after the first login.
The administrator and new operators shipped with Pega Platform must change their passwords whenthey first log in:
• ExternalInviteUser
• IntSampleUser
• PRPC_SOAPOper
• External
For more information about changing the administrator password, see Logging in and changing theadministrator password.
1. In Designer Studio, select > Org & Security > Authentication > Operator Access.
2. In the Disabled operators list, click the link for the Pega-provided operator that you want to enable.The following standard operators are installed but disabled by default. When these standard operatorsfirst log on, they are required to change their passwords. Enable only those operators you plan to use:
• ExternalInviteUser
• IntSampleUser
• PRPC_SOAPOper
• External
3. On the Edit Operator ID page, on the Security tab, select Force password change on next login andclear Disable Operator.
4. Select Update password.
5. Enter a password that conforms to your site standards and click Submit.
6. Click Save and close the operator page.
7. Repeat steps 2 through 6 for the remaining operators.
Pega Platform Upgrade Guide80
Post-upgrade configuration
Running upgrade utilitiesThe Pega Platform includes several upgrade utilities to help you to upgrade your application to use newfeatures. Run all of the upgrade utilities, even though some utilities might not return results for yourapplication:
1. Log in as the administrative user.
2. Click Designer Studio > System > Release > Upgrade > Upgrade Tools > General Utilities .
3. Click each utility and then click Run utility.
Cleaning up unused tablesPegasystems recommends that you drop unused rules tables in the data schema after deploying a split-schema. If you have only one database, also drop unused data tables in the rules schema.
1. Verify that you have the correct privileges to view and edit the Optimize Schema landing page. Setthese parameters to true:
• ViewAndOptimizeSchema
• Dynamic System Setting (DSS) databases/AutoDBSchemaChanges
• ViewSchemaOnImport
• SchemaImport
2. To open the optimize schema wizard, click Designer Studio > System > Database > OptimizeSchema.
3. Select the PegaDATA database.
4. Click view the unused tables to display a list of Pega Platform tables without class mappings. Eitherselect the ones you want to delete and click Proceed with Changes to have Pega Platform drop thetables, or drop them manually in your database.
5. Repeat steps 3 and 4 for the PegaRULES database.
For upgrades from Pega 7.x: Updating your customapplicationsIf you are upgrading from PRPC 5.x or PRPC 6.x, skip this section; the system automatically updatesyour custom applications. For upgrades from Pega 7.x, if you did not run the IUA to update yourcustom applications automatically, Run the Update Existing Application utility to ensure that yourexisting applications take advantage of new functionality in Pega Platform. Run the utility first on yourdevelopment system and test the changes. Then, run the utility again on the production system. Thespecific actions required for your application depend on your current version.
1. Open your development system.
2. Navigate to DesignerStudio>System>Release>Upgrade>Update Existing Applications to open theApplication Update Utility.
The utility lists the actions that will be performed, the number of records that will be modified, and anestimate of how long each action will take.
3. Click Run to start the utility.
Pega Platform Upgrade Guide81
Post-upgrade configuration
The system displays a progress bar and displays the current action. When the actions are complete, thesystem displays a completion message.
4. Test the application. If the test results are acceptable, repeat these steps on your production system.
Review log filesThe upgrade creates a series of log files in the Pega-image \scripts\logs directory. After you upgrade,even if the upgrade is successful, review the log file.
In particular, review the Prebuild Conclusion for messages about conclusions that cannot be built. Thesemessages do not indicate a problem with the upgrade but rather identify issues with the Pega Platformapplication that you must correct.
This is a sample of the Prebuild Conclusions section:
Prebuild Conclusions:
[java] May 1, 2015 1:00:21 PM com.pega.pegarules.internal.bootstrap.PRBootstrapDataSource
[java] 19830421: Loading bootstrap properties from file:///e:\temp/PegaInstallTemp-24-November-2014-11.07.15/prbootstrap.properties
[java] May 1, 2015 1:00:21 PM com.pega.pegarules.internal.bootstrap.SettingReaderJNDI
[java] 19830421: Could not find java:comp/env/prbootstrap/ in the local JNDI context, skipping prconfig setting lookup
Look for any warning or error messages. One common issue is that a conclusion cannot be built becausea class is invalid, for example:
[java] 2015-05-01 13:13:52,911 [ STANDARD] [ ] (ionary.ClassInfoConclusionImpl) WARNING -
[java] Unable to initialize a ClassInfoConclusion for PEGACARD-CPM-WORK-GENERALCUSTOMERCASE, classDef=null, classRule=null
The warning or error message includes information about the invalid class. See the PDN for information. Ifyou cannot resolve the issue, see the Support section of the PDN.
Test your applicationsThe post-upgrade procedures remove the known compatibility issues between Pega Platform andearlier versions. However, depending on your development methods, you might discover additionalmodifications that need to be made in your existing applications when they are upgraded to PegaPlatform. Perform full testing of your application functionality after the upgrade.
Pega Platform Upgrade Guide82
Post-upgrade configuration
Enabling server-side screen captures for applicationdocumentsRegardless of which application server platform you use, you must set up a Tomcat server to supporttaking and storing screen captures on a server rather than on a client. By taking and storing screencaptures on a server, you avoid client-side limitations, such as browser incompatibilities or client softwarerequirements.
As a best practice, virtually install Tomcat and deploy the prScreenShot.war file on the same server thatis running Pega Platform. Otherwise, use a standalone Linux or Windows server. If you use a Linux server,you must include the following components:
• fontconfig
• freetype
• libfreetype.so.6
• libfontconfig.so.1
• libstdc++.so.6
You can include screen captures in an application document that is generated by the DocumentApplication tool. Screen captures provide stakeholders with a realistic picture of an application's userinterface. Install a PhantomJS REST server to include screen captures in an application document.
1. Download the following WAR file: Pega_DistributionImage\Additional_Products\PhantomJS\prScreenShot.war
2. Deploy the WAR file on a Tomcat server.
3. Update the tomcat-users.xml file to add the following role and user. This file is located at \apache-tomcat-XX\conf\ tomcat-users.xml.
<role rolename="pegascreencapture" /> <user username="restUser" password="rules" roles="pegascreencapture" />
4. Start the Tomcat server. The service is hosted at http://IPaddress:port/prScreenShot/rest/capture,where IPaddress is the address of the system where Tomcat is hosted, and port is the port on which theservice is deployed.
5. Log in to your Pega Platform application and make the following updates:
a) Update the Data-Admin-System-Setting instance Pega-AppDefinition -CaptureScreenshotsResourcePath with the URL of the service, for example,http://10.224.232.91:8080/prScreenShot/rest/capture.
b) Update the Data-Admin-Security-Authentication profile instance CaptureScreenshotsAuthProfilewith the user that you created in step 3.
Continue at Configuring PhantomJS REST server security for including screen captures in an applicationdocument.
Configuring PhantomJS REST server security for including screencaptures in an application documentTo ensure a secure installation of Pega Platform, enable the PhantomJS REST server to take and storeserver-side screen captures. In application documents generated by the Document Application tool,screen captures provide stakeholders with a realistic picture of the application's user interface.
Pega Platform Upgrade Guide83
Post-upgrade configuration
1. Obtain the SSL certificate from the Pega Platform administrator.
2. Add the SSL certificate to the list of trusted certificates:
a) Double-click the certificate.
b) Click Install certificate to start the Certificate Import wizard.
c) Click Next, and select Place all certificates in the following store.
d) Click Browse, select Trusted Root certificate, and click OK.
e) Click Next, and then click Finish to complete the wizard.
3. Add the certificate to the truststore of the JVM on which the REST server is installed:
a) Open a command prompt.
b) Change the root directory to the security folder in the Java installation folder. For example, C:\Program Files (x86)\Java\jre7\lib\security.
c) Run the following command:
keytool -keystore cacerts -importcert -alias certificate alias -file certificate name
d) When prompted, enter the password for the cacerts keystore. The default password is changeit.
Adding special privileges to access the RequesterManagement landing pageTo access the Requester Management landing page in your application, you need to add privileges to the@baseclass and Pega-Landing access classes in your access roles.
Add the following privileges for the type of access that is needed:
• pzSystemOperationsObserver – Required to access the Requester Management landing page andto view performance and trace entry details.
• pzSystemOperationsAdministrator – Required to access the Requester Management landing pageand perform most actions on requestors. To trace requestors and view the clipboard you also need tohave the pzDebugRemoteRequestor privilege.
To add the privileges, complete the following steps:
1. Click the Operator menu in the Designer Studio header and select Operator.
2. In the Application Access section, expand an access group and click the role that you need to modify.
3. Click the @baseclass class in the Access Class column.
4. In the Privileges section, click the Plus icon and select the appropriate privilege in the Name column.
5. Enter 5 for the production level in the Level column. Production level 5 provides the highest security.
6. Click Submit.
7. Click the Pega-Landing class in the Access Class column and repeat steps 4 through 6.
Note: If the Pega-Landing class is not in the table, add it by clicking the Plus icon at the end ofthe table and entering Pega-Landing in the Class field.
8. Save the access role form.
Pega Platform Upgrade Guide84
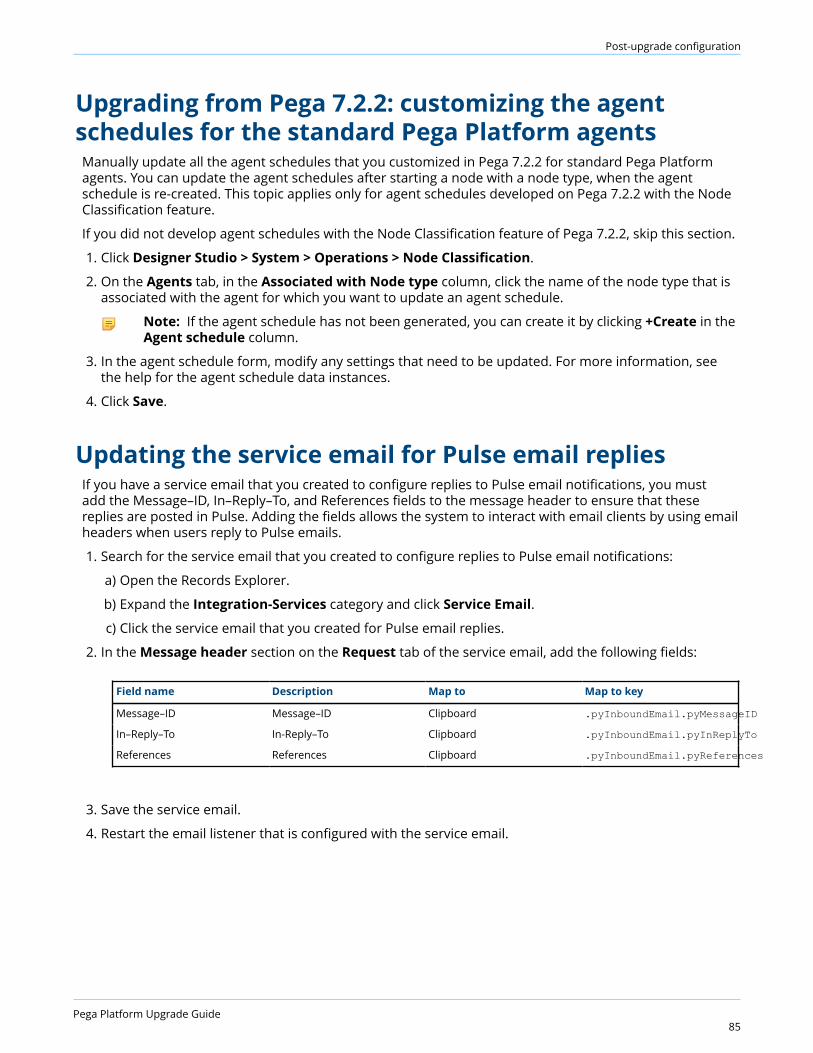
Post-upgrade configuration
Upgrading from Pega 7.2.2: customizing the agentschedules for the standard Pega Platform agentsManually update all the agent schedules that you customized in Pega 7.2.2 for standard Pega Platformagents. You can update the agent schedules after starting a node with a node type, when the agentschedule is re-created. This topic applies only for agent schedules developed on Pega 7.2.2 with the NodeClassification feature.
If you did not develop agent schedules with the Node Classification feature of Pega 7.2.2, skip this section.
1. Click Designer Studio > System > Operations > Node Classification.
2. On the Agents tab, in the Associated with Node type column, click the name of the node type that isassociated with the agent for which you want to update an agent schedule.
Note: If the agent schedule has not been generated, you can create it by clicking +Create in theAgent schedule column.
3. In the agent schedule form, modify any settings that need to be updated. For more information, seethe help for the agent schedule data instances.
4. Click Save.
Updating the service email for Pulse email repliesIf you have a service email that you created to configure replies to Pulse email notifications, you mustadd the Message–ID, In–Reply–To, and References fields to the message header to ensure that thesereplies are posted in Pulse. Adding the fields allows the system to interact with email clients by using emailheaders when users reply to Pulse emails.
1. Search for the service email that you created to configure replies to Pulse email notifications:
a) Open the Records Explorer.
b) Expand the Integration-Services category and click Service Email.
c) Click the service email that you created for Pulse email replies.
2. In the Message header section on the Request tab of the service email, add the following fields:
Field name Description Map to Map to key
Message–ID Message–ID Clipboard .pyInboundEmail.pyMessageID
In–Reply–To In-Reply–To Clipboard .pyInboundEmail.pyInReplyTo
References References Clipboard .pyInboundEmail.pyReferences
3. Save the service email.
4. Restart the email listener that is configured with the service email.
Pega Platform Upgrade Guide85
Appendix A — Properties filesThe Pega Platform properties files include several database-specific properties.
This list of supported values is organized by database:
IBM Db2 for Linux, UNIX and Windows
• JDBC driver JAR file — db2jcc4.jar
• Database driver class — com.ibm.db2.jcc.DB2Driver
• Database vendor type — udb
• JDBC URL — url="jdbc:db2:// host:port/dbname
Microsoft SQL Server
• JDBC driver JAR file — sqldbc.jar
• Database driver class — com.microsoft.sqlserver.jdbc.SQLServerDriver
• Database vendor type — mssql
• JDBC URL — url="jdbc:sqlserver:// host:port ;databaseName= dbName;SelectMethod=cursor;SendStringParametersAsUnicode=false"
Oracle
• JDBC driver JAR file — ojdbc7.jar
• Database driver class — oracle.jdbc.OracleDriver
• Database vendor type — oracledate
• JDBC URL — Use either the service name or the SID:
• url="jdbc:oracle:thin:@ host:port/service-name "
• url="jdbc:oracle:thin:@ host:port:SID "
PostgreSQL
• JDBC driver JAR file:
• PostgreSQL 9.3 — postgresql-9.3.1103.jdbc3.jar
• PostgreSQL 9.4 — postgresql-9.4.1207.jre6.jar, postgresql-9.4.1207.jre7.jar, orpostgresql-9.4.1207.jar
• PostgreSQL 9.5 — postgresql-9.4.1211.jre7.jar or postgresql-9.4.1211.jar
• PostgreSQL 9.6 — postgresql-9.4.1212.jre7.jar or postgresql-9.4.1212.jar
• Database driver class — org.postgresql.Driver
• Database vendor type — postgres
• JDBC URL — url="jdbc:postgresql:// host:port/dbname "
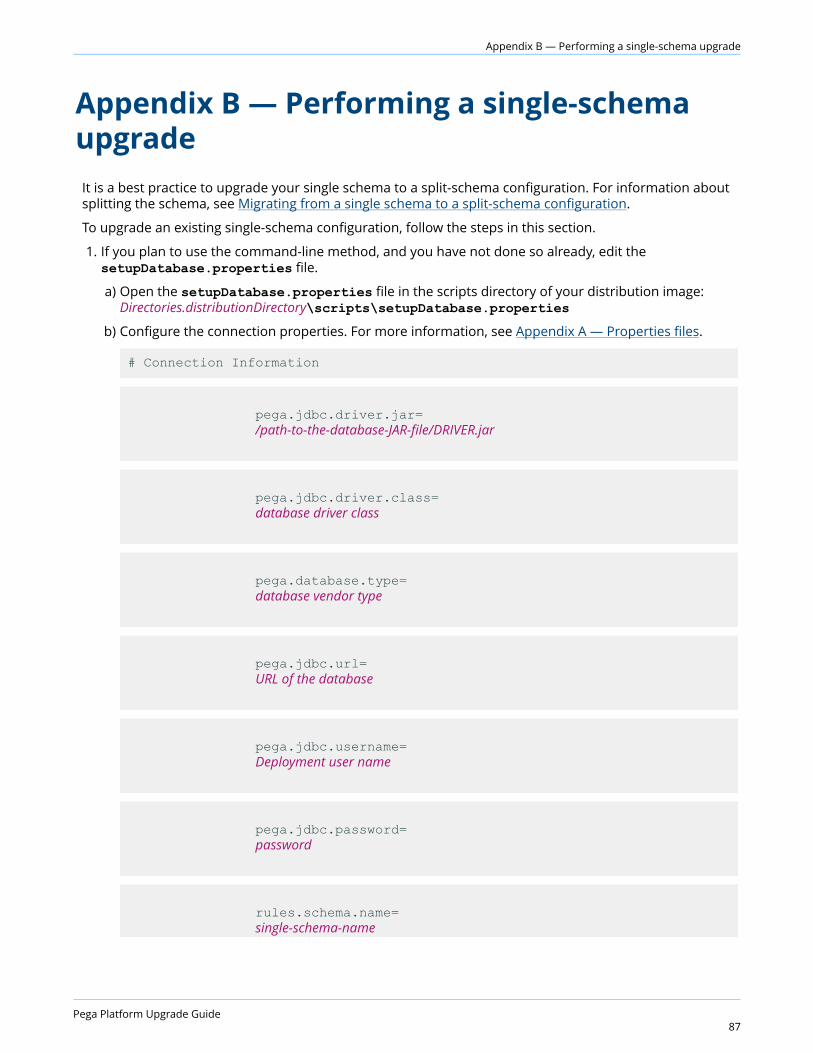
Appendix B — Performing a single-schema upgrade
Appendix B — Performing a single-schemaupgradeIt is a best practice to upgrade your single schema to a split-schema configuration. For information aboutsplitting the schema, see Migrating from a single schema to a split-schema configuration.
To upgrade an existing single-schema configuration, follow the steps in this section.
1. If you plan to use the command-line method, and you have not done so already, edit thesetupDatabase.properties file.
a) Open the setupDatabase.properties file in the scripts directory of your distribution image:Directories.distributionDirectory\scripts\setupDatabase.properties
b) Configure the connection properties. For more information, see Appendix A — Properties files.
# Connection Information
pega.jdbc.driver.jar= /path-to-the-database-JAR-file/DRIVER.jar
pega.jdbc.driver.class= database driver class
pega.database.type= database vendor type
pega.jdbc.url= URL of the database
pega.jdbc.username= Deployment user name
pega.jdbc.password= password
rules.schema.name= single-schema-name
Pega Platform Upgrade Guide87
Appendix B — Performing a single-schema upgrade
data.schema.name= single-schema-name
c) Optional: If you are repeating a failed upgrade, configure the resume property:
• To resume the upgrade from the last successful step, set automatic.resume=true.
• To restart the upgrade from the beginning, set automatic.resume=false.
d) Save and close the file.
2. Ensure that the application server is not running.
3. Optional: Generate DDL and have your database administrator apply the changes to your database.See Optional Generating and applying DDL
4. Upgrade the database and the rulebase. See Upgrading the schema.
5. Upgrade the applications:
a) Review the application server configuration described in the Pega 7.4 Installation Guide for yourapplication.
b) Undeploy the current Java applications:
• prweb.war or the EAR file appropriate to your application server
• prsysmgmt.war
• prhelp.war
c) Deploy the new Pega Platform applications.
6. Configure the Pega Platform; log in to the system and complete the upgrade configuration steps.
Single-schema upgrade methodsYour existing schema needs to be updated to be compatible with Pega 7.4. The schema can be updatedin one of the following methods. Each method is designed to preserve any prior customization to thedatabase.
• UI tool – the UI-based Installation and Upgrade Assistant automatically updates the schema leaving anycustomizations intact. See Running the Installation and Upgrade Assistant.
• Command-line script – Use the upgrade.bat or upgrade.sh script. See Upgrading from thecommand line.
These methods require a JDBC connection to the database and can be run from any Windows, UNIX, Linuxor Linux on IBM z/OS systems with Java 8 or later. The Deployment user should perform these actions.
Prior to loading the rulebase, the upgrade attempts to validate that each database table space has abuffer pool size large enough to accommodate the generated SQL DDL. The utility generates a report andstops if it finds any table space that requires an increased buffer pool size. The report identifies all tablespaces requiring an increased buffer pool size. Have the database administrator correct the table spacebuffer pool issues and rerun the tool.
Pega Platform Upgrade Guide88
Appendix B — Performing a single-schema upgrade
Upgrading a single schema by using the Installation and UpgradeAssistant (IUA)Because of the large volume of data, run the IUA on the same network as the database server. If this isnot possible, run the tool on a system with fast, direct access to the database server. The Deploymentuser performs these steps.
Pega Platform writes command-line output to a file in the Pega-image\scripts\logs directory.
The process can last for several hours and the time can vary widely based on network proximity to thedatabase server.
To run the IUA:
1. Double-click the PRPC_Setup.jar file to start the IUA.
Note: If JAR files are not associated with Java commands on your system, start the IUA from thecommand line. Navigate to the directory containing the PRPC_Setup.jar file, and type java -jar PRPC_Setup.jar.
The IUA loads and the Pega icon is displayed in your task bar.
2. Click Next to display the license agreement.
3. Review the license agreement and click Accept.
4. If you are resuming after a previous failed upgrade and the Resume Options screen is displayed,select either Resume or Start Over.
• If you select Resume, the system uses the previously entered database configuration information toresume the upgrade from the last successful process. Continue these instructions at step 8.
• If you select Start Over, continue at step 5 to reenter the configuration information.
5. On the Installer Mode screen, choose Upgrade and click Next.
6. Choose your database type and click Next.
7. Configure the database connection. The JDBC drivers allow the Pega Platform application tocommunicate with the database.
Note: Some of the fields on the Database Connection screen are pre-populated based onthe type of database you selected. If you edit these or any other fields on this screen, and thenlater decide to change the database type, the IUA might not populate the fields correctly. If thisoccurs, enter the correct field values as documented below, or exit and rerun the IUA to selectthe intended database type.
Note: If you are resuming after a failed upgrade, some pre-populated values might be disabled.
• JDBC Driver Class Name — Verify that the pre-populated value is accurate:
• IBM Db2 for Linux, UNIX, and Windows and IBM Db2 for z/OS — com.ibm.db2.jcc.DB2Driver
• Microsoft SQL Server — com.microsoft.sqlserver.jdbc.SQLServerDriver
• Oracle — oracle.jdbc.OracleDriver
• PostgreSQL — org.postgresql.Driver
• JDBC Driver JAR Files — Click Select Jar to browse to the appropriate driver files for your databasetype and version. For a list of supported drivers, see the Platform Support Guide.
• Database JDBC URL — Verify that the pre-populated value is accurate.
For information about URLs, see Obtaining database connection information.
Pega Platform Upgrade Guide89
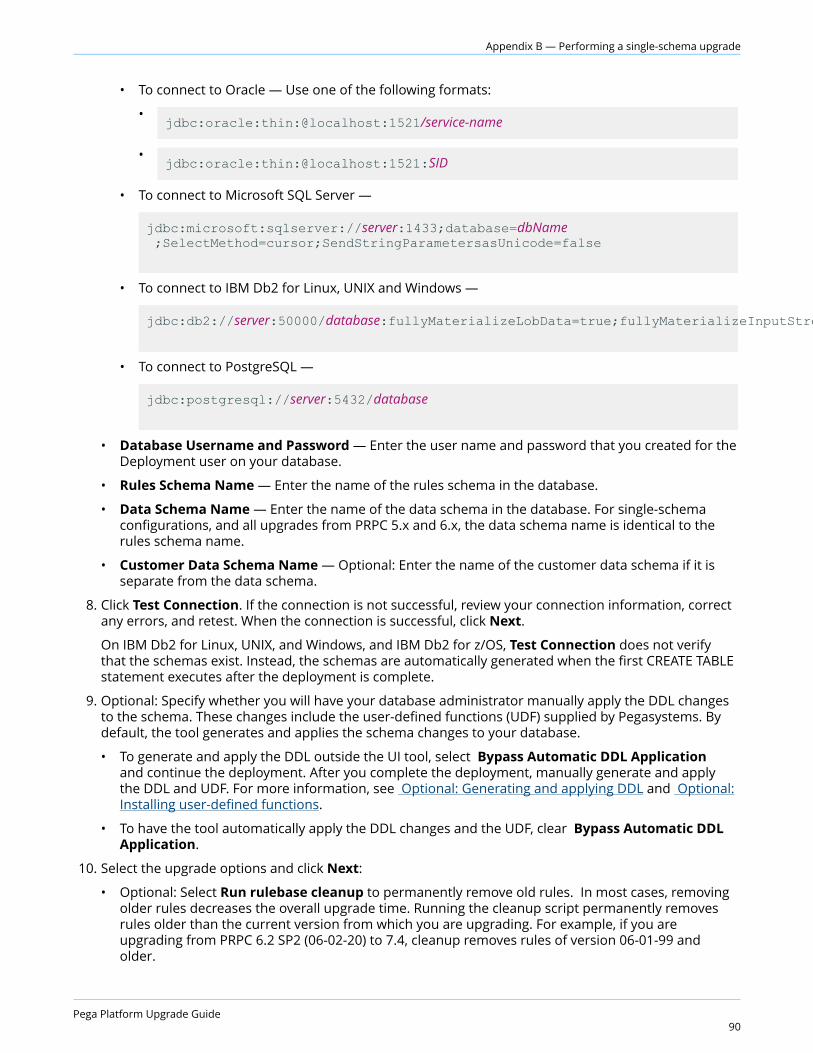
Appendix B — Performing a single-schema upgrade
• To connect to Oracle — Use one of the following formats:
•jdbc:oracle:thin:@localhost:1521/service-name
•jdbc:oracle:thin:@localhost:1521:SID
• To connect to Microsoft SQL Server —
jdbc:microsoft:sqlserver://server:1433;database=dbName ;SelectMethod=cursor;SendStringParametersasUnicode=false
• To connect to IBM Db2 for Linux, UNIX and Windows —
jdbc:db2://server:50000/database:fullyMaterializeLobData=true;fullyMaterializeInputStreams=true;progressiveStreaming=2;useJDBC4ColumnNameAndLabelSemantics=2;
• To connect to PostgreSQL —
jdbc:postgresql://server:5432/database
• Database Username and Password — Enter the user name and password that you created for theDeployment user on your database.
• Rules Schema Name — Enter the name of the rules schema in the database.
• Data Schema Name — Enter the name of the data schema in the database. For single-schemaconfigurations, and all upgrades from PRPC 5.x and 6.x, the data schema name is identical to therules schema name.
• Customer Data Schema Name — Optional: Enter the name of the customer data schema if it isseparate from the data schema.
8. Click Test Connection. If the connection is not successful, review your connection information, correctany errors, and retest. When the connection is successful, click Next.
On IBM Db2 for Linux, UNIX, and Windows, and IBM Db2 for z/OS, Test Connection does not verifythat the schemas exist. Instead, the schemas are automatically generated when the first CREATE TABLEstatement executes after the deployment is complete.
9. Optional: Specify whether you will have your database administrator manually apply the DDL changesto the schema. These changes include the user-defined functions (UDF) supplied by Pegasystems. Bydefault, the tool generates and applies the schema changes to your database.
• To generate and apply the DDL outside the UI tool, select Bypass Automatic DDL Application and continue the deployment. After you complete the deployment, manually generate and applythe DDL and UDF. For more information, see Optional: Generating and applying DDL and Optional:Installing user-defined functions.
• To have the tool automatically apply the DDL changes and the UDF, clear Bypass Automatic DDLApplication.
10. Select the upgrade options and click Next:
• Optional: Select Run rulebase cleanup to permanently remove old rules. In most cases, removingolder rules decreases the overall upgrade time. Running the cleanup script permanently removesrules older than the current version from which you are upgrading. For example, if you areupgrading from PRPC 6.2 SP2 (06-02-20) to 7.4, cleanup removes rules of version 06-01-99 andolder.
Pega Platform Upgrade Guide90

Appendix B — Performing a single-schema upgrade
• Optional: Select Update existing applications to modify your existing applications to support theupgraded version of the Pega Platform. The specific actions depend on your current version ofPRPC. If you do not automatically update the applications as part of the IUA, follow the instructionsin Updating existing applications to update the applications as part of the post-upgrade process.
• Optional: Select Update applications schema to run the Update Applications Schema utility toupdate the cloned rule, data, work, and work history tables with the schema changes in the latestbase tables as part of the update. If you do not automatically update the applications, you can alsorun the update applications schema utility later from the prpcUtils.bat or prpcUtils.sh script, or fromDesigner Studio. For information about using the Update Applications Schema utility, see the onlinehelp.
• Optional: Select Rebuild database indexes to have the IUA to rebuild the database indexes afterthe rulebase loads. The IUA rebuilds the database indexes to ensure good performance in theupgraded system. The amount of time this process adds to the upgrade procedure depends on thesize of your database.
11. Click Start to begin loading the rulebase.Logs display in the log window and are also stored in the Pega-image \scripts\logs directory. Duringthe deployment, the log window might appear inactive when the IUA is processing larger files.
12. Click Back to return to the previous screen, and then click Exit to close the IUA.
Determine the next step:
• If you opted to have the IUA automatically apply the schema changes, and you will not enable Kerberosauthentication, configure the application server.
• If your database administrator will apply DDL manually, or if you will enable Kerberos authentication,continue at Editing the setupDatabase.properties file.
Upgrading a single-schema from the command lineTo upgrade from the command line, configure the setupDatabase.properties file and run eitherupgrade.bat or upgrade.sh. The Deployment user runs these scripts.
The rulebase upgrade can take several hours, depending on the proximity of the database to the systemrunning the script.
1. If you have not done so already, edit the setupDatabase.properties file.
a) Open the setupDatabase.properties file in the scripts directory of your distribution image:Directories.distributionDirectory\scripts\setupDatabase.properties
b) Configure the connection properties. Use the new rules schema name for both the rules schemaname and data schema name. For more information about the connection properties, see Appendix A — Properties files.
# Connection Information
pega.jdbc.driver.jar= /path-to-the-database-JAR-file/DRIVER.jar
pega.jdbc.driver.class=
Pega Platform Upgrade Guide91
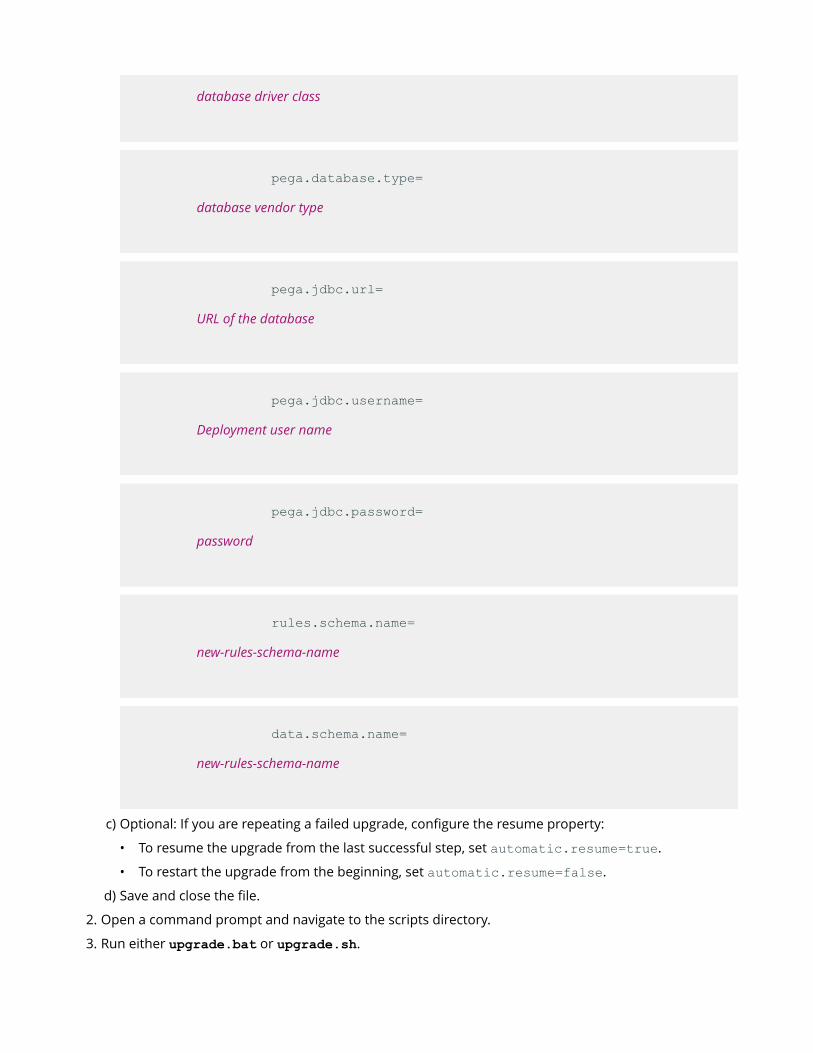
database driver class
pega.database.type= database vendor type
pega.jdbc.url= URL of the database
pega.jdbc.username= Deployment user name
pega.jdbc.password= password
rules.schema.name= new-rules-schema-name
data.schema.name= new-rules-schema-name
c) Optional: If you are repeating a failed upgrade, configure the resume property:
• To resume the upgrade from the last successful step, set automatic.resume=true.
• To restart the upgrade from the beginning, set automatic.resume=false.
d) Save and close the file.
2. Open a command prompt and navigate to the scripts directory.
3. Run either upgrade.bat or upgrade.sh.
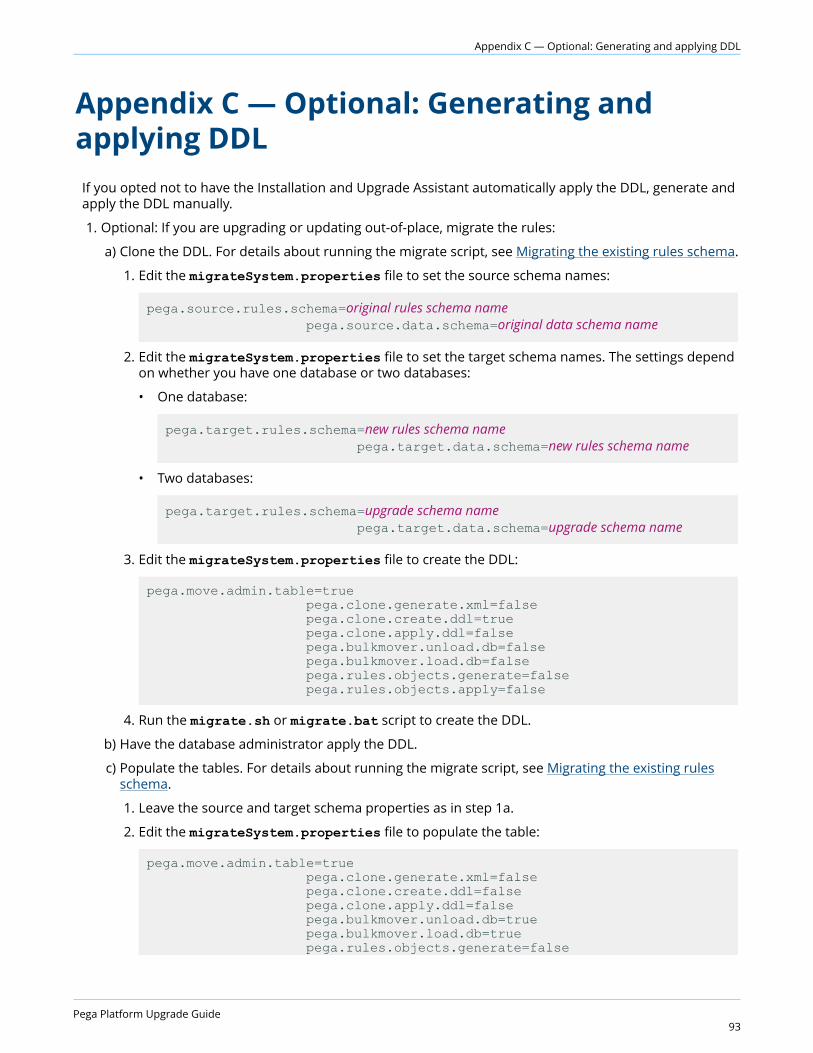
Appendix C — Optional: Generating and applying DDL
Appendix C — Optional: Generating andapplying DDLIf you opted not to have the Installation and Upgrade Assistant automatically apply the DDL, generate andapply the DDL manually.
1. Optional: If you are upgrading or updating out-of-place, migrate the rules:
a) Clone the DDL. For details about running the migrate script, see Migrating the existing rules schema.
1. Edit the migrateSystem.properties file to set the source schema names:
pega.source.rules.schema=original rules schema name pega.source.data.schema=original data schema name
2. Edit the migrateSystem.properties file to set the target schema names. The settings dependon whether you have one database or two databases:
• One database:
pega.target.rules.schema=new rules schema name pega.target.data.schema=new rules schema name
• Two databases:
pega.target.rules.schema=upgrade schema name pega.target.data.schema=upgrade schema name
3. Edit the migrateSystem.properties file to create the DDL:
pega.move.admin.table=true pega.clone.generate.xml=false pega.clone.create.ddl=true pega.clone.apply.ddl=false pega.bulkmover.unload.db=false pega.bulkmover.load.db=false pega.rules.objects.generate=false pega.rules.objects.apply=false
4. Run the migrate.sh or migrate.bat script to create the DDL.
b) Have the database administrator apply the DDL.
c) Populate the tables. For details about running the migrate script, see Migrating the existing rulesschema.
1. Leave the source and target schema properties as in step 1a.
2. Edit the migrateSystem.properties file to populate the table:
pega.move.admin.table=true pega.clone.generate.xml=false pega.clone.create.ddl=false pega.clone.apply.ddl=false pega.bulkmover.unload.db=true pega.bulkmover.load.db=true pega.rules.objects.generate=false
Pega Platform Upgrade Guide93
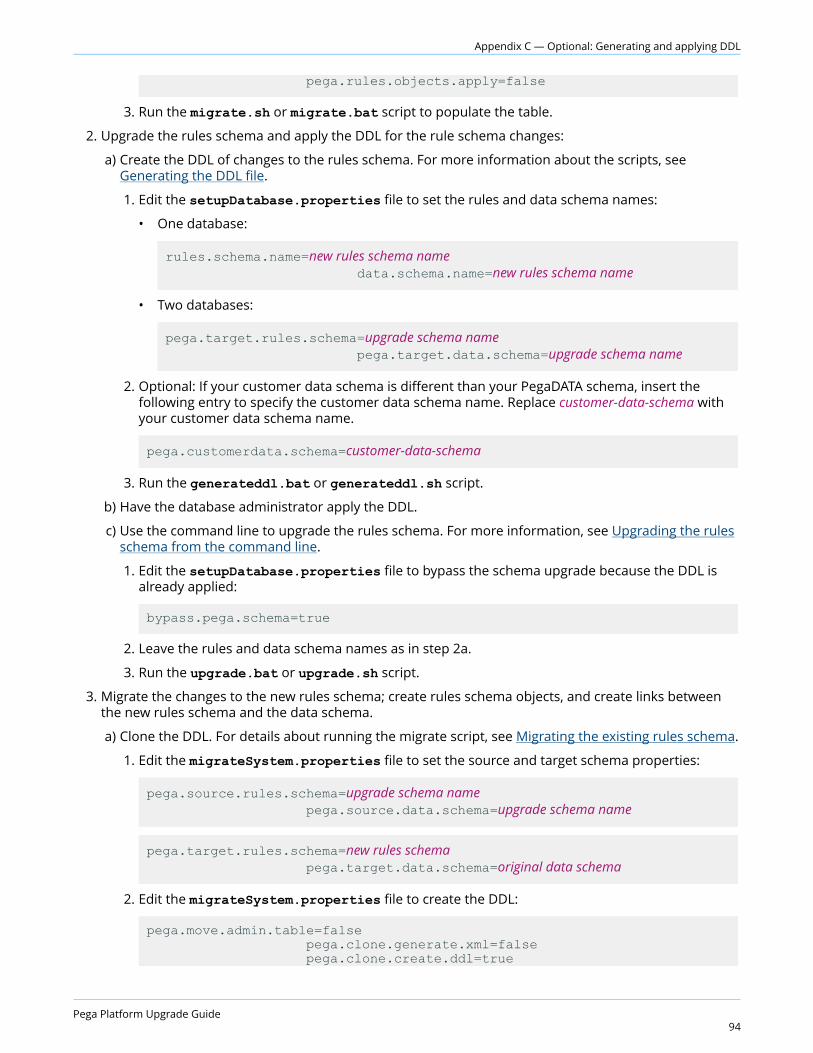
Appendix C — Optional: Generating and applying DDL
pega.rules.objects.apply=false
3. Run the migrate.sh or migrate.bat script to populate the table.
2. Upgrade the rules schema and apply the DDL for the rule schema changes:
a) Create the DDL of changes to the rules schema. For more information about the scripts, seeGenerating the DDL file.
1. Edit the setupDatabase.properties file to set the rules and data schema names:
• One database:
rules.schema.name=new rules schema name data.schema.name=new rules schema name
• Two databases:
pega.target.rules.schema=upgrade schema name pega.target.data.schema=upgrade schema name
2. Optional: If your customer data schema is different than your PegaDATA schema, insert thefollowing entry to specify the customer data schema name. Replace customer-data-schema withyour customer data schema name.
pega.customerdata.schema=customer-data-schema
3. Run the generateddl.bat or generateddl.sh script.
b) Have the database administrator apply the DDL.
c) Use the command line to upgrade the rules schema. For more information, see Upgrading the rulesschema from the command line.
1. Edit the setupDatabase.properties file to bypass the schema upgrade because the DDL isalready applied:
bypass.pega.schema=true
2. Leave the rules and data schema names as in step 2a.
3. Run the upgrade.bat or upgrade.sh script.
3. Migrate the changes to the new rules schema; create rules schema objects, and create links betweenthe new rules schema and the data schema.
a) Clone the DDL. For details about running the migrate script, see Migrating the existing rules schema.
1. Edit the migrateSystem.properties file to set the source and target schema properties:
pega.source.rules.schema=upgrade schema name pega.source.data.schema=upgrade schema name
pega.target.rules.schema=new rules schema pega.target.data.schema=original data schema
2. Edit the migrateSystem.properties file to create the DDL:
pega.move.admin.table=false pega.clone.generate.xml=false pega.clone.create.ddl=true
Pega Platform Upgrade Guide94
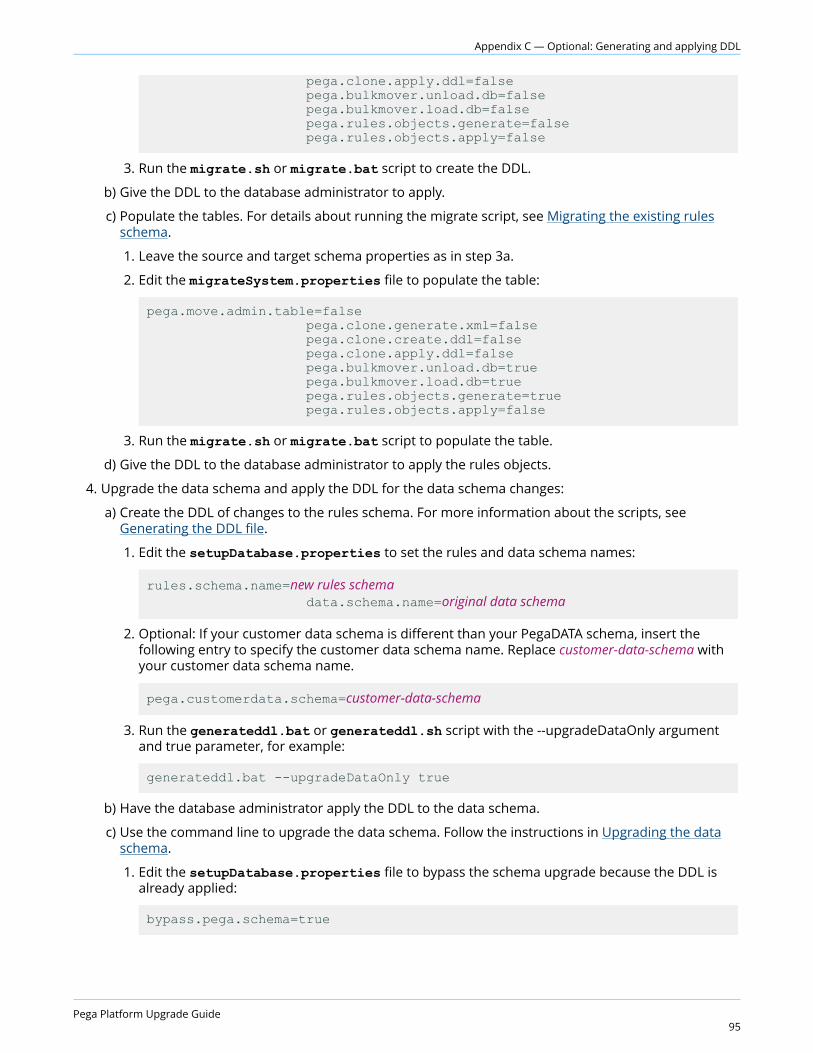
Appendix C — Optional: Generating and applying DDL
pega.clone.apply.ddl=false pega.bulkmover.unload.db=false pega.bulkmover.load.db=false pega.rules.objects.generate=false pega.rules.objects.apply=false
3. Run the migrate.sh or migrate.bat script to create the DDL.
b) Give the DDL to the database administrator to apply.
c) Populate the tables. For details about running the migrate script, see Migrating the existing rulesschema.
1. Leave the source and target schema properties as in step 3a.
2. Edit the migrateSystem.properties file to populate the table:
pega.move.admin.table=false pega.clone.generate.xml=false pega.clone.create.ddl=false pega.clone.apply.ddl=false pega.bulkmover.unload.db=true pega.bulkmover.load.db=true pega.rules.objects.generate=true pega.rules.objects.apply=false
3. Run the migrate.sh or migrate.bat script to populate the table.
d) Give the DDL to the database administrator to apply the rules objects.
4. Upgrade the data schema and apply the DDL for the data schema changes:
a) Create the DDL of changes to the rules schema. For more information about the scripts, seeGenerating the DDL file.
1. Edit the setupDatabase.properties to set the rules and data schema names:
rules.schema.name=new rules schema data.schema.name=original data schema
2. Optional: If your customer data schema is different than your PegaDATA schema, insert thefollowing entry to specify the customer data schema name. Replace customer-data-schema withyour customer data schema name.
pega.customerdata.schema=customer-data-schema
3. Run the generateddl.bat or generateddl.sh script with the --upgradeDataOnly argumentand true parameter, for example:
generateddl.bat --upgradeDataOnly true
b) Have the database administrator apply the DDL to the data schema.
c) Use the command line to upgrade the data schema. Follow the instructions in Upgrading the dataschema.
1. Edit the setupDatabase.properties file to bypass the schema upgrade because the DDL isalready applied:
bypass.pega.schema=true
Pega Platform Upgrade Guide95
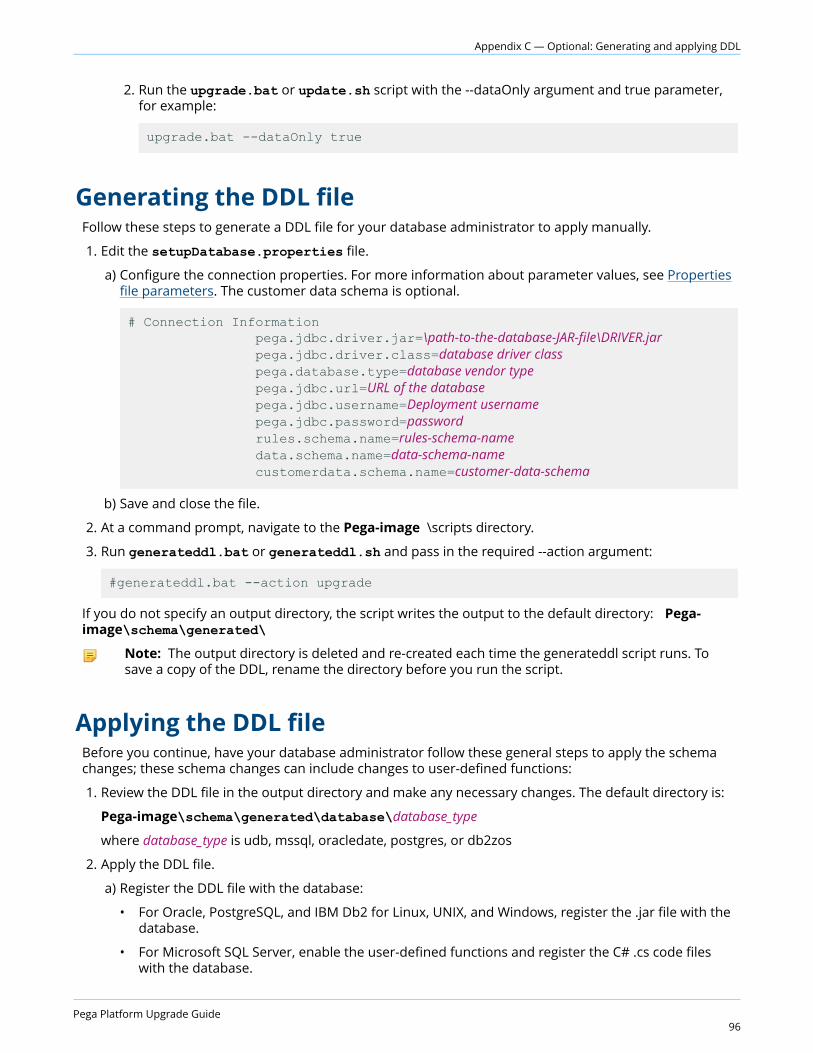
Appendix C — Optional: Generating and applying DDL
2. Run the upgrade.bat or update.sh script with the --dataOnly argument and true parameter,for example:
upgrade.bat --dataOnly true
Generating the DDL fileFollow these steps to generate a DDL file for your database administrator to apply manually.
1. Edit the setupDatabase.properties file.
a) Configure the connection properties. For more information about parameter values, see Propertiesfile parameters. The customer data schema is optional.
# Connection Information pega.jdbc.driver.jar=\path-to-the-database-JAR-file\DRIVER.jar pega.jdbc.driver.class=database driver class pega.database.type=database vendor type pega.jdbc.url=URL of the database pega.jdbc.username=Deployment username pega.jdbc.password=password rules.schema.name=rules-schema-name data.schema.name=data-schema-name customerdata.schema.name=customer-data-schema
b) Save and close the file.
2. At a command prompt, navigate to the Pega-image \scripts directory.
3. Run generateddl.bat or generateddl.sh and pass in the required --action argument:
#generateddl.bat --action upgrade
If you do not specify an output directory, the script writes the output to the default directory: Pega-image\schema\generated\
Note: The output directory is deleted and re-created each time the generateddl script runs. Tosave a copy of the DDL, rename the directory before you run the script.
Applying the DDL fileBefore you continue, have your database administrator follow these general steps to apply the schemachanges; these schema changes can include changes to user-defined functions:
1. Review the DDL file in the output directory and make any necessary changes. The default directory is:
Pega-image\schema\generated\database\database_type
where database_type is udb, mssql, oracledate, postgres, or db2zos
2. Apply the DDL file.
a) Register the DDL file with the database:
• For Oracle, PostgreSQL, and IBM Db2 for Linux, UNIX, and Windows, register the .jar file with thedatabase.
• For Microsoft SQL Server, enable the user-defined functions and register the C# .cs code fileswith the database.
Pega Platform Upgrade Guide96
Appendix C — Optional: Generating and applying DDL
b) Apply the CREATE FUNCTION DDL.
The output directory is deleted and re-created each time the generateddl script runs. To save a copy of theDDL, rename the directory before you rerun the script.
Editing the setupDatabase.properties file to bypassDDL generationAfter your database administrator applies the changes to your database, configure thesetupDatabase.properties file to bypass applying a schema that already exists. Reapplying an existingschema would cause the deployment to fail.
1. Open the setupDatabase.properties file in the scripts directory of your distribution image:Directories.distributionDirectory\scripts\setupDatabase.properties
2. Set the property bypass.pega.schema=true.
3. Save and close the file.
Pega Platform Upgrade Guide97
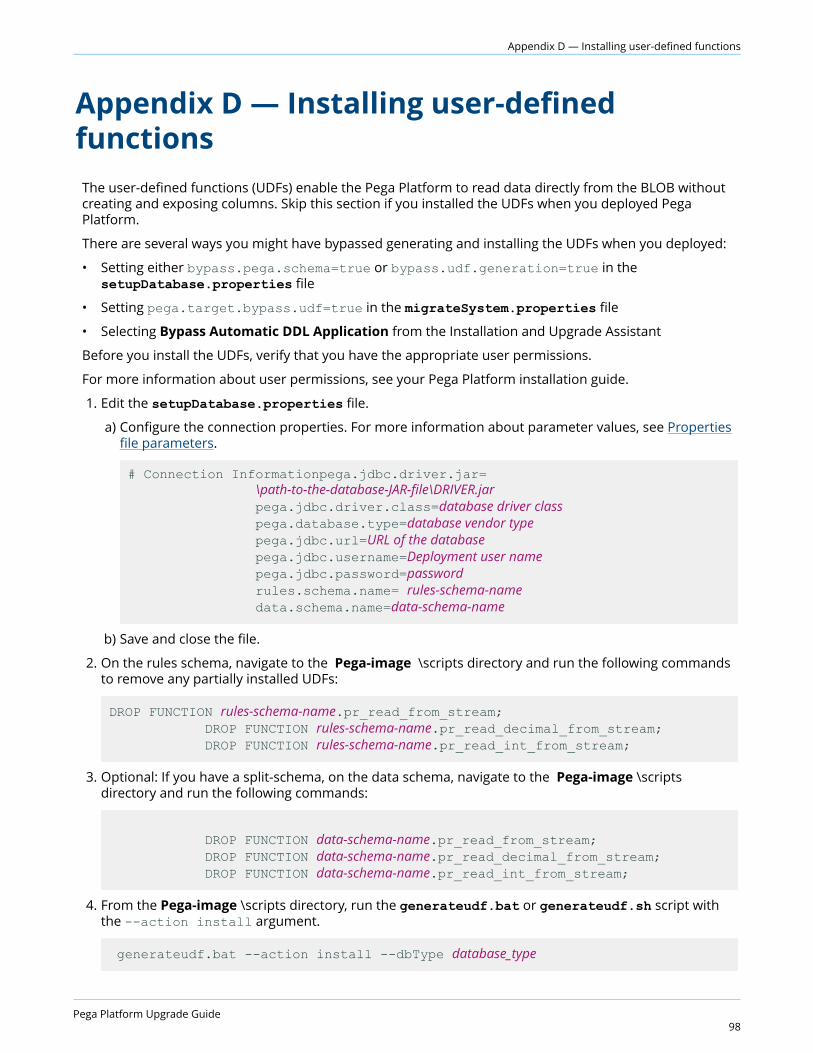
Appendix D — Installing user-defined functions
Appendix D — Installing user-definedfunctionsThe user-defined functions (UDFs) enable the Pega Platform to read data directly from the BLOB withoutcreating and exposing columns. Skip this section if you installed the UDFs when you deployed PegaPlatform.
There are several ways you might have bypassed generating and installing the UDFs when you deployed:
• Setting either bypass.pega.schema=true or bypass.udf.generation=true in thesetupDatabase.properties file
• Setting pega.target.bypass.udf=true in the migrateSystem.properties file
• Selecting Bypass Automatic DDL Application from the Installation and Upgrade Assistant
Before you install the UDFs, verify that you have the appropriate user permissions.
For more information about user permissions, see your Pega Platform installation guide.
1. Edit the setupDatabase.properties file.
a) Configure the connection properties. For more information about parameter values, see Propertiesfile parameters.
# Connection Informationpega.jdbc.driver.jar= \path-to-the-database-JAR-file\DRIVER.jar pega.jdbc.driver.class=database driver class pega.database.type=database vendor type pega.jdbc.url=URL of the database pega.jdbc.username=Deployment user name pega.jdbc.password=password rules.schema.name= rules-schema-name data.schema.name=data-schema-name
b) Save and close the file.
2. On the rules schema, navigate to the Pega-image \scripts directory and run the following commandsto remove any partially installed UDFs:
DROP FUNCTION rules-schema-name.pr_read_from_stream; DROP FUNCTION rules-schema-name.pr_read_decimal_from_stream; DROP FUNCTION rules-schema-name.pr_read_int_from_stream;
3. Optional: If you have a split-schema, on the data schema, navigate to the Pega-image \scriptsdirectory and run the following commands:
DROP FUNCTION data-schema-name.pr_read_from_stream; DROP FUNCTION data-schema-name.pr_read_decimal_from_stream; DROP FUNCTION data-schema-name.pr_read_int_from_stream;
4. From the Pega-image \scripts directory, run the generateudf.bat or generateudf.sh script withthe --action install argument.
generateudf.bat --action install --dbType database_type
Pega Platform Upgrade Guide98
Appendix D — Installing user-defined functions
Where database_type is mssql, oracledate, udb, db2zos, or postgres.
Pega Platform Upgrade Guide99
Appendix E — Rolling restart and Apache Ignite client-server mode
Appendix E — Rolling restart and ApacheIgnite client-server modeYou can upgrade Pega Platform to use Apache Ignite client-server clustering topology to separate thePega Platform processes from cluster communication and distributed features. Clustering technology hasseparate resources and uses a different JVM from Pega Platform. For more information, see Apache Igniteclient-server clustering topology.
To enable client-server mode, follow the rolling restart process with additional steps for enabling client-server mode. See Performing the rolling restart.
To switch back from client-server mode to embedded mode, follow the rolling restart process withadditional steps for disabling client-server mode. See Performing the rolling restart.
Performing the rolling restartYou can use a rolling restart process to enable Apache Ignite client-server mode or to switch back toembedded mode from client-server mode. For more details, see Apache Ignite client-server clusteringtopology.
Perform a rolling restart to keep your system always available during upgrade. You remove nodes fromthe load balancer, shut them down, upgrade, and start them again one by one. You do not add them backto the load balancer until you have upgraded half the nodes.
To perform a rolling restart, complete the following steps.
1. Prepare the database.
a) Disable rule saving. For more information, see Disabling rule creation on the rules schema.
b) Migrate the PegaRULES schema to a temporary schema. For more information, see Migrating theexisting rules schema.
c) Update the new rules schema, for example, a framework or application update. For moreinformation, see Upgrading the migrated rules schema.
d) Copy the new rule schema to the production database. For more information, see Migrating to thenew rules schema.
2. Optional: To switch to Apache Ignite client-server mode, start the stand-alone Apache Ignite serversbefore upgrading the nodes. For more information, see Deploying and starting the Apache Igniteservers.
3. Upgrade half of the nodes one by one.
a) Configure the load balancer to disable a node.
• Disabling the node does not allow new connections, but it allows existing users and services tocomplete work.
• Quiescing a Pega Platform node that has not been disabled in the load balancer results in errorconditions for users of that Pega Platform node, because new users cannot log in. The PegaPlatform must be disabled in the load balancer so that new users are redirected to anotheractive Pega Platform node.
b) Quiesce the Pega Platform node, by using the Autonomic Event Services (AES), System ManagementAdministrator (SMA), or high availability landing pages. For more information, see the help forCluster management and quiescing.
Pega Platform Upgrade Guide100
Appendix E — Rolling restart and Apache Ignite client-server mode
c) Ensure that all requestors are passivated and the system run state is set to "Quiesce Complete", byusing the HA Cluster Management landing page.
d) Shut down the node.
e) Update the data source to connect to the updated schema (to reflect changes made in step 1). Formore information, see Upgrading the data schema.
f) Optional: To enable Apache Ignite client-server mode, modify the prconfig.xml file to switch theApache Ignite cluster protocol and force the node to start in client mode.
g) Edit the prconfig.xml file and add the following settings:
<env name="cluster/clientserver/clientmode" value="true " /> <env name="identification/cluster/protocol" value="ignite " />
4. Optional: To switch back to embedded mode from client-server mode, modify the prconfig.xml fileand remove the following settings that were added during the switch to client-server mode.
<env name="cluster/clientserver/clientmode" value="true " /> <env name="identification/cluster/protocol" value="ignite " />
5. Optional. To specify the technology that you want to use in embedded mode, enter the appropriatesetting for the cluster protocol (Hazelcast or Ignite) instead of removing it.>
6. Start the node.
7. Perform any needed post-upgrade activities and tests. For more information, see Post-upgradeconfiguration.
8. After you upgrade half of the nodes, disable the remaining non-upgraded nodes in the load balancer.
9. Add all the upgraded nodes, which you upgraded in step 3, back to the load balancer to start takingtraffic.
10. Upgrade the remaining half of the nodes (the non-upgraded nodes) one by one.
a) Perform steps 3 b through 3 g.
b) Add the node back to the load balancer to start taking traffic.
11. Optional: To switch back to embedded mode from client-server mode, shut down all stand-aloneApache Ignite servers after all the nodes are upgraded and no longer use the stand-alone ApacheIgnite server cluster.
Deploying and starting the Apache Ignite serversTo use client-server clustering, deploy and start the Apache Ignite servers before you deploy and startthe Pega cluster. The Apache Ignite servers provide base clustering capabilities, including communicationbetween nodes. You must have a minimum of three stand-alone Apache Ignite servers for one cluster.
Perform the following procedure on each Apache Ignite server.
1. Make sure that the JAVA_HOME environment variable points to a valid Java installation directory (JRE orJDK).
2. Copy the prcluster_service.war file, which is used to start the cluster service, to the webappsdirectory on the Apache Tomcat server. The prcluster_service.war file is located in the Archivesdirectory of the Pega Platform distribution image.
Pega Platform Upgrade Guide101
3. Edit the cluster protocol in the prconfig.xml file located in the /WEB-INF/classes/ directory or theprcluster_service.war file. The Hazelcast cluster protocol is the default configuration.
a) Add the following setting to the prconfig.xml file: <env name="identification/cluster/protocol" value="ignite" />
b) Pass the following JVM argument to the application server:
-DNodeSettings=identification/cluster/protocol=ignite
4. Start the JVM.
After a successful startup, you can review the topology snapshot in the PegaRULES log files. By default,the log files are generated in the ../work/Catalina/localhost/prcluster_service/ directory and are accessibleonly from a terminal window.
Optional. Set up ELK (Elasticsearch, Logstash, and Kibana) for a convenient way to access and analyzethe log files. For more information about configuring ELK, see the Configuring Elasticsearch, Logstash, andKibana (ELK) for log management article on the PDN.
Appendix F — Troubleshoot upgrade errors
Appendix F — Troubleshoot upgrade errorsUse the information in this section to troubleshoot upgrade errors.
Error logs are displayed in the Installation and Upgrade Assistant window and are also stored in the Pega-image\scripts\logs directory.
Upgrades from PRPC 5.4 and earlier: System-Work-Indexer not found in dictionaryIf you are upgrading from PRPC 5.4 or earlier, an indexing error can cause the upgrade to fail with a classnot defined message.
Class not defined in dictionary: System-Work-Indexer aClassName
To fix the problem, first follow the instructions in Upgrading from PRPC 5.4 and earlier: setting indexing,and then repeat the upgrade.
Resuming or restarting after a failed deploymentIf the deployment fails, you can opt to either resume or start over:
• Resume — The system uses the previously-entered configuration information to resume a faileddeployment from the last successful step. This is the default behavior.
• Start Over — The system discards all previously-entered configuration information, drops thedatabase schema, and starts the deployment from the beginning.
1. Review the failure message for information about the source of the error. Use the information in theerror message to correct the error before you continue.
2. Optional. If you used the IUA, the select either Resume or Start Over when the system displays theResume Options screen.
3. Optional. If you used the command-line script, set the automatic.resume property in thesetupDatabase.properties file:
• To resume the deployment from the last successful step, set automatic.resume=true.
• To start over, set automatic.resume=false.
4. Repeat the deployment. Use the same procedure that you used for the initial deployment.
Recovering from a faulty split-schema migrationIf the split-schema migration fails, run the migration recovery scripts to remove duplicate rules.
The migration recovery scripts remove duplicate rules created as a result of a faulty split schemamigration, where indexes and primary keys were not created on rules tables. To check for this issue, see ifyour rules tables, such as pr4_base and pr4_rule, are missing primary keys.
Pega Platform Upgrade Guide103
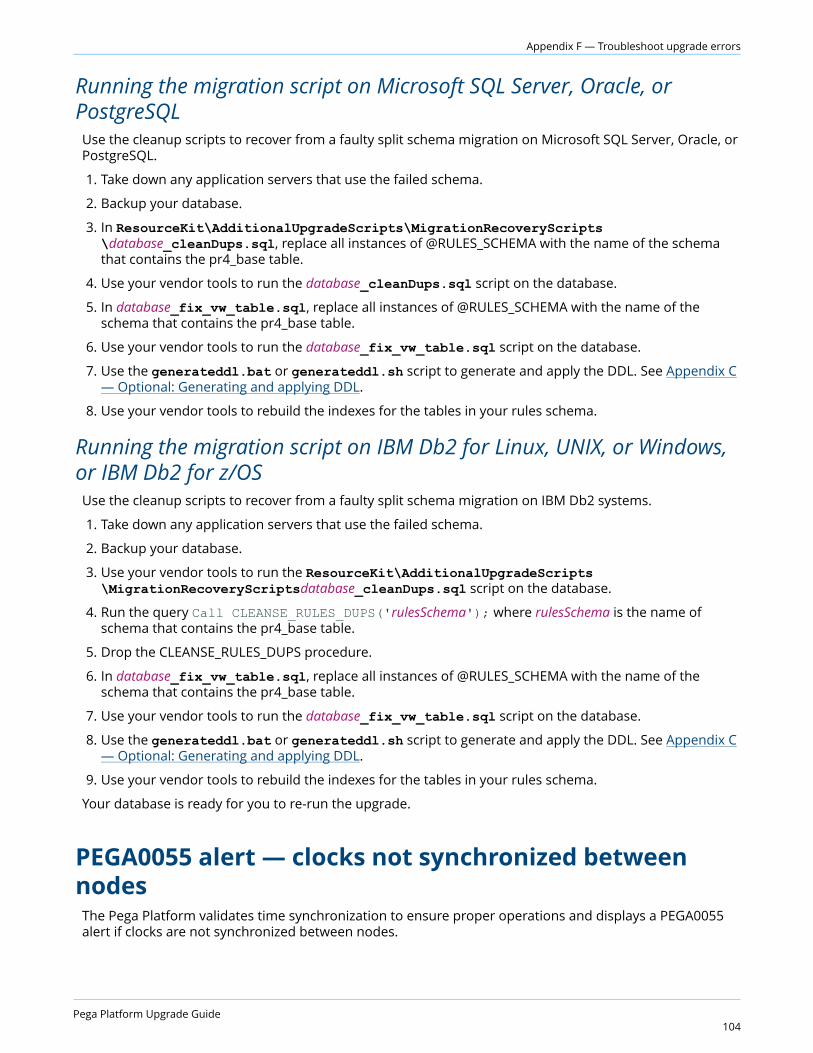
Appendix F — Troubleshoot upgrade errors
Running the migration script on Microsoft SQL Server, Oracle, orPostgreSQLUse the cleanup scripts to recover from a faulty split schema migration on Microsoft SQL Server, Oracle, orPostgreSQL.
1. Take down any application servers that use the failed schema.
2. Backup your database.
3. In ResourceKit\AdditionalUpgradeScripts\MigrationRecoveryScripts\database_cleanDups.sql, replace all instances of @RULES_SCHEMA with the name of the schemathat contains the pr4_base table.
4. Use your vendor tools to run the database_cleanDups.sql script on the database.
5. In database_fix_vw_table.sql, replace all instances of @RULES_SCHEMA with the name of theschema that contains the pr4_base table.
6. Use your vendor tools to run the database_fix_vw_table.sql script on the database.
7. Use the generateddl.bat or generateddl.sh script to generate and apply the DDL. See Appendix C— Optional: Generating and applying DDL.
8. Use your vendor tools to rebuild the indexes for the tables in your rules schema.
Running the migration script on IBM Db2 for Linux, UNIX, or Windows,or IBM Db2 for z/OSUse the cleanup scripts to recover from a faulty split schema migration on IBM Db2 systems.
1. Take down any application servers that use the failed schema.
2. Backup your database.
3. Use your vendor tools to run the ResourceKit\AdditionalUpgradeScripts\MigrationRecoveryScriptsdatabase_cleanDups.sql script on the database.
4. Run the query Call CLEANSE_RULES_DUPS('rulesSchema'); where rulesSchema is the name ofschema that contains the pr4_base table.
5. Drop the CLEANSE_RULES_DUPS procedure.
6. In database_fix_vw_table.sql, replace all instances of @RULES_SCHEMA with the name of theschema that contains the pr4_base table.
7. Use your vendor tools to run the database_fix_vw_table.sql script on the database.
8. Use the generateddl.bat or generateddl.sh script to generate and apply the DDL. See Appendix C— Optional: Generating and applying DDL.
9. Use your vendor tools to rebuild the indexes for the tables in your rules schema.
Your database is ready for you to re-run the upgrade.
PEGA0055 alert — clocks not synchronized betweennodesThe Pega Platform validates time synchronization to ensure proper operations and displays a PEGA0055alert if clocks are not synchronized between nodes.
Pega Platform Upgrade Guide104

Appendix F — Troubleshoot upgrade errors
For information about how to reference a common time standard, see the documentation for youroperating system.
Pega Platform Upgrade Guide105