pencil wiki
TRANSCRIPT

8/8/2019 Pencil Wiki
http://slidepdf.com/reader/full/pencil-wiki 1/10
Pencil Wiki
Trace: » index
• • •
−Table of Contents
• User Manual - Pencil 0.4.3b
o Overview
o Layers
o Drawing
Bitmap drawing Vector drawing
Zoom and rotation
o Animating Onion skin
Adjusting keys
Importing images Cameras
Sound
o Example
Vector drawing Bitmap drawing
o Saving and exporting your animation
User Manual - Pencil 0.4.3b
by P. Naidon - July 21st 2007 (to be completed)
Overview
A Pencil document is organized in layers. There are currently four types of layers: bitmapimage, vector image, sound and camera. The Time Line window at the bottom of the
screen shows the existing layers. By default, a new document contains a bitmap layer and
a vector layer on top of it, but you can add and delete layers as you wish (using either theor buttons next to “Layers”, or the menu Layer).

8/8/2019 Pencil Wiki
http://slidepdf.com/reader/full/pencil-wiki 2/10
The names of the layers can be changed to represent what you've put in each by double-clicking on the name of the layer in the timeline. A window will pop up, allowing you to
edit the layer's name. Click OK when you have changed it to the name you want and the
new name will appear in the timeline.
Each layer has a track which enables you to change it as a function of time. This is done by inserting keys (the little gray rectangles) at certain frames in the track. Each key
contains information about what the layer should show or produce at the frame where the
key is located. To add or delete keys at a particular frame in a layer track, use the or
buttons next to “Keys” (shortcut: type “return” to create a new frame). For image layers(ie bitmap and vector), each key corresponds to a different image. The sequence of these
images creates an animation. The current frame is indicated by the red bar and can be
changed by moving the red bar to scrub through your animation (or use the left and rightarrows). To play the animation, use the controls in the time line. Note that you can loop
the animation, as well as set the number of frames per seconds.
(note, you can loop and change the frame rate of the animation whilst the animation is
playing; this is great in terms of frame rate to find the best speed of your animation).

8/8/2019 Pencil Wiki
http://slidepdf.com/reader/full/pencil-wiki 3/10

8/8/2019 Pencil Wiki
http://slidepdf.com/reader/full/pencil-wiki 4/10

8/8/2019 Pencil Wiki
http://slidepdf.com/reader/full/pencil-wiki 5/10
Zoom and rotation
Using the hand tool, you can move the canvas in all directions. You can also zoom in andout by holding the command key (Apple on the Mac) and dragging the hand.
Alternatively, you can drag with the right button of your mouse. You can also rotate the
canvas by holding the ALT key, but be aware that some tools such as the painter bucketare not yet working when the image is rotated. To go back to the original view, simply
double-click with the hand tool, or double-click the hand tool button.
Animating
Now we want to make some animation. As mentioned above, the point is to create
several key images in an image layer.
It may help you to think first of the extreme key frames in your animation and draw them
first (then you can move the frame around afterwards as you expand).
Key Frames
This would for example be (if you imagine a swinging ball on a string), the right most,
middle and left most frames of the ball moving. The trick is then working out how fast
you want it to move, and how you want your ball to change speed.
Thinking about this will help you to understand what you do and don't need as an
animator; when you (or if you already do) more complicated animations, you will want to be very conservative about drawing only the frames you really need, as you will often
have deadlines and be working with hundreds of frames.
Frames per second?
Generally, filmed sequences will use a timing of 25 frames per second (fps).
Now that we know this, as an animator, you may find drawing 25fps is not needed at all.Often animators and the audiences watching them are happy using and watching 12fps.
Although this will give you less flexibility in terms of seamless seamless SEAMLESS
detail, 12fps is more than likely what is best to use in most circumstances.
But mess around with the fps and experiment, this is very important.
Onion skin
The traditional way of drawing key images is to use the previous (or next) key image toguide the drawing of the current key image, by displaying the previous (or next) key
images in semi-transparency. This is called onion skin. You can use the onion skin
buttons to activate or deactivate the previous and next onion skins.

8/8/2019 Pencil Wiki
http://slidepdf.com/reader/full/pencil-wiki 6/10
Adjusting keys
To test and improve your animation you can change the location of keys. Click to selectone key and drag it where you want. To select several keys, use the hold the SHIFT key.
Often you will want to extend the time between two keys, which implies moving all the
subsequent keys. To do that, hold the ALT key and click the second key; this willautomatically select all the subsequent keys.
Importing images
If you feel more comfortable with drawing sketches on real paper, you might want toimport existing drawings in Pencil. You can import a bitmap image at a particular frame
in a bitmap layer by using the Import image… command in the Layer menu.
Alternatively, you can drag and drop bitmap images from an external window onto thecanvas. A key is created for each imported image. This is particularly useful when you
have a lot of images. By default, the top left corner of each image is set to the centre of
the view. If you want to import your images at a particular location, use the select tooland drag a rectangle on the canvas. The images will be imported in the rectangle. If theimages are larger than the rectangle, they will be rescaled. Note that you can also paste
images from the clipboard, ie from other applications by copying/pasting.
Cameras
A camera layer lets you define a particular view, with a certain aspect ratio, within your unlimited canvas. What's more, you can define a view for each key of the camera track,
and the view is linearly interpolated between the keys. To do that, simply create a cameralayer, move the red scrub to the desired frame and use the hand tool to adjust the view
inside the camera viewing frame. By double-clicking on the camera name, you can set theresolution of the camera viewing frame.
Sound
Pencil has some elementary sound support. To add some sound, create a sound layer.
Then select the “Import sound…” command in the Layer menu and choose a sound file
(only WAV format is supported on Windows; the Mac version can import any format that
can be read by QuickTime). This will create a triangular key in the sound track. The keyindicates where the sound will start to play. You can move this key as any other key. A
sound layer does not play any sound when it is deactivated. All sounds can be turned on
and off for the whole animation by pressing the sound button in the the time-line controls.

8/8/2019 Pencil Wiki
http://slidepdf.com/reader/full/pencil-wiki 7/10
Note that the sound will not play if its starting key is at the end of the time line, simply
because Pencil stops playing when it reaches the last key of the document. You may needto add a key in some layer to be able to hear the sound.
Example
Vector drawing
Here is a typical example to draw one frame. We start in a bitmap layer and use the
pencil tool to sketch a character:
Once the draft is finished, we go to a vector layer and use the pen tool to “ink” the
character, ie draw clean lines on top of the draft. In order to draw precisely, you might
need to zoom in the picture. To do that, select the hand tool and right click on the picture (or click with Apple-key on the Mac) and drag the mouse. You will get a dynamic
zoom into the centre of the picture. If you experience some difficulty drawing with the pen tool (especially with a mouse instead of a stylet), you can also use the polyline tool
.
8/8/2019 Pencil Wiki
http://slidepdf.com/reader/full/pencil-wiki 8/10
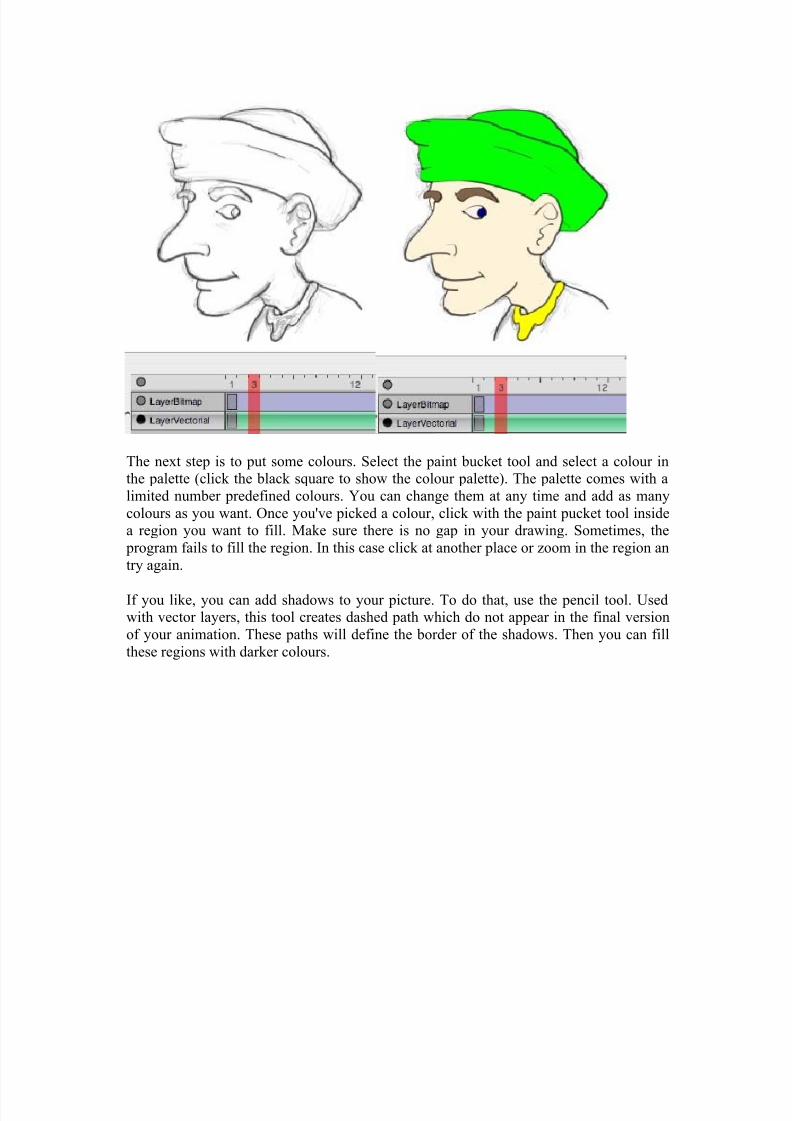
The next step is to put some colours. Select the paint bucket tool and select a colour inthe palette (click the black square to show the colour palette). The palette comes with a
limited number predefined colours. You can change them at any time and add as many
colours as you want. Once you've picked a colour, click with the paint pucket tool insidea region you want to fill. Make sure there is no gap in your drawing. Sometimes, the
program fails to fill the region. In this case click at another place or zoom in the region an
try again.
If you like, you can add shadows to your picture. To do that, use the pencil tool. Usedwith vector layers, this tool creates dashed path which do not appear in the final version
of your animation. These paths will define the border of the shadows. Then you can fill
these regions with darker colours.

8/8/2019 Pencil Wiki
http://slidepdf.com/reader/full/pencil-wiki 9/10
To hide or show these paths, press the button . Finally, click on the circle next to the bitmap layer to hide the original sketch.
To create an animation, you have to sketch several frames and test that your animation
works well. Then you can ink your drawings using the method described above.
Bitmap drawing
If you wish, you can use only bitmap layers. In that case, make sure you have a bitmap
layer below the bitmap layer that you ink: this way, clicking with the paint bucket will
put colours not in the current layer, but in the layer below it, which preserves your
original drawing.
Saving and exporting your animation
You can save your work in a specific XML format, along with a folder containing the bitmap data. This is the format currently used by Pencil to save a document. You can also
export your animation as a sequence of PNG images, or as a Flash movie or a QuickTimemovie (Mac OS X only). Note that the current view is used for the export,ie either theworking view or the camera view if a camera layer is selected. It might be possible to
export to other vector formats such as SVG in the future.
en/users/manual/0.4.3b/index.txt · Last modified: 2010/03/04 08:13 by revzack Back to
top

8/8/2019 Pencil Wiki
http://slidepdf.com/reader/full/pencil-wiki 10/10