pendulums - simply science€¦ · pendulums. 4. add five paper clips in a chain to one of the ......
TRANSCRIPT

- 1 -
Pendulums
OUTCOME : Students learn about gravity and inertia using pendulums made from paper clips and thread.
Use simple materials to reinforce students' understanding of pendulums, their frequencies, and how they are affected by length, mass, or amplitude. Reinforce the vocabulary you introduced on the playground.
SUPPLIES IN THE KIT : soft plastic cups, thread
SUPPLIES TO FIND : large paper clips, tape
PROCEDURE OVERVIEW:1. TEXT 2. TEXT3. TEXT4. TEXT
TEXT
- 2 -
TEACHER BACKGROUND
If a swing is pulled back farther (has a greater amplitude), it must travel farther to have the same frequency as the swing with less amplitude. The swing with greater amplitude has more inertia. This balances with the swing with less amplitude's shorter swing. This is why the frequency is the same.
If a swing has more mass (five paper clips, not two), it has more pull from gravity and more inertia once it is moving. The swing with less mass has less pull from gravity, but also less inertia when it is at rest.
The only way to get the swings to change frequency is the shorten or lengthen them. If a person blows over the mouth of a bottle, a sound is heard. If water is poured into the bottle, the column of air in the bottle is shortened and the sound is higher. The frequency of the sound is greater. This experiment was featured in the second grade physics unit.

- 3 -
PROCEDURE IN DETAIL
Make and tape up one pendulum at a time. This helps keep them from tangling. Place them up about 6" apart so that they can swing without hitting a neighboring pendulum.
Make a pendulum by tying 12" of thread to a paper clip and taping it to the edge of a table or desk. You may have to practice tying the knots. They must be double tied or they will come loose and fall. (You might want to tie a few of these ahead of time for students who struggle with this task.)
(Pendulums can be stored in small paper or soft plastic cups. Cut a one or two inch slit down the sides of the cup. Put the paper clips in the cup, wind the thread around the cup, and thread the tails of the string through the slits. This keeps the threads parallel to each other and tangle-free. Stack the cups for the class to store the pendulums neatly between lessons.)
Make another pendulum.
Important: The tape must be on the edge of the desk, NOT THE TOP of the desk. If you tape the pendulum to the top, your pendulum has two pivots.
If you tape the pendulum to the front of the edge of the desk, you have only one pivot.
1. Add five paper clips to the paper clip on one of the pendulums and only one paper clip to another pendulum.
Does the added MASS change the frequency?
2. Pull one pendulum back several inches and the other back just an inch or two. Release them and see if the amount of the swing changes the frequency. Don’t push the pendulums, simply release them.
- 4 -
If there is a large AMPLITUDE, is there a change in frequency compared to a small amplitude?
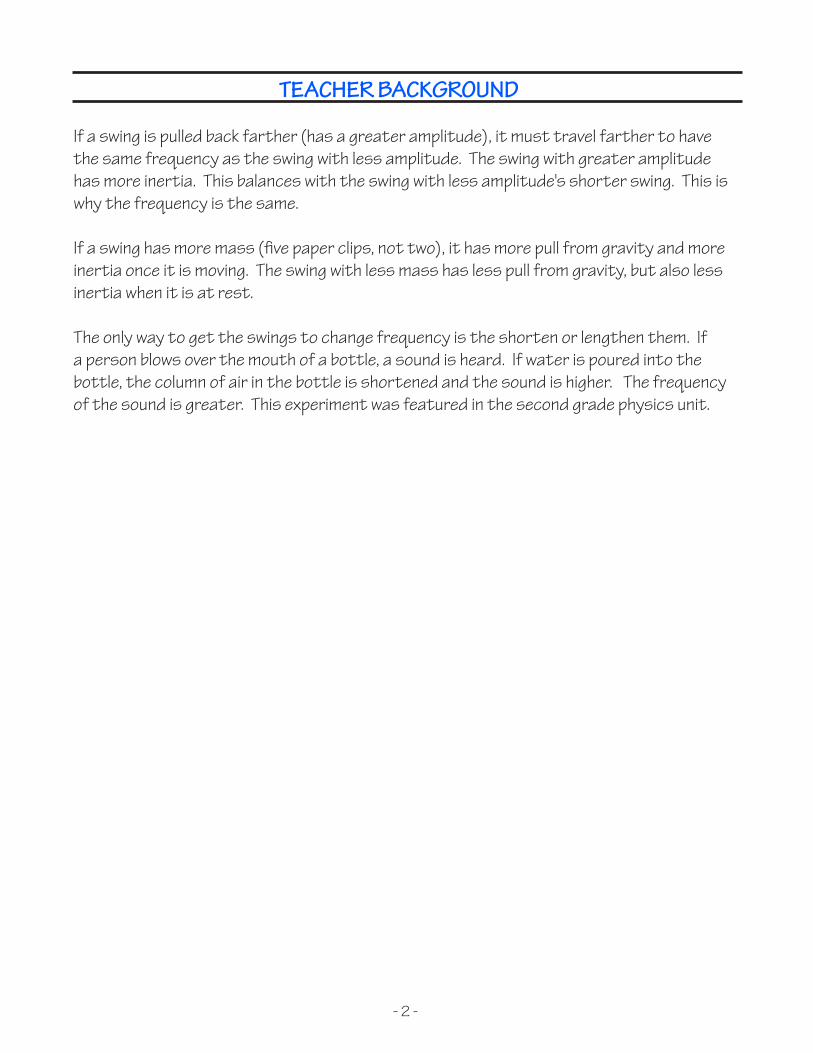
3. Adjust the LENGTH of the pendulums until they swing at the same frequency. Students can use a ruler to help them get their pendulums started at the same time. Place the ruler under the paper clips, pull the pendulums back, and slide the ruler straight down to release the pendulums.
4. Add five paper clips in a chain to one of the pendulums and five paper clips in a bunch to another pendulum. Does the added LENGTH change the frequency?
You have tested the pendulum and tried to change the frequency by changing the amplitude, the mass of the bob, and the length of the pendulums. What changes the frequency?
GET INTO THE SWINGExplain how to make a pendulum.What happens if you add mass to a pendulum?What happens if you shorten a pendulum?What happens if you lengthen a pendulum?What happens if you pull the pendulum back farther?What makes the pendulum swing faster?
PONTE AL CORRIENTE DE LA SITUACÍONExplica cómo hacer un péndulo.¿Qué sucede si agregas masa a un péndulo?¿Qué sucede si acortas un péndulo?¿Qué sucede si alargas un péndulo? ¿Qué sucede si jalas el péndulo más atrás?¿Qué hace que el péndulo oscile más rápidamente?
VOCABULARY : force: Any push or pull.gravity: Force that draws all bodies toward the earth or other object.inertia: The property of matter in which if at rest it continues to rest or if moving continues to move unless acted upon by an external force.
VOCABULARIO : fuerza: Empujón o jalón.gravedad: Fuerza que jala a todos los cuerpos hacia la tierra u otros objetos.inercia: Propiedad de un objeto para continuar moviéndose si en movimiento y a permanecer
- 5 -
ASSESSMENT OPTIONS IN DETAIL
GROUP ASSESSMENT1) Thumbs-up (C) if Thumbs-down(D)
2)
3)
INDIVIDUAL ASSESSMENTTEXT

- 6 -
OTHER ACTIVITIES AND RESOURCES TO CONSIDER
ENGINEERING CONNECTION
Amusement Park Engineering: What are some pendulums that engineers help to design? (Amusement park rides, clocks, earthquake seismometers, etc.) Have students design a new amusement park ride in which a pendulum is used. Have them name their ride and explain how it works, using the terms pendulum and inertia. Remind students that amusement park rides are designed by engineers who have learned about laws of motion. Places like Disneyland and Six Flags employ engineers to help them design their new attractions.
http://www.teachengineering.org/view_lesson.php?url=http://www.teachengineering.org/collection/cub_/lessons/cub_pend/cub_pend_lesson01.xml
MATH CONNECTIONRepeat the activity using a protractor to standardize the amplitude of the pendulum.
MATH CONNECTIONWhat is the pattern of the frequency of the pendulums if they are double in length: 5 cm, 10 cm, 20 cm?
MATH CONNECTIONWhat is the pattern to the length of the pendulums if you make them swing in increasing frequencies: 60c/min, 80c/min, 100c/min, 120c/min, etc.?
POETRY CONNECTION : "HOW TO MAKE A SWING WITH NO ROPE OR BOARD OR NAILS"Shel SilversteinA Light in the AtticHarperCollins Publishers
"THE ACROBATS"Shel SilversteinWhere the Sidewalk EndsHarperCollins Publishers

- 7 -
RESOURCES ON THE TEACHER DISK IN FILE "20–PENDULUMS"
AS = AssessmentAS 20/101–TEXT
AUDIO = Audio Recordings (open with QuickTime™)AU 20/101 En–STRUGGLING READER ESSAY IN ENGLISH
AU 20/101 Sp–STRUGGLING READER ESSAY IN SPANISH
AU 20/103 En–GRADE-LEVEL ESSAY IN ENGLISH
AU 20/103 Sp–GRADE-LEVEL ESSAY IN SPANISH
AU 20/105 En–ADVANCED READER ESSAY IN ENGLISH
PM = Projection MastersPM 20/101–TEXT PR = PresentationsPR 20/01–TEXT
SEs = Student Essays in EnglishSEs 20/101 En–STRUGGLING READERS WITH COLOR IMAGES
SEs 20/102 En–STRUGGLING READERS WITH BLACK LINE IMAGES
SEs 20/103 En–GRADE-LEVEL READERS WITH COLOR IMAGES
SEs 20/104 En–GRADE-LEVEL READERS WITH BLACK LINE IMAGES
SEs 20/105 En–CAPABLE READERS WITH COLOR (ENGLISH ONLY)
SEs 20/105 En–CAPABLE READERS WITH BLACK LINE (ENGLISH ONLY)
SEs = Student Essays in SpanishSEs 20/101 Sp–STRUGGLING READERS WITH COLOR IMAGES
SEs 20/102 Sp–STRUGGLING READERS WITH BLACK LINE IMAGES
SEs 20/103 Sp–GRADE-LEVEL READERS WITH COLOR IMAGES
SEs 20/104 Sp–GRADE-LEVEL READERS WITH BLACK LINE IMAGES
SW = Student Worksheets SW 20/101–TEXT

- 1 -
DraftDraftDraft
Magnetic Poles and Fields
OUTCOME: Students learn about magnetic poles.
STATE SCIENCE STANDARD5.2P.1 Describe how friction, gravity, and magnetic forces affect objects on or near Earth.
POTENTIAL STUDENT MISCONCEPTION: The Earth's has a giant magnet running through it and the poles are at the North Pole and South Pole.
SUPPLIES IN THE KIT: circle magnet set, domino magnets, bar magnet, BBs, compasses, Earth model.
SUPPLIES TO FIND: paper plate, materials to make directional signs.
PROCEDURE OVERVIEW:1. Use circular magnets to introduce magnetic poles. Show magnetic poles with a bar magnet and BBs. 2. Demonstrate magnetic fields with compasses. Use compasses to establish direction in the classroom.3. Use an Earth model and projection master to introduce students to the magnetic field around the Earth.4. Read about magnetic poles.
A magnet and the Earth both have a magnetic field.
The poles on a magnet are the areas of greatest magnetic force.
The north pole of a magnet points toward the north pole on the Earth. The south pole points towards the south pole.
Like poles repel each other. Unlike poles attract each other.
- 2 -
DraftDraftDraft
TEACHER BACKGROUND
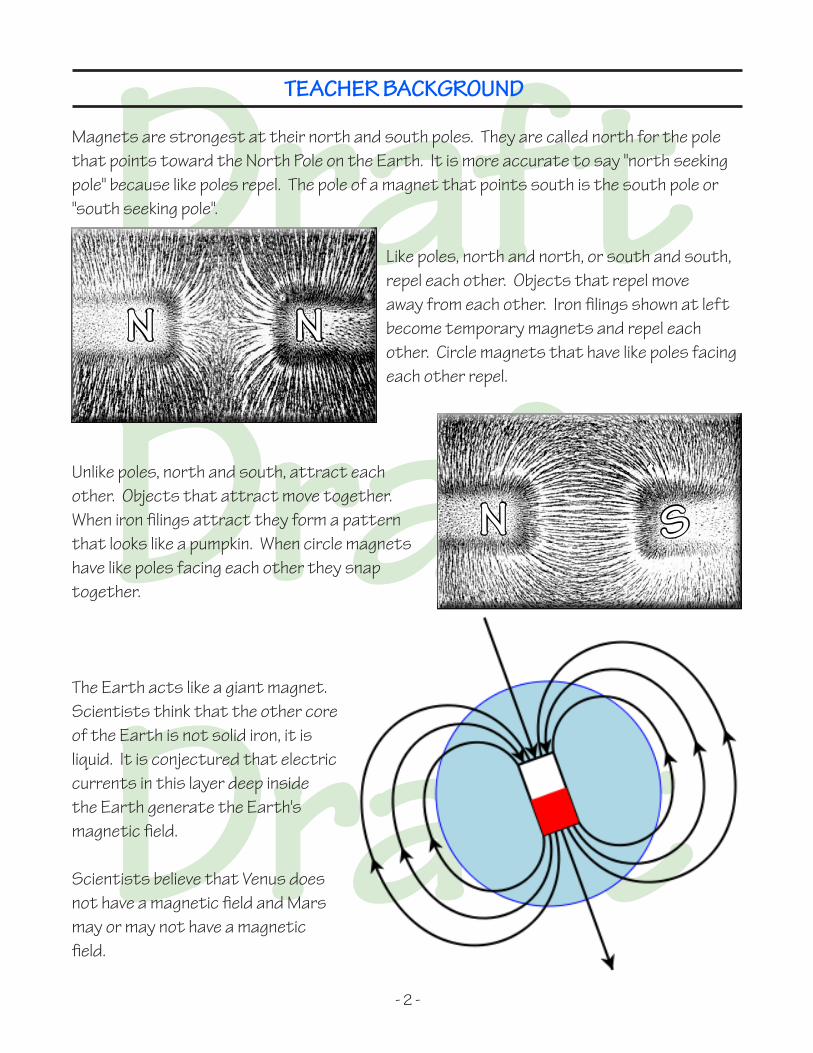
Magnets are strongest at their north and south poles. They are called north for the pole that points toward the North Pole on the Earth. It is more accurate to say "north seeking pole" because like poles repel. The pole of a magnet that points south is the south pole or "south seeking pole".
Like poles, north and north, or south and south, repel each other. Objects that repel move away from each other. Iron filings shown at left become temporary magnets and repel each other. Circle magnets that have like poles facing each other repel.
Unlike poles, north and south, attract each other. Objects that attract move together. When iron filings attract they form a pattern that looks like a pumpkin. When circle magnets have like poles facing each other they snap together.
The Earth acts like a giant magnet. Scientists think that the other core of the Earth is not solid iron, it is liquid. It is conjectured that electric currents in this layer deep inside the Earth generate the Earth's magnetic field.
Scientists believe that Venus does not have a magnetic field and Mars may or may not have a magnetic field.
N N
N S

- 3 -
DraftDraftDraft
PROCEDURE IN DETAIL
PREPARE: Use a stapler to create a small pile of used staples without stapling through paper.
1. Introduce or review the poles of a magnet with a simple demonstration .
Slip two round magnets over a pencil. Discuss what is observed. If the magnets move away from each other, they are repelling . If the magnets snap together, they are attracting .
Flip the top magnet over and see what happens. Magnets that attracted each other would repel. If the magnets repelled each other, they would snap together.
Use information from the teacher background to explain to students that magnets have poles .
Option : In the second grade unit, domino magnets were used in a teacher demonstration to show magnetic poles. Students saw that when like poles were brought together, the magnets moved apart. When unlike poles were brought together, the magnets snapped together.
Show magnetic poles with a bar magnet and BBs.
Place the bar magnet on a pile of bb's that have been poured onto a paper plate.
Lift it up and notice where most of the bb's are clinging to the magnet.

- 4 -
DraftDraftDraft
Explain to students that the magnet is strongest at each pole. In the center of the magnet, the magnetic domains tend to cancel each other out. At the end of the magnet there are no domains to cancel out the last ones in the magnet.
2. Demonstrate magnetic field with compasses.
Place a directional compass near a bar magnet. Move it around the magnet to show that the needle moves toward the magnet, even as the compass moves.
Place several compasses around a magnet to show that the needles on the compasses point toward or away from a pole on the magnet. An image of this can be displayed ( PM 22/101) from a projection master.
Hand out a compass to each team of students. One person in each team should point in the same direction
as the colored end of the arrow.
Explain that the needles are pointing toward the magnetic North Pole. Remind students that the colored end of the compass needle is the "north seeking" end of the needle. Option: Post signs for NORTH, SOUTH, then EAST and WEST.
Ask teams to walk slowly around the room and try to find places where the needle does not seek north.
Explain that a compass that is brought near metal will often point towards the metal. The compass is a simple magnet that has been constructed to move easily. When brought near metals, the compass points toward the metal.
3. Show students a model of the magnetic field around the Earth using a foam model.
While holding the ball over a paper plate or pie pan to catch any falling staples, sprinkle the prepared staples over the Earth. The staples lay flat on around the Equator and stand up at the poles.
Walk around, displaying the model, while students describe what they are seeing.
COMPASSES AROUND A BAR MAGNET
PM 22/101

- 5 -
DraftDraftDraft
Explain that the staples represent the magnetic field of the Earth just as iron filings can be used to illustrate the magnetic field of a magnet.
Show students the diagram that shows the magnetic field for the Earth ( PM 22/102).
4. Read about magnetic poles ( SEs 22/101-102 En/Sp, 103-104 En/Sp, 106 En/Sp) or (SEd pages 42-43 En/Sp).
Option: Listen to the text( AU 22/101 En/Sp, 22/103 En/Sp, 22/105 En).
ASSESSMENT OPTIONS OVERVIEW 1) Show students a diagram of the Earth and a compass. Students signal thumbs-up if a diagram is correct in showing the direction the compass would point.
2) Students draw and explain the Earth's magnetic field.
3) A capable student researches and reports on the magnetic field on another planet (Venus has no magnetic field and scientists are unsure about Mars).
Read more about assessments in the "Assessment Options in Detail" that follows.
INDIVIDUAL ASSESSMENT: Ask the student to use a compass to explain directions in the classroom.
VOCABULARY:field: An area around an object that has magnetic power.force: A push or pull.magnet: Object that attracts iron, cobalt, or nickel.pole: One of two points at the ends of a magnet where its power is strongest.
EARTH'S MAGNETIC FIELD
PM 22/102The compass needle aligns with the magnetic field of the Earth.
The magnetic poles of the Earth do not coincide with the poles we see on the map. The magnetic pole in the Northern Hemisphere, for example, is near Hudson Bay in Canada.
Mariners and others who use compasses must make allowances for the difference between magnetic north and true north.
We are not sure why the Earth is a magnet. Most scientists think that the part of the core of the Earth that is hot liquid creates an electrical charge that creates a magnetic field.
Dr. Gilbert was correct about the Earth having a magnetic field. He also thought, wrongly, that the planets were held in their orbits around the Sun by their magnetic attraction to the Sun.
North Pole
South Pole
STUDENT EDITION
SEd page 43
Magnets have Poles
The magnet is strongest at each pole.
In the center of the magnet, the magnetic domains tend to cancel each other out. At the end of the magnet there are no domains to cancel out the last ones in the magnet.
William Gilbert was an English physician. He wrote around 1600 that he thought the Earth was a huge magnet. He tried to prove his work with a compass.
A compass has a magnetized needle that points north and south. The end that points toward north is the “north seeking end”, and the end that points toward the South is the “South seeking end”.
STUDENT ESSAY
SEs 07/101-106 En/Sp
Magnets have PolesThe magnet is strongest at each pole.
In the center of the magnet, the magnetic domains tend to cancel each other out. At the end of the magnet there are no domains to cancel out the last ones in the magnet.
William Gilbert was an English physician. He wrote around 1600 that he thought the Earth was a huge magnet. He tried to prove his work with a compass.
A compass has a magnetized needle that points north and south. The end that points toward north is the “north seeking end”, and the end that points toward the South is the “South seeking end”.
STUDENT EDITION
SEd page 42