peoplesoft 8.4 eprocurement - case western reserve ... · pdf filerequisition types ... time...
TRANSCRIPT

PeopleSoft 8.4 eProcurement
Training Participant Guide for
PeopleSoft Financials Version 8.4
June 2004

© Copyright 2004 Cedar Enterprise Solutions, Inc. and Case Western Reserve University. All rights reserved, including the right to reproduce this manual or any part of it. Restricted Rights The information contained in this document is proprietary and confidential to Cedar Enterprise Solutions, Inc. and Case Western Reserve University. No part of this document may be reproduced or transmitted in any form or by any means, electronic or mechanical, including photocopying and recording, for non-education purposes to any user or employee outside of Case Western Reserve University, without the express written permission of Cedar Enterprise Solutions, Inc. or Case Western Reserve University. Cedar Enterprise Solutions, Inc. has made every effort to ensure that the information in this guide is complete, concise, and current. Cedar Enterprise Solutions, Inc. assumes no responsibility for the consequences of any errors beyond its control. The examples, sample screens, and reports used throughout this guide are for illustrative purposes only and may not conform to your system requirements. Cedar Enterprise Solutions, Inc. makes no implied warranties or merchantability or fitness for a particular purpose, and such implied warranties are hereby specifically disclaimed. PeopleSoft, PeopleTools, PeopleCode, and PS/n Vision are registered trademarks of PeopleSoft, Inc. Windows is a registered trademark of Microsoft Corp. All other product and company names are trademarks of their respective owners. Documentation Assistance To obtain additional documentation assistance, contact: Cedar Enterprise Solutions, Inc. 2727 Paces Ferry Road Suite 2-380 Atlanta, Georgia 30339 Attention: Training Assistance Phone: (404) 816-6672 Fax: (404) 816-9968 PeopleSoft Assistance To obtain additional help with your PeopleSoft functionality, contact 368-HELP (368-4357) or [email protected].

3/17/2005 Proprietary and Confidential to Case iii and Cedar Enterprise Solutions, Inc.
Table of Contents
Before you begin… ....................................................................... vii Intended Audience................................................................................vii How This Guide Is Organized...............................................................vii
Symbols and Conventions ....................................................................................... viii
Chapter 1 Introducing PeopleSoft eProcurement..................... 1-1
Lesson 1: Course Overview.................................................................................... 1-2 Course Objectives .............................................................................. 1-2
Chapter Structure ............................................................................... 1-3
Lesson 2: eProcurement Overview......................................................................... 1-4 Benefits Provided by PeopleSoft eProcurement................................. 1-4
Procurement Matrix ............................................................................ 1-5
Lesson 3: eProcurement “Circle of Life”.................................................................. 1-7 eProcurement Home Page ................................................................. 1-7
“Circle of Life” ..................................................................................... 1-7
Requisition Types ............................................................................... 1-9
Approvals............................................................................................ 1-9
Receiving.......................................................................................... 1-10
Review Questions ................................................................................................. 1-11
Chapter 2 Creating a Special Request Requisition................... 2-1
Lesson 1: Overview of Special Requests................................................................ 2-2 Required Information .......................................................................... 2-2
New Requisition Page ........................................................................ 2-3
Requisition Summary Page ................................................................ 2-3
Special Request Page ........................................................................ 2-5

Table of Contents PeopleSoft 8.4 Financials Overview
iv Proprietary and Confidential to Case 3/17/2005 and Cedar Enterprise Solutions, Inc.
Lesson 2: Special Request for Goods .................................................................... 2-6 Special Request – Goods Page ......................................................... 2-6
Lesson 3: Specifying Shipping Information............................................................. 2-8 Requisition Summary Page................................................................ 2-8
Shipping Information Page ............................................................... 2-10
Lesson 4: Setting Up Cost Distribution ................................................................. 2-12 Cost Distribution Information ............................................................ 2-12
Lesson 5: Creating a Special Request for Goods................................................. 2-15 Procedure – Creating a Special Request for Goods......................... 2-15
Lesson 6: Creating a Special Request for Services.............................................. 2-26 Special Request – Service Page...................................................... 2-26
Special Request – Fixed Cost Service Page.................................... 2-26
Procedure – Creating a Special Request for Services Using a Fixed Cost Template ........................................................................ 2-28
Special Request – Variable Cost Page ............................................ 2-38
Procedure – Creating a Special Request for Services Using a Variable Cost Template.................................................................... 2-39
Special Request – Time and Material Pages ................................... 2-45
Procedure – Creating a Special Request for Services Using a Time and Materials Template........................................................... 2-47
Lesson 7: Managing Requisitions......................................................................... 2-54 Manage Requisitions Search and Sort ............................................. 2-54
Manage Requisitions Summary ....................................................... 2-56
Procedure – Inquiring on a Requisition ............................................ 2-58
Lesson 8: Working with an Item Template............................................................ 2-61 Creating a Special Request Item Template...................................... 2-61
Using an Item Template ................................................................... 2-61
Procedure – Creating an Item Template .......................................... 2-62
Procedure – Using an Item Template............................................... 2-64
Review Questions................................................................................................. 2-65
Chapter 3 Creating a Catalog Requisition .................................3-1
Chapter Objectives............................................................................. 3-1
PeopleSoft 8.4 Financials Overview Table of Contents
3/17/2005 Proprietary and Confidential to Case v and Cedar Enterprise Solutions, Inc.
Chapter Lessons ................................................................................ 3-1
Lesson 1: Catalog Requisition Overview ................................................................ 3-2 Steps for Entering a Catalog Requisition............................................ 3-2
Key Requisition Elements................................................................... 3-2
Lesson 2: Creating a New Requisition .................................................................... 3-4 New Requisition Page ........................................................................ 3-5
Requisition Summary Page ................................................................ 3-6
Lesson 3: Searching the Catalog ............................................................................ 3-9
Lesson 4: Specifying Shipping Information ........................................................... 3-11 Selecting Ship To Locations ............................................................. 3-11
Lesson 5: Setting Up Cost Distribution and Line Details....................................... 3-13 Cost Distribution Information ............................................................ 3-13
Reviewing Line Details Information .................................................. 3-16
Line Details Page ............................................................................. 3-16
Procedure – Creating a Catalog Requisition..................................... 3-18
Lesson 6: Changing a Requisition ........................................................................ 3-22 Manage Requisitions ........................................................................ 3-22
Procedure – Changing a Requisition ................................................ 3-22
Review Questions ................................................................................................. 3-24
Chapter 4 Approval and Budget Checking ................................ 4-1
Lesson 1: Approval Workflow ................................................................................. 4-2 Requisition Approval Status Page ...................................................... 4-3
Workflow Rules................................................................................... 4-4
Lesson 2: Performing Approvals ............................................................................. 4-6 Worklist Page ..................................................................................... 4-7
Requisition Approval Page ................................................................. 4-8
Procedure – Approving a Requisition ............................................... 4-11
Assigning Approver Duties ............................................................... 4-12
Lesson 3: Performing Budget Checking................................................................ 4-13 Manage Requisitions Page............................................................... 4-13
Table of Contents PeopleSoft 8.4 Financials Overview
vi Proprietary and Confidential to Case 3/17/2005 and Cedar Enterprise Solutions, Inc.
Procedure – Budget Checking a Requisition.................................... 4-14
Review Questions................................................................................................. 4-15
Chapter 5 Receiving Items ..........................................................5-1
Lesson 1: Overview of Receiving ........................................................................... 5-2 “Circle of Life” and Item Receipt......................................................... 5-2
Lesson 2: Receiving Items...................................................................................... 5-3 Select Items to Receive Page ............................................................ 5-4
Receive Page..................................................................................... 5-4
Procedure – Receiving Items ............................................................. 5-5
Review Questions................................................................................................... 5-7
Appendix A Review Questions and Answers........................... A-1
Chapter 1: Introducing PeopleSoft eProcurement ..................................................A-2
Chapter 2: Creating a Special Request Requisition................................................A-3
Chapter 3: Creating a Catalog Requisition .............................................................A-4
Chapter 4: Approval and Budget Checking.............................................................A-5
Chapter 5: Receiving Items ....................................................................................A-6
03/17/05 Proprietary and Confidential to Case vii
Before you begin… You will use this guide during class to follow the topics as your instructor presents them. The instructor may also provide you with additional materials to support the training outlined in this guide.
After class, use this guide as a reference document for completing tasks within the PeopleSoft system.
Intended Audience This guide is intended for personnel who are responsible for entering and processing data in the PeopleSoft system.
We assume that you are familiar with Microsoft Windows. If you are new to the Windows environment, you should complete a Windows Tutorial prior to working in the PeopleSoft environment.
How This Guide Is Organized This guide is organized into modules and lessons to correspond with the topics your instructor will cover in class. Each module contains practice exercises that your instructor will walk you through, and individual exercises for you to complete on your own. There are review questions at the end of each module to recap the major points of the module.
Before you begin PeopleSoft 8.4 eProcurement
viii Proprietary and Confidential to Case 03/17/05
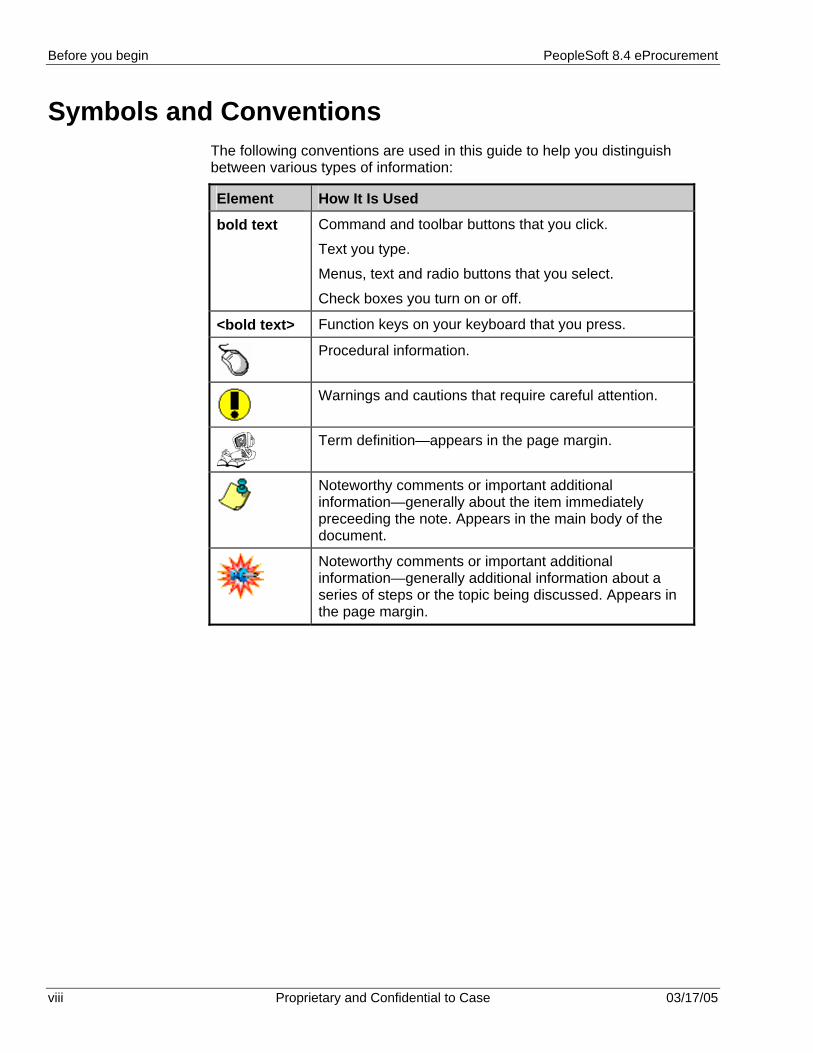
Symbols and Conventions The following conventions are used in this guide to help you distinguish between various types of information:
Element How It Is Used
bold text Command and toolbar buttons that you click.
Text you type.
Menus, text and radio buttons that you select.
Check boxes you turn on or off.
<bold text> Function keys on your keyboard that you press.
Procedural information.
Warnings and cautions that require careful attention.
Term definition—appears in the page margin.
Noteworthy comments or important additional information—generally about the item immediately preceeding the note. Appears in the main body of the document.
Noteworthy comments or important additional information—generally additional information about a series of steps or the topic being discussed. Appears in the page margin.
3/17/2005 Proprietary and Confidential to Case 1-1 and Cedar Enterprise Solutions, Inc.
Chapter 1 Introducing PeopleSoft eProcurement
The purpose of this one-half day class is to provide you with the skills you need to effectively use the PeopleSoft eProcurement (ePro) application.
Chapter Objectives This chapter explains:
• The agenda and objectives for this course.
• The PeopleSoft eProcurement application.
Chapter Lessons This chapter contains the following lessons:
Lesson 1: Course Overview.....................................................................1-2 Lesson 2: eProcurement Overview..........................................................1-4 Lesson 3: eProcurement “Circle of Life” ..................................................1-7 Review Questions ..................................................................................1-11

Chapter 1: Introducing PeopleSoft eProcurement PeopleSoft 8.4 eProcurement
1-2 Proprietary and Confidential to Case 3/17/2005 and Cedar Enterprise Solutions, Inc.
Lesson 1: Course Overview
The eProcurement Training Participants Guide includes four chapters and two appendices:
• Chapter 1, “Introducing PeopleSoft eProcurement,” explains the objectives for the course and provides an agenda for the training. This Chapter also introduces you to the components of PeopleSoft eProcurement and the eProcurement life cycle.
• Chapter 2, “Creating a Special Request Requisition,” describes how to enter special requests for goods and services.
• Chapter 3, “Creating a Catalog Request,” learn how to use the catalog to make purchases.
• Chapter 4, “Approving and Budget Checking Requisitions,” describes how to set up approvers to approve, budget check and review requisitions.
• Chapter 5, “Receiving Items,” instructs you on how to use the receiving functions to receive items in excess of $5,000 within the eProcurement life cycle.
• Appendix A, “Review Questions and Answers,” provides answers to review questions found at the end of each chapter.
• Appendix B, “Requisition Form Cross-Reference,” provides the requisition form and shows the details on where to enter the information in PeopleSoft.
Course Objectives This course on PeopleSoft eProcurement teaches you how to:
• Explain the basic elements of the eProcurement life cycle.
• Create requisitions for special request goods and services.
• Approve and budget check requisitions.
• Receive line items in excess of $5,000 as they are shipped to you.

PeopleSoft 8.4 eProcurement Chapter 1: Introducing PeopleSoft eProcurement
3/17/2005 Proprietary and Confidential to Case 1-3 and Cedar Enterprise Solutions, Inc.
Chapter Structure Most Chapters are structured the same way and generally consist of the following:
• Objectives. The objectives are found at the beginning of the Chapter and define what you will learn in the Chapter.
• Lessons. Each Chapter has several lessons that explain the various concepts. Some lessons contain practices and exercises.
Practices are step-by-step instructions for completing a procedure that the instructor and class participants walk-through together.
Exercises are scenarios for you to work through on your own during class time.
• Review Questions. You will find review questions at the end of the Chapter that recap material covered in the Chapter. The answers to the questions will be discussed among class participants and the instructor.
You are encouraged to ask your instructor questions throughout the entire course.
Chapter 1: Introducing PeopleSoft eProcurement PeopleSoft 8.4 eProcurement
1-4 Proprietary and Confidential to Case 3/17/2005 and Cedar Enterprise Solutions, Inc.
Lesson 2: eProcurement Overview
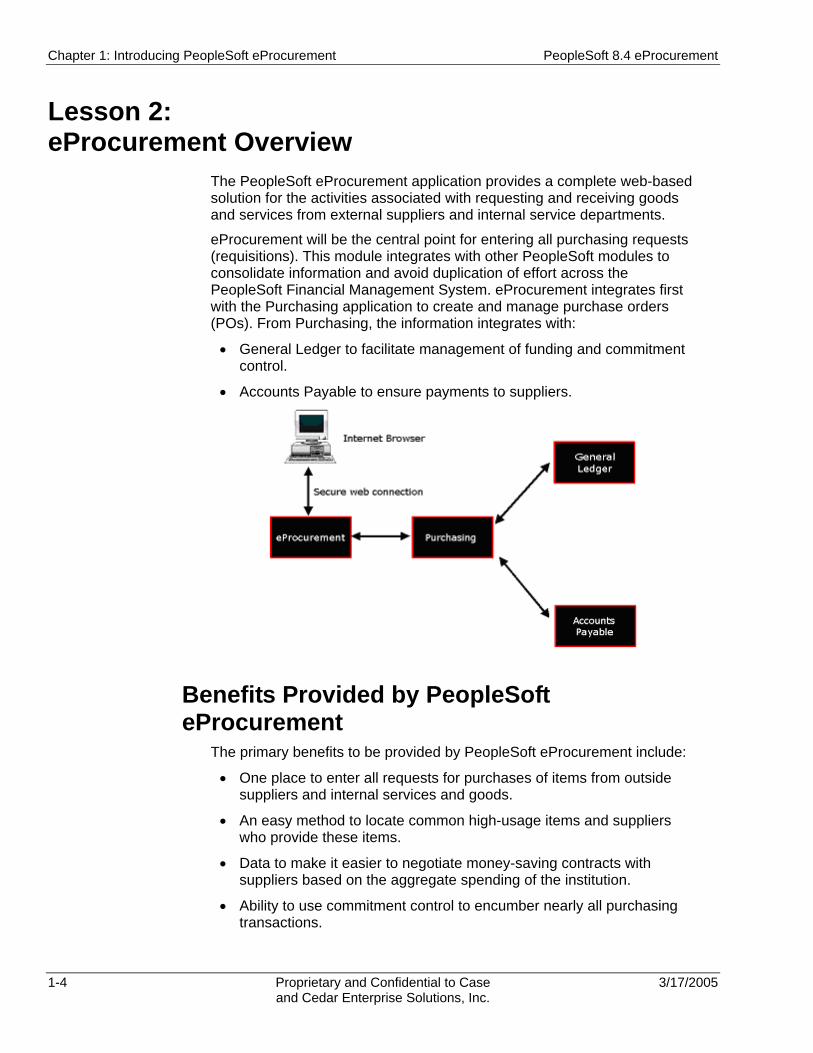
The PeopleSoft eProcurement application provides a complete web-based solution for the activities associated with requesting and receiving goods and services from external suppliers and internal service departments.
eProcurement will be the central point for entering all purchasing requests (requisitions). This module integrates with other PeopleSoft modules to consolidate information and avoid duplication of effort across the PeopleSoft Financial Management System. eProcurement integrates first with the Purchasing application to create and manage purchase orders (POs). From Purchasing, the information integrates with:
• General Ledger to facilitate management of funding and commitment control.
• Accounts Payable to ensure payments to suppliers.
Benefits Provided by PeopleSoft eProcurement
The primary benefits to be provided by PeopleSoft eProcurement include:
• One place to enter all requests for purchases of items from outside suppliers and internal services and goods.
• An easy method to locate common high-usage items and suppliers who provide these items.
• Data to make it easier to negotiate money-saving contracts with suppliers based on the aggregate spending of the institution.
• Ability to use commitment control to encumber nearly all purchasing transactions.
PeopleSoft 8.4 eProcurement Chapter 1: Introducing PeopleSoft eProcurement
3/17/2005 Proprietary and Confidential to Case 1-5 and Cedar Enterprise Solutions, Inc.
• Creation of favorites and templates to facilitate entry of repeated orders.
• Split funding for each line of the requisition.
• Addition of comments and different “Ship To” locations to send to the supplier with the purchase order.
• Assignment of additional reviewers and approvers as needed during the approval cycle.
• Ability to receive from your desktop.
• Ability to see the status of a requisition from entry in the system through payment.
Procurement Matrix Purchases may be made through several methods. These include:
• Online ordering
• P-Card purchases
• Requisitions
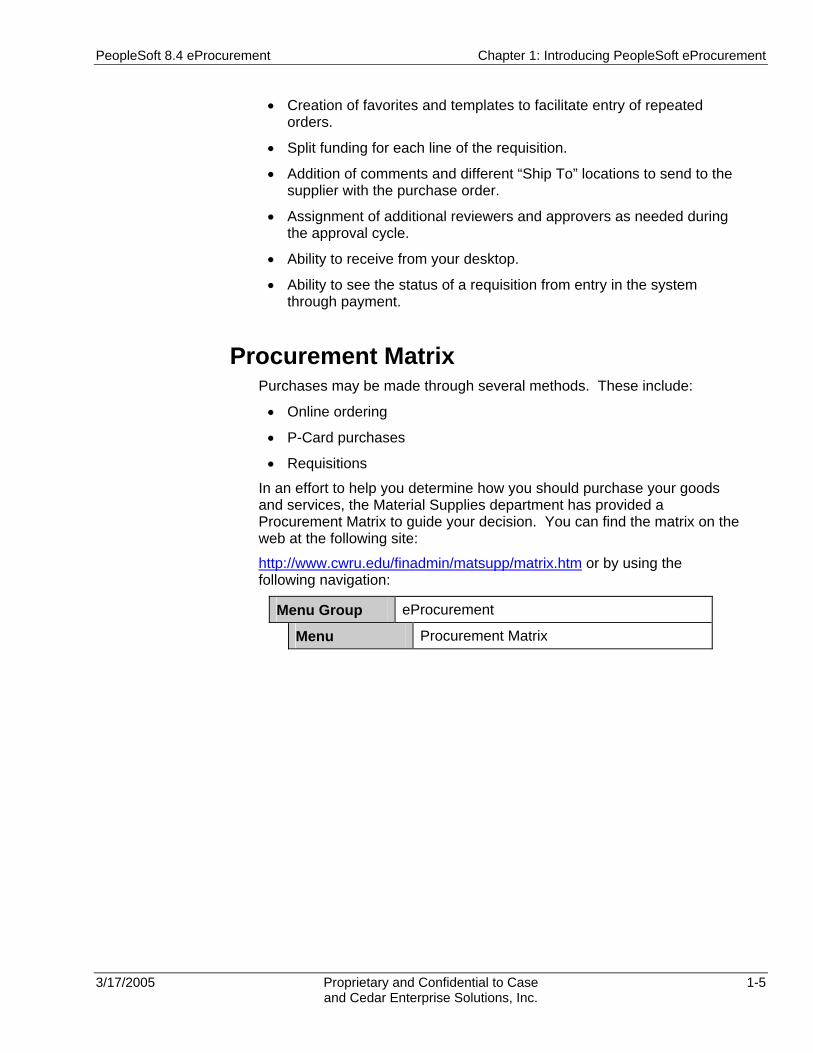
In an effort to help you determine how you should purchase your goods and services, the Material Supplies department has provided a Procurement Matrix to guide your decision. You can find the matrix on the web at the following site:
http://www.cwru.edu/finadmin/matsupp/matrix.htm or by using the following navigation:
Menu Group eProcurement
Menu Procurement Matrix
Chapter 1: Introducing PeopleSoft eProcurement PeopleSoft 8.4 eProcurement
1-6 Proprietary and Confidential to Case 3/17/2005 and Cedar Enterprise Solutions, Inc.
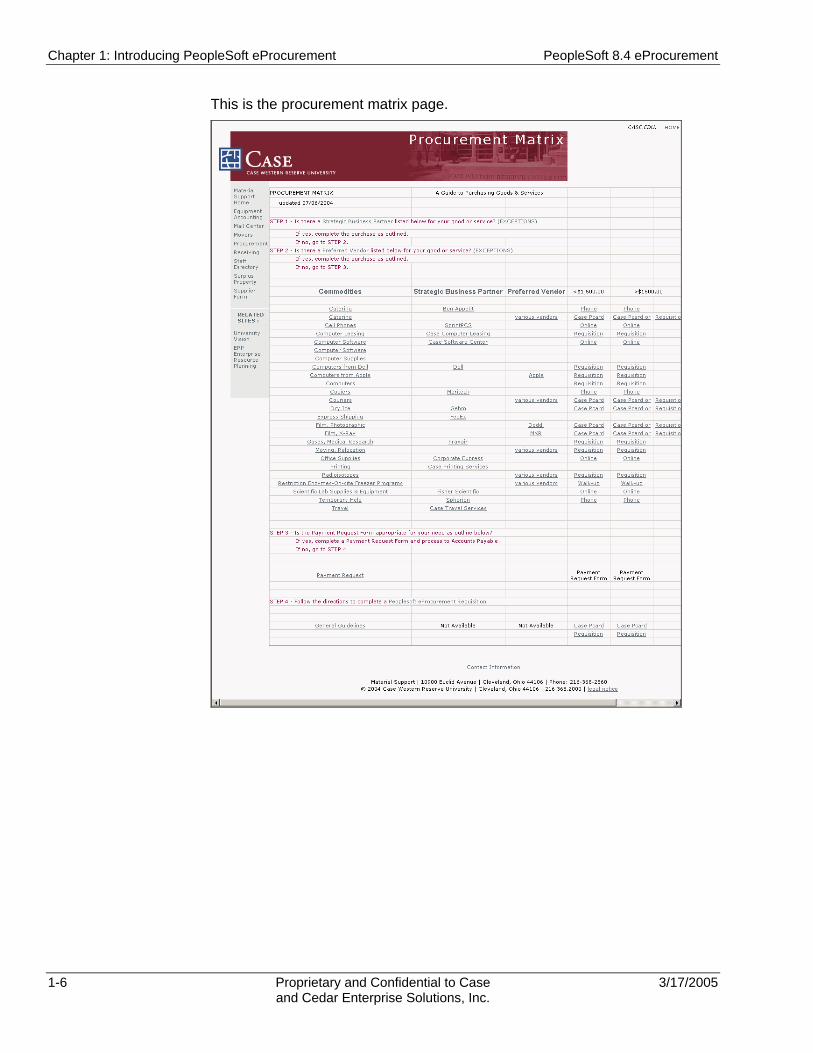
This is the procurement matrix page.

PeopleSoft 8.4 eProcurement Chapter 1: Introducing PeopleSoft eProcurement
3/17/2005 Proprietary and Confidential to Case 1-7 and Cedar Enterprise Solutions, Inc.
Lesson 3: eProcurement “Circle of Life”
The eProcurement Home Page gives you access to various eProcurement functions. This page is found on the menu using the following navigation path:
Menu Group eProcurement
Menu eProcurement Home Page
eProcurement Home Page This is the eProcurement Home Page:
From the eProcurement Home Page, the Manage Requisitions hyperlink takes you to the Manage Requisitions page where you can view specific requisitions that you have created for yourself or on behalf of others. You can narrow down your results by entering a date range.
“Circle of Life” From the Manage Requisitions page, you can access the Requisition Cycle, or “Circle of Life” to see the status of your requests for goods and services.
On the Manage Requisitions page, click (Requisition Cycle icon) for any requisition in the list to display the “Circle of Life”.
Go to Manage Requisitions to access the “Circle of Life”
The Manage Requisitions page can also be accessed directly from the eProcurement menu group on the left-hand navigation menu.

Chapter 1: Introducing PeopleSoft eProcurement PeopleSoft 8.4 eProcurement
1-8 Proprietary and Confidential to Case 3/17/2005 and Cedar Enterprise Solutions, Inc.
This is the Requisition Cycle page:
The “Circle of Life” tells you at a glance where your requisition is in relation to this cycle. The corresponding icon is illuminated as the requisition progresses through the purchasing process.
These are the steps in the “Circle of Life”:
• Request – places your requisition for goods or services into the system.
• Approve – requisition in the Approval Workflow is reviewed and subjected to budgetary approvals.
• Inventory –request is compared to in stock inventory.
• PO –purchase order has been created from the requisition.
• PO Approval –additional review and approval step prior to dispatch.
• Dispatch – actual release of the purchase order to the supplier.
• Change Request –submits a change to a requisition already converted to a purchase order and dispatched.
• Receive – receipt of the ordered goods or services.
• Returns – documents the return of items to the supplier.
• Invoice – input and receipt of a supplier’s request for payment of goods and services.
• Payment – paying for the item.
The ePro module is used for the Request, Approval, Receive, and Returns steps. The Purchasing module is used for the PO, PO Approval, Dispatch, and Change Order steps. The Accounts Payable module handles the Invoice and Payment steps.
PeopleSoft 8.4 eProcurement Chapter 1: Introducing PeopleSoft eProcurement
3/17/2005 Proprietary and Confidential to Case 1-9 and Cedar Enterprise Solutions, Inc.
Requisition Types Within PeopleSoft eProcurement, there are two types of transactions – requisitions and purchase orders. A requisition, or “Req”, is used to request a purchase, no matter what type of good or service needs to be purchased. A purchase order, or “PO”, is used to order the goods or services from the supplier.
At CASE Western Reserve University, you will use the Special Request type of requisition for goods or services.
External Requisitions Eventually, in a later phase, these are the external requisitions where the vendor or supplier for the requested good or service is external to CASE Western Reserve University:
• Catalog Request
• Special Request
Catalog Request A catalog request is a requisition for items that are selected through an electronic catalog. You can search the catalog for commonly used items, add them to your shopping cart, and then check out. The catalog is always up-to-date because various external suppliers daily maintain the items in the catalog at pricing which has been negotiated for the entire university. The PeopleSoft Catalog Request functionality will be part of Phase II at CASE Western Reserve University.
Special Request A Special Request is used to requisition items not found in the catalog. When entering this type of requisition, you provide a description only of the needed good or service. For a Special Request for service, three item templates are available to help you create the requisition.
Approvals Once the requisition is saved and submitted, it begins an automated cycle of workflow approvals. Rules have been set up to incorporate:
• Dollar-level approval
• Commodity type approval
• Addition of comments and justifications for approver’s benefit
• Assignment of additional reviewers and approvers as needed during the approval cycle
Approval information is covered in further detail in Chapter 3, “Approving and Budget Checking Requisitions”.
The term, “special,” is a PeopleSoft term for non-catalog requisitions. In a later phase, catalog requisitions will be available and “special” will be used for non-catalog items.

Chapter 1: Introducing PeopleSoft eProcurement PeopleSoft 8.4 eProcurement
1-10 Proprietary and Confidential to Case 3/17/2005 and Cedar Enterprise Solutions, Inc.
• Ability of the requestor to see where the requisition is in regards to the approval cycle
Receiving Receiving is made easier to monitor. Features of receiving in eProcurement include:
• Ability to receive from your desktop.
• Provision of 2-way matching method for most items (PO + invoice), and a 3-way matching method (PO + receipt + invoice) if the line item is in excess of $5,000.
• Special pages to process items for Return to Vendor (RTV).
PeopleSoft 8.4 eProcurement Chapter 1: Introducing PeopleSoft eProcurement
3/17/2005 Proprietary and Confidential to Case 1-11 and Cedar Enterprise Solutions, Inc.
Review Questions
1. The eProcurement module interfaces with what other PeopleSoft module?
2. What modules interface with Purchasing?
3. What is the first point of entry into the eProcurement system?
5. How are requisitions approved?

03/17/05 Proprietary and Confidential to Case 2-1 and Cedar Enterprise Solutions, Inc.
Chapter 2 Creating a Special Request Requisition
In this chapter you will learn how to enter special request requisitions for goods and services.
Chapter Objectives After completing this Chapter you will be able to:
• Create a special request for goods.
• Create a special request for services using a fixed cost template.
• Create a special request for services using a variable cost template.
• Create a special request for services using a time and materials template.
• Create a special request item template.
Chapter Lessons This Chapter contains the following lessons:
Lesson 1: Overview of Special Requests ................................................2-2 Lesson 2: Special Request for Goods .....................................................2-6 Lesson 3: Specifying Shipping Information..............................................2-8 Lesson 4: Setting Up Cost Distribution ..................................................2-12 Lesson 5: Creating a Special Request for Goods..................................2-15 Lesson 6: Creating a Special Request for Services...............................2-26 Lesson 7: Managing Requisitions ..........................................................2-54 Lesson 8: Working with an Item Template.............................................2-61 Review Questions ..................................................................................2-65
Chapter 2: Creating a Special Request Requisition PeopleSoft 8.4 eProcurement
2-2 Proprietary and Confidential to Case 03/17/05 and Cedar Enterprise Solutions, Inc.
Lesson 1: Overview of Special Requests
A special request is the method of entering a “description only” requisition. It is used for ordering items not found in the ePro catalogs or direct connect web sites.
Required Information When you enter a Special Request for goods or services, you should include the following required information:
• Item description
• Category
• Quantity
• Unit of Measure
• Price
• Vendor
• Buyer
Category Codes The Category code selected determines the default Purchasing Buyer.
Vendor Codes You can use the Vendor Lookup feature to help locate the appropriate vendor. To assign a vendor, the vendor must be already entered in the vendor table within PeopleSoft 8.4 FMS. If you do not select a vendor, your requisition may require additional processing time.
If you cannot locate a vendor in the PeopleSoft vendor table, you may request that the vendor be added. A Vendor Maintenance Team will be given the authority to enter vendors into the PeopleSoft system. Purchasing and Accounting will implement a procedure to periodically review new vendors that are added to the system.
Buyer The Buyer follows the purchase order throughout the process and will be determined by the Category code selected for each line item on the requisition.
PeopleSoft 8.4 eProcurement Chapter 2: Creating a Special Request Requisition
03/17/05 Proprietary and Confidential to Case 2-3 and Cedar Enterprise Solutions, Inc.
SpeedTypes Most of the distribution information will be filled in when you select a SpeedType. Select a SpeedType from the list or enter the SpeedType value to use. This will be equivalent to the project number.
When you enter the SpeedType, all ChartField information (Department, Fund, Project, Class) will be assigned. You will only need to change the Account and the Event, if applicable. If you are tracking the purchase to a specific event, you can also enter that information.
Navigation To create a Special Request requisition, use the following navigation path:
Menu Group eProcurement
Menu eProcurement Home Page
Menu Item Create Requisition
Requisition Summary Page When you click Create Requisition, the Requisition Summary page appears.
This is the Requisition Summary page:
For additional information on ChartFields refer to the PeopleSoft 8.4 Financials Overview course materials.

Chapter 2: Creating a Special Request Requisition PeopleSoft 8.4 eProcurement
2-4 Proprietary and Confidential to Case 03/17/05 and Cedar Enterprise Solutions, Inc.
There are four options available to create a new requisition:
Option Description
Search a catalog for items you wish to order. You will use the catalog to place orders for gas cylinders.
Click to select from a list of items used most often. You can add items to your Favorite Items list from the catalog.
Click to select a template created from a requisition you created previously.
Click to order all items not contained in the catalog.
PeopleSoft 8.4 eProcurement Chapter 2: Creating a Special Request Requisition
03/17/05 Proprietary and Confidential to Case 2-5 and Cedar Enterprise Solutions, Inc.
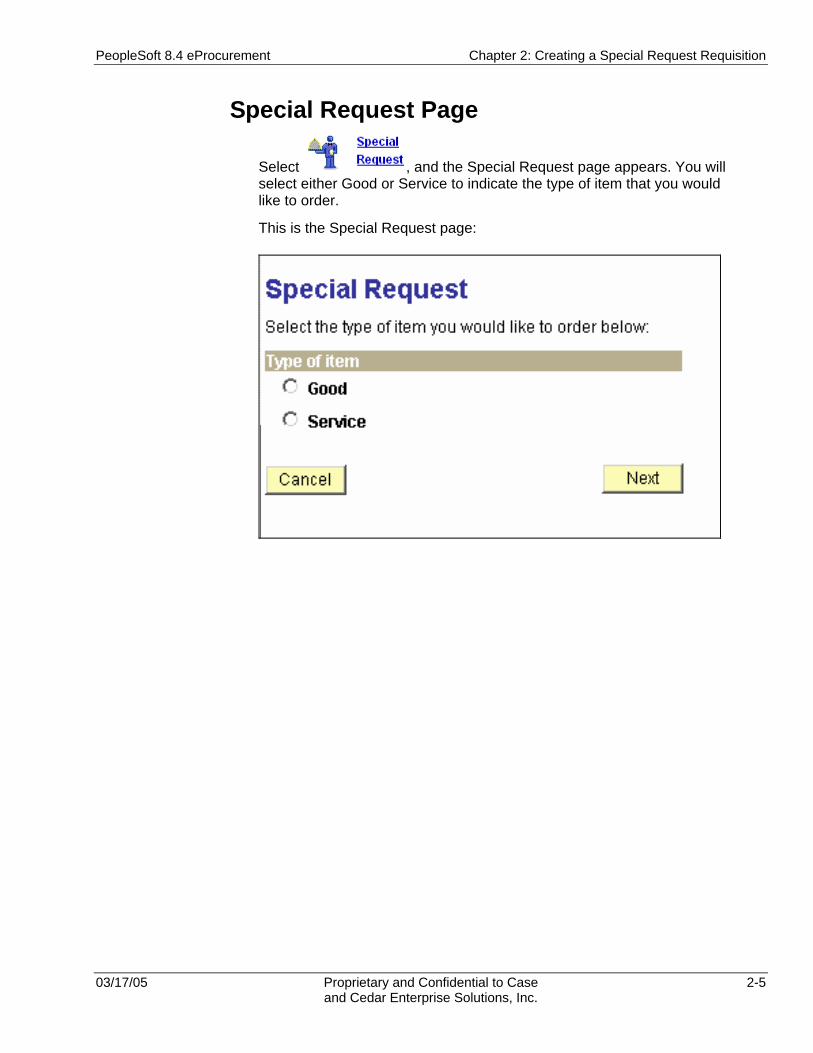
Special Request Page
Select , and the Special Request page appears. You will select either Good or Service to indicate the type of item that you would like to order.
This is the Special Request page:

Chapter 2: Creating a Special Request Requisition PeopleSoft 8.4 eProcurement
2-6 Proprietary and Confidential to Case 03/17/05 and Cedar Enterprise Solutions, Inc.
Lesson 2: Special Request for Goods
This lesson explains the pages used to enter a Special Request for Goods.
Special Request – Goods Page From the Special Request page, select the Good radio button and click Next. The Special Request – Goods page appears. Use this page to enter the item description, category, quantity, unit of measure (UOM), price, due date, and vendor.
This is the Special Request – Goods page:
These are the fields on the Special Request – Goods page.
Field Description
Description Enter the description of the item being ordered.
Use the following format: Catalog#, descr, size
Category Enter a pre-defined categorization of your items.
Use the Category lookup to find the correct entry. The Buyer will default for you based on the Category entered.
Qty Enter the quantity of the item being ordered.
PeopleSoft 8.4 eProcurement Chapter 2: Creating a Special Request Requisition
03/17/05 Proprietary and Confidential to Case 2-7 and Cedar Enterprise Solutions, Inc.
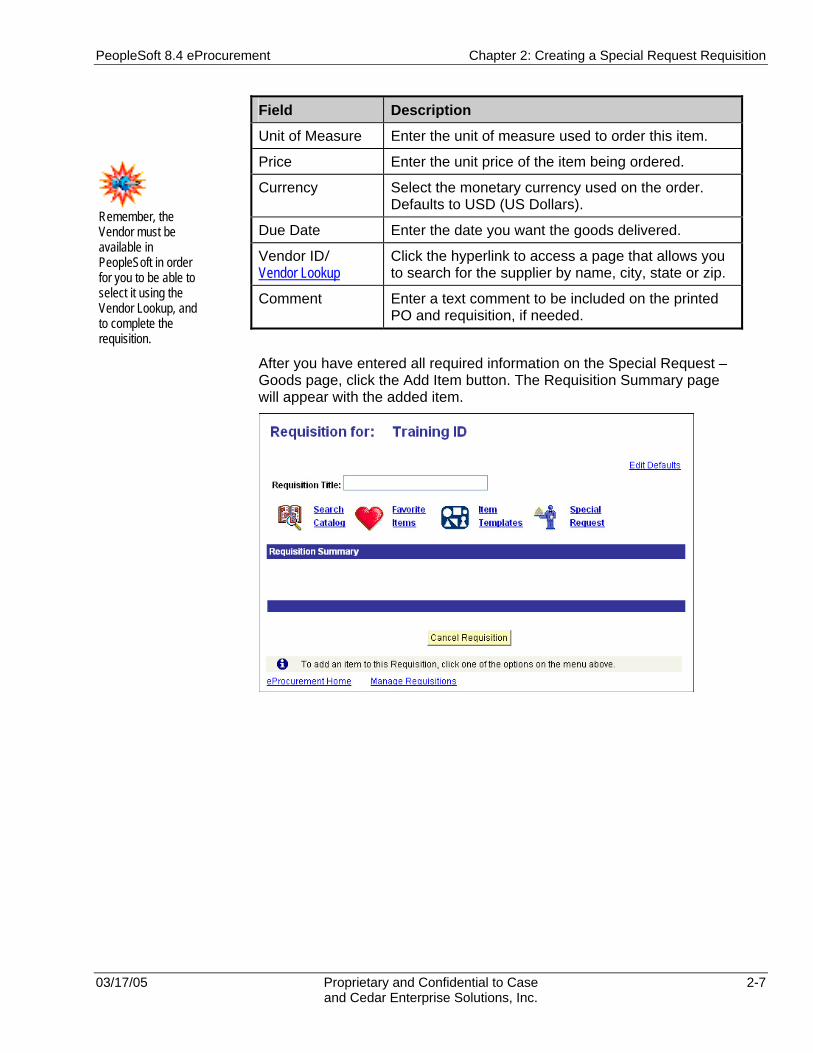
Field Description
Unit of Measure Enter the unit of measure used to order this item.
Price Enter the unit price of the item being ordered.
Currency Select the monetary currency used on the order. Defaults to USD (US Dollars).
Due Date Enter the date you want the goods delivered.
Vendor ID/ Vendor Lookup
Click the hyperlink to access a page that allows you to search for the supplier by name, city, state or zip.
Comment Enter a text comment to be included on the printed PO and requisition, if needed.
After you have entered all required information on the Special Request –Goods page, click the Add Item button. The Requisition Summary page will appear with the added item.
Remember, the Vendor must be available in PeopleSoft in order for you to be able to select it using the Vendor Lookup, and to complete the requisition.

Chapter 2: Creating a Special Request Requisition PeopleSoft 8.4 eProcurement
2-8 Proprietary and Confidential to Case 03/17/05 and Cedar Enterprise Solutions, Inc.
Lesson 3: Specifying Shipping Information
Once items have been added to the requisition, the Requisition Summary page re-appears with additional fields, icons, and hyperlinks.
Requisition Summary Page This is the Requisition Summary page:
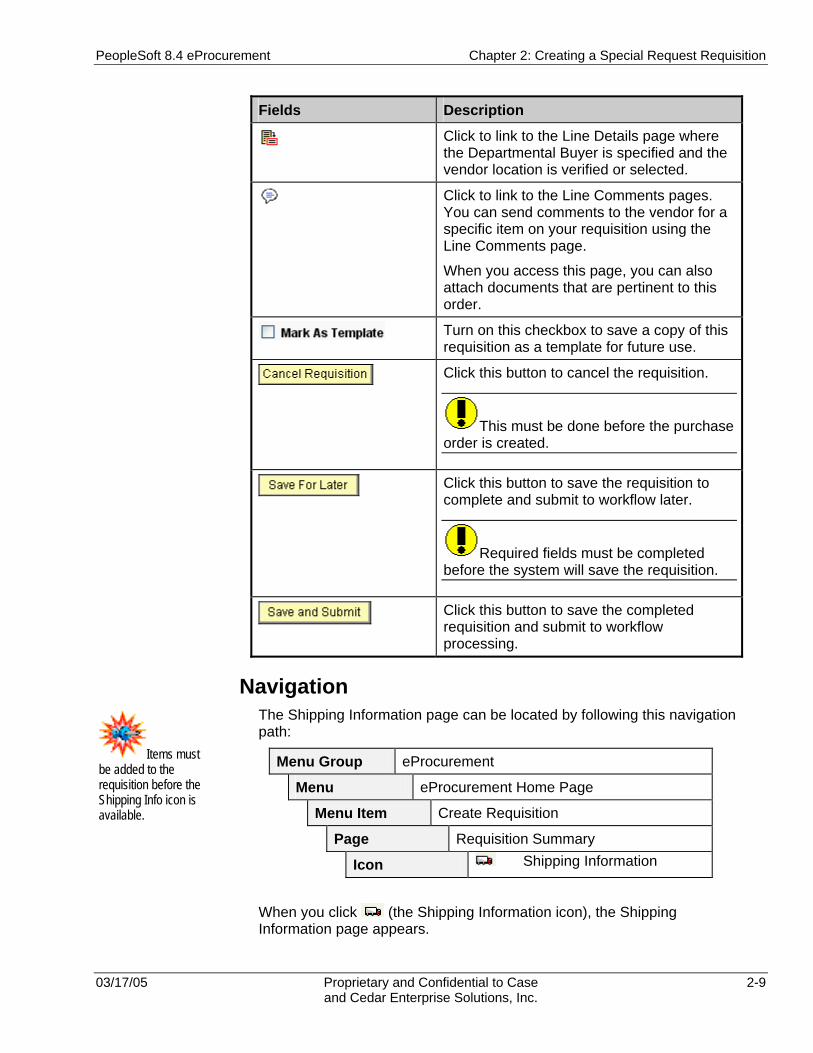
These are the icons, buttons and fields on the Requisition Summary page:
Fields Description
Requisition Summary grid
Click to link to the Shipping Information page to view and change shipping information. You must access the Shipping Information page in order to access the Distribution Information page where you will enter cost distribution information (SpeedType and Account).
Shipping Information
icon
PeopleSoft 8.4 eProcurement Chapter 2: Creating a Special Request Requisition
03/17/05 Proprietary and Confidential to Case 2-9 and Cedar Enterprise Solutions, Inc.
Fields Description
Click to link to the Line Details page where the Departmental Buyer is specified and the vendor location is verified or selected.
Click to link to the Line Comments pages. You can send comments to the vendor for a specific item on your requisition using the Line Comments page.
When you access this page, you can also attach documents that are pertinent to this order.
Turn on this checkbox to save a copy of this requisition as a template for future use.
Click this button to cancel the requisition.
This must be done before the purchase order is created.
Click this button to save the requisition to complete and submit to workflow later.
Required fields must be completed before the system will save the requisition.
Click this button to save the completed requisition and submit to workflow processing.
Navigation The Shipping Information page can be located by following this navigation path:
Menu Group eProcurement
Menu eProcurement Home Page
Menu Item Create Requisition
Page Requisition Summary
Icon Shipping Information
When you click (the Shipping Information icon), the Shipping Information page appears.
Items must be added to the requisition before the Shipping Info icon is available.
Chapter 2: Creating a Special Request Requisition PeopleSoft 8.4 eProcurement
2-10 Proprietary and Confidential to Case 03/17/05 and Cedar Enterprise Solutions, Inc.
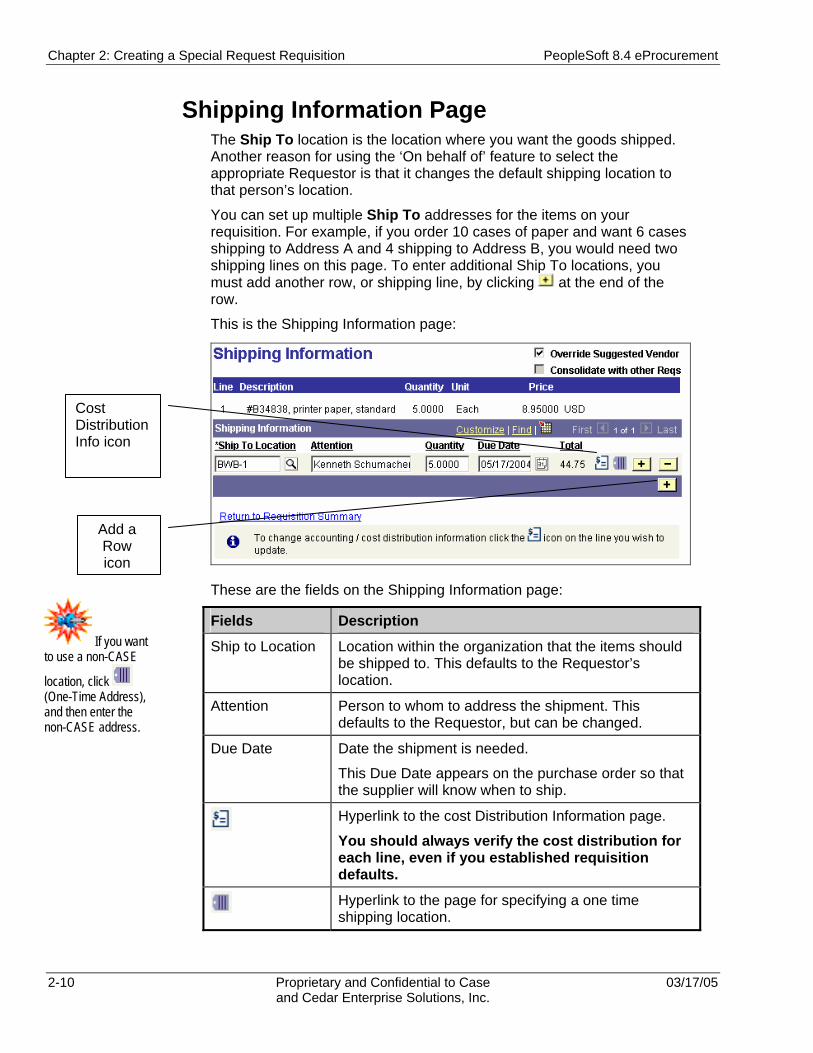
Shipping Information Page The Ship To location is the location where you want the goods shipped. Another reason for using the ‘On behalf of’ feature to select the appropriate Requestor is that it changes the default shipping location to that person’s location.
You can set up multiple Ship To addresses for the items on your requisition. For example, if you order 10 cases of paper and want 6 cases shipping to Address A and 4 shipping to Address B, you would need two shipping lines on this page. To enter additional Ship To locations, you must add another row, or shipping line, by clicking at the end of the row.
This is the Shipping Information page:
These are the fields on the Shipping Information page:
Fields Description
Ship to Location Location within the organization that the items should be shipped to. This defaults to the Requestor’s location.
Attention Person to whom to address the shipment. This defaults to the Requestor, but can be changed.
Due Date Date the shipment is needed.
This Due Date appears on the purchase order so that the supplier will know when to ship.
Hyperlink to the cost Distribution Information page.
You should always verify the cost distribution for each line, even if you established requisition defaults.
Hyperlink to the page for specifying a one time shipping location.
Cost Distribution Info icon
Add a Row icon
If you want to use a non-CASE
location, click (One-Time Address), and then enter the non-CASE address.
PeopleSoft 8.4 eProcurement Chapter 2: Creating a Special Request Requisition
03/17/05 Proprietary and Confidential to Case 2-11 and Cedar Enterprise Solutions, Inc.
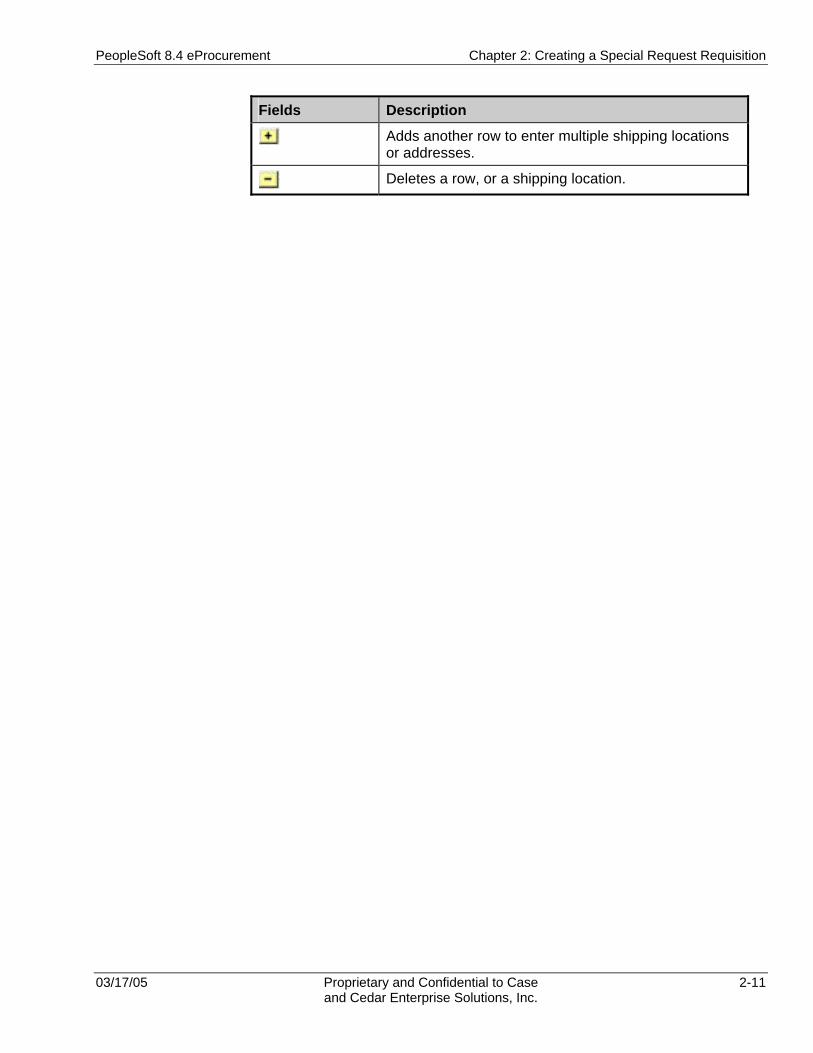
Fields Description
Adds another row to enter multiple shipping locations or addresses.
Deletes a row, or a shipping location.

Chapter 2: Creating a Special Request Requisition PeopleSoft 8.4 eProcurement
2-12 Proprietary and Confidential to Case 03/17/05 and Cedar Enterprise Solutions, Inc.
Lesson 4: Setting Up Cost Distribution
You can enter and update the cost distribution information for individual lines on the requisition using the Distribution Information page.
Navigation You can access the Distribution Information page by following this navigation path:
Menu Group eProcurement
Menu eProcurement Home Page
Menu Item Create Requisition
Page Requisition Summary
Icons Shipping Information
Distribution Information
Cost Distribution Information For each line of your requisition, you must enter the specific cost distribution information, or ChartFields, which are required for posting to the general ledger. ChartFields include the Account, Event, Fund, Department Code, Class, and Project. Together they are called a ChartField string.
To enter these Chartfields, you will enter a SpeedType (which will contain the Fund, Department Code, Class and Project) and Account. You may also enter an event, if applicable.
Click (Shipping Info icon) on any line of the Requisition Summary page and the Shipping Information page appears for that item: From the
Shipping Information page, click (Cost Distribution Info icon), and the Distribution Information page appears.
If you entered multiple shipping locations on the Shipping
Information page, you must click for each shipping line, or location, and enter the cost distribution information accordingly. If necessary, for each shipping line, you can split the funding and enter multiple cost distribution lines.
PeopleSoft 8.4 eProcurement Chapter 2: Creating a Special Request Requisition
03/17/05 Proprietary and Confidential to Case 2-13 and Cedar Enterprise Solutions, Inc.
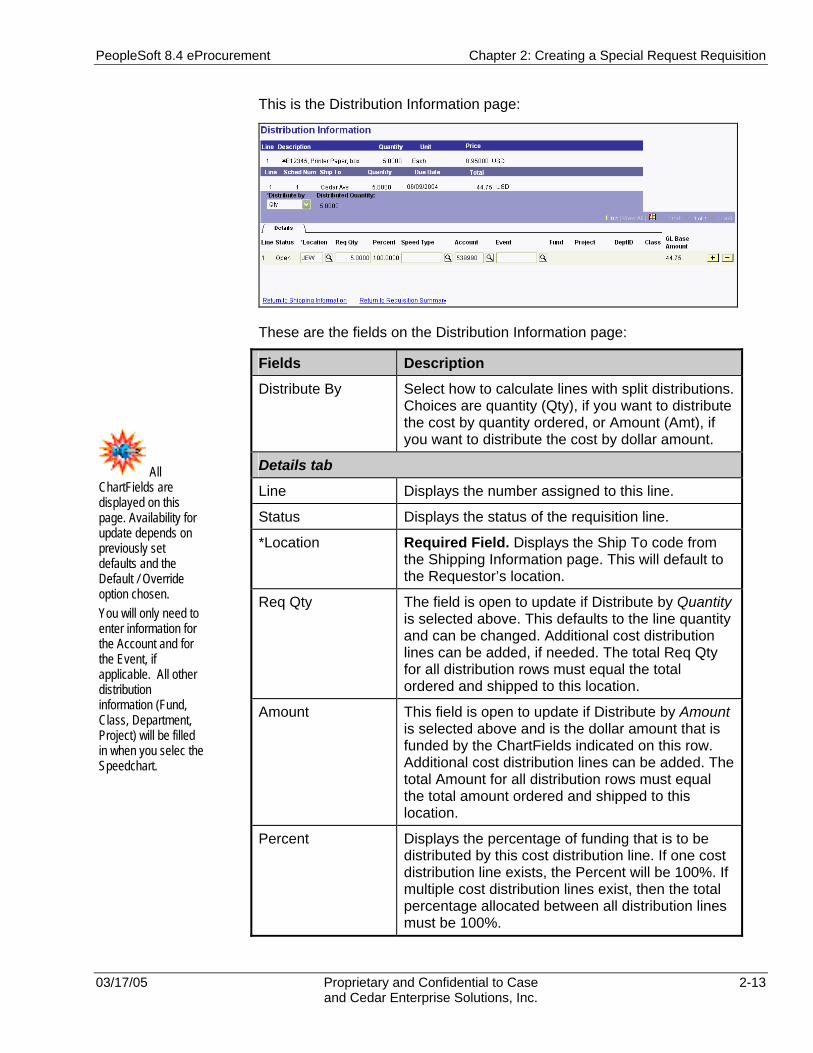
This is the Distribution Information page:
These are the fields on the Distribution Information page:
Fields Description
Distribute By Select how to calculate lines with split distributions. Choices are quantity (Qty), if you want to distribute the cost by quantity ordered, or Amount (Amt), if you want to distribute the cost by dollar amount.
Details tab
Line Displays the number assigned to this line.
Status Displays the status of the requisition line.
*Location Required Field. Displays the Ship To code from the Shipping Information page. This will default to the Requestor’s location.
Req Qty The field is open to update if Distribute by Quantity is selected above. This defaults to the line quantity and can be changed. Additional cost distribution lines can be added, if needed. The total Req Qty for all distribution rows must equal the total ordered and shipped to this location.
Amount This field is open to update if Distribute by Amount is selected above and is the dollar amount that is funded by the ChartFields indicated on this row. Additional cost distribution lines can be added. The total Amount for all distribution rows must equal the total amount ordered and shipped to this location.
Percent Displays the percentage of funding that is to be distributed by this cost distribution line. If one cost distribution line exists, the Percent will be 100%. If multiple cost distribution lines exist, then the total percentage allocated between all distribution lines must be 100%.
All ChartFields are displayed on this page. Availability for update depends on previously set defaults and the Default / Override option chosen. You will only need to enter information for the Account and for the Event, if applicable. All other distribution information (Fund, Class, Department, Project) will be filled in when you selec the Speedchart.

Chapter 2: Creating a Special Request Requisition PeopleSoft 8.4 eProcurement
2-14 Proprietary and Confidential to Case 03/17/05 and Cedar Enterprise Solutions, Inc.
Fields Description
SpeedType Click to find the Speedchart that applies to your requisition.
All Case requisitions will use SpeedTypes.
GL Unit Verify or enter the General Ledger business unit to update. The university will use CASE1.
Account Required Field. Enter the appropriate account which will pay the amount used for this line.
This field defaults to 539990. The pre-defined combo edits will check the validity of the value entered here.
Event Enter an event if you wish to track this requisition to a specific event.
Fund Displays the Fund code that comes from the SpeedType that you enter.
Project Displays the Project code that comes from the SpeedType that you enter.
DeptID Displays the department ID that comes from the SpeedType that you enter.
Class Displays the Class code that comes from the SpeedType that you enter.
GL Base Amount. Displays the amount to be charged to GL for this line.
Use the crosswalks and/or trees to determine the correct values. Refer to the PeopleSoft 8.4 Financials Overview course materials for additional details.
PeopleSoft 8.4 eProcurement Chapter 2: Creating a Special Request Requisition
03/17/05 Proprietary and Confidential to Case 2-15 and Cedar Enterprise Solutions, Inc.
Lesson 5: Creating a Special Request for Goods
This lesson explains the procedure used to create a Special Request requisition for Goods.
Procedure – Creating a Special Request for Goods
Use the following procedure to create a special request for goods.
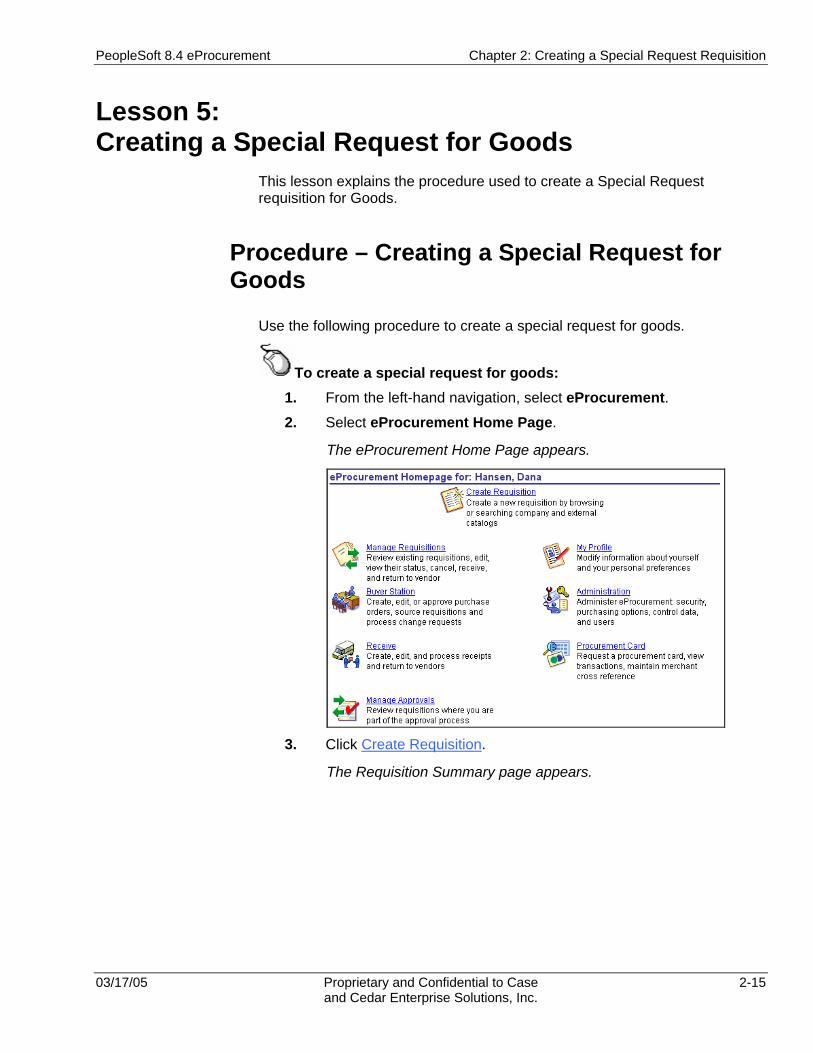
To create a special request for goods: 1. From the left-hand navigation, select eProcurement. 2. Select eProcurement Home Page.
The eProcurement Home Page appears.
3. Click Create Requisition.
The Requisition Summary page appears.
Chapter 2: Creating a Special Request Requisition PeopleSoft 8.4 eProcurement
2-16 Proprietary and Confidential to Case 03/17/05 and Cedar Enterprise Solutions, Inc.
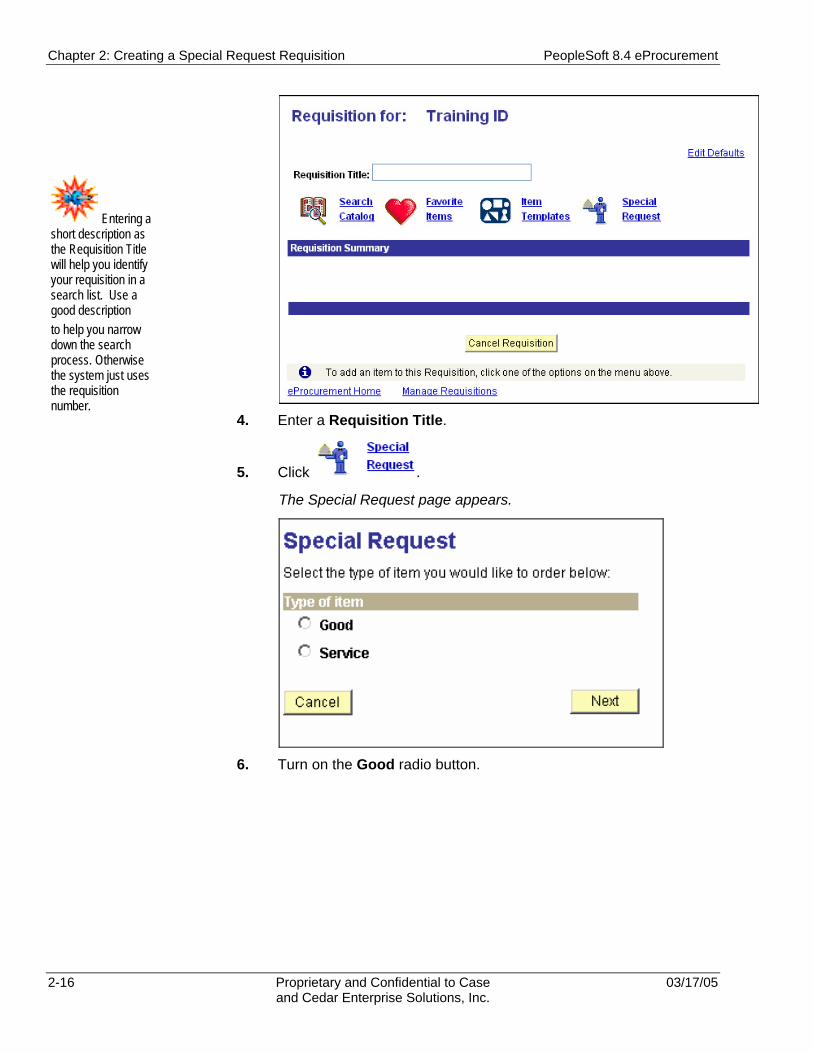
4. Enter a Requisition Title.
5. Click .
The Special Request page appears.
6. Turn on the Good radio button.
Entering a short description as the Requisition Title will help you identify your requisition in a search list. Use a good description to help you narrow down the search process. Otherwise the system just uses the requisition number.

PeopleSoft 8.4 eProcurement Chapter 2: Creating a Special Request Requisition
03/17/05 Proprietary and Confidential to Case 2-17 and Cedar Enterprise Solutions, Inc.
7. Click .
The Special Request – Goods page appears.
8. Enter a description of the item needed.
The description format must include: catalog#, descr, size (if applicable).
9. Click for the Category field.
The Lookup Category page appears.

Chapter 2: Creating a Special Request Requisition PeopleSoft 8.4 eProcurement
2-18 Proprietary and Confidential to Case 03/17/05 and Cedar Enterprise Solutions, Inc.
10. Select the appropriate item Category code.
11. Enter the quantity needed in the Qty field.
12. Enter the Unit of Measure for the item.
13. Enter the Price per unit of measure for the item.
14. Verify that USD is the Currency field.
15. Enter the date you need the item in the Due Date field.
16. Click the Vendor Lookup hyperlink.
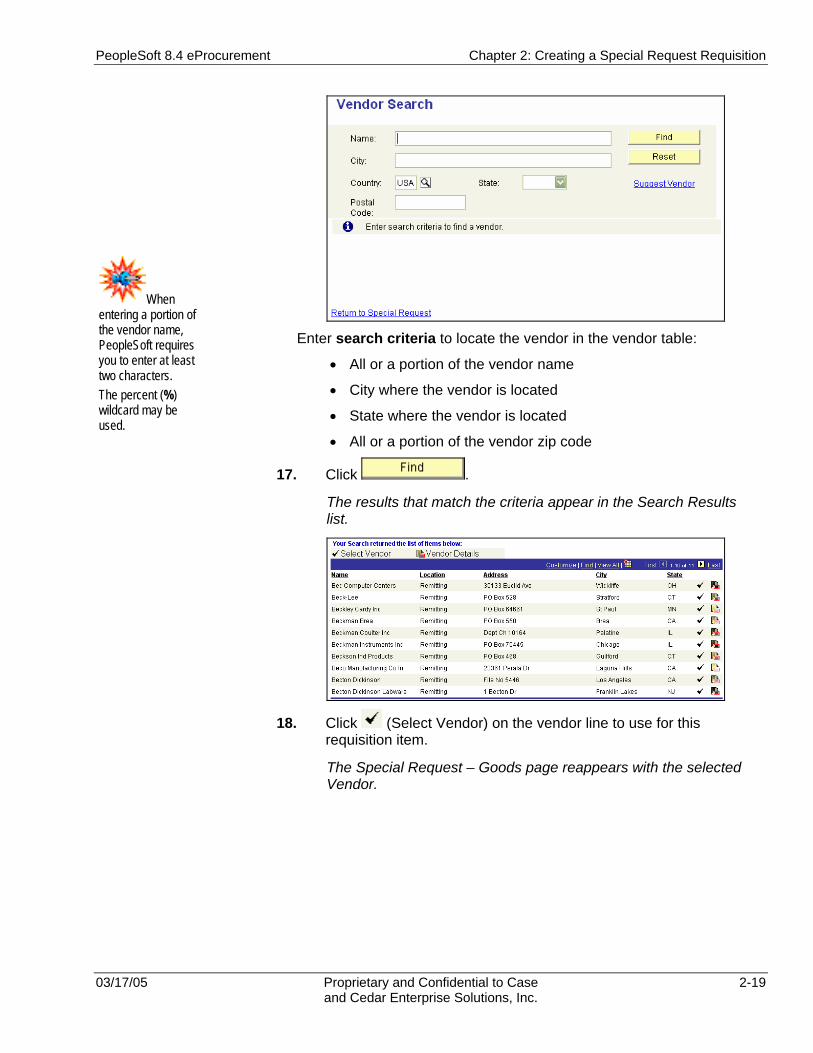
The Vendor Search page appears.
PeopleSoft 8.4 eProcurement Chapter 2: Creating a Special Request Requisition
03/17/05 Proprietary and Confidential to Case 2-19 and Cedar Enterprise Solutions, Inc.
Enter search criteria to locate the vendor in the vendor table:
• All or a portion of the vendor name
• City where the vendor is located
• State where the vendor is located
• All or a portion of the vendor zip code
17. Click .
The results that match the criteria appear in the Search Results list.
18. Click (Select Vendor) on the vendor line to use for this requisition item.
The Special Request – Goods page reappears with the selected Vendor.
When entering a portion of the vendor name, PeopleSoft requires you to enter at least two characters. The percent (%) wildcard may be used.
Chapter 2: Creating a Special Request Requisition PeopleSoft 8.4 eProcurement
2-20 Proprietary and Confidential to Case 03/17/05 and Cedar Enterprise Solutions, Inc.
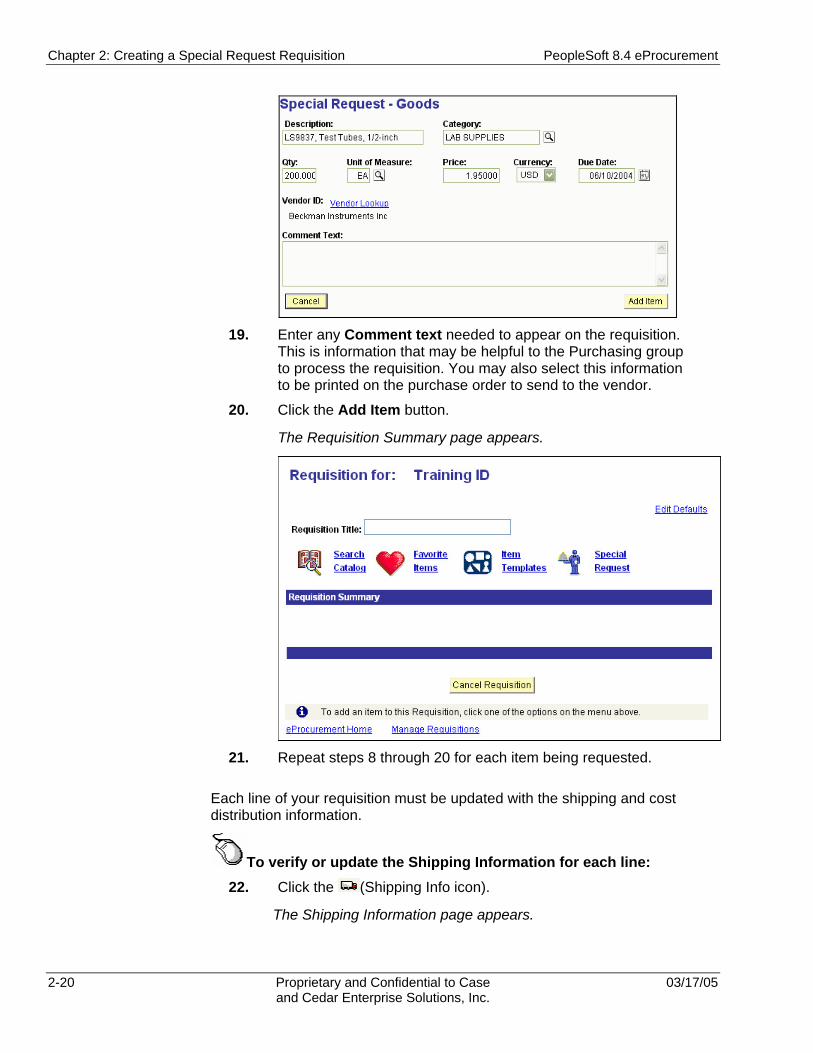
19. Enter any Comment text needed to appear on the requisition.
This is information that may be helpful to the Purchasing group to process the requisition. You may also select this information to be printed on the purchase order to send to the vendor.
20. Click the Add Item button.
The Requisition Summary page appears.
21. Repeat steps 8 through 20 for each item being requested.
Each line of your requisition must be updated with the shipping and cost distribution information.
To verify or update the Shipping Information for each line: 22. Click the (Shipping Info icon).
The Shipping Information page appears.

PeopleSoft 8.4 eProcurement Chapter 2: Creating a Special Request Requisition
03/17/05 Proprietary and Confidential to Case 2-21 and Cedar Enterprise Solutions, Inc.
23. If the Shipping location is a standard CASE location, select the
Ship To location and skip to step 31.
24. If it is a one-time ship to location (non-CASE location), click the (One Time Address icon).
The One Time Shipping Information page appears.
25. Enter the Country where the shipping address is located.
The remaining address lines become available in the format for that country.
26. Enter the correct, one-time shipping address.
27. Click .
The Shipping Information page appears.
28. Enter or Verify the name of the person receiving the item in the Attention field, if other than the Requestor.
29. Verify the date that the requested item is needed in the Due Date field.
30. If the requested items are going to multiple locations and or people, click the button and repeat steps 26 through 32.
Chapter 2: Creating a Special Request Requisition PeopleSoft 8.4 eProcurement
2-22 Proprietary and Confidential to Case 03/17/05 and Cedar Enterprise Solutions, Inc.
To verify or update the Distribution Information for each line:
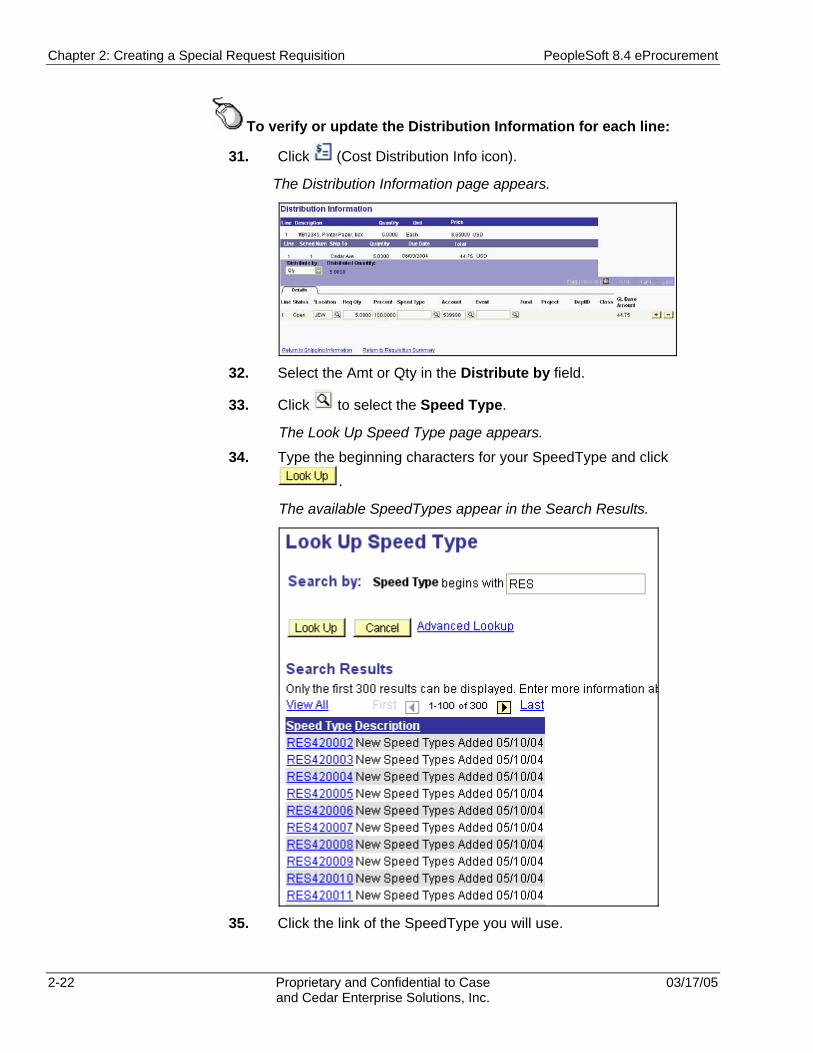
31. Click (Cost Distribution Info icon).
The Distribution Information page appears.
32. Select the Amt or Qty in the Distribute by field.
33. Click to select the Speed Type.
The Look Up Speed Type page appears.
34. Type the beginning characters for your SpeedType and click .
The available SpeedTypes appear in the Search Results.
35. Click the link of the SpeedType you will use.
PeopleSoft 8.4 eProcurement Chapter 2: Creating a Special Request Requisition
03/17/05 Proprietary and Confidential to Case 2-23 and Cedar Enterprise Solutions, Inc.
The Distribution Information page appears with the information from the selected Speed Type.
36. Enter the Account, if applicable.
37. Enter the Event, if applicable.
38. For split funding on the requested items, click the button, enter the Quantity or Amount, and repeat steps 36 – 40 for each additional distribution.
39. Click the Return to Shipping Information hyperlink
The Shipping Information page appears.
40. Click the Return to Requisition Summary hyperlink
The Requisition Summary page appears.
To verify or update the Line Details for each line:
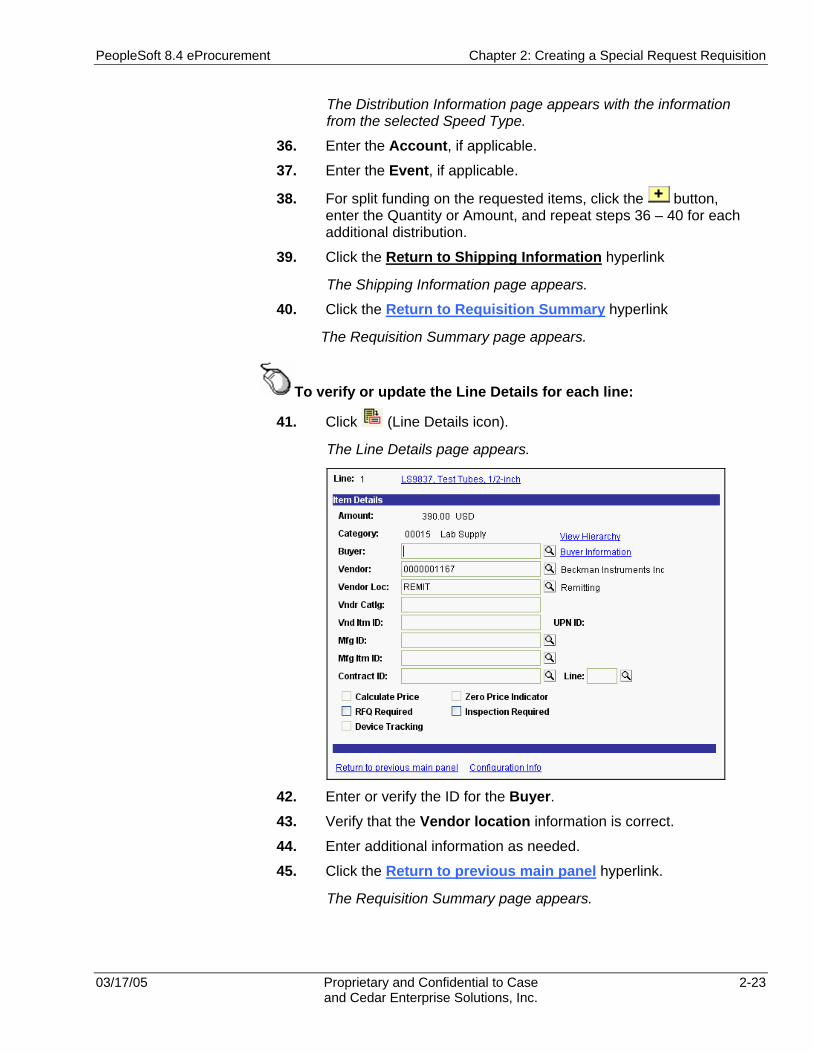
41. Click (Line Details icon).
The Line Details page appears.
42. Enter or verify the ID for the Buyer. 43. Verify that the Vendor location information is correct.
44. Enter additional information as needed.
45. Click the Return to previous main panel hyperlink.
The Requisition Summary page appears.

Chapter 2: Creating a Special Request Requisition PeopleSoft 8.4 eProcurement
2-24 Proprietary and Confidential to Case 03/17/05 and Cedar Enterprise Solutions, Inc.
To add comments or attachments to send with the purchase order:
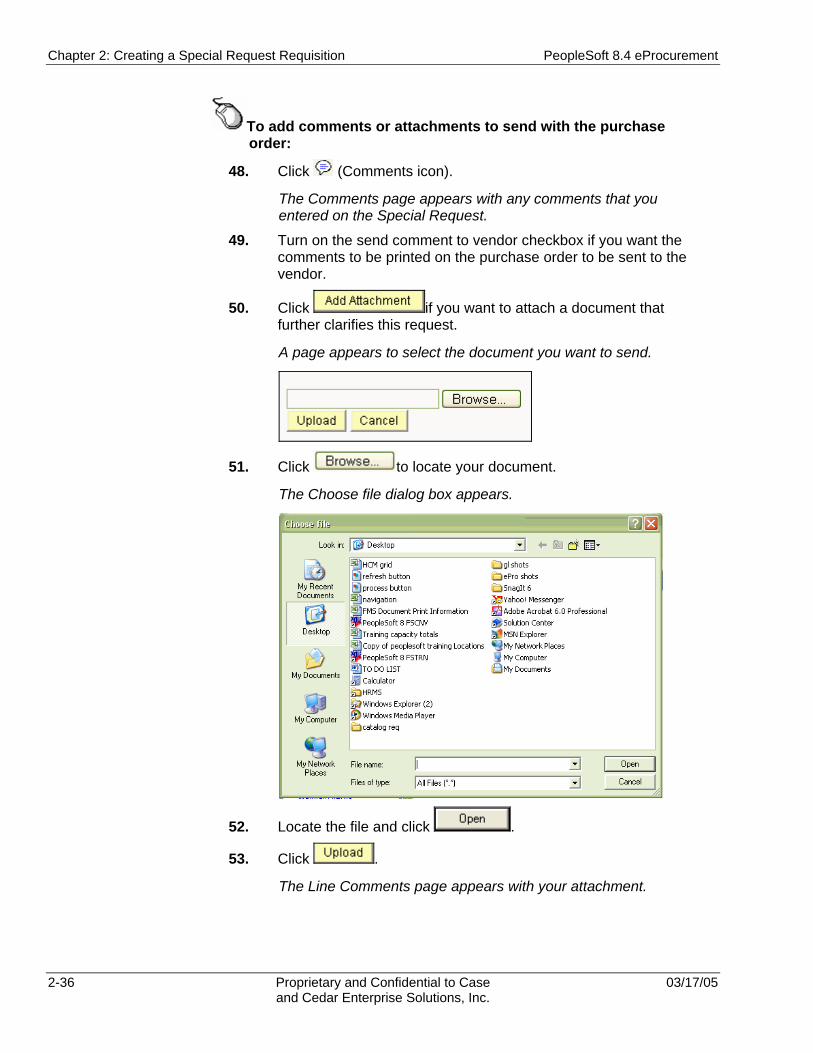
46. Click (Comments icon).
The Comments page appears with any comments that you entered on the Special Request.
47. Turn on the send comment to vendor checkbox if you want the comments to be printed on the purchase order to be sent to the vendor.
48. Click if you want to attach a document that further clarifies this request.
A page appears to select the document you want to send.
49. Click to locate your document.
The Choose file dialog box appears.
50. Locate the file and click .
51. Click .
The Line Comments page appears with your attachment.
PeopleSoft 8.4 eProcurement Chapter 2: Creating a Special Request Requisition
03/17/05 Proprietary and Confidential to Case 2-25 and Cedar Enterprise Solutions, Inc.
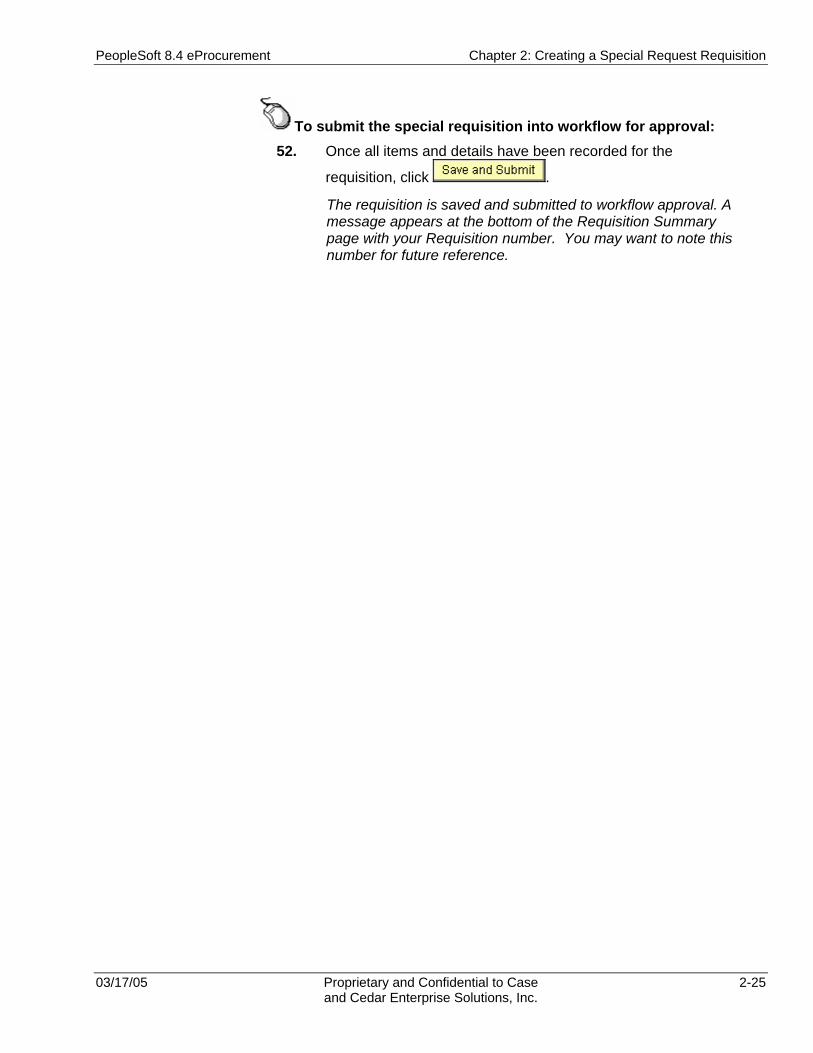
To submit the special requisition into workflow for approval: 52. Once all items and details have been recorded for the
requisition, click .
The requisition is saved and submitted to workflow approval. A message appears at the bottom of the Requisition Summary page with your Requisition number. You may want to note this number for future reference.

Chapter 2: Creating a Special Request Requisition PeopleSoft 8.4 eProcurement
2-26 Proprietary and Confidential to Case 03/17/05 and Cedar Enterprise Solutions, Inc.
Lesson 6: Creating a Special Request for Services
This lesson explains the pages and procedure used to enter a Special Request for Services.
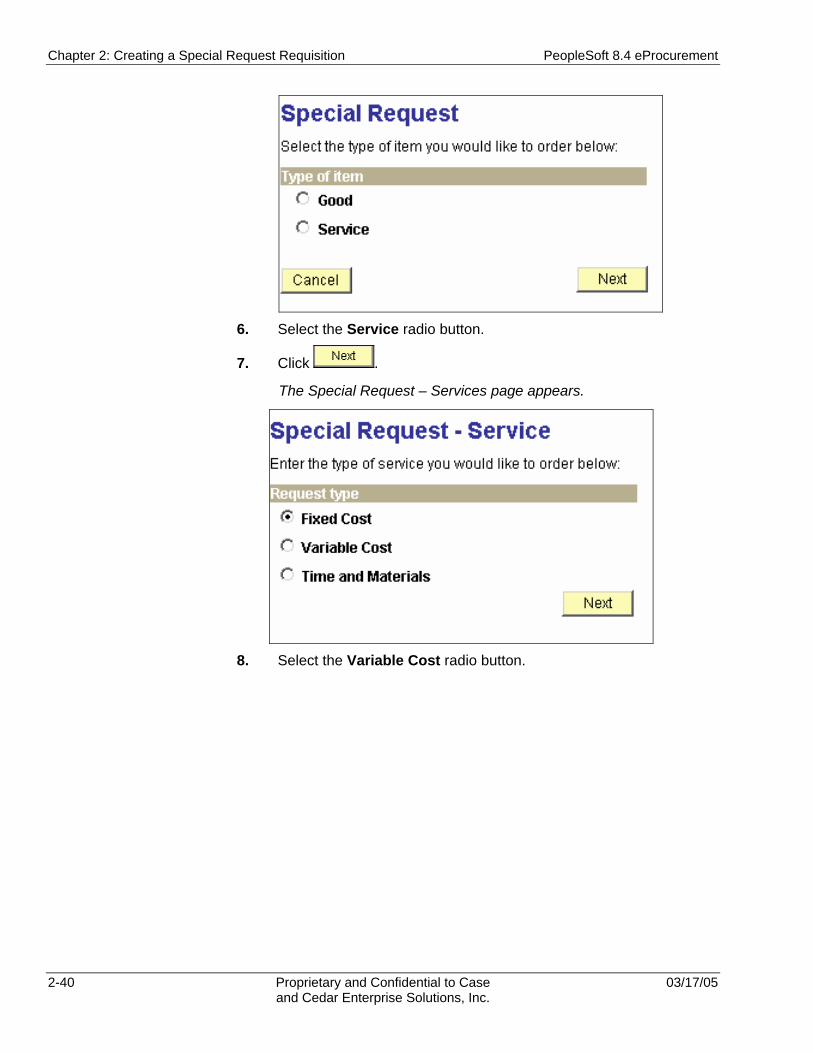
Special Request – Service Page Use the Special Request - Service page to indicate that this Special Request is for a service. From the Special Request page, select the Service radio button and click Next. This is the Special Request – Service page:
There are three templates on this page that you can use to request services. They are:
• Fixed Cost – Template for an item that has a specified cost. No allowance for quantity is available.
• Variable Cost – Template where unit price and quantity may be entered.
• Time and Materials – Template where unit price and time period may be entered.
Depending on the radio button selected, the appropriate template page will appear. You could use all three templates within the same requisition.
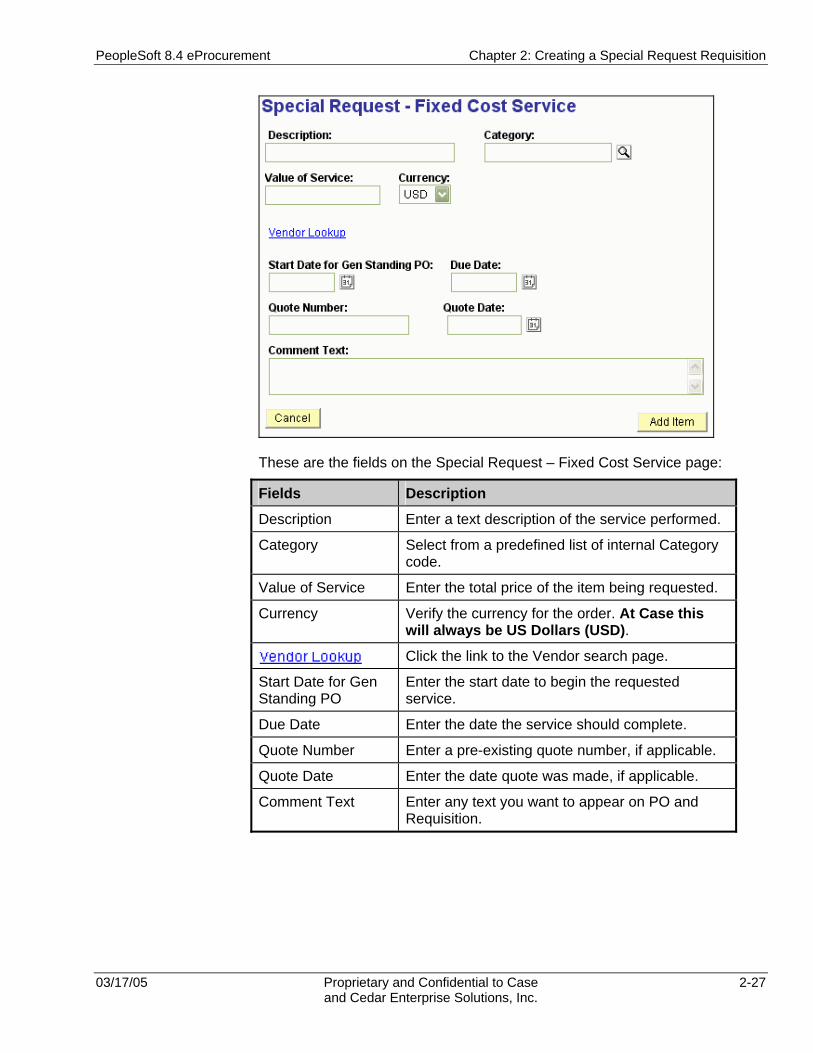
Special Request – Fixed Cost Service Page On the Special Request – Service page, select the Fixed Cost radio button when you need to request service at a fixed cost.
This is the Special Request – Fixed Cost Service page:
You will use a Special Request for Services requisition type when entering a blanket PO with a beginning and an ending date.
PeopleSoft 8.4 eProcurement Chapter 2: Creating a Special Request Requisition
03/17/05 Proprietary and Confidential to Case 2-27 and Cedar Enterprise Solutions, Inc.
These are the fields on the Special Request – Fixed Cost Service page:
Fields Description
Description Enter a text description of the service performed.
Category Select from a predefined list of internal Category code.
Value of Service Enter the total price of the item being requested.
Currency Verify the currency for the order. At Case this will always be US Dollars (USD).
Click the link to the Vendor search page.
Start Date for Gen Standing PO
Enter the start date to begin the requested service.
Due Date Enter the date the service should complete.
Quote Number Enter a pre-existing quote number, if applicable.
Quote Date Enter the date quote was made, if applicable.
Comment Text Enter any text you want to appear on PO and Requisition.

Chapter 2: Creating a Special Request Requisition PeopleSoft 8.4 eProcurement
2-28 Proprietary and Confidential to Case 03/17/05 and Cedar Enterprise Solutions, Inc.
Procedure – Creating a Special Request for Services Using a Fixed Cost Template
Use the following procedures to create a special request for services using the fixed cost template.
To create a special request for services with the fixed cost template:
1. From the left-hand navigation, select eProcurement. 2. Select eProcurement Home Page.
The eProcurement Home Page appears.
3. Select the Create Requisition hyperlink.
The Requisition Summary page appears.
4. Enter a Requisition Title.
5. Click .
The Special Request page appears.

PeopleSoft 8.4 eProcurement Chapter 2: Creating a Special Request Requisition
03/17/05 Proprietary and Confidential to Case 2-29 and Cedar Enterprise Solutions, Inc.
6. Select the Service radio button.
7. Click .
The Special Request – Services page appears.
8. Select the Fixed Cost radio button.

Chapter 2: Creating a Special Request Requisition PeopleSoft 8.4 eProcurement
2-30 Proprietary and Confidential to Case 03/17/05 and Cedar Enterprise Solutions, Inc.
9. Click .
The Special Request – Fixed Cost page appears.
10. Enter the Description of the item needed.
11. Click for the Category field.
The Lookup Category page appears.

PeopleSoft 8.4 eProcurement Chapter 2: Creating a Special Request Requisition
03/17/05 Proprietary and Confidential to Case 2-31 and Cedar Enterprise Solutions, Inc.
12. Select the Category.
The Special Request – Fixed Cost page appears with the selected category.
13. Enter the amount in the Value of Service field.
14. Verify USD is in the Currency field.
15. Click the Vendor Lookup hyperlink.
The Vendor Search page appears.

Chapter 2: Creating a Special Request Requisition PeopleSoft 8.4 eProcurement
2-32 Proprietary and Confidential to Case 03/17/05 and Cedar Enterprise Solutions, Inc.
16. Enter search criteria to locate the vendor in the vendor table:
All or a portion of the vendor name
City where the vendor is located
State where the vendor is located
All or a portion of the vendor zip code
17. Click .
A list of vendors that match the criteria appears.
18. Click the select button on the vendor line to use for this requisition item.
The Special Request – Fixed Cost Service page reappears with the selected vendor information.
19. Enter the Start Date or the day the service will begin.
20. Enter the Due Date or the day the service will end.
21. If a quote exists, enter the Quote Number and Quote Date.
22. Enter any needed Comments.
23. Click .
The Requisition Summary page appears with the information.

PeopleSoft 8.4 eProcurement Chapter 2: Creating a Special Request Requisition
03/17/05 Proprietary and Confidential to Case 2-33 and Cedar Enterprise Solutions, Inc.
24. Repeat steps 8-23 for all special items that you are requesting.
To verify or update the Shipping Information for each line: 25. Click (Shipping Information icon).
The Shipping Information page appears.
26. If the Shipping location is a standard Case location, select the
Ship To location and skip to step 29.
Chapter 2: Creating a Special Request Requisition PeopleSoft 8.4 eProcurement
2-34 Proprietary and Confidential to Case 03/17/05 and Cedar Enterprise Solutions, Inc.
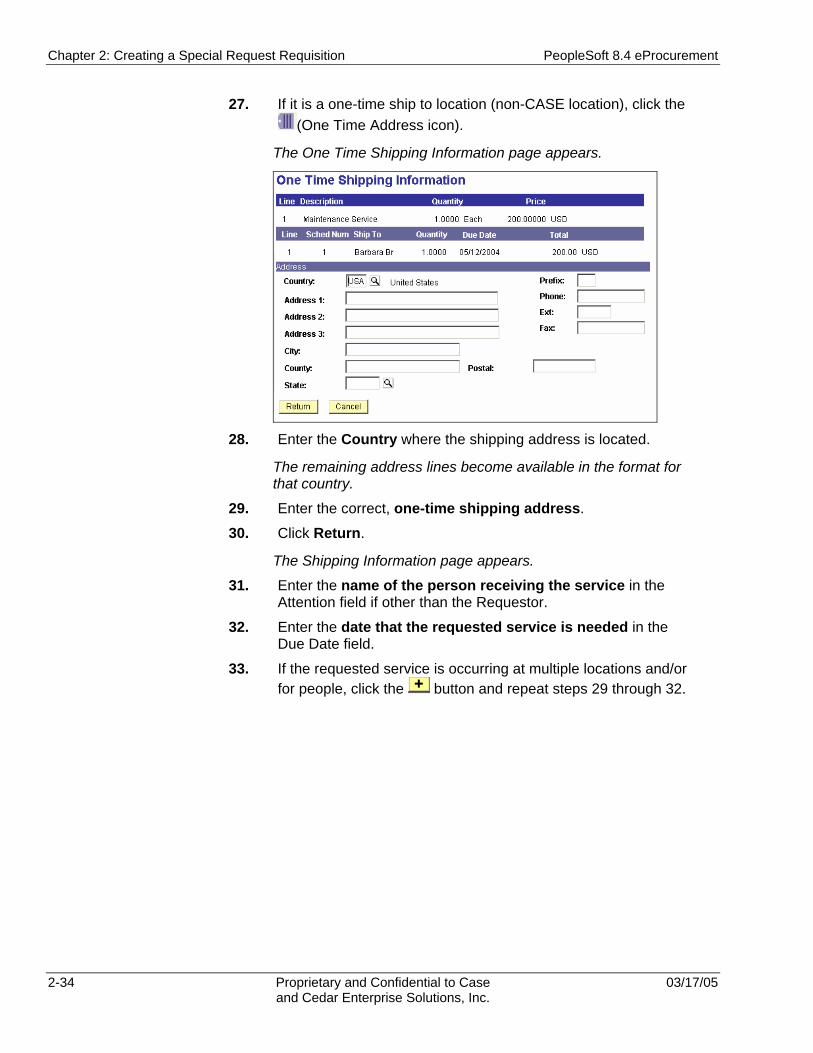
27. If it is a one-time ship to location (non-CASE location), click the (One Time Address icon).
The One Time Shipping Information page appears.
28. Enter the Country where the shipping address is located.
The remaining address lines become available in the format for that country.
29. Enter the correct, one-time shipping address.
30. Click Return.
The Shipping Information page appears.
31. Enter the name of the person receiving the service in the Attention field if other than the Requestor.
32. Enter the date that the requested service is needed in the Due Date field.
33. If the requested service is occurring at multiple locations and/or for people, click the button and repeat steps 29 through 32.
PeopleSoft 8.4 eProcurement Chapter 2: Creating a Special Request Requisition
03/17/05 Proprietary and Confidential to Case 2-35 and Cedar Enterprise Solutions, Inc.
To verify or update the Distribution Information for each line:
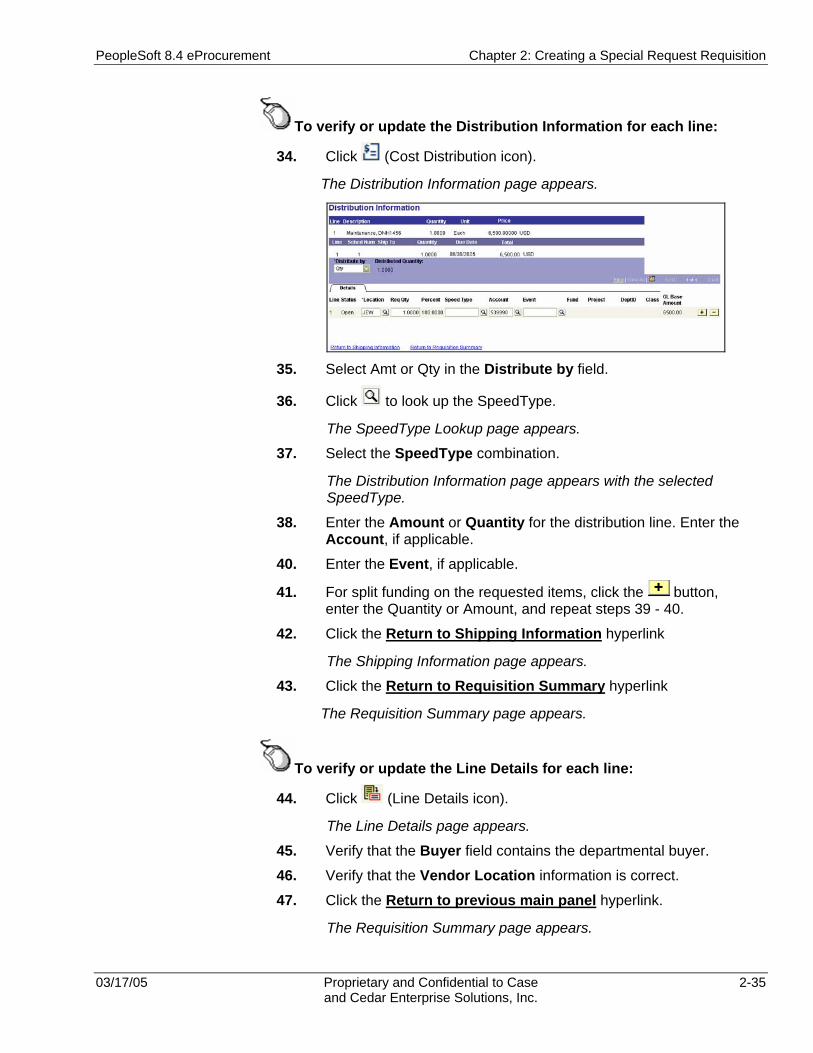
34. Click (Cost Distribution icon).
The Distribution Information page appears.
35. Select Amt or Qty in the Distribute by field.
36. Click to look up the SpeedType.
The SpeedType Lookup page appears.
37. Select the SpeedType combination.
The Distribution Information page appears with the selected SpeedType.
38. Enter the Amount or Quantity for the distribution line. Enter the Account, if applicable.
40. Enter the Event, if applicable.
41. For split funding on the requested items, click the button, enter the Quantity or Amount, and repeat steps 39 - 40.
42. Click the Return to Shipping Information hyperlink
The Shipping Information page appears.
43. Click the Return to Requisition Summary hyperlink
The Requisition Summary page appears.
To verify or update the Line Details for each line:
44. Click (Line Details icon).
The Line Details page appears.
45. Verify that the Buyer field contains the departmental buyer.
46. Verify that the Vendor Location information is correct.
47. Click the Return to previous main panel hyperlink.
The Requisition Summary page appears.
Chapter 2: Creating a Special Request Requisition PeopleSoft 8.4 eProcurement
2-36 Proprietary and Confidential to Case 03/17/05 and Cedar Enterprise Solutions, Inc.
To add comments or attachments to send with the purchase order:
48. Click (Comments icon).
The Comments page appears with any comments that you entered on the Special Request.
49. Turn on the send comment to vendor checkbox if you want the comments to be printed on the purchase order to be sent to the vendor.
50. Click if you want to attach a document that further clarifies this request.
A page appears to select the document you want to send.
51. Click to locate your document.
The Choose file dialog box appears.
52. Locate the file and click .
53. Click .
The Line Comments page appears with your attachment.

PeopleSoft 8.4 eProcurement Chapter 2: Creating a Special Request Requisition
03/17/05 Proprietary and Confidential to Case 2-37 and Cedar Enterprise Solutions, Inc.
To submit the special requisition into workflow for approval: 54. Once all items and details have been recorded for the
requisition, click .
The requisition is saved and submitted to workflow approval. A message appears at the bottom of the Requisition Summary page with your Requisition number. You may want to note this number for future reference.

Chapter 2: Creating a Special Request Requisition PeopleSoft 8.4 eProcurement
2-38 Proprietary and Confidential to Case 03/17/05 and Cedar Enterprise Solutions, Inc.
Special Request – Variable Cost Page On the Special Request – Service page, select the Variable Cost radio button when you need to request service at a variable cost, such as for equipment repair.
This is the Special Request – Variable Cost page:
These are the new fields on the Special Request – Variable cost page:
Field Description
# of Units of work Enter the quantity of work to be done.
Unit of Measure Enter how work is measured, (hours, days, tons, etc.)
Rate Per Unit of Work Enter the unit price for the service.
Beginning date of service Enter the beginning date of work.
Date of Completion Enter the date work is to be complete.
Scope of Work Enter a description of the work to be done.

PeopleSoft 8.4 eProcurement Chapter 2: Creating a Special Request Requisition
03/17/05 Proprietary and Confidential to Case 2-39 and Cedar Enterprise Solutions, Inc.
Procedure – Creating a Special Request for Services Using a Variable Cost Template
Use the following procedures to create a special request for services using the variable cost template.
To create a special request for services with the variable cost template:
1. From the left-hand navigation, select eProcurement. 2. Select eProcurement Home Page.
The eProcurement Home Page appears.
3. Select the Create Requisition hyperlink.
The Requisition Summary page appears.
4. Enter a Requisition Title.
5. Click .
The Special Request page appears.
Chapter 2: Creating a Special Request Requisition PeopleSoft 8.4 eProcurement
2-40 Proprietary and Confidential to Case 03/17/05 and Cedar Enterprise Solutions, Inc.
6. Select the Service radio button.
7. Click .
The Special Request – Services page appears.
8. Select the Variable Cost radio button.

PeopleSoft 8.4 eProcurement Chapter 2: Creating a Special Request Requisition
03/17/05 Proprietary and Confidential to Case 2-41 and Cedar Enterprise Solutions, Inc.
9. Click .
The Special Request – Variable Cost page appears.
10. Enter a Description of the item needed.
11. Click for the Category field.
The Lookup Category page appears.
12. Select the Category.
The Special Request – Variable Cost page appears.
13. Enter the # of Units of Work.
14. Enter the Unit of Measure for this work.
15. Enter the price Rate per Unit of Work.
16. Verify USD is in the Currency field.
17. Click the Vendor Lookup hyperlink.
The Vendor Search page appears.
18. Enter search criteria to locate the vendor in the vendor table:
All or a portion of the vendor name
City where the vendor is located
State where the vendor is located
All or a portion of the vendor zip code
19. Click the Find button.
Matched results display below the vendor search criteria.
20. Click on the vendor line to use for this requisition item.
The Special Request – Variable Cost page reappears
Chapter 2: Creating a Special Request Requisition PeopleSoft 8.4 eProcurement
2-42 Proprietary and Confidential to Case 03/17/05 and Cedar Enterprise Solutions, Inc.
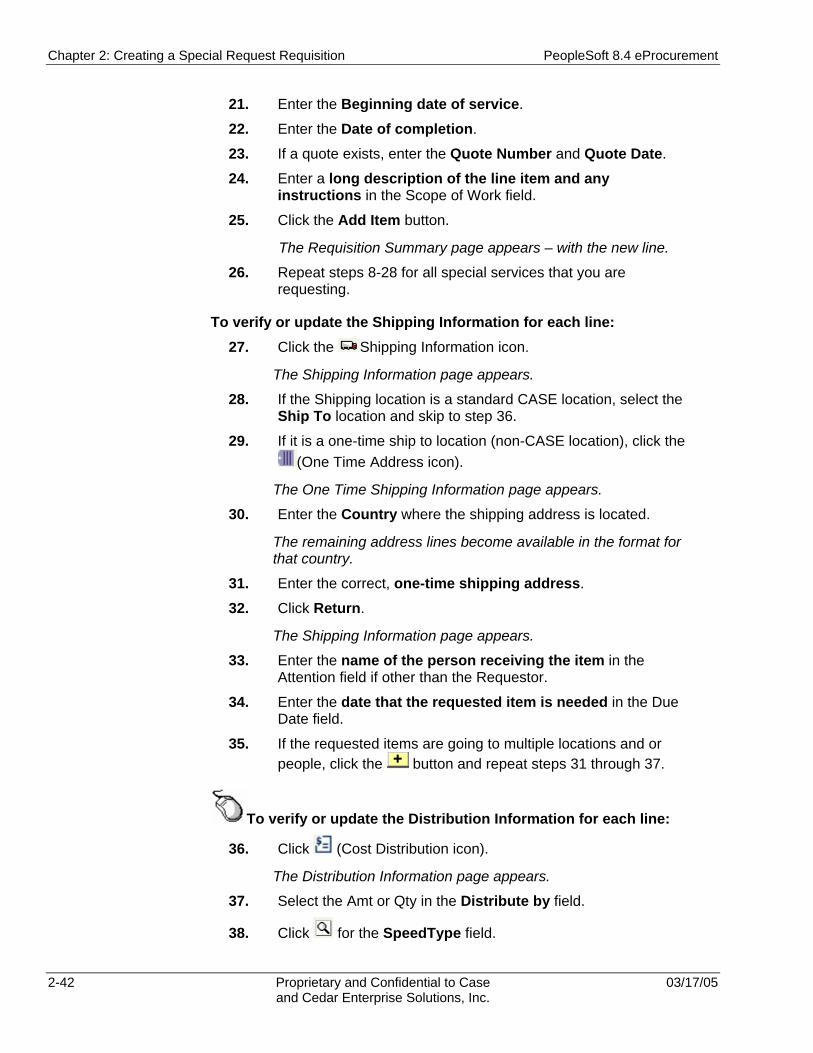
21. Enter the Beginning date of service.
22. Enter the Date of completion.
23. If a quote exists, enter the Quote Number and Quote Date.
24. Enter a long description of the line item and any instructions in the Scope of Work field.
25. Click the Add Item button.
The Requisition Summary page appears – with the new line.
26. Repeat steps 8-28 for all special services that you are requesting.
To verify or update the Shipping Information for each line: 27. Click the Shipping Information icon.
The Shipping Information page appears.
28. If the Shipping location is a standard CASE location, select the Ship To location and skip to step 36.
29. If it is a one-time ship to location (non-CASE location), click the (One Time Address icon).
The One Time Shipping Information page appears.
30. Enter the Country where the shipping address is located.
The remaining address lines become available in the format for that country.
31. Enter the correct, one-time shipping address.
32. Click Return.
The Shipping Information page appears.
33. Enter the name of the person receiving the item in the Attention field if other than the Requestor.
34. Enter the date that the requested item is needed in the Due Date field.
35. If the requested items are going to multiple locations and or people, click the button and repeat steps 31 through 37.
To verify or update the Distribution Information for each line:
36. Click (Cost Distribution icon).
The Distribution Information page appears.
37. Select the Amt or Qty in the Distribute by field.
38. Click for the SpeedType field.
PeopleSoft 8.4 eProcurement Chapter 2: Creating a Special Request Requisition
03/17/05 Proprietary and Confidential to Case 2-43 and Cedar Enterprise Solutions, Inc.
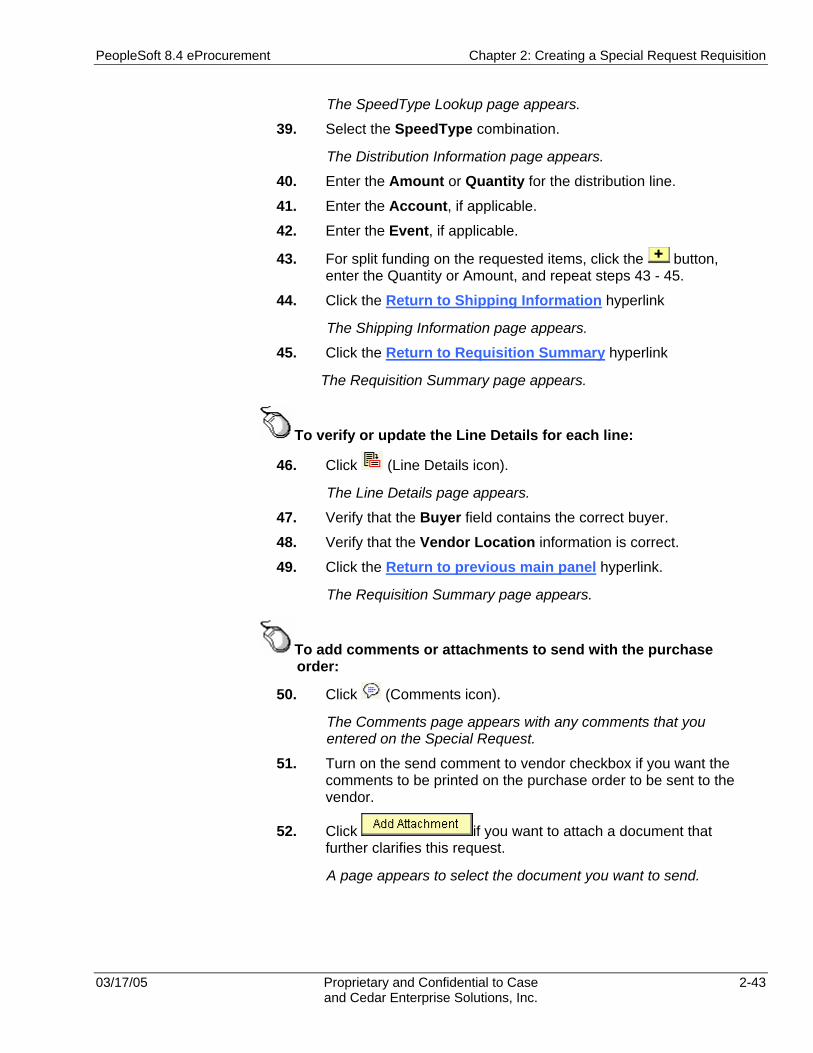
The SpeedType Lookup page appears.
39. Select the SpeedType combination.
The Distribution Information page appears.
40. Enter the Amount or Quantity for the distribution line.
41. Enter the Account, if applicable.
42. Enter the Event, if applicable.
43. For split funding on the requested items, click the button, enter the Quantity or Amount, and repeat steps 43 - 45.
44. Click the Return to Shipping Information hyperlink
The Shipping Information page appears.
45. Click the Return to Requisition Summary hyperlink
The Requisition Summary page appears.
To verify or update the Line Details for each line:
46. Click (Line Details icon).
The Line Details page appears.
47. Verify that the Buyer field contains the correct buyer.
48. Verify that the Vendor Location information is correct.
49. Click the Return to previous main panel hyperlink.
The Requisition Summary page appears.
To add comments or attachments to send with the purchase order:
50. Click (Comments icon).
The Comments page appears with any comments that you entered on the Special Request.
51. Turn on the send comment to vendor checkbox if you want the comments to be printed on the purchase order to be sent to the vendor.
52. Click if you want to attach a document that further clarifies this request.
A page appears to select the document you want to send.

Chapter 2: Creating a Special Request Requisition PeopleSoft 8.4 eProcurement
2-44 Proprietary and Confidential to Case 03/17/05 and Cedar Enterprise Solutions, Inc.
53. Click to locate your document.
The Choose file dialog box appears.
54. Locate the file and click .
55. Click .
The Line Comments page appears with your attachment.
To submit the special requisition into workflow for approval: 56. Once all items and details have been recorded for the
requisition, click .
The requisition is saved and submitted to workflow approval. A message appears at the bottom of the Requisition Summary page with your Requisition number. You may want to note this number for future reference.
PeopleSoft 8.4 eProcurement Chapter 2: Creating a Special Request Requisition
03/17/05 Proprietary and Confidential to Case 2-45 and Cedar Enterprise Solutions, Inc.
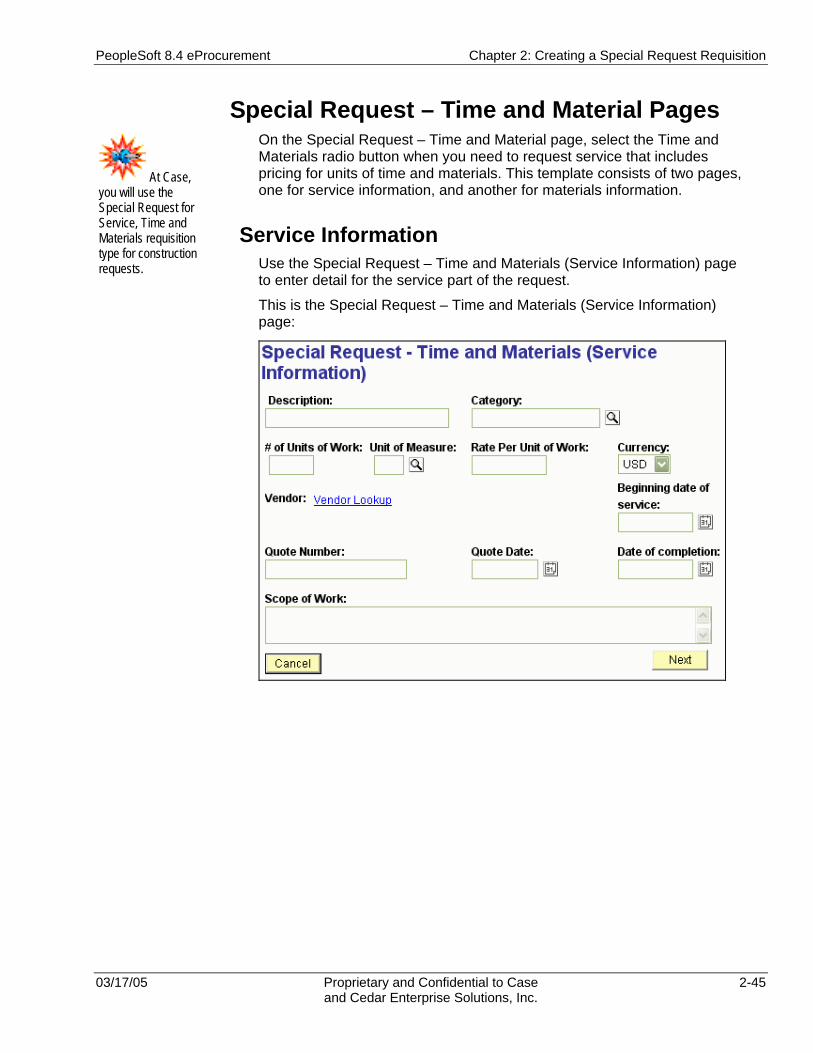
Special Request – Time and Material Pages On the Special Request – Time and Material page, select the Time and Materials radio button when you need to request service that includes pricing for units of time and materials. This template consists of two pages, one for service information, and another for materials information.
Service Information Use the Special Request – Time and Materials (Service Information) page to enter detail for the service part of the request.
This is the Special Request – Time and Materials (Service Information) page:
At Case, you will use the Special Request for Service, Time and Materials requisition type for construction requests.
Chapter 2: Creating a Special Request Requisition PeopleSoft 8.4 eProcurement
2-46 Proprietary and Confidential to Case 03/17/05 and Cedar Enterprise Solutions, Inc.
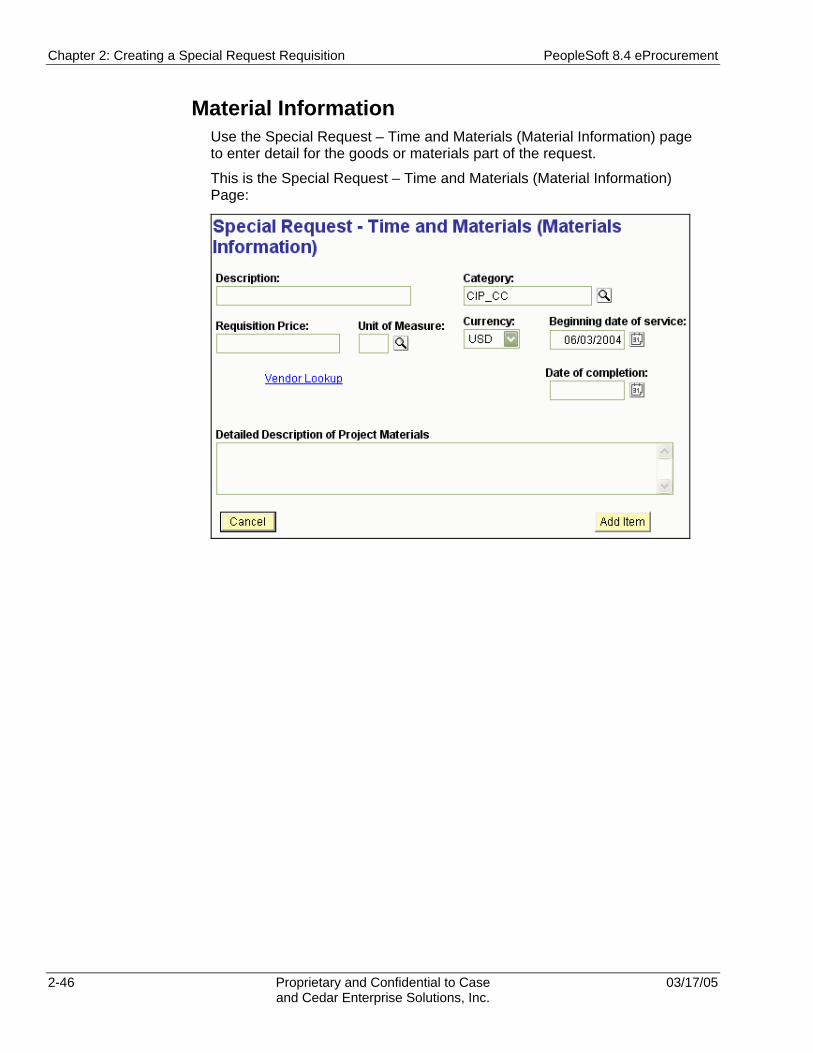
Material Information Use the Special Request – Time and Materials (Material Information) page to enter detail for the goods or materials part of the request.
This is the Special Request – Time and Materials (Material Information) Page:
PeopleSoft 8.4 eProcurement Chapter 2: Creating a Special Request Requisition
03/17/05 Proprietary and Confidential to Case 2-47 and Cedar Enterprise Solutions, Inc.
Procedure – Creating a Special Request for Services Using a Time and Materials Template
Use the following procedures to create a special request for services using the time and materials template.
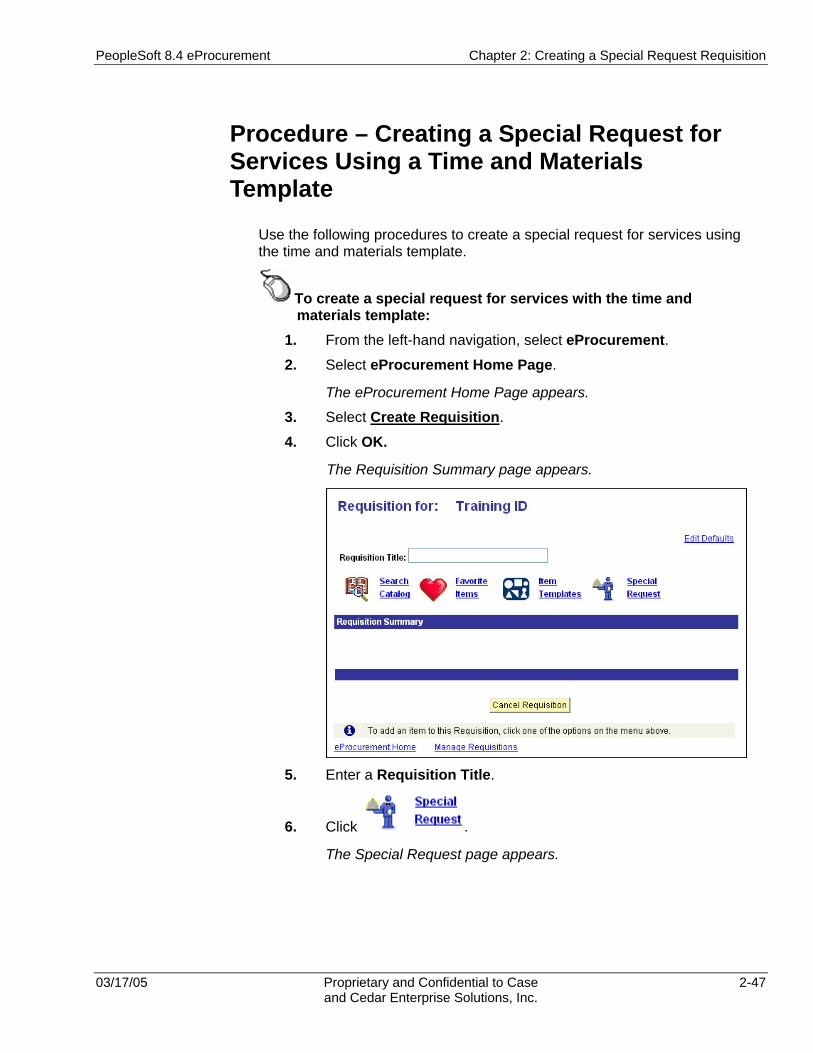
To create a special request for services with the time and materials template:
1. From the left-hand navigation, select eProcurement. 2. Select eProcurement Home Page.
The eProcurement Home Page appears.
3. Select Create Requisition.
4. Click OK.
The Requisition Summary page appears.
5. Enter a Requisition Title.
6. Click .
The Special Request page appears.

Chapter 2: Creating a Special Request Requisition PeopleSoft 8.4 eProcurement
2-48 Proprietary and Confidential to Case 03/17/05 and Cedar Enterprise Solutions, Inc.
7. Select the Service radio button.
8. Click Next.
The Special Request – Services page appears.
9. Select the Time and Materials radio button.
10. Click Next.
The Special Request – Time and Materials (Service Information) page appears.
PeopleSoft 8.4 eProcurement Chapter 2: Creating a Special Request Requisition
03/17/05 Proprietary and Confidential to Case 2-49 and Cedar Enterprise Solutions, Inc.
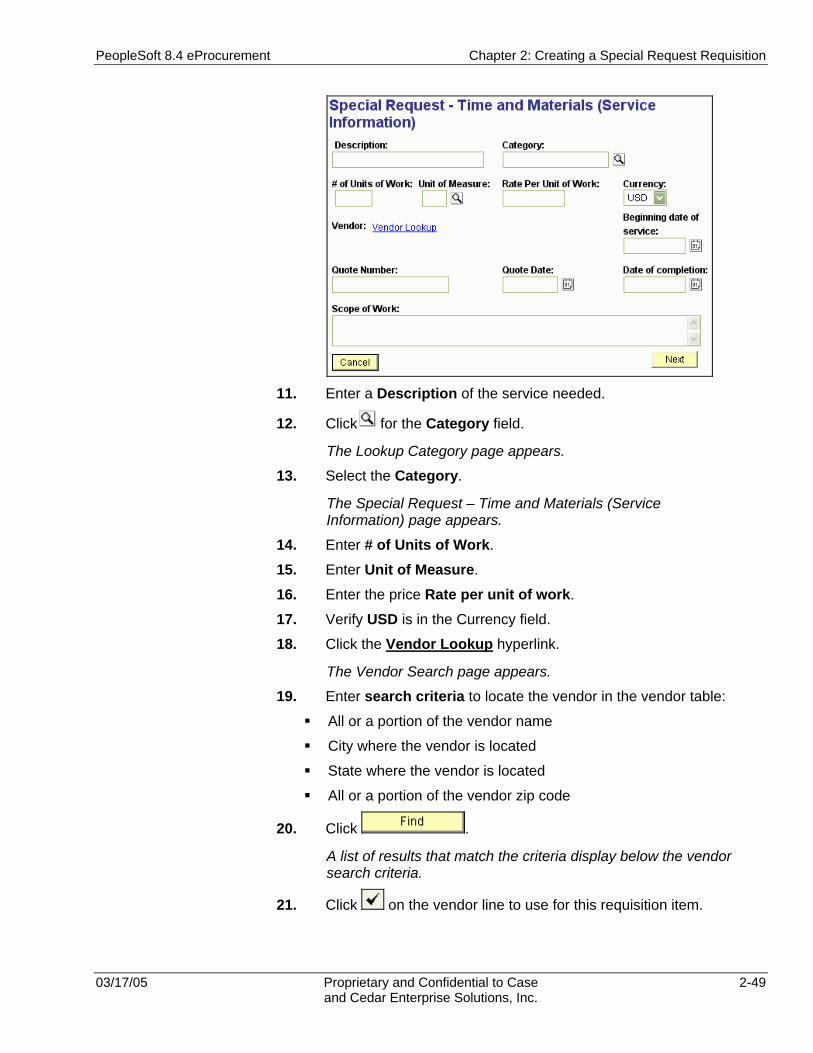
11. Enter a Description of the service needed.
12. Click for the Category field.
The Lookup Category page appears.
13. Select the Category.
The Special Request – Time and Materials (Service Information) page appears.
14. Enter # of Units of Work.
15. Enter Unit of Measure.
16. Enter the price Rate per unit of work.
17. Verify USD is in the Currency field.
18. Click the Vendor Lookup hyperlink.
The Vendor Search page appears.
19. Enter search criteria to locate the vendor in the vendor table:
All or a portion of the vendor name
City where the vendor is located
State where the vendor is located
All or a portion of the vendor zip code
20. Click .
A list of results that match the criteria display below the vendor search criteria.
21. Click on the vendor line to use for this requisition item.

Chapter 2: Creating a Special Request Requisition PeopleSoft 8.4 eProcurement
2-50 Proprietary and Confidential to Case 03/17/05 and Cedar Enterprise Solutions, Inc.
The Special Request – Time and Materials (Service Information) page reappears.
22. Enter the Beginning date of service.
23. If a quote exists, enter the Quote Number and Quote Date, if applicable.
24. Enter the Date of Completion.
25. Enter a long description of the work to be done and any instructions in the Scope of Work field.
26. Click the Next button.
The Special Request - Time and Materials (Materials Information) page appears.
27. Enter the Description of the materials.
28. Click to search for the Category.
The All Categories – Special Request Categories Lookup page appears.
29. Select the appropriate item Category.
30. Enter the material Requisition Price.
31. Enter the Unit of Measure.
32. Verify that USD is in the Currency field.
33. Enter the Beginning date of service.
34. Enter the Date of completion.
35. Click the Vendor Lookup hyperlink.
The Vendor Search page appears.
PeopleSoft 8.4 eProcurement Chapter 2: Creating a Special Request Requisition
03/17/05 Proprietary and Confidential to Case 2-51 and Cedar Enterprise Solutions, Inc.
36. Enter search criteria to locate the vendor in the vendor table:
• All or a portion of the vendor name
• City where the vendor is located
• State where the vendor is located
• All or a portion of the vendor zip code
37. Click .
A list of results that match the criteria display below the vendor search criteria.
38. Click on the vendor line to use for this requisition item.
The Special Request – Time and Materials (Materials Information) page reappears
39. Enter the Detailed description of Project Materials.
40. Click the Add Item button.
The Requisition Summary page appears with the new lines.
To verify or update the Shipping Information for each line: 41. Click (Shipping Information icon) for the first line item.
The Shipping Information page appears.
42. If the Shipping location is a standard Case location, select the Ship To location and skip to step 47.
43. If it is a one-time ship to location (non-Case location), click the (One Time Address icon).
The One Time Shipping Information page appears.
44. Enter the Country where the shipping address is located.
The remaining address lines become available in the format for that country.
45. Enter the correct, one-time shipping address.
46. Click Return.
The Shipping Information page appears.
47. Enter the name of the person receiving the service in the Attention field if other than the Requestor.
48. Enter the date that the requested item is needed in the Due Date field.
49. If the requested items are going to multiple locations and or people, click the button and repeat steps 44 through 50.
When you use the Time and Materials template, two line items appear on the Requisition Summary page. One line reflects the Time or service portion of the requisition, the other line reflects the materials portion of the requisition.

Chapter 2: Creating a Special Request Requisition PeopleSoft 8.4 eProcurement
2-52 Proprietary and Confidential to Case 03/17/05 and Cedar Enterprise Solutions, Inc.
To verify or update the Distribution Information for each line:
50. Click (Cost Distribution icon).
The Distribution Information page appears.
51. Select the Amt or Qty in the Distribute by field.
52. Click for the SpeedType field.
The SpeedType Lookup page appears.
53. Select the SpeedType combination.
The Distribution Information page appears.
54. Enter the Amount or Quantity for the distribution line.
55. Enter the Account, if applicable.
56. Enter the Event, if applicable.
57. For split funding on the requested items, click the button, enter the Quantity or Amount, and repeat steps 54 - 58.
58. Click the Return to Shipping Information hyperlink
The Shipping Information page appears.
59. Click the Return to Requisition Summary hyperlink
The Requisition Summary page appears.
To verify or update the Line Details for each line:
60. Click (Line Details icon).
The Line Details page appears.
61. Verify that the Buyer field contains the correct buyer.
62. Verify that the Vendor Location information is correct.
63. Click the Return to previous main panel hyperlink.
The Requisition Summary page appears.
To add comments or attachments to send with the purchase order:
64. Click (Comments icon).
The Comments page appears with any comments that you entered on the Special Request.

PeopleSoft 8.4 eProcurement Chapter 2: Creating a Special Request Requisition
03/17/05 Proprietary and Confidential to Case 2-53 and Cedar Enterprise Solutions, Inc.
65. Turn on the send comment to vendor checkbox if you want the comments to be printed on the purchase order to be sent to the vendor.
66. Click if you want to attach a document that further clarifies this request.
A page appears to select the document you want to send.
67. Click to locate your document.
The Choose file dialog box appears.
68. Locate the file and click .
69. Click .
The Line Comments page appears with your attachment.
To submit the special requisition into workflow for approval: 70. Once all items and details have been recorded for the
requisition, click .
The requisition is saved and submitted to workflow approval. A message appears at the bottom of the Requisition Summary page with your Requisition number. You may want to note this number for future reference.

Chapter 2: Creating a Special Request Requisition PeopleSoft 8.4 eProcurement
2-54 Proprietary and Confidential to Case 03/17/05 and Cedar Enterprise Solutions, Inc.
Lesson 7: Managing Requisitions
From the eProcurement Home Page, you can access your requisitions to modify and perform other maintenance functions.
Navigation Menu Group eProcurement
Menu eProcurement Home Page
Menu Item Manage Requisitions
Click the Manage Requisitions hyperlink from the eProcurement Home page to access the Manage Requisitions page.
Manage Requisitions Search and Sort Use the Search and Sort Requisitions group box at the top of this page to narrow down your search. If you enter requisitions on behalf of others, you can specify the name in the Requester field to view and manage requisitions for that person. You may also want to enter the Requisition Name (title) to narrow your search even further.
After you enter your search criteria and click , a list that matches the entered criteria appears.
This is the Manage Requisitions search dialog page.
These are the fields, icons and hyperlinks on the Manage Requisitions Search and Sort Requisitions group box
Fields/Icons/ Hyperlinks
Description
Requisition Name Enter all or a portion of the requisition title that you entered.
When you know the PO number, you can enter it in the PO field in the Manage Requisitions Search and Sort Requisitions group box.

PeopleSoft 8.4 eProcurement Chapter 2: Creating a Special Request Requisition
03/17/05 Proprietary and Confidential to Case 2-55 and Cedar Enterprise Solutions, Inc.
Fields/Icons/ Hyperlinks
Description
Show Status Select a status from the drop-down list to find the requisition you want.
Available status values are: All, Approved, Canceled, Complete, Denied, Open, PO(s) Created, PO(s) dispatched, Pending, Received, and Searched
Requestor Enter the Requestor of the requisition you want to find.
Use to lookup the requestor, if needed.
Date From Enter a beginning date for the date range in which to search for your requisition.
Through Date Enter an ending date for the date range in which to search for your requisition.
PO Enter the PO number associated to the requisition, if known.
After you have entered the search criteria in the Search and Sort Requisitions group box, click this button to display matches for the selected criteria
The PO field in the Search and Sort Requisitions group box is the only place that you can use the PO number to find a requisition.
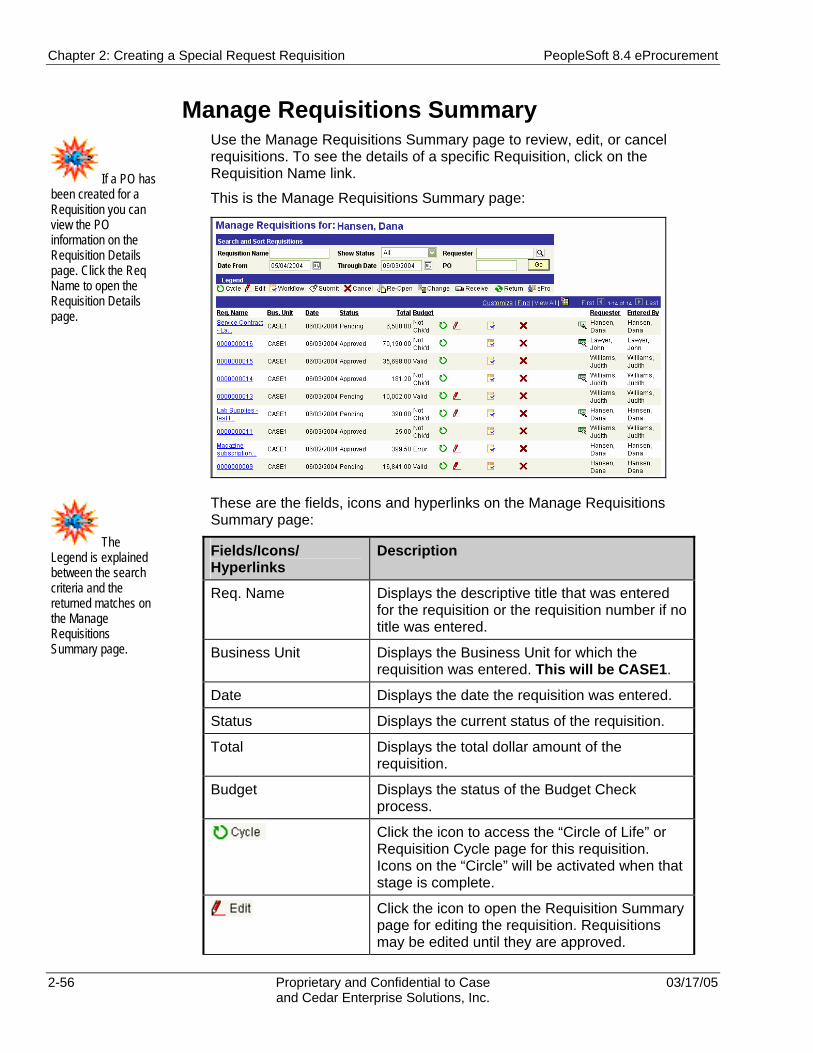
Chapter 2: Creating a Special Request Requisition PeopleSoft 8.4 eProcurement
2-56 Proprietary and Confidential to Case 03/17/05 and Cedar Enterprise Solutions, Inc.
Manage Requisitions Summary Use the Manage Requisitions Summary page to review, edit, or cancel requisitions. To see the details of a specific Requisition, click on the Requisition Name link.
This is the Manage Requisitions Summary page:
These are the fields, icons and hyperlinks on the Manage Requisitions Summary page:
Fields/Icons/ Hyperlinks
Description
Req. Name Displays the descriptive title that was entered for the requisition or the requisition number if no title was entered.
Business Unit Displays the Business Unit for which the requisition was entered. This will be CASE1.
Date Displays the date the requisition was entered.
Status Displays the current status of the requisition.
Total Displays the total dollar amount of the requisition.
Budget Displays the status of the Budget Check process.
Click the icon to access the “Circle of Life” or Requisition Cycle page for this requisition. Icons on the “Circle” will be activated when that stage is complete.
Click the icon to open the Requisition Summary page for editing the requisition. Requisitions may be edited until they are approved.
If a PO has been created for a Requisition you can view the PO information on the Requisition Details page. Click the Req Name to open the Requisition Details page.
The Legend is explained between the search criteria and the returned matches on the Manage Requisitions Summary page.
PeopleSoft 8.4 eProcurement Chapter 2: Creating a Special Request Requisition
03/17/05 Proprietary and Confidential to Case 2-57 and Cedar Enterprise Solutions, Inc.
Fields/Icons/ Hyperlinks
Description
Click the icon to access the Requisition Approval Status page. This will graphically show where the requisition is within the approval workflow structure.
Click the icon to submit the requisition into workflow for approval.
Click the icon to cancel the requisition
Click the icon to re-open a cancelled requisition
Click the icon to create a change request.
Click the icon to create a receipt on the PO for the requisition.
Click the icon to create a return to vendor transaction.
Click the icon to perform Budget Check on an approved requisition.
Click the hyperlink to return to the eProcurement Home Page.
Click the hyperlink to return to the New Requisition page.
Click the hyperlink to access a lists of change request that have been made.
Click the hyperlink to access a list of receipts created against the requisition.
Click the hyperlink to run the PO to Requisition XREF (cross-reference) report.
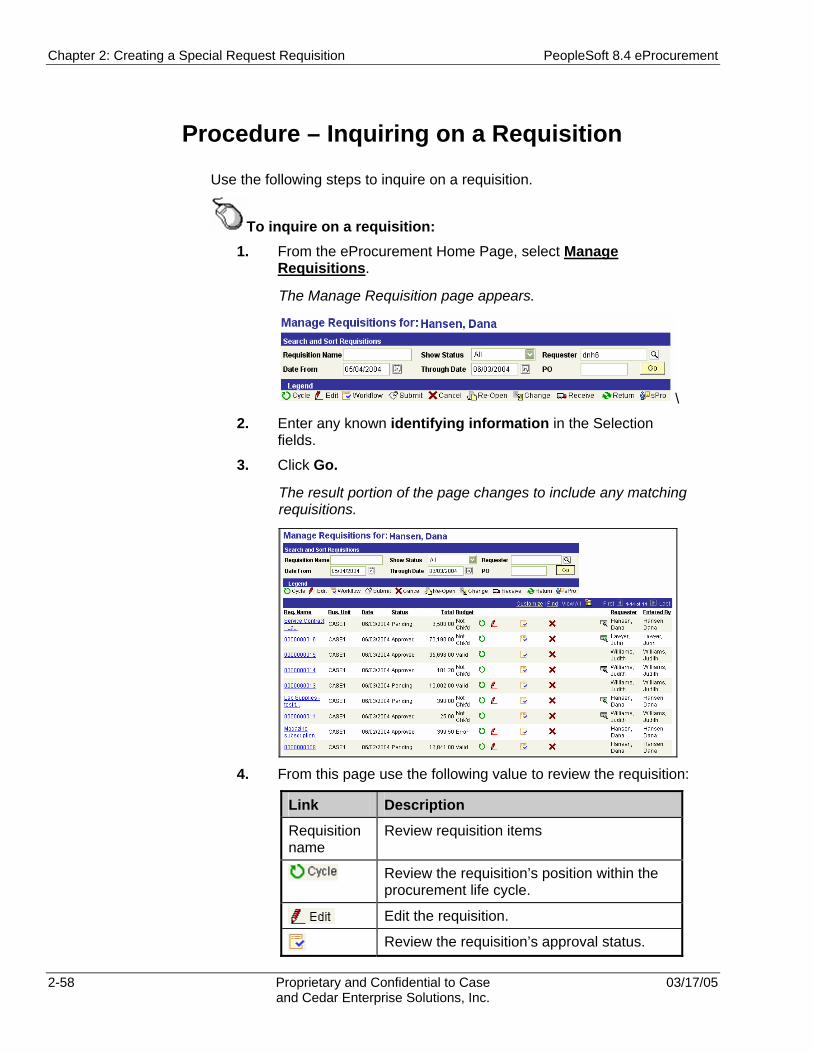
Chapter 2: Creating a Special Request Requisition PeopleSoft 8.4 eProcurement
2-58 Proprietary and Confidential to Case 03/17/05 and Cedar Enterprise Solutions, Inc.
Procedure – Inquiring on a Requisition
Use the following steps to inquire on a requisition.
To inquire on a requisition: 1. From the eProcurement Home Page, select Manage
Requisitions.
The Manage Requisition page appears.
\
2. Enter any known identifying information in the Selection fields.
3. Click Go.
The result portion of the page changes to include any matching requisitions.
4. From this page use the following value to review the requisition:
Link Description
Requisition name
Review requisition items
Review the requisition’s position within the procurement life cycle.
Edit the requisition.
Review the requisition’s approval status.

PeopleSoft 8.4 eProcurement Chapter 2: Creating a Special Request Requisition
03/17/05 Proprietary and Confidential to Case 2-59 and Cedar Enterprise Solutions, Inc.
Link Description
Submit the requisition for approval.
Cancel the requisition.
Reopen the requisition.
Create a change request. Do not use.
Create a receipt for the requisition.
Return an item to the vendor.
5. When you click on a requisition, the Circle of Life or Requisition Cycle page appears. The bright icon shows the completed stages in the circle.
This is a pending requisition:
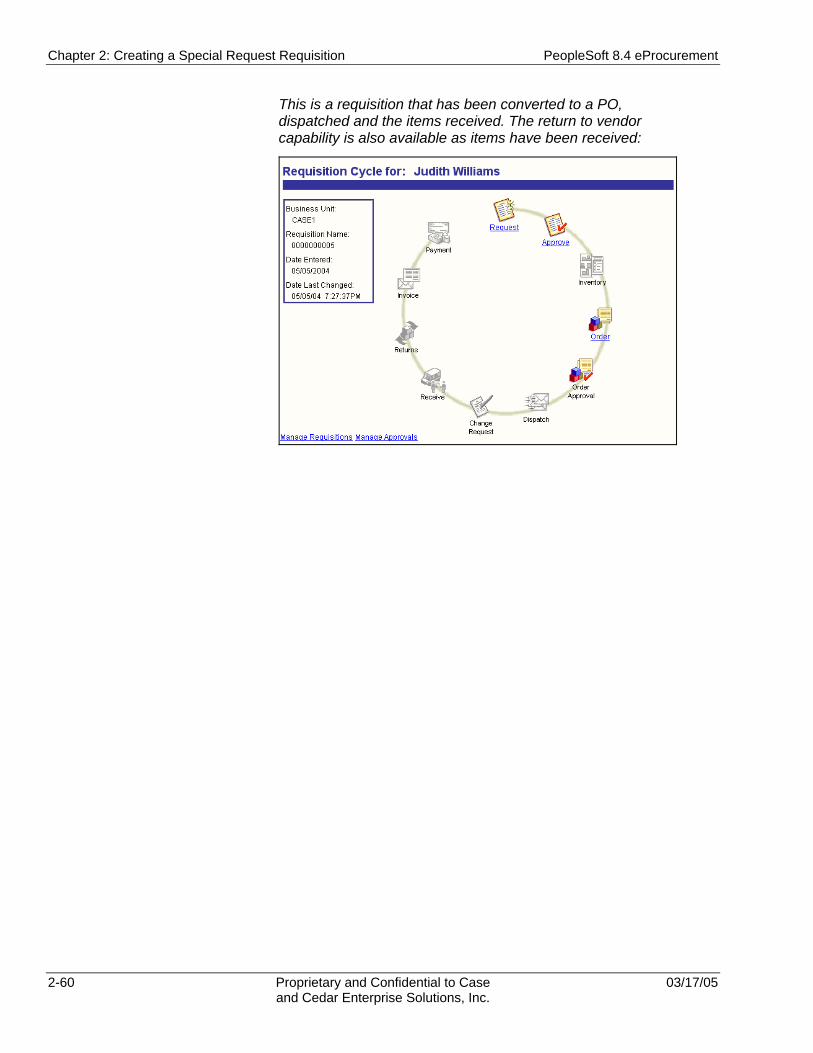
Chapter 2: Creating a Special Request Requisition PeopleSoft 8.4 eProcurement
2-60 Proprietary and Confidential to Case 03/17/05 and Cedar Enterprise Solutions, Inc.
This is a requisition that has been converted to a PO, dispatched and the items received. The return to vendor capability is also available as items have been received:

PeopleSoft 8.4 eProcurement Chapter 2: Creating a Special Request Requisition
03/17/05 Proprietary and Confidential to Case 2-61 and Cedar Enterprise Solutions, Inc.
Lesson 8: Working with an Item Template
This lesson explains how to create and use an item template.
Creating a Special Request Item Template PeopleSoft eProcurement gives you the ability to create item templates for a group of frequently ordered items on a Special Request requisition.
These are the steps to create an item template:
1. Create a Special Request requisition.
2. Add items to the requisition and include all related data (quantity, unit price, category, vendor, shipping, cost distribution, etc.).
3. Turn on the check box.
4. Save the requisition.
The template will be saved with all of the exact information that you established on the original requisition.
Using an Item Template Once you have created an item template, you can use it in the future to quickly add the items to your new requisition.
These are the steps in using an item template:
1. On the Requisition Summary page for a Special Request, select
.
2. Select the item template you want to use from the Use Templates Page.
3. Verify/adjust any details on the requisition as needed.
4. Modify the Due Date for the requisition.
5. Save the requisition.
Remember, the template you use carries forward the Due Date of the original requisition. Change the Due Date for the items in the new requisition or else the system will give you an error message that the Due Date cannot be prior to the date of the Requisition.

Chapter 2: Creating a Special Request Requisition PeopleSoft 8.4 eProcurement
2-62 Proprietary and Confidential to Case 03/17/05 and Cedar Enterprise Solutions, Inc.
Use Templates Page The Use Templates page allows you to select an item template to use for your requisition. If you click on the template name, every item on the template will be added to your requisition at the quantity of the original template. You still have the opportunity to edit the quantity, along with shipping and cost information as needed. You can also enter a quantity and then click the Insert Line button.
This is the User Templates page.
Manage Templates Page From the User Template page, click the Manage Templates button. The Manage Templates page lets you delete an item template you no longer need
This is the Manage Templates page:
Procedure – Creating an Item Template
Use the following procedures to create a Special Request item template for a group of items that you order frequently:
To create a special request item template: 1. From the left-hand navigation, select eProcurement.
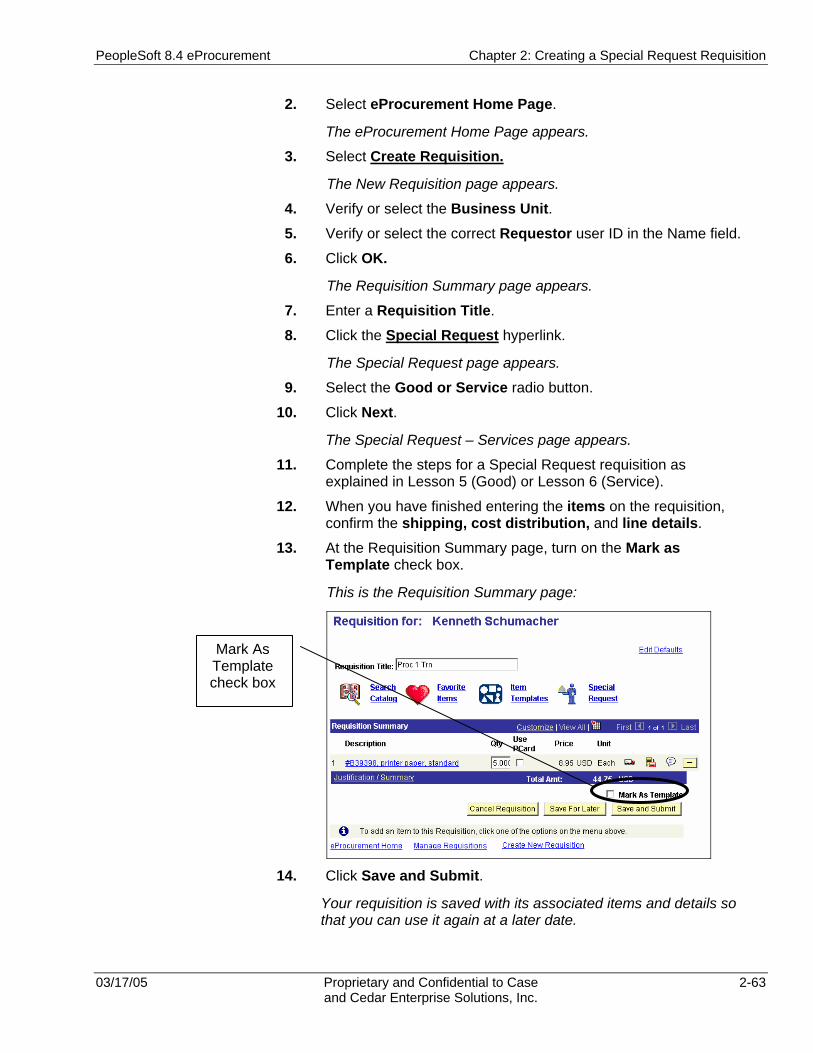
PeopleSoft 8.4 eProcurement Chapter 2: Creating a Special Request Requisition
03/17/05 Proprietary and Confidential to Case 2-63 and Cedar Enterprise Solutions, Inc.
2. Select eProcurement Home Page.
The eProcurement Home Page appears.
3. Select Create Requisition.
The New Requisition page appears.
4. Verify or select the Business Unit. 5. Verify or select the correct Requestor user ID in the Name field.
6. Click OK.
The Requisition Summary page appears.
7. Enter a Requisition Title.
8. Click the Special Request hyperlink.
The Special Request page appears.
9. Select the Good or Service radio button.
10. Click Next.
The Special Request – Services page appears.
11. Complete the steps for a Special Request requisition as explained in Lesson 5 (Good) or Lesson 6 (Service).
12. When you have finished entering the items on the requisition, confirm the shipping, cost distribution, and line details.
13. At the Requisition Summary page, turn on the Mark as Template check box.
This is the Requisition Summary page:
14. Click Save and Submit.
Your requisition is saved with its associated items and details so that you can use it again at a later date.
Mark As Template check box
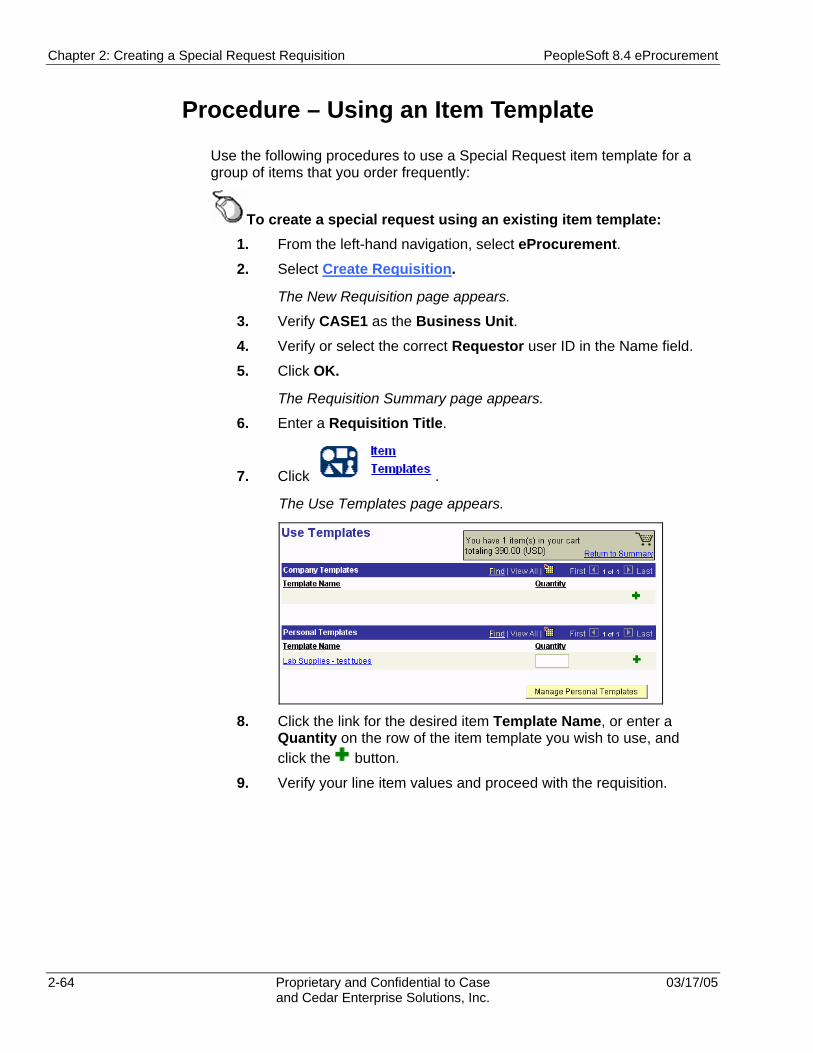
Chapter 2: Creating a Special Request Requisition PeopleSoft 8.4 eProcurement
2-64 Proprietary and Confidential to Case 03/17/05 and Cedar Enterprise Solutions, Inc.
Procedure – Using an Item Template
Use the following procedures to use a Special Request item template for a group of items that you order frequently:
To create a special request using an existing item template: 1. From the left-hand navigation, select eProcurement. 2. Select Create Requisition.
The New Requisition page appears.
3. Verify CASE1 as the Business Unit. 4. Verify or select the correct Requestor user ID in the Name field.
5. Click OK.
The Requisition Summary page appears.
6. Enter a Requisition Title.
7. Click .
The Use Templates page appears.
8. Click the link for the desired item Template Name, or enter a
Quantity on the row of the item template you wish to use, and click the button.
9. Verify your line item values and proceed with the requisition.
PeopleSoft 8.4 eProcurement Chapter 2: Creating a Special Request Requisition
03/17/05 Proprietary and Confidential to Case 2-65 and Cedar Enterprise Solutions, Inc.
Review Questions
1. What page is used to create a special request for goods?
2. What are the three types of templates you use to create special requests for services?
3/17/2005 Proprietary and Confidential to Case 3-1 and Cedar Enterprise Solutions, Inc.
Chapter 3 Creating a Catalog Requisition
Case will use a catalog for orders for Gas Cylinders. This chapter explains how to create a Catalog Request, edit defaults, create and use a Hot-List, and how to inquire on your requisition.
Chapter Objectives After completing this chapter you will be able to:
• Search and locate items in the catalog.
• Add items to your requisition shopping cart.
• Designate the ship to locations for your requisition.
• Designate cost distribution for your selected items.
• Review and update line details.
• Complete the requisition.
• Edit defaults for a requisition.
• Inquire on the requisition status.
Chapter Lessons This chapter contains the following lessons:
Lesson 1: Catalog Requisition Overview .................................................3-2 Lesson 2: Creating a New Requisition.....................................................3-4 Lesson 3: Searching the Catalog.............................................................3-9 Lesson 4: Specifying Shipping Information............................................3-11 Lesson 5: Setting Up Cost Distribution and Line Details .......................3-13 Lesson 6: Changing a Requisition .........................................................3-22 Review Questions ..................................................................................3-24

Chapter 3: Creating a Catalog Requisition PeopleSoft 8.4 eProcurement
3-2 Proprietary and Confidential to Case 3/17/2005 and Cedar Enterprise Solutions, Inc.
Lesson 1: Catalog Requisition Overview
On July 1, 2004, you will be able to place orders for Gas Cylinders using
the catalog. When ordering gas cylinders, use the link and select your items accordingly.
In Phase II of this project additional catalog functionality will become available i.e., (linking directly to vendors catalogs), etc.
Steps for Entering a Catalog Requisition Entering a catalog requisition includes the following steps:
Step Action
1 Create (open) the requisition.
2 Search for items in the catalog.
3 Add items to the Shopping Cart.
4 Check out.
5 Verify or change shipping and ChartField cost distribution on the item lines.
6 or the requisition for approval.
Key Requisition Elements There are several components that you will use when creating your requisition. Some of these have default values based on the type of requisition.
Business Unit The first piece of information used when creating a requisition is the Business Unit. PeopleSoft Business Units represent independent processing entities. Depending on the type of requisition selected, the business unit value will default for you.
The Business Units at Case is CASE1.
CASE1 will default as the Business Unit when you create a Catalog Request.
PeopleSoft 8.4 eProcurement Chapter 3: Creating a Catalog Requisition
3/17/2005 Proprietary and Confidential to Case 3-3 and Cedar Enterprise Solutions, Inc.
Requestor You must specify the Requestor in the Name field on the New Requisition page. This is the person who is actually requesting the goods or services and may not be the person entering the requisition or the buyer placing the order. A requisition can be entered on behalf of someone else by entering their name as the Requestor.
Requisition Title You will be able to enter a title for your requisition. The requisition title is a short description that will help you to identify your requisition later. Requisitions are retrieved in the order of the system-assigned requisition number, so enter a Requisition Title that will help you narrow down the search process.
Default Value The requisition has default values for:
• Vendor (Catalog only)
• Buyer
• Ship to location
• Due date
• Category (Catalog only)
• Unit of measure (Catalog only)
• ChartField distribution (Operating Unit and Department by user profile of the Requestor, Account code by Category of the good or service)
You can accept the defaults or override information based on the specifics of your requisition. This is useful for large requisitions where you want specific values for all or most of the lines.
If you do not enter a title, the requisition name defaults to the requisition number.

Chapter 3: Creating a Catalog Requisition PeopleSoft 8.4 eProcurement
3-4 Proprietary and Confidential to Case 3/17/2005 and Cedar Enterprise Solutions, Inc.
Lesson 2: Creating a New Requisition
This lesson explains how to create a new catalog requisition. You will begin at the eProcurement Home Page and use the Create Requisition hyperlink.
Navigation The Create Requisition component can be located by following this navigation path:
Menu Group eProcurement
Menu eProcurement Home Page
Menu Item Create Requisition
This is the eProcurement home page:
Click the Create Requisition hyperlink to open the New Requisition page.
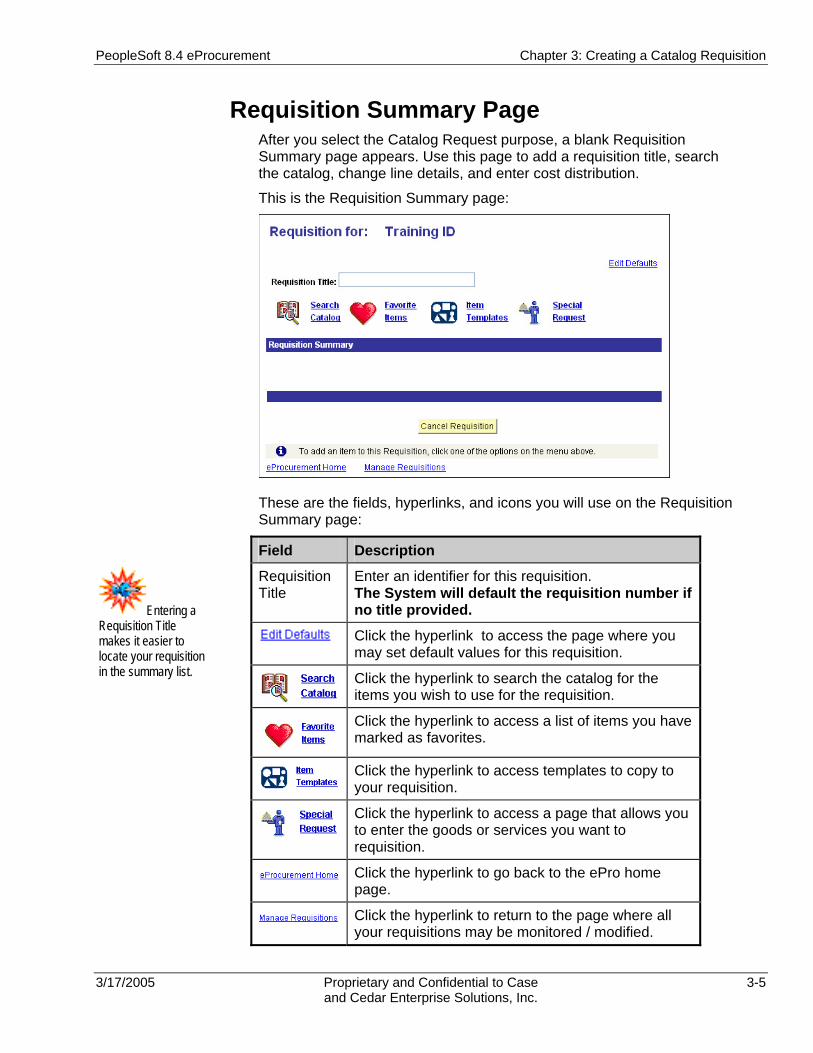
PeopleSoft 8.4 eProcurement Chapter 3: Creating a Catalog Requisition
3/17/2005 Proprietary and Confidential to Case 3-5 and Cedar Enterprise Solutions, Inc.
Requisition Summary Page After you select the Catalog Request purpose, a blank Requisition Summary page appears. Use this page to add a requisition title, search the catalog, change line details, and enter cost distribution.
This is the Requisition Summary page:
These are the fields, hyperlinks, and icons you will use on the Requisition Summary page:
Field Description
Requisition Title
Enter an identifier for this requisition. The System will default the requisition number if no title provided.
Click the hyperlink to access the page where you may set default values for this requisition.
Click the hyperlink to search the catalog for the items you wish to use for the requisition.
Click the hyperlink to access a list of items you have marked as favorites.
Click the hyperlink to access templates to copy to your requisition.
Click the hyperlink to access a page that allows you to enter the goods or services you want to requisition.
Click the hyperlink to go back to the ePro home page.
Click the hyperlink to return to the page where all your requisitions may be monitored / modified.
Entering a Requisition Title makes it easier to locate your requisition in the summary list.
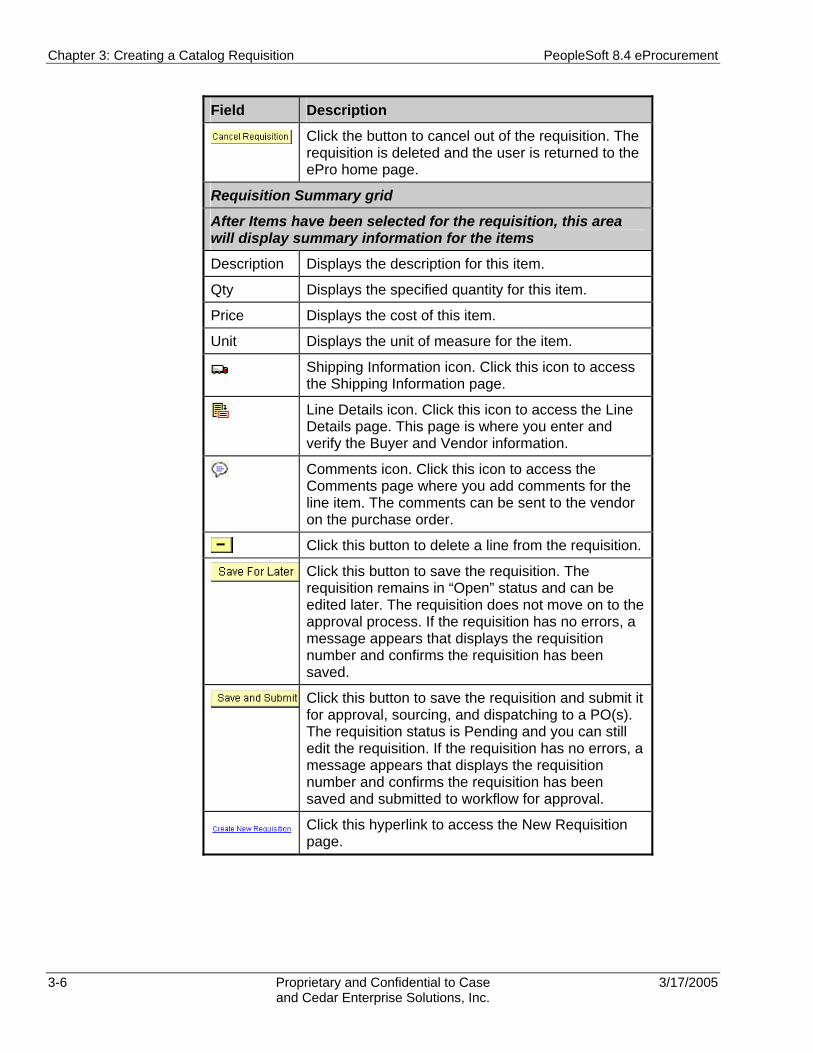
Chapter 3: Creating a Catalog Requisition PeopleSoft 8.4 eProcurement
3-6 Proprietary and Confidential to Case 3/17/2005 and Cedar Enterprise Solutions, Inc.
Field Description
Click the button to cancel out of the requisition. The requisition is deleted and the user is returned to the ePro home page.
Requisition Summary grid
After Items have been selected for the requisition, this area will display summary information for the items
Description Displays the description for this item.
Qty Displays the specified quantity for this item.
Price Displays the cost of this item.
Unit Displays the unit of measure for the item.
Shipping Information icon. Click this icon to access the Shipping Information page.
Line Details icon. Click this icon to access the Line Details page. This page is where you enter and verify the Buyer and Vendor information.
Comments icon. Click this icon to access the Comments page where you add comments for the line item. The comments can be sent to the vendor on the purchase order.
Click this button to delete a line from the requisition.
Click this button to save the requisition. The requisition remains in “Open” status and can be edited later. The requisition does not move on to the approval process. If the requisition has no errors, a message appears that displays the requisition number and confirms the requisition has been saved.
Click this button to save the requisition and submit it for approval, sourcing, and dispatching to a PO(s). The requisition status is Pending and you can still edit the requisition. If the requisition has no errors, a message appears that displays the requisition number and confirms the requisition has been saved and submitted to workflow for approval.
Click this hyperlink to access the New Requisition page.

PeopleSoft 8.4 eProcurement Chapter 3: Creating a Catalog Requisition
3/17/2005 Proprietary and Confidential to Case 3-7 and Cedar Enterprise Solutions, Inc.
Edit Defaults To change or verify user, requestor, and business unit default values for the entire requisition, click Edit Defaults on the Requisition Summary page.
This is the Requisition Defaults page:
The fields and links you will use on the Requisition Defaults page are:
Fields Description
Default Select this radio button to use the defaults from your user, requestor, and business unit definitions, using the default hierarchy for procurement. When you select this option, the default values are display-only.
Override Select to override the default values from your user, requestor, and business unit definitions. The default values that appear may be edited.
Line Defaults group box:
Vendor Enter the ID of the vendor. When you <Tab> out of the Vendor field, the default location for the selected vendor appears to the right of the Vendor field.
Click this hyperlink to access the Vendor Lookup page. The Vendor Lookup page differs from Vendor Search because search can be made on full name or address (city, state, zip) instead of only ID or short name.
Click this hyperlink to access the address page for entry of a shipping address that will be used for just this order.
Remember the values you enter here will be entered on each line of your requisition.
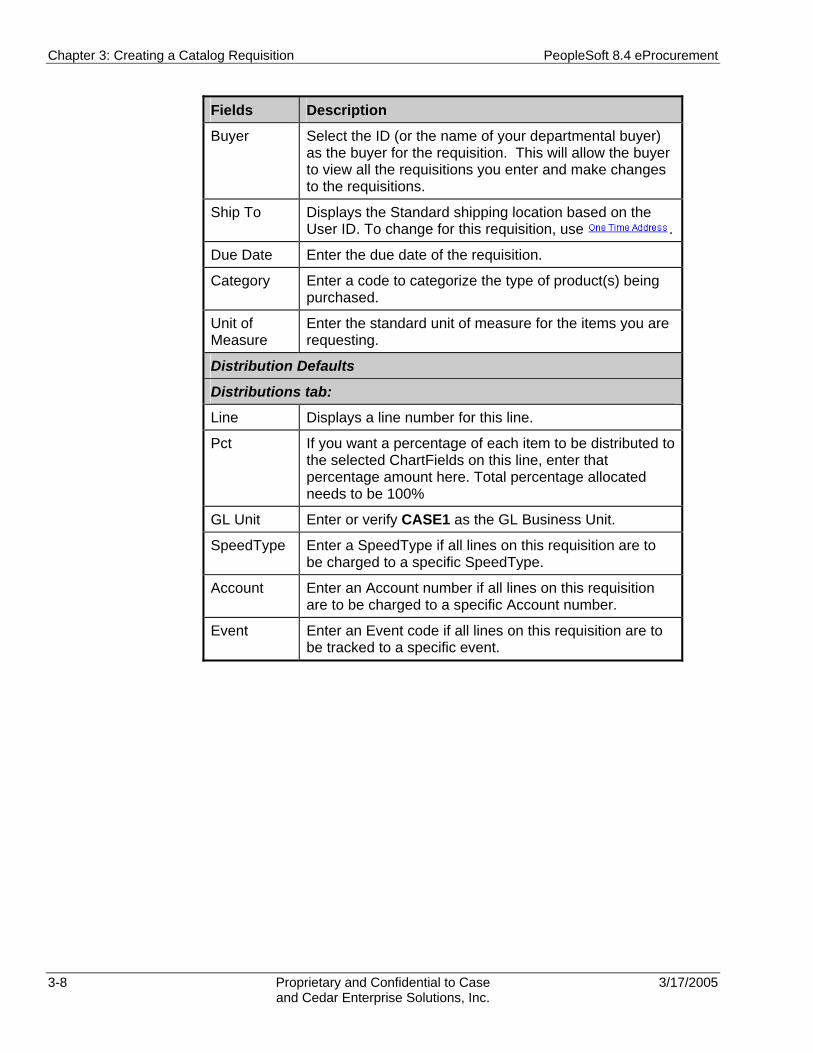
Chapter 3: Creating a Catalog Requisition PeopleSoft 8.4 eProcurement
3-8 Proprietary and Confidential to Case 3/17/2005 and Cedar Enterprise Solutions, Inc.
Fields Description
Buyer Select the ID (or the name of your departmental buyer) as the buyer for the requisition. This will allow the buyer to view all the requisitions you enter and make changes to the requisitions.
Ship To Displays the Standard shipping location based on the User ID. To change for this requisition, use .
Due Date Enter the due date of the requisition.
Category Enter a code to categorize the type of product(s) being purchased.
Unit of Measure
Enter the standard unit of measure for the items you are requesting.
Distribution Defaults
Distributions tab:
Line Displays a line number for this line.
Pct If you want a percentage of each item to be distributed to the selected ChartFields on this line, enter that percentage amount here. Total percentage allocated needs to be 100%
GL Unit Enter or verify CASE1 as the GL Business Unit.
SpeedType Enter a SpeedType if all lines on this requisition are to be charged to a specific SpeedType.
Account Enter an Account number if all lines on this requisition are to be charged to a specific Account number.
Event Enter an Event code if all lines on this requisition are to be tracked to a specific event.

PeopleSoft 8.4 eProcurement Chapter 3: Creating a Catalog Requisition
3/17/2005 Proprietary and Confidential to Case 3-9 and Cedar Enterprise Solutions, Inc.
Lesson 3: Searching the Catalog
On the Requisition Summary page, click to display the Search Catalog page.
This is the Search Catalog page:
These are the fields on the Search Catalog page:
Field Description
Return to Summary Click the hyperlink to return to the Requisition Summary page.
Enter information in the search field and click this button to search for items in the catalog.
Browse Catalogs (lists available catalogs)
All Purchasing Catalog Items
Click this link to see the available catalog. Continue to click the links to open the catalog and display the items.
Click All Purchasing Catalog Items to browse the catalog.
Click Gases and Gass Supplies for Res to open the Gas Cylinder catalog.
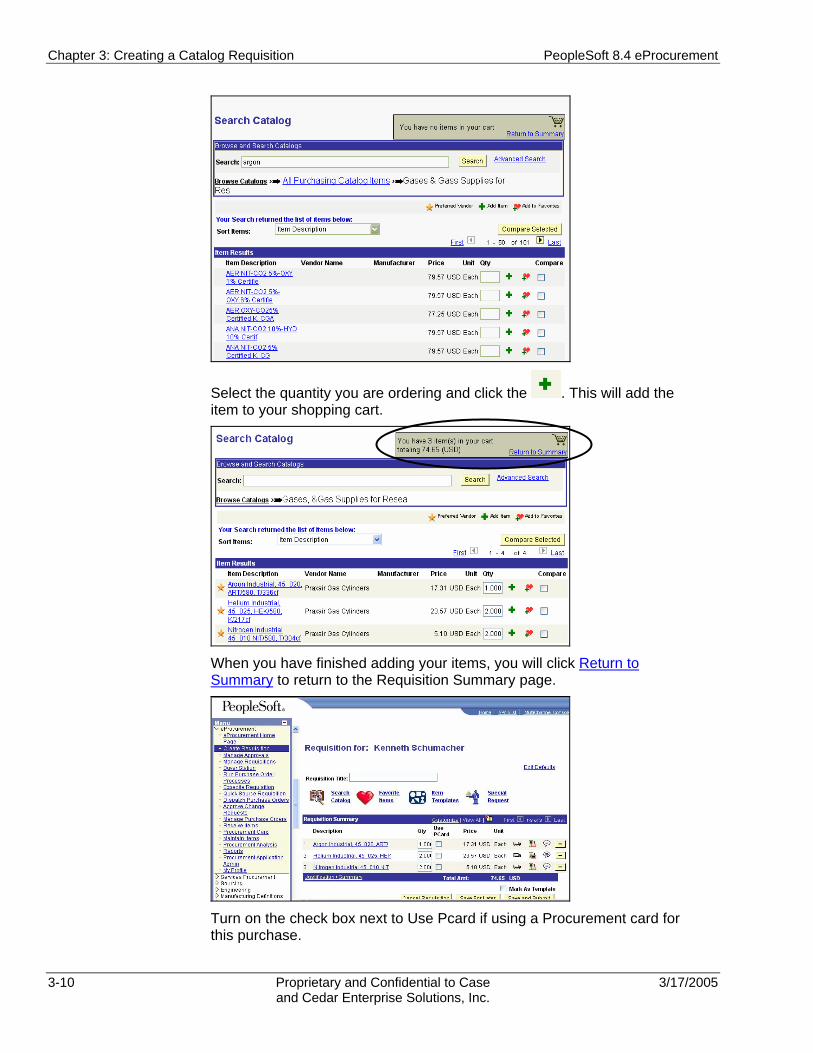
Chapter 3: Creating a Catalog Requisition PeopleSoft 8.4 eProcurement
3-10 Proprietary and Confidential to Case 3/17/2005 and Cedar Enterprise Solutions, Inc.
Select the quantity you are ordering and click the . This will add the item to your shopping cart.
When you have finished adding your items, you will click Return to Summary to return to the Requisition Summary page.
Turn on the check box next to Use Pcard if using a Procurement card for this purchase.

PeopleSoft 8.4 eProcurement Chapter 3: Creating a Catalog Requisition
3/17/2005 Proprietary and Confidential to Case 3-11 and Cedar Enterprise Solutions, Inc.
Lesson 4: Specifying Shipping Information
Once items have been selected from the catalog and added to the requisition, the Requisition Summary page re-appears with additional fields, icons, and hyperlinks:
These are the icons on the Requisition Summary page:
Fields Description
Requisition Summary grid
Link to page for changing shipping information and ChartField distribution information.
Link to the Line Detail page.
Link to the Line Comments pages.
When you click (the Shipping icon), the Shipping Information page appears.
Selecting Ship To Locations The default Ship To location for all requisitions is the building and room of the Requestor. Another reason for using the ‘On behalf of’ feature to select the appropriate Requestor is that it changes the default shipping location to that person’s location.
You can also set up different Ship To addresses for each line of your requisition. All <client> buildings and rooms will be listed as potential Ship To locations.
Refer to Lesson 2, Creating a New Requisition, for additional field descriptions for the Requisition Summary page.

Chapter 3: Creating a Catalog Requisition PeopleSoft 8.4 eProcurement
3-12 Proprietary and Confidential to Case 3/17/2005 and Cedar Enterprise Solutions, Inc.
This is the Shipping Information page:
These are the fields in the Shipping Information section:
Fields Description
Ship to Location Enter the location within the organization that the items should be shipped to. This defaults to the Requestor’s location.
Attention Enter the person to whom to address the shipment. This defaults to the Requestor.
Quantity Displays the quantity of items to be shipped.
Due Date Enter the date the shipment is needed.
This Due Date appears on the purchase order so that the supplier will know when to ship.
Total Displays the total dollar amount to be shipped.
Click this icon to go to the line accounting or cost Distribution Information page.
Setting requisition defaults does not update the Department ChartField, so use this link to verify/update the Department value.
Click this icon to go to the page for specifying a one time shipping location (other than an existing <client>location).
If you want to use a non-standard location, select ONETIME as the Ship To value, then click
(One-Time Address), and then enter the non-standard address.

PeopleSoft 8.4 eProcurement Chapter 3: Creating a Catalog Requisition
3/17/2005 Proprietary and Confidential to Case 3-13 and Cedar Enterprise Solutions, Inc.
Lesson 5: Setting Up Cost Distribution and Line Details
As reviewed in Lesson 2, Creating a New Requisition, of this chapter, default values can be viewed and edited for the entire requisition using the
hyperlink on the Requisition Summary page.
It is also possible to review and update the cost distribution information for individual lines on the requisition.
Navigation You can access and update Cost Distribution Information by following this navigation path:
Menu Group EProcurement
Menu eProcurement Home Page
Menu Item Create Requisition
Page Requisition Summary
Icons Shipping Information
Distribution Information
Line Details
Cost Distribution Information For each line of your requisition, you must enter the specific information for the distribution of costs because it is required for posting to the general ledger.
On any line of the Requisition Summary page, click and the Shipping Information page appears for that line: From the Shipping Information
page, click (Distribution Information icon), and the Distribution Information page appears.

Chapter 3: Creating a Catalog Requisition PeopleSoft 8.4 eProcurement
3-14 Proprietary and Confidential to Case 3/17/2005 and Cedar Enterprise Solutions, Inc.
This is the Distribution Information page:
These are the fields on the Distribution Information page:
Fields Description
Distribute By
Select a value to indicate how the split should be calculated. Choices are quantity (Qty) or Amount (Amt).
Distribution Qty
Displays the quantity of items on this line to be distributed.
SpeedType Turn on the checkbox to use a pre-assigned distribution combination for the requisition. When the check box is selected, a new field appears that allows you to enter the SpeedType value.
Details tab
Status Displays the status of the requisition line.
Location Enter the Ship To code from the Shipping Information page. This is a Required Field and defaults to the Requestor’s location.
Req Qty Enter the quantity. This is a Required Field and defaults to the line total.
Amount / Req Pct
Displays the amount of the line that goes to the distribution. The amount or percent will be displayed determined by the field used in the Distribute By field above.
Percent Using the Quantity distribution method what percentage of the line code is to be distributed to this distribution row. Total percentage allocated needs to be 100%
GL Unit Enter the General Ledger business unit to charge. Defaults to CASE1. This is a Required Field.
In the Defaults page, various fields may be protected from update. In the line Distribution Information page, all fields are updateable.
All ChartFields are displayed on this page. Availability for update depends on previously set defaults and the Default / Override option chosen.
PeopleSoft 8.4 eProcurement Chapter 3: Creating a Catalog Requisition
3/17/2005 Proprietary and Confidential to Case 3-15 and Cedar Enterprise Solutions, Inc.
Fields Description
Operating Unit
Enter the Operating Unit to charge. This defaults to the Requestor’s operating unit based on the user profile, but can be changed. This is a Required Field.
Department Enter the Department to charge. This defaults to the Requestor’s department based on the user profile, but can be changed. This is a Required Field.
Fund Enter the Fund to charge. This defaults to the Requestor’s fund based on the user profile, but can be changed. This is a Required Field.
Project Enter the project ID number to charge.
Program Code
Enter the Program to charge. This defaults to the Requestor’s program based on the user profile, but can be changed. This is a Required Field.
Account Enter the Account to charge. This is a Required Field.
Class Enter the Class to charge.
Fund Affiliate
Enter the Fund Affiliate to charge.
More Details tab:
Budget Date Enter the date to use for budget encumbrance. This defaults to the current date and can be changed.
More Details 2 tab:
Stat Enter the GL statistics code to charge.
Open Amt Displays the amount of the line open for distribution.
GL Base Amount.
Displays the amount in the base GL reporting currency instead of the purchasing currency if multi-currency processing is used. At <client> only USD is used
Exch Rt Displays the multi-currency exchange rate between purchase currency and base currency.
If you are purchasing a capital or controlled asset, review the Account ChartField that defaulted from the category. If it is incorrect, change the Account to appropriately record the expenditure as a capital or controlled asset.
Use the crosswalks and/or trees to determine the correct values. Refer to the PeopleSoft 8.4 Financials Overview course materials for additional details.
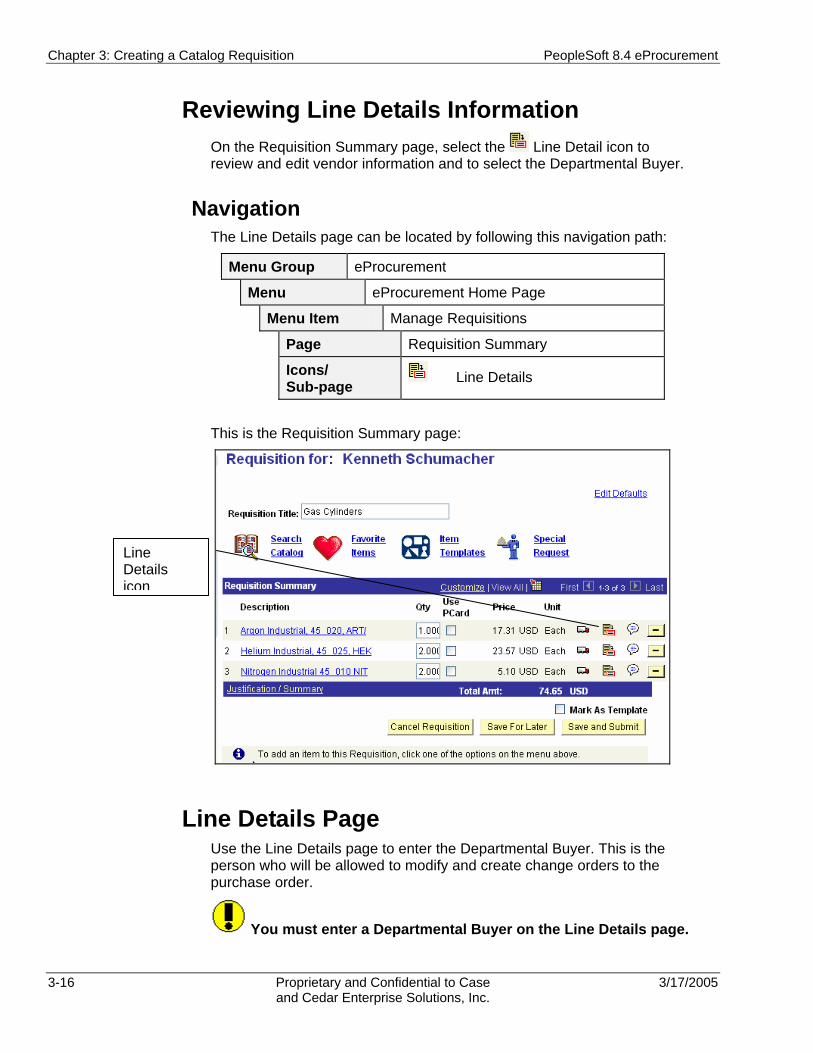
Chapter 3: Creating a Catalog Requisition PeopleSoft 8.4 eProcurement
3-16 Proprietary and Confidential to Case 3/17/2005 and Cedar Enterprise Solutions, Inc.
Reviewing Line Details Information On the Requisition Summary page, select the Line Detail icon to review and edit vendor information and to select the Departmental Buyer.
Navigation The Line Details page can be located by following this navigation path:
Menu Group eProcurement
Menu eProcurement Home Page
Menu Item Manage Requisitions
Page Requisition Summary
Icons/ Sub-page Line Details
This is the Requisition Summary page:
Line Details Page Use the Line Details page to enter the Departmental Buyer. This is the person who will be allowed to modify and create change orders to the purchase order.
You must enter a Departmental Buyer on the Line Details page.
Line Details icon
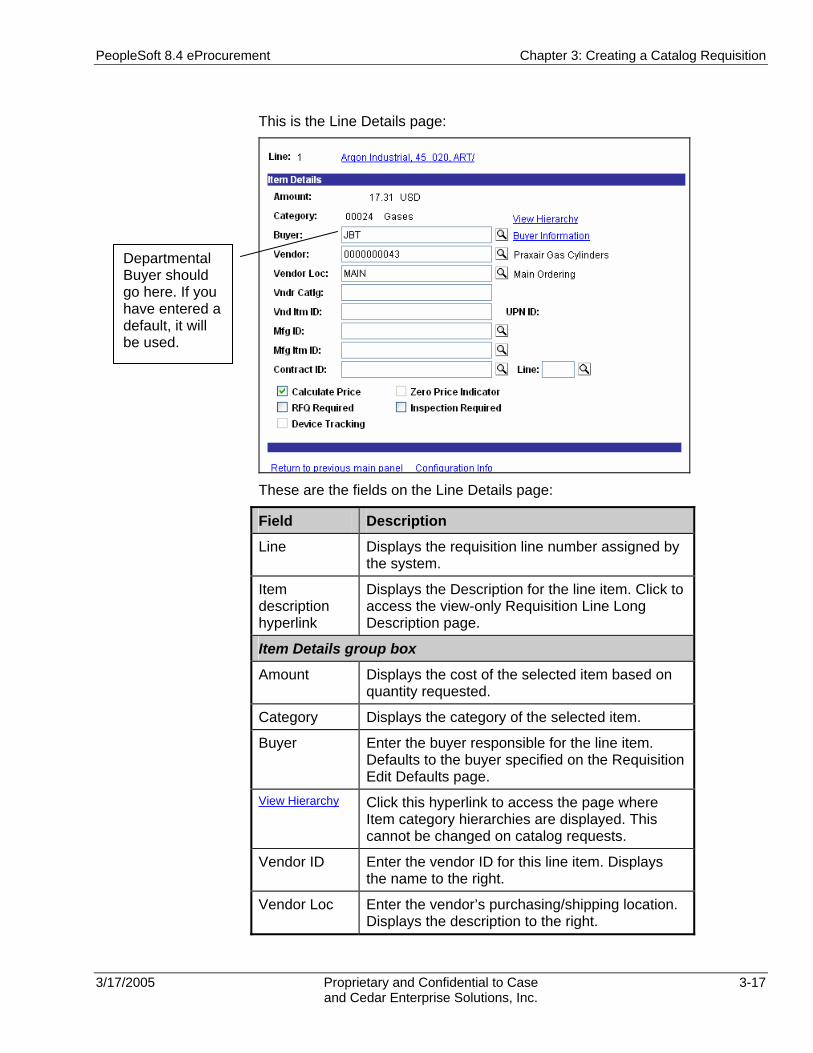
PeopleSoft 8.4 eProcurement Chapter 3: Creating a Catalog Requisition
3/17/2005 Proprietary and Confidential to Case 3-17 and Cedar Enterprise Solutions, Inc.
This is the Line Details page:
These are the fields on the Line Details page:
Field Description
Line Displays the requisition line number assigned by the system.
Item description hyperlink
Displays the Description for the line item. Click to access the view-only Requisition Line Long Description page.
Item Details group box
Amount Displays the cost of the selected item based on quantity requested.
Category Displays the category of the selected item.
Buyer Enter the buyer responsible for the line item. Defaults to the buyer specified on the Requisition Edit Defaults page.
View Hierarchy Click this hyperlink to access the page where Item category hierarchies are displayed. This cannot be changed on catalog requests.
Vendor ID Enter the vendor ID for this line item. Displays the name to the right.
Vendor Loc Enter the vendor’s purchasing/shipping location. Displays the description to the right.
Departmental Buyer should go here. If you have entered a default, it will be used.
Chapter 3: Creating a Catalog Requisition PeopleSoft 8.4 eProcurement
3-18 Proprietary and Confidential to Case 3/17/2005 and Cedar Enterprise Solutions, Inc.
Field Description
Click this hyperlink to access the page displaying the buyer’s phone and fax numbers.
Vndr Catlg Enter the name of the vendor catalog from which you are requesting goods, if applicable.
Vnd Itm ID Enter the vendor’s identification number for this item.
Mfg ID Enter the manufacturer’s classification for the item.
Mfg Item ID Enter the manufacturer identification number for this item. This defaults from the item table if the item has been established and has a manufacturer’s ID associated with it.
Contract ID Enter the purchasing Contract ID associated to the purchase.
Line Enter the line of the purchasing contract to which this item applies.
GPO ID Displays the group purchase organization ID.
GPO Item ID Displays the Group Purchase Organization item identifier.
Calculate Price?
Turn on the check box to calculate the price of the requisition as items are added
Zero Price Indicator
Turn on the check box to indicate a zero item price.
RFQ Required
Turn on the check box if a request for a quote is required for this item.
Inspection Required
Turn on the check box if you require an inspection of the goods at receiving.
Device Tracking
Turn on the check box to indicate that the line contains an item that is subject to device tracking.
Procedure – Creating a Catalog Requisition
Use the following steps to create a new catalog requisition.
To create a new catalog requisition: 1. From the left-hand navigation, select eProcurement. 2. Select eProcurement Home Page.
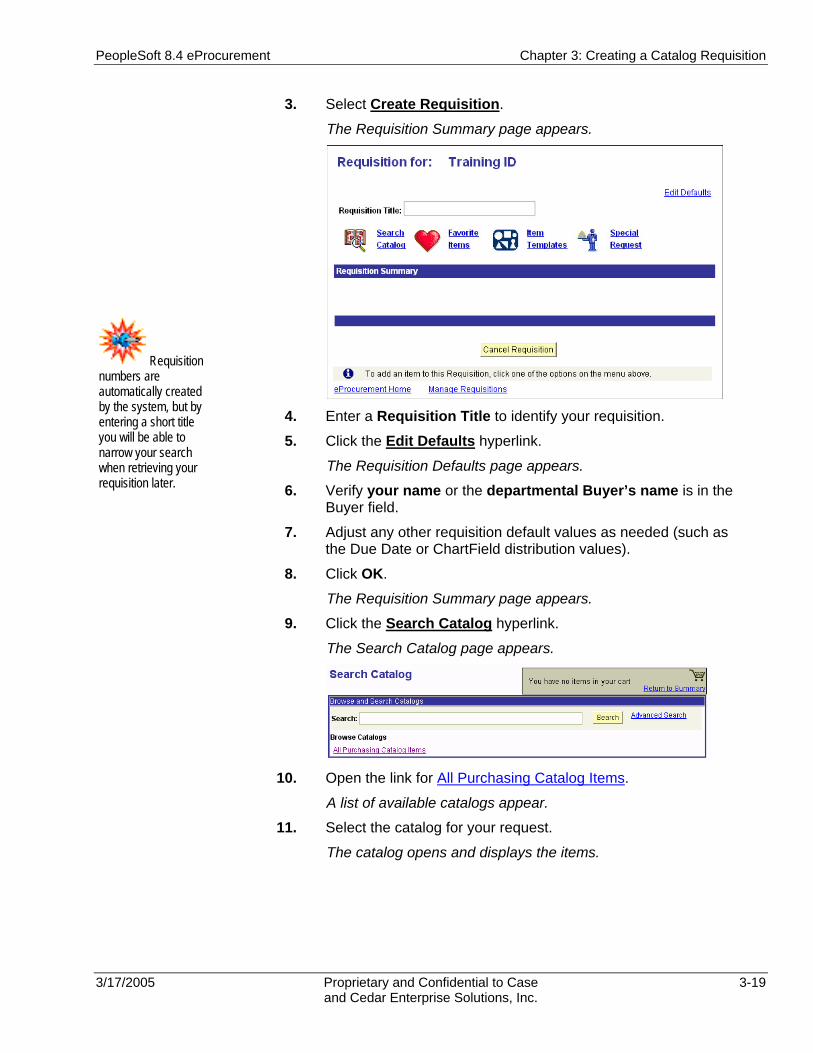
PeopleSoft 8.4 eProcurement Chapter 3: Creating a Catalog Requisition
3/17/2005 Proprietary and Confidential to Case 3-19 and Cedar Enterprise Solutions, Inc.
3. Select Create Requisition.
The Requisition Summary page appears.
4. Enter a Requisition Title to identify your requisition.
5. Click the Edit Defaults hyperlink.
The Requisition Defaults page appears.
6. Verify your name or the departmental Buyer’s name is in the Buyer field.
7. Adjust any other requisition default values as needed (such as the Due Date or ChartField distribution values).
8. Click OK.
The Requisition Summary page appears.
9. Click the Search Catalog hyperlink.
The Search Catalog page appears.
10. Open the link for All Purchasing Catalog Items.
A list of available catalogs appear.
11. Select the catalog for your request.
The catalog opens and displays the items.
Requisition numbers are automatically created by the system, but by entering a short title you will be able to narrow your search when retrieving your requisition later.

Chapter 3: Creating a Catalog Requisition PeopleSoft 8.4 eProcurement
3-20 Proprietary and Confidential to Case 3/17/2005 and Cedar Enterprise Solutions, Inc.
12. Enter keyword values in the Search for box.
13. Click Go.
The Search result /product match page appears.
14. Enter Quantity for the line item.
15. Click .
16. When all items have been selected, click Return to Summary.
The Requisition Summary page appears with all selected items.
To verify or update the Shipping Information for each line:
17. Click (Shipping Information icon).
The Shipping Information page appears.
18. If the shipping location is a standard <client> location, enter the Ship To location and skip to step 27.
19. If it is a one time shipping location (non-<client> location), enter ONETIME in the Ship to Location field.
20. Click the One time address icon.
The One Time Shipping Information page appears.
Enter the correct, one-time shipping address.
21. Click Return.
The Shipping Information page appears.
22. Enter the name of the person receiving the item in the Attention field, if other than the Requestor.
Click next to items you order frequently. When you save the requisition, those items will be added to the Favorite Items list.

PeopleSoft 8.4 eProcurement Chapter 3: Creating a Catalog Requisition
3/17/2005 Proprietary and Confidential to Case 3-21 and Cedar Enterprise Solutions, Inc.
23. Enter the date that the requested item is needed in the Due Date field.
24. If the requested items are going to multiple locations and or people, click the button and repeat steps 21 through 27.
To verify or update the Distribution Information for each line:
25. Click the (Cost Distribution icon).
The Line Item Distribution Information page appears.
26. Enter the SpeedType. 27. Enter an Account. 28. Enter an Event, if applicable.
29. For split funding on the requested items, click the button and repeat steps 30-32.
30. Click Return to Shipping Information.
The Shipping Information page appears.
31. Click Return to Requisition Summary.
The Requisition summary page appears.
To verify or update the Line Details for each line:
32. Click the (Line Details icon).
The Line Details page appears.
33. Verify that the Buyer field contains the Departmental Buyer’s user ID.
34. Verify that Category information is correct.
35. Click Return to previous main panel. The Requisition Summary page appears.
To submit the requisition via workflow for approval: 36. Once all of the items are selected for the requisition and the
shipping, distribution, and line details information has been entered, click .
The Requisition Summary page is updated and the requisition is saved and submitted to workflow for approval.
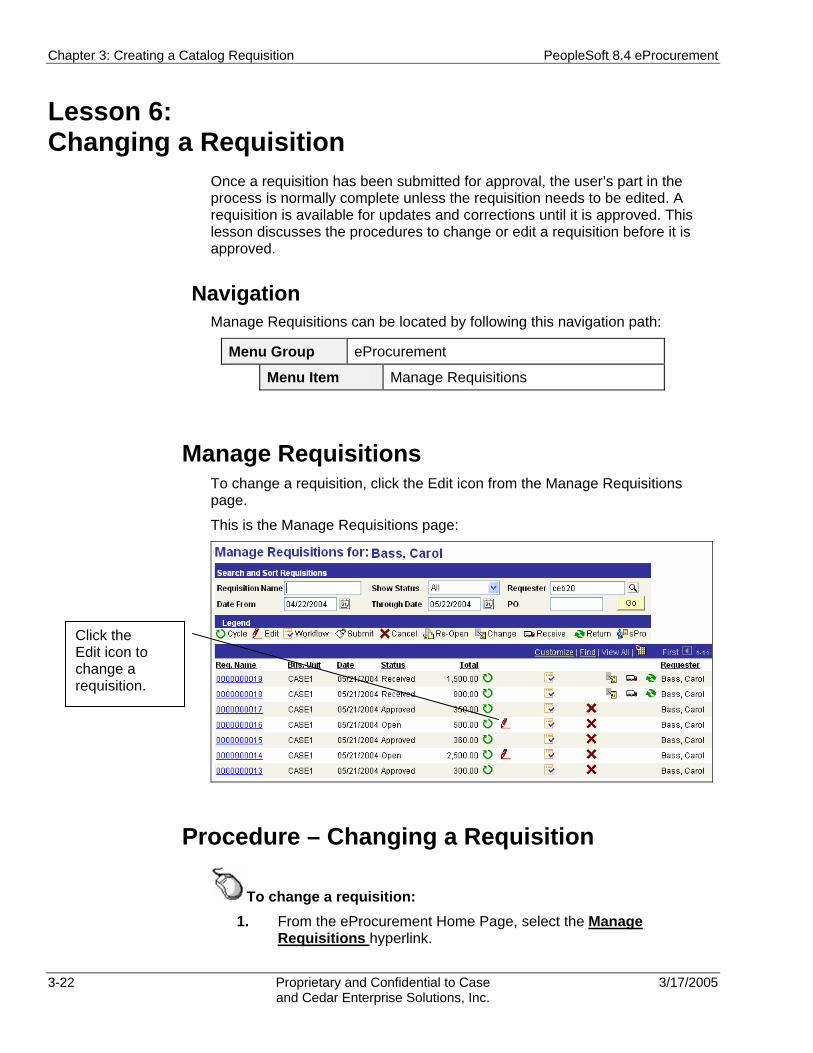
Chapter 3: Creating a Catalog Requisition PeopleSoft 8.4 eProcurement
3-22 Proprietary and Confidential to Case 3/17/2005 and Cedar Enterprise Solutions, Inc.
Lesson 6: Changing a Requisition
Once a requisition has been submitted for approval, the user’s part in the process is normally complete unless the requisition needs to be edited. A requisition is available for updates and corrections until it is approved. This lesson discusses the procedures to change or edit a requisition before it is approved.
Navigation Manage Requisitions can be located by following this navigation path:
Menu Group eProcurement
Menu Item Manage Requisitions
Manage Requisitions To change a requisition, click the Edit icon from the Manage Requisitions page.
This is the Manage Requisitions page:
Procedure – Changing a Requisition
To change a requisition: 1. From the eProcurement Home Page, select the Manage
Requisitions hyperlink.
Click the Edit icon to change a requisition.
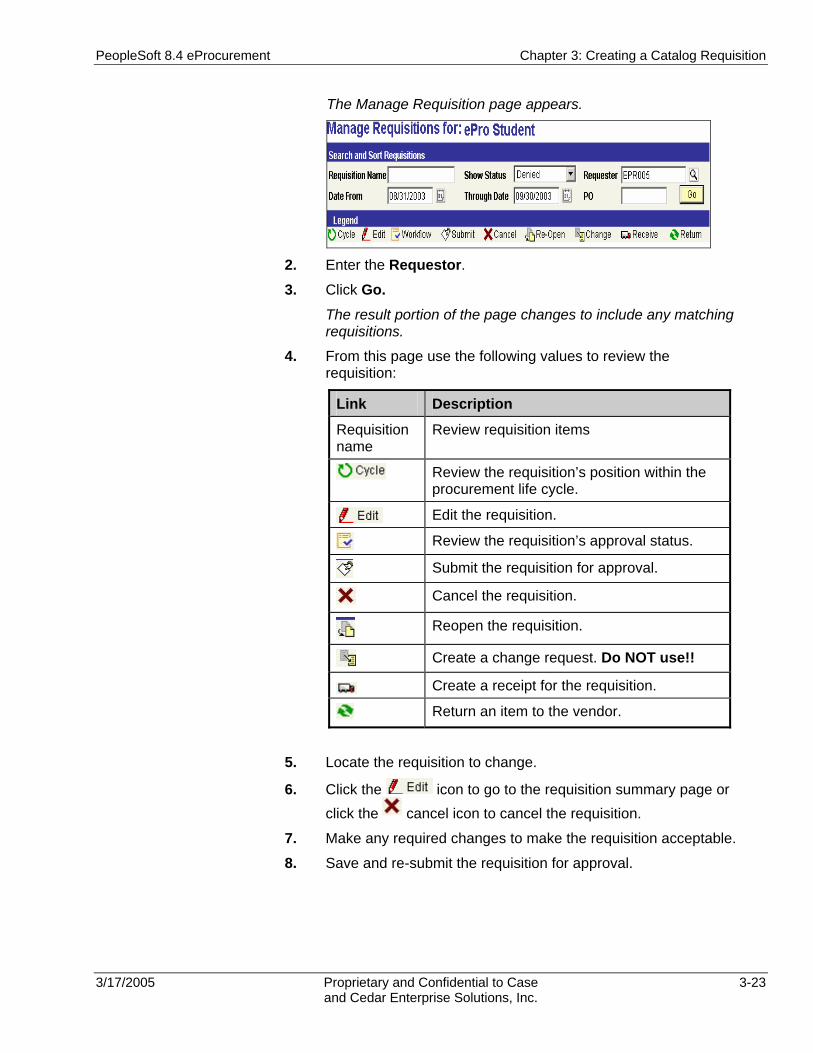
PeopleSoft 8.4 eProcurement Chapter 3: Creating a Catalog Requisition
3/17/2005 Proprietary and Confidential to Case 3-23 and Cedar Enterprise Solutions, Inc.
The Manage Requisition page appears.
2. Enter the Requestor. 3. Click Go.
The result portion of the page changes to include any matching requisitions.
4. From this page use the following values to review the requisition:
Link Description
Requisition name
Review requisition items
Review the requisition’s position within the procurement life cycle.
Edit the requisition.
Review the requisition’s approval status.
Submit the requisition for approval.
Cancel the requisition.
Reopen the requisition.
Create a change request. Do NOT use!!
Create a receipt for the requisition.
Return an item to the vendor.
5. Locate the requisition to change.
6. Click the icon to go to the requisition summary page or click the cancel icon to cancel the requisition.
7. Make any required changes to make the requisition acceptable.
8. Save and re-submit the requisition for approval.
Chapter 3: Creating a Catalog Requisition PeopleSoft 8.4 eProcurement
3-24 Proprietary and Confidential to Case 3/17/2005 and Cedar Enterprise Solutions, Inc.
Review Questions
1. Where do you start to create your requisition?
2. What are the steps to create a catalog requisition?
3. What are the business units to use for your requisitions?
4. Is the requestor the same as the buyer?
5. Why do you enter a requisition title?
6. Why do you need to designate ChartFields for each line?
7. What happens when you click on the ‘Save and Submit’ button?
3/17/2005 Proprietary and Confidential to Case 4-1 and Cedar Enterprise Solutions, Inc.
Chapter 4 Approval and Budget Checking
This chapter explains the processes to approve and budget check requisitions.
Chapter Objectives After completing this chapter you will be able to:
• Explain eProcurement workflow.
• Approve requisitions.
• Deny requisitions
• Budget check requisitions.
Chapter Lessons This chapter contains the following lessons:
Lesson 1: Approval Workflow ..................................................................4-2 Lesson 2: Performing Approvals..............................................................4-6 Lesson 3: Performing Budget Checking ................................................4-13 Review Questions ..................................................................................4-15

Chapter 4: Approval and Budget Checking PeopleSoft 8.4 eProcurement
4-2 Proprietary and Confidential to Case 3/17/2005 and Cedar Enterprise Solutions, Inc.
Lesson 1: Approval Workflow
The eProcurement application provides a standardized workflow for routing and processing all types of requisitions for goods and services. Workflow is setup behind the scenes to automate the processes that govern:
• Approvals
• Creation of purchase orders
• Budget checking of purchase orders
• Finalization of purchasing procedures
All requisitions must be approved before being converted into purchase orders. A scheduled batch process accepts the requisition and places it into the approval workflow process. Once you click the ‘Save and Submit’ button on the Requisition Summary page, the requisition will be picked up the next time the workflow process runs and deposited in the Approver’s Worklist.
Navigation Manage Requisitions can be located by following this navigation path:
Menu Group Eprocurement
Menu eProcurement Home Page
Menu Item Manage Requisitions.
You may see the following icon
on the Manage Requisitions page. You can click on this icon to manually submit the requisition and send to the Approver’s worklist.
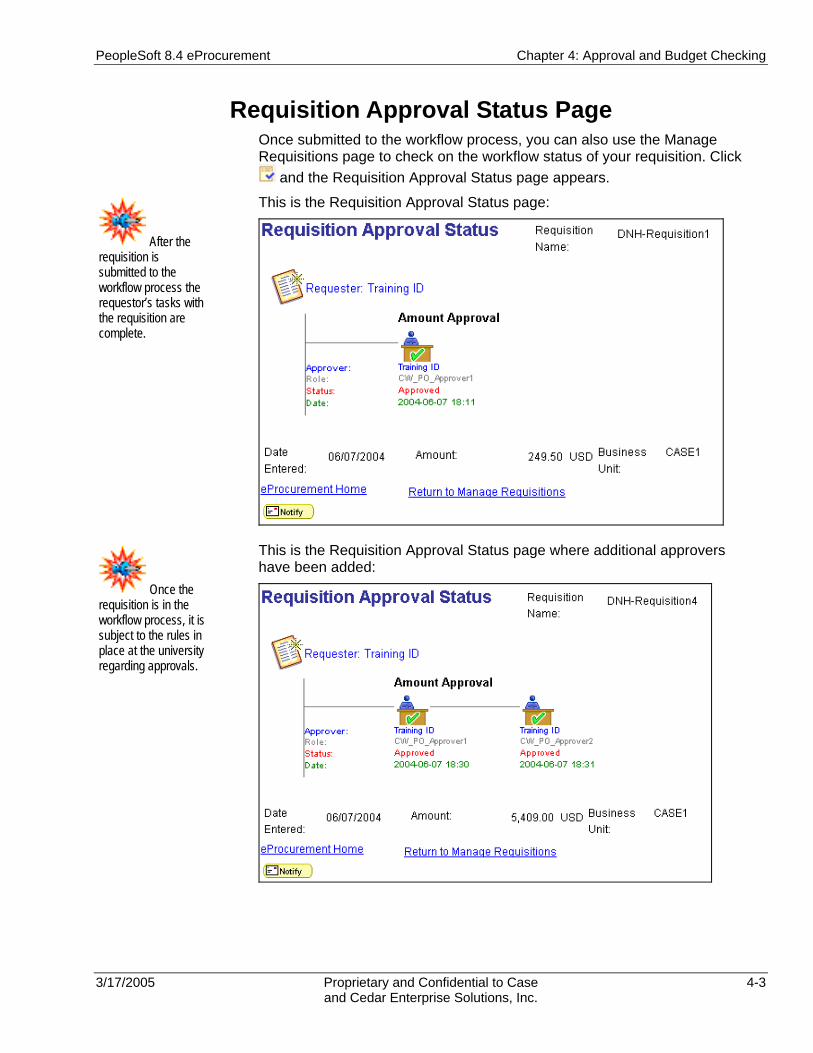
PeopleSoft 8.4 eProcurement Chapter 4: Approval and Budget Checking
3/17/2005 Proprietary and Confidential to Case 4-3 and Cedar Enterprise Solutions, Inc.
Requisition Approval Status Page Once submitted to the workflow process, you can also use the Manage Requisitions page to check on the workflow status of your requisition. Click
and the Requisition Approval Status page appears.
This is the Requisition Approval Status page:
This is the Requisition Approval Status page where additional approvers have been added:
After the requisition is submitted to the workflow process the requestor’s tasks with the requisition are complete.
Once the requisition is in the workflow process, it is subject to the rules in place at the university regarding approvals.

Chapter 4: Approval and Budget Checking PeopleSoft 8.4 eProcurement
4-4 Proprietary and Confidential to Case 3/17/2005 and Cedar Enterprise Solutions, Inc.
Workflow Rules Workflow rules have been established and are part of the steps that a requisition takes on its way to becoming a purchase order. Workflow rules incorporate CASE Western Reserve University business processes and established guidelines for purchasing. Workflow is triggered as soon as a requisition is ‘Saved and Submitted’.
Workflow Roles To better understand workflow, it is helpful to review the Roles associated with this process. The requisition is routed to the Level 1 Approver and additional approvers, depending upon the value or type of goods purchased. Additional Approvers or Reviewers can be added “on the fly”.
This chart describes the workflow roles:
Role Description
Requestor: Person needing the goods or services. Cannot approve their own requisition.
Approver Level 1 Person charged with reviewing and approving purchases, such as a Supervisor, first level Management Center Approver, or Environmental Safety Approver. For Capital Equipment or Radioactive or Hazardous Materials, an Amount approval is required at this level. Can approve purchases up to $4,999.99. May add additional approvers and reviewers to a requisition as needed.
Approver Level 2 For items in specified categories or over specified limits. Can approve purchases up to $19,999.99. May add additional approvers and reviewers to a requisition as needed.
Approver Level 3 For items in specified categories or over specified limits. Can approve purchases up to $99,999.99. May add additional approvers and reviewers to a requisition as needed.
Approver Level 4 For items in specified categories or over specified limits. Can approve purchases up to $999,999,999. May add additional approvers and reviewers to a requisition as needed.
All Approved Requisitions will ultimately be routed to a Purchasing Buyer based on the line item Category selected.
Category Exceptions: • Radioactive • Flammable/Hazardous
Chemicals • Animals • Capital Equipment • Dental Supplies
An additional level of approval is required to approve the ChartFields for requisitions containing assets.
PeopleSoft 8.4 eProcurement Chapter 4: Approval and Budget Checking
3/17/2005 Proprietary and Confidential to Case 4-5 and Cedar Enterprise Solutions, Inc.
A requisition for any single item with a cost of $5,000 or more is considered a Capital Equipment (an asset) request. Therefore, three levels of amount approvals are required, as well as ChartField approval, before being routed by Category to the Purchasing Buyer.
Requisitions for Radioactive or Flammable Chemicals MUST be routed to Environmental Safety for review and approval, prior to being routed to Purchasing.
Email Notification Email notification will be sent to the Approver when a requisition has been routed to their Worklist and is awaiting approval.
Worklist Notification Entries will stay in the requester’s Worklist until they marked them worked. If the entry is in their Worklist more than 5 days an email and a Worklist notification is sent to the user. The user cannot reassign the Worklist entry to another user.
Approved Requisition Most requisitions should be approved in the first level; however, some may require additional levels of approval. Once all levels of approvals are received, the requisition can move on to the next stage in the process of becoming a purchase order.
Denied Requisition Emails and Worklist entries will be routed to the user that entered the requisition when a requisition is denied.

Chapter 4: Approval and Budget Checking PeopleSoft 8.4 eProcurement
4-6 Proprietary and Confidential to Case 3/17/2005 and Cedar Enterprise Solutions, Inc.
Lesson 2: Performing Approvals
When the requisition is submitted to the approval process it is immediately routed to the first stop on the approval process. This is the Level 1 Approver, which is typically a Supervisor. It is that person’s responsibility to review the requisition and either approve or deny the request.
When the requisition is submitted to workflow the Approver is notified via e-mail that there is an item in their Worklist that needs to be reviewed. This Worklist appears on the Manage Approvals page within eProcurement or in the workflow Worklist.
This is the eProcurement Home page:
Click the Worklist link to view the Worklist page.
Or work each item in the worklist shown at the bottom of the home page.
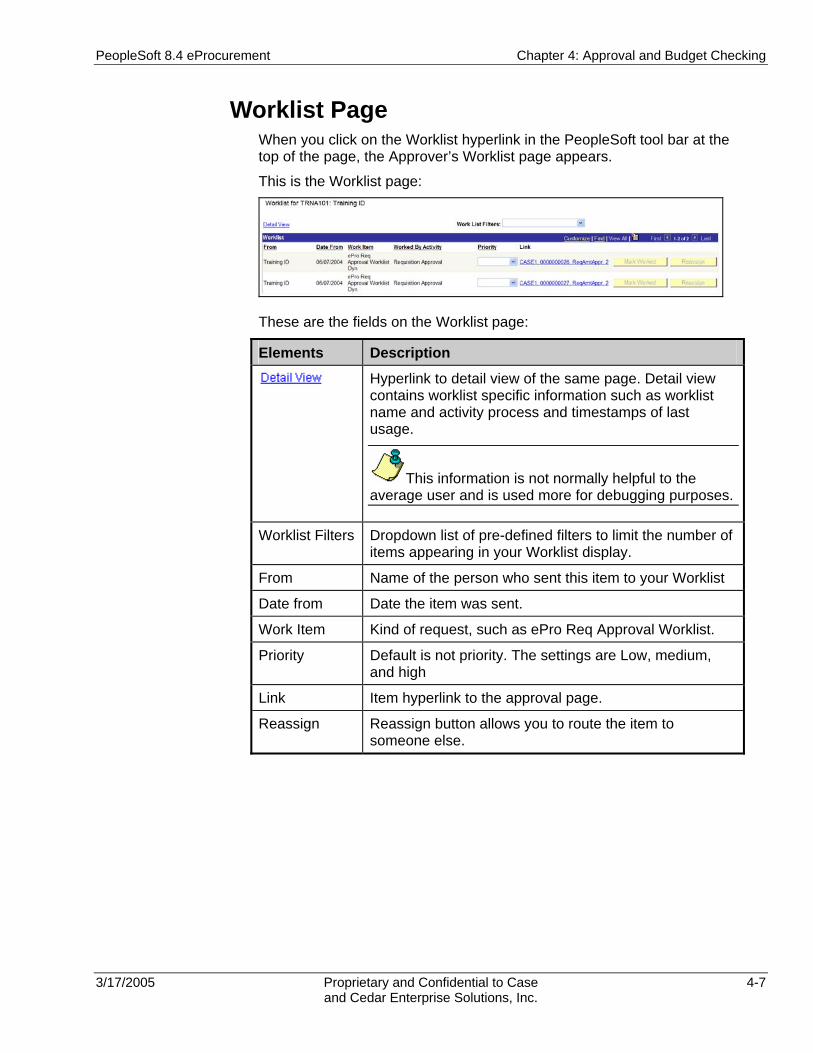
PeopleSoft 8.4 eProcurement Chapter 4: Approval and Budget Checking
3/17/2005 Proprietary and Confidential to Case 4-7 and Cedar Enterprise Solutions, Inc.
Worklist Page When you click on the Worklist hyperlink in the PeopleSoft tool bar at the top of the page, the Approver’s Worklist page appears.
This is the Worklist page:
These are the fields on the Worklist page:
Elements Description
Hyperlink to detail view of the same page. Detail view contains worklist specific information such as worklist name and activity process and timestamps of last usage.
This information is not normally helpful to the average user and is used more for debugging purposes.
Worklist Filters Dropdown list of pre-defined filters to limit the number of items appearing in your Worklist display.
From Name of the person who sent this item to your Worklist
Date from Date the item was sent.
Work Item Kind of request, such as ePro Req Approval Worklist.
Priority Default is not priority. The settings are Low, medium, and high
Link Item hyperlink to the approval page.
Reassign Reassign button allows you to route the item to someone else.

Chapter 4: Approval and Budget Checking PeopleSoft 8.4 eProcurement
4-8 Proprietary and Confidential to Case 3/17/2005 and Cedar Enterprise Solutions, Inc.
Requisition Approval Page To review, approve, or deny the item, click on an item’s hyperlink in the worklist, and the Requisition Approval page appears:
These are the fields on the Requisition Approval page:
Element Description
Rule ID Workflow approval rule being processed.
Step Step within the rule that is currently being approved.
Approve Button to approve the requisition. When pressed the workflow rule is executed and the requisition is moved to the next step in its approval flow.
Deny Button to click if the requisition is not approved.
Hold Button to change the status to Hold within the routing steps. On the Manage Requisitions page, no status change occurs.
Approver can add additional approvers or reviewers “on the fly.”
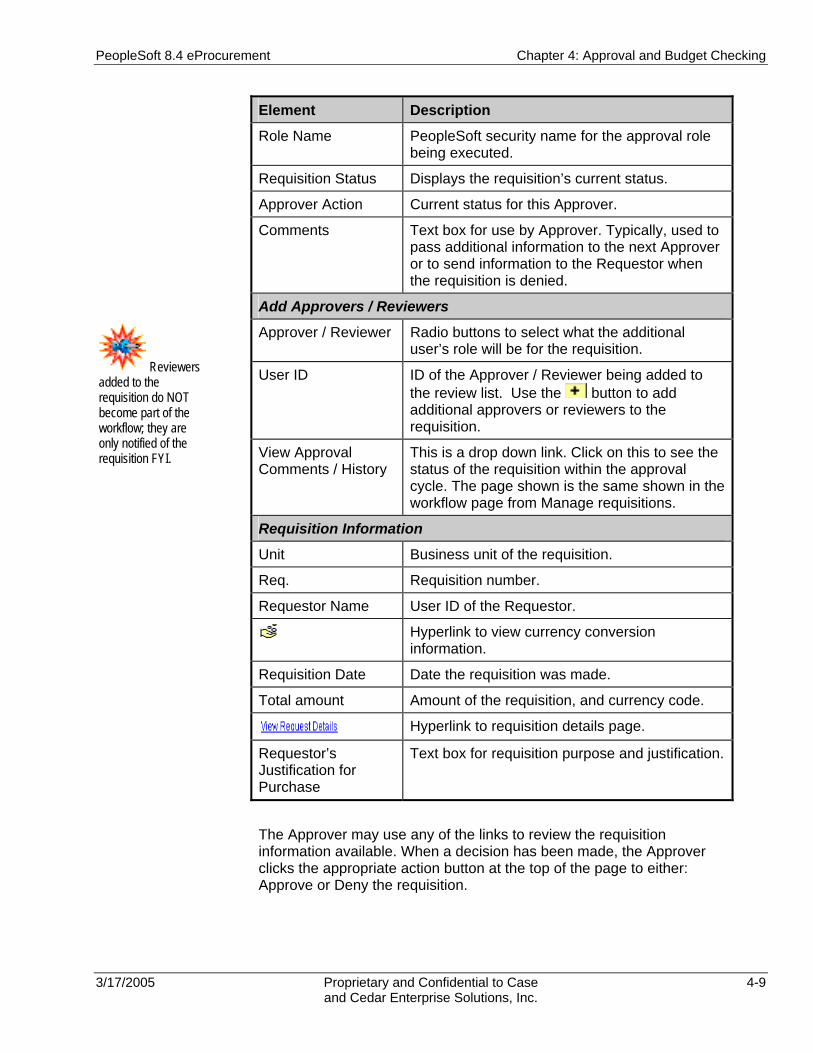
PeopleSoft 8.4 eProcurement Chapter 4: Approval and Budget Checking
3/17/2005 Proprietary and Confidential to Case 4-9 and Cedar Enterprise Solutions, Inc.
Element Description
Role Name PeopleSoft security name for the approval role being executed.
Requisition Status Displays the requisition’s current status.
Approver Action Current status for this Approver.
Comments Text box for use by Approver. Typically, used to pass additional information to the next Approver or to send information to the Requestor when the requisition is denied.
Add Approvers / Reviewers
Approver / Reviewer Radio buttons to select what the additional user’s role will be for the requisition.
User ID ID of the Approver / Reviewer being added to the review list. Use the button to add additional approvers or reviewers to the requisition.
View Approval Comments / History
This is a drop down link. Click on this to see the status of the requisition within the approval cycle. The page shown is the same shown in the workflow page from Manage requisitions.
Requisition Information
Unit Business unit of the requisition.
Req. Requisition number.
Requestor Name User ID of the Requestor.
Hyperlink to view currency conversion information.
Requisition Date Date the requisition was made.
Total amount Amount of the requisition, and currency code.
Hyperlink to requisition details page.
Requestor’s Justification for Purchase
Text box for requisition purpose and justification.
The Approver may use any of the links to review the requisition information available. When a decision has been made, the Approver clicks the appropriate action button at the top of the page to either: Approve or Deny the requisition.
Reviewers added to the requisition do NOT become part of the workflow; they are only notified of the requisition FYI.
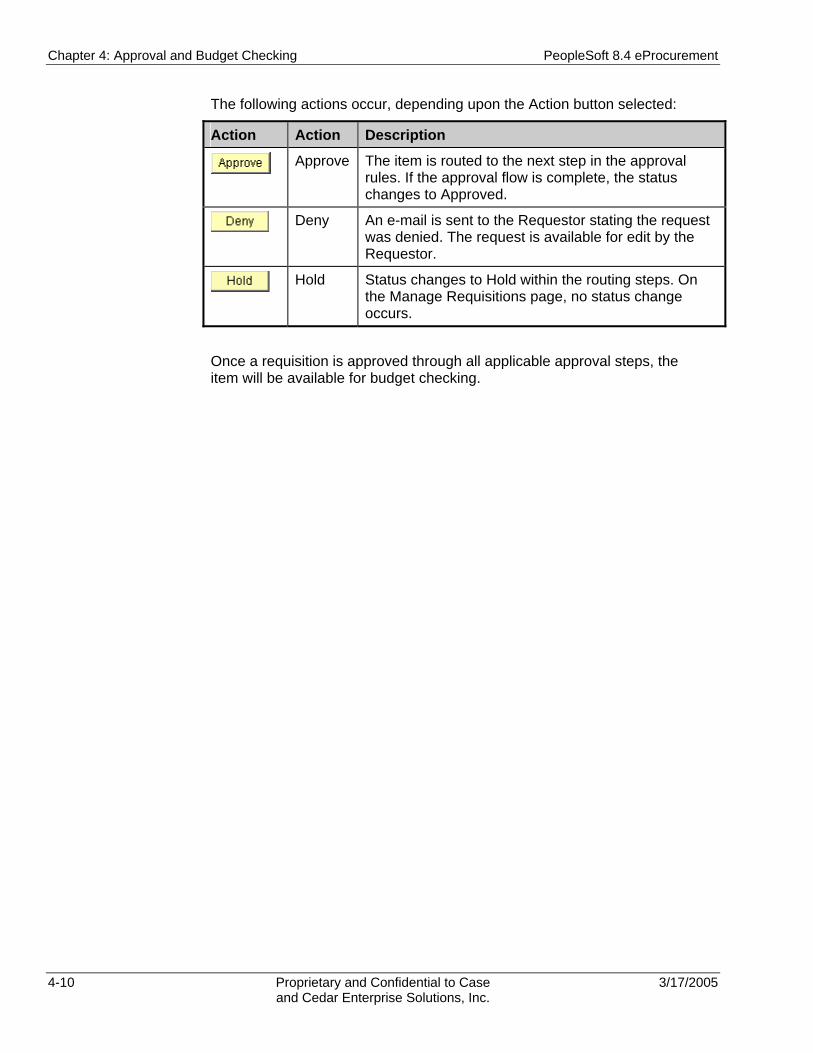
Chapter 4: Approval and Budget Checking PeopleSoft 8.4 eProcurement
4-10 Proprietary and Confidential to Case 3/17/2005 and Cedar Enterprise Solutions, Inc.
The following actions occur, depending upon the Action button selected:
Action Action Description
Approve The item is routed to the next step in the approval rules. If the approval flow is complete, the status changes to Approved.
Deny An e-mail is sent to the Requestor stating the request was denied. The request is available for edit by the Requestor.
Hold Status changes to Hold within the routing steps. On the Manage Requisitions page, no status change occurs.
Once a requisition is approved through all applicable approval steps, the item will be available for budget checking.

PeopleSoft 8.4 eProcurement Chapter 4: Approval and Budget Checking
3/17/2005 Proprietary and Confidential to Case 4-11 and Cedar Enterprise Solutions, Inc.
Procedure – Approving a Requisition Use these steps to approve or deny a requisition.
To review and approve/deny a requisition: 1. Login to PeopleSoft using your assigned Approver ID.
The PeopleSoft home page appears.
2. Click the Worklist hyperlink in the upper, right-hand toolbar.
Your Worklist page appears.
3. Click the link on the work item you want to review.
The Requisition Approval page appears.
4. Click the View Request Details link to review the requisition
details.
5. Go back to the Requisition Approval page, and approve or deny the req.
You can also click the link that corresponds to the requisition number on the Worklist section of the Home page to view the details.

Chapter 4: Approval and Budget Checking PeopleSoft 8.4 eProcurement
4-12 Proprietary and Confidential to Case 3/17/2005 and Cedar Enterprise Solutions, Inc.
Assigning Approver Duties Use these steps to assign your approval assignments to another.
To re-assign your workflow approval:
1. Click My System Profile at the bottom of the PeopleSoft main menu.
The General Profile Information page appears.
2. Enter an Alternate User ID in the Alternate User section.
This is the Case ID for the user to assume your duties.
3. Enter the first date you will be gone as the From Date.
4. Enter the date you will return as the To Date.
5. Click .
The information is saved and will be in effect for the selected date
Because automated workflow assigns transactions to the approver’s worklist, you may find a need to temporarily assign your approver duties if you are out of the office for a significant period of time. The following steps will allow you to re-assign those duties to another individual.
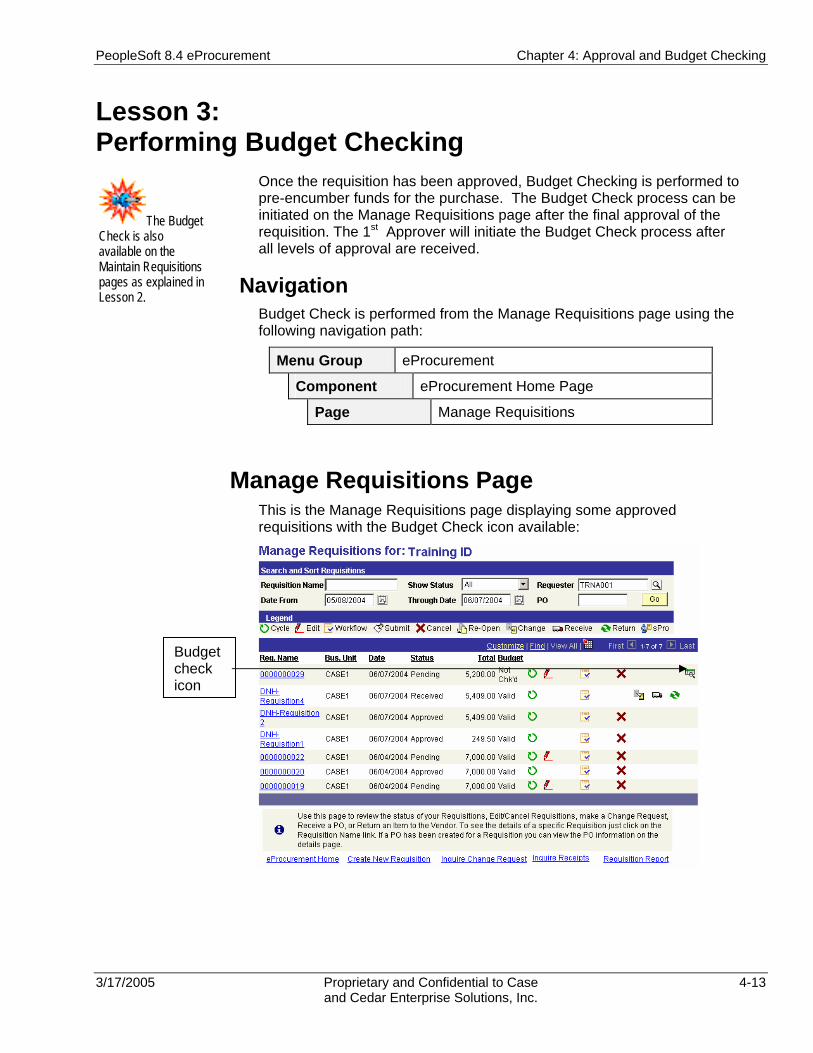
PeopleSoft 8.4 eProcurement Chapter 4: Approval and Budget Checking
3/17/2005 Proprietary and Confidential to Case 4-13 and Cedar Enterprise Solutions, Inc.
Lesson 3: Performing Budget Checking
Once the requisition has been approved, Budget Checking is performed to pre-encumber funds for the purchase. The Budget Check process can be initiated on the Manage Requisitions page after the final approval of the requisition. The 1st Approver will initiate the Budget Check process after all levels of approval are received.
Navigation Budget Check is performed from the Manage Requisitions page using the following navigation path:
Menu Group eProcurement
Component eProcurement Home Page
Page Manage Requisitions
Manage Requisitions Page This is the Manage Requisitions page displaying some approved requisitions with the Budget Check icon available:
Budget check icon
The Budget Check is also available on the Maintain Requisitions pages as explained in Lesson 2.
Chapter 4: Approval and Budget Checking PeopleSoft 8.4 eProcurement
4-14 Proprietary and Confidential to Case 3/17/2005 and Cedar Enterprise Solutions, Inc.
From the Manage Requisition page, click the Budget Check icon for an approved requisition. The Budget Status will change from “Not Chk’d” to either “Valid” or “Error.”
• If Budget Check is successful, the Budget Check icon disappears, and the Budget Status changes to ‘Valid’.
• If Budget Check is unsuccessful, “Error” appears in the Budget Status field.
The transaction must pass budget check before a purchase order will be created. Once the Budget Check has taken place and been validated, the requisition can be converted to a purchase order and the purchase order dispatched to the supplier.
Procedure – Budget Checking a Requisition Use these steps to Budget Check a requisition.
To budget check an approved requisition: 1. From the left-hand navigation, select eProcurement. 2. Select eProcurement Home Page.
3. Select Manage Requisitions.
The Manage Requisitions page appears.
4. Enter criteria in the Search and Sort Requisitions group box as needed.
5. Click the Go button.
6. Verify that the requisition status is approved and the Budget Check icon is displayed.
7. Click .
The Budget Status changes from Not Chk’d to Valid.
8. Repeat steps 3-7 as needed. If the
Budget Status changes to Error, you may need to check the budget balance and/or request a budget transfer. Once the transfer is made, repeat the Budget Check process.

PeopleSoft 8.4 eProcurement Chapter 4: Approval and Budget Checking
3/17/2005 Proprietary and Confidential to Case 4-15 and Cedar Enterprise Solutions, Inc.
Review Questions
1. Where can you view the approvals required for a requisition and the status of those approvals?
2. How do you add additional approvers or reviewers “on the fly” to a requisition?
3. When is a requisition budget checked and how does this happen?
3/17/2005 Proprietary and Confidential to Case 5-1 and Cedar Enterprise Solutions, Inc.
Chapter 5 Receiving Items
After the requisition is approved and budget checked, a purchase order is created and is dispatched to the vendor to order the items. Your next interaction with the requisition will be to record the receipt of line items in excess of $5,000.
Chapter Objectives After completing this Chapter you will be able to:
• Receive items against your requisition.
Chapter Lessons This Chapter contains the following lessons:
Lesson 1: Overview of Receiving.............................................................5-2 Lesson 2: Receiving Items.......................................................................5-3 Review Questions ....................................................................................5-7
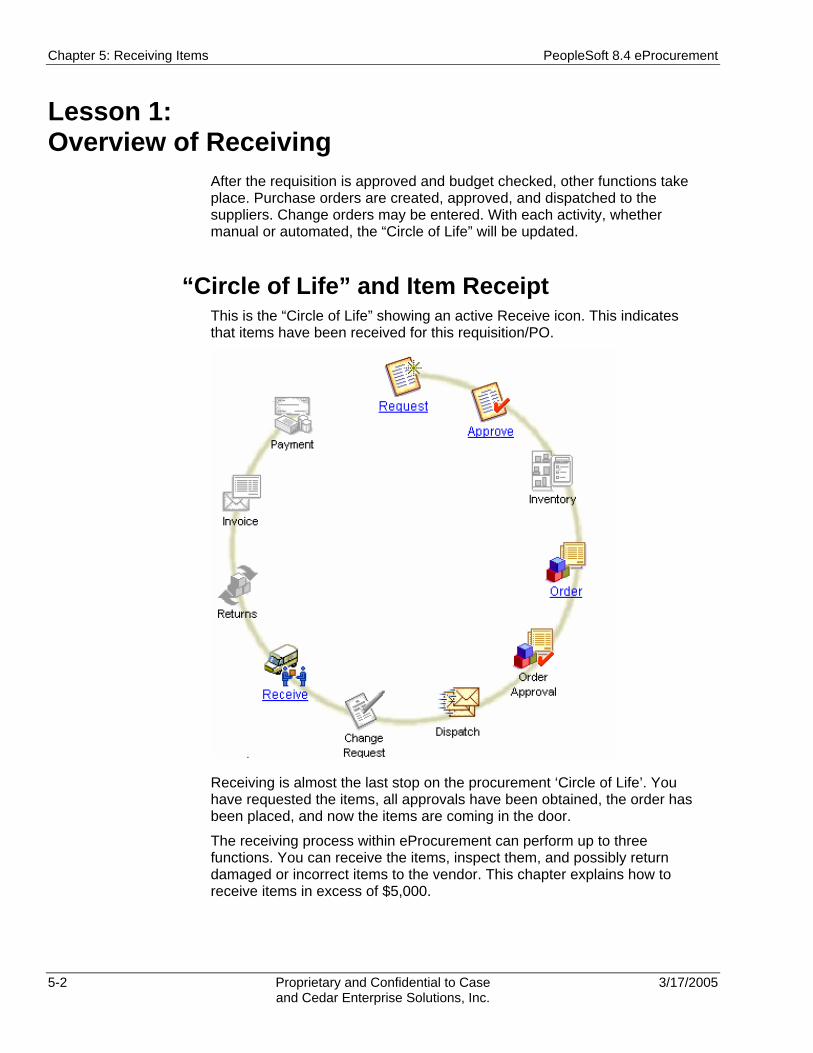
Chapter 5: Receiving Items PeopleSoft 8.4 eProcurement
5-2 Proprietary and Confidential to Case 3/17/2005 and Cedar Enterprise Solutions, Inc.
Lesson 1: Overview of Receiving
After the requisition is approved and budget checked, other functions take place. Purchase orders are created, approved, and dispatched to the suppliers. Change orders may be entered. With each activity, whether manual or automated, the “Circle of Life” will be updated.
“Circle of Life” and Item Receipt This is the “Circle of Life” showing an active Receive icon. This indicates that items have been received for this requisition/PO.
Receiving is almost the last stop on the procurement ‘Circle of Life’. You have requested the items, all approvals have been obtained, the order has been placed, and now the items are coming in the door.
The receiving process within eProcurement can perform up to three functions. You can receive the items, inspect them, and possibly return damaged or incorrect items to the vendor. This chapter explains how to receive items in excess of $5,000.
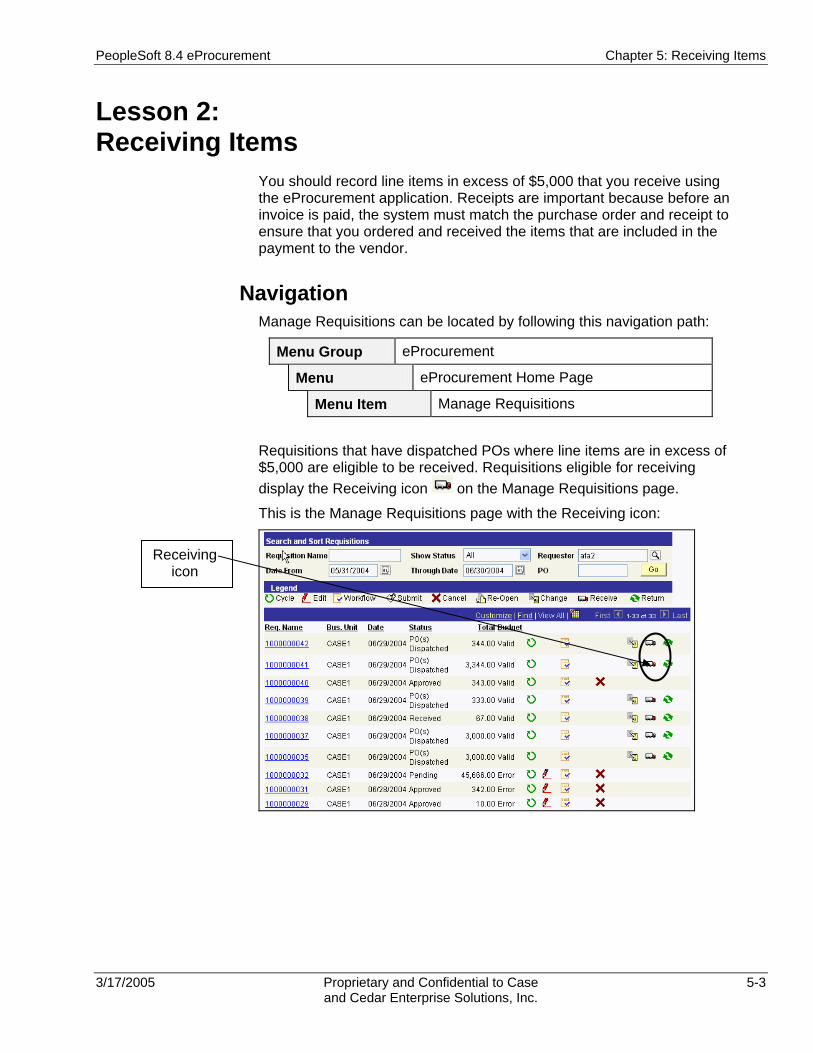
PeopleSoft 8.4 eProcurement Chapter 5: Receiving Items
3/17/2005 Proprietary and Confidential to Case 5-3 and Cedar Enterprise Solutions, Inc.
Lesson 2: Receiving Items
You should record line items in excess of $5,000 that you receive using the eProcurement application. Receipts are important because before an invoice is paid, the system must match the purchase order and receipt to ensure that you ordered and received the items that are included in the payment to the vendor.
Navigation Manage Requisitions can be located by following this navigation path:
Menu Group eProcurement
Menu eProcurement Home Page
Menu Item Manage Requisitions
Requisitions that have dispatched POs where line items are in excess of $5,000 are eligible to be received. Requisitions eligible for receiving display the Receiving icon on the Manage Requisitions page.
This is the Manage Requisitions page with the Receiving icon:
Receiving icon
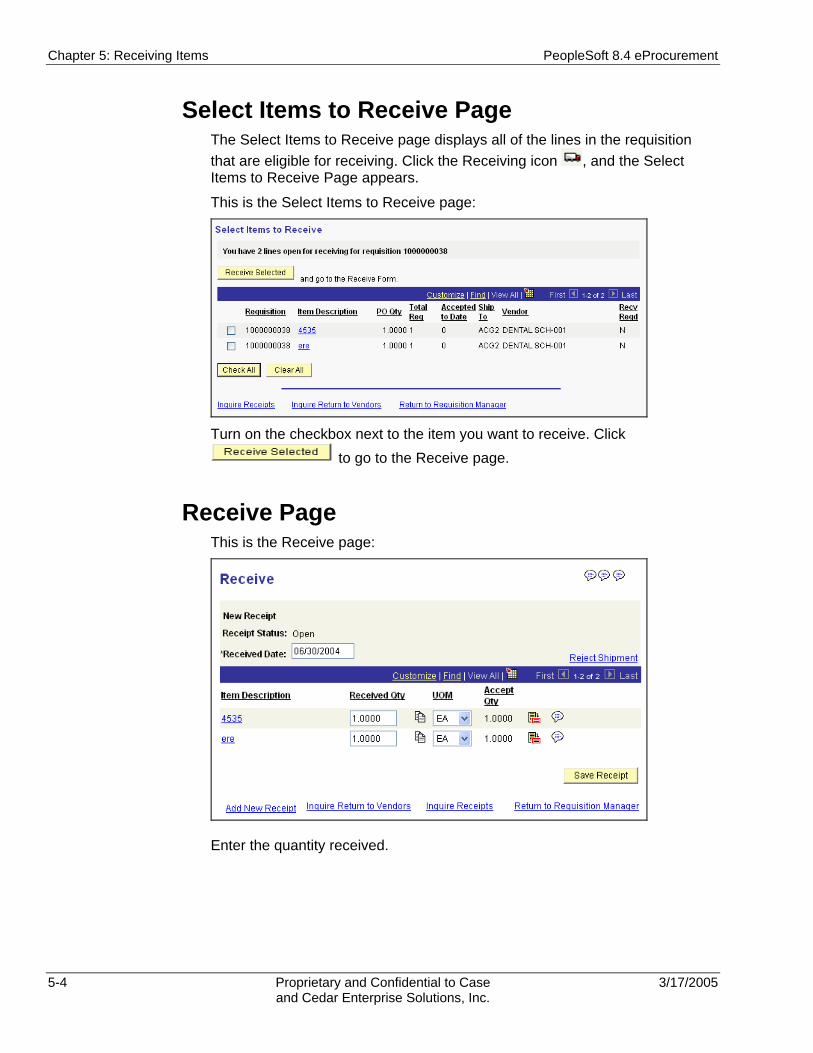
Chapter 5: Receiving Items PeopleSoft 8.4 eProcurement
5-4 Proprietary and Confidential to Case 3/17/2005 and Cedar Enterprise Solutions, Inc.
Select Items to Receive Page The Select Items to Receive page displays all of the lines in the requisition that are eligible for receiving. Click the Receiving icon , and the Select Items to Receive Page appears.
This is the Select Items to Receive page:
Turn on the checkbox next to the item you want to receive. Click
to go to the Receive page.
Receive Page This is the Receive page:
Enter the quantity received.

PeopleSoft 8.4 eProcurement Chapter 5: Receiving Items
3/17/2005 Proprietary and Confidential to Case 5-5 and Cedar Enterprise Solutions, Inc.
Procedure – Receiving Items
Use the following procedures to receive items against a PO.
To receive items: 1. From the left-hand navigation, select eProcurement. 2. Select eProcurement Home Page.
The ePro home page appears.
3. Select Manage Requisitions.
The Manage Requisitions page appears.
4. Enter criteria in the Search and Sort Requisitions group box.
5. Click Go.
Requisitions that match the criteria appear.

Chapter 5: Receiving Items PeopleSoft 8.4 eProcurement
5-6 Proprietary and Confidential to Case 3/17/2005 and Cedar Enterprise Solutions, Inc.
6. Click the Receiving icon for the requisition being received.
The Select Items to Receive page appears with the items waiting to be received.
7. Turn on the checkbox for the item(s) you wish to receive.
8. Click .
The Receive page appears
9. Enter the quantity of items received for each line listed.
10. Verify the Unit of Measure for each line listed.
11. Click Save Receipt. The Receipt Saved successfully page appears.

PeopleSoft 8.4 eProcurement Chapter 5: Receiving Items
3/17/2005 Proprietary and Confidential to Case 5-7 and Cedar Enterprise Solutions, Inc.
Review Questions
1. How do you access the page used to receive items?
2. What is the dollar limit that requires online receiving?

3/17/2005 Proprietary and Confidential to Case A-1 and Cedar Enterprise Solutions, Inc.
Appendix A Review Questions and Answers The following are the review questions and answers for each chapter.

Appendix A: Review Questions and Answers PeopleSoft 8.4 eProcurement
A-2 Proprietary and Confidential to Case 3/17/2005 and Cedar Enterprise Solutions, Inc.
Chapter 1: Introducing PeopleSoft eProcurement
1. The eProcurement module interfaces with what other PeopleSoft module?
PeopleSoft Purchasing
2. What modules interface with Purchasing?
General Ledger, Accounts Payable, Asset Management, Commitment Control
3. What is the first point of entry into the eProcurement system?
The requisition.
4. How are requisitions approved?
Through workflow which routes the requisition to appropriate approvers.

PeopleSoft 8.4 eProcurement Appendix A: Review Questions and Answers
3/17/2005 Proprietary and Confidential to Case A-3 and Cedar Enterprise Solutions, Inc.
Chapter 2: Creating a Special Request Requisition
1. What page is used to create a special request for goods?
Special Request – Goods.
2. What are the three types of templates you use to create special requests for services?
Fixed cost; variable cost; time and materials.

Appendix A: Review Questions and Answers PeopleSoft 8.4 eProcurement
A-4 Proprietary and Confidential to Case 3/17/2005 and Cedar Enterprise Solutions, Inc.
Chapter 3: Creating a Catalog Requisition
1. Where do you start to create your requisition?
The eProcurement Home Page
2. What are the steps to create a catalog requisition?
Open the requisition, search for items, add items, verify or change shipping information, verify or change line detail, save the requisition, review (edit) the requisition, submit for approval.
3. What are the business units to use for your requisitions?
CASE1
4. Is the requestor the same as the buyer?
Not necessarily. The requestor should be the person making the request.
5. Why do you enter a requisition title?
It allows you to identify your requisition in search lists.
6. Why do you need to designate ChartFields for each line?
So that each line may be correctly charged to the proper department, fund account, and program.
7. What happens when you click on the ‘Save and Submit’ button?
The requisition is saved and submitted to workflow for approval.
PeopleSoft 8.4 eProcurement Appendix A: Review Questions and Answers
3/17/2005 Proprietary and Confidential to Case A-5 and Cedar Enterprise Solutions, Inc.
Chapter 4: Approval and Budget Checking
1. Where can you view the approvals required for a requisition and the status of those approvals?
Requisition Approval Status page
2. How do you add additional approvers or reviewers “on the fly” to a requisition?
From the Approver’s worklist, access the Requisition Approval page and add the needed Approver or Reviewer User IDs.
3. When is a requisition budget checked and how does this happen?
When the requisition has an Approved status. Budget checking can be performed manually or during a regularly scheduled automated batch process.

Appendix A: Review Questions and Answers PeopleSoft 8.4 eProcurement
A-6 Proprietary and Confidential to Case 3/17/2005 and Cedar Enterprise Solutions, Inc.
Chapter 5: Receiving Items
1. How do you access the page used to receive items?
eProcurement Home Page /Manage Requisitions / Receiving icon
2. What is the dollar limit that requires online receiving?
$5,000 or more