peoplesoft fluid user interface guide · 2 table of contents chapter 1: layout introduction .....3...
TRANSCRIPT

PeopleSoft Fluid User Interface Guide
Published by: Controller’s
Office April 2018

2
Table of Contents Chapter 1: Layout Introduction ............................................................................ 3
1.0 Key Terms ................................................................................................. 3
1.1 Actions List ................................................................................................ 4
1.2 NavBar ...................................................................................................... 5
Chapter 2: Homepages ........................................................................................ 6
2.0 Returning to Your Homepage ....................................................................... 6
2.1 Navigating Homepages ................................................................................ 6
2.2 Creating a New Homepage ........................................................................... 7
2.3 Deleting a Homepage .................................................................................. 9
Chapter 3: Tiles ................................................................................................ 11
3.0 Creating a New Tile ................................................................................... 11
3.1 Creating a Tile for a Specific Page ............................................................... 13
3.2 Moving Tiles from Homepage to Homepage .................................................. 14
3.3 Deleting a Tile .......................................................................................... 15
Chapter 4: Searching for a Specific Page ............................................................. 16
Chapter 5: Adding a Page to Your Favorites/NavBar .............................................. 18
3
Chapter 1: Layout Introduction
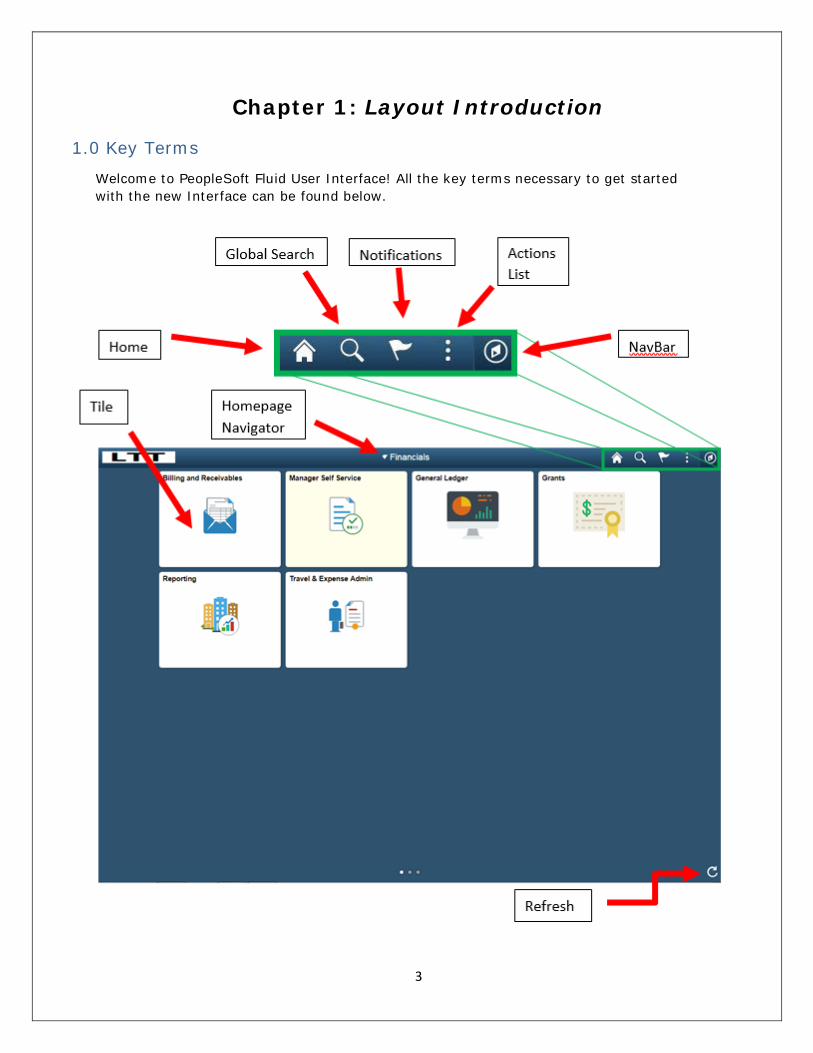
1.0 Key Terms
Welcome to PeopleSoft Fluid User Interface! All the key terms necessary to get started with the new Interface can be found below.

4
1.1 Actions List
• The “Actions List” button can be found at the top right of the page. This button allows the user to perform specific actions while either on the Homepage or on a specific page.
• From the Homepage, the “Actions List” button allows the user to personalize the
Homepage, change the settings through “My Preferences”, get help from Oracle through “Help,” or sign out of the account.
• If the user navigates to a specific page, the menu of the “Actions List” button will change. The user will now have the option to add the specific page to the Homepage, NavBar, or favorites. The user will still have the options of changing the settings and signing out.
5
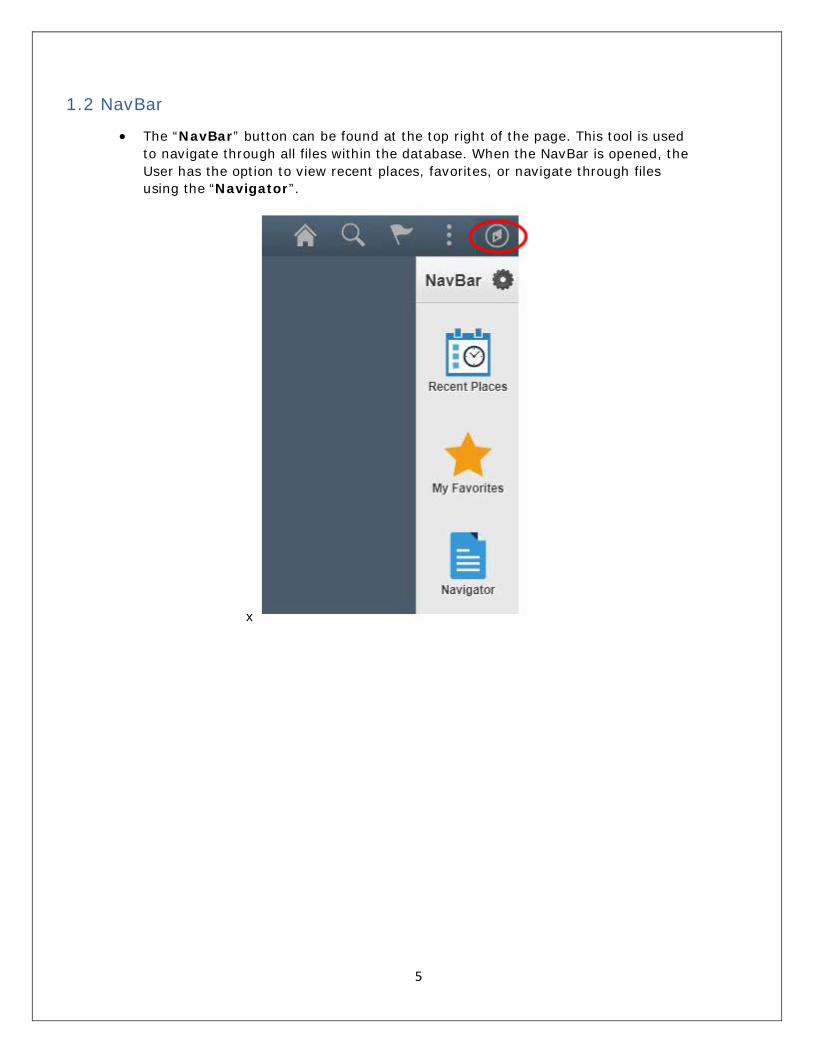
1.2 NavBar
• The “NavBar” button can be found at the top right of the page. This tool is used to navigate through all files within the database. When the NavBar is opened, the User has the option to view recent places, favorites, or navigate through files using the “Navigator”.
x

6
Chapter 2: Homepages
2.0 Returning to Your Homepage
• Return to the default Homepage by selecting the “Home” button on the top right of the page.
• When on a specific page, locate the “Back” button on the top left of the page.
Select this button to return to the current Homepage.
2.1 Navigating Homepages
• To navigate Homepages, return to the current Homepage by selecting the “Back” button at the top left of the page OR return to the default Homepage by selecting the “Home” button at the top right of the page.

7
• Once at a Homepage, the title of the current Homepage will be displayed at the top of the page. Select on the title, to view all available Homepages.
• Choose the desired Homepage.
2.2 Creating a New Homepage
• To create a new Homepage, select the “Actions List” button on the top right of the page.
• Select “Personalize Homepage” from the drop down menu.

8
• Select the “Add Homepage” button at the top left of the page.
o Once selected, decide between Choose from available homepages OR create a new Homepage. If Choose from available homepages is selected, a new Homepage will be added with default tiles that corresponds to the title of that specific option.
o If Create a new Homepage is selected, create a title for the new
Homepage in the field that says “Add New Homepage” and select “Add”.

9
• Once the new Homepage is added, select the green “Save” button at the top right of the page to save the new Homepage(s).
NOTE: Once a new Homepage is created, it will be blank- Creating a New Tile.
2.3 Deleting a Homepage
• Select the “Actions List” button at the top right of the page and select “Personalize Homepage” from the drop down menu.
• Select the default Homepage.

10
• A red “X” will appear next to the rest of the Homepages. Select the red “X” and the Homepage(s) will be deleted.
• Once the new Homepage(s) is/are deleted, select the green “Save” button the top right of the page to save the changes.

11
Chapter 3: Tiles 3.0 Creating a New Tile
• Select the “Actions List” button at the top right of the page and select “Personalize Homepage” from the drop down menu.
• Select which Homepage the tile should be added to.
• Select “Add Tile” at the top right of the page.

12
• Search for a tile using the search bar or navigate the available menus until the desired tile is found.
• Once the new tile is added, select the green “Save” button the top right of the page to save the changes.

13
3.1 Creating a Tile for a Specific Page • Navigate to a desired page using the Navigator. Select the “Actions List”
button from the top right of the page and select “Add To Homepage.”
o NOTE: A tile cannot be made for a specific page using the Folders.
• Select which Homepage the tile will be added to then the tile will be added to that Homepage.

14
3.2 Moving Tiles from Homepage to Homepage • Select the “Actions List” button at the top right of the page and select the
“Personalize Homepage” button from the drop down menu.
• Find the tile to be moved/copied, select the small square box with a small pencil at
the bottom right of the tile.
• Choose to move or copy the desired tile then choose which Homepage the tile will go to.
• Once the new tile is moved/ copied, select the green “Save” button the top right of the page to save the changes.

15
3.3 Deleting a Tile
• To delete a tile, select the “Actions List” button at the top right of the page and select “Personalize Homepage” from the drop down menu.
• Choose the Homepage to remove the tile from.
• Select the red “X” on the top right of the tile and the tile will disappear.
• Once the new tile is moved/ copied, select the green “Save” button the top right
of the page to save the changes.

16
Chapter 4: Searching for a Specific Page
• There are two ways to search for a specific page.
• Option 1: Select the “NavBar” at the top right of the page.
• Select the “Navigator” button then navigate the menus and select the desired page.
o Once within the menus, select the “Back: Root” button, if needed, to return to the previous menu.

17
o Select the “Back to Root” button within the Navigator, if needed, to return to the root of all the files in the Navigator.
• Option 2: Select a tile on the desired Homepage.
• Navigate the folders on the left-hand-side menu bar to find desired page.

18
Chapter 5: Adding a Page to Your Favorites/NavBar
• Navigate to the desired page using the Navigator within the NavBar
• Once at the desired page, select the “Actions List” button at the top right of the
page and select the “Add to NavBar” for the page to be added to your NavBar OR select “Add To Favorites” for the page to be added to favorites.