pfd station diagrams - seattle children's contents: 1) kids don’t float sign (packaged...
TRANSCRIPT

Lifejacket Loaner Program
Loaner StationConstruction Diagrams

Kit Contents:1) Kids Don’t Float sign (packaged separately)1) 1lb. Box - 2" coated screws (exterior grade) 1) 1lb. Box - 3” coated screws (exterior grade)1) package 4 - lag bolts with washers 3/8” x 2” (use with free standing mount option) 1) package 2 - lag bolts with washers 3/8” x 3” (use with free standing mount option) 6) cast zinc coated hooks with mounting screws 2) exterior hinges with mounting screws (use to mount sign on storage box option) 1) package 4 - bolts with washers and nuts 3/8” x 2” (use to mount sign on storage box option) 1) exterior hasp with mounting screws and washers (use with storage box option) 1) Loaner Station Construction Diagrams*
* Depending on the application, you may need to modify the design to suit your specific needs
WARNING*PRIOR TO STARTING YOUR PROJECT*
• Check on local building construction code & permit require-ments including those for signage.
• Check with the appropriate local utility companies (e.g. gas, electric) concerning underground lines prior to digging any holes for footings. Failure to do so may result in serious injury or death.
• To ensure safety and lasting structural stabiulity with your sign project, use only EXTERIOR grade screws and other hardware.
Kids Don’t Float Sign Kit
1
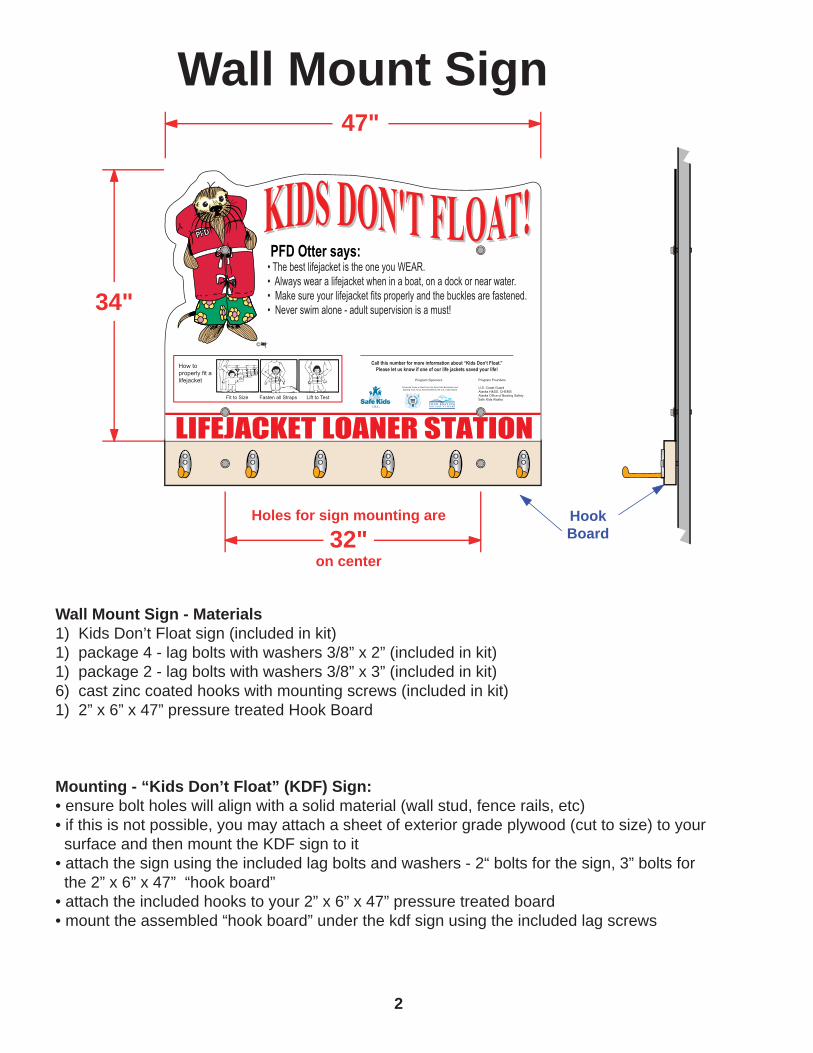
Wall Mount Sign
Wall Mount Sign - Materials1) Kids Don’t Float sign (included in kit)1) package 4 - lag bolts with washers 3/8” x 2” (included in kit) 1) package 2 - lag bolts with washers 3/8” x 3” (included in kit) 6) cast zinc coated hooks with mounting screws (included in kit)1) 2” x 6” x 47” pressure treated Hook Board
Mounting - “Kids Don’t Float” (KDF) Sign:• ensure bolt holes will align with a solid material (wall stud, fence rails, etc)• if this is not possible, you may attach a sheet of exterior grade plywood (cut to size) to your surface and then mount the KDF sign to it• attach the sign using the included lag bolts and washers - 2“ bolts for the sign, 3” bolts for the 2” x 6” x 47” “hook board”• attach the included hooks to your 2” x 6” x 47” pressure treated board• mount the assembled “hook board” under the kdf sign using the included lag screws
34"
47"
32"Holes for sign mounting are
on center
HookBoard
2
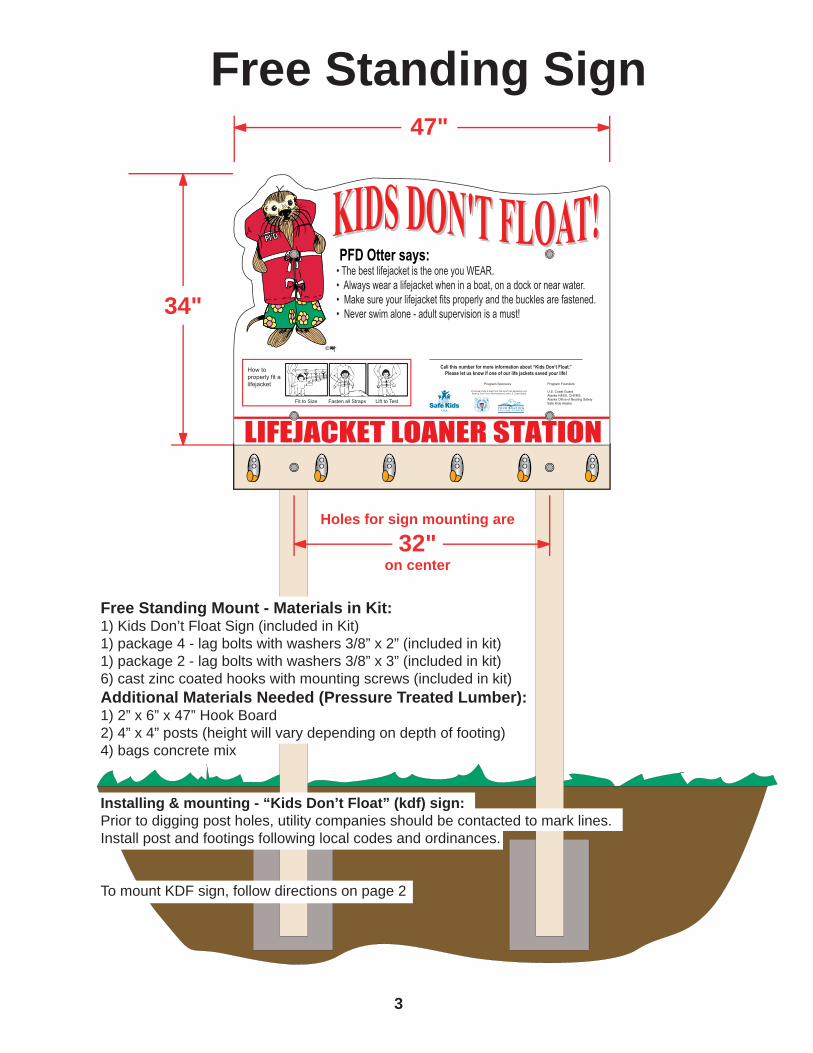
Free Standing Sign
34"
47"
32"Holes for sign mounting are
on center
3
Free Standing Mount - Materials in Kit: 1) Kids Don’t Float Sign (included in Kit)1) package 4 - lag bolts with washers 3/8” x 2” (included in kit) 1) package 2 - lag bolts with washers 3/8” x 3” (included in kit) 6) cast zinc coated hooks with mounting screws (included in kit)Additional Materials Needed (Pressure Treated Lumber):1) 2” x 6” x 47” Hook Board2) 4” x 4” posts (height will vary depending on depth of footing)4) bags concrete mix
Installing & mounting - “Kids Don’t Float” (kdf) sign:Prior to digging post holes, utility companies should be contacted to mark lines.Install post and footings following local codes and ordinances.
To mount KDF sign, follow directions on page 2

Free Standing Mount w/ Roof - Materials in Kit:4) Lag Bolts with Washers 3/8” x 2” 2) Lag Bolts with Washers 3/8” x 3”6) Zinc Coated Hooks with mounting screws1) 1lb. Box - 2" Coated Screws1) 1lb. Box - 3” Coated Screws
Additional Materials Needed (Pressure Treated Lumber):1) 2” x 6” x 47” - Hook Board2) 2” x 4” x 2’ 5” - Bottom Braces - 45º cut - both ends2) 2” x 4” x 1’ 10” - Back Braces - 45º cut - one end2) 2” x 4” x 1’ 11 1/2” - Front Braces - 45º cut - one end1) 2” x 4” x 3’ 6 1/2” - Top Beam2) 2” x 4” x 3’ 6 1/2” - Cross Beams - Notch cut 45º angle on bottom corner of both ends (see diagram)1) 4’ x 2’ x 1/2” Plywood - Front Roof Panel1) 4’ x 1’ 11 1/2” x 1/2” Plywood - Back Roof Panel2) 2’5“ x 1’11 1/2” x 1/2” Plywood - Side Panels (triangles)2) 4” x 4” Post (Height will vary depending on depth of footing)4) Bags of Concrete MixExterior paint or standard asphalt shingles & roofing nails
To mount KFD sign - follow directions on page 2
Roof AssemblyCut framing & panels assemble as shown using coated screws included in kit.
1’ 11 1/2”1’ 10”
2’ 5”
3’ 6 1/2”
Cross Beams3’ 6 1/2”
Top Beam
Front Brace1’ 11 1/2”
Back Brace1’ 10”
BottomBrace2’ 5”
All Angles: 45º
NOTE* Addition of roof to free standing mount sign requires an additional 16” height of 4” x 4” support posts.
All supporting beams and braces are Pressure Treated 2” x 4”.
Free Standing Sign with Roof
4

5
1) 4’ 8 1/2” x 2‘ - ROOF PANEL2) 3’ 7 3/4“ x 1’ 6” - SIDE PANELS - top end cut at 30º angle (up to 4‘ 6 1/8“)2) 4’ 5“ x 3 1/2“ - HORIZONTAL FACE BOARDS2) 2’ 10 3/8“ x 2 3/8“ - VERTICAL FACE BOARDS1) 4’ x 4’ 3 1/2“ - BACK PANEL (see Rear View)1) 4’ 3 1/2” x 1’ 4 1/2“ - FLOOR PANEL (To ensure adequate air circulation within the storage box, holes should be drilled in this panel as needed for water drainage and ventilation).1) Screen material (e.g. 1” x 1” wire mesh) for air space above Front & Back Panel (see Rear View)
Lifejacket Storage Box - MaterialsMaterials included in KDF Kit:1) Kids Don’t Float Sign (Packaged Separately)6) Zinc Coated Hooks with Mounting Screws (Included in Kit)1) 1lb. Box - 2" Coated Screws (Include in Kit) 1) 1lb. Box - 3 1/2” Coated Screws (Included in Kit)2) Exterior Hinges with Mounting Screws (Included in Kit)1) Package 4 - Bolts with Washers and nuts 3/8” x 2” (Included in Kit)1) Exterior Hasp with Mounting Screws and Washers (Included in Kit)
The following materials should all be pressure treated lumber:1) 2” x 6” x 4’ 1/2” - Hook Board5) 2” x 4” x 4’ 1/2” - Cross Braces2) 2” x 4” x 4’ 2 7/8” - Top end cut at 30 degree angle (up to 4’ 4 7/8”) - Back Post2) 2” x 4” x 3’ 7” -Top end cut at 30 degree angle (up to 3’ 9”) - Front Post2) 2” x 4” x 10 1/4” - Bottom Side Braces2) 2” x 4” x 11 7/8” - Both ends cut at 30 degree angle – Top Side Braces2) 2” x 4” x 4’ 1/2” - Door Cross Braces2) 2” x 4” x 4’ 1/2” - Door Vertical Braces
All exterior materials should be 3/4” thickness and be either pressure treatedor sealed and painted prior to assembly.From three 4’ x 8‘ sheets of 3/4“ plywood, cut the following panels:1) 4’ 8 1/2” x 2‘ - ROOF PANEL2) 3’ 7 3/4“ x 1’ 6” - SIDE PANELS - top end cut at 30º angle (up to 4‘ 6 1/8“)2) 4’ 5“ x 3 1/2“ - HORIZONTAL FACE BOARDS2) 2’ 10 3/8“ x 2 3/8“ - VERTICAL FACE BOARDS1) 4’ x 4’ 3 1/2“ - BACK PANEL (see Rear View)1) 4’ 3 1/2” x 1’ 4 1/2“ - FLOOR PANEL (To ensure adequate air circulation within the storage box, holes should be drilled in this panel as needed for water drainage and ventilation).1) Screen material (e.g. 1” x 1” wire mesh) for air space above Front & Back Panel (see Rear View)

Lifejacket Storage Box - Frame Design
Lifejacket Storage Box (Frame) Materials Included in Kit: 6) Zinc Coated Hooks with Mounting Screws (Included in Kit)1) 1lb. Box - 2" Coated Screws (Include in Kit) 1) 1lb. Box - 3 1/2” Coated Screws (Included in Kit)Additional Materials Needed (Pressure Treated Lumber):1) 2” x 6” x 4’ 1/2” - Hook Board5) 2” x 4” x 4’ 1/2” - Cross Braces2) 2” x 4” x 4’ 2 7/8” - Back Post - Top end cut at 30 degree angle (up to 4’ 4 7/8”)2) 2” x 4” x 3’ 7” - Front Post - Top end cut at 30 degree angle (up to 3’ 9”)2) 2” x 4” x 10 1/4” - Bottom Side Braces2) 2” x 4” x 11 7/8” - Top Side Braces - Both ends cut at 30 degree angle
Cut Framing & assemble as shown using coated screws included in kit. Hooks should be mounted on 2” x 6” x 4’ 1/2” Hook Board spaced approximately 8” apart on center.
4' 4 7/8"
2 3/4"
4' 2 7/8"
10 1/4"
4' 1/2"
PressureTreated
2" x 6"
HOOK BOARD
11 7/8"
4' 1/2"
3' 7"3' 9"
Roof Angles are 30º
All frame wood is Pressure Treated 2" x 4"unless otherwise noted
TOP SIDE BRACE
BACKPOST FRONT
POST
CROSS BRACES
CROSS BRACES
CROSS BRACES
BOTTOMSIDE BRACE
NOTE*** REAR CROSS BRACE Should be attached 4” below top of BACK POST to allow for air circulation.
2’
6

Lifejacket Storage Box - Exterior Design
Lifejacket Storage Box (Exterior) Materials: All exterior materials should be 3/4” thickness and be either pressure treated or sealed and painted prior to assembly.1) 4’ 8 1/2” x 2‘ - ROOF PANEL2) 3’ 7 3/4“ x 1’ 6” - SIDE PANELS - top end cut at 30º angle (up to 4‘ 6 1/8“)2) 4’ 5“ x 3 1/2“ - HORIZONTAL FACE BOARDS2) 2’ 10 3/8“ x 2 3/8“ - VERTICAL FACE BOARDS1) 4’ x 4’ 3 1/2“ - BACK PANEL (see Rear View)1) 4’ 3 1/2” x 1’ 4 1/2“ - FLOOR PANEL (To ensure adequate air circulation within the storage box, holes should be drilled in this panel as needed for water drainage and ventilation).1) Screen material (e.g. 1” x 1” wire mesh) for air space above Front & Back Panel (see Rear View)
Cut exterior panels & attach to frame as shown using coated screws included in kit.Prior to installing the roof panel, a screen material (e.g. 1” x 1” wire mesh) should be installed over the front & rear airspaces.
4' 6 1/8"
3' 7 3/4"
4' 5"
2' 10 3/8"
4' 8 1/2"
3 1/2"
3 1/2"
2 3/8"
2’
1' 6"
SIDEPANEL
4' 1/2"
ROOFPANEL
DOOR PANEL(KDF Sign Mounted to Door)
HORIZONTALFACE BOARD
FLOOR PANEL(UNDER BOX)
VERTICALFACE
BOARD
Air Spacewith screen
material cover
7

FLOOR PANEL(UNDER BOX)
Lifejacket Storage Box - Exterior DesignRear View
4' 8 1/2"
4' 6 1/2" 3' 7 3/4"
1' 6" 4' 3 1/2"
4'
1 3/4"
BACK PANEL
SIDEPANEL
Air Spacewith screen material cover
RoofOverhang
8
To ensure adequate air circulation within the storage box, holes should be drilled in the Floor Panel as needed for water drainage and ventilation.
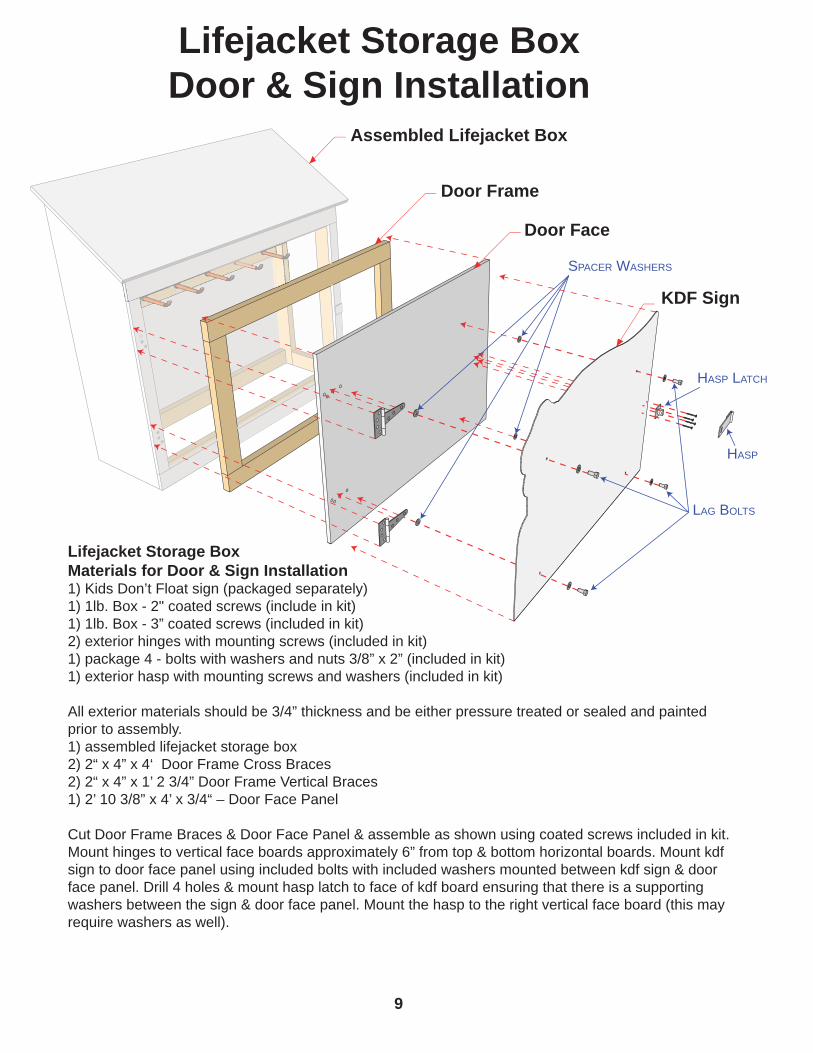
Assembled Lifejacket Box
Door Frame
Door Face
KDF Sign
SPACER WASHERS
LAG BOLTS
HASP LATCH
HASP
Lifejacket Storage BoxDoor & Sign Installation
Lifejacket Storage BoxMaterials for Door & Sign Installation1) Kids Don’t Float sign (packaged separately)1) 1lb. Box - 2" coated screws (include in kit) 1) 1lb. Box - 3” coated screws (included in kit)2) exterior hinges with mounting screws (included in kit)1) package 4 - bolts with washers and nuts 3/8” x 2” (included in kit)1) exterior hasp with mounting screws and washers (included in kit)
All exterior materials should be 3/4” thickness and be either pressure treated or sealed and painted prior to assembly.1) assembled lifejacket storage box2) 2“ x 4” x 4‘ Door Frame Cross Braces2) 2“ x 4” x 1’ 2 3/4” Door Frame Vertical Braces1) 2’ 10 3/8” x 4’ x 3/4“ – Door Face Panel
Cut Door Frame Braces & Door Face Panel & assemble as shown using coated screws included in kit. Mount hinges to vertical face boards approximately 6” from top & bottom horizontal boards. Mount kdf sign to door face panel using included bolts with included washers mounted between kdf sign & door face panel. Drill 4 holes & mount hasp latch to face of kdf board ensuring that there is a supporting washers between the sign & door face panel. Mount the hasp to the right vertical face board (this may require washers as well).
9