phantom drive 1 - manual - h+h...
TRANSCRIPT
H+H Software GmbH
Phantom Drive 1 Manual
Phantom Drive 1 — Manual
2
Preface Phantom Drive installs a virtual disc recorder in your computer. For your working environment, this is like installing an actual hardware device, except that in this case the recorder is emulated in software. This virtual recorder allows any application that can access an optical disc recorder to generate disc images exactly as if it were burning a disc in a real hardware disc recorder. This means that audio, video or any other kind of data can be recorded much faster than on an optical disc. Phantom Drive is the first program of its kind to provide a complete range of virtual blank disc types, from CD-R to Blu-ray RE.
Phantom Drive lets you do all this:
Ø Burn your data (audio, video, etc.) onto a virtual blank disc using any program;
Ø Test the resulting virtual disc to make sure the results are what you intended;
Ø Save time, because burning a virtual disc is generally much faster than burning an actual RW disc or other optical medium;
Ø Save money, because failed virtual discs cost nothing — you can always create more virtual blank discs;
Ø Install a compatible recorder in any computer;
Ø Experiment and gain experience with new media (Blu-ray, HD DVD, etc.) for which you have no physical recorder or discs.
And Phantom Drive offers still more capabilities, which you can read about in this manual. For optimum ease of use, this manual is divided into chapters that give newcomers a complete overview of the software, and allow experienced users to look up specific information.
• Preface: General information about Phantom Drive (installation, system requirements, etc.).
• Introduction: General description of the procedures involved in recording virtual discs with Phantom Drive.
• The Phantom Drive User Interface: Explains how and where Phantom Drive appears in your system.
• Phantom Images: Detailed information on creating virtual blank discs.
• Configuration: Description of the program settings.
• Appendix: Technical information.
Phantom Drive 1 — Manual
3
Conventions Used in This Manual For easy reading, this document uses special text styles to indicate certain kinds of information, such as procedures, program controls, etc. Thus dialog titles, menu commands and important terms are set in bold type.
Especially important information is also highlighted by symbols in the margin. Read these passages carefully in order to use the software as smoothly as possible.
The exclamation point symbol indicates especially important information or operations.
The light bulb symbol indicates tips and tricks to make working with Phantom Drive still easier.
This manual and the examples it contains were composed using Windows Vista Ultimate. If you use Phantom Drive on a different Windows version, you may not be able to reconstruct all the examples exactly. Furthermore, the names of some elements in the Windows environment may be different from those used here. For example, the icon that displays all the local drives in the Windows Explorer is called Computer in Windows Vista, but My Computer in Windows XP.
Installation To install Phantom Drive on your computer, start the Setup program. After you consent to the license conditions and choose an installation folder, the installation takes place automatically with no further interaction. If you have purchased a Phantom Drive license, you must enter your license key during the installation. Your license key is sent to you by e-mail when you purchase your license. If you are installing the 30-day evaluation version, you do not need to enter a key.
To avoid mistyping your license key, you can select it in the e-mail in which you received it and press <Ctrl>+<Ins> to copy it to the Clipboard. Then return to the Setup dialog and paste in the key by pressing <Shift>+<Ins>.
Removing Phantom Drive If you want to remove Phantom Drive from your computer, click on Control Panel in the Start menu and select the applet Programs, then Programs and Features. In the list that appears, select Phantom Drive, then click the Uninstall button.

Phantom Drive 1 — Manual
4
Upgrading from the Evaluation to the Full Version If you have already installed the evaluation version of Phantom Drive and have now purchased a full version license, you do NOT need to remove the evaluation version. On purchasing your Phantom Drive license, you received the setup program for the full version and the corresponding license key. Simply run the setup program as described in the section Installation, and enter the license key when you are prompted to do so. When Setup has finished, the full version of Phantom Drive is installed on your system.
System Requirements Phantom Drive supports the following operating systems:
• All versions of Windows XP; • All versions of Windows Vista; • Windows Server 2003 and 2008.
Phantom Drive supports both the 32-bit and the 64-bit versions of these operating systems. The memory requirements are the same as Microsoft’s specification for the given operating system.
Questions and Answers Because Phantom Drive is the first comprehensive program of its kind, we have collected several typical questions about the program and present the answers here.
Can Phantom Drive create virtual discs from real CDs and DVDs?
Yes, but only in the form of a copy made using a disc-burning application. Phantom Drive emulates a hardware disc recorder — in other words, it provides a virtual recorder which any application that accesses hardware disc recorders can use. By itself, Phantom Drive cannot create disc images. Creating virtual images of physical discs is a function of a CD emulator application. For further information, see http://www.virtualcd-online.com/.
How many virtual recorders does Phantom Drive provide?
Phantom Drive provides one virtual recorder.
Can Phantom Drive convert audio data into other file formats?
Not directly. However, you can burn audio data onto a virtual blank disc, and then rip it from the virtual disc into the desired file format.
Does Phantom Drive have an API?
No. However, Phantom Drive includes the command-line program Phantom Command, which can be used to perform all the key functions of Phantom Drive.

Phantom Drive 1 — Manual
5
Restrictions under Windows XP If you use Windows XP, you should bear in mind that its built-in disc recorder support is restricted in various ways.
• Blank disc size: The integrated disc-burning function in Windows Explorer only supports media up to a maximum size of one GB.
• UDF version: Windows XP can only read UDF file systems up to Version 2.01. Higher UDF versions are supported only under Windows Vista. Because of these restrictions. Windows XP does not allow you to burn discs in UDF format, and may not allow you to read Blu-ray media. Additional software is required to provide such capabilities in Windows XP.
• Recorder support: The integrated disc-burning function of Windows XP supports only one recorder. Recording capability must be activated in the drive properties of the given recorder. Furthermore, rewritable media such as FAT32-formatted DVD-RAM discs can be read in a recorder only if the recording capability is deactivated in the properties of the given drive.
• Live File System: Windows Vista’s Live File System service, to write optical media directly, is not available in Windows XP.
This list is only intended as an overview of the disc recording functions that are restricted or unavailable in Windows XP. For details, please consult the documentation of your operating system.
For Further Information For further information on Phantom Drive, visit http://www.phantomdrive.de/en/ on the World Wide Web.
Legal Notice The copyrights to the Phantom Drive software, the Phantom Drive trademark, and all of the program documentation are owned by H+H Software GmbH. Microsoft and Windows are trademarks of Microsoft Corporation and registered in the USA. Product names mentioned in this manual are used for identification only, and may be trademarks or registered trademarks of the companies concerned.
Phantom Drive 1 — Manual
6
Introduction
Burning on Virtual Blank Discs Phantom Drive allows you to record data using any program designed to access a disc recorder. Phantom Drive provides a virtual recorder and virtual blank discs for this purpose. The application software designed to burn optical media is responsible for filling the virtual blank disc with data. This application can be any program that records data on optical drives, such as a video editing program, a media player, photo software, Windows’ integrated disc burning function, etc. The steps involved in the procedure are always the same:
Compile your data — video, audio, or what have you — using the appropriate application software, such as a video editor, a media player, etc.
Create the type of virtual blank disc you need and insert it in the Phantom Drive. (If you prefer, you can also create the blank first, then insert it and use the auto-play function to start the desired application.)
Start burning the disc using the appropriate command in the given application to write the data to the virtual blank disc.
When the burning operation has been completed, insert the new virtual CD or virtual DVD in the drive to test the results. If you are happy with the result, you can burn it to a disc. If not, you can go back to Step 1, make the necessary changes, and repeat the virtual burning operation.
Reading Virtual CDs As mentioned in the last step above, Phantom Drive can load and play existing disc images. This DVD drive emulation serves primarily to test the contents of the virtual discs you burn with Phantom Drive, but is also available for reading disc images in general. In other words, you can use the virtual disc images you have burned at any time. Phantom Drive supports the following types of disc images:
• Phantom Images: These may be virtual blank discs or virtual discs to which you have burned any kind of data.
• ISO images: These are files that represent an ISO 9660 file system, and may be created by Phantom Drive or by other programs.
Phantom Drive’s optical drive emulation does not offer any of the extended functions of dedicated CD drive emulator software, since it is only meant for testing virtual blank discs.

Phantom Drive 1 — Manual
7
Example: Audio CD To illustrate the general disc burning procedure, we will describe a simple example: recording an audio CD using Windows Media Player 11.
Start the Windows Media Player and click the Burn tab to open the Windows Media Player’s recording module, and click Next Drive if necessary to select the Phantom Drive as the recorder to use. In our example, this is drive I:. Then compose a list of the desired tracks by dragging titles to the list panel.
Now you must create and insert a virtual blank disc. Double-click the Phantom Starter icon on the desktop. In the list that appears, select the item Phantom Creator. This is the program used to create new virtual blank discs.

Phantom Drive 1 — Manual
8
The Phantom Creator window shows a list of media types labeled Create a .... For our example, select the item CD-R. You can leave the default settings for all the other options. Then click the Create button to create a virtual CD-R blank disc and automatically insert it in the Phantom Drive. If the auto-play dialog then opens, simply close it again without selecting anything.
If the blank disc is already inserted in the drive, you can change back to the Media Player window. The Windows media player now indicates that a blank CD-R is inserted in the Phantom Drive. You can start the burning operation by clicking the Start Burn button.

Phantom Drive 1 — Manual
9
The Windows Media Player automatically ejects the disc after the burning operation has been completed. If Phantom Drive detects that the burning program has ejected the virtual disc, it prompts you to choose what you would like to do. Select Insert the Phantom Image
to listen to the disc you have just burned. If the disc ejection was not automatically detected, you must open the Phantom Starter to insert the disc image.
If you are satisfied with the results, you can repeat the burning process with a physical disc recorder, or save the virtual audio CD to use later. If the result is not what you wanted, go back to the beginning and compose your list of tracks to burn.
Don’t forget to delete the virtual disc that you don’t want to keep (see the section Deleting Images). Otherwise it will continue to take up space on the disk drive.
Phantom Drive 1 — Manual
10
The Phantom Drive User Interface The main purpose of Phantom Drive is to provide a virtual recorder and virtual blank discs to use with it. The user interface has been designed to provide easy, intuitive access to key program functions that allow you to create and delete images and perform other frequently occurring tasks.
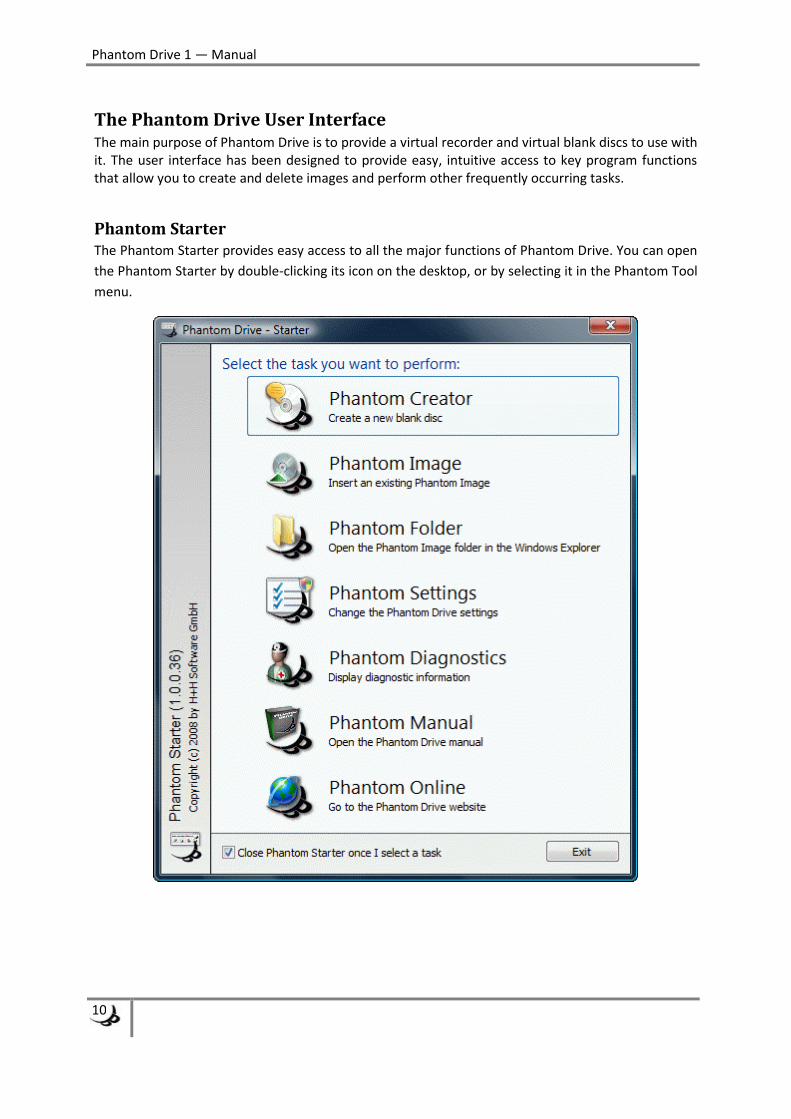
Phantom Starter The Phantom Starter provides easy access to all the major functions of Phantom Drive. You can open the Phantom Starter by double-clicking its icon on the desktop, or by selecting it in the Phantom Tool menu.
Phantom Drive 1 — Manual
11
If a new Phantom Drive version is available, the number of the new version appears below the Phantom Online command in the menu, and the corresponding icon is also modified to indicate the available update.
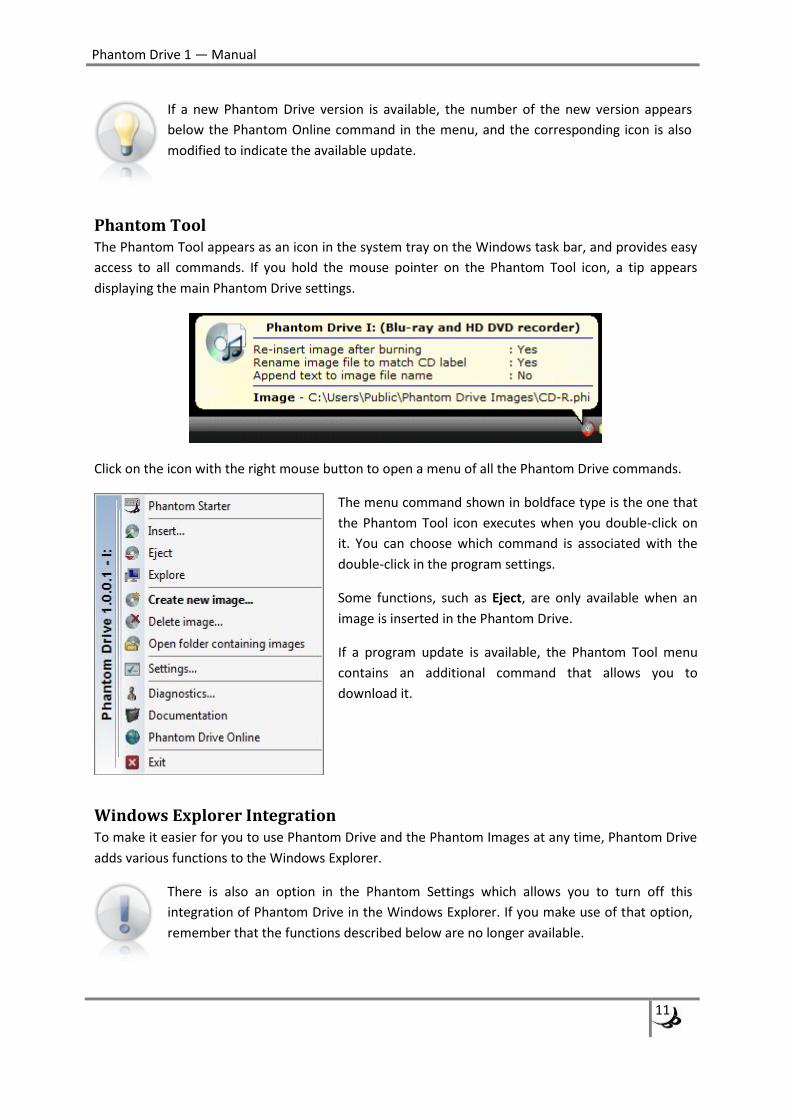
Phantom Tool The Phantom Tool appears as an icon in the system tray on the Windows task bar, and provides easy access to all commands. If you hold the mouse pointer on the Phantom Tool icon, a tip appears displaying the main Phantom Drive settings.
Click on the icon with the right mouse button to open a menu of all the Phantom Drive commands.
The menu command shown in boldface type is the one that the Phantom Tool icon executes when you double-click on it. You can choose which command is associated with the double-click in the program settings.
Some functions, such as Eject, are only available when an image is inserted in the Phantom Drive.
If a program update is available, the Phantom Tool menu contains an additional command that allows you to download it.
Windows Explorer Integration To make it easier for you to use Phantom Drive and the Phantom Images at any time, Phantom Drive adds various functions to the Windows Explorer.
There is also an option in the Phantom Settings which allows you to turn off this integration of Phantom Drive in the Windows Explorer. If you make use of that option, remember that the functions described below are no longer available.

Phantom Drive 1 — Manual
12
Phantom Drive in the Windows Explorer
When you open the Computer folder the Windows Explorer (using the shortcut in the Start menu, for example), one of the drives it contains is the Phantom Drive virtual recorder.
Like any physical CD or DVD drive, the virtual recorder appears with information about the medium currently inserted.
Because the Phantom Drive discs are virtual media, if you click on the virtual drive with the right mouse button, you will find two additional menu commands in the context menu.
These commands allow you to insert an existing Phantom Image and to create a new blank disc. (The Eject command is not new with Phantom Drive: the context menu for physical CD drives and recorders also has it.) If you select the Properties command in the Phantom Drive context menu, you will also find that the Properties window contains an additional page under the tab Phantom Drive:

Phantom Drive 1 — Manual
13
This page indicates the image currently inserted in the drive and displays the current Phantom Drive settings.
Phantom Images in the Windows Explorer
When you open the context menu for a Phantom Image file by clicking on it with the right mouse button in the Windows Explorer, you will find one of two additional menu commands, depending on whether the image is currently inserted in the Phantom Drive. If the image is not currently in the drive, the menu contains a command to insert it. If it is already in the drive, the menu contains a command to eject it.
Furthermore, all Phantom Image files are displayed in the Windows Explorer with the appropriate icon for the given media type. This makes it easy to identify the type of image.
Phantom Drive 1 — Manual
14
Phantom Images A Phantom Image is a virtual disc that you must insert in the Phantom Drive in order to work with it. This operation is analogous to inserting a CD in a physical CD drive. The following kinds of images can be used with Phantom Drive:
• Virtual blank discs: These are virtual images that correspond to blank discs of various types. You can use Phantom Drive to record data on them.
• Virtual CDs: These are disc images that contain data and are ready to be used as virtual discs. Phantom Drive allows you to create such images by recording data on a virtual blank disc.
• ISO images: These are disc images that contain a standardized ISO 9660 file system. This image format is compatible with many programs.
A Phantom Image generally consists of two files: the data file and the control file. In addition, if you have created the blank disc expressly to burn an ISO image, a temporary ISO file also exists until you actually burn the image. When you create a new virtual CD-R blank disc, for example, the following files are created:
• CD-R.phi: the control file of the Phantom Image;
• CD-R.000: the data file of the Phantom Image; and
• CD-R.$$$: the optional temporary ISO file.
When you burn a Phantom Image, an appropriately numbered data file is created for each audio or data track. Thus additional data files can be created when you record on a Phantom Image. For example, when you record audio CDs, Phantom Drive creates a data file for each track.
Furthermore, when you create a virtual blank disc on a hard disk drive whose format does not permit a single file as big as the desired blank disc size, Phantom Drive splits the image into several smaller files, so that many more files may be created.
If you need to copy a Phantom Image, you must always copy both the control file and all the data files. Otherwise, the copied image will be incomplete and will not work.
Phantom Creator The Phantom Creator allows you to create new Phantom Images. This capability gives you a practically unlimited number of virtual blank discs.

Phantom Drive 1 — Manual
15
Creating a New Phantom Image
To create a new Phantom Image, you must first specify the media type of the new virtual blank disc. For some media types, you can also specify the size.
Depending on the application you are using to record the disc, modifying the size of the medium may cause problems. For this reason modifying the size of a virtual blank disc is subject to various restrictions:
• You can specify the size of the following media types: DVD-R, DVD-RW, DVD+R, DVD+RW, DVD-RAM and HD DVD.
• The minimum size is 64 MB.
• The maximum size is 256 GB.
In addition to these two settings, the icon for the virtual blank disc you create indicates its capacity using the commercially accepted figure for the corresponding physical media. The number of sectors on the medium is also shown.
The file name can be changed if necessary. The Phantom Creator always assigns an initial file name that is not yet in use. If you change the file name yourself, you may find that a file with the desired name already exists.
During the recording process, Phantom Drive changes the file name of the virtual blank disc in accordance with the settings. For this reason it is rarely necessary to change the file name at this point.
Phantom Drive 1 — Manual
16
There is one case in which you should rename a virtual blank disc file, however: when you create a virtual blank CD-R or CD-RW disc to record an audio CD, you should give it an appropriate file name, because Phantom Drive does not change the file name on burning an audio CD.
Click on the Create button to generate a new virtual blank disc. If the option Insert the new Phantom image after creation was activated, then Phantom Drive automatically inserts the new blank disc, and you can start burning it immediately.
How Long Does It Take?
The amount of time necessary to create a virtual blank disc can vary widely, and depends on the following factors:
• Media type: For rewritable media, Phantom Drive always creates a complete disc image, since recording programs can start writing at any point on the medium. Creating rewritable media therefore takes longer than simple recordable media.
• Size: CD-RW media are much faster to create than Blu-ray RE media for example, since the files that need to be created are much smaller.
• File system: Various characteristics of your hard disk’s file system type may make generating virtual blank discs faster or slower. NTFS-formatted hard disk drives, which are most often used with Windows Vista and XP, are the most suitable for creating virtual blank discs. If your hard disk is formatted with a FAT32 file system, creating virtual media will take a long time.
We strongly recommend that you create rewritable media only on NTFS drives, since creating them on FAT32 drives can take an extremely long time.
The Physical Model
The Phantom Creator can also create a virtual blank disc that matches a given physical model. This can be practical if you want to make sure that the virtual blank disc is the same size as a given physical disc.
To use this capability, open the drop-down list labeled Create a ... and select the last item, <From a physical blank>.
Phantom Drive 1 — Manual
17
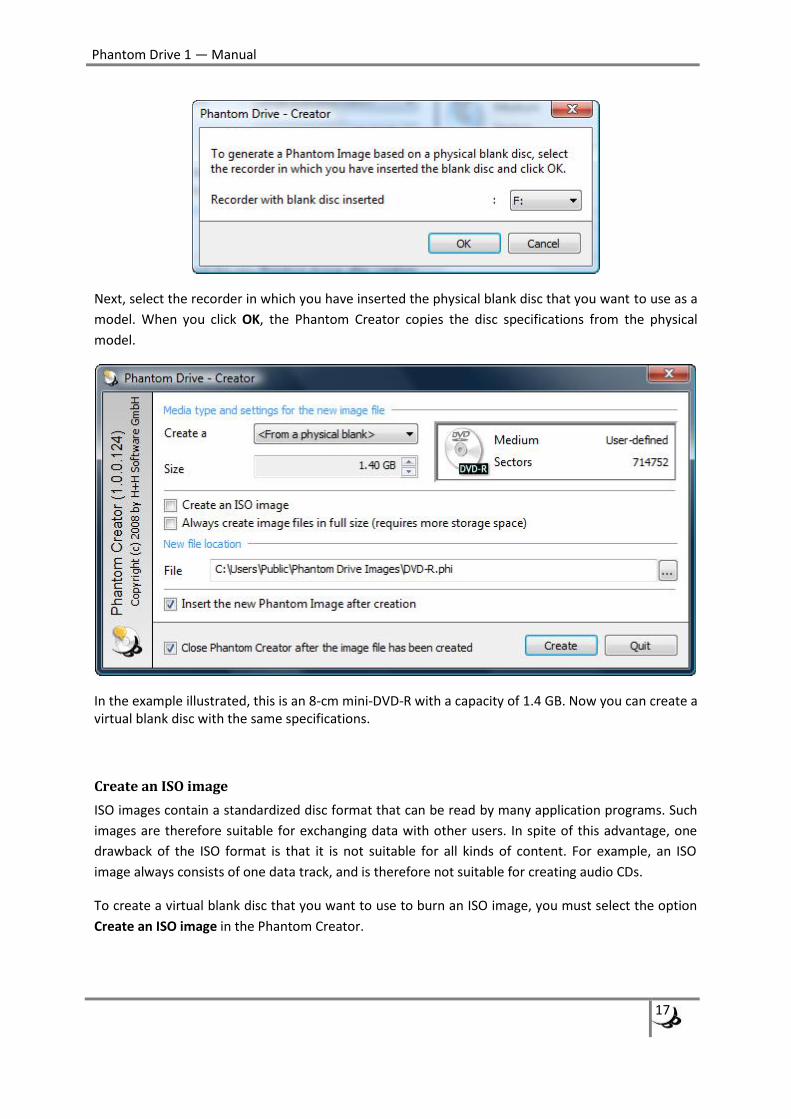
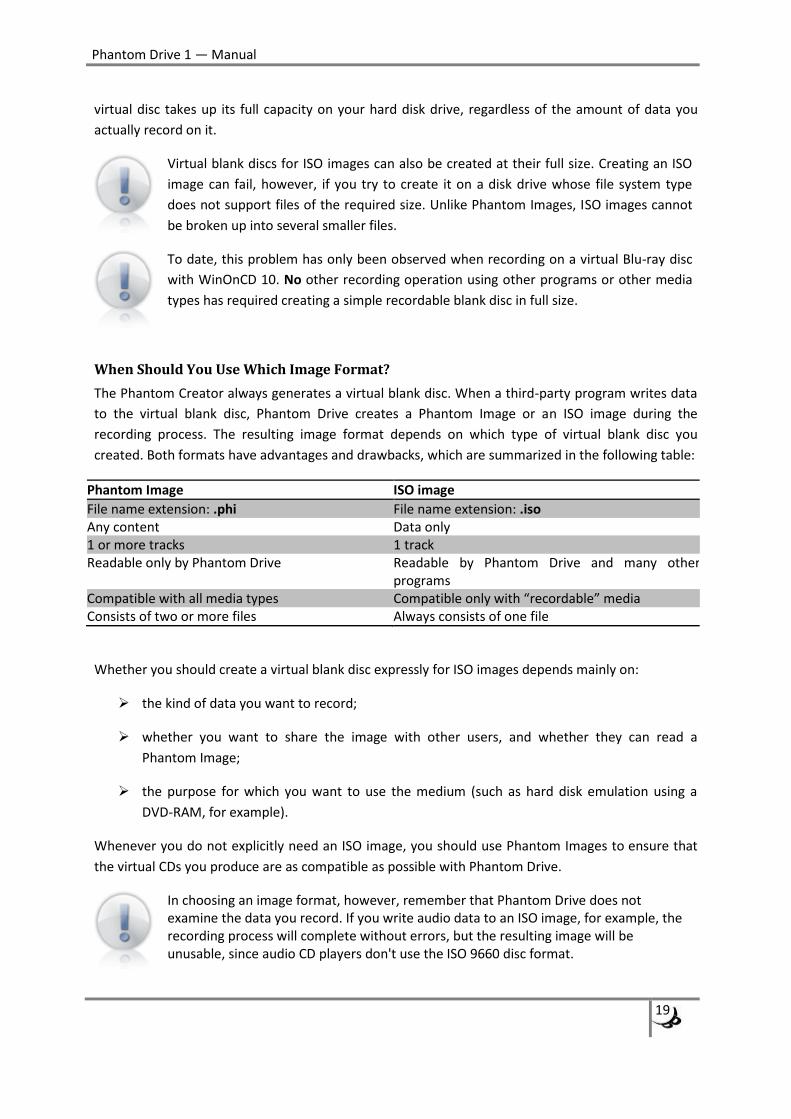
Next, select the recorder in which you have inserted the physical blank disc that you want to use as a model. When you click OK, the Phantom Creator copies the disc specifications from the physical model.
In the example illustrated, this is an 8-cm mini-DVD-R with a capacity of 1.4 GB. Now you can create a virtual blank disc with the same specifications.
Create an ISO image
ISO images contain a standardized disc format that can be read by many application programs. Such images are therefore suitable for exchanging data with other users. In spite of this advantage, one drawback of the ISO format is that it is not suitable for all kinds of content. For example, an ISO image always consists of one data track, and is therefore not suitable for creating audio CDs.
To create a virtual blank disc that you want to use to burn an ISO image, you must select the option Create an ISO image in the Phantom Creator.

Phantom Drive 1 — Manual
18
When this option is activated, the list of available media types no longer contains rewritable media, since they are not suitable for burning ISO images.
Do not change the file name of the virtual blank disc to end in “.iso”. Virtual blank discs must always have the file name extension .phi. The ISO file is created automatically during the recording process.
Always create image files in full size
There are two categories of virtual blank discs:
• Recordable: These are blank discs that can only be recorded on once. For these virtual blank discs, only the data file is created. Recordable discs are written sequentially. When the medium has been burned, the file contains exactly the amount of data that was recorded.
• Rewritable: These are blank discs that can be written on at random locations. In order to permit such random write access, these virtual blank discs are created in the form of a complete image file.
In very rare cases it may happen that the recording software writes to a simple recordable blank disc, not sequentially, but at the end first and then from the beginning. In such cases, the recording process takes an extremely long time. To the user, it appears as if the computer were no longer responding, but actually the data file — which can be up to 50 GB in the case of a Blu-ray disc — is being created, and the computer can respond to user input again when the process has been completed. To avoid this situation during the recording process, you can activate the option Always create image files in full size. Then the virtual blank disc will be created as a file with the full size of its recording capacity. Although this avoids the problem described, however, it also means that the
Phantom Drive 1 — Manual
19
virtual disc takes up its full capacity on your hard disk drive, regardless of the amount of data you actually record on it.
Virtual blank discs for ISO images can also be created at their full size. Creating an ISO image can fail, however, if you try to create it on a disk drive whose file system type does not support files of the required size. Unlike Phantom Images, ISO images cannot be broken up into several smaller files.
To date, this problem has only been observed when recording on a virtual Blu-ray disc with WinOnCD 10. No other recording operation using other programs or other media types has required creating a simple recordable blank disc in full size.
When Should You Use Which Image Format?
The Phantom Creator always generates a virtual blank disc. When a third-party program writes data to the virtual blank disc, Phantom Drive creates a Phantom Image or an ISO image during the recording process. The resulting image format depends on which type of virtual blank disc you created. Both formats have advantages and drawbacks, which are summarized in the following table:
Phantom Image ISO image File name extension: .phi File name extension: .iso Any content Data only 1 or more tracks 1 track Readable only by Phantom Drive Readable by Phantom Drive and many other
programs Compatible with all media types Compatible only with “recordable” media Consists of two or more files Always consists of one file
Whether you should create a virtual blank disc expressly for ISO images depends mainly on:
Ø the kind of data you want to record;
Ø whether you want to share the image with other users, and whether they can read a Phantom Image;
Ø the purpose for which you want to use the medium (such as hard disk emulation using a DVD-RAM, for example).
Whenever you do not explicitly need an ISO image, you should use Phantom Images to ensure that the virtual CDs you produce are as compatible as possible with Phantom Drive.
In choosing an image format, however, remember that Phantom Drive does not examine the data you record. If you write audio data to an ISO image, for example, the recording process will complete without errors, but the resulting image will be unusable, since audio CD players don't use the ISO 9660 disc format.

Phantom Drive 1 — Manual
20
The Recording Process Once you have created a virtual blank disc and inserted it in the Phantom Drive, any application designed to access a disc recorder can use the virtual recorder to write data to the virtual blank disc. Phantom Drive may also rename the virtual disc file, depending on the options you have chosen in the settings under Actions to be Performed after Burning a Disc Image:
Ø After you have recorded data on the virtual blank disc, Phantom Drive can automatically rename the image file using the CD label, which is part of the recorded data, as the file name.
Ø In the settings you can define text to be automatically appended to the file name. Generally this text includes the time and date of recording.
Ø If you recorded on a virtual blank disc created expressly for burning an ISO image, then only an ISO image file remains after the recording process.
Compatibility Phantom Drive has been tested with many applications to ensure the broadest possible compatibility. The program technically supports practically all disc formats. The only restrictions are as follows:
• Multi-session discs, such as CD Extra discs, are not supported. Phantom Drive always closes the disc at the end of the first recording session.
• Phantom drive writes only user-data and raw-data sectors (data and control information). For some disc formats, such as Video CD, other types of sectors may be written.
• Some information that may be stored in the subcode channel of a CD is not supported. Phantom Drive supports reading and writing CD-Text, but other information, such as that used for karaoke CDs for example, is not supported.
If you try to record data that the virtual recorder does not support, your application software will display an appropriate error message. The exact appearance of this error message depends on the recording program you use. See the documentation of your disc recording software.
Deleting Images When you no longer need a disc image, you can delete it. You can do so in two ways:
Ø “By hand”, that is, using Windows Explorer or a similar file handling tool. Browse to the Phantom Drive image folder and delete all the files that make up a given disc image.
Ø Using the Phantom Tool. In the Phantom Tool menu, select the command Delete image. In the list that appears, select the image that you want to delete.

Phantom Drive 1 — Manual
21
If you are not sure which files are part of a given image, then you should use the Phantom Tool to delete images. The Phantom Tool automatically deletes all the files that make up the selected image. It also tests first whether the image is currently inserted in the virtual recorder.

Phantom Drive 1 — Manual
22
Configuration The Phantom Settings window allows you to configure the Phantom Drive software. You can open the Phantom Settings from the Phantom Starter, the Phantom Tool or the Phantom Drive page in the properties of the virtual drive, which you can open using the virtual drive icon in the Windows Explorer.
Phantom Settings The Phantom Settings window is divided into various sections which contain options for the virtual recorder and other general settings.
When you open the Phantom Settings, Phantom Drive tests whether you have the necessary user privileges to save new settings. If you do not have sufficient privileges to save all the settings, a message appears, and the settings that you cannot change are deactivated in the window. That means you can read their current values, but not change them. If this occurs, log on to your computer as Administrator to change the desired settings.
In Windows Vista with User Account Control (UAC) activated, the Phantom Settings automatically prompt you to run the program with administrative privileges.

Phantom Drive 1 — Manual
23
Setting the Drive Type
The virtual recorder can be registered in the system as one of several kinds of devices. The available choices are:
• Blu-ray and HD DVD recorder
• Blu-ray recorder
• HD DVD recorder
By default, the Phantom Drive is installed as a Blu-ray and HD DVD recorder. This may cause conflicts with certain recording software, however, since no physical recorder can burn both Blu-ray and HD DVD media. If your recording software has trouble accessing Phantom Drive, change the drive type to Blu-ray or HD DVD.
Actions to be Performed after Burning a Disc Image
This section determines the program’s behavior upon completing a virtual disc recording session.
• Reinsert image after burning if ejected: Most recording programs automatically eject the medium after recording to make sure Windows rereads it and detects all the changes. If you activate this option, Phantom Drive automatically recognizes this behavior and can immediately insert the new virtual disc image. Otherwise, Phantom Drive prompts you to choose whether you would like to insert the image or open the Image folder.
• Rename image file to match CD label: When you burn an optical disc, a short text label is generally written to the disc as well. This text, called the CD label, appears in the Windows Explorer when you insert a disc in a drive. If you activate this option, Phantom Drive automatically uses the CD label as the name of the new virtual disc image file.
Not all disc images have a CD label. Some disc formats, such as audio CDs, do not provide for a CD label, and on some discs the CD label is left empty. In such cases, Phantom Drive does not rename the image file: instead, the image has the same name as the virtual blank disc that it was recorded on.
• Append text to image file name: This option lets you define a text suffix for Phantom Drive to add to the image file name when you record a virtual disc. Your text may contain the codes %TIME% and %DATE%, which are replaced in the file name with the time and date of the recording operation. Any invalid characters in your text are simply omitted in the file name. Furthermore, because Windows does not allow a colon in file names, an underscore character is substituted in the time format. Thus the file name would contain “10_00_00” rather than “10:00:00” for exactly ten o’clock.
Name in Windows Explorer
The name you specify here is shown in the Windows Explorer as the label of the Phantom Drive virtual recorder when no virtual image or blank disc is inserted.

Phantom Drive 1 — Manual
24
If you have other recorders installed in your system, this can help you to tell them apart.
Image Folder
The folder name selected here specifies where images are created, or what folder Phantom Drive presents for you to selected an image. Make sure this folder is on a disk drive that has sufficient free capacity for the images you want to create.
Bear in mind that virtual blank discs for simple recordable media are very small at first, but after recording the disc image files can be very large.
General Settings
These settings control various optional functions of the Phantom Drive programs:
• Automatically check for new version of Phantom Drive: If this option is activated, Phantom Drive automatically checks on starting whether there is a new program version available from the Phantom Drive website. If there is, then a command appears in the Phantom Starter and Phantom Tool menus to allow you to download it.
• Activate the Phantom Drive extensions in Windows Explorer: This option switches the Phantom Drive functions in the Windows Explorer menus on and off.
• Start Phantom Tool when Windows starts up: If this option is activated, Phantom Tool starts automatically when you log on, and is immediately available in the system tray.
• Double-clicking the Phantom Tool icon: Open the drop-down list and select the action that you want the Phantom Tool to perform when you double-click on its icon in the system tray.
• Language: Select the language in which you want the Phantom Drive programs to appear.
Assigning a Drive Letter
You cannot specify the drive letter for the virtual recorder in the Phantom Settings. Because Phantom Drive is completely integrated in the system, this setting is determined by Windows. To change the drive letter, you must open Disk Management in the Windows Management Console, click with the right mouse button on the virtual drive, and select the menu command Change Drive Letter and Path. For details, consult the documentation for your Windows operating system.
Phantom Drive 1 — Manual
25
The Command Line Program The major functions of Phantom Drive are also available from the command line through the Phantom Command program. You can call this program in scripts or other programs to access most Phantom Drive functions.
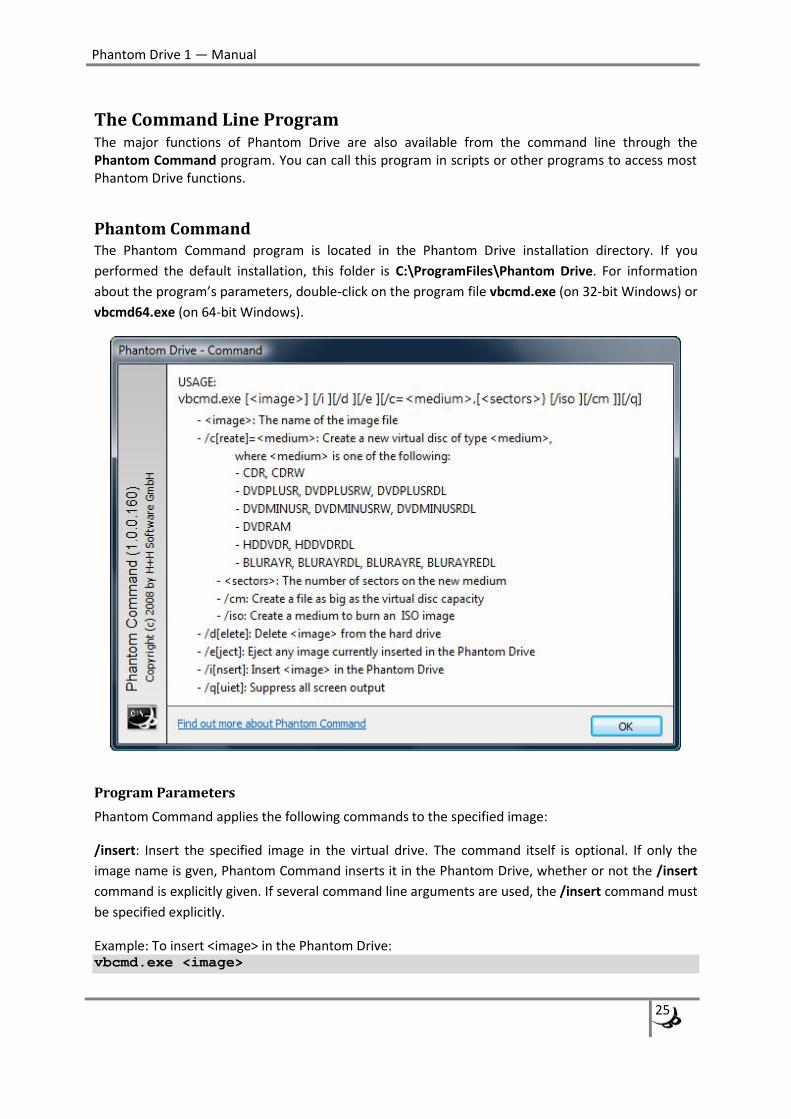
Phantom Command The Phantom Command program is located in the Phantom Drive installation directory. If you performed the default installation, this folder is C:\ProgramFiles\Phantom Drive. For information about the program’s parameters, double-click on the program file vbcmd.exe (on 32-bit Windows) or vbcmd64.exe (on 64-bit Windows).
Program Parameters
Phantom Command applies the following commands to the specified image:
/insert: Insert the specified image in the virtual drive. The command itself is optional. If only the image name is gven, Phantom Command inserts it in the Phantom Drive, whether or not the /insert command is explicitly given. If several command line arguments are used, the /insert command must be specified explicitly.
Example: To insert <image> in the Phantom Drive: vbcmd.exe <image>
Phantom Drive 1 — Manual
26
/create=<medium>: Create a new virtual blank disc of the specified media type, with the specified file name. You can also specify the number of sectors. If you do not, the new virtual blank disc used is created with the default number of sectors for the given media type (see Supported Media Types). With the argument /iso, the /create command generates an ISO virtual blank disc. The argument /cm causes the virtual blank disc to be created as a file as big as the medium’s capacity.
Example: To create a new virtual CD-R blank disc: vbcmd.exe <image> /create=CDR
Example: To create a new virtual CD-R blank disc for the purpose of burning an ISO image: vbcmd.exe <image> /create=CDR /iso
Example: To create a small virtual DVD-RAM blank disc: vbcmd.exe <image> /create=DVDRAM,32768
When you create a new image using the command line program, any existing file with the specified image file name is replaced without further confirmation.
/delete: Delete all files that make up the specified image.
Example: To delete <image>: vbcmd.exe <image> /delete
/eject: Eject the currently inserted image, if any, from the Phantom Drive.
Example: To eject whatever image is currently in the virtual recorder: vbcmd.exe /eject
/quiet: Suppress all of Phantom Command’s screen output. This argument can be used with any command.
All commands and other arguments can be truncated. For example, /Insert, /Ins and /i all have the same effect. This allows you to make your command line shorter or more self-explanatory.
Multiple Commands
Phantom Command can be called with multiple commands to perform several operations in sequence. If several commands are given, the program always executes them in this order: eject, delete, create, insert. The order in which the arguments appear on the command line is irrelevant.
Example: To delete an existing <image>, create a new virtual CD-RW blank disc also named <image>, and insert it in the virtual drive: vbcmd.exe <image> /d /c=CDRW /i

Phantom Drive 1 — Manual
27
Appendix
Supported Media Types The table lists all the media types that Phantom Drive can emulate in creating virtual blank discs.
Media Type Real Size Size Variable Sectors Blu-ray-R, 25 GB 23.87 GB No 12,219,392 Blu-ray-R DL, 50 GB 47.73 GB No 24,438,784 Blu-ray-RE, 25 GB 23.10 GB No 11,826,176 Blu-ray-RE DL, 50 GB 47.73 GB No 24,438,784 HD DVD-R, 15 GB 14.38 GB Yes 7,361,600 HD DVD-R, 30 GB 28.67 GB No 14,678,576 DVD+R, 4.7 GB 4.48 GB Yes 2,295,104 DVD+R DL, 8.5 GB 8.15 GB No 4,172,824 DVD+RW, 4.7 GB 4.48 GB Yes 2,295,104 DVD-R, 4.7 GB 4.48 GB Yes 2,295,254 DVD-R DL, 8.5 GB 8.15 GB No 4,171,712 DVD-RW, 4.7 GB 4.49 GB Yes 2,298,496 DVD-RAM, 4.7 GB 4.37 GB Yes 2,236,704 CD-R, 700 MB 703 MB No 359,997 CD-RW, 700 MB 702 MB No 359,848