pharmacy interface automation (pia) startup and ...pdm...pharmacy interface automation (pia) startup...
TRANSCRIPT
Pharmacy Interface Automation (PIA)
Startup and Troubleshooting Guide
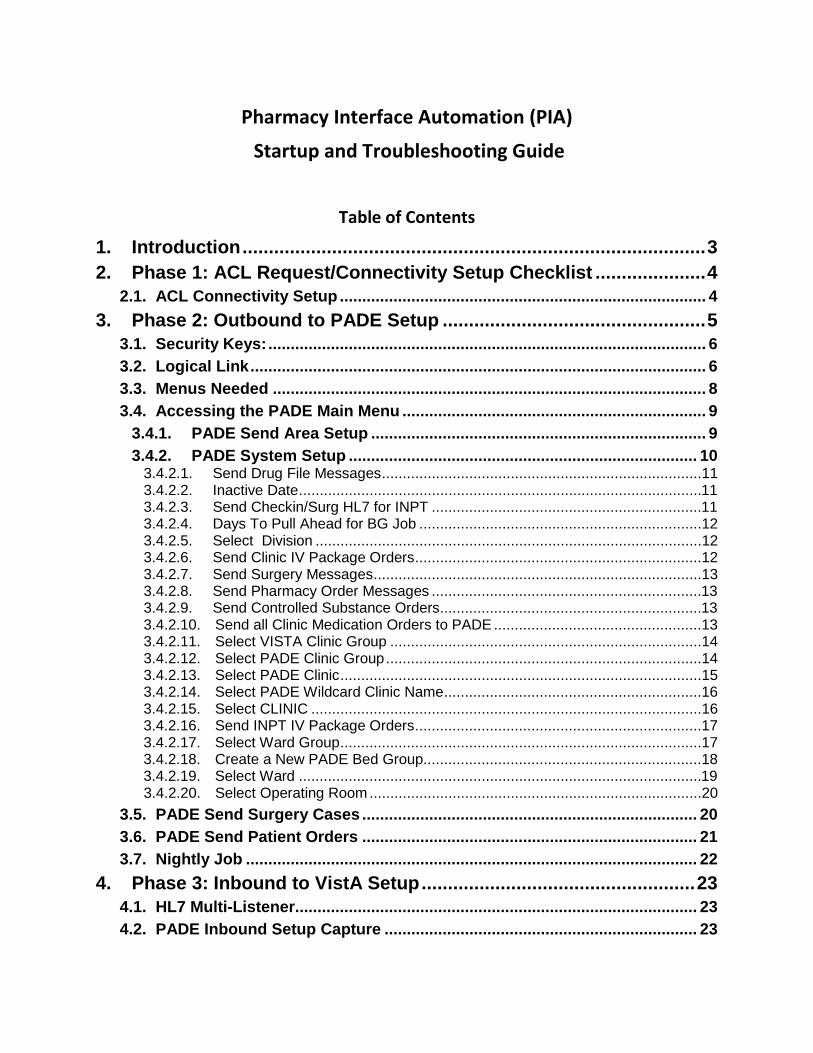
Table of Contents
1. Introduction ........................................................................................ 3
2. Phase 1: ACL Request/Connectivity Setup Checklist ..................... 4 2.1. ACL Connectivity Setup .................................................................................. 4
3. Phase 2: Outbound to PADE Setup .................................................. 5 3.1. Security Keys: .................................................................................................. 6 3.2. Logical Link ...................................................................................................... 6 3.3. Menus Needed ................................................................................................. 8 3.4. Accessing the PADE Main Menu .................................................................... 9
3.4.1. PADE Send Area Setup ........................................................................... 9 3.4.2. PADE System Setup .............................................................................. 10
3.4.2.1. Send Drug File Messages .............................................................................11 3.4.2.2. Inactive Date .................................................................................................11 3.4.2.3. Send Checkin/Surg HL7 for INPT .................................................................11 3.4.2.4. Days To Pull Ahead for BG Job ....................................................................12 3.4.2.5. Select Division .............................................................................................12 3.4.2.6. Send Clinic IV Package Orders .....................................................................12 3.4.2.7. Send Surgery Messages ...............................................................................13 3.4.2.8. Send Pharmacy Order Messages .................................................................13 3.4.2.9. Send Controlled Substance Orders ...............................................................13 3.4.2.10. Send all Clinic Medication Orders to PADE ..................................................13 3.4.2.11. Select VISTA Clinic Group ...........................................................................14 3.4.2.12. Select PADE Clinic Group ............................................................................14 3.4.2.13. Select PADE Clinic .......................................................................................15 3.4.2.14. Select PADE Wildcard Clinic Name ..............................................................16 3.4.2.15. Select CLINIC ..............................................................................................16 3.4.2.16. Send INPT IV Package Orders .....................................................................17 3.4.2.17. Select Ward Group .......................................................................................17 3.4.2.18. Create a New PADE Bed Group...................................................................18 3.4.2.19. Select Ward .................................................................................................19 3.4.2.20. Select Operating Room ................................................................................20
3.5. PADE Send Surgery Cases ........................................................................... 20 3.6. PADE Send Patient Orders ........................................................................... 21 3.7. Nightly Job ..................................................................................................... 22
4. Phase 3: Inbound to VistA Setup .................................................... 23 4.1. HL7 Multi-Listener .......................................................................................... 23 4.2. PADE Inbound Setup Capture ...................................................................... 23

Pharmacy Interface Automation Startup and Troubleshooting Guide ii October 16
4.3. PADE Inventory Error Messages .................................................................. 26 4.5. Dispensed Without Orders (DWO) Messages ............................................. 30
5. Phase 4: Implementation ................................................................. 33
6. Troubleshooting ............................................................................... 35 6.1. Key Contacts .................................................................................................. 35 6.2. Support sites/ Documentation ...................................................................... 35 6.3. Common Issues and Resolution .................................................................. 35

Pharmacy Interface Automation Startup and Troubleshooting Guide 3 October 16
1. Introduction The Pharmacy Interface Automation project creates an automated interface between the Pharmacy Automated Dispensing Equipment (PADE) used in the inpatient and outpatient care settings and VistA. The purpose of this user manual is to walk through the setup of the Pharmacy Interface Automation (PIA) functionality included in patches PSJ*5*317 and PSS*1*193.
It is highly suggested that you read the supporting documentation BEFORE beginning with setup. The links to the location are listed below:
• User Manual
• Technical Manual
• Installation Guide (this is for VistA installation)
We recommend the following approach to begin setting up and using the Pharmacy Interface Automation functionality. This will vary greatly from site to site and depend on the vendor at the site. Click the links for details.
Phase 1: ACL request/Connectivity Setup (2-3 weeks)
a. Outbound (VIE>> PADE)
b. Inbound (PADE>> VIE)
Phase 2: Outbound Setup
Note: The outbound setup can be started while waiting for ACL approval and connectivity.
Phase 3: Inbound Setup
Note: Wait until VIE connectivity is established to begin setup
Phase 4: Implementation

Pharmacy Interface Automation Startup and Troubleshooting Guide 4 October 16
2. Phase 1: ACL Request/Connectivity Setup Checklist The following roles are involved with ACL Request and Connectivity Setup:
• Region COTS team • Biomed group • VIE National Admins • Region LAN group • Region IT support • Clin 1 team • Vendor Engineer • Pharmacy
Note: It may take up to two to three weeks to setup your ACL.
2.1. ACL Connectivity Setup Here are the steps to get a connection established:
1. Ensure the latest patches are installed in VistA (PSJ*5*317 and PSS*1*193). 2. System owners (could be Biomed or Pharmacy depending on the site setup) need to initiate
changes to the VLAN ACL for the PADE system(s) via a CA Ticket that lists all changes needed to be done to the ACL.
a. Work with VIE national admin group (Lori Ramey) to get the exact information that needs to go into the ticket.
i. Open CA ticket for their support. ii. Email: [email protected]
3. Get confirmation that the ACLs are open. 4. Conduct connectivity testing (testing of communication of information)- suggest getting a call
with all parties (usually about 1 hour). a. Confirm VIE can establish a connection to the VistA HL7 multi-listener. (Inbound) b. Test VIE to Vendor (Outbound) c. Test Vendor to VIE (Inbound) d. Test communication to/from VistA and VIE e. Suggest sending a few test patients or drug information to PADE and having information
from PADE come back into VistA to make sure the communication is going through properly.
Refer to Section 4: Phase 3 Inbound to VistA Setup for more details on Inbound Setup.

Pharmacy Interface Automation Startup and Troubleshooting Guide 5 October 16
3. Phase 2: Outbound to PADE Setup In this phase, the setup will be configured in VistA to send the information to the appropriate PADE. This Phase can happen simultaneously to Phase 1. The main purpose of the outbound setup is to map the send areas to the location of the cabinets in the wards, clinics, and/or operating rooms.
Roles involved:
• Pharmacy Staff (ADPAC)- This role will have the most in this set up area
• Vendor Engineer or Implementation Support
• Clinical Product Support
• VIE National Admins
• Region IT support (if needed)
Phase 2: Outbound Setup
Step (click link for more details.) POC
☐ 1. Confirm Vendor POCs and adjust contract if needed
Pharmacy staff/ Biomed
☐ 2. Determine that you have the appropriate security keys and menus.
Pharmacy
3. PSJ PADE Logical Link Setup
☐ 4. (SA) PADE Send Area Setup
☐ 5. (SS) PADE System Setup
☐ 6. (SO) PADE Send Patient Orders
☐ 7. Nightly Job
☐
☐
☐

Pharmacy Interface Automation Startup and Troubleshooting Guide 6 October 16
3.1. Security Keys: The following security keys are needed for Outbound and Inbound PADE setup and functionality. Security Key Description PSJ PADE MGR This key is given to Pharmacy users who will need full access
to the PSJ PADE MAIN MENU including the PADE System setup.
PSJ PADE ADV This key is given to Pharmacy users in addition to the PSJ PADE MGR key to prevent the user from PADE System setup like IP address/port, and to allow setting up division specific lower level parameters (i.e. wards and clinics) of the PADE system.
PSS PADE INIT
This security key enables users to transmit the entire drug file (or UD and IV marked drugs) to Pharmacy Automated Dispensing Equipment (PADE) System(s) within the "Send Drug File Entries to External Interface" Vista option. This action is typically a onetime event to send a copy of the formulary to a new PADE vendor.
3.2. Logical Link To set up your logical links, complete the following steps:
1. From the HL7 Main Menu, select Interface Developer Options.
Select OPTION NAME: HL7 MAIN MENU HL MAIN MENU HL7 Main Menu Event monitoring menu ... Systems Link Monitor Filer and Link Management Options ... Message Management Options ... Interface Developer Options ... Site Parameter Edit HLO HL7 (Optimized) MAIN MENU ...
2. From the Interface Developer Options, select EL Link Edit.
You have PENDING ALERTS Enter "VA to jump to VIEW ALERTS option Select HL7 Main Menu <TEST ACCOUNT> Option: Interface Developer Options EA Application Edit EP Protocol Edit EL Link Edit
Pharmacy Interface Automation Startup and Troubleshooting Guide 7 October 16
VI Validate Interfaces Reports ...
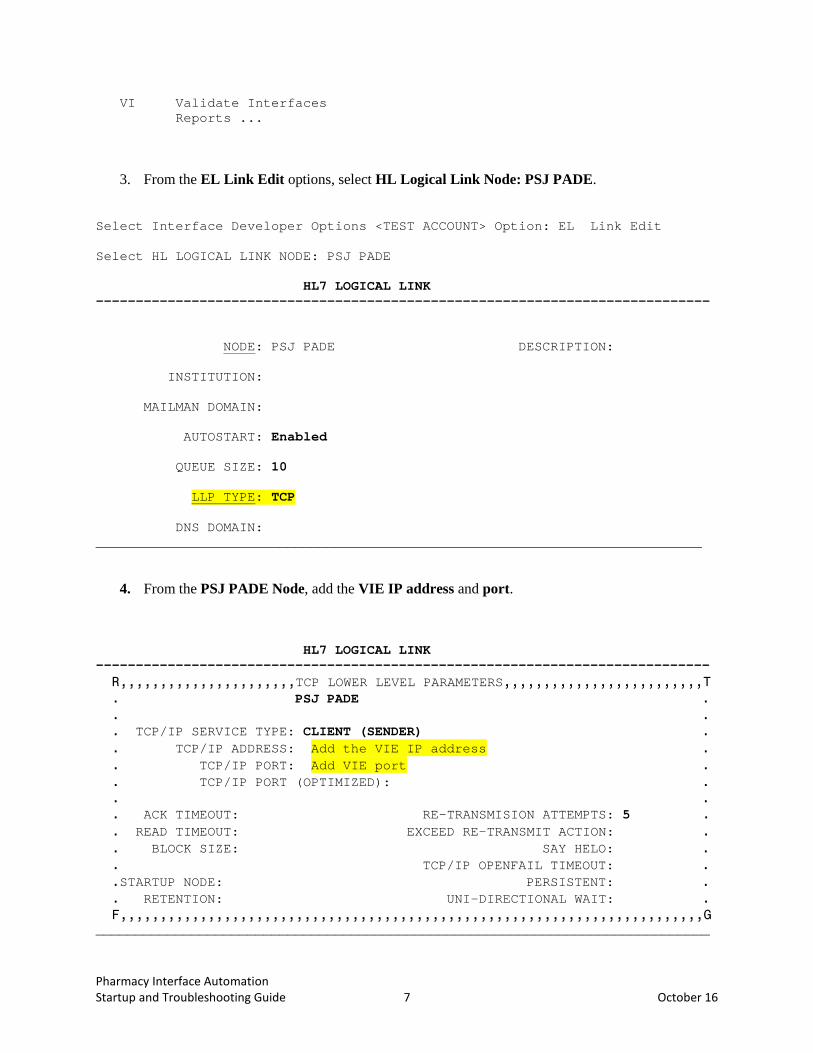
3. From the EL Link Edit options, select HL Logical Link Node: PSJ PADE.
Select Interface Developer Options <TEST ACCOUNT> Option: EL Link Edit Select HL LOGICAL LINK NODE: PSJ PADE HL7 LOGICAL LINK ----------------------------------------------------------------------------- NODE: PSJ PADE DESCRIPTION: INSTITUTION: MAILMAN DOMAIN: AUTOSTART: Enabled QUEUE SIZE: 10 LLP TYPE: TCP DNS DOMAIN: ____________________________________________________________________________
4. From the PSJ PADE Node, add the VIE IP address and port.
HL7 LOGICAL LINK ----------------------------------------------------------------------------- R,,,,,,,,,,,,,,,,,,,,,,TCP LOWER LEVEL PARAMETERS,,,,,,,,,,,,,,,,,,,,,,,,,T . PSJ PADE . . . . TCP/IP SERVICE TYPE: CLIENT (SENDER) . . TCP/IP ADDRESS: Add the VIE IP address . . TCP/IP PORT: Add VIE port . . TCP/IP PORT (OPTIMIZED): . . . . ACK TIMEOUT: RE-TRANSMISION ATTEMPTS: 5 . . READ TIMEOUT: EXCEED RE-TRANSMIT ACTION: . . BLOCK SIZE: SAY HELO: . . TCP/IP OPENFAIL TIMEOUT: . .STARTUP NODE: PERSISTENT: . . RETENTION: UNI-DIRECTIONAL WAIT: . F,,,,,,,,,,,,,,,,,,,,,,,,,,,,,,,,,,,,,,,,,,,,,,,,,,,,,,,,,,,,,,,,,,,,,,,,,G _____________________________________________________________________________

Pharmacy Interface Automation Startup and Troubleshooting Guide 8 October 16
3.3. Menus Needed You can access the following functions from the PSJ PADE MAIN MENU: Key Function Description SA PADE Send Area Setup This option is used to setup the Pharmacy
Automated Dispensing Equipment (PADE) send area, which will help map locations to the cabinets on the vendor systems.
SS PADE System Setup This is the name of the PADE system like Pyxis, OmniCell, AccuDose etc., that supports single/ multiple cabinets, located in Inpatient Wards and Outpatient Clinics to stock items (drug/non-drug) for dispensing.
IN PADE Inventory Setup This menu contains options used to set up PADE Inbound information. PADE vendor system parameters may be set, including the activation of the display of vendor drug item balances in Inpatient Order Entry and the entry of mail groups to which inbound HL7 error messages are sent. Individual PADE dispensing device (cabinet) parameters may also be defined, including initializing the device, activating/inactiving the device, and linking the device to a hospital division and ward or clinic location.
RP PADE Reports This menu contains options to run PADE Inbound inventory reports. The PADE Transaction Report contains information on individual HL7 transactions received from the PADE vendor, and is run for a specific date range. The PADE On Hand Report contains current inventory information for each drug item stocked in each PADE dispensing device (cabinet).
SC PADE Send Surgery Cases This option can be used to send surgery cases manually to a PADE for that date or future date.
SO PADE Send Patient Orders This option is used to send UD/IV orders to PADE.

Pharmacy Interface Automation Startup and Troubleshooting Guide 9 October 16
3.4. Accessing the PADE Main Menu Assign the PSJ PADE MGR key to access the PADE Main Menu Select OPTION NAME: PSJU MGR Unit Dose Medications (Inpatient Medications - Version 5.0 09/17/98) Align Labels (Unit Dose) Discontinue All of a Patient's Orders ECO Edit Clinic Med Orders Start Date/Time EUP Edit Inpatient User Parameters IOE Inpatient Order Entry IPF Inpatient Profile Check Drug Interaction INQuiries Menu ... Label Print/Reprint Non-Verified/Pending Orders Order Entry PADE Main Menu ... PAtient Profile (Unit Dose) Reports Menu ... Supervisor's Menu ... You have PENDING ALERTS Enter "VA to jump to VIEW ALERTS option Select Unit Dose Medications <TEST ACCOUNT> Option: PADE Main Menu Select OPTION NAME: PSJ PADE MAIN MENU PADE Main Menu SA PADE Send Area Setup SS PADE System Setup IN PADE Inventory Setup ... RP PADE Reports ... SC PADE Send Surgery Cases SO PADE Send Patient Orders
3.4.1. PADE Send Area Setup Coordinate with your vendor to get a list of send areas on the vendor side, so when the message is sent the vendor will know which cabinet to route the message to. Select PADE Main Menu <TEST ACCOUNT> Option: SA PADE Send Area Setup Select PADE SEND AREA: ?? Choose from: EMERGENCY ROOM 1 EMERGENCY ROOM 2

Pharmacy Interface Automation Startup and Troubleshooting Guide 10 October 16
MIKE’S CLINIC GROUP SA NICU FLOOR 7 OP CLINIC SURGERY FLOOR 2 You may enter a new PADE SEND AREA, if you wish. These are the pre-defined locations on the PADE vendor system where the messages will be sent to. Select PADE SEND AREA: SA PADE Send Area Setup SS PADE System Setup IN PADE Inventory Setup ... RP PADE Reports ... SC PADE Send Surgery Cases SO PADE Send Patient Orders
3.4.2. PADE System Setup PADE SYSTEM SETUP is the name of the Pharmacy Automated Dispensing Equipment (PADE) system like Pyxis, OmniCell, AccuDose etc., that supports single/multiple cabinets, located in Inpatient Wards and Outpatient Clinics to stock items (drug/non-drug) for dispensing. To enter a new PADE SYSTEM SETUPS, select PADE Main Menu <TEST ACCOUNT> Option: SS PADE System Setup Select PADE SYSTEM SETUP: ?? Choose from: ASEYNT OMNICELL PYXIS Select PADE SYSTEM SETUP: PYXIS PADE SYSTEM: PYXIS// DNS NAME/IP ADDRESS: 10.168.11.186// ?? This is the DNS name or the IP address of the PADE System. DNS NAME/IP ADDRESS: 10.168.11.186// PORT: 4800// ?? This is the port number associated with the PADE System. PORT: 4800// SEND DRUG FILE MESSAGES: NONE// ??

Pharmacy Interface Automation Startup and Troubleshooting Guide 11 October 16
3.4.2.1. Send Drug File Messages This parameter will determine if the user will be prompted to send HL7 drug formulary messages to PADE when using the DRUG ENTER/EDIT option. When set to "N" (for New DRUGS), the user will be prompted to send a message to PADE only when the DRUG ENTER/EDIT option is used to create NEW entries. If the parameter is set to "U" (for UPDATES) then the user will only be prompted to send messages when updating/changing current entries with the DRUG ENTER/EDIT OPTION. IF this parameter is set to "B" (for BOTH), then the user will be prompted during both of these scenarios. If the parameter is set to X (or left NULL/blank), then the user will never be prompted to send NEW or UPDATES to PADE when using the DRUG ENTER/EDIT option. This parameter will not impact the functioning of the MASTER FILE update option which can always be used to send the formulary update messages for one or all appropriate drugs to PADE. Choose from: N NEW DRUGS U UPDATES B BOTH X NONE SEND DRUG FILE MESSAGES: BOTH//
3.4.2.2. Inactive Date The following is an example of the PADE inactivation date. If the year is omitted, the computer uses CURRENT YEAR. Two digit year assumes no more than 20 years in the future, or 80 years in the past. Examples of Valid Dates: JAN 20 1957 or 20 JAN 57 or 1/20/57 or 012057 T (for TODAY), T+1 (for TOMORROW), T+2, T+7, etc. T-1 (for YESTERDAY), T-3W (for 3 WEEKS AGO), etc. IMPORTANT: until your site is ready to use PADE, it is recommended that you set the inactivation date to “T-1” to prevent generation of HL7 messages. Once your site is ready to use PADE, this inactivation date should be deleted.
3.4.2.3. Send Checkin/Surg HL7 for INPT This is vendor-dependent and should only be set to "NO" when it is known that these messages could cause the inpatient to be removed from their IP location on the vendor device. Choose from: Y YES N NO SEND CHECKIN/SURG HL7 FOR INPT: YES//

Pharmacy Interface Automation Startup and Troubleshooting Guide 12 October 16
3.4.2.4. Days To Pull Ahead for BG Job Check-in for a clinic will generate HL7 messages to PADE in real time. Clinics that do not have check-in, there is a nightly job that can be scheduled to run on a daily basis that will generate HL7 messages to PADE. If there is a need for you to send clinic appointments for future days as well then populating this field will help to pull those appointments in your nightly job. We allow a maximum of 30 days, but keep this to a minimum as it may impact your network traffic. Select DIVISION: ALBANY// ??
3.4.2.5. Select Division DIVISION is the MEDICAL CENTER DIVISION associated with the WARDS and CLINICS that are to be defined for this PADE system. You will only be able to define WARDS and Clinics that are associated with this DIVISION. Users with the PSJ PADE ADV key may only edit existing divisions in the multiple and may not add new ones. Choose from: ALBANY ISC 3 TROY Choose from: 1 TROY 888 2 ALBANY 500 9 CINCINNATI 539 10 ALB-PRRTP 500PA 11 ALBANY OPC 500A4 12 ISC 3 13000 Select DIVISION: ALBANY// DIVISION: ALBANY// INACTIVE DATE: ?? This is the date on or after which the division will no longer communicate with the PADE system.
3.4.2.6. Send Clinic IV Package Orders Enter "YES" if all IV package orders associated with clinics of this division will send messages to PADE. Choose from: Y YES N NO SEND CLINIC IV PACKAGE ORDERS?: YES// SEND SURGERY MESSAGES?: YES// ??

Pharmacy Interface Automation Startup and Troubleshooting Guide 13 October 16
3.4.2.7. Send Surgery Messages Entering "YES" in this field will send ADT messages for surgical cases scheduled in operating rooms defined within this division. This feature may not be needed if surgical cases for this division have associated clinic appointments into which patients are being checked into. Choose from: Y YES N NO SEND SURGERY MESSAGES?: YES// SEND ORDER MESSAGES?: YES// ??
3.4.2.8. Send Pharmacy Order Messages Entering YES in this field will allow pharmacy order messages from the inpatient medication package (including clinic orders) to be sent for wards and clinics defined in the PADE parameters for this division. Choose from: Y YES N NO SEND ORDER MESSAGES?: YES// SEND CS ORDERS ONLY?: ??
3.4.2.9. Send Controlled Substance Orders When this field is set to "YES", and the field "SEND ORDER MESSAGES?" is also set to "YES"; then only order messages for medications with a dispense drug having a DEA, SPECIAL HDLG field (#3) of the DRUG file (#50) containing 2,3,4 or 5 will transmit to PADE for the wards and clinics defined for this division. Use this field if you only use the PADE cabinets of this division to stock controlled substances. Choose from: Y YES N NO SEND CS ORDERS ONLY?: SEND MESSAGES FOR ALL CLINICS?: NO// ??
3.4.2.10. Send all Clinic Medication Orders to PADE Enter "YES" if all clinic medication order messages will be sent to PADE. This also includes SIU messages generated by clinic appointment activity/triggers. Caution should be taken when choosing to send ALL clinic messages (orders and ADT) from a particular division due to the potentially large volume of messages sent. This is particularly true if you answer YES to this field and leave the DEFAULT CLINIC ORDER SEND AREA field Null/Blank. In that case, all clinic messages (orders and SIU) will be sent to PADE for all clinics in that division using the FULL clinic name instead of a DEFAULT CLINIC ORDER SEND AREA. This may create a distinct location on the vendor side for each unique clinic name passed. Be sure to work with your vendor to ensure their capabilities prior to setting this field to YES. Choose from: Y YES

Pharmacy Interface Automation Startup and Troubleshooting Guide 14 October 16
N NO SEND MESSAGES FOR ALL CLINICS?: NO// Select VISTA CLINIC GROUP: MIKE’S CLINIC GROUP// ??
3.4.2.11. Select VISTA Clinic Group You may associate groups of clinics by their membership in a CLINIC GROUP (defined in pharmacy file 57.8). It is important to understand that this feature should only be used for sites that do NOT allow one clinic to be in more than one Clinic group (in file 57.8). In the event that a clinic is defined in TWO clinic groups associated with this file; the message will be sent to the VISTA CLINIC GROUP SEND AREA associated with the first entered clinic group in this file. If this is unacceptable, then that clinic should be defined individually. Select VISTA CLINIC GROUP: MIKE’S CLINIC GROUP// VISTA CLINIC GROUP: MIKE’S CLINIC GROUP// VISTA CLINIC GROUP SEND AREA: MIKE’S CLINIC GROUP SA// ?? This is the PADE cabinet location that will be used for this clinic group when sending messages. Choose from: AL-SARRTP EMERGENCY ROOM 1 EMERGENCY ROOM 2 MIKE’S CLINIC GROUP SA NICU FLOOR 7 OP CLINIC SURGERY FLOOR 2 VISTA CLINIC GROUP SEND AREA: MIKE’S CLINIC GROUP SA// INCLUDE CLINICS IN BG JOB: YES// ?? Enter "YES" if the nightly background job should run for all clinics in this group and generate appointment messages to PADE. Do not populate this field if check-in is done in these clinics as check-in will generate appointment messages to PADE in real time. Choose from: Y YES INCLUDE CLINICS IN BG JOB: YES// Select VISTA CLINIC GROUP: Select PADE CLINIC GROUP: PDCL2//
3.4.2.12. Select PADE Clinic Group PADE CLINIC GROUP allows you to create a custom grouping of clinics for PADE messages that will all transmit to the same PADE CLINIC GROUP SEND AREA. The benefit of adding clinics to this group, rather than individually, would be that the OP PADE CLINIC GROUP SEND AREA only has to be defined ONCE for the group vs. each time if the clinics were added individually. It also makes the process easier for changing the PADE CLINIC GROUP SEND AREA for an entire group, vs. if they were defined individually.

Pharmacy Interface Automation Startup and Troubleshooting Guide 15 October 16
Select PADE CLINIC GROUP: TONY’S PADE CLINIC// PADE CLINIC GROUP: TONY’S PADE CLINIC// Select PADE CLINIC: SHERYL'S CLINIC// ??
3.4.2.13. Select PADE Clinic If you want to set up a clinic group just for PADE use only to send messages to a particular PADE location then you can do so here by defining all the clinics and putting them under one group. If you intend to use the Clinic group already existing in VistA and there is no overlap of clinics within those clinic groups then you can do so by selecting the VISTA CLINIC GROUP multiple provided as part of the input template. Choose from: SHERYL'S CLINIC REGINA’S CLINIC Select PADE CLINIC: SHERYL'S CLINIC// PADE CLINIC GROUP SEND AREA: EMERGENCY ROOM 1 // ?? This is the PADE cabinet location that will be used to send messages associated with clinics under this group. Choose from: AL-SARRTP EMERGENCY ROOM 1 EMERGENCY ROOM 2 MIKE’S CLINIC GROUP SA NICU FLOOR 7 OP CLINIC SURGERY FLOOR 2 PADE CLINIC GROUP SEND AREA: EMERGENCY ROOM 1 INCLUDE CLINICS IN BG JOB: YES// ?? Enter "YES" if the nightly background job should run for all clinics in this group and generate appointment messages to PADE. Do not populate this field if check-in is done in these clinics as check-in will generate appointment messages to PADE in real time. Choose from: Y YES INCLUDE CLINICS IN BG JOB: YES// Select PADE CLINIC GROUP: Select PADE WILDCARD CLINIC NAME: ALB-ER// ??
Pharmacy Interface Automation Startup and Troubleshooting Guide 16 October 16
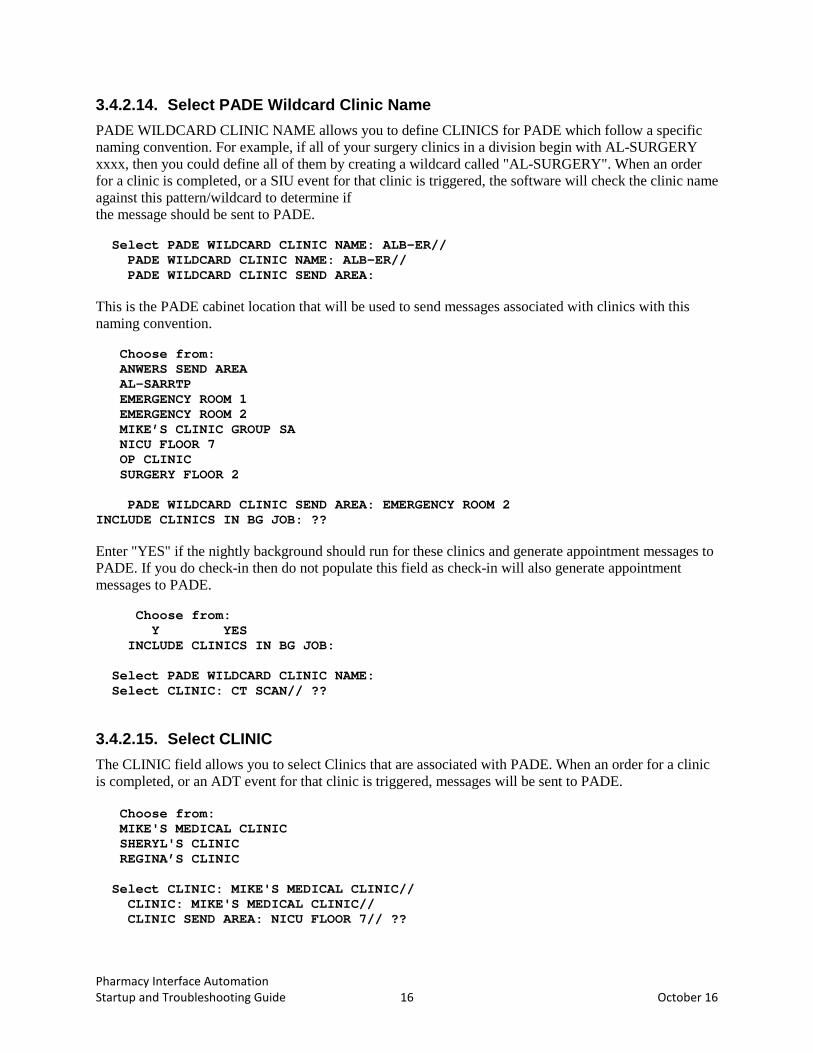
3.4.2.14. Select PADE Wildcard Clinic Name PADE WILDCARD CLINIC NAME allows you to define CLINICS for PADE which follow a specific naming convention. For example, if all of your surgery clinics in a division begin with AL-SURGERY xxxx, then you could define all of them by creating a wildcard called "AL-SURGERY". When an order for a clinic is completed, or a SIU event for that clinic is triggered, the software will check the clinic name against this pattern/wildcard to determine if the message should be sent to PADE. Select PADE WILDCARD CLINIC NAME: ALB-ER// PADE WILDCARD CLINIC NAME: ALB-ER// PADE WILDCARD CLINIC SEND AREA: This is the PADE cabinet location that will be used to send messages associated with clinics with this naming convention. Choose from: ANWERS SEND AREA AL-SARRTP EMERGENCY ROOM 1 EMERGENCY ROOM 2 MIKE’S CLINIC GROUP SA NICU FLOOR 7 OP CLINIC SURGERY FLOOR 2 PADE WILDCARD CLINIC SEND AREA: EMERGENCY ROOM 2 INCLUDE CLINICS IN BG JOB: ?? Enter "YES" if the nightly background should run for these clinics and generate appointment messages to PADE. If you do check-in then do not populate this field as check-in will also generate appointment messages to PADE. Choose from: Y YES INCLUDE CLINICS IN BG JOB: Select PADE WILDCARD CLINIC NAME: Select CLINIC: CT SCAN// ??
3.4.2.15. Select CLINIC The CLINIC field allows you to select Clinics that are associated with PADE. When an order for a clinic is completed, or an ADT event for that clinic is triggered, messages will be sent to PADE. Choose from: MIKE'S MEDICAL CLINIC SHERYL'S CLINIC REGINA’S CLINIC Select CLINIC: MIKE'S MEDICAL CLINIC// CLINIC: MIKE'S MEDICAL CLINIC// CLINIC SEND AREA: NICU FLOOR 7// ??

Pharmacy Interface Automation Startup and Troubleshooting Guide 17 October 16
This is the PADE cabinet location that will be used for this clinic when sending messages. Choose from: AL-SARRTP EMERGENCY ROOM 1 EMERGENCY ROOM 2 MIKE’S CLINIC GROUP SA NICU FLOOR 7 OP CLINIC SURGERY FLOOR 2 CLINIC SEND AREA: NICU FLOOR 7// INCLUDE CLINIC IN BG JOB: YES// ?? Enter "YES" if the nightly background job should run for this clinic and generate appointment messages to PADE. Do not populate this field if check-in is done in this clinic as check-in will generate appointment messages to PADE in real time. Choose from: Y YES INCLUDE CLINIC IN BG JOB: Select CLINIC: SEND INPT IV PACKAGE ORDERS?: YES// ??
3.4.2.16. Send INPT IV Package Orders Enter "YES" if all IV package orders associated with wards of this division will send messages to PADE. Choose from: Y YES N NO SEND INPT IV PACKAGE ORDERS?: YES// Select WARD GROUP: ??
3.4.2.17. Select Ward Group You can use ward groups to associate all the wards within a "P" type ward group to this Division instead of defining them individually. If you also define a WARD individually, which is part of a ward group defined within this field, then the WARD SEND AREA in this multiple will be ignored for that ward and the send location of the individually defined ward will be used to send messages. This allows you to define behavior for an entire ward group but create exceptions for specific wards that are part of that group. Choose from: 10C SARRTP-AL Select WARD GROUP: 10C SARRTP-AL// WARD GROUP: 10C SARRTP-AL// WARD GROUP SEND AREA: AL-SARRTP// ?? All the messages associated to the wards under this ward group will be sent to the PADE location defined here. Choose from:

Pharmacy Interface Automation Startup and Troubleshooting Guide 18 October 16
ANWERS SEND AREA AL-SARRTP EMERGENCY ROOM 1 EMERGENCY ROOM 2 MIKE’S CLINIC GROUP SA NICU FLOOR 7 OP CLINIC SURGERY FLOOR 2 WARD GROUP SEND AREA: AL-SARRTP// WARD GROUP SEND AREA: ?? All the messages associated to the wards under this ward group will be sent to the PADE location defined here. Choose from: ANWERS SEND AREA EMERGENCY ROOM 1 EMERGENCY ROOM 2 Select WARD GROUP: Select PADE BED GROUP NAME: PDBG1//??
3.4.2.18. Create a New PADE Bed Group PADE BED GROUP is an arbitrary name of your choosing that will be used to group beds for which the messages for patients in those beds will be sent to a specific send location. You should only define this for wards that have multiple PADE cabinets (i.e. two "wings"); where the bed designations can indicate which PADE cabinet will support the patients in that groups of beds. If both cabinets will support all patients on the ward, then the ward only need be defined and not specific groups of beds. Select PADE BED GROUP NAME: PDBG1// PADE BED GROUP NAME: PDBG1// Select PADE INDIVIDUAL BED: AS-9// ?? Choose from: A-2 AS-1 AS-9 PADE BEDS are the room-beds belonging to this group. Grouping the beds is helpful if there are more than one PADE cabinets supporting a ward. Defining the related send area with the accurate group of beds will help send HL7 messages to the PADE BED GROUP SEND AREA. Select PADE INDIVIDUAL BED: AS-9// PADE BED GROUP SEND AREA: SURGERY FLOOR 2// ?? This is the PADE cabinet location that will be used for this bed group when sending messages. Choose from:

Pharmacy Interface Automation Startup and Troubleshooting Guide 19 October 16
ANWERS SEND AREA AL-SARRTP EMERGENCY ROOM 1 EMERGENCY ROOM 2 MIKE’S CLINIC GROUP SA NICU FLOOR 7 OP CLINIC SURGERY FLOOR 2 PADE BED GROUP SEND AREA: SURGERY FLOOR 2// Select PADE BED GROUP NAME: Select PADE BED GROUP NAME:
3.4.2.19. Select Ward The WARD field allows you to select Wards that are associated with a PADE. When an order for an inpatient is completed, or an ADT event for that Ward is triggered, messages will be sent to PADE. Choose from: Select WARD: UNIT 1// Choose from: 5 West Psych MIKE'S IP WARD UNIT 1 WARD: UNIT 1// WARD SEND AREA: EMERGENCY ROOM 1// ?? This is the PADE cabinet location that will be used for this ward when sending messages. Choose from: ANWERS SEND AREA EMERGENCY ROOM 1 EMERGENCY ROOM 2 Select WARD: Select OPERATING ROOM: GENERAL SURGERY// ??

Pharmacy Interface Automation Startup and Troubleshooting Guide 20 October 16
3.4.2.20. Select Operating Room You have the option to enter a new OPERATING ROOM. If you have the "Send Surgery Messages?" set to "YES" for this division, you must also define the operating rooms whose scheduled cases should generate surgery messages to PADE. Choose from: GENERAL SURGERY Select OPERATING ROOM: GENERAL SURGERY// OPERATING ROOM: GENERAL SURGERY// OPERATING ROOM SEND AREA: SURGERY FLOOR 2// ?? Choose a send location for the surgery messages that will generate for surgical cases scheduled for this operating room. If you leave this field blank, the operating room name will be used as the location for the message. Choose from: ANWERS SEND AREA AL-SARRTP EMERGENCY ROOM 1 EMERGENCY ROOM 2 MIKE’S CLINIC GROUP SA NICU FLOOR 7 OP CLINIC SURGERY FLOOR 2 OPERATING ROOM SEND AREA: SURGERY FLOOR 2// Select OPERATING ROOM: Select DIVISION: Select PADE SYSTEM SETUP: SA PADE Send Area Setup SS PADE System Setup IN PADE Inventory Setup ... RP PADE Reports ... SC PADE Send Surgery Cases SO PADE Send Patient Orders
3.5. PADE Send Surgery Cases This option can be used to send surgery cases manually to a PADE for that date or future date. Select PADE Main Menu <TEST ACCOUNT> Option: SC PADE Send Surgery Cases Enter date of Surgery cases to send to PADE: T// (JUN 17, 2016) Do you want to continue? NO// YES Requested Start Time: NOW// (JUN 17, 2016@10:19:57) Task Queued ! SA PADE Send Area Setup SS PADE System Setup

Pharmacy Interface Automation Startup and Troubleshooting Guide 21 October 16
IN PADE Inventory Setup ... RP PADE Reports ... SC PADE Send Surgery Cases SO PADE Send Patient Orders
3.6. PADE Send Patient Orders This option can be used to send patient UD/IV orders to PADE, especially when initializing the PADE with initial load of all the orders so that the patients can be established along with their orders. PADE Send Patient Orders Select By: (PT/WD/CL/E): PT// ? Enter 'PT' to send orders by Patient 'WD' to send orders by Ward 'CL' to send orders by Clinic or 'E' or '^' to exit Select one of the following: PT PATIENT WD WARD CL CLINIC E EXIT Select By: (PT/WD/CL/E): PT// PATIENT Select PATIENT: ANTPATNM,A,A ANTPATNM,A 666-00-0099 04/10/08 3 NORTH GU 1 Order(s) Queued for ANTPATNM,A (0099) Select By: (PT/WD/CL/E): PT// WD WARD Select PADE: PYXIS You are logged under PADE: PYXIS Select DIVISION: TROY 888 You are logged under Division: TROY Select a Ward or ^ALL for all Wards: ? Answer with WARD LOCATION NAME, or SERVICE, or *NSERV, or SYNONYM Do you want the entire WARD LOCATION List? N (No) Select a Ward or ^ALL for all Wards: Select a Ward or ^ALL for all Wards: ^ALL Sending ward 3 NORTH SURG No patients with active orders for this ward Sending ward 3 NORTH GU

Pharmacy Interface Automation Startup and Troubleshooting Guide 22 October 16
1 Order(s) Queued for ANTPATNM,A (0099) Sending ward ICU/CCU No patients with active orders for this ward No patient in WARD REHAB No patient in WARD DSS OBSERVATION Select By: (PT/WD/CL/E): WD// CLINIC You are logged under PADE: PYXIS Select DIVISION: TROY 888 Select a Clinic or ^ALL for all Clinics: CECELIA'S CLINIC TROY MCCOY,BONES T Orders Queued to be sent to PADE Select a Clinic or ^ALL for all Clinics: MIKE S MENTAL CLINIC TROY MCCOY,BONES T Clinic is not setup for this PADE. Select a Clinic or ^ALL for all Clinics: ^ Select By: (PT/WD/CL/E): CL//
3.7. Nightly Job There are two options for nightly jobs:
1. PADE Appointment Task [PSJ PADE APPOINTMENT TASK] This option can be used to schedule a nightly job to generate HL7 messages of the appointments for that day to send to a PADE. If the DAYS TO PULL AHEAD FOR BG JOB field in the PADE SYSTEM SETUP file (#58.7) have a value, the appointments for those days will be included in the messages.
2. PADE Surgery Task [PSJ PADE SURGERY TASK] This option can be used to schedule a nightly job to generate HL7 messages of Surgery cases for that day to be sent to a PADE.

Pharmacy Interface Automation Startup and Troubleshooting Guide 23 October 16
4. Phase 3: Inbound to VistA Setup Roles involved:
• Pharmacy Staff (ADPAC)- This role will have the most in this set up area
• Vendor Engineer or Implementation Support
• Clinical Product Support
Phase 3: Inbound to VistA POC
☐ 1. HL7 Multi-Listener
☐ 2. (IN) PADE Inventory Setup (Inbound) Pharmacy
☐ 3. PADE Inventory Error Messages
☐ 4. Dispensed Without Orders (DWO) Messages
☐
☐
☐
☐
4.1. HL7 Multi-Listener PADE utilizes the VA Standard VistA HL7 multi-listener of port 5000 for production systems for all inbound HL7 messages from VIE. For Non-production accounts/Non-VA Sites, IP address/port numbers are needed by VIE for processing of inbound messaging to VistA. Contact your System Administrator for details on your sites VistA HL7 multi-listener configuration and status.
4.2. PADE Inbound Setup Capture PADE Inventory System requires configuration at the PADE System level, and at the PADE dispensing device (or cabinet) level. There are many system and cabinet parameters available that allow PADE inventory functionality to be adjusted to meet the needs of the facility; however, there are three setup items that must be completed to enable the core PADE Inventory functionality:

Pharmacy Interface Automation Startup and Troubleshooting Guide 24 October 16
1) PADE Inbound System This step must be done first, and it must be done before any incoming PADE HL7 messages can be filed. In order to file incoming PADE pocket activity transactions in the PADE INBOUND TRANSACTIONS (#58.6) file, the PADE Inventory System must be defined in the PADE INVENTORY SYSTEM (#58.601) file via the PADE Inventory System Setup [PSJ PADE INVENTORY SYSTEM] option.
a. The PADE Inventory System name must exactly match the value of the Dispensing System field (ZPM-2) received in the incoming HL7 message.
b. PADE dispensing devices (cabinets) are automatically filed into the PADE DISPENSING DEVICE (#58.63) file as they are received via HL7 messaging. Therefore, the suggested approach to initially populating the PADE DISPENSING DEVICE (#58.63) file with the new PADE dispensing devices is to define the Inventory System (#58.601) file, then trigger an ‘inventory’, or ‘count’ message from each PADE dispensing device. The above actions will automatically file all PADE dispensing devices in VistA. If the dispensing devices are added manually, an incorrect device name may be inadvertently entered.
c. As each transaction is filed into the PADE Inbound Transaction (#58.6) file, the total balance for each PADE dispensing device/cabinet is updated in the PADE INVENTORY SYSTEM (#58.601) file.
2) Dispensing Device Division In order to access the incoming PADE transaction and PADE inventory information via PADE reports, each PADE dispensing device (cabinet) must be associated with a Division via the PADE Dispensing Device Setup [PSJ PADE DEVICE SETUP].
3) Dispensing Device Dispense Location In order for PADE drug balance information to display in Inpatient Order Entry options, each PADE dispensing device (cabinet) must be associated with one (or more) of the following: Ward Location, Ward Group, Clinic Location, Clinic Group, Wildcard Clinic Name.
Example – Define a PADE Inventory System: Select OPTION NAME: PSJ PADE MAIN MENU PADE Main Menu SA PADE Send Area Setup SS PADE System Setup IN PADE Inventory Setup ... RP PADE Reports ... SC PADE Send Surgery Cases SO PADE Send Patient Orders Select PADE Main Menu <TEST ACCOUNT> Option: IN PADE Inventory Setup DEV PADE Dispensing Device Setup SYS PADE Inventory System Setup

Pharmacy Interface Automation Startup and Troubleshooting Guide 25 October 16
Select PADE Inventory Setup <TEST ACCOUNT> Option: SYS PADE Inventory System Setup Select PADE INVENTORY SYSTEM: TESTSYS Are you adding 'TESTSYS' as a new PADE INVENTORY SYSTEM (the 6TH)? No// Y (Yes) PADE INVENTORY SYSTEM: TESTSYS// Example – Define a PADE Dispensing Device/Cabinet: Select OPTION NAME: PSJ PADE MAIN MENU PADE Main Menu SA PADE Send Area Setup SS PADE System Setup IN PADE Inventory Setup ... RP PADE Reports ... SC PADE Send Surgery Cases SO PADE Send Patient Orders Select PADE Main Menu <TEST ACCOUNT> Option: IN PADE Inventory Setup DEV PADE Dispensing Device Setup SYS PADE Inventory System Setup Select PADE Inventory Setup <TEST ACCOUNT> Option: DEV PADE Dispensing Device Setup Select PADE DISPENSING DEVICE: PV_1 TESTSYS ACTIVE ...OK? Yes// (Yes) DIVISION: // ALBANY 500A4 Select WARD GROUP: // TESTWG Select WARD LOCATION: GENERAL SURGERY// Select CLINIC GROUP: // TESTCG Select CLINIC LOCATION: // AMB CLINIC Select WILDCARD CLINIC NAME: // DIABETES

Pharmacy Interface Automation Startup and Troubleshooting Guide 26 October 16
4.3. PADE Inventory Error Messages The VistA PADE Inventory interface receives HL7 messages when there is activity at the dispensing device (cabinet). Examples of dispensing device activity that generates an HL7 messages are loading, unloading, and dispensing drug items. When a PADE HL7 message is received that contains missing or invalid data, an error message may be sent if the VistA PADE System has been configured to send error messages. There are two types of PADE Inventory error messages, CONFIGURATION and DATA error messages.
CONFIGURATION error messages - This type of error indicates there is a problem with the configuration of the PADE Inventory interface. The two specific errors that are classified as CONFIGURATION errors are:
• Missing or Invalid Required HL7 Segment(s) • Missing or Unknown PADE Inventory System
DATA error messages – This type of error indicates there is a problem with the validation of the data received from the PADE vendor system. The following errors are classified as DATA errors:
• Missing or Invalid USER ID • Missing or Invalid Transaction Date/Time • Missing or Invalid Transaction Type • Patient Not on File (optional-controlled by parameter) • FileMan Error – Transaction not Filed • Drug Not on File • Outdated Transaction
Mail groups may be defined separately for Configuration errors and Data errors using the PADE Dispensing Device Setup [PSJ PADE DEVICE SETUP] option. Configuration error messages are sent to mail groups defined at the CONFIG ERRORS MAIL GROUPS parameter, and Data error messages are sent to mail groups defined at the DATA ERRORS MAIL GROUPS parameter. Multiple mail groups may be defined for each type of error. If an error occurs and NO mail recipients are defined, the interface will check for holders of the PSJ PADE MGR security key, and forward the error message to all holders of that key. To set up mail groups to receive CONFIGURATION errors, enter one or mail groups at the CONFIG ERRORS MAIL GROUPS prompt using the PADE Inventory System Setup [PSJ INVENTORY SYSTEM] option: Select OPTION NAME: PSJ PADE MAIN MENU PADE Main Menu SA PADE Send Area Setup SS PADE System Setup IN PADE Inventory Setup ... RP PADE Reports ... SC PADE Send Surgery Cases SO PADE Send Patient Orders Select PADE Main Menu <TEST ACCOUNT> Option: IN PADE Inventory Setup

Pharmacy Interface Automation Startup and Troubleshooting Guide 27 October 16
DEV PADE Dispensing Device Setup SYS PADE Inventory System Setup Select PADE Inventory Setup <TEST ACCOUNT> Option: SYS PADE Inventory System Setup Select PADE INVENTORY SYSTEM: TESTSYS PADE INVENTORY SYSTEM: TESTSYS// ^CONFIG ERRORS MAIL GROUP Select CONFIG ERRORS MAIL GROUPS: MAILGROUP1 Are you adding 'MAILGROUP1' as a new CONFIG ERRORS MAIL GROUP (the 1ST for this PADE INVENTORY SYSTEM)? No// Y Yes) Select CONFIG ERRORS MAIL GROUPS: To set up mail groups to receive DATA errors, enter one or mail groups at the DATA ERRORS MAIL GROUPS prompt using the PADE Inventory System Setup [PSJ INVENTORY SYSTEM] option: Select OPTION NAME: PSJ PADE MAIN MENU PADE Main Menu SA PADE Send Area Setup SS PADE System Setup IN PADE Inventory Setup ... RP PADE Reports ... SC PADE Send Surgery Cases SO PADE Send Patient Orders Select PADE Main Menu <TEST ACCOUNT> Option: IN PADE Inventory Setup DEV PADE Dispensing Device Setup SYS PADE Inventory System Setup Select PADE Inventory Setup <TEST ACCOUNT> Option: SYS PADE Inventory System Setup Select PADE INVENTORY SYSTEM: TESTSYS PADE INVENTORY SYSTEM: TESTSYS// ^DATA ERRORS MAIL GROUP Select DATA ERRORS MAIL GROUPS: MAILGROUP2 Are you adding 'MAILGROUP2' as a new DATA ERRORS MAIL GROUP (the 1ST for this PADE INVENTORY SYSTEM)? No// Y (Yes) Select DATA ERRORS MAIL GROUPS: Patient Not on File parameter The PATIENT NOT ON FILE error message, indicating a patient ID is not recognized, will not be sent unless the PADE dispensing device involved in the incoming PADE activity has been configured in VistA to send PATIENT NOT ON FILE errors. The SEND ‘PATIENT NOT ON FILE’ MSG parameter controlling this error message may be set using the PADE DISPENSING DEVICE SETUP [PSJ PADE DEVICE SETUP] option. If not set, the parameter is interpreted as NO, and PATIENT NOT ON FILE error messages will not be sent.

Pharmacy Interface Automation Startup and Troubleshooting Guide 28 October 16
To send PATIENT NOT ON FILE error messages, set the SEND ‘PATIENT NOT ON FILE’ MSG to YES using the PADE DISPENSING DEVICE SETUP [PSJ PADE DEVICE SETUP] option. Select OPTION NAME: PSJ PADE MAIN MENU PADE Main Menu SA PADE Send Area Setup SS PADE System Setup IN PADE Inventory Setup ... RP PADE Reports ... SC PADE Send Surgery Cases SO PADE Send Patient Orders Select PADE Main Menu <TEST ACCOUNT> Option: IN PADE Inventory Setup DEV PADE Dispensing Device Setup SYS PADE Inventory System Setup Select PADE Inventory Setup <TEST ACCOUNT> Option: DEV PADE Dispensing Device Setup Select PADE DISPENSING DEVICE: TESTSTN console ...OK? Yes// (Yes) PADE STATUS: ^SEND 'PATIENT NOT ON FILE' MSG SEND 'PATIENT NOT ON FILE' MSG: Y YES Example: Missing Required HL7 Segment Subj: PADE Error-Msg:482146 [#181575] 06/16/16@14:04 6 lines From: PADE In 'IN' basket. Page 1 *New* ------------------------------------------------------------------------------- An error was encountered while processing a message from PADE Date: Jun 16, 2016 14:04:39 Patient: PIAPATIENT, ELEVEN^768 Error Msg: Missing RQD segment. |CABINET=RDO-01|SYSTEM=TESTSYSO Header: MSH|~^\&|PSJ PADE SERVER|500~FO-ALBANY.MED.VA.GOV~DNS|PSJ VISTA|~~D NS|20160616140433-0400||OMS~O05~OMS_O05|500444576|P|2.5|||AL|NE|USA Enter message action (in IN basket): Ignore// Example: Missing or Invalid Data Subj: PADE Error-Msg:482152 [#181576] 06/16/16@14:34 5 lines From: PADE In 'IN' basket. Page 1 *New* ------------------------------------------------------------------------------- An error was encountered while processing a message from PADE Date: Apr 11, 2016 12:58:49 Error Msg: TRANS CODE -ZPM.1 is null or invalid|CABINET= RDO-01|SYSTEM=TESTSYSO Header: MSH|~^\&|PSJ PADE SERVER|500~FO-ALBANY.MED.VA.GOV~DNS|PSJ VISTA|~~D NS|20160616143429-0400||OMS~O05~OMS_O05|500444582|P|2.5|||AL|NE|USA Enter message action (in IN basket): Ignore//

Pharmacy Interface Automation Startup and Troubleshooting Guide 29 October 16
Example: FileMan Error attempting to file incoming transaction Subj: PADE Error-Msg:482154 [#181577] 06/16/16@14:47 5 lines From: PADE In 'IN' basket. Page 1 *New* ------------------------------------------------------------------------------- An error was encountered while processing a message from PADE Date: Apr 11, 2015 12:58:49 Error Msg: PADE DEVICE NOT UPDATED Unable to file PADE Device RDO-01|CABINET= RDO-01|SYSTEM=TESTSYSO Header: MSH|~^\&|PSJ PADE SERVER|500~FO-ALBANY.MED.VA.GOV~DNS|PSJ VISTA|~~D NS|20160616144653-0400||OMS~O05~OMS_O05|500444584|P|2.5|||AL|NE|USA Enter message action (in IN basket): Ignore// Example: Drug not on File Subj: PADE Error-Msg:483244-DRUG NOT ON FILE [#181654] 06/23/16@15:54 5 lines From: PADE In 'IN' basket. Page 1 *New* ------------------------------------------------------------------------------- An error was encountered while processing a message from PADE Date: Jun 23, 2016 15:21:01 Error Msg: DRUG/DEVICE NOT UPDATED DRUG NOT ON FILE|DRG ID=8000|NAME=TEST DRUG :CABINET=RDO-01:SYSTEM= TESTSYSO Header: MSH|~^\&|PSJ PADE SERVER|500~FO-ALBANY.MED.VA.GOV~DNS|PSJ VISTA|~~D NS|20160623155453-0400||OMS~O05~OMS_O05|500445711|P|2.5|||AL|NE|USA Enter message action (in IN basket): Ignore// Example: Outdated Transaction Date: Aug 02, 2016 20:12:13 Error Msg: - OUTDATED TRANSACTION - PADE.RDO-01.DRUG=RANITIDINE HCL 30 0MG TAB(1962).POCKET=34940.LAST UPDATED=3160802.212457.TRANS DT=3160802.201213| CABINET=RDO-01|SYSTEM=TESTSYSO Header: MSH|~^\&|PSJ PADE SERVER|~500~FO-ALBANY.MED.VA.GOV~DNS|PSJ VISTA|~~D NS|20160802224522|SECURE|OMS~O05~OMS_O05|ZPM-068776606 2|P|2.5|||AL|NE Enter message action (in IN basket): Ignore//

Pharmacy Interface Automation Startup and Troubleshooting Guide 30 October 16
4.5. Dispensed Without Orders (DWO) Messages A medication dispensed from a PADE dispensing device/cabinet without a corresponding pharmacy order may generate a MailMan message to one or more mail groups. For Dispensed Without Order (DWO) messages to be sent, the SEND DWO MESSAGES field must be set to YES for each PADE dispensing device that should be triggering DWO messages. The SEND DWO MESSAGES flag may be set via the PADE Dispensing Device Setup [PSJ PADE DEVICE SETUP] option. Dispensed Without Order (DWO) mail groups may be defined for seven types of entities that are ranked in order in terms of priority. The seven types of DWO entities are:
1) PADE Dispensing Device (Cabinet) 2) Ward Location 3) Clinic Location 4) Ward Group 5) Clinic Group 6) PADE System 7) Division
The seven types of DWO entities are grouped into four priority categories. The four priority groupings, in order from highest priority to lowest priority, are: Priority 1 – PADE Device (Cabinet) Priority 2 – Ward Location/Clinic Location Priority 3 – Ward Group/Clinic Group Priority 4 - PADE System/Division When a PADE HL7 message is received indicating a medication was dispensed without an order, the PADE dispensing device is first checked for a YES in the SEND DWO MESSAGES field, and if YES, the dispensing device entry is checked for a DWO mail group or groups. If DWO mail groups are defined for the dispensing device entry, the DWO message is sent to those mail groups and no other entities are checked. If no DWO mail groups are found at the first (cabinet) priority, the next highest entity priority grouping is checked (Ward Location and/or Clinic Location). If no DWO mail groups are found at the second (Ward Location and/or Clinic Location) priority, entities at the next highest entity is checked (Ward Group and/or Clinic Group), and if no DWO mail groups are found, entities at the 4th and lowest priority grouping (PADE System and Division) is checked for any DWO mail groups. When a DWO mail group is found at a given priority, a DWO message is sent to all mail groups defined at that priority, and all lower ranked DWO entities are ignored. For example, if no DWO mail group is defined for the dispensing device, all ward locations and clinic locations linked to the dispensing device are checked for DWO mail groups, and if at least one DWO mail group is found, a DWO message is sent and no additional checking is done. If multiple mail groups are found, the DWO message is sent to every mail group defined at that priority. In the diagram below
• A medication dispensed without an order from Dispensing Device 1 sends a DWO message to Mail Group 1, defined for the PADE system, as no mail group is defined for Device 2, or for Ward 1.
• A medication dispensed without an order from Dispensing Device 2 sends a DWO message to Mail Group 2 (defined for Ward 2) and Mail Group 3 (defined for Ward 3), since the Device has no DWO mail group, and the Ward Locations have a higher priority than the PADE System.

Pharmacy Interface Automation Startup and Troubleshooting Guide 31 October 16
• A medication dispensed from dispensing device CAB3 sends a DWO message to mail group TST5, defined for the dispensing device, since the dispensing device has the highest priority and all lower priorities are ignored.
Example– Define DWO mail group for ward OBSERVATION with exclusive dispensing device OBS-CAB, using the PADE Dispensing Device Setup [PSJ PADE DEVICE SETUP] option Select OPTION NAME: PADE DISPENSING DEVICE SETUP PSJ PADE DEVICE SETUP PADE Dispensing Device Setup PADE Dispensing Device Setup Select PADE DISPENSING DEVICE: OBS-CAB TESTSYS ACTIVE ...OK? Yes// (Yes) PADE STATUS: ACTIVE// ^ SEND DWO MESSAGES SEND DWO MESSAGES: Y Y DWO ENTITY: OBS-CAB Select DWO ENTITY MAIL GROUP: LOC 1 LOC GRP1 2 LOC GRP2 CHOOSE 1-2: 1 LOC GRP1 Are you adding 'LOC GRP1' as a new DWO ENTITY MAIL GROUP (the 1ST for this DWO MESSAGE ENTITY)? No// Y (Yes) Select DWO ENTITY MAIL GROUP: Select DWO MESSAGE ENTITY: Example – Define DWO mail group for ward NHCU-1, where there is no exclusive dispensing device (i.e., dispensing device is shared with other wards, or ward is supplied by more than on dispensing device), using the PADE Inventory System Setup [PSJ PADE INVENTORY SYSTEM] option. This will only generate DWO messages for dispensing devices with the SEND DWO MESSAGES? field set to YES. Select PADE Inventory Setup Option: PADE Inventory System Setup Select PADE INVENTORY SYSTEM: TESTSYS PADE INVENTORY SYSTEM: TESTSYS// Select DWO MESSAGE ENTITY: WD.NHCU

Pharmacy Interface Automation Startup and Troubleshooting Guide 32 October 16
Searching for a WARD for DWO messages., (pointed-to by DWO MESSAGE ENTITY) (NH NHCU) Searching for a WARD for DWO messages. NHCU ALBANY ...OK? Yes// (Yes) Are you adding 'NHCU' as a new DWO MESSAGE ENTITY (the 1ST for this PADE INVEN TORY SYSTEM)? No// Y (Yes) Select DWO ENTITY MAIL GROUP: LOC 1 LOC GRP1 2 LOC GRP2 CHOOSE 1-2: 1 LOC GRP1 Are you adding 'LOC GRP1' as a new DWO ENTITY MAIL GROUP (the 1ST for this DWO MESSAGE ENTITY)? No// Y (Yes) Select DWO ENTITY MAIL GROUP: Select DWO MESSAGE ENTITY: Example of a DWO message generated from dispensing device OBS-CAB, for drug FIDAXOMICIN 200MG dispensed for patient INPATIENT,ONE. Subj: PADE Dispensed Without Order [#179605] 01/26/16@20:19 11 lines From: PADE In 'IN' basket. Page 1 *New* ------------------------------------------------------------------------------- A medication was dispensed from a PADE device without an order PADE Device: JOB5 Date: Jan 26, 2016@20:19:06 Drug: FIDAXOMICIN 200MG Patient: INPATIENT,ONE User: NURSE,ONE - ID: 11361 Enter message action (in IN basket): Ignore//

Pharmacy Interface Automation Startup and Troubleshooting Guide 33 October 16
5. Phase 4: Implementation Roles involved:
• Pharmacy Staff (ADPAC)
• Vendor Engineer or Implementation Support
• Clinical Product Support
• VIE National Admins This phase will be mostly driven by your vendor implementation team, but below are some items that the pharmacy staff needs to do.
Phase 4: Implementation POC
☐ Confirm Implementation steps and plan with vendor.
Inpatient Pharmacy ADPAC
☐
☐
☐
☐
Notify facility (nursing, scheduling, etc) when the cut over date will occur and any down time. Note: There is a down time associated with the initial set up and testing connectivity. The vendors have to wipe out their current patient list as seen at Albany and Long Beach. From Vista, you need to re-send all the ward orders across to PADE so that the PADE vendor can rebuild their patients list. Depending on the number of patient and the orders they have, this process will take about 2–3 hours. During this down time (go live period), the nurses are allowed to take medications from the cabinets using the override feature. Inbound Step: Check the vendor’s PADE drug formulary for drug ID’s that are not directly mapped to Vista Drug File (#50) Internal Entry Numbers (IEN’s). Verify that there are NO purely numeric “non-Vista Drug File” drug ID’s in the vendor’s drug formulary.
Inpatient Pharmacy ADPAC

Pharmacy Interface Automation Startup and Troubleshooting Guide 34 October 16
☐ If any purely numeric drug ID’s are found in the vendor’s PADE formulary that do not correspond to the same drug in the VistA Drug File (#50), the vendor’s drug ID must be changed to an alpha or alpha-numeric ID so that it is not inadvertently linked to the wrong drug in VistA’s PADE inventory functionality.
☐ Request VIE Connection Information 1) IP and Port information for both PSJ PADE and Vendor Server as well as ACL edit for the VLAN where the Vendor server is located (FYI…getting these ACL edits applied by the LAN teams require a couple weeks lead time)
VIE National Admin Team
☐ Test connectivity once ACL Edits are applied.
VIE National Admin Team/Vendor/VLAN Manager
☐ Schedule a day/time for the interface to be brought up. This has typically taken 2+ hours. It seems to be best in the early morning hours.
Inpatient Pharmacy ADPAC /VIE/Vendor
☐ Notify the facility. Inpatient Pharmacy ADPAC /VIE/Vendor
☐ Initialize data and patient information. This will happen right before go live.
Vendor
☐ Bring up the Interface.
Note: The Inpatient Pharmacy ADPAC, VIE, vendor, and any local or regional IT support need to be present. This typically takes 2+ hours.
Inpatient Pharmacy ADPAC /VIE/Vendor
☐ In VistA, the pharmacist should process new orders and the vendor should confirm the receipt of the orders to ensure the interface is working.
Inpatient Pharmacy ADPAC/Vendor

Pharmacy Interface Automation Startup and Troubleshooting Guide 35 October 16
6. Troubleshooting
6.1. Key Contacts • Clinical Product Support- Submit a CA ticket for support
• VIE National Admins- Submit CA ticket
6.2. Support sites/ Documentation See introduction for all supporting documents. All information and discussion can be found on VA Pulse at https://www.vapulse.net/groups/pade.
6.3. Common Issues and Resolution
Issue Common Resolution Support Contact
Certain edits/corrections to historical ADT (admission, discharge, transfer) transactions, can cause the patients/orders to fall off the cabinet even though they are still admitted.
In this situation, the nurse will contact the pharmacy. The pharmacy can send the orders using the PSJ PADE Send Order option.
Vendor Messaging Server is not receiving messages.
1. Submit a CA ticket.
2. Check to see if logical link is working.
What is the contingency plan if VIE goes down?
For all of the applications that are supported by the VIE, if a site has an issue they think is potentially related to VIE, a CA ticket should be opened. In the case of OPAI or PADE they should open a High Priority CA ticket by calling the VA Service Desk. Request that the help desk get a member of the VIE National Admin team on the phone 24 /7. PADE will be supported in the same way as OPAI.
VIE National Admins – Submit CA Ticket