phaser 6200 color laser printer troubleshooting guide · color laser printer 6200 troubleshooting...
TRANSCRIPT
P h a s e r®
C o l o r L a s e r P r i n t e r6200
TroubleshootingGuide
Copyright © 2002, Xerox Corporation. All Rights Reserved. Unpublished rights reserved under the copyright laws of the United States. Contents of this publication may not be reproduced in any form without permission of Xerox Corporation.
Copyright protection claimed includes all forms of matters of copyrightable materials and information now allowed by statutory or judicial law or hereinafter granted, including without limitation, material generated from the software programs which are displayed on the screen such as styles, templates, icons, screen displays, looks, etc.
XEROX®, The Document Company®, the stylized X, CentreWare®, DocuPrint®, Made For Each Other®, Phaser®, PhaserShare®, the TekColor® icon, and WorkSet® are registered trademarks of Xerox Corporation. infoSMART™, PhaserPort™, PhaserPrint™, PhaserSMART™, PhaserSym™, PhaserTools™, and the TekColor™ name are trademarks of Xerox Corporation.
Adobe®, Acrobat®, Acrobat® Reader®, Illustrator®, PageMaker®, Photoshop®, PostScript®, ATM®, Adobe Garamond®, Birch®, Carta®, Mythos®, Quake®, and Tekton® are registered trademarks and Adobe Jenson™, Adobe Brilliant Screens™ technology, and IntelliSelect™ are trademarks of Adobe Systems Incorporated or its subsidiaries which may be registered in certain jurisdictions.
Apple®, LaserWriter®, LocalTalk®, Macintosh®, Mac® OS, AppleTalk®, TrueType2®, Apple Chancery®, Chicago®, Geneva®, Monaco®, and New York® are registered trademarks, and QuickDraw™ is a trademark of Apple Computer Incorporated.
Marigold™ and Oxford™ are trademarks of AlphaOmega Typography.
Avery™ is a trademark of Avery Dennison Corporation.
PCL® and HP-GL® are registered trademarks of Hewlett-Packard Corporation.
Hoefler Text was designed by the Hoefler Type Foundry.
ITC Avant Guard Gothic®, ITC Bookman®, ITC Lubalin Graph®, ITC Mona Lisa®, ITC Symbol®, ITC Zapf Chancery®, and ITC Zapf Dingbats® are registered trademarks of International Typeface Corporation.
Bernhard Modern™, Clarendon™, Coronet™, Helvetica™, New Century Schoolbook™, Optima™, Palatino™, Stempel Garamond™, Times™, and Univers™ are trademarks of Linotype-Hell AG and/or its subsidiaries.
MS-DOS® and Windows® are registered trademarks of Microsoft Corporation.
Wingdings™ in TrueType® format is a product of Microsoft Corporation. WingDings is a trademark of Microsoft Corporation and TrueType is a registered trademark of Apple Computer, Inc.
Albertus™, Arial™, Gill Sans™, Joanna™, and Times New Roman™ are trademarks of Monotype Corporation.
Antique Olive® is a registered trademark of M. Olive.
Eurostile™ is a trademark of Nebiolo.
Novell® and NetWare® are registered trademarks of Novell, Incorporated.
Sun® and Sun Microsystems® are registered trademarks of Sun Microsystems, Incorporated. SPARC® is a registered trademark of SPARC International, Incorporated. SPARCstation™ is a trademark of SPARC International, Incorporated, licensed exclusively to Sun Microsystems, Incorporated.
UNIX® is a registered trademark in the US and other countries, licensed exclusively through X/Open Company Limited.
As an ENERGY STAR® partner, Xerox Corporation has determined that this product meets the ENERGY STAR guidelines for energy efficiency. The ENERGY STAR name and logo are registered U.S. marks.
This product uses code for SHA-1 written by John Halleck, which is being used with his permission.
This product includes an implementation of LZW licensed under U.S. Patent 4,558,302.
Other marks are trademarks or registered trademarks of the companies with which they are associated.
PANTONE® Colors generated by the Phaser 6200 Color Printer are four- and/or three-color process simulations and may not match PANTONE-identified solid color standards. Use current PANTONE Color Reference Manuals for accurate colors.PANTONE Color simulations are only obtainable on this product when driven by qualified Pantone-licensed software packages. Contact Pantone, Inc. for a current list of qualified licensees.
Copyright © 2002 Xerox Corporation. All Rights Reserved. i
ContentsResources . . . . . . . . . . . . . . . . . . . . . . . . . . . . . . . . . . . . . . . . . . . . . . . . . . . 1Error Messages. . . . . . . . . . . . . . . . . . . . . . . . . . . . . . . . . . . . . . . . . . . . . . . . . . . . . . . . . . . 1
Diagnosing Print Quality . . . . . . . . . . . . . . . . . . . . . . . . . . . . . . . . . . . . . . . 2
Calibration . . . . . . . . . . . . . . . . . . . . . . . . . . . . . . . . . . . . . . . . . . . . . . . . . . . 3
Paper Jams . . . . . . . . . . . . . . . . . . . . . . . . . . . . . . . . . . . . . . . . . . . . . . . . . . 4Preventing jams . . . . . . . . . . . . . . . . . . . . . . . . . . . . . . . . . . . . . . . . . . . . . . . . . . . . . . . 5
What causes a paper jam? . . . . . . . . . . . . . . . . . . . . . . . . . . . . . . . . . . . . . . . . . . . . . . 5
Jam at the fuser . . . . . . . . . . . . . . . . . . . . . . . . . . . . . . . . . . . . . . . . . . . . . . . . . . . . . . . 5
Jam at the duplex unit . . . . . . . . . . . . . . . . . . . . . . . . . . . . . . . . . . . . . . . . . . . . . . . . . . 7
Jam at the Multi-Purpose Tray . . . . . . . . . . . . . . . . . . . . . . . . . . . . . . . . . . . . . . . . . . . 8
Jam at the registration roller. . . . . . . . . . . . . . . . . . . . . . . . . . . . . . . . . . . . . . . . . . . . . 9
Jam at the tray . . . . . . . . . . . . . . . . . . . . . . . . . . . . . . . . . . . . . . . . . . . . . . . . . . . . . . . 11
Regular Printer Maintenance . . . . . . . . . . . . . . . . . . . . . . . . . . . . . . . . . . . 14Cleaning the outside of the printer. . . . . . . . . . . . . . . . . . . . . . . . . . . . . . . . . . . . . . . 14
Cleaning the density sensor . . . . . . . . . . . . . . . . . . . . . . . . . . . . . . . . . . . . . . . . . . . . 15
Replacing a Toner Cartridge . . . . . . . . . . . . . . . . . . . . . . . . . . . . . . . . . . . 17
Replacing the Imaging Unit . . . . . . . . . . . . . . . . . . . . . . . . . . . . . . . . . . . . 18
Replacing the Fuser . . . . . . . . . . . . . . . . . . . . . . . . . . . . . . . . . . . . . . . . . 20
Replacing the Transfer Roller . . . . . . . . . . . . . . . . . . . . . . . . . . . . . . . . . . 23
Replacing the Feed Rollers . . . . . . . . . . . . . . . . . . . . . . . . . . . . . . . . . . . . 25
Repacking Instructions . . . . . . . . . . . . . . . . . . . . . . . . . . . . . . . . . . . . . . . 27
Index. . . . . . . . . . . . . . . . . . . . . . . . . . . . . . . . . . . . . . . . . . . . . . . . . . . . . . . 29
Phaser® 6200 Color Laser Printer
Copyright © 2002 Xerox Corporation. All Rights Reserved. 1
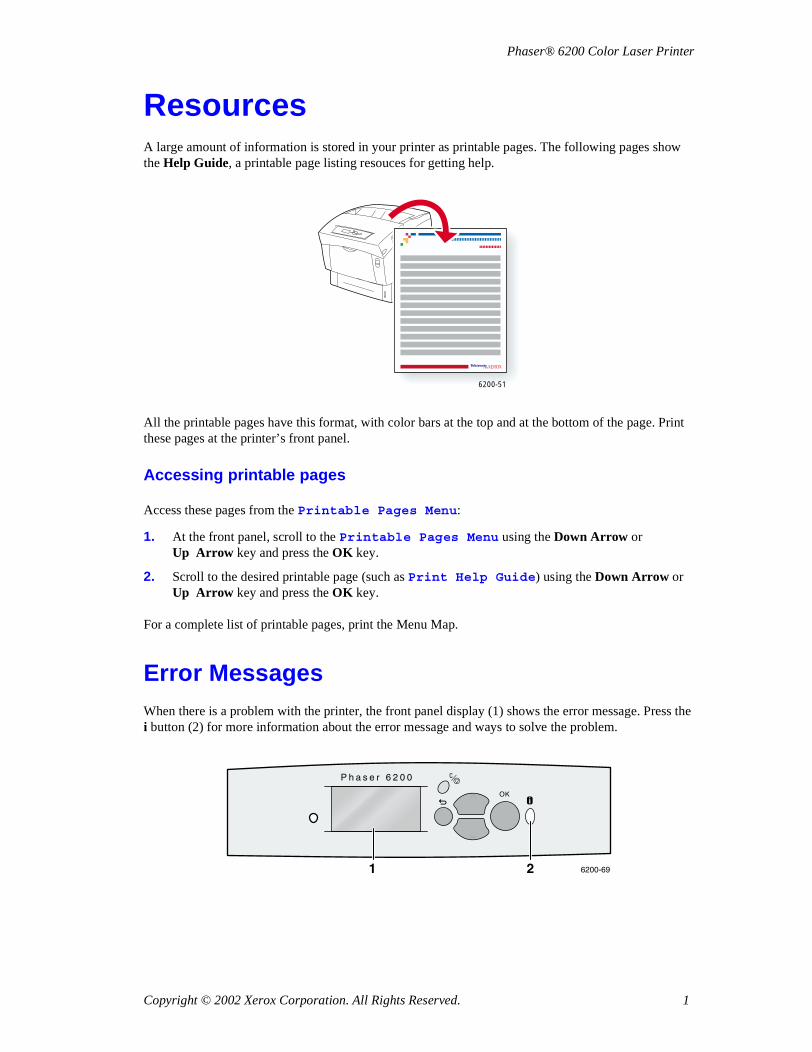
ResourcesA large amount of information is stored in your printer as printable pages. The following pages show the Help Guide, a printable page listing resouces for getting help.
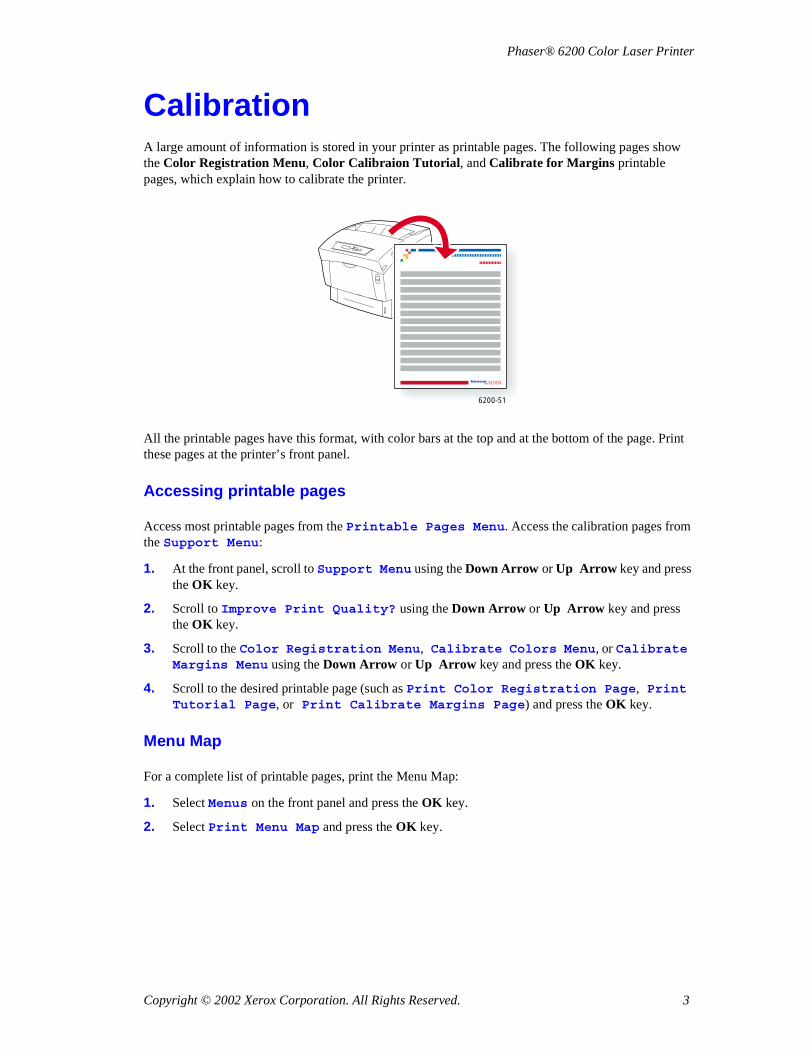
All the printable pages have this format, with color bars at the top and at the bottom of the page. Print these pages at the printer’s front panel.
Accessing printable pages
Access these pages from the Printable Pages Menu:
1. At the front panel, scroll to the Printable Pages Menu using the Down Arrow or Up Arrow key and press the OK key.
2. Scroll to the desired printable page (such as Print Help Guide) using the Down Arrow or Up Arrow key and press the OK key.
For a complete list of printable pages, print the Menu Map.
Error MessagesWhen there is a problem with the printer, the front panel display (1) shows the error message. Press the i button (2) for more information about the error message and ways to solve the problem.
6200-51
OK
6200-69
P h a s e r 6 2 0 0
1 2
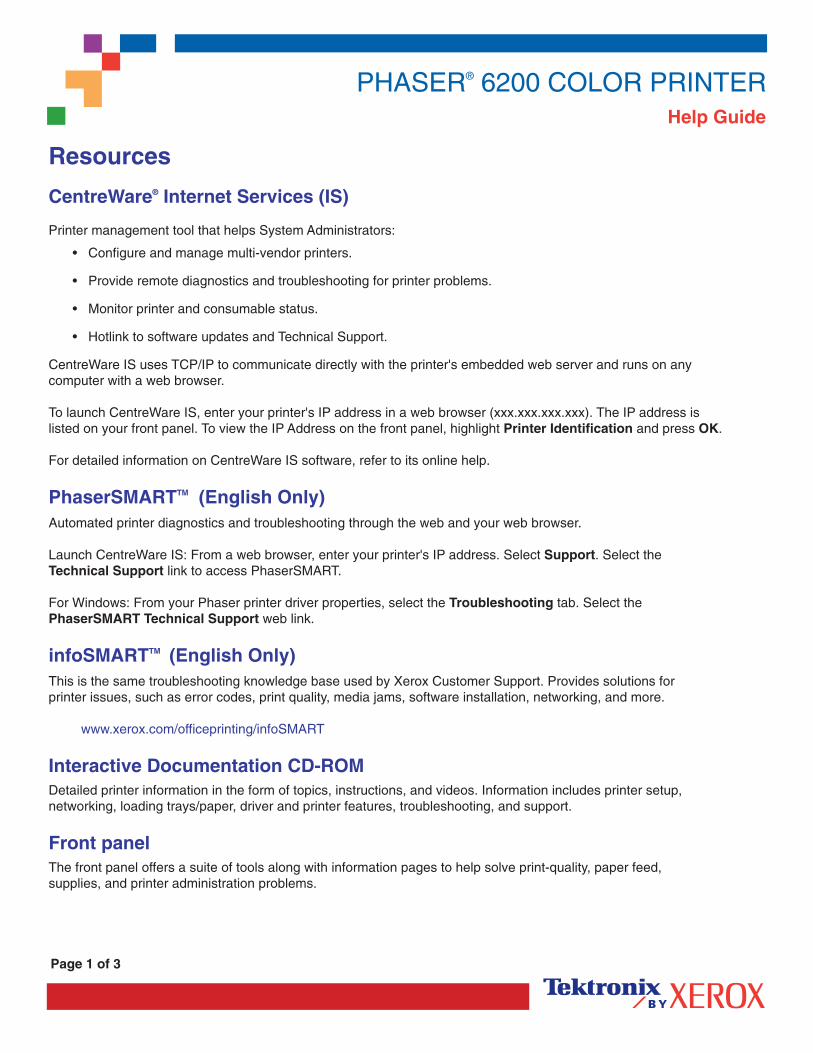
PHASER® 6200 COLOR PRINTERHelp Guide
Page 1 of 3
Resources
CentreWare® Internet Services (IS)
Printer management tool that helps System Administrators:
• Configure and manage multi-vendor printers.
• Provide remote diagnostics and troubleshooting for printer problems.
• Monitor printer and consumable status.
• Hotlink to software updates and Technical Support.
CentreWare IS uses TCP/IP to communicate directly with the printer's embedded web server and runs on any �computer with a web browser.
To launch CentreWare IS, enter your printer's IP address in a web browser (xxx.xxx.xxx.xxx). The IP address is �listed on your front panel. To view the IP Address on the front panel, highlight Printer Identification and press OK.
For detailed information on CentreWare IS software, refer to its online help.
PhaserSMARTTM (English Only)Automated printer diagnostics and troubleshooting through the web and your web browser.
Launch CentreWare IS: From a web browser, enter your printer's IP address. Select Support. Select the �Technical Support link to access PhaserSMART.
For Windows: From your Phaser printer driver properties, select the Troubleshooting tab. Select the �PhaserSMART Technical Support web link.
infoSMARTTM (English Only)This is the same troubleshooting knowledge base used by Xerox Customer Support. Provides solutions for �printer issues, such as error codes, print quality, media jams, software installation, networking, and more.
www.xerox.com/officeprinting/infoSMART
Interactive Documentation CD-ROMDetailed printer information in the form of topics, instructions, and videos. Information includes printer setup, �networking, loading trays/paper, driver and printer features, troubleshooting, and support.
Front panelThe front panel offers a suite of tools along with information pages to help solve print-quality, paper feed, �supplies, and printer administration problems.
Button
You can press the Information button at any time to get additional information about the message displayed �on the front panel.
Printable pages
To print a Menu Map, navigate the front panel and its menu items:
1. Select Menus and press OK.
2. Select Print Menu Map and press OK.
Driver helpIf you are using Windows 95/98, Windows 2000/XP, or Windows NT, install the driver from your printer's software CD-ROM and access the printer driver to:
• Link to relevant web sites from the Troubleshooting tab.
• View information about the printer features on the driver tabs by clicking the Help button on the tab.
• View troubleshooting information by clicking a Help button, then selecting the Troubleshooting Guide.
Troubleshooting
Paper jamsPhaserSMART
After you launch PhaserSMART, select the Troubleshooting Guide to help identify your printer's problem. If your printer detects a jam error, PhaserSMART will point you to a specific solution. Otherwise, select Media Jams for PhaserSMART to lead you to the best solution.
Interactive Documentation CD-ROM
For paper jams and error messages, see the Troubleshooting section.
Driver help
In the Troubleshooting Guide, refer to Error Messages for Paper Jams.
Print-quality problemsEnsure the paper type selected in the front panel matches the paper loaded in the trays and the Multi-Purpose Tray (MPT). Tray settings can be found by selecting Printer Setup Menu and then Tray Setup Menu.
The following table provides a list of printable pages that are accessible from the Support Menu �and Improve Print Quality?:
Condition� Printable page��
For additional paper tips: Print Paper Tips Page
To troubleshoot print-quality symptoms: Print Diagnostic Pages
To correct colors: Print-Quality Tips Page
Page 2 of 3
Page 3 of 3
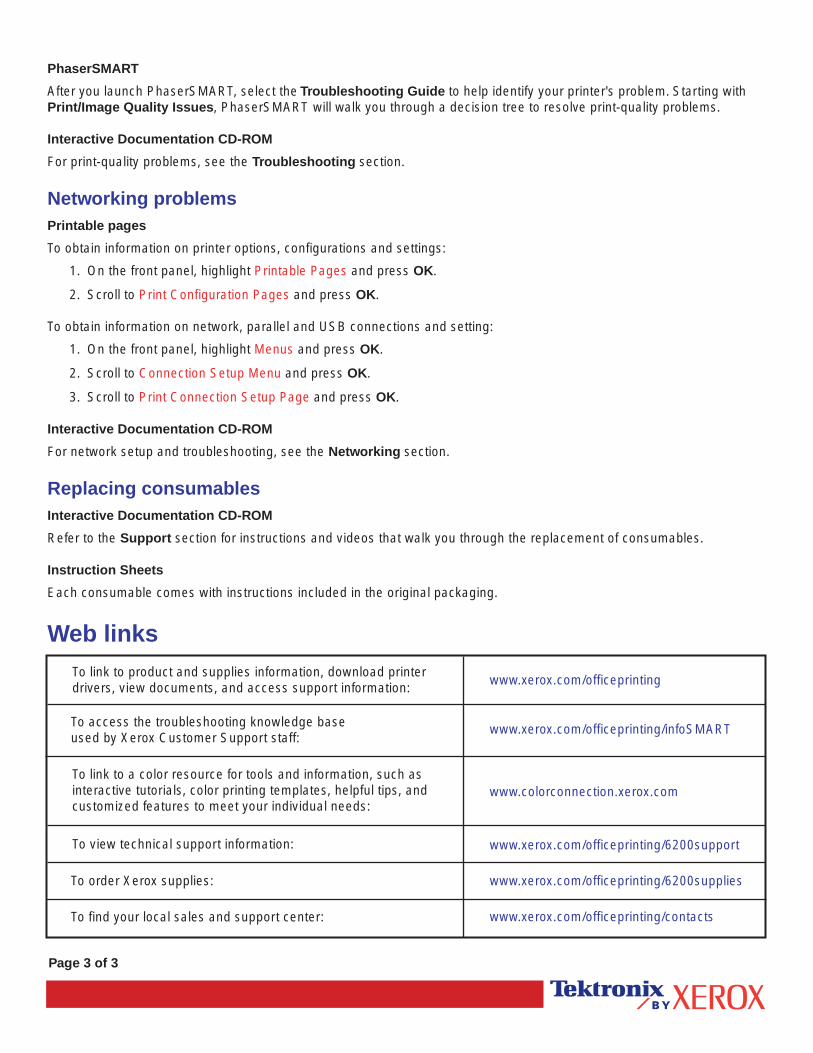
PhaserSMART
After you launch PhaserSMART, select the Troubleshooting Guide to help identify your printer's problem. Starting with Print/Image Quality Issues, PhaserSMART will walk you through a decision tree to resolve print-quality problems.
Interactive Documentation CD-ROM
For print-quality problems, see the Troubleshooting section.
Networking problemsPrintable pages
To obtain information on printer options, configurations and settings:
1. On the front panel, highlight Printable Pages and press OK.
2. Scroll to Print Configuration Pages and press OK.
To obtain information on network, parallel and USB connections and setting:
1. On the front panel, highlight Menus and press OK.
2. Scroll to Connection Setup Menu and press OK.
3. Scroll to Print Connection Setup Page and press OK.
Interactive Documentation CD-ROM
For network setup and troubleshooting, see the Networking section.
Replacing consumablesInteractive Documentation CD-ROM
Refer to the Support section for instructions and videos that walk you through the replacement of consumables.
Instruction Sheets
Each consumable comes with instructions included in the original packaging.
Web links
www.xerox.com/officeprinting
www.xerox.com/officeprinting/infoSMART
www.colorconnection.xerox.com
www.xerox.com/officeprinting/6200support
www.xerox.com/officeprinting/6200supplies
www.xerox.com/officeprinting/contacts
To link to product and supplies information, download printer drivers, view documents, and access support information:
To access the troubleshooting knowledge base used by Xerox Customer Support staff:
To link to a color resource for tools and information, such as interactive tutorials, color printing templates, helpful tips, and customized features to meet your individual needs:
To view technical support information:
To order Xerox supplies:
To find your local sales and support center:

Phaser® 6200 Color Laser Printer
Copyright © 2002 Xerox Corporation. All Rights Reserved. 2
Diagnosing Print QualityA large amount of information is stored in your printer as printable pages. The following pages show the Diagnose Print Quality printable page, which describes solutions for print quality problems.
All the printable pages have this format, with color bars at the top and at the bottom of the page. Print these pages at the printer’s front panel.
Accessing printable pages
Access these pages from the Printable Pages Menu:
1. At the front panel, scroll to the Printable Pages Menu using the Down Arrow or Up Arrow key and press the OK key.
2. Scroll to the desired printable page (such as Print Diagnostics Pages) using the Down Arrow or Up Arrow key and press the OK key.
Menu Map
For a complete list of printable pages, print the Menu Map:
1. Select Menus on the front panel and press the OK key.
2. Select Print Menu Map and press the OK key.
6200-51

Page 1 of 3
Dark Lines/Smudges or Streaks- All Colors
Black and/or colored areas appear on the page in all colors and/or in non-print areas.
1. From the printer's front panel Support Menu select Improve� Print Quality?, then select Print Paper Tips Page and � press OK. 2. Ensure the paper you are using is the correct type for the� printer and is properly loaded.
3. Ensure the paper loaded in the tray matches the paper� type selected on the printer's front panel and in the� printer driver.
4. From the printer's front panel Support Menu select Improve� Print Quality?, then select Remove Print Smears and press� OK. Three cleaning pages will run through the printer.
5. If the problem continues, replace the Imaging Unit.
Problem Solution
Repeating Defects
Marks or voids recur uniformly in only one color.
1. Replace the Imaging Unit if defects occur� every:
23.3 mm (.91 in.) 28.5 mm (1.12 in.) 62.0 mm (2.44 in.)131.8 mm (5.19 in.)
2. Replace the Transfer Roller if defects occur every:
63.6 mm (2.5 in.)
3. If the defect occurs every:
82.25 mm (3.24 in.)
a. From the printer's front panel Support Menu select� Improve Print Quality?, then select Remove Print � Smears and press OK.
b. If the problem continues, replace the Fuser.
Marks of any color or voids recur uniformly in all colors and/or in non-printed areas.
Note: Print the Repeating Defects Page for guides to identify defect.
1. Ensure the printer is on a solid, level, flat surface.
2. If the horizontal registration is off:� a. From the front panel Support Menu, select Improve Print� Quality?, and press OK. b. Select Color Registration Menu and Press OK. c. Follow the instructions on the Color Registration Page � just printed.
3. If the vertical registration is off: a. Turn the printer off and then back on to correct.
Color Misregistration
Color has shifted outside of the designated area or has been superimposed over another color area.
Test Pattern A 600 x 600
Test Pattern A 600 x 600
P 6200 P 6200P 6200 P 6200
P 6200 P 6200 P 6200 P 6200
P 6200 P 6200
P 6200 P 6200
P 6200 P 6200
P 6200 P 6200
P 6200 P 6200 P 6200 P 6200P 6200 P 6200 P 6200
8 mm
8 m
m
Abc Defg HijkAbc Defg Hijk Lmnop
Qrstuvw XYZ123456789
Abc Defg Hijk LmnopQrstuvw XYZ 123456789
261 mm
192
mm
PHASER® 6200 COLOR PRINTERDiagnose Print Quality

Page 2 of 3
Problem Solution
1. From the printer's front panel Support Menu select Improve� Print Quality?, then select Print Paper Tips Page and � press OK.
2. Ensure the paper you are using is the correct type for the� printer and is correctly loaded in tray.
3. Ensure the paper loaded in the tray matches the paper type� selected on the printer's front panel and in the printer driver.
4. If the problem persists, select the appropriate Tray Setup� Menu for the tray you are using and set the paper type to� the next lightest type of paper. Refer to the Paper Tips� Page for media types and weight.
Image Offset
Toner appears to have been pulled off the page and placed about 82.25 mm down the page from where it should be.
Note: To access the Paper Type Menu, open and close the selected paper tray or re-insert the paper loaded in the MPT. The front panel will then prompt you to select the paper type.
Incomplete Fusing
Toner appears to be pulled off print, or is �easy to rub off.
1. From the printer's front panel Support Menu select Improve Print Quality?, then select Print Paper Tips Page.
2. Ensure the paper you are using is the correct type for the� printer and is properly loaded.
3. Ensure the paper loaded in the tray matches the paper type selected on the printer's front panel and in the printer driver.
4. If the problem persists, select the appropriate Tray Setup� Menu for the tray you are using and set the paper type to � the next heaviest type of paper. Refer to the Paper Tips� Page for media types and weight.
Note: To access the Paper Type Menu, open and close the selected paper tray or re-insert the paper loaded in the MPT. The front panel will then prompt you to select the paper type.
Page 3 of 3
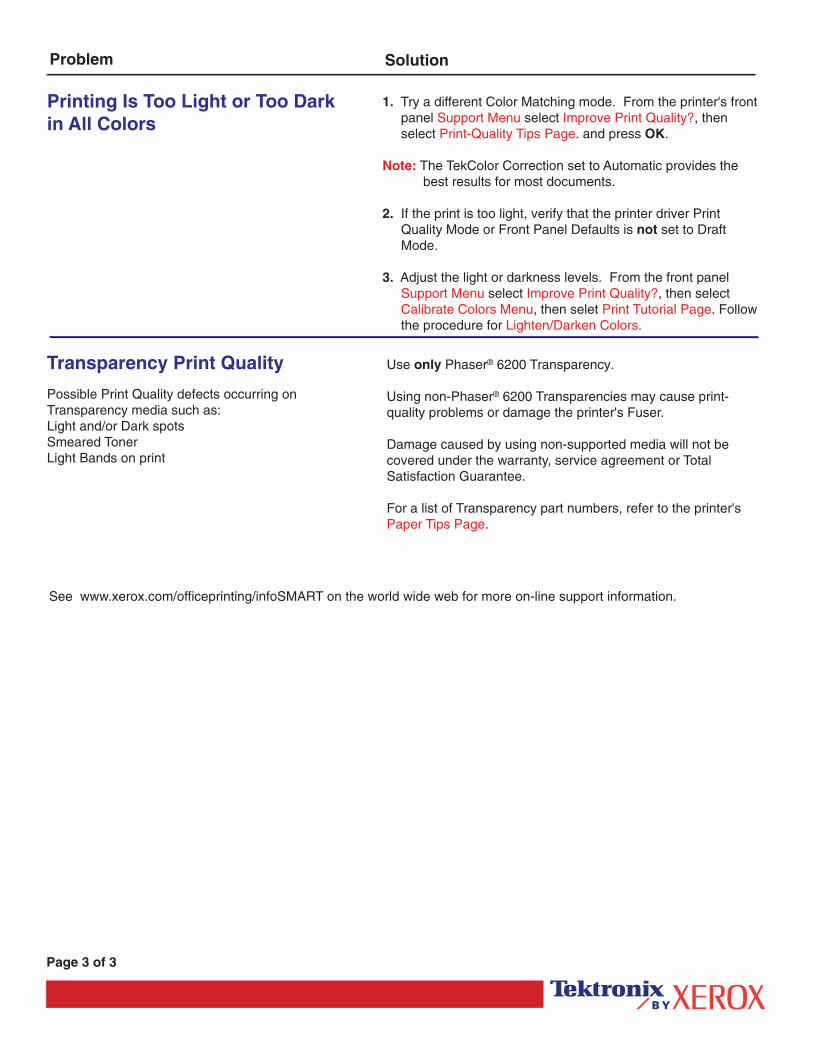
Problem Solution
1. Try a different Color Matching mode. From the printer's front panel Support Menu select Improve Print Quality?, then select Print-Quality Tips Page. and press OK.
Note: The TekColor Correction set to Automatic provides the best results for most documents.
2. If the print is too light, verify that the printer driver Print� Quality Mode or Front Panel Defaults is not set to Draft� Mode.
3. Adjust the light or darkness levels. From the front panel Support Menu select Improve Print Quality?, then select Calibrate Colors Menu, then selet Print Tutorial Page. Follow the procedure for Lighten/Darken Colors.
See www.xerox.com/officeprinting/infoSMART on the world wide web for more on-line support information.
Printing Is Too Light or Too Dark in All Colors
Transparency Print Quality Use only Phaser® 6200 Transparency.
Using non-Phaser® 6200 Transparencies may cause print-quality problems or damage the printer's Fuser.
Damage caused by using non-supported media will not be covered under the warranty, service agreement or Total Satisfaction Guarantee.
For a list of Transparency part numbers, refer to the printer's Paper Tips Page.
Possible Print Quality defects occurring on Transparency media such as:Light and/or Dark spotsSmeared TonerLight Bands on print
Phaser® 6200 Color Laser Printer
Copyright © 2002 Xerox Corporation. All Rights Reserved. 3
CalibrationA large amount of information is stored in your printer as printable pages. The following pages show the Color Registration Menu, Color Calibraion Tutorial, and Calibrate for Margins printable pages, which explain how to calibrate the printer.
All the printable pages have this format, with color bars at the top and at the bottom of the page. Print these pages at the printer’s front panel.
Accessing printable pages
Access most printable pages from the Printable Pages Menu. Access the calibration pages from the Support Menu:
1. At the front panel, scroll to Support Menu using the Down Arrow or Up Arrow key and press the OK key.
2. Scroll to Improve Print Quality? using the Down Arrow or Up Arrow key and press the OK key.
3. Scroll to the Color Registration Menu, Calibrate Colors Menu, or Calibrate Margins Menu using the Down Arrow or Up Arrow key and press the OK key.
4. Scroll to the desired printable page (such as Print Color Registration Page, Print Tutorial Page, or Print Calibrate Margins Page) and press the OK key.
Menu Map
For a complete list of printable pages, print the Menu Map:
1. Select Menus on the front panel and press the OK key.
2. Select Print Menu Map and press the OK key.
6200-51

Page 1 of 1
The Color Registration Menu allows you to adjust the printer's cyan, magenta and yellow against black to ensure that the colors are properly aligned.
Steps: You can adjust the settings from -7 to +7 units. (left to right). See the images on the left. 0 is always the printer's current color registration setting.
1. From the printer's front panel Support Menu, scroll to Improve Print Quality? and press OK.
2. Scroll to the Color Registration Menu and press OK to print this page.
3. To adjust the color registration, select Adjust Cyan and press OK.
a. Using the page just printed, select the number for the heaviest� Cyan area.
b. The Cyan lines above that number should form a straight line with the black lines.
c. Enter that number by using the Up Arrow or Down Arrow keys and press OK.
4. Repeat steps a through c for Adjust Magenta and Adjust Yellow.
Note: The adjustment value entered is stored and is now the new 0 positon for that color. Repeat the process until all� three colors are aligned at the 0 position.
5. Reprint this page to verify the adjustment.-7 -6 -5 -4 -3 -2 -1 0 +
1+
2+
3+
4+
5+
6+
7
-7 -6 -5 -4 -3 -2 -1 0 +1
+2
+3
+4
+5
+6
+7
-7 -6 -5 -4 -3 -2 -1 0 +1
+2
+3
+4
+5
+6
+7
PHASER® 6200 COLOR PRINTERColor Registration Menu

PHASER® 6200 COLOR PRINTERColor Calibration Tutorial
Page 1 of 1
OverviewColor calibration procedures adjust the printer for optimal color output. Color settings may need adjustment upon initial printer set-up or when toners and imaging units are replaced. There are two procedures: Lighten/Darken Colors and Balance Colors. If the overall image appears either too light or dark, use the Lighten/Darken Colors procedure. If a finer adjustment of the primary colors (cyan, magenta and yellow) are needed, continue with the Balance Colors procedure.
Lighten/Darken ColorsThe Lighten/Darken Colors procedure uniformly increases or decreases each primary color (cyan, magenta, yellow and black) to produce a lighter or darker image.
Procedure:
1. Select Lighten/Darken Colors from the Calibrate Colors Menu and press OK. Use the printed Color Reference Page� to evaluate the lightness/darkness of the image. The printer's current Lighten/Darken Value is listed on the page.
2. Use the Up Arrow and Down Arrow keys to change the value from -5 (lightest) to 5 (darkest) and press OK.
3. The Color Reference Page automatically prints using the new lighten/darken value. Repeat this procedure until you� achieve the desired result.
4. To finish the procedure select one of the following:
Accept Changes and Continue: Saves the new value and returns to the Calibrate Colors Menu.
Accept Changes and Exit: Saves the new value and returns to the Main Menu.�
Discard Changes and Exit: Returns to the Main Menu without saving
Balance ColorsThe Balance Colors procedure sets the balance between the primary colors (cyan, magenta and yellow) to simulate black.
Each of the color balance pages (like the page illustrated on the right) contains a �large cluster of circles, numbered from 0 to 54, that vary in hue.
The center circle (0) should match or appear to blend with some portion of its �surrounding hexagonal gray ring. The circle can show a color shift if one or more �of the colors are printing with a different density. For example, if cyan is printing �lighter than normal, the circle will appear redder.
Procedure:
1. Select Balance Colors from the Calibrate Colors Menu; The Light Color Balance page prints automatically.
2. Follow the steps on the Light Color Balance page until the desired adjustment is achieved.
3. Follow the steps on the Dark Color Balance page until the desired adjustment is achieved.
Light Color Balance Adjustment
0
1
2
3
4
5
6
7
8
9
10
11
12
13
14
15
16
17
18
19
20
21
22
23
24
25
26
27
28
29
30
31
32
33
34
35
36
37
38
3940
41
42
43
44
45
46
47
48 49
50
51
52
53
54
PHASER® 6200 COLOR PRINTERCalibrate for Margins
Page 1 of 1
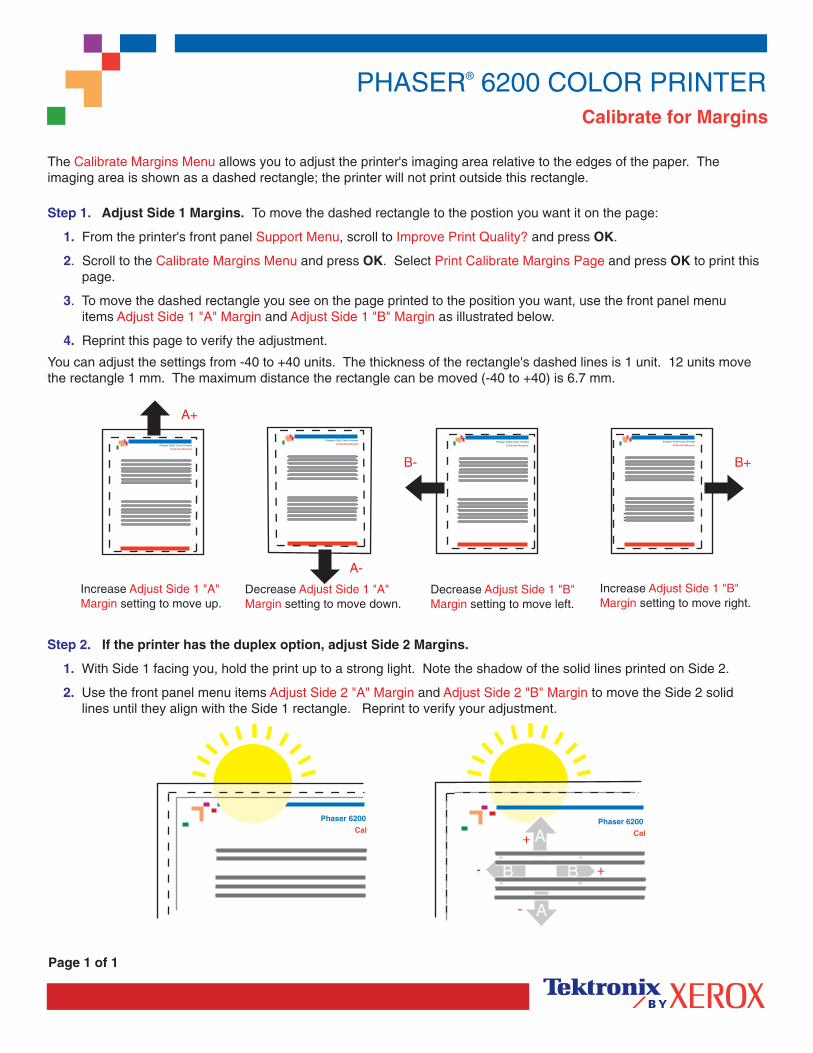
The Calibrate Margins Menu allows you to adjust the printer's imaging area relative to the edges of the paper. The imaging area is shown as a dashed rectangle; the printer will not print outside this rectangle.
Step 1. Adjust Side 1 Margins. To move the dashed rectangle to the postion you want it on the page:
1. From the printer's front panel Support Menu, scroll to Improve Print Quality? and press OK.
2. Scroll to the Calibrate Margins Menu and press OK. Select Print Calibrate Margins Page and press OK to print this page.
3. To move the dashed rectangle you see on the page printed to the position you want, use the front panel menu items Adjust Side 1 "A" Margin and Adjust Side 1 "B" Margin as illustrated below.
4. Reprint this page to verify the adjustment.
You can adjust the settings from -40 to +40 units. The thickness of the rectangle's dashed lines is 1 unit. 12 units move the rectangle 1 mm. The maximum distance the rectangle can be moved (-40 to +40) is 6.7 mm.
Decrease Adjust Side 1 "B" Margin setting to move left.
Increase Adjust Side 1 "A" Margin setting to move up.
Increase Adjust Side 1 "B" Margin setting to move right.
Decrease Adjust Side 1 "A" Margin setting to move down.
Step 2. If the printer has the duplex option, adjust Side 2 Margins.
1. With Side 1 facing you, hold the print up to a strong light. Note the shadow of the solid lines printed on Side 2.
2. Use the front panel menu items Adjust Side 2 "A" Margin and Adjust Side 2 "B" Margin to move the Side 2 solid � lines until they align with the Side 1 rectangle. Reprint to verify your adjustment.
Phaser 6200 Color Printer
Calibrate Margins
Phaser 7700 Color Printer
Calibrate MarginsPhaser 6200 Color Printer
Calibrate Margins
Phaser 6200 Color Printer
Calibrate Margins
B- B+
A+
A-
Phaser 6200
CalPhaser 6200
CalA
B
A
B +-
+
-
Phaser® 6200 Color Laser Printer
Copyright © 2002 Xerox Corporation. All Rights Reserved. 4
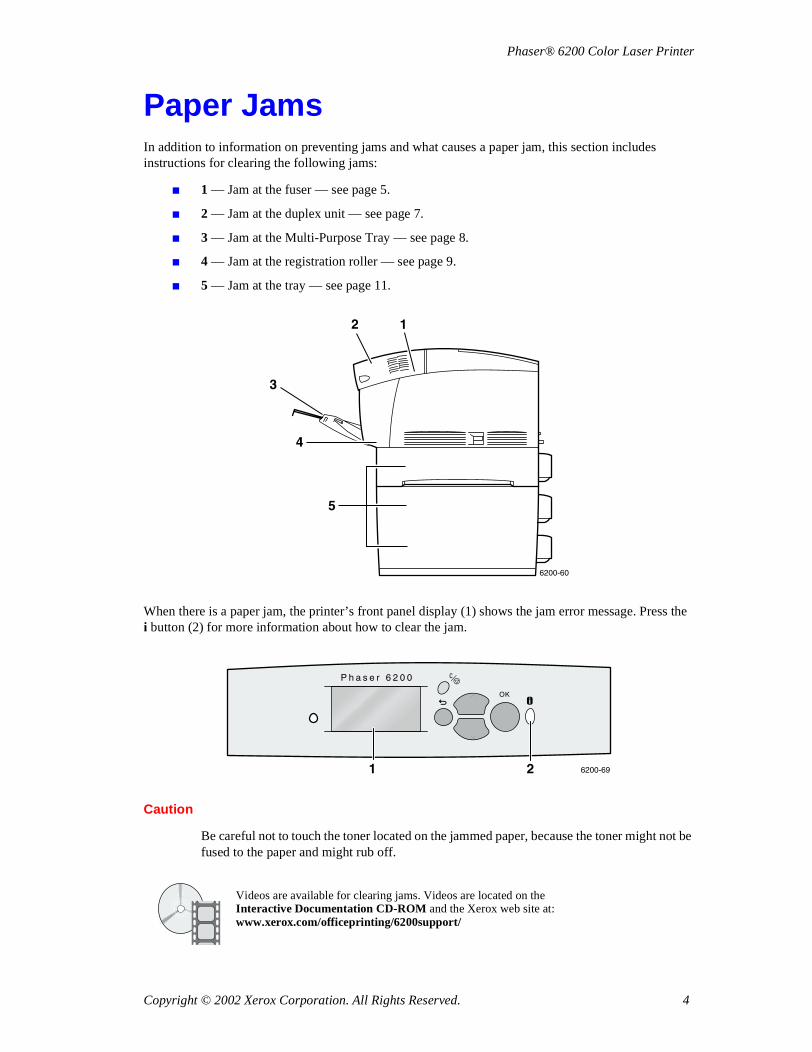
Paper JamsIn addition to information on preventing jams and what causes a paper jam, this section includes instructions for clearing the following jams:
� 1 — Jam at the fuser — see page 5.
� 2 — Jam at the duplex unit — see page 7.
� 3 — Jam at the Multi-Purpose Tray — see page 8.
� 4 — Jam at the registration roller — see page 9.
� 5 — Jam at the tray — see page 11.
When there is a paper jam, the printer’s front panel display (1) shows the jam error message. Press the i button (2) for more information about how to clear the jam.
Caution
Be careful not to touch the toner located on the jammed paper, because the toner might not be fused to the paper and might rub off.
Videos are available for clearing jams. Videos are located on the Interactive Documentation CD-ROM and the Xerox web site at: www.xerox.com/officeprinting/6200support/
3
4
5
2 1
6200-60
OK
6200-69
P h a s e r 6 2 0 0
1 2
Paper Jams
Phaser® 6200 Color Laser Printer 5
Preventing jams� To reduce the frequency of paper and transparency jams, use only Xerox Phaser branded paper
and media designed for the Phaser® 6200 printer. See the Supplies section in the Support Guide on the Interactive Documentation CD-ROM or go to the Xerox web site at: http://www.xerox.com/officeprinting/6200supplies to order supplies.
� Fan paper prior to loading in the trays or the Multi-Purpose Tray.
� For supported paper sizes, see the Supported Papers section in the Trays and Paper Guide on the Interactive Documentation CD-ROM.
� For proper paper-loading instructions, see the Loading Trays section in the Trays and Paper Guide on the Interactive Documentation CD-ROM.
� Use clean, undamaged paper. Do not use paper that is curled.
� Load paper from a newly opened package.
� Do not add paper above the tray’s fill line.
� Make sure that the tray guides are properly set for the paper size.
What causes a paper jam?
Paper jams occur most often under these conditions:
� An incorrect paper type was selected in the printer driver.
� The paper does not meet specifications.
� The loaded paper size or weight is not supported by the paper tray.
� The paper is damaged, moist, curled, creased, or folded.
� The paper is not loaded properly.
� The tray’s side and rear guides are not adjusted properly for the paper.
� The tray is overfilled; paper is loaded above the tray’s fill line.
Jam at the fuser
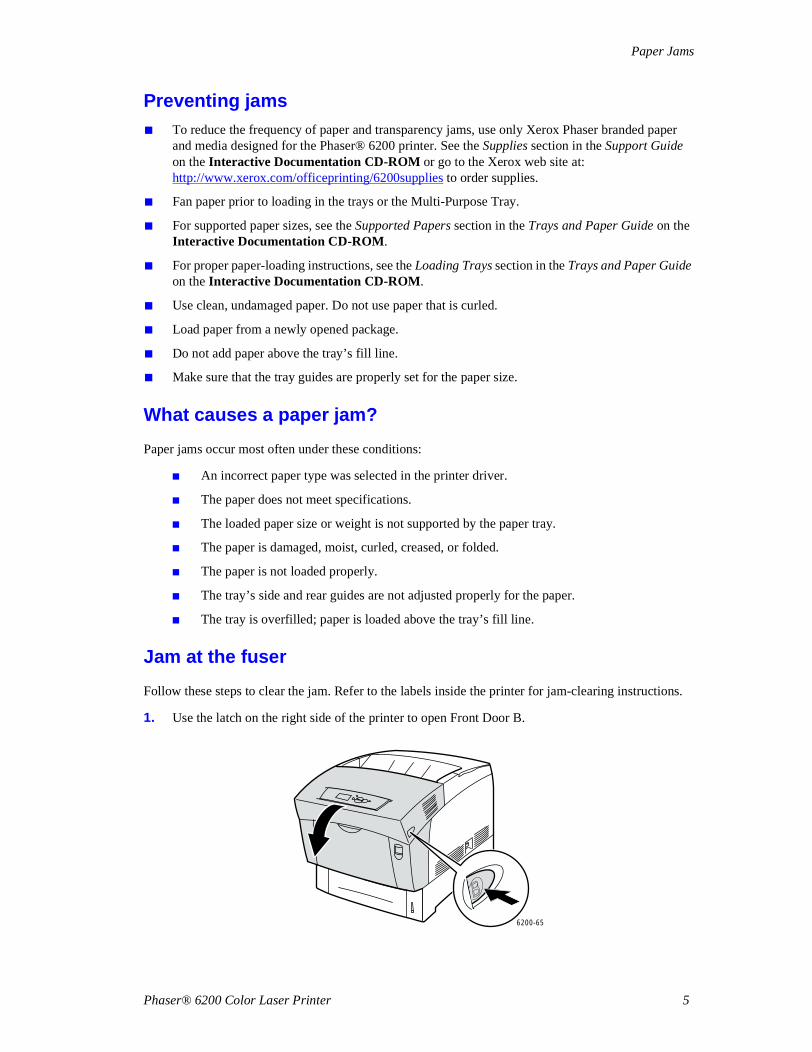
Follow these steps to clear the jam. Refer to the labels inside the printer for jam-clearing instructions.
1. Use the latch on the right side of the printer to open Front Door B.
6200-65
Paper Jams
Phaser® 6200 Color Laser Printer 6
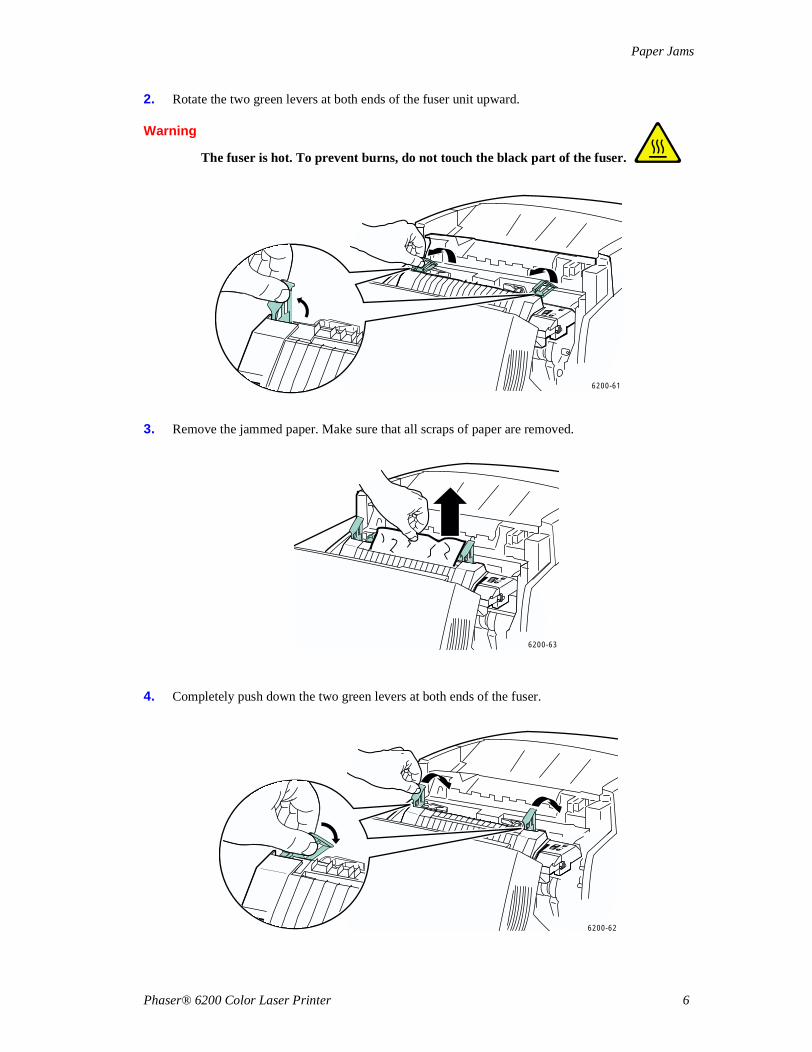
2. Rotate the two green levers at both ends of the fuser unit upward.
Warning
The fuser is hot. To prevent burns, do not touch the black part of the fuser.
3. Remove the jammed paper. Make sure that all scraps of paper are removed.
4. Completely push down the two green levers at both ends of the fuser.
6200-61
6200-63
6200-62
Paper Jams
Phaser® 6200 Color Laser Printer 7
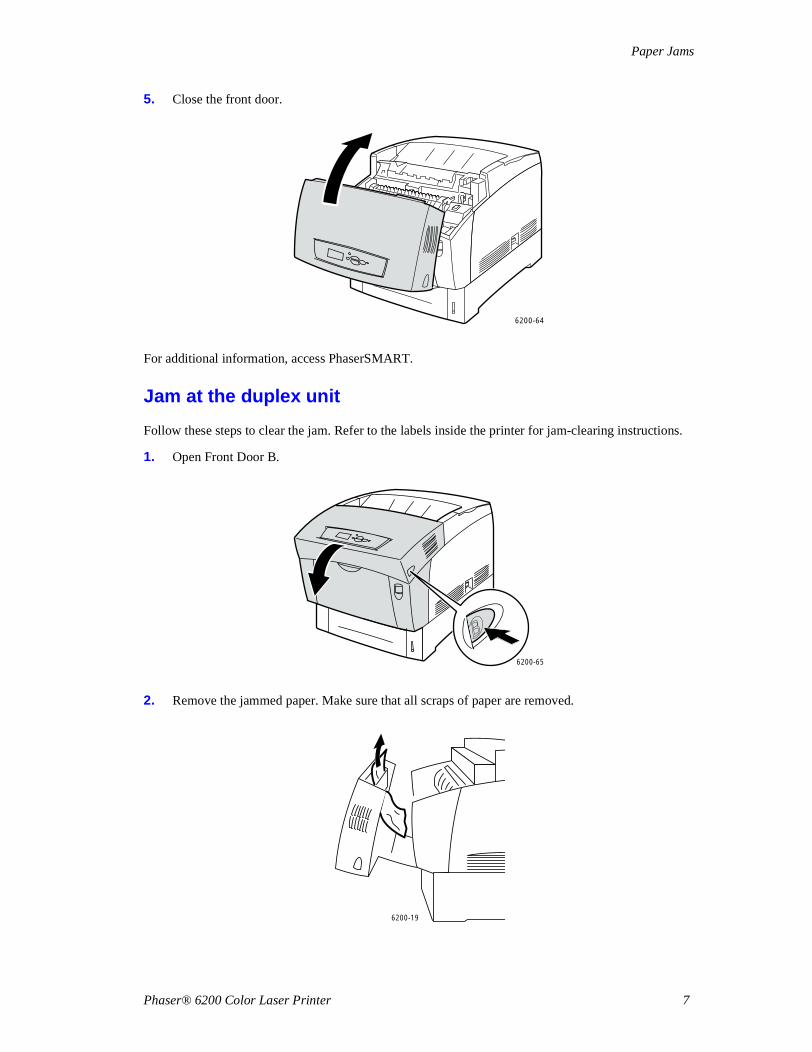
5. Close the front door.
For additional information, access PhaserSMART.
Jam at the duplex unit
Follow these steps to clear the jam. Refer to the labels inside the printer for jam-clearing instructions.
1. Open Front Door B.
2. Remove the jammed paper. Make sure that all scraps of paper are removed.
6200-64
6200-65
6200-19
Paper Jams
Phaser® 6200 Color Laser Printer 8
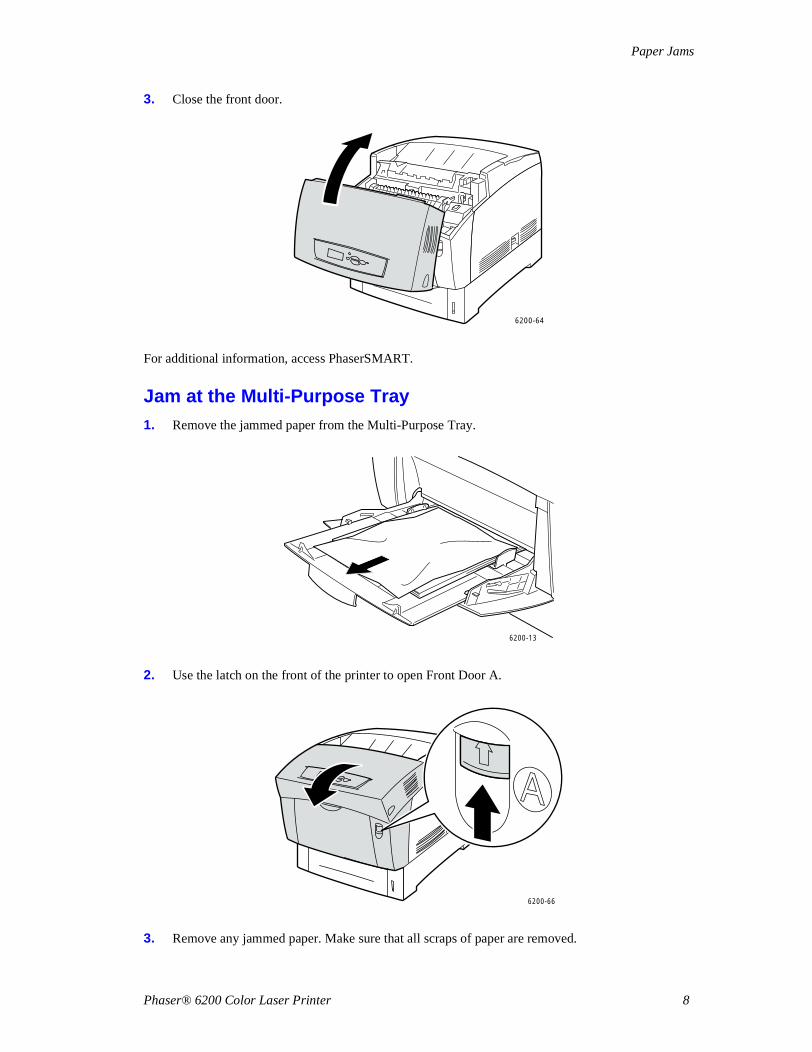
3. Close the front door.
For additional information, access PhaserSMART.
Jam at the Multi-Purpose Tray1. Remove the jammed paper from the Multi-Purpose Tray.
2. Use the latch on the front of the printer to open Front Door A.
3. Remove any jammed paper. Make sure that all scraps of paper are removed.
6200-64
6200-13
6200-66
Paper Jams
Phaser® 6200 Color Laser Printer 9
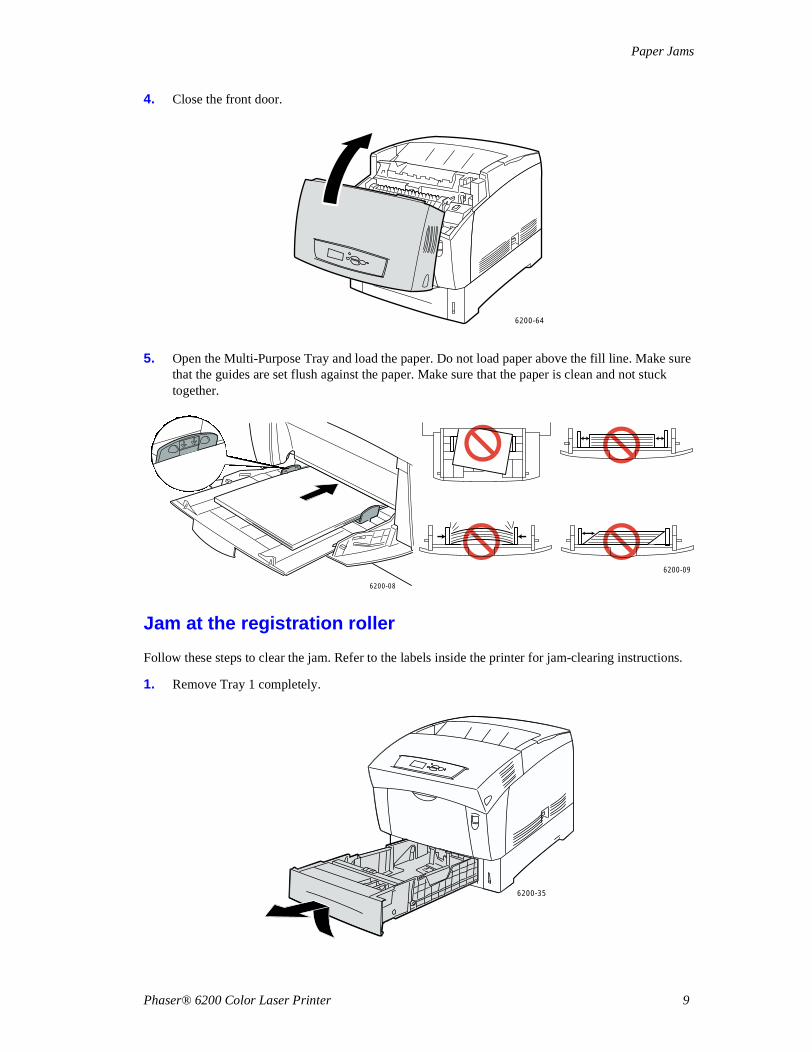
4. Close the front door.
5. Open the Multi-Purpose Tray and load the paper. Do not load paper above the fill line. Make sure that the guides are set flush against the paper. Make sure that the paper is clean and not stuck together.
Jam at the registration roller
Follow these steps to clear the jam. Refer to the labels inside the printer for jam-clearing instructions.
1. Remove Tray 1 completely.
6200-64
6200-08
6200-09
6200-35
Paper Jams
Phaser® 6200 Color Laser Printer 10
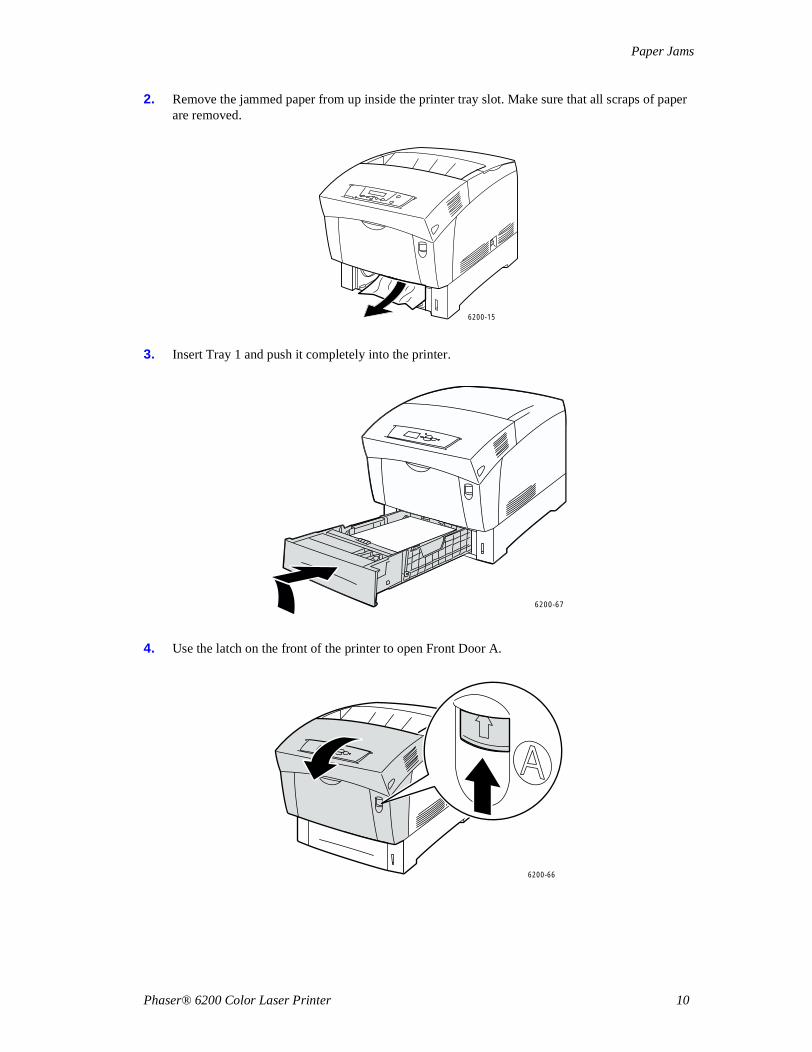
2. Remove the jammed paper from up inside the printer tray slot. Make sure that all scraps of paper are removed.
3. Insert Tray 1 and push it completely into the printer.
4. Use the latch on the front of the printer to open Front Door A.
6200-15
6200-67
6200-66
Paper Jams
Phaser® 6200 Color Laser Printer 11
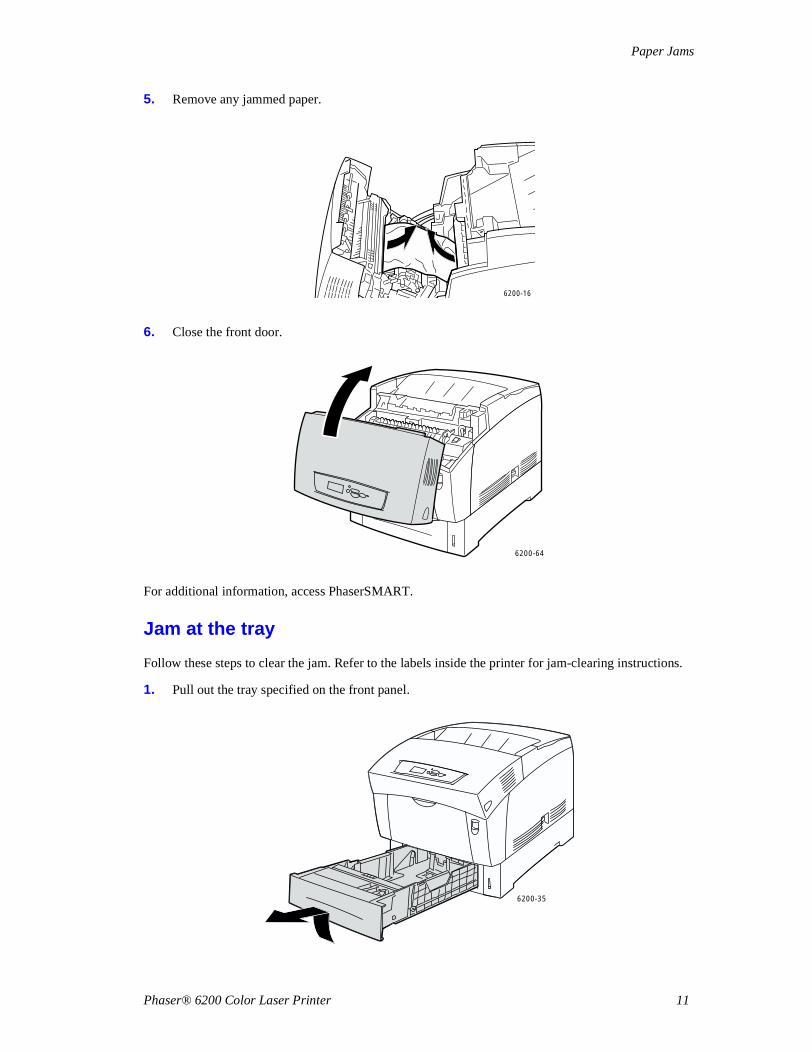
5. Remove any jammed paper.
6. Close the front door.
For additional information, access PhaserSMART.
Jam at the tray
Follow these steps to clear the jam. Refer to the labels inside the printer for jam-clearing instructions.
1. Pull out the tray specified on the front panel.
6200-16
6200-64
6200-35

Paper Jams
Phaser® 6200 Color Laser Printer 12
2. Remove any jammed paper.
3. Make sure that the paper is loaded correctly in the tray and the guides are set flush against the paper.
4. Remove any jammed paper from up inside the printer tray slot. Make sure that all scraps of paper are removed.
6200-14
6200-04
6200-15

Paper Jams
Phaser® 6200 Color Laser Printer 13
5. Insert the tray and push it completely into the printer.
6. Use the latch on the front of the printer to open Front Door A.
7. Remove any jammed paper.
8. Close the front door.
6200-67
6200-66
6200-64
Phaser® 6200 Color Laser Printer
Copyright © 2002 Xerox Corporation. All Rights Reserved. 14
Regular Printer MaintenanceYour printer needs little maintenance other than periodic cleaning of the density sensor and replacing the following Customer-Replaceable Consumables (CRCs) and Customer-Replaceable Units (CRUs):
� Toner cartridges (black, cyan, magenta and yellow) — see page 17
� Imaging unit — see page 18
� Transfer roller — see page 23
� Fuser — see page 20
� Feed rollers — see page 25
Order extra printer supplies when the printer’s front panel displays a warning that the consumable is low or near the end of its life. You must replace the consumable when the front panel displays an error message that the consumable is empty or at the end of its life. For part number information, refer to the Supplies section of the Support Guide on the Interactive Documentation CD-ROM. To order consumables and other supplies, visit the Phaser® 6200 Supplies and Accessories web site. Each item includes installation instructions in the package.
Caution
Keep the imaging unit out of direct sunlight. Otherwise, faded images, light areas or dark bands may result. Do not place the printer near vents or dust-producing equipment.
Warning
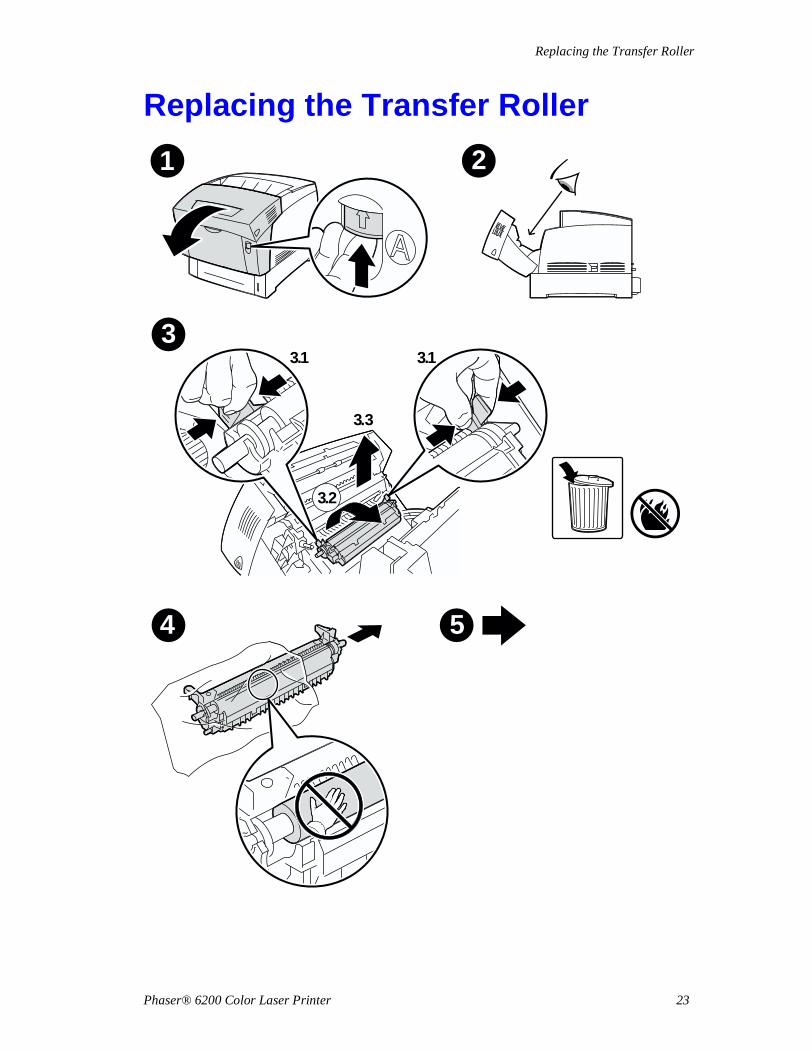
Do not burn the old toner cartridges, the imaging unit, the transfer roller, or the fuser.
Cleaning the outside of the printer
You can clean the outside of the printer with a soft, damp well-wrung cloth. You can use a cloth moistened with a mild neutral detergent to remove stains; do not spray detergent directly onto the printer.
Warning
To prevent electric shock, turn the printer off and unplug the power cord before cleaning the printer.
Caution
Do not use a vacuum cleaner to clean the printer. Do not lubricate the printer with oil.
Regular Printer Maintenance
Phaser® 6200 Color Laser Printer 15
Cleaning the density sensor
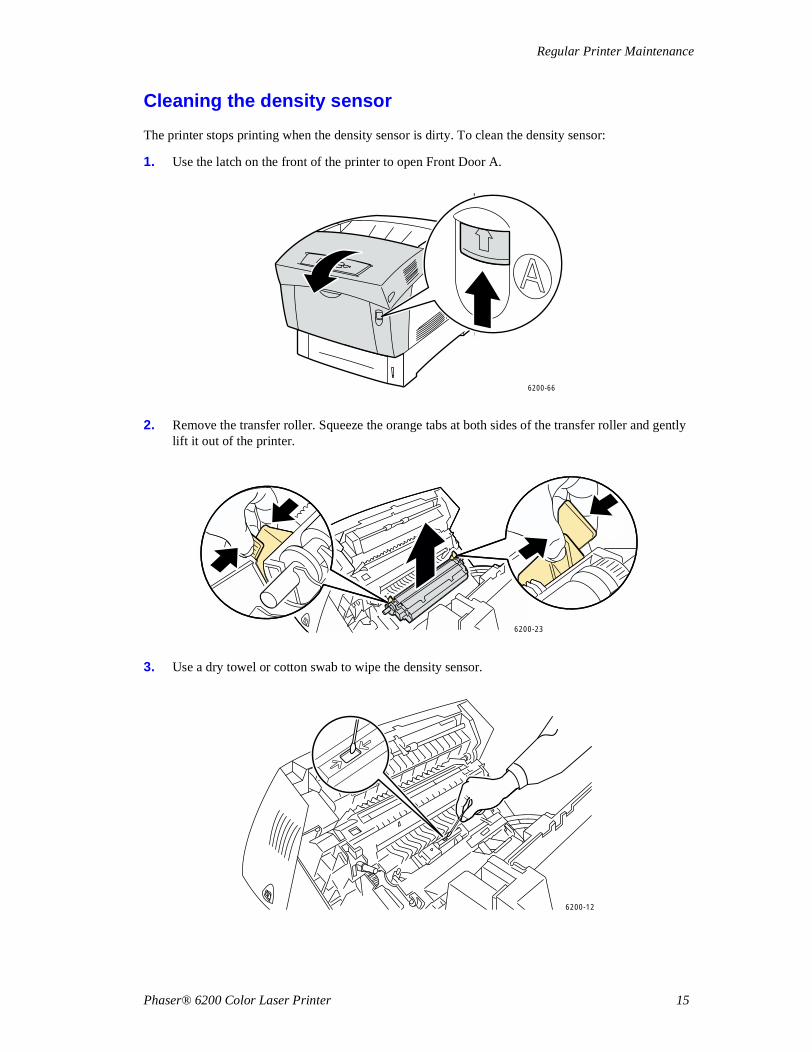
The printer stops printing when the density sensor is dirty. To clean the density sensor:
1. Use the latch on the front of the printer to open Front Door A.
2. Remove the transfer roller. Squeeze the orange tabs at both sides of the transfer roller and gently lift it out of the printer.
3. Use a dry towel or cotton swab to wipe the density sensor.
6200-66
6200-23
6200-12

Regular Printer Maintenance
Phaser® 6200 Color Laser Printer 16
Caution
Do not use canned air or isopropyl alcohol on the sensor.
4. Reinstall the transfer roller. Insert the rounded ends of the transfer roller into the curved black guides inside the printer. Lock the transfer roller into the printer by pushing down on the orange tabs until you hear a click.
5. Close the front door.
6200-24
6200-25
6200-64

Replacing a Toner Cartridge
Phaser® 6200 Color Laser Printer 17
Replacing a Toner Cartridge
6-8x
1 2
4.2
2.1
4.1
2.2
4
ClickDeclicClicKlickenClicClique
KlikKlick
6
PullTirerTirareZiehenTirarPuxe
TrekDra
5
3

Replacing the Imaging Unit
Phaser® 6200 Color Laser Printer 18
Replacing the Imaging Unit
12
1 2
4
8
4 x
7
PullTirerTirareZiehenTirarPuxe
TrekDra
6
4.5 kg10 lbs
3
P H A S E R® 6 2 0 0
I m p r i m a n t e c o u l e u r l a s e r
Unite imageur couleur
P H A S E R ® 6 2 0 0
C o l o r L a s e r P r i n t e r
12
Color Imaging Unit
5
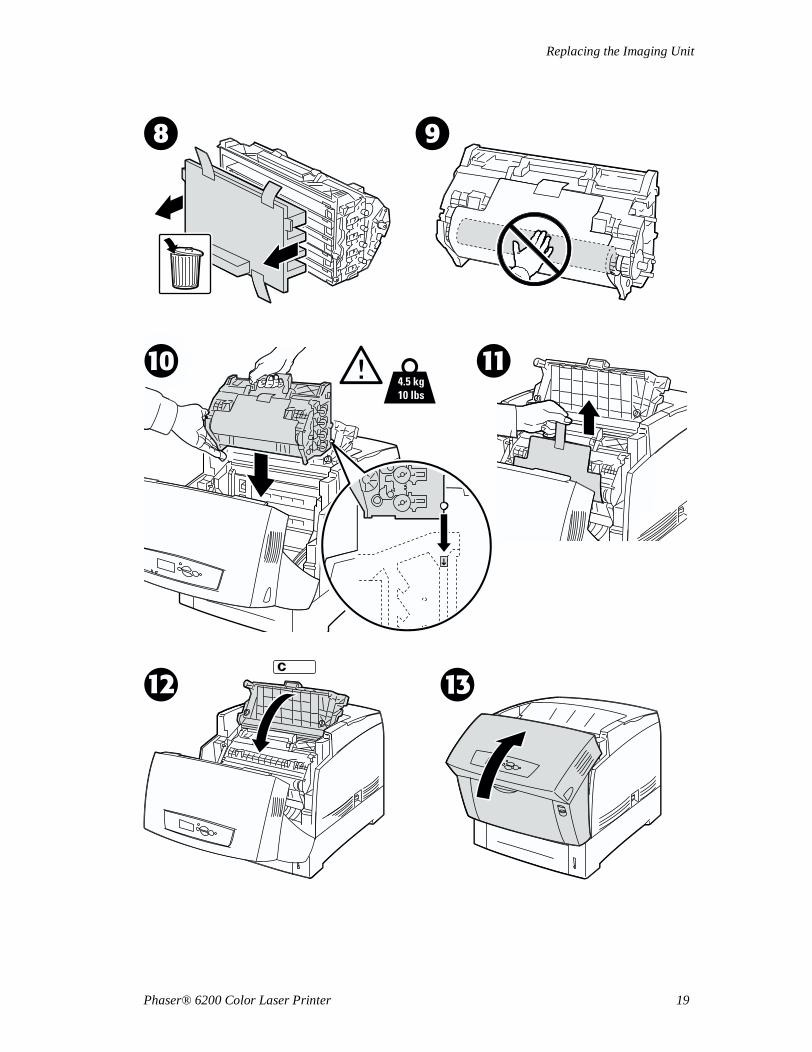
Replacing the Imaging Unit
Phaser® 6200 Color Laser Printer 19
9
12 13
8
11104.5 kg10 lbs
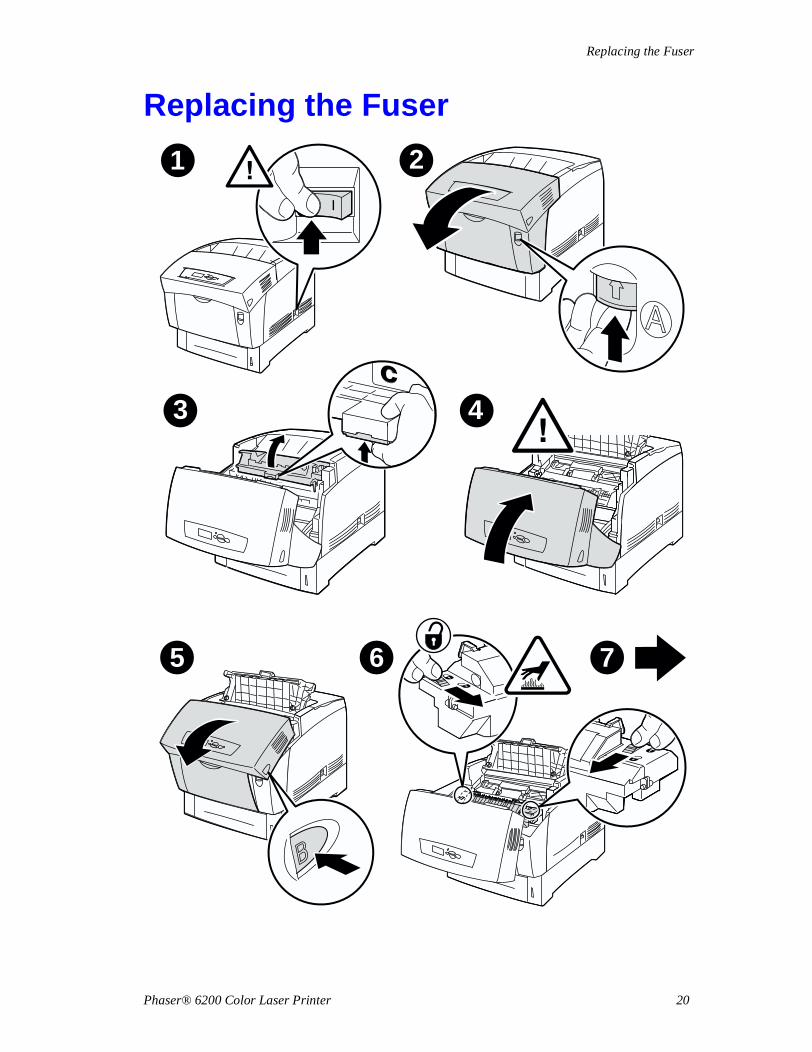
Replacing the Fuser
Phaser® 6200 Color Laser Printer 20
Replacing the Fuser
6
2
7
1
3 4
5
Replacing the Fuser
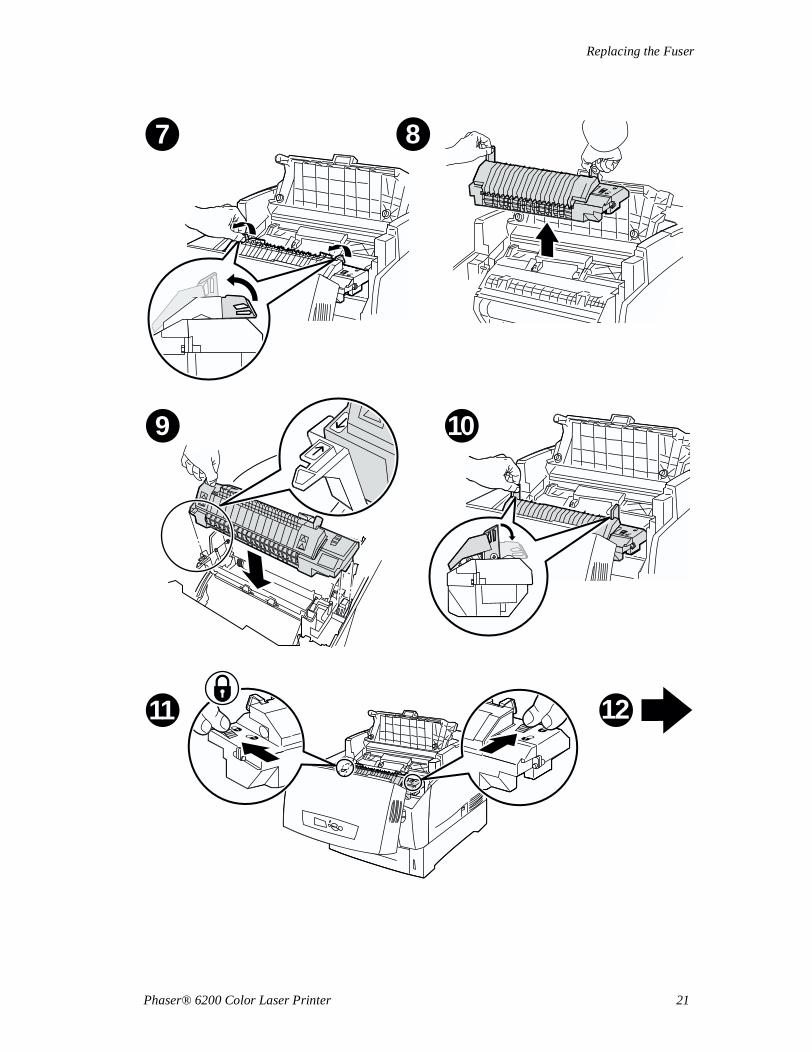
Phaser® 6200 Color Laser Printer 21
8
10
11 12
9
7
Replacing the Fuser
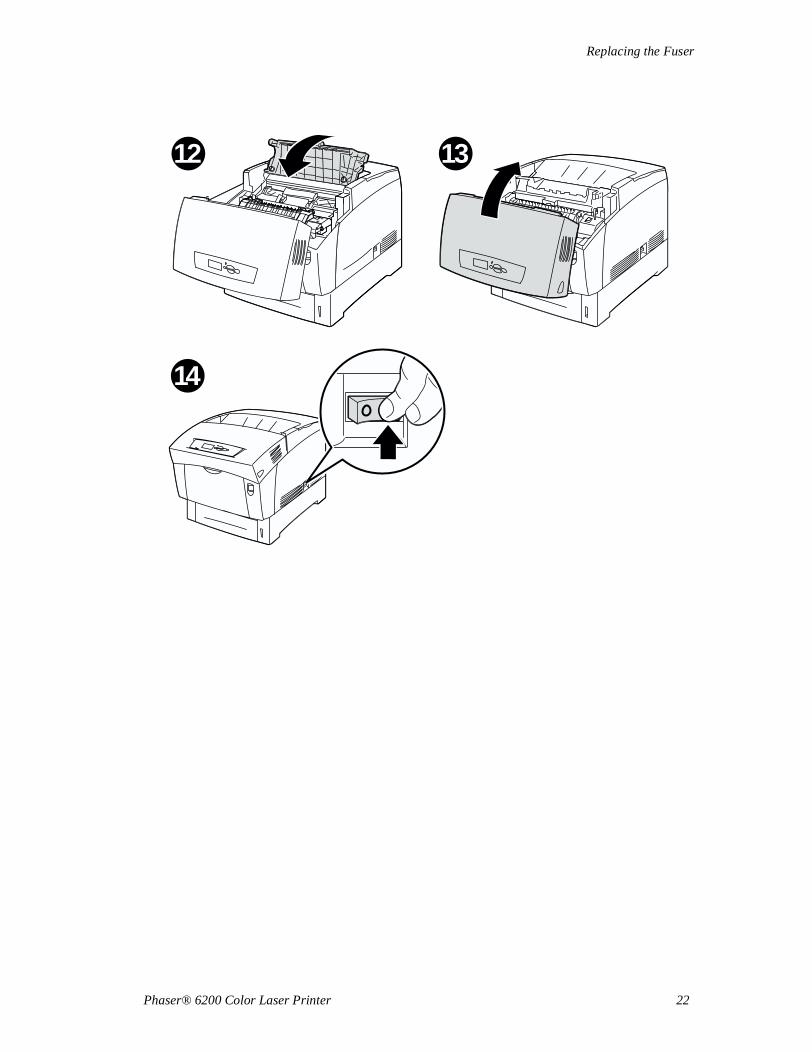
Phaser® 6200 Color Laser Printer 22
12 13
14
Replacing the Transfer Roller
Phaser® 6200 Color Laser Printer 23
Replacing the Transfer Roller
3.13.1
3.2
3.3
1 2
3
4 5
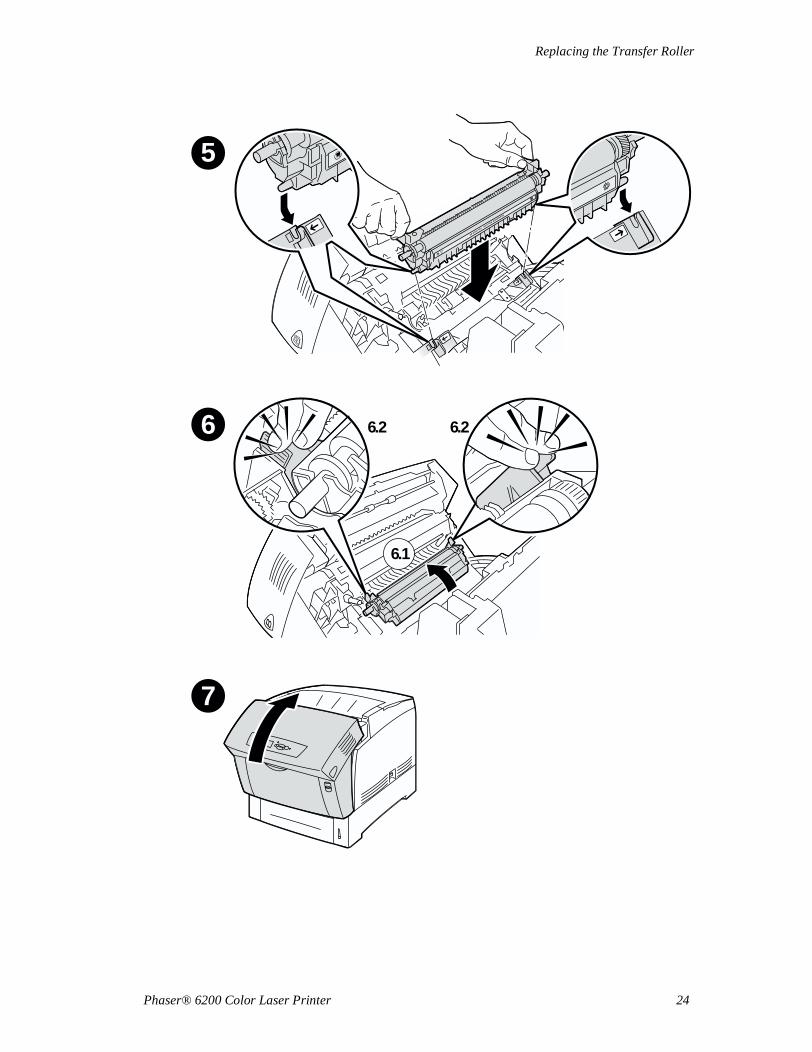
Replacing the Transfer Roller
Phaser® 6200 Color Laser Printer 24
6.1
6.2 6.2
7
5
6
TRANSFER ROLLER 016-2013-00

Replacing the Feed Rollers
Phaser® 6200 Color Laser Printer 25
Replacing the Feed Rollers
4
1
4.1
4.2
5
33.2
3.1
2
2.1
2.2
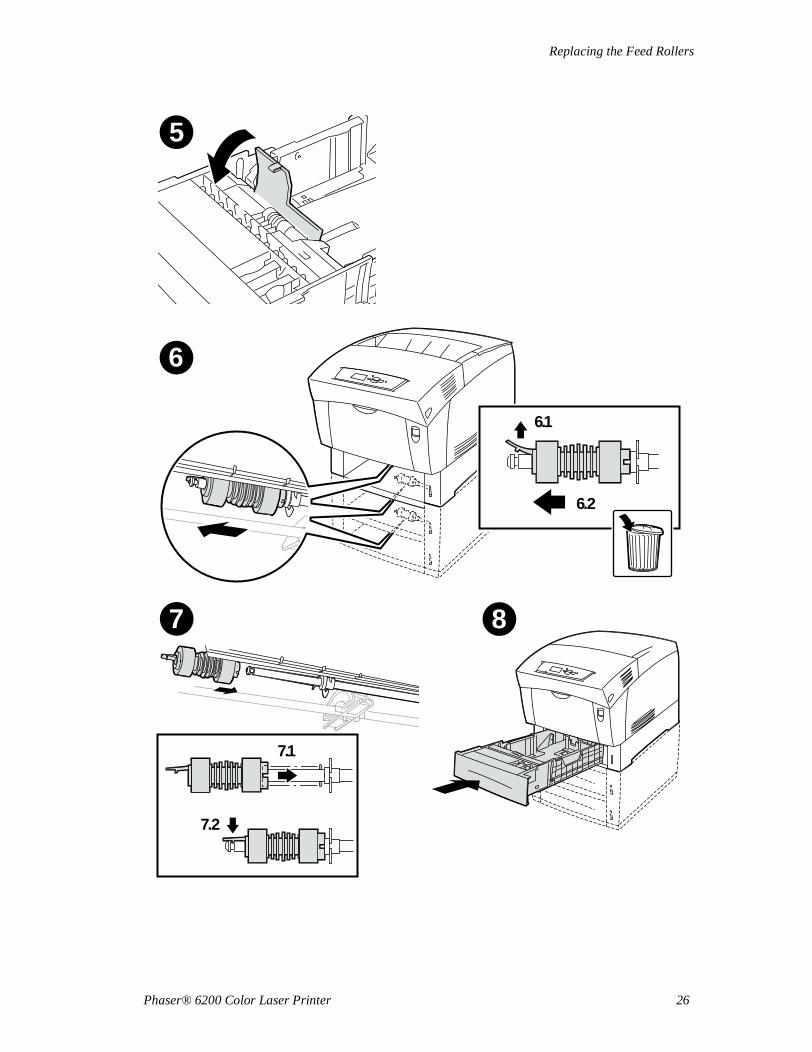
Replacing the Feed Rollers
Phaser® 6200 Color Laser Printer 26
6
8
5
6
6.1
6.2
7.1
7.2
7
Phaser® 6200 Color Laser Printer
Copyright © 2002 Xerox Corporation. All Rights Reserved. 27
Repacking Instructions
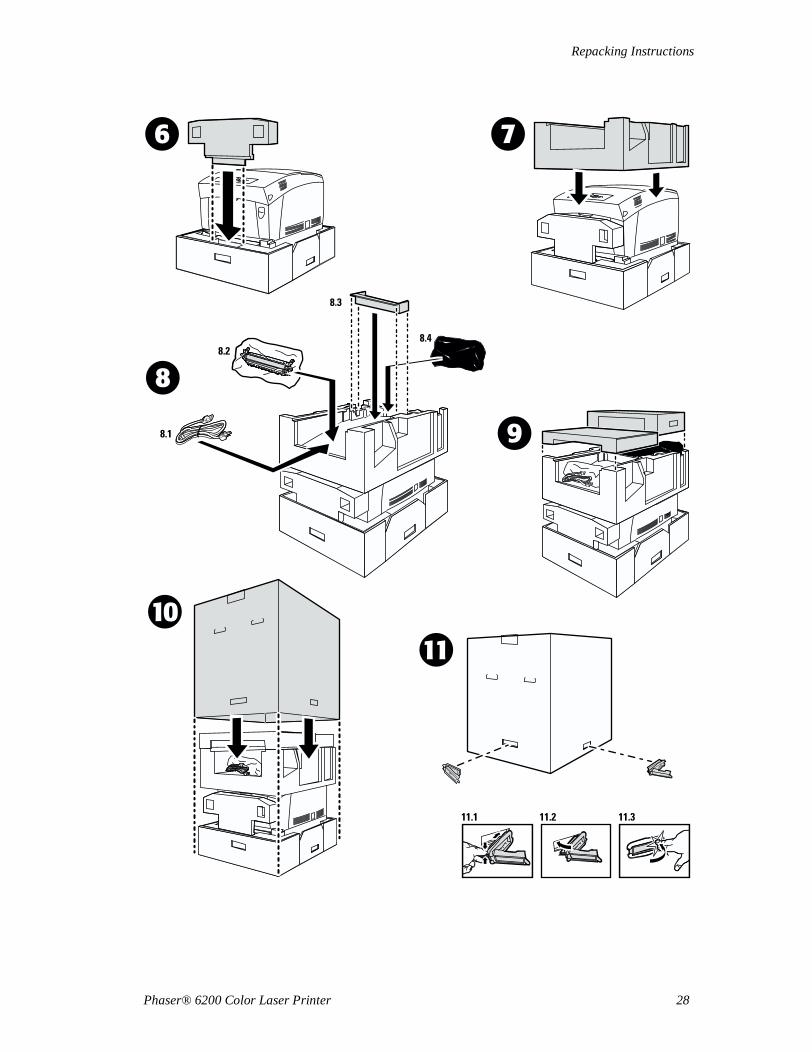
Repacking Instructions
Phaser® 6200 Color Laser Printer 28
Copyright © 2002 Xerox Corporation. All Rights Reserved. 29
Phaser® 6200 Color Laser Printer
Index
CCalibrate for Margins 3calibration 3cleaning
density sensor 15outside of printer 14
cleaning the printer 14clearing jams 4Color Calibration Tutorial 3Color Registration Menu 3Customer-Replaceable Consumables
(CRCs) 14
Ddensity sensor 15diagnosing print quality 2duplex unit
jam 7
Eerror messages 1
Ffeed rollers
replacing 25front panel
displaying errors 1fuser
jam 5replacing 20
HHelp Guide 1
Iimaging unit
replacing 18information on front panel 1instruction sheets
Repacking Instructions 27Replacing a Toner Cartridge 17Replacing the Feed Rollers 25Replacing the Fuser 20Replacing the Imaging Unit 18Replacing the Transfer Roller 23
Jjam at the duplex unit 7jam at the fuser 5jam at the Multi-Purpose Tray 8jam at the registration roller 9jam at the tray 11jams
clearing 4preventing 5
Mmisfeed at the tray 11Multi-Purpose Tray
jam 8
Ppaper jams
clearing 4preventing 5
preventing jams 5printable pages 1
calibration pages 3Diagnosing Print Quality 2Help Guide 1
Phaser® 6200 Color Laser Printer 30
Index
Rregistration roller
jam 9repacking instructions 27resources 1
Ttoner cartridge
replacing 17transfer roller
replacing 23tray
jam 11