phillips iber rt phillips fiber art - media.rainpos.com · tool the way you would use a template,...
TRANSCRIPT
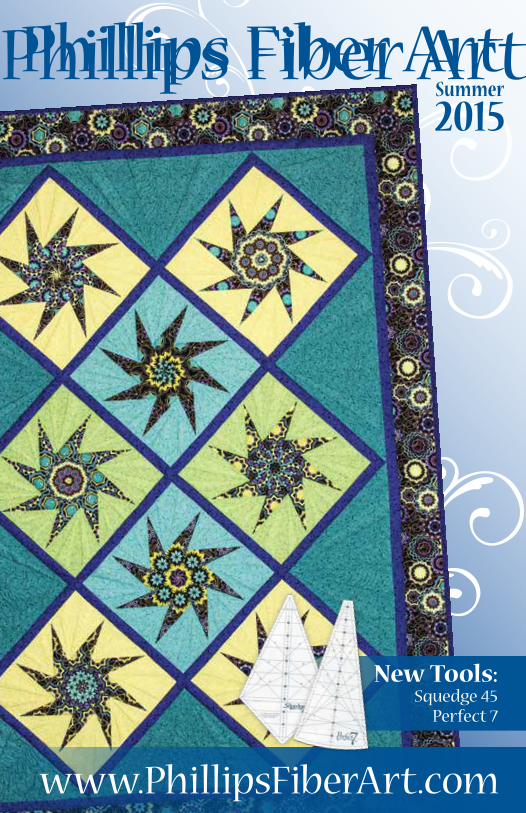
Summer
2015 Phillips Fiber ArtPhillips Fiber Art
New Tools:Squedge 45
Perfect 7
www.PhillipsFiberArt.com

Subscribe to our channel at: http://www.youtube.com/user/PhillipsFiberArt

From the Editor
Phillips Fiber ArtPhillips Fiber Art grew from Cheryl’s hobby into a successful small business, thanks to helpful family and friends. Each member of the Phillips Fiber Art team plays an integral role with Cheryl as author and designer, husband Gary as photographer, daughter Brooke as graphic artist, Carrie as office manager and Meg as packager. Nikki, pictured below, is off to college. Best wishes, Nikki!
We think of ourselves as a team, but more than that, a family. We’re real people committed not only to each other but also to you, our customer. We’re blessed to be part of the quilting community. Please visit us at phillipsfiberart.com or on our Facebook page. We’d love to see you there.
Photo: Jennifer Roth Photography
Sally SaysI'm back on staff!You might remember me as Circle Sally from earlier books, Circle A Round and Drunkard's Path.I've been given a whole new look since I started dabbling in Squedges You'll find my tips and pointers scattered though out the magazine.
^ Sally
3

Seven Designs with the Perfect 7
All seven
designsfound right in the
packaging!
STOP...Look at the star for a minute...while your eye expects symmetry,
it's surprised by seven points. The star dances!
Find perfection with the
Perfect 7
4

What is a Squedge? A Squedge is a wedge that makes a square. Funny name-Great Tool!
The latest arrival in our Squedge family is the Squedge 45. It’s amazingly simple!
The 45 is the largest of the Squedge tools. Only eight squedges are needed to make a 16” square. Fewer Squedges means a quicker block!
Inside the package you’ll find two free patterns, including
the block below. The full quilt is shown on the cover.
What's next for the Squedge family? We'll
be mixing it up in one big happy project. For
example combining the new Squedge 45
with the 22.5 and 11.25. Such fun!
Find many downloadable patterns on the
FREE page of our website.
SquedgeT
he
Lin
e U
p 5'
4'
3'
18˚ S
qued
ge
11.2
5˚ S
qued
ge
30˚ S
qued
ge
15˚ S
qued
ge
22.5
˚ Squ
edge
45˚ S
qued
ge
Funny NameGreat Tool!
Seven Designs with the Perfect 7
Great example of “you can’t make just one”.
5

FREE
Free pattern inside the
packaging!
Get started today!
PhillipsFiberArt.com 40 Free pattern downloads
Peaked PiecesSquedge 30
FREE!!!
Simple Garden
Echo StarTen Point Star
6

FREE Table ToppersHere’s a project you can whip up in no time!
It’s fun!
It’s fast!
It’s free!
And ohhh those beautiful border stripes work wonderfully. Let the stripes do the work for you. One tool, the Squedge 22.5, and the pattern found on the next few pages is all you need!
Suggested FabricBorder stripes are ideal for our table toppers, although any striped fabric makes a good choice. The key to your success is cutting exact design repeats. "How much fabric will I need?" This is a good question! You need eight design repeats in each direction, so you'll have to judge on a piece by piece basis. Take your 22.5 degree Squedge tool with you when shopping to be sure there is enough room to cut both eight design repeats.
CuttingFor border stripes, you may find it better to simply cut from the whole fabric piece using the Squedge
tool the way you would use a template, rather than cutting
strips. Doing this gives the best use of
your remaining fabric. Follow the chart below for simple linear stripes.
Striped Fabric
Number of strips
Strip width
AmountUsed
Suggested Yardage
stripe four identical strips
at least 8" wide 45" 1 ¼ yd
Backing/Batting 25" x 25" 3/4 yd
Finished Size: 24" x 24"
7

8
Prepare the Squedge 22.5 tool• Apply non-slip disks to both sides of the
Squedge tool. Cutting Squedges• Select the design to be repeated. Check
to be sure you have eight full design repeats before proceeding.
• Trace registration lines from the fabric design onto your Squedge tool.
• Cut around the entire tool for the first Squedge piece.
• Realign the Squedge tool matching the registration marks for exact duplicate cuts. Cut eight identical pieces.
• Next cut mirror image Squedge pieces* by flipping the tool over.
• Align your previous traced marks for each cut or create new ones.*
• Cut eight identical reversed Squedges.* Often you won't find an exact mirror image,
particularly in fabric with a floral motif. Keeping the stripe consistent while cutting the next eight pieces, still creates a lovely design. Trace new registration lines as necessary. See samples page 7.
Squedge 22.5with traced registration lines
Cut 8 Squedgepieces
Take it to the next level with strip sets. Download the February Table Topper on the Free Page of our website!
Sally Says

9
Assembly• Pin a Squedge to a mirror image
Squedge at matching stripes.• Sew the pair together.• Make eight pairs.
• Layer the batting, backing (right side up), then pieced top (right side down).
• Pin the layers together.
• Sew around the perimeter, leaving a place for turning.
• Trim away the excess backing and batting. Clip at the inside corners.
• Now turn the piece inside out and hand stitch the opening closed.
Appliqué• Trace a circle onto freezer paper.• Iron the freezer paper onto a scrap
of fabric you've chosen for your center appliqué.
• Cut the fabric ¼" beyond the paper edge to allow for turning under.
• Appliqué the circle to the center opening.
Finish the project using the “pillow case” method.
• Join the pairs to make the topper.
• Press the seam allowances from the back, opening seams, then press again from the front side.
• Iron a square of freezer paper to the back of the project to stabilize the center opening.
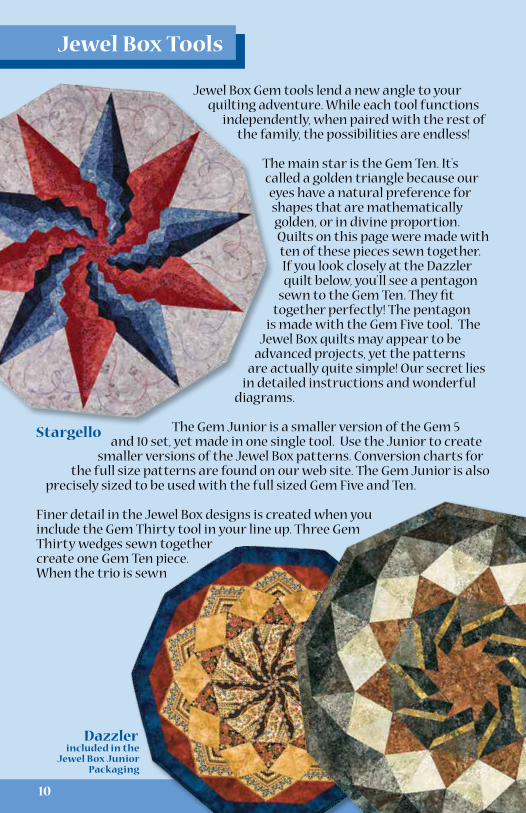
Jewel Box Gem tools lend a new angle to your quilting adventure. While each tool functions
independently, when paired with the rest of the family, the possibilities are endless!
The main star is the Gem Ten. It's called a golden triangle because our eyes have a natural preference for shapes that are mathematically golden, or in divine proportion. Quilts on this page were made with ten of these pieces sewn together. If you look closely at the Dazzler quilt below, you’ll see a pentagon
sewn to the Gem Ten. They fit together perfectly! The pentagon
is made with the Gem Five tool. The Jewel Box quilts may appear to be
advanced projects, yet the patterns are actually quite simple! Our secret lies
in detailed instructions and wonderful diagrams.
The Gem Junior is a smaller version of the Gem 5 and 10 set, yet made in one single tool. Use the Junior to create
smaller versions of the Jewel Box patterns. Conversion charts for the full size patterns are found on our web site. The Gem Junior is also
precisely sized to be used with the full sized Gem Five and Ten.
Finer detail in the Jewel Box designs is created when you include the Gem Thirty tool in your line up. Three Gem Thirty wedges sewn together create one Gem Ten piece. When the trio is sewn
Jewel Box Tools
Dazzler included in the
Jewel Box JuniorPackaging
Stargello
10

Jewel Box Patterns
Moroccan Tile
Star Sapphire
together in the various ten sided designs, they give the illusion of a complex quilt. The Stargello quilt shown here is a great example. You’ll be so surprised at how easy it’s put together!
Create fun five point star appliques in several sizes with the Gem Star. The quick folding technique means there are no edges to turn under! Stars are ideal for embellishing a project or making Christmas ornaments. More than stars, you can use the tool to make a different pentagon. Substitute it with Gem Five pentagons and your design possibilities have multiplied.
If you want to make any of the ten sided Jewel Box quilts into squares, use our free Framing Template pattern.
Framing segments are added in the piecing process, making it virtually painless. The template pattern is included in the Gem Five and Ten packaging or can be ordered on our web site.
The innovative and multipurpose Jewel Box tools inspire you to be creative and allow you to explore many avenues in your quilting experience.
The Jewel BoxGems 5& 10GemStarGem 30Jewel Box JuniorMoroccan TileRuby RingBronze MosaicFerris Wheel
Sierra TrailsBanded AgateStar SapphireSwirlSundialStargelloFive Star Gala
Gem Stars
11

Spirit Circles
Go
Team
Go!
Finished Size: 33"
Fabric Cutting Exact amount Yardage
A(main school
color)
one 14" square (cut first)28" ⅞ ydtwo 11 ¼"
from remaining A Fabric B
(accent school color)
one 11 ¼" x width 12" ⅜ yd
Batting one 36" square 36" 1 ydBacking one 36" square 36" 1 ydBinding
(Optional) six 2 ½" bias 18" ½ yd
45
45
45
45
15
17
18
19
20
21
22
23
24
25
16
6060
6060
60
6060
60
45
454
5
45
3
4
5
7
8
9
10
11
13
12
6
45
45
45
45
15
17
18
19
20
21
22
23
24
25
16
6060
6060
60
6060
60
45
454
5
45
3
4
5
7
8
9
10
11
13
12
6
Uppe
r Wed
geLo
wer
Wed
ge
Fabric SelectionChoose solid fabrics in your team's colors.
Spirit Circles
Continued on next page.
Go Team! Go!
Take it to the game--• sit on it• cover up with it• or wave it in the air.
Embroider your school logo in the center or add your special teen's name.
Great fund raiser!
Celebrate your favorite team!Make a Spirit Circle!
You'll need: A Two Piece Ten Degree tool A Cut A Round tool (optional) (If you don't have this tool, you can find a paper template on our web site.)
Option: For a one piece Ten Degree tool, use the upper, then the lower portion of the wedge. The 14" is the dividing line between the Upper and Lower Wedges.
12

13

14
A Wedges• Cut a 14" square of Fabric A. Set aside for center appliqué.• Cut two 11 ¼" wide strips from the remaining Fabric A.• Cut nine Fabric A wedges using the Lower Wedge (wider portion).• Cut nine Fabric A wedges using the Upper Wedge (narrower portion).
B Wedges• Cut one 11 ¼" wide strip of Fabric B.• Cut eighteen Fabric B wedges using the Upper Wedge
(narrower portion).
Assembly• Sew a group of four wedges together in
B, A (narrow), B, A (wide) order.• Make nine groups.• Sew the nine groups together to form
a ring.
Always sew with ¼" seams!
Layering• Stabilize the center of the circle
using a large piece of freezer paper. This keeps the circle round while you layer and sew it.
• Layer batting, backing (right side up), and quilt circle (right side down).
Make 9
Cut 9 Cut 18Cut 9
60
6060
60
45
454
5
45
3
4
5
7
8
9
10
11
13
12
6
60
6060
60
45
45 4
5
45
3
4
5
7
8
9
10
11
13
12
6
60
6060
60
45
454
5
45
3
4
5
7
8
9
10
11
13
12
6
60
6060
60
45
45 4
5
45
3
4
5
7
8
9
10
11
13
12
6
45
45
45
45
15
17
18
19
20
21
22
23
24
25
16
6060
6060
45
45
45
45
15
17
18
19
20
21
22
23
24
25
16
6060
6060
A A B
Stop the slip! If you're having trouble with tool slippage you need to put True Grips™ onto your wedge tool.
Don't have those? Try placing long tubes of clear packaging tape, sticky side out, to the back of your wedge.
Sally Says

15
backing hidden (not peeking out)
quilting lines
top
battingright side up
Quilting• Quilt the ring at this point.
Consider the continuous quilting design shown here as an option.
Turning Tips To get the edge of a circle smooth, just poke your hand between the layers and smooth along the seam. Follow by finger pressing from the top edge.
• Pin around the outer edge. • Sew all the way around.• Remove the freezer
paper and turn inside out through the center hole.
• Smooth the outer edge making sure you have a nice circle.
batting
backing
top
right side up
wrong side up
freezer paper
• Embroider your team name and logo onto the 14" Fabric A square. Substitute a printed T-shirt if desired.
• Trace a 13" circle onto the non-adhesive side of the fusible interfacing. The circle can be downloaded from the FAQ page on our website.
• Place the adhesive side against the right side of the appliqué fabric.• Stitch on the traced line.• Trim the two layers (interfacing and center fabric) ¼" from the stitching.• Slit the interfacing with an “X” and turn the appliqué inside out.
(See turning tips above).• Place the appliqué over the center opening and fuse in place.• Appliqué by hand or machine.
Circle Applique

Three New
Patterns for the
Ten Degree Tool
Same Great Tool
in Two Pieces!
When joined together, the Two Piece Ten Degree Tool makes the same wedge you've enjoyed for years!
It's just...
►Easier to take to class!
►Easier to store!
►Easier to mail!
Look on page 12 for our free Spirit Circle pattern using the two piece wedge.
Other free designs can be found on our website.
16

Quilts Without Corners
Ten Degree Wedge Facts
is overflowing with inspiration. Use a circle quilt to top a table, wrap a baby, toss over the couch or brighten a wall.
► It takes 36 Ten Degree wedges to make a circle.
► A regular Ten Degree wedge makes up to a 50" circle.
► An Extension tool extends the wedge up to a 70" circle.
► An Extension Squared extends the wedge to a 54" square.
► A Ten Degree Mini makes up to a 25" circle.
Patterns and graph paper are available at PhillipsFiberArt.com. 17

Attic Window
One simple tool... ...so many possibilities!
Make Six SizesNo ‘Y’ Seams!
Are you a Beginner? Start your quilting journey with the Attic Window tool. The folded technique offers amazingly simple results for the new quilter. A booklet with step by step instructions and fun projects is included with the tool. Check out the Attic Window video on our website. Welcome to the wonderful world of quilting!
18

One simple tool... ...so many possibilities!
Simple Curves
Simple Curves are exactly what they sound like: simple. The Simple Curves tool comes
with a bonus pattern for a table runner along with several helpful hints on how to sew curved pieces. The Simple Garden runner shown on page 10 as well as two other patterns
can be downloaded for free on our website.
You can make the simplest wedding ring quilt ever with the Simple Curves tool and the Simple Bands pattern. One tool cuts the ring, the football, and the frame portion. All of the components are easy to piece.
Before you know it you have a beautiful block and the start to a very simple wedding
ring quilt!
Another pattern for the incredible Simple Curves tool is the Simple Harmony pattern.
Two harmonizing blocks make the Simple Harmony quilt. Create blocks, borders, and strip sets with this one tool!
We challenge you to design your own Simple Curves creation.
Kat
hle
en M
oorh
ead
Joh
nso
n
19

Royal Companions
Royal Companion patterns continue the Bending the Line and Squedge play fun. Using the Squedge 18, Star Crossed is our newest addition. While the King’s Courtyard quilts may look complicated, the blocks are made with the same simple A, B, C and C+ blocks found in Bending the Line. The Four of a Kind plays its hand with a quick little trick turning ordinary into extraordinary.
The Squedge Corner Tool is your key to success on any Squedge project. It eliminates the need to applique a center onto your blocks. Easy as 1, 2, 3!
20

32 pages packed with step by step instructions
and great quilts!
™
Tool design by Cheryl Phillip
s
www.phillipsfib
erart.com
Made in USA
16 squedges = a 16 ½” square
Start your Squedge education with Bending The Line and the Squedge 22.5! Eleven different designs based on four simple quadrants. Advance from here to our Royal Companion patterns, Kings Courtyard and
Four of a Kind. Or try our other Squedge sizes. With so many free pattern downloads on our website, the Squedge family is a great value!
Sally Says
21

22
Available PatternsMoroccan TileRuby Ring
Bronze MosaicFerris WheelStar Sapphire
Banded AgateSwirlSundial
StargelloFive Star Gala
Also AvailableQuilts Without Corners PlatinumAngelica Pattern
Phoenix PatternSnappy Splendor Pattern
Jew
el B
ox
Stellar Medallion PatternEagle Pattern
Ten
Deg
ree
Per
fect
7
Sim
ple
Cu
rves
Att
ic W
ind
ow
Simple Bands PatternSimple Harmony Pattern
New

23
Sq
ued
ge
Cu
t A
Ro
un
d
Available CompanionsCircle A Round Book
Drunkards Path Book
New York Beauty Book
Phillips Fiber ArtMaking innovative tools for the creative quilter
Available Companions
Bending The Line BookKings Courtyard Pattern
Four of a Kind PatternSquedge Corner Tool
Calliope PatternStar Crossed 18Court Jester 15
New

FACEBOOK LOGO ICON for Adobe Illustrator
www.PhillipsFiberArt.comVideo Tutorials for your viewing pleasure
Rest of the Story with labels, grids, tips and moreFAQ find the answers to your questions
Photo Galleries inspiration for creativityFree Patterns we all love free stuff
YouTube Logo for Adobe Illustrator
Join us on Facebook and YouTube