phoenix big book analog and direct drive...
TRANSCRIPT

PHOENIX BIG BOOK ANALOG AND DIRECT DRIVE KITS
REV D 122419
C: TEMPB: FUEL B: VO LT D: PRESS

INTRODUCTION
Thank you for choosing NVU for your build. NVU style features and function
will make your ride’s dash look and act the part you always wanted it to. NVU
instruments are designed, coded, built and programmed right here in the Motor
City, Detroit , MI USA and feature a 5- year warranty. Please take the time to
read through this booklet and feel free to contact us with any questions you
have before, during and after installation.
TABLE OF CONTETNTS
INTRODUCTION ………………………………..…………………………………2
FEATURES ………………………………………………………..……………… 3
SPEEDOMETER SETUP…………………………………………………………4
SPEEDOMETER SIGNALS AND SENDERS …………………………………11
TACHOMETER SIGNALS …………………………………………………..……12
TACHOMETER SET-UP …………………………………………………………13
ANALOG MINOR GAUGE SENDERS AND SIGNALS ………………….……17
AUXILLARY INPUTS ………………………..……………………………….. 18-21
WIRING DIAGRAMS
THE BACK OF YOUR GAUGE: WITH DATA PORTS …………………………21
6 GAUGE KIT PROG SPEEDO AND TACH …………………………………22-23
5 GAUGE KIT PROG SPEEDO ………………………………………....…. 24-25
THE BACK OF YOUR GAUGE: WITHOUT DATA PORTS ……………………26
SPEEDOMETER AND QUAD GAUGE KIT …………………………………..…27
SPEEDO/TACH COMBO WITH QUAD GAUGE …………………….…………28
3-1 GAUGE KIT ………………………………………………………………….…29
STANDALONE SPEEDOMETER WITH OLED SCREEN ……..………………30
STANDAOLNE TACHOMETER WITH OLED SCREEN ………….……...…… 31
STANDALONE SPEEDO/TACH COMBINATION GAUGE ……………..…… 32
DUAL GAUGES ………………………………………………………………..…33
DIP SWITCHES AND SETTING RANGES …………………………………..... 34
ANALOG INPUT (RESISTANCE) 2-1/16” GAUGES ……………………….… 35
ANALOG INPUT (TRANSDUCER, 0-5v) 2-1/16” GAUGES …………………. 36
TROUBLESHOOTING BASICS …………………………………………........... 37
AIRCORE 2-1/16” INSTRUMENTS (SHORT SWEEP) …….…………....…38-39
2

NVU PHOENIX PLATFORM PLUG-AND-PLAY FEATURES
NVU Plug and play instruments are available in kits that have externally driven
2-1/16” gauges. The speedometer and tachometer are the master (driver)
gauges and use data ports on the back to run the minor gauges. This
simplifies installation and wiring dramatically not only saving time installing, but
also prevents the need for troubleshooting loose connections, mis-wiring, etc.
This system is analog driven and requires no additional boxes, driver or data
inputs to operate.
Features from the standard Phoenix platform instruments are carried over to
make installation and use easier with more features than ever. Plug and play
system features:
Minor gauge “Plug and Play” – plug it in the master gauge- no more individual
wires!
Phoenix features in addition to PNP :
Speedometer:
Odometer
Trip Odometer
Service mileage
Performance timers with 0-60, 1/8 and 1/4 mile functions
User settable (one time only in the 1st 100 miles) odometer mileage
Voltmeter display
One auxiliary input
Peak speed
MPH/Km/h toggle
Overspeed warning
Easy set-up menus
Digital filtering
GPS ready
Deadfronted (invisible when off) turn signals and hi beam indicators
Tachometer:
Sequential shift alert
Hourmeter
Service hours
Up to 2 additional auxiliary inputs
Peak RPM
Digital filtering
1,2,4,6,8,10,12 cylinder settings (custom options/ranges available)
Signal sources include, GM PCM, Coil, CDI box or other pulsed output
Deadfronted (invisible when off) warning indicators
3

PHOENIX SPEEDOMETERS
NVU Phoenix platform speedometers offer features found in complete clusters,
OE instrument systems and data loggers, all in a standalone unit. While all of
the features listed in this manual are available, they are not all required to be
used. You can use \your speedometer simply as a way to monitor your speed or
as a performance meter, its up to you. Some of the advanced features of the ---
- Phoenix platform speedometers:
- OLED high resolution display
- Drive-a mile self calibration
- Integration with OE and aftermarket speed signal and PCM outputs
- GPS input compatible
- Overspeed warning display (AMP Plug and commercial models)
- MPH/KPH speed toggle
- Performance meter 0-60, 1/8 and ¼ mile times/speed capture
Connections:
Speedometers are offered in either a studded or AMP plug connection. All of
the wires on the AMP plug may be used depending on the application, check
further in the manual for more details.
Terms when using the booklet:
Scroll: Pressing and releasing of the remote button to move through menu
options.
Short push: Briefly holding the remote button and releasing it
Long Push: Holding in the remote button for 1 sec. or until a menu display
changes.
With all of the features packed into NVU Phoenix platform speedometers, we
had to divide them up into different menus. Your speedometer has a main
“RUN” menu, and a “SETUP” menu. The RUN menu utilizes the features used
during normal operation. The SETUP menu stores all of the items that are set-
up during the installation process. (Items can be changed any time after if
desired) and are separate to prevent inadvertently changing them during normal
use.
During installation please contact NVU for questions/concerns, our qualified
tech staff can help get you going.
4

AUTOCAL (DRIVE A MILE SELF-CALIBRATION)
QUICK SET-UP
Check that your digital input filter is set to the proper input setting (see more later in
manual if needed) all NVU speedometers are shipped with the input set on HIGH
(suitable for most applications) with 16,000 PPM
Enter the setup menu by holding in the remote button and turning on the key (start
vehicle)
Scroll to auto calibrate (3RD ITEM)
Hold button until screen displays ready to drive? YES
Hold in button until display shows counting 0
Drive exactly one mile(or KM), speed does not affect accuracy. You may or may not see
action on the speedometer before or during calibration. Display will start counting with
the digits below increasing. This is the speedometer counting the number of pulses it
is receiving from the signal source. If the display does not count, check your signal
source or input filter, the speedometer is not reading a signal
At the end of the mile (or KM) (vehicle can be moving or stationary) Hold the button in
until SET YES appears
If NO PULSES is displayed, a signal was not read by the speedometer. Check your
input filter selection and speed signal. See page 37 for signal troubleshooting. See page
11 for signal types. See page 9 for filter settings.
Hold in button until SAVED! Appears
The speedometer is now calibrated. Pressing the button will take you through the rest of
the setup menu features. To resume normal operation turn off the key (vehicle) and
restart. 5

INSTALLATION BASICS:
-Use a minimum of 20 gauge insulated, stranded wire, all connections should
be connected with a crimp connection or solder and heat shrink.
-Keep speed signal wire(s) away from potential “noise” sources like ignition
wires, tach signal wires, fan motors, pumps etc.
-Studded speedometers use #8 studs, use applicable eye terminals for wiring.
-Use a maximum of 5A fuse for the entire cluster, this is usually already in your
fuse block
Commonize wiring, ground power and lights can be common on all gauges and
“daisy chained”
SPEEDOMETER OPERATION MENUS
With all of the features packed into NVU Phoenix platform Speedometers, we
have divided them into different menus. Your speedometer has a main “RUN”
Menu, and a “SETUP” menu. The RUN menu utilizes the features used during
normal operation. The SETUP menu stores all of the items that are setup
During the installation process. Items can be changed any time after, if desired,
And are separate to prevent inadvertently changing them during normal use.
RUN Menu Functions
Features can be accessed in the run menu during normal operation with the key
on. To scroll to the various displays in the OLED screen,use a short push or
tap of the remote button.
MAIN ODOMETER: Displays total distance travelled in miles or kilometers
depending on the model. This display does not show tenths.
TRIP METER: Displays current trip distance
Press and hold the button and the odometer will reset to 0. This display will
show tenths and will not have any zeros in front of the distance travelled.
6
RUN MENU-CONTINUED
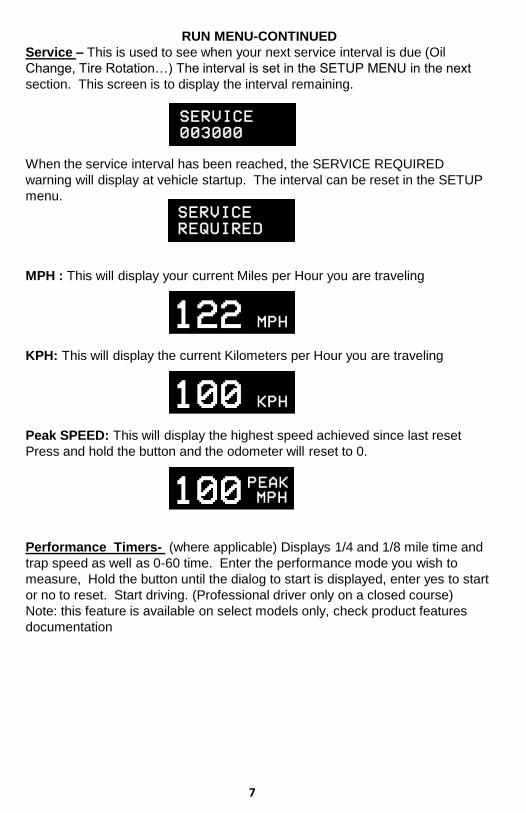
Service – This is used to see when your next service interval is due (Oil
Change, Tire Rotation…) The interval is set in the SETUP MENU in the next
section. This screen is to display the interval remaining.
When the service interval has been reached, the SERVICE REQUIRED
warning will display at vehicle startup. The interval can be reset in the SETUP
menu.
MPH : This will display your current Miles per Hour you are traveling
KPH: This will display the current Kilometers per Hour you are traveling
Peak SPEED: This will display the highest speed achieved since last reset
Press and hold the button and the odometer will reset to 0.
Performance Timers- (where applicable) Displays 1/4 and 1/8 mile time and
trap speed as well as 0-60 time. Enter the performance mode you wish to
measure, Hold the button until the dialog to start is displayed, enter yes to start
or no to reset. Start driving. (Professional driver only on a closed course)
Note: this feature is available on select models only, check product features
documentation
7

SETUP MENU
The setup menu contains menus used for functions not used during normal
operation. These features are in this sub-menu to avoid inadvertently changing
them during normal operation.
While the vehicle is off press and hold the button. Turn the vehicle on. The
odometer will display “SETUP MENU” Short pushes on the button will scroll
through these, long hold of the button will select the item. . To exit the SETUP
menu turn off the vehicle and restart. You may operate the speedometer in setup
mode if required the speedometer will operate to make fine tuning easier.
SERVICE RESET (Push and hold button to enter) This is used to reset service
interval if you have saved any (Oil Changes, Tire Rotations, Tune Ups…) You can
Set service intervals later in this menu (Service Set section).
Short push to scroll, long push to select
MANUAL CALIBRATE: (Push and hold button to enter) Manual calibration of the
speedometer is used to manually enter the pulse setting. You must know the
pulse setting of the speed signal to use this feature. Common uses are on OE
(pre-configured) senders, GM PCMs GPS senders. Note: using this method will
usually get you close enough and fine tuning or auto calibration may be required.
Although many speed senders are standard output, various gear ratios and tire
sizes will change the pulse settings depending on the vehicle build. The
speedometer will accept between 2,000-250,000 PPM. See next page for a chart
with common pulse settings.
To enter the manual calibration mode, hold the button until the current pulse
setting is shown. NVU ships all speedometer with a 16,000 PPM setting. If the
number shown is not 16,000 the speedometer has already been auto-calibrated by
the end user. If the pulse count shows zero, the previous autocal attempts
resulted in not receiving a speed signal, check you sender and input filter.
Continued, next page:
8

MANUAL CALIBRATE, CONTINUED:
The current pulses will be shown, with the first number highlighted. To change that
number short push scrolling will increase the digit. Stop on the number required
and hold the button to select the next number and follow the same sequence until
all numbers are correct and your are on the last digit to the right
The final dialog box will display asking to set. Select Y to accept, N to cancel.
Hold the button on Y and the setting will be saved. The speedometer is now
manually calibrated.
AUTO CALIBRATE
This feature allows the speedometer to automatically calibrate the speedometer
by driving a measured mile (or kilometer). See quick setup earlier in this manual
for instructions.
INPUT FILTER:
The digital filter in the speedometer is used to properly read the signal from
virtually any pulsed source. Enter the filter by holding the button. Scroll to the
filter selection desired, refer to the chart below. Select L, M or H (Low, Medium,
High). Hold the button to select FILTER, set yes or no, hold to select, saved! Will
display to indicate a successful session. You can change this at any time to adjust
as needed or to experiment for the best results for your application.
SOURCE TYPICAL PPM SIGNAL TYPE
INPUT FILTER
SET
GM PCM (ALL) 4,000
5-12V HALL
EFFECT 5V=M, 12V=H
AFTERMARKET 3
WIRE 16,000
12V HALL
EFFECT H
AFTERMARKET 2
WIRE 8,000 OR 16,000 AC SINEWAVE L
OE 2 WIRE (GM) 40,000 AC SINEWAVE L
NV4500 108,000 AC SINEWAVE L
TREMEC 16,000 OR 40,000
LOW AC
SINEWAVE L
GPS SENDER 8,000 OR 16,000 VARIES 5V=M, 12V=H
9

SETUP MENU, CONTINUED
OVERSPEED Available on AMP-Plug and commercial Units only. The overspeed
warning will display and flash an overspeed warning on the OLED display
To set the overspeed enter the setup menu and scroll to overspeed. Hold in the
button to enter the menu. The current setting will be displayed:
To change the overspeed setting, scroll to YES, then hold the button, the current
warning level will be shown with the first digit highlighted. To change the digit, tap
the button to increase the number. To move to the next number, hold the button
until the next is highlighted. Proceed with the same procedure until all 3 digits are
changed. On the last number hold until the display shows the speed and set?
YES. The saved speed will be shown. If there is an error you can select NO or
turn off the gauge and no changes will be made. To have the warning be
inoperable, set the warning level to zero.
SET ODOMETER:
The set odometer function is a one-time setting that the end user can change
during the first 100 miles of operation. The user can set the mileage to the
existing vehicle mileage to maintain a proper vehicle record. Once the mileage
passed 100 miles, the feature will no longer be available. To enter the set
odometer menu, scroll to set odometer and hold in the button. You will see one
time set ? yes. Hold in the button.
000000 will be shown with the first digit highlighted. To change the digit, tap the
button to increase the number. To move to the next number, hold the button until
the next is highlighted. Proceed with the same procedure until all digits are
changed. On the last number hold until the display shows the mileage set YES?
Hold in the button and SAVED! Will appear. Turn off and restart the vehicle,
mileage is now set.
10

SPEED SIGNALS AND TYPES OF SPEED SENDERS
Hall Effect speedometer signal sender and sensor (3-wire) Screw on and
integrated
Hall effect senders are named as such for the type of signal they produce, a hall
effect signal. This sender requires power and ground to operate. The benefeit of
this sender is it can be accurate at very low speeds as it has a power source. It is
generally identified by having 3 connections: Power, ground (sometimes through
the body and the signal output).
AC sinewave speed sender (2 wire) screw on and integrated
This type of sender, while more widely used in the 90s and early 2000's is simple
and reliable. It generates its own power and sends an AC sinewave signal to the
speedometer by teeth spinning past a coil with 2 wires. The sender requires one
wire to be grounded and the other is the signal. The wires can be reversed and the
same result will work just fine due to the fact that the sender waveform is a simple
sinewave. The downside is that due to the sender generating its own power by the
speed of the reluctor wheel (teeth) it can often lead to a weak signal at low
speeds. this is often seen when a speedometer will not operate until a certain
speed, say 25-30 MPH. NVU electronic programmable speedometers have built-in
sensitivity settings that can be changed to suit your signal strength. ONLY NVU
speedometers have this capability removing the need for converters, boxes or
additional equipment. One other disadvantage to this type of sender is the signal
cannot be split to send pluses to multiple devices such as speedometer and cruise
control.
PCM, ECU, Computer speed signal
Sounds complicated but this actually makes things easier. The speed signal is
already being picked up from the source ans being sent to the PCM (Powertrain
Control Module). The PCM then uses it as it needs and outputs a signal. The most
commonly used for builds are PCMs for GM engines. Regardless if its an LS, LT,
diesel 4, 6, or 8 cylinder GM PCMs always have 2 outputs (unless flashed by an
aftermarket company):
1. The speed signal is a 4,000 PPM output. You will still have to do your drive a
mile as the vehicles may have had different gears/tire sizes, but 4000 will get you
close.
2. Not related to speed; GM PCMs regardless of engine size or type output a 4
cylinder open collector tachometer signal. This means you need to use a 10-K
ohm pull-up resistor and set your tachometer to 4 cylinder.
11
TACHOMETER SIGNALS AND SET UP
IGNITION COIL Even today the most common ignition source is the traditional
coil. incorporates the coil and either points or electronic ignition all into the
distributor. Use the negative side of the coil when using a distributor style with
traditional points or electronic ignition . The signal is a high-voltage pulsed signal.
COIL ON PLUG (COP) Is essentially the same as a traditional coil with the
exception of each cylinder having its own individually fired coil. This setup is used
in conjunctions with PCMs. If you use the trigger on a COP the tachometer should
be set to 1 cylinder (2PPR) operation.
AFTERMARKET HIGH ENERGY IGNITION SYSTEM
Aftermarket distributors “MSD” boxes, CDI, etc. ALWAYS HAVE TACH
OUTPUT DO NOT CONNECT TO THE COIL OR DAMAGE WILL
RESULT. These types of systems have multiple high energy signals
going to the coil and will produce overvoltage feedback damaging to the
tachometer, this is why there is a separate tach signal
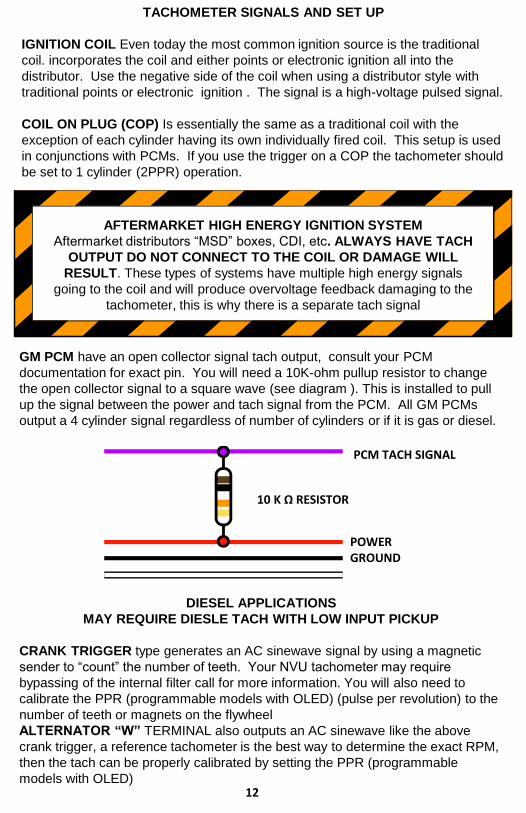
GM PCM have an open collector signal tach output, consult your PCM
documentation for exact pin. You will need a 10K-ohm pullup resistor to change
the open collector signal to a square wave (see diagram ). This is installed to pull
up the signal between the power and tach signal from the PCM. All GM PCMs
output a 4 cylinder signal regardless of number of cylinders or if it is gas or diesel.
DIESEL APPLICATIONS
MAY REQUIRE DIESLE TACH WITH LOW INPUT PICKUP
CRANK TRIGGER type generates an AC sinewave signal by using a magnetic
sender to “count” the number of teeth. Your NVU tachometer may require
bypassing of the internal filter call for more information. You will also need to
calibrate the PPR (programmable models with OLED) (pulse per revolution) to the
number of teeth or magnets on the flywheel
ALTERNATOR “W” TERMINAL also outputs an AC sinewave like the above
crank trigger, a reference tachometer is the best way to determine the exact RPM,
then the tach can be properly calibrated by setting the PPR (programmable
models with OLED)12
10 K Ω RESISTOR
PCM TACH SIGNAL
POWERGROUND

INSTALLATION BASICS:
-Use a minimum of 20 gauge insulated, stranded wire, all connections should
be connected with a crimp connection or solder and heat shrink.
-Keep speed signal wire(s) away from potential “noise” sources like ignition
wires, tach signal wires, fan motors, pumps etc.
-Studded speedometers use #8 studs, use applicable eye terminals for wiring.
-Use a maximum of 5A fuse for the entire cluster, this is usually already in your
fuse block
Commonize wiring, ground, power and lights can be common on all gauges and
“daisy chained”
OLED DISPLAY TACHOMETERS WITH ANALOG POINTERS
With all of the features packed into NVU Phoenix platform tachometers, we
have divided them into different menus. Your tach has a main “RUN”
Menu, and a “SETUP” menu. The RUN menu utilizes the features used during
normal operation. The SETUP menu stores all of the items that are setup
during the installation process. Items can be changed any time after, if desired,
and are separate to prevent inadvertently changing them during normal use.
RUN Menu Functions
Features can be accessed in the run menu during normal operation with the key
on. To scroll to the various displays in the OLED screen, use a short push or
tap of the remote button.
BLANK SCREEN: We have included a blank screen option to give the user an
opportunity to not display any information.
HOURMETER: Displays the total hours the vehicle has been running. This is
not resettable. This function is useful to track servicing the vehicle especially
when idling for long periods is common such as in commercial, fleet and
emergency vehicles, or when a speedometer or odometer is not used in the
vehicle.
13

RUN MENU-CONTINUED
SERVICE HOURS: User resettable hourmeter to track engine use similar to a
trip odometer. It is identified by the SH on the left side of the screen
This can be reset just like a trip odometer, while in this screen hold down the
set button until zero is displayed. The hours will count up from there. This can
be reset at any time and can also be used for tracking time to a destination as
well as servicing the vehicle.
PEAK RPM is displayed on the following screen. This will store and allow the
user to view the peak RPM achieved since the last reset.
This can be reset any time by holding in the programming button until all zeros
are displayed. This may be reset at any time and the last peak RPM will be
stored until reset.
BOOT or SETUP MENU. This area of the tachometer is used during set-up
and any of the settings can be changed at any time. The items in the setup
menu are “hidden” in this sub-menu to avoid inadvertently changing settings
during normal use. To enter the setup menu, hold in the button while turning
on the key (you do not have to start the vehicle if you do not want to). The
setup menu screen will be displayed. To exit the setup menu, turn the key off,
and restart normally.
14
BOOT MENU, CONTINUED
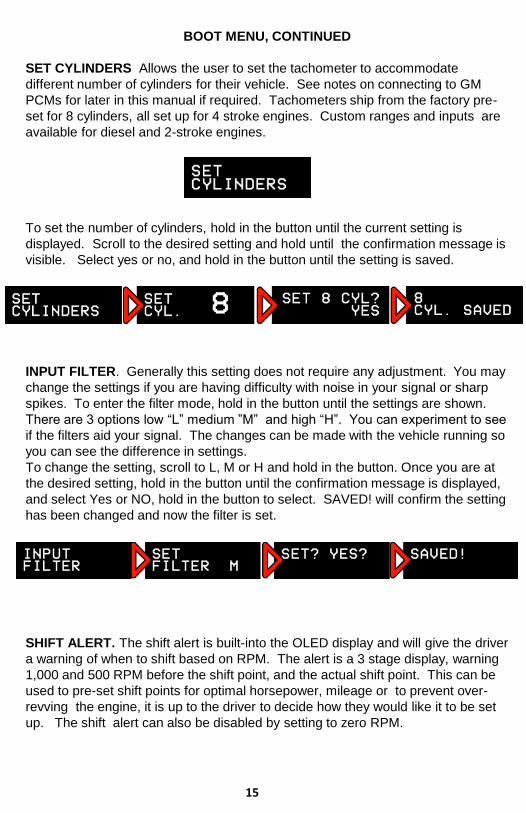
SET CYLINDERS Allows the user to set the tachometer to accommodate
different number of cylinders for their vehicle. See notes on connecting to GM
PCMs for later in this manual if required. Tachometers ship from the factory pre-
set for 8 cylinders, all set up for 4 stroke engines. Custom ranges and inputs are
available for diesel and 2-stroke engines.
To set the number of cylinders, hold in the button until the current setting is
displayed. Scroll to the desired setting and hold until the confirmation message is
visible. Select yes or no, and hold in the button until the setting is saved.
INPUT FILTER. Generally this setting does not require any adjustment. You may
change the settings if you are having difficulty with noise in your signal or sharp
spikes. To enter the filter mode, hold in the button until the settings are shown.
There are 3 options low “L” medium ”M” and high “H”. You can experiment to see
if the filters aid your signal. The changes can be made with the vehicle running so
you can see the difference in settings.
To change the setting, scroll to L, M or H and hold in the button. Once you are at
the desired setting, hold in the button until the confirmation message is displayed,
and select Yes or NO, hold in the button to select. SAVED! will confirm the setting
has been changed and now the filter is set.
SHIFT ALERT. The shift alert is built-into the OLED display and will give the driver
a warning of when to shift based on RPM. The alert is a 3 stage display, warning
1,000 and 500 RPM before the shift point, and the actual shift point. This can be
used to pre-set shift points for optimal horsepower, mileage or to prevent over-
revving the engine, it is up to the driver to decide how they would like it to be set
up. The shift alert can also be disabled by setting to zero RPM.
15
BOOT MENU, CONTINUED
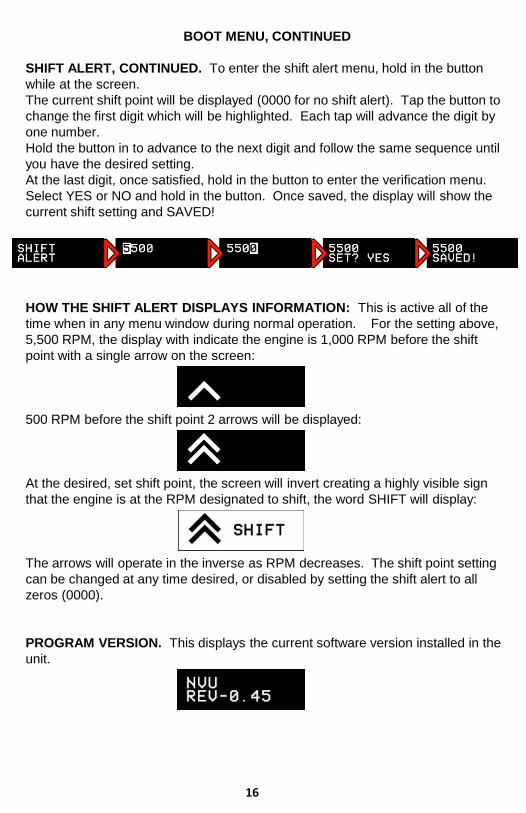
SHIFT ALERT, CONTINUED. To enter the shift alert menu, hold in the button
while at the screen.
The current shift point will be displayed (0000 for no shift alert). Tap the button to
change the first digit which will be highlighted. Each tap will advance the digit by
one number.
Hold the button in to advance to the next digit and follow the same sequence until
you have the desired setting.
At the last digit, once satisfied, hold in the button to enter the verification menu.
Select YES or NO and hold in the button. Once saved, the display will show the
current shift setting and SAVED!
HOW THE SHIFT ALERT DISPLAYS INFORMATION: This is active all of the
time when in any menu window during normal operation. For the setting above,
5,500 RPM, the display with indicate the engine is 1,000 RPM before the shift
point with a single arrow on the screen:
500 RPM before the shift point 2 arrows will be displayed:
At the desired, set shift point, the screen will invert creating a highly visible sign
that the engine is at the RPM designated to shift, the word SHIFT will display:
The arrows will operate in the inverse as RPM decreases. The shift point setting
can be changed at any time desired, or disabled by setting the shift alert to all
zeros (0000).
PROGRAM VERSION. This displays the current software version installed in the
unit.
16

ANALOG MINOR GAUGE SENDERS AND SIGNALS
Senders are the part of the gauge system that send a signal to the gauge to be read, and then displayed on the dial face. There are 4 types of senders, resistance bases pressure, temperature and level (fuel), voltage input pressure transducers, and pulsed speed inputs.
TEMPERATURE SENDERS Signal type is resistance to ground. Resistance DECREASES as temperature rises. All NVU Phoenix temperature gauges use a High-Match temperature sender. The sender will read between 450-500 ohms at room temperature. Both low and high read gauges use the same sender.
PRESSURE SENDERS are resistance to ground signal. All NVU pressure senders are 240-33 ohm, 0-100 PSI regardless of the pressure range.
PRESSURE TRANSDUCERS Send a voltage signal to the gauge to be read and are not senders.. Typically a linear .5V-4.5V signal can be read by any transducer gauge. There are typically 3 wires to the transducer, signal, ground and 5V power (from the gauge or module). There are some 12V transducers on the market. These are powered by 12V but still send out a .5-4.5 V range. The 12V style should be powered by vehicle voltage. 5V transducers require 5V power (from the gauge itself) and connecting to 12V will damage the unit
FUEL LEVEL SENDERS are also resistance to ground. A float arm rotates on a rheostat in the fuel tank and changes the resistance as the float arm moves. This is also available in a tube type sender. The ranges can be various depending on the OE manufacturer. You ALWAYS need to match the fuel gauge to the sender. NVU offers a universal fit 240-33 ohm and 0-90 ohm unit for aftermarket applications. The senders are universal and mount from the top of the tank and have a universal 5-hole flange. These are not intended to replace the stock sender for the tank which was specially manufactured for that tank size/shape/orientation. Use a stock sender if at all possible to make things easier on yourself. Please see DIP switch settings in this booklet (PAGE 34) for a full listing of stock ranges.
17

AUXILLARY INPUTS
Phoenix platform instruments feature add-on functions that can be displayed directly
on the OLED screen as needed. This can be accomplished by adding an NVU
pressure or temperature sender. Custom options are available, feel free to contact
us for your needs.
How it works:
Every speedometer (standalone and 3-1) has one auxiliary input wire on the harness.
Please see the wiring diagram for that particular unit/kit configuration.
Every Tachometer (standalone and 3-1) and speedo/tach combo gauge has 2
auxiliary inputs. Each is on the AMP plug. Please see the wiring diagram for that
particular unit/kit configuration.
All 3 inputs have the same features and menu settings. There are 3 types of inputs
standard and all are resistance to ground.
1. TEMPERATURE. All standard auxiliary inputs for temperature run from a
standard NVU hi-match temperature sender part number 99320-04. You must use
this sender to monitor any temp readings. This sender is separate from any other
sender you are using to monitor any other setting on the gauge itself. (You cannot
“split” a sender signal.). Custom ranges are available at additional cost-contact us for
more details.
2. PRESSURE All standard axillary inputs for pressure operate from a standard NVU
pressure sender 0-100 PSI, 240-33 ohm part number 90100-04. This range works
well for anything that uses at least 40% of the scale. (no less than 40 PSI). If you
need a different range, custom inputs are available, call us for more details.
Sender grounds: The above sender operate by varying the resistance to ground
through the base of the sender (threads). If you are monitoring the temperature or
pressure by attaching to a non-metal surface (plastic, rubber or insulated line) You
will require a floating ground sender. This has an additional terminal for grounding
the unit.
3. SHIFTER NVU shift inputs operate on resistance to ground. Please see part
number 99440-04 shift input terminal for exact specifications for shift inputs. This
terminal box accepts ground signals from various manufacturer’s shift drivers and
converts the signal to be compatible with any NVU Phoenix instrument with an OLED
display.
18

SETTING UP THE AUXILLARY INPUTS
Install sender as needed, run wire (20 ga min) to the appropriate input wire.
To set up the functions using the OLED display screen, the vehicle does not
need to be running.
Enter the SETUP menu by holding in the programming button while turning on
the key.
Scroll to AUX INPUT SETUP or AUX 2 SETUP
Speedometers use AUX Input (Green wire) ONLY
Tachometers and speedo/tachs use AUX INPUT (Green/yellow) and AUX 2
(Yellow wire)
Customs and specialty instruments please check your wiring diagram.
Once you have entered the specified input setting, scroll to the desired reading
you would like to display on the OLED screen.
19

AUXILLARY INPUTS CONTINUED
Once you are on the desired function to be displayed, press and hold the
programming button until the INPUT SET screen is displayed.
This can be changed at any time, just follow the preceeding setup process.
You may now continue on to other programming features or you can restart the
instrument. You must turn the power off and nd re-cycle the power before
setting will take effect. You do not have to start the vehicle, just simply turn the
key off and back on again.
NORMAL OPERATION
The auxiliary inputs are designed to be just that, additional instrument features
that you may or may not need to be viewing at all times. To view a particular
input while using the instruments, tap the programming button to scroll to the
display you would like to view. It will remain visible until the button is depressed
again.
MORE INFORMATION
The additional inputs are designed to measure temperature and pressure using
NVU (or equivalent) senders. The temperature or pressure of virtually anything
can be measured, for example Trans temp is shown on the display with a “T”
this can be for anything you like, axles, trans, t-case, its up to you, so keep your
mind open when it comes to the vitals you would like to watch.
CUSTOM OPTIONS:
Need something special? Custom range? Custom display? We can do that for
you. Just contact a factory rep for more details.
20

THE BACK OF YOUR GAUGE PROGRAMMABLE WITH OLED SCREEN AND PORTSAll programmable speedometers and tachometers with an OLED screen of any size are master gauges that can drive minor functions. The minor gauges are driven directly by the master and no additional connections are required.
DIP SWITCHES: Used to adjust fuel range on speedometers. See fuel gauge chart later in this booklet. Remove the black plastic cover to access this if needed. See DIP switch settings later in this booklet
AMP PLUG SOCKET :USE the NVU universal AMP plug and wire as shown in the proper diagram. NVU uses the same plug for all gauges so some wires may not be used in your application.
LIGHT SOCKETS:The sockets hold NVU bright white LED 194 bulbs. They are replaceable if needed. If you need to replace a bulb, the LEDs are polarity sensitive and have to be installed properly to operate. If you find the bulb will not light, turn it 180 degrees and reinstall.LEDS are not dimmable using a standard dimmer. Wire into your parking lamp circuit and use an LED dimmer if required
DRIVER SOCKETS:This applies to 5 and 6 gauge kits with NVU PNP technology. 2, 3 and 4 gauge kits will not use the driver features. Refer to each wiring diagram. Plug the appropriate gauge into the socket and it will function through the master driver unit.
The B, C and D pins are used to connect the 2-1/16” gauges through the master gauge. All functions and lighting are done through this plug. Refer to the wiring diagram for each kit for proper wiring. Below is each plug’s function and its corresponding input wire color. Pins C and D are the same on the speedo and tach.
SPEEDOMETER:B: PROGRAMMABLE FUEL (GREEN WIRE) Connects to your fuel sender. The input is programmable, please see the fuel gauge DIP switch settings on page 34C: WATER TEMPERATURE (YELLOW/GREEN WIRE) Connects to the NVU temperature sender.D: OIL PRESSURE (YELLOW WIRE) Connects to NVU pressure sender .
TACHOMETER:B: VOLTS No input wire required, internal to gaugeC: WATER TEMPERATURE (YELLOW/GREEN WIRE) Connects to the NVU temperature sender.D: OIL PRESSURE (YELLOW WIRE) Connects to NVU pressure sender .
21

6 GAUGE KIT PROGRAMMABLE SPEEDO AND TACHOMETER WITH OLED SCREENS
MASTER GAUGE WIRINGAll programmable speedometers and tachometers with an OLED screen of any size are master gauges that can drive minor functions. The minor gauges are driven directly by the master and no additional connections are required. Wire as shown below and plug the minor gauges into their appropriate plug (B,C,D) on the back of the master gauge.
22

MINOR GAUGE WIRING 6 GAUGE KIT
All programmable speedometers and tachometers with an OLED screen of any size are master gauges that can drive minor functions. The minor gauges are driven directly by the master and no additional connections are required. Wire as shown below and plug the minor gauges into their appropriate plug (B,C,D) on the back of the master gauge.
Follow the diagram below to properly plug the minor gauges into the master units.
23
.The B, C and D pins are used to connect the 2-1/16” gauges through the master gauge. All functions and lighting are done through this plug. Refer to the wiring diagram for each kit for proper wiring. Below is each plug’s function and its corresponding input wire color. Pins C and D are the same on the speedo and tach.
SPEEDOMETER:B: PROGRAMMABLE FUEL (GREEN WIRE) Connects to your fuel sender. The input is programmable, please see the fuel gauge DIP switch settings later on page 34C: WATER TEMPERATURE (YELLOW/GREEN WIRE) Connects to the NVU temperature sender.
TACHOMETER:B: VOLTS No input wire required, internal to gaugeD: OIL PRESSURE (YELLOW WIRE) Connects to NVU pressure sender .
SPEEDOMETER
TEMP/FUEL
TACHOMETER
VOLT/PRESS
C: TEMPB: FUEL
SET RANGE ON SPEEDO
DIP SWITCHES
B: VOLT D: PRESS
24
1 2 3 4 5 6
7 8 9 10 11 12
12-PIN AMP PLUG
PLUG #174045-2
PIN #173681-1
TEMP SEND
PRESS SEND
SPEEDOMETER
TEMP/FUEL
REMOTE BUTTONS ONE SIDETO SPEEDO, ONE SIDE TO
GROUND. MOMENTARY ON
GROUND
BATTERY IGNITION FUSE BLOCK
LIGHT SWITCH
DIMMER
FUEL SEND
TYPICA L 3-WIRE
SPEED SENDER
TYPICA L 2-WIRE
SPEED SENDER,
VSS, ECU OUTPUTBLACK-CHASSIS GROUND
BLACK-CHASSIS GROUND
RED- 12V SWITCHED
WHITE OR GREYTO SPEEDOMETER
SIGNAL INPUT
PCM/GPS
PIN COLOR FUNCTION
1 RED 12V+ SWITCHED 1A
2 GR/YEL TEMP SENDER
3 ORANGE SPEED SIGNAL
4 YELLOW OIL PRESS
5 TAN HI BEAM 12V+
6 WHITE LIGHTING
7 BLACK GROUND
8 VIOLET NOT USED
9 GREY RT. TURN 12v+
10 BLUE LEFT TURN 12V+
11 GREEN FUEL
12 BROWN PROG BUTTON
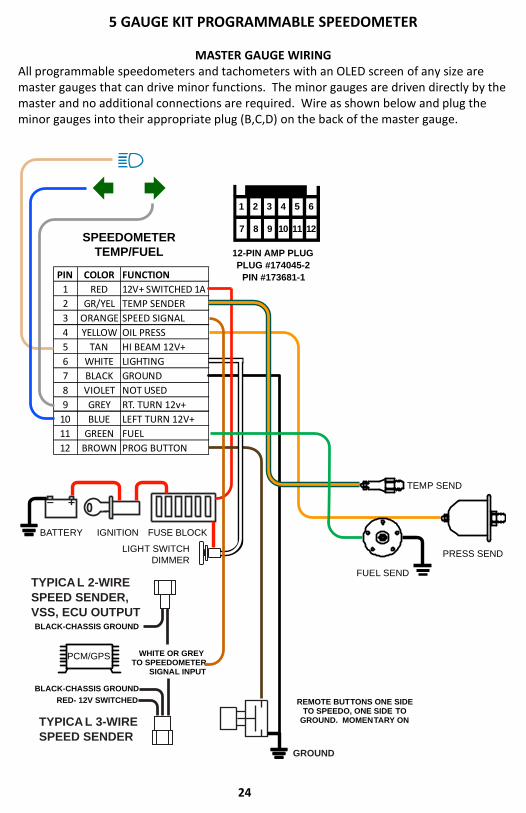
5 GAUGE KIT PROGRAMMABLE SPEEDOMETER
MASTER GAUGE WIRINGAll programmable speedometers and tachometers with an OLED screen of any size are master gauges that can drive minor functions. The minor gauges are driven directly by the master and no additional connections are required. Wire as shown below and plug the minor gauges into their appropriate plug (B,C,D) on the back of the master gauge.

25
4-PIN CONNECTOR
MINOR GAUGE WIRING 5 GAUGE KIT PROGRAMMABLE SPEEDOMETER
All programmable speedometers and tachometers with an OLED screen of any size are master gauges that can drive minor functions. The minor gauges are driven directly by the master and no additional connections are required. Wire as shown below and plug the minor gauges into their appropriate plug (B,C,D) on the back of the master gauge.
Follow the diagram below to properly plug the minor gauges into the master units.
C: TEMPB: FUEL D: PRESS
RED:12V SWITCHED POWER
BLACK:GROUND
WHITE: LIGHTS 12V +
GREEN: NOT USED
3-PIN PLUG:
NOT USED
VOLTMETERSPEEDOMETER
FUEL/TEMP/PRESS
The voltmeter is a standalone gauge that runs independently from the master gauge system. The connections can be communized as needed for installation. Voltage is read through the gauge circuitry, so no sender connection is required.

THE BACK OF YOUR GAUGE PROGRAMMABLE WITH OLED SCREEN WITHOUT PORTSAll programmable speedometers and tachometers with an OLED screen of any size are WITHOUT PORTS ON THE BACK Are the same units as with ports except the plugs are not used on this particular model. This is usually in a 2 gauges kit or a standalone order where driven instruments are not used. The programming, setup and features are the same on all models of NVU instruments with an OLED screen.
DIP SWITCHES: Used to adjust fuel range on speedometers with ports, quad gauges, dual gauges and 3-1 gauges. Please use the driven unit with the fuel function to set the switches. See DIP switch settings on page 34.
AMP PLUG SOCKET :USE the NVU universal AMP plug and wire as shown in the proper diagram. NVU uses the same plug for all gauges so some wires may not be used in your application.
LIGHT SOCKETS:The sockets hold NVU bright white LED 194 bulbs. They are replaceable if needed. If you need to replace a bulb, the LEDs are polarity sensitive and have to be installed properly to operate. If you find the bulb will not light, turn it 180 degrees and reinstall.LEDS are not dimmable using a standard dimmer. Wire into your parking lamp circuit and use an LED dimmer if required
26
NO DRIVER PORTS:Standalone gauges (speedometers, tachometers, quad gauges and 3-1 sets do not have driver ports. The ports mentioned previously are used on kits with remote 2-1/16” gauges. All features are shared between both models.
STANDALONE GAUGES NOT IN KITS:If installing a gauge normally in a kit (quad gauge, etc) wire as shown in the diagram, ignoring the other gauge(s) in the kit. All standalone instruments operate on their own independently from one another.

27
SPEEDOMETER AND QUAD GAUGE KITBoth the speedometer and quad gauges are standalone units that are internally driven. If your speedometer has data output plugs on the back these are not required for installation. Below is a schematic of how the wiring is typically accomplished.FUEL GAUGE SET-UP: The quad gauge features a programmable input that can be set any time with the DIP switches on the back. Please see DIP switch setting on page 34.
1 2 3 4 5 6
7 8 9 10 11 12
12-PIN AMP PLUG
PLUG #174045-2
PIN #173681-1
TEMP SEND
PRESS SEND
SPEEDOMETER QUAD GAUGE
REMOTE BUTTONS ONE SIDETO SPEEDO, ONE SIDE TO
GROUND. MOMENTARY ON
GROUND
BATTERY IGNITION FUSE BLOCK
LIGHT SWITCH
DIMMER
FUEL SEND
TYPICA L 3-WIRE
SPEED SENDER
TYPICA L 2-WIRE
SPEED SENDER,
VSS, ECU OUTPUTBLACK-CHASSIS GROUND
BLACK-CHASSIS GROUND
RED- 12V SWITCHED
WHITE OR GREYTO SPEEDOMETER
SIGNAL INPUT
PCM/GPS
PIN COLOR FUNCTION
1 RED 12V+ SWITCHED 1A
2 GR/YEL NOT USED
3 ORANGE SPEED SIGNAL
4 YELLOW AUX 1
5 TAN HI BEAM 12V+
6 WHITE LIGHTING
7 BLACK GROUND
8 VIOLET NOT USED
9 GREY RT TURN 12v+
10 BLUE LEFT TURN 12V+
11 GREEN NOT USED
12 BROWN PROG BUTTON
PIN COLOR FUNCTION
1 RED 12V+ SWITCHED 1A
2 GR/YEL TEMP SENDER
3 ORANGE NOT USED
4 YELLOW OIL PRESS SENDER
5 TAN NOT USED
6 WHITE LIGHTING
7 BLACK GROUND
8 VIOLET NOT USED
9 GREY NOT USED
10 BLUE NOT USED
11 GREEN FUEL LEVEL
12 BROWN NOT USED

28
SPEEDOMETER/TACHOMETER COMBINATION AND QUAD GAUGE KITBoth the speedometer and quad gauges are standalone units that are internally driven. If your speedometer has data output plugs on the back these are not required for installation. Below is a schematic of how the wiring is typically accomplished.SPEEDO/TACH SETUP: The calibration and setup for the speedo/tach gauge is the same as the speedometers and tachometers only the set-up menus have been combined into one unit.FUEL GAUGE SET-UP: The quad gauge features a programmable input that can be set any time with the DIP switches on the back. Please see DIP switch setting on page 34.
SEE TACH SIGNAL SECTION OF THIS MANUAL. DO NOT CONNECT TO HIGH ENERGY SIGNAL SYSTEM DIRECTLY. CALL US FIRST WITH ANY QUESTIONS
1 2 3 4 5 6
7 8 9 10 11 12
12-PIN AMP PLUG
PLUG #174045-2
PIN #173681-1
TEMP SEND
PRESS SEND
SPEEDOMETER QUAD GAUGE
REMOTE BUTTONS ONE SIDETO SPEEDO, ONE SIDE TO
GROUND. MOMENTARY ON
GROUND
BATTERY IGNITION FUSE BLOCK
LIGHT SWITCH
DIMMER
FUEL SEND
TYPICA L 3-WIRE
SPEED SENDER
TYPICA L 2-WIRE
SPEED SENDER,
VSS, ECU OUTPUTBLACK-CHASSIS GROUND
BLACK-CHASSIS GROUND
RED- 12V SWITCHED
WHITE OR GREYTO SPEEDOMETER
SIGNAL INPUT
PCM/GPS
PIN COLOR FUNCTION
1 RED 12V+ SWITCHED 1A
2 GR/YEL NOT USED
3 ORANGE SPEED SIGNAL
4 YELLOW AUX 1
5 TAN HI BEAM 12V+
6 WHITE LIGHTING
7 BLACK GROUND
8 VIOLET TACH SIGNAL
9 GREY RT TURN 12v+
10 BLUE LEFT TURN 12V+
11 GREEN NOT USED
12 BROWN PROG BUTTON
PIN COLOR FUNCTION
1 RED 12V+ SWITCHED 1A
2 GR/YEL TEMP SENDER
3 ORANGE NOT USED
4 YELLOW OIL PRESS SENDER
5 TAN NOT USED
6 WHITE LIGHTING
7 BLACK GROUND
8 VIOLET NOT USED
9 GREY NOT USED
10 BLUE NOT USED
11 GREEN FUEL LEVEL
12 BROWN NOT USED
PCM/CDI

29
3-1 GAUGE KIT WIRING DIAGRAMBoth the speedometer and quad gauges are standalone units that are internally driven. Below is a typical wiring setup of how the 2 gauges are wired in a set. Indicators are dead fronted (invisible when off) and powered by 12V+.
FUEL GAUGE SET-UP: The Tachometer features a programmable input that can be set any time with the DIP switches on the back. Please see DIP switch setting on page 34
SEE TACH SIGNAL SECTION OF THIS MANUAL. DO NOT CONNECT TO HIGH ENERGY SIGNAL SYSTEM DIRECTLY. CALL US FIRST WITH ANY QUESTIONS
1 2 3 4 5 6
7 8 9 10 11 12
12-PIN AMP PLUGPLUG #174045-2PIN #173681-1
TEMP SEND
PRESS SEND
SPEEDOMETER
TEMP/PRESS
TACHOMETER
VOLT/FUEL
REMOTE BUTTONS ONE SIDETO SPEEDO, ONE SIDE TO
GROUND. MOMENTARY ON
GROUND
BATTERY IGNITION FUSE BLOCK
LIGHT SWITCH
DIMMER
FUEL SEND
PCM/CDI
TYPICA L 3-WIRE
SPEED SENDER
TYPICA L 2-WIRE
SPEED SENDER,
VSS, ECU OUTPUTBLACK-CHASSIS GROUND
BLACK-CHASSIS GROUND
RED- 12V SWITCHED
WHITE OR GREYTO SPEEDOMETER
SIGNAL INPUT
PCM/GPS
PIN COLOR FUNCTION
1 RED 12V+ SWITCHED 1A
2 GR/YEL TEMP SENDER
3 ORANGE SPEED SIGNAL
4 YELLOW OIL PRESS SENDER
5 TAN HI BEAM 12V+
6 WHITE LIGHTING
7 BLACK GROUND
8 VIOLET NOT USED
9 GREY RED WARN 12v+
10 BLUE LEFT TURN 12V+
11 GREEN * AUX INPUT *
12 BROWN PROG BUTTON
PIN COLOR FUNCTION
1 RED 12V+ SWITCHED 1A
2 GR/YEL * AUX INPUT 1 *
3 ORANGENOT USED
4 YELLOW * AUX INPUT 2*
5 TAN WARNING 12V+
6 WHITE LIGHTING
7 BLACK GROUND
8 VIOLET TACH SIGNAL
9 GREY RT. TURN 12V+
10 BLUE CHK ENGINE 12V+
11 GREEN FUEL LEVEL
12 BROWN PROG BUTTON
COIL

30
1 2 3 4 5 6
7 8 9 10 11 12
12-PIN AMP PLUG
PLUG #174045-2
PIN #173681-1
SPEEDOMETER
REMOTE BUTTONS ONE SIDETO SPEEDO, ONE SIDE TO
GROUND. MOMENTARY ON
GROUND
BATTERY IGNITION FUSE BLOCK
LIGHT SWITCH
DIMMER
TYPICA L 3-WIRE
SPEED SENDER
TYPICA L 2-WIRE
SPEED SENDER,
VSS, ECU OUTPUTBLACK-CHASSIS GROUND
BLACK-CHASSIS GROUND
RED- 12V SWITCHED
WHITE OR GREYTO SPEEDOMETER
SIGNAL INPUT
PCM/GPS
PIN COLOR FUNCTION
1 RED 12V+ SWITCHED 1A
2 GR/YEL NOT USED
3 ORANGE SPEED SIGNAL
4 YELLOW AUX 1
5 TAN HI BEAM 12V+
6 WHITE LIGHTING
7 BLACK GROUND
8 VIOLET NOT USED
9 GREY RT TURN 12v+
10 BLUE LEFT TURN 12V+
11 GREEN NOT USED
12 BROWN PROG BUTTON
PROGRAMMABLE SPEEDOMETER (STANDALONE)The speedometer is a standalone unit that is internally driven. If your speedometer has data output plugs on the back these are not required for installation. Below is a schematic of how the wiring is typically accomplished. The indicators are 12V+ powered and deadfronted (invisible when off)

31
PROGRAMMABLE TACHOMETER WITH OLED SCREEN (STANDALONE)The tachometer is a standalone unit that is internally driven. If your speedometer has data output plugs on the back these are not required for installation. Below is a schematic of how the wiring is typically accomplished.
1 2 3 4 5 6
7 8 9 10 11 12
12-PIN AMP PLUG
PLUG #174045-2
PIN #173681-1TACHOMETER
REMOTE BUTTONS ONE SIDETO SPEEDO, ONE SIDE TO
GROUND. MOMENTARY ON
GROUND
BATTERY IGNITION FUSE BLOCK
LIGHT SWITCH
DIMMER
PCM/CDI
PIN COLOR FUNCTION
1 RED 12V+ SWITCHED 1A
2 GR/YEL AUX1
3 ORANGENOT USED
4 YELLOW OIL PRESS
5 TAN CHK ENGINE 12V+
6 WHITE LIGHTING
7 BLACK GROUND
8 VIOLET TACH SIGNAL
9 GREY WARN LIGHT 12V+
10 BLUE WARN LIGHT 12V+
11 GREEN AUX2
12 BROWN PROG BUTTON
SEE TACH SIGNAL SECTION OF THIS MANUAL. DO NOT CONNECT TO HIGH ENERGY SIGNAL SYSTEM DIRECTLY. CALL US FIRST WITH ANY QUESTIONS

32
SPEEDOMETER/TACHOMETER COMBINATIONThe speedo/tach combination is internally driven and requires no additional plugs or modules to run.. If your speedometer has data output plugs on the back these are not required for installation. Below is a schematic of how the wiring is typically accomplished.SPEEDO/TACH SETUP: The calibration and setup for the speedo/tach gauge is the same as the speedometers and tachometers only the set-up menus have been combined into one unit.
SEE TACH SIGNAL SECTION OF THIS MANUAL. DO NOT CONNECT TO HIGH ENERGY SIGNAL SYSTEM DIRECTLY. CALL US FIRST WITH ANY QUESTIONS
1 2 3 4 5 6
7 8 9 10 11 12
12-PIN AMP PLUG
PLUG #174045-2
PIN #173681-1
REMOTE BUTTONS ONE SIDETO SPEEDO, ONE SIDE TO
GROUND. MOMENTARY ON
GROUND
BATTERY IGNITION FUSE BLOCK
LIGHT SWITCH
DIMMER
TYPICA L 3-WIRE
SPEED SENDER
TYPICA L 2-WIRE
SPEED SENDER,
VSS, ECU OUTPUTBLACK-CHASSIS GROUND
BLACK-CHASSIS GROUND
RED- 12V SWITCHED
WHITE OR GREYTO SPEEDOMETER
SIGNAL INPUT
PCM/GPS
PIN COLOR FUNCTION
1 RED 12V+ SWITCHED 1A
2 GR/YEL NOT USED
3 ORANGE SPEED SIGNAL
4 YELLOW AUX 1
5 TAN HI BEAM 12V+
6 WHITE LIGHTING
7 BLACK GROUND
8 VIOLET TACH SIGNAL
9 GREY RT TURN 12v+
10 BLUE LEFT TURN 12V+
11 GREEN NOT USED
12 BROWN PROG BUTTON
PCM/CDI
SPEEDOMETER / TACHOMETER
COMBINATION
33
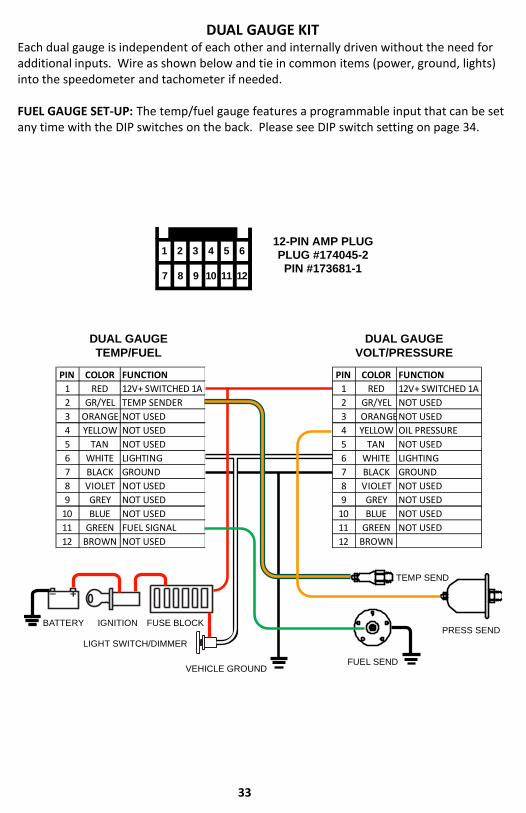
DUAL GAUGE KITEach dual gauge is independent of each other and internally driven without the need for additional inputs. Wire as shown below and tie in common items (power, ground, lights) into the speedometer and tachometer if needed.
FUEL GAUGE SET-UP: The temp/fuel gauge features a programmable input that can be set any time with the DIP switches on the back. Please see DIP switch setting on page 34.
1 2 3 4 5 6
7 8 9 10 11 12
12-PIN AMP PLUGPLUG #174045-2PIN #173681-1
TEMP SEND
PRESS SEND
DUAL GAUGE
TEMP/FUEL
DUAL GAUGE
VOLT/PRESSURE
BATTERY IGNITION FUSE BLOCK
LIGHT SWITCH/DIMMER
FUEL SEND
PIN COLOR FUNCTION
1 RED 12V+ SWITCHED 1A
2 GR/YEL TEMP SENDER
3 ORANGE NOT USED
4 YELLOW NOT USED
5 TAN NOT USED
6 WHITE LIGHTING
7 BLACK GROUND
8 VIOLET NOT USED
9 GREY NOT USED
10 BLUE NOT USED
11 GREEN FUEL SIGNAL
12 BROWN NOT USED
PIN COLOR FUNCTION
1 RED 12V+ SWITCHED 1A
2 GR/YEL NOT USED
3 ORANGENOT USED
4 YELLOW OIL PRESSURE
5 TAN NOT USED
6 WHITE LIGHTING
7 BLACK GROUND
8 VIOLET NOT USED
9 GREY NOT USED
10 BLUE NOT USED
11 GREEN NOT USED
12 BROWN
VEHICLE GROUND

34
SENDER TYPE MAKE/YEAR RANGE E-F Ω 1 2 3 4
EARLY GM/FORD PRE 65 0-30 OFF OFF ON OFF
GM 65-89 0-90 OFF ON OFF OFF
GM 90S-UP 40-250 OFF ON ON OFF
FORD/AMC/MOPAR 65-86 73-10 OFF OFF OFF ON
FORD 87-UP 20-145 ON ON OFF OFF
UNIVERSAL/SW 240-33 ON OFF OFF OFF
CUSTOM/EARLY FORD 168-15 ON OFF ON OFF
ANALOG INPUT INPUT Ω 1 2 3 4
OIL PRESS 0-100 PSI 240-33 OFF OFF OFF OFF
WATER TEMPERATURE 500-19 OFF OFF ON ON
OIL/TRANS TEMP 500-19 OFF ON OFF ON
VOLTAGE 10-18V OFF ON ON ON
VOLTAGE INPUT INPUT Ω 1 2 3 4
TRANSDUCER .5-4.5V ON OFF OFF ON
0-5 INPUT (AFR, OTHER) 0-5V ON OFF ON ON
DIP SWITCHESDIP switches are used on the back of some of the gauges to set ranges for your application. This can be changes at any time but in general They are set at the factory or on-site during installation and are left in that position for the life of the vehicle. When setting DIP switches, ON should be in the up position.
FUEL GAUGE:All fuel gauges are programmable by the DIP switches on the driver gauge or the 2-1/16” gauge itself. All fuel gauges and ranges are identical on all instruments. Set the switches as shown in the chart below for your application.
2-1/16” ANALOG MINOR GAUGESThis applies to all standalone 2-1/16” gauges. Driven instruments are adjustable at the master gauge on the back under the plug. On the back of the 2-1/16”gauge the switches are visible without removing any covers/plugs. Analog instruments refer to fuel, temperature, volts and pressure that use a traditional resistance to ground sender (not a transducer). All gauges are set at the factory to match the gauge dial range. The only time the end user will need to change the settings is for the fuel range. Use the settings below as a reference if needed.
2-1/16” 0-5V INPUT MINOR GAUGESThis applies to all standalone 2-1/16” gauges with a 0-5 or .5-4.5V input (transducer). The instrument will have BOTH a 4 and a 3 pin plug. The 3 pin plug will power your transducer. Please refer to the chart below for input DIP switch settings required for your application.

35
FUEL SEND
TEMP SEND
PRESS SEND
--OR--
--OR--
RED: 12V SWITCHED POWER
BLACK: GROUND
WHITE: LIGHTS 12V +
GREEN: SENDER
4-PIN CONNECTOR
SENDER TYPE MAKE/YEAR RANGE E-F Ω 1 2 3 4
EARLY GM/FORD PRE 65 0-30 OFF OFF ON OFF
GM 65-89 0-90 OFF ON OFF OFF
GM 90S-UP 40-250 OFF ON ON OFF
FORD/AMC/MOPAR 65-86 73-10 OFF OFF OFF ON
FORD 87-UP 20-145 ON ON OFF OFF
UNIVERSAL/SW 240-33 ON OFF OFF OFF
CUSTOM/EARLY FORD 168-15 ON OFF ON OFF
ANALOG INPUT INPUT Ω 1 2 3 4
OIL PRESS 0-100 PSI 240-33 OFF OFF OFF OFF
WATER TEMPERATURE 500-19 OFF OFF ON ON
OIL/TRANS TEMP 500-19 OFF ON OFF ON
VOLTAGE 10-18V OFF ON ON ON
ANALOG INPUT MINOR GAUGESDIP switches are used on the back of some of the gauges to set ranges for your application. This can be changes at any time but in general They are set at the factory or on site during installation and are left in that position for the life of the vehicle. When setting DIP switches, ON should be in the up position.
FUEL GAUGE:All fuel gauges are programmable by the DIP switches on the driver gauge or the 2-1/16” gauge itself. All fuel gauges and ranges are identical on all instruments. Set the switches as shown in the chart below for your application.
DIP-SWITCH ACCESS

36
VOLTAGE INPUT INPUT Ω 1 2 3 4
TRANSDUCER .5-4.5V ON OFF OFF ON
0-5 INPUT (AFR, OTHER) 0-5V ON OFF ON ON
ANALOG INPUT 0-5v OR .5-4.5V INSTRUMENTSDIP switches are used on the back of some of the gauges to set ranges for your application. This can be changes at any time but in general They are set at the factory or on site during installation and are left in that position for the life of the vehicle. When setting DIP switches, ON should be in the up position.
2-1/16” 0-5V INPUT MINOR GAUGESThis applies to all standalone 2-1/16” gauges with a 0-5 or .5-4.5V input (transducer). The instrument will have BOTH a 4 and a 3 pin plug. The 3 pin plug will power your transducer. Please refer to the chart below for input DIP switch settings required for your application.
Transducers operate on .5-4.5V range. AFR and 0-5V output devices use 0-5V. The input for both ranges should be on the BLUE wire on the 3-pin harness. The GREEN wire on the 4-pin harness is not used.
RED: 12V SWITCHED POWER
BLACK: GROUND
WHITE: LIGHTS 12V +
GREEN: NOT USED
RED: 5V POWER FOR TRANSDUCER
BLACK: GROUND FOR TRANSDUCER
BLUE: SIGNAL FROM TRANSDUCER
4-PIN CONNECTOR
3-PIN
CONNECTOR
USE CAUTION WHEN WIRING THE 3 PIN CONNECTOR. DAMAGE TO THE 5V DRIVER CAN OCCUR IF MIS-WIRED.
DIP-SWITCH ACCESS

37
SPEEDOMETER TROUBLESHOOTING
PROGRAM VERSION NUMBER:
This displays the current software version stored in the instrument. The version will
vary based on the model you have. It is only required if you have an issue with your
speedometer and this information will be useful when contacting NVU for service.
SPEEDOMETER TROUBLESHOOTING BASICS
Speedometers are just like any other gauge in respect that it has the same 3
requirements, power, ground and a signal. Troubleshooting process is the same, start
at the end of the system and work your way toward the gauge. As with all gauge
systems there are 3 components: The gauge, the wire and the sender or signal
source, all three need to be checked for the entire system to operate properly.
-Turn on the key, does the gauge power up?, NO>check power or gauge fault
-Turn on the lights, does the gauge light up? If not , check your ground.
-SPEEDOMETER WILL NOT CALIBRATE
All speedometers require a speed signal to operate properly we first need to check the
senders:
HALL EFFECT CABLE OUTPUT REPLACEMENT STYLE:
-Pull the plug from the back of the sender, check for power on the red wire, ground on
the black -Pull the sender from the trans, turn on the key and spin the sender with a
drill. Speedo operates check mechanical engagement issue with the transmission
drive gear, check as needed. Speedo does not operate, check the sender wire using a
test lamp
HALL EFFECT SPEED SENDER TEST
-The hall effect sender will alternate positive and negative pulsed when turning the
sender slowly by hand. Use a test lamp or multi meter to check by probing the signal
wire and the hot then the ground lead
2 WIRE SPEED SENDER, AC SINE WAVE AND MAGNETIC PICKUP
-Check that the ground lead is as short as possible
-Check for continuity between the sender and the gauge
-Pull the sender from the trans, turn on the key and spin the sender with a drill. Speedo
operates> mechanical engagement issue with the transmission drive gear, check as
needed.
Speedo does not operate, check the sender wire using a test lamp
SPEED SENDER TEST 2 WIRE:
-Set your multi meter on AC voltage, lowest setting or 20V. Probe the sender wire with
the red lead, ground the back lead. Spin the tires; you should see between 8-18V on
the signal wire. Low or no voltage is a bad or sender that will be going bad soon. This
test can also be performed on the cable output style by removing and spinning with a
drill to check for a mechanical issue (see above)
NOTE ON FORD STYLE CABLE OUTPUT SENDERS
Check that the drive gear is installed on the sender! The spin with a drill test should be
made with the drive gear on and off to rule out an out-of-square drive on the gear
PCM/ECU:
Testing the signal is the same as above methods but it is also important to check the
VSS on the transmission to ensure a signal is reaching the PCM first. Without that
signal the PCM will not be able to send a signal to the speedometer.
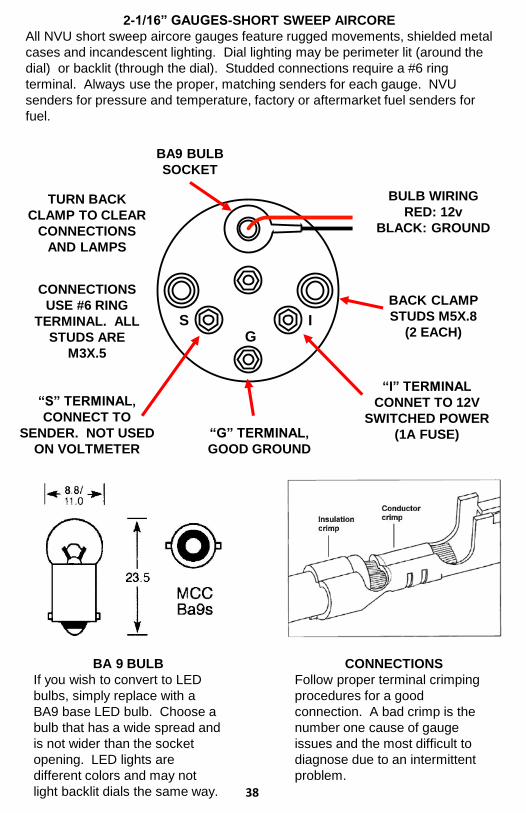
2-1/16” GAUGES-SHORT SWEEP AIRCORE
All NVU short sweep aircore gauges feature rugged movements, shielded metal
cases and incandescent lighting. Dial lighting may be perimeter lit (around the
dial) or backlit (through the dial). Studded connections require a #6 ring
terminal. Always use the proper, matching senders for each gauge. NVU
senders for pressure and temperature, factory or aftermarket fuel senders for
fuel.
S IG
BA9 BULB
SOCKET
BACK CLAMP
STUDS M5X.8
(2 EACH)
BULB WIRING
RED: 12v
BLACK: GROUND
TURN BACK
CLAMP TO CLEAR
CONNECTIONS
AND LAMPS
CONNECTIONS
USE #6 RING
TERMINAL. ALL
STUDS ARE
M3X.5
“I” TERMINAL
CONNET TO 12V
SWITCHED POWER
(1A FUSE)“G” TERMINAL,
GOOD GROUND
“S” TERMINAL,
CONNECT TO
SENDER. NOT USED
ON VOLTMETER
BA 9 BULB
If you wish to convert to LED
bulbs, simply replace with a
BA9 base LED bulb. Choose a
bulb that has a wide spread and
is not wider than the socket
opening. LED lights are
different colors and may not
light backlit dials the same way.
CONNECTIONS
Follow proper terminal crimping
procedures for a good
connection. A bad crimp is the
number one cause of gauge
issues and the most difficult to
diagnose due to an intermittent
problem.
38
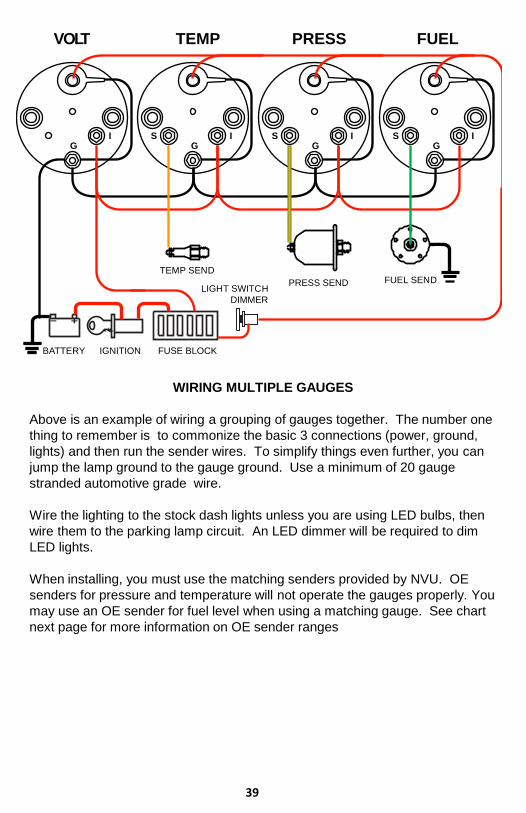
IG
S IG
S IG
S IG
VOLT TEMP PRESS FUEL
FUEL SENDTEMP SEND
PRESS SEND
BATTERY IGNITION FUSE BLOCK
LIGHT SWITCH
DIMMER
WIRING MULTIPLE GAUGES
Above is an example of wiring a grouping of gauges together. The number one
thing to remember is to commonize the basic 3 connections (power, ground,
lights) and then run the sender wires. To simplify things even further, you can
jump the lamp ground to the gauge ground. Use a minimum of 20 gauge
stranded automotive grade wire.
Wire the lighting to the stock dash lights unless you are using LED bulbs, then
wire them to the parking lamp circuit. An LED dimmer will be required to dim
LED lights.
When installing, you must use the matching senders provided by NVU. OE
senders for pressure and temperature will not operate the gauges properly. You
may use an OE sender for fuel level when using a matching gauge. See chart
next page for more information on OE sender ranges
39

Thank you for choosing New Vintage USA products. We strive to provide the finest quality and design components available on the market. If you need technical assistance, please call 248.850.5482 or email [email protected].
New Vintage USA 5-Year Warranty:New Vintage USA warrants all merchandise against defects in workmanship and materials for 60 months. After the 60 month period, a pro-rated service fee of no more than 50% production costs may be applied. This warranty applies to all instrumentation products, excluding senders. The warranty does not apply to a product used in a manner for which it was not designed, of if it has been altered in any way.; New Vintage USA LLC is not responsible for any damage or costs associated with any product that has been purchased. This is a limited warranty as identified in the Magnunson-Moss Warranty Act of 1975.
Warranty Service Service can be obtained during the normal warranty period by contacting New Vintage and obtaining a Return Authorization Number (RZA#). New Vintage will repair or replace any item found to be defective and return ship to no cost via ground or post office services. Other shipping/international services will be applied at additional cost. Buyer is responsible for shipping to New Vintage for warranty repair. Return shipping will be the responsibility of the customer if the product is found to be damaged or out of warranty. An RZA number must be obtained and proper return/warranty form accompanied with the product.
Missing items/Returns Missing items/returns must be processed within 15 days of end user receiving the product. All returned must be shipped back to the place of purchase. Any return shipping costs to New Vintage are the responsibility of the purchaser. An RZA number must be obtained and proper return/warranty form accompanied with the product. A restocking fee not to exceed 10% may be applied to items that must be repackaged. Any item returned in a non-usable condition will be returned or charged to the customer. Missing items must be reported within 15 days of receiving the product. Items found to be missing will be shipped via ground or postal service at no charge. Expedited/international shipping options are available at an additional charge. It is the policy of New Vintage to quickly replace any items that may be missing in a timely manner but not to overnight or expedite shipping in any way at no cost.