phonegap by dissection
TRANSCRIPT

PhoneGap by DissectionMy first PhoneGap 3.x app
Daniel Rhodes
This book is for sale at http://leanpub.com/phonegapbydissection
This version was published on 2015-02-26
This is a Leanpub book. Leanpub empowers authors and publishers with the Lean Publishingprocess. Lean Publishing is the act of publishing an in-progress ebook using lightweight toolsand many iterations to get reader feedback, pivot until you have the right book and buildtraction once you do.
©2015 Daniel Rhodes
Dedicated to all the hard-working girls and boys in the free and open source softwarecommunities.
Contents
1. Introduction . . . . . . . . . . . . . . . . . . . . . . . . . . . . . . . . . . . . . . . . 11.1 Conventions used in the text . . . . . . . . . . . . . . . . . . . . . . . . . . . . . 1
2. What you’ll need . . . . . . . . . . . . . . . . . . . . . . . . . . . . . . . . . . . . . . 3
3. What is PhoneGap . . . . . . . . . . . . . . . . . . . . . . . . . . . . . . . . . . . . . 4
4. Getting started . . . . . . . . . . . . . . . . . . . . . . . . . . . . . . . . . . . . . . . 54.1 The cool new way . . . . . . . . . . . . . . . . . . . . . . . . . . . . . . . . . . . 54.2 The fiddly older way . . . . . . . . . . . . . . . . . . . . . . . . . . . . . . . . . 8
5. Quick run-through of the default app . . . . . . . . . . . . . . . . . . . . . . . . . . 9
6. First things first: The layout . . . . . . . . . . . . . . . . . . . . . . . . . . . . . . . 15
7. First things first: The tabbing mechanism . . . . . . . . . . . . . . . . . . . . . . . . 27
8. The Search tab . . . . . . . . . . . . . . . . . . . . . . . . . . . . . . . . . . . . . . . 478.1 Layout and interface . . . . . . . . . . . . . . . . . . . . . . . . . . . . . . . . . 478.2 Creating the database . . . . . . . . . . . . . . . . . . . . . . . . . . . . . . . . . 518.3 Querying the database . . . . . . . . . . . . . . . . . . . . . . . . . . . . . . . . 588.4 Results scrolling . . . . . . . . . . . . . . . . . . . . . . . . . . . . . . . . . . . . 788.5 Extra credit challenges . . . . . . . . . . . . . . . . . . . . . . . . . . . . . . . . 89
9. The Discover tab . . . . . . . . . . . . . . . . . . . . . . . . . . . . . . . . . . . . . . 909.1 Layout and interface . . . . . . . . . . . . . . . . . . . . . . . . . . . . . . . . . 909.2 Extra credit challenges . . . . . . . . . . . . . . . . . . . . . . . . . . . . . . . . 96
10.TheWrite tab . . . . . . . . . . . . . . . . . . . . . . . . . . . . . . . . . . . . . . . . 9710.1 Layout and interface . . . . . . . . . . . . . . . . . . . . . . . . . . . . . . . . . 9710.2 Filling the screen . . . . . . . . . . . . . . . . . . . . . . . . . . . . . . . . . . . 10010.3 Displaying a random character . . . . . . . . . . . . . . . . . . . . . . . . . . . . 10610.4 Finger doodling . . . . . . . . . . . . . . . . . . . . . . . . . . . . . . . . . . . . 11210.5 Extra credit challenges . . . . . . . . . . . . . . . . . . . . . . . . . . . . . . . . 120
11.Splash screen . . . . . . . . . . . . . . . . . . . . . . . . . . . . . . . . . . . . . . . . 122
12.Launcher icon . . . . . . . . . . . . . . . . . . . . . . . . . . . . . . . . . . . . . . . 129
13.Submitting to Google Play . . . . . . . . . . . . . . . . . . . . . . . . . . . . . . . . 130
CONTENTS
14.That’s all folks! . . . . . . . . . . . . . . . . . . . . . . . . . . . . . . . . . . . . . . . 131
1. IntroductionThis book is going to teach you how to get started with mobile app development using thePhoneGap platform. We’ll essentially rebuild, from scratch, a basic yet fully-functional app thatreally exists! It’s called Japxlate and can be found here in the Google Play Store. The app is aJapanese dictionary that you can search - even if offline. Not to worry though, we won’t getbogged down in the nitty gritty of Japanese linguistics. We’ll focus on setting up, building andfinally deploying the app. You’ll laugh, you’ll cry, you’ll sick a little bit in the back of your throat,but the journey will definitely be worth it…
This is version 1.0 of the book, first published February 2015 (v0.9 first publishedJanuary 2014)
Latest source code for the app is at https://github.com/danielrhodeswarp/japxlate-android
This book was written using PhoneGap v3.1.0, but has been updated to cover anythingnew or different in v3.3.0
1.1 Conventions used in the text
A command that you need to type on the Linux command line will look like:
you@yours$ somewhere]$ some linux command to type
Code (of any type - CSS, HTML or JavaScript) that you need to type in will look like:
//does the cursor have random fractals?
function checkRandomFractals()
{
return something.or.other;
}
HTML elements will be referred to like:
<elementname>
Code fragments, variable names, method names etc will look like:
Introduction 2
someMethod();
File names and folder names will look like:
/assets/www/some_file.html
A side note, something tangental to the main text, will look like:
..
I’m hungry but my teeth hurt.
New or updated information relevant for PhoneGap v3.3.0 will look like:
PhoneGap v3.3.0 uses the “Plugman” plugin manager.
2. What you’ll needTo keep things small and simple we’ll focus solely on developing on Linux for an app that we’llmake for Android. Though one huge benefit of PhoneGap is that you can package the same(ish)code into a working app for many different mobile platforms. We also won’t be using any third-party JavaScript or CSS libraries, though these will be useful to you going forward with yourapp development. What you’ll need:
• A Linux desktop box• PhoneGap (which requires NodeJS) on the above box - at time of writing this tutorial Iwas using version 3.1.0. Don’t worry, we’ll install this in the Getting started chapter
• As many Android devices as you can get your hands on! At least one• Google’s “Android Developer Tools” bundle - or at least Eclipse with the Android plugins.Again we’ll cover this in the Getting started chapter
• At least a lower-intermediate knowledge of HTML5, JavaScript and CSS• To not be terrified of the Linux command line!
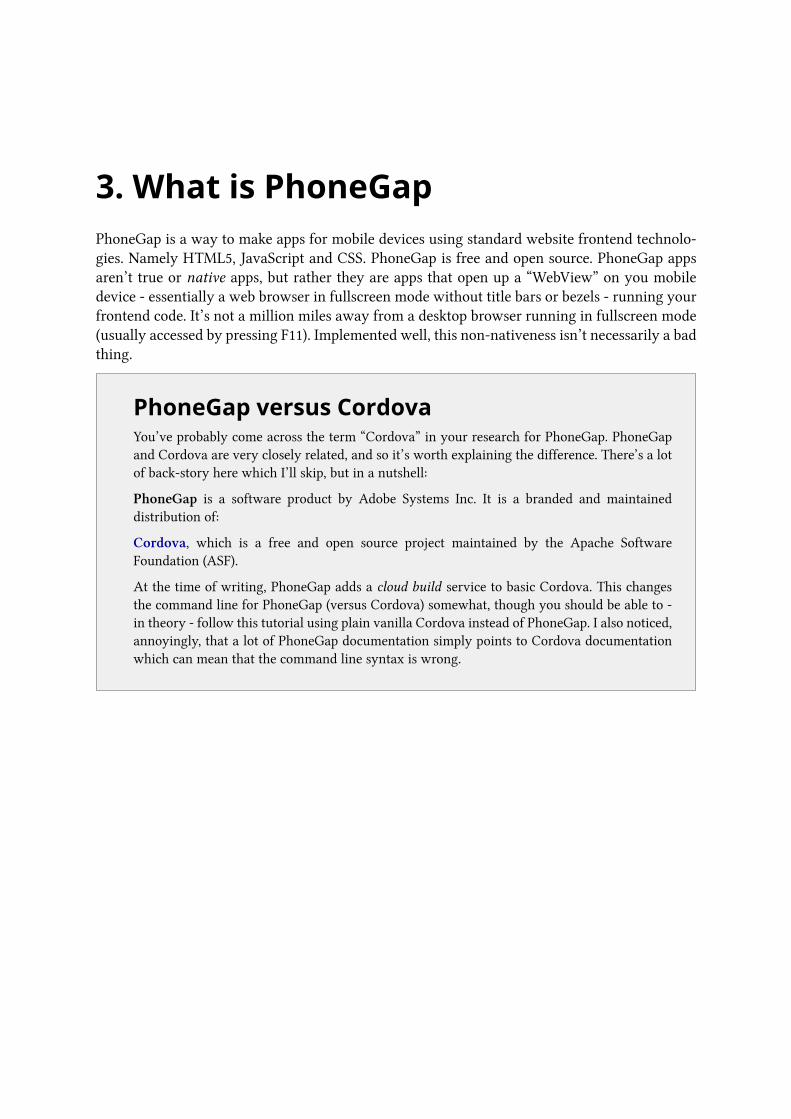
3. What is PhoneGapPhoneGap is a way to make apps for mobile devices using standard website frontend technolo-gies. Namely HTML5, JavaScript and CSS. PhoneGap is free and open source. PhoneGap appsaren’t true or native apps, but rather they are apps that open up a “WebView” on you mobiledevice - essentially a web browser in fullscreen mode without title bars or bezels - running yourfrontend code. It’s not a million miles away from a desktop browser running in fullscreen mode(usually accessed by pressing F11). Implemented well, this non-nativeness isn’t necessarily a badthing.
..
PhoneGap versus CordovaYou’ve probably come across the term “Cordova” in your research for PhoneGap. PhoneGapand Cordova are very closely related, and so it’s worth explaining the difference. There’s a lotof back-story here which I’ll skip, but in a nutshell:
PhoneGap is a software product by Adobe Systems Inc. It is a branded and maintaineddistribution of:
Cordova, which is a free and open source project maintained by the Apache SoftwareFoundation (ASF).
At the time of writing, PhoneGap adds a cloud build service to basic Cordova. This changesthe command line for PhoneGap (versus Cordova) somewhat, though you should be able to -in theory - follow this tutorial using plain vanilla Cordova instead of PhoneGap. I also noticed,annoyingly, that a lot of PhoneGap documentation simply points to Cordova documentationwhich can mean that the command line syntax is wrong.

4. Getting startedThere are two routes we can go down to get started with PhoneGap development. Both routesrequire theAndroid SDK to be installed so let’s do that first. The easiest way to install the AndroidSDK is to install the Android Developer Tools (or ADT) bundle. This bundle installs the AndroidSDK and Eclipse IDE configured for Android (native) development.
Right, let’s install the Android Developer Tools. The easy peasy way is to download and installthe “ADT Bundle for Linux” from http://developer.android.com/sdk/index.html which should beworry free.
If you’re already using Eclipse IDE, you can simply download the Android Developer Toolsplugin for it at http://developer.android.com/tools/index.html
..
About IDEsYou aren’t forced to use Eclipse IDE for Android development, though it does make a lot ofthings easier as it supports direct deploy to an actual Android device and it has a virtual devicemanager for deploying to emulated Android devices.
Myself, I didn’t like the way that Eclipse was opening - and highlighting - the variousfrontend source files for the app (though I don’t doubt that this is configurable in the optionssomewhere!). There’s also the fact that it doesn’t speak PhoneGap. I found myself cutting thecode in NetBeans IDE and checking in with Eclipse every now and again to deploy to the actualdevice (Ctrl-F11) or to check console.log() messages in LogCat.
Netbeans IDE v7.4 dropped just before I finished this tutorial and interestingly that seems tohave PhoneGap (well, Cordova) support built in! Definitely worth a look.
Bizarrely, I found that regardless of the IDE used, I often had to deploy to the device twicein order to have it truly updated. This happened whenever a resource file was updated, ie.JavaScript or HTML or CSS. I notice this doesn’t happen when Java sources are edited whichindicates some kind of caching issue. I still haven’t got to the bottom of this particular mystery.
4.1 The cool new way
OK, now we can install PhoneGap itself. For some strange reason that I can’t figure out (I’mguessing it’s just for package management) it requires NodeJS so go to http://nodejs.org andinstall it. Then, as we see at http://phonegap.com/install we simply do (on the command line):
you@yours$ somewhere]$ sudo npm install -g phonegap
Getting started 6
This installs the PhoneGap binaries and commands globally on our system. After that, let’sactually create the PhoneGap project where we’ll put all of our lovely code for the app. Thereare two slightly different syntaxes for this:
you@yours$ somewhere]$ phonegap create --name "Japxlate" --id "com.drappenheimer.japxla\
te" japxlate
or
you@yours$ somewhere]$ phonegap create japxlate com.drappenheimer.japxlate "Japxlate"
This will create a PhoneGap project folder structure for building the same code to manydifferent device targets (Android or iOS etc). "Japxlate" is the name of our app (in quotes).com.drappenheimer.japxlate is our app’s reverse domain name identifier. All Android appshave a unique identifier like this. japxlate is our desired folder name for the project. We thenwant to do:
you@yours$ somewhere]$ cd japxlate
you@yours$ japxlate]$ phonegap run android
Which will detect your Android SDK and try to run the app on the currently connected device(or configured virtual machine). If no Android SDK is found or present, it will try to deploy theapp to your account on the PhoneGap remote cloud build environment - which is just out ofbeta at time of writing. But you’ll more than likely need an extra bit of setup to get this runandroid command to work. Specifically you’ll need to add a couple of folders from the AndroidSDK install to your PATH. The gory details are at http://docs.phonegap.com/en/edge/guide_-platforms_android_index.md.html#Android%20Platform%20Guide, but how I did it was to addthe following lines to my ∼/.bashrc file:
export ANDROID_SDK_HOME=/wherever/you/installed/it/adt-bundle-linux-x86_64-20130729/sdk
export PATH=${PATH}:${ANDROID_SDK_HOME}/platform-tools:${ANDROID_SDK_HOME}/tools
As well as this I personally needed the Java development libraries to be installed.
If the run android command still doesn’t work after all this configuration, double check yourAndroid SDK Manager which you can reach from the Eclipse IDE.
Note that this run command is a shortcut for the build followed by install commands. If youdon’t want to actually run your PhoneGap app from the command line, you need to at least buildit which is like this:
you@yours$ japxlate]$ phonegap build android
This will create a PROJECTROOT/platforms/android folder with skeleton source files for our appin it. And importantly the project files for this to be pickupable as an Android project in EclipseIDE.

Getting started 7
..
How many mobile platforms does it take tochange a lightbulb?You might be wondering now, if PhoneGap is supposed to be this amazing tool that lets uswrite the same app code for multiple mobile platforms, why would we want to dive straight into the /platforms/android folder? How is that going to work on, say, iOS?
The answer is simple, PhoneGap is indeed a tool where the same app code can be compiledfor multiple mobile platforms, but - in a nutshell - we are cheating and taking a shortcut! Thistutorial is rather simplified and focuses solely on Android. This is why we dive right in at/platforms/android.
If your app needs to work on multiple mobile platforms - as most apps do - then you shouldreally create your app’s code in PROJECTROOT/www, specifying any platform-specific customisa-tions in PROJECTROOT/merges, then debug each time for your platforms with the build, installand run commands. The excellent blog post at http://devgirl.org/2013/09/05/phonegap-3-0-stuff-you-should-know/ explains this very well.
Like the run command, the build command will also fallback to the remote cloud buildenvironment. You can disable this fallback with the command phonegap local build android.
Right, so now you’ve at least built your app on the command line. You might even have run itfrom the command line! Going forward with this tutorial, let’s plug the skeleton code we’ve justbuilt into our Eclipse IDE as an Android project. Follow these steps:
1. Click File⇒ New⇒ Project2. Select Android ⇒ Android Project from Existing Code (note there’s also a sample native
project in there!)3. Browse to PROJECTROOT/platforms/android folder (actually just PROJECTROOT seems to
also work)4. Click OK5. You’ll get an “Import Projects” dialogue now with the project details that you can confirm
/ change and then click Finish
..
Keeping your PhoneGap up-to-dateInstalling PhoneGap via NodeJS has the nice advantage that you can keep your PhoneGapversion up-to-date by running this command:
you@yours$ somewhere]$ sudo npm update -g phonegap
Getting started 8
4.2 The fiddly older way
An older way of getting started (that PhoneGap up to v2.1.0 used) still works and can be usefulif you are struggling with the configuration steps details in the above section. You’ll still needto have Eclipse with the ADT installed first, but you won’t have to fiddle around with installingNodeJS or altering PATH environment variables.
Simply download - rather than install - the relevant “archive” version of PhoneGap fromhttp://phonegap.com/install, and then you can follow the steps from “Setup New Project” inthe PhoneGap documentation. Please note that these instructions are for older versions ofPhoneGap and Eclipse and so your mileage with the latest versions may vary.This page on the Adobe website is also a useful reference.
Sorry but I can’t specify exactly how to do it this way as it is not the supported way any more.It might stop working for future versions of PhoneGap. Though I could get it working - with afew tweaks - with PhoneGap v3.1.0.
Advantages of this method: You don’t have to install PhoneGap or NodeJS or any dependencies.Disadvantages of thismethod: You don’t get PhoneGap’s latest template for setting up anAndroidapp and you have to do it manually (ie. updating the manifest etc).

5. Quick run-through of the defaultapp
Our app starts life as the PhoneGap “Hello world” app (unless you went The fiddly older way inwhich case it’s empty). This is a good starting point and has some things we can build on andlearn from. Of course we’ll need to ditch a lot of it as well!
Go ahead, hit CTRL-F11 in Eclipse to run the app on your virtual or actual device. We get a littlerobot icon and a pulsing (via CSS3) “device is ready” message. Rotate your device, it redrawsitself accordingly and changes the layout slightly if needed. It also doesn’t present or allow anykind of scrolling or pinching which is A Good Thing for most apps - including Japxlate.
Figure 1. The default PhoneGap app (landscape)
The files that we’ll be wanting to edit (CSS, HTML5, JavaScript) to make our own app can befound in the assets/www folder of our Eclipse project.
Let’s take a look at the generated assets/www/index.html (Apache licence text removed forbrevity):
<!DOCTYPE html>
<html>
<head>
<meta charset="utf-8" />
<meta name="format-detection" content="telephone=no" />
<meta name="viewport" content="user-scalable=no, initial-scale=1, maximum-scale\
=1, minimum-scale=1, width=device-width, height=device-height, target-densitydpi=device\
-dpi" />
<link rel="stylesheet" type="text/css" href="css/index.css" />
<title>Hello World</title>
</head>
<body>

Quick run-through of the default app 10
<div class="app">
<h1>PhoneGap</h1>
<div id="deviceready" class="blink">
<p class="event listening">Connecting to Device</p>
<p class="event received">Device is Ready</p>
</div>
</div>
<script type="text/javascript" src="phonegap.js"></script>
<script type="text/javascript" src="js/index.js"></script>
<script type="text/javascript">
app.initialize();
</script>
</body>
</html>
PhoneGap v3.3.0 adds a comment talking about a workaround for iOS 7.
We’ve got the simplified “html” DOCTYPE for HTML5. We explicity set a charset of utf-8Unicode which is clearly going to be very important for this app! We’ve got a lot of “viewport”settings which are mostly self-explanatory, but essentially say “this app fills the device display,defaults to 100% zoom and can not be zoomed in or out”. This is really going to help our PhoneGapapp look and feel more like a native app and not a web browser view.
We then link to some CSS which we’ll look at shortly. The <title> needs updating, but thiswon’t normally be visible to the app user anyway. Especially as PhoneGap build puts a themesetting of Theme.Black.NoTitleBar in AndroidManifest.xml.
Then the <body> starts and we have whatever markup the app needs. Just before the <body>
closes, we have links to some JavaScript (this is debated but considered to be something of aperformance improvement). phonegap.js (in assets/www) is the PhoneGap library and is howwe can access phone hardware (ie. camera) from JavaScript in our PhoneGap app. Commentingout this file will enable you to somewhat preview the app just by opening the index.html file inChrome desktop browser. We’ll talk about this later.
js/index.js is JavaScript specifically for this app. We then call app.initialize(). The app
object is in index.js which we’ll look at after taking a quick peek at the key things in the CSSfile we mentioned a moment ago (Apache licence text removed for brevity):

Quick run-through of the default app 11
* {
-webkit-tap-highlight-color: rgba(0,0,0,0); /* make transparent link selection, adj\
ust last value opacity 0 to 1.0 */
}
body {
-webkit-touch-callout: none; /* prevent callout to copy image, etc w\
hen tap to hold */
-webkit-text-size-adjust: none; /* prevent webkit from resizing text to\
fit */
-webkit-user-select: none; /* prevent copy paste, to allow, change\
'none' to 'text' */
background-color:#E4E4E4;
background-image:linear-gradient(top, #A7A7A7 0%, #E4E4E4 51%);
background-image:-webkit-linear-gradient(top, #A7A7A7 0%, #E4E4E4 51%);
background-image:-ms-linear-gradient(top, #A7A7A7 0%, #E4E4E4 51%);
background-image:-webkit-gradient(
linear,
left top,
left bottom,
color-stop(0, #A7A7A7),
color-stop(0.51, #E4E4E4)
);
background-attachment:fixed;
font-family:'HelveticaNeue-Light', 'HelveticaNeue', Helvetica, Arial, sans-serif;
font-size:12px;
height:100%;
margin:0px;
padding:0px;
text-transform:uppercase;
width:100%;
}
/* Portrait layout (default) */
.app {
background:url(../img/logo.png) no-repeat center top; /* 170px x 200px */
position:absolute; /* position in the center of the screen */
left:50%;
top:50%;
height:50px; /* text area height */
width:225px; /* text area width */
text-align:center;
padding:180px 0px 0px 0px; /* image height is 200px (bottom 20px are overlapped\
with text) */
margin:-115px 0px 0px -112px; /* offset vertical: half of image height and text ar\
ea height */
/* offset horizontal: half of text area width */
}
Quick run-through of the default app 12
/* Landscape layout (with min-width) */
@media screen and (min-aspect-ratio: 1/1) and (min-width:400px) {
.app {
background-position:left center;
padding:75px 0px 75px 170px; /* padding-top + padding-bottom + text area = ima\
ge height */
margin:-90px 0px 0px -198px; /* offset vertical: half of image height */
/* offset horizontal: half of image width and tex\
t area width */
}
}
.
.
The clause for * simply removes, from any element that we might make tappable, the defaultsickly orange highlight that Android WebView gives to links and buttons and things.
The body clause starts by disabling some default Android WebView interations. This makes ourPhoneGap app feel a bit more nativey.
Then we set a grey gradient as the background.
Then we set the font type and size (12px). Height and width are both set to 100% which makesour <body> fill the size of the WebView screen. We specify no margin (which is gap space outsidethe <body>) and no padding (which is gap space inside the <body>).
In .app - our top level div in the markup - we set the layout of our app specific things. Portraitorientation is assumed - a safe assumption for most phone apps. I won’t bore you with this toomuch (but if you are baffled then please see a CSS refresher) other than to say it pulls somestrings with absolute positioning and negative margins to centre a background image and sometext.
Then we have another .app block wrapped in what’s called a media query(http://cssmediaqueries.com/what-are-css-media-queries.html is a useful introduction) whichtriggers when the phone is rotated into landscape view. It moves the background image to theleft of the text and also moves the text such that things are still centred.
Right, let’s get back to that js/index.js file that we’ve almost forgotten about! (Apache licencetext removed for brevity):
var app = {
// Application Constructor
initialize: function() {
this.bindEvents();
},
// Bind Event Listeners
//
// Bind any events that are required on startup. Common events are:
// 'load', 'deviceready', 'offline', and 'online'.
bindEvents: function() {
document.addEventListener('deviceready', this.onDeviceReady, false);

Quick run-through of the default app 13
},
// deviceready Event Handler
//
// The scope of 'this' is the event. In order to call the 'receivedEvent'
// function, we must explicity call 'app.receivedEvent(...);'
onDeviceReady: function() {
app.receivedEvent('deviceready');
},
// Update DOM on a Received Event
receivedEvent: function(id) {
var parentElement = document.getElementById(id);
var listeningElement = parentElement.querySelector('.listening');
var receivedElement = parentElement.querySelector('.received');
listeningElement.setAttribute('style', 'display:none;');
receivedElement.setAttribute('style', 'display:block;');
console.log('Received Event: ' + id);
}
};
All we have is one object called app which represents - wait for it! - our PhoneGap app.initialize() is the constructor. We call this directly from index.html if you remember.initialize() simply calls app.bindEvents()which in turn uses a DOM standard way of addingan event listener. The event we listen for here is ‘deviceready’ which is fired from the PhoneGaplibrary when our Android device is, well, ready. We specify that this event is to be handled byapp.onDeviceReady() which simply calls app.receivedEvent('deviceready').
app.receivedEvent('deviceready') simply hides the “connecting” message and displays the“ready” message (which are displayed and hidden, respectively, via the default index.css).
someElement.querySelector() is very interesting here and we’ll look at that later.
console.log(someMessage) is worth talking about now because we are going to be hammering itduring development! Basically this logs something to the browser’s console without disturbingthe user. When running your app via Eclipse’s F11, console.log() messages that fire on thedevice will show up in your Eclipse’s “LogCat” thus:

Quick run-through of the default app 14
Figure 2. console.log() messages as appearing in Eclipse’s LogCat
Or, if debugging in Chrome desktop, you can see it by pressing F12 on the page in question thenclicking the console tab:
Figure 3. console.log() messages as appearing in Chrome desktop’s debugger
console.log() (and there are actually some other methods) is a general JavaScript developmenttechnique that isn’t specific to mobile development. It works on all major browsers (though IEneeds help!).
6. First things first: The layoutJapxlate is going to have a single screen or “intent”. It won’t jump out to, for example, yourphone’s camera intent or “share to” list. The single screen is going to have three tab options -Search, Discover and Write. We want the tab navigation and current tab content to all fit on thedevice display without scrolling. OK, the PhoneGap Hello World app we just looked at is a goodstart, but let’s see what tweaks we can do.
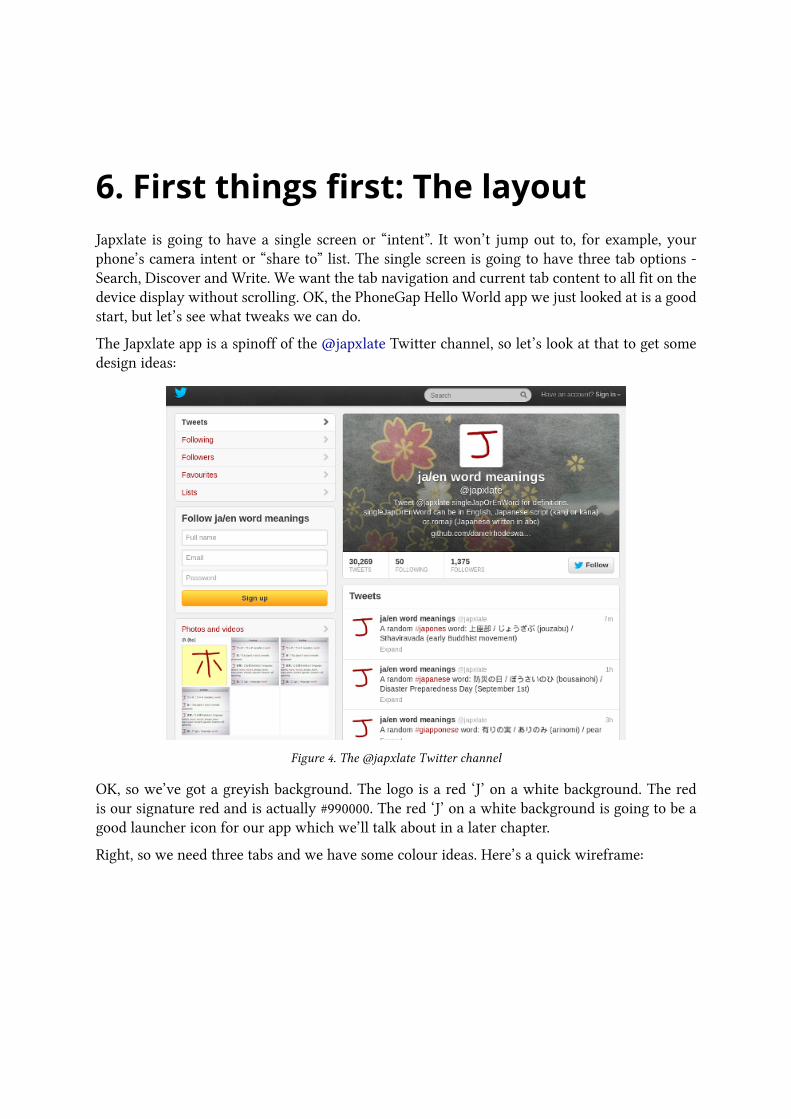
The Japxlate app is a spinoff of the @japxlate Twitter channel, so let’s look at that to get somedesign ideas:
Figure 4. The @japxlate Twitter channel
OK, so we’ve got a greyish background. The logo is a red ‘J’ on a white background. The redis our signature red and is actually #990000. The red ‘J’ on a white background is going to be agood launcher icon for our app which we’ll talk about in a later chapter.
Right, so we need three tabs and we have some colour ideas. Here’s a quick wireframe:
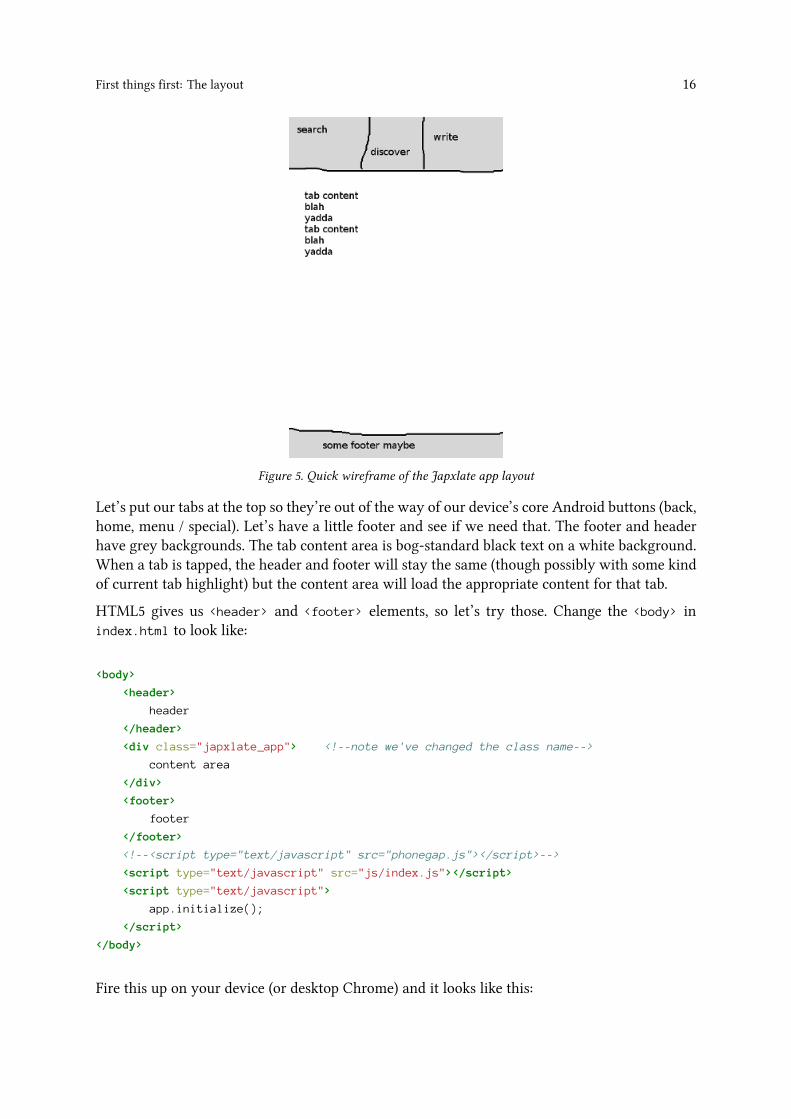
First things first: The layout 16
Figure 5. Quick wireframe of the Japxlate app layout
Let’s put our tabs at the top so they’re out of the way of our device’s core Android buttons (back,home, menu / special). Let’s have a little footer and see if we need that. The footer and headerhave grey backgrounds. The tab content area is bog-standard black text on a white background.When a tab is tapped, the header and footer will stay the same (though possibly with some kindof current tab highlight) but the content area will load the appropriate content for that tab.
HTML5 gives us <header> and <footer> elements, so let’s try those. Change the <body> inindex.html to look like:
<body>
<header>
header
</header>
<div class="japxlate_app"> <!--note we've changed the class name-->
content area
</div>
<footer>
footer
</footer>
<!--<script type="text/javascript" src="phonegap.js"></script>-->
<script type="text/javascript" src="js/index.js"></script>
<script type="text/javascript">
app.initialize();
</script>
</body>
Fire this up on your device (or desktop Chrome) and it looks like this:

First things first: The layout 17
Figure 6. Unstyled <header> and <footer>
Not quite what we had in mind! The <header> and <footer> are both 100% wide which is great,but we need to give them positions and heights (with tab content taking up the remaining spaceinbetween). Also let’s get rid of the PhoneGap background gradient and put our own backgroundcolours in. Also let’s take out the forced uppercase. Change the body clause in index.css to looklike this:
body {
-webkit-touch-callout: none; /* prevent callout to copy image, etc w\
hen tap to hold */
-webkit-text-size-adjust: none; /* prevent webkit from resizing text to\
fit */
-webkit-user-select: none; /* prevent copy paste, to allow, change\
'none' to 'text' */
font-family:'HelveticaNeue-Light', 'HelveticaNeue', Helvetica, Arial, sans-serif;
font-size:12px;
height:100%;
margin:0px;
padding:0px;
width:100%;
}
Then add a clause for header like this:

First things first: The layout 18
header {
background-color:#555; /*medium grey*/
color:#ccc; /*slightly greyish white*/
height:40px;
line-height:40px; /*height of a *text* line*/
}
Then add a clause for footer like this:
footer {
background-color:#555; /*medium grey*/
color:#ccc; /*slightly greyish white*/
height:20px;
line-height:20px;
}
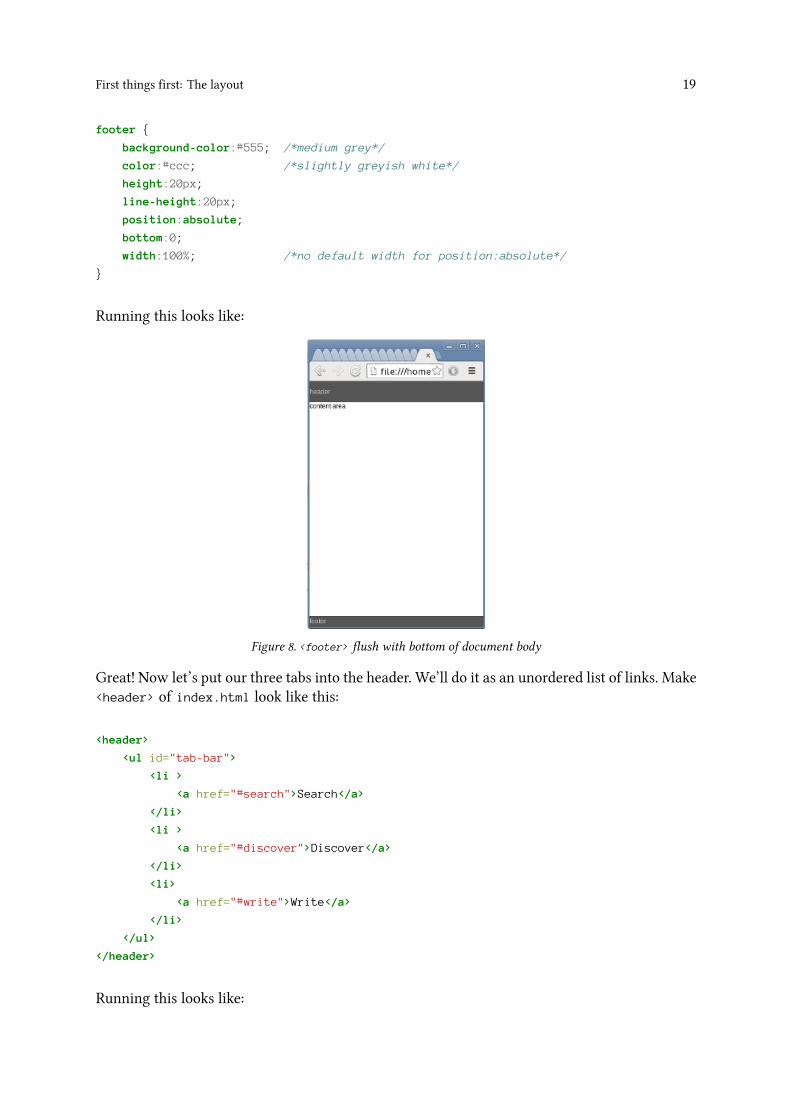
Running this looks like:
Figure 7. <footer> is too high
Hmm, the footer isn’t at the bottom! Let’s position it absolutely andmake it flush with the bottomof its parent (the document body). Add to the footer rule so that it looks like:
First things first: The layout 19
footer {
background-color:#555; /*medium grey*/
color:#ccc; /*slightly greyish white*/
height:20px;
line-height:20px;
position:absolute;
bottom:0;
width:100%; /*no default width for position:absolute*/
}
Running this looks like:
Figure 8. <footer> flush with bottom of document body
Great! Now let’s put our three tabs into the header. We’ll do it as an unordered list of links. Make<header> of index.html look like this:
<header>
<ul id="tab-bar">
<li >
<a href="#search">Search</a>
</li>
<li >
<a href="#discover">Discover</a>
</li>
<li>
<a href="#write">Write</a>
</li>
</ul>
</header>
Running this looks like:
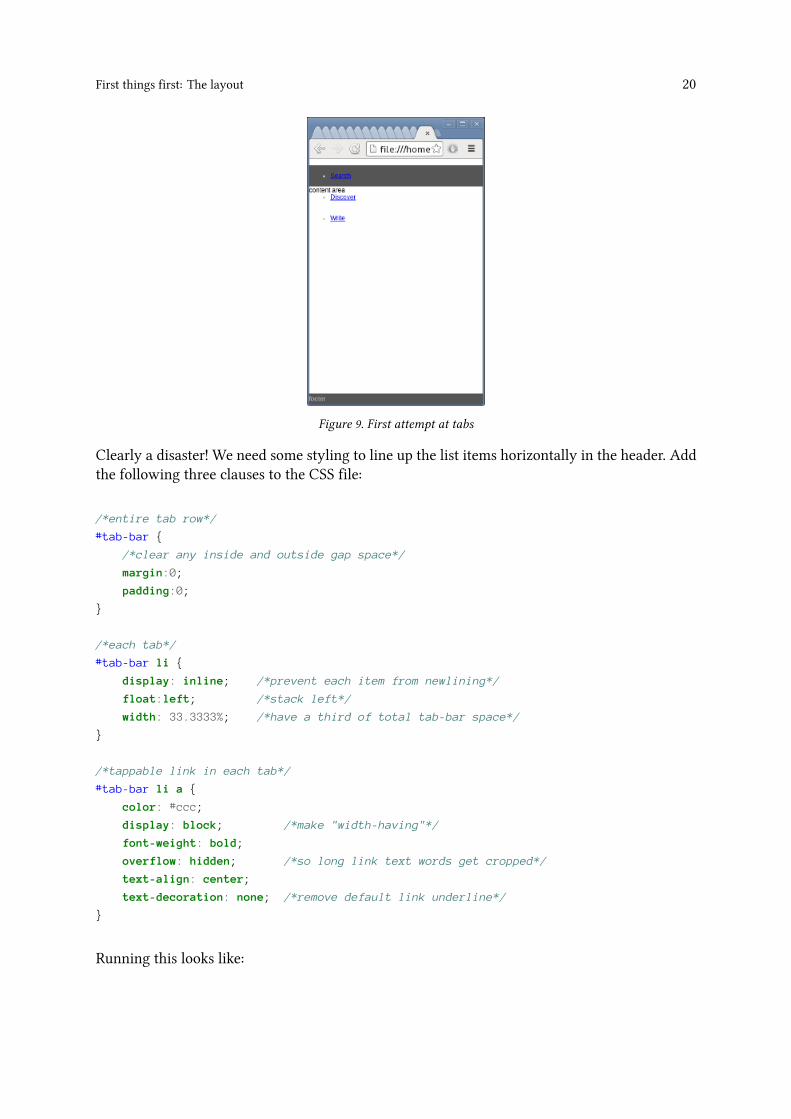
First things first: The layout 20
Figure 9. First attempt at tabs
Clearly a disaster! We need some styling to line up the list items horizontally in the header. Addthe following three clauses to the CSS file:
/*entire tab row*/
#tab-bar {
/*clear any inside and outside gap space*/
margin:0;
padding:0;
}
/*each tab*/
#tab-bar li {
display: inline; /*prevent each item from newlining*/
float:left; /*stack left*/
width: 33.3333%; /*have a third of total tab-bar space*/
}
/*tappable link in each tab*/
#tab-bar li a {
color: #ccc;
display: block; /*make "width-having"*/
font-weight: bold;
overflow: hidden; /*so long link text words get cropped*/
text-align: center;
text-decoration: none; /*remove default link underline*/
}
Running this looks like:

First things first: The layout 21
Figure 10. Tabs line up horizontally
Looking good! But the tabs need a few more things to look more useful. Namely, horizontaldividers, icons and some kind of current tab highlight. For the horizontal dividers, let’s try givingthe second and third tabs a left border. CSS version 2 (the latest version being 3) has a niftyselector where we can say “element type Y only where it follows an element type X”. With thiswe can target any tab after the first one and apply a left border. Add the following clause to theCSS:
/*a border-left for the middle and rightmost tab*/
#tab-bar li + li
{
border-left:1px solid #aaa; /*light grey*/
}
Running this looks like:
Figure 11. <header> too wide for document body
First things first: The layout 22
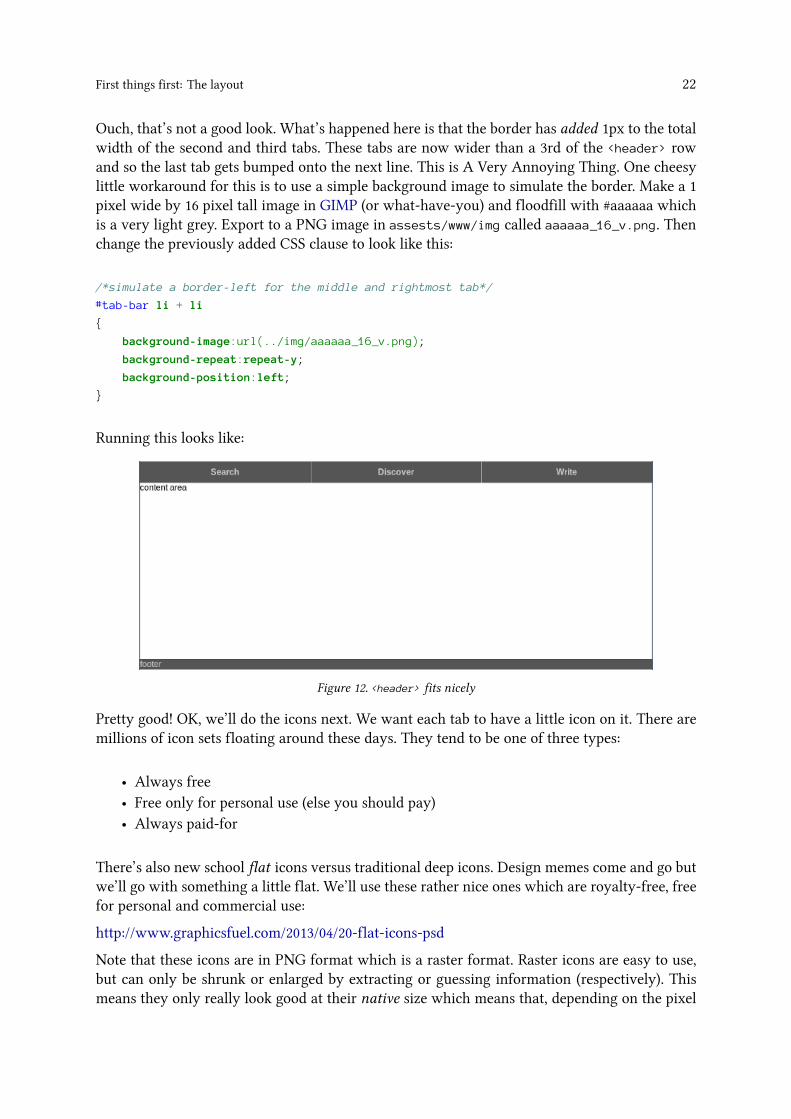
Ouch, that’s not a good look. What’s happened here is that the border has added 1px to the totalwidth of the second and third tabs. These tabs are now wider than a 3rd of the <header> rowand so the last tab gets bumped onto the next line. This is A Very Annoying Thing. One cheesylittle workaround for this is to use a simple background image to simulate the border. Make a 1pixel wide by 16 pixel tall image in GIMP (or what-have-you) and floodfill with #aaaaaa whichis a very light grey. Export to a PNG image in assests/www/img called aaaaaa_16_v.png. Thenchange the previously added CSS clause to look like this:
/*simulate a border-left for the middle and rightmost tab*/
#tab-bar li + li
{
background-image:url(../img/aaaaaa_16_v.png);
background-repeat:repeat-y;
background-position:left;
}
Running this looks like:
Figure 12. <header> fits nicely
Pretty good! OK, we’ll do the icons next. We want each tab to have a little icon on it. There aremillions of icon sets floating around these days. They tend to be one of three types:
• Always free• Free only for personal use (else you should pay)• Always paid-for
There’s also new school flat icons versus traditional deep icons. Design memes come and go butwe’ll go with something a little flat. We’ll use these rather nice ones which are royalty-free, freefor personal and commercial use:
http://www.graphicsfuel.com/2013/04/20-flat-icons-psd
Note that these icons are in PNG format which is a raster format. Raster icons are easy to use,but can only be shrunk or enlarged by extracting or guessing information (respectively). Thismeans they only really look good at their native size which means that, depending on the pixel

First things first: The layout 23
density of the device display, they might be too tiny and hard to make out or really massive andLegoish. But we’ll use them for simplicity.
One alternative would be to use a vector format - such as SVG - for the icons which stores theimage such that it can be scaled up or down without losing information. Another new trend is tohave the browser load something called an icon font. This is like a normal font but where eachcharacter is an icon (remember Wingdings?!). This has the advantage that the icons are sizeablejust like any other text. Also they can be bolded or italicised. But they can only be of one colour.
Go ahead and put all of the PNG icons in assets/www/img (though we won’t use all of them).Let’s reference some of these icons in our tab markup, change <header> in index.html to looklike this:
<header>
<ul id="tab-bar">
<li>
<a href="#search"><img src="img/search.png"> Search</a>
</li>
<li>
<a href="#discover"><img src="img/chat-bubble.png"> Discover</a>
</li>
<li>
<a href="#write"><img src="img/file.png"> Write</a>
</li>
</ul>
</header>
Note the space after the image and before the link text. Running this gives:
Figure 13. Icons we sourced are way too big
Woah, those icons are pretty big eh? The icons are a mix of square, tall or wide, but they all havea biggest side of about 128 pixels. That’s clearly way too big for us here. Let’s use GIMP to resizesearch.png, chat-bubble.png and file.png to have a biggest side of 16px - the same as our appfont size (in index.css) [NOTETOSELF double check this]. So go ahead and make those changesand overwrite the original icon files. While you’re at it, do the same for paste.png because we’llbe using that later on. (Feel free to trash the other icon files from assets/www/img as we won’t
First things first: The layout 24
be needing them in this little app.) Those scalable icon formats are looking real attractive nowhuh?
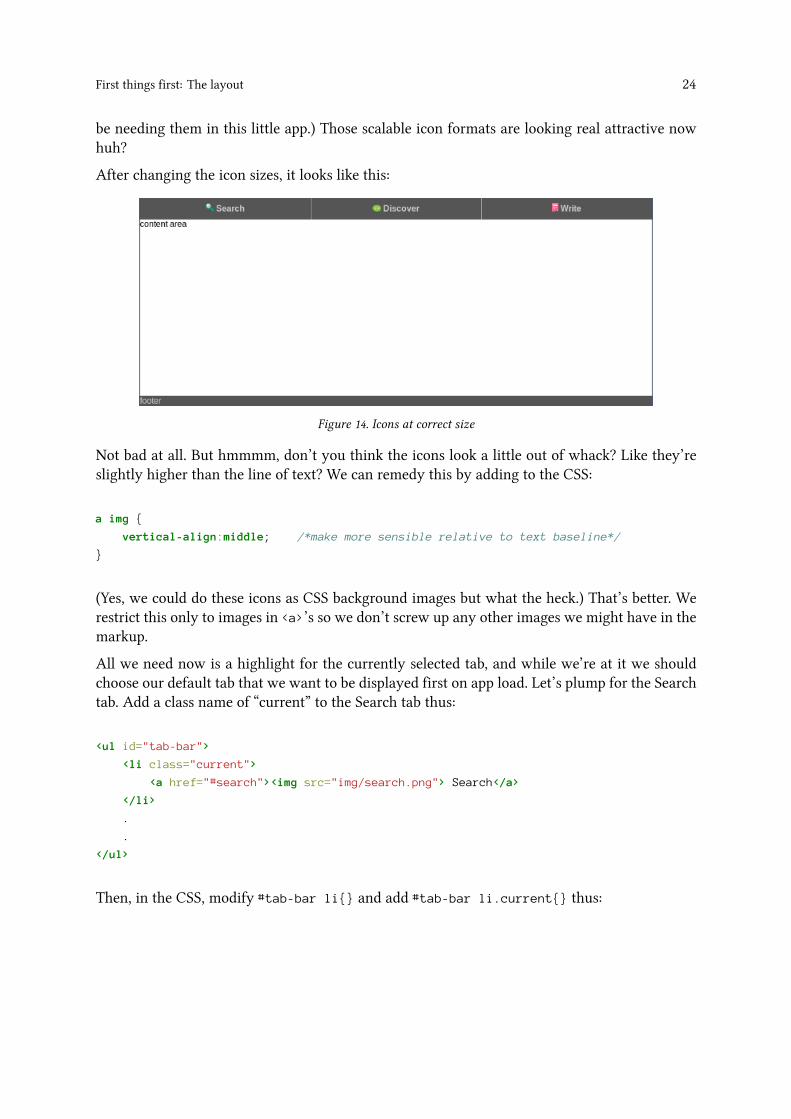
After changing the icon sizes, it looks like this:
Figure 14. Icons at correct size
Not bad at all. But hmmmm, don’t you think the icons look a little out of whack? Like they’reslightly higher than the line of text? We can remedy this by adding to the CSS:
a img {
vertical-align:middle; /*make more sensible relative to text baseline*/
}
(Yes, we could do these icons as CSS background images but what the heck.) That’s better. Werestrict this only to images in <a>’s so we don’t screw up any other images we might have in themarkup.
All we need now is a highlight for the currently selected tab, and while we’re at it we shouldchoose our default tab that we want to be displayed first on app load. Let’s plump for the Searchtab. Add a class name of “current” to the Search tab thus:
<ul id="tab-bar">
<li class="current">
<a href="#search"><img src="img/search.png"> Search</a>
</li>
.
.
</ul>
Then, in the CSS, modify #tab-bar li{} and add #tab-bar li.current{} thus:

First things first: The layout 25
/*each tab*/
#tab-bar li {
display: inline;
float:left;
width: 33.3333%;
border-bottom:3px solid #555; /*same bg as header*/
}
/*current tab*/
#tab-bar li.current {
border-bottom:3px solid #990000; /*signature red*/
}
We simply add a bottom border, in our signature red, to any tab bar list item that has a class of“current”. We also add a border of the same size but using the header’s background colour to noncurrent tabs. This keeps everything looking flush horizontally. Later on (soon actually!) we willuse JavaScript to detect tap events on the tabs and change the current tab. Running what youhave so far looks like:
Figure 15. Current tab highlight
Pretty good! Only two little things are bugging us now. The content area text starts a little tooclose to the tab bar, and, thinking about it this app doesn’t really need a footer at all! Change theHTML footer to simply look like this:
<footer></footer>
Then add .japxlate_app{} to the CSS and also change the height of footer{} thus:
.japxlate_app {
padding-top:1em; /*move content away from tab bar*/
}
footer {
background-color:#555;
color:#ccc;
height:2px; /*down to 2px from 20px*/
line-height:20px; /*no longer meaningful...*/

First things first: The layout 26
position:absolute;
bottom:0;
width:100%;
}
Running this looks like:
Figure 16. Final app layout
Which we’ll stick with for the rest of the tutorial - and app! We have a 2px footer which is a bitgimmicky, but will help us a bit with scroll debugging a bit later on. The tab content text is nowone newline(ish) down from the tab bar.
..
To fullscreen or not?You might have noticed by now that the default PhoneGap app, and our own app’s layout thatwe’ve just finished, fill the entire screen of the device. Even the Android status bar (whichshows the time, battery charge and signal strength etc) is obliterated.
Game apps tend to fill the entire screen, but almost every utility app out there leaves thestatus bar. The good news is that we can get the status bar back quite easily by openingPROJECTROOT/platforms/android/res/xml/config.xml and changing:
<preference name="fullscreen" value="true" />
to
<preference name="fullscreen" value="false" />
and then re-running the app.
You can choose which style you like and the rest of this tutorial is valid either way. Note thatfigures showing device screenshots won’t have the status bar.

7. First things first: The tabbingmechanism
The layout is in the bag now, but we need a mechanism to markup the content for our threedifferent tabs and a way for taps on the tabs to trigger the display of the relevant content.
We can markup the content for all three tabs in the HTML file and simply have Discover andWrite hidden (Search is our default remember) with CSS when the app first starts. Let’s do thisfirst before we look at any JavaScript. Edit <div class="japxlate_app"> in index.html so thatit’s contents are like this:
<div class="japxlate_app">
<div id="tab-content">
<div id="search" class="current">
search tab content. search tab content. search tab content.
search tab content. search tab content. search tab content.
search tab content. search tab content. search tab content.
search tab content. search tab content. search tab content.
</div>
<div id="discover">
discover tab content. discover tab content. discover tab content.
discover tab content. discover tab content. discover tab content.
discover tab content. discover tab content. discover tab content.
discover tab content. discover tab content. discover tab content.
</div>
<div id="write">
write tab content.write tab content. write tab content.
write tab content.write tab content. write tab content.
write tab content.write tab content. write tab content.
write tab content.write tab content. write tab content.
</div>
</div>
</div>
Then let’s default to hidden, but with class="current" being visible, for these <div>s in#tab-content. Add the following two clauses to index.css:
First things first: The tabbing mechanism 28
#tab-content > div.current {
display:block;
}
#tab-content > div {
display:none;
}
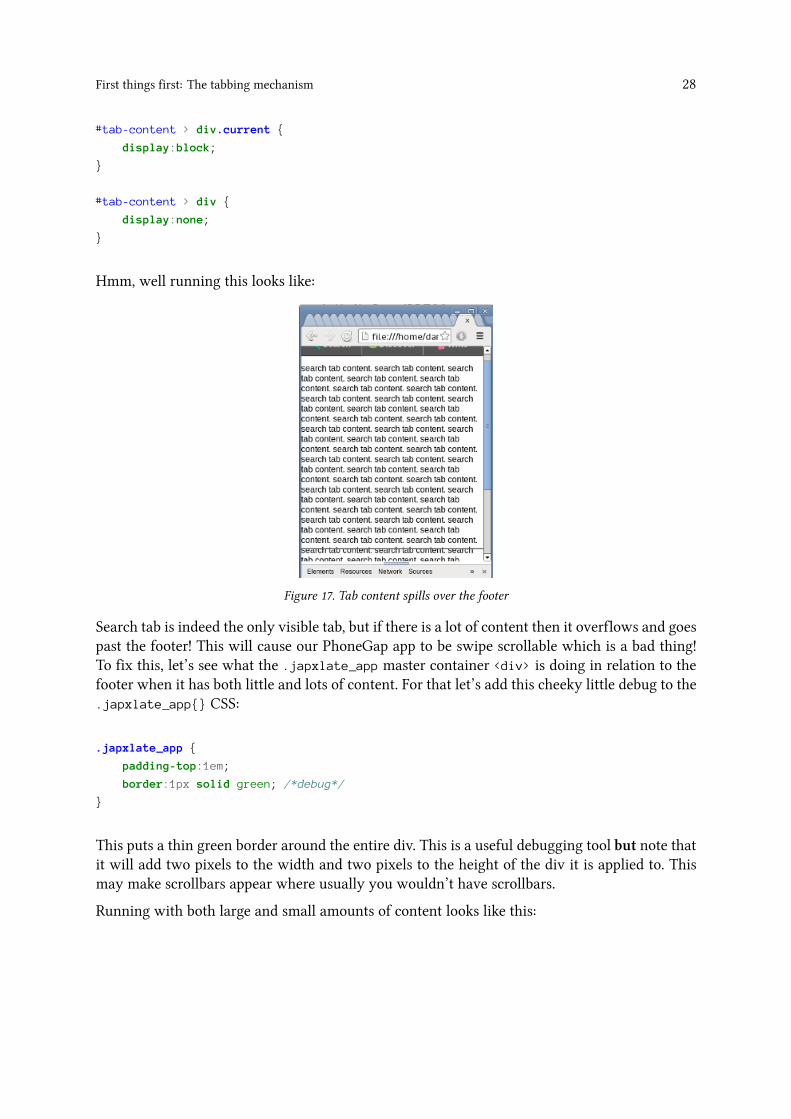
Hmm, well running this looks like:
Figure 17. Tab content spills over the footer
Search tab is indeed the only visible tab, but if there is a lot of content then it overflows and goespast the footer! This will cause our PhoneGap app to be swipe scrollable which is a bad thing!To fix this, let’s see what the .japxlate_app master container <div> is doing in relation to thefooter when it has both little and lots of content. For that let’s add this cheeky little debug to the.japxlate_app{} CSS:
.japxlate_app {
padding-top:1em;
border:1px solid green; /*debug*/
}
This puts a thin green border around the entire div. This is a useful debugging tool but note thatit will add two pixels to the width and two pixels to the height of the div it is applied to. Thismay make scrollbars appear where usually you wouldn’t have scrollbars.
Running with both large and small amounts of content looks like this:
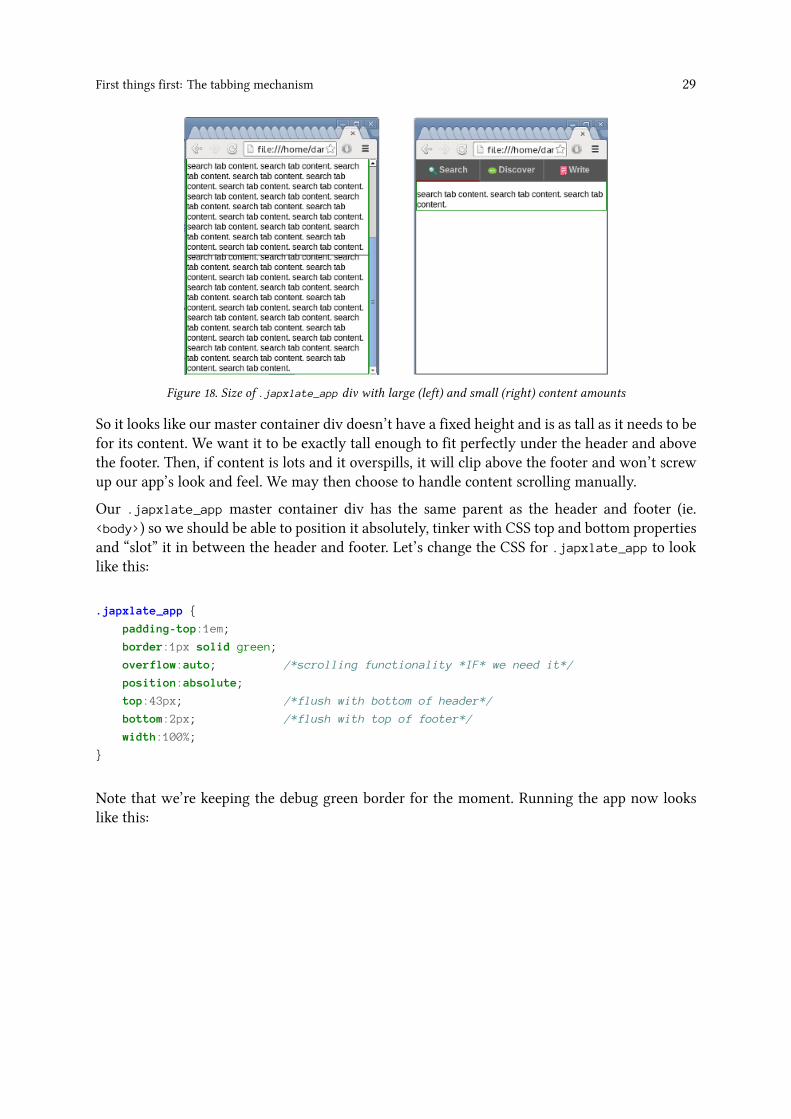
First things first: The tabbing mechanism 29
Figure 18. Size of .japxlate_app div with large (left) and small (right) content amounts
So it looks like our master container div doesn’t have a fixed height and is as tall as it needs to befor its content. We want it to be exactly tall enough to fit perfectly under the header and abovethe footer. Then, if content is lots and it overspills, it will clip above the footer and won’t screwup our app’s look and feel. We may then choose to handle content scrolling manually.
Our .japxlate_app master container div has the same parent as the header and footer (ie.<body>) so we should be able to position it absolutely, tinker with CSS top and bottom propertiesand “slot” it in between the header and footer. Let’s change the CSS for .japxlate_app to looklike this:
.japxlate_app {
padding-top:1em;
border:1px solid green;
overflow:auto; /*scrolling functionality *IF* we need it*/
position:absolute;
top:43px; /*flush with bottom of header*/
bottom:2px; /*flush with top of footer*/
width:100%;
}
Note that we’re keeping the debug green border for the moment. Running the app now lookslike this:
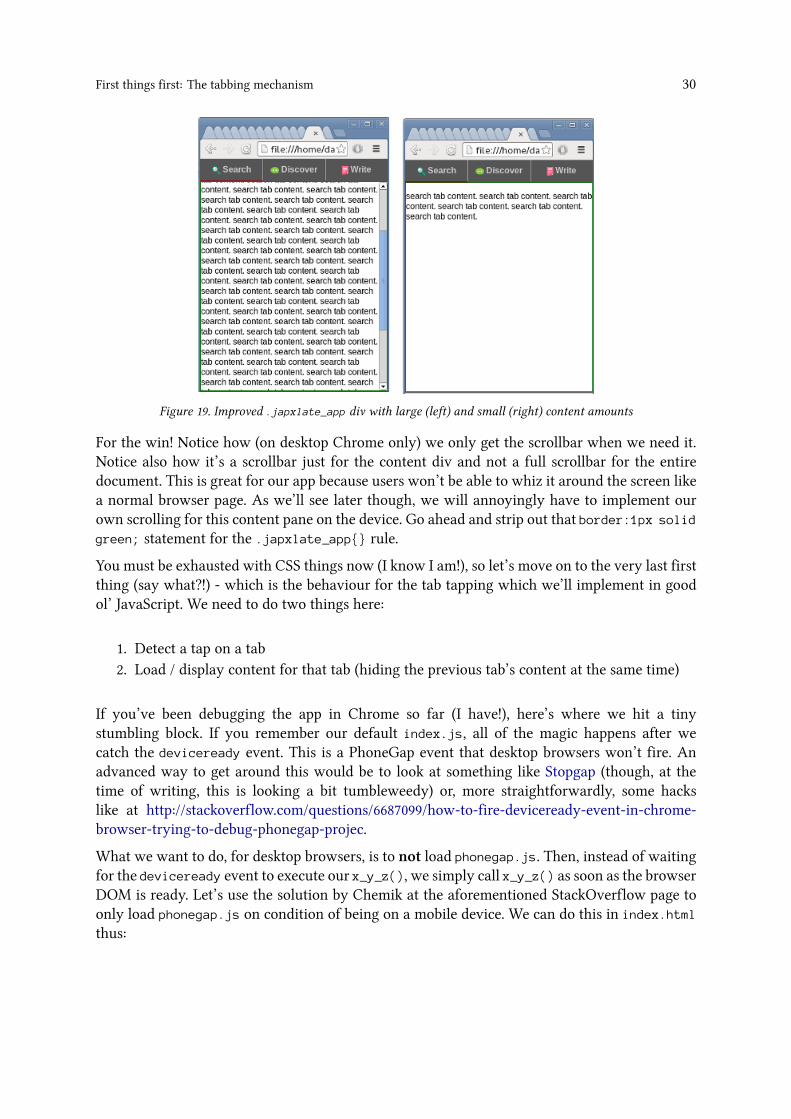
First things first: The tabbing mechanism 30
Figure 19. Improved .japxlate_app div with large (left) and small (right) content amounts
For the win! Notice how (on desktop Chrome only) we only get the scrollbar when we need it.Notice also how it’s a scrollbar just for the content div and not a full scrollbar for the entiredocument. This is great for our app because users won’t be able to whiz it around the screen likea normal browser page. As we’ll see later though, we will annoyingly have to implement ourown scrolling for this content pane on the device. Go ahead and strip out that border:1px solid
green; statement for the .japxlate_app{} rule.
You must be exhausted with CSS things now (I know I am!), so let’s move on to the very last firstthing (say what?!) - which is the behaviour for the tab tapping which we’ll implement in goodol’ JavaScript. We need to do two things here:
1. Detect a tap on a tab2. Load / display content for that tab (hiding the previous tab’s content at the same time)
If you’ve been debugging the app in Chrome so far (I have!), here’s where we hit a tinystumbling block. If you remember our default index.js, all of the magic happens after wecatch the deviceready event. This is a PhoneGap event that desktop browsers won’t fire. Anadvanced way to get around this would be to look at something like Stopgap (though, at thetime of writing, this is looking a bit tumbleweedy) or, more straightforwardly, some hackslike at http://stackoverflow.com/questions/6687099/how-to-fire-deviceready-event-in-chrome-browser-trying-to-debug-phonegap-projec.
What we want to do, for desktop browsers, is to not load phonegap.js. Then, instead of waitingfor the deviceready event to execute our x_y_z(), we simply call x_y_z() as soon as the browserDOM is ready. Let’s use the solution by Chemik at the aforementioned StackOverflow page toonly load phonegap.js on condition of being on a mobile device. We can do this in index.html
thus:
First things first: The tabbing mechanism 31
.
.
<footer></footer>
<!--load phonegap.js only if on mobile device-->
<script type="text/javascript">
if (navigator.userAgent.match(/(iPhone|iPod|iPad|Android|BlackBerry|IEMobile)/)) {
var line = '<script type="text/javascript" src="phonegap.js"' + '></'+'script>';
document.writeln(line);
}
</script>
.
.
Note that we break up the ending </script> in our string so that it isn’t picked up by the(WebView) browser - or our IDE - as an actual ending script tag! This code will now only loadphonegap.js for mobile devices. You can test this by - carefully! - inserting a cheeky alert('I am
phonegap.js'); right at the top of phonegap.js. Don’t forget to remove this alert when you’vefinished testing!
So nowwe only have phonegap.js loaded on an actual mobile device. This gives us a little tool tohelp with the deviceready event problem. Edit bindEvents() and receivedEvent() in index.js
to look like this:
.
.
// Bind Event Listeners
//
// Bind any events that are required on startup. Common events are:
// 'load', 'deviceready', 'offline', and 'online'.
bindEvents: function() {
if (window.cordova) { //actual app
document.addEventListener('deviceready', this.onDeviceReady, false);
} else { //debugging in desktop browser
this.onDeviceReady();
}
},
// Update DOM on a Received Event
receivedEvent: function(id) {
console.log('Received Event: ' + id);
},
.
.
If phonegap.js is loaded, it will define the window.cordova object which we can test for beforesetting up our event listener. If phonegap.js is not loaded, we simply call what the listener callsanyway. Running this in both desktop Chrome and your device should produce the eventualconsole.log() message (you’ll see this via Eclipse’s LogCat if running on your device).
First things first: The tabbing mechanism 32
..
All about alerts (and PhoneGap API plugins)Since we’re talking about debugging and JavaScript alert()s and things, let’s talk about howwe can use PhoneGap to produce more native-like alerts. JavaScript alerts will definitely giveyour app that non-nativey, browser app feel. In fact, using alert() even on desktop sites isconsidered a bit naff these days!
Conveniently, PhoneGap exposes a Notification API for “Visual, audible, and tactile device no-tifications.” The documentation at http://docs.phonegap.com/en/3.1.0/cordova_notification_-notification.md.html says we can use it like this:

First things first: The tabbing mechanism 33
..
navigator.notification.alert(message, alertCallback, [title], [buttonName]);
So let’s try that. Stick navigator.notification.alert('Some alert message', null); in thereceivedEvent() function that we were just tinkering with. Running this (which obviouslywon’t work in desktop Chrome) gives a spurious error in LogCat:
Figure 20. Error when attempting navigator.notification.alert()
What’s going on? Well, it turns out that “As of version 3.0, Cordova implements device-levelAPIs as plugins”. We have to install whichever APIs we want in our project. This removesbloat as, previously, all APIs came pre-installed in every PhoneGap project. I actually foundthis to be a bit mysterious and poorly documented (I found myself mashing up a mix of infofrom Cordova docs and PhoneGap docs). But here’s how to add a particular plugin to yourPhoneGap project. Go to anywhere in your project folder structure on the command line and:

First things first: The tabbing mechanism 34
..
you@yours$ japxlate]$ phonegap local plugin add https://git-wip-us.apache.org/repos/asf\
/cordova-plugin-dialogs.git
From PhoneGap v3.3.0 you can simply type phonegap local plugin add
org.apache.cordova.dialogs
Which should echo:
First things first: The tabbing mechanism 35
..
[phonegap] adding the plugin: https://git-wip-us.apache.org/repos/asf/cordova-plugin-di\
alogs.git
[phonegap] successfully added the plugin
(Note that you won’t need to run this command, and you won’t get the above error, if you’vegone down The fiddly older way as that bundles all plugins into your project).
You’ll get the relevant URL from the docs for whichever plugin at the “API Reference” section athttp://docs.phonegap.com/en/3.1.0/ (PhoneGap has a good list of core and 3rd party plugins athttps://build.phonegap.com/plugins but the installation instructions for each one are seeminglyout-of-date and mention tinkering with XML config files which we don’t need to do afterrunning the above command.) The above command has downloaded the source for the pluginand put it in /assets/www/plugins (in this case in org.apache.cordova.dialogs)
but diff on v3.3.0 etc.
It has also added references to the plugin in /assets/www/cordova_plugins.js - a file whichhas been there from the start but just as a placeholder stub. The phonegap.js that we includein our index.html actually also includes cordova_plugins.js so after running the abovecommand, we have all we need to start using navigator.notification.alert()! Try it again!It works!:
First things first: The tabbing mechanism 36
..
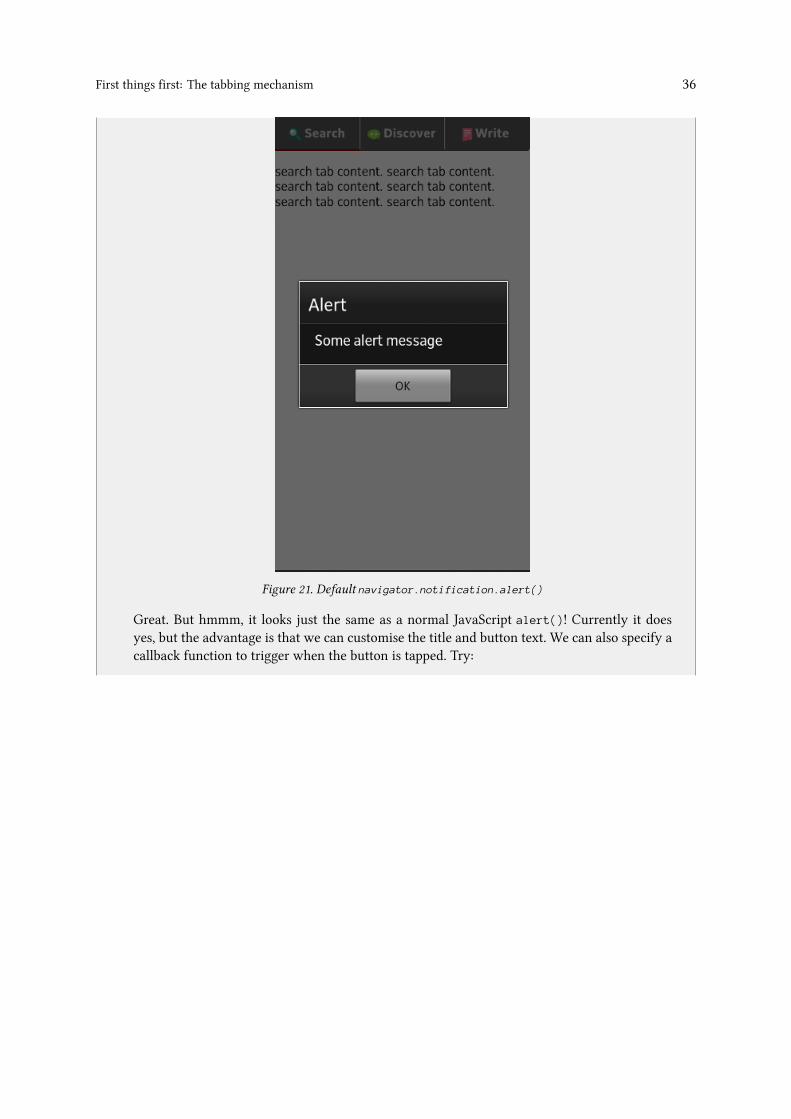
Figure 21. Default navigator.notification.alert()
Great. But hmmm, it looks just the same as a normal JavaScript alert()! Currently it doesyes, but the advantage is that we can customise the title and button text. We can also specify acallback function to trigger when the button is tapped. Try:
First things first: The tabbing mechanism 37
..
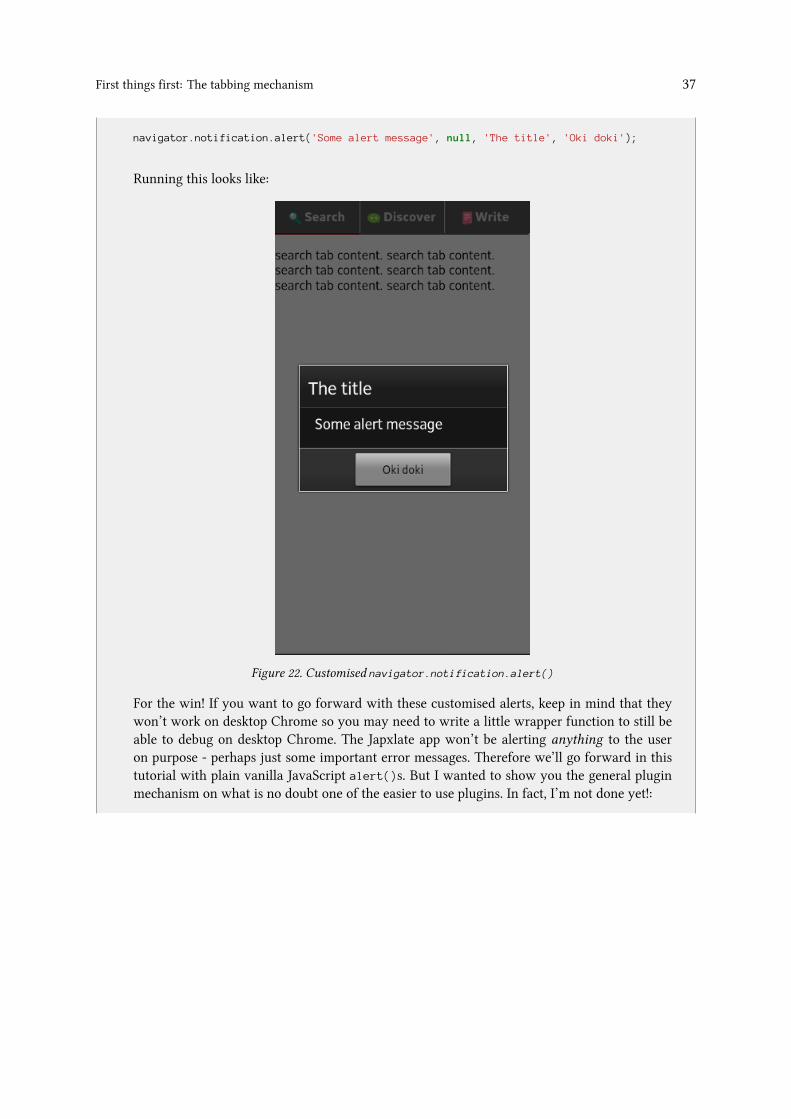
navigator.notification.alert('Some alert message', null, 'The title', 'Oki doki');
Running this looks like:
Figure 22. Customised navigator.notification.alert()
For the win! If you want to go forward with these customised alerts, keep in mind that theywon’t work on desktop Chrome so you may need to write a little wrapper function to still beable to debug on desktop Chrome. The Japxlate app won’t be alerting anything to the useron purpose - perhaps just some important error messages. Therefore we’ll go forward in thistutorial with plain vanilla JavaScript alert()s. But I wanted to show you the general pluginmechanism on what is no doubt one of the easier to use plugins. In fact, I’m not done yet!:

First things first: The tabbing mechanism 38
..
you@yours$ japxlate]$ phonegap local plugin list
[phonegap] org.apache.cordova.dialogs
This command lists all plugins installed in the current project.
you@yours$ japxlate]$ phonegap local plugin remove org.apache.cordova.dialogs
[phonegap] removing the plugin: org.apache.cordova.dialogs
[phonegap] successfully removed the plugin
This command removes the specified plugin from the current project. You specify the pluginby its reverse-DNS identifier. You can find these out by issuing the above “list” command.
There are plugins to access the mobile device’s camera, accelerometer, phone contacts andmany more. Using these plugins is how we make a full fat mobile app and not just a simplewebsite-in-a-box.
PhoneGap v3.3.0 also has “Plugman” which is another way of working with plugins.Plugman lets you add or remove plugins for one specific platform, whereas the abovemethod will add or remove plugins globally to any and all platforms used in the project.Please see http://docs.phonegap.com/en/3.3.0/plugin_ref_plugman.md.html.
We’ve just been able to simulate our deviceready event on desktop Chrome for debugging andwe are ready to get our tab taps working. receivedEvent() in index.js is where the magichappens because by the time we reach there, the device is ready (and the browser DOM is readyas we’ve put JavaScript includes at the bottom of our HTML). But let’s not go down the route ofstuffing all of our JavaScript in index.js. Let’s go modular - right from the start. Create a newJavaScript file called:
japxlate.js
in /assets/www/js
and include it from index.html thus:
<script type="text/javascript" src="js/japxlate.js"></script>
<script type="text/javascript" src="js/index.js"></script>
<script type="text/javascript">
app.initialize();
</script>
Put a function called configureTabs() in the newly created japxlate.js thus:
First things first: The tabbing mechanism 39
//tab clickability
function configureTabs()
{
var tabs = document.querySelectorAll("#tab-bar li a");
for(var loop = 0; loop < tabs.length; loop++)
{
var tab = tabs.item(loop);
tab.addEventListener('click', function(event){alert(event + ' on ' + this);}, f\
alse);
}
}
Then modify index.js to call this new function in receivedEvent() thus:
// Update DOM on a Received Event
receivedEvent: function(id) {
console.log('Received Event: ' + id);
configureTabs();
},
Running this, and clicking on one of the tabs results in:
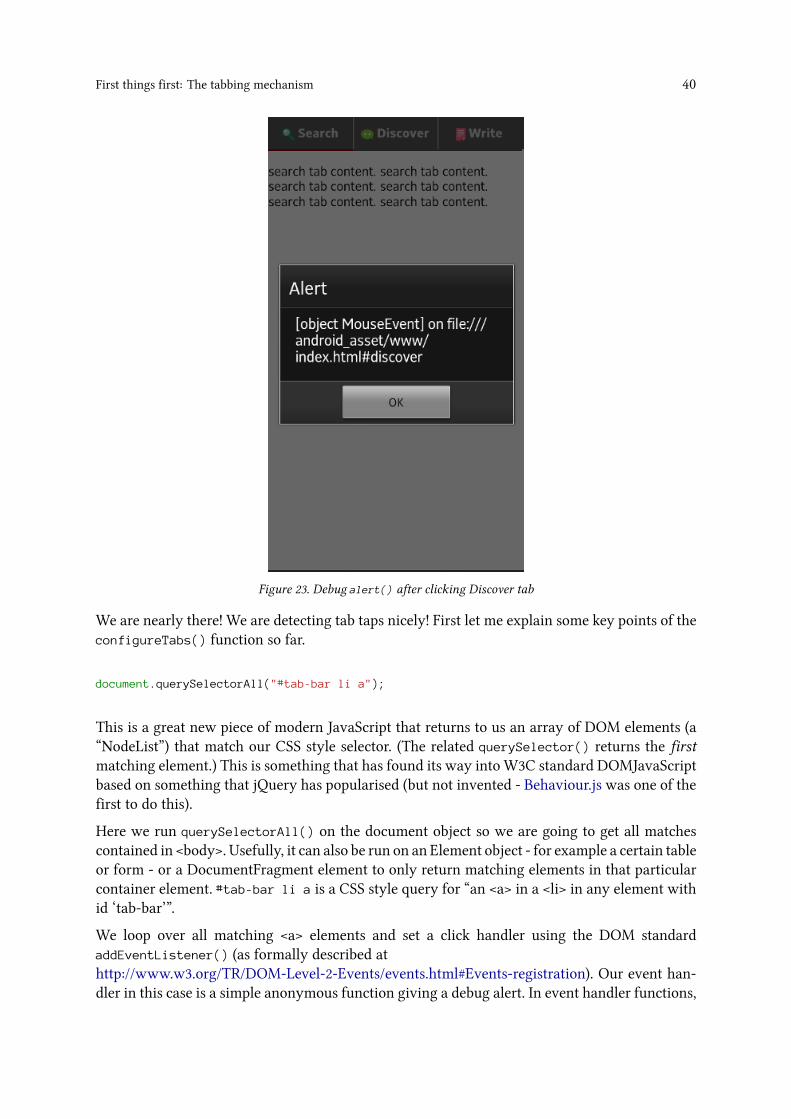
First things first: The tabbing mechanism 40
Figure 23. Debug alert() after clicking Discover tab
We are nearly there! We are detecting tab taps nicely! First let me explain some key points of theconfigureTabs() function so far.
document.querySelectorAll("#tab-bar li a");
This is a great new piece of modern JavaScript that returns to us an array of DOM elements (a“NodeList”) that match our CSS style selector. (The related querySelector() returns the firstmatching element.) This is something that has found its way into W3C standard DOMJavaScriptbased on something that jQuery has popularised (but not invented - Behaviour.js was one of thefirst to do this).
Here we run querySelectorAll() on the document object so we are going to get all matchescontained in <body>. Usefully, it can also be run on an Element object - for example a certain tableor form - or a DocumentFragment element to only return matching elements in that particularcontainer element. #tab-bar li a is a CSS style query for “an <a> in a <li> in any element withid ‘tab-bar’”.
We loop over all matching <a> elements and set a click handler using the DOM standardaddEventListener() (as formally described athttp://www.w3.org/TR/DOM-Level-2-Events/events.html#Events-registration). Our event han-dler in this case is a simple anonymous function giving a debug alert. In event handler functions,
First things first: The tabbing mechanism 41
an Event object is passed as a parameter and contains information about the particular event thattriggered the handler - screen x and y coordinates for mouse events and which key was pressedfor keyboard events and so on. In event handler functions, this refers to the element on whichthe event happened.
Let’s replace the dummy click handler with something that we’ll actually want to use. But first,remember that in the click handler function we only have the event object and the <a> object (asthis)? We’ll also need to know which content <div> relates to which <a>, then we can switchthe content accordingly. Modify the header of index.html to look like this:
<header>
<ul id="tab-bar">
<li class="current">
<a href="#search" data-div-id="search"><img src="img/search.png"> Search</a>
</li>
<li>
<a href="#discover" data-div-id="discover"><img src="img/chat-bubble.png"> \
Discover</a>
</li>
<li>
<a href="#write" data-div-id="write"><img src="img/file.png"> Write</a>
</li>
</ul>
</header>
HTML5 allows us to use custom or “data” attributes where we can add any attribute and valuewe like to any particular element. The attribute names start with “data-“. Here we simply linkeach <a> to its matching content <div> id. We’ll use this attribute (soon) in the click handler fortabs.
OK, next strip out the dummy handler from addEventListener() and make it look like this:
tab.addEventListener('click', onclickForTab, false);
This will call the onclickForTab() function as a click handler. We define the onclickForTab()function, in japxlate.js thus:
//set up and display a newly tapped tab
function onclickForTab(event)
{
//to prevent URL from changing and browse history building up
event.preventDefault();
//-------tab display logic---
var lastTab = document.querySelector('li.current a');
//NOP if clicking current tab again
if(lastTab == this)

First things first: The tabbing mechanism 42
{
return false;
}
lastTab.parentNode.className = ''; //undisplay
this.parentNode.className = 'current';
//---------------------------
//-----content div display logic---
var lastDiv = document.querySelector('div.current');
lastDiv.className = ''; //undisplay
var matchingDiv = this.getAttribute('data-div-id');
var thisDiv = document.getElementById(matchingDiv);
thisDiv.className = 'current';
//-----------
//get tab div id from tab link
var divId = this.getAttribute('data-div-id');
}
Let’s go through this code, which looks fiddly at first, but basically tinkers with CSS class namessuch that things turn on and off as we want.
The first thing we do is the DOM standard preventDefault() which prevents the browser’sdefault action for the event from triggering. The default browser action for clicking on a link isto:
1. Change URL in address bar to that of link target2. Add new URL to browsing history3. Load new URL
As our links are simply triggers to load tabs and not proper links, we don’t want any of thesesteps to happen. Step [2] is especially annoying. If we don’t call preventDefault() for our tabtaps, if we open our app and click on the tabs ten times, we will have to use the device’s BACKbutton ten times to exit the app!
Next we use querySelector() to get the single current tab link. Because ‘this’ in our click handlerwill be the clicked element, we can do a check to see if this is the same as the previous currenttab. And if so, do a “no operation” (NOP). We then manipulate classnames to activate only theclicked tab.
Similarly, we use querySelector() to get the currently active content <div>. We activate thecontent <div> for the clicked tab by retreiving data-div-id from the clicked <a> and using thatto get the correct div.
First things first: The tabbing mechanism 43
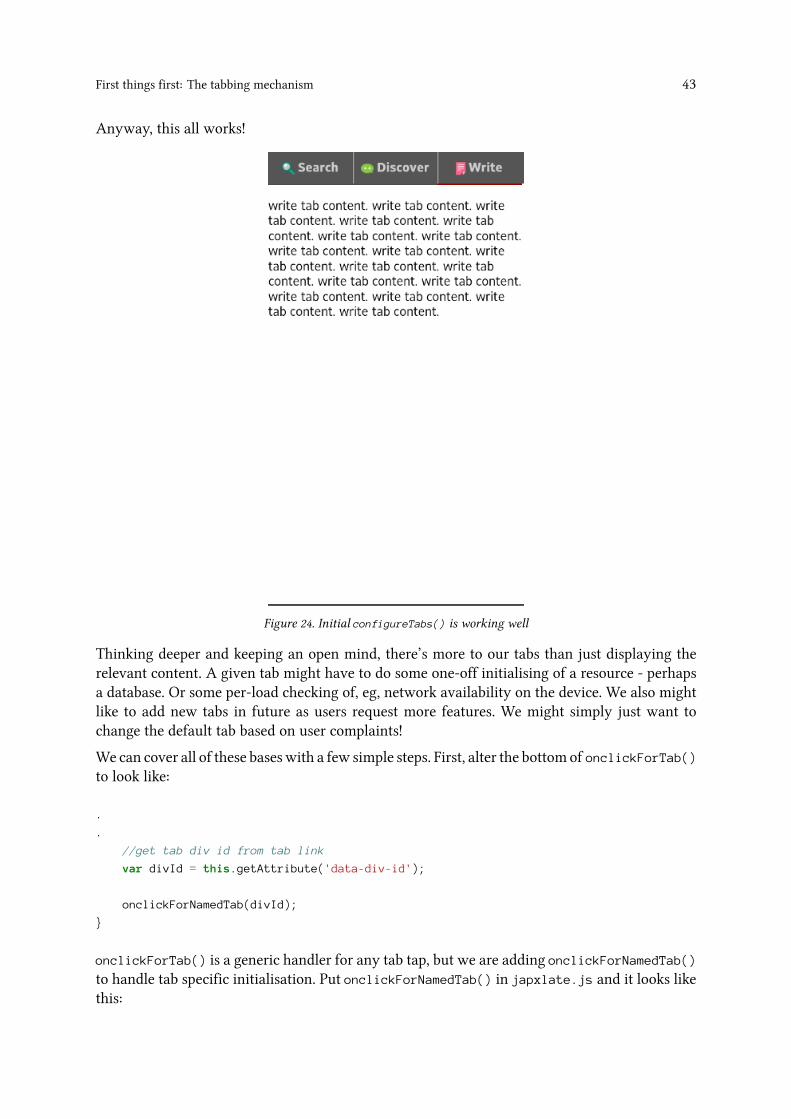
Anyway, this all works!
Figure 24. Initial configureTabs() is working well
Thinking deeper and keeping an open mind, there’s more to our tabs than just displaying therelevant content. A given tab might have to do some one-off initialising of a resource - perhapsa database. Or some per-load checking of, eg, network availability on the device. We also mightlike to add new tabs in future as users request more features. We might simply just want tochange the default tab based on user complaints!
We can cover all of these baseswith a few simple steps. First, alter the bottom of onclickForTab()to look like:
.
.
//get tab div id from tab link
var divId = this.getAttribute('data-div-id');
onclickForNamedTab(divId);
}
onclickForTab() is a generic handler for any tab tap, but we are adding onclickForNamedTab()to handle tab specific initialisation. Put onclickForNamedTab() in japxlate.js and it looks likethis:
First things first: The tabbing mechanism 44
//Do the one-off loading and everytime setup for whichever tab
function onclickForNamedTab(divId)
{
if(divId == 'discover')
{
onclickForTab_Discover();
}
else if(divId == 'search')
{
onclickForTab_Search();
}
else if(divId == 'write')
{
onclickForTab_Write();
}
}
We simply switch on the tab content <div> id, calling the appropriate onclickForTab_theTab().Yes, you’ve guessed it, if you want to add more tabs to the app, you will have to update thisswitch case (and add the corresponding onclickForTab_theNewTab()). This function is a simpledispatcher to other functions that are going to do the actual one-off and per-load initialisationsfor tabs.
For a “one-off” initialisation, we are going to have to somehow record which tabs have beenopened so far. We’ll do this using a global variable. Eek! Global variables are not current bestpractice for JavaScript, but we’ll do it to keep this small and simple app, er, small and simple. Putthis at the top of japxlate.js:
//Has the first load of each tab happened yet?
var global_pagesLoaded = {discover:false, search:false, write:false};
We can then check - and set - these values in our onclickForTab_theTabName() functions thatour onclickForNamedTab() dispatcher calls. Let’s get started with the first of these functions forour Discover tab. Put this in japxlate.js:
//One-off loading and each time setup for discover tab
function onclickForTab_Discover()
{
//console.log('click on discover tab');
if(!global_pagesLoaded.discover)
{
firstLoadForTab_Discover();
}
//each time setup to go here
}
First things first: The tabbing mechanism 45
We simply check if global_pagesLoaded.discover is false and if so call firstLoadForTab_-Discover(). We also have a space here for any “each time” setup of the Discover tab. Go aheadand create functions, using this one as a template, for the Search and Write tabs (do a copy pasteand then change ‘Discover’ to ‘Search’ and ‘discover’ to ‘search’ and etc). We’ll modify thesefunctions later if we need to.
OK, we still need firstLoadForTab_Discover()which will perform one-off initialisation for theDiscover tab. Do it like this, again in japxlate.js:
//One-off loading for discover tab
function firstLoadForTab_Discover()
{
//console.log('first load for discover tab');
global_pagesLoaded.discover = true;
//one-off setup to go here
}
All we do is set global_pagesLoaded.discover to true so that this function does not getcalled again from onclickForTab_Discover() when the tab is tapped a subsequent time. Atthe moment this is just a placeholder for whatever we might need down the line. Like we justdid for onclickForTab_*(), replicate this function for the Search and Write tabs.
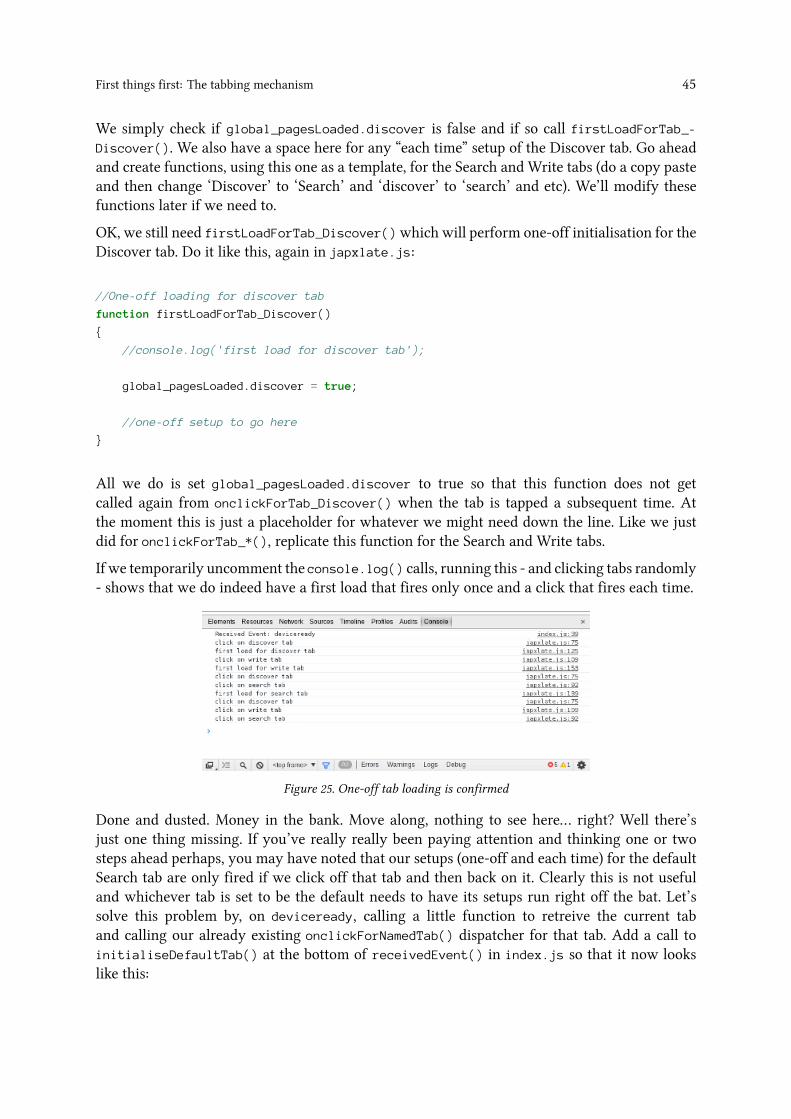
If we temporarily uncomment the console.log() calls, running this - and clicking tabs randomly- shows that we do indeed have a first load that fires only once and a click that fires each time.
Figure 25. One-off tab loading is confirmed
Done and dusted. Money in the bank. Move along, nothing to see here… right? Well there’sjust one thing missing. If you’ve really really been paying attention and thinking one or twosteps ahead perhaps, you may have noted that our setups (one-off and each time) for the defaultSearch tab are only fired if we click off that tab and then back on it. Clearly this is not usefuland whichever tab is set to be the default needs to have its setups run right off the bat. Let’ssolve this problem by, on deviceready, calling a little function to retreive the current taband calling our already existing onclickForNamedTab() dispatcher for that tab. Add a call toinitialiseDefaultTab() at the bottom of receivedEvent() in index.js so that it now lookslike this:
First things first: The tabbing mechanism 46
// Update DOM on a Received Event
receivedEvent: function(id) {
console.log('Received Event: ' + id);
configureTabs();
//load and show whatever we've set the initial tab to be
initialiseDefaultTab();
}
Then define initialiseDefaultTab() in japxlate.js thus:
//Load and show our default initial tab
function initialiseDefaultTab()
{
var defaultTab = document.querySelector('div.current');
var divId = defaultTab.id;
onclickForNamedTab(divId);
}
We use querySelector() to get whichever content <div> has been set as current in the HTMLmarkup. We could in theory select the tab that has been marked as current but, as that will bein sync with the content div anyway, it is academic.
Congratulations, you have just built a working infrastructure for the Japxlate app! This is a goodstarting point for any simple PhoneGap app.

8. The Search tab8.1 Layout and interface
The Search tab - the first tab that the user will see when launching our app - is going to bea search form for the user to search our Japanese dictionary. It will also display any and allmatching results in a scrollable area.
We’ll have a rule that the user’s search query can be in Japanese as well as English. Not only willthis increase the usefulness of our app, it will also enable a future “reversing” of the app to belocalised for Japanese speakers wanting to learn English vocabulary. Let’s have another rule thatthey can type the Japanese or English query into the form in the same input box and withouthaving to fiddle with radio buttons or other such inputs (which are a bit old hat for search formsanyway but especially cumbersome on mobile devices). With these rules and functionalities inmind, a wireframe of the Search tab might look like:
Figure 26. Quick wireframe of the Search tab layout
OK, let’s markup - and then style - the search form and the results space for dictionary queries.Mosey on down to http://www.ajaxload.info and make a “loading” spinner image (gif) for theSearch tab. I made mine use the Japxlate signature red (#990000) and a transparent background.Download it and put it in /assets/www/img as spinner.gif.
Let’s markup the form and results space - in index.html - like this:
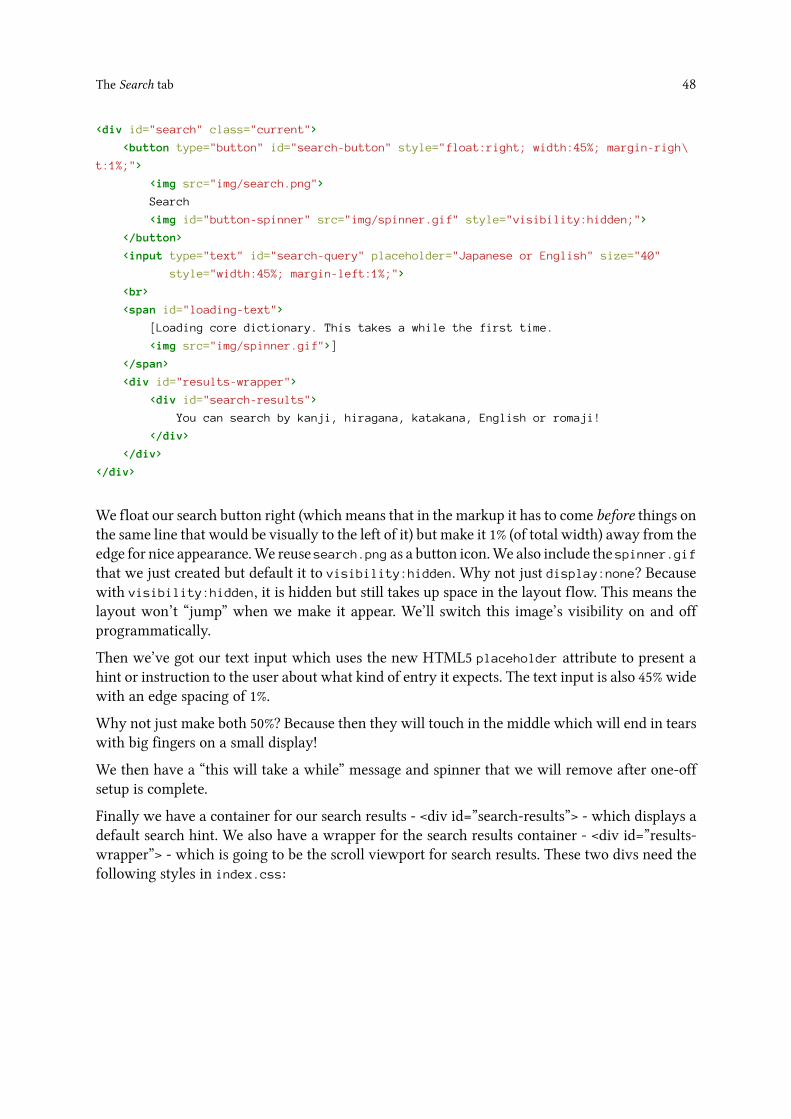
The Search tab 48
<div id="search" class="current">
<button type="button" id="search-button" style="float:right; width:45%; margin-righ\
t:1%;">
<img src="img/search.png">
Search
<img id="button-spinner" src="img/spinner.gif" style="visibility:hidden;">
</button>
<input type="text" id="search-query" placeholder="Japanese or English" size="40"
style="width:45%; margin-left:1%;">
<br>
<span id="loading-text">
[Loading core dictionary. This takes a while the first time.
<img src="img/spinner.gif">]
</span>
<div id="results-wrapper">
<div id="search-results">
You can search by kanji, hiragana, katakana, English or romaji!
</div>
</div>
</div>
We float our search button right (which means that in the markup it has to come before things onthe same line that would be visually to the left of it) but make it 1% (of total width) away from theedge for nice appearance.We reuse search.png as a button icon.We also include the spinner.gifthat we just created but default it to visibility:hidden. Why not just display:none? Becausewith visibility:hidden, it is hidden but still takes up space in the layout flow. This means thelayout won’t “jump” when we make it appear. We’ll switch this image’s visibility on and offprogrammatically.
Then we’ve got our text input which uses the new HTML5 placeholder attribute to present ahint or instruction to the user about what kind of entry it expects. The text input is also 45% widewith an edge spacing of 1%.
Why not just make both 50%? Because then they will touch in the middle which will end in tearswith big fingers on a small display!
We then have a “this will take a while” message and spinner that we will remove after one-offsetup is complete.
Finally we have a container for our search results - <div id=”search-results”> - which displays adefault search hint. We also have a wrapper for the search results container - <div id=”results-wrapper”> - which is going to be the scroll viewport for search results. These two divs need thefollowing styles in index.css:
The Search tab 49
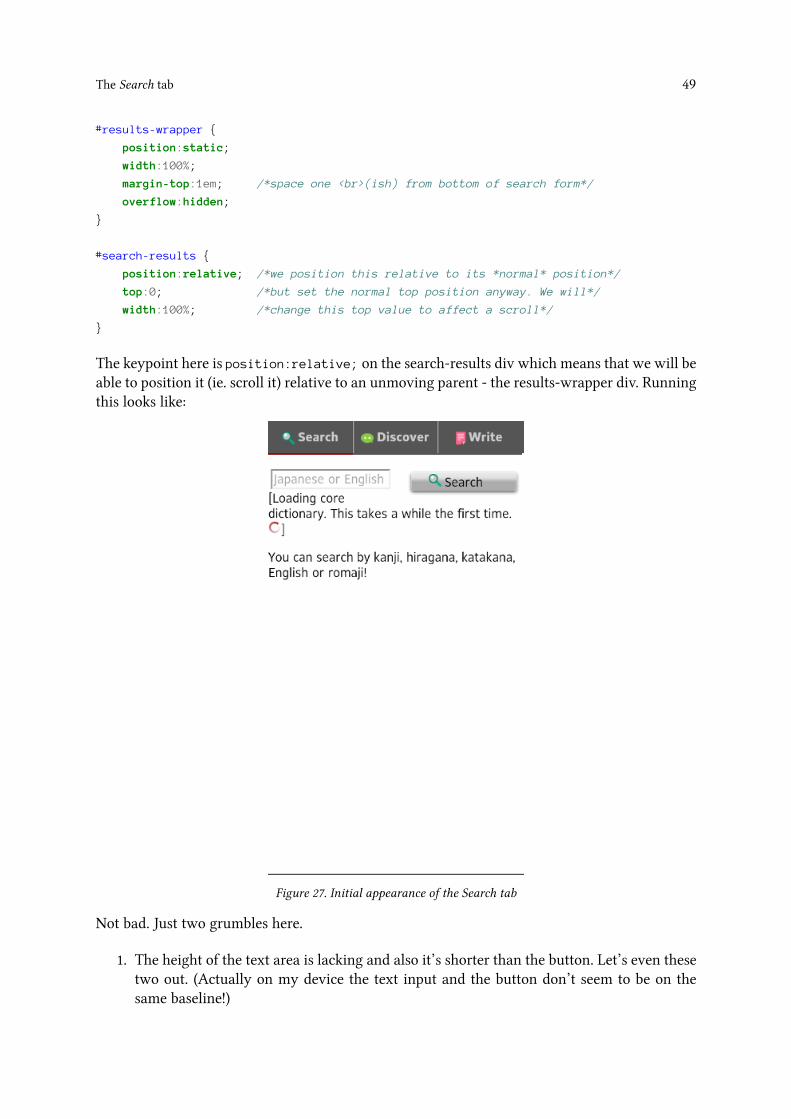
#results-wrapper {
position:static;
width:100%;
margin-top:1em; /*space one <br>(ish) from bottom of search form*/
overflow:hidden;
}
#search-results {
position:relative; /*we position this relative to its *normal* position*/
top:0; /*but set the normal top position anyway. We will*/
width:100%; /*change this top value to affect a scroll*/
}
The keypoint here is position:relative; on the search-results div which means that we will beable to position it (ie. scroll it) relative to an unmoving parent - the results-wrapper div. Runningthis looks like:
Figure 27. Initial appearance of the Search tab
Not bad. Just two grumbles here.
1. The height of the text area is lacking and also it’s shorter than the button. Let’s even thesetwo out. (Actually on my device the text input and the button don’t seem to be on thesame baseline!)

The Search tab 50
2. Icon for search is screwy again - let’s fix that like we fixed the tab icons.
In index.css, change the existing:
a img
{
vertical-align:middle; /*make more sensible relative to text baseline*/
}
to:
a img, button img
{
vertical-align:middle; /*make more sensible relative to text baseline*/
}
Which covers (2). To fix (1), add this to index.css:
input[type="text"], button {
height:30px;
margin:0;
}
Running looks like this:
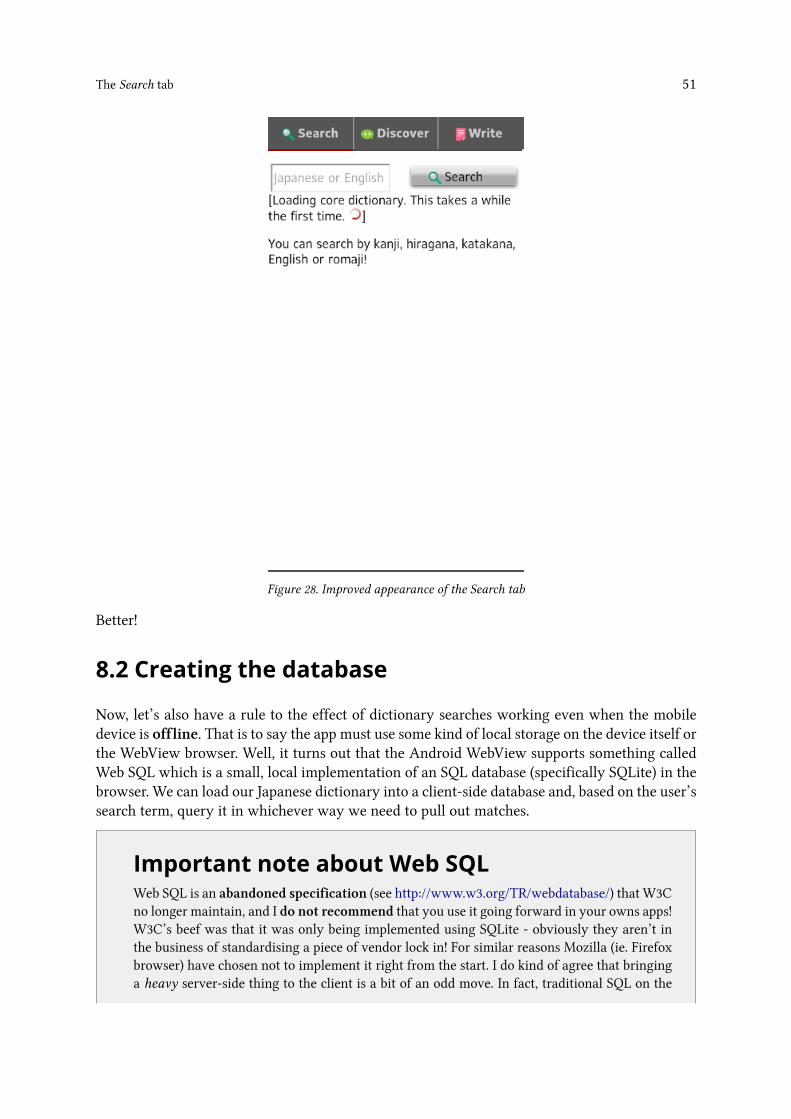
The Search tab 51
Figure 28. Improved appearance of the Search tab
Better!
8.2 Creating the database
Now, let’s also have a rule to the effect of dictionary searches working even when the mobiledevice is offline. That is to say the app must use some kind of local storage on the device itself orthe WebView browser. Well, it turns out that the Android WebView supports something calledWeb SQL which is a small, local implementation of an SQL database (specifically SQLite) in thebrowser. We can load our Japanese dictionary into a client-side database and, based on the user’ssearch term, query it in whichever way we need to pull out matches.
..
Important note about Web SQLWeb SQL is an abandoned specification (see http://www.w3.org/TR/webdatabase/) that W3Cno longer maintain, and I do not recommend that you use it going forward in your owns apps!W3C’s beef was that it was only being implemented using SQLite - obviously they aren’t inthe business of standardising a piece of vendor lock in! For similar reasons Mozilla (ie. Firefoxbrowser) have chosen not to implement it right from the start. I do kind of agree that bringinga heavy server-side thing to the client is a bit of an odd move. In fact, traditional SQL on the
The Search tab 52
..
back-end is somewhat in crisis itself these days in the world of NoSQL datastores. Though it isvery useful for mobile apps that might not be online and need to work with some data.
Why are we using it for this tutorial?Somewhat for historical reasons but also because I know it will be perfect for fuzzy textsearching. I know from experience that it will “just work”. When using PhoneGap we are luckytoo because “Cordova provides access to both interfaces (Web SQL and something else calledWeb Storage) for the minority of devices that don’t already support them. Otherwise the built-in implementations apply.”
What would be some alternatives?Ignoring PhoneGap and the world of mobile apps, Indexed DB (a W3C standard athttp://www.w3.org/TR/IndexedDB/) looks to be picking up steam. Though caniuse.com tellsme that support is currently less than that of Web SQL. Also it hasn’t made its way intoPhoneGap at the time of writing. Indexed DB mirrors the more modern style of NoSQLdatabases closely.
I hope that future versions of the app (and this tutorial) can use Indexed DB.
PhoneGap v3.3.0 now supports Indexed DB, but only if the underlying WebViewsupports it. At the time of writing this means only Windows Phone 8 and BlackBerry10.
PhoneGap’s (well actually Cordova’s) Web SQL docs are athttp://docs.phonegap.com/en/3.1.0/cordova_storage_storage.md.htmlAs you can see, it’s a fairlysmall implementation of an SQL database. But writing for it in JavaScript with callbacks was anovelty for this grizzled MySQL hacker!
OK, let’s crack on now with Web SQL initialisation for the first load of the Search tab. Stick thischeeky call - to a function we’re about to create - at the bottom of firstLoadForTab_Search()in japxlate.js:
tryPopulateDB();
Let’s create this function, and other functions to do with general Web SQL setup, in a new filein /assets/www/js called websql_core.js. Create this file, and the first function we’ll put in itis the tryPopulateDB() we’ve just referenced. It will look like this:

The Search tab 53
//Open / create the "Japxlate" Web SQL database and - if it's not already
//present - create and populate the "edict" table
function tryPopulateDB()
{
//version 1.0, 4 megabytes
var db = window.openDatabase("Japxlate", "1.0", "Japxlate DB", 4 * 1024 * 1024);
db.transaction(checkDB); //only populate edict table if it not already exist
}
PRO TIP: The Cordova docs on Web SQL are going to be very useful to referencewhen following this chapter. They are at http://docs.phonegap.com/en/3.1.0/cordova_-storage_storage.md.html.
The same page for PhoneGap v3.3.0 removes the Web SQL reference, which to behonest had at least one mistake in it, and instead points you to have a look athttp://www.html5rocks.com/en/features/storage.
We open aWeb SQL database called Japxlate, at version 1.0, with a display name of “Japxlate DB”and a size of 4 megabytes. I know from tinkering with the dictionary database for the @japxlateTwitter channel that the core dictionary definitions will fit in 4 megabytes with a bit to spare.
Then we call transaction() on the returned database to run the query or queries in thecheckDB() function that we’re about to implement.
Now’s a good time to talk about the schema we’ll use for the dictionary table. We’ll call the table“edict” as that’s the name of the Japanese dictionary that powers it(at http://www.csse.monash.edu.au/∼jwb/wwwjdicinf.html#dicfil_tag) and the fields will be:
edict(id unique, kanji, kana, definition)
“id” will be an integer and a unique key to each record. “kanji” will hold the Chinese charactersthat the word is written in. “kana” will hold the Japanese phonetic script that the word is writtenin. Finally “definition” will hold one or more English language definitions for the word, separatedby ‘/’.
Our checkDB() function needs to know if the edict table exists and is full. If not, create it and fillit.
The checkDB() functionwill receive a SQLTransaction object as a parameter from db.transaction().Again in websql_core.js, make checkDB() look like this:
The Search tab 54
//Check if "edict" table exists and has records
function checkDB(tx)
{
//console.log('checkDB()');
tx.executeSql('SELECT COUNT(id) AS count FROM edict', [], successCheckDB, errorChec\
kDB);
}
We call executeSql() on the received SQLTransaction object which needs at least an SQL queryas its first argument (and parameter values as the 2nd parameter if the query in the first argumentuses parameter binding), but can optionally take both a success and failure callback as 3rd and4th parameter respectively. Here we run a very simple query to get the count of rows - by id- in the edict table. This query will throw an error if the edict table does not exist (but not ifit exists and is empty which is a condition we will knowingly ignore for this simple app). Wedon’t use parameter binding in this query so we provide an empty array as the 2nd parametersimply because we need to “get” to the 3rd and 4th parameters. We specify an error and a successcallback. Should the query fail we can assume that the table does not exist and therefore needsto be created and populated. Let’s look at the success callback first as it’s simpler and only hasto clear the “database loading” message:
//Callback for if checkDB() succeeds - ie. "edict" table present and full
//SO clear the "database loading" message
function successCheckDB(tx, results)
{
//console.log('edict already loaded');
document.getElementById('loading-text').innerHTML = '';
}
Pretty easy and not worth explaining other than to point out that the callback function receivesan SQLTransaction and an SQLResultSet object respectively.
Let’s get started on the error callback:
//Callback for if checkDB() fails - ie. no "edict" table
//SO create it and fill it
function errorCheckDB(transaction, error)
{
console.log('edict table not exist - will create and fill');
//here we need to do something to fill the table
}
This code so far will run without errors (but don’t forget include websql_core.js fromindex.html (above the japxlate.js include)) but won’t do anything useful. It will get to the“edict table not exist - will create and fill” log message and then stop. In the error callback, weneed to run another transaction on the Japxlate database which will load all the dictionary datawe need. Change errorCheckDB() to look like this:
The Search tab 55
//Callback for if checkDB() fails - ie. no "edict" table
//SO create it and fill it
function errorCheckDB(transaction, error)
{
console.log('edict table not exist - will create and fill');
//version 1.0, 4 megabytes
var db = window.openDatabase("Japxlate", "1.0", "Japxlate DB", 4 * 1024 * 1024);
db.transaction(populateDB, errorWebSQL, successPopulate);
}
We open the same Japxlate database and try to run the populateDB() queries on it. We have newsuccess and error callbacks. populateDB() looks like this:
//Create and fill the "edict" table
function populateDB(tx)
{
console.log('creating and filling edict table');
//DROP if present (ie. because it's present but empty)
tx.executeSql('DROP TABLE IF EXISTS edict');
//create
tx.executeSql('CREATE TABLE IF NOT EXISTS edict(id unique, kanji, kana, definition)\
');
websqlEdictInserts(tx); //see websql_edict_inserts.js
}
We create the table according to our schema - DROPing it first just in case and so theCREATE doesn’t fail. Finally we call websqlEdictInserts() which is a function we’ll putin another JavaScript file. The websqlEdictInserts() function accepts an SQLTransactionobject and essentially runs a huge list of INSERT queries on it to populate our table. Thisfunction isn’t very do-at-homeable because it’s basically a dump of the most common wordsfrom the @japxlate Twitter feed’s database. If you are following this tutorial step by step,please get the file /js/websql_edict_inserts.js from the app’s GitHub repository and stickit in your /assets/www/js folder. To explain it a little bit more, here’s an excerpt from/js/websql_edict_inserts.js:
The Search tab 56
function websqlEdictInserts(tx)
{
tx.executeSql('INSERT INTO edict(id, kanji, kana, definition) VALUES(5,"��","���","\
/curry/rice and curry/")');
tx.executeSql('INSERT INTO edict(id, kanji, kana, definition) VALUES(21,"��","��","\
/to blow (one\'s nose)/")');
tx.executeSql('INSERT INTO edict(id, kanji, kana, definition) VALUES(119,"�����","�\
���","/1000 yen/")');
tx.executeSql('INSERT INTO edict(id, kanji, kana, definition) VALUES(138,"��","����\
","/ten percent/")');
.
.
}
Note that the ID numbers aren’t in sequence because these words are the most common 20,000or so words from @japxlate’s Edict dictionary which has nearly 200,000 entries!
OK, that’s populateDB() in the bag. But don’t forget errorCheckDB()’s custom error and successcallbacks. Let’s do the error callback first:
//Generic SQLError handler (for both db.transaction() and tx.executeSQL())
function errorWebSQL(transactionOrError, errorOrNull)
{
var error = null;
if(typeof transactionOrError == 'SQLTransaction') { //from tx.executeSQL()
error = errorOrNull;
} else { //from db.transaction()
error = transactionOrError;
}
console.log(error); //error is now an SQLError object
alert("Error processing SQL: " + error.code);
}
Ouch! This looks a bit over-complicated. What’s going on? Well, I didn’t realise at first,and I only discovered it on a hunch, but we can reference error callbacks from both thedatabase.transaction() and transaction.executeSQL() methods (as we are already doing) but ineach case they will receive different parameters! The PhoneGap / Cordova docs for the WebSQL API - at the time of writing - don’t seem to realise this and actually are therefore incorrect.
The PhoneGap v3.3.0 docs remove the entire Web SQL reference section.
This is something of a generic error callback and so we pull some strings to handle both cases.Error callbacks as called from database.transaction() will receive (SQLError), and error callbackscalled from transaction.executeSQL() will receive (SQLTransaction, SQLError).
The Search tab 57
We simply alert out the code property of the received SQLError object. This is going to be ourrecyclable Web SQL error handler going forward with the app.
The success callback for errorCheckDB() is going to do the same as the success callback forcheckDB() (which is successCheckDB()):
//Callback for if errorCheckDB() succeeds - ie. "edict" table populated OK
function successPopulate()
{
console.log('finished loading edict');
document.getElementById('loading-text').innerHTML = '';
}
Include websql_edict_inserts.js from index.html (above the include for websql_core.js)and we are ready to go for a spin!
On first run, the “database loading” message and spinner take a few seconds to disappear, andthe log messages indicate database loading success. It looks like this:
Figure 29. First run of app with Web SQL database loading
Go ahead and run the app again after exiting it, the 2nd time around feels kind of faster right?Let’s check the logs:

The Search tab 58
Figure 30. Second, faster run of app with Web SQL database loading
Woah! That’s right, Web SQL databases that you’ve created persist over multiple sessions of theapp (or browser). Pretty hot and tasty! This is a great reason why Web SQL, as abandoned andawkward as it is, is really useful for mobile WebView apps as it can be used for saving thingsoffline.
8.3 Querying the database
Right, so that’s the database created, the table created, and the table filled. Phew!
We’re coming to the meat and bones of it now which is getting results from the database basedon the user’s search query. This will involve a bit of work on the frontend interface and a lotof work on the backend. As we are kind of frazzled with Web SQL things right now, let’s get towork on the frontend interface first.
Let’s make a new JavaScript file in /assets/www/js called search_interface.js to holdanything to do with the frontend look and feel of searching. Right, one of the main things we’llwant to do is to put search results from the database into the container div in our markup. Let’sadd a function to do this:
The Search tab 59
//Put the matching search results (which could be zero matches) on the page
function putResultsOnPage(results)
{
//get search results div
var theDiv = document.getElementById('search-results');
//clear current content
theDiv.innerHTML = '';
//might be no matches
if(results.rows.length === 0)
{
theDiv.innerHTML = 'No matches found in the common words dictionary.\
Tweet @japxlate yourAdvancedWord for advanced word definitions.';
buttonSpinnerVisible(false); //stop the loading spinner
return;
}
//some results so loop through and print
for(var loop = 0; loop < results.rows.length; loop++)
{
var item = results.rows.item(loop);
var var theRomaji = item.kana; //TODO
var formattedDefinition = format_slashes(item.definition);
var defText = item.kanji + ' / ' + item.kana + ' (' + theRomaji + ') / ' + form\
attedDefinition;
defText = defText.replace(new RegExp(global_searchTerm, 'ig'), '<span style="co\
lor:#990000;">$&</span>');
var defLine = '<img src="img/j.png" style="vertical-align:middle;"> ' + defText\
+ '<hr>';
//var defLine = '<p class="def-line"> ' + defText + '</p>'; //had CSS styling i\
ssues (mostly text overflow)
theDiv.innerHTML += defLine;
}
buttonSpinnerVisible(false); //stop the loading spinner
}
We’ll expect to be passed an SQLResultSet object which will come from a successful queryon our Web SQL database. First we reset the current (ie. old) results by setting the containerdiv’s innerHTML property to empty. We then cover a scenario of no matches by printing a“no matches” message (with a plug for the @japxlate Twitter bot!). Note that you can split upvery long quoted strings in JavaScript by ending lines with a ‘\’. We then stop the “searching”spinner by calling the buttonSpinnerVisible() function with a parameter of false. We’ll write

The Search tab 60
this function shortly and it’s basically a way to switch the “searching” spinner on and off. Wethen return.
..
document.getElementById('some-id')versusdocument.querySelector('#some-id')Youmay bewonderingwhy, for single elements, I am using document.getElementById('some-id')and not the new fangled document.querySelector('#some-id'). Well it’s true that these willboth return the same element, and it’s true that getElementById() is a much older pieceof XML DOM, but the issue - at the time of writing - is one of performance (and perhapsgetElementById() is a teeny tiny bit more readable). After some benchmarking experimentsin desktop Chrome (using the mega useful console.time() and console.timeEnd() as athttps://developers.google.com/chrome-developer-tools/docs/console-api#consoletimelabel) I sawthat, for single elements, getElementById() was much faster than querySelector(). Out ofcuriosity I also tested jQuery’s $('#some-id) (which returns a jQuery-specific list of nodes)and found this to be much slower than the browser’s native querySelector(). Of note is thatthe new jQuery v2.0 was much faster than v1.x for the same selector (though still slower thanquerySelector()).
Now, if we’re still in the function we’ll have some results. We loop over and retrieve the resultsusing the SQLResultSet object’s rows.length property and rows.item(itemIndex) method.What we do in the loop looks fiddly, but all we are doing is replicating the style of definitionlines that @japxlate uses. If you remember the snippet of websql_edict_inserts.js that welooked at earlier, the format of the “definition” field in the database is “/definition one/definitiontwo/definition three/”. We want to space these multiple definitions out a bit more and removethe lead and tail slashes; for that we’ll use a helper function called format_slashes()which alsogoes in this file:
//Clean up the EDICT definition line that we get from our Web SQL DB
//For example, "/one/two/three/" --> "one; two; three"
function format_slashes(slashesString)
{
//remove leading and trailing '/' characters
var string = slashesString.replace(/^\//, ''); //leading
var string = string.replace(/\/$/, ''); //trailing
//change remaining '/' characters to a semicolon with space
return string.replace(/\//g, '; ');
}
We use JavaScript’s core replace() method to change the slashes based on regex matching. Wereplace single lead and tail slashes with an empty string. We replace globally (the ‘g’ modifierafter the regex) all remaining slashes with a semicolon followed by space.We return the modifiedstring.
The Search tab 61
OK, let’s come back to explaining putResultsOnPage(). We create in defText a nicely formatteddefinition line. We use String.replace() on this definition line to highlight the user’s searchterm in our trademark red. For this we use global_searchTerm which we’ll define a bit later on.
buttonSpinnerVisible() is a simple CSS style toggler that also goes in search_interface.js
and looks like this:
//Toggle for search button's loading spinner
function buttonSpinnerVisible(visible)
{
var spinner = document.getElementById('button-spinner');
if(visible)
{
spinner.style.visibility = 'visible';
}
else
{
spinner.style.visibility = 'hidden';
}
}
Remember in websql_core.js we did this a couple of times:
document.getElementById('loading-text').innerHTML = '';
As this is manipulating the search interface, let’s refactor this as a function in search_-
interface.js. Let’s call it clearLoadingMessage():
function clearLoadingMessage()
{
document.getElementById('loading-text').innerHTML = '';
}
Then replace the two document.getElementById('loading-text').innerHTML = ''; lines inwebsql_core.js with calls to clearLoadingMessage();.
OK, in search_interface.js we now have all of the functions that other functions might callto update the interface for database searching, but we are missing something here. The user! Weneed to catch tap events on the Search button and then use their entered query to search thedatabase and return results. Let’s start where the user starts - the Search button. Let’s add a clickhandler. Add a call to:
configureSearchButton();
at the bottom of receivedEvent() in good old index.js.
We define configureSearchButton() in search_interface.js:

The Search tab 62
//search button clickability
function configureSearchButton()
{
document.getElementById('search-button').addEventListener('click', onclickForSearch\
Button, false);
}
We define onclickForSearchButton() as the click handler for the search button.onclickForSearchButton(), also in search_interface.js, is like this:
//Perform a dictionary search for entered query
function onclickForSearchButton(event)
{
var q = document.getElementById('search-query').value;
//some kanji searches are going to be legitimately only one char
if(q.length < 1)
{
return;
}
buttonSpinnerVisible(true);
var matches = doEdictQueryOn(q);
}
We get the user’s entered search query and - on the condition that it’s at least one character long- we pass it to doEdictQueryOn() after displaying the “searching” spinner. doEdictQueryOn() is afunction that we haven’t written yet that will need a whole ‘nother JavaScript file. We’ve alreadygot quite a few JavaScript files, but this is keeping it nice and modular. Create websql_query.jsin /assets/www/js and add doEdictQueryOn() thus:
//function to query the database based on whatever query string
function doEdictQueryOn(newQ)
{
//TODO
}
What? It’s empty! Yes, we’re going to take a breather now and plan what we’re going to do next.A keyboard break if you like. Remember back in the Layout and interface section of this chapterwhen we laid down some rules about our app? It’s time to recap those now as it will affect howwe implement dictionary searching. We said we’ll stick to a rule “that the user’s search querycan be in Japanese as well as English”. Obviously we’ll then go down different search queryroutes depending on the entered language. So we need a way to detect if the query is Japaneseor English.
The Search tab 63
..
Why two search querying routes?We could get away with not detecting the input query’s language by having this kind of logic:
“Assume the query is English, do a search, if no results then assume it’s Japaneseand search again”
Which has two problems. We have to make an assumption about how our app is being mostlyused. (Admittedly we could change the assumption if we find out it’s wrong.) Another problemis performance - we may be searching unnecessarily.
A very simple, and linguistically incorrect!, way to do this is to see if we have multibytecharacters in our query string or not. We’ve set our HTML page to be UTF-8. UTF-8 is interestingbecause it’s a flavour of Unicode that’s backwards compatible with good ol’ ASCII. ASCII canbe utf-8, but so can Japanese! But ASCII won’t set the right bits in each byte to be considereda multibyte stream. Something we can use to our advantage is that for ASCII, the length of astring in bytes will also be the length of that string in characters. For multibyte utf-8 strings, thiswill not be the case and the byte length will be greater than the character length.
Let’s implement an is_mb() (“mb” meaning “multibyte”) check using this knowledge. Keepingthings modular, and realising that we are going to need functions soon for Japanese languagehandling, make a new file in /assets/www/js called linguistics.js. Add is_mb() thus:
//Does the given utf8 string have multibyte characters or not?
function is_mb(utf8String)
{
return utf8String.length != mb_bytelen(utf8String);
}
Here we compare a string’s length in characters (using the length property - JavaScript operatesinternally with utf-16 unicode) with its length in bytes. mb_bytelen() is the key functionhere that we need to write. It will give us the byte length for a utf8 string. Put it also inlinguistics.js:
//Get length in BYTES of a utf8 string
function mb_bytelen(utf8String)
{
//Matches only the 10.. bytes that are non-initial characters
//in a multi-byte sequence.
var m = encodeURIComponent(utf8String).match(/%[89ABab]/g);
return utf8String.length + (m ? m.length : 0);
}
In utf-8, everything is a sequence of bytes. For an ASCII character, one byte is the full sequence- that byte is the character. But it allows for multibyte characters by the initial byte in
The Search tab 64
that character’s sequence of bytes setting a special bit. This special bit tells the browser (orprogramming language or text editor etc) that “there’s more to come!” and the browser addsthe remaining bytes in the sequence to get the full value for that character. The remaning bytesalso set a special bit so the browser knows when that particular character has all of its bytes read.For the gory details please see http://en.wikipedia.org/wiki/UTF-8.
So what we are doing in mb_bytelen() is adding the length of the string in characters to thecount of non-initial character sequence bytes. This will give us the total byte length for any utf8string - containing multibyte characters or not!
OK, is_mb() is one important tool for our database querying logic in the bag. Using it, let’s thinkmore about our query logic with some pseudocode:
if(is_mb(searchTerm)) {
//searchTerm is Japanese (or at least multibyte)
//
//[1] exact kanji match
//[2] exact kana match
} else {
//searchTerm is English or, as last resort, romaji
//
//[1] exact definition match
//[2] partial definition match
//[3] exact romaji match (on kana field)
}
So, if we detect multibyte characters in the search term, we assume it is Japanese and try tomatch it exactly against, first, the kanji field of the words in our database. Then, if that producesno results, we try to match it exactly against the kana field. This priority order is realistic becausekanji (Chinese idiogrammic characters) are the “correct” way to write a Japanese word. The kanais just the way to pronounce those Chinese characters. Though note that some words are kanaonly and don’t hava a kanji.
We assume that the search term is in English if it contains no multibyte characters. Then wefocus on the definition field of our database. Remember that definition entries look like this:
"/uncertain/vague/ambiguous/"
Multiple definitions are separated by slashes. So our most relevant results (query [1] of theEnglish route) would be to find the search term exactly as one of these definitions. A searchfor “vague” would match the above definition, for example. If that produces no results, we queryfor partial matches of the search term in these definitions. For example a search for “director”will match a definition of "/company director/board member/". Finally, if we still have noresults, we can take a gamble and assume that the user has entered a term in romaji (whichis Japanese written in abc like “sayonara” or “moshimoshi”). For this we’ll have to convert thesearch term into phonetic kana and query for a matching kana field. So this one needs a bit morework programmatically.
Note that if we go down the Japanese route, and get no results at the end, we don’t then proceeddown the English route (and vice-versa).

The Search tab 65
Let’s implement the Japanese route first as the queries are easier. We’ll go back to working inwebsql_search.js. Remember fromwriting websql_core.js howWeb SQLworks with callbackchains? Well, with this in mind (and don’t get me wrong, there are better and cleverer ways todo this) we’re going to stick a couple of global variables at the top of websql_search.js so thatall callback functions can access them:
//User's search term as a global variable (so we can access it from all the different c\
allbacks). Hmmm...
var global_searchTerm = null;
//Maximum number of search results to return for any query
var global_maxResultsCount = 40;
Now make doEdictQueryOn() look like this:
function doEdictQueryOn(newQ)
{
//set global_searchTerm
global_searchTerm = newQ;
//version 1.0, 4 megabytes
var db = window.openDatabase("Japxlate", "1.0", "Japxlate DB", 4 * 1024 * 1024);
if(is_mb(global_searchTerm)) //Japanese (or at least multibyte)
{
//console.log('doing as japanese - kanji');
db.transaction(queryDB_ja, errorWebSQL);
}
else //ie. English (or - as last resort - romaji)
{
console.log('doing as english - exact');
}
}
We simply save the search term into global_searchTerm, open the database and attempt thequeryDB_ja() query function (using our generic Web SQL error handler). We’ll come back tothe else section for English later, but in the meantime let’s make queryDB_ja() which is likethis:

The Search tab 66
//Search edict for an exact kanji match
function queryDB_ja(tx)
{
var safeQ = global_searchTerm;
//use placeholders (so we don't need to escape the query)
tx.executeSql("SELECT * FROM edict WHERE kanji = ? LIMIT " + global_maxResultsCount\
, [safeQ], successQueryDB_ja, errorWebSQL);
}
We accept an SQLTransaction object - as per the Web SQL specification - and call it tx for short.We use tx.executeSql() to run a very simple SQL query on the edict table; Matching the kanjifield exactly to the search term. Note how we get the search term from the global variable wedefined earlier.
In the SQL query, we have "kanji = ?", the question mark is a placeholder for parameter (orvalue) binding. We then specify the value to be bound to this placeholder in the 2nd argument totx.executeSql(), in this case safeQ. Why do this? Why not just query for "kanji = '" + safeQ
+ "'", ie. literally. Well because, this way, if the entered search term contains single quotes orslashes or anything that Web SQL considers “special”, the SQL query will break and result inerrors. When we use parameter binding, Web SQL is going to escape the parameter value forus so that we are safe from dodgy characters accidentally breaking our SQL (or malicious “SQLinjection” attacks). You can try this a little later if you like to see how wrong it can go!
So we query with a success callback of successQueryDB_ja() and our all-purpose error handler.Note that successQueryDB_ja() will be called if the executeSql() query is valid and executes- which means even if zero results are returned. So successQueryDB_ja() is going to look likethis:
//Callback for if queryDB_ja() did not error (which includes zero results)
//Print kanji matches if we have any ELSE try kana matches
function successQueryDB_ja(tx, results)
{
if(results.rows.length == 0) //no kanji matches - try kana matches
{
//console.log('no ja kanji matches');
//version 1.0, 4 megabytes
var db = window.openDatabase("Japxlate", "1.0", "Japxlate DB", 4 * 1024 * 1024);
db.transaction(queryDB_ja_kana, errorWebSQL);
}
else
{
putResultsOnPage(results);
}
}
The Search tab 67
We receive the SQLTransaction and an SQLResultSet. We check the rows.length property ofthe resultset to see if we got any matches or not. If we have no matches then we open the DBagain and run a different query function on it, namely queryDB_ja_kana() which is going tosearch for kana matches against the search term. If we have any matches, we simply call ourputResultsOnPage() function (that we made previously in search_interface.js) and pass itthe resultset. Then we are done with this particular query route. OK, we still need to implementqueryDB_ja_kana(), which - yes you’ve guessed it - is almost identical to queryDB_ja() butusing the kana field:
//Search edict for an exact kana match
function queryDB_ja_kana(tx)
{
var safeQ = global_searchTerm;
//use placeholders (so we don't need to escape the query)
tx.executeSql("SELECT * FROM edict WHERE kana = ? LIMIT " + global_maxResultsCount,\
[safeQ], successQueryDB_ja_kana, errorWebSQL);
}
We simply print out any and all results that we might have.
We are now ready to give this Japanese query route a test drive! First, include the new JavaScriptfiles we’ve made at the bottom of index.html so that it looks like this:
.
.
<script type="text/javascript" src="js/linguistics.js"></script>
<script type="text/javascript" src="js/search_interface.js"></script>
<script type="text/javascript" src="js/websql_edict_inserts.js"></script>
<script type="text/javascript" src="js/websql_core.js"></script>
<script type="text/javascript" src="js/websql_search.js"></script>
<script type="text/javascript" src="js/japxlate.js"></script>
<script type="text/javascript" src="js/index.js"></script>
<script type="text/javascript">
app.initialize();
</script>
.
.
Run it! Enter an English search term and click the search button. You’ll get a console message of“doing as english - exact”, and the spinner will start to spin and not stop! We’ve obviously notfinished the English query route yet.
Let’s check if it is really searching for any entered Japanese terms. Go ahead and copy somerandom text from http://www.yahoo.co.jp and paste it into our app’s search box. Click search.You’ll probably get the “no matches found” message (unless you got really lucky!). OK, so that’sworking.What about an actual match? Open up the websql_edict_inserts.js file and copy any
The Search tab 68
kanji or kana INSERT value. Search for this on the app and you should get the correspondingdefinition. Nice!
This is pretty awesome right now. It’s beginning to feel like a useful, working app! OK, beforethe very final thing we need to implement for searching (I’ll let you guess what you think it is;-)) let’s tackle that English searching route. Go back to the else clause in doEdictQueryOn() (inwebsql_search.js) and edit it to actually do something:
.
.
if(is_mb(global_searchTerm)) //Japanese (or at least multibyte)
{
//console.log('doing as japanese - kanji');
db.transaction(queryDB_ja, errorWebSQL);
}
else //ie. English (or - as last resort - romaji)
{
console.log('doing as english - exact');
db.transaction(queryDB_en, errorWebSQL);
}
.
.
We do what we do for Japanese just with a different query function called queryDB_en() whichis going to do step [1] of our English route and is like this:
//Search edict for an exact English match
function queryDB_en(tx)
{
var safeQ = global_searchTerm;
//use placeholders (so we don't need to escape the query)
tx.executeSql("SELECT * FROM edict WHERE definition LIKE ? LIMIT " + global_maxResu\
ltsCount, ['%/' + safeQ + '/%'], successQueryDB_en, errorWebSQL);
}
Here we query the definition field of our edict table and note how we use the LIKE operatorand not, as with the Japanese route queries, the ‘=’ operator. LIKE allows us to use wildcardcharacters which allows us to do a fuzzier search. We need that functionality here as we aretrying to match only one of each database row’s many definitions (separated by ‘/’).
What’s going on with our 2nd argument where we have to specify the value for parameterbinding? Well, we basically build a LIKE condition that will match, completely, safeQ as ANYone of the definition entries - first one, last one or any of the middle ones. ‘%’ is the SQL wildcardmeaning “match anything” and actually it will match zero characters if applicable too! With adefinition of:
"/one/two/three/"
The Search tab 69
then the same format of condition like: ‘%/one/%’, ‘%/two/%’, ‘%/three/%’ will match each corre-sponding definition respectively. We simply build this pattern and put it in the 2nd argument.We use the general error handler again and the success handler is successQueryDB_en():
//Callback for if queryDB_en() did not error (which includes zero results)
//Print exact matches if we have any ELSE try partial matches
function successQueryDB_en(tx, results)
{
if(results.rows.length == 0) //no exact matches - try partial matches
{
//console.log('no en exact matches');
//version 1.0, 4 megabytes
var db = window.openDatabase("Japxlate", "1.0", "Japxlate DB", 4 * 1024 * 1024);
db.transaction(queryDB_en_partial, errorWebSQL);
}
else
{
putResultsOnPage(results);
}
}
This is cut from the same mould as successQueryDB_en() that we’ve just done. If we haveno results from exact matching, we move on to step [2] which is partial matches by callingqueryDB_en_partial():
//Search edict for a partial English match
function queryDB_en_partial(tx)
{
var safeQ = global_searchTerm;
//use placeholders (so we don't need to escape the query)
tx.executeSql("SELECT * FROM edict WHERE definition LIKE ? LIMIT " + global_maxResu\
ltsCount, ['%' + safeQ + '%'], successQueryDB_en_partial, errorWebSQL);
}
This is very very similar to queryDB_en(), but the important difference is in the LIKE condition.We do not use slashes here which means we are not locked down to an exact match and willmatch any definition list where the user’s search term appears. For example, searching for “userinterface” will match a definiton of:
"/graphical user interface/GUI/"
The success callback here is successQueryDB_en_partial() which is going to trigger the finalstep [3] of English searching, or display results from this step [2].
It is in the same shape as the other success callbacks so far:

The Search tab 70
//Callback for if queryDB_en_partial() did not error (which includes zero results)
//Print partial matches if we have any ELSE try romaji matches
function successQueryDB_en_partial(tx, results)
{
if(results.rows.length == 0) //no partial matches - try as romaji
{
//console.log('no en partial matches');
//version 1.0, 4 megabytes
var db = window.openDatabase("Japxlate", "1.0", "Japxlate DB", 4 * 1024 * 1024);
db.transaction(queryDB_en_romaji, errorWebSQL);
}
else
{
putResultsOnPage(results);
}
}
Wedo step [3] - if we need to - by calling queryDB_en_romaji(). This is going to be the fiddly stepthat wementioned earlier as it will need to convert search terms like “sayonara” or “moshimoshi”into phonetic Japanese kana so we can then search the database. queryDB_en_romaji() is likethis:
//Search edict for a romaji match
function queryDB_en_romaji(tx)
{
var safeQ = global_searchTerm;
var safeQKana = romaji_to_hira(global_searchTerm);
//use placeholders (so we don't need to escape the query)
tx.executeSql("SELECT * FROM edict WHERE kana LIKE ? LIMIT " + global_maxResultsCou\
nt, [safeQKana], successQueryDB_en_romaji, errorWebSQL);
}
We convert the search term into hiragana (which is one of the Japanese phonetic scripts and themost common one used in the kana field of our table) via romaji_to_hira()whichwe implementvery soon. The query is straightforward, but don’t forget to implement the success callback ofsuccessQueryDB_en_romaji() which is a carbon copy of successQueryDB_ja_kana() but witha different name.
So we’ve come to a bit of a dead-end as we need to implement the romaji_to_hira() scriptconversion function. Well, I know from the experience of building the @japxlate bot - andMapanese - that we can cover almost all cases of Japanese <–> English script conversion bysimple string replacement operations. For example, we have a table of all Japanese charactersand then a corresponding table of English spellings for those characters. Then we can convertJapanese script to English and vice versa.

The Search tab 71
JavaScript has a builtin String.replace() method, but it works by replacing the first (or all)matching regexes in the string with the supplied replacement value. We can’t give it a list oftargets and a list of corresponding replacements. We want something a little easier to use, andso we’re going to go deep down and dirty with some advanced JavaScript. We are going toprototype a new method onto the String object which means we can add a new method to theString class ONCE and it is available to any variable of type string in JavaScript! Let’s put this inlinguistics.js (we’ll get back to database querying when we’ve got the language conversionall done and dusted). OK, code first explanations second:
//Here we use prototyping to add a method to the String class to give
//us the equivalent of PHP's str_replace()
String.prototype.str_replace = function(find, replace)
{
var replaceString = this;
var regex;
for (var i = 0; i < find.length; i++) {
regex = new RegExp(find[i], "g");
replaceString = replaceString.replace(regex, replace[i]);
}
return replaceString;
};
‘String’ is JavaScript’s object name for character strings. Any variable - or literal - that’s a stringwill be of object type ‘String’. That’s how we can run .replace() and .match() and thingslike that on any JavaScript string - because they are all String objects and the String object hasprototypes of those methods.
So the syntax to prototype a new method into the String object is:
String.prototype.newMethodName = function(any, args, you, need){code; to; do; stuff;};
We name the method “str_replace” (in honour of PHP ;-)) and define it as a function acceptingtwo parameters; find and replace - both of which are character arrays.
In a prototype method, the context of ‘this’ will refer to the object on which the method wascalled. For example, if calling myStringVariable.str_replace(), then in the str_replace()
protoype, ‘this’ will be myStringVariable.
We save the string in replaceString. We then loop over each item in the find array and globally(the ‘g’ modifier) replace any occurrences of it with the corresponding character in the replacearray. So yes, the find and replace arrays need to have the same number of items in them whichwe don’t explicitly police here.
Before we write romaji_to_hira(), we need the character tables that our String.str_-
replace() will operate on. I won’t dwell on these too much, and it’s best to simply paste thesein to your code as a black box - this isn’t a linguistics course! Though the variable names andcomments will help if you want to read through it. Stick these at the top of linguistics.js:

The Search tab 72
//----character tables----------------------------------------------------------
//All single character hiragana (in "biggest" first order)
var coreHiragana =
[
'�', '�', '�', '�', '�',
'�', '�', '�', '�', '�',
'�', '�', '�', '�', '�',
'�', '�', '�', '�', '�',
'�', '�', '�', '�', '�',
'�', '�', '�', '�', '�',
'�', '�', '�', '�', '�',
'�', '�', '�', '�', '�',
'�', '�', '�', '�', '�',
'�', '�', '�', '�', '�',
'�', '�', '�', '�', '�',
'�', '�', '�',
'�', '�', '�', '�', '�',
'�', '�', '�', '�',
'�', '�',
'�', '�', '�', '�', '�',
'�', '�', '�',
'�', '�', '�', '�', '�',
];
//All single character katakana (in "biggest" first order)
var coreKatakana =
[
'�', '�', '�', '�', '�',
'�', '�', '�', '�', '�',
'�', '�', '�', '�', '�',
'�', '�', '�', '�', '�',
'�', '�', '�', '�', '�',
'�', '�', '�', '�', '�',
'�', '�', '�', '�', '�',
'�', '�', '�', '�', '�',
'�', '�', '�', '�', '�',
'�', '�', '�', '�', '�',
'�', '�', '�', '�', '�',
'�', '�', '�',
'�', '�', '�', '�', '�',
'�', '�', '�', '�',
'�', '�',
'�', '�', '�', '�', '�',
'�', '�', '�',
'�', '�', '�', '�', '�',
];
//Transliterations of coreHiragana

The Search tab 73
var coreRomaji =
[
'ga', 'gi', 'gu', 'ge', 'go',
'za', 'ji', 'zu', 'ze', 'zo',
'da', 'di', 'du', 'de', 'do',
'ba', 'bi', 'bu', 'be', 'bo',
'pa', 'pi', 'pu', 'pe', 'po',
'ka', 'ki', 'ku', 'ke', 'ko',
'sa', 'shi', 'su', 'se', 'so',
'ta', 'chi', 'tsu', 'te', 'to',
'na', 'ni', 'nu', 'ne', 'no',
'ha', 'hi', 'fu', 'he', 'ho',
'ma', 'mi', 'mu', 'me', 'mo',
'ya', 'yu', 'yo',
'ra', 'ri', 'ru', 're', 'ro',
'wa', 'wi', 'we', 'wo',
'n', '�', //preserve chiisai tsu
'a', 'i', 'u', 'e', 'o',
'ya', 'yu', 'yo',
'a', 'i', 'u', 'e', 'o',
];
//All "combination" katakana
var comboKatakana =
[
'��', '��', '��', '��',
'��', '��', '��', '��',
'��', '��', '��', '��',
'��', '��', '��',
'��', '��', '��',
'��', '��',
'��', '��', '��',
'��', '��', '��',
'��', '��', '��',
'��', '��', '��',
'��', '��', '��',
'��', '��', '��',
'��', '��', '��', '��',
'��', '��', '��',
'��', '��', '��', '��',
'��',
'��'
];
//Transliterations of comboKatakana
var comboRomaji =
[
'cha', 'chu', 'che', 'cho',
'sha', 'shu', 'she', 'sho',
The Search tab 74
'ja', 'ju', 'je', 'jo',
'kya', 'kyu', 'kyo',
'gya', 'gyu', 'gyo',
'ryu', 'ryo',
'mya', 'myu', 'myo',
'hya', 'hyu', 'hyo',
'nya', 'nyu', 'nyo',
'bya', 'byu', 'byo',
'pya', 'pyu', 'pyo',
'dya', 'dyu', 'dyo',
'fa', 'fi', 'fe', 'fo',
'wi', 'we', 'wo',
'va', 'vi', 've', 'vo',
'ti',
'di'
];
//----/end character tables-----------------------------------------------------
The “combo” tables represent larger Japanese phonics that are written with two characters. Weneed to search and replace these first in order to prevent splitting any of them up by searchingand replacing single characters first.
Note that we don’t define a “comboHiragana” table because we can get that by computingcomboKatakana.str_replace(coreKatakana, coreHiragana); if we need to.
romaji_to_hira() is going to now look like this:
//Convert romaji to hiragana
function romaji_to_hira(romajiString)
{
//replace combos first
var katakana = romajiString
.str_replace(comboRomaji, comboKatakana)
.str_replace(coreRomaji, coreKatakana);
//force hiragana
return kata_to_hira(katakana);
}
We accept a string in romaji (abc) and then run String.str_replace() on it twice using atechnique called chaining. We replace combo characters first and then single characters. Wenow have a converted string in katakana, but as the function name implies we want to returnhiragana. We return the katakana as modified by kata_to_hira() which we implement, againin linguistics.js, thus:

The Search tab 75
//Convert katakana to hiragana
function kata_to_hira(katakanaString)
{
return katakanaString.str_replace(coreKatakana, coreHiragana);
}
Here we simply replace all katakana with the corresponding hiragana. We don’t need to botherwith combo characters here as this will cover all cases.
The English search route is ready to go! Give it a whirl by searching for some words and seeingwhat - if any - results you get. To be double dog sure that we are trying exact definition matchesfirst and then falling back to partial matches, have a peek at the websql_edict_inserts.sql fileagain and pick out some definitions to searh for.
In fact, we’ve not had any screenshots of the app for a while so let’s have one for each type ofsearch (kanji, kana, English exact, English partial):
Figure 31. Respective results for kanji, kana, English (exact matches found) and English (partial matches found)queries
Great! Though looking at these reminds us that we still need to, in putResultsOnPage() ofsearch_interface.js, somehow convert the kana field from the database into romaji to makeour result lines easier to understand. In that function, change this bit:
var theRomaji = item.kana; //TODO
to this:
var theRomaji = kana_to_romaji(item.kana);
Let’s implement kana_to_romaji() in linguistics.js and it will be somewhat the opposite ofour current romaji_to_hira(). kana_to_romaji() is like this:
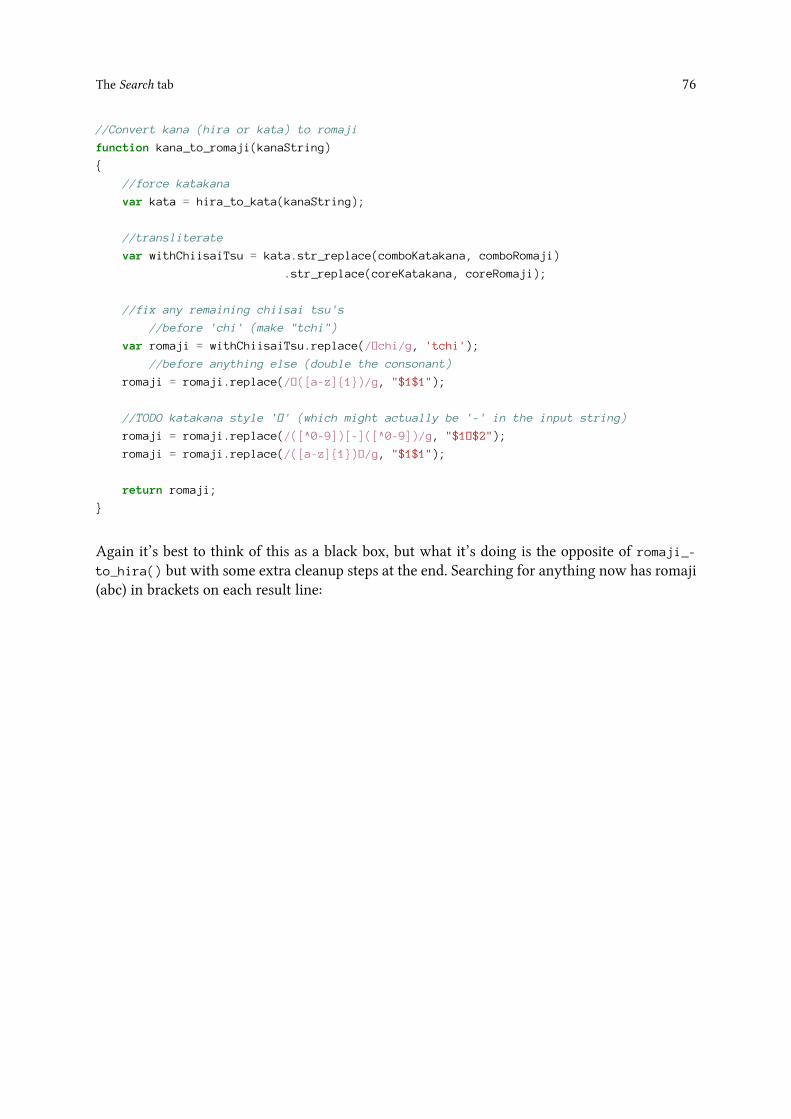
The Search tab 76
//Convert kana (hira or kata) to romaji
function kana_to_romaji(kanaString)
{
//force katakana
var kata = hira_to_kata(kanaString);
//transliterate
var withChiisaiTsu = kata.str_replace(comboKatakana, comboRomaji)
.str_replace(coreKatakana, coreRomaji);
//fix any remaining chiisai tsu's
//before 'chi' (make "tchi")
var romaji = withChiisaiTsu.replace(/�chi/g, 'tchi');
//before anything else (double the consonant)
romaji = romaji.replace(/�([a-z]{1})/g, "$1$1");
//TODO katakana style '�' (which might actually be '-' in the input string)
romaji = romaji.replace(/([^0-9])[-]([^0-9])/g, "$1�$2");
romaji = romaji.replace(/([a-z]{1})�/g, "$1$1");
return romaji;
}
Again it’s best to think of this as a black box, but what it’s doing is the opposite of romaji_-to_hira() but with some extra cleanup steps at the end. Searching for anything now has romaji(abc) in brackets on each result line:
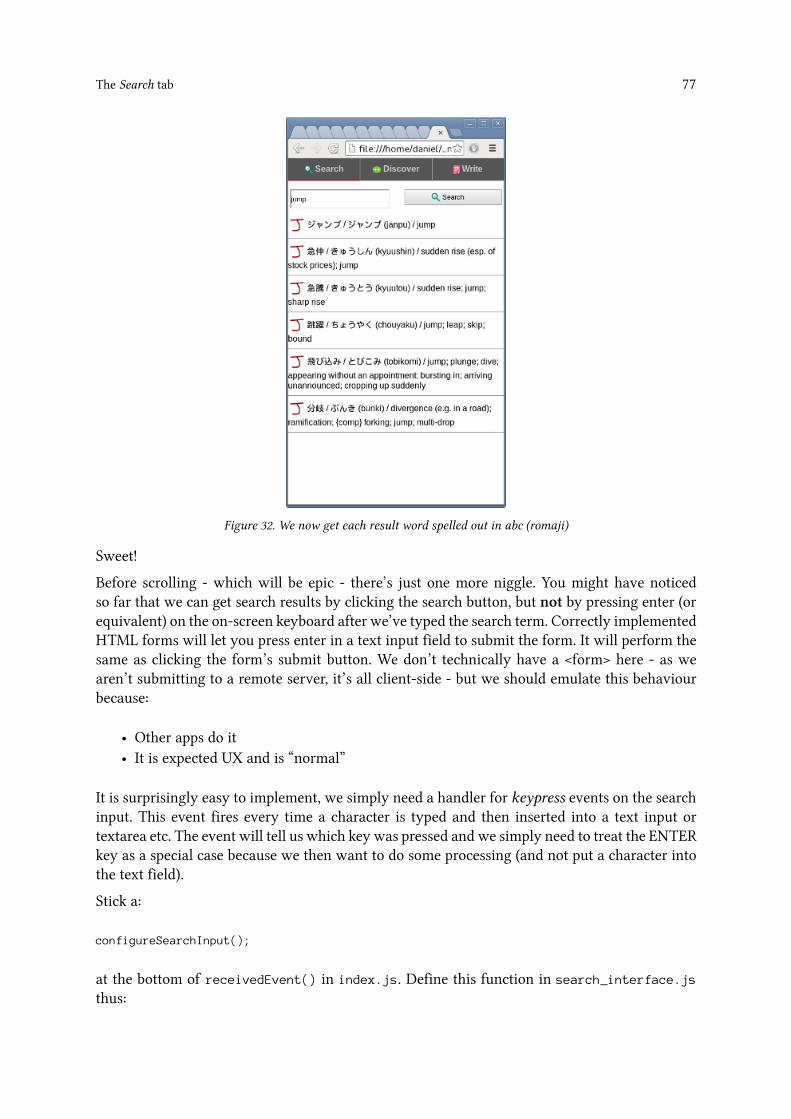
The Search tab 77
Figure 32. We now get each result word spelled out in abc (romaji)
Sweet!
Before scrolling - which will be epic - there’s just one more niggle. You might have noticedso far that we can get search results by clicking the search button, but not by pressing enter (orequivalent) on the on-screen keyboard after we’ve typed the search term. Correctly implementedHTML forms will let you press enter in a text input field to submit the form. It will perform thesame as clicking the form’s submit button. We don’t technically have a <form> here - as wearen’t submitting to a remote server, it’s all client-side - but we should emulate this behaviourbecause:
• Other apps do it• It is expected UX and is “normal”
It is surprisingly easy to implement, we simply need a handler for keypress events on the searchinput. This event fires every time a character is typed and then inserted into a text input ortextarea etc. The event will tell us which key was pressed and we simply need to treat the ENTERkey as a special case because we then want to do some processing (and not put a character intothe text field).
Stick a:
configureSearchInput();
at the bottom of receivedEvent() in index.js. Define this function in search_interface.js
thus:
The Search tab 78
//search box ENTER keypress
function configureSearchInput()
{
document.getElementById('search-query').addEventListener('keypress', onkeyForSearch\
Input, false);
}
We set onkeyForSearchInput() as the keypress handler for our search text input.onkeyForSearchInput() also lives in search_interface.js and is this:
//Simulate a "normal" HTML form input by allowing an ENTER press in the
//query input to perform the same as clicking the search button
function onkeyForSearchInput(event)
{
//.charCode or .keyCode ??
if(event.keyCode == 13) //ENTER key
{
//trigger the already registered "click" handler
document.getElementById('search-button').click();
}
}
We simply use the keyCode property of the received event to detect an ENTER press andthen call the already registered click handler for the search button. For anything other thanENTER, we “do nothing”. How we call the click handler manually is worth talking about. Wesimply get the relevant DOM element using document.getElementById() (or you could usedocument.querySelector() or what-have-you) and then call .click() on it. This will triggerthe registered click handler for that element.
You’ll be wondering now “but our click handler for the search button receives a mouse event - aclick in fact. What will it receive in this case?” Interestingly, after manually calling .click() onan element, that element’s click handler will be triggered with a dummy mouse event (where, forexample, the x and y coordinates are zero and etc). Depending on what you do with the mouseevent in the click handler, it may or may not make sense to call it manually with .click(). Inour case, the click handler doesn’t even use the received event, and so we are fine.
Give it a whirl! You can now search by hitting the ENTER (or equivalent) key after typing asearch term. It will work on desktop Chrome or your device! Sweet!
8.4 Results scrolling
The final epic thing on our Search tab is results scrolling. You’ve probably already noticed thatif your search produces lots of results, it is simply clipped at the bottom of the screen (actuallyjust above our footer). If you haven’t noticed this yet, then try searching for “it’s” and you’ll seethe problem.

The Search tab 79
With desktop Chrome, you can scroll as per normal with the scrollbar that appears - or yourmouse wheel. In fact, the search box and search button also scroll because this is the japxlate_-app div that is scrolling, due to CSS overflow:auto;
So why don’t we have scrollbars or scrollability on the device? It’s because the AndroidWebViewbrowser (and the stock browser app) will only allow scrolling when the entire html documentitself is larger than the viewport. Even then it doesn’t show scrollbars. It would be very veryfiddly on a small mobile screen if, say, the html document itself was scrollable and then a smalldiv inside of that was scrollable too! This is why CSS scrolling does not work on WebView.
What we need to do is to use browser events to implement our own scrolling for search results.Also, let’s limit scrollability to our #results-wrapper div so that we don’t scroll the search boxand button.
So, we probably want to detect a finger drag on the results and then scroll based on that. Andwe’ve just seen that the DOM event of “click” (on the search button) worked for both mouseclicks and finger taps. So, to detect a finger drag on our device we can probably just detect a“mousemove” event or something like that huh? Annoyingly no. The “traditional” DOM mouseevents of “mousedown”, “mousemove” and “mouseup” do NOT get triggered in WebView whenputting a finger down, moving and then releasing the finger. This is initially very annoying andconfusing, but it makes sense really because of things like multi-finger gestures which obviouslyhave no parallel on a mouse. Maybe in the future there will even be pressure sensitive mobilescreens?
The events in question are touchstart, touchmove and touchend. These somewhat correlate to themousedown, mousemove, and mouseup events. Remembering that the parent #results-wrapperdiv is actually our static “window” on the search results, we need to attach scrolling behaviourto #search-results which is where the search result content gets written to.
Mosey on back to receivedEvent() in index.js and stick a call to:
configureSearchTouchScrolling();
at the bottom. And yes, you’ve guessed it, we are going to define this function in search_-
interface.js . thus:
//configure touch dragging for search results
function configureSearchTouchScrolling()
{
document.getElementById('search-results')
.addEventListener('touchstart', touchstartForSearchResults, false);
document.getElementById('search-results')
.addEventListener('touchmove', touchmoveForSearchResults, false);
document.getElementById('search-results')
.addEventListener('touchend', touchendForSearchResults, false);
}
We simply register one custom handler function for each of the touch events. To get the ballrolling, define placeholders for these handlers - still in search_interface.js - thus:
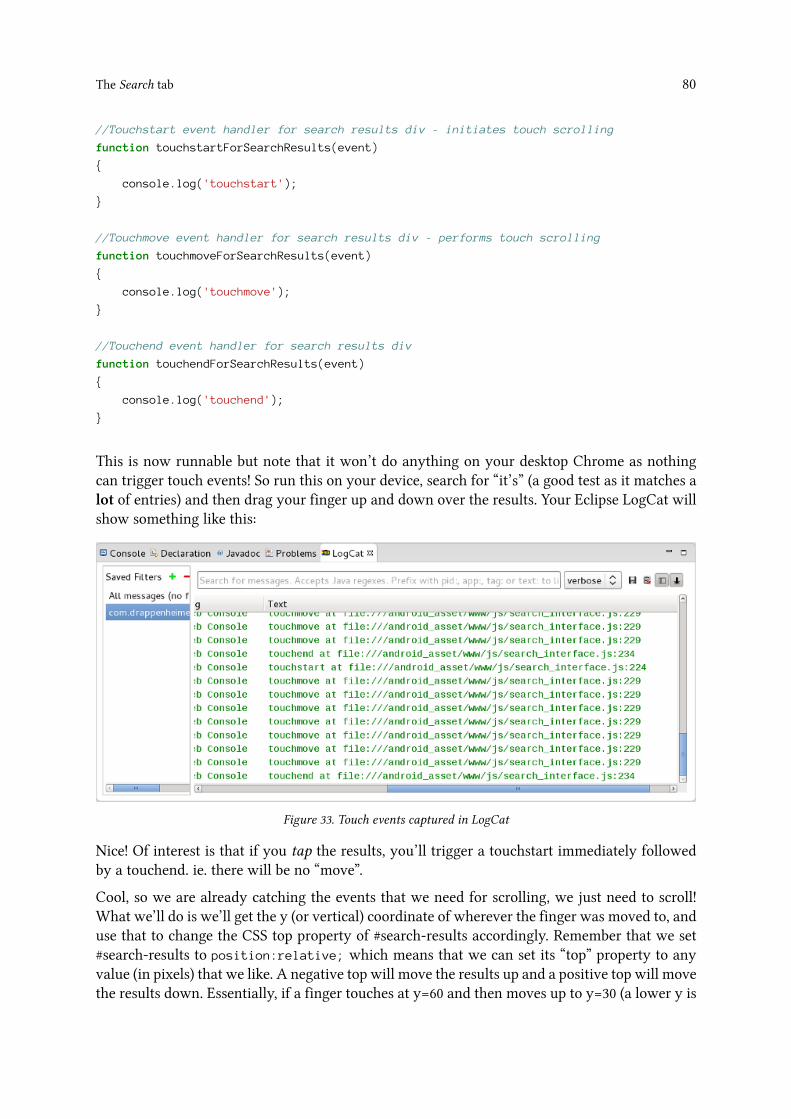
The Search tab 80
//Touchstart event handler for search results div - initiates touch scrolling
function touchstartForSearchResults(event)
{
console.log('touchstart');
}
//Touchmove event handler for search results div - performs touch scrolling
function touchmoveForSearchResults(event)
{
console.log('touchmove');
}
//Touchend event handler for search results div
function touchendForSearchResults(event)
{
console.log('touchend');
}
This is now runnable but note that it won’t do anything on your desktop Chrome as nothingcan trigger touch events! So run this on your device, search for “it’s” (a good test as it matches alot of entries) and then drag your finger up and down over the results. Your Eclipse LogCat willshow something like this:
Figure 33. Touch events captured in LogCat
Nice! Of interest is that if you tap the results, you’ll trigger a touchstart immediately followedby a touchend. ie. there will be no “move”.
Cool, so we are already catching the events that we need for scrolling, we just need to scroll!What we’ll do is we’ll get the y (or vertical) coordinate of wherever the finger was moved to, anduse that to change the CSS top property of #search-results accordingly. Remember that we set#search-results to position:relative; which means that we can set its “top” property to anyvalue (in pixels) that we like. A negative top will move the results up and a positive top will movethe results down. Essentially, if a finger touches at y=60 and then moves up to y=30 (a lower y is

The Search tab 81
higher up the screen) we know that we should move the results div up by 30; which is to say atop value of -30px.
OK, we’ve already got three different touch events each with its own handler function. I’mthinking already that we are going to need some evil global variables to store things that will beshared between these handlers. For example, finger y positions and so on. Stick these at the topof search_interface.js:
//start y axis position (in pixels) of the current scroll
var global_scrollStartY;
//current 'top' css value (in pixels) of our scrollable div
var global_scrollDivTop;
//height (in pixels) of our viewport over the scrollable div (used to activate scrollin\
g)
var global_scrollWindowHeight;
//current height (in pixels) of our scrollable div's content (used to activate scrollin\
g and for scroll locking)
var global_scrollDivHeight;
For every finger scroll we want to know the start y of the results div and the start y of the finger.Then we can find out how far up (or down) the finger moves and simply subtract (or add) thisto the top value of the results div. We also need to know (a) do we need scrolling at all? and(b) when to stop scrolling to prevent content being scrolled off the viewport! For both (a) and(b) we save the height of the scrollable content and the height of the scroll viewport. We sawearlier from fiddling with the device screen and looking at LogCat that finger scrolling is splitinto three steps; touchstart, touchmove then touchend. We’ll map these three different events tothree different steps for our scrolling. Thus:
• touchstart⇒ finger scrolling may start• touchmove⇒ finger scrolling happening now!• touchend⇒ finger scrolling (if it was happening at all) has stopped
Sidenote now, but have you noticed that we are no longer able to debug results scrolling indesktop Chrome? To get rid of this annoyance, we’ll implement our touch scrolling in as generica way as possible so that we can - a little bit later in the tutorial - add simulated touch scrollingby using mouse events instead of touch events.
OK, go back to touchstartForSearchResults() and touchmoveForSearchResults() and makethem look a bit like this:
The Search tab 82
//Touchstart event handler for search results div - initiates touch scrolling
function touchstartForSearchResults(event)
{
//console.log('touchstart');
touchobj = event.changedTouches[0]; //reference *first* touch point
startVerticalDragScrolling(this, touchobj.clientY);
event.preventDefault(); //prevent default tap behavior
}
//Touchmove event handler for search results div - performs touch scrolling
function touchmoveForSearchResults(event)
{
//console.log('touchmove');
touchobj = event.changedTouches[0]; //reference first touch point for this event
doVerticalDragScrolling(this, touchobj.clientY);
event.preventDefault();
}
Well we don’t do much in these handler functions themselves, other than call soon-to-be-writtenhelper functions and then preventing the default action for the touch event in question. Webundle away scroller functionality into helper functions to keep things nice and generic whichwill help us later when we go back and get scrolling working with the mouse. As the defaultbehaviour for dragging a finger over some text would be to select that text, we prevent thisdefault.
The key point here is how to use the touch event that we receive. Touch events contain achangedTouches property which is an array of touch objects. Each touch object in the arrayrepresents a single touch directly involved in this event. Which for touchstart means all thefingers that hit the screen, and for touchmove means all the fingers that moved.
As we don’t need or want to do anything fancy with multi touch gestures on Japxlate, we cansimply access .changedTouches[0] and ignore the rest. There will always be at least one touchobject in changedTouches[0], and there may or may not be more.
We pass the clientY property of our touch object to our helper functions. As the first argument,we also pass ‘this’, which if you remember for event handler functions means the element thatthe event triggered on - in this case the search results div.
See http://www.javascriptkit.com/javatutors/touchevents.shtml for more about touch events inJavaScript.

The Search tab 83
..
NOTETOSELF SIDENOTE about the different JavaScript event coordinate systems [dont 4getthat for mobile there is one extra which is the current poz of the small device window on thebigger client window
OK, so the meat-and-bones of scrolling are bundled away in helper functions. Let’s have a lookat our scroll initiator - startVerticalDragScrolling() - first of all:
//initialise vertical scrolling for ontouchmove
function startVerticalDragScrolling(elementToScroll, eventClientY)
{
//console.log('initialise scrolling');
var theStyle = window.getComputedStyle(elementToScroll);
global_scrollDivTop = parseInt(theStyle.top); //get 'top' value of box
global_scrollStartY = parseInt(eventClientY); // get x coord of touch point
global_scrollDivHeight = parseInt(theStyle.height); //get 'height' value of box
//work out height of #search-results versus height of results
//pane (which is .japxlate_app.height - #search-form.height)
global_scrollWindowHeight =
parseInt(
window.getComputedStyle(
document.querySelector('.japxlate_app')
).height, 10) -
parseInt(
window.getComputedStyle(
document.querySelector('#search-form')
).height);
}
So we expect to receive an elementToScroll which could be any old element (but with the rightCSS settings) but in our case will be the search-results div. We also expect an eventClientY value.
All we do in this function is save elementToScroll’s CSS top value, and eventClientY to the globalvariables we defined earlier on. The novelty here is the use of window.getComputedStyle()
which will return the CSS style properties of the specified element, but not the developer definedstyle as per a CSS stylesheet rule or an inline style="something" attribute. Rather this will returnthe CSS properties that the browser’s rendering engine has given to the element to display itwhere it is. This method is useful to get natural CSS values for elements that we haven’t styledourselves very aggressively - or at all.
We also save the height of the results div (global_scrollDivHeight) and the height of the resultspane. (The results pane being all the space in .japxlate_app div under the search form). We do
The Search tab 84
this so we can work out if we actually need to scroll at all! Note that to get the height of theresults pane, we subtract the height of the search form from the total height of .japxlate_app. Weget the height of the search form by getting the height of the #search-form wrapper div whichwe need to implement in index.html thus:
<div id="search" class="current">
<div id="search-form">
<button type="button" id="search-button" style="float:right; width:45%; margin-\
right:1%;">
<img src="img/search.png">
Search
<img id="button-spinner" src="img/spinner.gif" style="visibility:hidden;">
</button>
<input type="text" id="search-query" placeholder="Japanese or English" size="40"
style="width:45%; margin-left:1%;">
<br>
<span id="loading-text">
[Loading core dictionary. This takes a while the first time.
<img src="img/spinner.gif">]
</span>
</div>
<div id="results-wrapper">
.
.
</div>
.
.
</div>
That’s the initiator, now on the the actual scroller which is, of course, going to be a bit morecomplex. We need to use the global values we just saved to work out how far we’ve scrolled andthen move the results div accordingly. We also should check if we need to do any scrolling at all- there might be no overflow of content!
A first bash looks like this:
//do vertical scrolling for ontouchmove
function doVerticalDragScrolling(elementToScroll, eventClientY)
{
//console.log('do scrolling');
//if height of results content is less than height of results pane,
//we have no content overflow and so don't need to scroll
if(global_scrollDivHeight < global_scrollWindowHeight)
{
console.log('no overflow');
return;
}

The Search tab 85
//calculate distance travelled by touch point
var distance = parseInt(eventClientY) - global_scrollStartY;
//new CSS top for elementToScroll
var newTop = global_scrollDivTop + distance;
//set the new top value for the div we are moving
elementToScroll.style.top = newTop + 'px';
}
First and foremost, we return immediately if we see that we don’t need to do any scrollingbecause the results content div is shorter than the results pane. This prevents the user frombeing able to scroll a single result up and down the pane! Next, we have to work out how faraway we are from the touch start point. This distance becomes the amount we have to add to- or subtract from - the top value of the results div. We access the CSS top value directly withelementToScroll.style.top.
This works! Run it on you device! Nice! Just one problem, which we can see with thesescreenshots:
Figure 34. We can scroll content past the top (left) and bottom (right) of the scroll viewport
Currently, we can scroll the content too far in either direction. We can fix this by editingdoVerticalDragScrolling() to look like this:
//do vertical scrolling for ontouchmove
function doVerticalDragScrolling(elementToScroll, eventClientY)
{
//console.log('do scrolling');
//if height of results content is less than height of results pane,
//we have no content overflow and so don't need to scroll
if(global_scrollDivHeight < global_scrollWindowHeight)
{
console.log('no overflow');
The Search tab 86
return;
}
//calculate distance travelled by touch point
var distance = parseInt(eventClientY) - global_scrollStartY;
//new CSS top for elementToScroll
var newTop = global_scrollDivTop + distance;
//disallow scrolling bottom of content higher than bottom of results pane
//(using height of results pane)
if(newTop < ((0 - global_scrollDivHeight) + global_scrollWindowHeight))
{
console.log('top cushion');
return; //return false??
}
//disallow scrolling top of content lower than top of results pane
if(newTop > 0)
{
console.log('bottom cushion');
return; //return false?
}
//set the new top value for the div we are moving
elementToScroll.style.top = newTop + 'px';
}
(The changes are the two if clauses before the final elementToScroll.style.top.) To stop thetop of the results going lower than the top of the results pane, we simply prevent the resultsdiv’s top property from going higher than zero. To prevent the bottom of the results from goinghigher than the bottom of the results pane, we have to prevent the top value from going less thannegative(results height + results pane height). If the height of the results is 1000 pixels, and weset the results div top to -1000 pixels, this will put the bottom of the results right at the top ofthe results pane. From this state, adding, to top, the height of the results div will put the bottomof the results at the bottom of the results pane. This is the minimum height we enforce here.[NOTETOSELF the height of the results div.(?)]
Run this on your device and you’ll see that scrolling is “locked” and behaves more like nativeAndroid.
Great, just onemore problemwhich youmight already be thinking about. Run the app and searchfor “it’s” which produces lots of results. Scroll right to the bottom of the results. No problemsthere. But then do a search that only gives a few results like “gas”. Eh? Where are the results?Well, when you scrolled to the bottom of the results for “it’s” you moved the top value of thesearch results div to quite a high negative number. This means that the top of the div is veryhigh up on the page, probably higher that the top of the screen! When you search again, thediv is still up there and a short amount of content will be obscured and not “reach down” tothe visible results pane. Clearly we need to reset the search result div’s top on every display of
The Search tab 87
search results. We can do this quite easily by a simple addition to putResultsOnPage() in oursearch_interface.js file. Edit the start of this function to look like:
function putResultsOnPage(results)
{
//get search results div
var theDiv = document.getElementById('search-results');
//clear current content
theDiv.innerHTML = '';
//reset Y position because it might have changed after some touch scrolling frenzy!
theDiv.style.top = '0';
.
.
}
The only change here is the new line setting style.top to zero. This is all we need to fix thescroll problem we’ve just experienced. Try it!
Money in the bank! Searching and scrolling is operational now and we are ready to move onto the next tab. But do you remember we talked about, for debugging purposes, simulating thetouch scrolling with mouse events for desktop Chrome? Here’s a whistle-stop tour on gettingthat working:
At the top of search_interface.js put:
var global_mouseButtonDown = false;
At the bottom of receivedEvent() in index.js put:
configureSearchMouseScrolling();
In search_results.js add:
//configure mouse dragging for search results
function configureSearchMouseScrolling()
{
//simulated touch (ie. mouse) dragging for results
document.getElementById('search-results')
.addEventListener('mousedown', mousedownForSearchResults, false);
document.getElementById('search-results')
.addEventListener('mousemove', mousemoveForSearchResults, false);
document.getElementById('search-results')
.addEventListener('mouseup', mouseupForSearchResults, false);
}
In search_interface.js add:

The Search tab 88
//Mousedown event handler for search results div - initiates simulated touch scrolling
function mousedownForSearchResults(event)
{
//console.log('mousedown event on scrollable');
global_mouseButtonDown = true; //set global
startVerticalDragScrolling(this, event.clientY);
event.preventDefault(); //prevent default click behaviour (ie. select text or whate\
ver)
}
//Mousemove event handler for search results div - performs simulated touch scrolling
function mousemoveForSearchResults(event)
{
//console.log('mousemove event on scrollable');
if(!global_mouseButtonDown)
{
return false; //do nothing if the mouse button isn't pressed down
//false is ok to return?
}
doVerticalDragScrolling(this, event.clientY);
event.preventDefault();
}
//Mouseup event handler for search results div
function mouseupForSearchResults(event)
{
//console.log('mouseup event on scrollable');
global_mouseButtonDown = false;
event.preventDefault(); //need?
}
We simply recycle our existing scrolling helpers. The biggest difference is we need to track ifthe mouse button is down or not as we don’t want to scroll on a mousemove when the mousebutton isn’t down.
[NOTETOSELF mention using libraries for mobile touch scrolling etc]
[NOTETOSELF and the android webkit hack that you found]
The Search tab 89
8.5 Extra credit challenges
Solutions not provided. Try to add:
1. “Content has become scrollable” indicator2. “Can’t scroll anymore” indicator (the “flare” that native Android scrolling
usually has)3. Our scrolling lacks the slippy, momentous feel that native Android scrolling
usually has. Try to add this (this will be very challenging!).
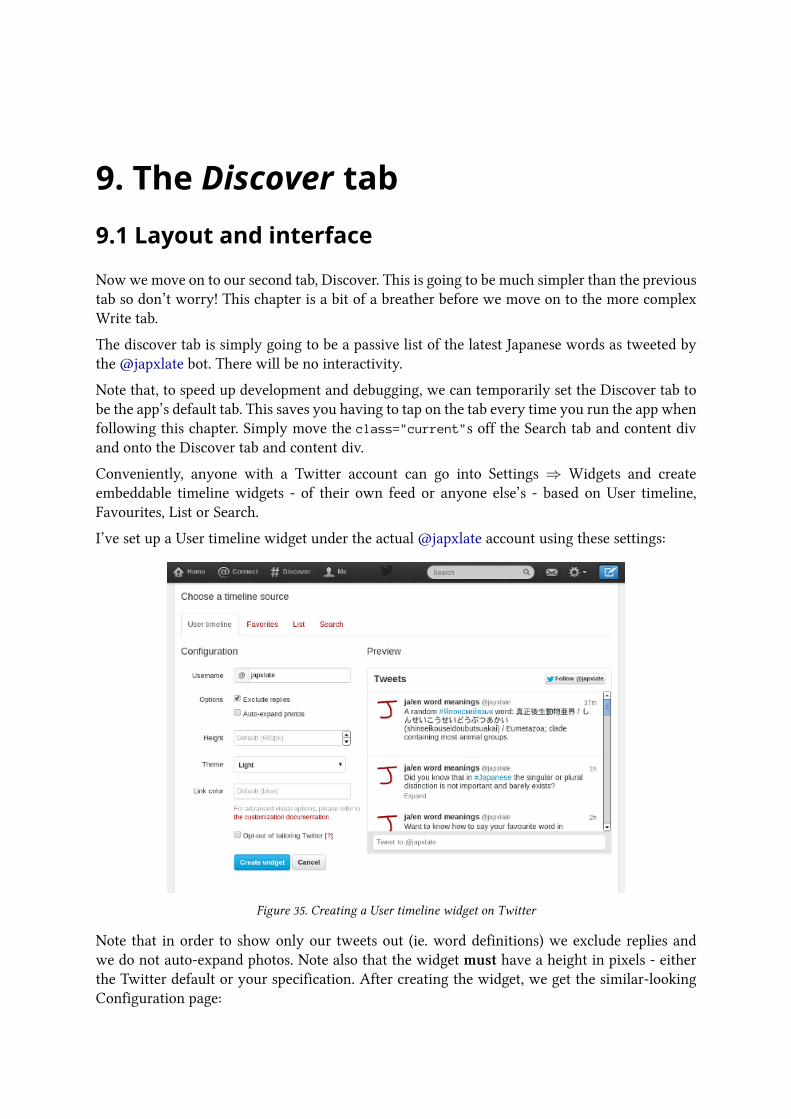
9. The Discover tab9.1 Layout and interface
Nowwe move on to our second tab, Discover. This is going to be much simpler than the previoustab so don’t worry! This chapter is a bit of a breather before we move on to the more complexWrite tab.
The discover tab is simply going to be a passive list of the latest Japanese words as tweeted bythe @japxlate bot. There will be no interactivity.
Note that, to speed up development and debugging, we can temporarily set the Discover tab tobe the app’s default tab. This saves you having to tap on the tab every time you run the app whenfollowing this chapter. Simply move the class="current"s off the Search tab and content divand onto the Discover tab and content div.
Conveniently, anyone with a Twitter account can go into Settings ⇒ Widgets and createembeddable timeline widgets - of their own feed or anyone else’s - based on User timeline,Favourites, List or Search.
I’ve set up a User timeline widget under the actual @japxlate account using these settings:
Figure 35. Creating a User timeline widget on Twitter
Note that in order to show only our tweets out (ie. word definitions) we exclude replies andwe do not auto-expand photos. Note also that the widget must have a height in pixels - eitherthe Twitter default or your specification. After creating the widget, we get the similar-lookingConfiguration page:
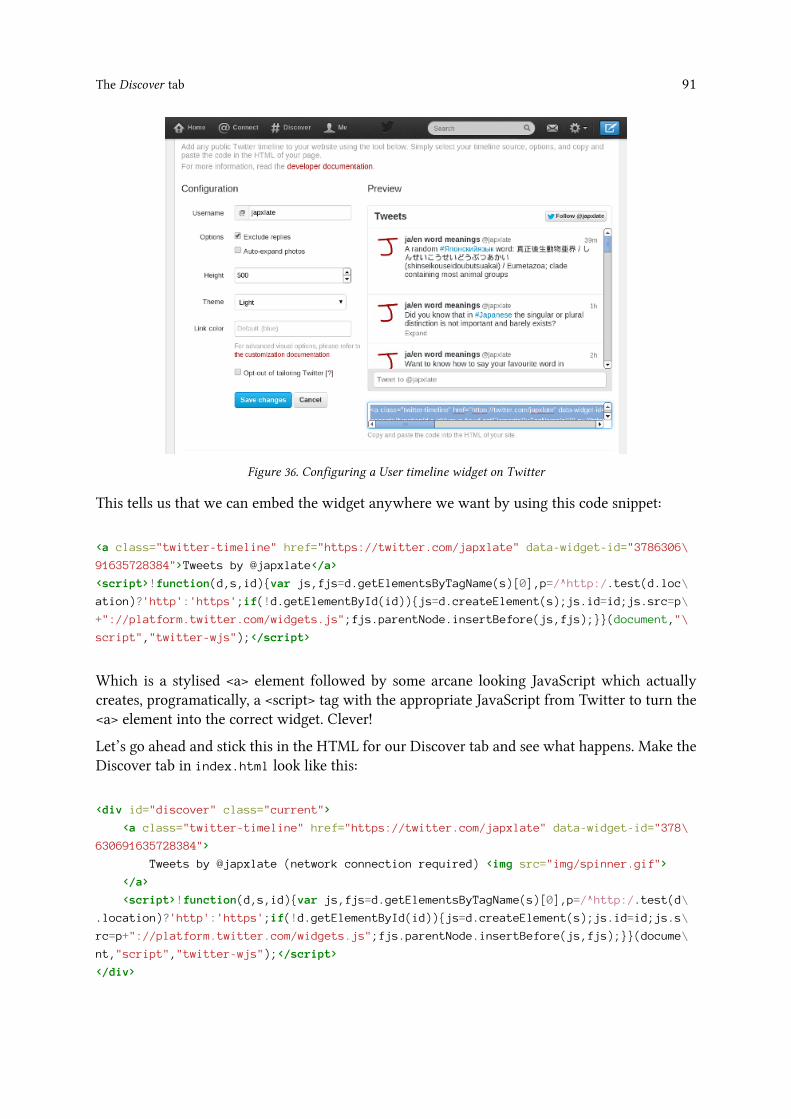
The Discover tab 91
Figure 36. Configuring a User timeline widget on Twitter
This tells us that we can embed the widget anywhere we want by using this code snippet:
<a class="twitter-timeline" href="https://twitter.com/japxlate" data-widget-id="3786306\
91635728384">Tweets by @japxlate</a>
<script>!function(d,s,id){var js,fjs=d.getElementsByTagName(s)[0],p=/^http:/.test(d.loc\
ation)?'http':'https';if(!d.getElementById(id)){js=d.createElement(s);js.id=id;js.src=p\
+"://platform.twitter.com/widgets.js";fjs.parentNode.insertBefore(js,fjs);}}(document,"\
script","twitter-wjs");</script>
Which is a stylised <a> element followed by some arcane looking JavaScript which actuallycreates, programatically, a <script> tag with the appropriate JavaScript from Twitter to turn the<a> element into the correct widget. Clever!
Let’s go ahead and stick this in the HTML for our Discover tab and see what happens. Make theDiscover tab in index.html look like this:
<div id="discover" class="current">
<a class="twitter-timeline" href="https://twitter.com/japxlate" data-widget-id="378\
630691635728384">
Tweets by @japxlate (network connection required) <img src="img/spinner.gif">
</a>
<script>!function(d,s,id){var js,fjs=d.getElementsByTagName(s)[0],p=/^http:/.test(d\
.location)?'http':'https';if(!d.getElementById(id)){js=d.createElement(s);js.id=id;js.s\
rc=p+"://platform.twitter.com/widgets.js";fjs.parentNode.insertBefore(js,fjs);}}(docume\
nt,"script","twitter-wjs");</script>
</div>
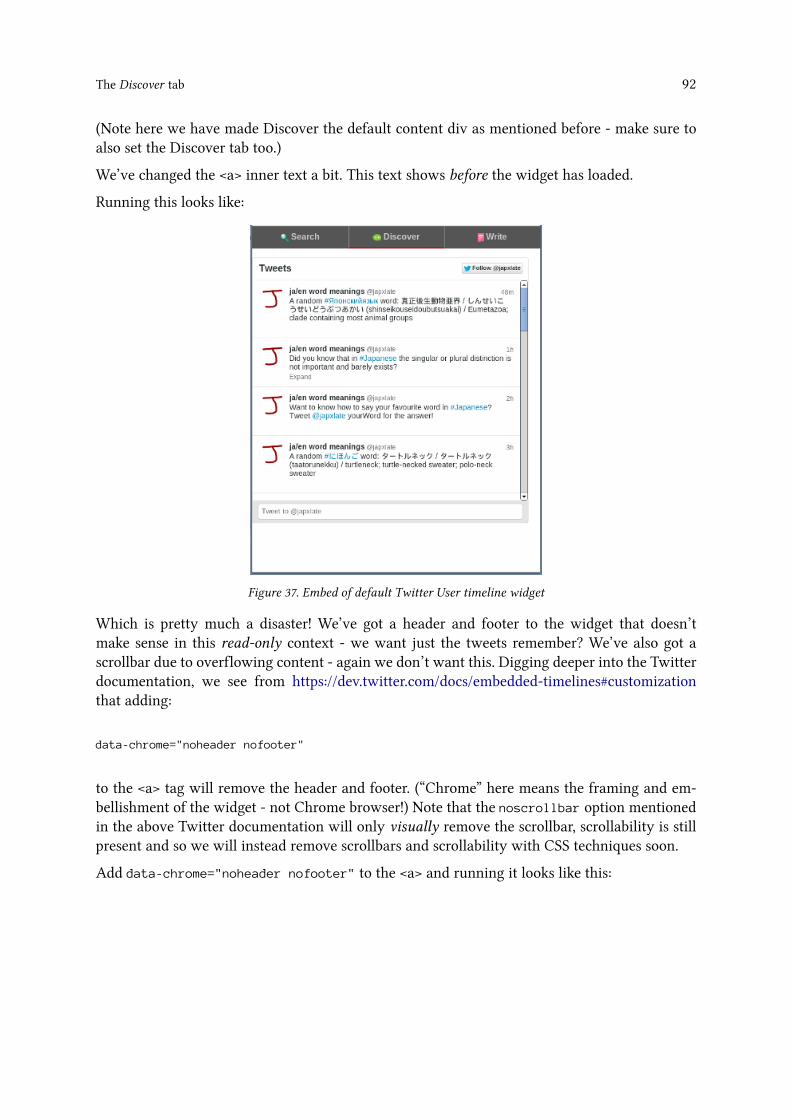
The Discover tab 92
(Note here we have made Discover the default content div as mentioned before - make sure toalso set the Discover tab too.)
We’ve changed the <a> inner text a bit. This text shows before the widget has loaded.
Running this looks like:
Figure 37. Embed of default Twitter User timeline widget
Which is pretty much a disaster! We’ve got a header and footer to the widget that doesn’tmake sense in this read-only context - we want just the tweets remember? We’ve also got ascrollbar due to overflowing content - again we don’t want this. Digging deeper into the Twitterdocumentation, we see from https://dev.twitter.com/docs/embedded-timelines#customizationthat adding:
data-chrome="noheader nofooter"
to the <a> tag will remove the header and footer. (“Chrome” here means the framing and em-bellishment of the widget - not Chrome browser!) Note that the noscrollbar option mentionedin the above Twitter documentation will only visually remove the scrollbar, scrollability is stillpresent and so we will instead remove scrollbars and scrollability with CSS techniques soon.
Add data-chrome="noheader nofooter" to the <a> and running it looks like this:
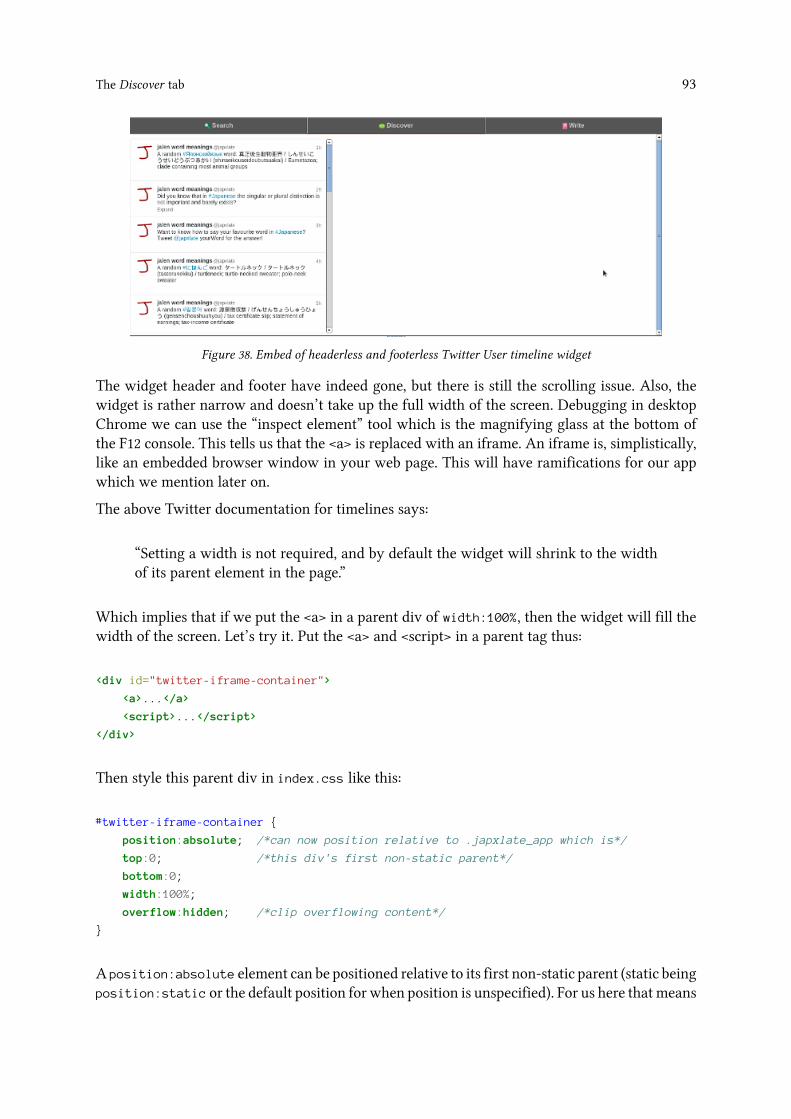
The Discover tab 93
Figure 38. Embed of headerless and footerless Twitter User timeline widget
The widget header and footer have indeed gone, but there is still the scrolling issue. Also, thewidget is rather narrow and doesn’t take up the full width of the screen. Debugging in desktopChrome we can use the “inspect element” tool which is the magnifying glass at the bottom ofthe F12 console. This tells us that the <a> is replaced with an iframe. An iframe is, simplistically,like an embedded browser window in your web page. This will have ramifications for our appwhich we mention later on.
The above Twitter documentation for timelines says:
“Setting a width is not required, and by default the widget will shrink to the widthof its parent element in the page.”
Which implies that if we put the <a> in a parent div of width:100%, then the widget will fill thewidth of the screen. Let’s try it. Put the <a> and <script> in a parent tag thus:
<div id="twitter-iframe-container">
<a>...</a>
<script>...</script>
</div>
Then style this parent div in index.css like this:
#twitter-iframe-container {
position:absolute; /*can now position relative to .japxlate_app which is*/
top:0; /*this div's first non-static parent*/
bottom:0;
width:100%;
overflow:hidden; /*clip overflowing content*/
}
A position:absolute element can be positioned relative to its first non-static parent (static beingposition:static or the default position for when position is unspecified). For us here that means
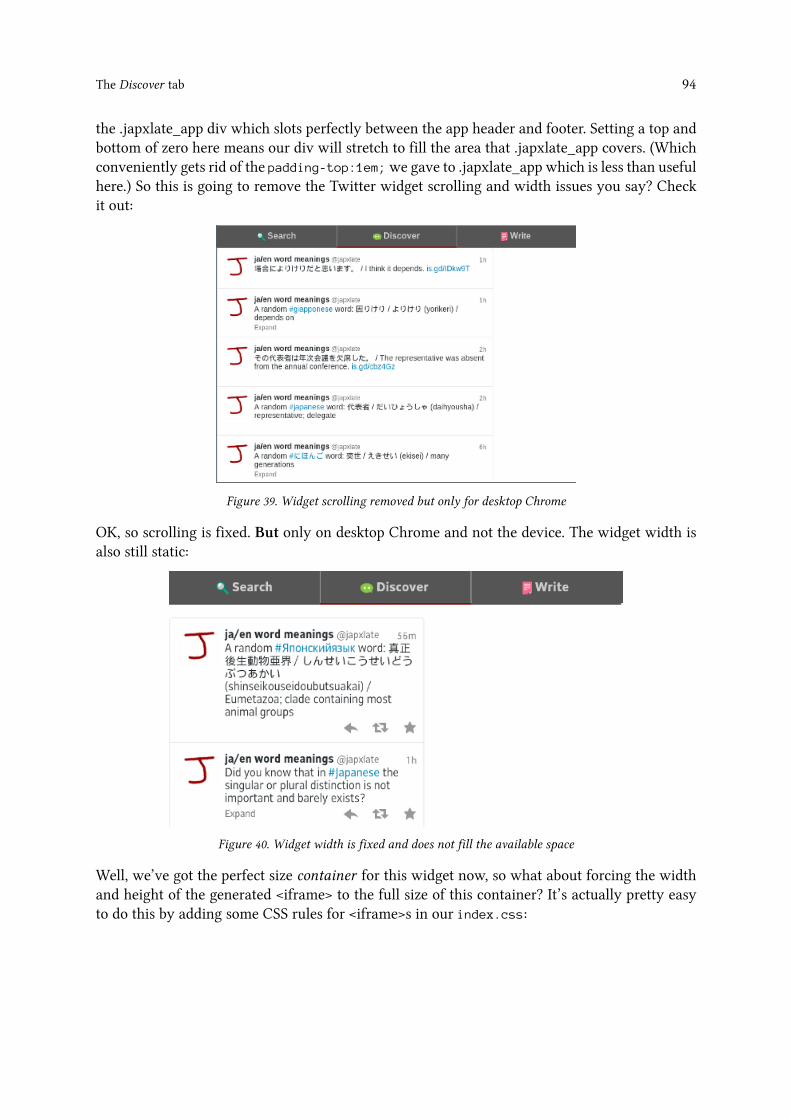
The Discover tab 94
the .japxlate_app div which slots perfectly between the app header and footer. Setting a top andbottom of zero here means our div will stretch to fill the area that .japxlate_app covers. (Whichconveniently gets rid of the padding-top:1em;we gave to .japxlate_app which is less than usefulhere.) So this is going to remove the Twitter widget scrolling and width issues you say? Checkit out:
Figure 39. Widget scrolling removed but only for desktop Chrome
OK, so scrolling is fixed. But only on desktop Chrome and not the device. The widget width isalso still static:
Figure 40. Widget width is fixed and does not fill the available space
Well, we’ve got the perfect size container for this widget now, so what about forcing the widthand height of the generated <iframe> to the full size of this container? It’s actually pretty easyto do this by adding some CSS rules for <iframe>s in our index.css:
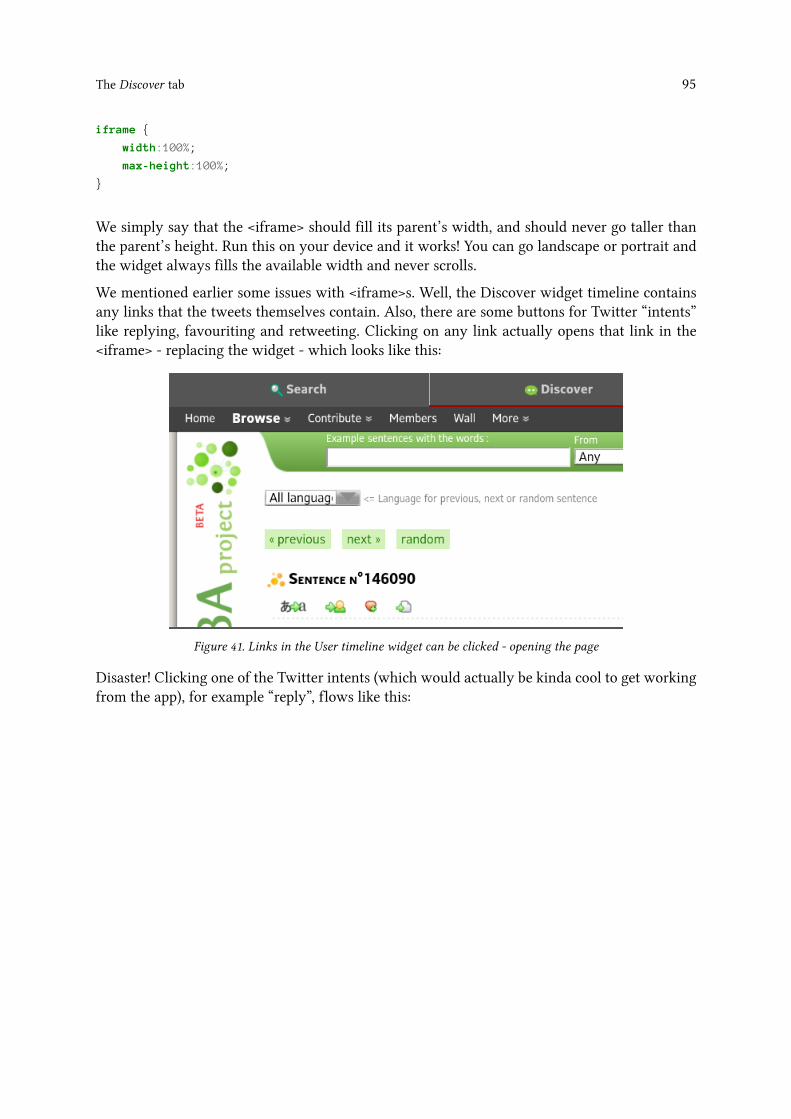
The Discover tab 95
iframe {
width:100%;
max-height:100%;
}
We simply say that the <iframe> should fill its parent’s width, and should never go taller thanthe parent’s height. Run this on your device and it works! You can go landscape or portrait andthe widget always fills the available width and never scrolls.
We mentioned earlier some issues with <iframe>s. Well, the Discover widget timeline containsany links that the tweets themselves contain. Also, there are some buttons for Twitter “intents”like replying, favouriting and retweeting. Clicking on any link actually opens that link in the<iframe> - replacing the widget - which looks like this:
Figure 41. Links in the User timeline widget can be clicked - opening the page
Disaster! Clicking one of the Twitter intents (which would actually be kinda cool to get workingfrom the app), for example “reply”, flows like this:
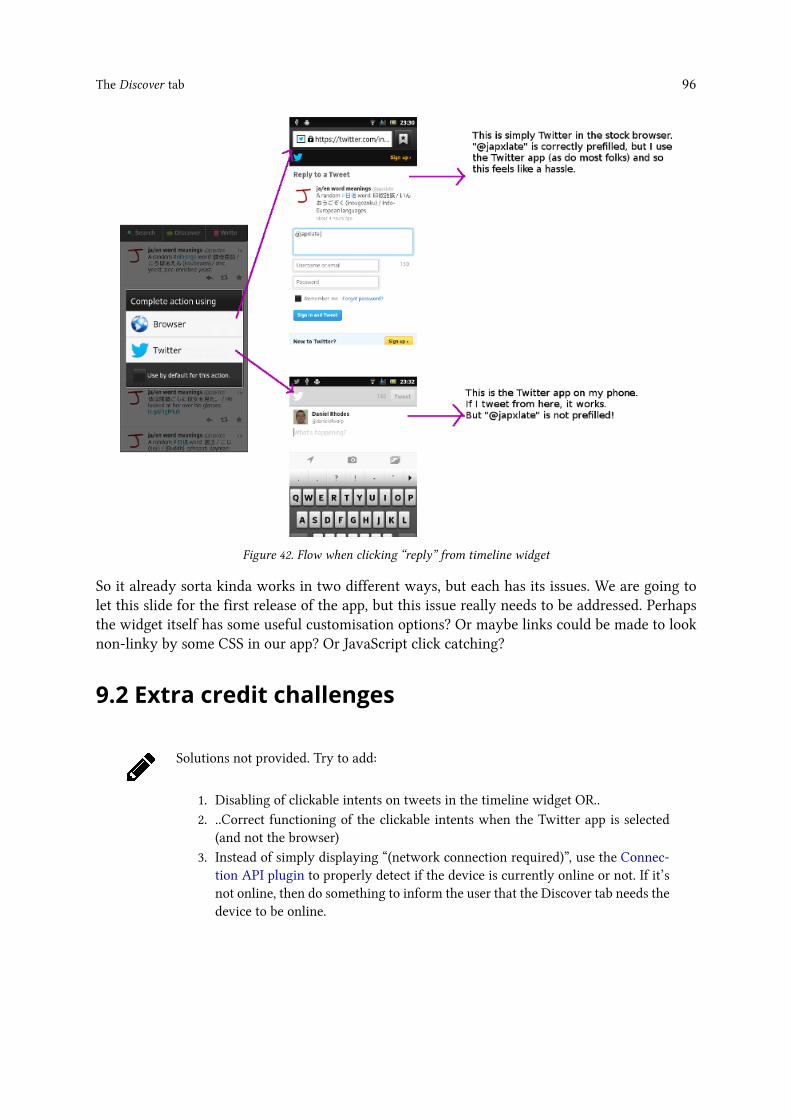
The Discover tab 96
Figure 42. Flow when clicking “reply” from timeline widget
So it already sorta kinda works in two different ways, but each has its issues. We are going tolet this slide for the first release of the app, but this issue really needs to be addressed. Perhapsthe widget itself has some useful customisation options? Or maybe links could be made to looknon-linky by some CSS in our app? Or JavaScript click catching?
9.2 Extra credit challenges
Solutions not provided. Try to add:
1. Disabling of clickable intents on tweets in the timeline widget OR..2. ..Correct functioning of the clickable intents when the Twitter app is selected
(and not the browser)3. Instead of simply displaying “(network connection required)”, use the Connec-
tion API plugin to properly detect if the device is currently online or not. If it’snot online, then do something to inform the user that the Discover tab needs thedevice to be online.

10. TheWrite tab10.1 Layout and interface
Our third and final tab now which is Write. This is more complex than the previous Discovertab, but slightly quicker to implement than the first Search tab - mostly due to not having anyscrolling woes to care about.
The write tab is going to be a little scratchpad area for the user to practice writing Japanesephonic characters. We’ll present a random character and then an empty canvas for the user tofinger draw the character. A wireframe might look like this:
Figure 43. Quick wireframe of the Write tab layout
We simply present a character and a space for them to practice drawing it in.
Let’s start with the markup, and a dollop of CSS, first. Edit the write <div> of index.html to looklike this:
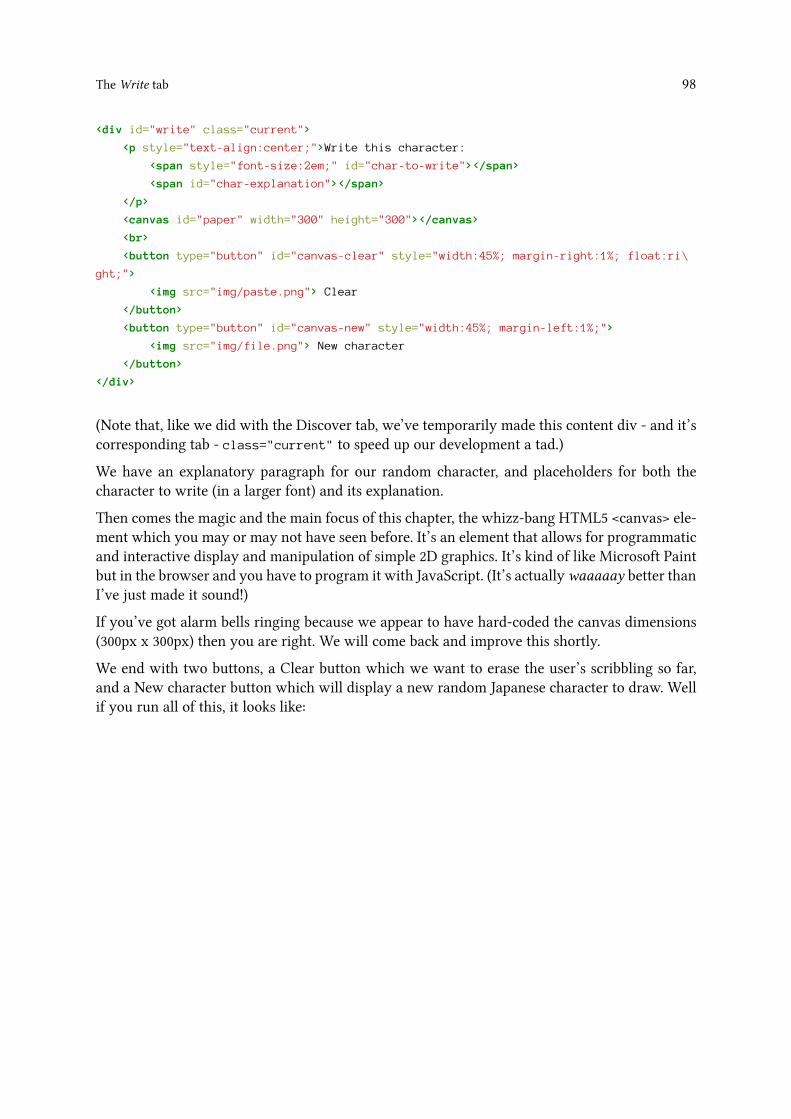
TheWrite tab 98
<div id="write" class="current">
<p style="text-align:center;">Write this character:
<span style="font-size:2em;" id="char-to-write"></span>
<span id="char-explanation"></span>
</p>
<canvas id="paper" width="300" height="300"></canvas>
<br>
<button type="button" id="canvas-clear" style="width:45%; margin-right:1%; float:ri\
ght;">
<img src="img/paste.png"> Clear
</button>
<button type="button" id="canvas-new" style="width:45%; margin-left:1%;">
<img src="img/file.png"> New character
</button>
</div>
(Note that, like we did with the Discover tab, we’ve temporarily made this content div - and it’scorresponding tab - class="current" to speed up our development a tad.)
We have an explanatory paragraph for our random character, and placeholders for both thecharacter to write (in a larger font) and its explanation.
Then comes the magic and the main focus of this chapter, the whizz-bang HTML5 <canvas> ele-ment which you may or may not have seen before. It’s an element that allows for programmaticand interactive display and manipulation of simple 2D graphics. It’s kind of like Microsoft Paintbut in the browser and you have to program it with JavaScript. (It’s actuallywaaaaay better thanI’ve just made it sound!)
If you’ve got alarm bells ringing because we appear to have hard-coded the canvas dimensions(300px x 300px) then you are right. We will come back and improve this shortly.
We end with two buttons, a Clear button which we want to erase the user’s scribbling so far,and a New character button which will display a new random Japanese character to draw. Wellif you run all of this, it looks like:
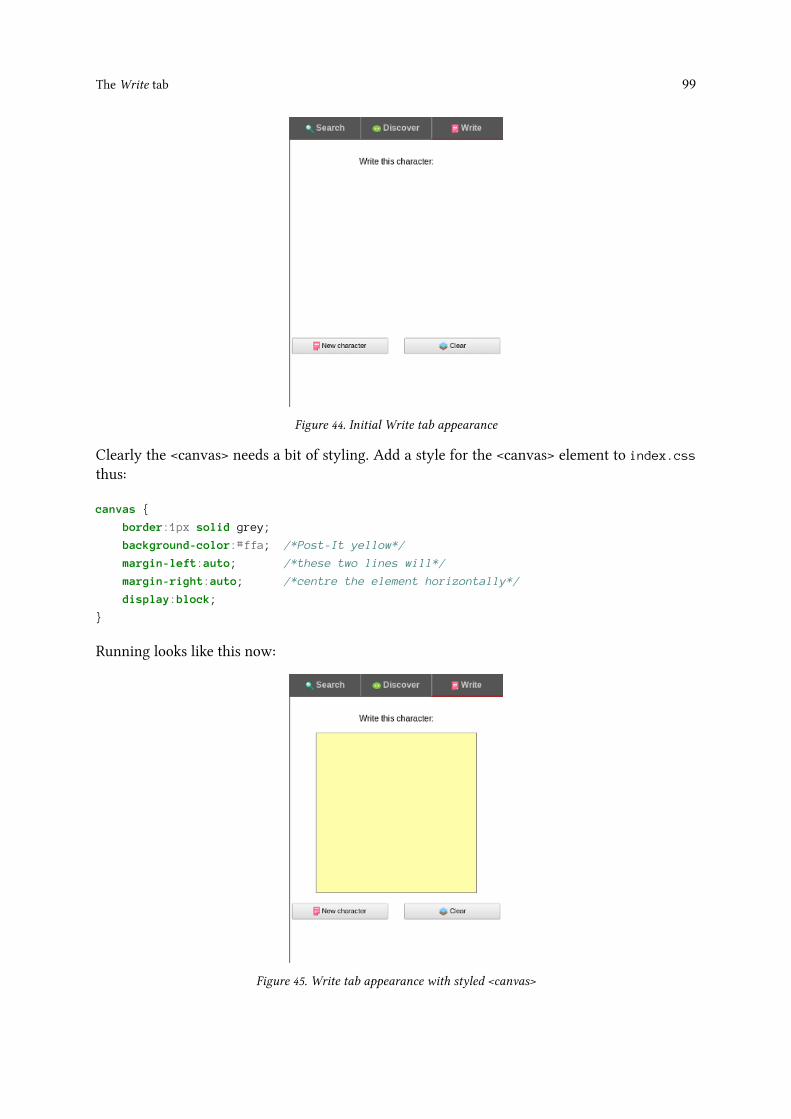
TheWrite tab 99
Figure 44. Initial Write tab appearance
Clearly the <canvas> needs a bit of styling. Add a style for the <canvas> element to index.css
thus:
canvas {
border:1px solid grey;
background-color:#ffa; /*Post-It yellow*/
margin-left:auto; /*these two lines will*/
margin-right:auto; /*centre the element horizontally*/
display:block;
}
Running looks like this now:
Figure 45. Write tab appearance with styled <canvas>
TheWrite tab 100
Better!
10.2 Filling the screen
Hmmm, but Android devices come in all shapes and sizes. What to do about the size of thecanvas? We would want, ideally, the biggest square (Japanese characters tend to be rathersquareish) that would fit on the screen at that time - for portrait or lanscape.
We’ll take an approach like this:
1. Put the two buttons at the bottom of the screen2. Make a containing <div> for the <canvas> that fills 100% of its available width and height
(the height under “Write this character” and above the buttons, then the full width of thescreen)
3. Set the size of the canvas to be the biggest square that will fit in this container. Centred inthe container
4. When the device is rotated, we will have to resize the <canvas> to be the biggest square inthe newly created container size
OK, tackling [1] and [2] first, we need a new layout. We are going to do the same thing we didfor the app’s header, content and footer; position them absolutely relative to parent. But this timethe parent will be our .japxlate_app div. Edit the write div in index.html to look like this:
<div id="write" class="current">
<p id="write-intro">Write this character: <span style="font-size:2em;" id="char-to-\
write"></span>
<span id="char-explanation"></span>
</p>
<div id="write-canvas-container">
<!--<canvas id="paper" width="300" height="300"></canvas>-->
</div>
<div id="write-buttons">
<button type="button" id="canvas-clear" style="width:45%; margin-right:1%; floa\
t:right;">
<img src="img/paste.png"> Clear
</button>
<button type="button" id="canvas-new" style="width:45%; margin-left:1%;">
<img src="img/file.png"> New character
</button>
</div>
</div>
We’ve given the intro paragraph an id. We’ve commmented the <canvas> out for the time beingbut we’ve put it in a container div of #write-canvas-container. The buttons have also been placedin a containing div of #write-buttons. Now we need to position and size these elements such thatthe intro paragraph will be right at the top, the buttons will be right at the bottom, and the canvascontainer will fill all the space inbetween. Add these CSS rules to index.css:
TheWrite tab 101
#write-intro {
position:absolute;
top:0; /*absolute top of .japxlate_app*/
height:40px; /*make arbitrarily big enough for our 2em character*/
width:100%;
margin-bottom:0; /*so #write-canvas-container is flush*/
margin-top:10px; /*so we aren't directly under the navigation tabs*/
text-align:center; /*centre text horizontally*/
/*background-color:green;*/
}
#write-canvas-container {
position:absolute;
top:50px; /*make flush with #write-intro*/
bottom:40px; /*stop 40px up from the botton of .japxlate_app*/
width:100%;
}
#write-buttons {
position:absolute;
bottom:0; /*absolute bottom of .japxlate_app*/
height:40px; /*make flush with bottom of #write-canvas-container*/
width:100%;
}
We simply make write-intro and write-buttons a little bit bigger than they need to be, and setcanvas container to fill the remaining space. We set margin-top of #write-intro to 10px so thatthe intro paragraph text is not too close to the tabs and so that we know the top of #write-canvas-container is 50px. We have previously set padding-top of .japxlate_app to 1em but this isobliterated with the position:absolute and top:0 of #write-intro. (So yes, we’ve set a defaulttop padding of 1em on .japxlate_app but only used it in the Search tab as we positioned over iton the Discover tab and this tab!). If you like you can confirm the size and shape of these divsby setting a different background-color in each of the CSS rules and then changing the size ofdesktop Chrome or rotating your device.
For [3] we need to programatically get the dimensions of #write-canvas-container, work outthe biggest square that will fit in those dimensions (possibly trimming a bit off so our canvasisn’t too close to the buttons etc), and then dynamically add the appropriate canvas element into#write-canvas-container - centreing it.
For [4] we need to catch a device rotation event and then do the steps for [3] again.
Create a file called canvas.js in assets/www/js. Include this JavaScipt file from the bottom ofindex.html (above the include for index.js).
We are going to implement a function in canvas.js called adjustCanvas() which will be ourstep [3]. adjustCanvas() looks like this:

TheWrite tab 102
//adjust - creating if necessary - the canvas element
function adjustCanvas()
{
var container = document.getElementById('write-canvas-container');
var style = window.getComputedStyle(container);
var width = parseInt(style.width);
var height = parseInt(style.height);
var smallestDim = width; //smallest dimension is width (= portrait)
if(height < width) //ie. landscape
{
smallestDim = height;
}
//invisible frame around canvas so it's not flush with buttons etc
var frameGap = 15;
smallestDim -= (frameGap * 2); //gap at top and bottom (left and right)
var canvas = null; //we proceed to get or create this
//element existence check
var firstTime = !document.getElementById('paper');
if(firstTime) //create canvas element with correct id
{
canvas = document.createElement('canvas');
canvas.id = 'paper';
canvas.style.position = 'relative'; //so we can "top" the canvas down
}
else //get existing canvas element
{
canvas = document.getElementById('paper');
}
//size and position the canvas
canvas.width = smallestDim;
canvas.height = smallestDim;
canvas.style.top = frameGap + 'px';
//add canvas (as child of container) if first time
if(firstTime)
{
container.appendChild(canvas);
}
}
TheWrite tab 103
Wow, this is our longest piece of JavaScript so far. With the first two lines we get the containerelement for the <canvas>, and its style. We then save the width and height of the container.We get the smallest dimension of the container (which will be the squared size of our canvas) byassuming the container is portrait shaped. If container height is less than container width, we sayit is landscape shaped. (A perfectly square container will be covered by the portrait assumptionwhich will be fine as any of its side measurements is fine to use in that case.) We then put animaginary frame around the canvas of 15 pixels so that the bottom of the canvas is not flushwith our buttons.
Thinking ahead to step [4], it would be nice if this function to set up the <canvas> initially couldalso be used to adjust the canvas for a device rotate. We tackle this with the concept of “firsttime”. Basically, if the function is happening for the first time - ie. the canvas does not exist -then it must create the canvas. If not the first time then it simply needs to alter the existingcanvas. We action this by:
var firstTime = !document.getElementById('paper');
Which relies on document.getElementById('someId') returning boolean false if an elementwith the id of someId does not exist on the page. So we get or create the canvas ele-ment and set its size to the smallest dimension of the container. Minus our frame gap ofcourse. The first time around we have to insert the created <canvas> element into the DOM(document.createElement('elementname'); creates the element in memory only) which we dowith container.appendChild(canvas);.
Go ahead and delete the line:
canvas.style.position = 'relative';
and put that in the canvas{} rule in index.css as that makes more sense.
Next, mosey on over to firstLoadForTab_Write() in japxlate.js and add a call toadjustCanvas() thus:
function firstLoadForTab_Write()
{
console.log('first load for write tab');
adjustCanvas(); //create canvas element of correct size
global_pagesLoaded.write = true;
}
Remember firstLoadForTab_Write() is our one-off initialiser for the Write tab and so runningthe app now looks like:

TheWrite tab 104
Figure 46. <canvas> now fills available space
Pretty good! You can test that the <canvas> fills the available space by closing the page, resizingthe browser and loading the page again (desktop Chrome) or closing the app, rotating your phone,reopening the app (device).
OK, that was actually the easy bit! Our next step is [4] and this is a bit fiddly as we need to figureout how to detect a device rotation.
Well, the proper way is to catch the “orientationchange” event (of the window object) with ahandler. (Interestingly there is no PhoneGap API to do this.) Orientationchange will fire foreach and every orientation change of the device. And then in that handler you can use thewindow.orientation property to work out the device orientation. Window.orientation will be 0meaning portrait, 90 meaning landscape (top of phone pointing right) or -90 meaning landscape(top of phone pointing left). These values represent the number of degrees the phone has beenrotated from the resting - or zero - position which is portrait. Android does not allow the screento be rotated upside-down and so there is no 180 value (phones only?).
As you would expect, our desktop Chrome browser doesn’t support the orientationchange event.(You can try to spin your monitor around but don’t blame me if you wreck anything!). Keepingour spirit of making the app work as an app and in the desktop Chrome, we are going to dosomething a little different. (Although orientationchange is the “correct” way to do it.)
The closest thing to orientationchange on a desktop browser, and something that will also workon our WebView browser, is the “resize” event of the window object. This event fires for everyresize - big or small - of the browser window. This includes the resize that our device will do tothe WebView when we rotate the device.
OK, let’s get the ball rolling (or should that be rotating? LOL). Stick a call toconfigureCanvasRotationAdjustment(); at the bottom of receivedEvent() in index.js. Wedefine this function in canvas.js:

TheWrite tab 105
//device "rotation" handler
function configureCanvasRotationAdjustment()
{
window.addEventListener('resize', adjustCanvas, false);
}
Run this and you can see that the <canvas> resizes when you rotate the device OR when youresize the desktop Chrome.
But there’s a problem, if you click on a different tab (not Write), rotate the device / resize thebrowser and then click back on the Write tab, you get a tiny canvas like this:
Figure 47. <canvas> can become too small
What’s happening is this: Our onresize handler (adjustCanvas()) triggers when the browserresizes, regardless of whichever tab we are on. The <canvas> container will not be visible whennot on the Write tab because of our whole tabbing mechanism. But adjustCanvas()will still getcalled and create or adjust the canvas. It seems like .getComputedStyle() picks up the <canvas>container smallest dimension as 100px when it is not visible. This resizes the <canvas> to a tinysize - it just isn’t visible until you click the Write tab.
Remember we put adjustCanvas() in firstLoadForTab_Write()? This means that when we goback to the Write tab after clicking another tab, adjustCanvas() is not called. One solutionwould be to somehow only action the resize handler when on the Write tab. But what wewill do instead is move the call to adjustCanvas() out of firstLoadForTab_Write() and intoonclickForTab_Write() such that the canvas is adjusted on every clicking of theWrite tab. So re-move adjustCanvas() from firstLoadForTab_Write() and stick it in onclickForTab_Write()
so it looks like this:
TheWrite tab 106
function onclickForTab_Write()
{
console.log('click on write tab');
if(!global_pagesLoaded.write)
{
firstLoadForTab_Write();
}
adjustCanvas(); //adjust - creating if necessary - the canvas element
}
Run this and the problem has been resolved. Nice.
Phew, so the canvas display and layout is pretty hot and tasty right now and should beappropriate for any device that the app runs on.
10.3 Displaying a random character
Now, even before we get to the New character and Clear buttons, we need to present a randomJapanese character for the user to draw. And of course we need to make finger movements onthe canvas actually write something!
Put a call to the soon-to-be-implemented doNewChar() at the end of onclickForTab_Write() (sothat every click on the Write tab will present a new character to practice) such that it looks likethis:
function onclickForTab_Write()
{
console.log('click on write tab');
if(!global_pagesLoaded.write)
{
firstLoadForTab_Write();
}
adjustCanvas(); //adjust - creating if necessary - the canvas element
//get and display a random Japanese character to practice writing
doNewChar();
}
doNewChar() is going to get a random Japanese character, and display it above the canvas for theuser’s reference. So before we implement doNewChar(), we need a slight detour - we need thefunction to get a random Japanese character! We will put this in, you guessed, linguistics.js:
TheWrite tab 107
//return a random (non-chiisai, non-obsolete) hiragana or katakana
//RETURNs object like {char:'�', romaji:'ku', type:'hiragana'}
function getRandomKana()
{
//indices to ignore from coreHiragana:
//64,65,68,>=74
//so this is indices of coreHiragana of chars that we WANT to practice
//(ie. not chiisai or obsolete):
var coreIndices =
[
0, 1, 2, 3, 4, 5, 6, 7, 8, 9,
10, 11, 12, 13, 14, 15, 16, 17, 18, 19,
20, 21, 22, 23, 24, 25, 26, 27, 28, 29,
30, 31, 32, 33, 34, 35, 36, 37, 38, 39,
40, 41, 42, 43, 44, 45, 46, 47, 48, 49,
50, 51, 52, 53, 54, 55, 56, 57, 58, 59,
60, 61, 62, 63, 66, 67, 69, 70, 71, 72,
73
];
//get one of above indices at random
var index = coreIndices[Math.floor(Math.random() * coreIndices.length)];
//default to hiragana...
var char = coreHiragana[index]; //use our random index
var type = 'hiragana';
//...but have a 50% chance of returning katakana
if(Math.random() > 0.50)
{
char = hira_to_kata(char);
type = 'katakana';
}
//return a useful object
return {char:char, romaji:kana_to_romaji(char), type:type};
}
This again might be something that’s best ignored and treated as a black box, but basically wecherry pick a phonetic character from coreHiragana based on some desired indices (to give us afull size and non-obsolete character). We then convert that character into katakana 50% of thetime. We return an object with the character itself and some metadata.
Let’s use this function in doNewChar() which we define in canvas.js:
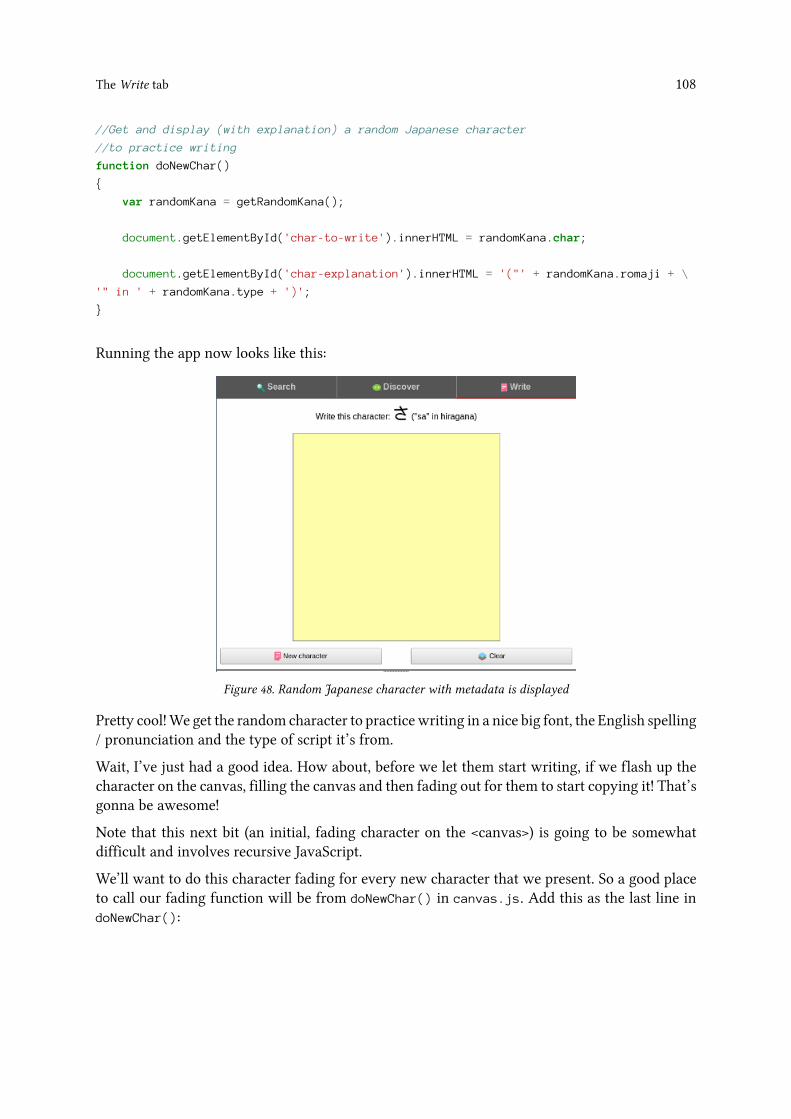
TheWrite tab 108
//Get and display (with explanation) a random Japanese character
//to practice writing
function doNewChar()
{
var randomKana = getRandomKana();
document.getElementById('char-to-write').innerHTML = randomKana.char;
document.getElementById('char-explanation').innerHTML = '("' + randomKana.romaji + \
'" in ' + randomKana.type + ')';
}
Running the app now looks like this:
Figure 48. Random Japanese character with metadata is displayed
Pretty cool!We get the random character to practice writing in a nice big font, the English spelling/ pronunciation and the type of script it’s from.
Wait, I’ve just had a good idea. How about, before we let them start writing, if we flash up thecharacter on the canvas, filling the canvas and then fading out for them to start copying it! That’sgonna be awesome!
Note that this next bit (an initial, fading character on the <canvas>) is going to be somewhatdifficult and involves recursive JavaScript.
We’ll want to do this character fading for every new character that we present. So a good placeto call our fading function will be from doNewChar() in canvas.js. Add this as the last line indoNewChar():
TheWrite tab 109
//put character on canvas and fade to nothing (starting at 1 opacity)
//our trademark #990000 red is rgb(153, 0, 0)
fadeCharOnCanvas(randomKana.char, 153, 0, 0, 1, 1, 100, 10);
We call fadeCharOnCanvas() with a lot of parameters. Let’s implement fadeCharOnCanvas() -also in canvas.js - right now. It’s a biggie because it uses a few helper functions and variablesthat we’ll implement shortly. So don’t be scared if you see something that hasn’t been referencedyet! OK, implement fadeCharOnCanvas() to look like this:
//Animate a fade out of a single (Japanese) character on the canvas.
//Starting from opacity of startAlpha and stepping down to zero opacity
function fadeCharOnCanvas(char, startR, startG, startB, startAlpha, thisAlpha, msDelay,\
frameCount)
{
//calc the step down amount
var dec = startAlpha / frameCount;
//what will the *next* opacity be?
var nextAlpha = thisAlpha - dec;
//console.log('thisAlpha:' + thisAlpha + ' -- nextAlpha:' + nextAlpha);
//dues to floating point rounding we prob won't reach exactly zero
//BUT we want exactly zero for the char to disappear
//SO if thisAlpha is on the last frame, force to zero
if(thisAlpha <= (startAlpha - ((frameCount - 1) * dec)))
{
//console.log('last frame reached');
thisAlpha = 0;
}
clearCanvas(); //else we are drawing a lighter char over a darker one!
//console.log(global_canvasElement.width);
var fontSize = parseInt(global_canvasElement.width * 0.833);
//console.log(fontSize);
global_canvas.font = 'normal ' + fontSize + 'px serif';
global_canvas.fillStyle = 'rgba(' + startR + ',' + startG + ',' + startB + ',' + th\
isAlpha + ')'; //rgb alpha
global_canvas.fillText(char, parseInt(global_canvasElement.width * 0.05), parseInt(\
global_canvasElement.width * 0.78));
if(nextAlpha < 0)
{
//console.log('last frame drawn - exiting');
return;
}

TheWrite tab 110
//recurse!
setTimeout(function(){fadeCharOnCanvas(char, startR, startG, startB, startAlpha, ne\
xtAlpha, msDelay, frameCount)}, msDelay);
}
The <canvas> API lets us write text in any colour and at any opacity. We set the opacity usingwhat’s called an alpha value; one meaning fully opaque and zero meaning fully transparent.In a nutshell, we simply draw the character on the canvas a bunch of times and increase thetransparency at each step. OK, let’s have a fuller explanation…
We accept, in order of appearance, these parameters:
1. char - the single Japanese character to draw2. startR - red element of colour to use for drawing (integer 0 - 255)3. startG - green element of colour to use for drawing (integer 0 - 255)4. startB - blue element of colour to use for drawing (integer 0 - 255)5. startAlpha - opacity used to draw the first frame (float 0.0 - 1.0)6. thisAlpha - opacity used to draw the current frame (float 0.0 - 1.0)7. msDelay - the delay, in milliseconds, between each frame8. frameCount - how many frames to take to get down to zero opacity
(Note that startR, startG and startB don’t actually change value at any step of the recursion.)
We save in dec the amount we have to decrement the starting opacity (startAlpha) by each stepto reach zero opacity after the specified number of frames (frameCount).
We then use dec to work out what the opacity of the next frame will be. We’ll use this value abit later on.
Next we have a workaround for the vagaries of floating point arithmetic. Basically, due torounding, we might not reach an opacity of exactly zero on our last frame. So we do an if
check here to see if we are more-or-less on the last frame now (ie. (frameCount - 1) frames havealready happened). If we are, we force the current opacity to zero.
Next, and before we draw anything, we clear the canvas. We will define clearCanvas() shortly.
Next we calculate fontSize to make the character best fill the canvas. During development Isaw that for a 300px by 300px canvas, a font size of 250px was best. This is the equivalent of thefont size being 83.3% of the canvas size. Trial-and-error with some different canvas sizes told methat this percentage just works. global_canvasElement is the <canvas> DOM element which weneed to have available when this function is called.
Next we use the font property of global_canvas to set the font size we just calculated. global_-canvas is the drawing context of our <canvas> element which we need to have available whenthis function is called. We cover this shortly so don’t worry.
Next we use an rgba (“red, green, blue, alpha”) value to set the global_canvas.fillStyle
property. This sets the colour and opacity that our character will get drawn with.
Then we call global_canvas.fillText()which actually writes our character on the canvas. Thesecond argument is the canvas x coordinate where you want the (left edge of the) text to start

TheWrite tab 111
drawing. The third argument is the canvas y coordinate where you want the (bottom baselineof the) text to be. Again by trial-and-error I saw it was best for the x coordinate to be 5% of thecanvas total width, and the y coordinate to be 78% of the canvas total height.
OK, that’s one frame drawn, but we are still in the function and so we need to exit the functionif we have just drawn the last frame. That’s what we do with the next if check.
Last but not least, if we are still in the function then we have another frame to draw. Wemake the function call itself (recursion) at the end. But this should only happen after thespecified delay (msDelay) and sowe use JavaScript’s builtin setTimeout()method (of the windowobject) to call ourself after the delay. setTimeout()works like setTimeout(someCallableThing,delayInMilliseconds);. We simply call ourself with the updated value for nextAlpha - all theother arguments are the same.
Great! But we still need to define clearCanvas() and initialise global_canvas and global_-
canvasElement. Let’s do the globals first, define them at the top of canvas.js like this:
//The drawing context of our <canvas>
var global_canvasElement;
//Our <canvas> DOM element
var global_canvas;
Nothing difficult there. Now, again in canvas.js, define initialiseCanvas() thus:
//Save our global canvas variables
function initialiseCanvas()
{
//set the globals
global_canvasElement = document.getElementById('paper');
global_canvas = global_canvasElement.getContext('2d');
}
Good old document.getElementById() is used to save the canvas DOM element into global_-
canvasElement. For global_canvas we call getContext('2d') on our canvas DOM element.This is a builtin method of the HTML5 canvas object and will return an API for 2D drawing.(Yes, there’s a 3D API - getContext('webgl') - but it won’t work in as many browsers as the2D API.)
The question now is where to call initialiseCanvas()? If you’re thinking that we need to callit once and only once, then you’re thinking the same as me. However, during development Inoticed an obscure quirk with the canvas drawing context whenever the canvas was resized (ie.we rotate our device): the canvas drawing context would reset! With this in mind we need to callinitialiseCanvas() every time the canvas is adjusted. This is actually easy to do and simplyinvolves adding:
initialiseCanvas();
as the very last line of adjustCanvas().
Just clearCanvas() left now. Stick it in canvas.js and it goes like:

TheWrite tab 112
//Clear the canvas
function clearCanvas()
{
global_canvas.clearRect(0, 0, global_canvasElement.width, global_canvasElement.heig\
ht);
}
We use the clearRect() canvas API method to clear a rectangle on the canvas. The rectangle weclear starts at (0, 0) in canvas space and the width and height matches that of the canvas itself.This clears the entire canvas.
All done! You should now get the Japanese character fading down on the canvas for each newcharacter!
10.4 Finger doodling
Right, on to the biggie now which is making something draw on the canvas when the usermoves their finger in there. Do you remember our work on finger scrolling for the Search tab?Remember we got it working on the device first then we simulated finger presses - using mouseevents - for debugging in desktop Chrome? Well, let’s do it the other way round this time. Let’sget canvas writing working on desktop Chrome first.
When the mouse is down in the canvas, and then the mouse is moved, we want to leave a “trail”on the canvas as if drawing with a calligraphy brush or what-have-you. I mentioned earlier thatHTML5 canvas is somewhat like MS Paint in the browser. Like MS Paint, it has a line drawingAPI where we can start the “brush” at a certain coordinate, and then paint a line from there toany other coordinate.
And, like we did for simulated finger scrolling, we are going to need a global variable to trackthe mouse downness. In fact, we’ll recycle the same global variable (so yes, it might not logicallybelong in a file called search_interface.js).
You remember our initialiseCanvas() in canvas.js which is where we stored the canvas inglobal variables just after creating it for the first time. That seems like a good place to put theevent listeners we’re going to need for our mouse drawing. Add three addEventListener() calls- on the canvas element - at the bottom of initialiseCanvas() such that it now looks like this:
function initialiseCanvas()
{
//set the globals
global_canvasElement = document.getElementById('paper');
global_canvas = global_canvasElement.getContext('2d');
//simulated touch (ie. mouse) dragging for writing pad
global_canvasElement.addEventListener('mousedown', mousedownForCanvas, false);
global_canvasElement.addEventListener('mousemove', mousemoveForCanvas, false);
global_canvasElement.addEventListener('mouseup', mouseupForCanvas, false);
}
TheWrite tab 113
You’ve guessed it, we’re going to define mousedownForCanvas(), mousemoveForCanvas() andmouseupForCanvas() right now; also in canvas.js:
//Mousedown event handler for canvas - set "now drawing" state
function mousedownForCanvas(event)
{
global_mouseButtonDown = true;
event.preventDefault();
}
//Mousemove event handler for canvas - draw on canvas
function mousemoveForCanvas(event)
{
var x, y;
// Get the mouse position relative to the canvas element.
//(ie. the mouse position IN CANVAS SPACE)
if (event.offsetX || event.offsetX == 0) { // Opera and Chrome
x = event.offsetX;
y = event.offsetY;
}
//This event handler works like a drawing pencil which tracks the mouse
//movements. We start drawing a path made up of lines.
if(global_mouseButtonDown)
{
doDrawOnCanvas(x, y); //our canvas API magic
}
}
//Mouseup event handler for canvas - unset "now drawing" state
function mouseupForCanvas(event)
{
//console.log('mouseup event on canvas');
global_mouseButtonDown = false;
global_startedDrawing = false;
event.preventDefault();
}
mousedownForCanvas() simply sets our recycled global_mouseButtonDown to true. InmousemoveForCanvas() we receive the mouse event and, if the mouse button is down, calldoDrawOnCanvas() with canvas space x and y coordinates. Specifically we pass it offsetX andoffsetY of the mouse event. In Chrome (and also Opera but definitely not Firefox), this is the xycoords of the mouse event but offset to be in element space. Element space meaning the verytop-left of the element is x=0, y=0 and so on.
Why call doDrawOnCanvas() and not just do the canvas drawing logic in the mousemovehandler? Well it’s because, like we did for search results scrolling, we want to reuse the same
TheWrite tab 114
logic for actual finger drawing and simulated finger drawing with the mouse. We’ll get on todoDrawOnCanvas() in a moment.
Finally in mouseupForCanvas() we set global_mouseButtonDown to false. We also set global_-startedDrawing to false but we haven’t defined that yet. Let’s define it first then I’ll explain.Stick:
//Are we already drawing on the canvas?
var global_startedDrawing = false;
at the top of canvas.js with the other globals.
We need to keep track of this because, as we will see shortly, with canvas API we have twovery distinct steps of drawing lines; moving the brush to a certain point to start the pathand then actually moving the brush from that point. So most of the magic happens in ourdoDrawOnCanvas() which we will define right now, also in canvas.js:
//Universal canvas line plotter. for onmousemove etc
function doDrawOnCanvas(canvasX, canvasY)
{
//This works like a drawing pencil which tracks the mouse / touch
//movements. We draw a path made up of lines.
if(!global_startedDrawing) //first time
{
global_canvas.beginPath();
global_canvas.moveTo(canvasX, canvasY);
global_startedDrawing = true;
}
else
{
global_canvas.lineTo(canvasX, canvasY);
global_canvas.stroke();
}
}
We expect to receive x and y coordinates in canvas space, which is conveniently provided by.offsetX and Y on the mousemove event. (The offsetX and Y properties will contain the screencoordinates of the mouse converted into element space such that if the mouse is in the verytop-left of the element - our canvas - the offsetX and Y will be 0,0.)
For the first time that drawing has started, we call a couple of canvas APImethods to get ready fordrawing. We call beginPath()which starts a new path. A path is basically a line or curve that wedraw onto the canvas. We then call moveTo() which positions the “brush” but does not actuallypaint anything. We then, for subsequent mousemoves or finger drags set global_startedDrawingto true so that the next bit can happen…
Which is simply to call twomore canvas API methods. We call lineTo()with the updated mouse/ finger position (again in canvas space) which will move the brush from its path starting point
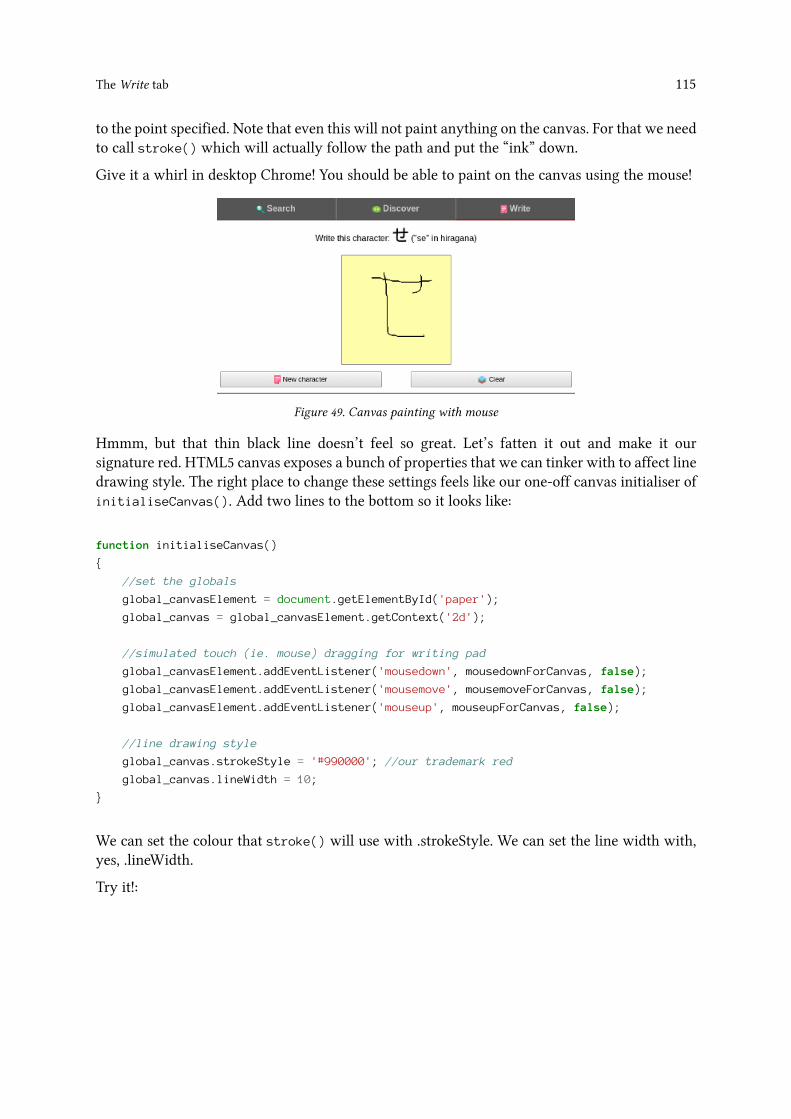
TheWrite tab 115
to the point specified. Note that even this will not paint anything on the canvas. For that we needto call stroke() which will actually follow the path and put the “ink” down.
Give it a whirl in desktop Chrome! You should be able to paint on the canvas using the mouse!
Figure 49. Canvas painting with mouse
Hmmm, but that thin black line doesn’t feel so great. Let’s fatten it out and make it oursignature red. HTML5 canvas exposes a bunch of properties that we can tinker with to affect linedrawing style. The right place to change these settings feels like our one-off canvas initialiser ofinitialiseCanvas(). Add two lines to the bottom so it looks like:
function initialiseCanvas()
{
//set the globals
global_canvasElement = document.getElementById('paper');
global_canvas = global_canvasElement.getContext('2d');
//simulated touch (ie. mouse) dragging for writing pad
global_canvasElement.addEventListener('mousedown', mousedownForCanvas, false);
global_canvasElement.addEventListener('mousemove', mousemoveForCanvas, false);
global_canvasElement.addEventListener('mouseup', mouseupForCanvas, false);
//line drawing style
global_canvas.strokeStyle = '#990000'; //our trademark red
global_canvas.lineWidth = 10;
}
We can set the colour that stroke() will use with .strokeStyle. We can set the line width with,yes, .lineWidth.
Try it!:
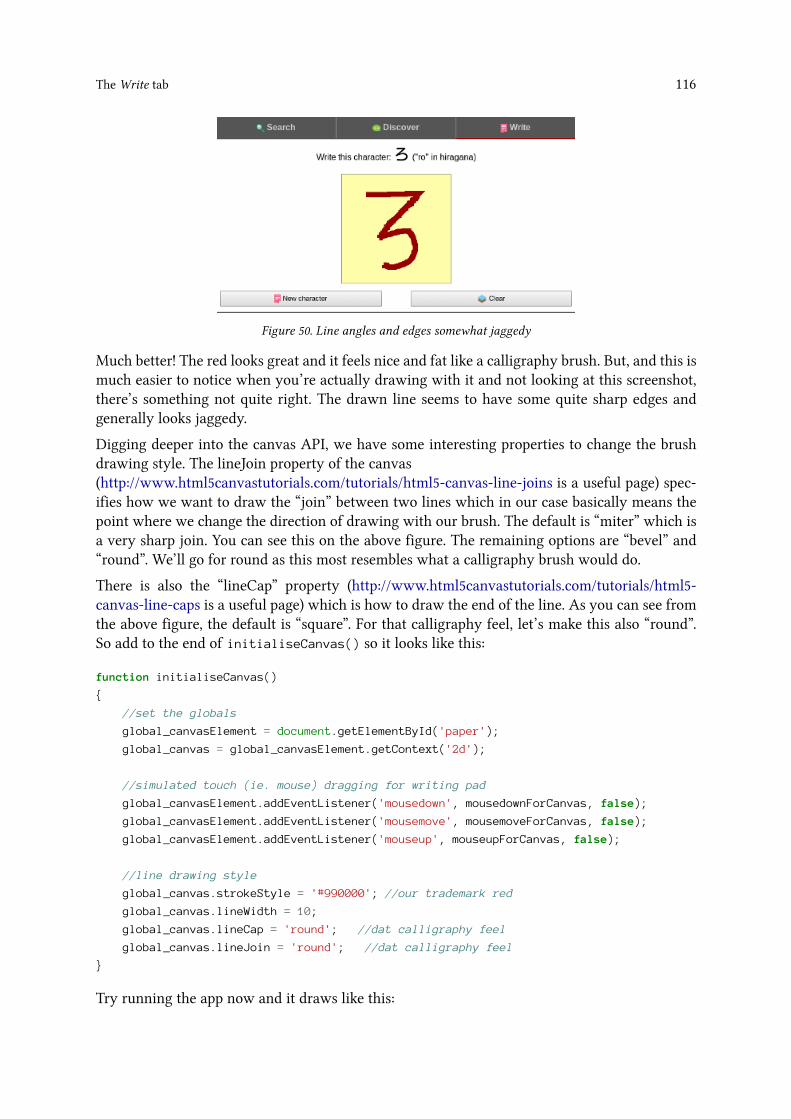
TheWrite tab 116
Figure 50. Line angles and edges somewhat jaggedy
Much better! The red looks great and it feels nice and fat like a calligraphy brush. But, and this ismuch easier to notice when you’re actually drawing with it and not looking at this screenshot,there’s something not quite right. The drawn line seems to have some quite sharp edges andgenerally looks jaggedy.
Digging deeper into the canvas API, we have some interesting properties to change the brushdrawing style. The lineJoin property of the canvas(http://www.html5canvastutorials.com/tutorials/html5-canvas-line-joins is a useful page) spec-ifies how we want to draw the “join” between two lines which in our case basically means thepoint where we change the direction of drawing with our brush. The default is “miter” which isa very sharp join. You can see this on the above figure. The remaining options are “bevel” and“round”. We’ll go for round as this most resembles what a calligraphy brush would do.
There is also the “lineCap” property (http://www.html5canvastutorials.com/tutorials/html5-canvas-line-caps is a useful page) which is how to draw the end of the line. As you can see fromthe above figure, the default is “square”. For that calligraphy feel, let’s make this also “round”.So add to the end of initialiseCanvas() so it looks like this:
function initialiseCanvas()
{
//set the globals
global_canvasElement = document.getElementById('paper');
global_canvas = global_canvasElement.getContext('2d');
//simulated touch (ie. mouse) dragging for writing pad
global_canvasElement.addEventListener('mousedown', mousedownForCanvas, false);
global_canvasElement.addEventListener('mousemove', mousemoveForCanvas, false);
global_canvasElement.addEventListener('mouseup', mouseupForCanvas, false);
//line drawing style
global_canvas.strokeStyle = '#990000'; //our trademark red
global_canvas.lineWidth = 10;
global_canvas.lineCap = 'round'; //dat calligraphy feel
global_canvas.lineJoin = 'round'; //dat calligraphy feel
}
Try running the app now and it draws like this:

TheWrite tab 117
Figure 51. Line angles and ends have a rounder feel
Awesome! I feel warm and fuzzy inside.
Right, let’s quickly get our bottom buttons in the bag and then we’ll get our calligraphy brushworking with our sticky fingers on our actual device. Okey dokey, we’re going to need someevent handlers to do the appropriate things for our New character and Clear buttons. Stroll overto index.js and whack a call to configureCanvasButtons(); at the end of receivedEvent().receivedEvent() will look like this now:
// Update DOM on a Received Event
receivedEvent: function(id) {
console.log('Received Event: ' + id);
configureTabs();
//load and show whatever we've set the initial tab to be
initialiseDefaultTab();
configureSearchButton();
configureSearchInput();
configureSearchTouchScrolling();
configureSearchMouseScrolling();
configureCanvasRotationAdjustment();
configureCanvasButtons();
},
We’ll define configureCanvasButtons() in canvas.js thus:
TheWrite tab 118
//"New character" and "Clear" buttons
function configureCanvasButtons()
{
document.getElementById('canvas-clear').addEventListener('click', clearCanvas, fals\
e);
document.getElementById('canvas-new').addEventListener('click', doNewChar, false);
}
And that’s it! The Clear button simply calls our existing clearCanvas() function, and the Newcharacter button simply calls our existing doNewChar() function. Try it! The write tab is muchmore fun now!
Right, the remaining matter is the important one of getting drawing to work with finger moveson the device itself. We are happy with how it works in desktop Chrome now so let’s moveforward and think about the device. We isolated the doDrawOnCanvas() function and it is readyto accept canvas coordinates from any event, not just mouse events.
Just like with search results scrolling, the events in question are touchstart, touchmove andtouchend. These will somewhat correlate with the mousedown, mousemove and mouseuphandlers (respectively) that we’ve just implemented.
In initialiseCanvas() in canvas.js, go ahead and insert these three lines to add our touchevent handlers. Insert them after the mouse event handlers:
//touch dragging for writing pad
global_canvasElement.addEventListener('touchstart', touchstartForCanvas, false);
global_canvasElement.addEventListener('touchmove', touchmoveForCanvas, false);
global_canvasElement.addEventListener('touchend', touchendForCanvas, false);
Great, now let’s define these handlers; again in canvas.js:
//Touchstart event handler for canvas
function touchstartForCanvas(event)
{
//console.log('touchstart event on canvas');
event.preventDefault();
}
//Touchmove event handler for canvas - draw on canvas
function touchmoveForCanvas(event)
{
var touchobj = event.changedTouches[0]; //reference first touch point for this event
//where, in canvas space, has been touched?
var x, y;
x = touchobj.offsetX;
y = touchobj.offsetY;
TheWrite tab 119
doDrawOnCanvas(x, y);
}
//Touchend event handler for canvas - unset "now drawing" state
function touchendForCanvas(event)
{
//console.log('touchend event on canvas');
global_startedDrawing = false;
event.preventDefault();
}
We don’t actually do anything in the touchstart handler, but we’ll keep it in case we do need todo anything in future.
In the touchmove handler we get the first touch point and, like we did for mousemove, pass itsoffsetX and Y to doDrawOnCanvas().
Finally the touchend handler simply sets the global “started drawing” state to false; ready for thenext scribble.
OK, so run this on your device and, hmmmm, finger drawing does not work! What gives? Theproblem is that the touch object we get from the touchmove event does not have offsetX or Yproperties! Nor does the touchmove event itself! This is officially A Very Annoying Thing. Ithink the JavaScript implementors are missing a bit of a trick here honestly. Without offsettingthe touch object coordinates, they will be screen coordinates and will not correlate to canvasspace. They will basically be too big to point to anywhere meaningful in the canvas.
The good news is that every DOM element under <body> exposes some offset properties.Specifically we have .offsetParent which points to an element’s parent element, and we have.offsetLeft and .offsetTop which tell us, in pixels, how far away from the top-left of the parentthe top-left of the element is.
The bad news is that most elements, in particular our canvas, have multiple parents. We aregoing to have to programatically loop up through an element’s parents and tot up the offsetsto work out a true screen offset of an element. It’s actually a trivial function and let’s put it incanvas.js:
//Get DOM element position on page
function getPosition(obj)
{
var x = 0, y = 0;
if (obj.offsetParent)
{
do
{
x += obj.offsetLeft;
TheWrite tab 120
y += obj.offsetTop;
obj = obj.offsetParent;
}
while(obj);
}
return {'x':x, 'y':y};
};
We accept a DOM element in obj. We start the x and y values - our offset - at zero. Then, if wehave an .offsetparent on obj (if not then it is <body> and will have no parent) we loop (at leastonce) cumulatively adding .offsetLeft to x and .offsetTop to y. We loop as long as there is a parentup the chain. We return the coordinates in a little object.
Right, with this we can go back and fix touchmoveForCanvas(). Edit touchmoveForCanvas() tolook like this:
function touchmoveForCanvas(event)
{
var touchobj = event.changedTouches[0]; //reference first touch point for this event
//where, in canvas space, has been touched?
var x, y;
var canvasOffset = getPosition(global_canvasElement); //why no offset x and y for\
if it's a touch event? :-(
x = touchobj.screenX - canvasOffset.x;
y = touchobj.screenY - canvasOffset.y;
doDrawOnCanvas(x, y);
}
Run this on your device. It works!
OMG, we’ve nailed it, we’ve finished all the tabs! Crack open the beers at this point ;-)
Just two more easy things. Let’s have a splashscreen that displays while we are waiting for theapp to start. Also, we’re going to need something other than PhoneGap’s default launcher icon!
10.5 Extra credit challenges
Solutions not provided.
Easy
Prevent the current character from being displayed again when clicking the Newcharacter button

TheWrite tab 121
Medium
The way we have centred the big fading character on the <canvas> is slightly ridiculous.
Use the <canvas> API to properly centre the character on the <canvas> [NOTETOSELFfind the good link for this]
Difficult
Technically what we are doing here for finger doodling is following the mouse or finger and,underneath it, creating a multi-sectional line. We aren’t actually simply placing a pixel underthe mouse or finger. Now, the effect is the same so it mostly doesn’t matter, but there is a sideeffect of doing it this way which is that, on the device, if you draw a very quick semi-circle, forexample, it will end up looking like this:
Figure 52. Imperfect lines can be created
Re-engineer finger doodling to use HTML5 canvas’s pixel manipulation API and seeif that solves this problem. http://beej.us/blog/data/html5s-canvas-2-pixel is a usefulreference here (though a few years old now)
11. Splash screenTo kill the dragon, turn to page 84. To hide in the tunnel, keep reading. LOL that was an interactivefiction reference, because this entire chapter is optional. Why? Well it’s about implementing asplash screenwhich is a contentious issue in the world of Android apps. (It also involves fiddlingwith our app’s Java sources which is a bit advanced for this book.)
A splash screen is displayed after tapping an app’s launcher icon. They tend to fill the screen anddisappear after a delay and / or when the app is ready. Plenty of apps don’t have one. Most bigname games have one as those apps can take a while to load. Small utility apps (which is whatJapxlate is) seem to mostly not have one.
Why is this contentious? Well, the thinking is that they form a barrier to using the app. But theyare something to look at when larger apps are loading which could be useful.
So make up your own mind (http://cyrilmottier.com/2012/05/03/splash-screens-are-evil-dont-use-them is useful) and skip this chapter if you feel Japxlate doesn’t need a splash screen. Ifyou think it does need one - or just want to see how it generally works - then please read on.
Hopefully only the first timewhile theWeb SQL database is created, but our appmay take awhileto start, and we also want to have some branding. So, we will have a splash screen. PhoneGapexposes splash screen control in the “Splashscreen” API. This needs to be installed as a pluginwhich can be done like this:
you@yours$ japxlate]$ phonegap local plugin add https://git-wip-us.apache.org/repos/asf\
/cordova-plugin-splashscreen.git
From PhoneGap v3.3.0 you can simply type phonegap local plugin add
org.apache.cordova.splashscreen
Under the hood, this command will do a few things for you:
• Add <feature name="SplashScreen"> to res/xml/config.xml
• Put SplashScreen.java in newly created /src/org/apache/cordova/splashscreen folder(so this is an example of a plugin that will add to the native Java sources)
• Put the plugin in /assets/www/plugins/
• Add references to the plugin in /assets/www/cordova_plugins.js
Because of the new Plugman, PhoneGap v3.3.0 instead puts the plugin inPROJECTROOT/plugins

Splash screen 123
So now we’ve got the JavaScript API exposing splash screen actions (show or hide). But this plu-gin has also added some native Java (the “SplashScreen” class). Hold on to your hats folks becausewe’re going to have to fiddle with the app’s Java source code! Don’t worry though, it’s prettystraightforward. Open up Japxlate.java (which is in /src/com/drappenheimer/japxlate), itwill look like this:
.
.
public class Japxlate extends CordovaActivity
{
@Override
public void onCreate(Bundle savedInstanceState)
{
super.onCreate(savedInstanceState);
super.init();
// Set by <content src="index.html" /> in config.xml
super.loadUrl(Config.getStartUrl());
//super.loadUrl("file:///android_asset/www/index.html")
}
}
This is the constructor code that gets the app up and running when the launcher icon is tapped.All we do here is load (indirectly from config.xml) index.html into the current activity - whichis a WebView browser. Change it to this:
public class Japxlate extends CordovaActivity
{
@Override
public void onCreate(Bundle savedInstanceState)
{
super.onCreate(savedInstanceState);
super.init();
// Set by <content src="index.html" /> in config.xml
super.setIntegerProperty("splashscreen", R.drawable.splash);
super.loadUrl(Config.getStartUrl(), 5000); //5 seconds timeout for splash
//super.loadUrl("file:///android_asset/www/index.html")
}
}
Before super.loadUrl(), we use super.setIntegerProperty() to set the “splashscreen” prop-erty to R.drawable.splash. “R” is a piece of Java and XMLmagic which basically picks up all thefiles and resources in the “res” folder and exposes them as useable properties of the “R” object.R.drawable.splash refers to the appropriate splash.png placed in the /res/drawable folder.splash.png will be our image file for the splash screen. We are about to make that, but first let’stake a peek at the /res folder structure:
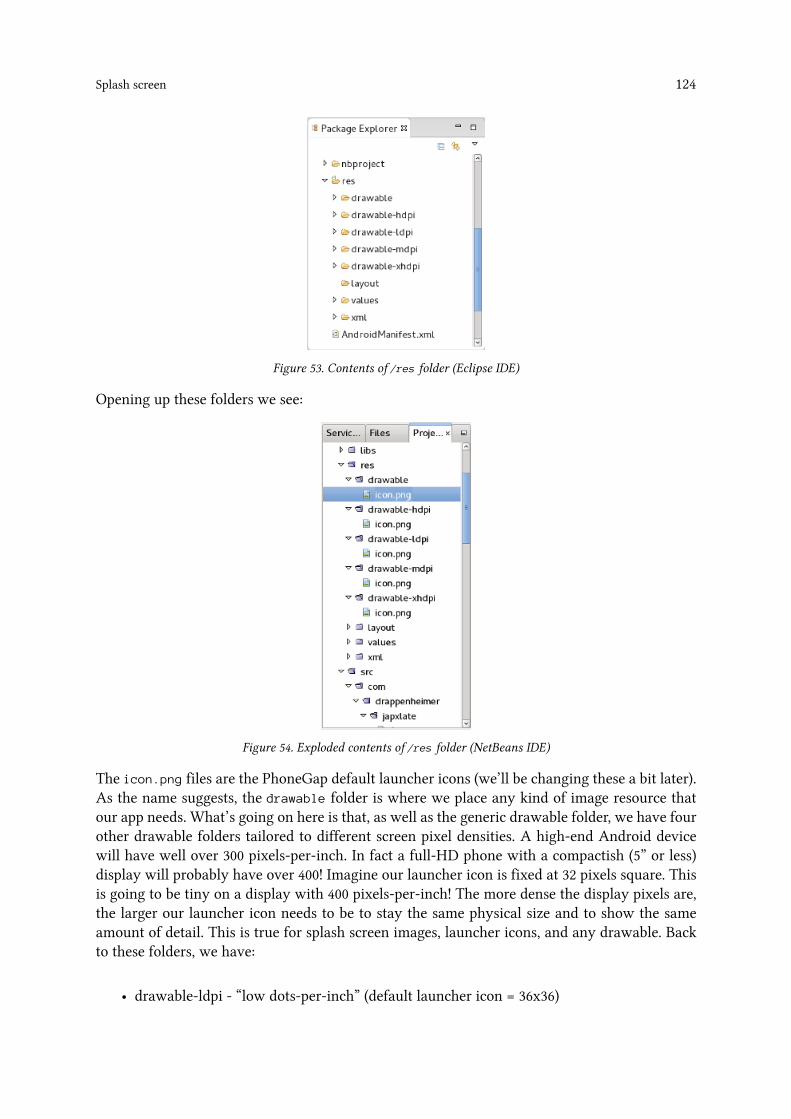
Splash screen 124
Figure 53. Contents of /res folder (Eclipse IDE)
Opening up these folders we see:
Figure 54. Exploded contents of /res folder (NetBeans IDE)
The icon.png files are the PhoneGap default launcher icons (we’ll be changing these a bit later).As the name suggests, the drawable folder is where we place any kind of image resource thatour app needs. What’s going on here is that, as well as the generic drawable folder, we have fourother drawable folders tailored to different screen pixel densities. A high-end Android devicewill have well over 300 pixels-per-inch. In fact a full-HD phone with a compactish (5” or less)display will probably have over 400! Imagine our launcher icon is fixed at 32 pixels square. Thisis going to be tiny on a display with 400 pixels-per-inch! The more dense the display pixels are,the larger our launcher icon needs to be to stay the same physical size and to show the sameamount of detail. This is true for splash screen images, launcher icons, and any drawable. Backto these folders, we have:
• drawable-ldpi - “low dots-per-inch” (default launcher icon = 36x36)
Splash screen 125
• drawble-mdpi - “medium dots-per-inch” (default launcher icon = 48x48)• drawable-hdpi - “high dots-per-inch” (default launcher icon = 72x72)• drawable-xhdpi - “eXtra high dots-per-inch” (default launcher icon = 96x96)
(Gory details at http://developer.android.com/guide/practices/screens_support.html)
So for our splash screen we need to put a splash.png of correct size in each of these folders.But just to make sure our code works first we can simply put one splash.png in the “drawable”folder. Our device will suss that there is no specific splash image for its native DPI and simplydisplay the default one in the “drawable” folder.Which obviouslymight look hideous if the imageis too small for the display (or vice versa). Let’s do that first just to get the code working andthen we can put in the proper images.
OK, so make (or get from the Japxlate sources) a muckabout png in portrait shape of size 320x470.It’s going to be the Japxlate “J” in our signature red.
Put the png file in the drawable folder and run the app on your device. You should get the imagesplashed onto the display for 5 seconds before the app starts. It might look very stretched out andjaggedy. Note that the splash screen will not appear when running the app in desktop Chrome(which is a good thing).
..
If you’ve added the status bar to the app as discussed at the end of the First things first: Thelayout chapter, you’ll still have the status bar when the splash screen is being displayed.
Hmmm, but what if 5 seconds is too long? The app might load much quicker than that and wewant the splash screen to disappear as soon as the app loads. Well I remember seeing somethingin config.xml:
<preference name="auto-hide-splash-screen" value="true" />
So maybe the splash screen is auto hiding as soon as the app is ready, and, by coincidence, ourapp is taking 5 seconds to load? Well, let’s test that by changing the timeout in Japxlate.java
to 20 seconds:
.
.
public class Japxlate extends CordovaActivity
{
@Override
public void onCreate(Bundle savedInstanceState)
{
super.onCreate(savedInstanceState);
super.init();
// Set by <content src="index.html" /> in config.xml
super.setIntegerProperty("splashscreen", R.drawable.splash);
Splash screen 126
super.loadUrl(Config.getStartUrl(), 20000);
//super.loadUrl("file:///android_asset/www/index.html")
}
}
Run this and we see that the splash screen does indeed hang around for 20 seconds. Theapp is not quite that slow and so we need a way to hide the splash screen when theapp is ready. We learn from http://docs.phonegap.com/en/3.1.0/cordova_splashscreen_splash-screen.md.html#Splashscreen that:
“To dismiss the splash screen once the app receives the deviceready event, call thenavigator.splashscreen.hide() method.”
Let’s try that. Edit the receivedEvent() method in index.js to look like this:
// Update DOM on a Received Event
receivedEvent: function(id) {
console.log('Received Event: ' + id);
if (window.cordova) { //actual app
navigator.splashscreen.hide();
}
.
.
As the whole of receivedEvent() is called from both our actual device and debugging indesktop Chrome*, we need to check for window.cordova - ie. we’re on the device - before callingnavigator.splashscreen.hide();.
*Which does not need to be the case but is just how our simple app has evolved.
Run this on your device and you will see that the splash screen disappears when the app is ready,much sooner than 20 seconds! Great!
OK, we now need to create the actual splash screen images in the correct sizes. The correct sizesfor each image should be:
• xlarge (xhdpi): at least 960 × 720• large (hdpi): at least 640 × 480• medium (mdpi): at least 470 × 320• small (ldpi): at least 426 × 320
So go ahead and create (or get from the Japxlate repo) your final “J” images in these sizes andput them in the correct drawables folders.
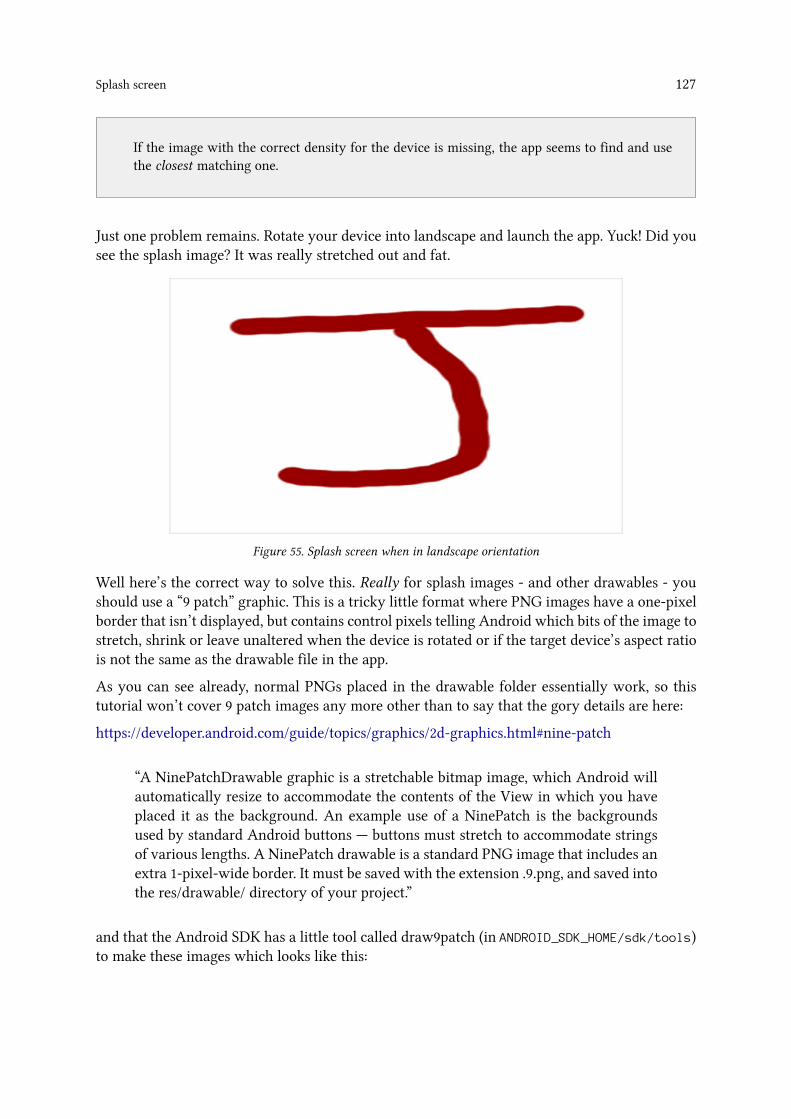
Splash screen 127
..
If the image with the correct density for the device is missing, the app seems to find and usethe closest matching one.
Just one problem remains. Rotate your device into landscape and launch the app. Yuck! Did yousee the splash image? It was really stretched out and fat.
Figure 55. Splash screen when in landscape orientation
Well here’s the correct way to solve this. Really for splash images - and other drawables - youshould use a “9 patch” graphic. This is a tricky little format where PNG images have a one-pixelborder that isn’t displayed, but contains control pixels telling Android which bits of the image tostretch, shrink or leave unaltered when the device is rotated or if the target device’s aspect ratiois not the same as the drawable file in the app.
As you can see already, normal PNGs placed in the drawable folder essentially work, so thistutorial won’t cover 9 patch images any more other than to say that the gory details are here:
https://developer.android.com/guide/topics/graphics/2d-graphics.html#nine-patch
“A NinePatchDrawable graphic is a stretchable bitmap image, which Android willautomatically resize to accommodate the contents of the View in which you haveplaced it as the background. An example use of a NinePatch is the backgroundsused by standard Android buttons — buttons must stretch to accommodate stringsof various lengths. A NinePatch drawable is a standard PNG image that includes anextra 1-pixel-wide border. It must be saved with the extension .9.png, and saved intothe res/drawable/ directory of your project.”
and that the Android SDK has a little tool called draw9patch (in ANDROID_SDK_HOME/sdk/tools)to make these images which looks like this:
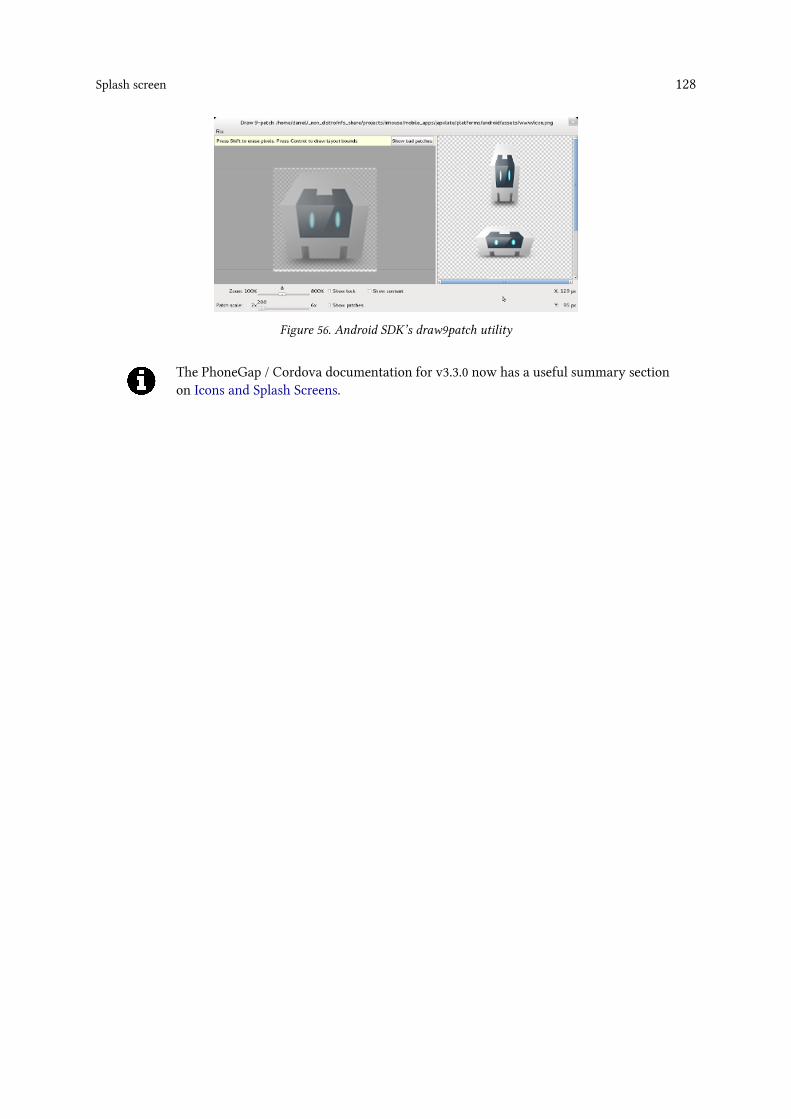
Splash screen 128
Figure 56. Android SDK’s draw9patch utility
The PhoneGap / Cordova documentation for v3.3.0 now has a useful summary sectionon Icons and Splash Screens.
12. Launcher iconNow we move on to our launcher icon. We are provided with a default one which is like a robotcube thing. Let’s replace this with one more relevant for Japxlate. Let’s have one with our “J”.We simply replace the icon.png files in the various drawable folders. The size of each existingicon.png will tell you the required icon size for that density.
http://developer.android.com/design/style/iconography.html is a useful design and technicalreference.
Note that youmight, in order for the icon to update on deploy to the device, need to do a Project⇒ Clean in Eclipse IDE.
The PhoneGap / Cordova documentation for v3.3.0 now has a useful summary sectionon Icons and Splash Screens.

13. Submitting to Google Play[NOTETOSELF expand on this section]
This topic deserves - and has - whole books and tutorials dedicated to it. [NOTETOSELF somelinks would be nice] We’ll cover it in a whistle-stop fashion. To publish your app on the PlayStore, follow these steps:
1. Open PROJECTROOT/AndroidManifest.xml and change android:debuggable="true" toandroid:debuggable="false"
2. In Eclipse IDE, right-click on the Project and select Android Tools ⇒ Export SignedApplication Package
3. Follow the steps (choosing “create new keystore”) and be sure to save the keystore file andpassword, and the alias password, in your favourite secure place for future reference
4. The final step creates an .apk file in the location you specify. This is what we will uploadto google.
5. Youwill need to attach anAndroidDeveloper account to an already existing vanilla Googleaccount. Do this by logging into Google with your vanilla account first, then signing upas an Android developer at https://play.google.com/apps/publish/signup.
6. You’ll need a credit or debit card handy as there is a one-off registration fee of $25.7. Upload the .apk file to your shiny new Developer account, set the title, description and
screenshots (you also need a 512px x 512px hi-res icon) and Bob’s your uncle!

14. That’s all folks![NOTETOSELF this is going to be a wrapping up chat. talk about the app’s pros and cons,PhoneGap pros and cons. And talk about what they need to do and research going forward withtheir app development. strongly recommend libraries like Sencha Touch, jQuery Mobile andiScroll especially as doing scrolling from scratch took me more than 50% of total developmenttime which is ridiculous!]
TODO useful references