photography 1: digital photographic practice · this supports the submission of the second...
TRANSCRIPT
Photography 1: Digital Photographic Practice
Assignment Two (Seeing Like Your Camera)
Mike Nott (Student Number 510717)
Page 1 of 38 © Copyright Mike Nott 2014
PHOTOGRAPHY 1:
DIGITAL PHOTOGRAPHIC PRACTICE
Assignment Two (Seeing Like Your Camera)
Mike Nott (Student Number 510717)
3rd October 2014
Photography 1: Digital Photographic Practice
Assignment Two (Seeing Like Your Camera)
Mike Nott (Student Number 510717)
Page 2 of 38 © Copyright Mike Nott 2014
1) INTRODUCTION:
This supports the submission of the second assignment for Photography 1: Digital Photographic
Practice. This assignment is titled ‘Seeing Like Your Camera’ and the requirements for this
assignment are repeated below from the course material:
“The assignment revolves around high-contrast scenes. You will need to produce a set of
photographs that demonstrates that you can pre-visualise how your digital camera ‘sees’ a
scene. The ability to anticipate how your camera sensor will render the scene will help you
produce higher quality images which will need less post-processing.
Part 1:
Choose a minimum for situations from the following models:
1) A street scene in the middle of a clear, sunny day - narrow streets and high buildings
which cast deep, long shadows;
2) Indoor space in which the only available light is a strong natural window light;
3) Photographing people in the shade while the background is in the sunshine, e.g. a
group portrait in the shade of a tree;
4) Early morning or late evening landscapes with low angle incident light;
5) Any backlit scene, whether in direct or indirect light;
6) Scenes which include objects are very different reflectivity, even in flat light such as
an overcast day;
7) Indoor scenes illuminated by a single source of artificial light of high luminance, for
example, a desk lamp;
8) A scene with strong incident dappled lights. These conditions are often found when
photographing in a forest on a sunny day.
Locations and subject matter of this seems that you photograph up to you; the sample
photographs provided for reference only. Whichever locations and topics you choose will
need to offer lighting conditions equivalent to the above situations.
Submit three images for each of the four situations that you choose, that's a total of 12
images. You will need to decide the most appropriate metering mode and settings of your
camera. File formats that you are asked to shoot is high-quality JPEG. The aim is to get
correctly exposed images straight out of the camera with no post-processing. Even if you
normally shoot RAW you must shoot JPEG assignment.
Together with each set of images you will need to submit brief written notes about the
technical challenges that each situation presented, how you dealt with high contrast scenes
and the decisions that you took regarding camera settings and composition. Your note should
analyse the differences between how you saw the scenes, how you thought the camera would
reproduce it, and how the camera sensor finally rendered it.
Photography 1: Digital Photographic Practice
Assignment Two (Seeing Like Your Camera)
Mike Nott (Student Number 510717)
Page 3 of 38 © Copyright Mike Nott 2014
Part 2:
Select one of the four situations that you chose in Part One and think about what the lighting
conditions should be in order to reduce the contrast of the scenes that you photographed or
even make them low contrast scenes. Think about the different variables over which you can
have certain control, such as choosing in which, whether you shoot (for example overcast),
changing the composition (avoiding deep shadows) or having some additional sources of light
(you can explore the possibilities of fill-in flash).
Once you have decided which conditions would result in low contrast scenes, photograph the
same three images in your chosen situation in these conditions. Submit these images
together with a brief reflective commentary.”
The presence of London so close to my home always draws me back when I seek inspiration and a diverse subject matter and like most big cities, London ‘hums’ with life and energy and has prospects, landscapes and buildings, both modern and old, that are now instantly recognisable to most people. As stated in Clarke, Graham, (1997). The Photograph, Oxford University Press:
“The city has always been celebrated in terms of its central icons, and many of these, plus a
visual hierarchy; if not, of skyscrapers, then, of church spires and towers”.
London certainly has many iconic buildings, and with the continual building frenzy that seems to be pervasive now and in the recent past, we are now seeing an ever changing skyline, with the juxtaposition the modern and the old. Many of the images submitted in this assignment are very much architectural in nature, however, the subject matter of this assignment certainly allowed a more human and personal perspective to be presented, and as Clarke also goes on to talk about the city ‘street’, the human dimension found on it and of the “walker of the streets”:
“The direct opposite is the street and the negotiation that such a space at eye-level implies.
Street-level both engages with the clutter of the city, its chaos and process, and also celebrates its multiplicity, difference, and (at times) danger. It suggests that human dimension rather than an ideal prospect…. To be a walker in the city is to engage in a very distinctive relationship with the urban scene, and the flâneur has been rightly celebrated as a distinctive figure of the modern city. The camera negotiates between two poles, the vertical and horizontal; extremes of visual unity and disunity which suggest part of a larger dialectic as to how the city has been: the public and the private, the detail and the general, the exterior and the interior, historical, and the modern, the permanent and temporary. All add up to the compulsive complexity and enigmatic quality of the city as both an experience and a phenomenon, for effectively what the urban photographers consistently asked is what Charles Dickens, in his great urban novel of London, Bleak House, also asked: what does the city
mean and how can one represented?”
I’m not sure I really see myself as a modern day flâneur1, but why not? Whilst I had researched
the areas and types of images that I aspired to capture during my planned visit, I certainly travelled with open mind and used my eyes to guide me in my image taking when in London.
In my act of walking around Docklands, Canary Wharf in particular, and the financial heartland of the ‘City of London’, I was most definitely in the mode of a modern day “flâneur” albeit with a keen eye and a focussed purpose. In Susan Sontag’s ‘On Photography’ (1997, Penguin Books, page 55) she speculates that “The photographer is an armed version of the solitary walker reconnoitring, stalking, cruising the urban inferno, the voyeuristic stroller who discovers the city as a landscape of voluptuous extremes”. I guess that’s me then!
1 Flâneur – from the French noun flâneur means “stroller”, “lounger”, “saunterer” or “loafer”. Flanerie refers to
the act of strolling with all its accompanying connotations.
Photography 1: Digital Photographic Practice
Assignment Two (Seeing Like Your Camera)
Mike Nott (Student Number 510717)
Page 4 of 38 © Copyright Mike Nott 2014
As stated in the assignment requirements, all images are original JPEG’s. The only post-processing performed on these images was in preparation for printing and this included limited image sharpening and the addition of a thin black key-line and wider white border for hard-copy presentation to my course tutor – and it is these images that were prepared for printing that have been inserted in this assignment presentation. Ideally localised adjustments would have been ideal – including some vertical/horizontal line straightening – but as directed, no post processing has been performed.
Not unsurprisingly, I need to stress that I am not a professional photographer; I do not make money from the art form that I love. I have to perform other ‘work’ like everyone else to get paid a salary to have a roof over my head, put food on the table and to provide all the other things that go to make up a comfortable lifestyle. What this means is that I do not necessarily have the time to develop a strong background and awareness of what ‘works’ and what does ‘not work’, from a photographic perspective, that a professional photographer may develop over many years of experience and practice of their trade. I am more likely to rely on the tools and automatic features provided by camera manufacturers to aid my photography; in most cases, these will work just fine.
However, there will be circumstances where these automated camera features may “get it wrong” and the skill of a good photographer is to realise where this might be the case and to take control of the situation with aim of creating a good and well exposed image.
The human eye is very good a quickly adjusting to a wide range of brightness and adjusting the perception of the scene. As I have discovered through the exercises prior to this assignment, my camera has a usable dynamic range of approximately 8 stops in any one scene – and this is considerably less than the human eye
2. The human eye and brain also have the ability to quickly
adapt to changes in colour and to effectively normalise them, whereas the camera sensor and processor cannot. The camera has to perform complex processing within the camera when deriving the ‘best’ estimate of the colour adjustment for the Auto White Balance (AWB) setting, whereas manually setting of the white balance, forces the camera to use fixed values of temperature (in Kelvins) with no further thought.
I have developed an increased awareness of the camera settings available to me and how to use them in a more ‘manual’ context. The controls that are mainly used are those associated with changes to the ISO (depending on the available light and the subject matter), manually altering the white balance rather than relying on the automatic processing by the camera (AWB) and a number of metering modes that can be selected to perform best under any given lighting conditions. Of these three controls, only one (white balance) can really be used in post-processing to make meaningful changes to an image provided the image has been saved in RAW format. Using the correct ISO speed and metering modes are fundamental to making a good image at the time of taking (i.e. getting it right first time). That’s the easy part! The photographer then needs have good situational awareness and be able to make some very quick decisions and judgements if they are to be able to take well composed and exposed images.
Michael Freeman in his excellent book, Perfect Exposure (2009), UK, The Ilex Press, breaks down the process of this pre-image taking decision making into eight major steps:
1) Settings – make sure all the pertinent camera settings are as YOU require them;
2) Metering mode – set the preferred metering mode and know how it will perform under the lighting conditions;
3) Know what you want – a key part of the process is to imagine in advance how YOU want the brightness distribution of the image to be;
4) Scan for problems – being able to quickly assess what the key issues and likely problems will be, particularly the dynamic range of the scene relative to the camera’s sensor capability;
5) Key tones – identifying the areas of the scene that are the most important for brightness and in order of importance;
2 The dynamic range of the human eye seems to be a hot topic of debate. It would appear that the consensus is
approximately 20 stops, but this is not simultaneous. The dynamic chemical composition and adjustment of the iris, coupled with some complex jiggery-pokery within the brain all combine to produce the image that we ‘see’.
Photography 1: Digital Photographic Practice
Assignment Two (Seeing Like Your Camera)
Mike Nott (Student Number 510717)
Page 5 of 38 © Copyright Mike Nott 2014
6) Risk of clipping – If the dynamic range of the scene exceeds the sensor’s performance, decide whether to make changes, or settle for a compromise exposure and/or rely on post-processing to correct where possible (not an option in the case of this assignment);
7) Meter and expose – use the appropriate metering mode, adjusting exposure up/down if required;
8) Review – look at the results on the rear camera screen (including the histogram) – and if it needs improving, re-shoot if necessary.
For the scenes that I needed to take a second part of the assignment - where I was required to attempt to control the dynamic range – I elected to shoot a subject that was somewhat nearer to hand. I had already considered taking myself round to my better half’s family home. H’s dad died prematurely some 14+ years ago and his workshop in the garden remains largely unchanged since that time; I wanted to capture the essence of a former time when the tools were lovingly used by a skilled craftsman. I expected this to be a challenge, and as it turned out, I spent many hours trying to wring something out of what I was presented with. It was harder than I had envisaged and I’m not entirely convinced I have met the desired objectives.
I already knew that the subject matter listed for this assignment was likely to cause issues with the scene dynamic range - and what the camera could/could not be successful at capturing. As each situation presented itself, decisions needed to be taken over what the final image was going to look like. This is very much personal preference depending on what I wanted to achieve in terms of the exposure and composition. Given the restrictions that have been placed on the ability to post-process images means that decisions need to be taken at the time of image taking – and the eight-point list on the previous page is the general decision-making process that I tried to apply when taking images in support of this exercise.
The assignment was shot entirely on a Canon 5D Mark III predominantly using a 24-105mm f4 lens.
Photography 1: Digital Photographic Practice
Assignment Two (Seeing Like Your Camera)
Mike Nott (Student Number 510717)
Page 6 of 38 © Copyright Mike Nott 2014
2) Part 1 (Shooting High Contrast Scenes):
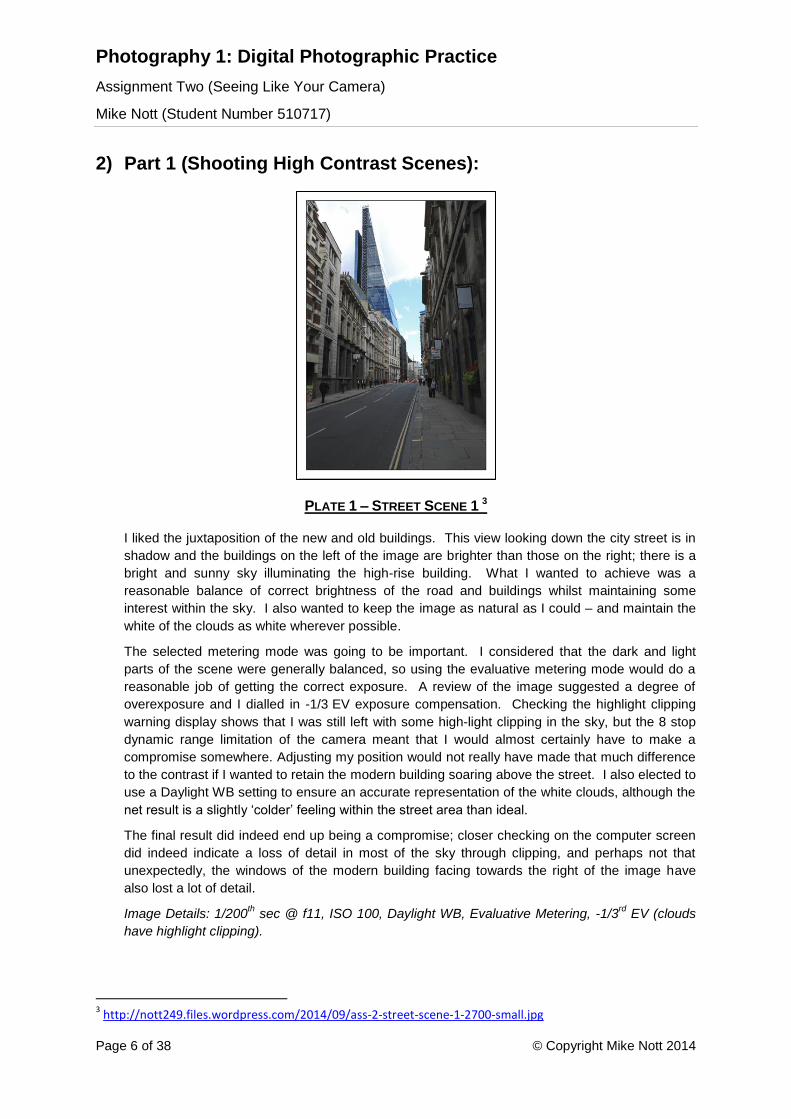
PLATE 1 – STREET SCENE 1 3
I liked the juxtaposition of the new and old buildings. This view looking down the city street is in
shadow and the buildings on the left of the image are brighter than those on the right; there is a
bright and sunny sky illuminating the high-rise building. What I wanted to achieve was a
reasonable balance of correct brightness of the road and buildings whilst maintaining some
interest within the sky. I also wanted to keep the image as natural as I could – and maintain the
white of the clouds as white wherever possible.
The selected metering mode was going to be important. I considered that the dark and light
parts of the scene were generally balanced, so using the evaluative metering mode would do a
reasonable job of getting the correct exposure. A review of the image suggested a degree of
overexposure and I dialled in -1/3 EV exposure compensation. Checking the highlight clipping
warning display shows that I was still left with some high-light clipping in the sky, but the 8 stop
dynamic range limitation of the camera meant that I would almost certainly have to make a
compromise somewhere. Adjusting my position would not really have made that much difference
to the contrast if I wanted to retain the modern building soaring above the street. I also elected to
use a Daylight WB setting to ensure an accurate representation of the white clouds, although the
net result is a slightly ‘colder’ feeling within the street area than ideal.
The final result did indeed end up being a compromise; closer checking on the computer screen
did indeed indicate a loss of detail in most of the sky through clipping, and perhaps not that
unexpectedly, the windows of the modern building facing towards the right of the image have
also lost a lot of detail.
Image Details: 1/200th sec @ f11, ISO 100, Daylight WB, Evaluative Metering, -1/3
rd EV (clouds
have highlight clipping).
3 http://nott249.files.wordpress.com/2014/09/ass-2-street-scene-1-2700-small.jpg
Photography 1: Digital Photographic Practice
Assignment Two (Seeing Like Your Camera)
Mike Nott (Student Number 510717)
Page 7 of 38 © Copyright Mike Nott 2014
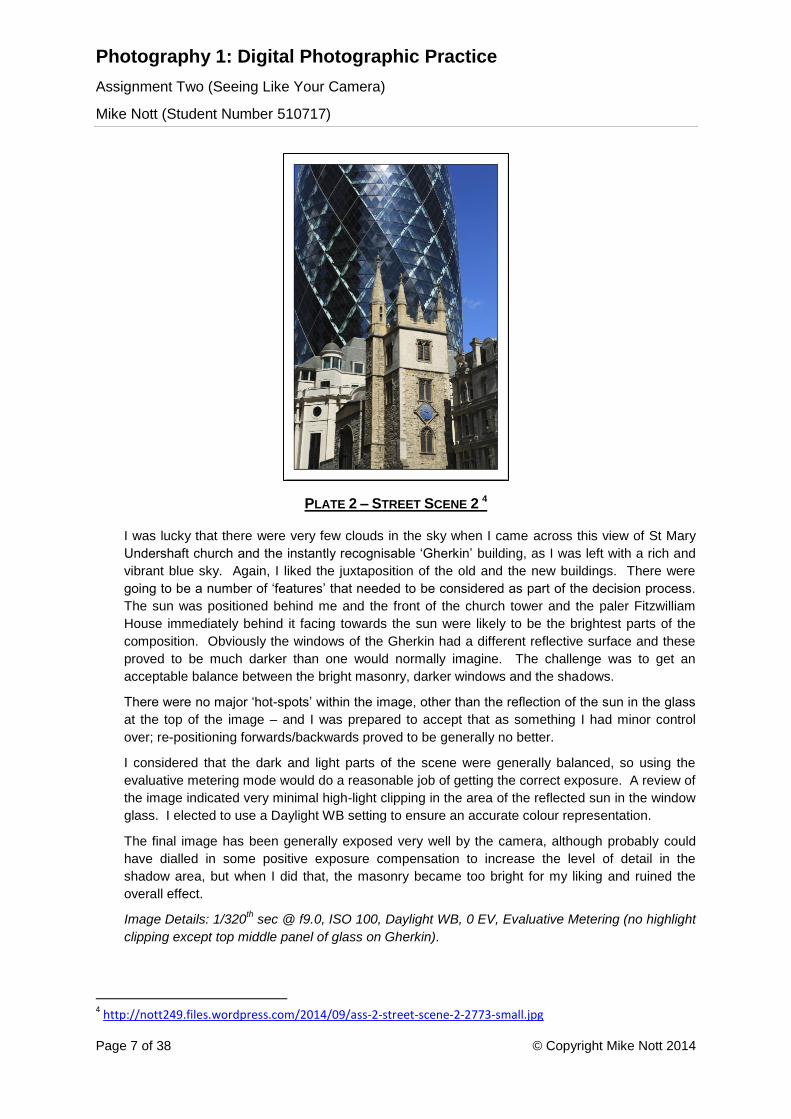
PLATE 2 – STREET SCENE 2 4
I was lucky that there were very few clouds in the sky when I came across this view of St Mary
Undershaft church and the instantly recognisable ‘Gherkin’ building, as I was left with a rich and
vibrant blue sky. Again, I liked the juxtaposition of the old and the new buildings. There were
going to be a number of ‘features’ that needed to be considered as part of the decision process.
The sun was positioned behind me and the front of the church tower and the paler Fitzwilliam
House immediately behind it facing towards the sun were likely to be the brightest parts of the
composition. Obviously the windows of the Gherkin had a different reflective surface and these
proved to be much darker than one would normally imagine. The challenge was to get an
acceptable balance between the bright masonry, darker windows and the shadows.
There were no major ‘hot-spots’ within the image, other than the reflection of the sun in the glass
at the top of the image – and I was prepared to accept that as something I had minor control
over; re-positioning forwards/backwards proved to be generally no better.
I considered that the dark and light parts of the scene were generally balanced, so using the
evaluative metering mode would do a reasonable job of getting the correct exposure. A review of
the image indicated very minimal high-light clipping in the area of the reflected sun in the window
glass. I elected to use a Daylight WB setting to ensure an accurate colour representation.
The final image has been generally exposed very well by the camera, although probably could
have dialled in some positive exposure compensation to increase the level of detail in the
shadow area, but when I did that, the masonry became too bright for my liking and ruined the
overall effect.
Image Details: 1/320th sec @ f9.0, ISO 100, Daylight WB, 0 EV, Evaluative Metering (no highlight
clipping except top middle panel of glass on Gherkin).
4 http://nott249.files.wordpress.com/2014/09/ass-2-street-scene-2-2773-small.jpg
Photography 1: Digital Photographic Practice
Assignment Two (Seeing Like Your Camera)
Mike Nott (Student Number 510717)
Page 8 of 38 © Copyright Mike Nott 2014
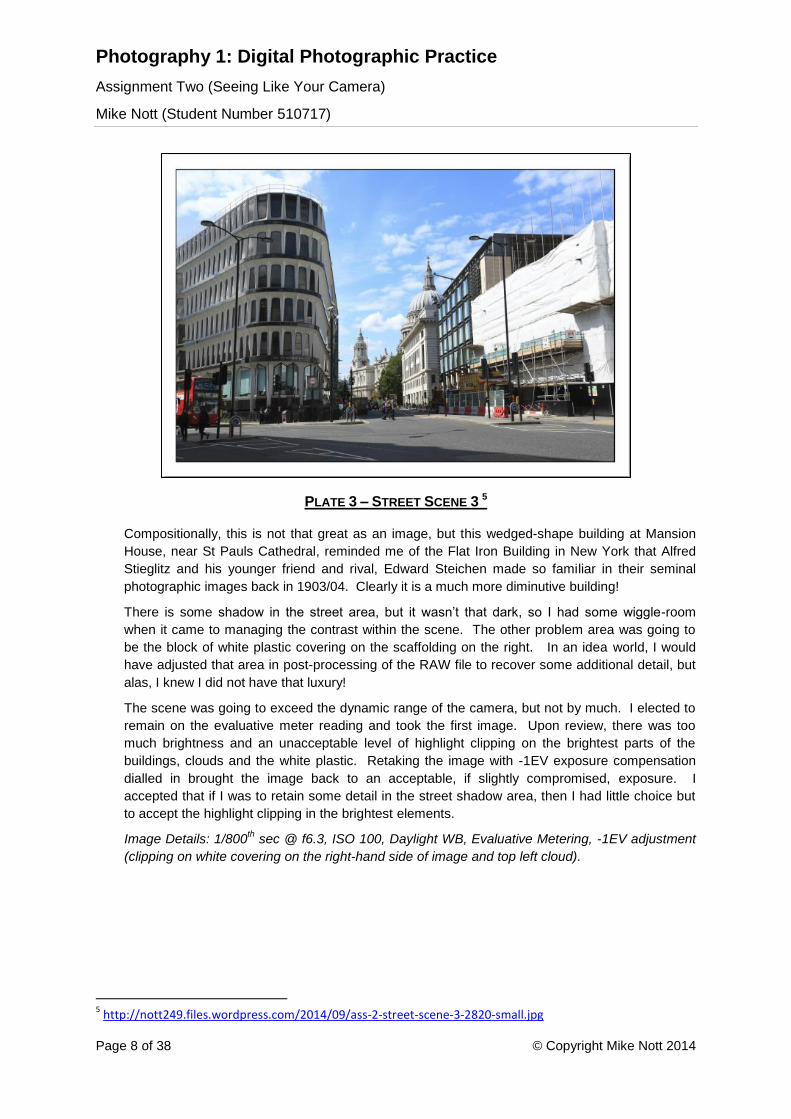
PLATE 3 – STREET SCENE 3 5
Compositionally, this is not that great as an image, but this wedged-shape building at Mansion
House, near St Pauls Cathedral, reminded me of the Flat Iron Building in New York that Alfred
Stieglitz and his younger friend and rival, Edward Steichen made so familiar in their seminal
photographic images back in 1903/04. Clearly it is a much more diminutive building!
There is some shadow in the street area, but it wasn’t that dark, so I had some wiggle-room
when it came to managing the contrast within the scene. The other problem area was going to
be the block of white plastic covering on the scaffolding on the right. In an idea world, I would
have adjusted that area in post-processing of the RAW file to recover some additional detail, but
alas, I knew I did not have that luxury!
The scene was going to exceed the dynamic range of the camera, but not by much. I elected to
remain on the evaluative meter reading and took the first image. Upon review, there was too
much brightness and an unacceptable level of highlight clipping on the brightest parts of the
buildings, clouds and the white plastic. Retaking the image with -1EV exposure compensation
dialled in brought the image back to an acceptable, if slightly compromised, exposure. I
accepted that if I was to retain some detail in the street shadow area, then I had little choice but
to accept the highlight clipping in the brightest elements.
Image Details: 1/800th sec @ f6.3, ISO 100, Daylight WB, Evaluative Metering, -1EV adjustment
(clipping on white covering on the right-hand side of image and top left cloud).
5 http://nott249.files.wordpress.com/2014/09/ass-2-street-scene-3-2820-small.jpg
Photography 1: Digital Photographic Practice
Assignment Two (Seeing Like Your Camera)
Mike Nott (Student Number 510717)
Page 9 of 38 © Copyright Mike Nott 2014
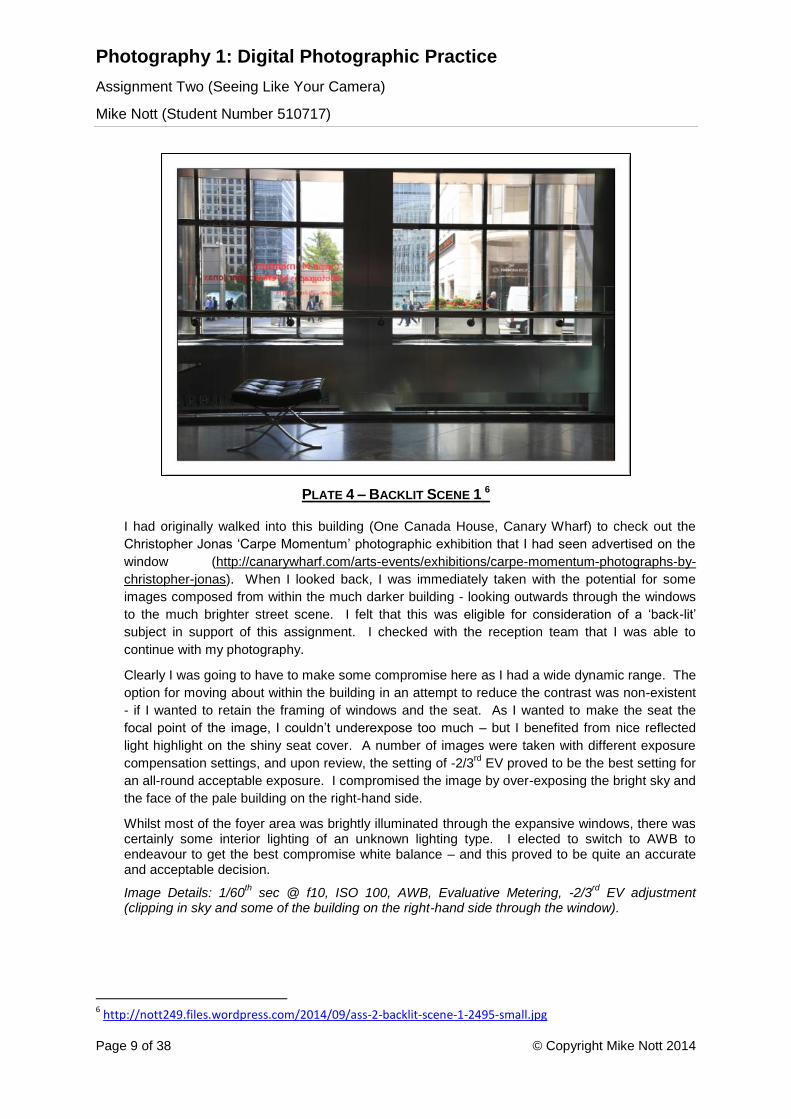
PLATE 4 – BACKLIT SCENE 1 6
I had originally walked into this building (One Canada House, Canary Wharf) to check out the
Christopher Jonas ‘Carpe Momentum’ photographic exhibition that I had seen advertised on the
window (http://canarywharf.com/arts-events/exhibitions/carpe-momentum-photographs-by-
christopher-jonas). When I looked back, I was immediately taken with the potential for some
images composed from within the much darker building - looking outwards through the windows
to the much brighter street scene. I felt that this was eligible for consideration of a ‘back-lit’
subject in support of this assignment. I checked with the reception team that I was able to
continue with my photography.
Clearly I was going to have to make some compromise here as I had a wide dynamic range. The
option for moving about within the building in an attempt to reduce the contrast was non-existent
- if I wanted to retain the framing of windows and the seat. As I wanted to make the seat the
focal point of the image, I couldn’t underexpose too much – but I benefited from nice reflected
light highlight on the shiny seat cover. A number of images were taken with different exposure
compensation settings, and upon review, the setting of -2/3rd
EV proved to be the best setting for
an all-round acceptable exposure. I compromised the image by over-exposing the bright sky and
the face of the pale building on the right-hand side.
Whilst most of the foyer area was brightly illuminated through the expansive windows, there was certainly some interior lighting of an unknown lighting type. I elected to switch to AWB to endeavour to get the best compromise white balance – and this proved to be quite an accurate and acceptable decision.
Image Details: 1/60th sec @ f10, ISO 100, AWB, Evaluative Metering, -2/3
rd EV adjustment
(clipping in sky and some of the building on the right-hand side through the window).
6 http://nott249.files.wordpress.com/2014/09/ass-2-backlit-scene-1-2495-small.jpg
Photography 1: Digital Photographic Practice
Assignment Two (Seeing Like Your Camera)
Mike Nott (Student Number 510717)
Page 10 of 38 © Copyright Mike Nott 2014
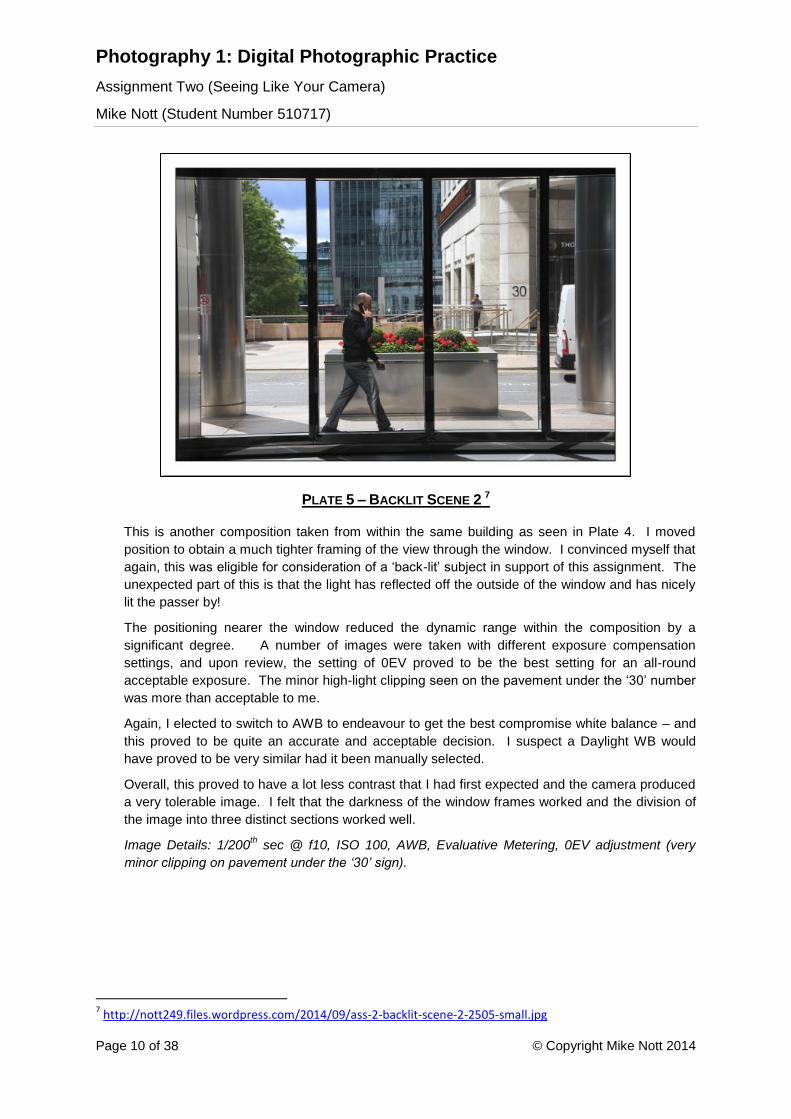
PLATE 5 – BACKLIT SCENE 2 7
This is another composition taken from within the same building as seen in Plate 4. I moved
position to obtain a much tighter framing of the view through the window. I convinced myself that
again, this was eligible for consideration of a ‘back-lit’ subject in support of this assignment. The
unexpected part of this is that the light has reflected off the outside of the window and has nicely
lit the passer by!
The positioning nearer the window reduced the dynamic range within the composition by a
significant degree. A number of images were taken with different exposure compensation
settings, and upon review, the setting of 0EV proved to be the best setting for an all-round
acceptable exposure. The minor high-light clipping seen on the pavement under the ‘30’ number
was more than acceptable to me.
Again, I elected to switch to AWB to endeavour to get the best compromise white balance – and
this proved to be quite an accurate and acceptable decision. I suspect a Daylight WB would
have proved to be very similar had it been manually selected.
Overall, this proved to have a lot less contrast that I had first expected and the camera produced
a very tolerable image. I felt that the darkness of the window frames worked and the division of
the image into three distinct sections worked well.
Image Details: 1/200th sec @ f10, ISO 100, AWB, Evaluative Metering, 0EV adjustment (very
minor clipping on pavement under the ‘30’ sign).
7 http://nott249.files.wordpress.com/2014/09/ass-2-backlit-scene-2-2505-small.jpg
Photography 1: Digital Photographic Practice
Assignment Two (Seeing Like Your Camera)
Mike Nott (Student Number 510717)
Page 11 of 38 © Copyright Mike Nott 2014
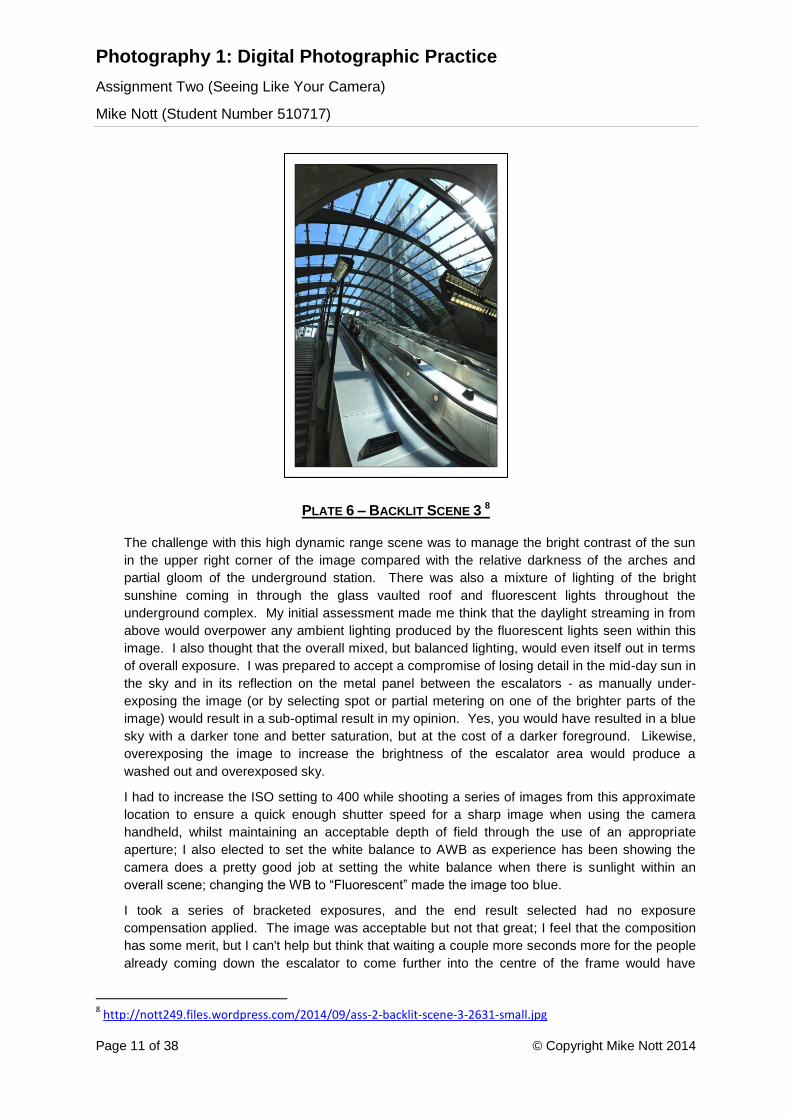
PLATE 6 – BACKLIT SCENE 3 8
The challenge with this high dynamic range scene was to manage the bright contrast of the sun
in the upper right corner of the image compared with the relative darkness of the arches and
partial gloom of the underground station. There was also a mixture of lighting of the bright
sunshine coming in through the glass vaulted roof and fluorescent lights throughout the
underground complex. My initial assessment made me think that the daylight streaming in from
above would overpower any ambient lighting produced by the fluorescent lights seen within this
image. I also thought that the overall mixed, but balanced lighting, would even itself out in terms
of overall exposure. I was prepared to accept a compromise of losing detail in the mid-day sun in
the sky and in its reflection on the metal panel between the escalators - as manually under-
exposing the image (or by selecting spot or partial metering on one of the brighter parts of the
image) would result in a sub-optimal result in my opinion. Yes, you would have resulted in a blue
sky with a darker tone and better saturation, but at the cost of a darker foreground. Likewise,
overexposing the image to increase the brightness of the escalator area would produce a
washed out and overexposed sky.
I had to increase the ISO setting to 400 while shooting a series of images from this approximate
location to ensure a quick enough shutter speed for a sharp image when using the camera
handheld, whilst maintaining an acceptable depth of field through the use of an appropriate
aperture; I also elected to set the white balance to AWB as experience has been showing the
camera does a pretty good job at setting the white balance when there is sunlight within an
overall scene; changing the WB to “Fluorescent” made the image too blue.
I took a series of bracketed exposures, and the end result selected had no exposure
compensation applied. The image was acceptable but not that great; I feel that the composition
has some merit, but I can't help but think that waiting a couple more seconds more for the people
already coming down the escalator to come further into the centre of the frame would have
8 http://nott249.files.wordpress.com/2014/09/ass-2-backlit-scene-3-2631-small.jpg

Photography 1: Digital Photographic Practice
Assignment Two (Seeing Like Your Camera)
Mike Nott (Student Number 510717)
Page 12 of 38 © Copyright Mike Nott 2014
produced a more pleasing result. Selecting an aperture of f11 has also resulted in a nice
starburst effect of the sun, even though it is chronically overexposed and has no detail.
Image Details: 1/320th sec @ f11, ISO 400, AWB, Evaluative Metering, 0EV adjustment (there is
clipping in sky to the right of the building in the background – and of course, the sun. Highlight
clipping is also present on the shiny surface separating the escalators).
Photography 1: Digital Photographic Practice
Assignment Two (Seeing Like Your Camera)
Mike Nott (Student Number 510717)
Page 13 of 38 © Copyright Mike Nott 2014
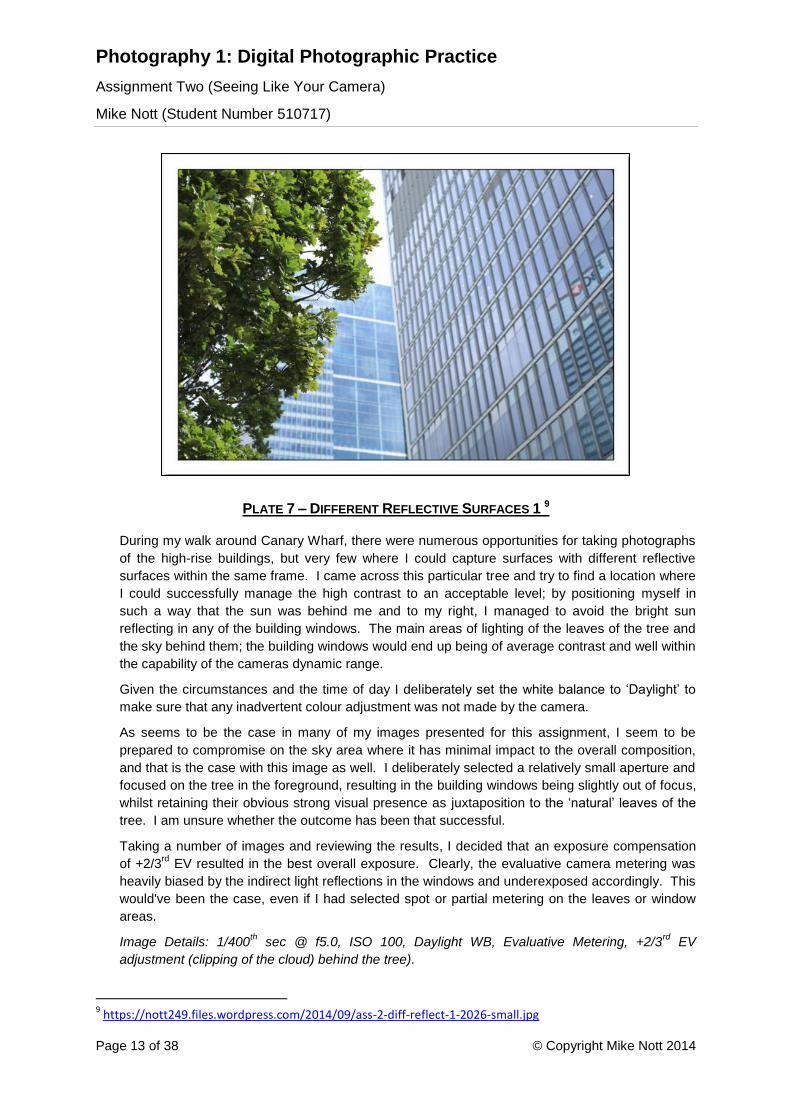
PLATE 7 – DIFFERENT REFLECTIVE SURFACES 1 9
During my walk around Canary Wharf, there were numerous opportunities for taking photographs
of the high-rise buildings, but very few where I could capture surfaces with different reflective
surfaces within the same frame. I came across this particular tree and try to find a location where
I could successfully manage the high contrast to an acceptable level; by positioning myself in
such a way that the sun was behind me and to my right, I managed to avoid the bright sun
reflecting in any of the building windows. The main areas of lighting of the leaves of the tree and
the sky behind them; the building windows would end up being of average contrast and well within
the capability of the cameras dynamic range.
Given the circumstances and the time of day I deliberately set the white balance to ‘Daylight’ to
make sure that any inadvertent colour adjustment was not made by the camera.
As seems to be the case in many of my images presented for this assignment, I seem to be
prepared to compromise on the sky area where it has minimal impact to the overall composition,
and that is the case with this image as well. I deliberately selected a relatively small aperture and
focused on the tree in the foreground, resulting in the building windows being slightly out of focus,
whilst retaining their obvious strong visual presence as juxtaposition to the ‘natural’ leaves of the
tree. I am unsure whether the outcome has been that successful.
Taking a number of images and reviewing the results, I decided that an exposure compensation
of +2/3rd
EV resulted in the best overall exposure. Clearly, the evaluative camera metering was
heavily biased by the indirect light reflections in the windows and underexposed accordingly. This
would've been the case, even if I had selected spot or partial metering on the leaves or window
areas.
Image Details: 1/400th sec @ f5.0, ISO 100, Daylight WB, Evaluative Metering, +2/3
rd EV
adjustment (clipping of the cloud) behind the tree).
9 https://nott249.files.wordpress.com/2014/09/ass-2-diff-reflect-1-2026-small.jpg
Photography 1: Digital Photographic Practice
Assignment Two (Seeing Like Your Camera)
Mike Nott (Student Number 510717)
Page 14 of 38 © Copyright Mike Nott 2014
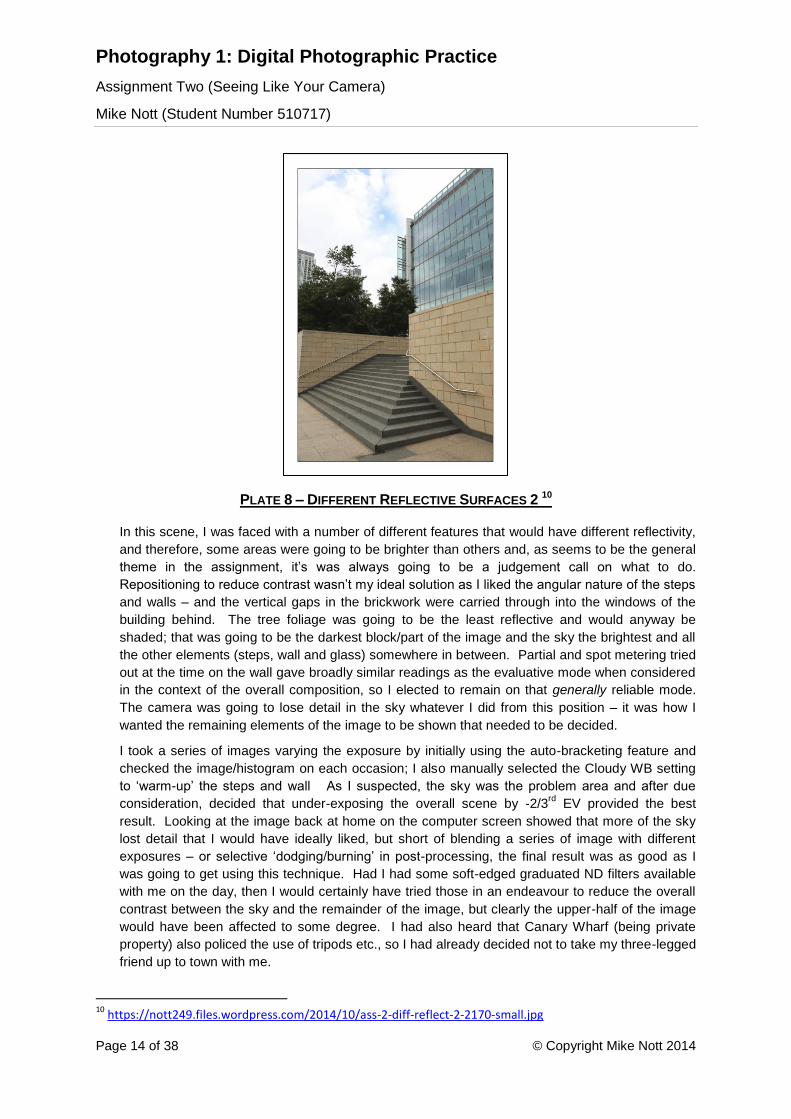
PLATE 8 – DIFFERENT REFLECTIVE SURFACES 2 10
In this scene, I was faced with a number of different features that would have different reflectivity,
and therefore, some areas were going to be brighter than others and, as seems to be the general
theme in the assignment, it’s was always going to be a judgement call on what to do.
Repositioning to reduce contrast wasn’t my ideal solution as I liked the angular nature of the steps
and walls – and the vertical gaps in the brickwork were carried through into the windows of the
building behind. The tree foliage was going to be the least reflective and would anyway be
shaded; that was going to be the darkest block/part of the image and the sky the brightest and all
the other elements (steps, wall and glass) somewhere in between. Partial and spot metering tried
out at the time on the wall gave broadly similar readings as the evaluative mode when considered
in the context of the overall composition, so I elected to remain on that generally reliable mode.
The camera was going to lose detail in the sky whatever I did from this position – it was how I
wanted the remaining elements of the image to be shown that needed to be decided.
I took a series of images varying the exposure by initially using the auto-bracketing feature and
checked the image/histogram on each occasion; I also manually selected the Cloudy WB setting
to ‘warm-up’ the steps and wall As I suspected, the sky was the problem area and after due
consideration, decided that under-exposing the overall scene by -2/3rd
EV provided the best
result. Looking at the image back at home on the computer screen showed that more of the sky
lost detail that I would have ideally liked, but short of blending a series of image with different
exposures – or selective ‘dodging/burning’ in post-processing, the final result was as good as I
was going to get using this technique. Had I had some soft-edged graduated ND filters available
with me on the day, then I would certainly have tried those in an endeavour to reduce the overall
contrast between the sky and the remainder of the image, but clearly the upper-half of the image
would have been affected to some degree. I had also heard that Canary Wharf (being private
property) also policed the use of tripods etc., so I had already decided not to take my three-legged
friend up to town with me.
10
https://nott249.files.wordpress.com/2014/10/ass-2-diff-reflect-2-2170-small.jpg

Photography 1: Digital Photographic Practice
Assignment Two (Seeing Like Your Camera)
Mike Nott (Student Number 510717)
Page 15 of 38 © Copyright Mike Nott 2014
Image Details: 1/125th sec @ f11, ISO 200, Cloudy WB, Evaluative Metering, -2/3
rd EV adjustment
(extensive highlight clipping of cloud in sky).
Photography 1: Digital Photographic Practice
Assignment Two (Seeing Like Your Camera)
Mike Nott (Student Number 510717)
Page 16 of 38 © Copyright Mike Nott 2014
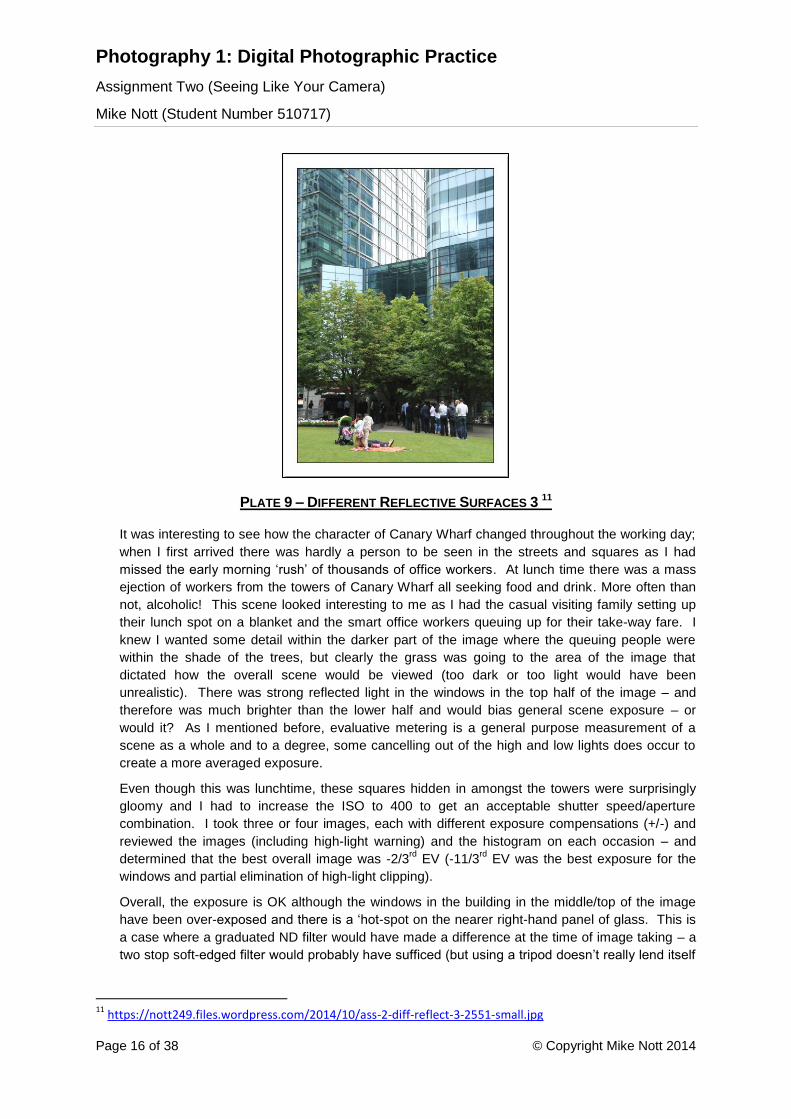
PLATE 9 – DIFFERENT REFLECTIVE SURFACES 3 11
It was interesting to see how the character of Canary Wharf changed throughout the working day;
when I first arrived there was hardly a person to be seen in the streets and squares as I had
missed the early morning ‘rush’ of thousands of office workers. At lunch time there was a mass
ejection of workers from the towers of Canary Wharf all seeking food and drink. More often than
not, alcoholic! This scene looked interesting to me as I had the casual visiting family setting up
their lunch spot on a blanket and the smart office workers queuing up for their take-way fare. I
knew I wanted some detail within the darker part of the image where the queuing people were
within the shade of the trees, but clearly the grass was going to the area of the image that
dictated how the overall scene would be viewed (too dark or too light would have been
unrealistic). There was strong reflected light in the windows in the top half of the image – and
therefore was much brighter than the lower half and would bias general scene exposure – or
would it? As I mentioned before, evaluative metering is a general purpose measurement of a
scene as a whole and to a degree, some cancelling out of the high and low lights does occur to
create a more averaged exposure.
Even though this was lunchtime, these squares hidden in amongst the towers were surprisingly
gloomy and I had to increase the ISO to 400 to get an acceptable shutter speed/aperture
combination. I took three or four images, each with different exposure compensations (+/-) and
reviewed the images (including high-light warning) and the histogram on each occasion – and
determined that the best overall image was -2/3rd
EV (-11/3rd
EV was the best exposure for the
windows and partial elimination of high-light clipping).
Overall, the exposure is OK although the windows in the building in the middle/top of the image
have been over-exposed and there is a ‘hot-spot on the nearer right-hand panel of glass. This is
a case where a graduated ND filter would have made a difference at the time of image taking – a
two stop soft-edged filter would probably have sufficed (but using a tripod doesn’t really lend itself
11
https://nott249.files.wordpress.com/2014/10/ass-2-diff-reflect-3-2551-small.jpg

Photography 1: Digital Photographic Practice
Assignment Two (Seeing Like Your Camera)
Mike Nott (Student Number 510717)
Page 17 of 38 © Copyright Mike Nott 2014
to this street-type of photography – and I hardly wanted to draw attention to myself given the
proximity of the young children within the frame – and for people to ask questions!).
Image Details: 1/80th sec @ f9.0 ISO 400, Daylight WB, Evaluative Metering, -2/3EV adjustment
(some clipping on the glass panels in the upper/centre area).
Photography 1: Digital Photographic Practice
Assignment Two (Seeing Like Your Camera)
Mike Nott (Student Number 510717)
Page 18 of 38 © Copyright Mike Nott 2014
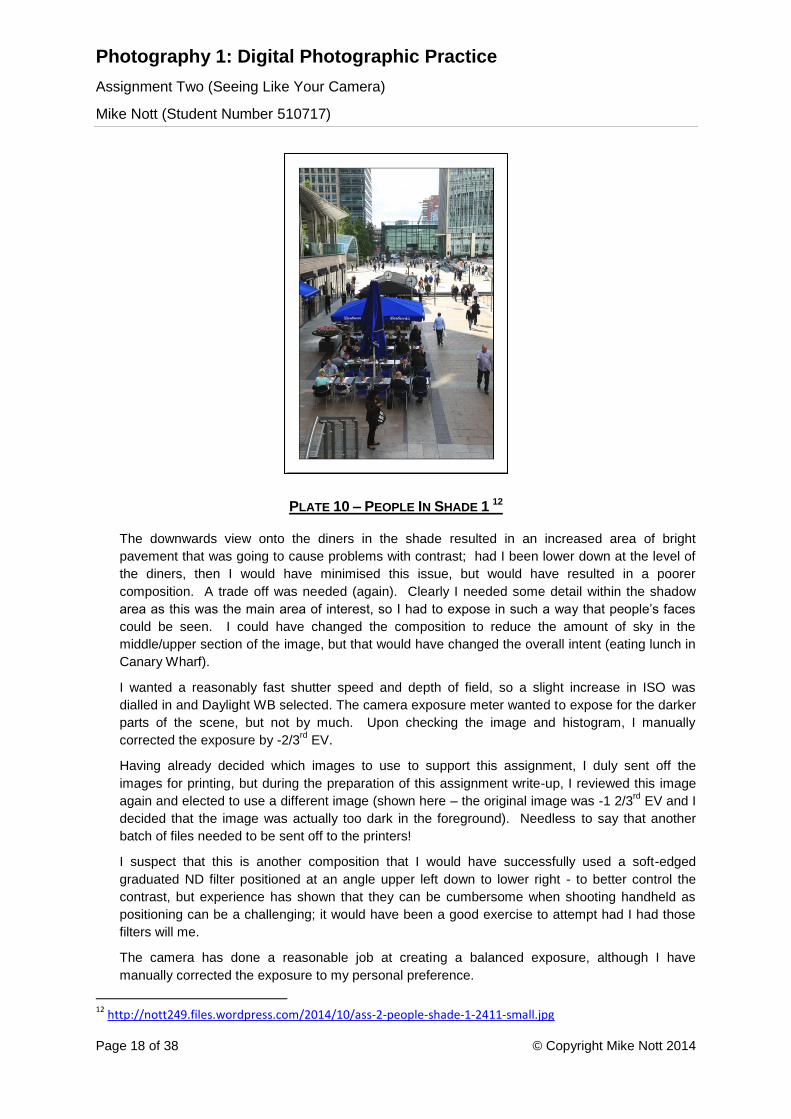
PLATE 10 – PEOPLE IN SHADE 1 12
The downwards view onto the diners in the shade resulted in an increased area of bright
pavement that was going to cause problems with contrast; had I been lower down at the level of
the diners, then I would have minimised this issue, but would have resulted in a poorer
composition. A trade off was needed (again). Clearly I needed some detail within the shadow
area as this was the main area of interest, so I had to expose in such a way that people’s faces
could be seen. I could have changed the composition to reduce the amount of sky in the
middle/upper section of the image, but that would have changed the overall intent (eating lunch in
Canary Wharf).
I wanted a reasonably fast shutter speed and depth of field, so a slight increase in ISO was
dialled in and Daylight WB selected. The camera exposure meter wanted to expose for the darker
parts of the scene, but not by much. Upon checking the image and histogram, I manually
corrected the exposure by -2/3rd
EV.
Having already decided which images to use to support this assignment, I duly sent off the
images for printing, but during the preparation of this assignment write-up, I reviewed this image
again and elected to use a different image (shown here – the original image was -1 2/3rd
EV and I
decided that the image was actually too dark in the foreground). Needless to say that another
batch of files needed to be sent off to the printers!
I suspect that this is another composition that I would have successfully used a soft-edged
graduated ND filter positioned at an angle upper left down to lower right - to better control the
contrast, but experience has shown that they can be cumbersome when shooting handheld as
positioning can be a challenging; it would have been a good exercise to attempt had I had those
filters will me.
The camera has done a reasonable job at creating a balanced exposure, although I have
manually corrected the exposure to my personal preference.
12
http://nott249.files.wordpress.com/2014/10/ass-2-people-shade-1-2411-small.jpg

Photography 1: Digital Photographic Practice
Assignment Two (Seeing Like Your Camera)
Mike Nott (Student Number 510717)
Page 19 of 38 © Copyright Mike Nott 2014
Image Details: 1/100th sec @ f10, ISO200, Daylight WB, Evaluative Metering, -1/3
rd EV (clipping
of the sky area and some pavement areas in the middle).
Photography 1: Digital Photographic Practice
Assignment Two (Seeing Like Your Camera)
Mike Nott (Student Number 510717)
Page 20 of 38 © Copyright Mike Nott 2014
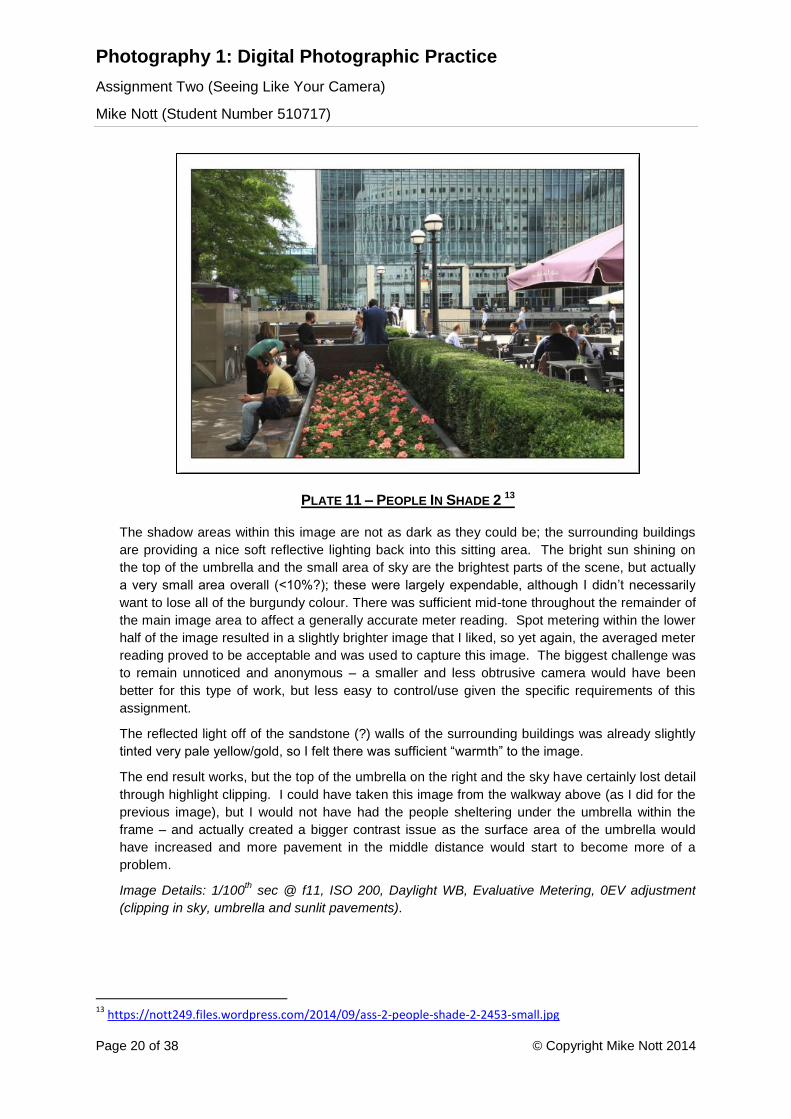
PLATE 11 – PEOPLE IN SHADE 2 13
The shadow areas within this image are not as dark as they could be; the surrounding buildings
are providing a nice soft reflective lighting back into this sitting area. The bright sun shining on
the top of the umbrella and the small area of sky are the brightest parts of the scene, but actually
a very small area overall (<10%?); these were largely expendable, although I didn’t necessarily
want to lose all of the burgundy colour. There was sufficient mid-tone throughout the remainder of
the main image area to affect a generally accurate meter reading. Spot metering within the lower
half of the image resulted in a slightly brighter image that I liked, so yet again, the averaged meter
reading proved to be acceptable and was used to capture this image. The biggest challenge was
to remain unnoticed and anonymous – a smaller and less obtrusive camera would have been
better for this type of work, but less easy to control/use given the specific requirements of this
assignment.
The reflected light off of the sandstone (?) walls of the surrounding buildings was already slightly
tinted very pale yellow/gold, so I felt there was sufficient “warmth” to the image.
The end result works, but the top of the umbrella on the right and the sky have certainly lost detail
through highlight clipping. I could have taken this image from the walkway above (as I did for the
previous image), but I would not have had the people sheltering under the umbrella within the
frame – and actually created a bigger contrast issue as the surface area of the umbrella would
have increased and more pavement in the middle distance would start to become more of a
problem.
Image Details: 1/100th sec @ f11, ISO 200, Daylight WB, Evaluative Metering, 0EV adjustment
(clipping in sky, umbrella and sunlit pavements).
13
https://nott249.files.wordpress.com/2014/09/ass-2-people-shade-2-2453-small.jpg
Photography 1: Digital Photographic Practice
Assignment Two (Seeing Like Your Camera)
Mike Nott (Student Number 510717)
Page 21 of 38 © Copyright Mike Nott 2014
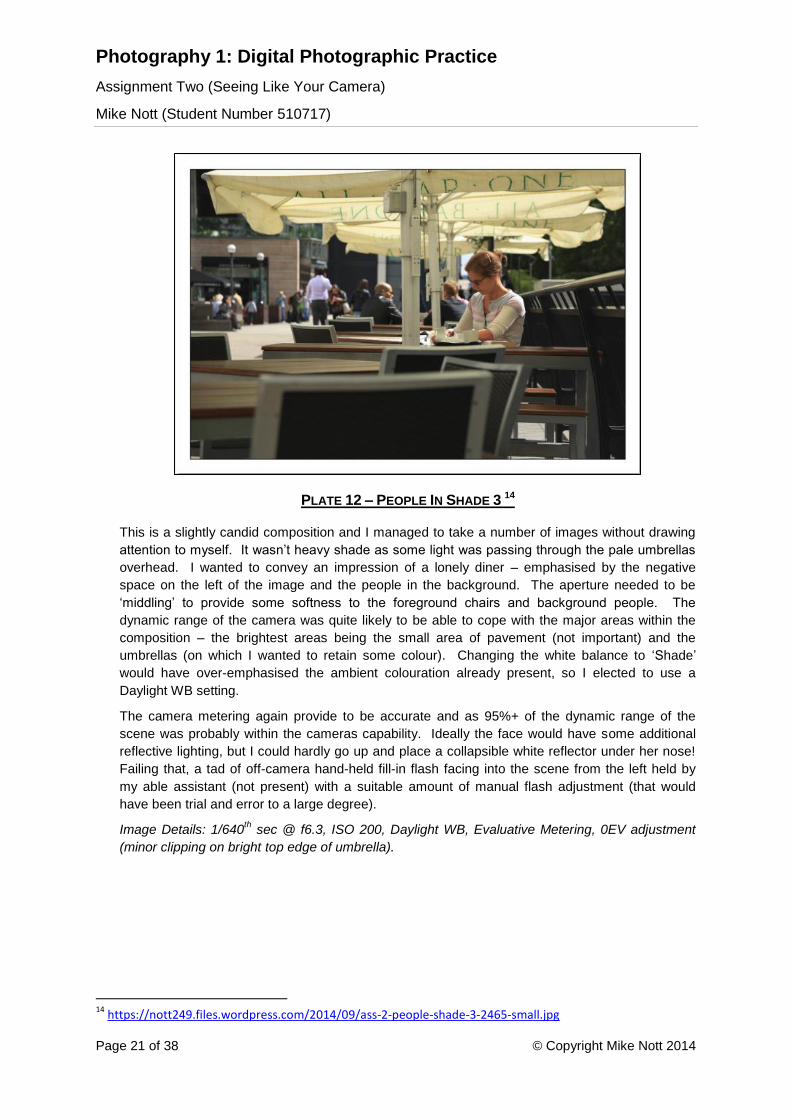
PLATE 12 – PEOPLE IN SHADE 3 14
This is a slightly candid composition and I managed to take a number of images without drawing
attention to myself. It wasn’t heavy shade as some light was passing through the pale umbrellas
overhead. I wanted to convey an impression of a lonely diner – emphasised by the negative
space on the left of the image and the people in the background. The aperture needed to be
‘middling’ to provide some softness to the foreground chairs and background people. The
dynamic range of the camera was quite likely to be able to cope with the major areas within the
composition – the brightest areas being the small area of pavement (not important) and the
umbrellas (on which I wanted to retain some colour). Changing the white balance to ‘Shade’
would have over-emphasised the ambient colouration already present, so I elected to use a
Daylight WB setting.
The camera metering again provide to be accurate and as 95%+ of the dynamic range of the
scene was probably within the cameras capability. Ideally the face would have some additional
reflective lighting, but I could hardly go up and place a collapsible white reflector under her nose!
Failing that, a tad of off-camera hand-held fill-in flash facing into the scene from the left held by
my able assistant (not present) with a suitable amount of manual flash adjustment (that would
have been trial and error to a large degree).
Image Details: 1/640th sec @ f6.3, ISO 200, Daylight WB, Evaluative Metering, 0EV adjustment
(minor clipping on bright top edge of umbrella).
14
https://nott249.files.wordpress.com/2014/09/ass-2-people-shade-3-2465-small.jpg
Photography 1: Digital Photographic Practice
Assignment Two (Seeing Like Your Camera)
Mike Nott (Student Number 510717)
Page 22 of 38 © Copyright Mike Nott 2014
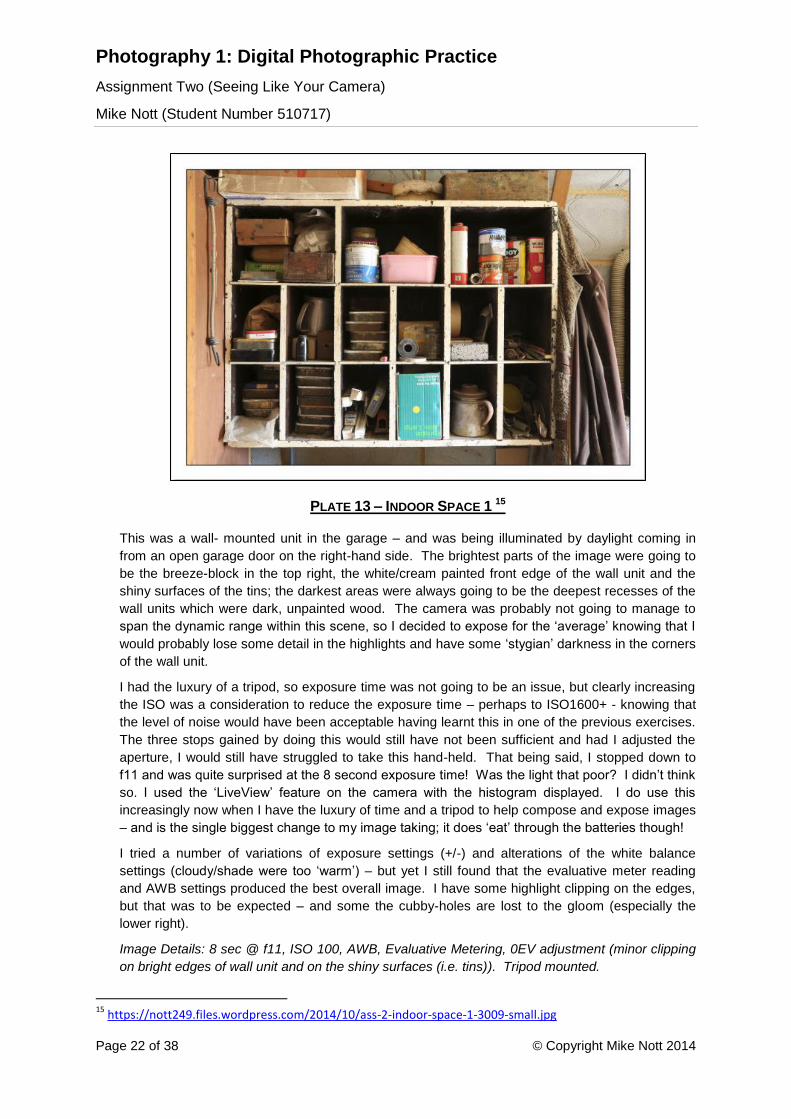
PLATE 13 – INDOOR SPACE 1 15
This was a wall- mounted unit in the garage – and was being illuminated by daylight coming in
from an open garage door on the right-hand side. The brightest parts of the image were going to
be the breeze-block in the top right, the white/cream painted front edge of the wall unit and the
shiny surfaces of the tins; the darkest areas were always going to be the deepest recesses of the
wall units which were dark, unpainted wood. The camera was probably not going to manage to
span the dynamic range within this scene, so I decided to expose for the ‘average’ knowing that I
would probably lose some detail in the highlights and have some ‘stygian’ darkness in the corners
of the wall unit.
I had the luxury of a tripod, so exposure time was not going to be an issue, but clearly increasing
the ISO was a consideration to reduce the exposure time – perhaps to ISO1600+ - knowing that
the level of noise would have been acceptable having learnt this in one of the previous exercises.
The three stops gained by doing this would still have not been sufficient and had I adjusted the
aperture, I would still have struggled to take this hand-held. That being said, I stopped down to
f11 and was quite surprised at the 8 second exposure time! Was the light that poor? I didn’t think
so. I used the ‘LiveView’ feature on the camera with the histogram displayed. I do use this
increasingly now when I have the luxury of time and a tripod to help compose and expose images
– and is the single biggest change to my image taking; it does ‘eat’ through the batteries though!
I tried a number of variations of exposure settings (+/-) and alterations of the white balance
settings (cloudy/shade were too ‘warm’) – but yet I still found that the evaluative meter reading
and AWB settings produced the best overall image. I have some highlight clipping on the edges,
but that was to be expected – and some the cubby-holes are lost to the gloom (especially the
lower right).
Image Details: 8 sec @ f11, ISO 100, AWB, Evaluative Metering, 0EV adjustment (minor clipping
on bright edges of wall unit and on the shiny surfaces (i.e. tins)). Tripod mounted.
15
https://nott249.files.wordpress.com/2014/10/ass-2-indoor-space-1-3009-small.jpg
Photography 1: Digital Photographic Practice
Assignment Two (Seeing Like Your Camera)
Mike Nott (Student Number 510717)
Page 23 of 38 © Copyright Mike Nott 2014
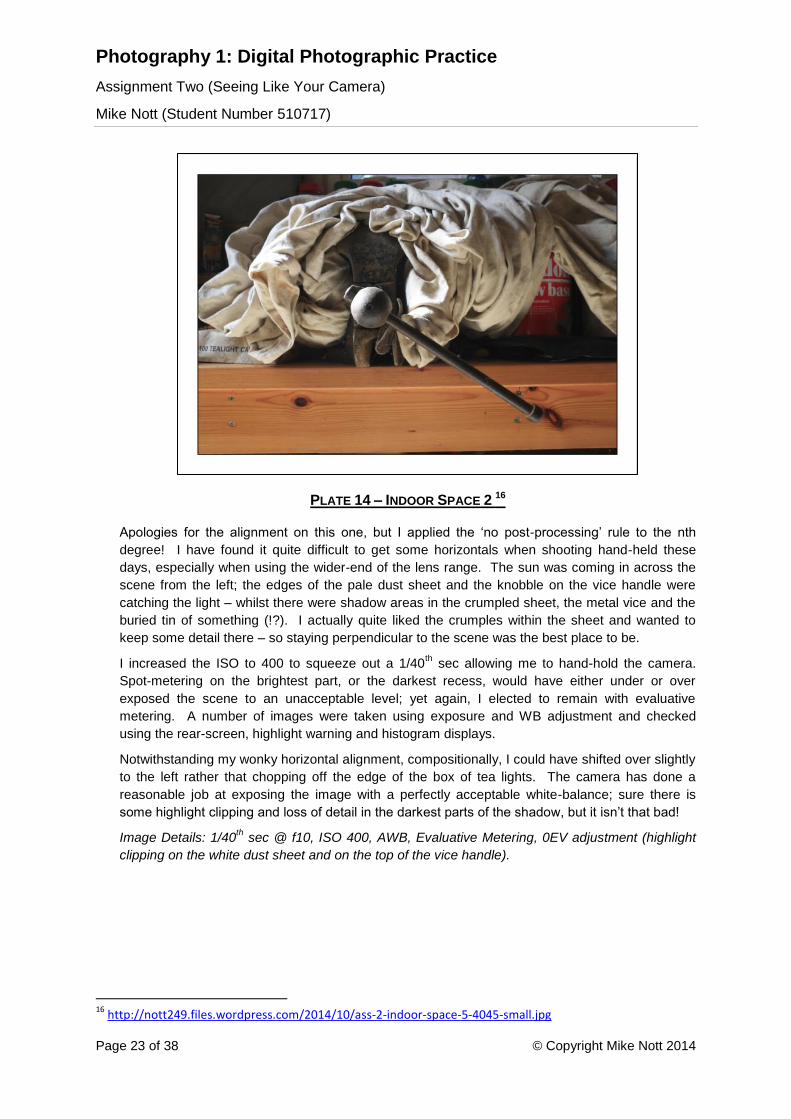
PLATE 14 – INDOOR SPACE 2 16
Apologies for the alignment on this one, but I applied the ‘no post-processing’ rule to the nth
degree! I have found it quite difficult to get some horizontals when shooting hand-held these
days, especially when using the wider-end of the lens range. The sun was coming in across the
scene from the left; the edges of the pale dust sheet and the knobble on the vice handle were
catching the light – whilst there were shadow areas in the crumpled sheet, the metal vice and the
buried tin of something (!?). I actually quite liked the crumples within the sheet and wanted to
keep some detail there – so staying perpendicular to the scene was the best place to be.
I increased the ISO to 400 to squeeze out a 1/40th sec allowing me to hand-hold the camera.
Spot-metering on the brightest part, or the darkest recess, would have either under or over
exposed the scene to an unacceptable level; yet again, I elected to remain with evaluative
metering. A number of images were taken using exposure and WB adjustment and checked
using the rear-screen, highlight warning and histogram displays.
Notwithstanding my wonky horizontal alignment, compositionally, I could have shifted over slightly
to the left rather that chopping off the edge of the box of tea lights. The camera has done a
reasonable job at exposing the image with a perfectly acceptable white-balance; sure there is
some highlight clipping and loss of detail in the darkest parts of the shadow, but it isn’t that bad!
Image Details: 1/40th sec @ f10, ISO 400, AWB, Evaluative Metering, 0EV adjustment (highlight
clipping on the white dust sheet and on the top of the vice handle).
16
http://nott249.files.wordpress.com/2014/10/ass-2-indoor-space-5-4045-small.jpg

Photography 1: Digital Photographic Practice
Assignment Two (Seeing Like Your Camera)
Mike Nott (Student Number 510717)
Page 24 of 38 © Copyright Mike Nott 2014
PLATE 15 – INDOOR SCENE 3 17
My approach to all these images in the workshop was to move nothing to aid composition or to
reduce the contrast; the contents of the workshop and garage had remained largely untouched for
many years and I felt that it wasn’t my place to move anything; I did break this self-imposed
restriction just the one time. I moved this chair out from its location and turned it slightly towards
me so the sun light was hitting it more fully. I also shut the half-glazed open door away to the left
to cut the incoming light by approximately 50% as a means to control some of the contrast.
As I was shooting hand-held, the ISO was increased to 800 as the light levels were generally
poor, despite the incoming sunlight and the WB adjusted to ‘Daylight’. I pushed the exposure by
+2/3rd
EV to get as much brightness on the floor and chair as I could whilst trying to have as much
shadow detail as I could. Compositionally, I could have elected to leave the shadow area much
darker, but I decided not to in this case. There is some minor highlight clipping on the floor, but
the overall dusty detail has not been lost. The camera has done a reasonable job here.
Image Details: 1/100th sec @ f9, ISO 800, Daylight WB, Evaluative Metering, +2/3
rd EV
adjustment (some clipping on sun-lit floor).
17
https://nott249.files.wordpress.com/2014/10/ass-2-indoor-space-4-4155-small.jpg
Photography 1: Digital Photographic Practice
Assignment Two (Seeing Like Your Camera)
Mike Nott (Student Number 510717)
Page 25 of 38 © Copyright Mike Nott 2014
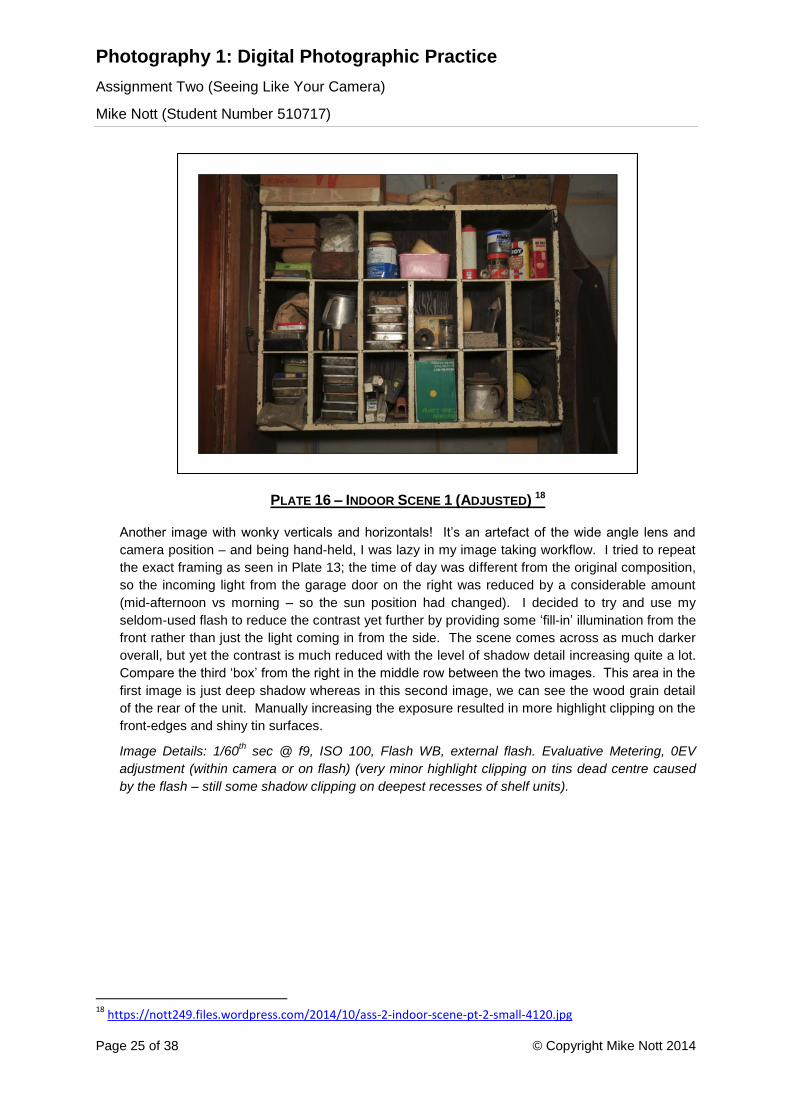
PLATE 16 – INDOOR SCENE 1 (ADJUSTED) 18
Another image with wonky verticals and horizontals! It’s an artefact of the wide angle lens and
camera position – and being hand-held, I was lazy in my image taking workflow. I tried to repeat
the exact framing as seen in Plate 13; the time of day was different from the original composition,
so the incoming light from the garage door on the right was reduced by a considerable amount
(mid-afternoon vs morning – so the sun position had changed). I decided to try and use my
seldom-used flash to reduce the contrast yet further by providing some ‘fill-in’ illumination from the
front rather than just the light coming in from the side. The scene comes across as much darker
overall, but yet the contrast is much reduced with the level of shadow detail increasing quite a lot.
Compare the third ‘box’ from the right in the middle row between the two images. This area in the
first image is just deep shadow whereas in this second image, we can see the wood grain detail
of the rear of the unit. Manually increasing the exposure resulted in more highlight clipping on the
front-edges and shiny tin surfaces.
Image Details: 1/60th sec @ f9, ISO 100, Flash WB, external flash. Evaluative Metering, 0EV
adjustment (within camera or on flash) (very minor highlight clipping on tins dead centre caused
by the flash – still some shadow clipping on deepest recesses of shelf units).
18
https://nott249.files.wordpress.com/2014/10/ass-2-indoor-scene-pt-2-small-4120.jpg
Photography 1: Digital Photographic Practice
Assignment Two (Seeing Like Your Camera)
Mike Nott (Student Number 510717)
Page 26 of 38 © Copyright Mike Nott 2014
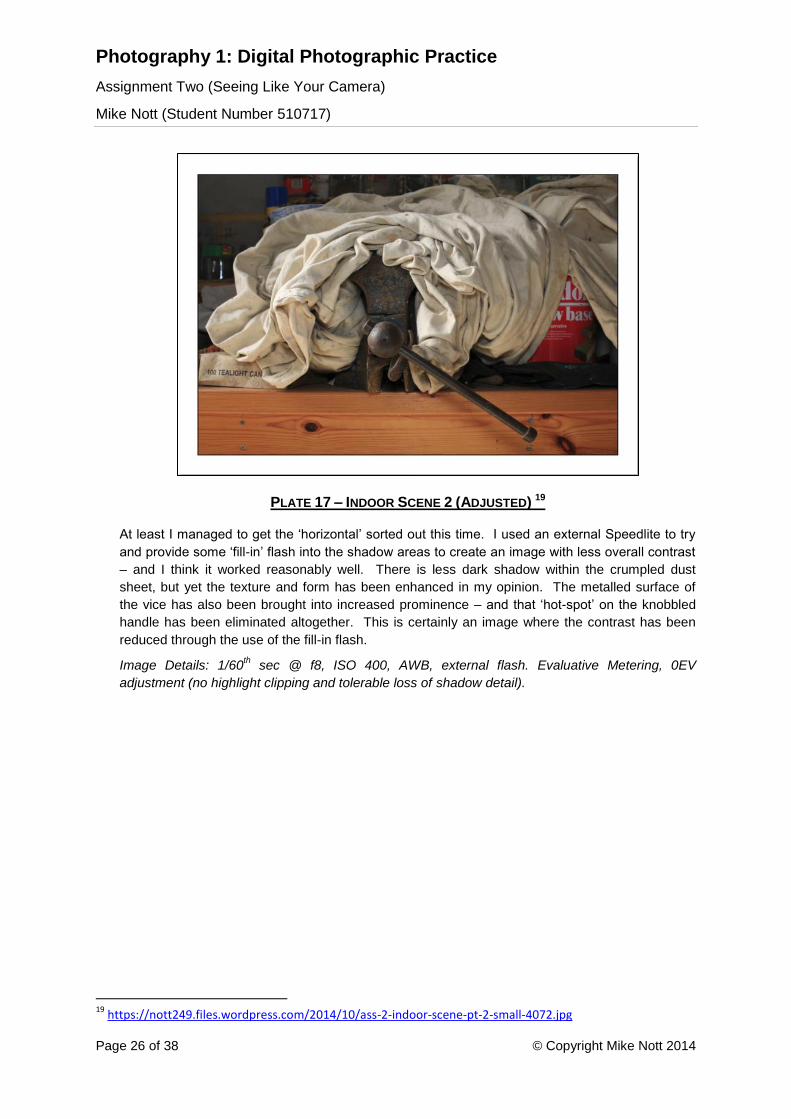
PLATE 17 – INDOOR SCENE 2 (ADJUSTED) 19
At least I managed to get the ‘horizontal’ sorted out this time. I used an external Speedlite to try
and provide some ‘fill-in’ flash into the shadow areas to create an image with less overall contrast
– and I think it worked reasonably well. There is less dark shadow within the crumpled dust
sheet, but yet the texture and form has been enhanced in my opinion. The metalled surface of
the vice has also been brought into increased prominence – and that ‘hot-spot’ on the knobbled
handle has been eliminated altogether. This is certainly an image where the contrast has been
reduced through the use of the fill-in flash.
Image Details: 1/60th sec @ f8, ISO 400, AWB, external flash. Evaluative Metering, 0EV
adjustment (no highlight clipping and tolerable loss of shadow detail).
19
https://nott249.files.wordpress.com/2014/10/ass-2-indoor-scene-pt-2-small-4072.jpg
Photography 1: Digital Photographic Practice
Assignment Two (Seeing Like Your Camera)
Mike Nott (Student Number 510717)
Page 27 of 38 © Copyright Mike Nott 2014
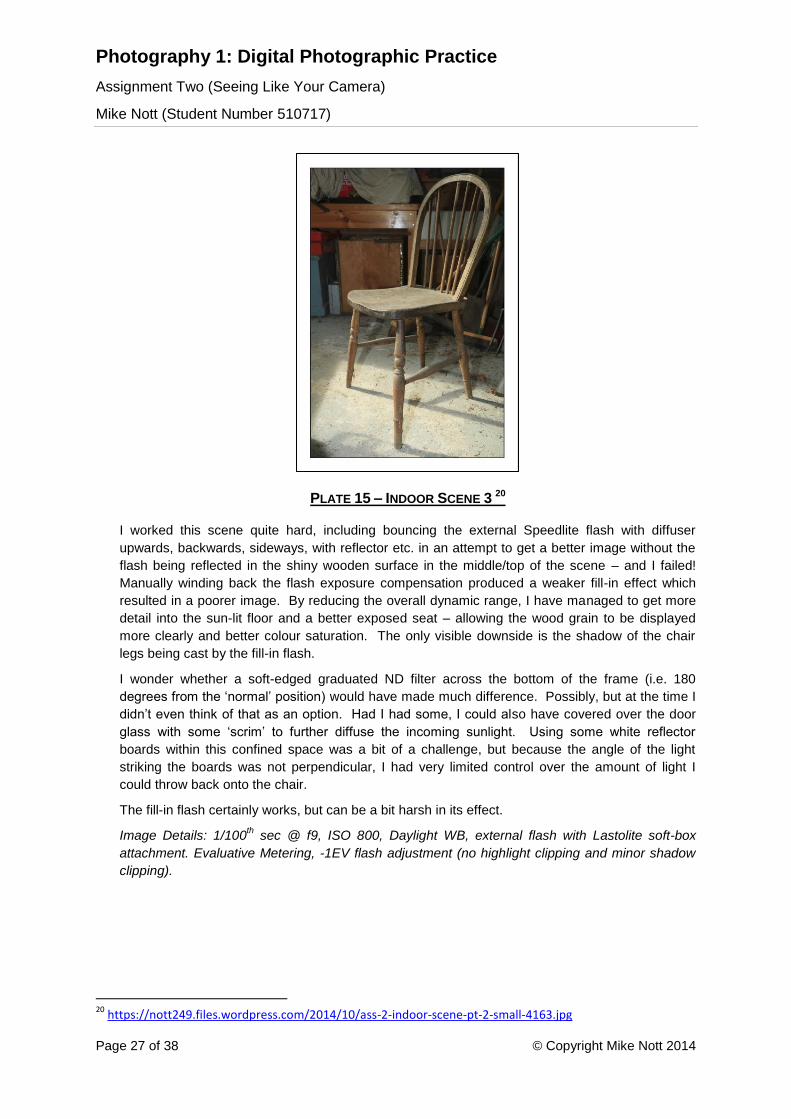
PLATE 15 – INDOOR SCENE 3 20
I worked this scene quite hard, including bouncing the external Speedlite flash with diffuser
upwards, backwards, sideways, with reflector etc. in an attempt to get a better image without the
flash being reflected in the shiny wooden surface in the middle/top of the scene – and I failed!
Manually winding back the flash exposure compensation produced a weaker fill-in effect which
resulted in a poorer image. By reducing the overall dynamic range, I have managed to get more
detail into the sun-lit floor and a better exposed seat – allowing the wood grain to be displayed
more clearly and better colour saturation. The only visible downside is the shadow of the chair
legs being cast by the fill-in flash.
I wonder whether a soft-edged graduated ND filter across the bottom of the frame (i.e. 180
degrees from the ‘normal’ position) would have made much difference. Possibly, but at the time I
didn’t even think of that as an option. Had I had some, I could also have covered over the door
glass with some ‘scrim’ to further diffuse the incoming sunlight. Using some white reflector
boards within this confined space was a bit of a challenge, but because the angle of the light
striking the boards was not perpendicular, I had very limited control over the amount of light I
could throw back onto the chair.
The fill-in flash certainly works, but can be a bit harsh in its effect.
Image Details: 1/100th sec @ f9, ISO 800, Daylight WB, external flash with Lastolite soft-box
attachment. Evaluative Metering, -1EV flash adjustment (no highlight clipping and minor shadow
clipping).
20
https://nott249.files.wordpress.com/2014/10/ass-2-indoor-scene-pt-2-small-4163.jpg
Photography 1: Digital Photographic Practice
Assignment Two (Seeing Like Your Camera)
Mike Nott (Student Number 510717)
Page 28 of 38 © Copyright Mike Nott 2014
3) Self-Assessment and Reflection:
This is my second assignment for Photography 1: Digital Photographic Practice.
In terms of the assessment criteria laid out within the coursework, there are four main areas to be
considered:
Demonstration of technical and visual skills
Quality outcome
Demonstration of creativity
Context
This assignment has surprised me insomuch that, even though I didn’t necessarily view myself
as someone who was a big ‘post-processor’, how much I rely on little adjustments to highlight or
shadow details to finish off my images – even if taken in JPEG files rather than RAW. I am a
habitual user of graduated neutral density filters for my landscape work, but I have now started to
think that there may be a case for their selective use in other areas of work.
In an ideal world, the best exposure of an image is when the values fill the range from dark to
light, i.e. a fully expanded histogram from left to right. High contrast images that we have been
tasked with shooting for this assignment always run the risk of being clipped. We have seen in
Exercise five that the performance of a camera sensor to light is linear, roughly meaning that it
‘fills up’ to absolute white a lot more readily than the equivalent film used to do. Within digital
imaging, clipped highlights are more critical than clipped shadows, primarily because even a little
light generates some response at the shadow end of the range (left) and secondly, it is the bright
areas within an image that draws the viewer’s attention. In Michael Freeman’s ‘The Digital SLR
Handbook’ (2011, Ilex Press Ltd) he comments that if you are shooting JPEG, then contrast and
exposure are the only in-camera controls that will help. Endeavouring to reduce the contrast at
the time of shooting an image is sensible, but not necessarily that easily done. Freeman also
goes on to say it is often safer to under expose the bulk of an image to preserve the highlights
and lighten the shadow areas during image editing (not that we had that luxury in this
assignment). Knowing how a camera sensor works, it's dynamic range, and the effective use of
the histogram and highlight clipping warning capability, all help contribute towards being able to
effectively optimise an image in post-processing; endeavouring to avoid clipped highlights ,even
at the expense of a darker image, will ultimately pay dividends.
Are there any other options to control contrast, not necessarily that we could have used in
support of this assignment that would allow the photographer a greater degree of flexibility in
post-processing? Yes, of course there are. If there is the luxury of time and a static scene, then
the use of a tripod and taking bracketed exposures and merging them together in post-
processing, would allow a high dynamic range composition to be more successfully created.
Alternatively, provided the dynamic range of the camera is sufficient, taking a RAW image into a
post-processing application and varying the exposure for both the highlights and shadow areas -
and creating a new file for each - and then blending these together would achieve a similar end
result to that of bracketed exposures. Another option is High Dynamic Range (HDR)
photography. Provided a camera can be held steady, a series of images taken at different
exposures can capture all the detail within any given situation. These images are processed
within a suitable computer application and are combined within a single HDR image presenting
the entire contrast range within it.

Photography 1: Digital Photographic Practice
Assignment Two (Seeing Like Your Camera)
Mike Nott (Student Number 510717)
Page 29 of 38 © Copyright Mike Nott 2014
The main goal of this assignment was to 'see like your camera'. The Zone System, first created
by Ansel Adams, is a long-standing method to getting the most tonal range within an image
(primarily in Adams’ well-known black and white compositions). This 'system' has become more
relevant today in digital photography than had been the case with colour negative and
transparency films in the recent past, and it is probably best used when the photographer has the
luxury of time to assess any given scene in front of them at the time of image taking (e.g.,
landscape photography rather than street photography). This ‘Zone System’ deconstructs a
scene into 10 different zones, from solid black to pure white, each one f-stop apart - and the key
part of this process is to identify the important tones into the appropriate zones in what Adams
calls 'pre-visualisation’. I know one professional landscape photographer here in the UK (David
Noton) who still continues to use this term when trying to convey his thought processes when
taking his photographs. A subtle part of this ‘Zone System’ assessment is to know how the final
image is going to appear - whether on-screen or in print – as prints can have a far smaller
dynamic range than on a computer screen.
I think I have already mentioned Michael Freeman’s tome before - ‘Perfect Exposure’ (2009, Ilex
Press Ltd). In this book, Freeman proposes that there are 12 types of exposure situations within
four ‘sections’ (listed below) that he subconsciously uses when shooting his photographs every
day. Through his years of experience, he has developed the skill of rapidly assessing any given
situation and applying his thought considerations to something he may have encountered before
- and knowing how to deal with it. There are two important assumptions that seem obvious, but
would benefit from being voiced. Firstly, there is the concept of key tones - which is where one
or more areas in the scene have the most importance, and secondly, there is the recognition that
most people, when viewing an image, would expect subjects to be close to ‘average’ in tone
unless there is an understood reason why. Working these pre-conceptions into the final
exposure will help with the overall acceptability of the final image to a viewer.
The Range Fits (the dynamic range of the scene fits the dynamic range of a camera sensor)
1. Average - key tones average
2. Bright - key tones bright
3. Dark - key tones dark
Low Range (scenes with a low dynamic range)
4. Average - average
5. Bright - bright
6. Dark - dark
High Range (scenes that exceed the dynamic range of a camera sensor)
7. Key Average - key tones average
8. Large Brighter - large brighter against dark
9. Small Brighter - small brighter against dark
High Range (low-key compositions with small bright areas)
10. Edge Lit - edge-lit subject
11. Larger Darker - large darker against bright
12. Small Darker - small darker against bright

Photography 1: Digital Photographic Practice
Assignment Two (Seeing Like Your Camera)
Mike Nott (Student Number 510717)
Page 30 of 38 © Copyright Mike Nott 2014
It will take many years for me to learn to apply this assessment criteria, and I suspect it is
something that will only come through repeated and systematic work and review and developing
an innate personal judgement of what works, and what does not. Call it experience!
In this assignment, I had originally set out to create a series of images with a common underlying
theme (i.e. architecture and people), but due to the pressures of working around my day job and
my domestic life, I felt I had compromised the overall integrity of this assignment by electing to
use the ‘indoor scenes’ category in the way that I did. By using subject that was in close
proximity to home, it provided greater freedom for me to take the opportunities of time and
weather as they presented themselves, in capturing the comparison images is required for part
one and part two of this assignment.
I have deliberately not included my observations and comments from the supporting the ‘Digital
Image Qualities’ exercises associated with this section of the course. My write ups for these
exercises can be seen using the following links:
Exercise 5 (Sensor Linear Capture)
https://nott249.wordpress.com/wp-admin/post.php?post=1969&action=edit
Exercise 6 (Highlight Clipping)
https://nott249.wordpress.com/wp-admin/post.php?post=2027&action=edit
Exercise 7 (Your Tolerance for Noise)
https://nott249.wordpress.com/wp-admin/post.php?post=2055&action=edit
Exercise 8 (Your Camera’s Dynamic Range)
https://nott249.wordpress.com/wp-admin/post.php?post=2060&action=edit
Exercise 9 (Scene Dynamic Range)
https://nott249.wordpress.com/wp-admin/post.php?post=2077&action=edit
Exercise 10 (Colour Cast and White Balance)
https://nott249.wordpress.com/wp-admin/post.php?post=2096&action=edit

Photography 1: Digital Photographic Practice
Assignment Two (Seeing Like Your Camera)
Mike Nott (Student Number 510717)
Page 31 of 38 © Copyright Mike Nott 2014
ANNEX A - SUPPORTING MATERIAL

Photography 1: Digital Photographic Practice
Assignment Two (Seeing Like Your Camera)
Mike Nott (Student Number 510717)
Page 32 of 38 © Copyright Mike Nott 2014
General Course Assessment Criteria
Repeated verbatim from the OCA course study material:
“Here are the assessment criteria for this course. These are central to the assessment
process for this course, so if you are going to have your work assessed to gain formal
credits, please make sure you take note of these criteria and consider how each of the
assignments you complete demonstrates evidence of each criterion. On completion of each
assessment, and before you send your assignment to your tutor, test yourself against the
criteria – in other words – do a self-assessment, and see how you think you would do. Note
down your findings of each assignment you’ve completed in your learning log, noting all your
perceived strengths and weaknesses, taking into account the criteria every step of the way.
This will be helpful for your tutor to see, as well as helping you prepare for assessment.
Assessment Criteria Points:
Demonstration of Technical and Visual Skills material, techniques, observational skills,
visual awareness, design and compositional skills;
Quality of Outcome content, application of knowledge, presentation of work in a
coherent manner, discernment, conceptualisation of thoughts, communication of ideas;
Demonstration of Creativity imagination, experimentation, invention, development of a
personal voice;
Context reflection, research, critical thinking (learning log).”
Photography 1: Digital Photographic Practice
Assignment Two (Seeing Like Your Camera)
Mike Nott (Student Number 510717)
Page 33 of 38 © Copyright Mike Nott 2014
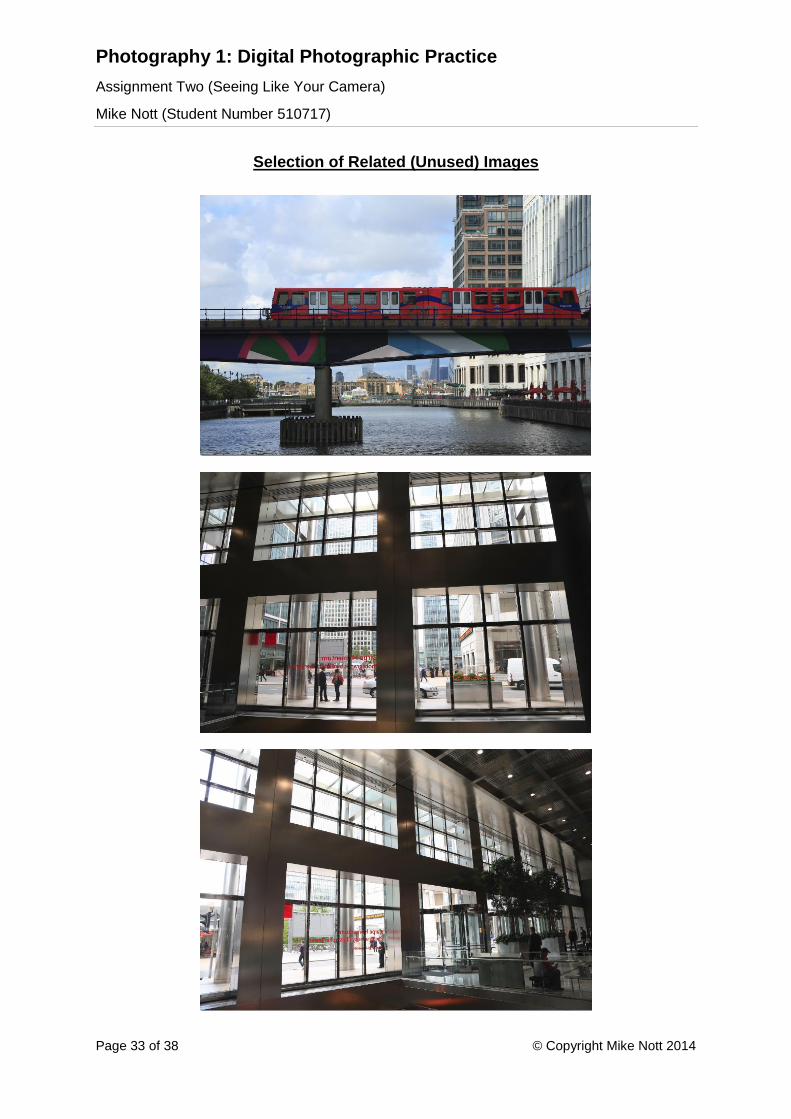
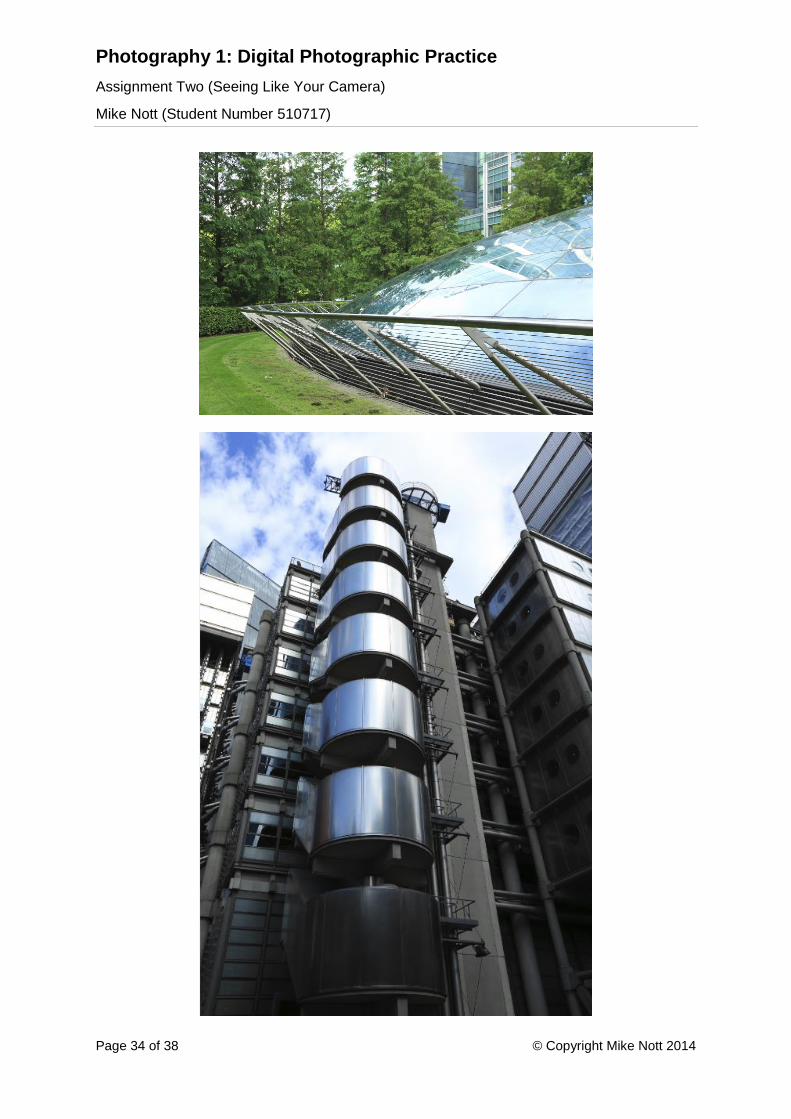
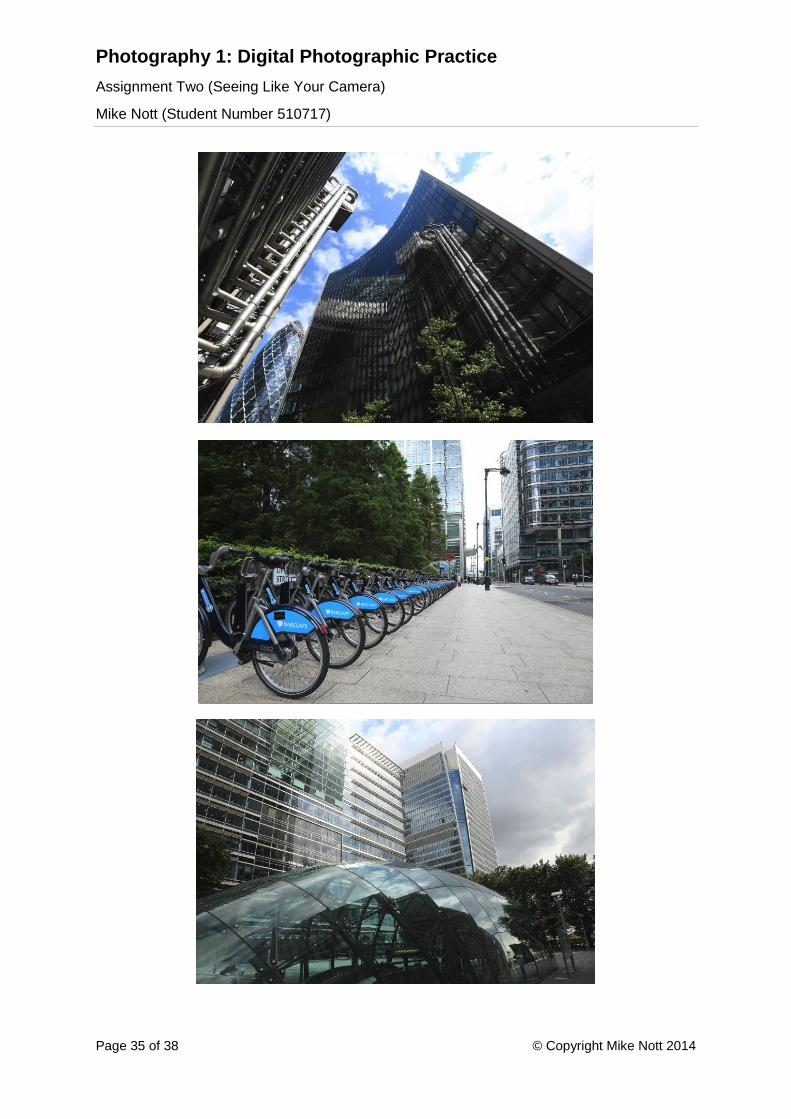
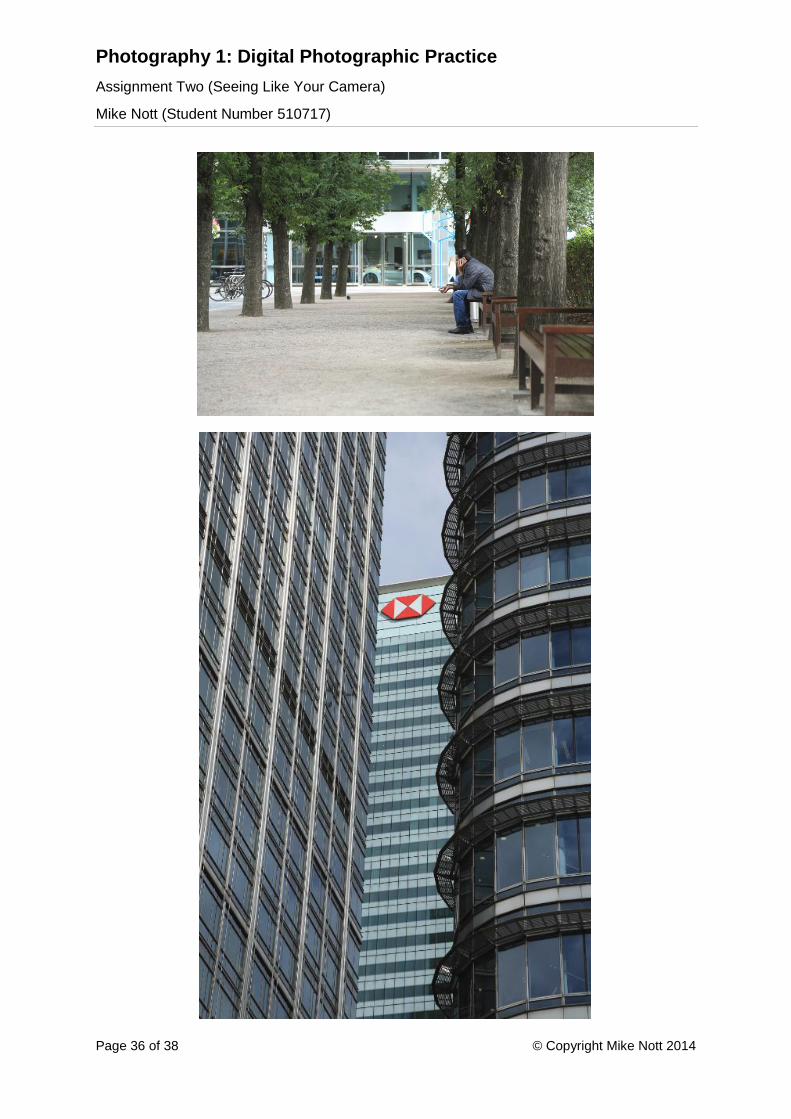
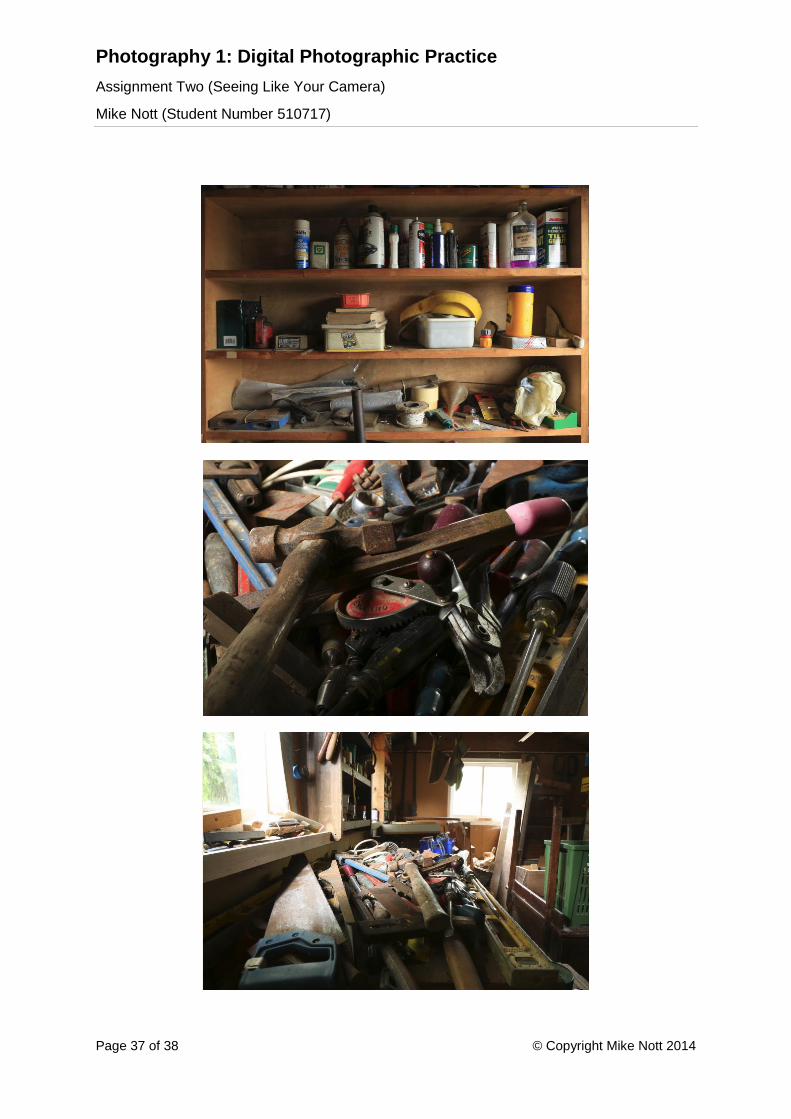
Selection of Related (Unused) Images
Photography 1: Digital Photographic Practice
Assignment Two (Seeing Like Your Camera)
Mike Nott (Student Number 510717)
Page 34 of 38 © Copyright Mike Nott 2014
Photography 1: Digital Photographic Practice
Assignment Two (Seeing Like Your Camera)
Mike Nott (Student Number 510717)
Page 35 of 38 © Copyright Mike Nott 2014
Photography 1: Digital Photographic Practice
Assignment Two (Seeing Like Your Camera)
Mike Nott (Student Number 510717)
Page 36 of 38 © Copyright Mike Nott 2014
Photography 1: Digital Photographic Practice
Assignment Two (Seeing Like Your Camera)
Mike Nott (Student Number 510717)
Page 37 of 38 © Copyright Mike Nott 2014
Photography 1: Digital Photographic Practice
Assignment Two (Seeing Like Your Camera)
Mike Nott (Student Number 510717)
Page 38 of 38 © Copyright Mike Nott 2014
End of Document