photoshop for photography - west chester university introduction adobe photoshop is a graphics...
TRANSCRIPT
Copyright 2016, Faculty and Staff Training, West Chester University. A member of the Pennsylvania State System of Higher Education. No portion of this
document may be reproduced without the written permission of the authors. For assistance, contact the IT Help Desk, x3350
Photoshop
For Photography
2
Table of Contents Introduction ...................................................................................................................................................... 3
Opening an Image ............................................................................................................................................. 4
Image Size ......................................................................................................................................................... 5
Color Mode ....................................................................................................................................................... 6
Duplicating a Layer............................................................................................................................................ 7
Image Adjustments ........................................................................................................................................... 8
Auto Adjustments ......................................................................................................................................... 8
Go to Image and select either Auto Tone, Auto Contrast, or Auto Color ..................................................... 8
Brightness and Contrast................................................................................................................................ 9
Levels ............................................................................................................................................................ 9
Curves ......................................................................................................................................................... 10
Hue and Saturation vs. Vibrance ..................................................................................................................... 11
Hue and Saturation ..................................................................................................................................... 11
Vibrance ...................................................................................................................................................... 11
Color Balance .............................................................................................................................................. 12
Black & White ............................................................................................................................................. 13
Shadows and Highlights .............................................................................................................................. 14
Using Adjustments in the Layer Panel .......................................................................................................15
Cleaning Up a Photo ........................................................................................................................................ 16
Clone Stamp tool ......................................................................................................................................... 16
Healing Brush vs. Spot Healing Brush .......................................................................................................... 17
Healing Brush vs. Spot Healing Brush ...................................................................................................... 17
Patch Tool ................................................................................................................................................... 18
3
Introduction
Adobe Photoshop is a graphics editing program, or image editing software, that allows you to create and
manipulate visual images on the computer. Editing features in the program help in creating and
managing visual images for Internet, print, and other new media disciplines. To begin creating a
Photoshop project, start Photoshop CS6 and follow along with the steps below.
4
Opening an Image
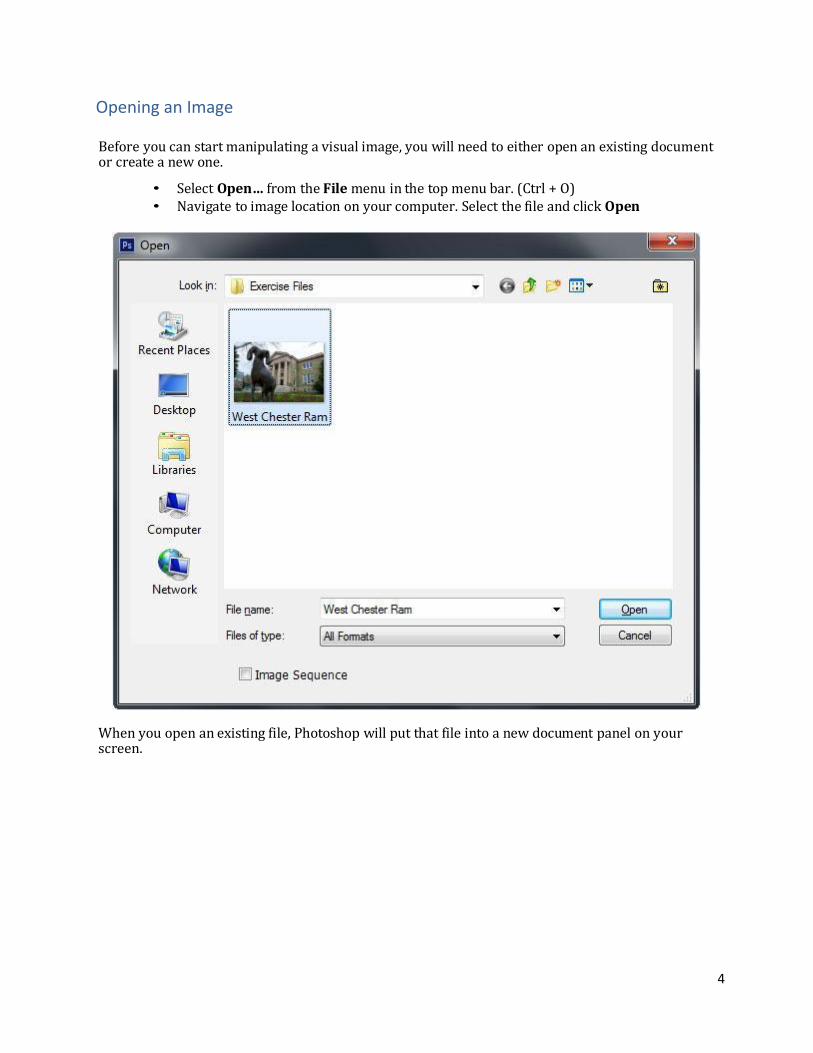
Before you can start manipulating a visual image, you will need to either open an existing document or create a new one.
• Select Open… from the File menu in the top menu bar. (Ctrl + O) • Navigate to image location on your computer. Select the file and click Open
When you open an existing file, Photoshop will put that file into a new document panel on your screen.
5
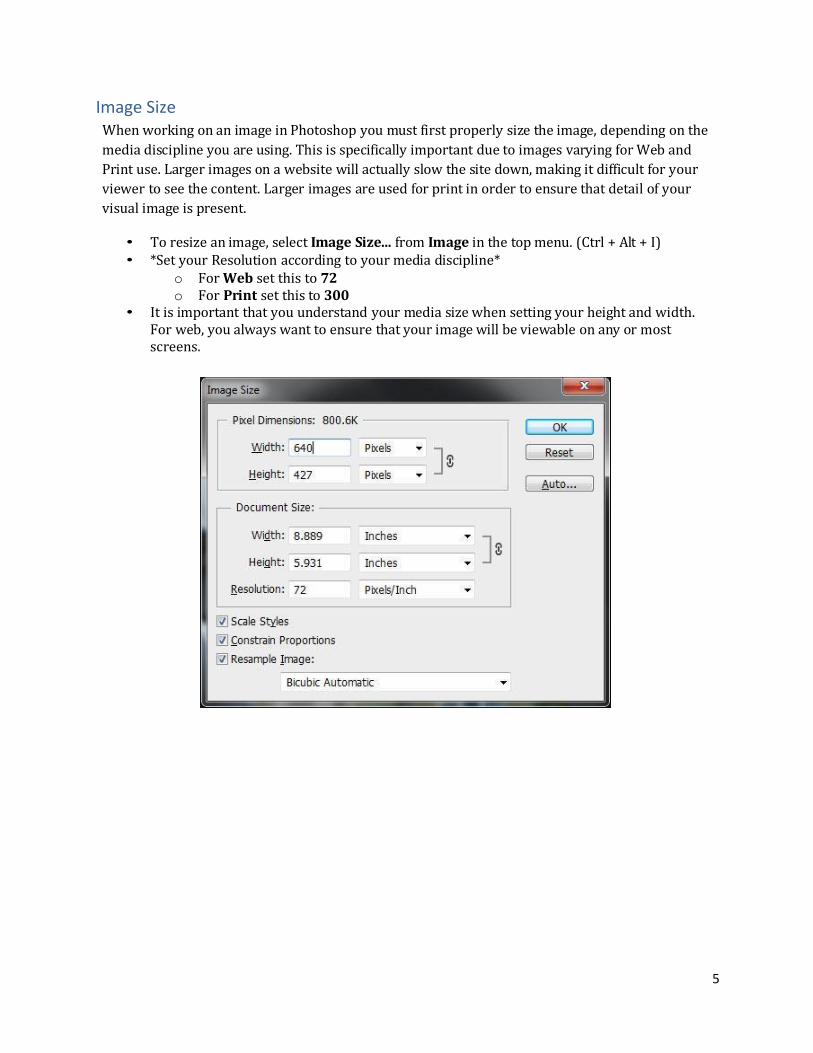
Image Size When working on an image in Photoshop you must first properly size the image, depending on the
media discipline you are using. This is specifically important due to images varying for Web and
Print use. Larger images on a website will actually slow the site down, making it difficult for your
viewer to see the content. Larger images are used for print in order to ensure that detail of your
visual image is present.
• To resize an image, select Image Size... from Image in the top menu. (Ctrl + Alt + I) • *Set your Resolution according to your media discipline*
o For Web set this to 72 o For Print set this to 300
• It is important that you understand your media size when setting your height and width. For web, you always want to ensure that your image will be viewable on any or most screens.
6
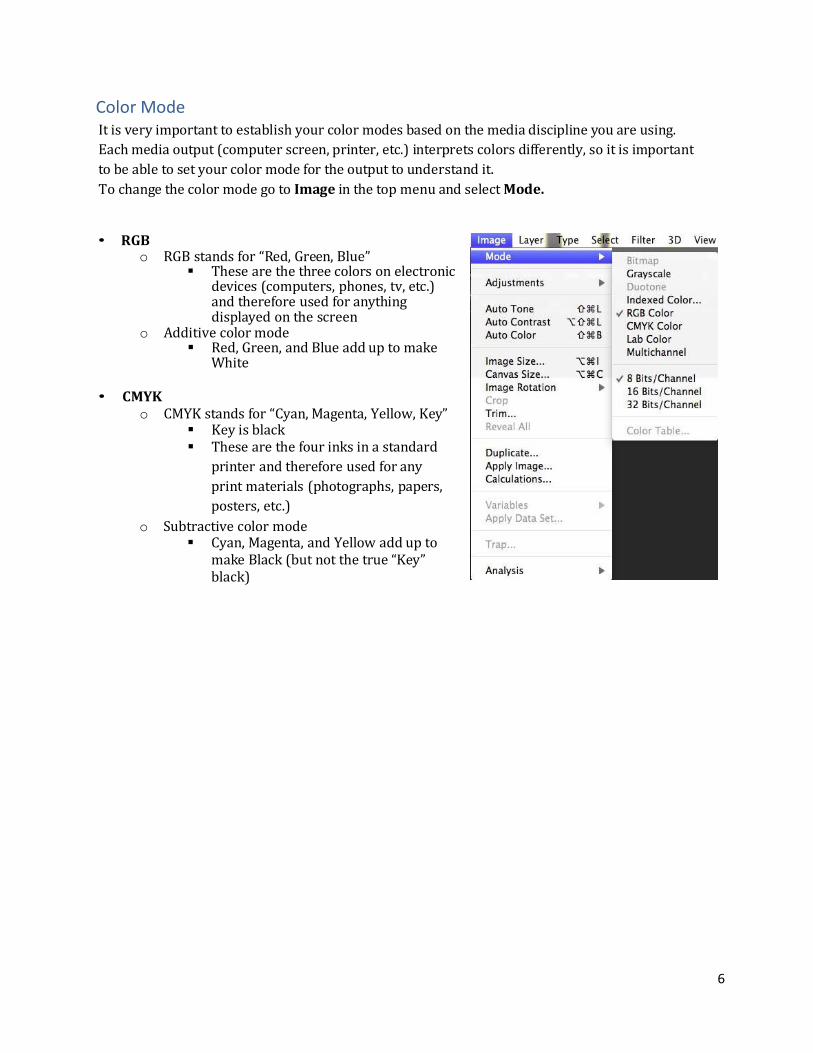
Color Mode It is very important to establish your color modes based on the media discipline you are using.
Each media output (computer screen, printer, etc.) interprets colors differently, so it is important
to be able to set your color mode for the output to understand it.
To change the color mode go to Image in the top menu and select Mode.
• RGB
o RGB stands for “Red, Green, Blue” These are the three colors on electronic
devices (computers, phones, tv, etc.) and therefore used for anything displayed on the screen
o Additive color mode Red, Green, and Blue add up to make
White • CMYK
o CMYK stands for “Cyan, Magenta, Yellow, Key” Key is black These are the four inks in a standard
printer and therefore used for any
print materials (photographs, papers,
posters, etc.)
o Subtractive color mode Cyan, Magenta, and Yellow add up to
make Black (but not the true “Key” black)
7
Duplicating a Layer One limitation that Photoshop has is how many Undo’s you are allowed to make. The application’s
default settings only allows 20 Undo’s. This limit can be adjusted in preferences, however it will greatly
decrease the performance of the application. Given this setback, we must remember to take cautious
measures to ensure that our work isn’t lost. An easy way to ensure this is by duplicating your layers,
allowing you to go back to previous states.
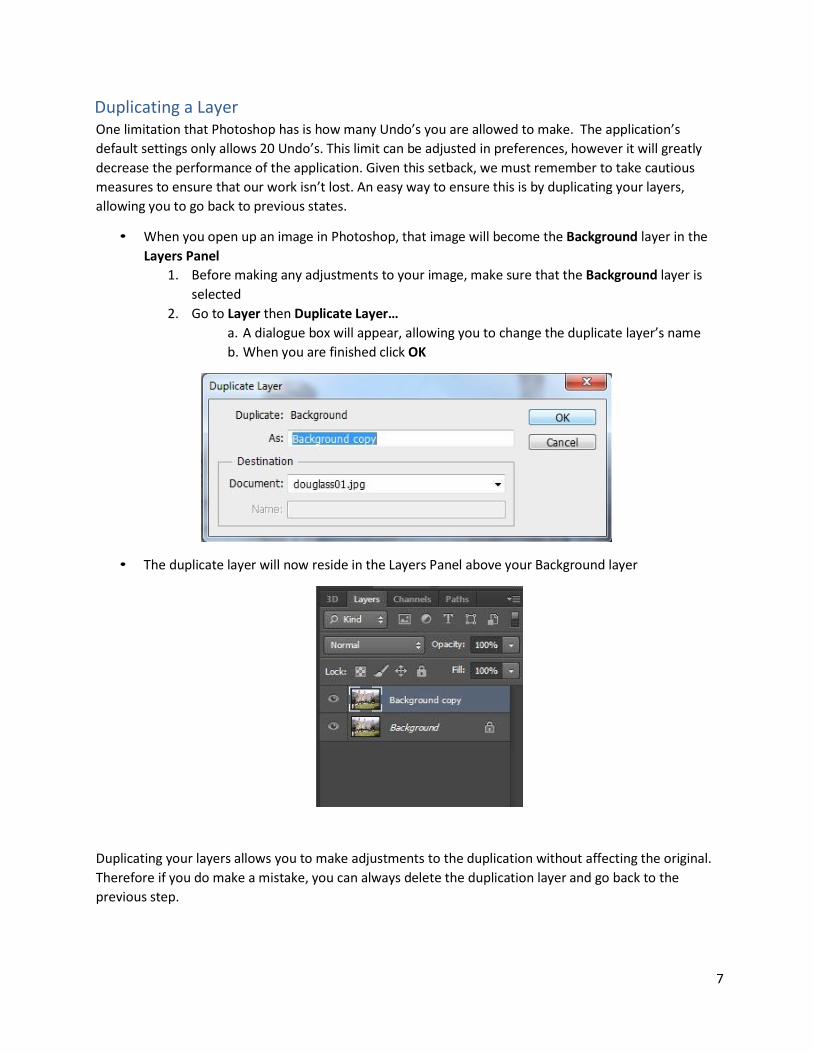
• When you open up an image in Photoshop, that image will become the Background layer in the
Layers Panel
1. Before making any adjustments to your image, make sure that the Background layer is
selected
2. Go to Layer then Duplicate Layer…
a. A dialogue box will appear, allowing you to change the duplicate layer’s name
b. When you are finished click OK
• The duplicate layer will now reside in the Layers Panel above your Background layer
Duplicating your layers allows you to make adjustments to the duplication without affecting the original.
Therefore if you do make a mistake, you can always delete the duplication layer and go back to the
previous step.
8
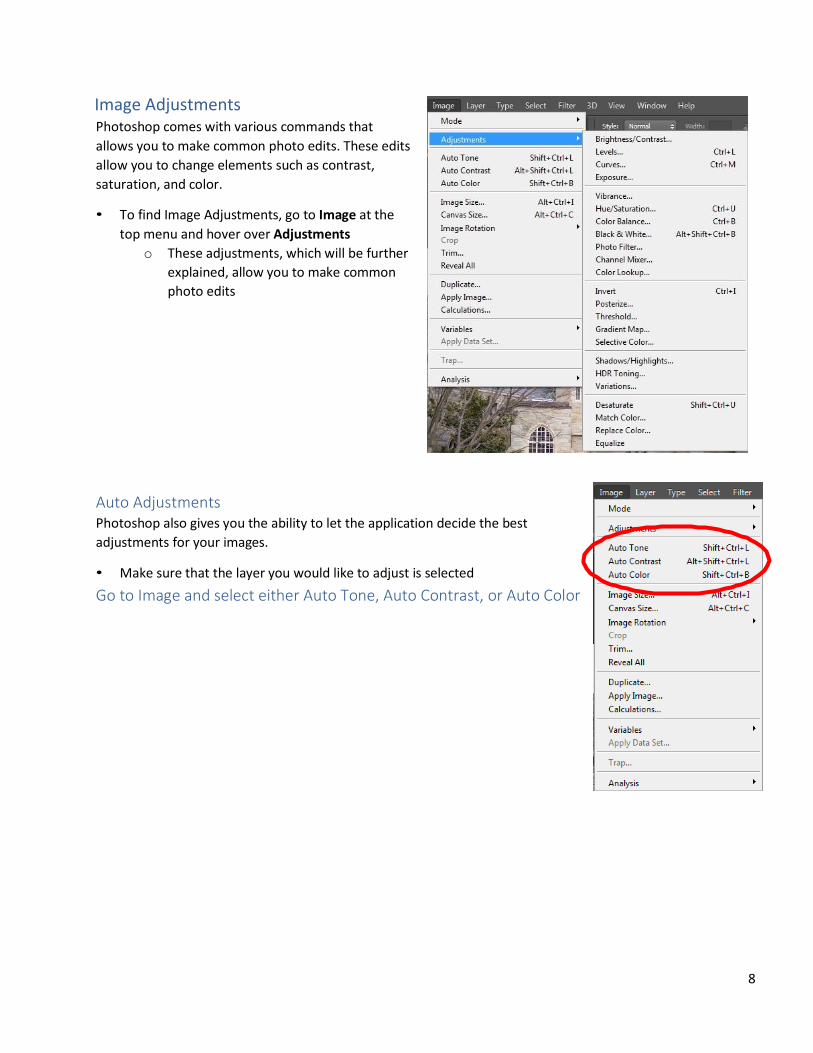
Image Adjustments Photoshop comes with various commands that
allows you to make common photo edits. These edits
allow you to change elements such as contrast,
saturation, and color.
• To find Image Adjustments, go to Image at the
top menu and hover over Adjustments
o These adjustments, which will be further
explained, allow you to make common
photo edits
Auto Adjustments Photoshop also gives you the ability to let the application decide the best
adjustments for your images.
• Make sure that the layer you would like to adjust is selected
Go to Image and select either Auto Tone, Auto Contrast, or Auto Color

9
Brightness and Contrast The brightness/contrast adjustment will allow you to make simple adjustments to the tonal range of an
image.
• Make sure that the layer you would like to adjust is
selected
• Go to Image, Adjustments, and select
Brightness/Contrast
• In the window that appears, you will be able to adjust
Brightness and Contrast
o Move the slider to the right on Brightness to
brighten an image, and to the left to darken
o Move the slider to the right on Contrast to
increase the contrast, and to the left to decrease it
• When you are finished click OK
Levels Photoshop allows you to correct the overall tonal range and color balance of your image by using Levels.
It does this by allowing you to change the darkest darks, brightest lights, and mid-tones of your image.
• Make sure that the layer you would like to adjust is selected
• Go to Image, Adjustments, and select Levels
What you see in the window that appears is called a “Histogram.” This
histogram tells you how the pixels of the image fall into the tonal
range of the photo, i.e. how many shadows, midtones, and highlights.
A. Shadows are controlled from the slider on the far left
o By sliding this to the right, you increase the intensity of the
shadows
B. Midtones are controlled from the slider in the middle
o By sliding this to the left, you lighten the midtones
o By sliding this to the right, you darken the midtones
C. Highlights are controlled from the slider on the far right
o By sliding this to the left, you increase the intensity of the
highlights

10
Curves The Curves adjustment in Photoshop allows you to adjust points throughout an image’s tonal range.
Therefore you can adjust certain points within the tone, rather than focusing on a large section, like you
can with Levels.
• Make sure that the layer you would like to adjust is selected
• Go to Image, Adjustments, and select Curves
A window will appear with a curve graph.
• The upper right area represents highlights
• The lower left area represents shadows
By selecting the horizontal line on the graph, you can control the
overall contrast of the image
• A steeper curve will produce a higher contrast
• A flatter curve will produce a lower contrast
11
Hue and Saturation vs. Vibrance When you want to increase the overall colors in your image, then you want to use 2 tools; Vibrance and
Hue and Saturation
Hue and Saturation The Hue and Saturation tool allows you to adjust the overall hue (color tone), saturation (color
intensity), and lightness of your image.
• Make sure that the layer you would like to adjust is selected
• Go to Image, Adjustments, and select Hue/Saturation
In this window you can either user the slider to select your hue, saturation, and lightness or you can use
the textbox to enter values for each one.
• Hue: The hue slider will give you a rainbow spectrum, allowing you to track what color tone you
are choosing.
• Saturation: By sliding the saturation slider to the right, you are increasing the intensity of color
for the entire image. By sliding to the left, you are decreasing the intensity; the lowest point
making the image black and white.
• Lightness: By moving the slider to the right, you are increasing the lightness of the photo. By
moving the slider to the left, you are decreasing the lightness of the photo. (Note: this is
different from brightening the photo, as it increases or decreases the lightness of all tones in the
photo).
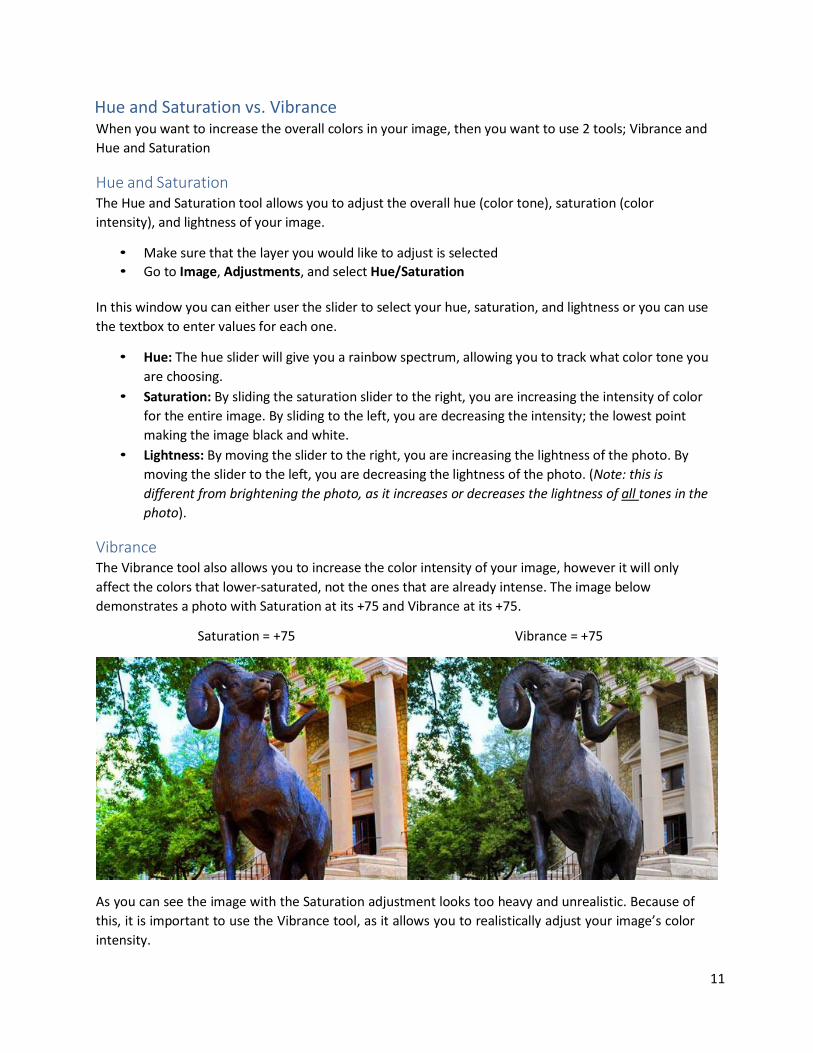
Vibrance The Vibrance tool also allows you to increase the color intensity of your image, however it will only
affect the colors that lower-saturated, not the ones that are already intense. The image below
demonstrates a photo with Saturation at its +75 and Vibrance at its +75.
Saturation = +75 Vibrance = +75
As you can see the image with the Saturation adjustment looks too heavy and unrealistic. Because of
this, it is important to use the Vibrance tool, as it allows you to realistically adjust your image’s color
intensity.
12
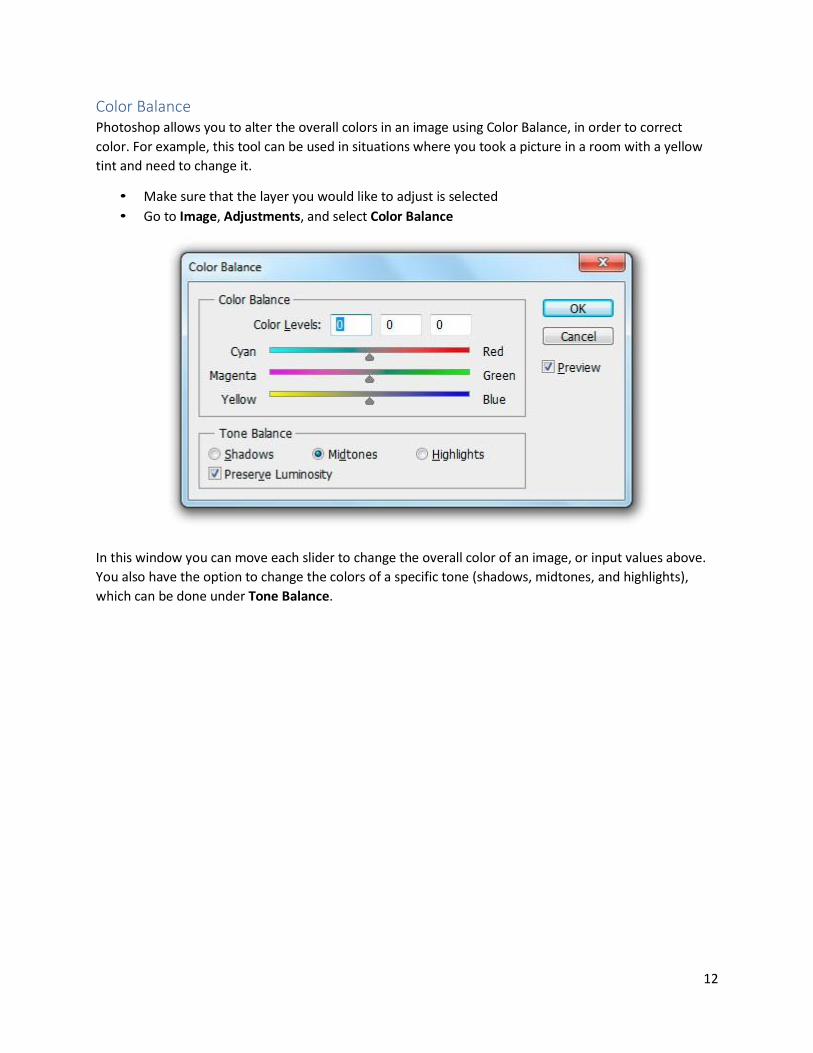
Color Balance Photoshop allows you to alter the overall colors in an image using Color Balance, in order to correct
color. For example, this tool can be used in situations where you took a picture in a room with a yellow
tint and need to change it.
• Make sure that the layer you would like to adjust is selected
• Go to Image, Adjustments, and select Color Balance
In this window you can move each slider to change the overall color of an image, or input values above.
You also have the option to change the colors of a specific tone (shadows, midtones, and highlights),
which can be done under Tone Balance.
13
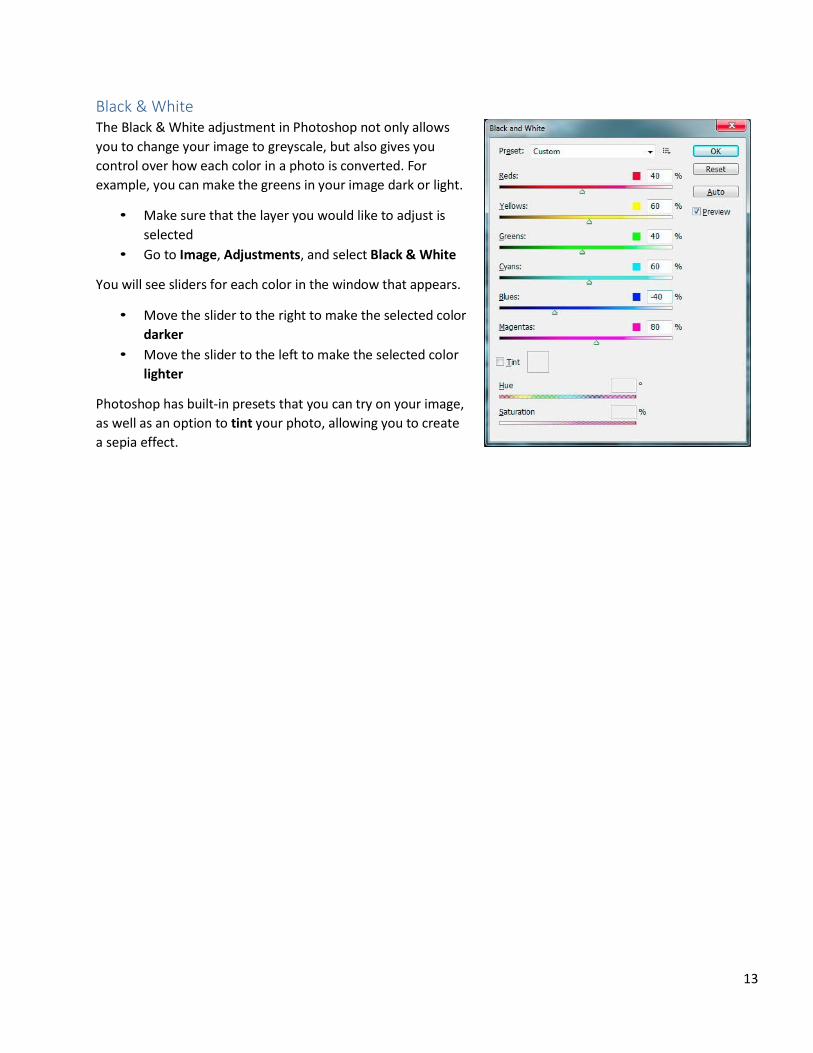
Black & White The Black & White adjustment in Photoshop not only allows
you to change your image to greyscale, but also gives you
control over how each color in a photo is converted. For
example, you can make the greens in your image dark or light.
• Make sure that the layer you would like to adjust is
selected
• Go to Image, Adjustments, and select Black & White
You will see sliders for each color in the window that appears.
• Move the slider to the right to make the selected color
darker
• Move the slider to the left to make the selected color
lighter
Photoshop has built-in presets that you can try on your image,
as well as an option to tint your photo, allowing you to create
a sepia effect.
14
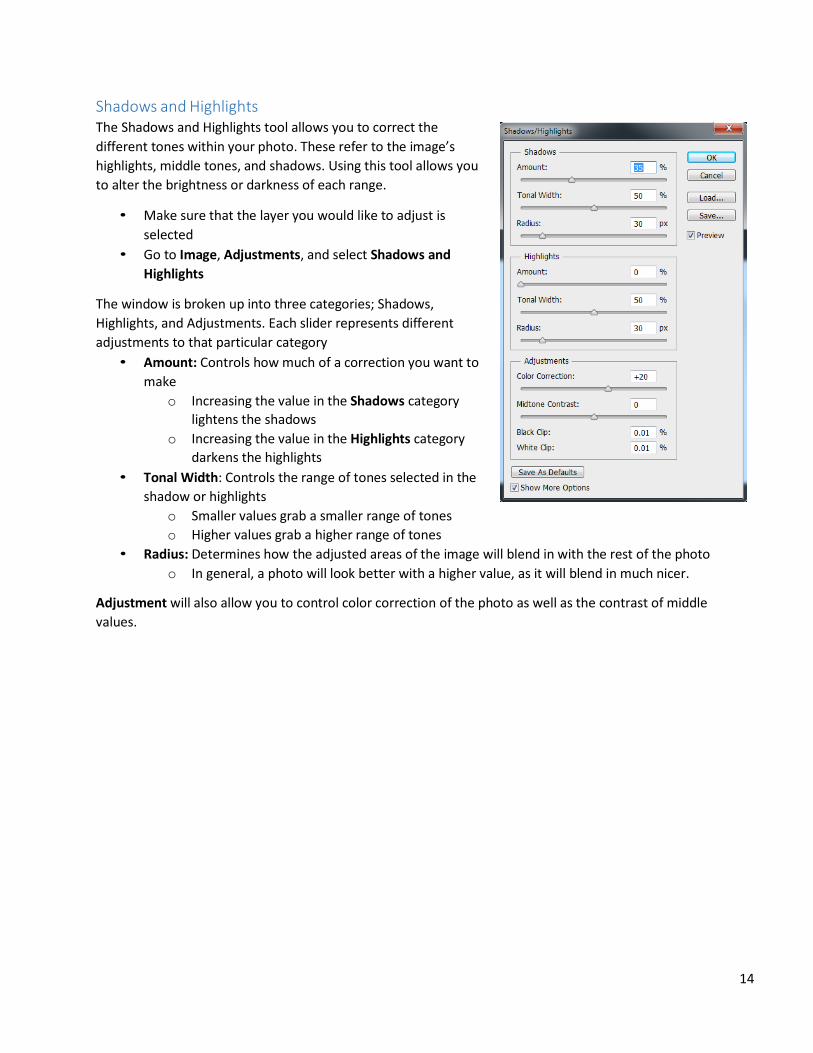
Shadows and Highlights The Shadows and Highlights tool allows you to correct the
different tones within your photo. These refer to the image’s
highlights, middle tones, and shadows. Using this tool allows you
to alter the brightness or darkness of each range.
• Make sure that the layer you would like to adjust is
selected
• Go to Image, Adjustments, and select Shadows and
Highlights
The window is broken up into three categories; Shadows,
Highlights, and Adjustments. Each slider represents different
adjustments to that particular category
• Amount: Controls how much of a correction you want to
make
o Increasing the value in the Shadows category
lightens the shadows
o Increasing the value in the Highlights category
darkens the highlights
• Tonal Width: Controls the range of tones selected in the
shadow or highlights
o Smaller values grab a smaller range of tones
o Higher values grab a higher range of tones
• Radius: Determines how the adjusted areas of the image will blend in with the rest of the photo
o In general, a photo will look better with a higher value, as it will blend in much nicer.
Adjustment will also allow you to control color correction of the photo as well as the contrast of middle
values.
15
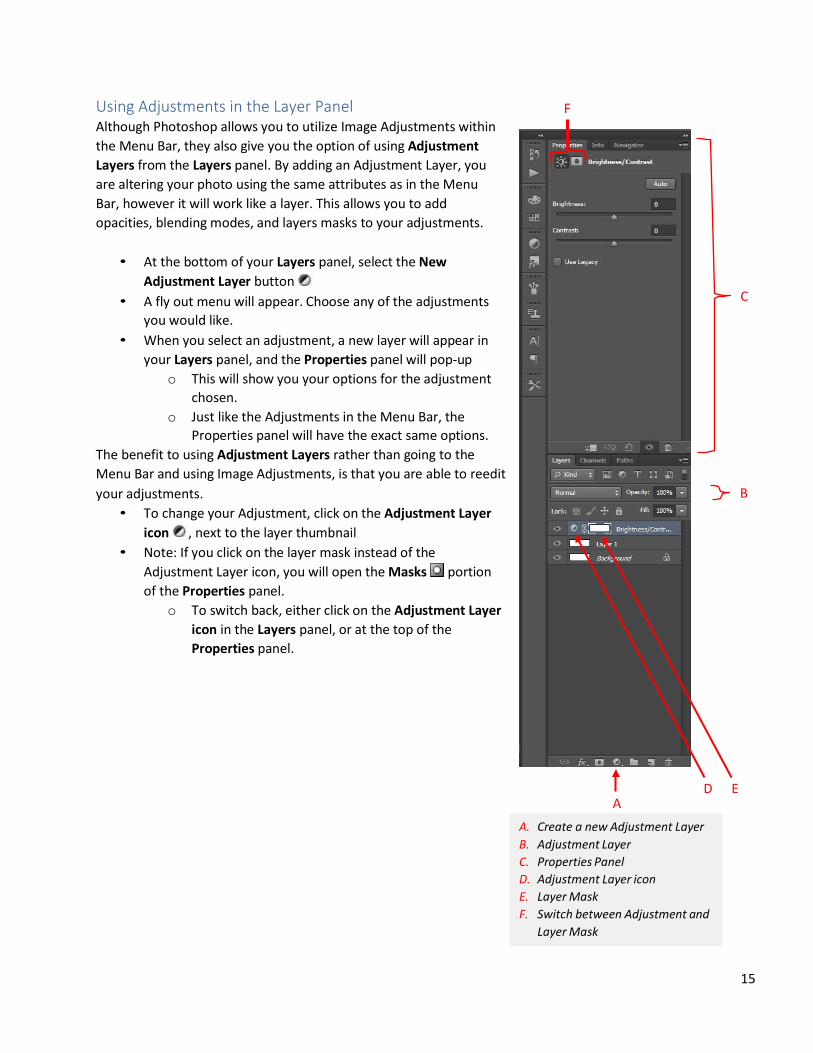
Using Adjustments in the Layer Panel F
Although Photoshop allows you to utilize Image Adjustments within
the Menu Bar, they also give you the option of using Adjustment
Layers from the Layers panel. By adding an Adjustment Layer, you
are altering your photo using the same attributes as in the Menu
Bar, however it will work like a layer. This allows you to add
opacities, blending modes, and layers masks to your adjustments.
• At the bottom of your Layers panel, select the New
Adjustment Layer button
• A fly out menu will appear. Choose any of the adjustments C
you would like.
• When you select an adjustment, a new layer will appear in
your Layers panel, and the Properties panel will pop-up
o This will show you your options for the adjustment
chosen.
o Just like the Adjustments in the Menu Bar, the
Properties panel will have the exact same options.
The benefit to using Adjustment Layers rather than going to the
Menu Bar and using Image Adjustments, is that you are able to reedit
your adjustments. B
• To change your Adjustment, click on the Adjustment Layer
icon , next to the layer thumbnail
• Note: If you click on the layer mask instead of the
Adjustment Layer icon, you will open the Masks portion
of the Properties panel.
o To switch back, either click on the Adjustment Layer
icon in the Layers panel, or at the top of the
Properties panel.
D E A
A. Create a new Adjustment Layer
B. Adjustment Layer
C. Properties Panel
D. Adjustment Layer icon
E. Layer Mask
F. Switch between Adjustment and
Layer Mask
16
Cleaning Up a Photo Photoshop gives users a multitude of tools to help clean up your photos. It can help you take objects out
of an image or edit them seamlessly.
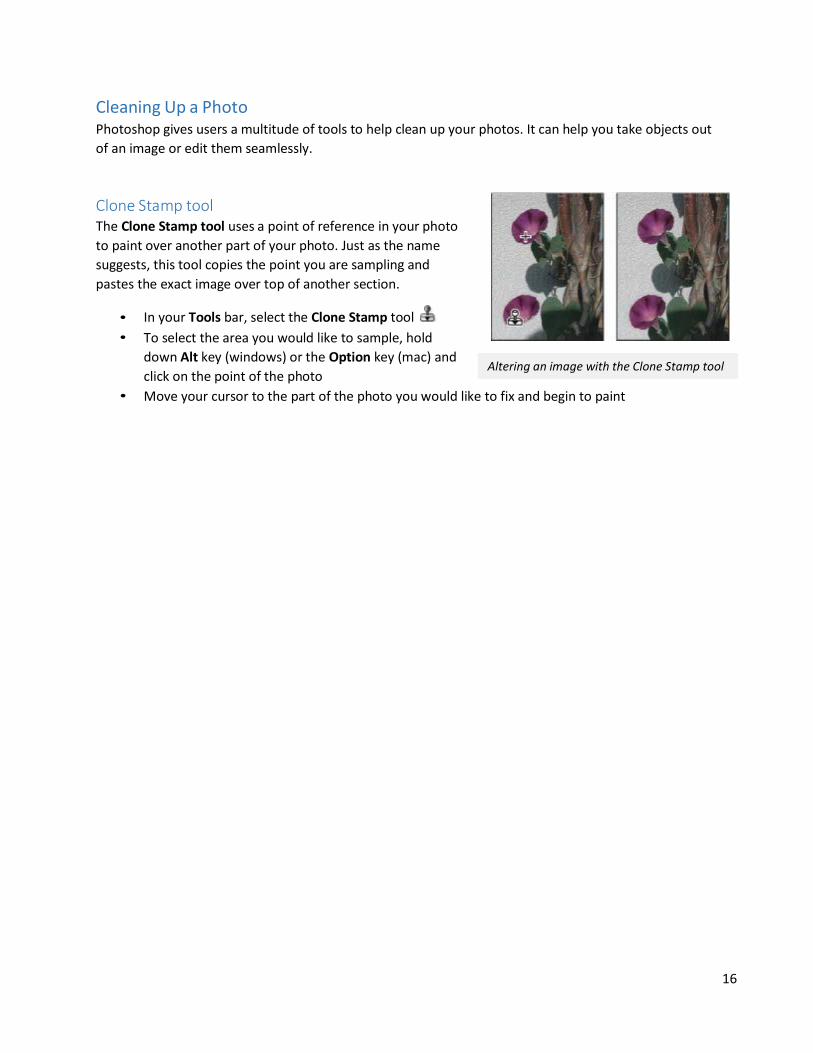
Clone Stamp tool The Clone Stamp tool uses a point of reference in your photo
to paint over another part of your photo. Just as the name
suggests, this tool copies the point you are sampling and
pastes the exact image over top of another section.
• In your Tools bar, select the Clone Stamp tool
• To select the area you would like to sample, hold
down Alt key (windows) or the Option key (mac) and
click on the point of the photo
Altering an image with the Clone Stamp tool
• Move your cursor to the part of the photo you would like to fix and begin to paint
17
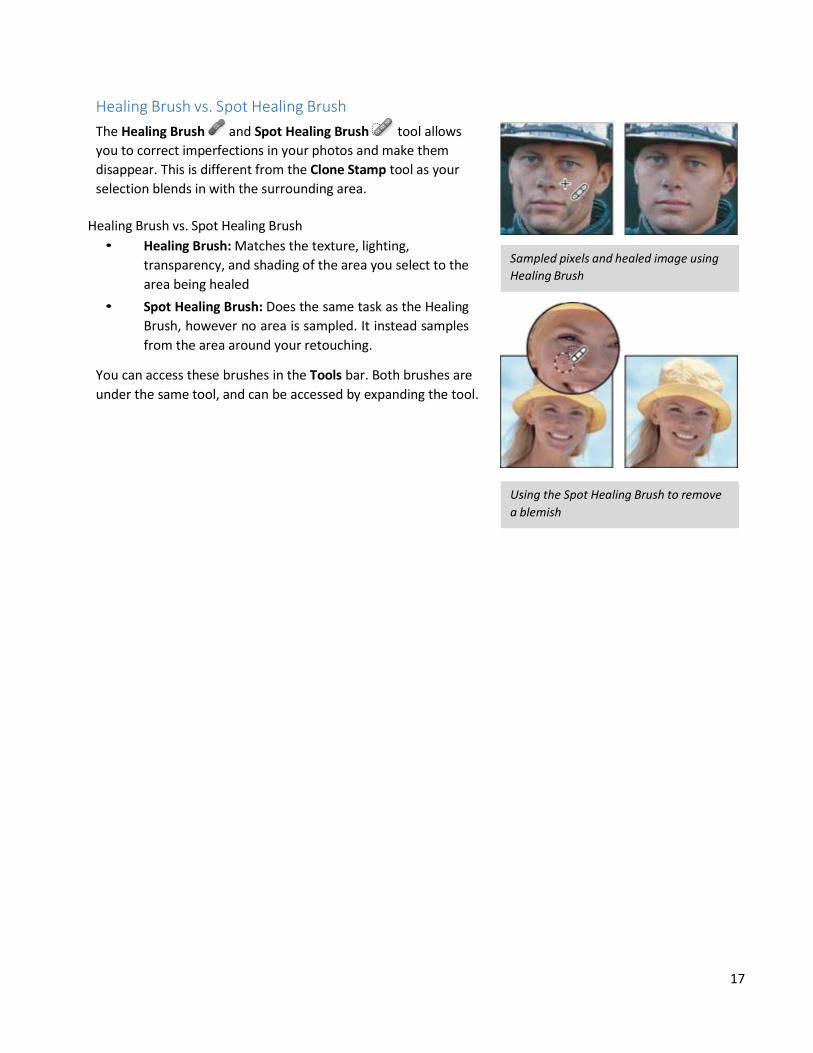
Healing Brush vs. Spot Healing Brush
The Healing Brush and Spot Healing Brush tool allows
you to correct imperfections in your photos and make them
disappear. This is different from the Clone Stamp tool as your
selection blends in with the surrounding area.
Healing Brush vs. Spot Healing Brush
• Healing Brush: Matches the texture, lighting,
transparency, and shading of the area you select to the
area being healed
• Spot Healing Brush: Does the same task as the Healing
Brush, however no area is sampled. It instead samples
from the area around your retouching.
You can access these brushes in the Tools bar. Both brushes are
under the same tool, and can be accessed by expanding the tool.
Sampled pixels and healed image using
Healing Brush
Using the Spot Healing Brush to remove
a blemish

18
Patch Tool The Patch Tool lets you repair a selected area with pixels from
another area or a pattern. Like the Healing Brush tool, the Patch tool
matches the texture, lighting, and shading of the sampled pixels to
the source pixels.
• In your Tools bar, select the Patch Tool
• Click and grab to select the area of the image you want to fix
• Move your mouse over your selection, click, hold, and drag
the selection to the area you would like to sample
The Patch Tool can work like the Clone Stamp tool, where it takes the
same exact part you sampled and overlays it. You can also set the
Patch Tool to use Content Aware, which blends the area you sampled
with the area around your original selection. You can change this
setting in your Options bar.
Using the Patch tool to replace
pixels
Patched image