physical qualities development in children and...
TRANSCRIPT

PHYSICAL QUALITIES DEVELOPMENT IN CHILDREN AND TEENAGERS BY MEANS OF KARATE GOJU RYU
1. INTRODUCTION
The comprehensive education of children and teenagers, harmonious development of their physical qualities, as well as their normal mental development are major goals of our society. Therefore it is necessary to develop mass physical culture and sports in our society in order to make sports and physical education an inseparable part of every modern human’s life. In the face of the increasing worldwide popularity of different types of martial arts, it should be mentioned, that martial arts, including Okinawan karate, are not only a spectacular competitive disciplines, but also a unique tool for the younger generation’s development in the mass physical culture.
"Karate, as a martial art, originally developed on the island of Okinawa. We define the term “karate” as an art of defense, which depends exclusively on the physical and mental qualities. In a daily karate training a karate practitioner seeks to improve both body and mind. Our intention is to develop a normal and healthy body, so that in case of unexpected attacks, we can effectively defend ourselves. That is to say, the fundamental principle of karate is to hit the enemy, using a mostly natural weapon - our body.” (M. Higaonna "The History of karate").
In 1933, Goju Ryu karate style was officially introduced in the lists Butoku-kai, the Japanese Martial Arts Association. Miyagi Chodjun Sensei, founder of this style, began studying karate under the guidance of his mentor Higaonna Kanrjo Sensei at the age of 14 years. In those days it was considered quite an early onset of training. Classes used to start with a warm-up exercise (jumbi-undo), which prepares the body to the serious physical strain of training time. The body had evolved and strengthened through due to special exercises (hodjo-undo) with different projectiles, such as reinforced boards for practicing punches (makiwara); hanging bags of sand; stones with a wooden handle (chishi); iron shoes (tetcu-geta); pitchers for training grips (nigiri-gami); a large stone (sashi-ishi); padlocks (ishisashi); bound beam bamboo (tou); bar (tan). Students also did a special formal complex (kata) Sanchin. Its goal is to develop will power, breathing and physical strength of the body. It was a single program for any student who joined the dodjo.
Since karate competitions had not yet been held at that time, the main focus of training was not on raising an athlete, but on a many-sided development of man, both physically and mentally. In 1910 Miyagi Chodjun Sensei was called into the army. The first year of life in the army was extremely difficult for new recruits, but Miyagi Chodjun Sensei’s physical strength and abilities amazed both recruits and officers during trainings. When they asked him about the secret of his strength, he used to say that he had developed his body through regular karate practice. So he earned a reputation as a skilled karate practitioner, and gained the respect of the higher ranks. In the end, Miyagi Chodjun Sensei became an instructor for the training of soldiers.
At present, children join karate much earlier, at the age of 6-7 years, when most parents bring their children to the gym to practice martial arts without any intention to make sports stars of them. First of all parents want to improve the physical development and health of the child to protect him or her from the pernicious influence of the street, addiction to bad habits, and a bad company.
Diverse means and methods of karate can successfully meet the challenges of primary physical education for children and adolescents and create a foundation for the development of their physical and motor abilities, greatly expanding their functional and adaptive capabilities. Motor skills and physical qualities are manifested and developed in the course of motor activity, but it is necessary to create certain conditions and use appropriate physical exercises. It is also important to bear in mind that this or that quality is prevailing in different age groups (among children and young people of school age, 7-18 years), and to achieve the best results in the development of a certain quality it is necessary to influence it in its most sensitive (favourable) period.
The traditional Okinawan karate has effective tools for the development of various physical qualities, but today training programmes are designed without taking into account age differences of school children.
As following from the above mentioned, it is clear that special complexes of traditional Okinawan karate exercises should be designed to meet the needs of the mass performance as well as practice in the system of supplementary education, and to develop the physical qualities of school-age children.
The aim of this paper is to show the variations of such complexes and their influence on the dynamics of the physical qualities of children and youths aged 7-10, 11-14, and 15-18 years, practicing Okinawan Goju Ryu karate.
2

2. PHYSICAL QUALITIES AND ABILITIES, AND THEIR SENSITIVE PERIODS
Physical qualities are innate morphological qualities that make possible the physical activity of a man, which has its full expression in the appropriate motor activity. There is also a term “physical (motor) abilities”, and it can be defined as individual characteristics that determine the level of movement of human capabilities. These abilities manifest themselves and develop during a motor activity. One of the main problems to be solved in the process of physical education is to ensure the optimal development of physical qualities inherent in any human.
The terms "development" and "education" are used with regard to the dynamic changes in the indices of physical qualities. The term “development” describes the development of the natural course of changes in a physical quality, and the term “education” implies an active and direct impact on the growth of physical quality indices.
Strength is a person's ability to overcome external resistance or to resist it by muscular effort (stress). The most favorable periods of strength development in young boys and young men are between the ages of 13-14 to 17-18 years.
Strength ability is a complex of different manifestations of a person in a specific motor activity, based on the notion of "strength".
Strength ability does not manifest itself as it is, but through any motor activity. Different factors influence the performance of strength ability. The role and contribution of these factors change depending on particular motor activities and conditions in which these activities are performed, as well as an individual’s age, sex and individual features. Among the factors are the following: 1) muscles proper factors, 2) central-nervous, 3) personal-psychological, 4) biomechanical, 5) biochemical, and 6) physiological factors, as well as different environment conditions in which a particular motor activity is performed.
Speed/strength abilities are characterized by unsaturated muscle tension which manifests itself with a necessary, and often maximal power in the exercises performed at a considerable speed. However, the power does not usually reach its limit point. These abilities manifest themselves in motor activities which require both considerable muscle strength and speed of movement.
Strength endurance is the ability to resist fatigue caused by a prolonged and considerable muscular tension. Depending on the mode of muscle work isolated static and dynamic power endurance are distinguished. Dynamic strength endurance is typical of the cyclic and acyclic activity, and the static strength endurance is typical of activities related to the retention of the muscle tension at a certain position.
Speed abilities are physical abilities of a human, which allow performing motor activities during a minimum period of time available in the given conditions. There are elementary and complex types of speed abilities. Elementary forms include reaction rate,
3
one-movement rate, frequency (tempo) of movements. The most favorable periods for the development of speed abilities both in boys and girls is the age from 7 to 11 years. At the age of 11-15 years speed abilities continue developing, but less dramatically.
Endurance is the ability to resist physical exhaustion during muscular activity. The measure of endurance is the time during which the muscle activity of a certain character and intensity is performed. For example, in martial arts one measures the time during which a particular motor activity is executed at a level of a given effectiveness. The most intensive growth of endurance occurs in the period from 14 to 18 years.
Flexibility is the ability to perform movements with large amplitudes. The term "flexibility" is more acceptable when the total mobility in the joints of the body is meant. While talking about individual joints it is correct to speak about "mobility" rather than "flexibility", such as "mobility in the shoulder, hip or ankle joints. Good flexibility allows freedom, speed and economy of motion, increases the path of effective application of effort during exercises. Underdeveloped flexibility makes it difficult to move, as this limits the movement of separate parts of the body. Depending on the form of manifestation of flexibility two types of flexibility are distinguished: active and passive. In the case with active flexibility a movement is made with large amplitudes, due to the corresponding muscles activity of the body. Passive flexibility implies the ability to perform the same movements under the influence of external forces: efforts of a partner, the force of an external weight or special facilities. Flexibility develops most intensively up to 15-17 years. The most sensitive period for the passive flexibility growth would be the age of 9-10 years, and for the active one - 10-14 years.
Motor-coordination abilities include abilities to quickly, accurately, appropriately, economically and resourcefully i.e. most completely, perform movement acts (especially complex ones and those emerging unexpectedly).
Among motor-coordination abilities are the following: ability to accurately weigh and regulate spatial, temporal and dynamic parameters of movement; ability to maintain a static (posture) and dynamic balance; ability to perform motor acts without excessive muscle tension (stiffness). In the period from 11 to 13-14 years the accuracy of differentiation of muscle effort increases and the ability to reproduce a particular movement at a given rate improves. The 13-14-year old teenagers have outstanding abilities to master complex motor coordination.
Thus, most obvious physical qualities in primary school children (7-10 years old) are speed and flexibility; in secondary school children (11-14 years old) speed/strength and coordination abilities; in high-school children (15-18 years old) - strength and endurance.
Below you will find examples of sets of exercises for different age groups of children and young people based on the exercises used in Okinawan Goju Ryu. For your convenience each complex consists of ten exercises, although this does not mean that one cannot use fewer or more of them.
4

3. SETS OF EXERCISES FOR CHILDREN AND TEENAGERS OF DIFFERENT AGES
The sets of following exercises for each age are developed and based on the exercises and training methods used in Okinawan Karate. The aim of the exercises is to develop the main physical qualities at certain ages.
Since traditional karate trainings consist of general and special - training (hodjo-undo) in the first part and the technique and tactical preparation in the second part, it is possible to use these sets of exercises in the educational and training process as a part of hodjo-undo.
3.1. 7-10 AGE GROUPS
3.1.1. Flexibility
Students of this group are offered to do the following exercises as their age allows them to develop the passive flexibility easily. It is necessary to do the special warm up before. The students should be under control while doing the exercises. They should follow the safety regulations to avoid injury.
All the exercises should be done slowly with a fixation of the body for 5-10 seconds.
Exercise 1: Starting position is sitting on the floor. The legs are moved apart as the sides as much as possible.Assistant sits in front of the student, resting his feet at the ankle holding the students’ hands in his/her own one, and starts pushing his legs up high, and then pulls his hands to himself.It is possible to press on one’s back.
Exercise 2: Starting position is sitting on the floor. The legs are moved apart as as much as possible.One hand rests on the floor (palm up) and the other is placed behind the head.
5
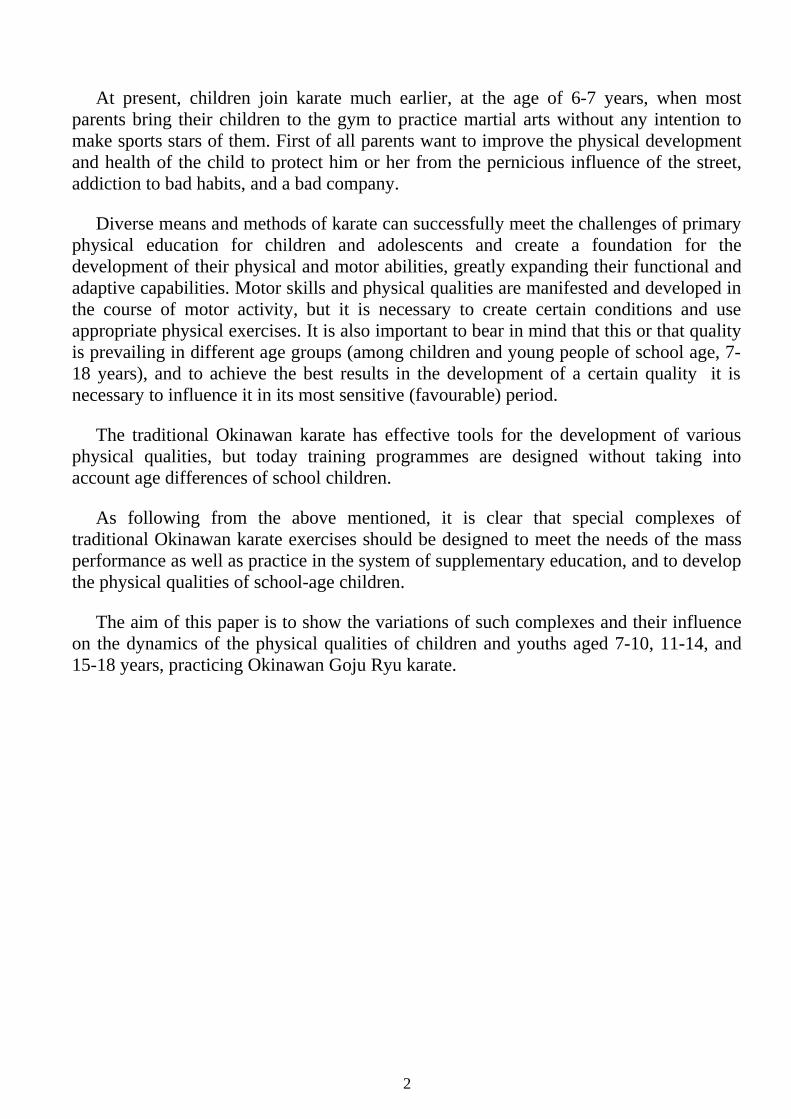
The assistant sits behind and places his hands on one’s (doing the exercise) shoulders, helps to carry out the slope (shoulder to knee) turning the body and pressures from the top.
Exercise 3: Starting position is sitting on the floor. The legs are moved apart as much as possible.The body is faced to the leg.
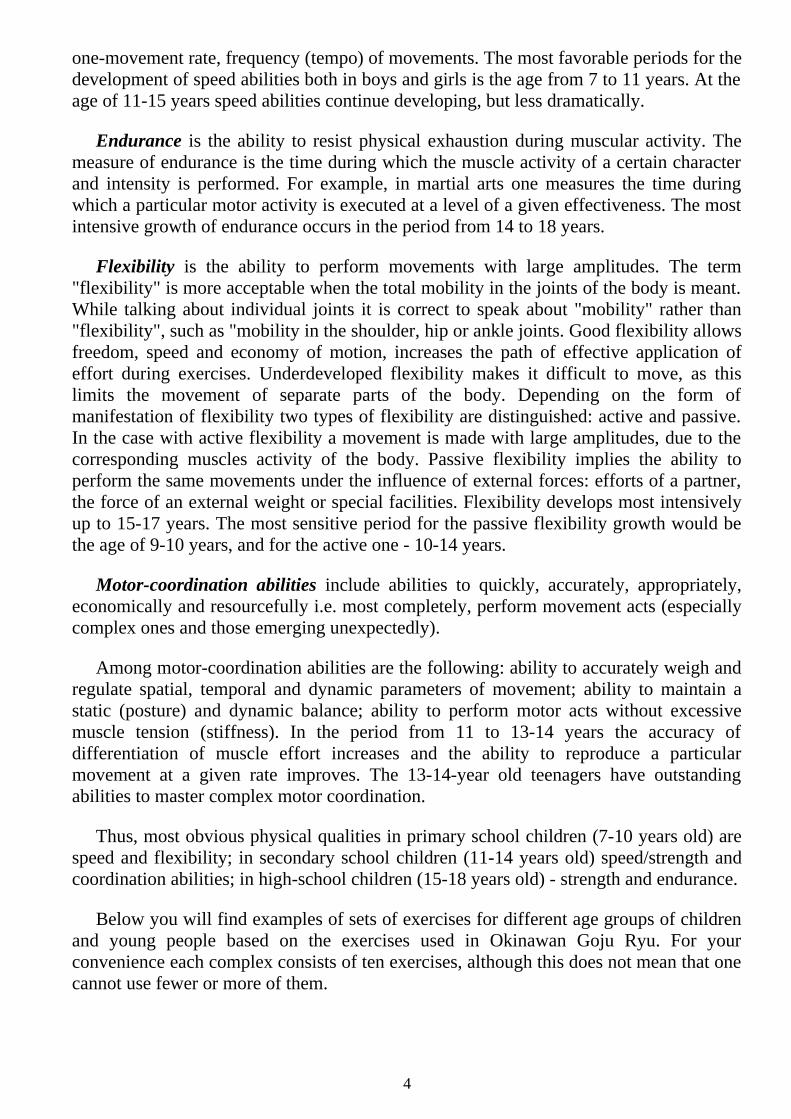
The assistant sits behind and places his hands on one’s (doing the exercise) back, helps to do the slope (chest to knee), pressures from the top.
Exercise 4: Starting position is sitting on the floor. Legs are brought together.
The assistant sits behind and places his hands on one’s (doing the exercise) back, helps to do the slope (chest to knees), pressures from on back.
.
6

Exercise 5: Starting position is sitting on the floor. One leg is bent inwards and the other is straight.
The assistant sits behind and places his hands on one’s (doing the exercise) back, helps (chest to the straight leg and to the centre (between legs)), pressures on back.
Exercise 6: Starting position is sitting on the floor. Legs are bent (feet to each other). The assistant help to press the knees to the floor by pushing on them with hands or legs.
The assistant can also sit behind and place his arms on the one’s (doing the exercise) back and can help to do the slope (chest to the floor), pressures on back. It is also possible to pressure on back or knees with your hands, legs or chest.
Exercise 7: Starting position is sitting on the floor. One legis bent inwards and the other is straight.
The assistant sits behind and places his hands on one’s (doing the exercise) back, helps (chest to the straight leg and to the centre (between legs)), pressures on back.
7

Exercise 8: Starting position is back against the wall. One leg is on the assistant’s shoulder.
Assistant slowly starts to rise up to the top point (until the student can keep the position and stay with a straight leg). If the leg can’t be raised up very high you can lift it with hands. After this the student starts to push on the assistant, who gives small resistance. This way the student lowers his leg. Then the assistant raises the leg again and starts to slope it to the body. Finally, the assistant takes the leg with both hands, and does some forward steps to help the student go ahead and down.
Exercise 9: Starting position is standing sideways to the wall. One foot is on the assistant’s shoulder.
The assistant slowly starts to rise up to the top point (until the student can keep the position and stay with a straight leg). If the leg can’t be raised up very high you can lift it with hands. After this the student starts to push on the assistant, who gives small resistance. This way the student lowers his leg. Then the assistant raises the leg again and
8

starts to slope the body to the floor. Finally, the assistant takes the leg with both hands, and does some forward steps to help the student go aside and down.
Exercise 10: Starting position is facing the wall. One foot is on the assistant‘s hands.
Assistant slowly starts to rise up to the top point (until the student can save the position and stay with a straight leg). After this the student starts to push on the assistant, who gives small resistance. This way the student lowers his leg. Then the assistant raises the leg again and starts to slope the body to the floor. Finally, the assistant takes the leg with both hands and does some forward steps to help the student go back and down.
9

For more details about flexibility development used in Goju Ryu, please follow the link below:
http://devnull.samersoff.net/Budo/ratnik/upraznennija_na_gibkost_djunan_undo.pdf
3.1.2. Speed
All the exercises should be done on a track along the length of the gym. It is necessary to do a small jog in the gym with several accelerations (5-7 metres) and with the final acceleration of 30 metres.
Exercise 1: Starting position is foot and palm rest, the stomach is up. Body is parallel to the floor.
Speedy moving on the floor (with legs, head or both sides (in turn) ahead).
10

Exercise 2: Starting position is standing. Arms are bent in the elbows. Forearms are parallel to the floor.
Slowly moving ahead with a maximum fast knee rises until they touch the palms one after the other.
Exercise 3: Starting position is standing. Straight arms are stretched behind. The back of the hand are put on the buttocks.
Slow moving ahead with maximal fast motion of foot touching the palm (with change).
Exercise 4: Starting position is standing. Straight arms are stretched behind and moved apart with palms back.
Slow moving ahead with maximal fast motion of foot aside touching the palm (with change).
11

Exercise 5: Starting position is squatting. Arms are stretched along body.
Outleap with arms and legs swinging ahead until the full straightening of legs and with a landing ahead in the starting position.
Exercise 6: Starting position is squatting. Palms touch the floor.
Long jump ahead with a landing on arms and pulling legs to the starting position.
Exercise 7: Starting position is standing on all fours.
Moving on all fours (with either head or legs ahead).
12

Exercise 8: Starting positing is standing on toes, faced ahead. Body is relaxed but bent in waist. Knees are half-bent.
Slow moving ahead with maximal fast and small feet tearing from the floor.
Exercise 9: Starting position is back to the direction of movement, on toes, with bent waist and a relaxed body.
Slow movement backwards.
13

Exercise 10: Starting position is sideways to the direction of movement on toes. Knees half bent and arms bent in the elbows.
Slow movement to the left and right sides with a maximum rate and small foot avulsion. Hands are moving back and forth in tact with legs.
3.2. 11-14 AGE GROUPS
3.2.1. Strength/speed qualities
Since at this age giving loads of free weights is not necessary (they may adversely affect the growing child's body) all the exercises to develop strength/speed qualities should be done with its own weight. The complex is divided into two blocks. Each has legs, arms, body and stomach muscles developing exercises. It is necessary to do several jogs along the gym with jerks 5-7 meters and finally an acceleration of 30 meters. These blocks can be also done as different mini-complexes (it depends on the level of the students’ preparation and age). Each exercise should be done at a maximal speed, 10-20 times.
Block 1
Exercise 1: Starting position is front leaning support with a two-shoulder gap between the palms.
Bend one hand, lower the body to it, then move the body to the other hand, straighten it and take the starting position. Next time the exercise should be started with the other hand.
14

Exercise 2: Starting position is lying on the back. Hands on hips.
Try to sit on the buttocks without the help of the hands, and then touch toes with fingers. After it take the starting position.
Exercise 3: Starting position is sitting support.
Take the position of “front leaning support” with a jump and take the starting position.
15
Block 2
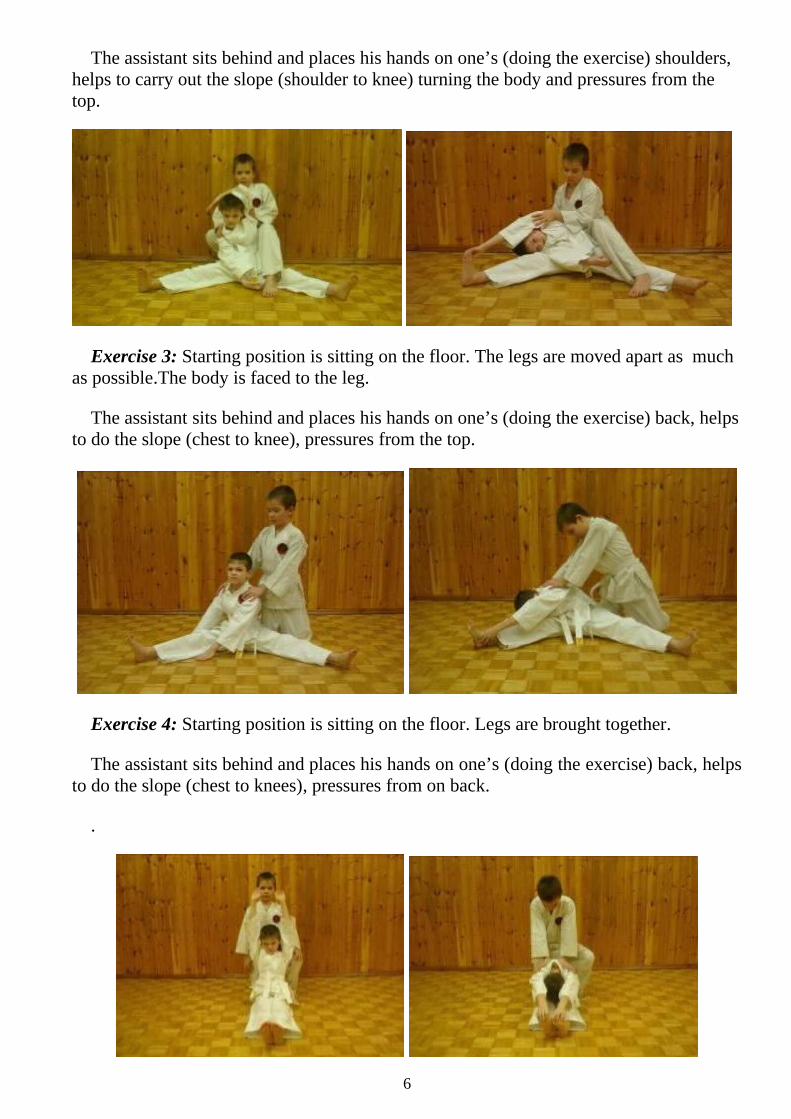
Exercise 1: Starting position is front leaning support with a two-shoulder gap between the palms.
Bend both hands one after the other.
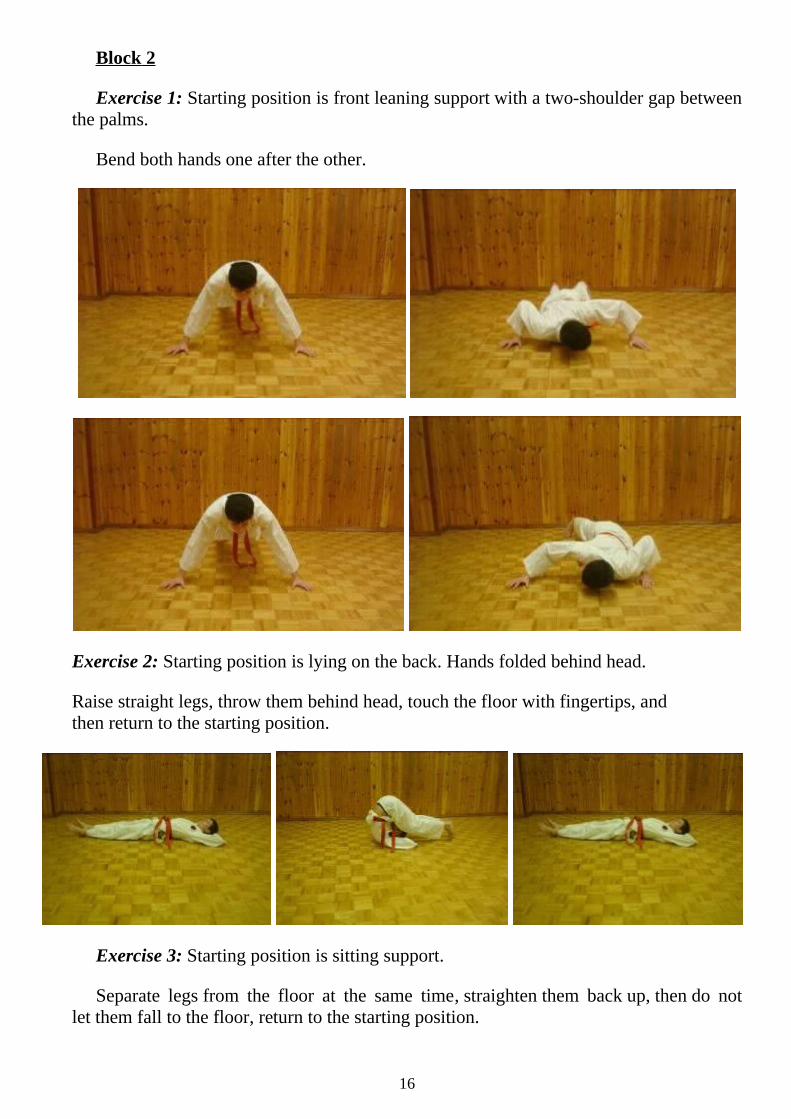
Exercise 2: Starting position is lying on the back. Hands folded behind head.
Raise straight legs, throw them behind head, touch the floor with fingertips, and then return to the starting position.
Exercise 3: Starting position is sitting support.
Separate legs from the floor at the same time, straighten them back up, then do not let them fall to the floor, return to the starting position.
16

Block 3
Exercise 1: Starting position is front leaning support with a two-shoulder gap between the palms.
Bend, straighten and touch the floor with your nose.
Exercise 2: Starting position is lying on the back. Hands pulled out behind head.
Separate straight legs, arms and back from the floor at the same time. Sit on the buttocks and touch the tips of the fingers, toes on the belly. Arms and legs remain straight.
Exercise 3: Starting position is sitting support.
Jump, fully extend leg and pull your hands up. After landing, take a "front leaning support" position and lie on your stomach, stretch hands forward. After that jump, pull the hands back to starting position.
17

Block 4
Exercise 1: Starting position is front leaning support with a two-shoulder gap between the palms. Fast push-ups.
Exercise 2: Starting position is lying on the back. Arms folded behind head.
Sit on the buttocks without the help of hands and touch the left knee with the right elbow, then take the starting position again. Next time start from the other side.
18

Exercise 3: Starting position is sitting support.
Abruptly straighten legs right and up. Then drop them on the floor, while caving in the back and jump back to its starting position. Next time carry straight back, and then perform an exercise to the left. Each time should be started from different sides.
Block 5
Exercise 1: Starting position is front leaning support with a two-shoulder gap between the palms. Hands bent and the distance between the body and the floor is about 2-3 cm.
Abruptly straighten arms and then bend them, returning the body to its original position.
19

Exercise 2: Starting position is lying on the back. Arms are pulled out behind head and are separated at an angle of 90 degrees.
Raise straight legs, put them behind the head, touch the floor with fingers of one hand, then take starting position. Next time touch the other hand.
Exercise 3: Starting position is sitting support. One leg is pushed back.
Do fast changes of your legs.
20

Block 6
Exercise 1: Starting position is front leaning support with a two-shoulder gap between the palms. Bend and straighten your arms slowly and without stops.
Exercise 2: Starting position is lying on the back. Arms are folded behind the head. Legs are slightly off the floor.
Bend the legs and twist the body at the same time, so that you can touch the left elbow with the right knee. Then take the starting position. Next time do the exercise vice versa.
21

Exercise 3: Starting position is sitting support. One leg is pushed aside. Do fast changes of your legs.
Block 7
Exercise 1: Starting position is sitting support. Palms are next to each other.
Bend and straighten your arms fast.
Exercise 2: Starting position is lying on a side. Arms are bent behind the head.
Quickly (without hands) separate the body from the floor and return to the starting position.
22

Exercise 3: Starting position is squatting with the hands bent near the head.
Quickly bounce up so that the knees touch the chest.
Block 8
Exercise 1: Starting position is front leaning support on the one hand.
Bend and straighten arms quickly.
Exercise 2: Starting position is lying on your side. Arms are bent behind the head.
Rise the legs up together and take the starting position quickly.
Exercise 3: Starting position, squatting (cosi-dati). Arms are bent around your head.
Jump up quickly and raise your legs in such a way so that you are able to touch your buttocks with heels.
23

Block 9
Exercise 1: Starting position is front leaning support with a two-shoulder gap between the palms. Bend your arms quickly and push off the floor. Clap your hands before landing.
Exercise 2: Starting position is lying on a side. Arms are bent behind your head.
Quickly bending, separate the body and legs off the floor. Touch the knees with the elbows and take the starting position.
24

Exercise 3: Starting position is standing on toes with a two-shoulder gap between the palms.
Without lowering the heels to the floor quickly squat and take the starting position.
For further details about these exercises, please, follow the link below:
http://devnull.samersoff.net/Budo/ratnik/antologija_otzimanija.pdf http://devnull.samersoff.net/Budo/ratnik/press_bronja_kotoraja_vsegda_s_toboy.pdf
3.2.2. Coordination abilities
The main aim of the following exercises is to develop the vestibular apparatus, the reaction, the ability to perform movements of different limbs at the same time, as well as the correct execution of complex movements.
Exercise 1: Starting position is standing on one leg. Hands are on waist.
Rotate the feet, the leg and then the bent leg in different directions. In more the complicated version, this exercise is performed with eyes closed.
Exercise 2: Starting position is standing on the spot. Hands moved apart to the sides.
Perform wrists, forearms and then hands rotation, inward and outward in one direction, as well as in different ones.
25

Exercise 3: Starting position is standing on the spot. Hands are straight forward.
At the command perform wrists, forearms and then hands rotations, back and forth in one direction, as well as in different ones.
Exercise 4: Starting position is standing on the spot. Hands bent at the elbows.
Perform a circular forearms motion in the air in front of your and on the floor inwards and outwards at the same time. Arms and legs moving in different directions.
26

Exercise 5: Starting position is standing.
Perform small jumps in place, do a high jump at a command with a turn at an angle chosen arbitrarily (90, 180, 270 and 360 degrees).
Exercise 6: In the initial position, a group of several students in a confined space.
At the command perform chaotic movements in different directions with the aim of not to stop, do not collide and do not run out of the limited space by using maneuvers of speed and direction of motion.
Exercise 7: In the initial position, movement in the specified directions.
At the command execute a predetermined set of movements imitating attacking and defensive actions in accordance with the number of command.
Exercise 8: In the initial position, student takes combat ready, and the assistant is behind him.
The assistant randomly touches (from one to three taps at a time) the student’s limbs, and the student must hit exactly in the order in which the assistant touched.
Exercise 9: In the initial position, student gets ready to the attack and closes his eyes, and the assistant stands close to him.
27
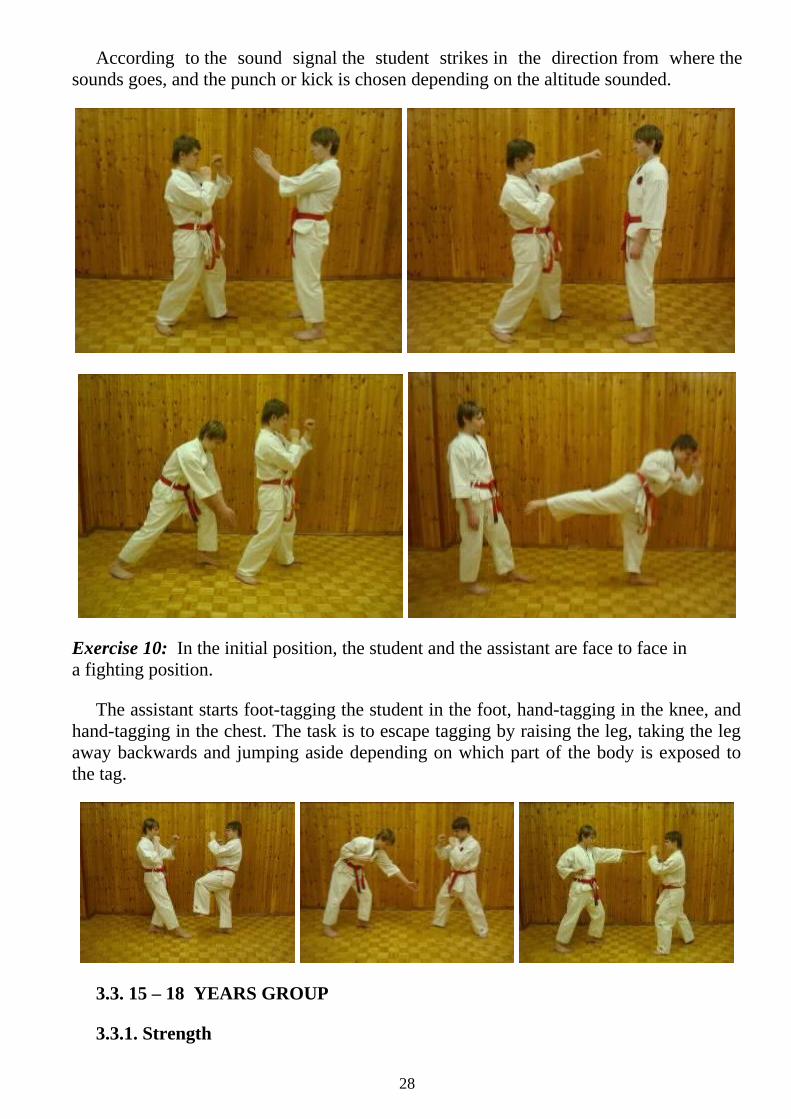
According to the sound signal the student strikes in the direction from where the sounds goes, and the punch or kick is chosen depending on the altitude sounded.
Exercise 10: In the initial position, the student and the assistant are face to face in a fighting position.
The assistant starts foot-tagging the student in the foot, hand-tagging in the knee, and hand-tagging in the chest. The task is to escape tagging by raising the leg, taking the leg away backwards and jumping aside depending on which part of the body is exposed to the tag.
3.3. 15 – 18 YEARS GROUP
3.3.1. Strength
28

Traditionally to develop strength in karate such heavy projectiles as iron oval (kongoken), a stone with a broken stick in it (sasiisi), a rod with a wooden handle (tan) as well as special exercises with a partner as a complication are used .
On the basis of the latter, a set of exercises is selected has been for the development of strength. All exercises are performed in four sessions, with tenfold repetitions in each.
Exercise1: Starting position is lying on back. Legs are raised upward. The assistant is feeding on student’s feet with elongated back legs.
Bend and straighten legs.
Exercise 2: Starting position is lying on stomach. Legs bent at the knees. The assistant is by the side of the legs, grasping the ankle.
Bend legs so that your heels touch the buttocks. Assistant at this time creates the resistance.
29

Exercise 3: Starting position is standing, straight legs with the assistant on the back.
Rise on toes and return to the starting position.
Exercise 4: Starting position is standing with legs apart with a two-shoulder gap. The assistant rests his head on the student’s hands, and his feet on the floor.
Squat with the assistant in hands.
Exercise 5: Starting position is standing with the assistant on shoulders.
Turn the body, holding the assistant on shoulders.
30

Exercise 6: Starting position is lying on back. Arms stretched behind your head. The assistant takes the position “front leaning support" relying on the wrist doing the exercise.
Raise your hands up and drop to the starting position.
Exercise 7: Starting position is lying on your back. Hands stretched out to the side. Assistant takes the position "front leaning support" relying on the wrist doing the exercise.
Raise your hands up and drop to the starting position.
Exercise 8: Starting position is lying on the back. The assistant is on top, leaning back against the student’s arm.
Straighten and bend your hands
.
Exercise 9: Starting position is standing with a two-shoulder gap between the feet. Hands are bent so that the palms are placed around the head. The assistant is back, his hands resting on the student’s hands.
31

Settling down, straighten arms up. The assistant resists this movement.
.
Exercise 10: Starting position is kneeling. Hands rest on the floor. The assistant is in front of the student.
Tip and lift head, overcoming the assistant’s resistance.
For further details about the pair strength exercises used in Goju, please, follow the link below:
http://devnull.samersoff.net/Budo/ratnik/parnoe_hodze_undo.pdf
3.3.2. Sstrength endurance
To develop strength endurance such projectiles are commonly used in in Goju Ryu as stone hammers (chishi) and stone castles (ishisashi). They can be used in exercises of up to twenty repetitions.
The following complexes use both of these projectiles.
Exercise 1: Starting position is standing with a two-shoulder gap between the feet. The projectile is seized by the end of the handle with one hand.
32

As you inhale stretch up one hand to the eye level, and then as you exhale turn the projectile upside-down in one movement (simultaneously bending the knees and settling slightly down). As you make the next inhale and exhale put the projectile down in the starting position.
Exercise 2: Starting position is standing with a two-shoulder gap between the feet. Projectile is seized by the end of the handle with one hand.
As you inhale lift forward the arm and as you exhale overturn the projectile upside-down (at the same time bending your knees and settling slightly down). As you make the next inhale and exhale throw the hand behind head and return to starting position.
33

Exercise 3: Starting position is standing with a two-shoulder gap between the feet. Projectile is seized by the end of the handle with one hand.
As you inhale turn the projectile holding it in your hand and move it to your chest, as you exhale straighten the arm forward (at the same time bending your knees and settling slightly down).
34

Exercise 4: Starting position is standing with a two-shoulder gap between the feet. Projectile is seized by the end of the handle with one hand.
As you inhale move the projectile behind your head and as you exhale stop it in front of you with the arm stretched forward upside-down (at the same time bending your knees and settling slightly down). As you make the next inhale and exhale repeat the exercise, but in the opposite direction.
.
35

Exercise 5: Starting position is standing with a two-shoulder gap between the feet. Projectile is seized by the end of the handle with both hands.
As you inhale turn the projectile inside between the arms and press it towards the stomach. As you exhale (settling slightly down) bend slightly forward, afterwards push chishi backwards between the legs.
.
36

Exercise 6: Starting position is front leaning support leaning ishisashi.
Perform push-ups with punches forward, keeping the projectiles in the hands.
37

Exercise 7: Starting position is lying on the back. One leg is bent and the other is straight both are off the floor. The projectiles are hanging on the feet.
Change the legs, as if you were rotating bike pedals, but in the opposite direction.
Exercise 8: Starting position is standing. One foot is pushed into the projectile.
Raise and lower the legs, bending the knee.
38

Exercise 9: Starting position is standing. One foot is pushed into the projectile.
Raise and lowers the straight leg in front of you with a projectile.
Exercise 10: Starting position is standing. One leg is bent, off the floor and one foot is pushed into the projectile.
Straighten and bend the leg with the projectile hanging on the foot.
For further details about exercises with chishi and ishisashi, please, follow the links below:
http://devnull.samersoff.net/Budo/ratnik/upraznenija_s_tisi.pdf http://devnull.samersoff.net/Budo/ratnik/upraznenija_s_isisasi.pdf
39
4. Conclusion
Over the last few years in children and teenage groups in the town of Lyubertsy club (instructor Pavel Klopov) a part of the course dedicated to the development of physical qualities of students is based on the above-described plan and complexes. Every six months control measurements are made, which give ground to believe that this approach to planning the training process can improve the physical abilities of students in the most efficient way. Moreover tests carried out in a health-rehabilitation group in the town of Vologda club (Yury Korma), showed that this program has a positive impact on treatment and rehabilitation after injuries, as well as the correction of congenital physical defects. You can read more about the results in these groups following the links below:
http://www.iogkf.ru/content/index.php?go=Pages&in=view&id=299 (Russian version)
http://www.iogkf.com/newsletter/edition_2010_4/articles_pg_06.htm (English version)
Author: Methodical director IOGKF-Russia Pavel Klopov.
2011
40