physician quality reporting system accountable …...physician quality reporting system accountable...
TRANSCRIPT
Physician Quality Reporting System Accountable Care Organization
Group Practice Reporting Option Web Interface User Manual
Program Year 2012 Last Modified: January 18, 2013
PQRS ACO GPRO Web Interface
PQRS / ACO GPRO Web Interface User Manual Phase 4.5 01/18/13 ii
DISCLAIMER This information was current at the time it was published or uploaded onto the web. Medicare policy changes frequently so links to any source documents have been provided within the document for your reference.
This document was prepared as a tool to assist eligible professionals and is not intended to grant rights or impose obligations. Although every reasonable effort has been made to assure the accuracy of the information within these pages, the ultimate responsibility for the correct submission of claims and response to any remittance advice lies with the provider of services. The Centers for Medicare & Medicaid Services (CMS) employees, agents, and staff make no representation, warranty, or guarantee that this compilation of Medicare information is error-free and will bear no responsibility or liability for the results or consequences of the use of this guide. This publication is a general summary that explains certain aspects of the Medicare program, but is not a legal document. The official Medicare program provisions are contained in the relevant laws, regulations, and rulings.
PQRS ACO GPRO Web Interface
PQRS / ACO GPRO Web Interface User Manual 01/18/13 i
TABLE OF CONTENTS
DISCLAIMER ................................................................................................................................... II
1 INTRODUCTION ....................................................................................................................... 1
2 REFERENCED DOCUMENTS .................................................................................................... 4
3 OVERVIEW .............................................................................................................................. 5
3.1 Conventions ...................................................................................................................... 5
3.2 Cautions & Warnings ....................................................................................................... 5
4 GETTING STARTED ................................................................................................................. 6
4.1 Set-Up Considerations...................................................................................................... 6
4.1.1 General Set-up Considerations ........................................................................................... 6
4.1.2 Section 508 Accessibility Set-Up Considerations ................................................................ 6
4.1.3 Web Browser Set-Up Considerations .................................................................................. 9
4.2 User Access Considerations ........................................................................................... 14
4.3 Accessing the System ..................................................................................................... 14
4.3.1 Signing In to the Portal ..................................................................................................... 16
4.3.2 Changing Your Password .................................................................................................. 18
4.4 System Organization & Navigation ............................................................................... 21
4.5 Exiting the System ......................................................................................................... 22
5 USING THE SYSTEM .............................................................................................................. 23
5.1 View/Change Data on the Home Page ........................................................................... 23
5.1.1 Patient List ........................................................................................................................ 23
5.1.2 Group Status ..................................................................................................................... 25
5.1.3 Patient Status .................................................................................................................... 25
5.1.4 Patient Status - CARE Tab ................................................................................................ 30
5.1.5 Patient Status – CAD Tab ................................................................................................. 32
5.1.6 Patient Status - DM Tab .................................................................................................... 35
5.1.7 Patient Status - HF Tab ..................................................................................................... 38
5.1.8 Patient Status - HTN Tab .................................................................................................. 40
5.1.9 Patient Status – IVD Tab ................................................................................................... 42
PQRS ACO GPRO Web Interface
PQRS / ACO GPRO Web Interface User Manual 01/18/13 ii
5.1.10 Patient Status - PREV Tab ................................................................................................ 44
5.2 Export Data .................................................................................................................... 48
5.3 Upload Data.................................................................................................................... 50
5.4 Add/Edit ......................................................................................................................... 52
5.5 Data Validation .............................................................................................................. 52
5.6 Reports ........................................................................................................................... 54
5.6.1 Patient Summary Report ................................................................................................... 54
5.6.2 Totals Report Summary ..................................................................................................... 57
5.6.3 Pre-filled Elements Report ................................................................................................ 59
5.6.4 Measure Rates Report ....................................................................................................... 60
5.6.5 Activity Logs Report .......................................................................................................... 62
5.6.6 Submit Status Report ......................................................................................................... 63
5.7 Locked Records .............................................................................................................. 63
5.8 List Users........................................................................................................................ 65
5.9 Submit Screen ................................................................................................................ 66
5.10 Preferences.................................................................................................................. 67
6 TROUBLESHOOTING & SUPPORT ......................................................................................... 68
6.1 Special Considerations: Copyright and Trademark Information ................................... 68
6.2 Support ........................................................................................................................... 68
APPENDIX A – ACRONYMS ........................................................................................................... 70
GLOSSARY .................................................................................................................................... 71
PQRS ACO GPRO Web Interface
PQRS / ACO GPRO Web Interface User Manual 01/18/13 iii
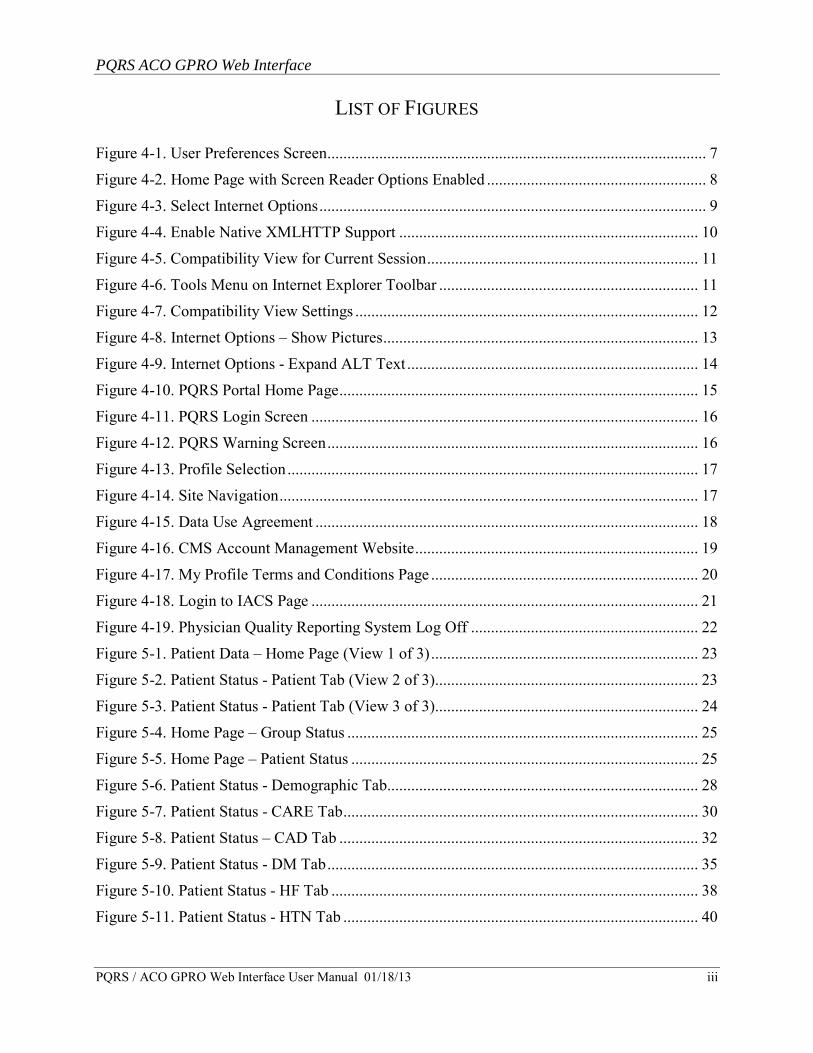
LIST OF FIGURES
Figure 4-1. User Preferences Screen ............................................................................................... 7
Figure 4-2. Home Page with Screen Reader Options Enabled ....................................................... 8
Figure 4-3. Select Internet Options ................................................................................................. 9
Figure 4-4. Enable Native XMLHTTP Support ........................................................................... 10
Figure 4-5. Compatibility View for Current Session .................................................................... 11
Figure 4-6. Tools Menu on Internet Explorer Toolbar ................................................................. 11
Figure 4-7. Compatibility View Settings ...................................................................................... 12
Figure 4-8. Internet Options – Show Pictures ............................................................................... 13
Figure 4-9. Internet Options - Expand ALT Text ......................................................................... 14
Figure 4-10. PQRS Portal Home Page .......................................................................................... 15
Figure 4-11. PQRS Login Screen ................................................................................................. 16
Figure 4-12. PQRS Warning Screen ............................................................................................. 16
Figure 4-13. Profile Selection ....................................................................................................... 17
Figure 4-14. Site Navigation ......................................................................................................... 17
Figure 4-15. Data Use Agreement ................................................................................................ 18
Figure 4-16. CMS Account Management Website ....................................................................... 19
Figure 4-17. My Profile Terms and Conditions Page ................................................................... 20
Figure 4-18. Login to IACS Page ................................................................................................. 21
Figure 4-19. Physician Quality Reporting System Log Off ......................................................... 22
Figure 5-1. Patient Data – Home Page (View 1 of 3) ................................................................... 23
Figure 5-2. Patient Status - Patient Tab (View 2 of 3).................................................................. 23
Figure 5-3. Patient Status - Patient Tab (View 3 of 3).................................................................. 24
Figure 5-4. Home Page – Group Status ........................................................................................ 25
Figure 5-5. Home Page – Patient Status ....................................................................................... 25
Figure 5-6. Patient Status - Demographic Tab .............................................................................. 28
Figure 5-7. Patient Status - CARE Tab ......................................................................................... 30
Figure 5-8. Patient Status – CAD Tab .......................................................................................... 32
Figure 5-9. Patient Status - DM Tab ............................................................................................. 35
Figure 5-10. Patient Status - HF Tab ............................................................................................ 38
Figure 5-11. Patient Status - HTN Tab ......................................................................................... 40
PQRS ACO GPRO Web Interface
PQRS / ACO GPRO Web Interface User Manual 01/18/13 iv
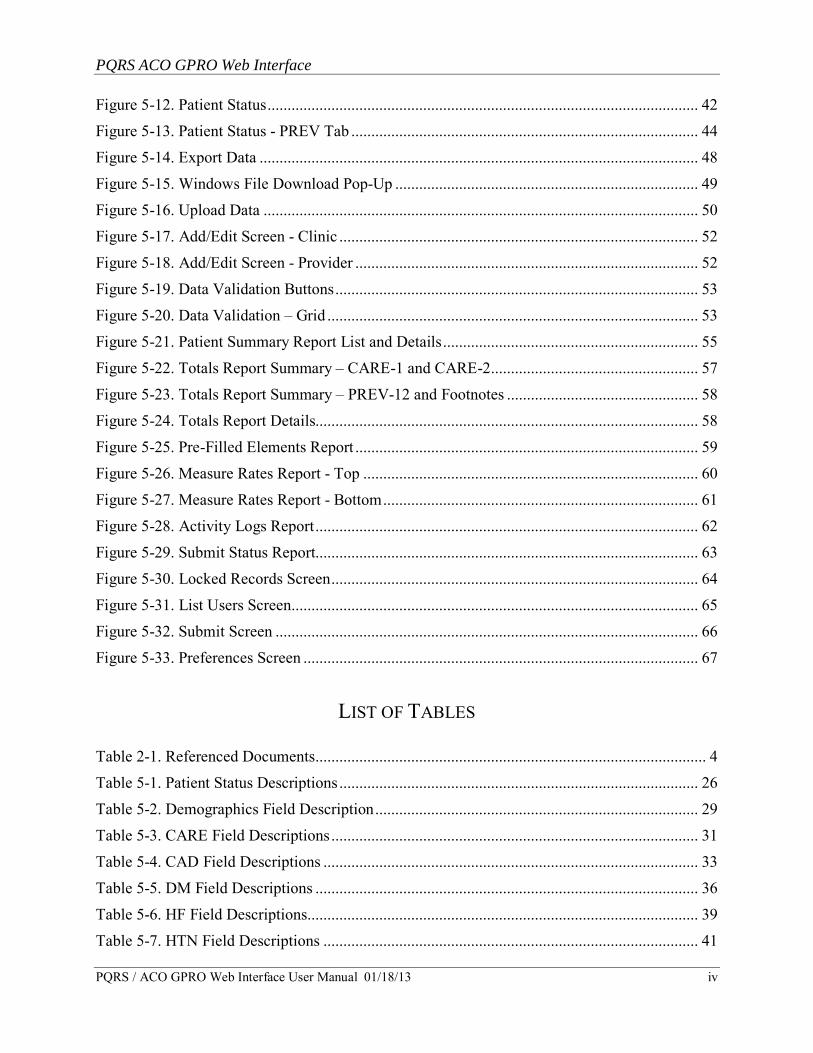
Figure 5-12. Patient Status ............................................................................................................ 42
Figure 5-13. Patient Status - PREV Tab ....................................................................................... 44
Figure 5-14. Export Data .............................................................................................................. 48
Figure 5-15. Windows File Download Pop-Up ............................................................................ 49
Figure 5-16. Upload Data ............................................................................................................. 50
Figure 5-17. Add/Edit Screen - Clinic .......................................................................................... 52
Figure 5-18. Add/Edit Screen - Provider ...................................................................................... 52
Figure 5-19. Data Validation Buttons ........................................................................................... 53
Figure 5-20. Data Validation – Grid ............................................................................................. 53
Figure 5-21. Patient Summary Report List and Details ................................................................ 55
Figure 5-22. Totals Report Summary – CARE-1 and CARE-2.................................................... 57
Figure 5-23. Totals Report Summary – PREV-12 and Footnotes ................................................ 58
Figure 5-24. Totals Report Details................................................................................................ 58
Figure 5-25. Pre-Filled Elements Report ...................................................................................... 59
Figure 5-26. Measure Rates Report - Top .................................................................................... 60
Figure 5-27. Measure Rates Report - Bottom ............................................................................... 61
Figure 5-28. Activity Logs Report ................................................................................................ 62
Figure 5-29. Submit Status Report................................................................................................ 63
Figure 5-30. Locked Records Screen ............................................................................................ 64
Figure 5-31. List Users Screen...................................................................................................... 65
Figure 5-32. Submit Screen .......................................................................................................... 66
Figure 5-33. Preferences Screen ................................................................................................... 67
LIST OF TABLES
Table 2-1. Referenced Documents .................................................................................................. 4
Table 5-1. Patient Status Descriptions .......................................................................................... 26
Table 5-2. Demographics Field Description ................................................................................. 29
Table 5-3. CARE Field Descriptions ............................................................................................ 31
Table 5-4. CAD Field Descriptions .............................................................................................. 33
Table 5-5. DM Field Descriptions ................................................................................................ 36
Table 5-6. HF Field Descriptions.................................................................................................. 39
Table 5-7. HTN Field Descriptions .............................................................................................. 41
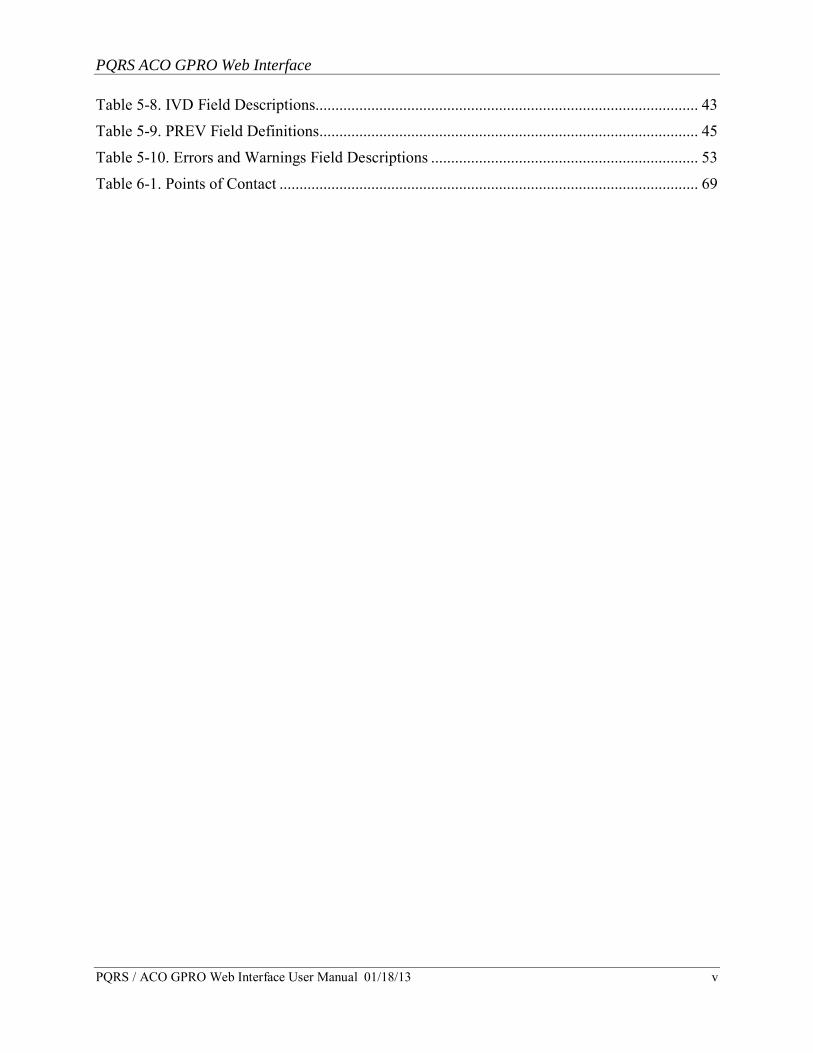
PQRS ACO GPRO Web Interface
PQRS / ACO GPRO Web Interface User Manual 01/18/13 v
Table 5-8. IVD Field Descriptions................................................................................................ 43
Table 5-9. PREV Field Definitions ............................................................................................... 45
Table 5-10. Errors and Warnings Field Descriptions ................................................................... 53
Table 6-1. Points of Contact ......................................................................................................... 69
PQRS ACO GPRO Web Interface
PQRS / ACO GPRO Web Interface User Manual 01/18/13 1
1 INTRODUCTION On October 20, 2011, the Centers for Medicare & Medicaid Services (CMS) finalized new rules under the Patient Protection and Affordable Care Act (Affordable Care Act) to help doctors, hospitals, and other health care providers better coordinate care for Medicare patients through Accountable Care Organizations (ACO). Coordinated care helps to ensure that patients, especially the chronically ill, get the right care at the right time, with the goal of avoiding unnecessary duplication of services and preventing medical errors. When an Accountable Care Organization succeeds in both delivering high-quality care and spending health care dollars more wisely, the Medicare Shared Savings Program (Shared Savings Program) will reward Accountable Care Organizations that lower their growth in health care costs while meeting performance standards on quality of care and putting patients first.
The Affordable Care Act allows CMS to incorporate the Physician Quality Reporting System (PQRS) reporting requirements and incentive payments into the Shared Savings Program. Accountable Care Organization participants that include providers/suppliers who are also eligible professionals for purposes of the Physician Quality Reporting will earn PQRS incentive as an ACO practice under the Shared Savings Program, by reporting required clinical quality measures through the Accountable Care Organization Group Practice Reporting Option Web Interface (ACO GPRO Web Interface). For 2012, the ACO GPRO measures will be used for Physician Quality Reporting incentive purposes and eligible professionals in ACOs must participate in the Physician Quality Reporting through the Shared Savings Program if they wish to earn a Physician Quality Reporting incentive payment.
The Pioneer Accountable Care Organization Model adopted the same quality measures reporting criteria and PQRS incentive eligibility criteria as the Shared Savings Program.
PQRS eligible Taxpayer Identification Numbers (TIN) within an ACO will be eligible to receive the PQRS incentive payments for each calendar year in which their ACO fully and completely report the ACO GPRO measures, regardless of the ACO’s start date or generation of shared savings, allowing ACOs joining the Pioneer ACO Model in January of 2012 or the Shared Savings Program in April or July of 2012 the opportunity to participate. ACO providers/suppliers who are eligible professionals within an ACO may only participate under their ACO participant Taxpayer Identification Number as an ACO practice under the Shared Savings Program or Pioneer ACO Model for purposes of receiving an incentive payment under the PQRS. No separate self-nomination for GPRO participation is required by an ACO or individual Taxpayer Identification Number. To ensure no duplication in PQRS incentive payments, Centers for Medicare & Medicaid Services will notify the PQRS of Taxpayer Identification Numbers that become part of an Accountable Care Organization.
An ACO, on behalf of its providers/suppliers who are eligible professionals, must satisfactorily report the ACO GPRO quality measures during the reporting period in order to receive a Physician Quality Reporting incentive payment under the Shared Savings Program. Eligible professionals within an ACO who qualify for a Physician Quality Reporting incentive payment in each ACO participant Taxpayer Identification Number will receive an incentive, for those years an incentive is available, based on the allowed Medicare Part B charges under the physician fee schedule for that Taxpayer Identification Number.
PQRS ACO GPRO Web Interface
PQRS / ACO GPRO Web Interface User Manual 01/18/13 2
Each Physician Quality Reporting eligible Taxpayer Identification Number will receive its own payment. The payment will be based on all eligible professional allowed Medicare Part B charges under the Taxpayer Identification Number, regardless of whether the eligible professional is participating as an ACO provider/supplier. That is, an individual healthcare professional who is eligible to participate in Physician Quality Reporting, has re-assigned billing rights to a Taxpayer Identification Number that is a Pioneer ACO, but as an individual provider has decided not to be affiliated with the Pioneer Accountable Care Organization, is not eligible to earn a separate PQRS incentive under the same Taxpayer Identification Number.
For both Pioneer ACO and Medicare Shared Savings Program ACO, the first year of quality reporting (2012) through the ACO GRPO Web Interface for Physician Quality Reporting incentive payments purpose will be in 2013.
The ACO GPRO Web Interface is a method of data submission that incorporates some characteristics and methods from CMS demonstration projects, including the Physician Group Practice Demonstration for large ACO practices and the Medicare Care Management Performance (MCMP) Demonstration for solo to medium-sized practices. More importantly, it is another (almost identical) version of the portal that is currently used in the PQRS GPRO. In the Web Interface, a database pre-populated with an assigned beneficiary sample under each condition module (e.g., Diabetes, Heart Failure, etc.) will serve as a data collection tool for groups to use in collecting and submitting quality measures data to CMS. While an ACO’s first performance year for shared savings purposes would be either 18 or 21 months, depending on the start date, quality data will be collected for, and quality performance standards based on, the calendar year, beginning with the reporting period ending December 31, 2012. Similarly, the first data collection for Pioneer ACO will take place after the reporting period ending December 31, 2012.
Each ACO selected to participate in 2012 will be assigned a patient sample that includes the patients’ demographic and utilization information. The sample of patients is a subset of the ACO’s assigned/aligned beneficiaries who are included in the third-quarter report.
The selected patients’ data will be populated in the ACO practices’ Web Interface page. The ACO must access the system using its Web Interface to add missing quality measure data on each patient who received services during the 2012 reporting year (i.e., between January 1, 2012 and December 31, 2012). To add this data, ACOs have options:
• Enter the data directly into the system through its Web Interface.
• Download the patient list and create an Extensible Markup Language (XML) file for those patients containing quality data using another resource. Upload the XML file to the system using its Web Interface.
• Data that has been uploaded can be viewed and updated through the Web Interface for accuracy and completeness.
ACOs will be required to submit data for 22 quality measures using the ACO GPRO Web Interface. The quality measures are grouped into disease modules (Coronary Artery Disease, Diabetes Mellitus, Heart Failure, Hypertension, Ischemic Vascular Disease), plus patient care modules (Care Coordination/Patient Safety and Preventive Care), which have separately sampled measures. Note that for the diabetes-related measures, five of the six measures are grouped into
PQRS ACO GPRO Web Interface
PQRS / ACO GPRO Web Interface User Manual 01/18/13 3
one “all-or-nothing” composite performance rate. Similarly, the two coronary artery disease measures are also grouped into one “all-or-nothing” composite rate for reporting purpose.
For each disease module or preventive care measure, the ACO practice must submit data for the first 411 consecutively sampled and ranked Medicare patients (with an over-sample of 616 patients). Sampled patients will be limited to those Medicare Fee-for-Service patients with Medicare Parts A and/or B for whom Medicare is the primary payer. If the pool of eligible assigned patients is less than 411 for any module/measure, then the ACO practice must report on 100% (all) of the assigned patients for that module.
For more information on the ACO GPRO, please visit the ACO section of the Centers for Medicare & Medicaid Services http://cms.hhs.gov/Medicare/Medicare-Fee-for-Service-Payment/sharedsavingsprogram/Quality_Measures_Standards.html website.
PQRS ACO GPRO Web Interface
PQRS / ACO GPRO Web Interface User Manual 01/18/13 4
2 REFERENCED DOCUMENTS Medicare Shared Savings Program Website, http://cms.hhs.gov/Medicare/Medicare-Fee-for-Service-Payment/sharedsavingsprogram/index.html.
Table 2-1. Referenced Documents
Document Name Document Number
Issuance Date
ACO GPRO XML Specification N/A January 2013
PQRS ACO GPRO Web Interface
PQRS / ACO GPRO Web Interface User Manual 01/18/13 5
3 OVERVIEW This document describes how to use the ACO GPRO Web Interface to view, change, upload, and export patient data, as well as how to view and print reports on data stored in the system that is used in the Physician Quality Reporting System.
3.1 Conventions
This document provides screen prints and corresponding narrative to describe how to use the ACO GPRO Web Interface.
Fields or buttons to be acted upon are indicated in bold in the action statement; links to be acted upon are indicated as links in underlined blue text in the action statement.
The term “user” is used throughout this document to refer to a person who requires and/or has acquired access to the ACO GPRO Web Interface.
3.2 Cautions & Warnings
When signing into the application, a warning screen will appear with Terms and Conditions of Use of the QualityNet Portal, content, and applications. Be sure to read the message completely, which explains the penalties and consequences of misusing the system(s) and its contents.
Screen shots are evolving during development. The screens that you see as you use the system may differ slightly from the sample images that appear in this document.
PQRS ACO GPRO Web Interface
PQRS / ACO GPRO Web Interface User Manual 01/18/13 6
4 GETTING STARTED
4.1 Set-Up Considerations
4.1.1 General Set-up Considerations
The minimum system requirements to effectively access the PQRS Portal are:
• Hardware: 233 MHZ Pentium processor with a minimum of 150 MB free disk space
• 64 MB Ram (128MB is recommended) Software:
Microsoft® Internet Explorer Version 8.0
Before starting the GPRO Web Interface
The Internet Option Enable native XMLHTTP Support must be activated.
The Internet Option Display all websites in Compatibility View must be deselected.
4.1.2 Section 508 Accessibility Set-Up Considerations
In order to use the ACO GPRO Web Interface with Accessible technologies, the following must be available:
• JAWS 11 (or higher)
• ACO GPRO Web Interface User Preference Settings If the ACO GPRO Web Interface will be used with screen reading software, you must change a setting in the Application’s Preferences menu. Once the setting is configured, the setting will apply for all subsequent logins until it is changed.
To enable the Application Preferences to support screen reading software:
1. Log on to the ACO GPRO Web Interface as instructed in Section 4.3.
2. On the global navigation bar, click Preferences. The User Preferences window opens to the General Preferences screen (Figure 4-1).
3. For the Enable screen reader mode option, click Yes. This will make ACO GPRO Web Interface content accessible for users with visual impairments and enable the use of screen reader software such as JAWS.
4. Click Save, and then click OK on the confirmation pop-up. If you selected Enable Screen Reader Mode, the screens will be changed reflect that setting after navigating away from the User Preferences screen.
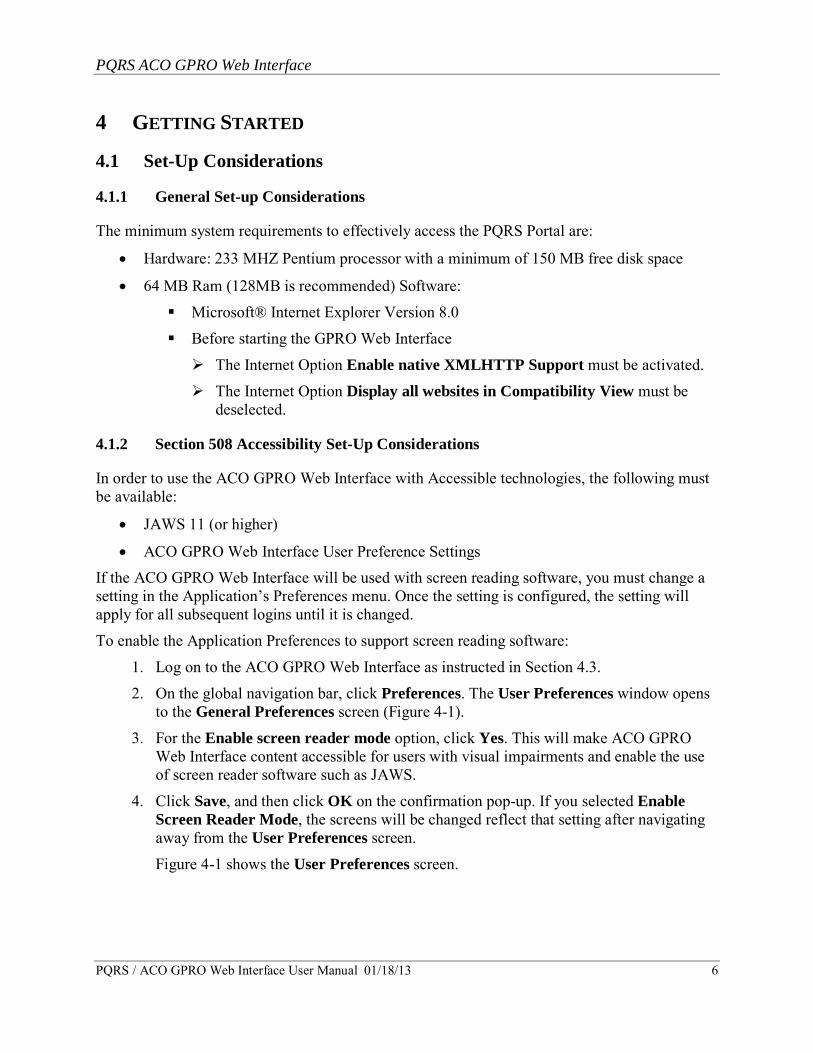
Figure 4-1 shows the User Preferences screen.
PQRS ACO GPRO Web Interface
PQRS / ACO GPRO Web Interface User Manual 01/18/13 7
Figure 4-1. User Preferences Screen
When the screen reader mode is enabled, the ACO GPRO Web Interface screens will be modified to optimize the use of screen reader software such as JAWS. The screen changes include:
• Expanded menu items in the global navigation
• Link Icons, such as the Online Help icon, will be changed to plain text links
• Row selection radio buttons in lists
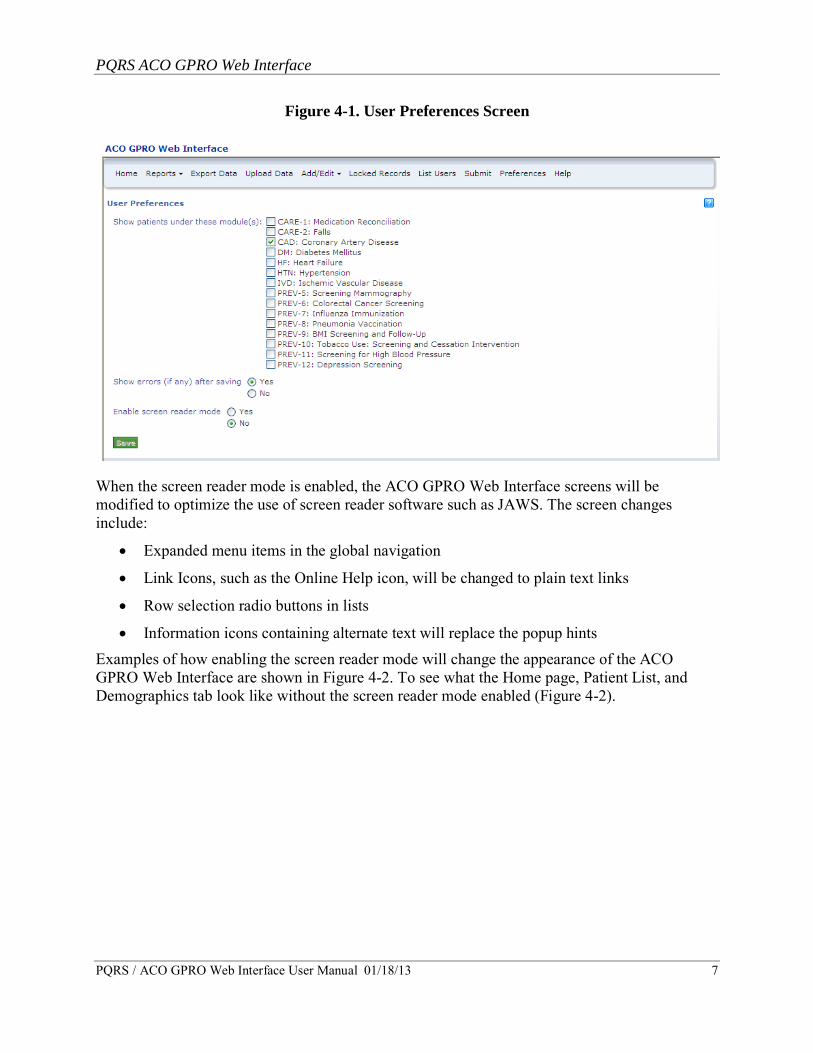
• Information icons containing alternate text will replace the popup hints Examples of how enabling the screen reader mode will change the appearance of the ACO GPRO Web Interface are shown in Figure 4-2. To see what the Home page, Patient List, and Demographics tab look like without the screen reader mode enabled (Figure 4-2).
PQRS ACO GPRO Web Interface
PQRS / ACO GPRO Web Interface User Manual 01/18/13 8
Figure 4-2. Home Page with Screen Reader Options Enabled
PQRS ACO GPRO Web Interface
PQRS / ACO GPRO Web Interface User Manual 01/18/13 9
4.1.2.1 Data Abstraction for Accessible technologies
Data abstraction for the selected patients in the ACO GPRO Web Interface should be done using the XML export and upload functionality. Export Data screen is detailed in Figure 5-14 and the Upload Data screen is detailed in Figure 5-16.
The XML files containing the data exported from the ACO GPRO Web Interface may be imported into Excel spreadsheets for modification. The modified data may then be exported from the Excel spreadsheet into the correct XML format so it may be uploaded into the Web Interface. The ACO GPRO XML Specification details the XML format and the steps on how to use Excel to abstract the patient data.
4.1.3 Web Browser Set-Up Considerations
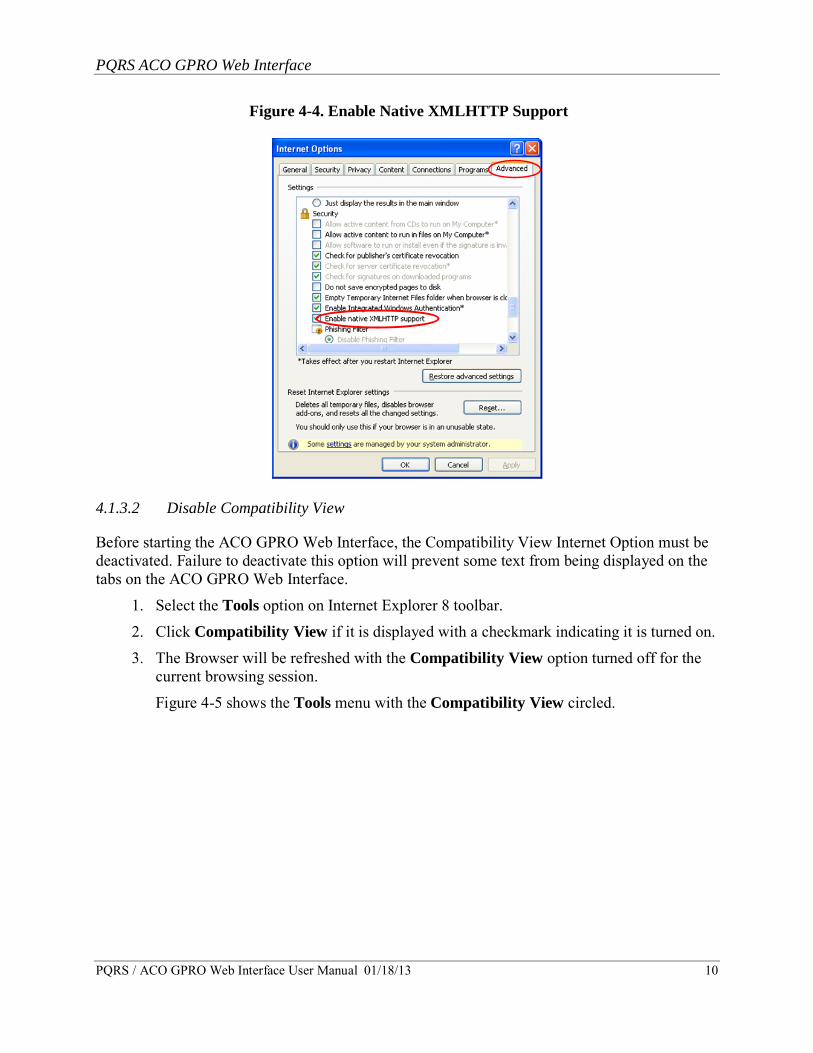
4.1.3.1 Enable Native XMLHTTP Support
Before starting the ACO GPRO Web Interface, the web browser must be configured to support XMLHTTP. Failure to activate this option will prevent navigation to the tabs on the ACO GPRO Web Interface.
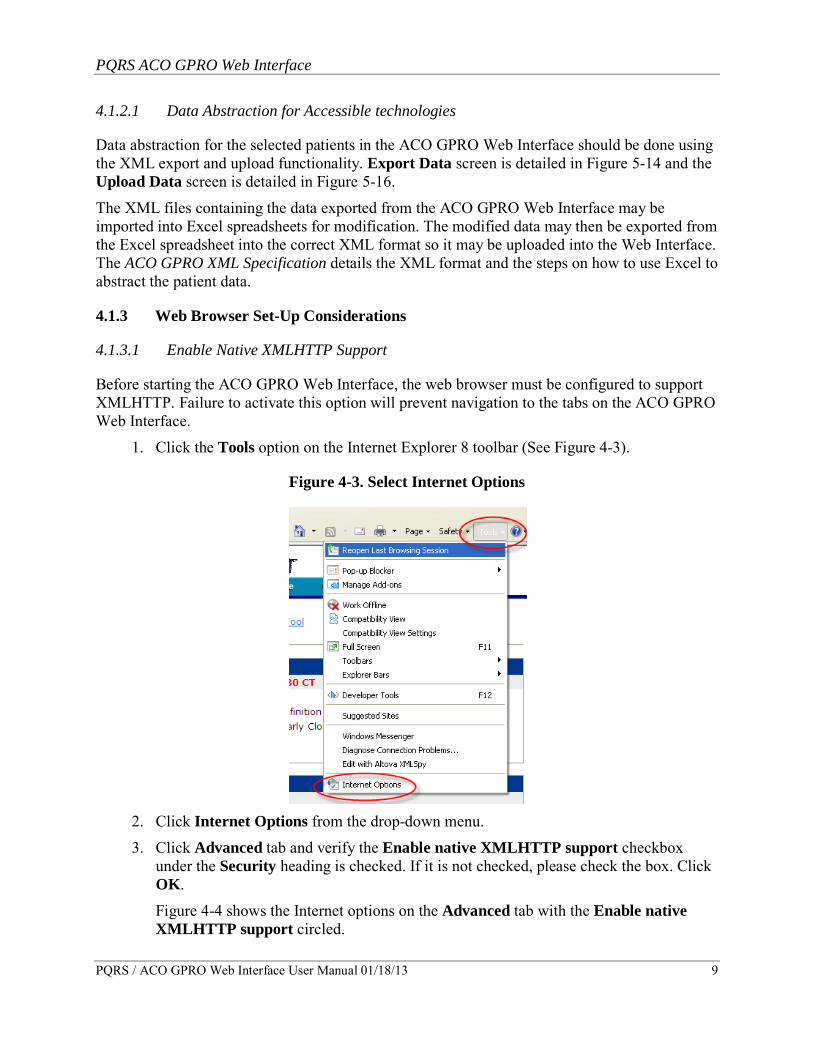
1. Click the Tools option on the Internet Explorer 8 toolbar (See Figure 4-3).
Figure 4-3. Select Internet Options
2. Click Internet Options from the drop-down menu.
3. Click Advanced tab and verify the Enable native XMLHTTP support checkbox under the Security heading is checked. If it is not checked, please check the box. Click OK.
Figure 4-4 shows the Internet options on the Advanced tab with the Enable native XMLHTTP support circled.
PQRS ACO GPRO Web Interface
PQRS / ACO GPRO Web Interface User Manual 01/18/13 10
Figure 4-4. Enable Native XMLHTTP Support
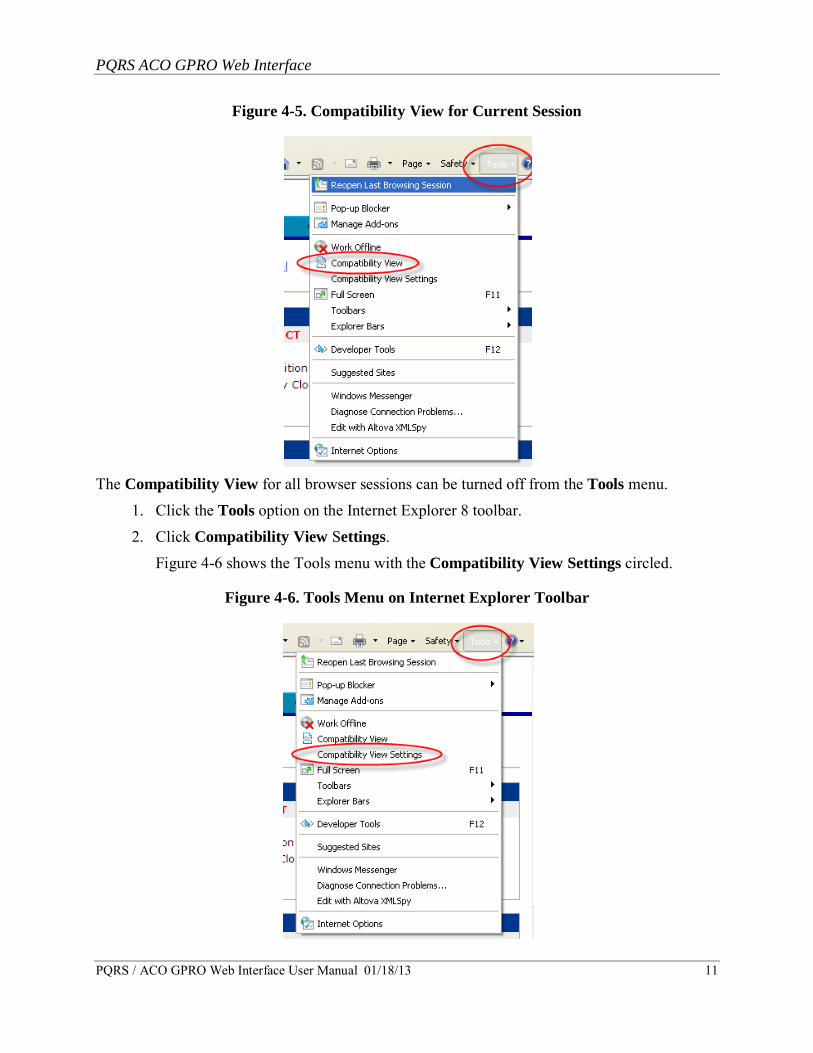
4.1.3.2 Disable Compatibility View
Before starting the ACO GPRO Web Interface, the Compatibility View Internet Option must be deactivated. Failure to deactivate this option will prevent some text from being displayed on the tabs on the ACO GPRO Web Interface.
1. Select the Tools option on Internet Explorer 8 toolbar.
2. Click Compatibility View if it is displayed with a checkmark indicating it is turned on.
3. The Browser will be refreshed with the Compatibility View option turned off for the current browsing session.
Figure 4-5 shows the Tools menu with the Compatibility View circled.
PQRS ACO GPRO Web Interface
PQRS / ACO GPRO Web Interface User Manual 01/18/13 11
Figure 4-5. Compatibility View for Current Session
The Compatibility View for all browser sessions can be turned off from the Tools menu.
1. Click the Tools option on the Internet Explorer 8 toolbar.
2. Click Compatibility View Settings.
Figure 4-6 shows the Tools menu with the Compatibility View Settings circled.
Figure 4-6. Tools Menu on Internet Explorer Toolbar
PQRS ACO GPRO Web Interface
PQRS / ACO GPRO Web Interface User Manual 01/18/13 12
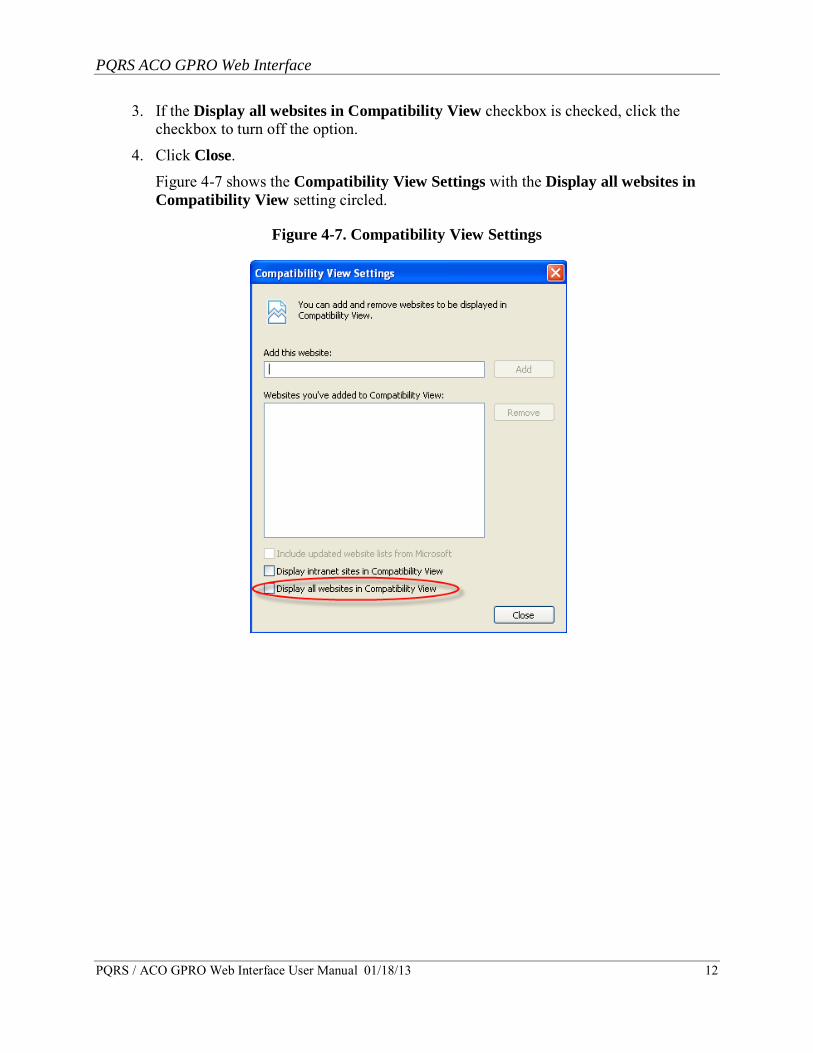
3. If the Display all websites in Compatibility View checkbox is checked, click the checkbox to turn off the option.
4. Click Close.
Figure 4-7 shows the Compatibility View Settings with the Display all websites in Compatibility View setting circled.
Figure 4-7. Compatibility View Settings
PQRS ACO GPRO Web Interface
PQRS / ACO GPRO Web Interface User Manual 01/18/13 13
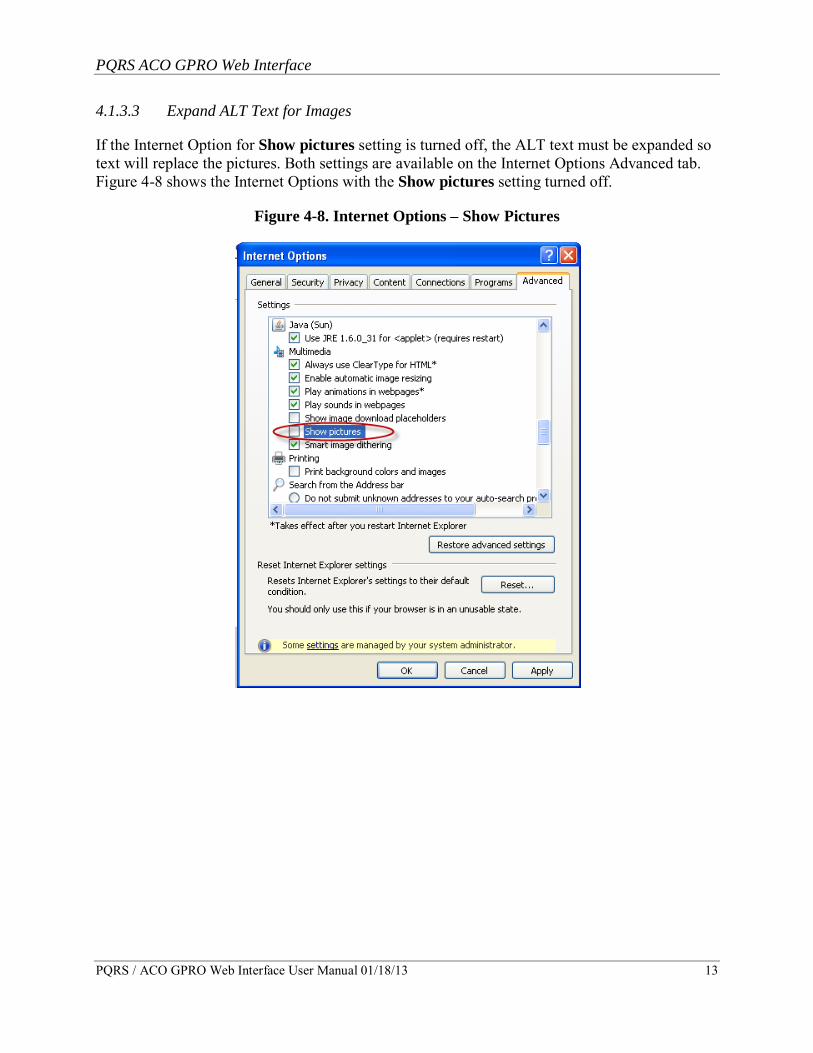
4.1.3.3 Expand ALT Text for Images
If the Internet Option for Show pictures setting is turned off, the ALT text must be expanded so text will replace the pictures. Both settings are available on the Internet Options Advanced tab. Figure 4-8 shows the Internet Options with the Show pictures setting turned off.
Figure 4-8. Internet Options – Show Pictures

PQRS ACO GPRO Web Interface
PQRS / ACO GPRO Web Interface User Manual 01/18/13 14
Figure 4-9 shows the Internet Options with the Always expand ALT Text for images setting selected.
Figure 4-9. Internet Options - Expand ALT Text
4.2 User Access Considerations
The ACO GPRO Web Interface will be used by ACOs to submit quality measure data on an assigned beneficiary sampling.
4.3 Accessing the System
To sign in to the portal, you must have an Individuals Authorized Access to Centers for Medicare & Medicaid Computer Services (IACS) account. If you have an account but have forgotten your password, go to Section 4.3.2 of this document. To access the system, from your web browser, go to the QualityNet Portal, (https://www.qualitynet.org/portal/server.pt). The home page of the ACO Portal appears below (Figure 4-10).
PQRS ACO GPRO Web Interface
PQRS / ACO GPRO Web Interface User Manual 01/18/13 15
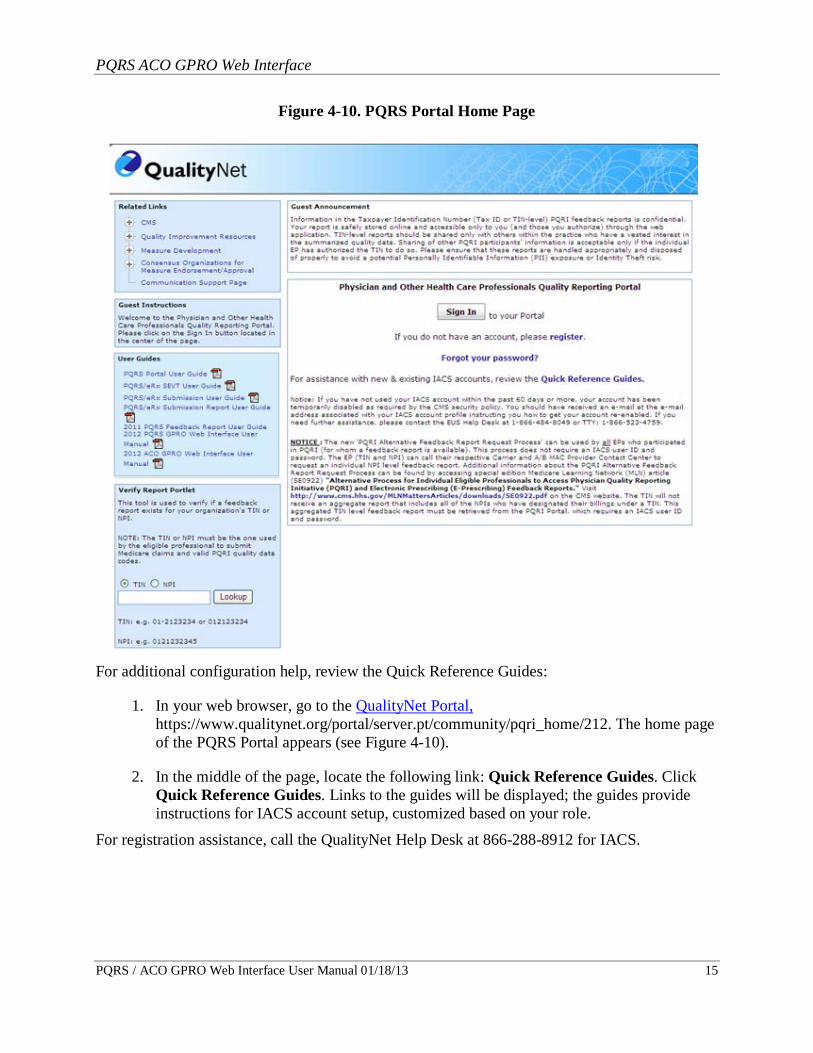
Figure 4-10. PQRS Portal Home Page
For additional configuration help, review the Quick Reference Guides:
1. In your web browser, go to the QualityNet Portal, https://www.qualitynet.org/portal/server.pt/community/pqri_home/212. The home page of the PQRS Portal appears (see Figure 4-10).
2. In the middle of the page, locate the following link: Quick Reference Guides. Click Quick Reference Guides. Links to the guides will be displayed; the guides provide instructions for IACS account setup, customized based on your role.
For registration assistance, call the QualityNet Help Desk at 866-288-8912 for IACS.
PQRS ACO GPRO Web Interface
PQRS / ACO GPRO Web Interface User Manual 01/18/13 16
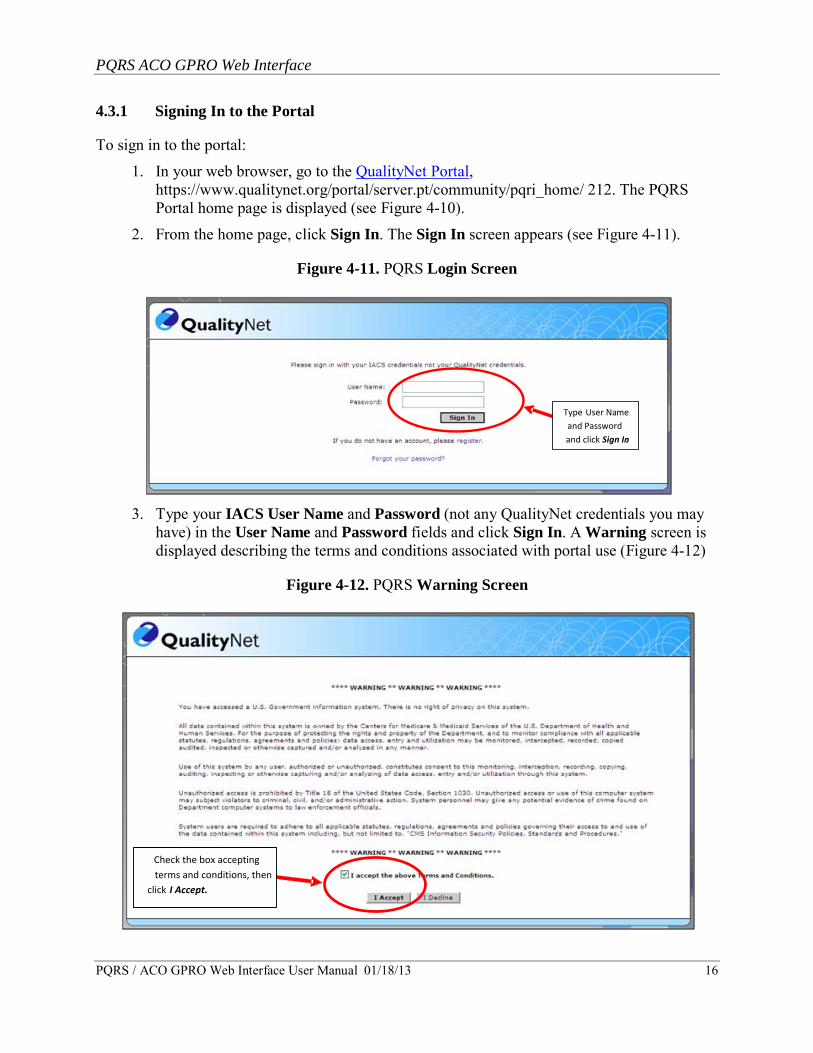
4.3.1 Signing In to the Portal
To sign in to the portal:
1. In your web browser, go to the QualityNet Portal, https://www.qualitynet.org/portal/server.pt/community/pqri_home/ 212. The PQRS Portal home page is displayed (see Figure 4-10).
2. From the home page, click Sign In. The Sign In screen appears (see Figure 4-11).
Figure 4-11. PQRS Login Screen
Type User Name and Password and click Sign In.
3. Type your IACS User Name and Password (not any QualityNet credentials you may
have) in the User Name and Password fields and click Sign In. A Warning screen is displayed describing the terms and conditions associated with portal use (Figure 4-12)
Figure 4-12. PQRS Warning Screen
Check the box accepting terms and conditions, then
click I Accept.
PQRS ACO GPRO Web Interface
PQRS / ACO GPRO Web Interface User Manual 01/18/13 17
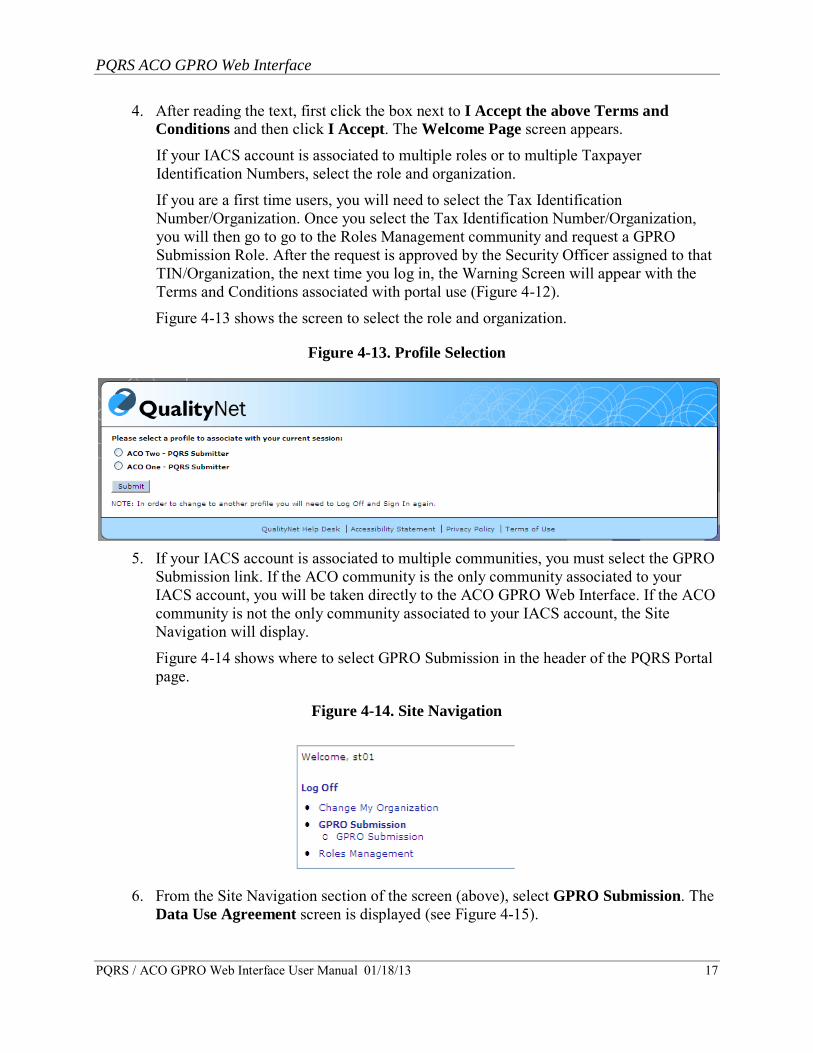
4. After reading the text, first click the box next to I Accept the above Terms and Conditions and then click I Accept. The Welcome Page screen appears.
If your IACS account is associated to multiple roles or to multiple Taxpayer Identification Numbers, select the role and organization.
If you are a first time users, you will need to select the Tax Identification Number/Organization. Once you select the Tax Identification Number/Organization, you will then go to go to the Roles Management community and request a GPRO Submission Role. After the request is approved by the Security Officer assigned to that TIN/Organization, the next time you log in, the Warning Screen will appear with the Terms and Conditions associated with portal use (Figure 4-12).
Figure 4-13 shows the screen to select the role and organization.
Figure 4-13. Profile Selection
5. If your IACS account is associated to multiple communities, you must select the GPRO Submission link. If the ACO community is the only community associated to your IACS account, you will be taken directly to the ACO GPRO Web Interface. If the ACO community is not the only community associated to your IACS account, the Site Navigation will display.
Figure 4-14 shows where to select GPRO Submission in the header of the PQRS Portal page.
Figure 4-14. Site Navigation
6. From the Site Navigation section of the screen (above), select GPRO Submission. The Data Use Agreement screen is displayed (see Figure 4-15).
PQRS ACO GPRO Web Interface
PQRS / ACO GPRO Web Interface User Manual 01/18/13 18
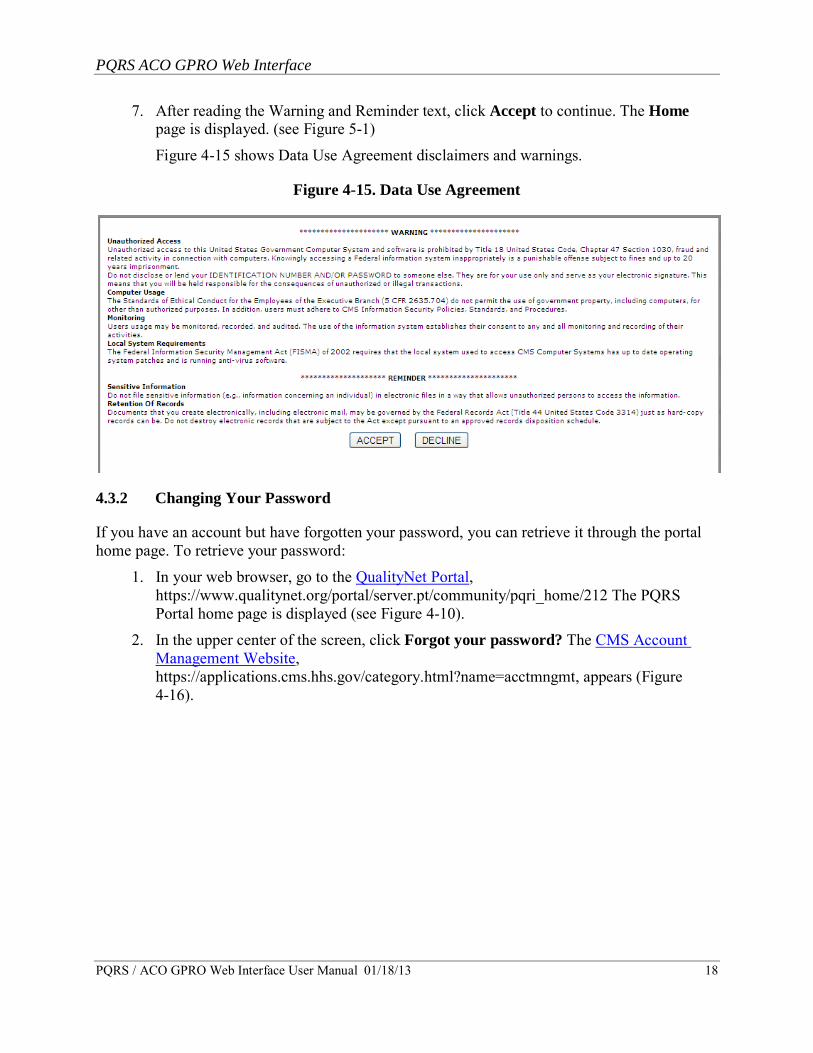
7. After reading the Warning and Reminder text, click Accept to continue. The Home page is displayed. (see Figure 5-1)
Figure 4-15 shows Data Use Agreement disclaimers and warnings.
Figure 4-15. Data Use Agreement
4.3.2 Changing Your Password
If you have an account but have forgotten your password, you can retrieve it through the portal home page. To retrieve your password:
1. In your web browser, go to the QualityNet Portal, https://www.qualitynet.org/portal/server.pt/community/pqri_home/212 The PQRS Portal home page is displayed (see Figure 4-10).
2. In the upper center of the screen, click Forgot your password? The CMS Account Management Website, https://applications.cms.hhs.gov/category.html?name=acctmngmt, appears (Figure 4-16).
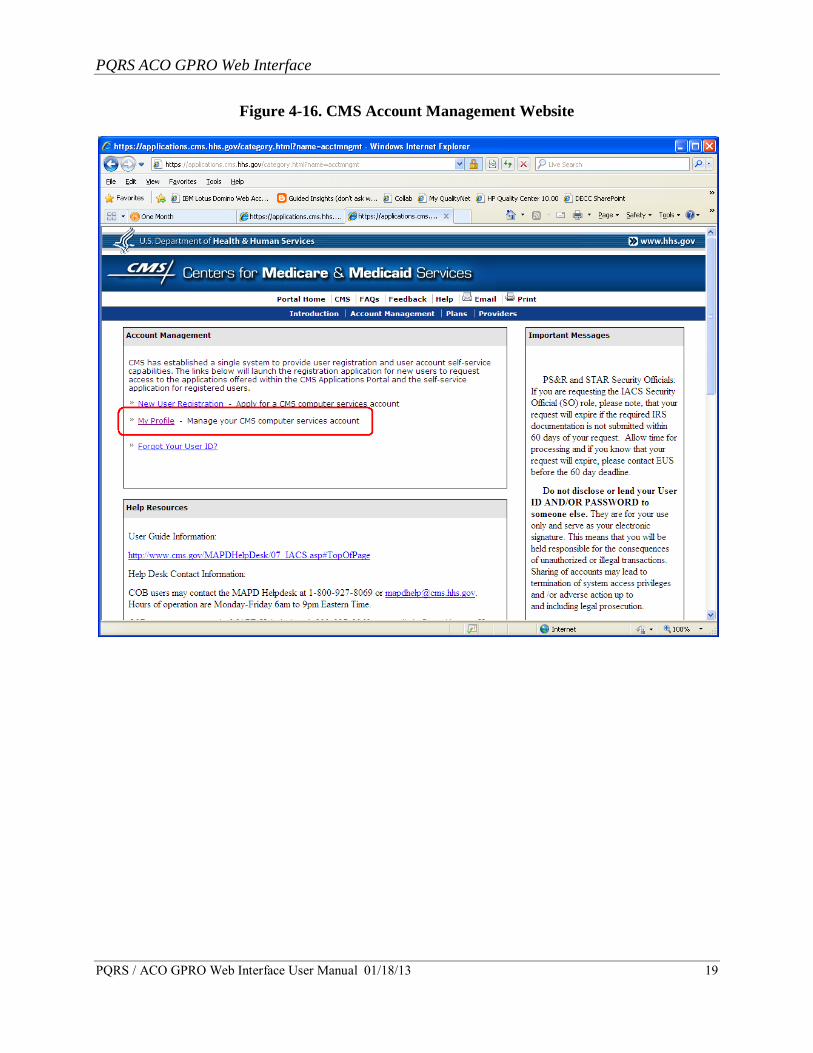
PQRS ACO GPRO Web Interface
PQRS / ACO GPRO Web Interface User Manual 01/18/13 19
Figure 4-16. CMS Account Management Website
PQRS ACO GPRO Web Interface
PQRS / ACO GPRO Web Interface User Manual 01/18/13 20
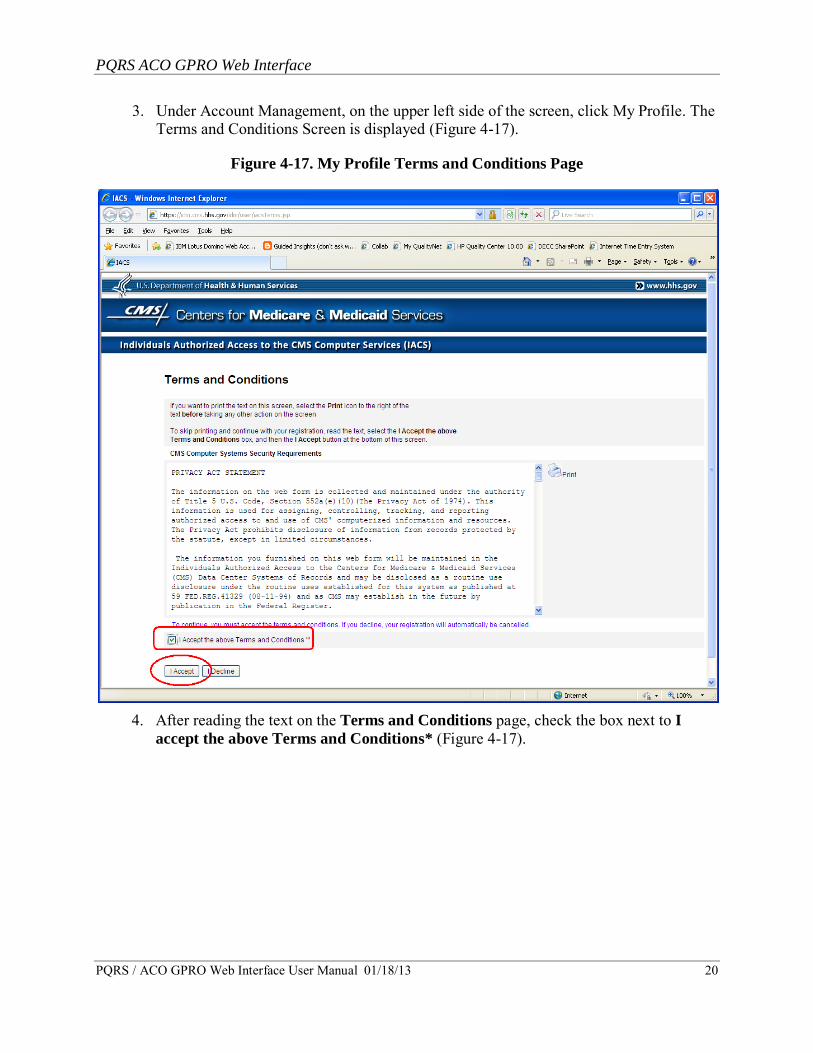
3. Under Account Management, on the upper left side of the screen, click My Profile. The Terms and Conditions Screen is displayed (Figure 4-17).
Figure 4-17. My Profile Terms and Conditions Page
4. After reading the text on the Terms and Conditions page, check the box next to I
accept the above Terms and Conditions* (Figure 4-17).
PQRS ACO GPRO Web Interface
PQRS / ACO GPRO Web Interface User Manual 01/18/13 21
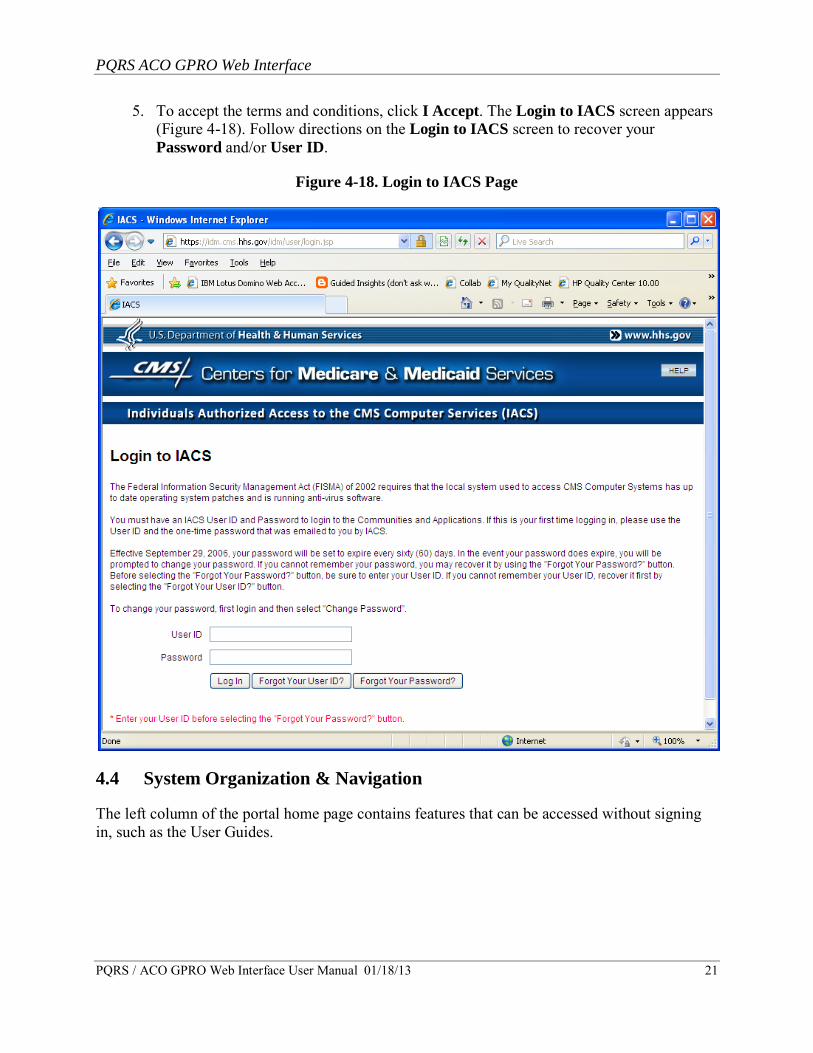
5. To accept the terms and conditions, click I Accept. The Login to IACS screen appears (Figure 4-18). Follow directions on the Login to IACS screen to recover your Password and/or User ID.
Figure 4-18. Login to IACS Page
4.4 System Organization & Navigation
The left column of the portal home page contains features that can be accessed without signing in, such as the User Guides.
PQRS ACO GPRO Web Interface
PQRS / ACO GPRO Web Interface User Manual 01/18/13 22
4.5 Exiting the System
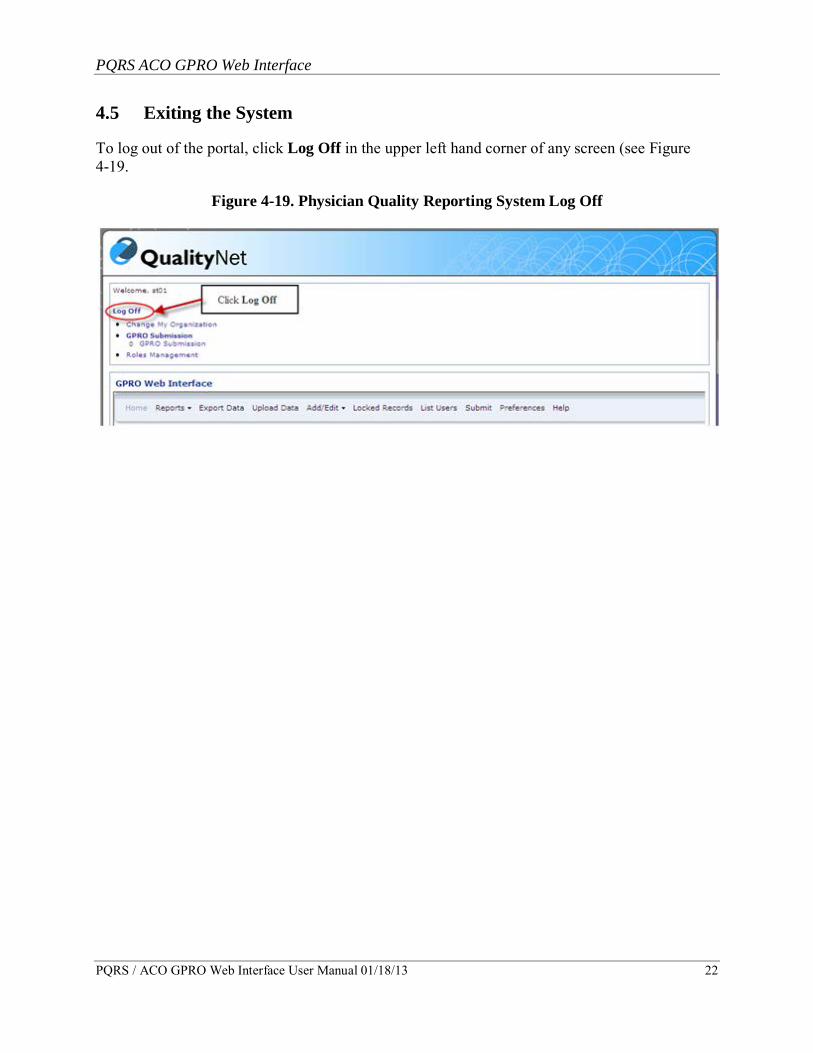
To log out of the portal, click Log Off in the upper left hand corner of any screen (see Figure 4-19.
Figure 4-19. Physician Quality Reporting System Log Off
PQRS ACO GPRO Web Interface
PQRS / ACO GPRO Web Interface User Manual 01/18/13 23
5 USING THE SYSTEM The following sections and subsections provide detailed, step-by-step instructions describing how to use the various functions or features of the ACO GPRO Web Interface.
While in the ACO GPRO Web Interface do not use the standard browser navigation toolbar to refresh or go back to a previous page. Use of these options on the navigation toolbar will cause the current session to end. Only the application buttons should be used.
5.1 View/Change Data on the Home Page
The Home Page has a list of all patients sampled for the ACO in the top section of the screen. The middle section will display the ACO’s completeness status by module as well as the number completed. The lower section will display the modules for a selected patient.
After a patient is highlighted (selected) from the patient list, the middle section will change to Patient Status.
5.1.1 Patient List
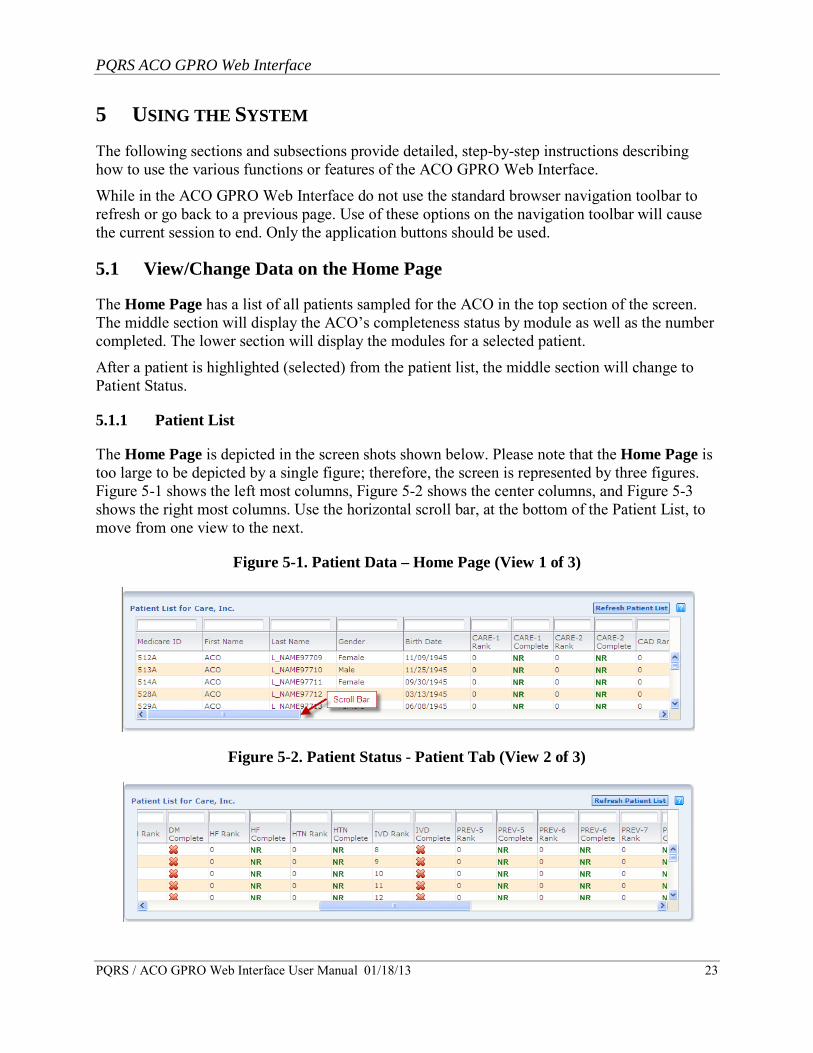
The Home Page is depicted in the screen shots shown below. Please note that the Home Page is too large to be depicted by a single figure; therefore, the screen is represented by three figures. Figure 5-1 shows the left most columns, Figure 5-2 shows the center columns, and Figure 5-3 shows the right most columns. Use the horizontal scroll bar, at the bottom of the Patient List, to move from one view to the next.
Figure 5-1. Patient Data – Home Page (View 1 of 3)
Figure 5-2. Patient Status - Patient Tab (View 2 of 3)
PQRS ACO GPRO Web Interface
PQRS / ACO GPRO Web Interface User Manual 01/18/13 24
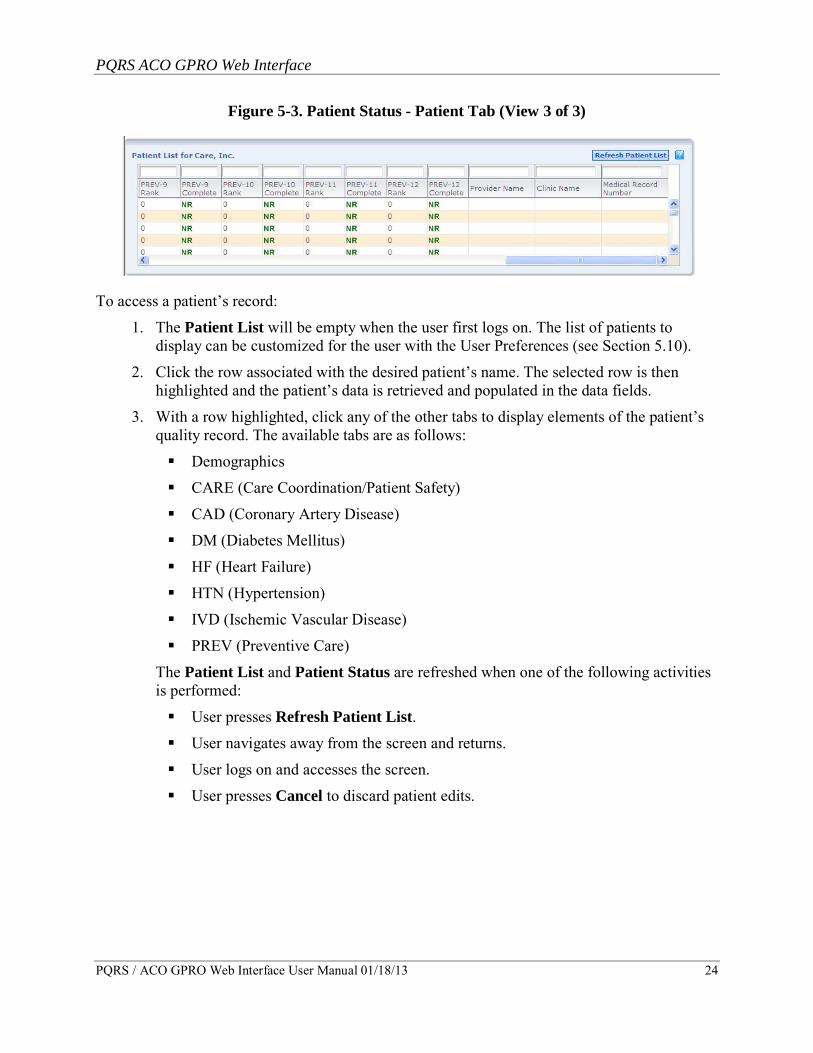
Figure 5-3. Patient Status - Patient Tab (View 3 of 3)
To access a patient’s record:
1. The Patient List will be empty when the user first logs on. The list of patients to display can be customized for the user with the User Preferences (see Section 5.10).
2. Click the row associated with the desired patient’s name. The selected row is then highlighted and the patient’s data is retrieved and populated in the data fields.
3. With a row highlighted, click any of the other tabs to display elements of the patient’s quality record. The available tabs are as follows:
Demographics
CARE (Care Coordination/Patient Safety)
CAD (Coronary Artery Disease)
DM (Diabetes Mellitus)
HF (Heart Failure)
HTN (Hypertension)
IVD (Ischemic Vascular Disease)
PREV (Preventive Care)
The Patient List and Patient Status are refreshed when one of the following activities is performed:
User presses Refresh Patient List. User navigates away from the screen and returns.
User logs on and accesses the screen.
User presses Cancel to discard patient edits.
PQRS ACO GPRO Web Interface
PQRS / ACO GPRO Web Interface User Manual 01/18/13 25
5.1.2 Group Status
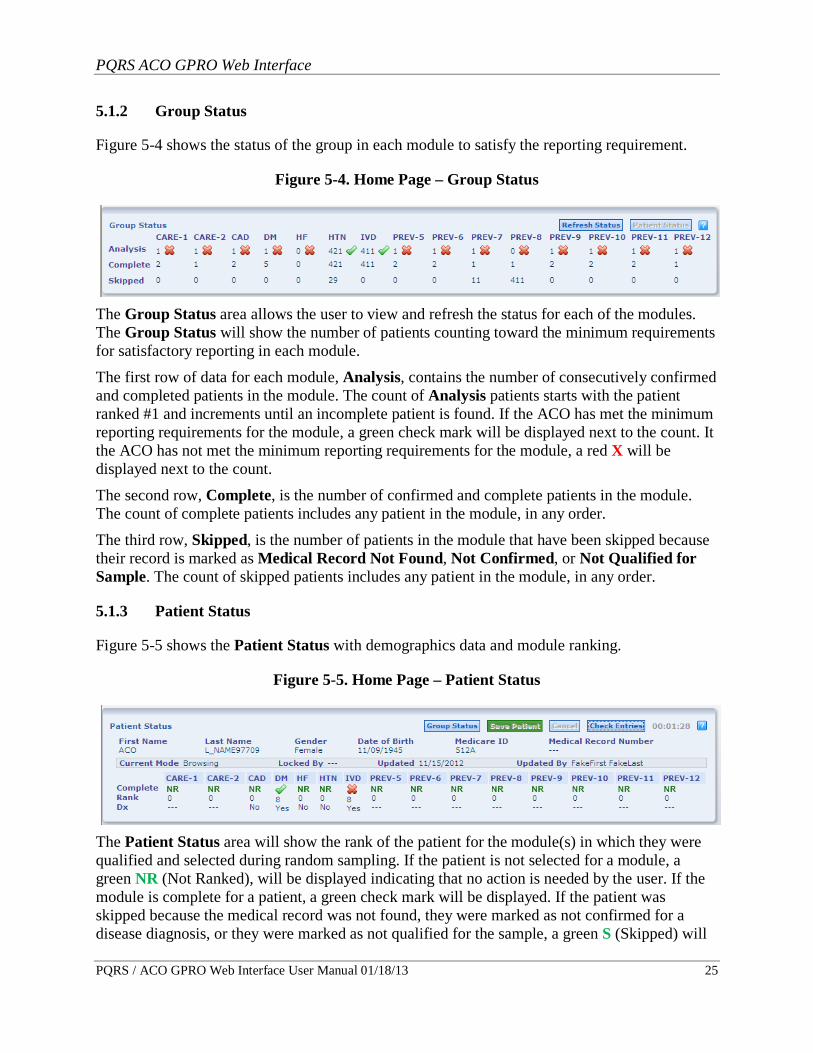
Figure 5-4 shows the status of the group in each module to satisfy the reporting requirement.
Figure 5-4. Home Page – Group Status
The Group Status area allows the user to view and refresh the status for each of the modules. The Group Status will show the number of patients counting toward the minimum requirements for satisfactory reporting in each module.
The first row of data for each module, Analysis, contains the number of consecutively confirmed and completed patients in the module. The count of Analysis patients starts with the patient ranked #1 and increments until an incomplete patient is found. If the ACO has met the minimum reporting requirements for the module, a green check mark will be displayed next to the count. It the ACO has not met the minimum reporting requirements for the module, a red X will be displayed next to the count.
The second row, Complete, is the number of confirmed and complete patients in the module. The count of complete patients includes any patient in the module, in any order.
The third row, Skipped, is the number of patients in the module that have been skipped because their record is marked as Medical Record Not Found, Not Confirmed, or Not Qualified for Sample. The count of skipped patients includes any patient in the module, in any order.
5.1.3 Patient Status
Figure 5-5 shows the Patient Status with demographics data and module ranking.
Figure 5-5. Home Page – Patient Status
The Patient Status area will show the rank of the patient for the module(s) in which they were qualified and selected during random sampling. If the patient is not selected for a module, a green NR (Not Ranked), will be displayed indicating that no action is needed by the user. If the module is complete for a patient, a green check mark will be displayed. If the patient was skipped because the medical record was not found, they were marked as not confirmed for a disease diagnosis, or they were marked as not qualified for the sample, a green S (Skipped) will
PQRS ACO GPRO Web Interface
PQRS / ACO GPRO Web Interface User Manual 01/18/13 26
disease diagnosis, or they were marked as not qualified for the sample, a green S (Skipped) will be displayed. If there is a red X this indicates that the module is incomplete and the user will need to update the information.
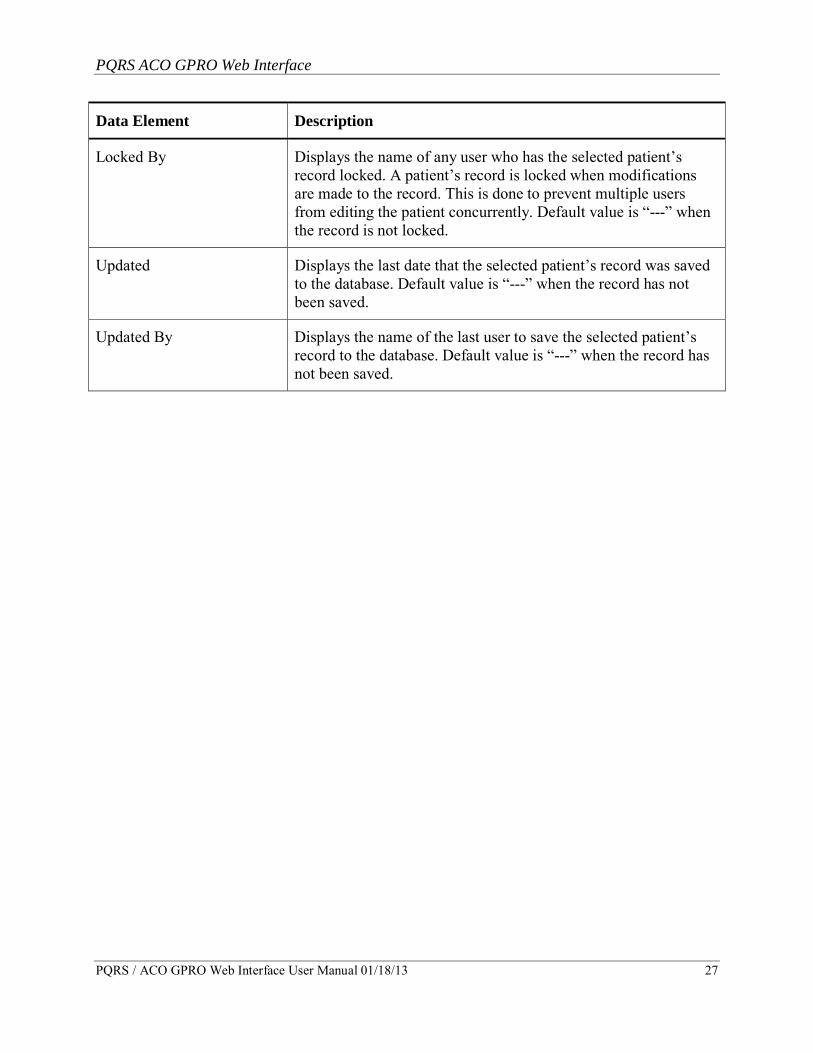
Table 5-1 details the information in the Patient Status area.
Table 5-1. Patient Status Descriptions
Data Element Description
Group Status This allows the user to switch between the Patient Status and the Group Status dashboard.
Save Patient Click to save patient record modifications.
Cancel Click to cancel patient record modifications.
Check Entries Allows the user to see the completeness of a patient record and validate the entered data.
Timer Tracks the amount of time used to complete the patient’s quality record.
First Name Displays the first name of the selected patient.
Last Name Displays the last name of the selected patient.
Gender Displays the gender of the selected patient.
Date of Birth Displays the date of birth of the selected patient.
Medicare ID Displays the Health Insurance Claim Number of the selected patient; cannot be modified.
Medical Record Number Displays the user provided medical record number of the selected patient. The default value is blank.
Current Mode Displays the indicator if the current user has made modifications to the selected patient. If changes have not been made, the Current Mode is Browsing. If changes have been made, but not saved, the Current Mode is Editing.
PQRS ACO GPRO Web Interface
PQRS / ACO GPRO Web Interface User Manual 01/18/13 27
Data Element Description
Locked By Displays the name of any user who has the selected patient’s record locked. A patient’s record is locked when modifications are made to the record. This is done to prevent multiple users from editing the patient concurrently. Default value is “---” when the record is not locked.
Updated Displays the last date that the selected patient’s record was saved to the database. Default value is “---” when the record has not been saved.
Updated By Displays the name of the last user to save the selected patient’s record to the database. Default value is “---” when the record has not been saved.
PQRS ACO GPRO Web Interface
PQRS / ACO GPRO Web Interface User Manual 01/18/13 28
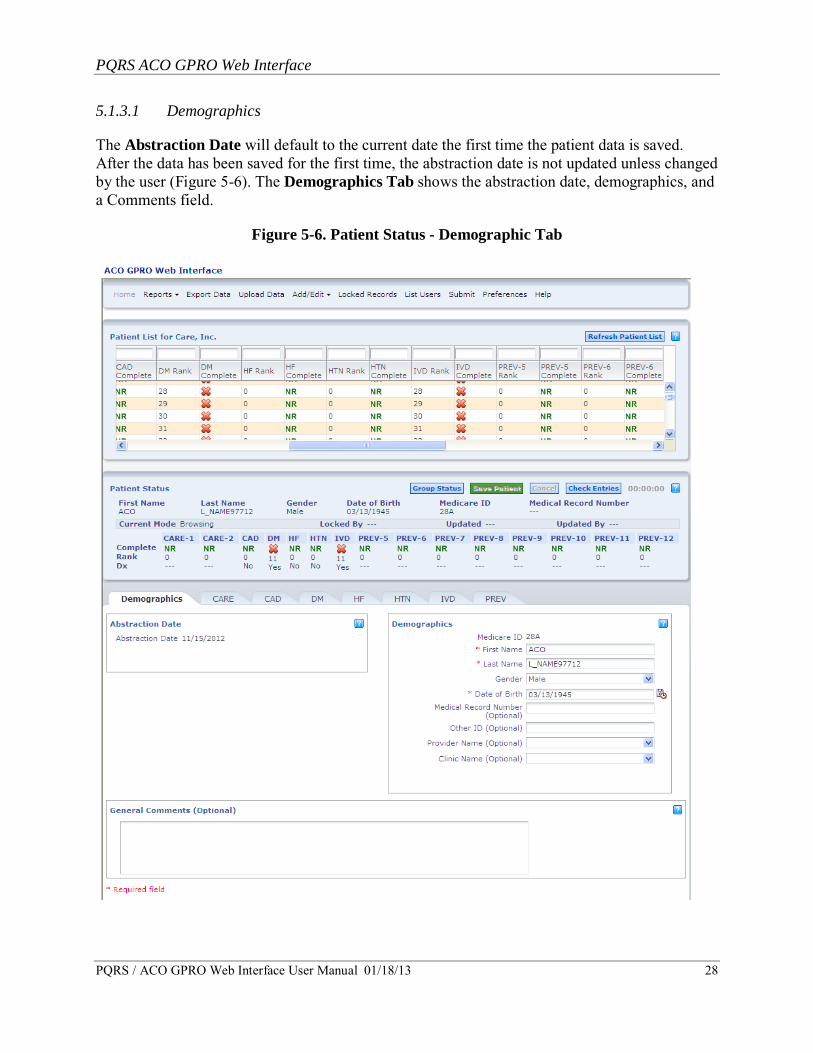
5.1.3.1 Demographics
The Abstraction Date will default to the current date the first time the patient data is saved. After the data has been saved for the first time, the abstraction date is not updated unless changed by the user (Figure 5-6). The Demographics Tab shows the abstraction date, demographics, and a Comments field.
Figure 5-6. Patient Status - Demographic Tab
PQRS ACO GPRO Web Interface
PQRS / ACO GPRO Web Interface User Manual 01/18/13 29
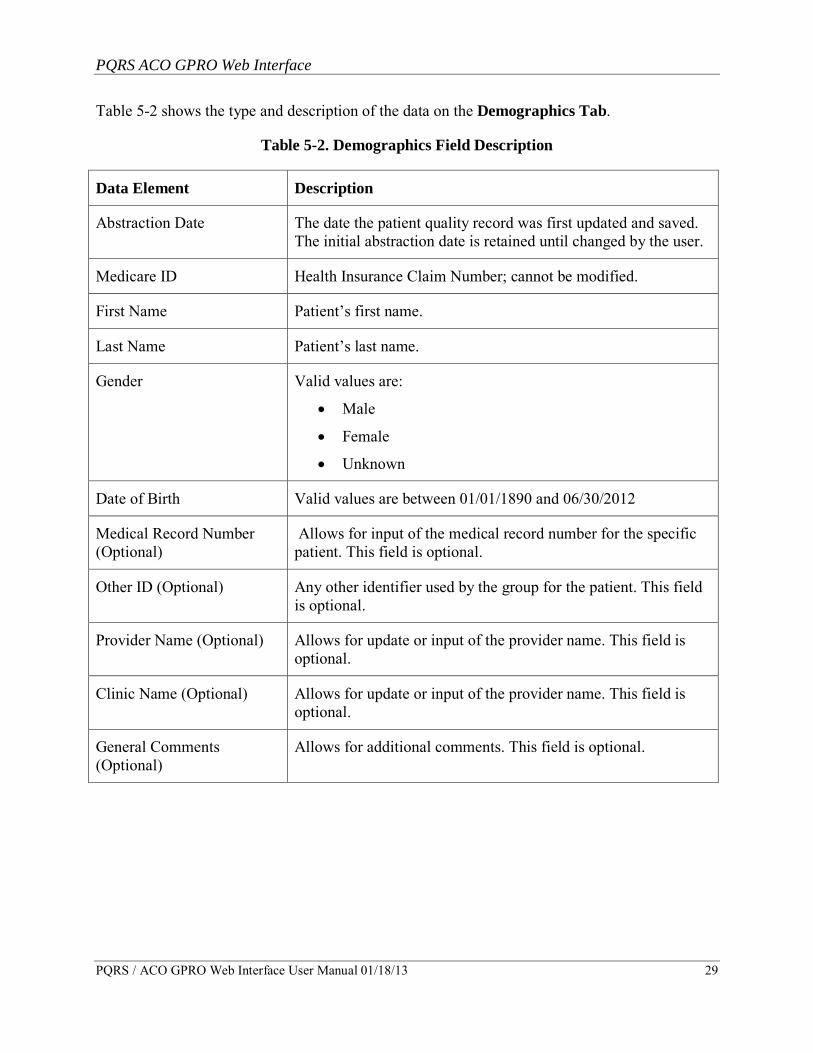
Table 5-2 shows the type and description of the data on the Demographics Tab.
Table 5-2. Demographics Field Description
Data Element Description
Abstraction Date The date the patient quality record was first updated and saved. The initial abstraction date is retained until changed by the user.
Medicare ID Health Insurance Claim Number; cannot be modified.
First Name Patient’s first name.
Last Name Patient’s last name.
Gender Valid values are:
• Male
• Female
• Unknown
Date of Birth Valid values are between 01/01/1890 and 06/30/2012
Medical Record Number (Optional)
Allows for input of the medical record number for the specific patient. This field is optional.
Other ID (Optional) Any other identifier used by the group for the patient. This field is optional.
Provider Name (Optional) Allows for update or input of the provider name. This field is optional.
Clinic Name (Optional) Allows for update or input of the provider name. This field is optional.
General Comments (Optional)
Allows for additional comments. This field is optional.
PQRS ACO GPRO Web Interface
PQRS / ACO GPRO Web Interface User Manual 01/18/13 30
5.1.4 Patient Status - CARE Tab
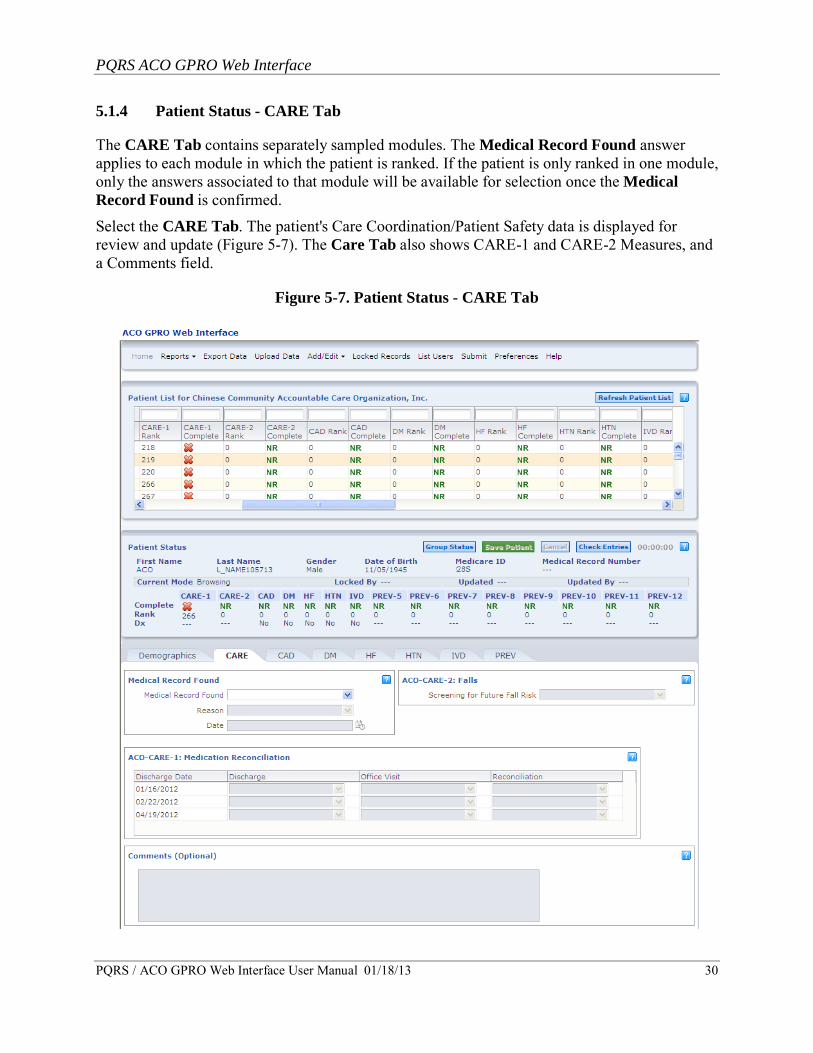
The CARE Tab contains separately sampled modules. The Medical Record Found answer applies to each module in which the patient is ranked. If the patient is only ranked in one module, only the answers associated to that module will be available for selection once the Medical Record Found is confirmed.
Select the CARE Tab. The patient's Care Coordination/Patient Safety data is displayed for review and update (Figure 5-7). The Care Tab also shows CARE-1 and CARE-2 Measures, and a Comments field.
Figure 5-7. Patient Status - CARE Tab
PQRS ACO GPRO Web Interface
PQRS / ACO GPRO Web Interface User Manual 01/18/13 31
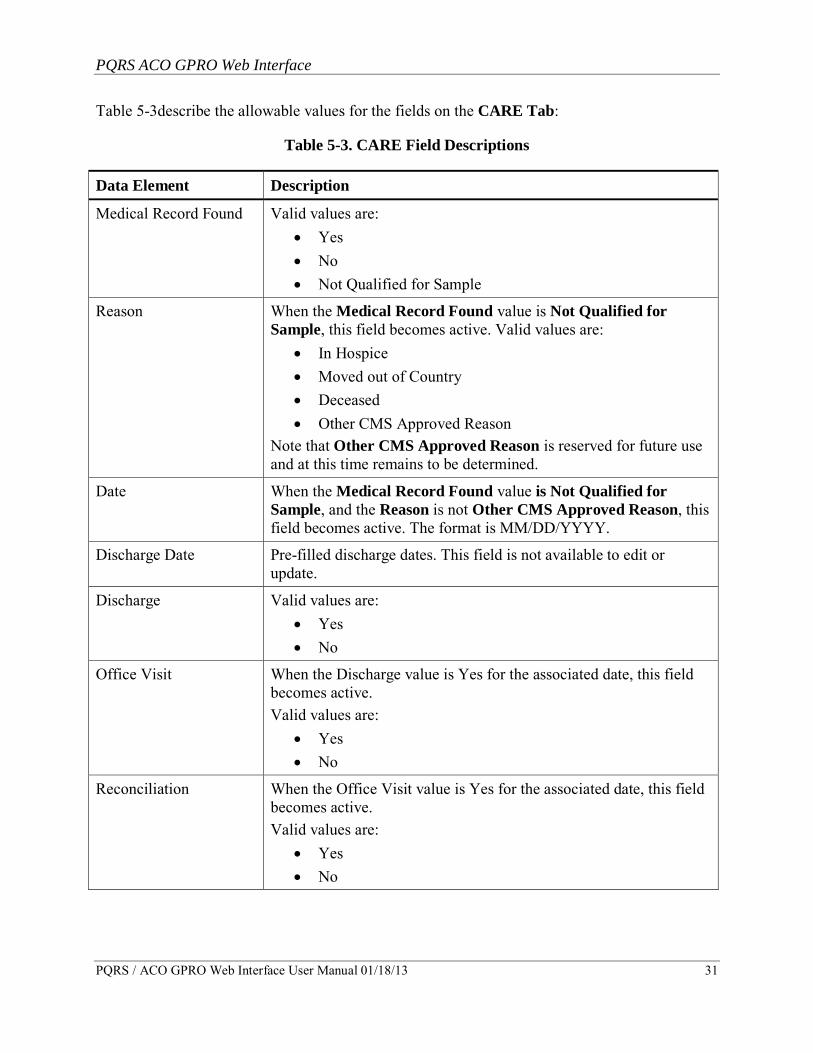
Table 5-3describe the allowable values for the fields on the CARE Tab:
Table 5-3. CARE Field Descriptions
Data Element Description
Medical Record Found Valid values are: • Yes • No • Not Qualified for Sample
Reason When the Medical Record Found value is Not Qualified for Sample, this field becomes active. Valid values are:
• In Hospice • Moved out of Country • Deceased • Other CMS Approved Reason
Note that Other CMS Approved Reason is reserved for future use and at this time remains to be determined.
Date When the Medical Record Found value is Not Qualified for Sample, and the Reason is not Other CMS Approved Reason, this field becomes active. The format is MM/DD/YYYY.
Discharge Date Pre-filled discharge dates. This field is not available to edit or update.
Discharge Valid values are: • Yes • No
Office Visit When the Discharge value is Yes for the associated date, this field becomes active. Valid values are:
• Yes • No
Reconciliation When the Office Visit value is Yes for the associated date, this field becomes active. Valid values are:
• Yes • No
PQRS ACO GPRO Web Interface
PQRS / ACO GPRO Web Interface User Manual 01/18/13 32
Data Element Description
ACO-CARE-2 Falls Risk Screening
Valid values are: • Yes • No • No - Medical Reasons
Comments Allows for additional comments. This field is optional. This field is active when a selection has been made in Medical Record Found.
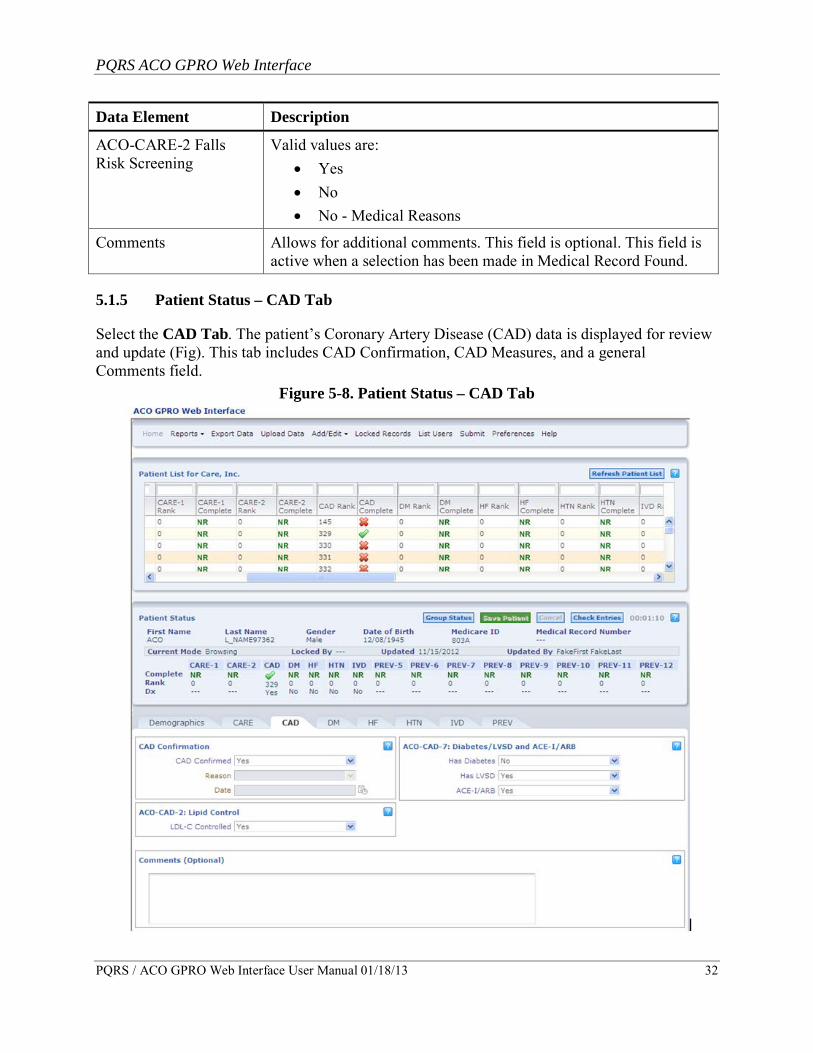
5.1.5 Patient Status – CAD Tab
Select the CAD Tab. The patient’s Coronary Artery Disease (CAD) data is displayed for review and update (Fig). This tab includes CAD Confirmation, CAD Measures, and a general Comments field.
Figure 5-8. Patient Status – CAD Tab
PQRS ACO GPRO Web Interface
PQRS / ACO GPRO Web Interface User Manual 01/18/13 33
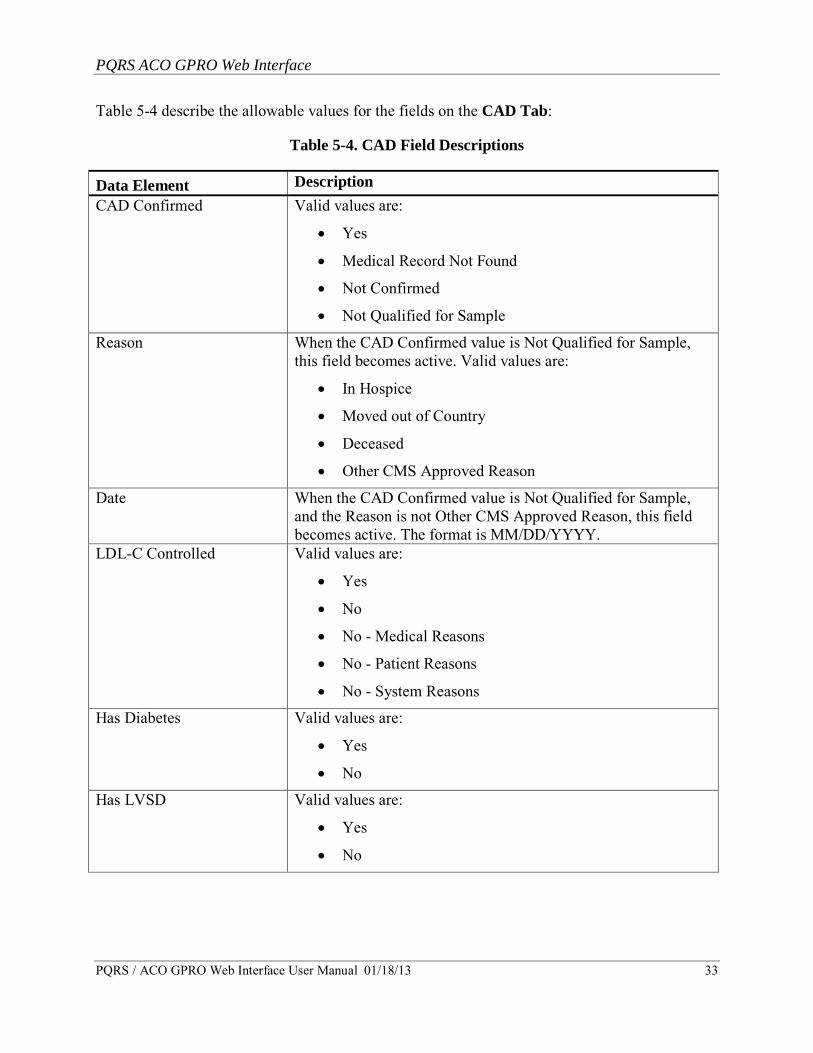
Table 5-4 describe the allowable values for the fields on the CAD Tab:
Table 5-4. CAD Field Descriptions
Data Element Description CAD Confirmed Valid values are:
• Yes
• Medical Record Not Found
• Not Confirmed
• Not Qualified for Sample
Reason When the CAD Confirmed value is Not Qualified for Sample, this field becomes active. Valid values are:
• In Hospice
• Moved out of Country
• Deceased
• Other CMS Approved Reason
Date When the CAD Confirmed value is Not Qualified for Sample, and the Reason is not Other CMS Approved Reason, this field becomes active. The format is MM/DD/YYYY.
LDL-C Controlled Valid values are:
• Yes
• No
• No - Medical Reasons
• No - Patient Reasons
• No - System Reasons
Has Diabetes Valid values are:
• Yes
• No
Has LVSD Valid values are:
• Yes
• No

PQRS ACO GPRO Web Interface
PQRS / ACO GPRO Web Interface User Manual 01/18/13 34
Data Element Description ACE–I/ARB When either the Has Diabetes or Has LVSD value is Yes, this
field becomes active. Valid values are:
• Yes
• No
• No - Medical Reasons
• No - Patient Reasons
• No - System Reasons
Comments Allows for additional comments. This field is optional. This field is active when a selection has been made in CAD Confirmed.

PQRS ACO GPRO Web Interface
PQRS / ACO GPRO Web Interface User Manual 01/18/13 35
5.1.6 Patient Status - DM Tab
Select the DM Tab. The patient's Diabetes Mellitus (DM) data is displayed for review and update (Figure 6-9). The DM Tab provides fields to update DM Confirmation and DM measures and has a general Comments field.
Figure 5-9. Patient Status - DM Tab
PQRS ACO GPRO Web Interface
PQRS / ACO GPRO Web Interface User Manual 01/18/13 36
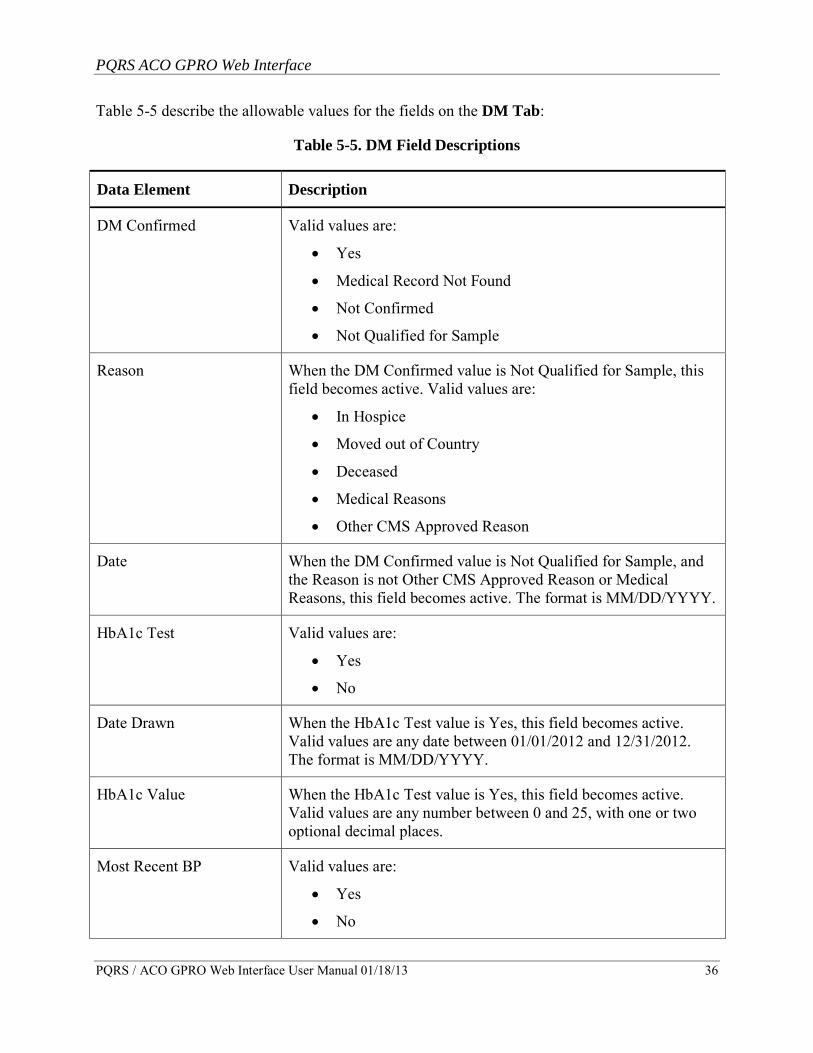
Table 5-5 describe the allowable values for the fields on the DM Tab:
Table 5-5. DM Field Descriptions
Data Element Description
DM Confirmed Valid values are:
• Yes
• Medical Record Not Found
• Not Confirmed
• Not Qualified for Sample
Reason When the DM Confirmed value is Not Qualified for Sample, this field becomes active. Valid values are:
• In Hospice
• Moved out of Country
• Deceased
• Medical Reasons
• Other CMS Approved Reason
Date When the DM Confirmed value is Not Qualified for Sample, and the Reason is not Other CMS Approved Reason or Medical Reasons, this field becomes active. The format is MM/DD/YYYY.
HbA1c Test Valid values are:
• Yes
• No
Date Drawn When the HbA1c Test value is Yes, this field becomes active. Valid values are any date between 01/01/2012 and 12/31/2012. The format is MM/DD/YYYY.
HbA1c Value When the HbA1c Test value is Yes, this field becomes active. Valid values are any number between 0 and 25, with one or two optional decimal places.
Most Recent BP Valid values are:
• Yes
• No
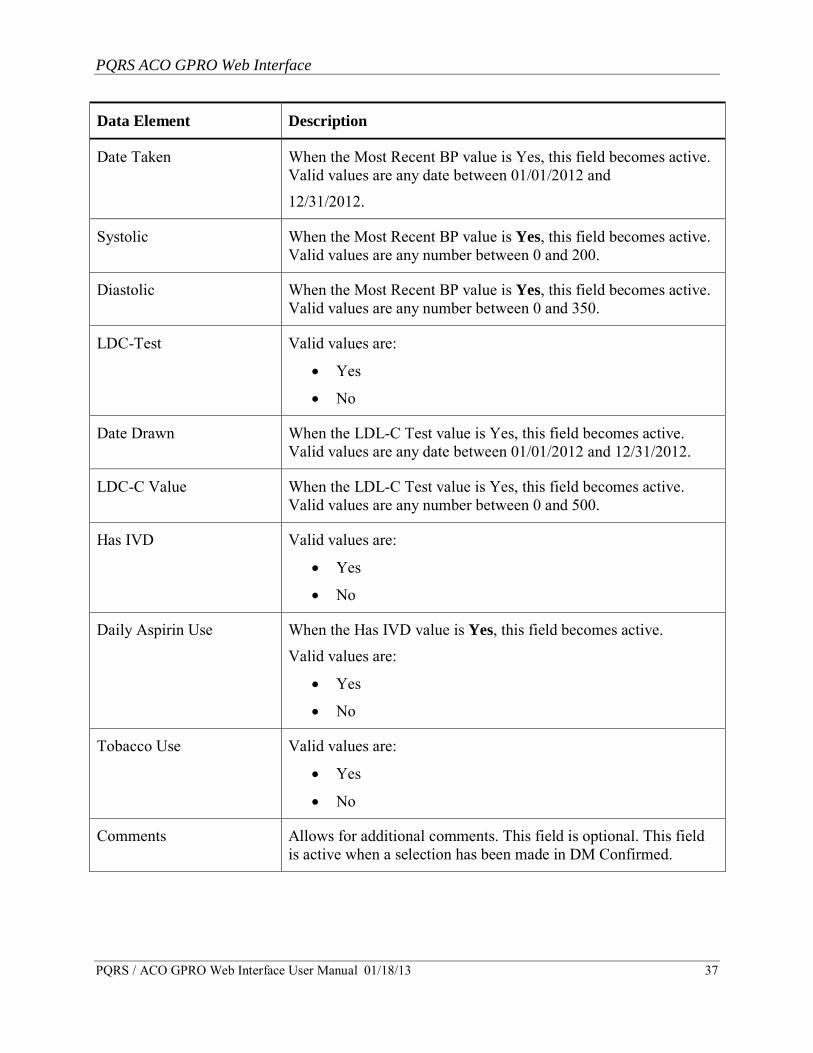
PQRS ACO GPRO Web Interface
PQRS / ACO GPRO Web Interface User Manual 01/18/13 37
Data Element Description
Date Taken When the Most Recent BP value is Yes, this field becomes active. Valid values are any date between 01/01/2012 and
12/31/2012.
Systolic When the Most Recent BP value is Yes, this field becomes active. Valid values are any number between 0 and 200.
Diastolic When the Most Recent BP value is Yes, this field becomes active. Valid values are any number between 0 and 350.
LDC-Test Valid values are:
• Yes
• No
Date Drawn When the LDL-C Test value is Yes, this field becomes active. Valid values are any date between 01/01/2012 and 12/31/2012.
LDC-C Value When the LDL-C Test value is Yes, this field becomes active. Valid values are any number between 0 and 500.
Has IVD Valid values are:
• Yes
• No
Daily Aspirin Use When the Has IVD value is Yes, this field becomes active.
Valid values are:
• Yes
• No
Tobacco Use Valid values are:
• Yes
• No
Comments Allows for additional comments. This field is optional. This field is active when a selection has been made in DM Confirmed.
PQRS ACO GPRO Web Interface
PQRS / ACO GPRO Web Interface User Manual 01/18/13 38
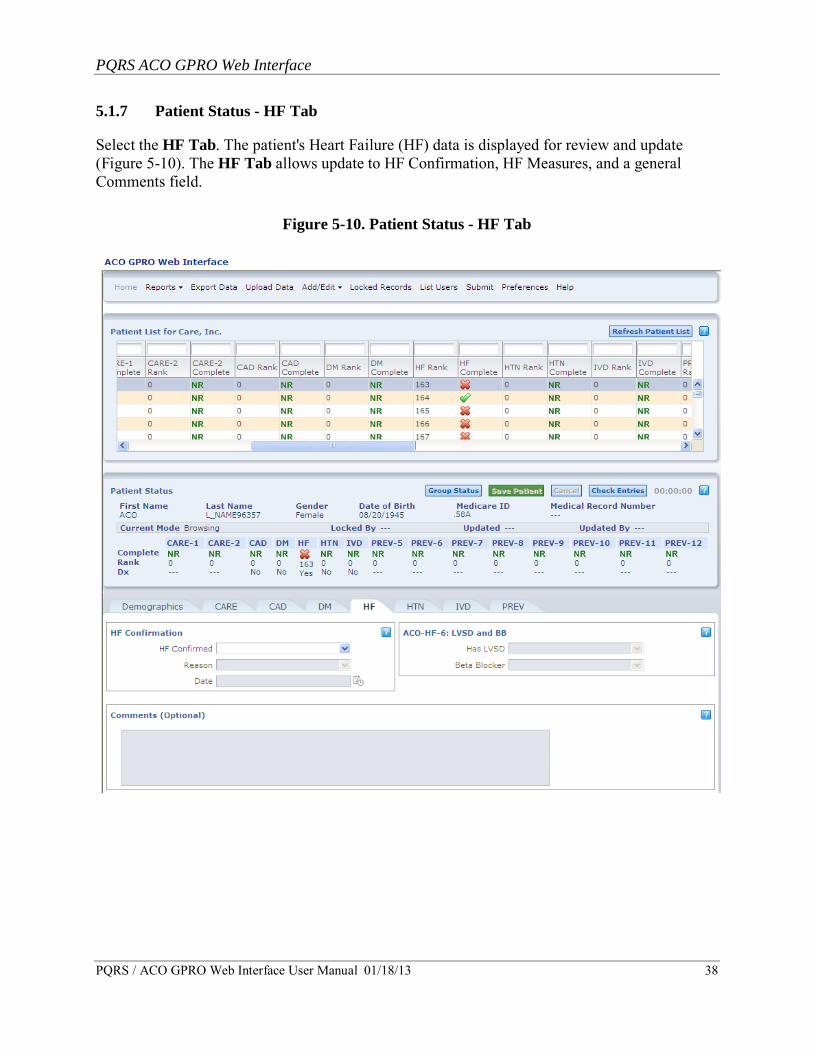
5.1.7 Patient Status - HF Tab
Select the HF Tab. The patient's Heart Failure (HF) data is displayed for review and update (Figure 5-10). The HF Tab allows update to HF Confirmation, HF Measures, and a general Comments field.
Figure 5-10. Patient Status - HF Tab
PQRS ACO GPRO Web Interface
PQRS / ACO GPRO Web Interface User Manual 01/18/13 39
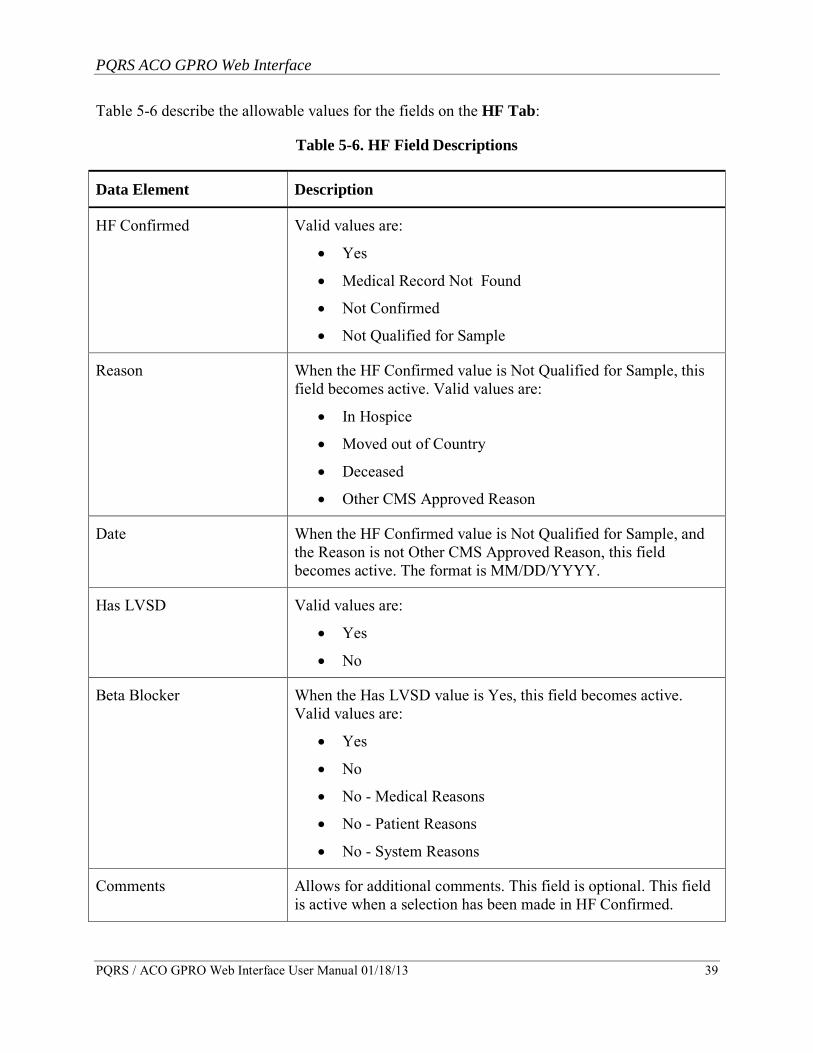
Table 5-6 describe the allowable values for the fields on the HF Tab:
Table 5-6. HF Field Descriptions
Data Element Description
HF Confirmed Valid values are:
• Yes
• Medical Record Not Found
• Not Confirmed
• Not Qualified for Sample
Reason When the HF Confirmed value is Not Qualified for Sample, this field becomes active. Valid values are:
• In Hospice
• Moved out of Country
• Deceased
• Other CMS Approved Reason
Date When the HF Confirmed value is Not Qualified for Sample, and the Reason is not Other CMS Approved Reason, this field becomes active. The format is MM/DD/YYYY.
Has LVSD Valid values are:
• Yes
• No
Beta Blocker When the Has LVSD value is Yes, this field becomes active. Valid values are:
• Yes
• No
• No - Medical Reasons
• No - Patient Reasons
• No - System Reasons
Comments Allows for additional comments. This field is optional. This field is active when a selection has been made in HF Confirmed.
PQRS ACO GPRO Web Interface
PQRS / ACO GPRO Web Interface User Manual 01/18/13 40
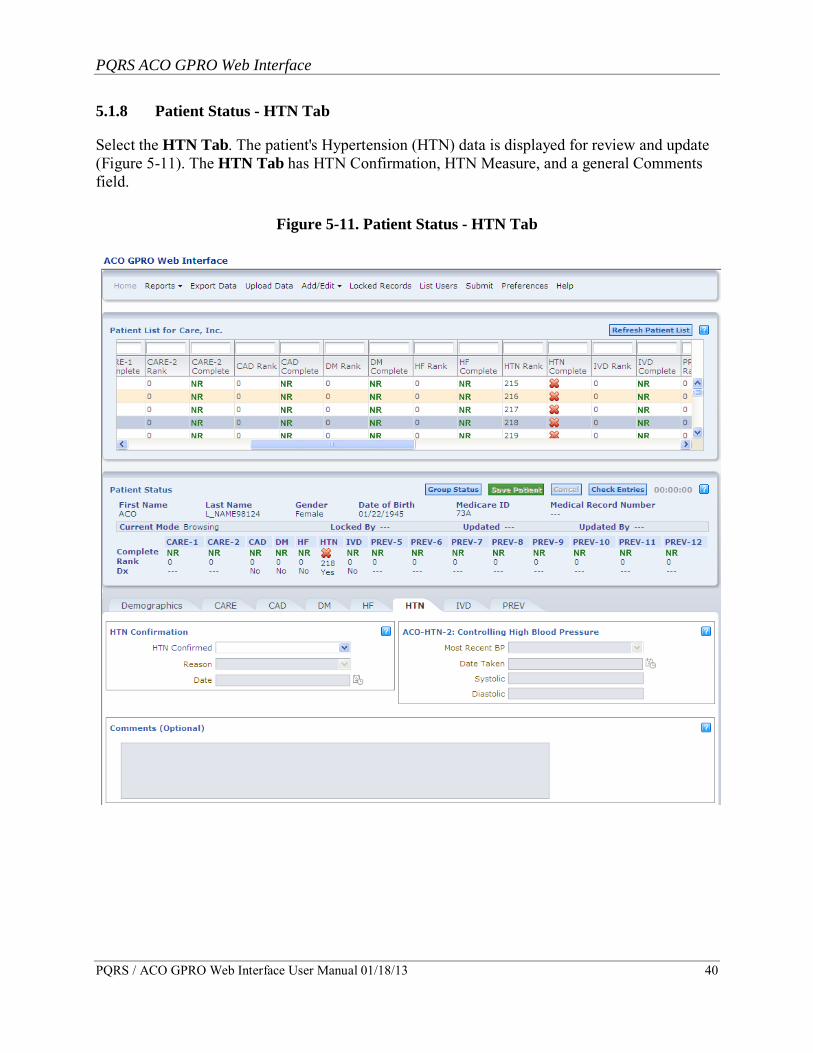
5.1.8 Patient Status - HTN Tab
Select the HTN Tab. The patient's Hypertension (HTN) data is displayed for review and update (Figure 5-11). The HTN Tab has HTN Confirmation, HTN Measure, and a general Comments field.
Figure 5-11. Patient Status - HTN Tab

PQRS ACO GPRO Web Interface
PQRS / ACO GPRO Web Interface User Manual 01/18/13 41
Table 5-7 describes the allowable values for the fields on the HTN Tab:
Table 5-7. HTN Field Descriptions
Data Element Description
HTN Confirmed Valid values are:
• Yes
• Medical Record Not Found
• Not Confirmed
• Not Qualified for Sample
Reason When the HTN Confirmed value is Not Qualified for Sample, this field becomes active. Valid values are:
• In Hospice
• Moved out of Country
• Deceased
• Other CMS Approved Reason
Date When the HTN Confirmed value is Not Qualified for Sample, and the Reason is not Other CMS Approved Reason, this field becomes active. The format is MM/DD/YYYY.
Most Recent BP Valid values are:
• Yes
• No No - Medical Reasons
Date Taken If Most Recent BP is “Yes” this field becomes available. Valid values are between 01/01/2012 and 12/31/2012. The format is MM/DD/YYYY.
Systolic Value If Most Recent BP is “Yes” this field becomes available. The blood pressure systolic reading for latest office visit. Valid value is any number between 0 and 350.
Diastolic Value If Most Recent BP is “Yes” this field becomes available. The blood pressure diastolic reading for latest office visit. Valid value is any number between 0 and 200.
PQRS ACO GPRO Web Interface
PQRS / ACO GPRO Web Interface User Manual 01/18/13 42
Data Element Description
Comments Allows for additional comments. This field is optional. This field is active when a selection has been made in HTN Confirmed.
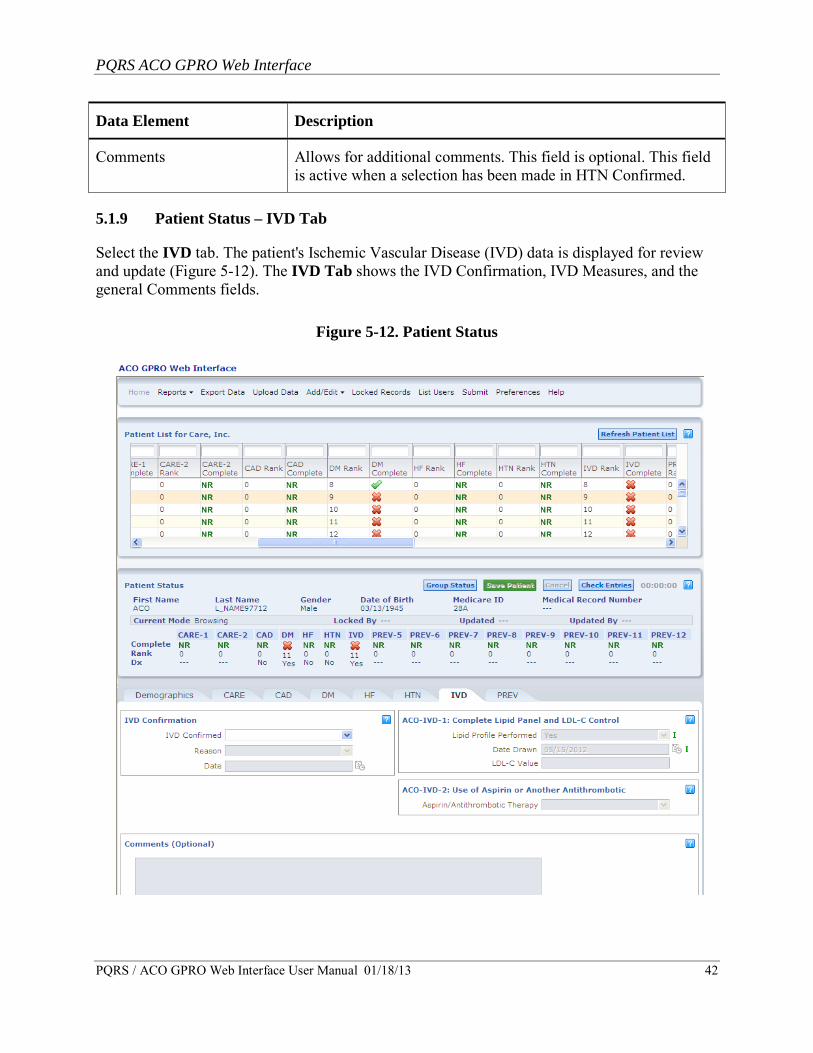
5.1.9 Patient Status – IVD Tab
Select the IVD tab. The patient's Ischemic Vascular Disease (IVD) data is displayed for review and update (Figure 5-12). The IVD Tab shows the IVD Confirmation, IVD Measures, and the general Comments fields.
Figure 5-12. Patient Status
PQRS ACO GPRO Web Interface
PQRS / ACO GPRO Web Interface User Manual 01/18/13 43
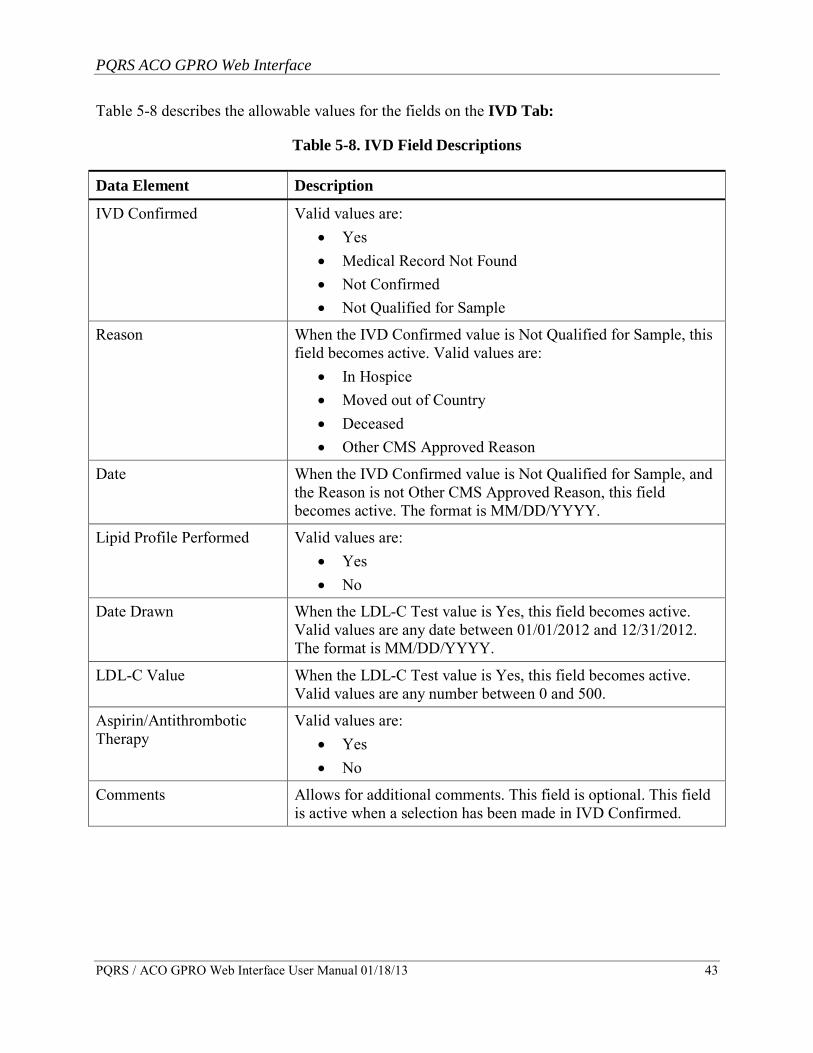
Table 5-8 describes the allowable values for the fields on the IVD Tab:
Table 5-8. IVD Field Descriptions
Data Element Description
IVD Confirmed Valid values are: • Yes • Medical Record Not Found • Not Confirmed • Not Qualified for Sample
Reason When the IVD Confirmed value is Not Qualified for Sample, this field becomes active. Valid values are:
• In Hospice • Moved out of Country • Deceased • Other CMS Approved Reason
Date When the IVD Confirmed value is Not Qualified for Sample, and the Reason is not Other CMS Approved Reason, this field becomes active. The format is MM/DD/YYYY.
Lipid Profile Performed Valid values are: • Yes • No
Date Drawn When the LDL-C Test value is Yes, this field becomes active. Valid values are any date between 01/01/2012 and 12/31/2012. The format is MM/DD/YYYY.
LDL-C Value When the LDL-C Test value is Yes, this field becomes active. Valid values are any number between 0 and 500.
Aspirin/Antithrombotic Therapy
Valid values are: • Yes • No
Comments Allows for additional comments. This field is optional. This field is active when a selection has been made in IVD Confirmed.
PQRS ACO GPRO Web Interface
PQRS / ACO GPRO Web Interface User Manual 01/18/13 44
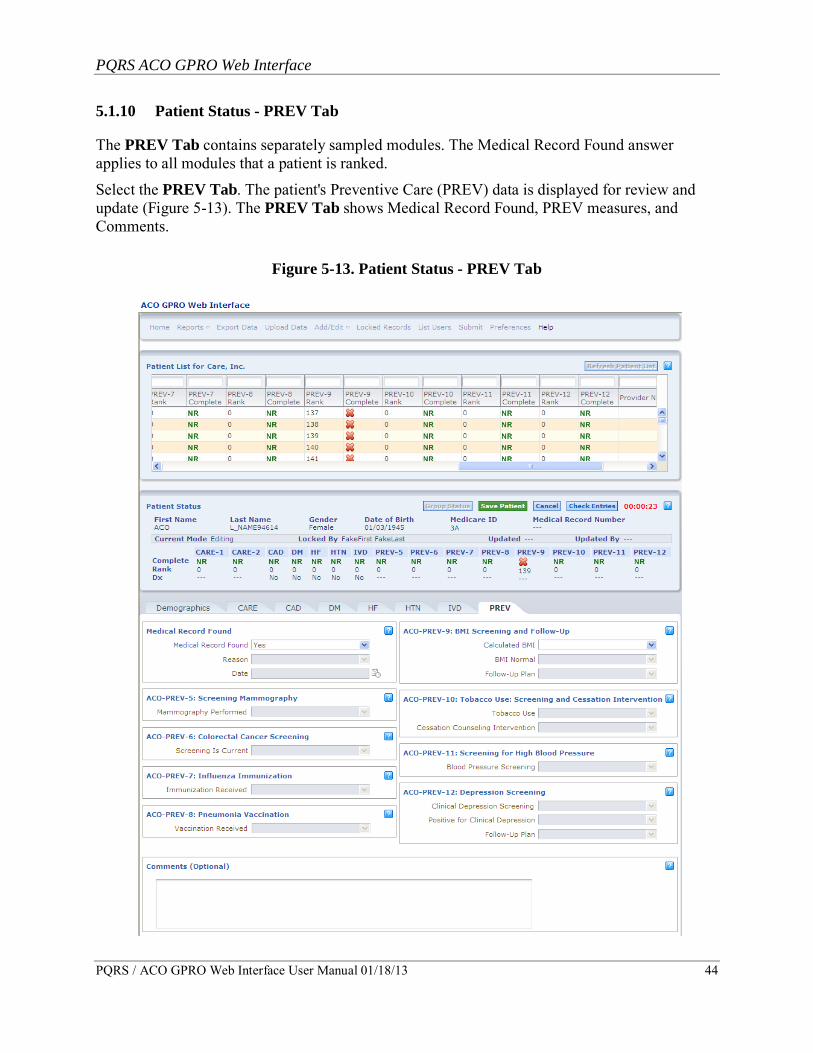
5.1.10 Patient Status - PREV Tab
The PREV Tab contains separately sampled modules. The Medical Record Found answer applies to all modules that a patient is ranked.
Select the PREV Tab. The patient's Preventive Care (PREV) data is displayed for review and update (Figure 5-13). The PREV Tab shows Medical Record Found, PREV measures, and Comments.
Figure 5-13. Patient Status - PREV Tab
PQRS ACO GPRO Web Interface
PQRS / ACO GPRO Web Interface User Manual 01/18/13 45
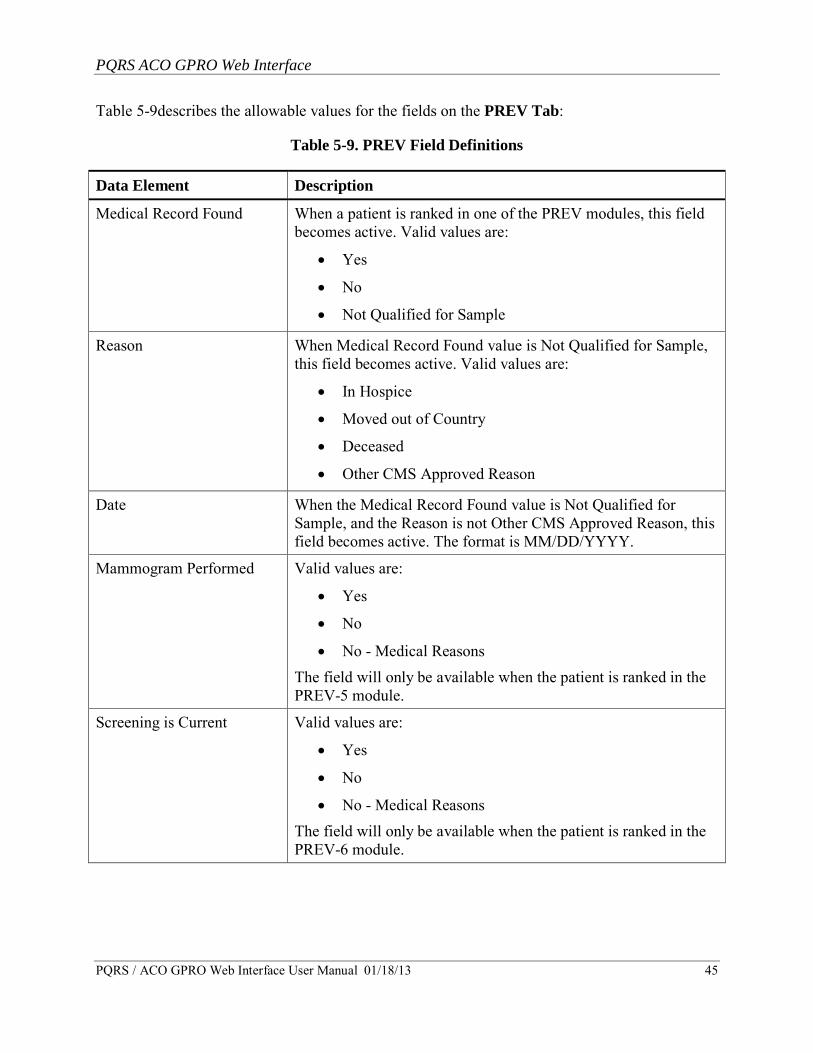
Table 5-9describes the allowable values for the fields on the PREV Tab:
Table 5-9. PREV Field Definitions
Data Element Description
Medical Record Found When a patient is ranked in one of the PREV modules, this field becomes active. Valid values are:
• Yes
• No
• Not Qualified for Sample
Reason When Medical Record Found value is Not Qualified for Sample, this field becomes active. Valid values are:
• In Hospice
• Moved out of Country
• Deceased
• Other CMS Approved Reason
Date When the Medical Record Found value is Not Qualified for Sample, and the Reason is not Other CMS Approved Reason, this field becomes active. The format is MM/DD/YYYY.
Mammogram Performed Valid values are:
• Yes
• No
• No - Medical Reasons The field will only be available when the patient is ranked in the PREV-5 module.
Screening is Current Valid values are:
• Yes
• No
• No - Medical Reasons The field will only be available when the patient is ranked in the PREV-6 module.
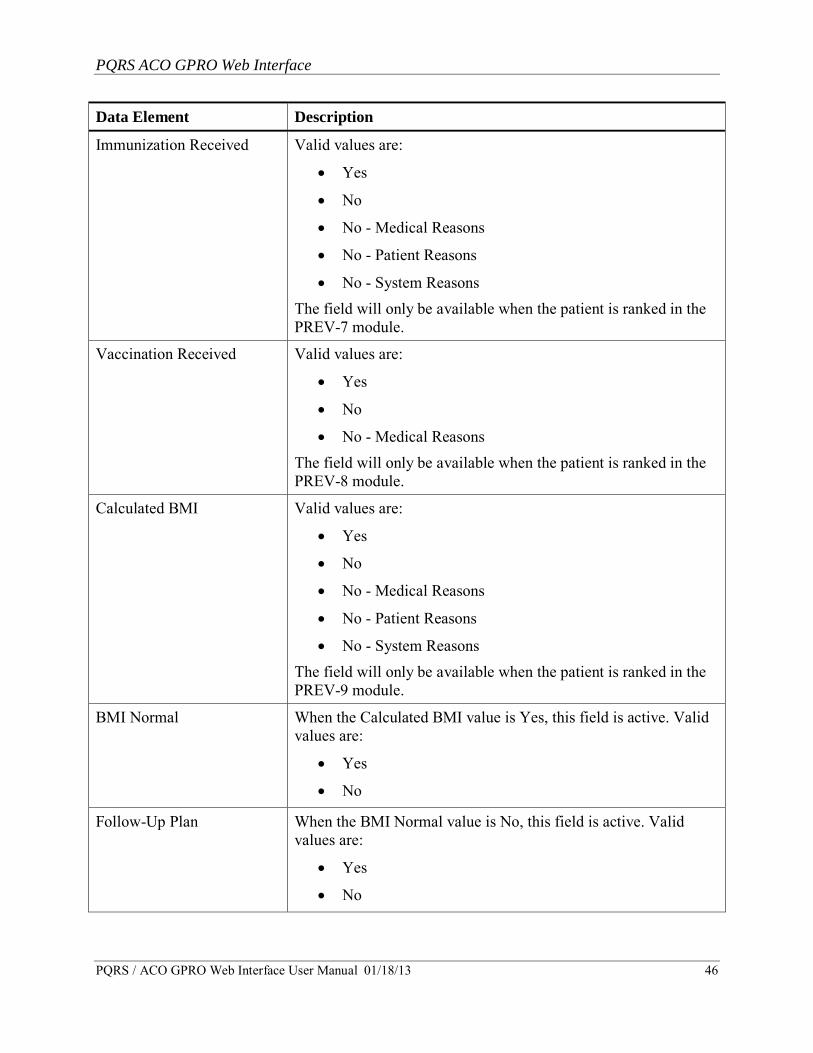
PQRS ACO GPRO Web Interface
PQRS / ACO GPRO Web Interface User Manual 01/18/13 46
Data Element Description
Immunization Received Valid values are:
• Yes
• No
• No - Medical Reasons
• No - Patient Reasons
• No - System Reasons The field will only be available when the patient is ranked in the PREV-7 module.
Vaccination Received Valid values are:
• Yes
• No
• No - Medical Reasons The field will only be available when the patient is ranked in the PREV-8 module.
Calculated BMI Valid values are:
• Yes
• No
• No - Medical Reasons
• No - Patient Reasons
• No - System Reasons The field will only be available when the patient is ranked in the PREV-9 module.
BMI Normal When the Calculated BMI value is Yes, this field is active. Valid values are:
• Yes
• No
Follow-Up Plan When the BMI Normal value is No, this field is active. Valid values are:
• Yes
• No

PQRS ACO GPRO Web Interface
PQRS / ACO GPRO Web Interface User Manual 01/18/13 47
Data Element Description
Tobacco Use Valid values are:
• Yes
• No
• Not Screened The field will only be available when the patient is ranked in the PREV-10 module.
Cessation Counseling Intervention
When the Tobacco Use value is “Yes” this field becomes active. Valid values are:
• Yes
• No
Blood Pressure Screening Valid values are:
• Yes
• No
• No - Medical Reasons
• No - Patient Reasons The field will only be available when the patient is ranked in the PREV-11 module.
Clinical Depression Screening
Valid values are:
• Yes
• No
• No - Medical Reasons
• No - Patient Reasons
• No - System Reasons The field will only be available when the patient is ranked in the PREV-12 module.
Positive for Clinical Depression
When the Screened for Clinical Depression value is Yes, this field is active. Valid values are:
• Yes
• No
PQRS ACO GPRO Web Interface
PQRS / ACO GPRO Web Interface User Manual 01/18/13 48
Data Element Description
Follow-Up Plan When the Positive for Clinical Depression value is Yes, this field is active. Valid values are:
• Yes
• No
Comments Allows for additional comments. This field is optional. This field is active when a selection has been made in Medical Record found.
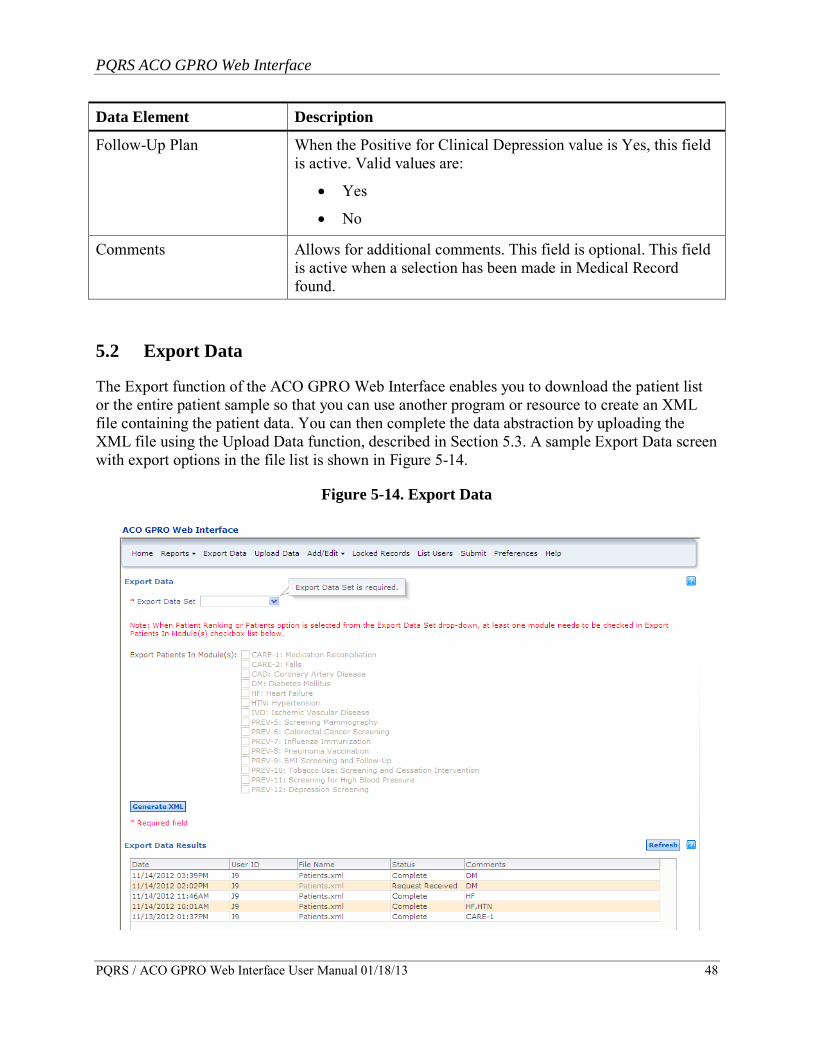
5.2 Export Data
The Export function of the ACO GPRO Web Interface enables you to download the patient list or the entire patient sample so that you can use another program or resource to create an XML file containing the patient data. You can then complete the data abstraction by uploading the XML file using the Upload Data function, described in Section 5.3. A sample Export Data screen with export options in the file list is shown in Figure 5-14.
Figure 5-14. Export Data
PQRS ACO GPRO Web Interface
PQRS / ACO GPRO Web Interface User Manual 01/18/13 49
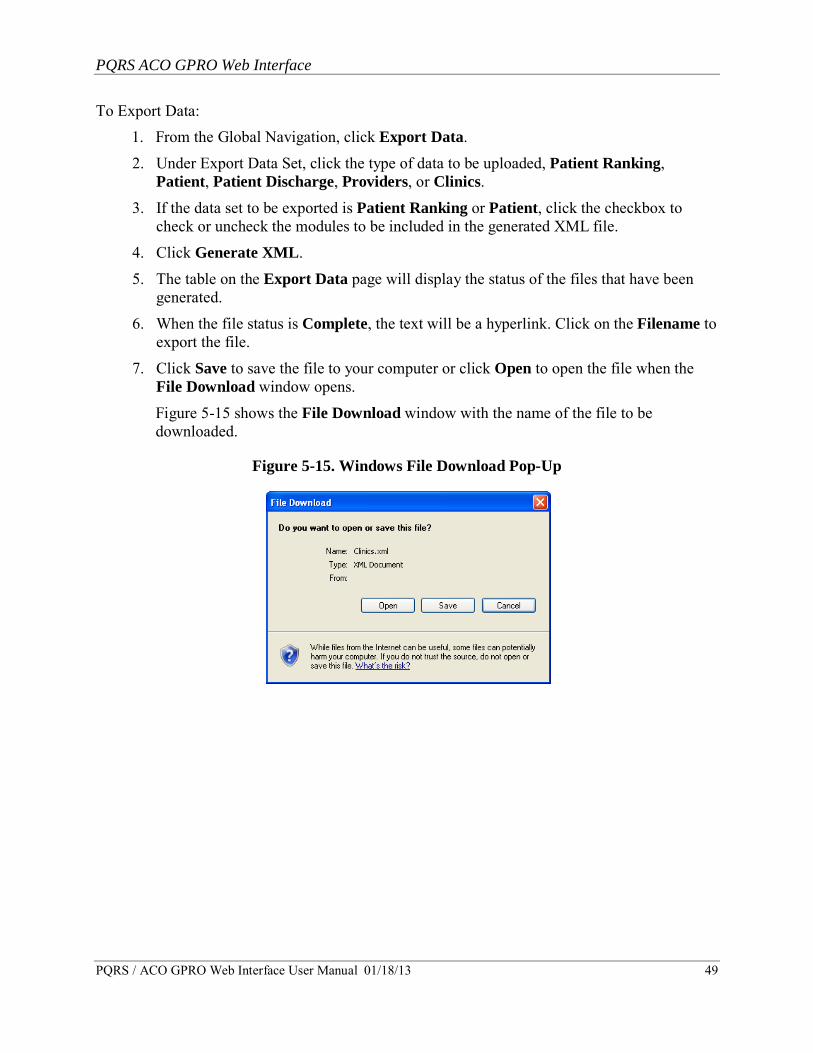
To Export Data: 1. From the Global Navigation, click Export Data.
2. Under Export Data Set, click the type of data to be uploaded, Patient Ranking, Patient, Patient Discharge, Providers, or Clinics.
3. If the data set to be exported is Patient Ranking or Patient, click the checkbox to check or uncheck the modules to be included in the generated XML file.
4. Click Generate XML.
5. The table on the Export Data page will display the status of the files that have been generated.
6. When the file status is Complete, the text will be a hyperlink. Click on the Filename to export the file.
7. Click Save to save the file to your computer or click Open to open the file when the File Download window opens.
Figure 5-15 shows the File Download window with the name of the file to be downloaded.
Figure 5-15. Windows File Download Pop-Up
PQRS ACO GPRO Web Interface
PQRS / ACO GPRO Web Interface User Manual 01/18/13 50
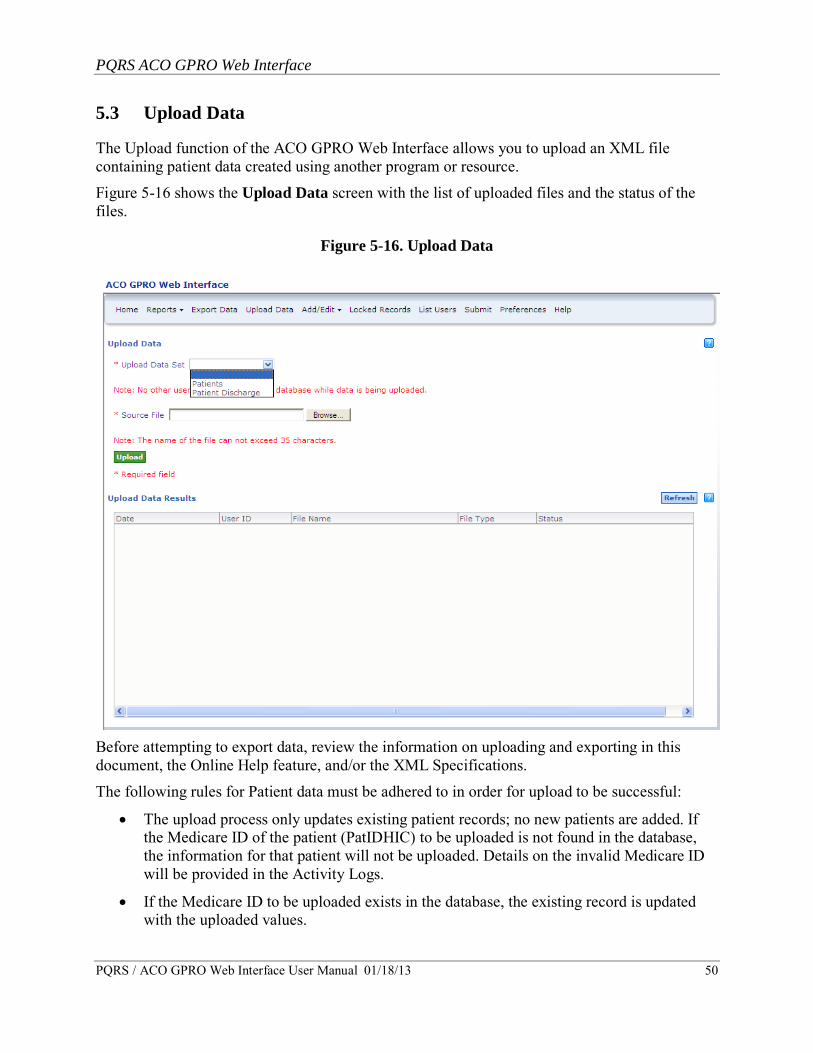
5.3 Upload Data
The Upload function of the ACO GPRO Web Interface allows you to upload an XML file containing patient data created using another program or resource.
Figure 5-16 shows the Upload Data screen with the list of uploaded files and the status of the files.
Figure 5-16. Upload Data
Before attempting to export data, review the information on uploading and exporting in this document, the Online Help feature, and/or the XML Specifications.
The following rules for Patient data must be adhered to in order for upload to be successful:
• The upload process only updates existing patient records; no new patients are added. If the Medicare ID of the patient (PatIDHIC) to be uploaded is not found in the database, the information for that patient will not be uploaded. Details on the invalid Medicare ID will be provided in the Activity Logs.
• If the Medicare ID to be uploaded exists in the database, the existing record is updated with the uploaded values.
PQRS ACO GPRO Web Interface
PQRS / ACO GPRO Web Interface User Manual 01/18/13 51
The following rules for Patient Discharge data must adhered to in order for upload to be successful:
• If the Medicare ID number of the patient to be uploaded is not found in the database, the discharge data will not be uploaded. Details on the invalid Medicare ID will be provided in the Activity Logs.
• If the Medicare ID number of the patient to be uploaded is found in the database but the Discharge Date does not exist for the patient, the data will not be uploaded. Details on the invalid date will be provided in the Activity Logs.
• If the values of the Medicare ID and Discharge Date to be uploaded exist in the database, the existing record is updated with the uploaded values.
• There must be no duplicate Discharge Dates for each patient in the XML file. That is, the combination of Medicare ID and Discharge Date must be unique for each patient.
To Upload Data:
1. From the Global Navigation, click Upload Data. The Upload Data Screen appears.
2. Under Upload Data Set, Select the type of data to be uploaded, Patient or Patient Discharge.
3. In the Source File field, use the Browse… or Update… button to select the file to be uploaded. If a file name does not exist in the
4. Click Upload Data.
5. The table on the Upload Data page will display the status of the files that have been uploaded.
6. If there were errors in the file, the Status column in the table can be selected to display the errors.
No other users from your group practice (i.e., with the same Tax Identification Number in their IACS user profile) should use your group’s database while data is being uploaded.
PQRS ACO GPRO Web Interface
PQRS / ACO GPRO Web Interface User Manual 01/18/13 52
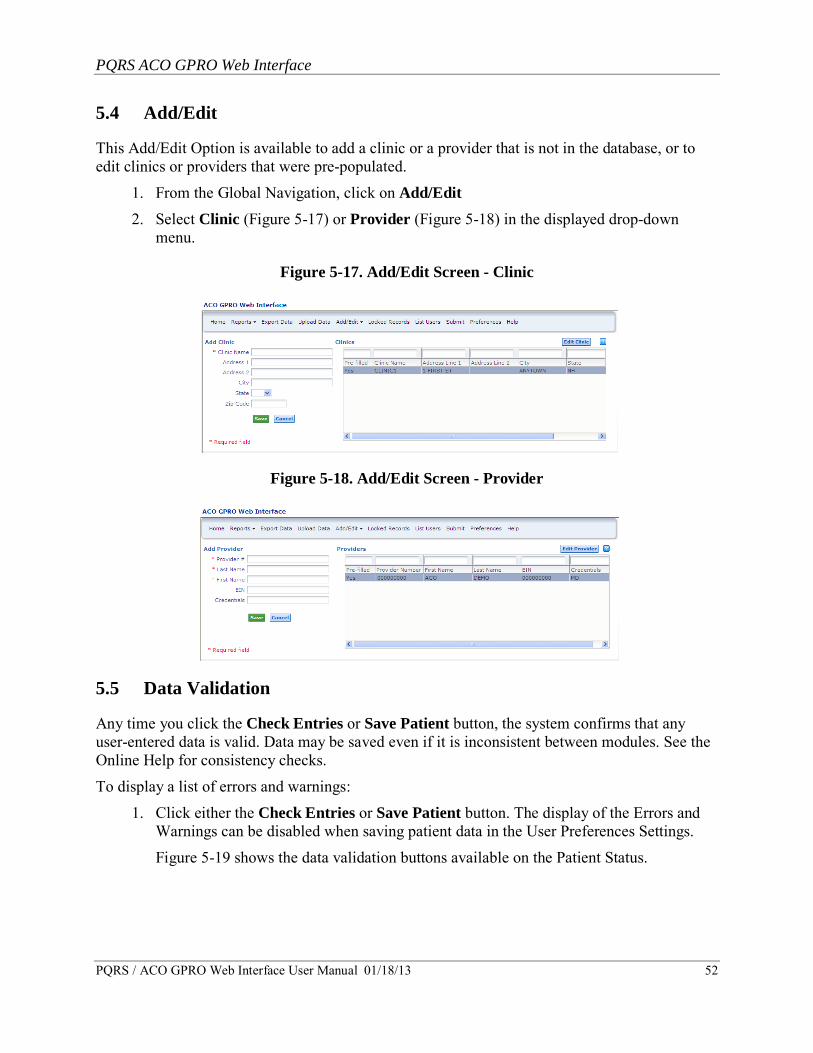
5.4 Add/Edit
This Add/Edit Option is available to add a clinic or a provider that is not in the database, or to edit clinics or providers that were pre-populated.
1. From the Global Navigation, click on Add/Edit 2. Select Clinic (Figure 5-17) or Provider (Figure 5-18) in the displayed drop-down
menu.
Figure 5-17. Add/Edit Screen - Clinic
Figure 5-18. Add/Edit Screen - Provider
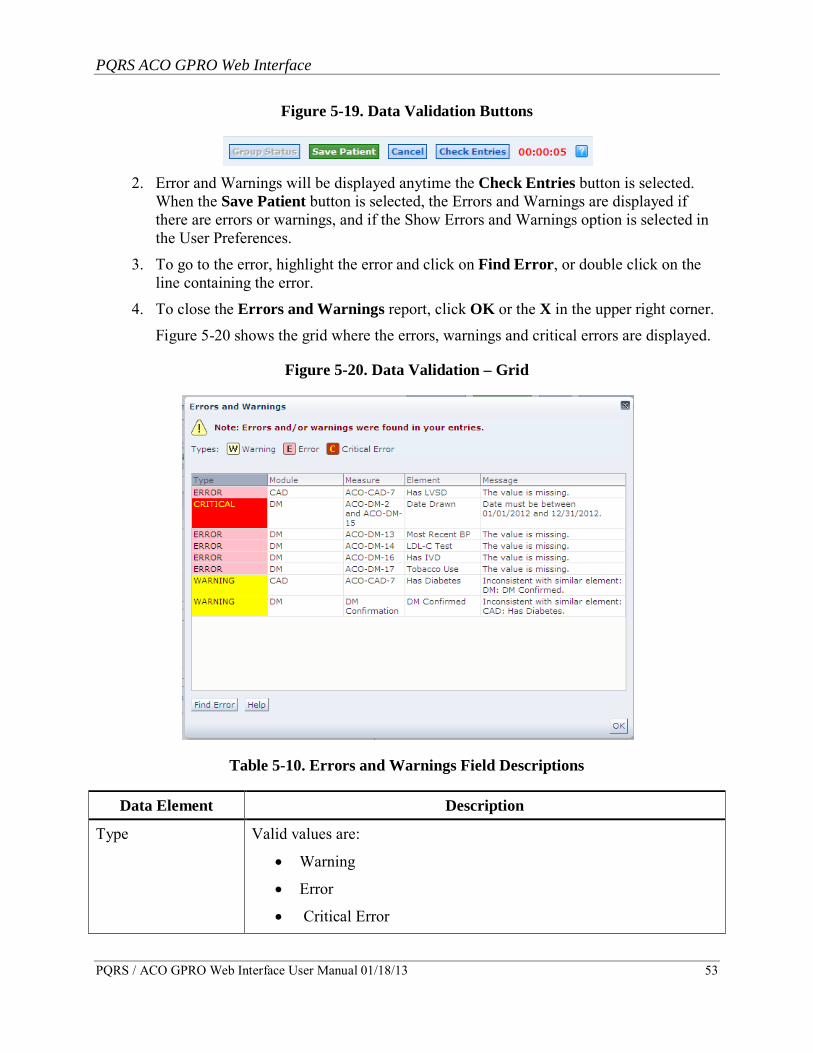
5.5 Data Validation
Any time you click the Check Entries or Save Patient button, the system confirms that any user-entered data is valid. Data may be saved even if it is inconsistent between modules. See the Online Help for consistency checks.
To display a list of errors and warnings:
1. Click either the Check Entries or Save Patient button. The display of the Errors and Warnings can be disabled when saving patient data in the User Preferences Settings.
Figure 5-19 shows the data validation buttons available on the Patient Status.
PQRS ACO GPRO Web Interface
PQRS / ACO GPRO Web Interface User Manual 01/18/13 53
Figure 5-19. Data Validation Buttons
2. Error and Warnings will be displayed anytime the Check Entries button is selected. When the Save Patient button is selected, the Errors and Warnings are displayed if there are errors or warnings, and if the Show Errors and Warnings option is selected in the User Preferences.
3. To go to the error, highlight the error and click on Find Error, or double click on the line containing the error.
4. To close the Errors and Warnings report, click OK or the X in the upper right corner.
Figure 5-20 shows the grid where the errors, warnings and critical errors are displayed.
Figure 5-20. Data Validation – Grid
Table 5-10. Errors and Warnings Field Descriptions
Data Element Description
Type Valid values are:
• Warning
• Error
• Critical Error
PQRS ACO GPRO Web Interface
PQRS / ACO GPRO Web Interface User Manual 01/18/13 54
Data Element Description
Module The tab on which the error can be found. Valid values are:
• CARE
• CAD
• DM
• HF
• HTN
• IVD
• PREV
Measure The specific individual measure that contains the error.
Element The element within the measure with the error.
Message Explanation of the error.
Note: When saving changes to patient data, your changes will only be saved to the database and the user action logged if no critical errors are present.
5.6 Reports
This section provides information on a variety of reports are accessible to users.
From the Global Navigation Menu ribbon located at the top of the page, select the report you wish to run from the Reports drop-down.
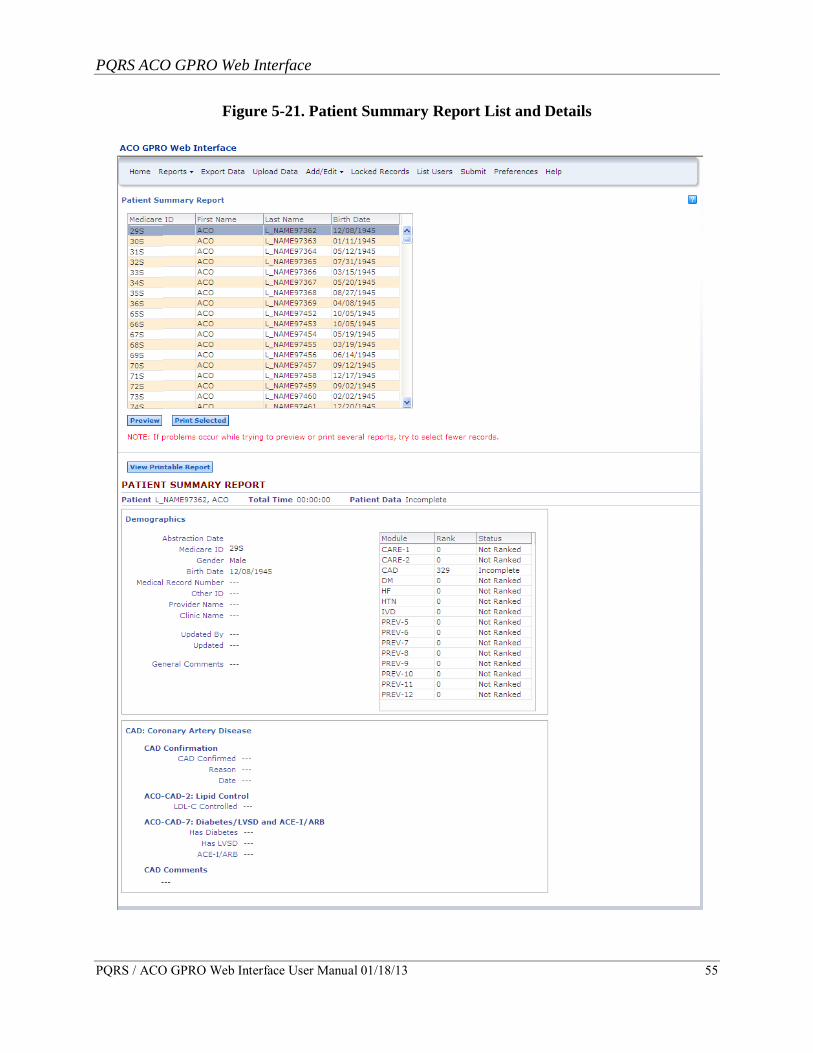
5.6.1 Patient Summary Report
The Patient Summary Report displays all information provided for a selected patient. A patient must be currently selected from the list for the report to run. You may print several Patient Summary Reports at a time by selecting multiple patients in the list. The data displayed will contain the data saved as of the time the report was generated.
Figure 5-21 shows the Patient Summary Report for a patient ranked in CAD.
PQRS ACO GPRO Web Interface
PQRS / ACO GPRO Web Interface User Manual 01/18/13 55
Figure 5-21. Patient Summary Report List and Details
PQRS ACO GPRO Web Interface
PQRS / ACO GPRO Web Interface User Manual 01/18/13 56
1. From the Global Navigation, click on Reports. 2. Click Patient Summary Report in the displayed drop-down menu.
3. The Patient Summary Report screen is displayed with a list of the patients in the modules selected in the user’s Preferences.
4. Click one or more patients in the list at the top of the screen.
5. To view the report for the selected patient(s), click the Preview button.
6. To print the report for selected patient(s), click the Print Selected button.
7. To print a report displayed on the screen, select the View Printable Report button.
8. A new screen or tab, dependent on user’s browser settings, will display a report that can be printed using standard browser print options.
9. Use the browsers print options to print the displayed report.
The patient’s demographic data is displayed at the top of the report; beneath it is the data from each tab of the patient’s record.
• If the patient is not ranked under a disease module or patient care module (i.e., tab), that module will not be shown in the report.
• The information displayed in the Patient Status dashboard on the Home page is included in the Demographics group in the Patient Summary Report.
• A Status column is added to the right of the Rank column indicating the data status of each module. Valid values are Complete, Incomplete, Not Ranked, or Skipped.
PQRS ACO GPRO Web Interface
PQRS / ACO GPRO Web Interface User Manual 01/18/13 57
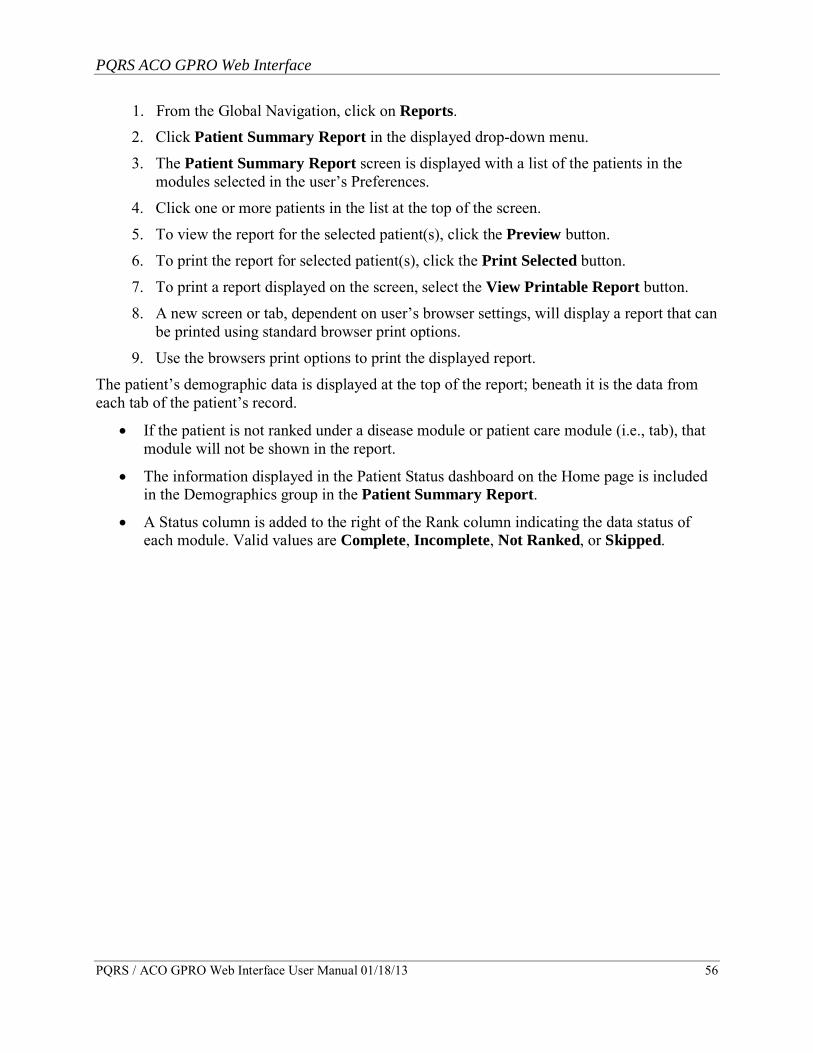
5.6.2 Totals Report Summary
The Totals Report provides the overall status of completeness for the patient sample. If the Totals Report summary shows that a measure has not met the completion threshold, the Totals Report Details can help identify which records need to be completed. The Details section of the Totals Summary Report lists all ranked patients with rank and status. The figures below show the top and bottom of the report as an example of the format. All modules will be included in the full report.
Figure 5-22 shows the Totals Summary and Details Tabs with the top of a Summary Report.
Figure 5-22. Totals Report Summary – CARE-1 and CARE-2
PQRS ACO GPRO Web Interface
PQRS / ACO GPRO Web Interface User Manual 01/18/13 58
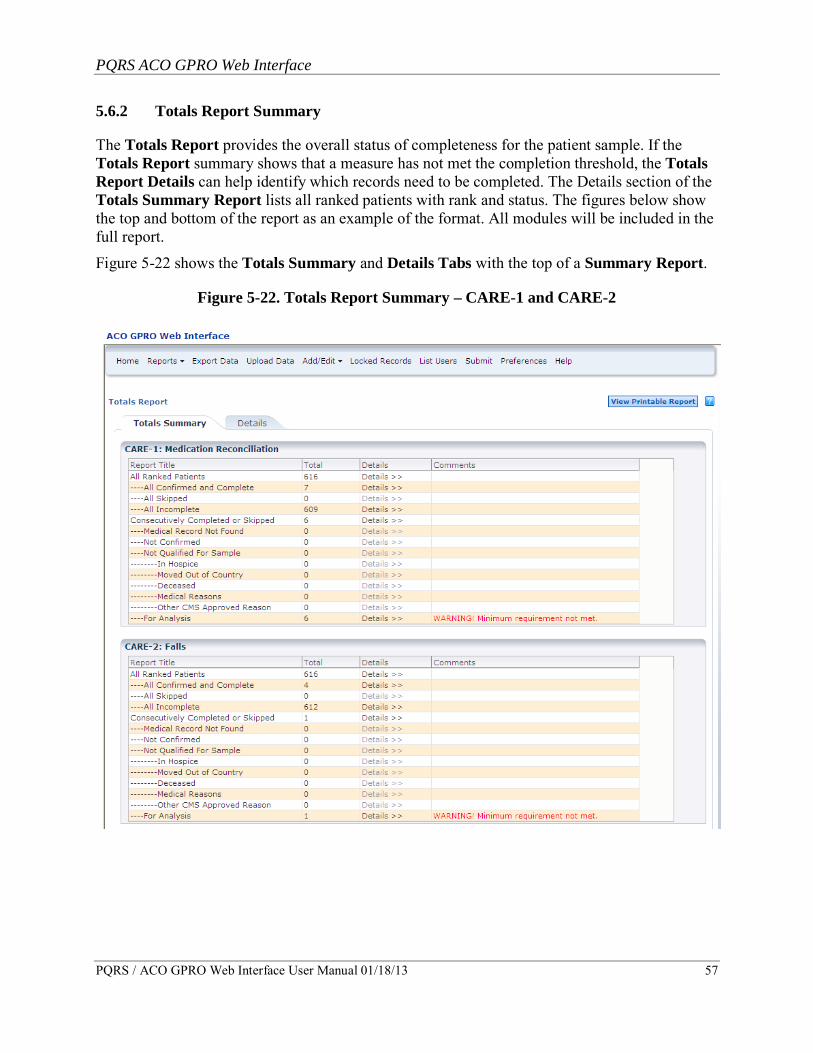
Figure 5-23 shows the summary for PREV-12 and footnotes that are displayed at the end of the report.
Figure 5-23. Totals Report Summary – PREV-12 and Footnotes
To display Totals Report detail:
1. Highlight a row (e.g., CAD: All Incomplete: 1).
2. Click the Details tab (next to the Totals Summary tab).
3. An alternate method to display the Totals Report Details is to double click the row containing the data to be displayed.
4. A third method to display the Totals Report Details is to click the Details >> hyperlink in the Details column for the row.
Figure 5-24 shows the Totals Report Details for the confirmed and complete patients in CAD.
PQRS ACO GPRO Web Interface
PQRS / ACO GPRO Web Interface User Manual 01/18/13 59
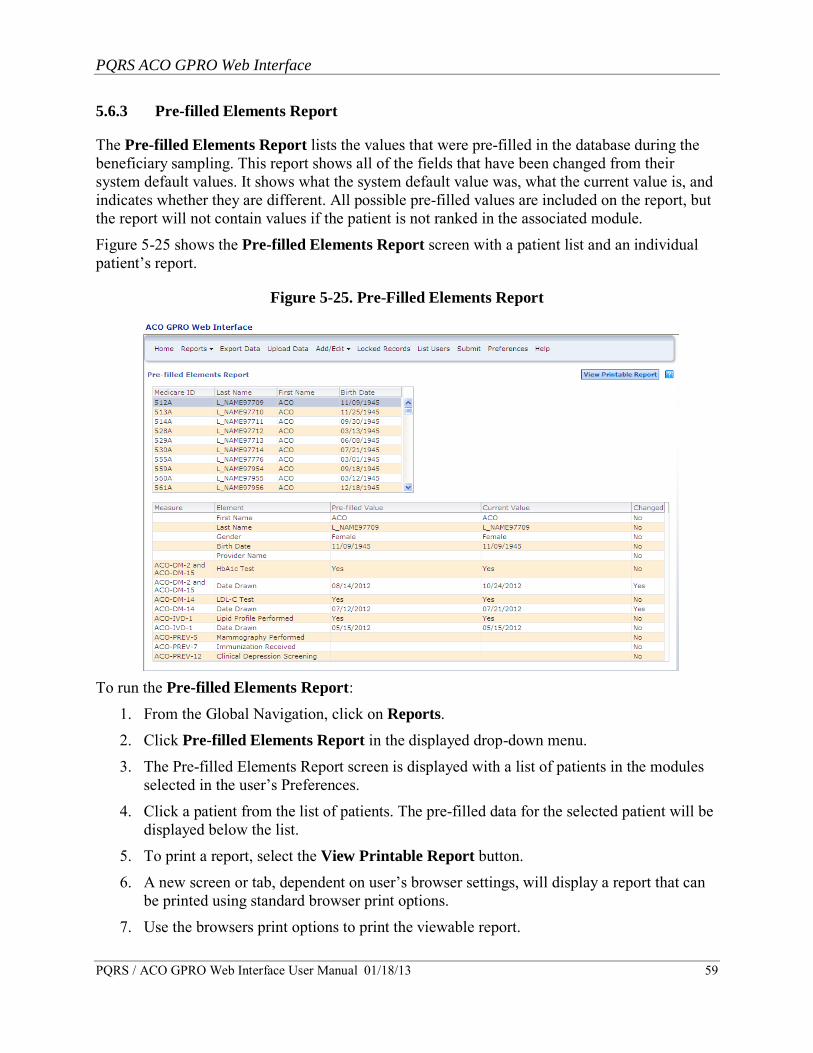
5.6.3 Pre-filled Elements Report
The Pre-filled Elements Report lists the values that were pre-filled in the database during the beneficiary sampling. This report shows all of the fields that have been changed from their system default values. It shows what the system default value was, what the current value is, and indicates whether they are different. All possible pre-filled values are included on the report, but the report will not contain values if the patient is not ranked in the associated module.
Figure 5-25 shows the Pre-filled Elements Report screen with a patient list and an individual patient’s report.
Figure 5-25. Pre-Filled Elements Report
To run the Pre-filled Elements Report:
1. From the Global Navigation, click on Reports.
2. Click Pre-filled Elements Report in the displayed drop-down menu.
3. The Pre-filled Elements Report screen is displayed with a list of patients in the modules selected in the user’s Preferences.
4. Click a patient from the list of patients. The pre-filled data for the selected patient will be displayed below the list.
5. To print a report, select the View Printable Report button.
6. A new screen or tab, dependent on user’s browser settings, will display a report that can be printed using standard browser print options.
7. Use the browsers print options to print the viewable report.
PQRS ACO GPRO Web Interface
PQRS / ACO GPRO Web Interface User Manual 01/18/13 60
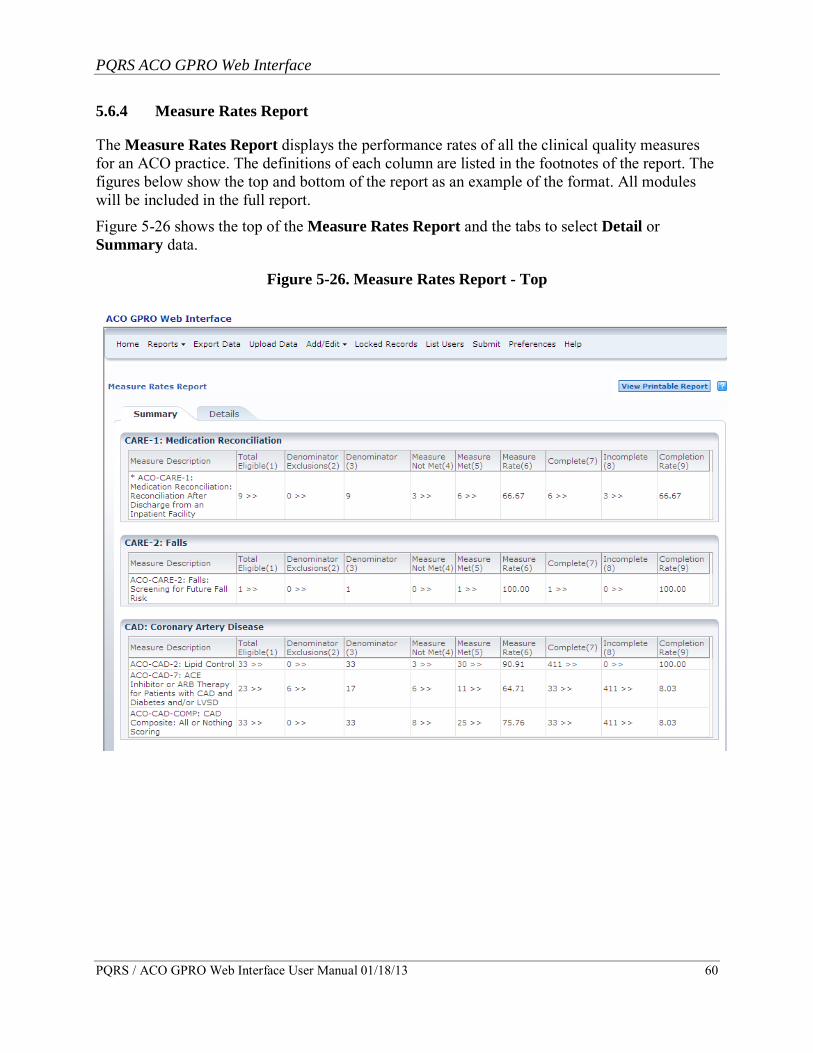
5.6.4 Measure Rates Report
The Measure Rates Report displays the performance rates of all the clinical quality measures for an ACO practice. The definitions of each column are listed in the footnotes of the report. The figures below show the top and bottom of the report as an example of the format. All modules will be included in the full report.
Figure 5-26 shows the top of the Measure Rates Report and the tabs to select Detail or Summary data.
Figure 5-26. Measure Rates Report - Top
PQRS ACO GPRO Web Interface
PQRS / ACO GPRO Web Interface User Manual 01/18/13 61
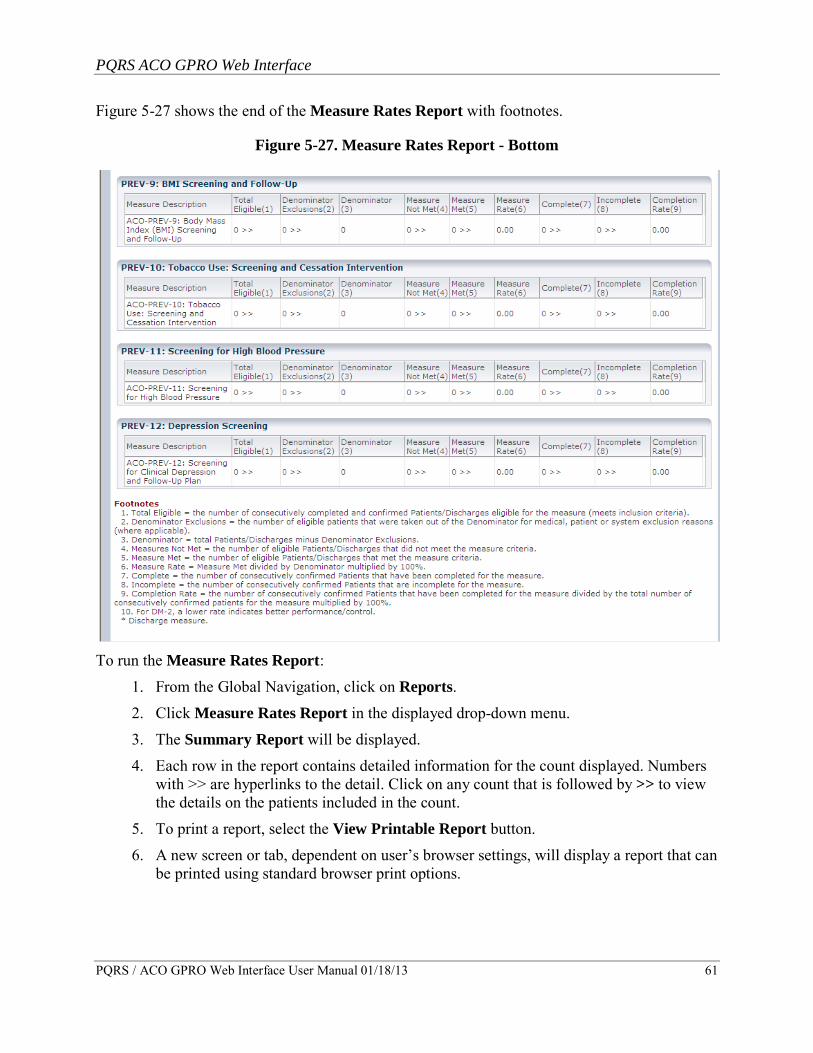
Figure 5-27 shows the end of the Measure Rates Report with footnotes.
Figure 5-27. Measure Rates Report - Bottom
To run the Measure Rates Report:
1. From the Global Navigation, click on Reports.
2. Click Measure Rates Report in the displayed drop-down menu.
3. The Summary Report will be displayed.
4. Each row in the report contains detailed information for the count displayed. Numbers with >> are hyperlinks to the detail. Click on any count that is followed by >> to view the details on the patients included in the count.
5. To print a report, select the View Printable Report button.
6. A new screen or tab, dependent on user’s browser settings, will display a report that can be printed using standard browser print options.
PQRS ACO GPRO Web Interface
PQRS / ACO GPRO Web Interface User Manual 01/18/13 62
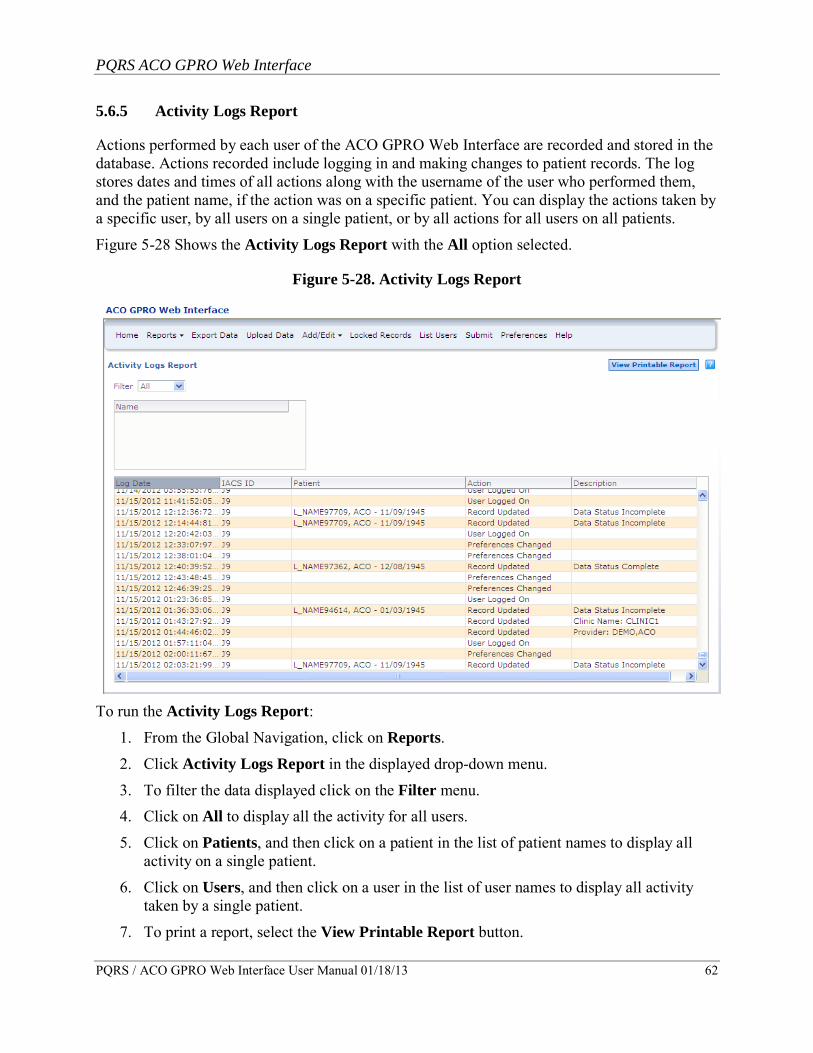
5.6.5 Activity Logs Report
Actions performed by each user of the ACO GPRO Web Interface are recorded and stored in the database. Actions recorded include logging in and making changes to patient records. The log stores dates and times of all actions along with the username of the user who performed them, and the patient name, if the action was on a specific patient. You can display the actions taken by a specific user, by all users on a single patient, or by all actions for all users on all patients.
Figure 5-28 Shows the Activity Logs Report with the All option selected.
Figure 5-28. Activity Logs Report
To run the Activity Logs Report:
1. From the Global Navigation, click on Reports.
2. Click Activity Logs Report in the displayed drop-down menu.
3. To filter the data displayed click on the Filter menu. 4. Click on All to display all the activity for all users.
5. Click on Patients, and then click on a patient in the list of patient names to display all activity on a single patient.
6. Click on Users, and then click on a user in the list of user names to display all activity taken by a single patient.
7. To print a report, select the View Printable Report button.
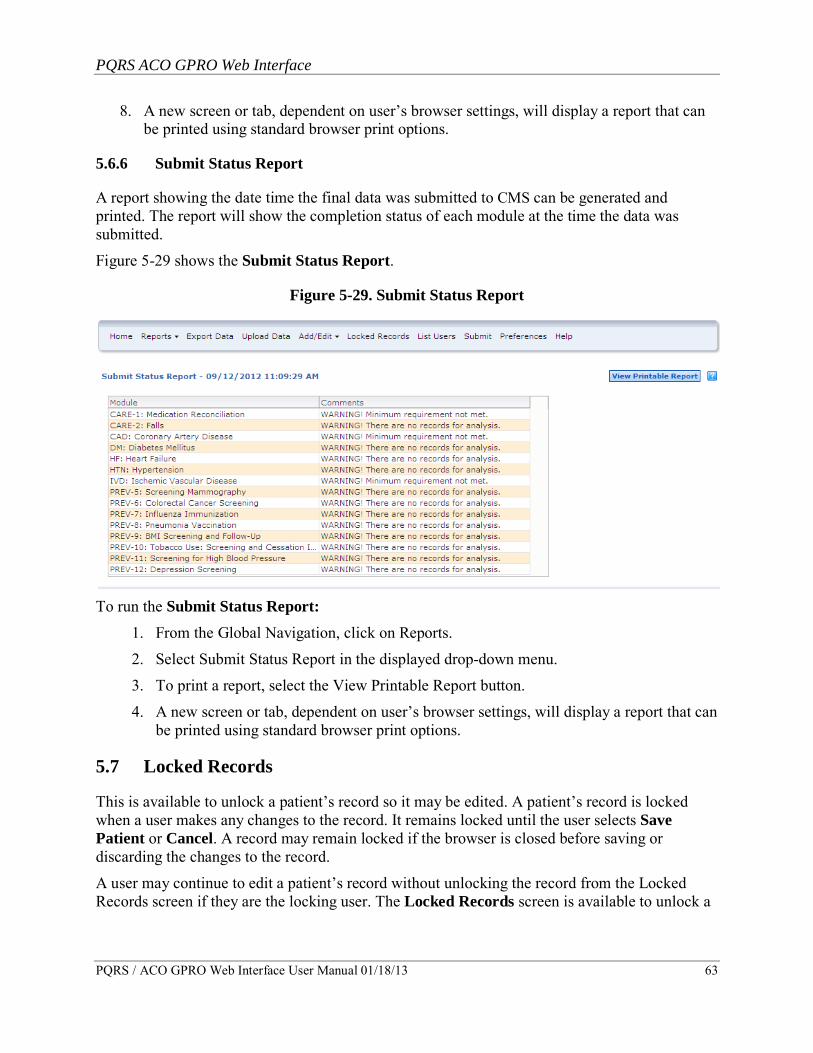
PQRS ACO GPRO Web Interface
PQRS / ACO GPRO Web Interface User Manual 01/18/13 63
8. A new screen or tab, dependent on user’s browser settings, will display a report that can be printed using standard browser print options.
5.6.6 Submit Status Report
A report showing the date time the final data was submitted to CMS can be generated and printed. The report will show the completion status of each module at the time the data was submitted.
Figure 5-29 shows the Submit Status Report.
Figure 5-29. Submit Status Report
To run the Submit Status Report:
1. From the Global Navigation, click on Reports.
2. Select Submit Status Report in the displayed drop-down menu.
3. To print a report, select the View Printable Report button.
4. A new screen or tab, dependent on user’s browser settings, will display a report that can be printed using standard browser print options.
5.7 Locked Records
This is available to unlock a patient’s record so it may be edited. A patient’s record is locked when a user makes any changes to the record. It remains locked until the user selects Save Patient or Cancel. A record may remain locked if the browser is closed before saving or discarding the changes to the record.
A user may continue to edit a patient’s record without unlocking the record from the Locked Records screen if they are the locking user. The Locked Records screen is available to unlock a
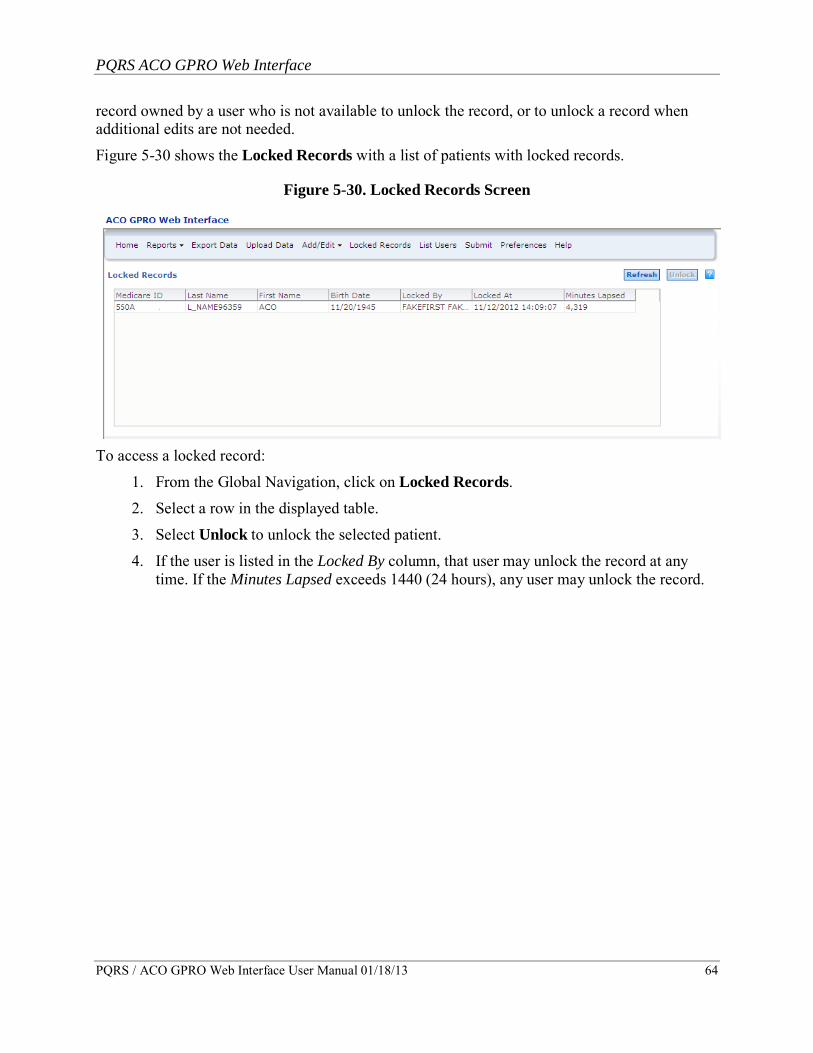
PQRS ACO GPRO Web Interface
PQRS / ACO GPRO Web Interface User Manual 01/18/13 64
record owned by a user who is not available to unlock the record, or to unlock a record when additional edits are not needed.
Figure 5-30 shows the Locked Records with a list of patients with locked records.
Figure 5-30. Locked Records Screen
To access a locked record:
1. From the Global Navigation, click on Locked Records.
2. Select a row in the displayed table.
3. Select Unlock to unlock the selected patient.
4. If the user is listed in the Locked By column, that user may unlock the record at any time. If the Minutes Lapsed exceeds 1440 (24 hours), any user may unlock the record.
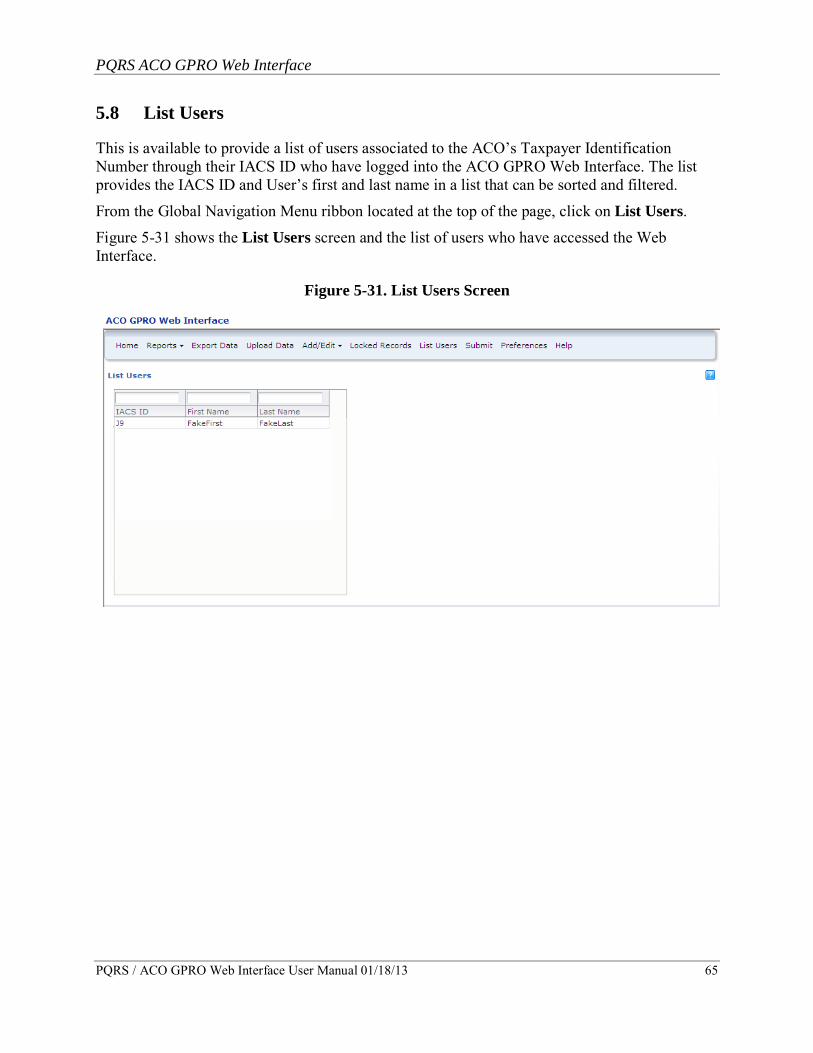
PQRS ACO GPRO Web Interface
PQRS / ACO GPRO Web Interface User Manual 01/18/13 65
5.8 List Users
This is available to provide a list of users associated to the ACO’s Taxpayer Identification Number through their IACS ID who have logged into the ACO GPRO Web Interface. The list provides the IACS ID and User’s first and last name in a list that can be sorted and filtered.
From the Global Navigation Menu ribbon located at the top of the page, click on List Users.
Figure 5-31 shows the List Users screen and the list of users who have accessed the Web Interface.
Figure 5-31. List Users Screen
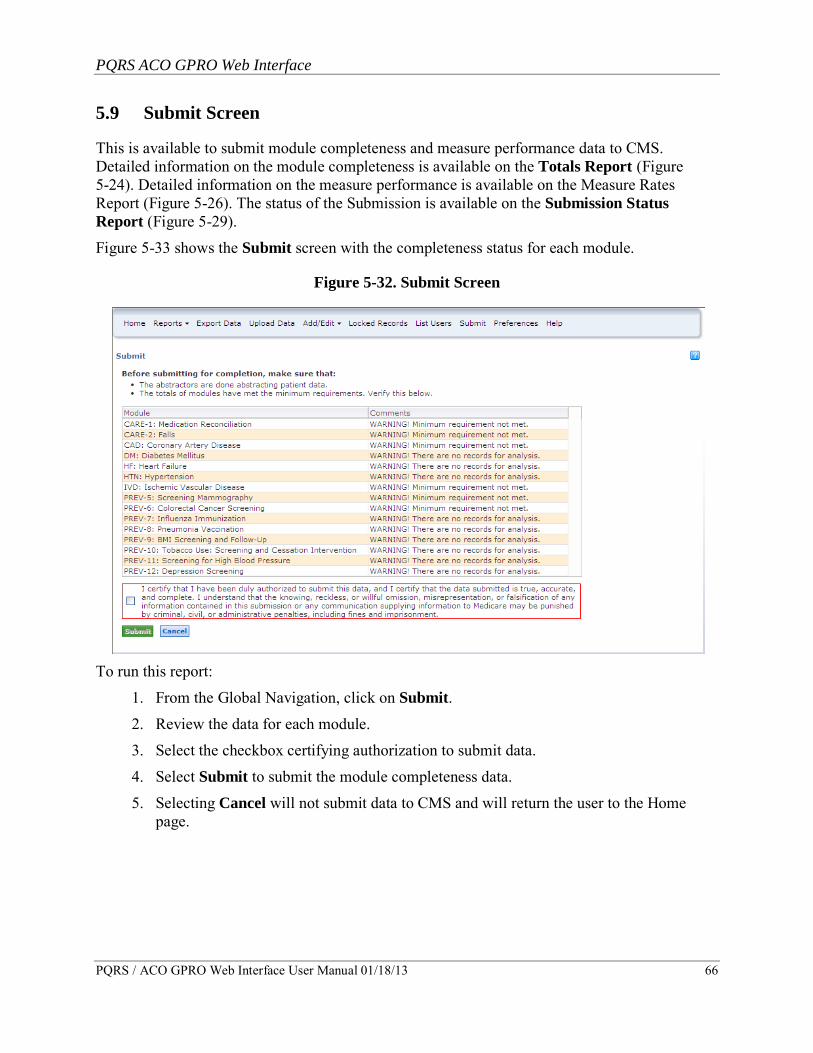
PQRS ACO GPRO Web Interface
PQRS / ACO GPRO Web Interface User Manual 01/18/13 66
5.9 Submit Screen
This is available to submit module completeness and measure performance data to CMS. Detailed information on the module completeness is available on the Totals Report (Figure 5-24). Detailed information on the measure performance is available on the Measure Rates Report (Figure 5-26). The status of the Submission is available on the Submission Status Report (Figure 5-29).
Figure 5-33 shows the Submit screen with the completeness status for each module.
Figure 5-32. Submit Screen
To run this report:
1. From the Global Navigation, click on Submit. 2. Review the data for each module.
3. Select the checkbox certifying authorization to submit data.
4. Select Submit to submit the module completeness data.
5. Selecting Cancel will not submit data to CMS and will return the user to the Home page.
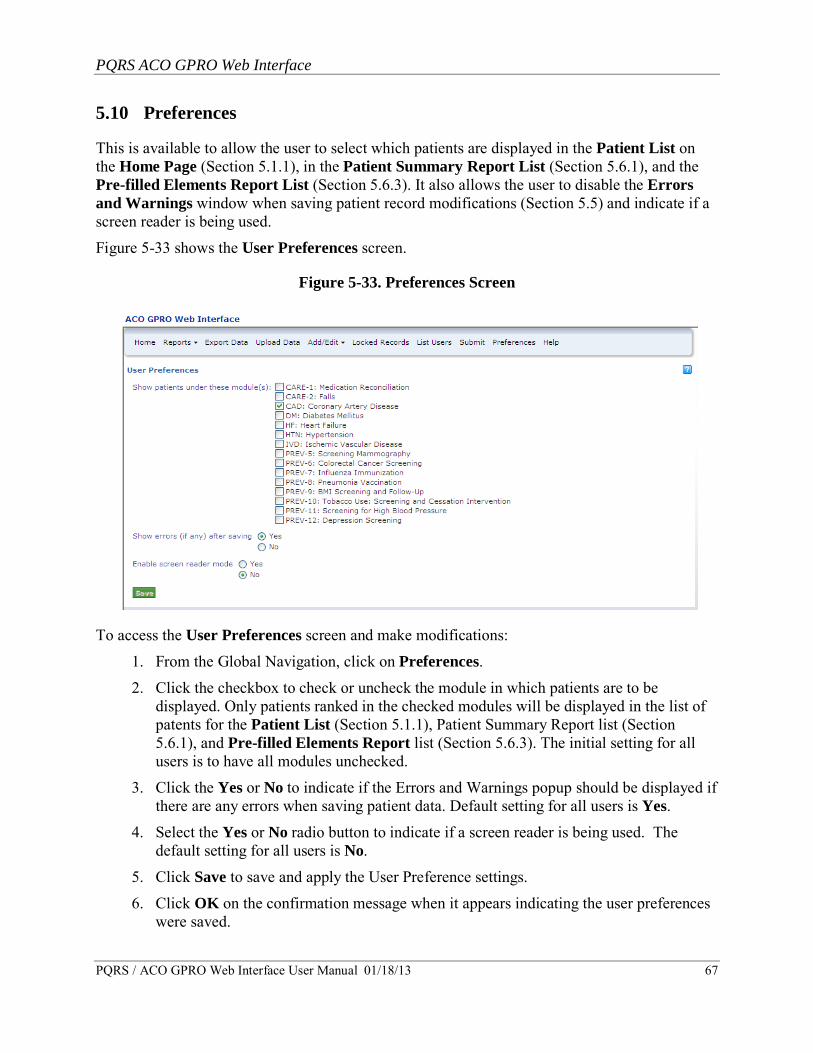
PQRS ACO GPRO Web Interface
PQRS / ACO GPRO Web Interface User Manual 01/18/13 67
5.10 Preferences
This is available to allow the user to select which patients are displayed in the Patient List on the Home Page (Section 5.1.1), in the Patient Summary Report List (Section 5.6.1), and the Pre-filled Elements Report List (Section 5.6.3). It also allows the user to disable the Errors and Warnings window when saving patient record modifications (Section 5.5) and indicate if a screen reader is being used.
Figure 5-33 shows the User Preferences screen.
Figure 5-33. Preferences Screen
To access the User Preferences screen and make modifications:
1. From the Global Navigation, click on Preferences.
2. Click the checkbox to check or uncheck the module in which patients are to be displayed. Only patients ranked in the checked modules will be displayed in the list of patents for the Patient List (Section 5.1.1), Patient Summary Report list (Section 5.6.1), and Pre-filled Elements Report list (Section 5.6.3). The initial setting for all users is to have all modules unchecked.
3. Click the Yes or No to indicate if the Errors and Warnings popup should be displayed if there are any errors when saving patient data. Default setting for all users is Yes.
4. Select the Yes or No radio button to indicate if a screen reader is being used. The default setting for all users is No.
5. Click Save to save and apply the User Preference settings.
6. Click OK on the confirmation message when it appears indicating the user preferences were saved.
PQRS ACO GPRO Web Interface
PQRS / ACO GPRO Web Interface User Manual 01/18/13 68
6 TROUBLESHOOTING & SUPPORT A variety of resources are available that offer more information about any module, from Quality Measures and Performance Standards (available on the CMS Web page dedicated to the Shared Savings Program program, http://cms.hhs.gov/Medicare/Medicare-Fee-for-Service-Payment/sharedsavingsprogram/Quality_Measures_Standards.html to screen element explanations (available in the Online Help feature built into the ACO GPRO Web Interface).
6.1 Special Considerations: Copyright and Trademark Information
• Microsoft® Internet Explorer is a registered trademark of the Microsoft Corporation.
• Current Procedural Terminology only copyright 2009 American Medical Association. All rights reserved.
• Current Procedural Terminology is a registered trademark of the American Medical Association.
• Applicable Federal Acquisition Regulations/Defense Federal Acquisition Regulations apply to government use.
• Fee schedules, relative value units, conversion factors and/or related components are not assigned by the American Medical Association, are not part of CPT, and the American Medical Association is not recommending their use. The American Medical Association does not directly or indirectly practice medicine or dispense medical services. The American Medical Association assumes no liability for data contained or not contained herein.
• This user manual was current at the time it was published or uploaded onto the web. Medicare policy changes frequently so links to the source documents have been provided within the document for your reference.
6.2 Support
To access the Online Help feature
1. To navigate to specific information, select a Topic from the Table of Contents (TOC). 2. To search for help modules, click Search and enter a keyword or phrase in the search
field.
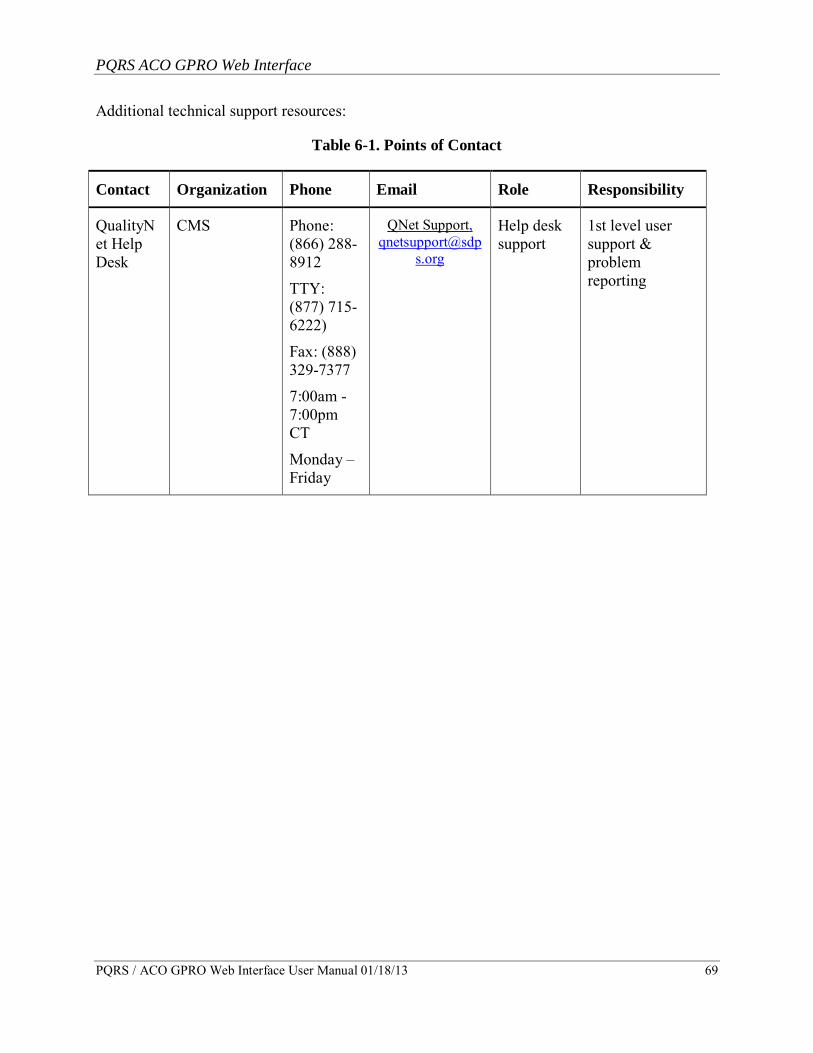
PQRS ACO GPRO Web Interface
PQRS / ACO GPRO Web Interface User Manual 01/18/13 69
Additional technical support resources:
Table 6-1. Points of Contact
Contact Organization Phone Email Role Responsibility
QualityNet Help Desk
CMS Phone: (866) 288-8912
TTY: (877) 715-6222)
Fax: (888) 329-7377
7:00am - 7:00pm CT
Monday – Friday
QNet Support, qnetsupport@sdp
s.org
Help desk support
1st level user support & problem reporting
PQRS ACO GPRO Web Interface
PQRS / ACO GPRO Web Interface User Manual 01/18/13 70
APPENDIX A – ACRONYMS This section describes the acronyms used in this document.
Acronym Description
ACO Accountable Care Organization
CAD Coronary Heart Disease
CMS Centers for Medicare & Medicaid Services
DM Diabetes Mellitus
GPRO Group Practice Reporting Option
HF Heart Failure
HTN Hypertension
IACS Individuals Authorized Access to CMS Computer Services
IVD Ischemic Vascular Disease
PQRS Physician Quality Reporting System
PREV Preventative Care
PQRS ACO GPRO Web Interface
PQRS / ACO GPRO Web Interface User Manual 01/18/13 71
GLOSSARY Accountable Care Organizations - ACOs are groups of doctors, hospitals, and other health care providers, who come together voluntarily to give coordinated high quality care to their Medicare patients.
Advance Payment Initiative - a supplementary incentive program for selected participants in the Shared Savings Program.
Electronic Health Record – Electronic Health Records are electronic records of patient health information gathered and/or generated in any care delivery setting. This information includes patient demographics, progress notes, medications, vital signs, past medical history, immunizations, laboratory data and radiology reports. This provides the ability to pass information from care point to care point providing the ability for quality health management by physicians.
Group Practice Reporting Option (GPRO) –Group Practice Reporting Option describes the Group Practices that are participating in this reporting option. To qualify for this reporting option, Group Practices must go through a vetting process.
Physicians Quality Reporting System (PQRS) – Physician Quality Reporting System: A quality reporting system that includes an incentive payment for eligible professionals who satisfactorily report data on quality measures for covered professional services provided during the specified program year.
Performance Rate – The percent of cases where appropriate care was delivered.
Pioneer ACO Model – a population-based payment incentive for health care organizations and providers already experienced in coordinating care for patients across care settings.
Preventive Care – Preventive Care is one of the modules for the Group Practice Reporting Option Web Interface.
Rank – A read-only numeric value assigned to a patient that indicates his/her order in a disease module or Preventive Care measure.
Reporting Period – The reporting period of time eligible for the 2012 Physicians Quality Reporting System program (healthcare services provided by eligible professionals during January 1, 2012 – December 31, 2012).
Tax Identification Number – An identification number used by the Internal Revenue Service in the administration of tax laws.