pim - ms 1320-1700 - glunz-jensen.com · notes, cautions, and warnings! throughout the manual...
TRANSCRIPT

Pre-installation Manual
MS 1320/1700


Pre-installation Manual
MS 1320/1700
Edition AA, June 2014
This book has part no 10076645

This manual is published by: GLUNZ & JENSEN A/SSelandia Park 1
DK-4100 Ringsted
Denmark
Phone: +45 5768-8181
E-mail: [email protected]
Internet: www.glunz-jensen.com
Copyright © 2014 by GLUNZ & JENSEN A/S.
Pre-installation Manual - MS 1320/1700 1425
0-2

Part 0: Introduction
Reservations
• This manual was written and illustrated using the best possible information avail-able at the time of publication.
• Any differences between this manual and the equipment reflect improvements intro-duced after the publication of the manual.
• Changes, technical inaccuracies and typographic errors will be corrected in subse-quent editions.
• As a part of our policy of continuous improvement, we reserve the right to alter de-sign and specifications without further notice.
Pre-installation instructions
The instructions in this Pre-installation Manual allow the customer and the servicetechnician to prepare the installation site for the equipment and for the installation it-self.
• Never install the equipment in explosive environments.
• It is the responsibility of the owner and operator(s) of the equipment that the instal-lation is made in accordance with local regulations, and by engineers authorized tocarry out pneumatic and electrical installations.
• The manufacturer cannot be held responsible for any damage caused by incorrect in-stallation of the equipment.
�Only qualified service technicians are allowed to unpack and install theequipment.
�When preparing the installation site please take into consideration that thisequipment is for restricted access locations only!
1425 Pre-installation Manual - MS 1320/1700
0-3Introduction

Notes, cautions, and warnings!
Throughout the manual warnings, cautions, and notes are written in bold like the ex-ample below:
�Electrical installation must conform to local regulations and guidelines.
Symbol Meaning Explanation
� Note
The operator should observe and/or act according to the
information in order to obtain the best possible function of the
equipment.
� Caution
The operator must observe and/or act according to the
information in order to avoid any mechanical or electrical
damage to the equipment.
� Warning
The operator must observe and/or act according to the
information in order to avoid any personal injury.
Pre-installation Manual - MS 1320/1700 1425
0-4Introduction

Table of contents
1425 Pre-installation Manual - MS 1320/1700
0-5Introduction
Part 0: Introduction . . . . . . . . . . . . . . . . . . . . . . . . . . . . . . . . . . . . 0-3
Reservations . . . . . . . . . . . . . . . . . . . . . . . . . . . . . . . . . . . . . . . . . . . . . . . . . . 0-3
Pre-installation instructions . . . . . . . . . . . . . . . . . . . . . . . . . . . . . . . . . . . . . . . . 0-3
Notes, cautions, and warnings ! . . . . . . . . . . . . . . . . . . . . . . . . . . . . . . . . . . . . . 0-4
Part 1: Transportation . . . . . . . . . . . . . . . . . . . . . . . . . . . . . . . . . . 1-1
When the unit arrives . . . . . . . . . . . . . . . . . . . . . . . . . . . . . . . . . . . . . . . . . . . . . . 1-1
Storing the unit before installation . . . . . . . . . . . . . . . . . . . . . . . . . . . . . . . . . . . 1-1
The crate. . . . . . . . . . . . . . . . . . . . . . . . . . . . . . . . . . . . . . . . . . . . . . . . . . . . . . . 1-1
Dimensions and weight. . . . . . . . . . . . . . . . . . . . . . . . . . . . . . . . . . . . . . . . . . . 1-1
Checking the crate for damage. . . . . . . . . . . . . . . . . . . . . . . . . . . . . . . . . . . . . . 1-2
Handling the crate . . . . . . . . . . . . . . . . . . . . . . . . . . . . . . . . . . . . . . . . . . . . . . 1-2
Transporting the unit. . . . . . . . . . . . . . . . . . . . . . . . . . . . . . . . . . . . . . . . . . . . . . . 1-3
Lifting the crate . . . . . . . . . . . . . . . . . . . . . . . . . . . . . . . . . . . . . . . . . . . . . . . . 1-3
Available width for transport . . . . . . . . . . . . . . . . . . . . . . . . . . . . . . . . . . . . . . . 1-3
Part 2: Installation requirements . . . . . . . . . . . . . . . . . . . . . . . . . . . 2-1
Environmental requirements . . . . . . . . . . . . . . . . . . . . . . . . . . . . . . . . . . . . . . . . . 2-1
Accessories to be provided by customer for connections . . . . . . . . . . . . . . . . . . . . . . 2-1
Space requirements . . . . . . . . . . . . . . . . . . . . . . . . . . . . . . . . . . . . . . . . . . . . . . . 2-2
Free space around the equipment . . . . . . . . . . . . . . . . . . . . . . . . . . . . . . . . . . . 2-2
Equipment dimensions . . . . . . . . . . . . . . . . . . . . . . . . . . . . . . . . . . . . . . . . . . . 2-3
Comressed air connection . . . . . . . . . . . . . . . . . . . . . . . . . . . . . . . . . . . . . . . . . . . 2-4
Electrical requirements . . . . . . . . . . . . . . . . . . . . . . . . . . . . . . . . . . . . . . . . . . . . . 2-5
Main power connection. . . . . . . . . . . . . . . . . . . . . . . . . . . . . . . . . . . . . . . . . . . 2-5
Main power outlet . . . . . . . . . . . . . . . . . . . . . . . . . . . . . . . . . . . . . . . . . . . . . . 2-5
Power cable. . . . . . . . . . . . . . . . . . . . . . . . . . . . . . . . . . . . . . . . . . . . . . . . . . . 2-5
Electrical specifications . . . . . . . . . . . . . . . . . . . . . . . . . . . . . . . . . . . . . . . . . . . . . 2-6
Installation requirements for power supply . . . . . . . . . . . . . . . . . . . . . . . . . . . . . 2-6
Fuses . . . . . . . . . . . . . . . . . . . . . . . . . . . . . . . . . . . . . . . . . . . . . . . . . . . . . . . 2-6
Power consumption . . . . . . . . . . . . . . . . . . . . . . . . . . . . . . . . . . . . . . . . . . . . . 2-6
Part 3: Pre-installation check list . . . . . . . . . . . . . . . . . . . . . . . . . . 3-1

Pre-installation Manual - MS 1320/1700 1425
0-6Introduction

Part 1: Transportation
When the unit arrives
Storing the unit before installation
The crated equipment will usually be delivered some time before the arrival of theservice technician. In which case you should prepare an appropriate place indoors tostore the crated unit.
The crate
Dimensions and weight
Width (W) 160 cm (64")
Length (L) 360 cm (141.7")
Height (H) 220 cm (86.6")
Weight crated (± 5%) 3000 kg (6614 lb)
Weight without crate 2650 kg (5842 lb)
1425 Pre-installation Manual - MS 1320/1700
1-1Transportation
When the unit arrives
H
WL
T31690

Checking the crate for damage
Check if the crate is damaged at the time of delivery. Take note of the damage beforeyou allow the service technician to unpack the equipment. Provide a detailed descrip-tion or take a photograph of the damage.
�Report any damage to the crate to the transport company.
Handling the crate
The icons on the crate indicate how to handle the crate during transport and storage:
Pre-installation Manual - MS 1320/1700 1425
1-2Transportation
The crate
Ensure that the sideindicated by the arrows
is always up
Handle the crate withcare.
Never expose the crate towater, or place it in a high-
humidity area.
Do not stack the crates. Do not tilt the crate.
T32326
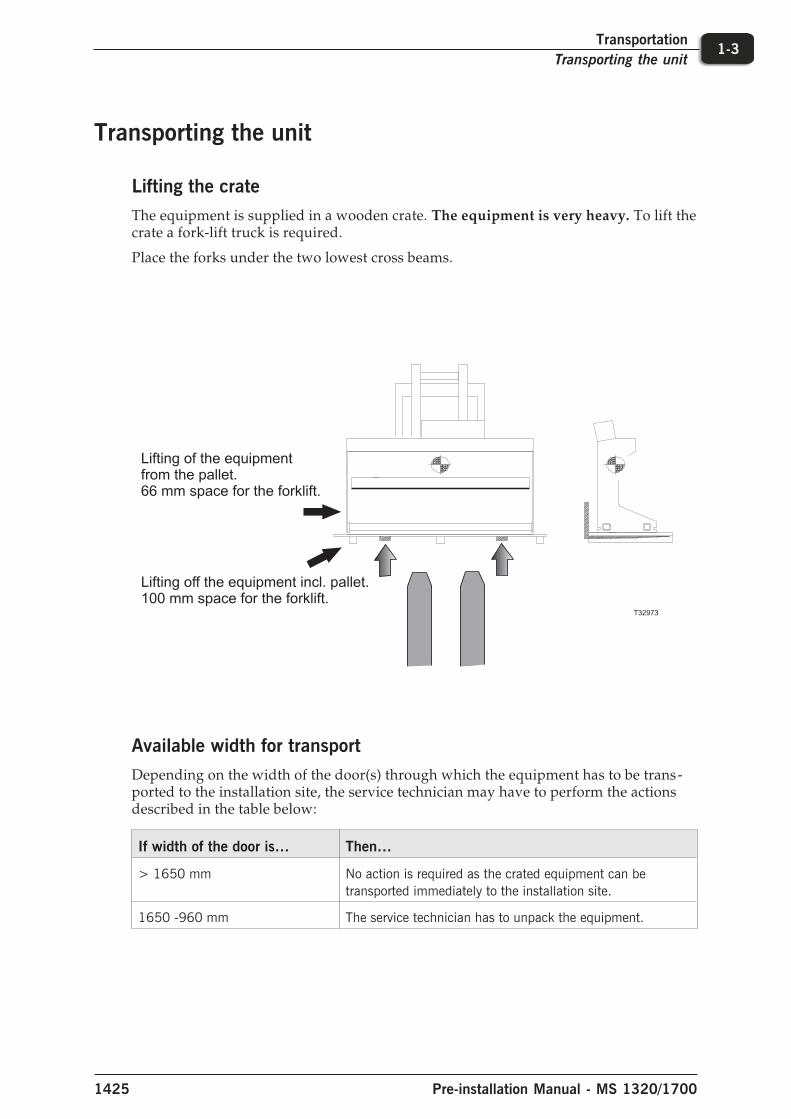
Transporting the unit
Lifting the crate
The equipment is supplied in a wooden crate. The equipment is very heavy. To lift thecrate a fork-lift truck is required.
Place the forks under the two lowest cross beams.
Available width for transport
Depending on the width of the door(s) through which the equipment has to be trans-ported to the installation site, the service technician may have to perform the actionsdescribed in the table below:
If width of the door is… Then…
> 1650 mm No action is required as the crated equipment can be
transported immediately to the installation site.
1650 -960 mm The service technician has to unpack the equipment.
1425 Pre-installation Manual - MS 1320/1700
1-3Transportation
Transporting the unit
Lifting off the equipment incl. pallet.100 mm space for the forklift.
T32973
Lifting of the equipmentfrom the pallet.66 mm space for the forklift.

Pre-installation Manual - MS 1320/1700 1425
1-4Transportation
Transporting the unit

Part 2: Installation requirements
�This equipment must be installed in restricted access locations only.
�Check the delivery route to the installation location for necessary clearanceand remove all obstructions.
Environmental requirements
Provide a heating and ventilating system capable of maintaining room temperature be-tween 15 and 25°C (59 and 77°F) and relative humidity of max. 80%.
Accessories to be provided by customer for connections
• Cable for the main power connection.
• Hose for the compressed air supply.
1425 Pre-installation Manual - MS 1320/1700
2-1Installation requirements
Environmental requirements
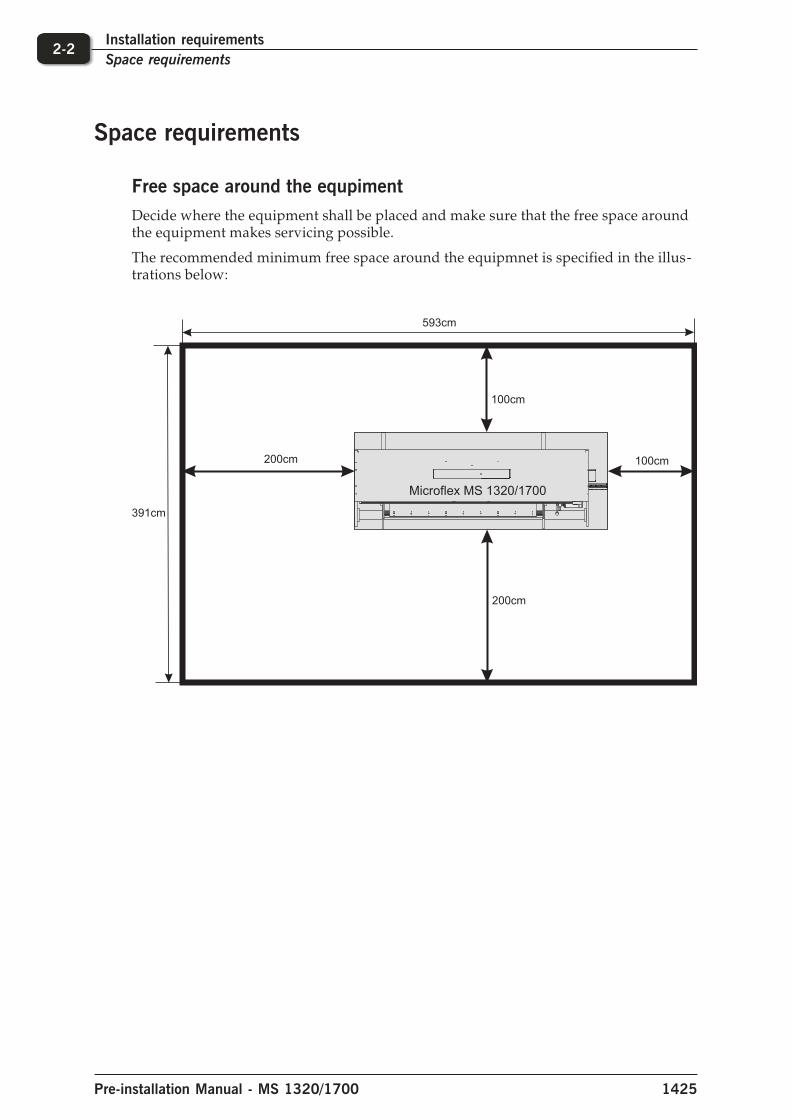
Space requirements
Free space around the equpiment
Decide where the equipment shall be placed and make sure that the free space aroundthe equipment makes servicing possible.
The recommended minimum free space around the equipmnet is specified in the illus-trations below:
Pre-installation Manual - MS 1320/1700 1425
2-2Installation requirements
Space requirements
100cm
100cm
200cm
200cm
593cm
391cm
Microflex MS 1320/1700
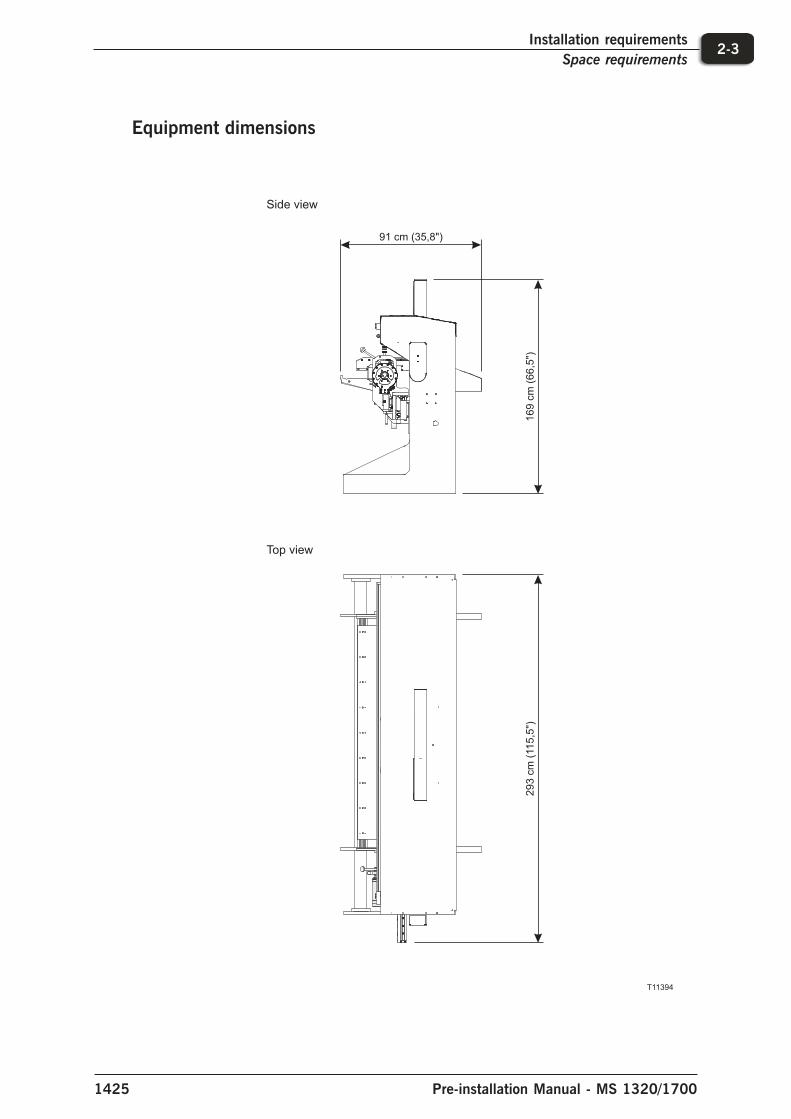
Equipment dimensions
1425 Pre-installation Manual - MS 1320/1700
2-3Installation requirements
Space requirements
T11394
91 cm (35,8")
16
9cm
(66
,5")
29
3cm
(11
5,5
")
Top view
Side view
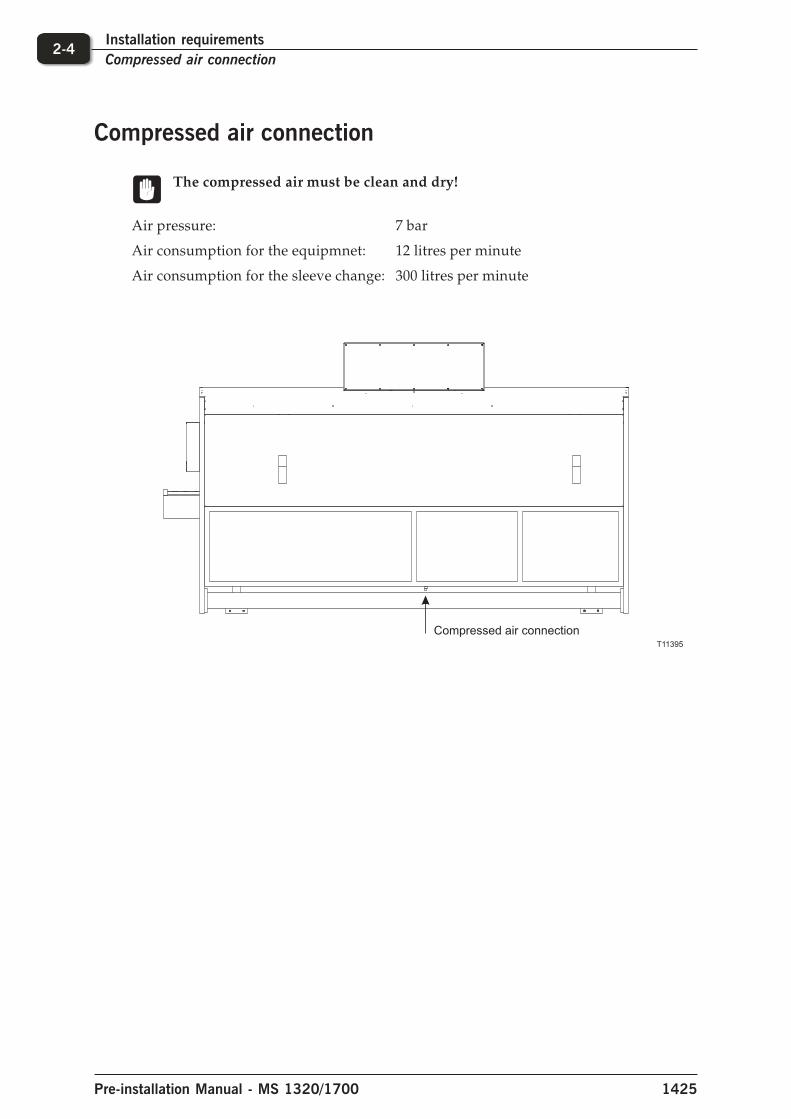
Compressed air connection
�The compressed air must be clean and dry!
Air pressure: 7 bar
Air consumption for the equipmnet: 12 litres per minute
Air consumption for the sleeve change: 300 litres per minute
Pre-installation Manual - MS 1320/1700 1425
2-4Installation requirements
Compressed air connection
T11395
Compressed air connection
Electrical requirements
�Electrical installation must conform to local regulations and guidelines.
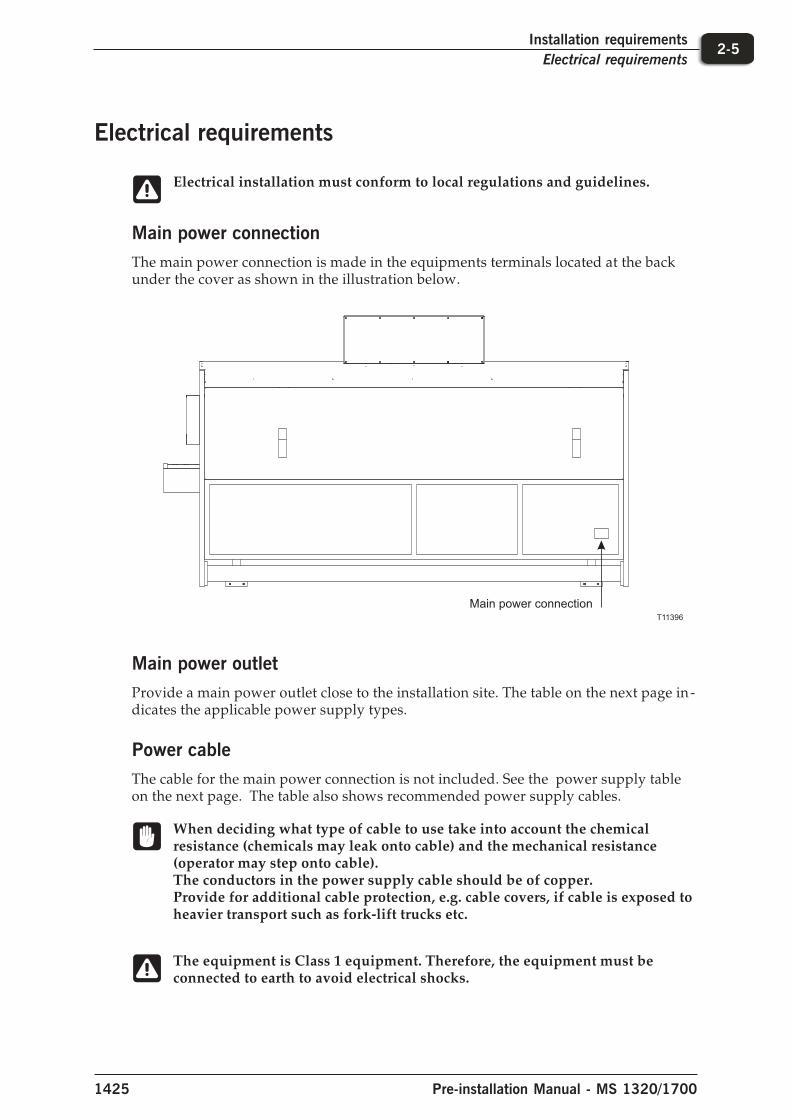
Main power connection
The main power connection is made in the equipments terminals located at the backunder the cover as shown in the illustration below.
Main power outlet
Provide a main power outlet close to the installation site. The table on the next page in-dicates the applicable power supply types.
Power cable
The cable for the main power connection is not included. See the power supply tableon the next page. The table also shows recommended power supply cables.
�When deciding what type of cable to use take into account the chemicalresistance (chemicals may leak onto cable) and the mechanical resistance(operator may step onto cable).The conductors in the power supply cable should be of copper.Provide for additional cable protection, e.g. cable covers, if cable is exposed toheavier transport such as fork-lift trucks etc.
�The equipment is Class 1 equipment. Therefore, the equipment must beconnected to earth to avoid electrical shocks.
1425 Pre-installation Manual - MS 1320/1700
2-5Installation requirements
Electrical requirements
T11396
Main power connection
Electrical specifications
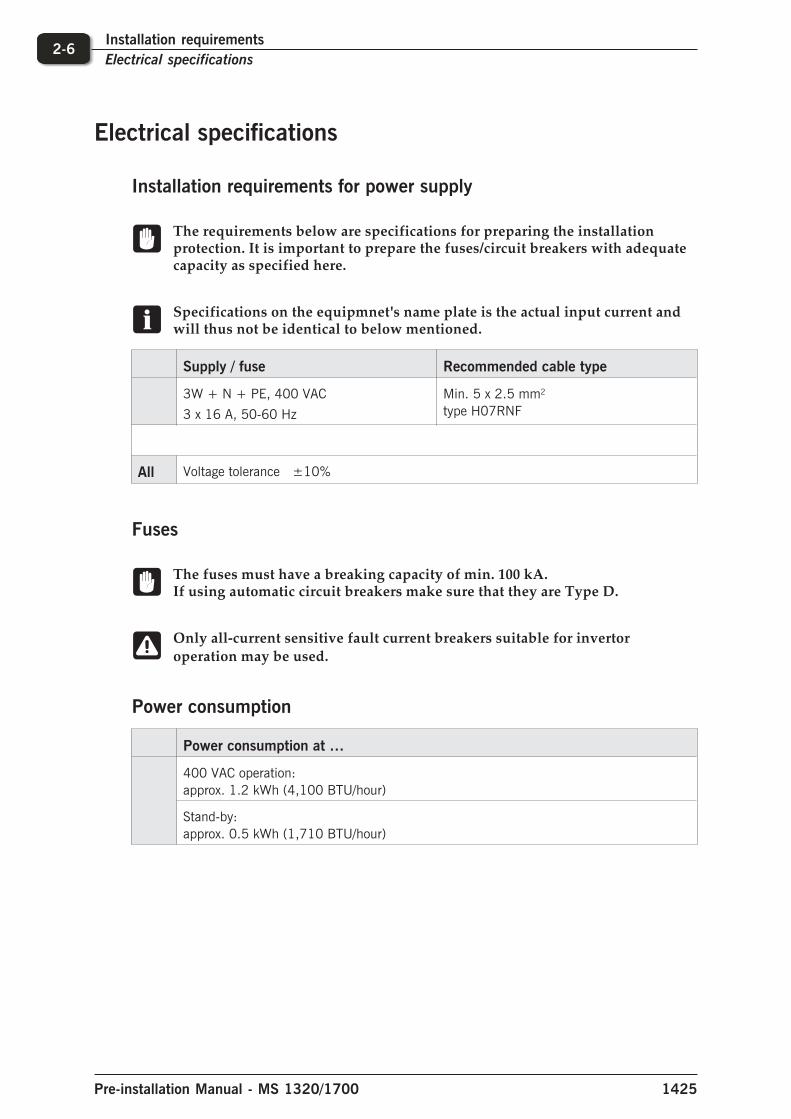
Installation requirements for power supply
�The requirements below are specifications for preparing the installationprotection. It is important to prepare the fuses/circuit breakers with adequatecapacity as specified here.
�Specifications on the equipmnet's name plate is the actual input current andwill thus not be identical to below mentioned.
Supply / fuse Recommended cable type
3W + N + PE, 400 VAC
3 x 16 A, 50-60 Hz
Min. 5 x 2.5 mm2
type H07RNF
All Voltage tolerance ±10%
Fuses
�The fuses must have a breaking capacity of min. 100 kA.If using automatic circuit breakers make sure that they are Type D.
�Only all-current sensitive fault current breakers suitable for invertoroperation may be used.
Power consumption
Power consumption at …
400 VAC operation:
approx. 1.2 kWh (4,100 BTU/hour)
Stand-by:
approx. 0.5 kWh (1,710 BTU/hour)
Pre-installation Manual - MS 1320/1700 1425
2-6Installation requirements
Electrical specifications

Switching the mains power
�Cyclic power switching is permitted every 60 seconds: Jog mode is notpermitted.
�If switching is too frequent, the equipment protects itself by means ofhigh-resistance isolation from the system. After a rest phase of a few minutesthe equipment is ready to start once again.
�TN network and TT network: Permitted without restriction.IT network (insulated centre point): Not permitted.
�In the event of a ground fault the voltage stress is around twice as high, andcreepages and clearances to EN50178 are no longer maintained.
�The supply must be made in a way so the live wire always will be connectedto the L1/L2/L3 terminal and the neutral wire always connected tothe N terminal in the electrical panel.
2-7Installation requirements
Electrical specifications
1425 Pre-installation Manual - MS 1320/1700

Pre-installation Manual - MS 1320/1700 1425
2-8Installation requirements
Electrical specifications

Part 3: Pre-installation check list
Please ask the customer to answer the following questions in order to ensure a trouble-freeinstallation of the equipment:
1. Delivery of the crate and transport to the installation site YES NO
A. Is there a place indoors where the crated equipment can be stored � �temporarily.
B. Is there a hand-powered pallet mover, a fork-lift truck or any other lifting � �device available?
C. Can the crate be transported directly to the installation site? � �See minimum width specifications on page 1-3.
D. Is it sufficient to unpack the equipment before it is transported to the � �installation site?See minimum width specifications on page 1-3.
E. Are there other factors (stairs, elevators, corners, obstacles, etc.) which � �should be taken into account when transporting the crate or equipment?
If so, explain: ...............................................................................................................................
........................................................................................................................................................
........................................................................................................................................................
........................................................................................................................................................
2. Power supply
A. Make a note of the present supply specifications:
No. of Phases .......... Voltage .......... Fused by ..........
Neutral Wire? .......... Earth Wire? .......... Frequency .......... YES NO
B. Has a connection box been provided to connect the equipment to the � �mains?
C. Is the customer aware that he/she should have to (or order) all supplies � �(cables, fuses, etc.) necessary to connect the equipment to the mains?
D. Is there a local electrician available? � �
E. Are there any known problems in the building where the equipment will � �be installed?
If so, explain: ...............................................................................................................................
........................................................................................................................................................
........................................................................................................................................................
........................................................................................................................................................
1425 Pre-installation Manual - MS 1320/1700
3-1Pre-installation check list

3. Compressed air supply YES NO
A. Is there a connection hose to supply compressed air � �according to page 2-4?
4. Disposition of the various supplies and equipment on the installation site:
Pre-installation Manual - MS 1320/1700 1425
3-2Pre-installation check list