pipette controller - capp capptempo pipette controller_0.pdf · tm requires charging when the lcd...
TRANSCRIPT

PIPETTE CONTROLLER
USER GUIDE
M a s t e r s o f p r e c i s i o n
www.capp.dk
Tempo

TempoYou have made a very wise decision in investing in the CAPPTempoTM advanced motorised pipette controller. Not only does CAPPTempoTM provide easy and efficient pipetting with maximum comfort, it also provides the unique Electronic Braking System (EBSTM).
Previously, customers had to utilise “stop-and-go” methods in order to aspirate the correct volume of the sample. As a result, pipetting with typical pipette controllers was time-consuming and inefficient.
Now customers are able to adjust the speed of aspiration or dispensation in real time to enable them to pipette the correct amount faster and easier than ever before.
Please verify that your CAPPTempoTM Kit includes the following:
• Pipette Controller
• 5V Charger
• Filter - 0.2 µm
• Wall Holder
• Recharging Stand (Optional)
• User Guide

1. General Description2. Safety Instructions3. Operating Instructions 3.1.1 To Aspirate 3.1.2 To Dispense 3.1.3 Electronic Speed Adjustment 3.1.4 Mechanical Speed Adjustment 3.1.5 Recharging the Battery 3.1.6 Battery Condition 3.1.7 Replacing the Battery 3.1.8 Replacing the Filter and cleaning of Silicon Pipette Holder 3.1.9 EBSTM (Electronic Brake System) 3.1.10 Standby Mode4. General Maintenance5. Accessories6. Warranty7. Technical Specifications
TABLE OF CONTENTS

01: Handle (LS)02: Nose Cone03: Silicon Pipette Holder 04: Pipette Holder Valve 05: Outlet Connector06: Aspiration Trigger 07: Dispensing Trigger 08: EBSTM Control Switch 09: Speed Selection Switch 10: Piston11: O Ring12: Knob Valve13: Battery14: Battery Cover15: Battery Charging Point16: LCD Display17: Micro Pump18: Circuit Board
2. SAFETY INSTRUCTIONS To prevent fire, electronic shock or any injury to persons, following must be observed:
• The unit and its charger must not be submerged in any liquid
• The user should not operate the charger if the cord is damaged
• The user must only use batteries and chargers that are compatible with CAPPTempoTM (Either purchased from the manufacturer or any CAPP authorised distributor.)
• Do not expose the battery to excessive heat
• The user should not handle the charger plug with moist hands
• The user must take caution while inserting a glass pipette
1. GENERAL DESCRIPTION
Tempo

3. OPERATING INSTRUCTIONS 3.1.1 TO ASPIRATE
Select the desired aspiration speed by pressing (A) on the Speed Selection Switch (09). Cautiously insert the pipette into the Nose Cone (02) and Silicon Pipette Holder (03).
Immerse the pipette into the liquid vessel. Press the Aspiration Trigger (06) and start observing the volume on the pipette.
During the aspiration operation, you will find that the Arrow and ASP text blink on the LCD screen to ensure that you are working in Aspiration mode. Release the Aspiration Trigger (06) when the desired volume has been aspirated.
The user can decrease the aspiration speed electronically to its lowest level [1] during aspiration operation by pressing the EBSTM control switch (08) for a precise stop at the desired volume. Check 3.1.9 EBSTM (Electronic Brake System) for more detail.
The user can adjust the aspiration speed mechanically by adjusting the finger pressure on the Aspiration Trigger.
3.1.2 TO DISPENSE
Select the desired dispense speed by pressing (D) on the Speed Selection Switch (09). Insert the pipette into the targeted vessel. Press the Dispensing Trigger (07).
During the dispensing operation, you will find that the Arrow and DISP text blink on the LCD screen to ensure that you are working in Dispensing mode. Release the Dispensing Trigger (07) when the desired volume is dispensed.
The user can decrease the dispensing speed electronically to its lowest level [G] during the dispensing operation by pressing the EBSTM control switch (08) for a precise stop at the desired volume. Check 3.1.9 EBSTM (Electronic Brake System) for more detail.
The user can adjust the dispensing speed mechanically by adjusting the finger pressure on the Dispensing Trigger.

3.1.3 ELECTRONIC SPEED ADJUSTMENT
The Speed Selection Switch (09) on your CAPPTempoTM allows you to set the desired pace of your aspiration speed by pressing “A”, and dispensing speed by pressing “D”. The selection will be displayed on the LCD screen.
The user can select the aspiration speed level, which ranges from 1 to 6. This will be displayed on the left side of the LCD screen where “1” is the lowest speed and “6” is the highest speed.
The user can select the dispensing speed level, which ranges from G to 5. This will be displayed on the right side of the LCD screen where “G” is the lowest speed (Dispensing via Gravity) and “5” is the highest speed.
In gravity speed selection, the motor will stop and dispensing will be done by gravitational force only.
The user-selected speed will be stored in the internal memory so that, after being on standby, when the user starts working again, they can start with the previously selected speed.
It is recommended to choose a lower speed for pipettes of 5mL or less.
3.1.4 MECHANICAL SPEED ADJUSTMENT
The aspiration and dispensing speeds can be controlled manually by controlling finger pressure on the trigger buttons. The deeper the button is pressed, the faster the liquid will aspirate or dispense.
3.1.5 RECHARGING THE BATTERY
CAPPTempoTM requires charging when the LCD display shows a single battery bar on the screen. The original charger supplied, along with the pipette controller kit, should be used for charging so as to avoid any kind of overcharging, short circuiting or damaging of batteries.
The pipette controller can also be charged using the Recharging Stand which is supplied with the kit.
Steps for charging through a wall charger:
1. Plug the charger jack into the Battery Charging Point (15).
2. Plug the charger into a suitable wall socket. The moving bars on the LCD will ensure charging.
3. Allow unit to charge for approx 4 hours (due to its quick charge characteristics) in order to be fully charged.
4. Once the battery is fully charged, the bars will stop moving.
Aspiration Speed Selection (1 to 6)
Dispense Speed Selection (G to 5)

To maintain maximum battery capacity, it is advisable to charge the battery when there is only one bar on the LCD screen.
Steps for charging through recharging stand:
1. Plug the charging stand into a suitable wall socket.
2. Place the pipette controller into a stand socket (as shown in the figure on the right).
3. Charging will automatically start and moving bars on the LCD screen will indicate that it is charging.
4. Allow the unit to charge for approximately 4 hours in order to be fully charged.
5. Once the instrument is fully charged, the battery indicator bars will stop moving.
3.1.6 BATTERY CONDITION
The display on the top half of the Illuminated LCD screen is the battery life indicator. This indicates the level of charge – more bars indicate more charge, while fewer bars mean less charge.
When the battery is low a single bar will be displayed on the screen and the instrument will stop working after few minutes.
A fully charged Lithium battery will allow 8 hours of continuous use.
3.1.7 REPLACING THE BATTERY
The Lithium battery supplied with the CAPPTempoTM is designed to last for several years and only needs to be replaced when it is unable to maintain a charge or is damaged. If it is necessary to replace the Lithium battery it is important to use the appropriate battery from CAPP or an authorised distributor.
Steps for changing the battery:
1. Hold the pipette controller in an upward direction (as shown in the figure below) and remove the battery cover (14).
2. Remove the old battery (13).
3. Check the + and - signs marked on the battery slot area and insert the battery in the correct direction.
4. Close the battery cover.
5. Charge the battery.
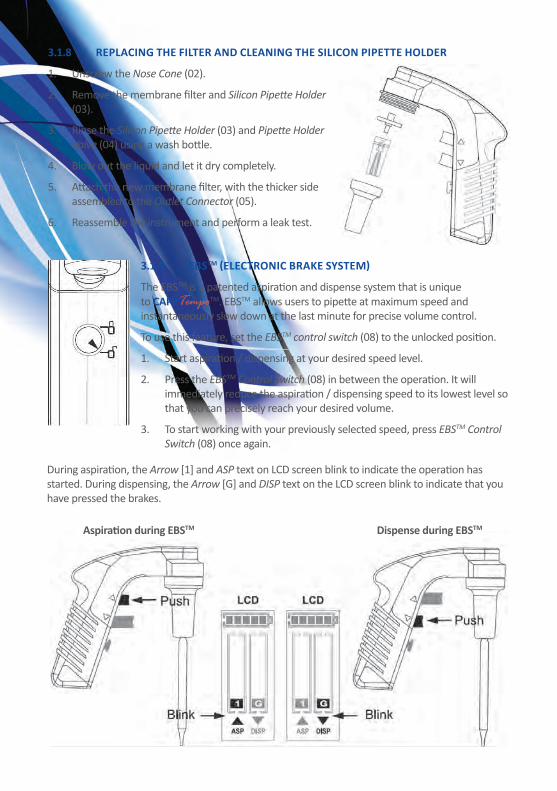
3.1.8 REPLACING THE FILTER AND CLEANING THE SILICON PIPETTE HOLDER
1. Unscrew the Nose Cone (02).
2. Remove the membrane filter and Silicon Pipette Holder (03).
3. Rinse the Silicon Pipette Holder (03) and Pipette Holder Valve (04) using a wash bottle.
4. Blow out the liquid and let it dry completely.
5. Attach the new membrane filter, with the thicker side assembled to the Outlet Connector (05).
6. Reassemble the instrument and perform a leak test.
3.1.9 EBSTM (ELECTRONIC BRAKE SYSTEM)
The EBSTM is a patented aspiration and dispense system that is unique to CAPPTempoTM. EBSTM allows users to pipette at maximum speed and instantaneously slow down at the last minute for precise volume control.
To use this feature, set the EBSTM control switch (08) to the unlocked position.
1. Start aspiration / dispensing at your desired speed level.
2. Press the EBSTM Control Switch (08) in between the operation. It will immediately reduce the aspiration / dispensing speed to its lowest level so that you can precisely reach your desired volume.
3. To start working with your previously selected speed, press EBSTM Control Switch (08) once again.
During aspiration, the Arrow [1] and ASP text on LCD screen blink to indicate the operation has started. During dispensing, the Arrow [G] and DISP text on the LCD screen blink to indicate that you have pressed the brakes.
Aspiration during EBSTM Dispense during EBSTM

You can readjust the speed by pressing A/D on the Speed Selection Switch (09).
If user does not want to use this feature for a long time, simply place the EBSTM Control Switch (08) to the locked position (see figure, right).
3.1.10 STANDBY MODE
There is no on / off switch in this instrument. Once in an idle state, the instrument will automatically switch off after 20 seconds. The instrument can be activated again by pressing any of the buttons.
4. GENERAL MAINTENANCELike most pipette controllers, CAPPTempoTM can be cleaned with any laboratory disinfectant (e.g. ethanol).
However, it must not be submerged in any liquid as this will damage the electronic components of the pipette.
1. To prepare the unit for cleaning, turn the Nose Cone (02) in a counter-clockwise direction with the Nose Cone pointing upwards.
2. Remove the Silicon Pipette Holder (03). Rinse the Silicon Pipette Holder (03) with Pipette Holder Valve (04) using a wash bottle.
3. Blow out the liquid and let it dry completely.
4. Autoclave the Nose Cone (02) at 121oC. You may autoclave the Nose Cone along with the Silicon Pipette Holder.
5. Reassemble the instrument in reverse order and carry out a leak test.

5. ACCESSORIES
Tempo

6. WARRANTYCAPPTempoTM provides a warranty for the instrument for a period of one year from the date of purchase.
Under the terms and condition of the warranty this covers material and manufacturing defects.
The manufacturer’s warranty does not cover damage resulting from improper handling, negligence, accidental damage, trauma or normal wear and tear.
CAPP is not liable for any kind of damage resulting from usage of non standard accessories which are not purchased from original manufacturer or any CAPP authorised distributors.
7. TECHNICAL SPECIFICATIONS
Pipettes 0.1 - 100 mL plastic / glass pipette
Aspiration Speed Selection 1 - 6
Dispense Speed Selection G - 5
EBSTM (Electronic Brake System) Lowest Aspiration and Dispense Speed
Battery 1400 mAh / 3.7 V Li-ion
Charger Input: ~100V - 240V 50 / 60 Hz
Display Segmented LCD
Filter Hydrophobic 0.2 µm
Silicon pipette holder Autoclave at 121oC
Nose cone Autoclave at 121oC
Storage Temperature -20oC to +50oC
Tempo

Distributed by:
v.2018-01
Uthleber Weg 1499734 NordhausenGermanyTel. +49 (0) 3631 65242-0Fax. +49 (0) 3631 [email protected]
www.capp.dk