pipetting and pipette tracking system - stlcc.edu
TRANSCRIPT
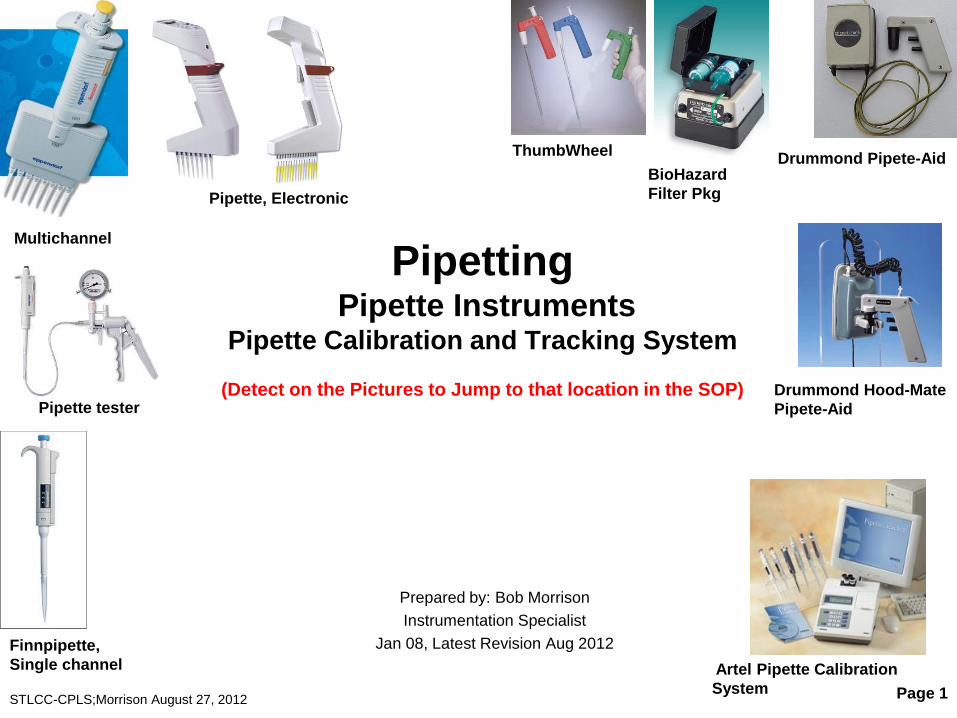
Page 1
Pipetting Pipette Instruments
Pipette Calibration and Tracking System
(Detect on the Pictures to Jump to that location in the SOP)
Prepared by: Bob Morrison
Instrumentation Specialist
Jan 08, Latest Revision Aug 2012
Artel Pipette Calibration
System
Drummond Pipete-Aid BioHazard
Filter Pkg
Multichannel
Pipette, Electronic
STLCC-CPLS;Morrison August 27, 2012
Finnpipette,
Single channel
Drummond Hood-Mate
Pipete-Aid
ThumbWheel
Pipette tester

Pipetting: Pippette Tester, Brinkman, @FV
STLCC-CPLS;Morrison August 27, 2012 Page 2
Brinkmann® Universal Pipette Tester, gifted from
Millipore 3/2010
The Brinkmann Universal Pipette Tester (UPT) is a
hand operated pump system that easily tests any
manufac-turer’s piston-operated pipettes for air leaks,
proper tip fit, and pipette function. A slight vacuum is
introduced into the pipette and a high resolution gauge
measures any pressure changes caused by leaking.
Prior to standard gravimetric performance tests and
calibration, a quick test can be done to see if any
wearing parts, such as pistons, seals, or O-rings, need
to be replaced. Once worn parts are replaced, proper
pipette function may be restored without modifying the
factory calibration.

August 27, 2012
Page 3
Pipetting: Finnpipette, Maintenance
Link to Finnpipette User Manual, info on Calibration……pdf
Maintenance Note: In general, two problems tend to surface most often: 1) jamming
of the dial settings or 2) sluggish or stuck plunger operations.
1) Use the tool to remove the lower outer tip tube and the sliding trapezoid-shaped
tip release at the grip. This should expose the digit cam mechanism where a small
screwdriver or other tool can be used to loosen the cams or realign them.
2) Remove the lower outer tip tube, then use the tool to unscrew the inner tube from
the grip handle. This will expose an inner plunger with a piston that moves inside the
shaft of the grip handle. Remove any debris in the tubes, then lubricate the piston
cylinder area with light grease (comes with device) or WD40. O-rings can also be
replaced in some models.
Plunger (up/down) and Volume setting (twist motion)
Tip release plunger
Handle/Grip/ and Piston chamber (inside)
Volume setting dials (cam)
Tip tube with internal tube housing internal piston
and O-ring in some models. See Maint note below.
Standard Maint kit.
O-ring, lubricant

Pipette: Manual, Eppendorf, Research Series
August 27, 2012 Page 4
Features:
Two-button operation
Autoclavable lower part
TÜV award: ergonomic, user-friendly and user-tested
Viable calibration seal indicates factory calibration has
not been changed
Chemically resistant
Reduced operating forces
Single-handed operation
4-digit display
Maintenance-free nose cones
Three-year warranty
Link to Eppendorf Manual .. pdf
Link to Eppendorf Pipette SOP.. pdf
Link to Basic Training in Micropipetting
Link to Eppendorf .com
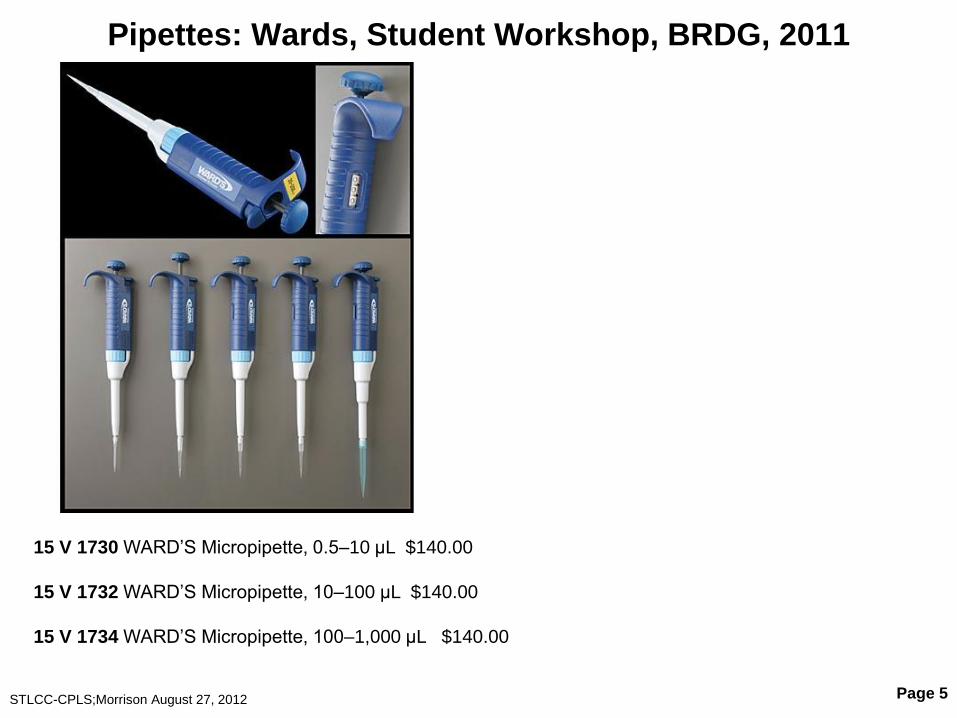
Pipettes: Wards, Student Workshop, BRDG, 2011
STLCC-CPLS;Morrison August 27, 2012 Page 5
15 V 1730 WARD’S Micropipette, 0.5–10 μL $140.00
15 V 1732 WARD’S Micropipette, 10–100 μL $140.00
15 V 1734 WARD’S Micropipette, 100–1,000 μL $140.00

Pipette: Electronic, Thermo Scientific, Matrix, Impact2
August 27, 2012 Page 6
Features:
• Lightweight, ergonomic design increases comfort and
reduced risk of repetitive stress injuries (RSI)
• Trigger-based operation and tip ejection eliminates use of
thumb; reduces strain when ejecting tips
• Step-based programming makes it logical, intuitive and
easy to create programs. Enables the pipette to perform all
the tasks you might do with a manual pipette—only faster
and with less effort—as well as functions such as serial
dilutions across a microplate
• On-board memory saves six programs (up to 40 steps
each) allowing you to spend more time pipetting and less
time programming
• Large volume capacity of 1250 µl per tip allows you to fill
an entire microplate with up to 100 µl per well from a single
aspiration
• Advanced battery technology allows days of work
between charges, no memory effect
• Stepper motor technology and error correction software
ensure accurate and precise pipetting, even when
performing incremental dispensing or when operating at top
or bottom of a pipette's volume range
• Pipette can be used while plugged in resulting in no
downtime during recharging
Link to Thermo Scientific Matrix Website
Link to Thermo Scientific Matrix
Specifications/Options pdf
Link to Basic Training in Micropipetting

Pipette: Electronic, ThermoSci-Matrix, Controls
August 27, 2012 Page 7
Display and Keypad
Pipette Trigger
Ejector Trigger
Access to Batteries
On/Off
Program
Purge
Fill
Dispense
Mix
Enter
Display
Charger Port
Special Key
Volume, also
+/-

Pipetteing; Electronic, ThermoSci-Matrix, Keys
August 27, 2012 Page 8
On/Off
Program
Purge
Fill
Dispense
Mix
Enter
Operation:
Fill
Disp
Mix
Run
Special Key Hole
(four functions)
On/Off ; Flashes ZERO then moves to first step of any previously selected Program
Prog; enables storage of up to five programs in locations1-5 plus ―scratch pad‖ open program #0
Purge; enters and purge prompt to abort the program, dispenses any remaining liquid after trigger
Run; performs the operation displayed when you activate it using the trigger, 3 beeps at end of a program
Special Key; (use pipette tip to activate) four functions; beep tone, pace of repeat operations, calibration, and
SPd ;for adjusting the speed by pressing the volume key.
Volume, also
move up/down
Program
In use
Step
Volume
Speed; Slow
to Fast

Pipetting; Electronic, Programming Example
This example sequence will use the Scratch (Program #0) space to create a
sequence of operations to:
Fill 200ul from one source, Fill 300ul from another source
Mix 500ul, Mix 500ul internally
Disp 100ul, Disp 100ul, Disp 100ul, Disp 100ul, Disp 100ul, then PURGE
1. Turn on the pipette and wait for the Display to show Fill or Run options. At
this point it is ready to execute the Program # shown in the lower right of the
Display OR create a new Scratch program which is what this example will do.
2. Press FILL, Vol will start blinking in the Display, use the up/down Vol arrows
to set the volume for the first fill operation (200ul), then ENTER
3. Press FILL, Vol will blink, up/down to 300ul, then ENTER
4. Press MIX, the Vol will start blinking, use up/down Vol to set it to 500ul, then
ENTER
5. Press MIX, Vol will blink, up/down to 500ul, then ENTER
6. Press DISP, Vol will blink, use up/down to set it to 100ul, then ENTER
7. Repeat step 6 for four times until all 500ul has been Dispensed
8. Press PURGE to clear the pipette and ENTER
9. Press ENTER to end this programming sequence. The P0 is now ready to
“dry run”.
10. Pull the Trigger to execute each step, verifying the proper operation in the
Display window. The program is now ready to run using liquids.
August 27, 2012 Page 9

Pipetting; Electronic, ThermoSci, Matrix, Programming
Entering Program in Open Programming “Scratch Pad” (Program #0) mode – Enter steps in the sequence they will be performed, then save the new Program to one of the five (5)
permanent memory locations, up to 40 steps per program
– After turning on the device, Select any operation (normally fill) FILL, MIX, or PURGE
– Enter the volume for each operation using the up/down arrows
– Press ENTER to confirm each programming step
– Continue entering operational steps pressing ENTER after each step
– Press ENTER one extra time when all steps are done.
Creating/Storing a Program into a specific Program number (1-5) – Press the PROG key then the VOL key until the desired program number is displayed
– Press and hold the PROG key while simultaneously pressing the Special Key Hole to enter the
programming mode
– Begin entering the program steps as you would in Open Programming Mode
– Press ENTER to end and save the program in the preselected Program # location
Recall and Run an Stored Program – Press the PROG key then the VOL key to find the desired program
– Press ENTER to activate the displayed program number
Reviewing a Program (without liquids) – Make sure the RUN mode is displayed. (If display is flashing it is still in Programming mode, hit ENTER)
– Press the Trigger to move to each step of the Program
Adjusting Pipetting Speed in a Program – Press the VOL key during any FILL, DISPENSE, or MIX operation and the new speed will stay active until
the pipettor is turned off.
August 27, 2012
Page 10

Pipetting: Manual, ThumbWheel,
STLCC-CPLS;Morrison August 27, 2012 Page 11
Capacity, mL Color Bel-Art No. VWR Catalog# Unit Price Quantity
2 Blue 379020002 47751-780 Each (2 ML) $26.03
10 Green 379020010 47751-782 Each (10 ML) $26.26
25 Red 379020025 47751-784 Each (25 ML) $35.34
These pipetting devices provide accurate, trouble-free pipetting with simple, one-handed
operation. The ergonomic design enhances comfort, utility, and dispensing precision while
helping to reduce the risk of injury from repetitive and awkward pipetting motions. The
optimally located thumb wheel rotates easily for precision aspirating or dispensing while
using a more relaxed grip. The thumb wheel can also be used to blow out the pipet.
Pipettors resist acids, alkalies, and most solvents and can be easily disassembled for
cleaning. Length: 17.1cm (63/4"). Color-coded for easy identification.

Pipettes: Pipete-Aid Drummond, w Filtration Unit
August 27, 2012 Page 12
Drummond Pipet-Aid. Model: JM0009
Electrically powered pipetting device for dispensing 1 to 100mL volumes. Just push button to fill
and empty pipets. Accepts most glass and plastic pipets. Useful in confined spaces such as
laminar flow hoods. Has positive-action check valve to prevent fluid intake into handle. Handle is
autoclavable. Filler/Dispenser with 0.2µm Filter. Tissue culture unit eliminates cross-
contamination due to overpipetting by using a dual hydrophilic, hydrophobic 0.8µm filter. Filter
prevents detectable penetration of 0.035µm particles and prevents further use of filler/dispenser
if it becomes contaminated with fluid.
Power
On/Off
button
Catalog 4-000-005 Pipet-Aid®
Biohazard Filter Kit 4-000-060
Replacement Biohazard Filters
(pair)
BioHazard Filter
Kit, add-on
Make Sure
tubing is inside
female opening,
not just pushed
against it.
If not working:
1)Remove this fitting and clear all
internal openings of crystals or
other matter.
2) Remove/replace the filter if
necessary.
Vacuum
Pressure

Pipetting: Pipete-Aid, Drummond, 4-000-110-TC Parts
STLCC-CPLS;Morrison August 27, 2012 Page 13

Pipetting: Pipet-Aid, BRDG, Drummond, Tissue Culture Nosepiece
STLCC-CPLS;Morrison August 27, 2012 Page 14
This unit converts any standard laboratory pipet into a hand-
operated dispenser. It is ideal for use in confined spaces such
as laminar flow hoods. Accepts a range of standard glass and
plastic pipets from 1 to 100mL. The Pipet-Aid device
incorporates two precision valves that allow effortless control
of fluid level in pipet. Easily replaceable check valve prevents
fluid from entering the handle. Hose and handle are fully
autoclavable. Withstands ordinary laboratory reagents. Pump
features quiet, long-life operation.
The tissue culture nosepiece kit, standard on model 53498-
125, comes with housing, gaskets, rubber insert, and four
filters. Replacement outer shell (53498-068) for existing
nosepiece is available separately. Additional filters may be
ordered separately.
From VWR Catalog: Pipet-Aid, 110V, with Tissue Culture Nosepiece Kit 4-000-110-TC 53498-125 Each $262.41

Pipetting: BRDG, Pipet-Aid, Hood-Mate, Drummond
STLCC-CPLS;Morrison August 27, 2012 Page 15
From VWR Catalog: Pipet-Aid Hood Mate, 100V 4-000-300 62111-310 Each $340.79
Specifically designed for convenient, comfortable pipetting under
a hood. The Pipet-Aid Hood Mate device can deliver precise
volumes with exact control. Made of UV-resistant material, unit is
lightweight, never requires recharging, and won’t ―walk away‖
from your workstation.
Lightweight handle, weighing only 122g (4.3oz.), provides nine fill
and empty speed settings and proportional fingertip control.
Handle holder incorporates ―auto off‖ and ―sleep mode‖ features
to save energy. Compact and convenient, the pump housing
attaches to hood wall, saving space and preventing spills. Coiled
vacuum/pressure line enters handle from the top, preventing
bench items from being accidentally knocked over. Tissue culture
nosepiece holds a self-locking membrane filter to protect against
over-pipetting. One drop of liquid will cause filter to block, cutting
off all liquid flow in the pipet and preventing damage to the unit.
Ordering Information: Eighteen-month manufacturer’s warranty.
Supplied complete with wall-mounting bracket, adhesive strips,
AC adapter, and a tissue culture nosepiece complete with filters,
gaskets, and rubber insert. Nosepiece outer shell rainbow pack
contains one each of blue, green, orange, red, violet, and yellow.
110V Adapter

Pipette-Aid: Tissue Culture
Filter_Valve Assembly
STLCC-CPLS;Morrison August 27, 2012 Page 3

Pipetting: Pipette Calibration System
STLCC-CPLS;Morrison August 27, 2012 Page 17
The ARTEL PCS is a compact, bench-top spectrophotometer
containing wavelength specific filters allowing measurement of
NIST-traceable ARTEL reagents from 100 nL to 5000 µL. The
system features an easy-to-use screen-based interface that guides
the user through the calibration of single channel pipettes.
Size 23 cm W x 11.5 H x 30.5 D
Weight 4 kg
Keypad 18 keys
Display 2 X 20 alphanumeric
Wavelengths 520 nm and 730 nm
Microprocessor Intel 8031
Printer Interface Centronics Parallel
Serial I/O RS 232: 9600 baud,
8 data bits, 1 stop bit, no parity
Noise < .00015A at A = 1
Inaccuracy < 0.75% (range 0-1.5 A)
Link to Artel Pipette Calibration System Quick Start Guide…pdf

August 27, 2012 Page 18
Pippette Calibration System:
Instrument and Printer Illustration
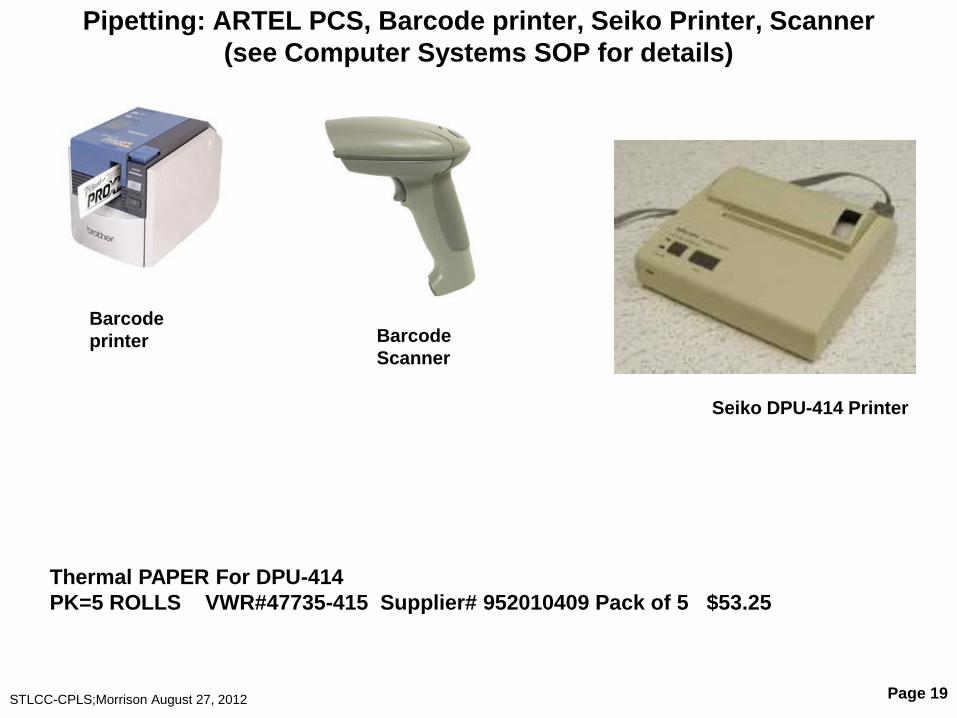
Pipetting: ARTEL PCS, Barcode printer, Seiko Printer, Scanner
(see Computer Systems SOP for details)
STLCC-CPLS;Morrison August 27, 2012 Page 19
Barcode
printer Barcode
Scanner
Thermal PAPER For DPU-414
PK=5 ROLLS VWR#47735-415 Supplier# 952010409 Pack of 5 $53.25
Seiko DPU-414 Printer

Pipetting: Pipette Calibration, Reagents, Cal Kit
STLCC-CPLS;Morrison August 27, 2012 Page 20
Part: G2235BN Reagent Kit, CAT# PCS-210
Blank Vials 50
50 Data points per Blank Vial
Sample Solutions 1-4 included for pipette volumes 2.0 -
5000 µL
(Additional solutions for pipette volumes 0.1 - 1.9 µL
available separately)
Part: G2216C32T, CAT # PCS-600
The Calibrator Kit is composed of a series of vials
containing solutions made of the same dyes as the
Sample Solutions and Blank Solution. The kit provides
traceability to the National Institute of Standards and
Technology (NIST) by correlating the measured
absorbance readings to the calibrated values encoded
on the lot card associated with the kit. The set of vials
must be measured every 30 days or when the
environment changes by +/- 2 °C

Pipetting: Artel
Calibration
Supplies order
Nov 2011
STLCC-CPLS;Morrison August 27, 2012 Page 21

Pipetting: Artel PCS2, Calibrating Instrument, Pg 1/2
STLCC-CPLS;Morrison August 27, 2012 Page 22
Completed Instrument Calibration
12/8/11 RGM

Pipetting: Artel PCS2, Calibrating Instrument, Pg 2/2
STLCC-CPLS;Morrison August 27, 2012 Page 23

August 27, 2012 Page 24
PCS: Instructor Setup Protocol • Prior to the first use each semester, contact Bob Morrison to validate than an Instrument Calibration
Protocol has been done.
• Setup and connect the PCS and printer devices as shown in the diagram on Page 2.
• 15 minutes prior to use, move the CAL A Vial and several Blank Vials (blue liquid) from the Reagent Kit to the Vial Block holders, the 4 slots near the top of the device. Also remove the appropriate Range # Bottle (based on the volume the Students will be testing) from the Reagent Kit and place it near the PCS device to ensure that all chemicals are at/near the same temperatures.
1. Flip the switch, right lower side of the PSC device to the “on” position.
2. The PCS machine will be at the prompt: Main Menu Pipette Calibration? Press “YES” to begin the procedure
3. The next prompt is Lot Code 45711, Correct Y/N? or Enter: (If the system will not proceed due to expiration date on the lot #, see Troubleshooting at the end of this SOP)
4. A Self Calibration (Zero Check) will occur on the first use of the system after first power-on after 8 hours or due to lab temperature variations. If this is required, the following prompts will display:
• Lift the cover on the Vial Holder and move the CAL A vial from the Vial Block into the Vial holder and close the cover. DO NOT remove the cap from the CAL A vial.
• After the Zero check is performed, open the cover, remove the CAL A vial and return it to the Reagent Kit.
5. If the Zero check is OK, the system will respond: “Remove cap and insert Blank Vial“. Proceed to the procedures for 20 uL Student testing.
August 27, 2012 Page 25
PCS: Setup Protocol for Student 20ul Testing
1. From the Reagent Vial Kit, select one of the Blank vials with a light blue fluid in the bottle. Remove the sealing cap from this Blank vial. Do not smudge sides of vial.
2. Open the Vial Holder Cover, insert Blank vial, press down to bottom. Close cover.
3. The system will “Read the Blank Vial” and respond by requesting Enter Operator ID_____. Let the PSC system remain at this prompt until you have completed steps 4,5, and 6 below.
4. From the Reagent Vial Kit, select the large Range Bottle #3 Sample Solution labeled with a range of 10-49 uL for the first round of Student testing at 20 uL. Mix the contents of the Range Bottle by inverting it several times before opening the cap.
5. Open the cap of an unused and empty Aliquot container and place it into the plastic Aliquot container ring (or other stable area).
6. Use a clean Transfer Pipette to aspirate and transfer an amount of the Range #3 Sample Solution to this empty Aliquot container. The amount should be five times the pipette test volume for each student. You may need to transfer more of the Sample Solution to the Aliquot container later, depending on the volume being used by the students as they perform pipette testing.
7. Have the students select their pipette and tips for the first test round at 20 uL.
8. When the Student tests are complete at 20uL, you may consider running another round of tests using another volume, new Blank Vials, and the appropriate Range # Sample Solution. Begin this procedure again at Step 1 above.

August 27, 2012 Page 26
PCS: Student Test Protocol 1. At Enter Operator ID ________ prompt, enter the first four digits (after the “A”) of your Student
ID. Press Enter when finished.
2. Enter the Pipette ID: 000XX found in the bar code or any simple value. Press Enter when finished.
3. Enter the Volume: ___ uL that the instructor has setup for this test. The system will respond with the number of samples that can be made using this Blank vial at this volume. If this number four or less, notify the instructor to replace the Blank vial.
4. Using you Pipette for testing this amount and a new tip for each sample, aspirate the targeted amount of Sample Solution from the Aliquot container.
5. Open the Vial Holder Cover and dispense the test pipette amount into the Blank Vial, careful to release the amount into the blue solution and not on the sides of the vial.
6. Close the Vial Holder cover and wait as the following messages are displayed: Mixing Sample #1, Reading Sample #1.
7. Device will display Result #1 = _______, print results, and prompt for next Sample.
8. Continue this process with your pipette and a new tip until the specified number of tests (usually five) have been made. Press END OF RUN after the fifth test has been run. The system will prompt: Reprint Results (Yes/No), press NO.
9. A summary of the results and statistical analysis will be printed. The device will prompt: Another Cal w/Vial (Yes/No). Press YES to allow the next student to begin testing at this volume at Step #1 above. Press NO after the last student or to change the volume setting for the next round of testing.
10. Tear off your results from the PCS printer, add your name, and follow your lab instructor directions for turning this in or further steps in the assignment.

August 27, 2012 Page 27
PCS Tracking Software: Databases
• Location:
– The tracking software databases are stored in the location below on the host CPU
– C:/Program Files/Labtronics/Artel Pipette Tracker v3.2/Databases
• Type/Format:
– There are several unique databases, one for Pipettes, one for Methods and Test Plans, and one for an Audit trail.
– All of these are Microsoft ACCESS however, it is highly recommended that you use only the Artel tracking software to view or modify them.
• Backup and Copy:
– Although there is a ―backup‖ option under the System- Define Database menu, it is recommended that you backup the entire Databases directory to a flashdrive or other media using a normal Microsoft drag/drop/replace operation.
• Restore:
– To restore a backed-up or copied database, use the Microsoft drag/drop/replace operation from the media to the Artel Pipette Tracker v3.2 folder. This insures that audit and other parameters are consistent with the system software.

August 27, 2012 Page 28
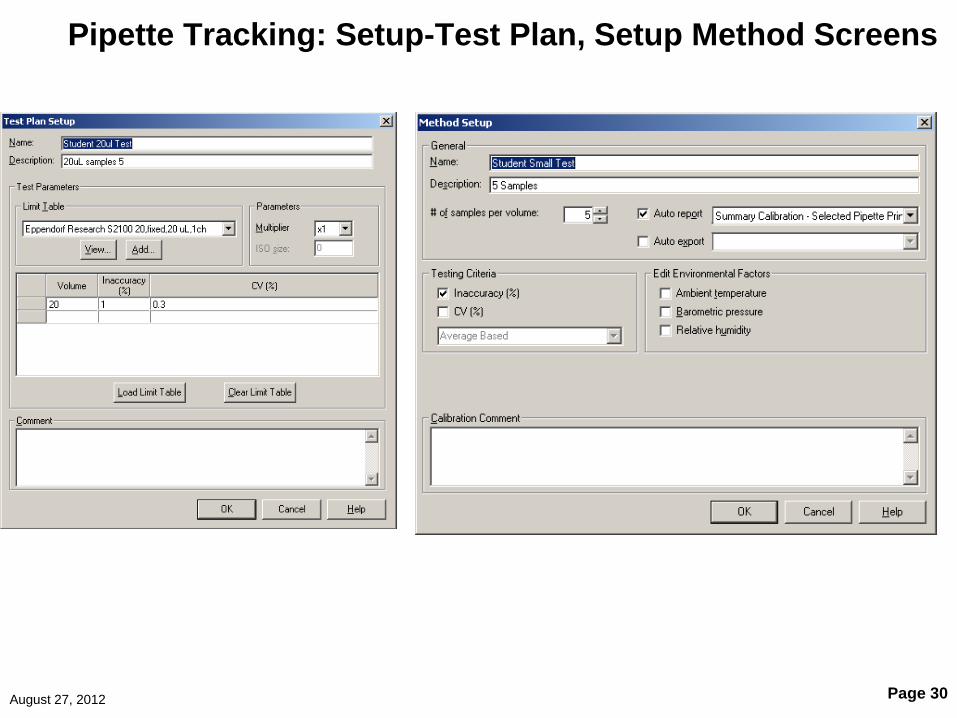
PCS Tracking Software: Methods, Models, Test Plans
• General Procedures: – Before you can add a pipette to the database either by either key in, copy, or barcode reader, you
must first define a Test Plan and Method (in that order) that will be used for this pipette
– Test Plans are used to identify the limits of measurements and accuracy range appropriate for pipettes
– Methods are used to define the number of measurements/samples to be taken. There can be several of these, one for professional calibrations and others for Student operations
– Models is used to select, edit or modify a list of current industry pipette Models with their specified limit parameter on accuracy and precision
– Use the PCS Setup command in the main toolbar to initiate or modify these items
• Defining Test Plans: – Use the Add, Edit, or Copy options and enter a title and description for this Test Plan
– Select the Limit Table from the model database that most closely matches your test plan requirements, then edit or modify the limit parameters if needed. Note, you can edit or add to the Models list from the Setup-Models toolbar
– Modify the Multiplier field as needed.
– Continue this operation using the Add, Edit, or Copy commands to complete the required Test Plans
• Defining Methods: – Use the Add, Edit, or Copy options and enter and enter a name and description for each Method
– Select the # Samples per volume for this Method and make sure the Name/Description field has information about the Samples quantity.
– Select the Testing Criteria and Report level of detailed desired
– Continue to Add, Edit, or Copy until all Methods have been defined.

August 27, 2012 Page 29
Pipette Tracking: View-Inventory Screen
August 27, 2012 Page 30
Pipette Tracking: Setup-Test Plan, Setup Method Screens

August 27, 2012 Page 31
PCS Tracking Software: Pipette Definition
• General Procedures: – On the main Toolbar, select View, then Inventory or Worklist
– On the main Toolbar, select Setup and then select Pipette
– Select Add, Edit, or Copy to add or modify a Pipette from these lists to suit your requirements.
• Pipette General: – Key in or use a Barcode reader to enter the Pipette ID:
– Enter a Description for the pipette
– Key in a location/Room or storage area
• Details Tab: – Select the Model from the pull down list that matches your Pipette type
• Method and Test Plans: – Select the Method and Test Plan for this pipette from those previously entered
– Select a Calibration Interval in Number and Period
• Select OK if you wish to define other Pipettes to the system
• Select Calibrate to initiate an actual Calibration procedure for this device. Note, to do this operation you must have the PSC device online and setup prior to this operation.

August 27, 2012 Page 32
PCS: Troubleshooting , Expiration Date on Lot#
• During the setup for Student testing, the device checks the date of the lot number entered for the Cal A and other items against a database stored in the device. If the current date is beyond the ―expiration date‖ the machine will not proceed.
• To get around this situation, use the following technique, assuming you are willing to accept use of expired vials.
- When the device prompts for ― Pipette Calibration‖? Press NO
- Press NO on the next few screen options until you get to ―Instrument Setup‖, then press YES
- Follow the prompts until you get to the ―Enter Day/mo/year and press YES
- Enter 07 for day, month, and year; ex (07/07/07) which is a year ahead of the expiration date on the chemicals/vials supplied with the original PCS order kit.
- Enter NO on other options until you get back to the main Calibration menu
- The System should no longer reject the testing due to expired lot # information.