pivot door instruction manual - plumbase.co.uk · stage 4 - screw-fixing the 1st wall profile •...
TRANSCRIPT

IMPORTANT• This is an important document as it holds the Consumer Guarantee which needs to be returned,
please ensure it is retained by the end user.• Please read these instructions carefully prior to attempting installation.• Unpack and handle the product with care to avoid damage to the product finish.• Check for hidden electrical cables and water pipes prior to commencing any drilling work.• Do not plasterboard over the rim of the Tray.• Ensure the walls where the Enclosure is to be fitted are vertical. (If the walls are not completely
vertical there is 20mm of adjustment in each Wall Profile.) Note: It is recommended that the wallsare tiled after the Tray is fitted and grouted before fitting the Enclosure. This will provide maximumadjustment and will aid sealing.
• No attempt should be made to rework toughened safety glass.• Pictures used are for illustration purposes only, product designs may alter slightly as a result of
continuing product development.• Roman’s toughened glass is completely safe for use in our shower enclosures and bath screens;
providing our products are installed according to our guidelines. • It is important to note, that the glass must not be mounted or ‘pinched’ in such a way that would
cause a stress point to develop in the glass. In addition, it must not be subjected to any sharpimpact or severe temperature fluctuation which may also cause a stress point to develop in theglass.
• Roman’s toughened glass is physically and thermally significantly stronger than standard glass.During our toughening process the stresses contained within any glass are balanced so if in theunlikely situation any of the above occurs and the glass breaks, the glass will shatter safely intosmall thumbnail sized blunt fragments.
• Please note that some natural misting may occur when you remove this product from itspackaging, due to the addition of the glass protection pre-coating. If this does occur this can easilybe removed with a soft, dry cloth.
Before Assembly and Installation of thePivot Door
* Check the product for defects. Installation queries ondamaged parts can not be resolved once the installationhas been completed.
* The Tray must be completely sealed along tiled walls, fittedlevel (check with a Spirit Level) and should have no leaks.
Notes: It is recommended that the Wall Profiles are fitteddirectly onto tiles or a similar sealed surface. If walls ortray or a combination of both are out of level you will notachieve full adjustment of maximum width.
Pivot Door Instruction Manual
If you have any problems with your Shower Enclosure once installed, please refer back to this Instruction Manual to ensure you havecompleted every stage correctly. If you still experience any difficulties or have any queries please contact us on
+44 (0) 1325 328033 for Technical Assistance or +44 (0) 1325 328034 for Sales.
Component Check List: Supplied
No: Description Quantity1 Wall Profiles 22 Pivot Door 1
Fixing Kit: Component Check ListNo: Description Quantity3 Wall Plugs 6 4 35mm Screws (Wall Profiles) 65 Handle 16 12mm Screws 67 Screw Cover Caps 128 Top Caps 29 Seals 2
H2P Aug 12
Equipment Check List: Not Supplied• 4.5mm Drill Bit • 6mm Masonry Drill Bit • 2.5mm Drill
Bit • Mains or Battery Drill • Spirit Level •Pozi/Flathead Screw Driver
• Bathroom Sealant Gun • Bathroom Sealant Tube•Tape Measure • Pencil • Pliers • Additional fixings if
going into plasterboard
Consumer Guarantee - Please make sure the purchaser/end user completes and returns the Guarantee card which isenclosed with this product. Failure to validate the Guarantee will mean only the 1 Year Statutory Guarantee will apply.
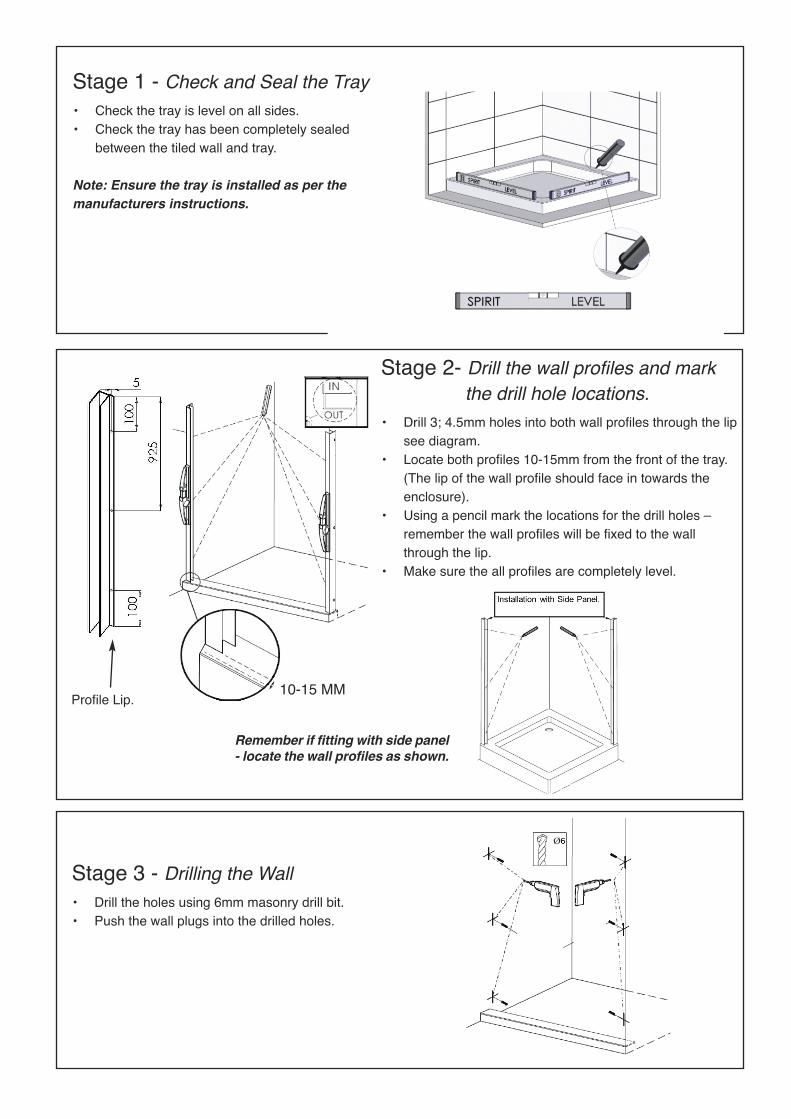
Stage 3 - Drilling the Wall• Drill the holes using 6mm masonry drill bit.• Push the wall plugs into the drilled holes.
Stage 1 - Check and Seal the Tray• Check the tray is level on all sides.• Check the tray has been completely sealed
between the tiled wall and tray.
Note: Ensure the tray is installed as per themanufacturers instructions.
Stage 2- Drill the wall profiles and mark the drill hole locations.
• Drill 3; 4.5mm holes into both wall profiles through the lipsee diagram.
• Locate both profiles 10-15mm from the front of the tray. (The lip of the wall profile should face in towards the enclosure).
• Using a pencil mark the locations for the drill holes – remember the wall profiles will be fixed to the wall through the lip.
• Make sure the all profiles are completely level.
Profile Lip.10-15 MM
Remember if fitting with side panel- locate the wall profiles as shown.
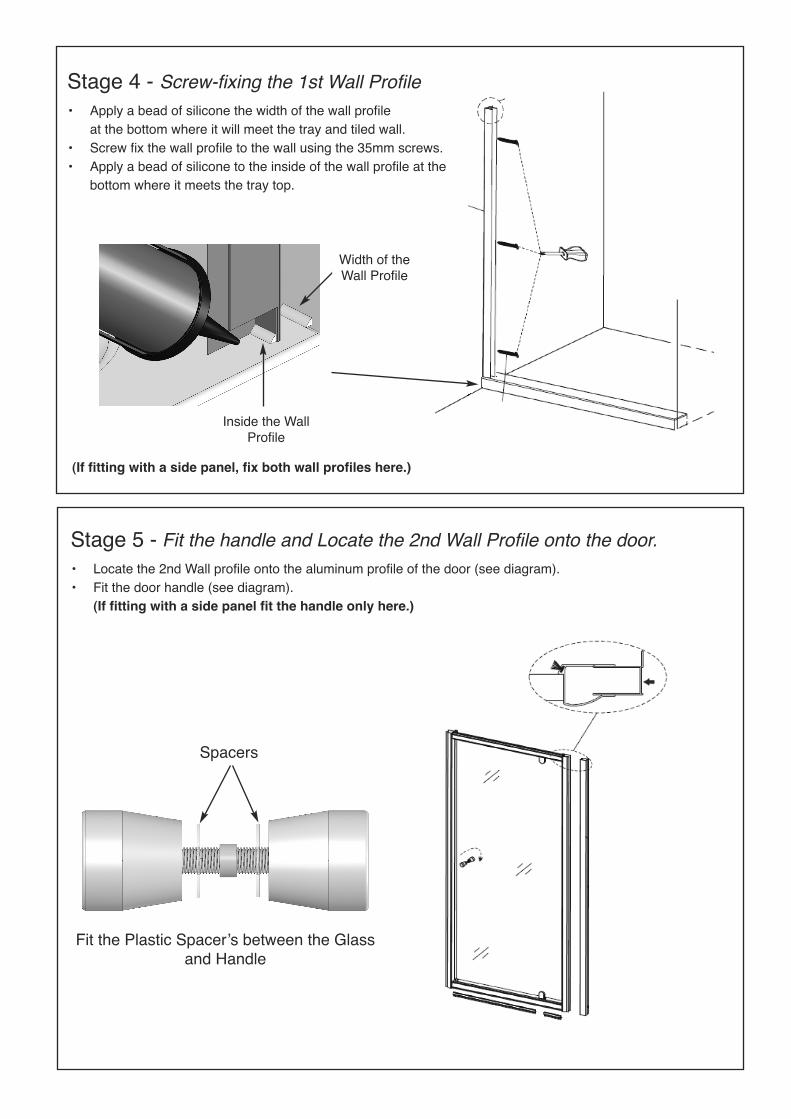
Stage 4 - Screw-fixing the 1st Wall Profile• Apply a bead of silicone the width of the wall profile
at the bottom where it will meet the tray and tiled wall.• Screw fix the wall profile to the wall using the 35mm screws.• Apply a bead of silicone to the inside of the wall profile at the
bottom where it meets the tray top.
Stage 5 - Fit the handle and Locate the 2nd Wall Profile onto the door.• Locate the 2nd Wall profile onto the aluminum profile of the door (see diagram).• Fit the door handle (see diagram).
(If fitting with a side panel fit the handle only here.)
Inside the Wall Profile
Width of theWall Profile
(If fitting with a side panel, fix both wall profiles here.)
Fit the Plastic Spacer’s between the Glassand Handle
Spacers

Stage 6 - Lift the Door onto the tray and fix the 2nd wall profile.(If fitting with a side panel perform bullet point 2 only - then refer to your side panel instructions).
• Prior to lifting the door onto the tray, apply a bead of silicone the width of a wall profile, where the 2nd wall profile will meet the tray and tiled wall at the bottom.
• Lift the door onto the tray and locate it onto the 1st wall profile.• Adjust the 2nd wall profile so it locates against the wall and the holes in the profile lip line up with the
drilled holes in the wall• Using a screw driver screw fix the wall profile to the wall using 35mm screws (supplied).
Width of theWall Profile
1st WallProfile 2nd Wall
Profile
Stage 7 - Drilling the Enclosure.• Ensure the enclosure is centred between
the wall profiles (see diagram).
• No Gap – ensure the magnet seal is locating the full length of the door when in the closed position.
• Adjust the door within its own main frame to ensure the gap between the top of the door and the horizontal main frame is parallel. Toachieve this adjustment, push the main vertical door frame from the top (on the pivotside), further into the wall profile following the arrow. This will ensure the glass door lifts away from the bottom of the main horizontal main frame. (Diagram A)
• Drill holes through the wall profiles and into the profiles of the door frame using 2.5mm drill bit.
Important: It is critical the door has beenadjusted correctly so that the door opensand closes correctly prior to drilling.
2.5mm
A

Stage 8 - Screw Fixing the Enclosure.• Using the 12mm screws secure the enclosure to the wall profiles,
It is critical the door has been adjusted correctly so that the door opens and closes correctly.There is slight adjustment in the door hinges to help achieve this– follow the adjustment instructions below if necessary.
• When the door is closed, make sure the magnets of the door and frame locate onto each other along the full length.
• Fit the screw cover caps to conceal the 12mm screw heads.All ways check the screws from the door hinges are tight.
Stage 9 - Sealing the Enclosure and fit the top caps• Seal both sides of the wall profiles vertically inside and outside where they meet the tiled walls.• Fully seal the base of the enclosure to the tray top from the outside only.• Please allow 24 hrs for the sealant to cure prior to using the enclosure.• Fit the top caps to the profiles of the door (the caps have a snap-off function to allow a good fit).
Important: Failure to follow the sealing procedures correctly may result in serious water damage andwill not be covered under the terms of the guarantee.
Door hinge adjustment:Slide the cover cap down on the back of the hinges. Loosen the screws by approx 2 -3 turns, adjust the hingesand glass door so they are level, re-tighten all the screws and replace the hinge cover caps.Take care during this operation -2 persons are recommended when lifting and adjusting the door.Always check the screws from the door hinges are tight.

Cleaning your product:Shower Enclosures are designed for luxury showering and with care and attention you can keep them looking new for longer. Simply clean your Shower Enclosure regularly using a soft cloth and warm soapy water and………If you live in a hard water area, occasionally clean your Shower Enclosure using a 50/50 solution of white vinegar and water. Thesolution should be left on the product for approximately 5 mins and then rinsed off using warm water. This method of cleaning shouldremove lime scale residue. It is also a good idea to wipe all water droplets and residue from the glass surfaces of your Enclosure after use - a window"squeegee" is ideal for this task. This is particularly important in hard-water areas where lime scale build up is likely if water is left onthe smooth glass surface for extended periods of time. The use of any other cleaning products is not recommended Proprietary cleaning products frequently change formulawithout notification and cannot be endorsed for this reason.
A List of don’ts: • Don’t use acidic based products.• Don’t use abrasive cleaners and/or cleaners containing bleach or solvents.• Don’t use scouring pads, powder or any sharp instruments.