pl20664 data and lifecycle management in the...
TRANSCRIPT
1
PL20664
Data and Lifecycle Management in the Cloud Adam Luttenbacher Autodesk, Inc. Craig Godfrey Autodesk, Inc.
Description In this hands-on lab, we will teach you how to effortlessly upload and access your data in the Autodesk cloud. But getting data into the cloud is only part of the story; you’re going to want to do something with it. Being a Fusion Lifecycle software user, you will use that data to work through lifecycle workflows. We will do all of this through a brand-new cohesive and fluid experience that you have to see! Come to this lab to take a spin through the new Fusion Lifecycle software and cloud product data management (CPDM) experience. Your AU Expert(s) Adam Luttenbacher Adam Luttenbacher is a principal user experience designer and chief product owner for Autodesk, Inc.’s Autodesk Drive. With over 14 years of data management experience, Adam has played a significant role in improving both the user's experience and the product quality of Autodesk's data management applications. Educating and interacting directly with the user community at Autodesk University each year has been a top priority for Adam. Craig Godfrey Craig Godfrey is a senior user experience designer for the Data Management Group at Autodesk, Inc., in Novi, Michigan. Craig has worked at Autodesk for 13 years, starting in quality assurance for AutoCAD Mechanical, Inventor, and Vault before becoming part of the user experience team on Fusion Lifecycle.
Learning Objectives • Learn how to use Fusion Lifecycle and A360 together through a new
cohesive and fluid experience • Learn how to use Fusion Lifecycle with data stored in the Autodesk cloud • Learn how to access, edit, and upload all data from the cloud directly from
desktop applications • Understand the concept of pinning attachments, of the various pinning policies,
and of file operations using Fusion Lifecycle
2
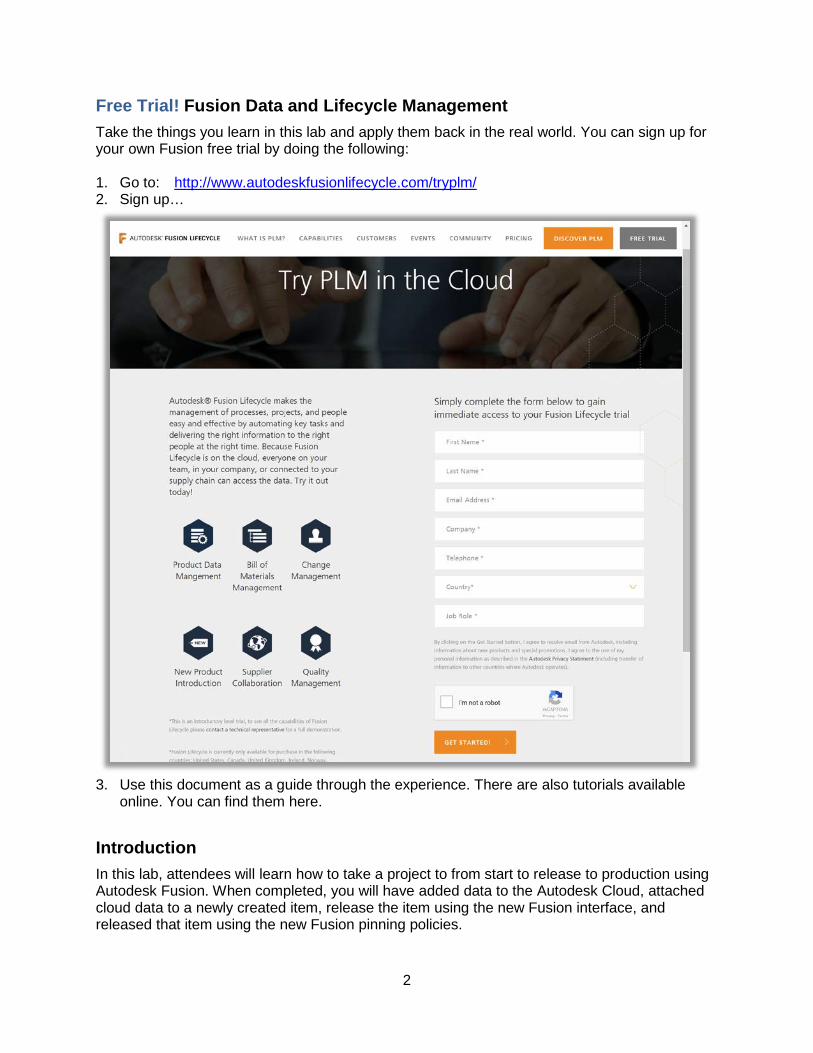
Free Trial! Fusion Data and Lifecycle Management Take the things you learn in this lab and apply them back in the real world. You can sign up for your own Fusion free trial by doing the following: 1. Go to: http://www.autodeskfusionlifecycle.com/tryplm/ 2. Sign up…
3. Use this document as a guide through the experience. There are also tutorials available
online. You can find them here. Introduction In this lab, attendees will learn how to take a project to from start to release to production using Autodesk Fusion. When completed, you will have added data to the Autodesk Cloud, attached cloud data to a newly created item, release the item using the new Fusion interface, and released that item using the new Fusion pinning policies.

3
Autodesk Cloud Product Data Management (CPDM) This lab begins with the “cake already in the oven”. A team hub has been created and configured for all lab attendees.
• Name: FusionAU2016 • URL: https://fusionau2016.autodeskplm360.net • Username: Provided to you in the lab – See
your card. • Password: Autodesk1
Product Lifecycle Management Take a Look Around The Fusion Lifecycle interface is new and makes it easy to find the work you have been doing or the work you want to do. This section will walk you through some of the interface.
Dashboard The dashboard presents all of the Items that are interesting to you. If you have bookmarked an item, it will show up here. It will also show you the work that you have pending.
Figure 1: Bookmarks on Fusion dashboard page
If you are a part of a workflow, you can also find the items requiring your attention in the My Outstanding Work section.
Workspaces Your site is made up of workspaces. A workspace is a collection of items of the same type, behavior, and properties. A workspace is where you store, view, and work with data items that have the same attributes. Workspaces typically represent logical

4
groupings, such as Items and BOMs, Change Requests, Change Orders, and Project Management.
Figure 2: Fusion workspaces are available in main menu
Explore Fusion Data Management Cloud data is easily accessed while managing product lifecycles. It is accessible directly from the main menu.
I. Go to Fusion Data
Steps to view data 1. Choose the main menu. 2. Choose Data from the main menu.
5
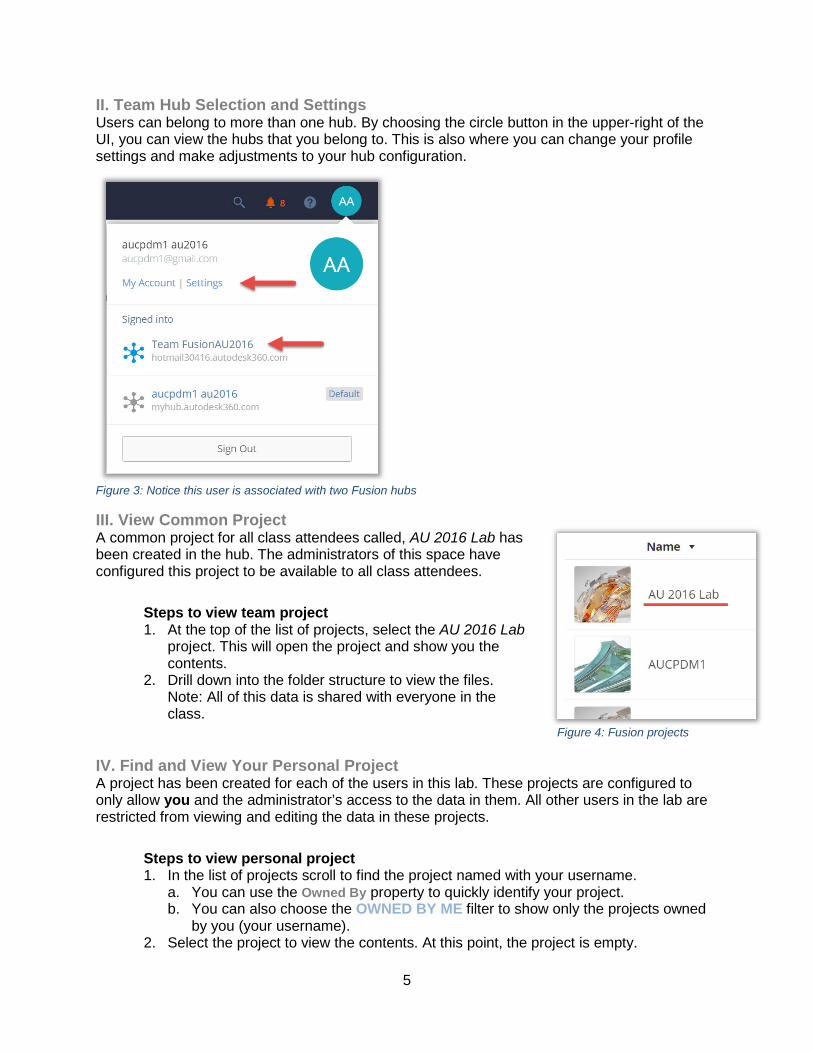
II. Team Hub Selection and Settings Users can belong to more than one hub. By choosing the circle button in the upper-right of the UI, you can view the hubs that you belong to. This is also where you can change your profile settings and make adjustments to your hub configuration.
Figure 3: Notice this user is associated with two Fusion hubs
III. View Common Project A common project for all class attendees called, AU 2016 Lab has been created in the hub. The administrators of this space have configured this project to be available to all class attendees.
Steps to view team project 1. At the top of the list of projects, select the AU 2016 Lab
project. This will open the project and show you the contents.
2. Drill down into the folder structure to view the files. Note: All of this data is shared with everyone in the class.
IV. Find and View Your Personal Project A project has been created for each of the users in this lab. These projects are configured to only allow you and the administrator’s access to the data in them. All other users in the lab are restricted from viewing and editing the data in these projects.
Steps to view personal project 1. In the list of projects scroll to find the project named with your username.
a. You can use the Owned By property to quickly identify your project. b. You can also choose the OWNED BY ME filter to show only the projects owned
by you (your username). 2. Select the project to view the contents. At this point, the project is empty.
Figure 4: Fusion projects

6
V. Create a Folder Structure in Your Personal Project Treat this project as your own workspace and create a folder structure that would be logical to support your daily work activities.
Steps to create a folder structure 1. From inside of your personal project, choose the New Folder
button. 2. In the Folder Name field, create a folder named My Office
Files. 3. Choose Create and notice the folder is created in your
project. 4. Create another folder named Design Data. 5. Choose Create and notice the folder is created in your project. Note: Files will be added to these folders later in the lab.
Figure 5: Folders inside of a Fusion project

7
Autodesk Drive – Access Cloud Data from Desktop Autodesk Drive is installed on your lab machine and waiting for you in the system tray.
I. Log into the Cloud Your Autodesk ID is the common key used to identify you and give you access to all of the Fusion functionality.
Steps to log into the cloud 1. Right-click on the Autodesk Drive icon. 2. Choose “Sign In” from the menu.
3. Enter the username provided for you: AUCPDM<number> (see card)
4. Choose NEXT. 5. Enter the password: Autodesk1
II. View Hubs and Folder Structure 1. After logging in, Autodesk Drive is available from Windows File Explorer
Figure 7: Autodesk Drive icons
Figure 6: Autodesk Drive tray application

8
2. Navigate into Autodesk Drive to view the Fusion Team hubs and folder structure.
III. Add Data to the Cloud Adding data to the cloud is simple with Autodesk Drive. By saving files to the Autodesk Drive, they will be uploaded to the cloud for you. In this step, you will be uploading the data to the cloud using a drag-and-drop copy command. For this exercise, data has been added to your lab machine and is available here: Z:\_new-datasets\PL20664.
Steps to add office documents to the cloud 1. Navigate to C:\Datasets\<classroom>\PL20664\Office Files. 2. Shift-select the files. 3. Drag-and-drop files from the z drive to a folder already created in your Autodesk
Drive workspace.
4. With the files added to Autodesk Drive, they are automatically uploaded to Fusion. 5. View files in Fusion.
Figure 8t: The folder structure is the same as the folder structure in Fusion. Navigating into your personal project will show the structure you created in the previous step.
9
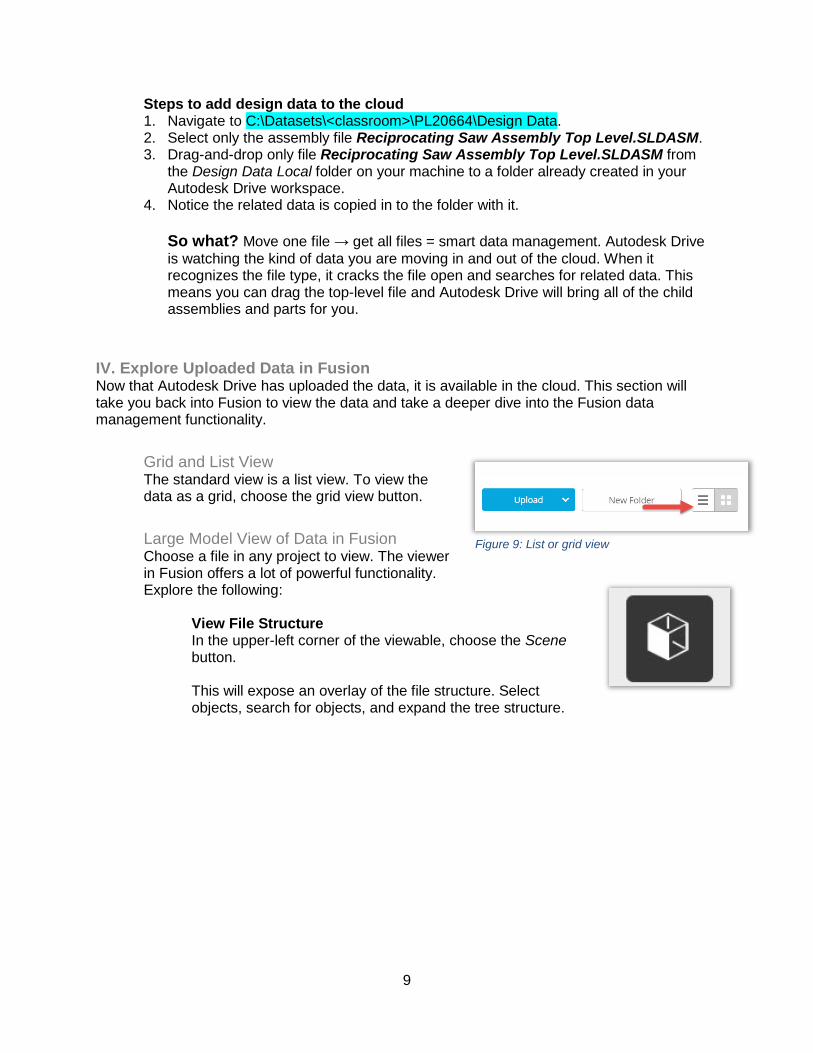
Steps to add design data to the cloud 1. Navigate to C:\Datasets\<classroom>\PL20664\Design Data. 2. Select only the assembly file Reciprocating Saw Assembly Top Level.SLDASM. 3. Drag-and-drop only file Reciprocating Saw Assembly Top Level.SLDASM from
the Design Data Local folder on your machine to a folder already created in your Autodesk Drive workspace.
4. Notice the related data is copied in to the folder with it. So what? Move one file → get all files = smart data management. Autodesk Drive is watching the kind of data you are moving in and out of the cloud. When it recognizes the file type, it cracks the file open and searches for related data. This means you can drag the top-level file and Autodesk Drive will bring all of the child assemblies and parts for you.
IV. Explore Uploaded Data in Fusion Now that Autodesk Drive has uploaded the data, it is available in the cloud. This section will take you back into Fusion to view the data and take a deeper dive into the Fusion data management functionality.
Grid and List View The standard view is a list view. To view the data as a grid, choose the grid view button. Large Model View of Data in Fusion Choose a file in any project to view. The viewer in Fusion offers a lot of powerful functionality. Explore the following:
View File Structure In the upper-left corner of the viewable, choose the Scene button. This will expose an overlay of the file structure. Select objects, search for objects, and expand the tree structure.
Figure 9: List or grid view

10
Isolate Components in Assembly After expanding the structure, select a sub-assembly or component to isolate the object in the image.
Mark Up the File The mark up tool allows consumers to use a variety of tools to make notes on the visualization. Mark-ups are stored as comments on the file. Choose the file in the grid/list to see associated mark-ups.
Figure 10: Gear Housing is isolated by choosing it in the structure
Figure 11: Markup can be saved and associated with the drawing
11
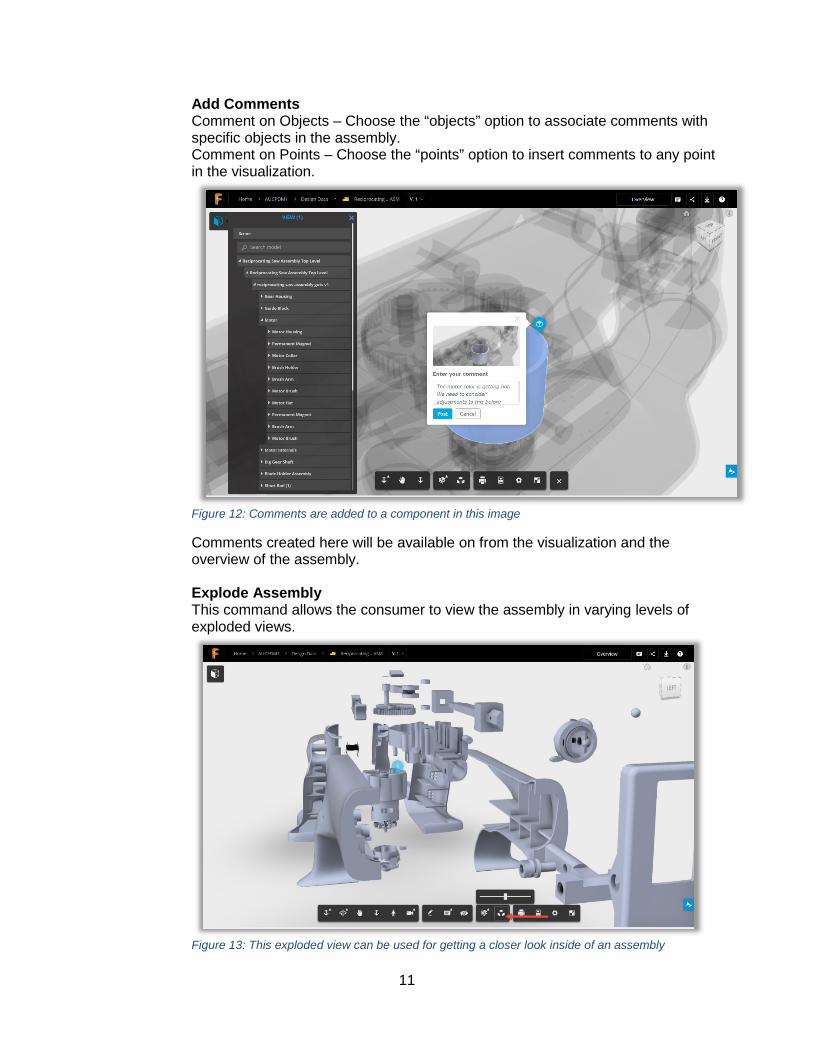
Add Comments Comment on Objects – Choose the “objects” option to associate comments with specific objects in the assembly. Comment on Points – Choose the “points” option to insert comments to any point in the visualization.
Figure 12: Comments are added to a component in this image
Comments created here will be available on from the visualization and the overview of the assembly. Explode Assembly This command allows the consumer to view the assembly in varying levels of exploded views.
Figure 13: This exploded view can be used for getting a closer look inside of an assembly

12
Overview and Related Data From the file view, choose the Overview button.
View Uses Data By default, the Uses tab is selected and shows you a thumbnail image of all child components.
View Used In Data Choosing the Used In tab will show all files that consume the selected object. View Drawings Fusion Team will identify associated drawing files and show them here.
Figure 14: These components are used to make Motor.sldasm

13
Create an Item for Lifecycle I. Create a New Item An item can be generated as the result of a workflow, an automated script, importing item data, or manually within a workspace. When an item is created manually, it is added to the current workspace.
1. From the main menu, choose Workspaces>Product Development>Item and BOMs. 2. Notice a long list of items listed in the grid. 3. Click Create. 4. Enter values for the required fields (*) on the Item Details tab.
Note: You will have to select a classification for the item. Select the hypertext next to the Classification header.
5. Click Save.
II. Bookmark Item to Dashboard Bookmarking functionality allows you to quickly access items you are working on.
1. With the item open, choose the star Bookmark icon in the upper-right corner. 2. Choose Home to view the list of bookmarked items. Notice this item is present in the list.
Figure 15: 1. Choose Bookmark button. 2. Confirmation of bookmarking

14
III. Attach Files to an Item With an integration to Fusion Team, files can be attached to your items from the Autodesk Cloud.
Attach Blade Guard Base 1. Open the item you created in the previous step. 2. Choose the Attachments tab.
3. In the Attachments tab, choose the Add button. The data in the cloud is now
available for attaching to the item. 4. Navigate to and check the box for Blade Guard Base.sldprt.
5. Select Add.

15
IV. Quick Create Change Order Use the Actions menu to create and link an engineering change order (ECO) to the open item. An ECO is an item in a revisioning workspace that is linked to an item in another workspace. The linked item is managed by the ECO and is listed on the affected items tab for the ECO.
1. Open the item you created to link to the ECO. 2. In the item header, click Actions. 3. Select Quick Create ECO.
4. Give the change order a title. 5. Save the ECO.
a. Click Save and Manage to create the ECO and link it to the item. b. Choose the lifecycle you want to use. In this example, use Production
Release. c. Click Save and View to create the ECO, link it to the open item, and go to
the new change order.
Release Change Order and Review 1. You are now viewing the change order that was just created.From the Actions menu,
choose Workflow Transition>Submit to Work. 2. From the Actions menu, choose Workflow Transition>Submit for Review. 3. From the Actions menu, choose Approve and Close and select the Approve button.
4. Select the item from the Affected Items tab. 5. In the item, notice the attachment is locked to the revision that was created.

16
V. Version File from Autodesk Drive The item has been released to production, and a modification is needed on the housing of the assembly.
Add a New Version to Autodesk Drive Real world workflow would be to modify a component to create a second version of the cloud data. For the sake of time, drag Blade Guard Base.sldprt into the Design Data folder in Autodesk Drive.
1. Navigate to Blade Guard Base.sldprt in folder Updated Blade Guard - Solidworks folder on the machine.
2. Choose the file and drag-and-drop it into the Reciprocating Saw – SolidWorks folder in the Autodesk Drive workspace. Note: Dropping the same file into this folder will update the version of the file.
Figure 16:Notice version 2 of Blade Guard Base.sldprt
View Multiple Versions in Fusion 1. Chose Data from the main menu. 2. Navigate to the file. 3. View the assembly and change between version 1 and version 2.

17
VI. Pin Attachment Versions to Item Revisions This exercise will demonstrate the pinning of attachments to revisions.
Quick Create Change Order on Item With the changes done on the data, we want to consume and release the item with those changes. 1. Find the same item in your dashboard. 2. In the item header, click Actions. 3. Select Quick Create ECO. 4. In the dialog that pops-up, enter the information required for creating the ECO. 5. Save the ECO.
a. Click Save and Manage to create the ECO and link it to the item. b. Choose the lifecycle you want to use. In this example, use Production
Revision. c. Click Save and View to create the ECO, link it to the open item, and go to the
new change order.
Release Change Order and Review You are now viewing the change order that was just created. 1. From the Actions menu, choose Workflow Transition>Submit to Work. 2. From the Actions menu, choose Workflow Transition>Submit for Review. 3. From the Actions menu, choose Approve and Close and select the Approve button.
4. Select the item from the Affected Items tab. 5. In the item, notice the attachment is locked to the revision that was created.
18
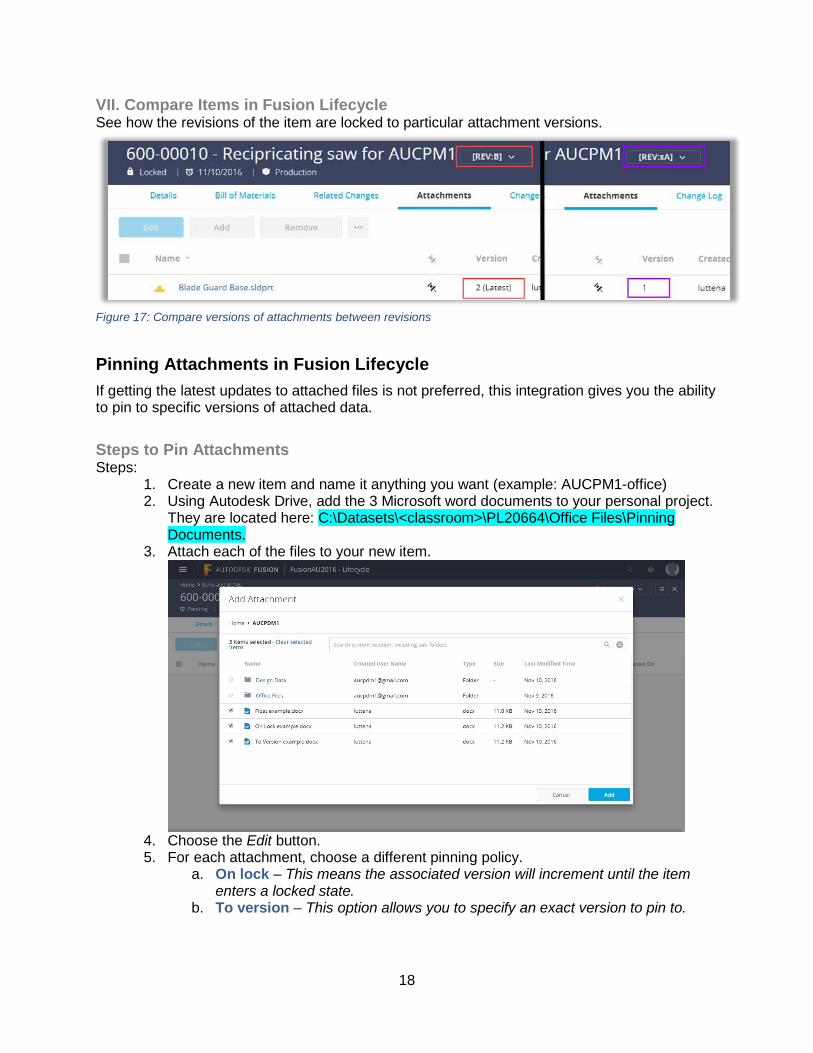
VII. Compare Items in Fusion Lifecycle See how the revisions of the item are locked to particular attachment versions.
Figure 17: Compare versions of attachments between revisions
Pinning Attachments in Fusion Lifecycle If getting the latest updates to attached files is not preferred, this integration gives you the ability to pin to specific versions of attached data.
Steps to Pin Attachments Steps:
1. Create a new item and name it anything you want (example: AUCPM1-office) 2. Using Autodesk Drive, add the 3 Microsoft word documents to your personal project.
They are located here: C:\Datasets\<classroom>\PL20664\Office Files\Pinning Documents.
3. Attach each of the files to your new item.
4. Choose the Edit button. 5. For each attachment, choose a different pinning policy.
a. On lock – This means the associated version will increment until the item enters a locked state.
b. To version – This option allows you to specify an exact version to pin to.

19
c. Float – This means your item will always be associated with the latest version of the attachment.
6. Quick create a change order for the item created in step 1. 7. Release the item to create revision A. 8. Navigate to Autodesk Drive. 9. Modify and save each of the 3 Microsoft Word documents. Make each edit unique. 10. Quick create and release again to create revision B. 11. View the items and review the versions of the attachments. 12. Notice how the pinning policies affected the version of the attachment on the item.
Figure 18: Clicking on the cell will expose pinning options.