planning projects: step-by-step guide for 1st time · pdf file · 2017-07-14a...
TRANSCRIPT

Planning Projects: Step-By-Step Guide For 1st Time Users
Copyright © BNH Expert Software Inc. 1 (514) 745-4010 www.bnhexpertsoft.com
1
Planning Projects: Step-By-Step Guide for 1st Time Users Latest Update: October 30, 2012
1. Introduction A step-by-step process is presented to assist project managers in developing a project plan, identifying critical paths/milestones, assigning personnel and resources as well as monitoring progress. In depth instructions are provided in ADVISOR “Project and Resource Management” User Guide. Remember that context sensitive help for each screen is also available by clicking on Help (button). Although forecasting training budget and resources is not required for the development of a project plan, it can simplify the process if an estimate has been generated. To skip forecasting training budget and resources, proceed to Step 17 on page 9. Otherwise, commence with Step 1. Although two approaches may be used for forecasting training costs and resources, only the Preliminary Cost Analysis will be presented in this Guide. To review the Detailed Cost Analysis, please refer to Chapter 2 of ADVISOR “Project and Resource Management” User Guide
2. Table of Contents
Conduct preliminary cost analysis (Step 1, page 2) Definitions of primary factors (Step 3a, page 3) Definitions of cost analysis factors (Step 3b, page 4) View course analysis (Step 4, page 6) Divide course into modules (Step 7, page 6) Compute the cost of alternate delivery options (Step 8, page 7) Generate report (Step 16, page 8)
Setup Project (Step 17, page 9) Divide Project into Phases and Tasks (Step 23, page 10) Identify Dependencies and Constraints (Step 31, page 12) Schedule Tasks (Step 35, page 13) Assign Personnel and Resources (Step 36, page 13) Generate Project Plan (Step 41, page 16)

Planning Projects: Step-By-Step Guide For 1st Time Users
Copyright © BNH Expert Software Inc. 1 (514) 745-4010 www.bnhexpertsoft.com
2
3. Preliminary Cost Analysis To quickly generate high order estimates of the costs of alternate delivery options. Step 1. To analyze a new course, click on the Data Collection Wizard folder.
P.S. To edit an existing course or conduct a detailed analysis of a new course, click on the Course Analysis folder.
Step 2. Click on Add (button) (top left corner). Step 3. Critical data required for forecasting the costs of a new course is presented in this section. Course
info is requested in the 1st tab and cost data in the 2nd [Cost factors] tab. All fields with an asterisk (*) should be completed. But of course, the more data you provide the better the results. Once all screens (i.e., the 2 tabs) have been completed, click Save.

Planning Projects: Step-By-Step Guide For 1st Time Users
Copyright © BNH Expert Software Inc. 1 (514) 745-4010 www.bnhexpertsoft.com
3
For your reference, a brief description of data collected is presented below. Step 3a. Primary Information Course Title Input the course title, maximum 200 characters
Learning objectives What is the learning outcome/objective of this course? If more than one,
what is the most dominant category?
# of hours required to deliver the course
Estimate the number of hours required to deliver the course in an instructor-led format.
Course start date [dd/mm/yyyy]
Indicate the expected delivery date of the course. If the course exists, then use today's date as a reference point.
Expected life of course [years]
Over how many years can the course be delivered before it becomes obsolete, irrelevant or requires major changes? If the course exists, estimate the remaining life, using today's date as a reference point.
Number of trainees over the life of the course
Estimate the number of learners over the Life of the course. If the course exists, estimate the number of learners using today's date as a reference point.
Client Indicate the Client for this course. In other words, costs and resources for the course are allocated to which Client.

Planning Projects: Step-By-Step Guide For 1st Time Users
Copyright © BNH Expert Software Inc. 1 (514) 745-4010 www.bnhexpertsoft.com
4
Step 3b. Cost Factors % of course that changes each year
Estimate the percentage of the course content that may change each year. The estimate should be indicated as a percentage of the initial development effort [10% each year, for example]. Although a course may have a life span of three years, for example, 15% of the content may change each year.
Annual salary of individuals taking the course
Input the average annual salary of trainees [$40,000, for example]. Data on average annual salary of trainees may be obtained from personnel or payroll department.
Organization fringe benefits factor [%]
Input the organization's fringe benefits factor. This covers all expenses including employees' benefits such as medical and dental coverage; organization's contribution to pension and other funds; as well as general operational expenses such as rent, electricity, phone, security, etc. Fringe benefits factor generally varies between 25% to 75% of employees’ salary. Data on the fringe benefits factor may be obtained from personnel or payroll department.
Average number of trainees per class
Estimate the average number of trainees per class, if course is delivered in a synchronous mode.
Average number of instructors per class
Estimate the average number of instructors/facilitators per class, if course is delivered in a synchronous mode.
% of trainees that travel to course
Estimate the percentage of trainees that would have to travel to and from the course site, if course is delivered in an instructor-led format.
% of instructors that travel to course
Estimate the percentage of instructors/facilitators that would have to travel to and from the course site, if course is delivered in an instructor-led format.
Average per diem cost per individual [per day]
This includes reimbursable daily expenses for lodging, meals and tips. Data on the average per diem costs may be obtained from the payroll or accounting department.
Average travel cost per individual
This includes round-trip air, bus or train fare, local automobile mileage, taxi or local public transportation costs. You may average these costs for participants in the course. However, the method used to compute the average should be documented. Data on average travel costs may be obtained from the payroll or accounting department.
Average instructor annual salary
Input the average annual salary of instructors/facilitators, if course is delivered in a synchronous mode. Data on the annual salary of instructors may be obtained from the personnel or payroll department.
Average consulting fees per class
Input the average consulting fees per class, if external subject matter experts, instructors or facilitators deliver course in a synchronous mode.
Planning Projects: Step-By-Step Guide For 1st Time Users
Copyright © BNH Expert Software Inc. 1 (514) 745-4010 www.bnhexpertsoft.com
5
If course exists, present delivery method
Select method presently used to deliver the training, if applicable.
Effort required to develop course
Indicate the effort required to develop the course, even if course already exists, as follows:
Low – a course that deals with a simple subject. The course content can be adequately presented in text, graphics and simple animation, if developed in an asynchronous mode. That is, it does not require complex animation, simulation, audio or video.
Medium – a course that deals with a moderately complex subject. The course content requires text, graphics, animation, simple simulations, some audio but minimal video, if developed in an asynchronous mode.
High – a course that deals with an abstract/complex subject that is difficult to comprehend. The course content requires text, graphics, complex animations and simulations as well as audio and video if developed in an asynchronous mode.
Average cost of room rental per class
Estimate facilities costs per class (hotel or conference center room rental, for example), if course is delivered in an instructor-led format.
# of administrative required [per class]
Estimate the number of days per class required to administer the course, if delivered in an asynchronous mode. This may include registering trainees, booking a room, arranging for equipment, etc. Note that this refers to working days and not calendar days.
Cost of computer/hardware required by course
Cost of special equipment (computers or trainers, for example] required for training. If remodeling the classroom is required, then the costs should also be included.
Planning Projects: Step-By-Step Guide For 1st Time Users
Copyright © BNH Expert Software Inc. 1 (514) 745-4010 www.bnhexpertsoft.com
6
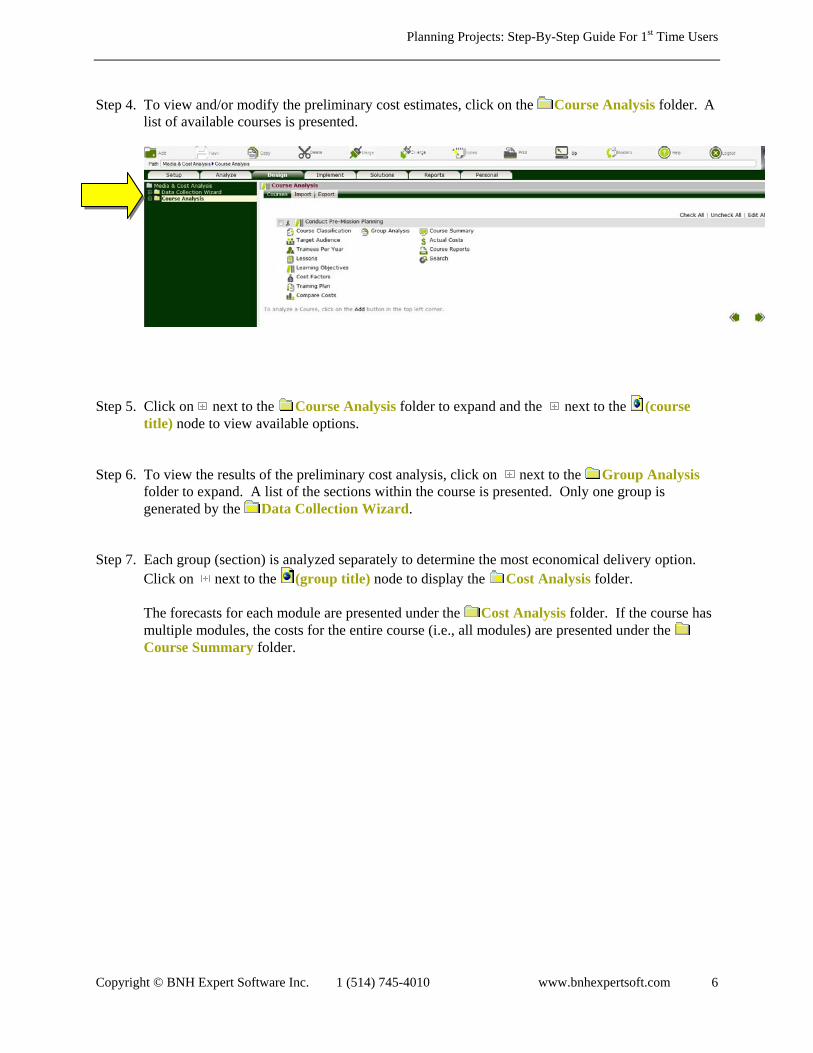
Step 4. To view and/or modify the preliminary cost estimates, click on the Course Analysis folder. A list of available courses is presented.
Step 5. Click on next to the Course Analysis folder to expand and the next to the (course
title) node to view available options. Step 6. To view the results of the preliminary cost analysis, click on next to the Group Analysis
folder to expand. A list of the sections within the course is presented. Only one group is generated by the Data Collection Wizard.
Step 7. Each group (section) is analyzed separately to determine the most economical delivery option.
Click on next to the (group title) node to display the Cost Analysis folder. The forecasts for each module are presented under the Cost Analysis folder. If the course has multiple modules, the costs for the entire course (i.e., all modules) are presented under the Course Summary folder.

Planning Projects: Step-By-Step Guide For 1st Time Users
Copyright © BNH Expert Software Inc. 1 (514) 745-4010 www.bnhexpertsoft.com
7
Step 8. For a detailed breakdown of the costs of alternate delivery options, click on next to the Cost Analysis folder to expand and then click on the Summary node. To hide and/or rename options, click on the Delivery Options node.
Step 9. You may also view direct (budget related) costs, indirect (productivity related) costs, savings that
may result from utilizing alternate delivery options, start-up and recurring costs as well as personnel required to design, develop, deliver, administer, maintain and support this section by clicking on corresponding tabs.
To view graphical representations of the results, click on the Distribution Charts,
Direct/Indirect Charts or Break Even Point Charts nodes. Step 10. To find out how each item (development costs, for example) is computed, click on the
corresponding ( Development) node. You may also edit any field and click Save to re-compute.

Planning Projects: Step-By-Step Guide For 1st Time Users
Copyright © BNH Expert Software Inc. 1 (514) 745-4010 www.bnhexpertsoft.com
8
Step 11. If the course has multiple sections, ADVISOR will recommend the most economical delivery option for each group. To create and compare alternate blends of delivery options, click on next to the Course Summary folder to expand.
Step 12. Two blends are automatically created by ADVISOR, namely: Currently Used and ADVISOR Recommendation. To view options recommended by ADVISOR, for example, click on next to Delivery Options folder to expand, click on next to ADVISOR Recommendation node to expand, and click on the Delivery Methods node to view the delivery options recommended by ADVISOR.
To create additional blends, click on Delivery Options folder, click Add (button), input the delivery option title (analyst recommendations, for example) and click Save. Click on next to the (delivery option title) node that was created, click on the Delivery Methods node, select the desired blend of delivery options and click Save.
Step 13. Click on Base of Comparison node, select the delivery option to be used as base of
comparison and click Save. In general, the Currently Used or method commonly used for the delivery of training should be selected as the base of comparison.
Step 14. For detailed breakdown of the costs of alternate blends of delivery options for course, click on
the Cost Distribution node. You may also view direct (budget related) costs, indirect (productivity related) costs, savings that may result from utilizing alternate delivery options, start-up and recurring costs as well as personnel required to design, develop, deliver, administer, maintain and support course by clicking on corresponding tabs.
To view graphical representations of the results, click on the Distribution Charts,
Direct/Indirect Chart or Break Even Point Charts nodes. Step 15. Once you have had the opportunity to evaluate and compare the costs of alternate blends of
delivery options, an option should be recommended by clicking on User Recommendation node, selecting the desired delivery option and clicking Save.
Step 16. A comprehensive report that documents process used to compute the costs of alternate delivery
options can be generated by clicking on the Course Report node, selecting items to be included and clicking Save. The report in html format is presented in a new window. You may print or save the report using the corresponding functions in your Browser.
Since the report is in html format, you can quickly advance to any section by clicking on the corresponding title in Table of Contents. To return to ADVISOR, close the Course Report window.
Remember that context sensitive help is also available for each screen by clicking on the Help (button). Enjoy!

Planning Projects: Step-By-Step Guide For 1st Time Users
Copyright © BNH Expert Software Inc. 1 (514) 745-4010 www.bnhexpertsoft.com
9
4. Setup Project
To subdivide a project into Phases and Tasks as well as estimate time and money needed to complete each Task. Step 17. Click on the [Implement] tab. Step 18. To setup a new project, click on the Projects folder. Step 19. Click on Add (button) (top left corner). Step 20. Input the required data and click Save to setup a project.
Notes:
Once the schedule for various Tasks have been established, the entire schedule – i.e., the Start and End Date of each Task – can be shifted by the same amount of time by changing the Start Date, selecting yes for Change Tasks Date and clicking Save. The Start and End Date of each Task is shifted by the following amount of time: New Start Date – Current Start Date.
Team members can only update Projects “Underway”. Pending projects cannot be seen by team members (i.e., individuals assigned to various Tasks). Moreover, once the Status of a project is changed to “Completed” or “Cancelled”, the project will appear to team members under the Completed Project folder in read only mode.
Training programs analyzed under Course Analysis folder are presented under the Import Course field. To import time and cost estimates from a training program, select the course title and click Save.
You may share your analysis with colleagues (i.e., Users assigned to the same Client) by clicking on the [Sharing] tab, placing checkmarks next to their names and click Save.

Planning Projects: Step-By-Step Guide For 1st Time Users
Copyright © BNH Expert Software Inc. 1 (514) 745-4010 www.bnhexpertsoft.com
10
Step 21. Click on next to the (project title) to expand. Step 22. Click on Import Course Analysis node, select the delivery option for the training program/
course and click Save. ADVISOR will automatically setup Phases and initial Tasks including costs and number of hours needed to complete based on the selected delivery option. You may view and edit the Phases and Tasks by clicking on the Phases folder.
Note: If a training program/course is not selected under the Import Course field, then the
Import Course Analysis node will not be presented.
5. Setup Phases and Tasks Step 23. Click on the Phases folder. Step 24. To add a new Phase, click on Add (button). You may edit a Phase by clicking on the (phase
title) node or delete a Phase (including Tasks) by clicking on the next to the title. Step 25. Type the phase title, # of hours needed to complete the phase, cost and sequence; and click Save.
Note: If project is imported from a training program, then Phases corresponding to actions needed to setup, develop, deliver, support and maintain the training program – including # of hours needed to complete as well as out of pocket expenses costs are automatically generated. If Phases, # of hours required to complete or expenses are modified under Project Management, you may restore the original estimates from Course Analysis by clicking on the Import Course Analysis node, selecting the desired delivery option and clicking Save.

Planning Projects: Step-By-Step Guide For 1st Time Users
Copyright © BNH Expert Software Inc. 1 (514) 745-4010 www.bnhexpertsoft.com
11
To setup Tasks for each Phase: Step 26. Click on next to the (phase) to expand. Step 27. Click on the Tasks folder under the (phase) node. Step 28. To add a new Task, click on Add (button). You may edit a Task by clicking on the (task title)
node or delete a Task by clicking on the next to the title. Step 29. Input the Task title, % of work allocated to this task, % of cost allocated to this task, whether or
not it is a milestone as well as its sequence and click Save.
Note: Each Phase should have a minimum of one Task. You may edit the Task title and corresponding parameters by clicking on the (task title), editing the parameters and clicking Save.
Step 30. To facilitate the assignment of work [hours] and costs among the Tasks within each Phase, click
on the Summary node that follows the Tasks folder. The Tasks for the Phase are presented in a table. Indicate the % of work and % of cost assigned for each Task, and click Save. The number of hours and costs allocated to each Task are automatically computed and displayed.
Note: To preserve data integrity, user cannot directly specify the work hours and costs within each task. These values are controlled and computed from % of work and % cost allocated to the task.

Planning Projects: Step-By-Step Guide For 1st Time Users
Copyright © BNH Expert Software Inc. 1 (514) 745-4010 www.bnhexpertsoft.com
12
6. Identify Dependencies and Constraints To ensure that the Project Plan is accurate and realistic as well as to enable project manager to anticipate the impact of certain delays on the schedule, dependencies among Tasks can be defined in this section. For example, the “Development” task can only commence after “Instructional Design” has been completed. To facilitate this process, all project Tasks (defined in Step 28) are presented under the Dependency folder. To indicate the dependency of one task, on others: Step 31. Click on next to the Plan folder to expand. Step 32. Click on next to the Dependency folder to expand.
Step 33. To indicate the dependency of one task on others, click on the (task title), indicate the type of dependency, the lead or lag time and click Save.
Note: When scheduling Tasks (Step 35), ADVISOR validates the Start and End Date of each Task against the specified dependencies. In other words, you cannot setup a schedule that violates the dependencies.
Step 34. To ensure that the Project Plan meets client’s needs, as well as to enable project manager to
anticipate potential problems, time constraints on various Tasks can be defined by clicking on the Constraint node, indicating the constraint type and date and clicking Save.
Note: When scheduling Tasks (Step 35), ADVISOR validates the Start and End Date of each Task against the specified constraints. In other words, you cannot setup a schedule that violates the constraints.
Planning Projects: Step-By-Step Guide For 1st Time Users
Copyright © BNH Expert Software Inc. 1 (514) 745-4010 www.bnhexpertsoft.com
13
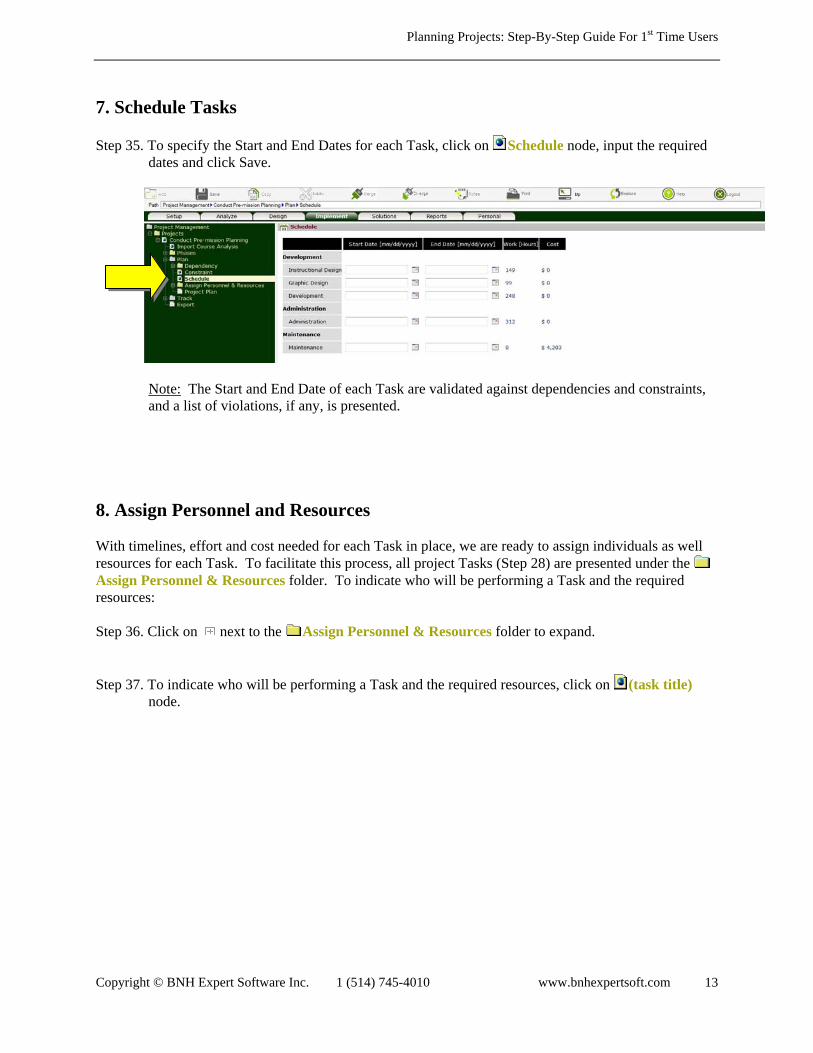
7. Schedule Tasks Step 35. To specify the Start and End Dates for each Task, click on Schedule node, input the required
dates and click Save.
Note: The Start and End Date of each Task are validated against dependencies and constraints, and a list of violations, if any, is presented.
8. Assign Personnel and Resources With timelines, effort and cost needed for each Task in place, we are ready to assign individuals as well resources for each Task. To facilitate this process, all project Tasks (Step 28) are presented under the Assign Personnel & Resources folder. To indicate who will be performing a Task and the required resources: Step 36. Click on next to the Assign Personnel & Resources folder to expand. Step 37. To indicate who will be performing a Task and the required resources, click on (task title)
node.

Planning Projects: Step-By-Step Guide For 1st Time Users
Copyright © BNH Expert Software Inc. 1 (514) 745-4010 www.bnhexpertsoft.com
14
Step 38. To assign personnel for the Task, click on the [Personnel] tab. Individuals assigned to this Client are presented. You may click the [Calendar] as well as [Skills/Attributes] links of each individual to find out whether they are qualified to perform the Task and availability. To assign one or more individuals for the Task, indicate the % of Work [Hours] allocated to each individual as well as the response date – i.e., when confirmation from individual is needed. For example, if the Task requires 40 hours to complete and one individual is expected to perform all the work, then assign 100% under Work [% of Total]. If on the other hand, two individuals are needed to perform this Task and the work is divided equally between them, (i.e., 20 hours each), then assign 50% under Work [% of Total] for each individual.
Step 39. To assign resources for the Task, click on the [Resources] tab. Resources defined under the Client for this project (Chapter 9 of ADVISOR Project and Resource Management User Guide) are presented. You may click the [Calendar] as well as [Description] links of each resource to find out whether they are suitable for the Task as well as availability. To assign one or more resources for the Task, indicate the number of hours needed as well as the response date – i.e., when confirmation from resource manager (if applicable) is needed – and click Save.
Planning Projects: Step-By-Step Guide For 1st Time Users
Copyright © BNH Expert Software Inc. 1 (514) 745-4010 www.bnhexpertsoft.com
15
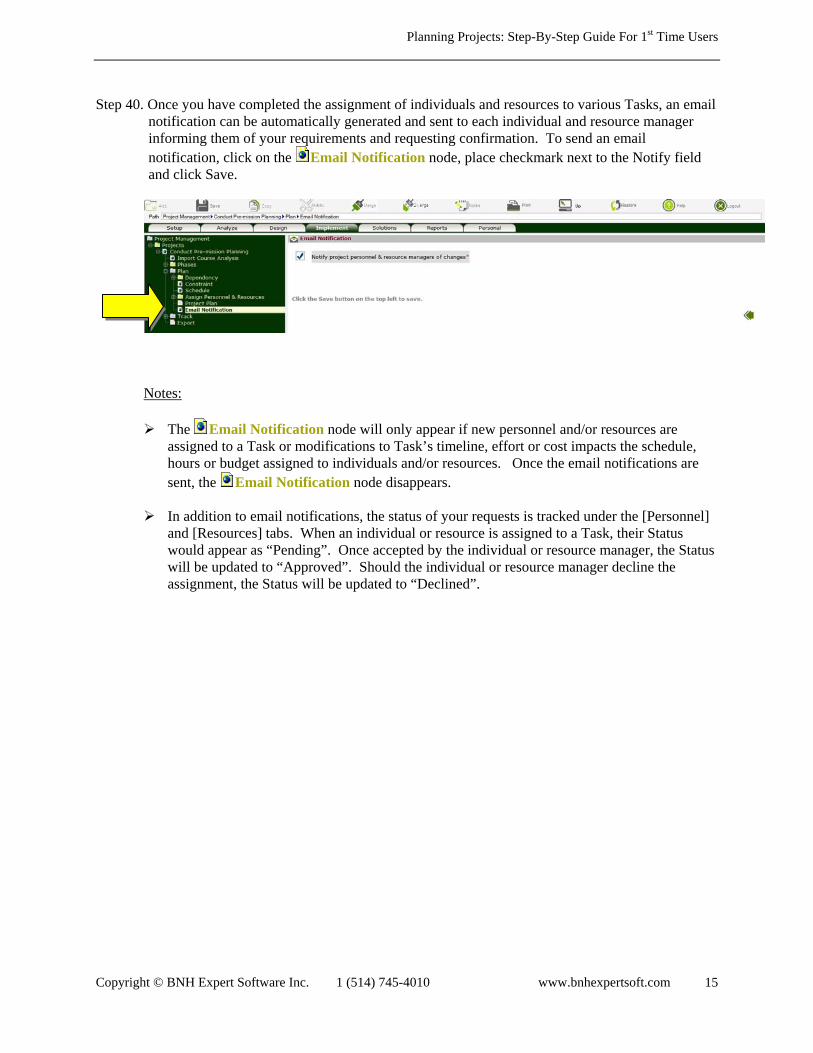
Step 40. Once you have completed the assignment of individuals and resources to various Tasks, an email notification can be automatically generated and sent to each individual and resource manager informing them of your requirements and requesting confirmation. To send an email notification, click on the Email Notification node, place checkmark next to the Notify field and click Save.
Notes: The Email Notification node will only appear if new personnel and/or resources are
assigned to a Task or modifications to Task’s timeline, effort or cost impacts the schedule, hours or budget assigned to individuals and/or resources. Once the email notifications are sent, the Email Notification node disappears.
In addition to email notifications, the status of your requests is tracked under the [Personnel]
and [Resources] tabs. When an individual or resource is assigned to a Task, their Status would appear as “Pending”. Once accepted by the individual or resource manager, the Status will be updated to “Approved”. Should the individual or resource manager decline the assignment, the Status will be updated to “Declined”.

Planning Projects: Step-By-Step Guide For 1st Time Users
Copyright © BNH Expert Software Inc. 1 (514) 745-4010 www.bnhexpertsoft.com
16
9. Generate Project Plan Step 41. To generate a project plan including timelines for various Tasks, individual assigned for each
Task as well as % of time required by each individual, click on the Project Plan node, specify the time period that you would like to examine as well as the level of details – i.e., daily or monthly and click Submit. The Project Plan for the specified period is presented in a new window.
Notes: Time off (i.e., weekends, holidays, etc.) for Client is indicated with vertical grey lines.
% of Individual’s Time required by the Task is also indicated after the individual’s name. It is
computed as follows: # of Hours Required to Complete Task / # of Work Hours Available to Individual. In other words, 100% indicates that all individual’s available time is allocated to this task. Over 100% indicates that the individual would be required to work overtime to meet this obligation.
Remember that context sensitive help is also available for each screen by clicking on the Help (button). Enjoy!