plaster textures & acrylic finishes - tsib textures and acrylic finishes.pdf · 6 light dash...
TRANSCRIPT

P L A S T E R T E X T U R E S& A C R Y L I C F I N I S H E S
Technical Services Information Bureau

2
Table of ContentsPORTLAND CEMENT “STUCCO” TEXTURES
Float Finishes (Machine or Hand Applied & Hand “Floated”)
Fine Sand or 20/30 . . . . . . . . . . . . . . . . 5Medium Sand or 16/20 . . . . . . . . . . . . 5Heavy Sand . . . . . . . . . . . . . . . . . . . . . . 5
Dash Finishes (Machine Applied)
Light . . . . . . . . . . . . . . . . . . . . . . . . . . . . 6Medium . . . . . . . . . . . . . . . . . . . . . . . . . 6Heavy . . . . . . . . . . . . . . . . . . . . . . . . . . . 7Tunnel . . . . . . . . . . . . . . . . . . . . . . . . . . 7Knockdown . . . . . . . . . . . . . . . . . . . . . . 7
Hard Trowel or Smooth FinishesSmooth . . . . . . . . . . . . . . . . . . . . . . . . . 8Santa Barbara. . . . . . . . . . . . . . . . . . . . 8Cat Faces . . . . . . . . . . . . . . . . . . . . . . . . 9
Lace and Other Finishes (Machine or Hand Applied & Hand “Textured”)
Light Lace . . . . . . . . . . . . . . . . . . . . . . . 9Heavy Lace . . . . . . . . . . . . . . . . . . . . . 10California . . . . . . . . . . . . . . . . . . . . . . . 10Spanish . . . . . . . . . . . . . . . . . . . . . . . . 11Monterey . . . . . . . . . . . . . . . . . . . . . . . 11Arizona. . . . . . . . . . . . . . . . . . . . . . . . . 12Frieze . . . . . . . . . . . . . . . . . . . . . . . . . . 12English. . . . . . . . . . . . . . . . . . . . . . . . . 13Scraped . . . . . . . . . . . . . . . . . . . . . . . . 13Trowel Sweep . . . . . . . . . . . . . . . . . . . 14Web . . . . . . . . . . . . . . . . . . . . . . . . . . . 14Briar . . . . . . . . . . . . . . . . . . . . . . . . . . . 15Combed . . . . . . . . . . . . . . . . . . . . . . . . 15Rock ‘n’ Roll . . . . . . . . . . . . . . . . . . . . 16Glacier . . . . . . . . . . . . . . . . . . . . . . . . . 16
“Specialty” FinishesMarblecrete . . . . . . . . . . . . . . . . . . . . . 17Simulated Timber. . . . . . . . . . . . . . . . 17
“Wet” Grooved Plaster. . . . . . . . . . . . . 18Brick. . . . . . . . . . . . . . . . . . . . . . . . . . . 18
Table of ContentsACRYLIC FINISHES
About Acrylic Finishes . . . . . . . . . . . . . . . 20Worm, Swirl or “Putz”. . . . . . . . . . . . . . . . 21Heavy Worm or Swirl . . . . . . . . . . . . . . . . 21Semi-Smooth. . . . . . . . . . . . . . . . . . . . . . . 22Fine Sand . . . . . . . . . . . . . . . . . . . . . . . . . . 22Medium Sand. . . . . . . . . . . . . . . . . . . . . . . 23Colored Aggregate . . . . . . . . . . . . . . . . . . 23

3
Depicted in this book are specimens of plastertextures which are in most common use today.The term “plaster” is used generally to describematerial prepared with either Portland cement orgypsum. The term “stucco” used herein describesa factory-prepared, integrally colored finish whichover the years has come to be used to describeall colored Portland cement finishes.
Each of the pictures shown herein was photo-graphed from the same distance of approximatelyfour feet and depicts a one-square-foot panel.Plaster prepared in a plastic state may create a greatvariety of design configurations or texture patterns.Note: weather will affect color and/or texture.
Plaster is the most commonly used exteriorcladding the Southwest. Since it lasts the life of the building, redecoration is necessary onlywhen a change in color and/or texture is desired.Nevertheless, stucco is one of the most economicalmaterials a designer can specify. Marblecrete, forexample, produces a highly attractive surface at a fraction of what exposed aggregate concretecosts. The architect is limited only by his or herimagination in choice of texture treatments.
Designers, builders and contractors can pickfrom a wide variety of textures in this catalog. It is recommended that the contractor prepare
samples before construction to assure that all parties agree on the finish to be produced. Color selection should be made at the timespecifications are written. Special colors notincluded in the manufacturer’s current colorchart usually require an additional charge. Deepercolors call for additional pigment and are thereforepriced higher and can also affect the texture.
The textures illustrated are not intended toshow the whole range of possibilities. These areonly the most commonly used. Identifying namesare those by which the texture is commonlyreferred to in the trade. It should be noted that a designer, contractor or journeyman may havediffering concepts of such terms as Spanish,Monterey or English. Suggested application procedures are included as general, abbreviatedguidelines to the production of each texture. Thetextures shown can be used on either exterior or interiors. Interior plaster is formulated withgypsum rather than Portland cement. Generallyspeaking, heavier textures with deeper relief areused on the outside.
Mill-mixed colored stucco is produced undercontrolled conditions in modern plants to insureuniformity from batch to batch.
The textures depicted in this catalog can be achieved using field mixed or proprietary packaged stucco mixes. For best results, specify ASTM C926 for application of Portlandcement-based plaster over plaster reinforcing conforming to ASTM C1063.
Please Note: the suggested application procedures under each texture are just that, suggested.TSIB understands that a knowledgeable and experienced contractor will have his own meansand methods to ultimately achieve the specified finish or texture.
This catalog is published by the WWCCA / Technical Services Information Bureau1910 N. Lime Street, Orange, CA 92865-4123(714) 221-5530 | Fax (714) 221-5535 | www.tsib.org | Email: [email protected]

Portland Cement“Stucco” Textures
4

Fine Sand FloatSUGGESTED APPLICATION PROCEDURES:
1. Apply a first coat and double back
with a second application. Plaster mix
is to be formulated with a blend of a
20/30 aggregate.
2. Using circular motion, rub surface
with float to achieve uniform pattern,
bringing sand particles to surface. An
absolute minimum of water should
be used in floating.
Heavy Sand FloatSUGGESTED APPLICATION PROCEDURES:
1. Apply a first coat and double back with
a second application. Plaster mix is to
be formulated with coarse aggregate or
relatively coarse blend.
2. Using circular motion, rub surface
with float to achieve uniform pattern,
bringing sand particles to surface. An
absolute minimum of water should
be used in floating.
Medium Sand FloatSUGGESTED APPLICATION PROCEDURES:
1. Apply a first coat and double back
with a second application. Plaster mix
is to be formulated with a blend of a
16/20 aggregate.
2. Using circular motion, rub surface
with float to achieve uniform pattern,
bringing sand particles to surface. An
absolute minimum of water should
be used in floating.
5
12˝
6
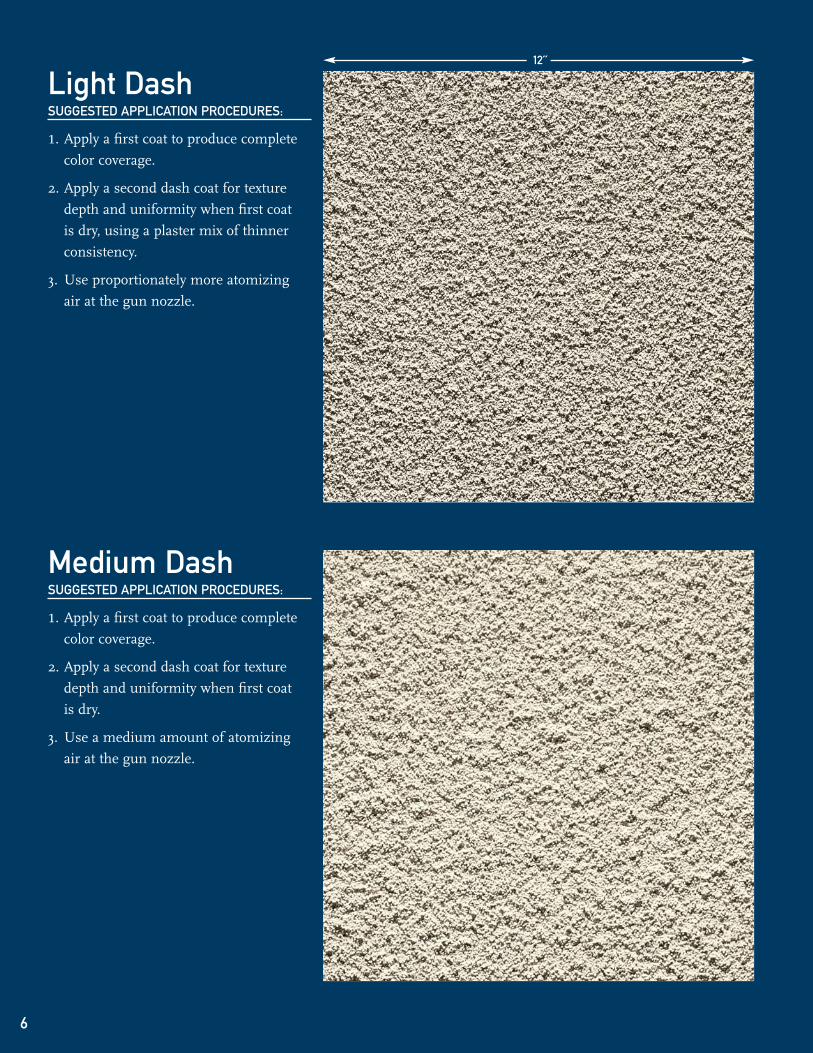
Light DashSUGGESTED APPLICATION PROCEDURES:
1. Apply a first coat to produce complete
color coverage.
2. Apply a second dash coat for texture
depth and uniformity when first coat
is dry, using a plaster mix of thinner
consistency.
3. Use proportionately more atomizing
air at the gun nozzle.
Medium DashSUGGESTED APPLICATION PROCEDURES:
1. Apply a first coat to produce complete
color coverage.
2. Apply a second dash coat for texture
depth and uniformity when first coat
is dry.
3. Use a medium amount of atomizing
air at the gun nozzle.
12˝

7
Heavy DashSUGGESTED APPLICATION PROCEDURES:
1. Apply a first coat to produce complete
color coverage.
2. Apply a second dash coat for texture
depth and uniformity when first coat
is dry, mortar to be of relatively stiff
consistency.
3. Use relatively less atomizing air at the
gun nozzle and lower water ratio of
the plaster.
Knockdown DashSUGGESTED APPLICATION PROCEDURES:
1. Apply a first coat in thin consistency to
produce complete color coverage.
2. Apply a coarse second dash coat for
texture depth and uniformity, allowing
some of the first coat to show through.
3. Trowel lightly after moisture surface
leaves.
Tunnel DashSUGGESTED APPLICATION PROCEDURES:
1. Apply a first coat to produce complete
color coverage.
2. When surface moisture leaves, or on
second day, apply a second heavy coat.
3. Use low atomizing air and reduce water
ratio of the plaster.
12˝

8
SmoothSUGGESTED APPLICATION PROCEDURES:
1. Apply a first coat to completely
cover base.
2. Apply a second coat and steel trowel
to a smooth finish.
Note: An accelerator can be used in the
first coat. Smooth finishes are subject to
moderate cracking. Also,“burn” lines and
color mottling can be expected. TSIB
recommends further decorating of this
finish with an approved coating.
Santa BarbaraSUGGESTED APPLICATION PROCEDURES:
1. Apply a first coat to completely
cover base.
2. Apply a second coat and steel trowel
to a smooth finish, leaving minor tool
marks and “open” areas.
Note: An accelerator can be used in the
first coat. Smooth finishes are subject to
moderate cracking. Also,“burn” lines and
color mottling can be expected. TSIB
recommends further decorating of this
finish with an approved coating.
12˝

9
Cat FacesSUGGESTED APPLICATION PROCEDURES:
1. Apply a first coat to completely
cover base.
2. Apply a second coat and steel trowel
to a smooth finish leaving the first
coat exposed in the design specified.
Note: An accelerator can be used in the
first coat. Smooth finishes are subject to
moderate cracking. Also,“burn” lines and
color mottling can be expected. TSIB
recommends further decorating of this
finish with an approved coating.
Light LaceSUGGESTED APPLICATION PROCEDURES:
1. Apply a first coat to completely
cover base.
2. When surface moisture leaves, trowel
apply light second coat in random
directions.
3. Knock down surfaces lightly with trowel.
12˝

10
Heavy LaceSUGGESTED APPLICATION PROCEDURES:
1. Apply a first coat to completely
cover base.
2. When surface moisture leaves, hand
apply second coat in random directions.
CaliforniaSUGGESTED APPLICATION PROCEDURES:
1. Apply a first coat to completely
cover base.
2. Apply a thin texture coat with trowel in
a random pattern, overlapping strokes.
3. Flatten high areas with trowel.
12˝

11
SpanishSUGGESTED APPLICATION PROCEDURES:
1. Apply a first coat, leaving relatively
smooth.
2. Apply second coat in a random texture,
using overlapping strokes.
MontereySUGGESTED APPLICATION PROCEDURES:
1. Apply a first coat, leaving relatively
smooth.
2. Apply second coat in a random texture,
using overlapping strokes.
12˝

12
ArizonaSUGGESTED APPLICATION PROCEDURES:
1. Apply a heavy texture coat.
2. After surface moisture is absorbed,
apply heavy second coat, leaving it
rough under the trowel with small
area texture pats.
FriezeSUGGESTED APPLICATION PROCEDURES:
1. Apply a first coat using double-back
method, and rake with a coarse brush
or broom.
2. Splatter dash sparingly with dash broom,
using mortar of fairly stiff consistency
to partially cover the surface.
3. After moisture leaves surface, trowel
down high spots, retaining general
pattern of dash texture.
12˝

13
EnglishSUGGESTED APPLICATION PROCEDURES:
1. Apply a first coat to completely
cover base.
2. Using a rounded trowel, apply a thick
texture coat with short strokes in
varying directions, leaving a rough,
irregular pattern.
3. After moisture leaves surface, trowel
down high spots, retaining general
pattern.
ScrapedSUGGESTED APPLICATION PROCEDURES:
1. Apply a finish coat approximately 1/4˝
thick and allow to take up until surface
moisture leaves.
2. Scrape vertically with a steel joint rod
or trowel held at right angles to the
plane of the wall. Remove sufficient
material to leave a torn surface, free
from smooth spots and joinings.
12˝

14
Trowel SweepSUGGESTED APPLICATION PROCEDURES:
1. Apply a first coat to completely
cover base.
2. Apply a second coat with fan-shaped
strokes, lapping each other so as to
form narrow, high ridges where mortar
flows over the toe of the trowel.
WebSUGGESTED APPLICATION PROCEDURES:
1. Apply a first coat and broom lightly in
varying directions, using a sweeping
motion.
2. Using a trowel, apply a texture coat in
strips approximately 2˝ x 6˝ forming
a more or less rectangular pattern.
3. Trowel surface lightly.
12˝

15
BriarSUGGESTED APPLICATION PROCEDURES:
1. Apply a first coat to completely
cover base.
2. Apply a texture coat, holding trowel at
angle to surface. With heel of the trowel
serving as a pivot point, produce fan-like
ridges in radiating pattern.
3. Flatten higher areas with trowel.
CombedSUGGESTED APPLICATION PROCEDURES:
1. Apply a finish coat in sufficient thickness
to accommodate depth of grooves
without exposing base (brown) coat.
2. Rod and darby, leaving surface
reasonably straight and true.
3. Using a strip as a guide, comb surface
vertically (or horizontally) with a
template, formed to achieve pattern
detailed on drawings.
Note: Special mix required.
12˝
16
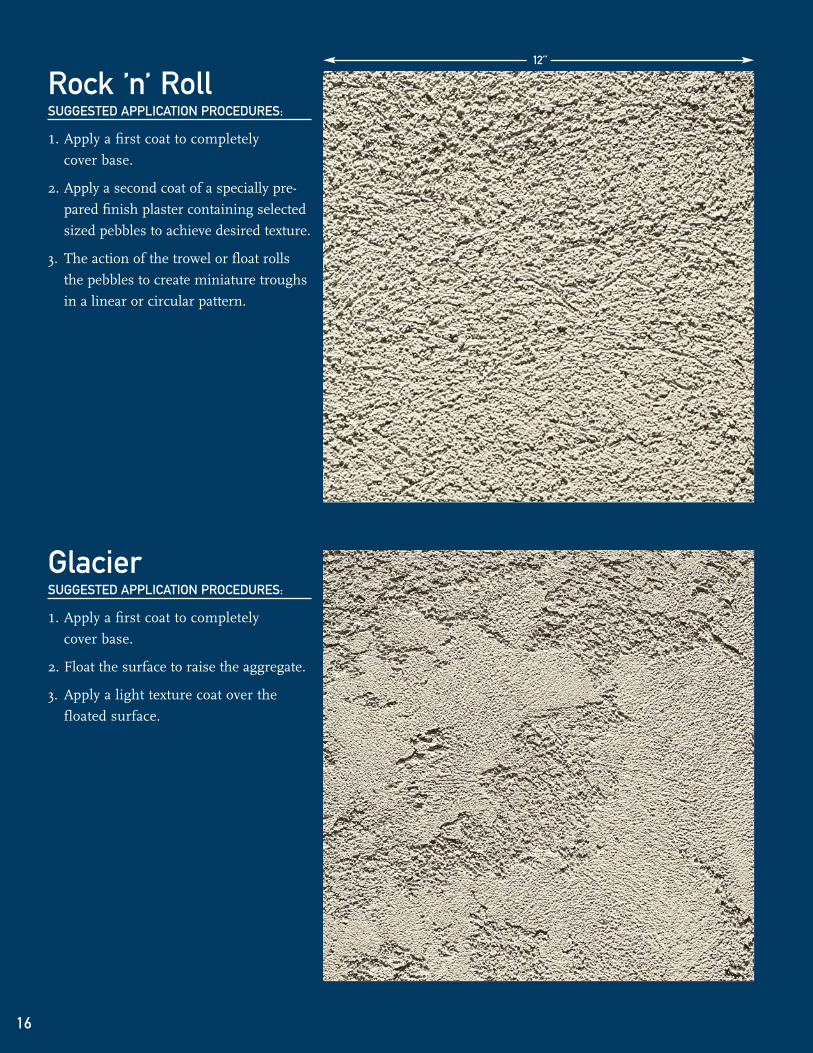
Rock ’n’ RollSUGGESTED APPLICATION PROCEDURES:
1. Apply a first coat to completely
cover base.
2. Apply a second coat of a specially pre-
pared finish plaster containing selected
sized pebbles to achieve desired texture.
3. The action of the trowel or float rolls
the pebbles to create miniature troughs
in a linear or circular pattern.
GlacierSUGGESTED APPLICATION PROCEDURES:
1. Apply a first coat to completely
cover base.
2. Float the surface to raise the aggregate.
3. Apply a light texture coat over the
floated surface.
12˝

17
MarblecreteSUGGESTED APPLICATION PROCEDURES:
1. Apply bedding coat to proper thickness.
2. Straighten with rod and darby, leaving
surface reasonably smooth.
3. Apply aggregate to bedding coat.
4. After material takes a set, tamp in
aggregate to embed into cement.
Note: This finish should only be performed
by one qualified applicator for any one
project.
Simulated TimberSUGGESTED APPLICATION PROCEDURES:
1. Spread finish coat plaster to desired
panel texture.
2. Lay on a narrow band approximately
6˝ to 8˝ wide of same material in
pattern of half-timber.
3. Cut shallow groove on each side of
simulated timber.
4. Lightly trowel face of simulated timber
to relatively smooth surface.
5. If peg marks are desired, lightly press
large screw head near ends of simulated
timber.
12˝

18
SUGGESTED APPLICATION PROCEDURES:
1. Apply finish coat 1/4˝ to 3/8˝ thick over
the damp base.
2. Rod and darby.
3. Layout the design as shown on drawings.
To simulate joints, stamp in lines with a
joint rod or rake out with a raking tool.
4. Water trowel smooth, retaining
indentations.
“Wet” Grooved Plaster
BrickSUGGESTED APPLICATION PROCEDURES:
1. Apply a first coat of mortar-colored
joint material.
2. Apply a second coat of brick colored
stucco material.
3. Comb or broom the surface with a
coarse fiber brush or broom to achieve
desired grain. A light troweled texture
may also be applied.
4. Using a brick template or straight-edge,
rake joints to depth required to expose
mortar joint material.
12˝

19
Acrylic Finishes

20
Acrylic finishes are a blend of 100% acrylicco-polymers, an aggregate either composed ofmarble or quartz, liquid pigments and other proprietary ingredients. This “high performing”finish was originally designed to go over ExteriorInsulation Finish Systems known as EIFS. EIFSare designed to be very flexible and crack resistant.Therefore, the finish must have the same charac-teristics as the rest of the assembly. While acrylicfinishes won’t stop Portland cement plaster fromcracking, they have a higher crack resistant qualitythan cement-based finishes.
Acrylic finishes have other qualities that makethem a more popular alternative to cement-based stucco finishes: namely color. The finishuses very stable “wet pigments” to make the prod-uct integrally colored. These stable pigmentsalong with the specially formulated 100% acrylicbinder, promote superior resistance to fading,chalking and yellowing. As a result, the finishestend to maintain their original appearance overtime. Acrylic finishes give your plaster assembly aconsistent and durable finish with an unlimitedcolor selection. Many textures are also available to suit your design needs. “Specialty” finishes areavailable that provide other aesthetic optionsand/or have increased “mar resistance” than thestandard finishes.
Many acrylic finish manufacturers have DirtPick-up Resistant technology in their products.This “DPR” technology causes the finish to cureinto a tough, non-tacky coating that resists theaccumulation of dirt, mold and pollutants. Manymanufacturers also offer “upgrades” to standardacrylic finishes including: adding “light-weight”finishes to make them more “user-friendly,”adding silicone to boost durability to withstandthe most damaging environmental conditions,and adding biocides to the products during the manufacturing process designed for extraresistance to fungi and algae growth.
One more advantage of acrylic finishes is thatthey are less moisture permeable than cementstucco. Acrylic finishes won’t darken or discolorduring prolonged rainstorms. They also addweather resistance to the Portland cement assemblywhile still allowing the assembly to breathe.
“Smooth steel trowel” finishes are not recommended. Applying a “smooth” finishrequires the substrate beneath the finish to bevery smooth and making a plaster brown coatsmooth is difficult at best and also an expensiveprocess. It is recommended to use either sandfine or sand coarse finish over a traditional plasterbrown coat. It is also recommended that anacrylic primer that matches the color of thefinish be applied to the brown coat prior to the application of the finish. This will allow the finish to dry evenly and the end result will bea more consistent and “brighter” colored wall!
In the event a “smooth steel trowel finish” isrequired, many acrylic finish manufacturers offer“smooth” finishes. Some manufacturers wouldrecommend the use or even require the applicationof an acrylic base coat (an EIFS base coat) betweenthe finish and the brown coat to “level out” thebrown coat surface.
Nevertheless, when applying acrylic finishesright over a traditional brown coat, the browncoat should be as level, uniform and “closed” aspossible. In addition, many if not all acrylicmanufacturers recommend the use of an acrylicprimer prior to the application of the finish(primer should be avoided with some acrylic“smooth” finishes). For more information andapplication procedures, call your local acrylic finish manufacturer representative.

21
Worm, Swirlor “Putz”Also known as a “rilled” or “circle” finish, is
typically 1.5 mm aggregate and can be hand
or machine applied. Finish is typically
textured with a plastic float in a figure 8
or circular motion. The aggregate “rolls”
around in this acrylic paste to achieve
desired look.
Heavy Worm or SwirlThis finish has a heavier aggregate (3 mm)
than the “putz” but is applied the same way.
12˝

22
Semi-SmoothFinish with the smallest aggregate available.
Material is typically “steel troweled” twice
and textured “smooth” using a “non-burn-
ing” trowel or float. This finish is the most
labor-intensive, difficult and expensive of
the acrylic finishes.
Fine SandA 1 mm aggregate size finish, its stucco
“cousin” is 20/30 sand. It has a tight
aggregate matrix that allows for a uniform
texture. The finish can be hand or machine
applied. Floating method will determine
the outcome of the finish.
12˝
23
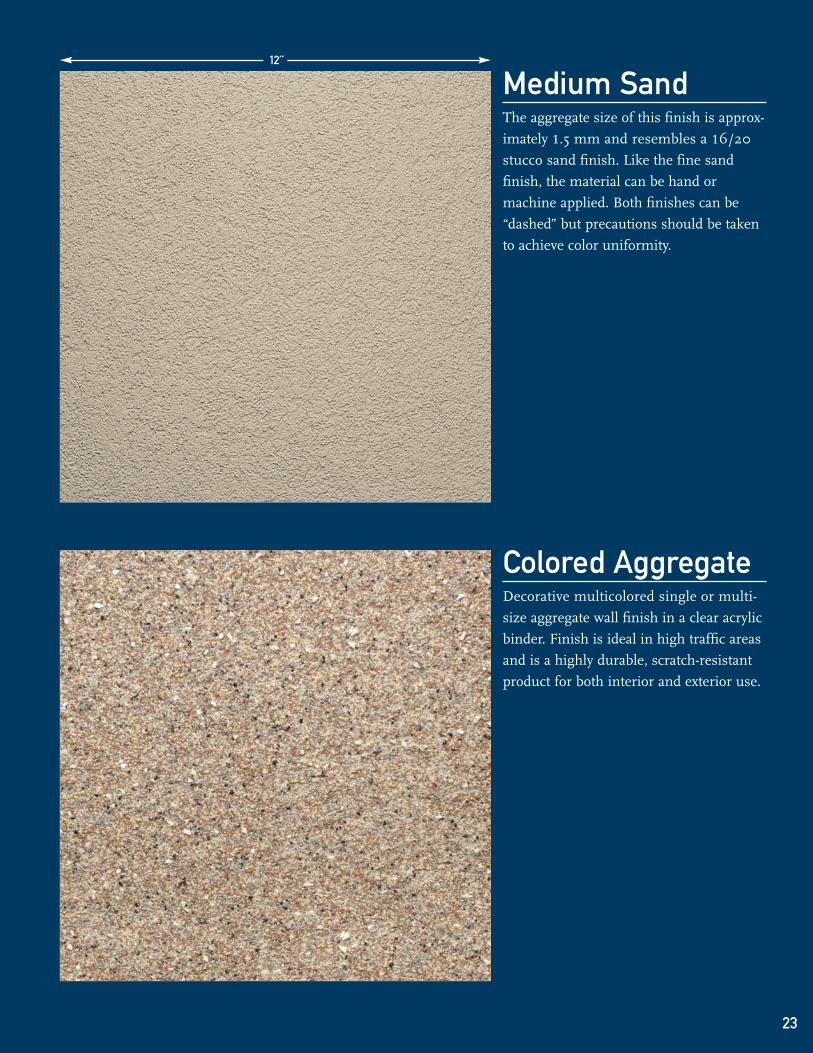
Medium SandThe aggregate size of this finish is approx-
imately 1.5 mm and resembles a 16/20
stucco sand finish. Like the fine sand
finish, the material can be hand or
machine applied. Both finishes can be
“dashed” but precautions should be taken
to achieve color uniformity.
Colored AggregateDecorative multicolored single or multi-
size aggregate wall finish in a clear acrylic
binder. Finish is ideal in high traffic areas
and is a highly durable, scratch-resistant
product for both interior and exterior use.
12˝

Technical Services Information Bureau
1910 N. Lime Street, Orange, CA 92865-4123
(714) 221-5530 | Fax (714) 221-5535 | www.tsib.org
Price: $20