plastic repair and refinishing procedures repair and refinishing procedures.pdf · use 39927...
TRANSCRIPT
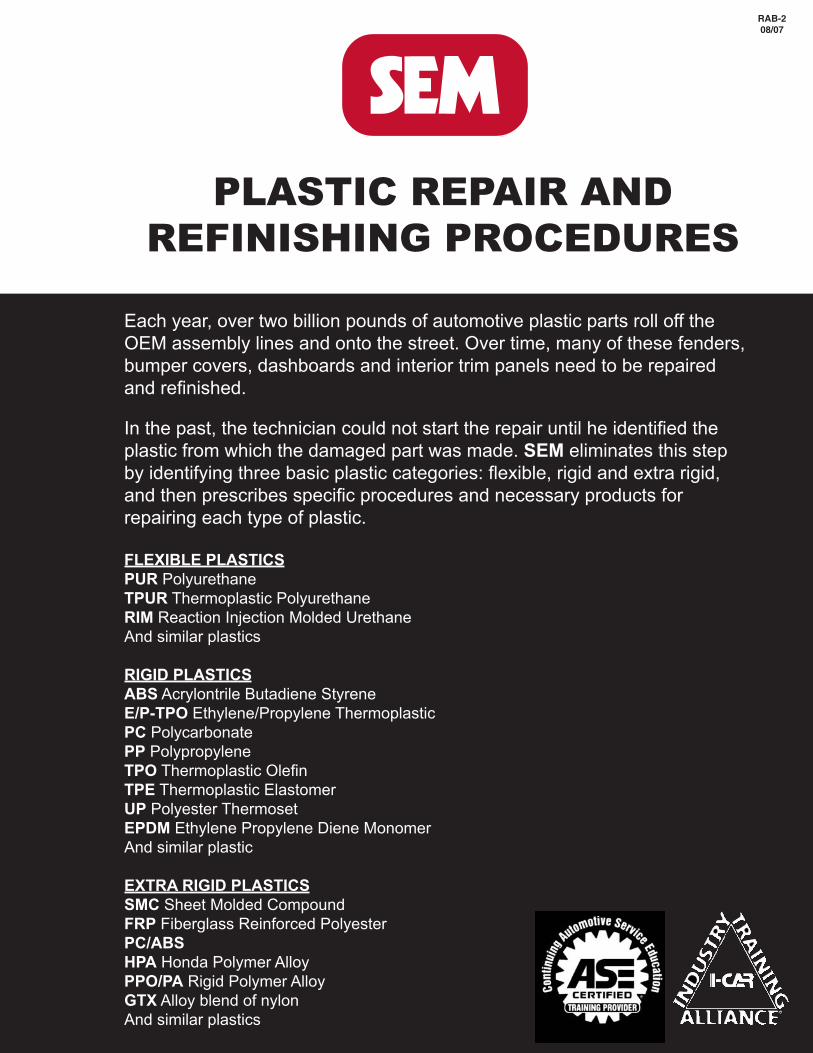
PLASTIC REPAIR AND REFINISHING PROCEDURES
Each year, over two billion pounds of automotive plastic parts roll off the OEM assembly lines and onto the street. Over time, many of these fenders, bumper covers, dashboards and interior trim panels need to be repaired and refinished.
In the past, the technician could not start the repair until he identified the plastic from which the damaged part was made. SEM eliminates this step by identifying three basic plastic categories: flexible, rigid and extra rigid, and then prescribes specific procedures and necessary products for repairing each type of plastic.
FLEXIBLE PLASTICSPUR PolyurethaneTPUR Thermoplastic PolyurethaneRIM Reaction Injection Molded UrethaneAnd similar plastics
RIGID PLASTICSABS Acrylontrile Butadiene StyreneE/P-TPO Ethylene/Propylene ThermoplasticPC PolycarbonatePP PolypropyleneTPO Thermoplastic OlefinTPE Thermoplastic ElastomerUP Polyester ThermosetEPDM Ethylene Propylene Diene Monomer And similar plastic
EXTRA RIGID PLASTICSSMC Sheet Molded CompoundFRP Fiberglass Reinforced PolyesterPC/ABSHPA Honda Polymer AlloyPPO/PA Rigid Polymer AlloyGTX Alloy blend of nylonAnd similar plastics
RAB-208/07
2
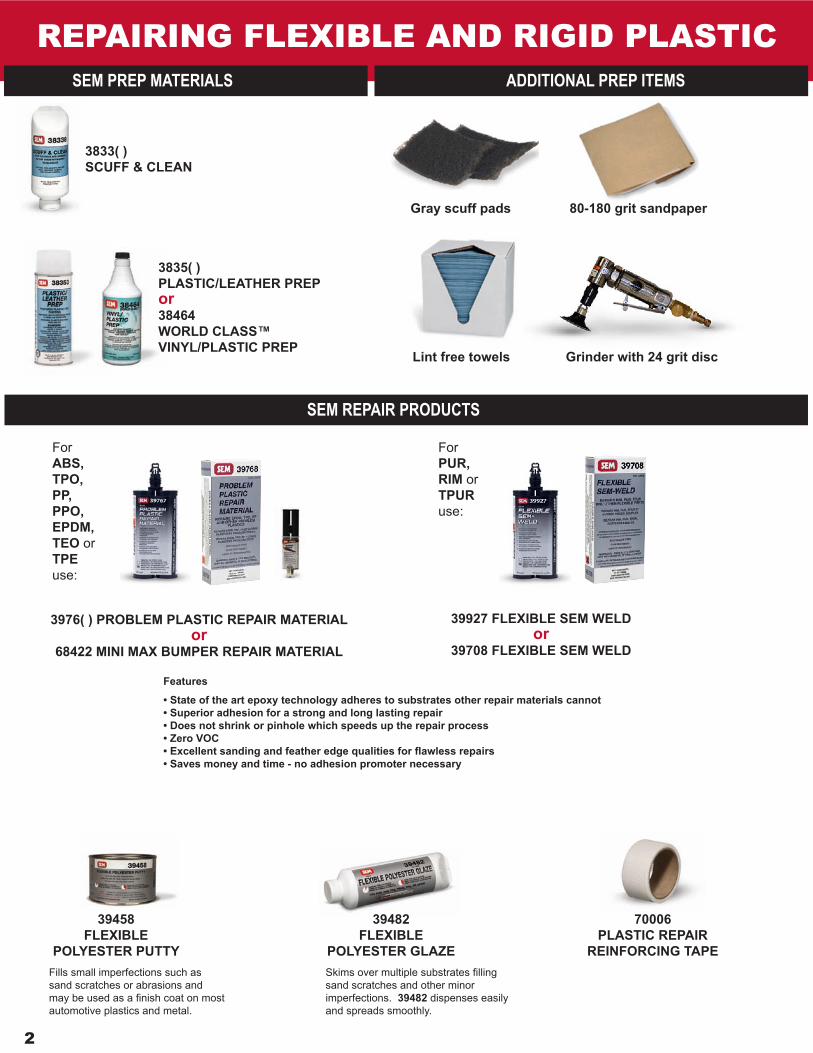
REPAIRING FLEXIBLE AND RIGID PLASTIC
3833( )SCUFF & CLEAN
3835( )PLASTIC/LEATHER PREP or38464 WORLD CLASS™ VINYL/PLASTIC PREP
Gray scuff pads
Lint free towels
SEM PREP MATERIALS ADDITIONAL PREP ITEMS
3976( ) PROBLEM PLASTIC REPAIR MATERIAL or
68422 MINI MAX BUMPER REPAIR MATERIAL
SEM REPAIR PRODUCTS
ForABS, TPO, PP, PPO, EPDM, TEO or TPEuse:
39927 FLEXIBLE SEM WELD or
39708 FLEXIBLE SEM WELD
For PUR, RIM or TPUR use:
80-180 grit sandpaper
39458 FLEXIBLE
POLYESTER PUTTY
39482 FLEXIBLE
POLYESTER GLAZE
70006 PLASTIC REPAIR
REINFORCING TAPE
Grinder with 24 grit disc
Features
• State of the art epoxy technology adheres to substrates other repair materials cannot • Superior adhesion for a strong and long lasting repair • Does not shrink or pinhole which speeds up the repair process • Zero VOC • Excellent sanding and feather edge qualities for flawless repairs • Saves money and time - no adhesion promoter necessary
Fills small imperfections such as sand scratches or abrasions and may be used as a finish coat on most automotive plastics and metal.
Skims over multiple substrates filling sand scratches and other minor imperfections. 39482 dispenses easily and spreads smoothly.
REPAIRING FLEXIBLE AND RIGID PLASTIC
3
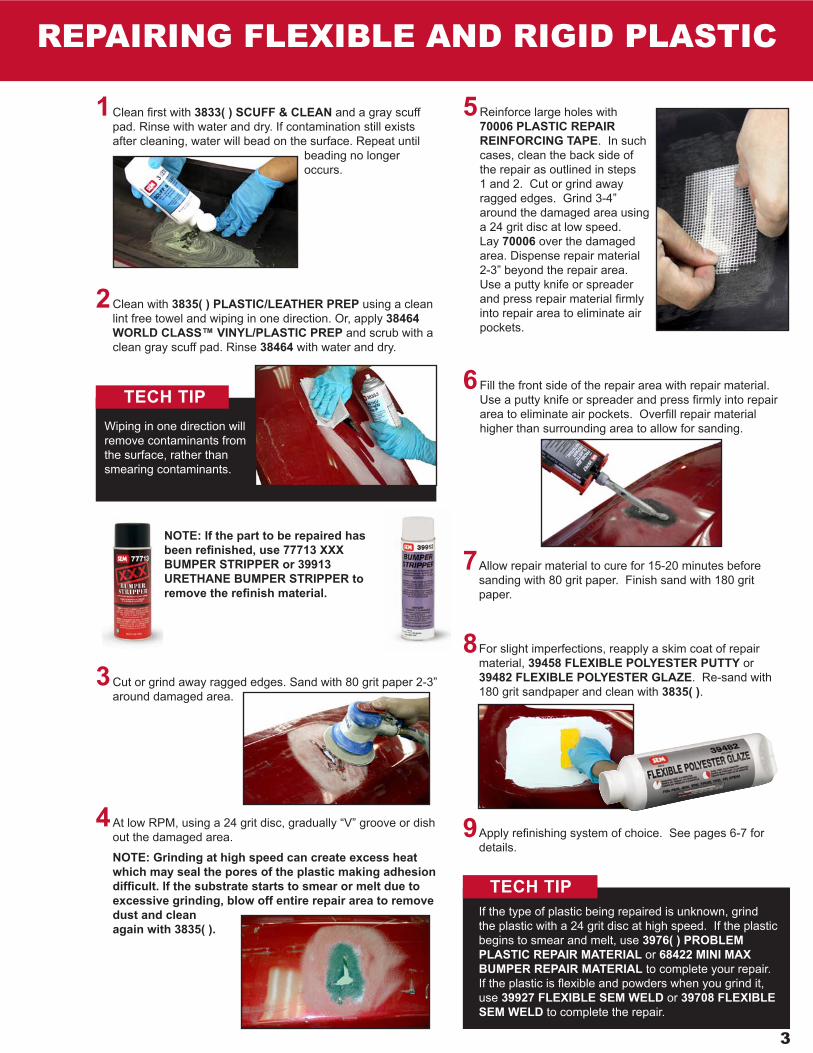
1
2
Clean first with 3833( ) SCUFF & CLEAN and a gray scuff pad. Rinse with water and dry. If contamination still exists after cleaning, water will bead on the surface. Repeat until beading no longer occurs.
Clean with 3835( ) PLASTIC/LEATHER PREP using a clean lint free towel and wiping in one direction. Or, apply 38464 WORLD CLASS™ VINYL/PLASTIC PREP and scrub with a clean gray scuff pad. Rinse 38464 with water and dry.
7Allow repair material to cure for 15-20 minutes before sanding with 80 grit paper. Finish sand with 180 grit paper.
3
4At low RPM, using a 24 grit disc, gradually “V” groove or dish out the damaged area.
NOTE: Grinding at high speed can create excess heat which may seal the pores of the plastic making adhesion difficult. If the substrate starts to smear or melt due to excessive grinding, blow off entire repair area to remove dust and clean again with 3835( ).
If the type of plastic being repaired is unknown, grind the plastic with a 24 grit disc at high speed. If the plastic begins to smear and melt, use 3976( ) PROBLEM PLASTIC REPAIR MATERIAL or 68422 MINI MAX BUMPER REPAIR MATERIAL to complete your repair. If the plastic is flexible and powders when you grind it, use 39927 FLEXIBLE SEM WELD or 39708 FLEXIBLE SEM WELD to complete the repair.
TECH TIPWiping in one direction will remove contaminants from the surface, rather than smearing contaminants.
5Reinforce large holes with 70006 PLASTIC REPAIR REINFORCING TAPE. In such cases, clean the back side of the repair as outlined in steps 1 and 2. Cut or grind away ragged edges. Grind 3-4” around the damaged area using a 24 grit disc at low speed. Lay 70006 over the damaged area. Dispense repair material 2-3” beyond the repair area. Use a putty knife or spreader and press repair material firmly into repair area to eliminate air pockets.
6Fill the front side of the repair area with repair material. Use a putty knife or spreader and press firmly into repair area to eliminate air pockets. Overfill repair material higher than surrounding area to allow for sanding.
8For slight imperfections, reapply a skim coat of repair material, 39458 FLEXIBLE POLYESTER PUTTY or 39482 FLEXIBLE POLYESTER GLAZE. Re-sand with 180 grit sandpaper and clean with 3835( ).
9Apply refinishing system of choice. See pages 6-7 for details.
TECH TIP
NOTE: If the part to be repaired has been refinished, use 77713 XXX BUMPER STRIPPER or 39913 URETHANE BUMPER STRIPPER to remove the refinish material.
Cut or grind away ragged edges. Sand with 80 grit paper 2-3” around damaged area.
3835( )PLASTIC/LEATHER PREP or38464 WORLD CLASS™ VINYL/PLASTIC PREP
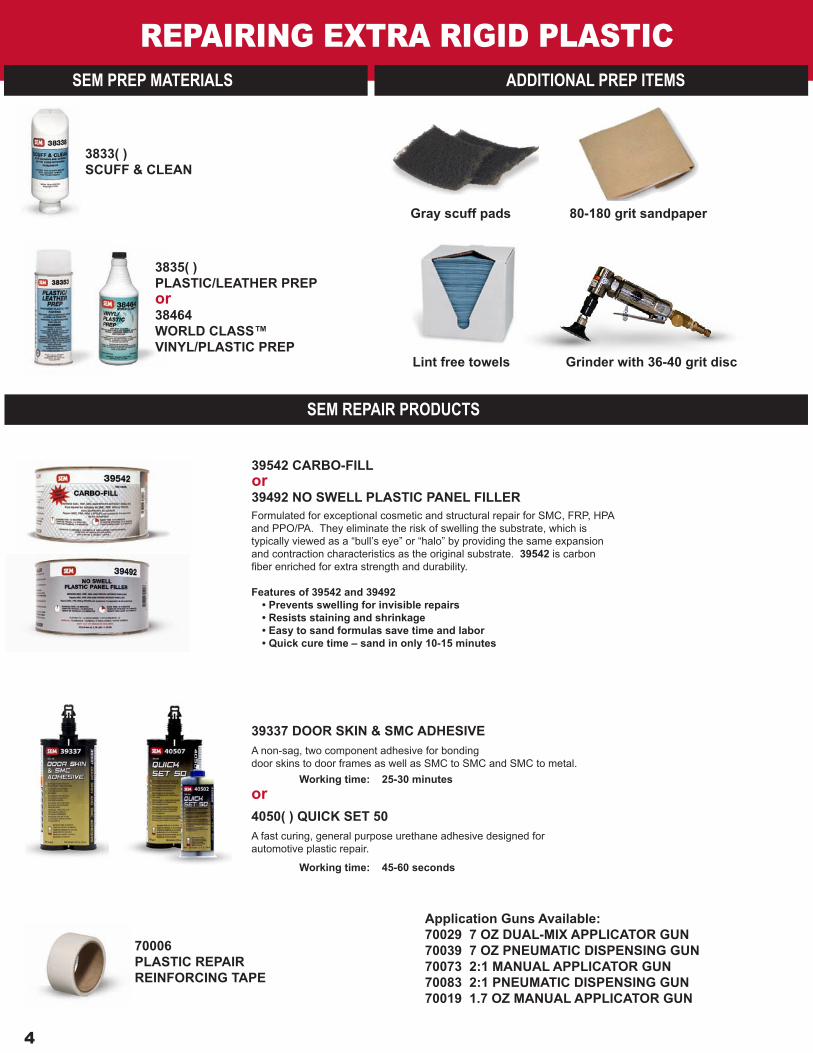
REPAIRING EXTRA RIGID PLASTICSEM PREP MATERIALS ADDITIONAL PREP ITEMS
SEM REPAIR PRODUCTS
4
3833( )SCUFF & CLEAN
Gray scuff pads
Lint free towels
80-180 grit sandpaper
39542 CARBO-FILL or39492 NO SWELL PLASTIC PANEL FILLER
Grinder with 36-40 grit disc
Formulated for exceptional cosmetic and structural repair for SMC, FRP, HPA and PPO/PA. They eliminate the risk of swelling the substrate, which is typically viewed as a “bull’s eye” or “halo” by providing the same expansion and contraction characteristics as the original substrate. 39542 is carbon fiber enriched for extra strength and durability.
Features of 39542 and 39492• Prevents swelling for invisible repairs• Resists staining and shrinkage• Easy to sand formulas save time and labor• Quick cure time – sand in only 10-15 minutes
70006 PLASTIC REPAIR REINFORCING TAPE
39337 DOOR SKIN & SMC ADHESIVEA non-sag, two component adhesive for bonding door skins to door frames as well as SMC to SMC and SMC to metal. Working time: 25-30 minutes or 4050( ) QUICK SET 50A fast curing, general purpose urethane adhesive designed for automotive plastic repair.
Working time: 45-60 seconds
Application Guns Available:70029 7 OZ DUAL-MIX APPLICATOR GUN70039 7 OZ PNEUMATIC DISPENSING GUN70073 2:1 MANUAL APPLICATOR GUN70083 2:1 PNEUMATIC DISPENSING GUN70019 1.7 OZ MANUAL APPLICATOR GUN

1
2
Clean thoroughly with 3833( ) SCUFF & CLEAN and a gray scuff pad. Wipe off with a damp towel and dry.
Clean with 3835( ) PLASTIC/LEATHER PREP using a clean, lint free towel and wiping in one direction. Or, use 38464 WORLD CLASS™ VINYL/PLASTIC PREP and scrub with a clean gray scuff pad. Wipe off 38464 with a damp towel and dry.
NOTE: Use caution during cleaning process and avoid saturating exposed fibers with water or solvent.
7Fill repair area with chosen repair material. Use a putty knife or spreader and press firmly into repair area to eliminate air pockets. Apply repair material higher than surrounding area to allow for sanding.
3
4
Sand with 80 grit 2-3” around damaged area. Using a 36-40 grit disc, gradually “V” groove or dish out the damaged area making a gradual taper, 1 ½” wide leaving no sharp edges. Blow off to remove dust and clean again with 3835( ) PLASTIC/LEATHER PREP. Blow off again to ensure surface is completely dry.
Large holes should be reinforced with 70006 SEM REINFORCING TAPE or a backer panel made from scrap SMC, fiberglass or similar plastic. Cut and fit scrap material to be used as a backer panel, making certain the original contour of the panel being repaired is followed as closely as possible. Bond backer panel in place with 39337 DOOR SKIN & SMC ADHESIVE or 4050( ) QUICK SET 50. 39337 or 4050( ) MUST BE USED FOR STRUCTURAL REPAIRS.
REPAIRING EXTRA RIGID PLASTIC
5
5Clean out all excess adhesive from the area to be filled. This is most easily done just after set time with a scraper or razor blade. Otherwise, carefully grind out with a 36-40 grit disc. If this material is not removed, it could cause swelling commonly known as a “bull’s eye” or “halo.”
6Mix a 1” ribbon of cream hardener with a golf ball sized amount of 39542 CARBO-FILL or 39492 NO SWELL PLASTIC PANEL FILLER. Do not over catalyze or mix more than can be used in 3-5 minutes. Mix thoroughly to a uniform color.
8Allow repair material to cure for 10-15 minutes before sanding with 80 grit paper. Finish sand with 180 grit paper.
9For slight imperfections, reapply a skim coat of repair material and finish sand with 180 grit sandpaper.
NOTE: For cosmetic repairs, skip to step 6. For structural repairs, such as a puncture, continue to step 4.
10 Apply refinishing system of choice. See pages 6-7 for details.
6
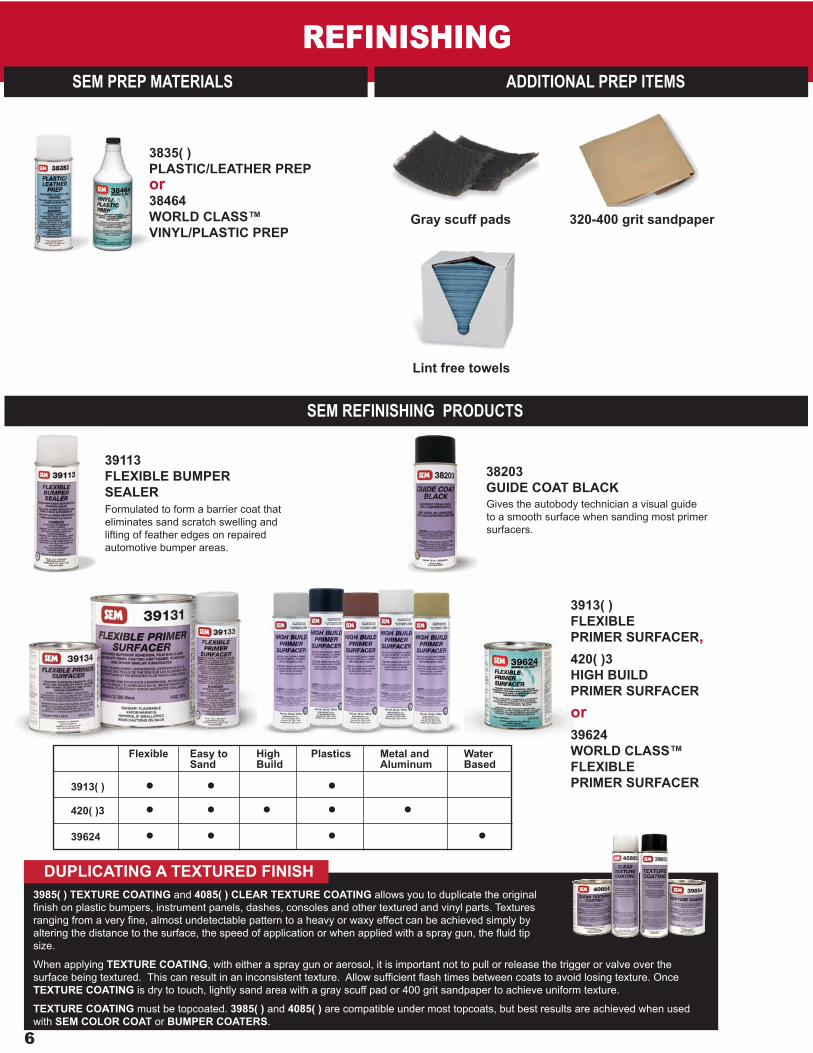
REFINISHING
3835( )PLASTIC/LEATHER PREP or38464 WORLD CLASS™ VINYL/PLASTIC PREP
SEM PREP MATERIALS ADDITIONAL PREP ITEMS
SEM REFINISHING PRODUCTS
Gray scuff pads
Lint free towels
320-400 grit sandpaper
39113FLEXIBLE BUMPERSEALER
38203GUIDE COAT BLACK
3913( ) FLEXIBLE PRIMER SURFACER, 420( )3 HIGH BUILD PRIMER SURFACER or 39624 WORLD CLASS™ FLEXIBLE PRIMER SURFACER
Formulated to form a barrier coat that eliminates sand scratch swelling and lifting of feather edges on repaired automotive bumper areas.
Gives the autobody technician a visual guide to a smooth surface when sanding most primer surfacers.
3913( ) • • • 420( )3 • • • • •
39624 • • • •
Flexible Easy to High Plastics Metal and Water Sand Build Aluminum Based
DUPLICATING A TEXTURED FINISH3985( ) TEXTURE COATING and 4085( ) CLEAR TEXTURE COATING allows you to duplicate the original finish on plastic bumpers, instrument panels, dashes, consoles and other textured and vinyl parts. Textures ranging from a very fine, almost undetectable pattern to a heavy or waxy effect can be achieved simply by altering the distance to the surface, the speed of application or when applied with a spray gun, the fluid tip size.
When applying TEXTURE COATING, with either a spray gun or aerosol, it is important not to pull or release the trigger or valve over the surface being textured. This can result in an inconsistent texture. Allow sufficient flash times between coats to avoid losing texture. Once TEXTURE COATING is dry to touch, lightly sand area with a gray scuff pad or 400 grit sandpaper to achieve uniform texture.
TEXTURE COATING must be topcoated. 3985( ) and 4085( ) are compatible under most topcoats, but best results are achieved when used with SEM COLOR COAT or BUMPER COATERS.
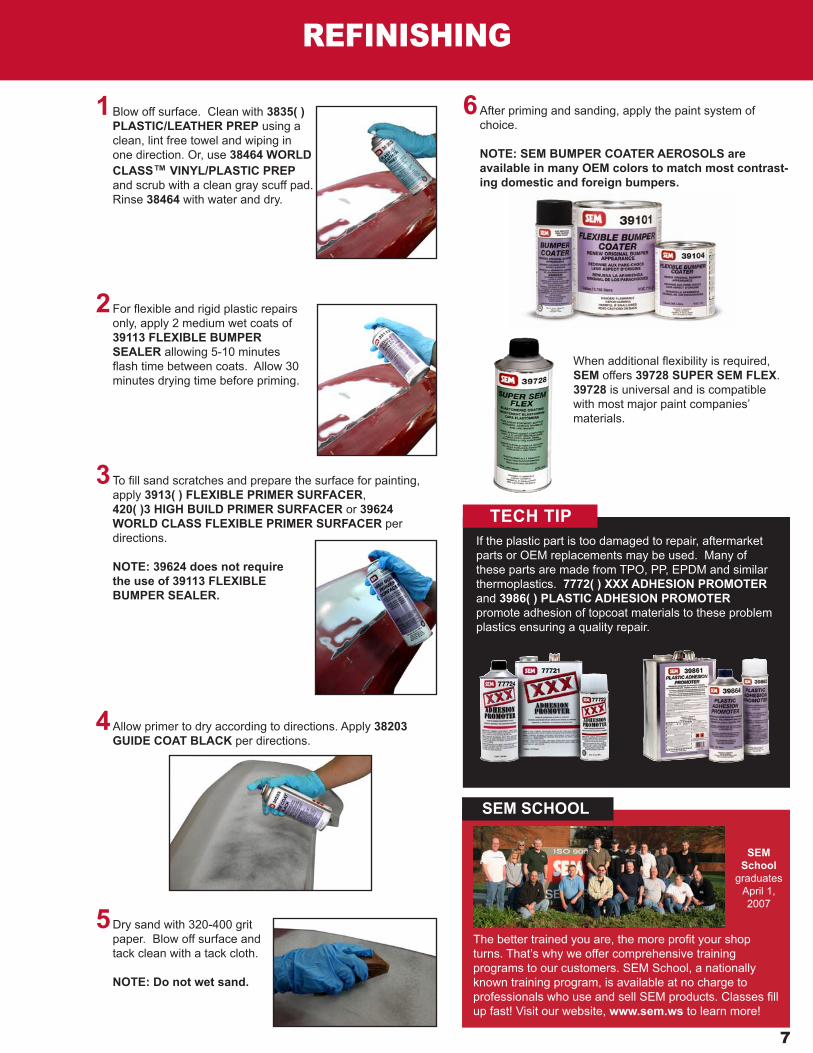
REFINISHING
7
1
2
Blow off surface. Clean with 3835( ) PLASTIC/LEATHER PREP using a clean, lint free towel and wiping in one direction. Or, use 38464 WORLD CLASS™ VINYL/PLASTIC PREP and scrub with a clean gray scuff pad. Rinse 38464 with water and dry.
For flexible and rigid plastic repairs only, apply 2 medium wet coats of 39113 FLEXIBLE BUMPER SEALER allowing 5-10 minutes flash time between coats. Allow 30 minutes drying time before priming.
When additional flexibility is required, SEM offers 39728 SUPER SEM FLEX. 39728 is universal and is compatible with most major paint companies’ materials.
3
4
To fill sand scratches and prepare the surface for painting, apply 3913( ) FLEXIBLE PRIMER SURFACER, 420( )3 HIGH BUILD PRIMER SURFACER or 39624 WORLD CLASS FLEXIBLE PRIMER SURFACER per directions.
NOTE: 39624 does not require the use of 39113 FLEXIBLE BUMPER SEALER.
Allow primer to dry according to directions. Apply 38203 GUIDE COAT BLACK per directions.
5Dry sand with 320-400 grit paper. Blow off surface and tack clean with a tack cloth. NOTE: Do not wet sand.
6After priming and sanding, apply the paint system of choice.
NOTE: SEM BUMPER COATER AEROSOLS are available in many OEM colors to match most contrast-ing domestic and foreign bumpers.
If the plastic part is too damaged to repair, aftermarket parts or OEM replacements may be used. Many of these parts are made from TPO, PP, EPDM and similar thermoplastics. 7772( ) XXX ADHESION PROMOTER and 3986( ) PLASTIC ADHESION PROMOTER promote adhesion of topcoat materials to these problem plastics ensuring a quality repair.
TECH TIP
SEM SCHOOL
The better trained you are, the more profit your shop turns. That’s why we offer comprehensive training programs to our customers. SEM School, a nationally known training program, is available at no charge to professionals who use and sell SEM products. Classes fill up fast! Visit our website, www.sem.ws to learn more!
SEM School
graduatesApril 1, 2007
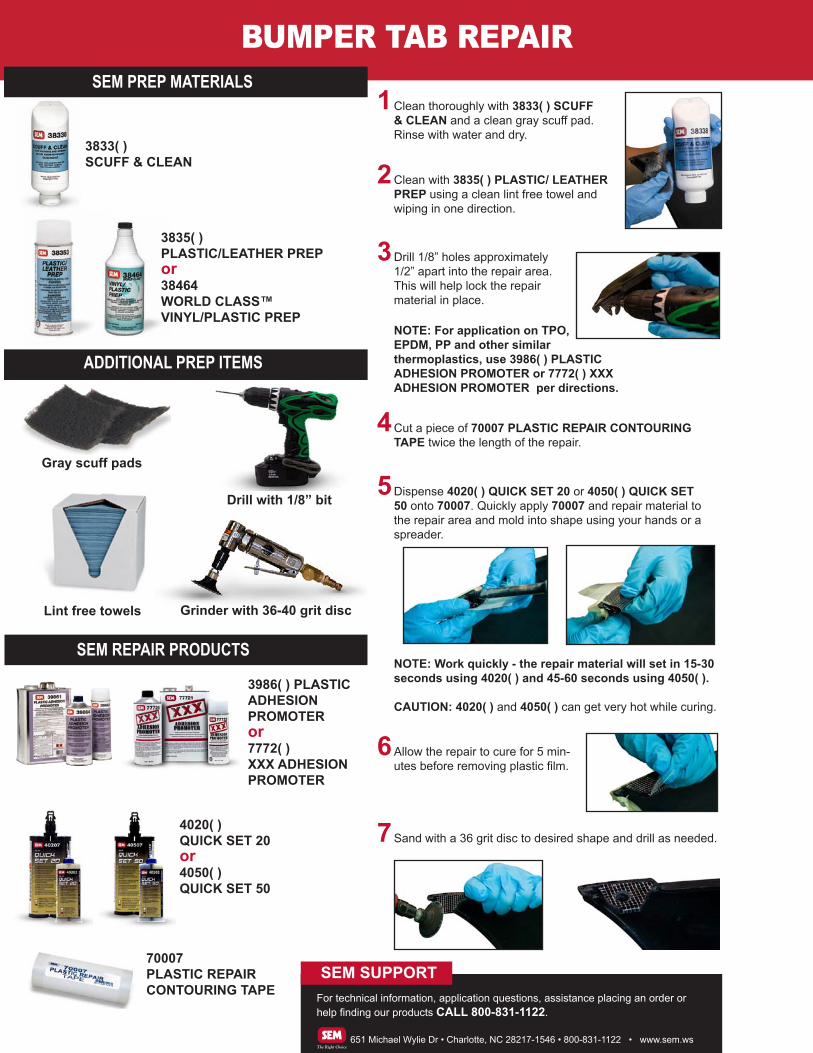
BUMPER TAB REPAIRSEM PREP MATERIALS
Gray scuff pads
Lint free towels Grinder with 36-40 grit disc
Drill with 1/8” bit
3835( )PLASTIC/LEATHER PREP or38464 WORLD CLASS™ VINYL/PLASTIC PREP
3833( )SCUFF & CLEAN
SEM REPAIR PRODUCTS
ADDITIONAL PREP ITEMS
1
2
Clean thoroughly with 3833( ) SCUFF & CLEAN and a clean gray scuff pad. Rinse with water and dry.
Clean with 3835( ) PLASTIC/ LEATHER PREP using a clean lint free towel and wiping in one direction.
4
6
Cut a piece of 70007 PLASTIC REPAIR CONTOURING TAPE twice the length of the repair.
Allow the repair to cure for 5 min-utes before removing plastic film.
3Drill 1/8” holes approximately 1/2” apart into the repair area. This will help lock the repair material in place.
5Dispense 4020( ) QUICK SET 20 or 4050( ) QUICK SET 50 onto 70007. Quickly apply 70007 and repair material to the repair area and mold into shape using your hands or a spreader.
NOTE: Work quickly - the repair material will set in 15-30 seconds using 4020( ) and 45-60 seconds using 4050( ).
CAUTION: 4020( ) and 4050( ) can get very hot while curing.
7Sand with a 36 grit disc to desired shape and drill as needed.
70007 PLASTIC REPAIR CONTOURING TAPE
4020( ) QUICK SET 20 or 4050( ) QUICK SET 50
For technical information, application questions, assistance placing an order or help finding our products CALL 800-831-1122.
651 Michael Wylie Dr • Charlotte, NC 28217-1546 • 800-831-1122 • www.sem.ws
SEM SUPPORT
3986( ) PLASTIC ADHESION PROMOTERor 7772( ) XXX ADHESIONPROMOTER
NOTE: For application on TPO, EPDM, PP and other similar thermoplastics, use 3986( ) PLASTIC ADHESION PROMOTER or 7772( ) XXX ADHESION PROMOTER per directions.