plate handling: best practices for the plate room & beyond
TRANSCRIPT

Plate HandlingBest Practices for the Plate Room & Beyond
Jessica Harkins Harrell
Technologies Manager
Anderson & Vreeland
An FPPA-Sponsored Webinar

• Simplify the control check-point process
• Create a checklist of regularly monitored
control-points
• Give peace of mind that the “print
problem” is not a “plate problem”
Purpose
A B C
?PLATE ROOM

What is Critical?
• Dots, lines & other elements must form
well on the plates
– Repeatable, everyday with every operator
• Within an operating tolerance
• What impacts the plate making process?

“You Don’t Know What You Got
(Till its Gone) -
Don’t know what it is I did so wrong…”
Cinderella, 1988

Recommended Tools
Bench Micrometer
UV-A Meter
Digital Thermometer
Images from target.com, ebay.com, transkat.com, fasttech.com, betascreen.com, Providentgrp.com, andvre.com
Light Table 50-100x scope
Trans Densitometer
Plate Measuring Device
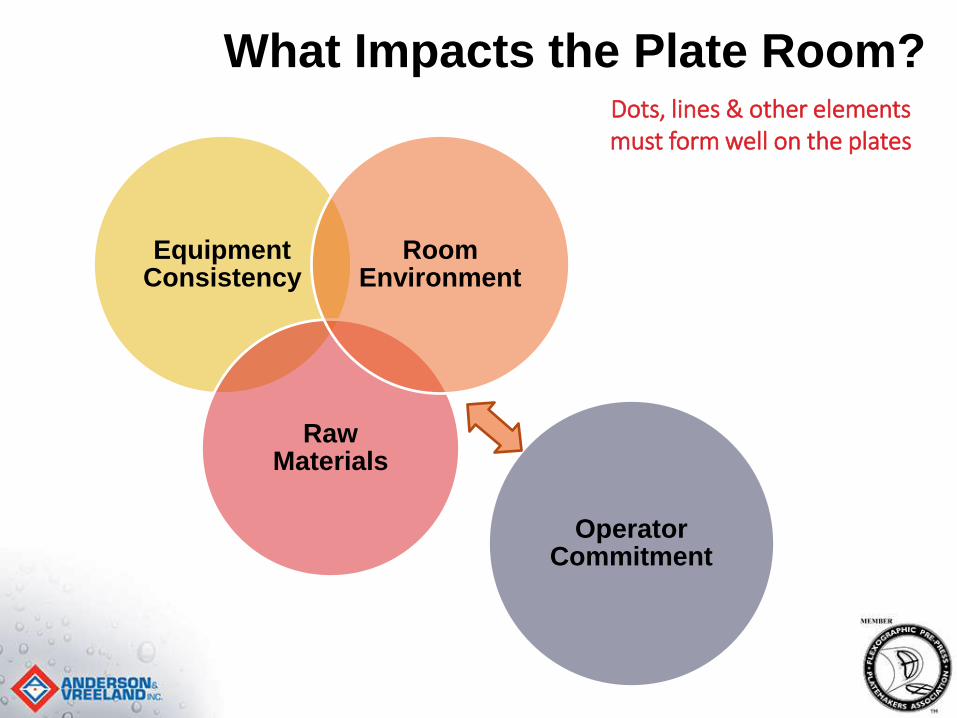
What Impacts the Plate Room?
Equipment Consistency
Raw Materials
Room Environment
Operator Commitment
Dots, lines & other elements must form well on the plates

Best Practices
1. Cleanliness
a. Remove dust
a. Wipe down all flat surfaces
b. Vacuum and mop floors
i. Interval: Daily-weekly depending on production
b. Reduce the amount of Corrugated/Paperboard used
in & around the plate room
a. Overtime corrugated fibers release into the air with
movement creating dust
Room Environment

Checklist
2. Temperature/Humidity Sheet
a. Optimal Room Temperature: 72 F
b. Optimal Relative Humidity: 45-55%
3. Temperature/Humidity Liquid
a. Optimal Room Temperature: 70-75 F
b. Optimal Relative Humidity: 55-65%
i. Important for hitting proper caliper consistently
DateTemperature
Environment Checklist:
Humidity
Room Environment
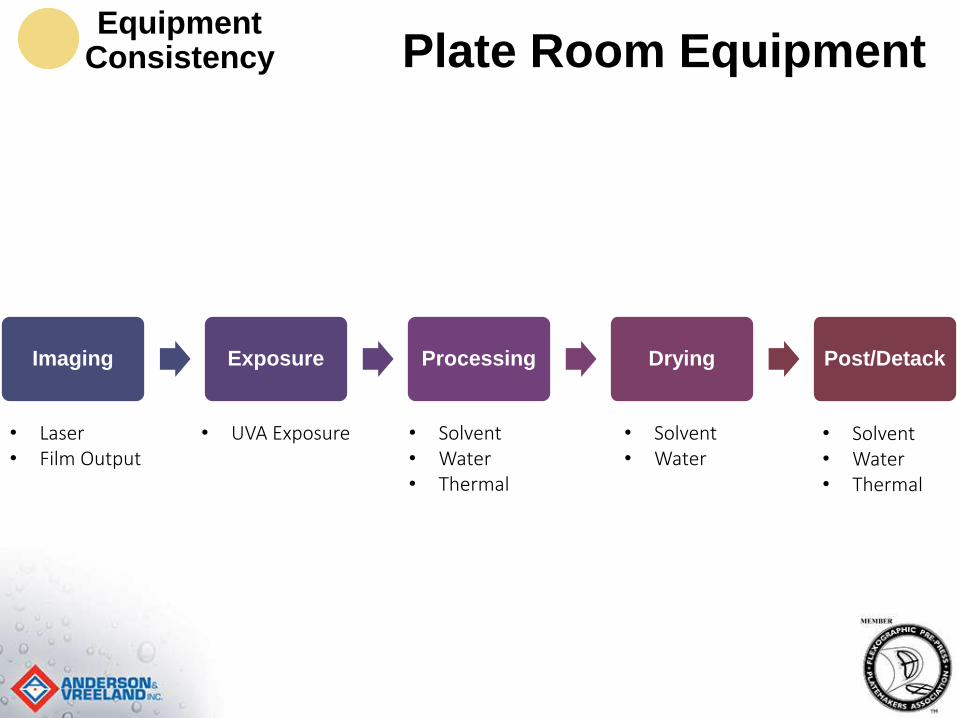
Plate Room EquipmentEquipment
Consistency
Imaging Exposure Processing Drying Post/Detack
• Laser • Film Output
• UVA Exposure • Solvent• Water• Thermal
• Solvent• Water
• Solvent• Water• Thermal

Best Practices
Imaging
1. Routine PM visitsa. Interval: 1-2x per year by certified technician
2. Visual Inspection a. Interval: Every plate!
b. Tools: Eyes Raw material
Laser Ablation
Equipment Consistency

Best Practices
3. Focus & Stain Test
a. Interval: Minimum 1x per week &
when Visual Inspection fails
b. Tools: Transmission Densitometer
Trans. DensitometerLaser
Imaging
Equipment Consistency

Best Practices
1. UV output check
a. Measure 9-points across the bed
i. Interval: 1x per week
ii. Tools: UV-A Meter
image c/o Flint Group – Flexo toolbox app
UV-A MeterExposure FrameDocument
Imaging
Equipment Consistency

Best Practices
Digital Thermometer
2. Temperature Check
a. Measure 9 points to verify good air circulation
i. Interval: 1x per week
ii. Tools: Thermometer w/ probe or infrared
Left Ctr Right
Back 120 125 121
Mid 124 128 125
Front 122 126 124
Document
Exposure Frame
Imaging
Equipment Consistency

Best Practices
Processing
Solvent Processing Thermal Processing Water Processing
1. Check with your manufacturer for recommended practices!
Equipment Consistency

Best Practices
2. Monitor Percent Solids of Solventa. Too much = inconsistent washout
b. Too little = wasteful
3. Inspection of Brush Conditiona. Look for:
a. Damaged, chipped or missing dots/fine text, un-even washout.
b. Extended wash time
c. Fuzzy looking shoulders on mid-tone dots; Dots that measure larger than normal on plate-measurement device.
4. Wiping Rollers
a. Look for: i. Pooling solvent or residue left on plate – replace socks
Solvent Processing
Processing
Equipment Consistency

Best Practices
1. Monitor pH
a. pH maintained by water hardness, soap,
& polymer leveli. Tools: Use pH meter
ii. Interval: to start, measure approximately every 4 plates
2. Temperature
a. Water that is tool cold will not effectively
wash away the un-exposed polymeri. Tools: digital thermometer
ii. Interval: 2x per day
Water Processing
Processing
Equipment Consistency

Best Practices
1. Check Dryer Temperature
a. Should maintain temp between 140-145 Fi. Tools: Thermometer with probe
ii. Interval: Weekly or if suspicious of issue
Drying
Digital Thermometer
Left Ctr Right
Back 140 145 144
Mid 142 144 140
Front 141 145 143
Document
Equipment Consistency

Best Practices
1. Measure UV-A & UV-C output
a. Post Exposure sets the plate; Detack changes the
plate surface tension to best transfer inki. Tools: UV-A meter, UV-A, UV-C Meters & Protective Eye-wear
ii. Interval: 6 months
UVA & C Meters
Left Ctr Right
Back
Mid
Front
Document
Post/Detack
Equipment Consistency
Best Practices
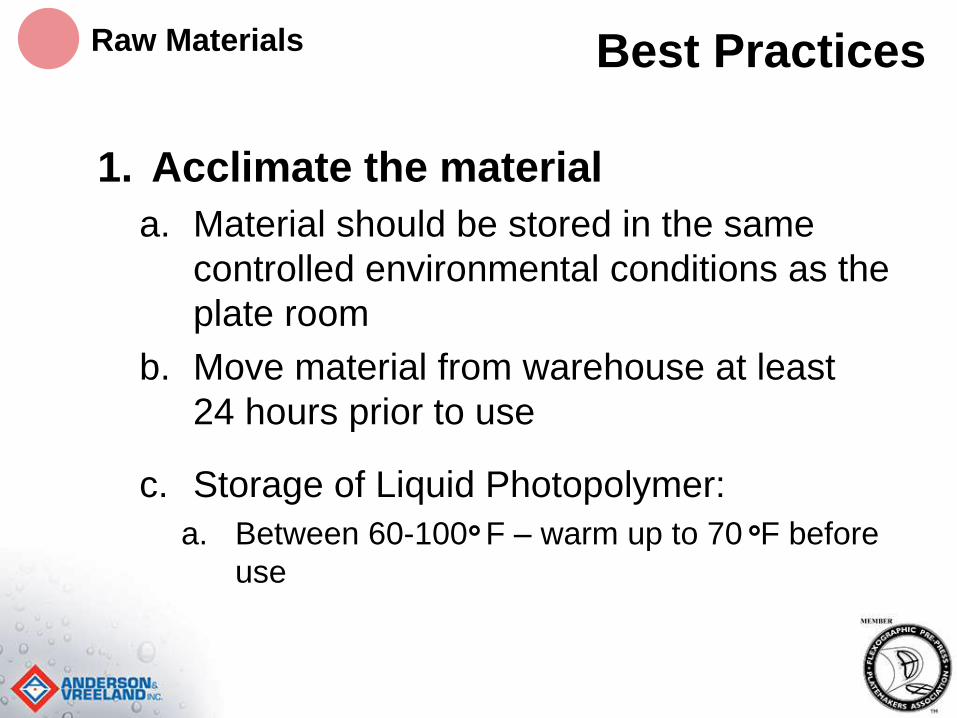
1. Acclimate the material
a. Material should be stored in the same
controlled environmental conditions as the
plate room
b. Move material from warehouse at least
24 hours prior to use
c. Storage of Liquid Photopolymer:
a. Between 60-100 F – warm up to 70 F before
use
Raw Materials

Bench Micrometer
Checklist
2. Raw Sheet Material Gauge
a. Measure overall plate thickness
i. Interval: each box
ii. Tools: Bench Micrometer
b. Record Thickness with Lot Number and Date
Date
Lot Number
Raw Material Checklist:
Gauge
Raw Materials

6 Month Checklist Date
Laser/Film PM
Exposure PM
Processor PM
Dryer PM
Check Post/Detack lamps UV-A UV-C
6 Month Checklist Review

Weekly Checklist Date
Clean all surfaces/Floor
Laser: Focus/Stain tests
Exp UV-A output & temp UV-A Temp.
Dryer temperature Temp.
Weekly Checklist Review

Daily Checklist Date
Clean all surfaces/Floor
Room Temperature (AM) 71
Room Temperature (PM) 73
Room Humidity (AM) 52.4
Room Humidity (PM) 50.3
Raw Material Type/Gauge Lot # Measured
1.
2.
3.
4.
5.
Daily Checklist Review

Add Plate Room Checkpoints& make INFORMED decisions
Drop
Glass
0.026”
Breaks
No Min Dot
Plate
Relief
> 0.025”
Cause Effect
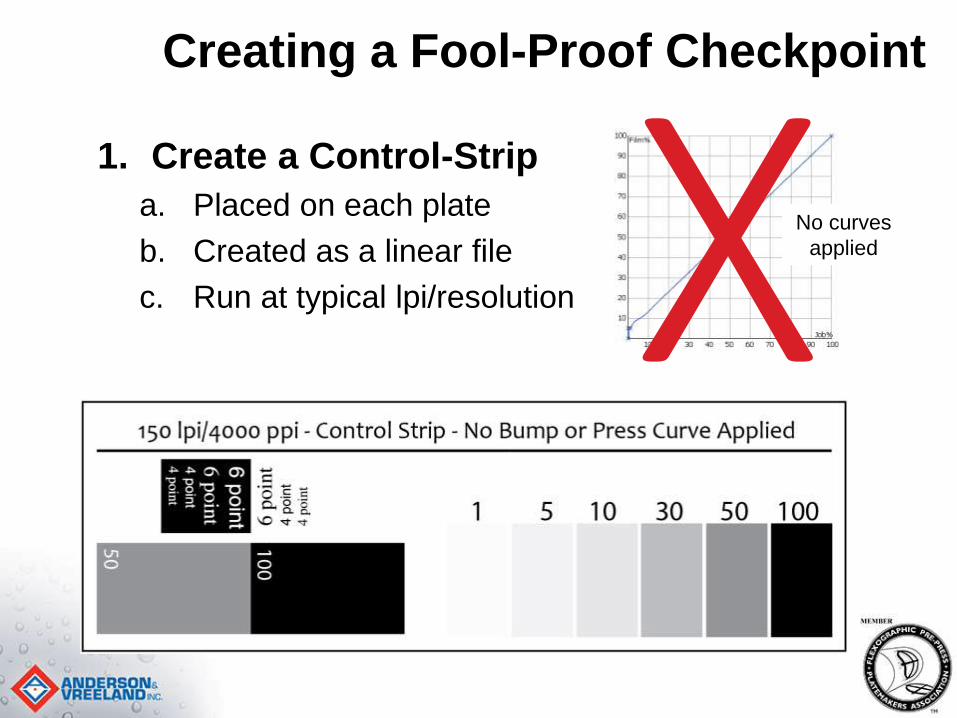
Creating a Fool-Proof Checkpoint
1. Create a Control-Strip
a. Placed on each plate
b. Created as a linear file
c. Run at typical lpi/resolution
No curves
applied

1. Create a Control-Strip
Creating a Fool-Proof Checkpoint
Text for verifying imaging,
washout & exposure
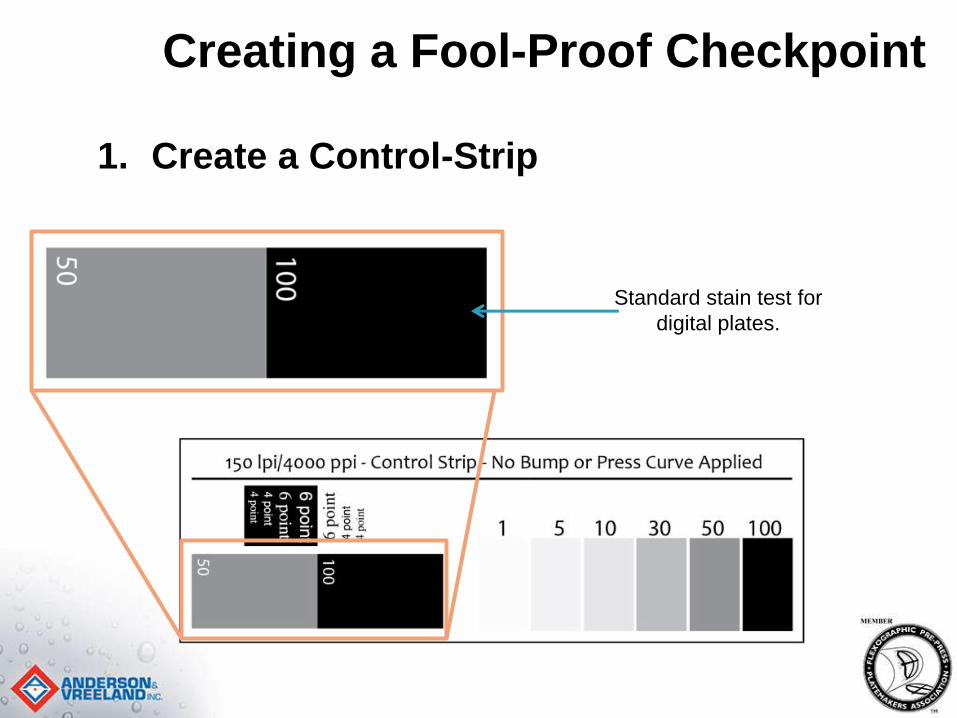
1. Create a Control-Strip
Creating a Fool-Proof Checkpoint
Standard stain test for
digital plates.
Creating a Fool-Proof Checkpoint
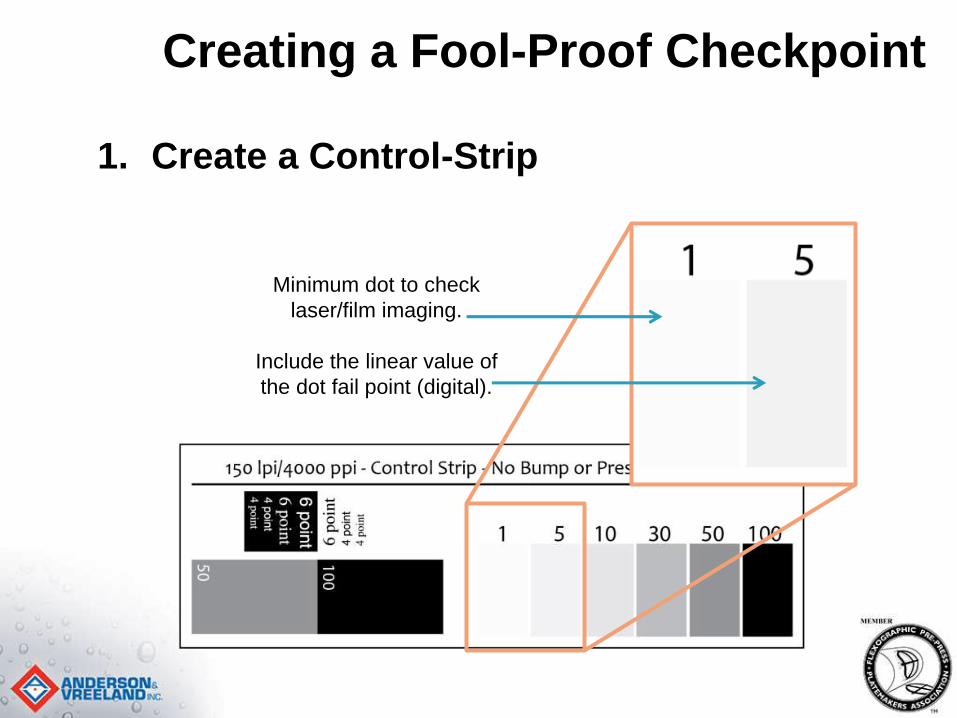
1. Create a Control-Strip
Minimum dot to check
laser/film imaging.
Include the linear value of
the dot fail point (digital).

Creating a Fool-Proof Checkpoint
1. Create a Control-Strip
Tint patches for measuring on
plate reading device

Creating a Fool-Proof Checkpoint
1. Image this target on each plate/film.
ImagingVisual inspection for laser lines or any imaging
defect in especially the solid (100%) areas. Look
first with naked eye, and/or scope on a light table.
After…
Laser Lines = poor imaging quality
Creating a Fool-Proof Checkpoint
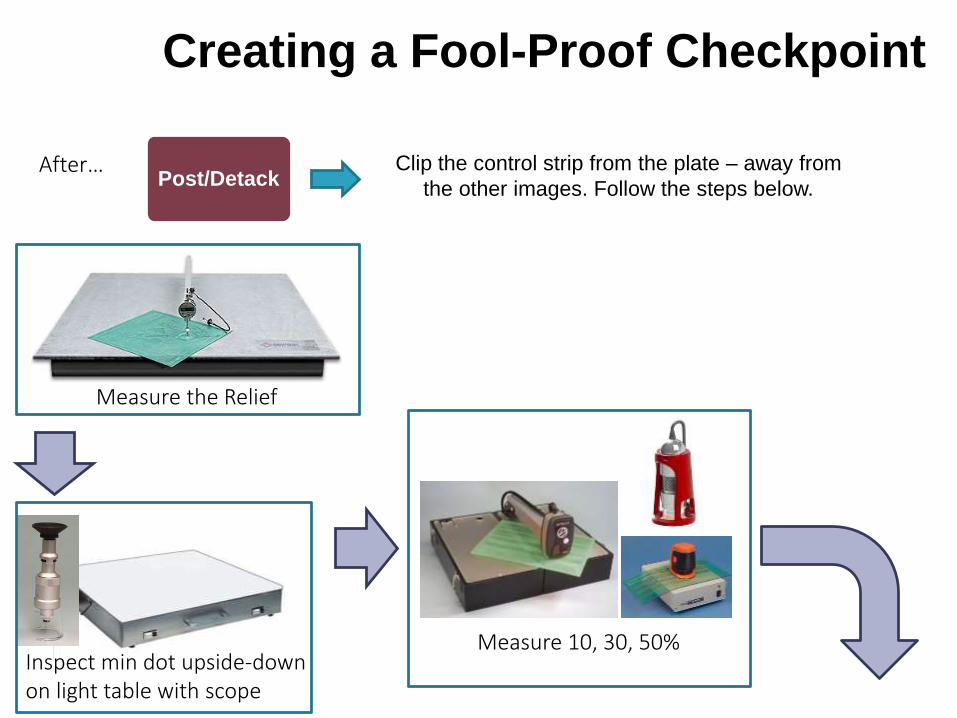
Post/DetackClip the control strip from the plate – away from
the other images. Follow the steps below.
Measure the Relief
Inspect min dot upside-down on light table with scope
Measure 10, 30, 50%
After…

Document the Data
1. Customizable Web Database

Document the Data
1. iPhone App – syncs to web database

Upper Limit
Lower Limit
Document the Data
Initially, documenting helps to realize the target,
as well set the usable range.

Upper Limit
Lower Limit
Document the Data
Develop an Action Plan for those
points outside of the Target Range

• Operators take the time to collect the data…
• Schedule time as a team to review regularly
– (Weekly/Monthly)
USE it!

Sheet Plate Cleaning*confirm with plate manufacturer!
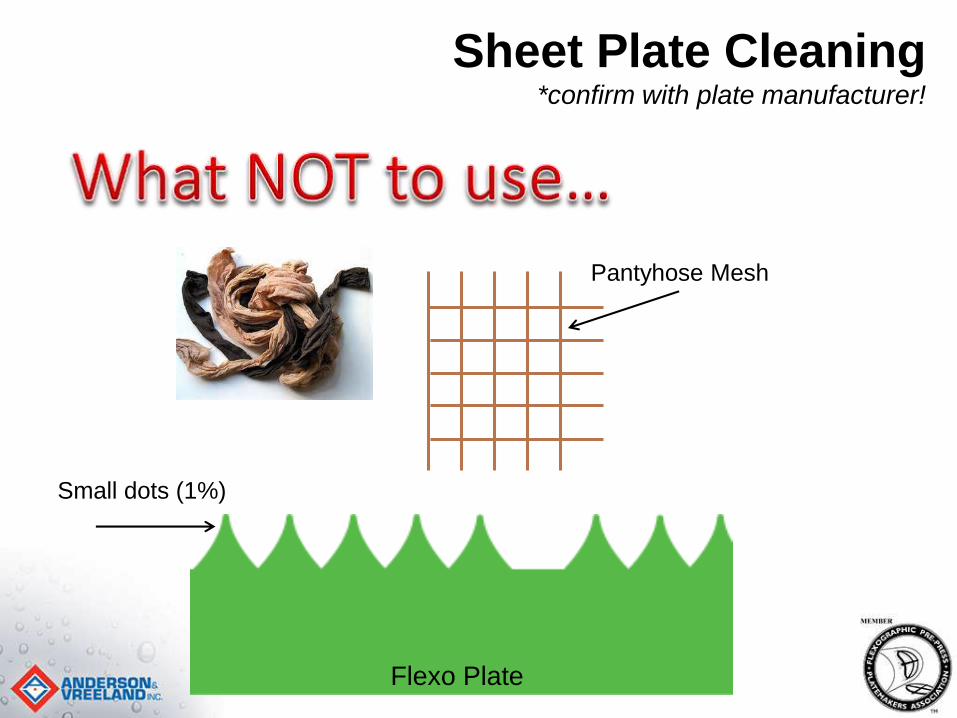
Small dots (1%)
Flexo Plate
Pantyhose Mesh
Sheet Plate Cleaning*confirm with plate manufacturer!

Small dots (1%)
Dot without top…
Sheet Plate Cleaning*confirm with plate manufacturer!

• Pamarco Care Pads or Horse Hair Brush
• Open fiber
• Will not catch dots
Sheet Plate Cleaning*confirm with plate manufacturer!
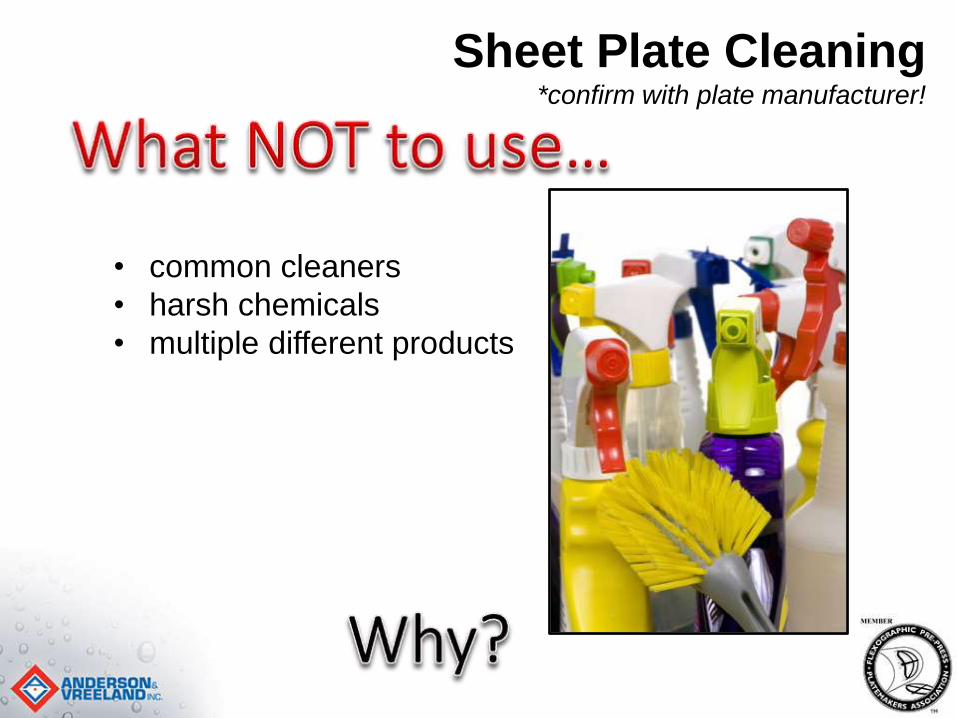
• common cleaners
• harsh chemicals
• multiple different products
Sheet Plate Cleaning*confirm with plate manufacturer!
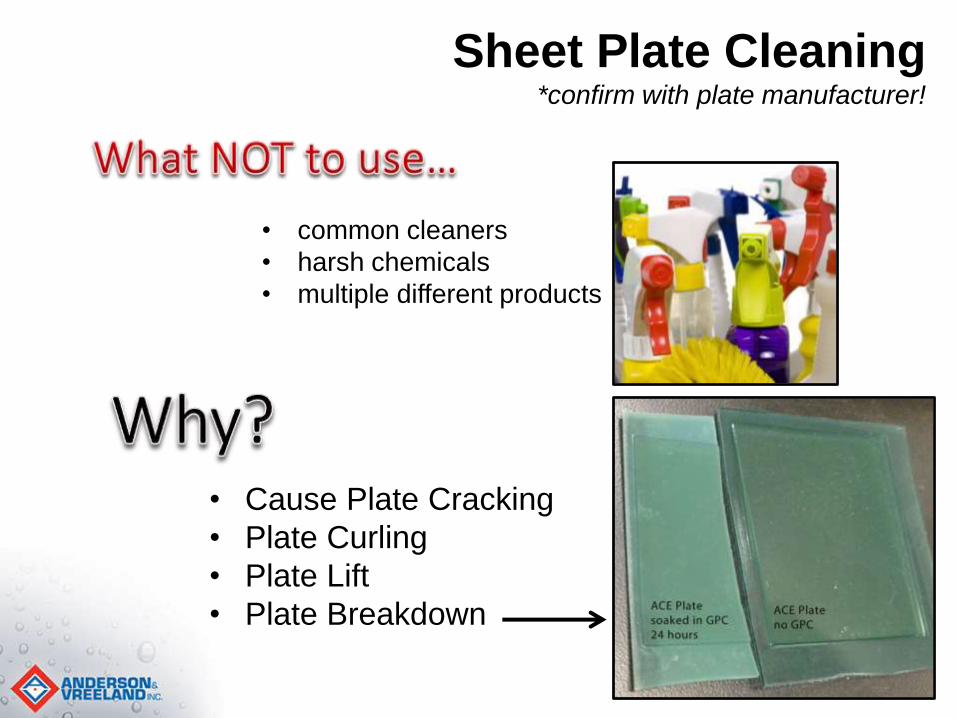
• common cleaners
• harsh chemicals
• multiple different products
• Cause Plate Cracking
• Plate Curling
• Plate Lift
• Plate Breakdown
Sheet Plate Cleaning*confirm with plate manufacturer!

1st Recommended Cleaning Solution
100%EthanolAlcohol
0-20% Acetate
80-100%
Ethanol Alcohol
2nd Recommended Cleaning Solution
Sheet Plate Cleaning*confirm with plate manufacturer!
Okay for use with most solvent produced plates
Complete a swell test with any solution

CLEAN plates before storage Store FLAT and as square as possible
Never Face-to-Face!
• Store FLAT
• Face-to-Mylar Backing – with foam interleave
• Out of Direct Light (envelope)
Sheet Plate Storage*confirm with plate manufacturer!

CLEAN plates before storage
• Always clean plates before storing.
• Use a detergent & water solution for cleaning
• Solution temp must <140 degrees F.
• Use a soft horse-hair brush
• Dry completely before storage
70% Iso. Alcohol
IndustrialAmmoniaSolutionWater70%
20%
10%
Liquid Plate Care/Cleaning*confirm with plate manufacturer!
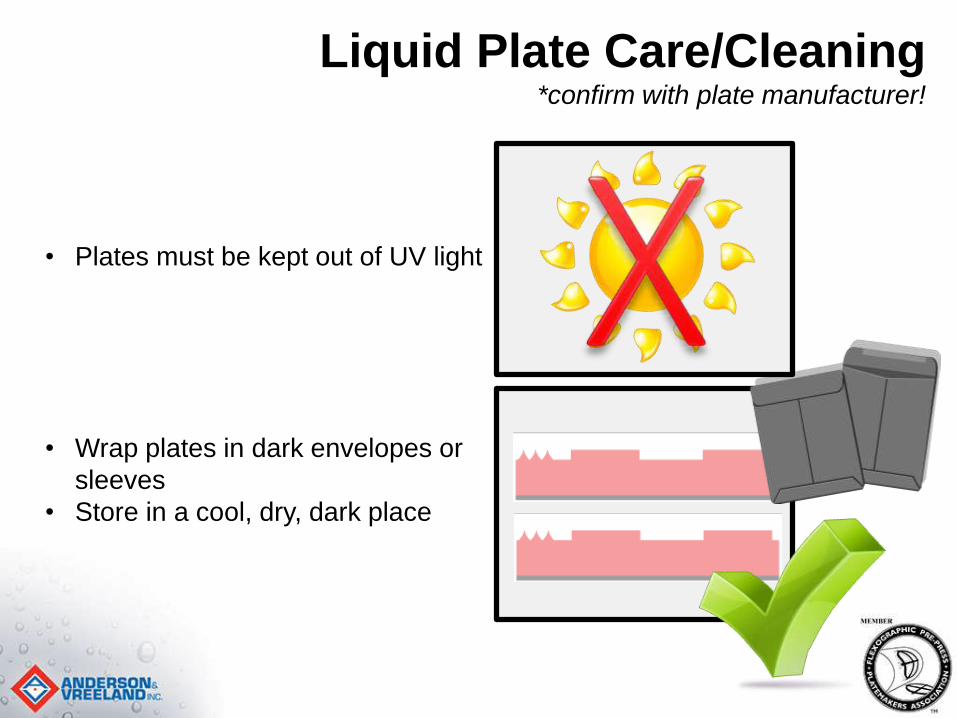
• Plates must be kept out of UV light
• Wrap plates in dark envelopes or
sleeves
• Store in a cool, dry, dark place
Liquid Plate Care/Cleaning*confirm with plate manufacturer!

• Too high of a storage room
temperature can damage plates
• Heat increases the likelihood of:
• Ozone cracking
• Excessive tack
• Plate shrinkage
• Optimal storage conditions:
70-100 degrees F60-80% RH
Liquid Plate Care/Cleaning*confirm with plate manufacturer!

Plate HandlingBest Practices for the Plate Room & Beyond
Jessica Harkins Harrell
Technologies Manager
Anderson & Vreeland