platespin migrate 12 - netiq · contents 3 contents about netiq corporation 5 about this guide 7 1...
TRANSCRIPT

PlateSpin® Migrate 12.2Installation and Upgrade Guide
February 2018
Legal Notice
For information about legal notices, trademarks, disclaimers, warranties, export and other use restrictions, U.S. Government rights, patent policy, and FIPS compliance, see https://www.netiq.com/company/legal/.
Copyright © 2017 NetIQ Corporation. All Rights Reserved.
License Grant
License bought for PlateSpin Migrate 9.3 and later versions cannot be used with PlateSpin Migrate 9.2 and prior versions.
Third-Party Software
Please refer to the PlateSpin Third-Party License Usage and Copyright (https://www.netiq.com/documentation/platespin_licensing/platespin_licensing_qs/data/platespin_licensing_qs.html) page for information about third party software used in PlateSpin Migrate.

Contents
About NetIQ Corporation 5About This Guide 7
1 Installing PlateSpin Migrate 91.1 Preparing to Install PlateSpin Migrate . . . . . . . . . . . . . . . . . . . . . . . . . . . . . . . . . . . . . . . . . . . . . . . . . 9
1.1.1 System Requirements for PlateSpin Server . . . . . . . . . . . . . . . . . . . . . . . . . . . . . . . . . . . . . 91.1.2 System Requirements for PlateSpin Migrate Client. . . . . . . . . . . . . . . . . . . . . . . . . . . . . . . 111.1.3 General Guidelines for Server Installation . . . . . . . . . . . . . . . . . . . . . . . . . . . . . . . . . . . . . 12
1.2 Installing Prerequisite Software . . . . . . . . . . . . . . . . . . . . . . . . . . . . . . . . . . . . . . . . . . . . . . . . . . . . . 131.2.1 Installing Prerequisite Software on Windows Server 2012 R2 Systems . . . . . . . . . . . . . . . 131.2.2 Installing Prerequisite Software on Windows Server 2008 R2 Systems . . . . . . . . . . . . . . . 161.2.3 Enabling Support for FIPS-Compliant Data Encryption Algorithms (Optional). . . . . . . . . . . 18
1.3 Installing PlateSpin Migrate Software Components . . . . . . . . . . . . . . . . . . . . . . . . . . . . . . . . . . . . . . 191.3.1 Starting the PlateSpin Migrate Installation Launcher. . . . . . . . . . . . . . . . . . . . . . . . . . . . . . 191.3.2 Installing the Database Server. . . . . . . . . . . . . . . . . . . . . . . . . . . . . . . . . . . . . . . . . . . . . . . 201.3.3 Installing the PlateSpin Server. . . . . . . . . . . . . . . . . . . . . . . . . . . . . . . . . . . . . . . . . . . . . . . 201.3.4 Installing the PlateSpin Migrate Client . . . . . . . . . . . . . . . . . . . . . . . . . . . . . . . . . . . . . . . . . 22
1.4 Installing the PlateSpin Migrate Software Components Using a Batch File . . . . . . . . . . . . . . . . . . . . 231.5 Checking for Software Updates . . . . . . . . . . . . . . . . . . . . . . . . . . . . . . . . . . . . . . . . . . . . . . . . . . . . . 241.6 Modifying the Password for the SQL Server Express System Administrator User. . . . . . . . . . . . . . . 24
2 Troubleshooting Installation Problems 272.1 Common Installation Issues and Solutions . . . . . . . . . . . . . . . . . . . . . . . . . . . . . . . . . . . . . . . . . . . . 272.2 Knowledgebase Articles about Installation Troubleshooting . . . . . . . . . . . . . . . . . . . . . . . . . . . . . . . 282.3 Removing PlateSpin Software . . . . . . . . . . . . . . . . . . . . . . . . . . . . . . . . . . . . . . . . . . . . . . . . . . . . . . 28
3 Upgrading PlateSpin Migrate 313.1 Prerequisites for Upgrade . . . . . . . . . . . . . . . . . . . . . . . . . . . . . . . . . . . . . . . . . . . . . . . . . . . . . . . . . 31
3.1.1 Backing Up Your Database Files Before Upgrade. . . . . . . . . . . . . . . . . . . . . . . . . . . . . . . . 313.1.2 Backing Up Your Custom Linux blkwatch Drivers Before Upgrade . . . . . . . . . . . . . . . . . . . 32
3.2 Upgrading Migrate . . . . . . . . . . . . . . . . . . . . . . . . . . . . . . . . . . . . . . . . . . . . . . . . . . . . . . . . . . . . . . . 32
A Documentation Updates 33A.1 February 2018 . . . . . . . . . . . . . . . . . . . . . . . . . . . . . . . . . . . . . . . . . . . . . . . . . . . . . . . . . . . . . . . . . . 33
Contents 3

4
About NetIQ Corporation
NetIQ, an Attachmate business, is a global leader in systems and security management. With more than 12,000 customers in over 60 countries, NetIQ solutions maximize technology investments and enable IT process improvements to achieve measurable cost savings. The company’s portfolio includes award-winning management products for IT Process Automation, Systems Management, Security Management, Configuration Audit and Control, Enterprise Administration, and Unified Communications Management. For more information, please visit www.netiq.com.
Contacting Sales SupportFor questions about products, pricing, and capabilities, please contact your local partner. If you cannot contact your partner, please contact our Sales Support team.
Contacting Technical SupportFor specific product issues, contact our Technical Support team.
Contacting Documentation SupportOur goal is to provide documentation that meets your needs. If you have suggestions for improvements, click comment on this topic at the bottom of any page in the HTML versions of the documentation posted at www.netiq.com/documentation. You can also email [email protected]. We value your input and look forward to hearing from you.
Worldwide: www.netiq.com/about_netiq/officelocations.asp
United States and Canada: 888-323-6768
Email: [email protected]
Web Site: www.netiq.com
Worldwide: www.netiq.com/support/contactinfo.asp
North and South America: 1-713-418-5555
Europe, Middle East, and Africa: +353 (0) 91-782 677
Email: [email protected]
Web Site: www.netiq.com/support
About NetIQ Corporation 5
Contacting the Online User CommunityQmunity, the NetIQ online community, is a collaborative network connecting you to your peers and NetIQ experts. By providing more immediate information, useful links to helpful resources, and access to NetIQ experts, Qmunity helps ensure you are mastering the knowledge you need to realize the full potential of IT investments upon which you rely. For more information, please visit http://community.netiq.com.
6 About NetIQ Corporation

About This Guide
This guide provides information to help you install your PlateSpin Migrate product.
Chapter 1, “Installing PlateSpin Migrate,” on page 9 Chapter 2, “Troubleshooting Installation Problems,” on page 27 Chapter 3, “Upgrading PlateSpin Migrate,” on page 31 Appendix A, “Documentation Updates,” on page 33
AudienceThis guide is intended for IT staff, such as data center administrators and operators, who use PlateSpin Migrate in their ongoing workload migration projects.
FeedbackWe want to hear your comments and suggestions about this manual and the other documentation included with this product. Please use the User Comments feature at the bottom of each page of the online documentation.
Additional DocumentationThis guide is part of the PlateSpin Migrate documentation set. For a complete list of publications supporting this release, visit the PlateSpin Migrate Online Documentation Web Site (http://www.netiq.com/documentation/platespin-migrate-12-2).
Documentation UpdatesThe most recent version of this guide can be found at the PlateSpin Migrate 12.2 Online Documentation Web Site (https://www.netiq.com/documentation/platespin-migrate-12-2/).
About This Guide 7

8 About This Guide
1 1Installing PlateSpin Migrate
PlateSpin Migrate is a Windows application that runs on server operating systems. Its functionality depends on several software components, including the Microsoft Internet Information Services (IIS) Web server software along with its feature extension modules, the ASP.NET Web application framework, the Microsoft .NET Framework library and runtime, as well as a dedicated Microsoft SQL Server database instance.
For trouble-free installation and operation of PlateSpin Migrate, you should review the system requirements and plan your installation.
PlateSpin Migrate provides a Web Interface that you can use to plan and execute automated migrations for a large number of workloads. The PlateSpin Migrate Web Interface is automatically installed when you install the PlateSpin Migrate Server. For more information about working with the PlateSpin Migrate Web Interface, see the PlateSpin Migrate User Guide on the Documentation Website (https://www.netiq.com/documentation/platespin-migrate-12-2/).
NOTE: In addition to the English version of PlateSpin Migrate, the product has been localized for installation and use on machines configured for the Chinese Simplified, Chinese Traditional, French, German, and Japanese languages.
This section provides information about installing PlateSpin Migrate:
Section 1.1, “Preparing to Install PlateSpin Migrate,” on page 9 Section 1.2, “Installing Prerequisite Software,” on page 13 Section 1.3, “Installing PlateSpin Migrate Software Components,” on page 19 Section 1.4, “Installing the PlateSpin Migrate Software Components Using a Batch File,” on
page 23 Section 1.5, “Checking for Software Updates,” on page 24 Section 1.6, “Modifying the Password for the SQL Server Express System Administrator User,”
on page 24
1.1 Preparing to Install PlateSpin Migrate Section 1.1.1, “System Requirements for PlateSpin Server,” on page 9 Section 1.1.2, “System Requirements for PlateSpin Migrate Client,” on page 11 Section 1.1.3, “General Guidelines for Server Installation,” on page 12
1.1.1 System Requirements for PlateSpin ServerPlateSpin Server hosts must meet the following system requirements:
Requirement Details
Dedicated host Physical or virtual server
Installing PlateSpin Migrate 9
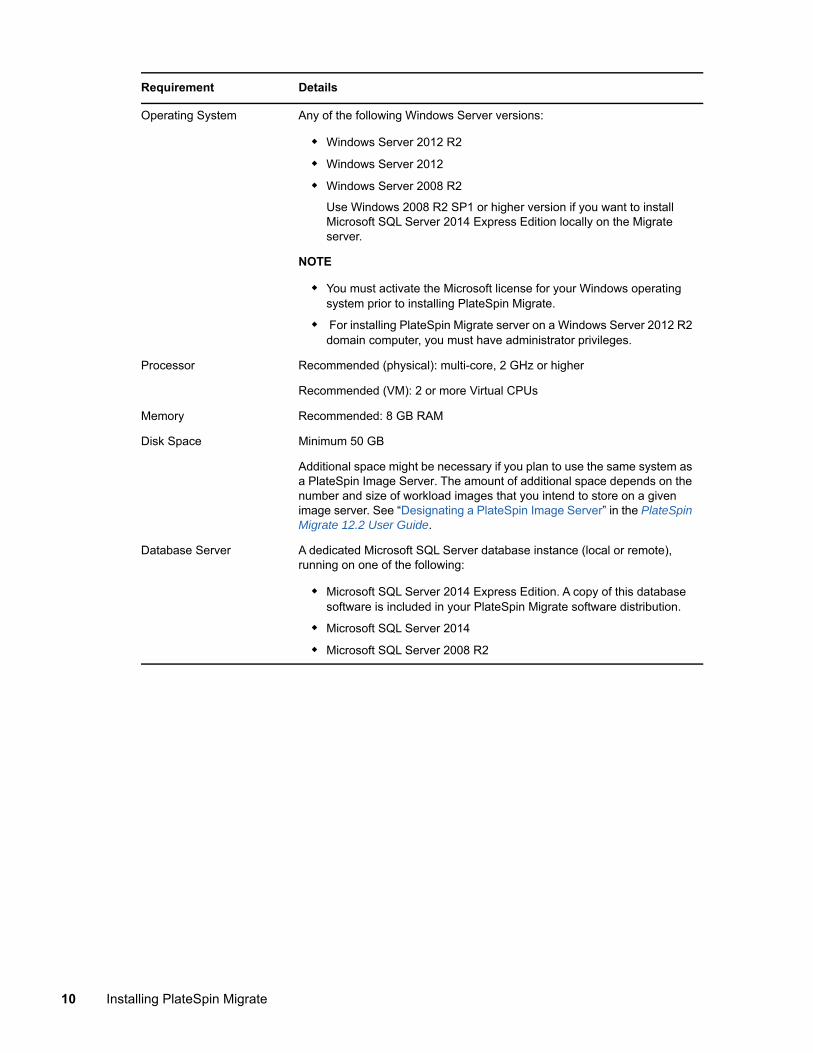
Operating System Any of the following Windows Server versions:
Windows Server 2012 R2
Windows Server 2012
Windows Server 2008 R2
Use Windows 2008 R2 SP1 or higher version if you want to install Microsoft SQL Server 2014 Express Edition locally on the Migrate server.
NOTE
You must activate the Microsoft license for your Windows operating system prior to installing PlateSpin Migrate.
For installing PlateSpin Migrate server on a Windows Server 2012 R2 domain computer, you must have administrator privileges.
Processor Recommended (physical): multi-core, 2 GHz or higher
Recommended (VM): 2 or more Virtual CPUs
Memory Recommended: 8 GB RAM
Disk Space Minimum 50 GB
Additional space might be necessary if you plan to use the same system as a PlateSpin Image Server. The amount of additional space depends on the number and size of workload images that you intend to store on a given image server. See “Designating a PlateSpin Image Server” in the PlateSpin Migrate 12.2 User Guide.
Database Server A dedicated Microsoft SQL Server database instance (local or remote), running on one of the following:
Microsoft SQL Server 2014 Express Edition. A copy of this database software is included in your PlateSpin Migrate software distribution.
Microsoft SQL Server 2014
Microsoft SQL Server 2008 R2
Requirement Details
10 Installing PlateSpin Migrate
1.1.2 System Requirements for PlateSpin Migrate ClientYou can install the PlateSpin Migrate Client on the PlateSpin Server host or on a separate computer.
Standalone PlateSpin Migrate Client hosts must meet the following system requirements:
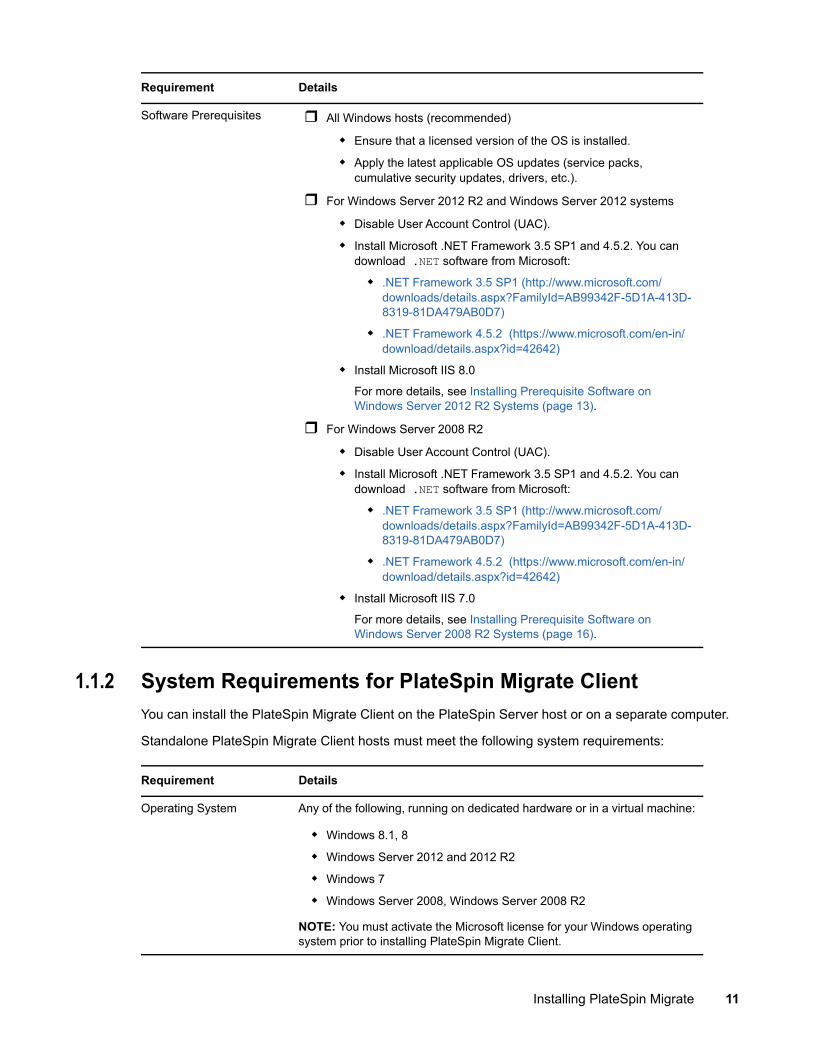
Software Prerequisites All Windows hosts (recommended)
Ensure that a licensed version of the OS is installed.
Apply the latest applicable OS updates (service packs, cumulative security updates, drivers, etc.).
For Windows Server 2012 R2 and Windows Server 2012 systems
Disable User Account Control (UAC).
Install Microsoft .NET Framework 3.5 SP1 and 4.5.2. You can download .NET software from Microsoft:
.NET Framework 3.5 SP1 (http://www.microsoft.com/downloads/details.aspx?FamilyId=AB99342F-5D1A-413D-8319-81DA479AB0D7)
.NET Framework 4.5.2 (https://www.microsoft.com/en-in/download/details.aspx?id=42642)
Install Microsoft IIS 8.0
For more details, see Installing Prerequisite Software on Windows Server 2012 R2 Systems (page 13).
For Windows Server 2008 R2
Disable User Account Control (UAC).
Install Microsoft .NET Framework 3.5 SP1 and 4.5.2. You can download .NET software from Microsoft:
.NET Framework 3.5 SP1 (http://www.microsoft.com/downloads/details.aspx?FamilyId=AB99342F-5D1A-413D-8319-81DA479AB0D7)
.NET Framework 4.5.2 (https://www.microsoft.com/en-in/download/details.aspx?id=42642)
Install Microsoft IIS 7.0
For more details, see Installing Prerequisite Software on Windows Server 2008 R2 Systems (page 16).
Requirement Details
Requirement Details
Operating System Any of the following, running on dedicated hardware or in a virtual machine:
Windows 8.1, 8
Windows Server 2012 and 2012 R2
Windows 7
Windows Server 2008, Windows Server 2008 R2
NOTE: You must activate the Microsoft license for your Windows operating system prior to installing PlateSpin Migrate Client.
Installing PlateSpin Migrate 11
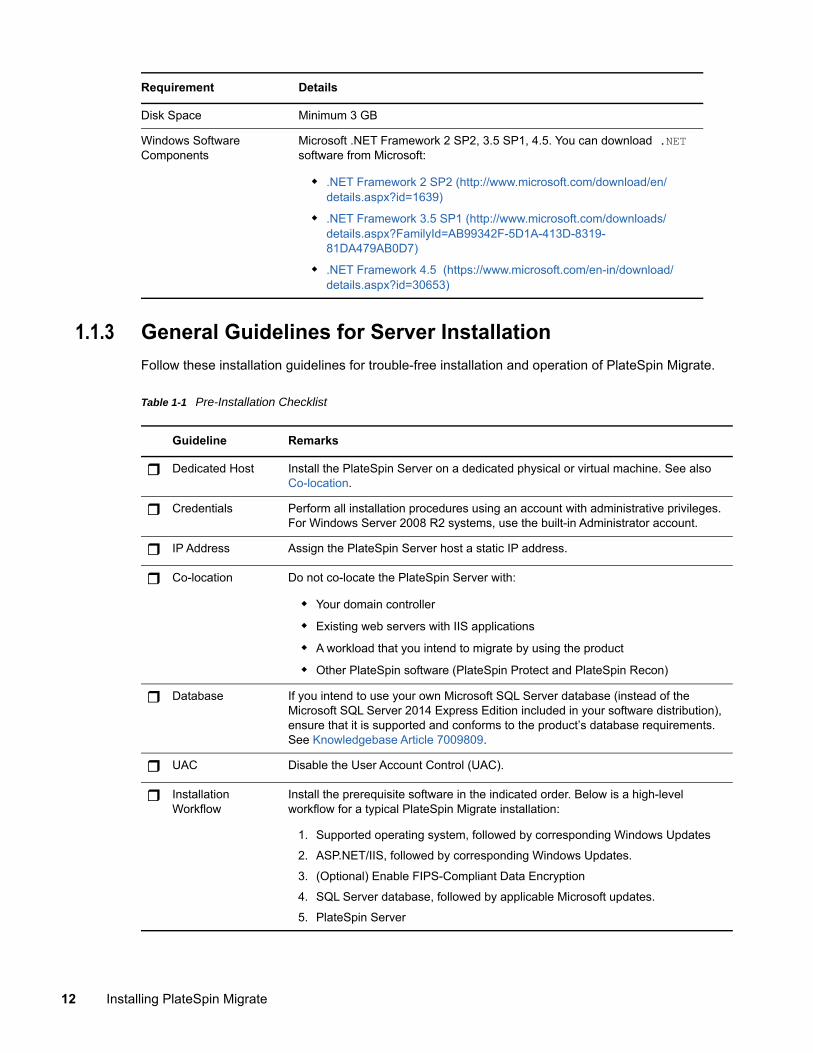
1.1.3 General Guidelines for Server Installation Follow these installation guidelines for trouble-free installation and operation of PlateSpin Migrate.
Table 1-1 Pre-Installation Checklist
Disk Space Minimum 3 GB
Windows Software Components
Microsoft .NET Framework 2 SP2, 3.5 SP1, 4.5. You can download .NET software from Microsoft:
.NET Framework 2 SP2 (http://www.microsoft.com/download/en/details.aspx?id=1639)
.NET Framework 3.5 SP1 (http://www.microsoft.com/downloads/details.aspx?FamilyId=AB99342F-5D1A-413D-8319-81DA479AB0D7)
.NET Framework 4.5 (https://www.microsoft.com/en-in/download/details.aspx?id=30653)
Requirement Details
Guideline Remarks
Dedicated Host Install the PlateSpin Server on a dedicated physical or virtual machine. See also Co-location.
Credentials Perform all installation procedures using an account with administrative privileges. For Windows Server 2008 R2 systems, use the built-in Administrator account.
IP Address Assign the PlateSpin Server host a static IP address.
Co-location Do not co-locate the PlateSpin Server with:
Your domain controller
Existing web servers with IIS applications
A workload that you intend to migrate by using the product
Other PlateSpin software (PlateSpin Protect and PlateSpin Recon)
Database If you intend to use your own Microsoft SQL Server database (instead of the Microsoft SQL Server 2014 Express Edition included in your software distribution), ensure that it is supported and conforms to the product’s database requirements. See Knowledgebase Article 7009809.
UAC Disable the User Account Control (UAC).
Installation Workflow
Install the prerequisite software in the indicated order. Below is a high-level workflow for a typical PlateSpin Migrate installation:
1. Supported operating system, followed by corresponding Windows Updates
2. ASP.NET/IIS, followed by corresponding Windows Updates.
3. (Optional) Enable FIPS-Compliant Data Encryption
4. SQL Server database, followed by applicable Microsoft updates.
5. PlateSpin Server
12 Installing PlateSpin Migrate
1.2 Installing Prerequisite SoftwareThis section provides information on installing the required ASP.NET, IIS, and .NET Framework software components. Because the packaging and distribution of these software components varies among different versions of the supported Windows Server platforms, procedures vary slightly. Use the indicated order of installation and setup.
Section 1.2.1, “Installing Prerequisite Software on Windows Server 2012 R2 Systems,” on page 13
Section 1.2.2, “Installing Prerequisite Software on Windows Server 2008 R2 Systems,” on page 16
Section 1.2.3, “Enabling Support for FIPS-Compliant Data Encryption Algorithms (Optional),” on page 18
1.2.1 Installing Prerequisite Software on Windows Server 2012 R2 SystemsUse the following procedure to install prerequisite software on the Microsoft Windows Server 2012 R2 servers where you plan to install PlateSpin Migrate Server. Before you begin, ensure that you are familiar with the “System Requirements for PlateSpin Server” on page 9 and “General Guidelines for Server Installation” on page 12.
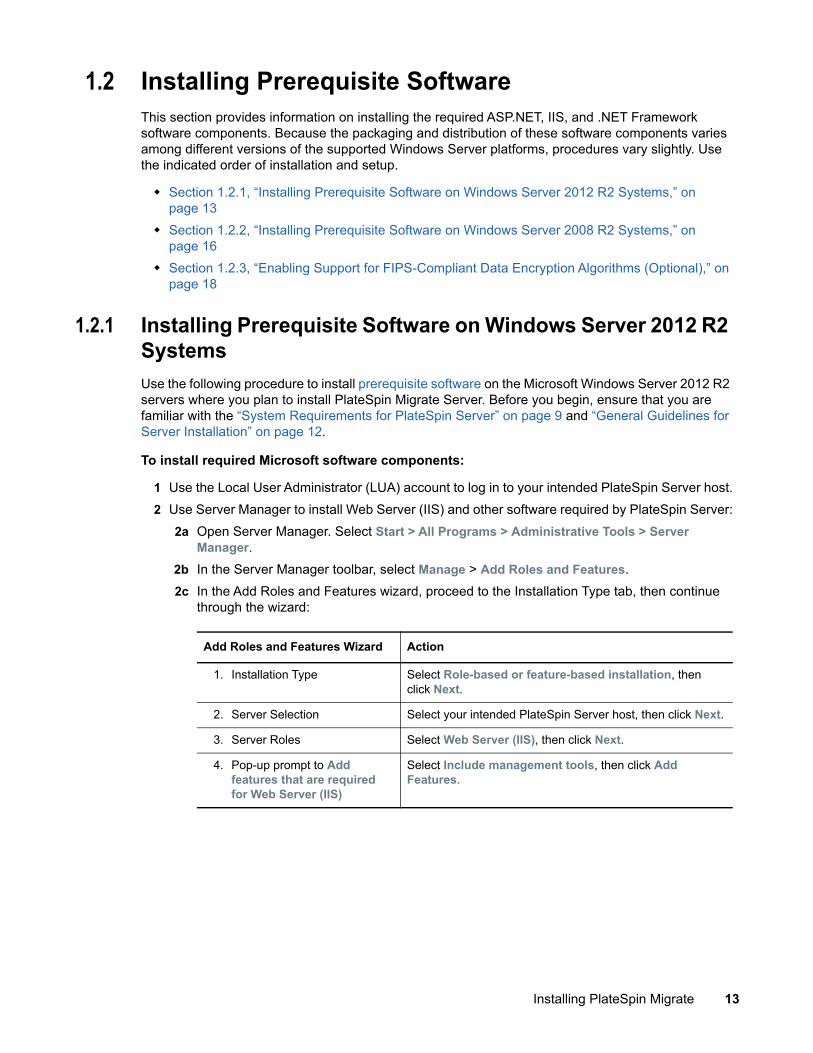
To install required Microsoft software components:
1 Use the Local User Administrator (LUA) account to log in to your intended PlateSpin Server host.2 Use Server Manager to install Web Server (IIS) and other software required by PlateSpin Server:
2a Open Server Manager. Select Start > All Programs > Administrative Tools > Server Manager.
2b In the Server Manager toolbar, select Manage > Add Roles and Features.2c In the Add Roles and Features wizard, proceed to the Installation Type tab, then continue
through the wizard:
Add Roles and Features Wizard Action
1. Installation Type Select Role-based or feature-based installation, then click Next.
2. Server Selection Select your intended PlateSpin Server host, then click Next.
3. Server Roles Select Web Server (IIS), then click Next.
4. Pop-up prompt to Add features that are required for Web Server (IIS)
Select Include management tools, then click Add Features.
Installing PlateSpin Migrate 13
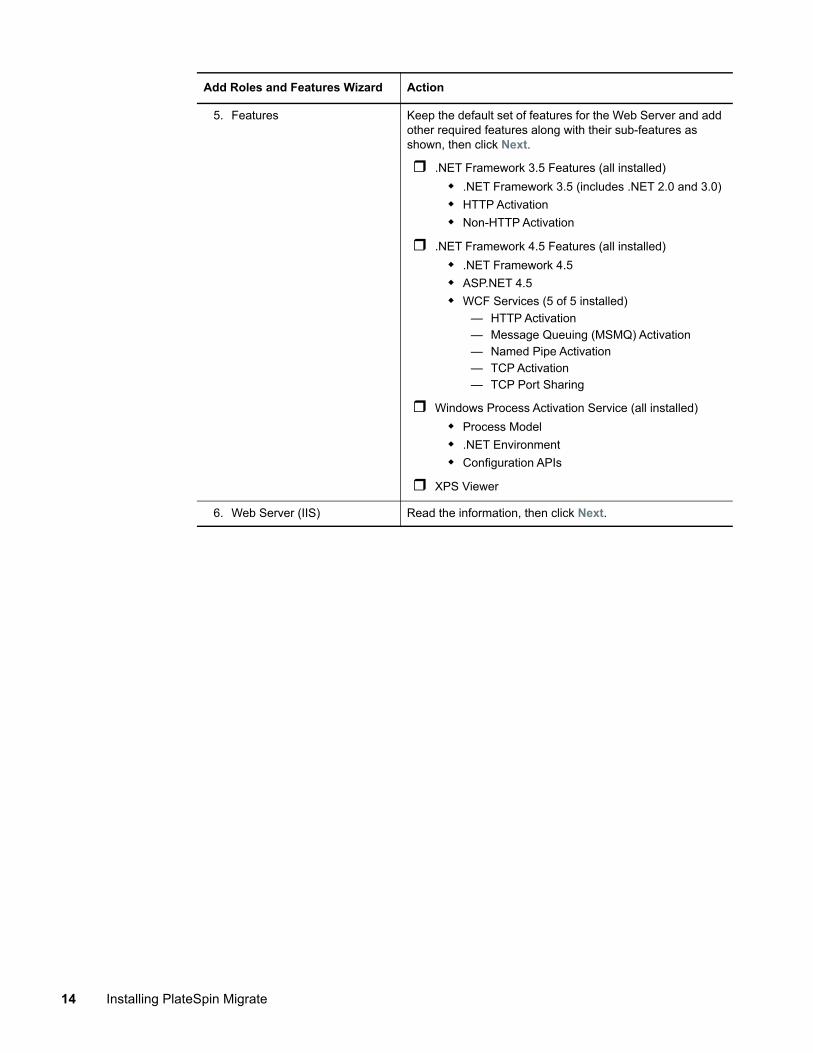
5. Features Keep the default set of features for the Web Server and add other required features along with their sub-features as shown, then click Next.
.NET Framework 3.5 Features (all installed) .NET Framework 3.5 (includes .NET 2.0 and 3.0) HTTP Activation Non-HTTP Activation
.NET Framework 4.5 Features (all installed) .NET Framework 4.5 ASP.NET 4.5 WCF Services (5 of 5 installed)
— HTTP Activation— Message Queuing (MSMQ) Activation— Named Pipe Activation— TCP Activation— TCP Port Sharing
Windows Process Activation Service (all installed) Process Model .NET Environment Configuration APIs
XPS Viewer
6. Web Server (IIS) Read the information, then click Next.
Add Roles and Features Wizard Action
14 Installing PlateSpin Migrate
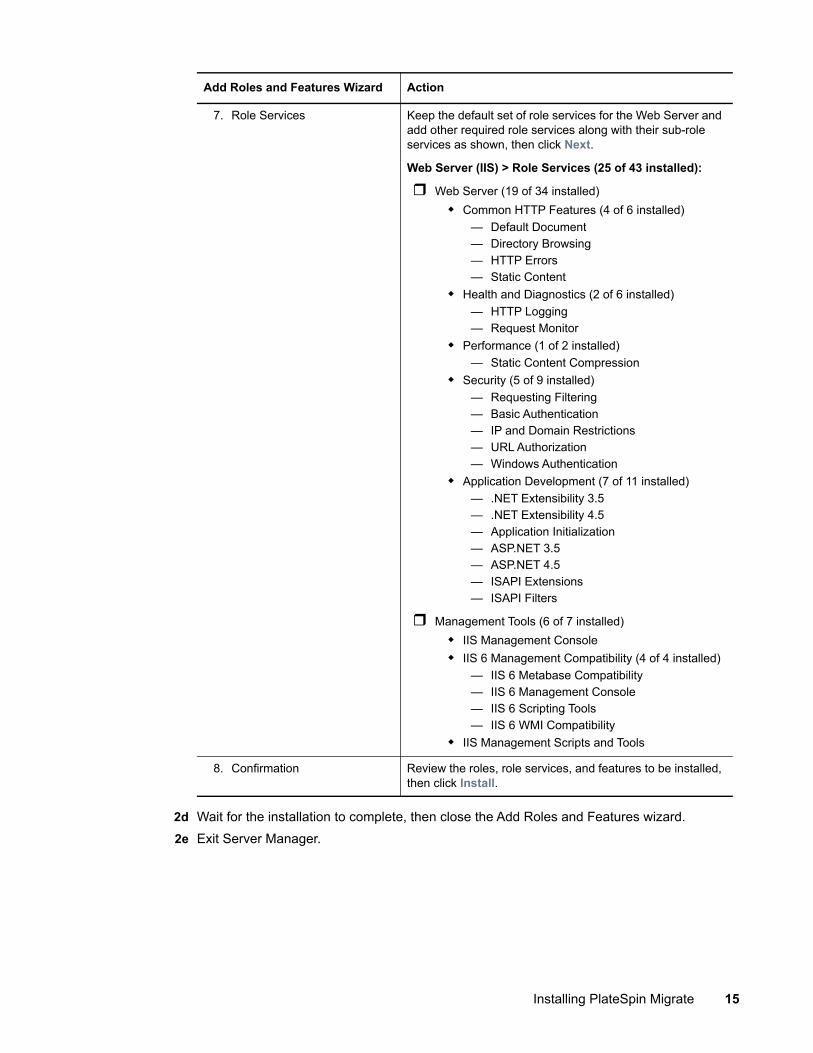
2d Wait for the installation to complete, then close the Add Roles and Features wizard.2e Exit Server Manager.
7. Role Services Keep the default set of role services for the Web Server and add other required role services along with their sub-role services as shown, then click Next.
Web Server (IIS) > Role Services (25 of 43 installed):
Web Server (19 of 34 installed) Common HTTP Features (4 of 6 installed)
— Default Document— Directory Browsing— HTTP Errors— Static Content
Health and Diagnostics (2 of 6 installed)— HTTP Logging— Request Monitor
Performance (1 of 2 installed)— Static Content Compression
Security (5 of 9 installed)— Requesting Filtering— Basic Authentication— IP and Domain Restrictions— URL Authorization— Windows Authentication
Application Development (7 of 11 installed)— .NET Extensibility 3.5— .NET Extensibility 4.5— Application Initialization— ASP.NET 3.5— ASP.NET 4.5— ISAPI Extensions— ISAPI Filters
Management Tools (6 of 7 installed) IIS Management Console IIS 6 Management Compatibility (4 of 4 installed)
— IIS 6 Metabase Compatibility— IIS 6 Management Console— IIS 6 Scripting Tools— IIS 6 WMI Compatibility
IIS Management Scripts and Tools
8. Confirmation Review the roles, role services, and features to be installed, then click Install.
Add Roles and Features Wizard Action
Installing PlateSpin Migrate 15

1.2.2 Installing Prerequisite Software on Windows Server 2008 R2 SystemsUse the following procedure to install prerequisite software on the Microsoft Windows Server 2008 R2 servers where you plan to install PlateSpin Migrate Server. Before you begin, ensure that you are familiar with the “System Requirements for PlateSpin Server” on page 9 and “General Guidelines for Server Installation” on page 12.
To install required Microsoft software components:
1 Use the Local User Administrator (LUA) account to log in to your intended PlateSpin Server host.2 Open Server Manager. Select Start > All Programs > Administrative Tools > Server Manager.
16 Installing PlateSpin Migrate
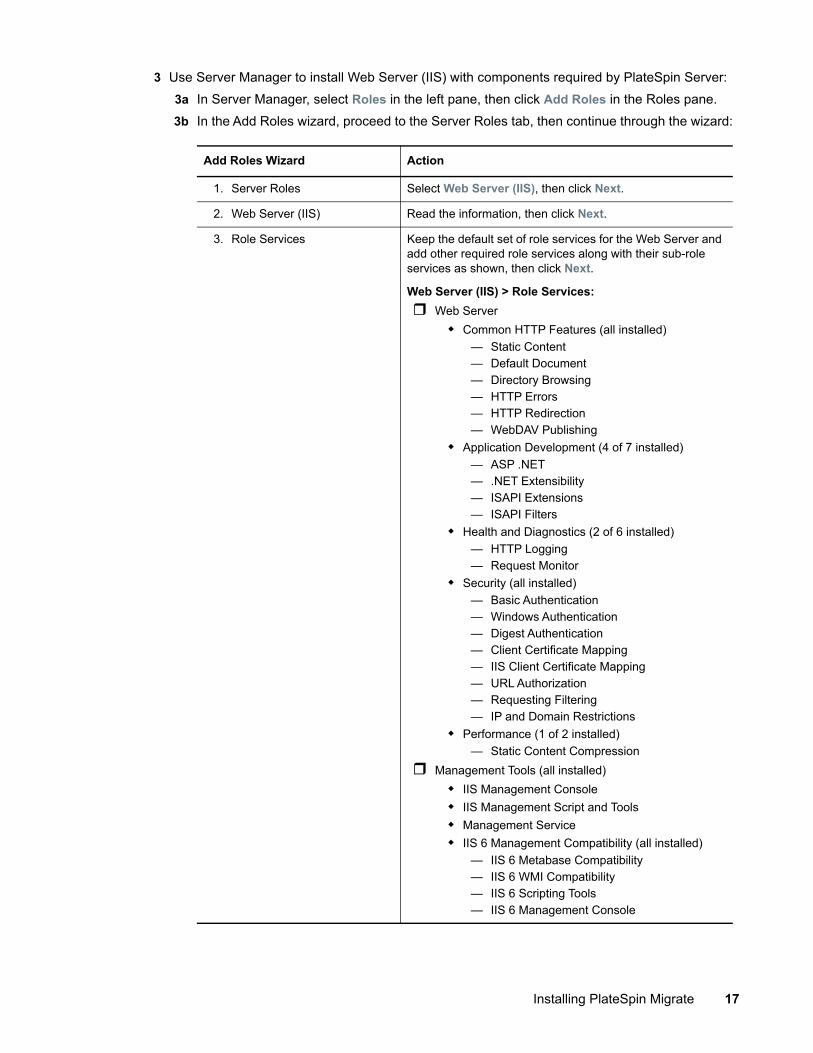
3 Use Server Manager to install Web Server (IIS) with components required by PlateSpin Server:3a In Server Manager, select Roles in the left pane, then click Add Roles in the Roles pane.3b In the Add Roles wizard, proceed to the Server Roles tab, then continue through the wizard:
Add Roles Wizard Action
1. Server Roles Select Web Server (IIS), then click Next.
2. Web Server (IIS) Read the information, then click Next.
3. Role Services Keep the default set of role services for the Web Server and add other required role services along with their sub-role services as shown, then click Next.
Web Server (IIS) > Role Services: Web Server
Common HTTP Features (all installed)— Static Content— Default Document— Directory Browsing— HTTP Errors— HTTP Redirection— WebDAV Publishing
Application Development (4 of 7 installed)— ASP .NET— .NET Extensibility— ISAPI Extensions— ISAPI Filters
Health and Diagnostics (2 of 6 installed)— HTTP Logging— Request Monitor
Security (all installed)— Basic Authentication— Windows Authentication— Digest Authentication— Client Certificate Mapping— IIS Client Certificate Mapping— URL Authorization— Requesting Filtering— IP and Domain Restrictions
Performance (1 of 2 installed)— Static Content Compression
Management Tools (all installed) IIS Management Console IIS Management Script and Tools Management Service IIS 6 Management Compatibility (all installed)
— IIS 6 Metabase Compatibility— IIS 6 WMI Compatibility— IIS 6 Scripting Tools— IIS 6 Management Console
Installing PlateSpin Migrate 17

3c Wait for the installation to complete, then close the Add Roles wizard.4 Use Server Manager to install additional software required by PlateSpin Server:
4a In Server Manager, select Features in the left pane, then click Add Features in the Features pane.
4b In the Add Features wizard, proceed to the Features tab, then continue through the wizard:
4c Wait for the installation to complete, then close the Add Features wizard.5 Exit Server Manager.6 Download and install Microsoft .NET Framework 4.5.2 (https://www.microsoft.com/en-us/
download/details.aspx?id=42642) on your intended PlateSpin Server host.
1.2.3 Enabling Support for FIPS-Compliant Data Encryption Algorithms (Optional)PlateSpin Migrate supports data encryption algorithms that are compliant with FIPS (Federal Information Processing Standards, Publication 140-2).
If compliance with FIPS is required, it must be enabled on the intended PlateSpin Server host prior to the installation of the PlateSpin Server. This is because PlateSpin Migrate runs in FIPS-compliant mode only if it detects that a workload’s operating system is running in FIPS-compliant mode.
NOTE: FIPS-compliant mode has a performance impact and might slow down the data transfer rate up to 30%.
4. Confirmation Review the roles and role services to be installed, then click Install.
Add Features Wizard Action
1. Features Select the following required features and their sub-features as shown, then click Next. .NET Framework (all installed)
.NET Framework 3.5.1 WCF Activation
— HTTP Activation— Non-HTTP Activation
Windows Process Activation Service (all installed) Process Model .NET Environment Configuration APIs
XPS Viewer
2. Confirmation Review the features to be installed, then click Install.
Add Roles Wizard Action
18 Installing PlateSpin Migrate

To enable FIPS-compliant algorithms:
1 Enable FIPS-compliant algorithms in the security options of your PlateSpin Migrate host’s local security policies:1a Run secpol.msc and browse to Local Policies > Security Options.1b Enable the System cryptography: Use FIPS compliant algorithms for encryption security
option.2 Configure ASP.NET for FIPS support:
2a Access the machine.config file located in the following directory of your PlateSpin Server host:
..Windows\Microsoft.Net\Framework\vX.X.XXXXX\Config2b Add the following under the <system.web> element:
<machineKey validationKey="AutoGenerate,IsolateApps" decryptionKey="AutoGenerate,IsolateApps" validation="3DES" decryption="3DES"/>
3 Access the web.config file in each of the below listed directories of your PlateSpin Server host and add the following under the <system.web> element of each of the web.config file:
<machineKey validationKey="AutoGenerate,IsolateApps" decryptionKey="AutoGenerate,IsolateApps" validation="3DES" decryption="3DES"/> PlateSpin Migrate Install Directory\PlateSpin Forge\web\ PlateSpin Migrate Install Directory\Web\ PlateSpin Migrate Install Directory\ConfigurationEditor.Web\ PlateSpin Migrate Install Directory\Protection.WebServices\ PlateSpin Migrate Install Directory\OfxWeb\
1.3 Installing PlateSpin Migrate Software Components Section 1.3.1, “Starting the PlateSpin Migrate Installation Launcher,” on page 19 Section 1.3.2, “Installing the Database Server,” on page 20 Section 1.3.3, “Installing the PlateSpin Server,” on page 20 Section 1.3.4, “Installing the PlateSpin Migrate Client,” on page 22
1.3.1 Starting the PlateSpin Migrate Installation Launcher1 From NetIQ Downloads (https://dl.netiq.com/), download the PlateSpinMigrateSetup-
12.X.X.X.exe installation program and save it on your intended PlateSpin Server host.2 Run the installation program and click Next to launch the prerequisites check utility.
The prerequisites check queries the host where you intend to install the PlateSpin Server. It verifies that all of the required software is installed or enabled. If you see any cautions or omissions, you need to either enable or install the prerequisite software before you proceed with the installation.
3 Click Next to launch the installation program.
Installing PlateSpin Migrate 19
The installation program extracts the required files and opens the Installation Launcher window (if the installation program detects a local installation of SQL Server 2008 R2 or Microsoft SQL Server 2014, it disables the corresponding Install SQL Server Express option):If you intend to use the Microsoft SQL Server 2014 Express Edition distributed with PlateSpin Migrate, install it first. If you intend to use an existing SQL Server database, skip the database installation, start installing the PlateSpin Server, and point to your existing database when prompted.
IMPORTANT: When you browse to and select an existing database, the default value for the server name is displayed, for example:
<database_server>\<Database_instance_name>You need not specify the DB instance name explicitly in this field. Specify the database server name only, and delete the instance name default. Specifying the database instance name results in a failure to validate the server.
1.3.2 Installing the Database ServerIf you do not have a SQL Server 2008 R2 database engine or SQL Server 2014, you can install Microsoft SQL Server 2014 Express Edition included in your PlateSpin Migrate software distribution.
1 On your intended database server host, start the Installation Launcher. See “Starting the PlateSpin Migrate Installation Launcher” on page 19.
2 Click Install SQL Server Express and follow the on-screen instructions.The program installs a database server and the database instances required for the operation of PlateSpin Migrate.
NOTE: The SQL administrator password is generated during the installation of Microsoft SQL Server Express Edition. Keep the default sa credentials throughout the PlateSpin Migrate Server installation. After the installation is complete, you should modify the SQL administrator password. See Section 1.6, “Modifying the Password for the SQL Server Express System Administrator User,” on page 24.
1.3.3 Installing the PlateSpin Server1 Before you install the PlateSpin Server host, you must ensure the following requirements are
met: The PlateSpin Server host meets the minimum system requirements. See “System
Requirements for PlateSpin Server” on page 9. The PlateSpin Server host has the necessary prerequisite software installed. See “Installing
Prerequisite Software” on page 13.2 On the PlateSpin Server host, launch the Installation Launcher. See “Starting the PlateSpin
Migrate Installation Launcher” on page 19.3 Click Install PlateSpin Server and follow the on-screen instructions. Select the license
agreement option and click Next.4 On the Database Connection Information screen, click Browse to select the database server and
select the authentication type.
20 Installing PlateSpin Migrate
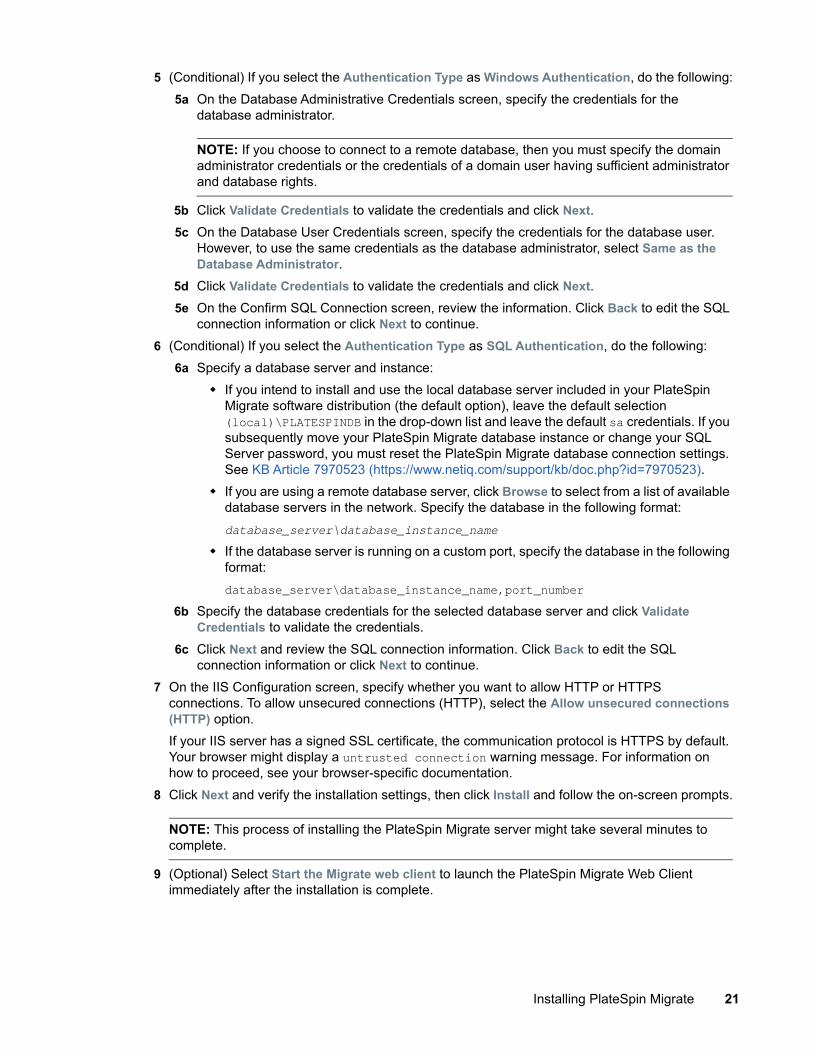
5 (Conditional) If you select the Authentication Type as Windows Authentication, do the following:5a On the Database Administrative Credentials screen, specify the credentials for the
database administrator.
NOTE: If you choose to connect to a remote database, then you must specify the domain administrator credentials or the credentials of a domain user having sufficient administrator and database rights.
5b Click Validate Credentials to validate the credentials and click Next.5c On the Database User Credentials screen, specify the credentials for the database user.
However, to use the same credentials as the database administrator, select Same as the Database Administrator.
5d Click Validate Credentials to validate the credentials and click Next.5e On the Confirm SQL Connection screen, review the information. Click Back to edit the SQL
connection information or click Next to continue.6 (Conditional) If you select the Authentication Type as SQL Authentication, do the following:
6a Specify a database server and instance: If you intend to install and use the local database server included in your PlateSpin
Migrate software distribution (the default option), leave the default selection (local)\PLATESPINDB in the drop-down list and leave the default sa credentials. If you subsequently move your PlateSpin Migrate database instance or change your SQL Server password, you must reset the PlateSpin Migrate database connection settings. See KB Article 7970523 (https://www.netiq.com/support/kb/doc.php?id=7970523).
If you are using a remote database server, click Browse to select from a list of available database servers in the network. Specify the database in the following format:database_server\database_instance_name
If the database server is running on a custom port, specify the database in the following format:database_server\database_instance_name,port_number
6b Specify the database credentials for the selected database server and click Validate Credentials to validate the credentials.
6c Click Next and review the SQL connection information. Click Back to edit the SQL connection information or click Next to continue.
7 On the IIS Configuration screen, specify whether you want to allow HTTP or HTTPS connections. To allow unsecured connections (HTTP), select the Allow unsecured connections (HTTP) option.If your IIS server has a signed SSL certificate, the communication protocol is HTTPS by default. Your browser might display a untrusted connection warning message. For information on how to proceed, see your browser-specific documentation.
8 Click Next and verify the installation settings, then click Install and follow the on-screen prompts.
NOTE: This process of installing the PlateSpin Migrate server might take several minutes to complete.
9 (Optional) Select Start the Migrate web client to launch the PlateSpin Migrate Web Client immediately after the installation is complete.
Installing PlateSpin Migrate 21
1.3.4 Installing the PlateSpin Migrate ClientYou have two installation options for the PlateSpin Migrate Client:
“Installing the Client from within the Installation Launcher” on page 22 “Downloading the Client from your PlateSpin Server” on page 22 “Starting the Client and Activating the License” on page 22
Installing the Client from within the Installation LauncherUse this option to install the Client on the same host with your PlateSpin Server immediately after the completion of the Server installation.
1 Complete the Server installation. See “Installing the PlateSpin Server” on page 20.
2 In the Installation Launcher window, click Install PlateSpin Client and follow the on-screen instructions.The installation program installs and configures the PlateSpin Migrate Client, preparing it to run.
Downloading the Client from your PlateSpin ServerUse this option to install the Client on a remote host by using a Web browser at any time after the completion of the Server installation.
1 Complete the PlateSpin Server installation. See “Installing the PlateSpin Server” on page 20.
2 Make sure your intended PlateSpin Migrate Client host meets the minimum system requirements. See “System Requirements for PlateSpin Migrate Client” on page 11.
3 On your intended PlateSpin Migrate Client host, open a Web browser and navigate to the following URL:http://server_host/platespinmigrateReplace server_host with the actual name or IP address of your PlateSpin Server host. If the PlateSpin Server is installed on the local computer, replace server_host with localhost. If SSL is enabled, use the https protocol in the URL.The browser loads the PlateSpin Server’s home page.
4 Click the PlateSpin Migrate Client download link, download the PlateSpin Migrate Client software, and install it by following the on-screen instructions.
Starting the Client and Activating the LicenseTo start the client, click Start > Programs > PlateSpin Migrate > PlateSpin Migrate Client. When you install and launch the PlateSpin Migrate Client for the first time, the License Wizard opens and prompts you to activate your copy of the software. For help with product licensing, see “PlateSpin Migrate Product Licensing ” in the PlateSpin Migrate 12.2 User Guide.
You can also use the PlateSpin Migrate Web Interface to activate the license. For more information, see the PlateSpin Migrate User Guide on the Documentation Website (https://www.netiq.com/documentation/platespin-migrate-12-2/).
22 Installing PlateSpin Migrate

1.4 Installing the PlateSpin Migrate Software Components Using a Batch FileTo silently install the PlateSpin Migrate Software Components:
1 From NetIQ Downloads (https://dl.netiq.com/), download the PlateSpinMigrateSetup-12.X.X.X.exe installation program and save it on your intended PlateSpin Server host where you have installed and configured the prerequisite operating system and applications. See Section 1.2, “Installing Prerequisite Software,” on page 13.
2 Double-click the PlateSpinMigrateSetup-12.x.x.x.exe and extract the contents to a folder of your preference, such as C:\Install\.
IMPORTANT: Do not extract the contents of the .exe file to the default folder.
3 After the files are extracted, click Cancel to exit the installation wizard.4 Depending on your desired installation type, copy and paste one of the following scripts to a
batch file and execute the batch file after modifying the installation path as applicable. For a local Microsoft SQL Server Express Edition database:
C:\Migrate-12.2.0.X\PlateSpinImage\ServerInstall\setup.exe /s /v/qn /v"/l*v c:\install.log" ^/v"DBINSTALLTYPE=customerinstall" ^ /v"IS_SQLSERVER_SERVER=(local)\PLATESPINDB" ^/v"IS_SQLSERVER_AUTHENTICATION=1" ^/v"IS_SQLSERVER_PASSWORD=pwd"
For a remote Microsoft SQL Server Express database:C:\Migrate-12.2.0.X\PlateSpinImage\ServerInstall\setup.exe /s /v/qn /v"/l*v c:\install.log" ^/v"INSTALLDIR=c:\Migrate" ^/v"DBINSTALLTYPE=remotedb" ^/v"IS_SQLSERVER_SERVER=BM7W2K12SQL\BM8INSTANCE,59977" ^/v"IS_SQLSERVER_AUTHENTICATION=0" ^/v"IS_SQLSERVER_USERNAME= domain\sqladminUser " ^/v"IS_SQLSERVER_USER_USERNAME= domain\sqlServiceUser " ^/v"IS_SQLSERVER_USER_PASSWORD=pwd"
Property Definition
DBINSTALLTYPE Specifies the database install type:
For an embedded database: customerInstall
For a remote database: remotedb
INSTALLDIR Specifies the installation directory. For example: C:\Program Files\PlateSpin Migrate Server
IS_SQLSERVER_AUTHENTICATION Specifies the authentication method to be used:
For Windows authentication: 0
For SQL authentication: 1
Installing PlateSpin Migrate 23
1.5 Checking for Software UpdatesWhen the PlateSpin Migrate Client starts, it automatically checks the current version of the product and displays any available updates in the Update Availability dialog box.
To prevent the system from automatically checking for updates every time:
1 In the Update Availability dialog box, select the Do not check for update at startup option.2 Click OK.
To re-enable automatic software update checks:
1 In the PlateSpin Migrate Client, click Tools > Options.2 In the General tab, select Restore Defaults.3 Click OK.
To manually check for version updates:
1 In the PlateSpin Migrate Client, click Help > Check for Update.The system checks the current version of the product and shows updates if they are available. To download a specific software update or hotfix, follow the provided URL.
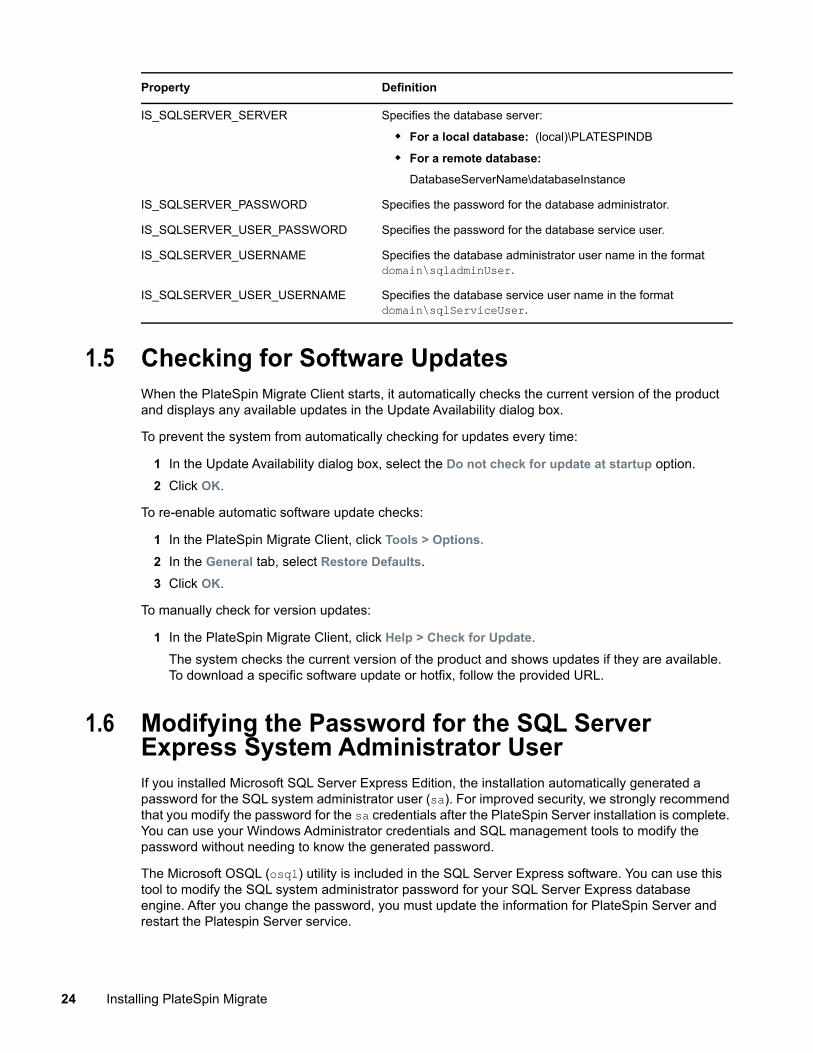
1.6 Modifying the Password for the SQL Server Express System Administrator UserIf you installed Microsoft SQL Server Express Edition, the installation automatically generated a password for the SQL system administrator user (sa). For improved security, we strongly recommend that you modify the password for the sa credentials after the PlateSpin Server installation is complete. You can use your Windows Administrator credentials and SQL management tools to modify the password without needing to know the generated password.
The Microsoft OSQL (osql) utility is included in the SQL Server Express software. You can use this tool to modify the SQL system administrator password for your SQL Server Express database engine. After you change the password, you must update the information for PlateSpin Server and restart the Platespin Server service.
IS_SQLSERVER_SERVER Specifies the database server:
For a local database: (local)\PLATESPINDB
For a remote database: DatabaseServerName\databaseInstance
IS_SQLSERVER_PASSWORD Specifies the password for the database administrator.
IS_SQLSERVER_USER_PASSWORD Specifies the password for the database service user.
IS_SQLSERVER_USERNAME Specifies the database administrator user name in the format domain\sqladminUser.
IS_SQLSERVER_USER_USERNAME Specifies the database service user name in the format domain\sqlServiceUser.
Property Definition
24 Installing PlateSpin Migrate
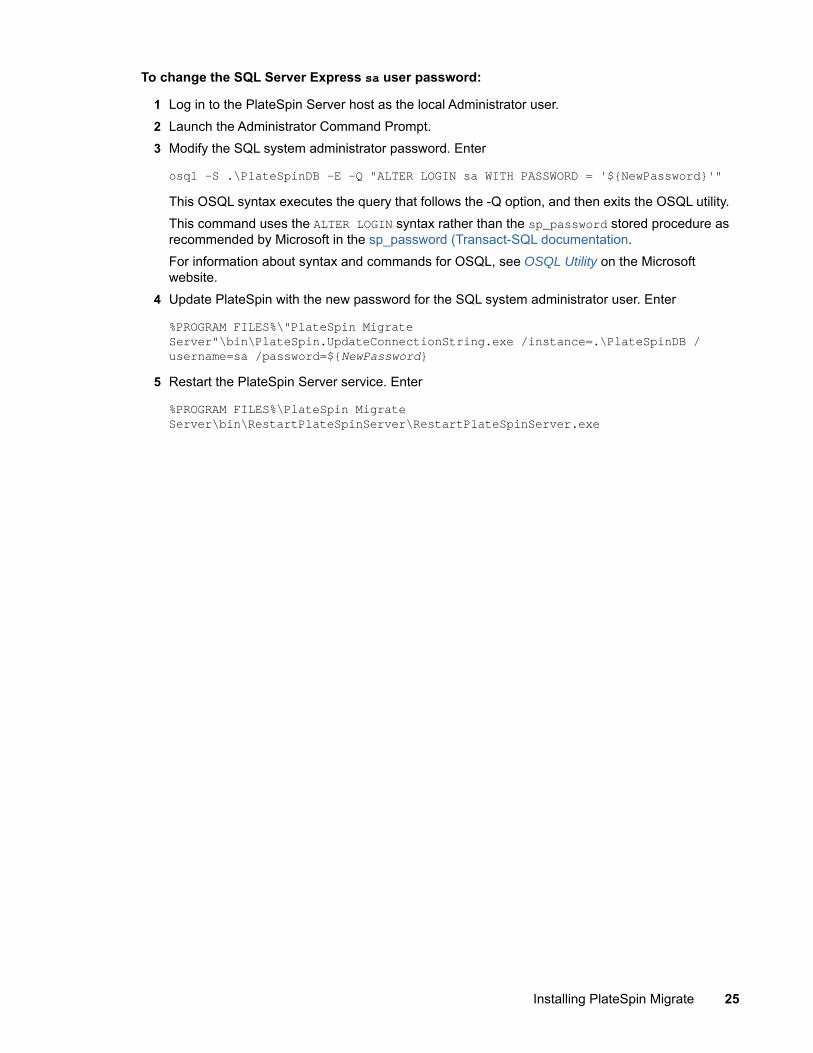
To change the SQL Server Express sa user password:
1 Log in to the PlateSpin Server host as the local Administrator user.2 Launch the Administrator Command Prompt.3 Modify the SQL system administrator password. Enter
osql -S .\PlateSpinDB -E -Q "ALTER LOGIN sa WITH PASSWORD = '${NewPassword}'"This OSQL syntax executes the query that follows the -Q option, and then exits the OSQL utility. This command uses the ALTER LOGIN syntax rather than the sp_password stored procedure as recommended by Microsoft in the sp_password (Transact-SQL documentation. For information about syntax and commands for OSQL, see OSQL Utility on the Microsoft website.
4 Update PlateSpin with the new password for the SQL system administrator user. Enter
%PROGRAM FILES%\"PlateSpin Migrate Server"\bin\PlateSpin.UpdateConnectionString.exe /instance=.\PlateSpinDB /username=sa /password=${NewPassword}
5 Restart the PlateSpin Server service. Enter
%PROGRAM FILES%\PlateSpin Migrate Server\bin\RestartPlateSpinServer\RestartPlateSpinServer.exe
Installing PlateSpin Migrate 25

26 Installing PlateSpin Migrate

2 2Troubleshooting Installation Problems
Section 2.1, “Common Installation Issues and Solutions,” on page 27 Section 2.2, “Knowledgebase Articles about Installation Troubleshooting,” on page 28 Section 2.3, “Removing PlateSpin Software,” on page 28
2.1 Common Installation Issues and Solutions
Problems or Messages Solutions
An unexpected error occurs when trying to install the PlateSpin Server to a non-default location
When you install the PlateSpin Server in a non-default directory, you must also grant the ASP.NET user account full access to that directory. For example, if you want to install the server in D:\PM_9, you must make sure that the ASP.NET user account has full access to D:\PM_9.
HTTP 403 Error PlateSpin Migrate uses ASP.NET for its Web services. If ASP.NET is not installed on the server, the Web services do not function correctly, and the installation fails with this error.
ASP.NET is included as part of the .NET Framework. When you install the .NET Framework, IIS must already be installed on the server for ASP.NET to be configured. If the .NET Framework was installed prior to IIS, simply uninstall and reinstall the .NET Framework.
Cannot connect to IIS with http or https...
During installation, an error message appears indicating that PlateSpin Migrate cannot connect to IIS with HTTP or HTTPS, when Setup attempted to connect with the existing IIS Server. The cause of this error generally indicates a problem with the IIS Server.
Ensure that IIS and ASP.NET are installed properly. See KB Article 7920595 (https://www.netiq.com/support/kb/doc.php?id=7920595).
To ensure that ASP.NET is properly registered with IIS, run the following command:
"C:\WINDOWS\Microsoft.NET\Framework\v2.0.50727\aspnet_regiis.exe" -i
If the above steps do not resolve the issue, refer to the detailed instructions for reinstalling IIS and configuring IIS for isolation mode in KB Article 7920710 (https://www.netiq.com/support/kb/doc.php?id=7920710).
Troubleshooting Installation Problems 27

2.2 Knowledgebase Articles about Installation Troubleshooting
2.3 Removing PlateSpin SoftwareThe procedure below outlines the required steps for uninstalling the software components of PlateSpin Migrate and performing an optional manual cleanup. This might be necessary when upgrading or recovering from problems with a previous installation.
For information on a post-migration cleanup of source workloads, see “Post-migration Cleanup of Source Workloads” in the PlateSpin Migrate 12.2 User Guide.
NOTE: This procedure does not remove license information from the server.
1 Use the Windows Control Panel to uninstall the PlateSpin Migrate Client.2 Use the Windows Control Panel to uninstall the PlateSpin Server.3 (Optional) If you opted to install the local database server from within the PlateSpin Migrate
installation program and if you no longer need it, use the Windows Control Panel to uninstall Microsoft SQL Server 2014 Express Edition.
4 Ensure that the program directories of PlateSpin Migrate components were removed:4a Make sure the PlateSpin Server home directory was removed:
..\PlateSpin Migrate Server4b Make sure the PlateSpin Migrate Client home directory was removed:
..\PlateSpin Migrate Client4c (Optional) If you installed a local Microsoft SQL Server 2014 Express Edition database
server and if you chose to uninstall it, remove the directory:..\Program Files\Microsoft SQL Server
WARNING: Do not delete the SQL directory if you have another SQL server installed on the PlateSpin Migrate server host.
Installing PlateSpin Migrate on a computer that has other applications running on IIS
This can cause problems during and after installation. If possible, avoid installing the product on a computer that has other applications running on IIS.
Problems or Messages Solutions
ID Description
7920710 (https://www.netiq.com/support/kb/doc.php?id=7920710)
ERRMSG: Install Error: Cannot connect to IIS with http or https...
7920718 (https://www.netiq.com/support/kb/doc.php?id=7920718)
INFO: IIS and NTFS Permissions requirements for PlateSpin Migrate
7920595 (https://www.netiq.com/support/kb/doc.php?id=7920595)
INFO: Installing IIS and ASP.NET v2.0
28 Troubleshooting Installation Problems
5 Open IIS Manager and ensure that the ofxweb and PlateSpinMigrate virtual directories are deleted.
6 Reboot the host.
Troubleshooting Installation Problems 29

30 Troubleshooting Installation Problems
3 3Upgrading PlateSpin Migrate
To upgrade your PlateSpin Server to PlateSpin Migrate 12.2, you must have an existing installation of PlateSpin Migrate 12.1 or PlateSpin Migrate 12.1 Patch Update 1 (P1). Other direct upgrades are not supported.
IMPORTANT: Before upgrading:
Run Diagnostics to generate detailed diagnostic reports on jobs executed before upgrade. Post upgrading, the diagnostics reports are not available for jobs that you executed before upgrading.
Close the Migrate Client.
Section 3.1, “Prerequisites for Upgrade,” on page 31 Section 3.2, “Upgrading Migrate,” on page 32
3.1 Prerequisites for UpgradeBefore an upgrade, prepare your environment for the backup and import of data.
Section 3.1.1, “Backing Up Your Database Files Before Upgrade,” on page 31 Section 3.1.2, “Backing Up Your Custom Linux blkwatch Drivers Before Upgrade,” on page 32
3.1.1 Backing Up Your Database Files Before UpgradeDuring the upgrade, the PlateSpin Migrate installation program transparently exports data from your existing database and re-imports it into a new database instance as required. However, as an additional measure of precaution, consider backing up your data prior to the upgrade.
1 On your server host, stop MS SQL services: 1a On the Start menu, click Run, type services.msc, then click OK.1b In the Services window, right-click the SQL Server items, then select Stop.
2 Copy all *.mdf and *.ldf files to a location outside the product installation directory. The default location of these files is:\Program Files\PlateSpin Migrate Server\Database
3 Restart MS SQL services that you stopped in Step 1.
Proceed with the upgrade, as detailed in “Upgrading Migrate” on page 32.
Upgrading PlateSpin Migrate 31
3.1.2 Backing Up Your Custom Linux blkwatch Drivers Before UpgradeDuring the upgrade, the PlateSpin Migrate installation program will overwrite custom Linux blkwatch drivers that you previously added to PlateSpin Migrate. Consider saving a copy of your custom Linux blkwatch drivers prior to the upgrade.
1 Log in to the PlateSpin Migrate Server host machine as the Administrator user.2 Navigate to the PlateSpin application's installation directory, such as C:\Program
Files\PlateSpin Migrate Server\.3 Open the .\Packages\9D470BFF-E30F-4015-83D8-4D308A8C8B1B\ folder and copy the
1.package file out of this folder to a temporary directory.4 Rename 1.package with the .zip file extension (1.zip), then extract the contents of the file to
this temporary directory.5 Save your CustomKernel* content to another temporary location.
Proceed with the upgrade, as detailed in “Upgrading Migrate” on page 32.
After the upgrade, you should upload again any custom Linux blkwatch drivers you need for future migrations. See KB Article 7005873 (https://www.netiq.com/support/kb/doc.php?id=7005873).
3.2 Upgrading Migrate1 Back up your data.
See “Backing Up Your Database Files Before Upgrade” on page 31.2 Use the Windows Control Panel to uninstall your client application, the PlateSpin Migrate Client.3 On your server host, start the PlateSpinMigrateSetup-12.X.X.X.exe installation program.4 Click Install Server and follow the on-screen instructions. When you are prompted to specify a
database instance, point the installation program to your existing database instance.5 Install the current version of the PlateSpin Migrate Client.
See “Installing the PlateSpin Migrate Client” on page 22.6 (Optional) After the upgrade, you should upload again any custom Linux blkwatch drivers you
need for future migrations. See KB Article 7005873 (https://www.netiq.com/support/kb/doc.php?id=7005873).See also “Backing Up Your Custom Linux blkwatch Drivers Before Upgrade” on page 32.
32 Upgrading PlateSpin Migrate

A ADocumentation Updates
This section contains information on documentation content changes that were made in the English version of the PlateSpin Migrate Installation and Upgrade Guide since the General Availability of PlateSpin Migrate 12.2.
Section A.1, “February 2018,” on page 33
A.1 February 2018
Location Update
Section 1.3.2, “Installing the Database Server,” on page 20
NOTE: The SQL administrator password is generated during the installation of Microsoft SQL Server Express Edition. Keep the default sa credentials throughout the PlateSpin Migrate Server and PlateSpin Migrate Client installation. After the PlateSpin installation is complete, you can modify the SQL administrator password. For information about how to change the password, contact Micro Focus Technical Support.
Section 1.6, “Modifying the Password for the SQL Server Express System Administrator User,” on page 24
This section is new.
Section 3.1.2, “Backing Up Your Custom Linux blkwatch Drivers Before Upgrade,” on page 32
This section is new.
Section 3.2, “Upgrading Migrate,” on page 32 Added a step to optionally upload the custom Linux blkwatch drivers that you backed up for the Migrate server.
Section 3.2, “Upgrading Migrate,” on page 32 Removed an optional step to manually update any remote hosts running PlateSpin Image Server software. This step is not needed for PlateSpin Migrate 12. and later.
Documentation Updates 33

34 Documentation Updates