pn4 cardholder manual 2014 0530 - umsl college of … delta... · · 2017-01-03cardholder manual...
TRANSCRIPT
1
PaymentNet 4
Cardholder Manual
FINANCE SUPPORT CENTER
MU, UMSYS, & UOEXT: 882-3201 Missouri S&T: 341-4266 (877-752-1117 after hours) UMKC: 235-1371 UMSL: 516-5366 Hospital & Clinics: 884-1234 Toll Free All Campuses: 877-752-3334
Email: [email protected] http://www.umsystem.edu/ums/fa/finance-support-center
PURCHASING CARD CONSULTANTS
http://www.umsystem.edu/ums/fa/procurement/card/policy#contacts
P-CARD EMAIL

2
TABLE OF CONTENTS
TOPIC DESCRIPTION PAGE Introduction & Technical Specs 3 Special Note: Saving Your Changes
Special Note: Timing Out 4
1. Logging Into PaymentNet 5 JPMorgan Access Emails 6 First Time Login Setup 6 Special Note: Computer Registration 7
2. The Home Page 8 3. Transaction List 9 4. Transaction Detail 11
Special Note: Using Edit Complete to Control Export 13 5. Adding Lines (Split-funding) 16 6. Disputing 18 7. Mass Update Requests 20 8. Creating Queries 22
Saving Queries & Setting a New Default 25 9. Authorizations and Declines 26 10. Reports 27
Statement of Account - PeopleSoft 28 Available Downloads 28 Saving Reports and Accessing Them Later 29 Scheduling Reports to Run Automatically 30
11. My Profile 31 Special Note: Changing Your Password 34
Glossary of Terms 35 Appendix A: Transactions Requiring Special Documentation 38 Appendix B: Useful Queries and Reports 40 Appendix C: Reports List 44
30 May 2014
1600
3
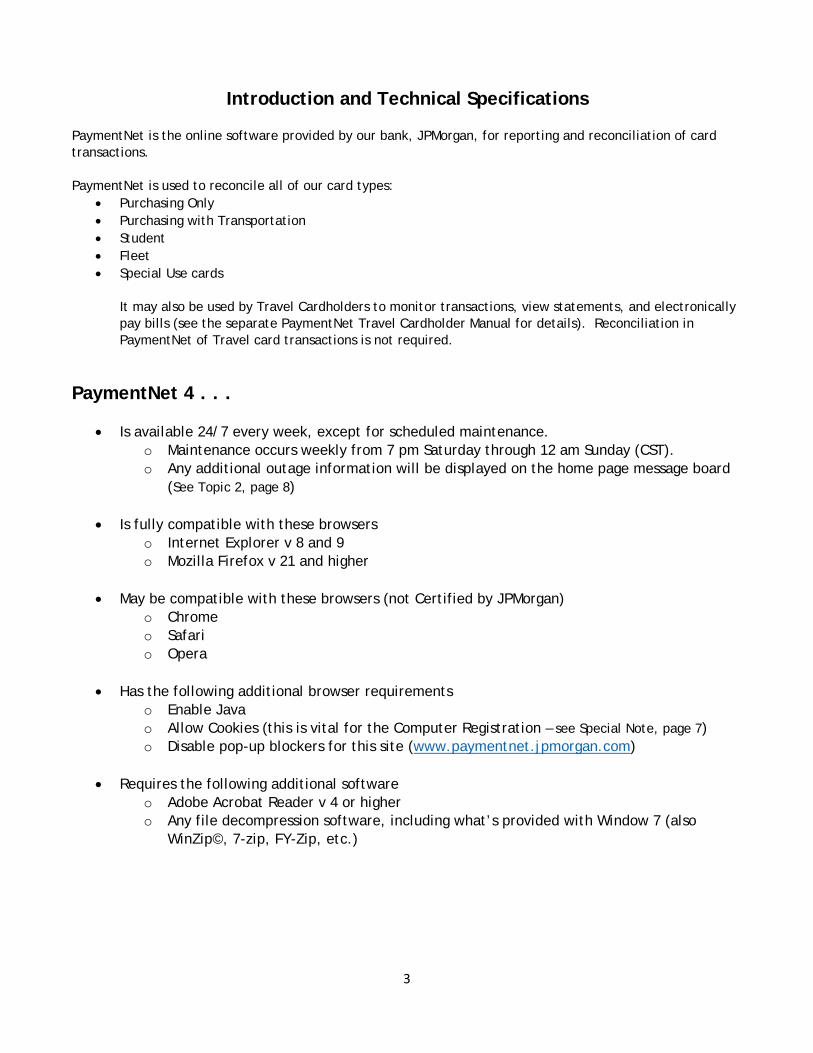
Introduction and Technical Specifications PaymentNet is the online software provided by our bank, JPMorgan, for reporting and reconciliation of card transactions. PaymentNet is used to reconcile all of our card types:
Purchasing Only Purchasing with Transportation Student Fleet Special Use cards
It may also be used by Travel Cardholders to monitor transactions, view statements, and electronically pay bills (see the separate PaymentNet Travel Cardholder Manual for details). Reconciliation in PaymentNet of Travel card transactions is not required.
PaymentNet 4 . . .
Is available 24/7 every week, except for scheduled maintenance. o Maintenance occurs weekly from 7 pm Saturday through 12 am Sunday (CST). o Any additional outage information will be displayed on the home page message board
(See Topic 2, page 8)
Is fully compatible with these browsers o Internet Explorer v 8 and 9 o Mozilla Firefox v 21 and higher
May be compatible with these browsers (not Certified by JPMorgan)
o Chrome o Safari o Opera
Has the following additional browser requirements
o Enable Java o Allow Cookies (this is vital for the Computer Registration – see Special Note, page 7) o Disable pop-up blockers for this site (www.paymentnet.jpmorgan.com)
Requires the following additional software
o Adobe Acrobat Reader v 4 or higher o Any file decompression software, including what’s provided with Window 7 (also
WinZip©, 7-zip, FY-Zip, etc.)

4
SAVE THOSE CHANGES!
PaymentNet 4 will not automatically save changes you make to your transactions. Further, it will not
warn you that you have unsaved data when you navigate between transactions, tabs, or pages.
Be sure to use the Save buttons provided on each page if you have made any changes.
Successful Saves will be noted with a green message:
TIMING OUT PaymentNet 4 will time out after 15 minutes of inactivity. Once you have been inactive
for 12 minutes, a three (3) minute countdown will appear (displayed as 180 seconds) with
the option to remain logged in:
If you’ve been logged out while away from your computer or in another program,
PaymentNet lets you know when you return: Any error message will be noted with a red
message:
You will also be logged out after eight (8) hours of continuous PaymentNet use, at which
point you will need to repeat the login process if you have additional reconciliation to
perform.
Any error message will be noted with a red message:
5
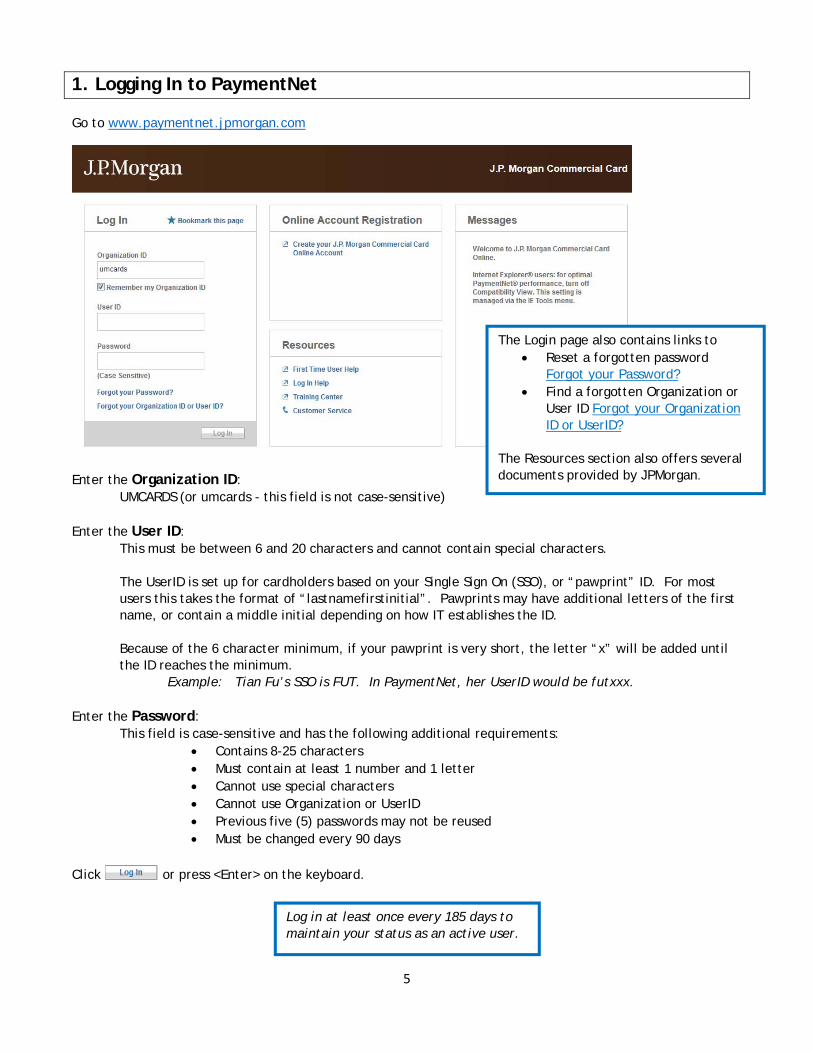
1. Logging In to PaymentNet Go to www.paymentnet.jpmorgan.com
Enter the Organization ID:
UMCARDS (or umcards - this field is not case-sensitive) Enter the User ID:
This must be between 6 and 20 characters and cannot contain special characters. The UserID is set up for cardholders based on your Single Sign On (SSO), or “pawprint” ID. For most users this takes the format of “lastnamefirstinitial”. Pawprints may have additional letters of the first name, or contain a middle initial depending on how IT establishes the ID.
Because of the 6 character minimum, if your pawprint is very short, the letter “x” will be added until the ID reaches the minimum.
Example: Tian Fu’s SSO is FUT. In PaymentNet, her UserID would be futxxx. Enter the Password: This field is case-sensitive and has the following additional requirements:
Contains 8-25 characters Must contain at least 1 number and 1 letter Cannot use special characters Cannot use Organization or UserID Previous five (5) passwords may not be reused Must be changed every 90 days
Click or press <Enter> on the keyboard.
Log in at least once every 185 days to maintain your status as an active user.
The Login page also contains links to Reset a forgotten password
Forgot your Password? Find a forgotten Organization or
User ID Forgot your Organization ID or UserID?
The Resources section also offers several documents provided by JPMorgan.

6
JPMorgan Access Emails When you are initially granted access to PaymentNet, JPMorgan will send two (2) emails containing login information. These emails will have the following Subject lines and contents.
Subject: PaymentNet(R) User ID (Reference # xxxxxxxx)
Organization ID: UMCARDS UserID: <your UserID> Temporary Password: Refer to the email titled PaymentNet(R) Temporary Password
Link to PaymentNet: https://www.paymentnet.jpmorgan.com/
Subject: PaymentNet(R) Temporary Password (Reference # xxxxxxxx) Organization ID: UMCARDS UserID: Refer to the email titled PaymentNet(R) UserID Temporary Password: <your initial password> (case sensitive)
Link to PaymentNet: https://www.paymentnet.jpmorgan.com/
Log in with the information provided to you in the above pair of emails. Be sure to type your initial password exactly, as the field is case-sensitive and any errors will prevent successful login. If desired, COPY the password from the email and PASTE into the password field on the login screen. This password will only work once and PaymentNet will require that you change it. First Time Login Setup Once you have successfully logged in the first time, you will be guided through several pages as part of your first time setup.
1. Create Password: Create and confirm a new password, and click Next o Contains 8-25 characters o Must contain at least 1 number and 1 letter o Cannot use special characters o Cannot use Organization or UserID o Previous five (5) passwords may not be used
2. Confirm Email: Confirm your email address by reentering it, and click Save 3. Set Security Questions: Answer at least three questions (preferably all five), and click Next
o You must answer at least three questions to activate the Save button o Answers may be up to 30 characters o Uppercase and lowercase may be used, but responses are not case-sensitive o Spaces may be used and count as characters. Be sure to remember the spaces when answering
security questions in the future. o A Question/Answer confirmation page will display. Click Edit to change your answers, or click
Next 4. Register Computer: Click Next (See Special Note: Computer Registration, page 7) 5. Setup Complete should display. Click Get Started to continue into PaymentNet.

7
COMPUTER REGISTRATION This registration associates specific computers to specific users and helps to keep your card data safe by preventing unauthorized users from accessing PaymentNet. The initial registration of your computer takes place as part of the First Time Login Setup. If you need to access your account from a different, unrecognized computer, PaymentNet will prompt you for an Access Code (Click ) which will be delivered only to the user’s email address on record within PaymentNet. Once this Access code and log in credentials are used (Click ), login is complete and you will be able to use multiple computers.
Access codes are valid only for five (5) days. If multiple codes are requested, only the most recent code is valid. Please Note: This registration is “cookie” based. If you have a need to clear your browser’s cache, be sure to uncheck the “Clear Cookies” box. If cookies are cleared, the computer registration must be repeated.

8
2. The Home Page When you have successfully logged in, the PaymentNet home page will display:
Menu Bar - Includes the PaymentNet modules you can access
Transactions: Access and manipulate your transactions here – review, adjust or split fund (MoCode & PS Account), add documentation, dispute, check authorizations and declines real time. Reports: Run, schedule, download, and delete reports. Payments: Does Not Apply to Purchasing Cards (Travel Card ONLY) Help: Access online documentation and help topics published by JPMorgan
Icons – Includes shortcuts to basic user interface options
Home Page : Returns you at any time to the home page Contact Information : Displays the contact information specific to your campus, including Hotline phone number, Hotline email, and P-card consultant information My Profile : View and change profile information including email notification options, screen view settings, reset your password, and view your account information. (See Topic 11, page 31).
Logout : Securely end your PaymentNet session Messages – Will include notifications from
JPMorgan: details regarding outages for maintenance, issues affecting performance, or delays in the posting of transactions Procurement Operations: information about billing cycle end date, due date for reconciliation of transactions and statements, transaction export dates, and any other information Operations may need to communicate to PaymentNet users.
Items Awaiting Your Action – Includes quick links to access
Transactions for Review: takes you directly to transactions waiting to be reviewed Files for Download: displays how many, if any, files are available for download. Note that this count will not go down until files are deleted or expire (See Topic 10, page 28).
Alerts – although this box displays, currently there are no alerts displayed here for the Cardholder role.
The home page consists of the menu bar, icons, messages, items for action, and alerts.

9
3. Transaction List
To view your Transaction List, choose Transactions > Manage. This will display the system’s default of “Last 30 days” relative to the day you are accessing PaymentNet.
This default query view of “Last 30 days” can be changed by each individual PaymentNet user. (See Topic 8, page 25) Transaction List Basics
Unless overridden manually, the default sort on the List is descending by Post Date. This means the newest transactions will appear at the top of the list.
Sort by clicking on any column header that is underlined. You can sort only by one column at a time, and can toggle the sort by clicking the header again.
Example: Click once and transactions are sorted from smallest to largest. Click a second time and the order changes from largest to smallest.
The default setting displays 20 transactions per page. This can be increased up to 100 lines per page (See Topic 11, Page 32)
Navigate to additional pages by using the page dropdown or arrows that appear in the top and
bottom right of your Transaction List. A minimal number of columns has been selected to appear in your Transaction List. You may add
additional column information, or change the display order of the fields. (See Topic 11, Page 32)
The Transactions Module contains all transaction information for your account(s) and allows you to reconcile (edit funding, add documentation, dispute, change status boxes), perform Mass Updates (reconciling multiple transactions simultaneously), view your real-time authorizations and declines, and run queries to easily find specific transactions. Note: Statements in the Transactions module refers only to Travel Card statements. This is NOT your Statement of Account - PeopleSoft.

10
Scroll bars will appear at the bottom of the page to scroll right and left, and along the right edge to scroll up and down.
A Quick Query option is available at upper right and may be used to search a limited number of fields. Select from the dropdown and enter a value (complete or partial words, not case-sensitive).
Transactions that have successfully been fed to PeopleSoft are marked as Exported . Once
Exported, the Chart of Account (COA) information is locked and cannot be edited. (See Topic 4, page 12).
Other informational icons may appear on the Transaction list, including Addendum Detail, Dispute Status, Compliance Monitor Flags, and Mass Update icons. Addendum Detail Icons Additional Icons
Airline Addendum Icon Dispute Initiated Icon
Car Rental Addendum Icon Dispute in Process Icon
Fuel Addendum Icon Dispute Resolved Icon
Lodging Addendum Icon Compliance Monitor Flag
Purchase Addendum Icon Mass Update Icon
Shipping Services Addendum Icon
Temporary Services Addendum Icon
Multiple icons may be seen on A single transaction simultaneously.
Addendum Detail: This information originates with the merchant – cardholders do not enter this detail. It can be very useful as part of the reconciliation and documentation of transactions. Information can be viewed by clicking on the icon, or by viewing the Addendum tab (See Topic 4, page 14). Compliance Monitor: Transactions flagged by this program will display a red flag. The program may flag valid business purchases and all flagged transactions are part of monthly audits.
If documentation is not recorded in Transaction Detail, you may be contacted by Procurement Operations to provide an explanation of the purpose of the flagged transactions or what caused the pattern of charges.

11
4. Transaction Detail From the Transaction List, click on a transaction to access the Transaction Detail page. This is where you perform the following:
General Information Tab o Reconcile the transaction
Ensure accurate funding via MoCode and PS Account, including adding lines (split-funding)
Document via Job Number, Comments, Transaction Notes Flag by Custom Fields Mark as Edit Complete (optional) View Export status
o Dispute the transaction Addendum Tab - View Addendum detail, if passed by the merchant History Tab - View the log of who made what changes and when.
Move between Transaction Detail pages by using the navigation options in the upper right corner
These links take you to the First transaction, the Previous transaction, the Next transaction, and the Last transaction. Note that how you have your List sorted will affect this navigation. In the middle is a read-only indicator of your progress through your current list.
Example: Above we are viewing the 7th of 29 transactions.
To return to the Transaction List
at any time, click the link
12
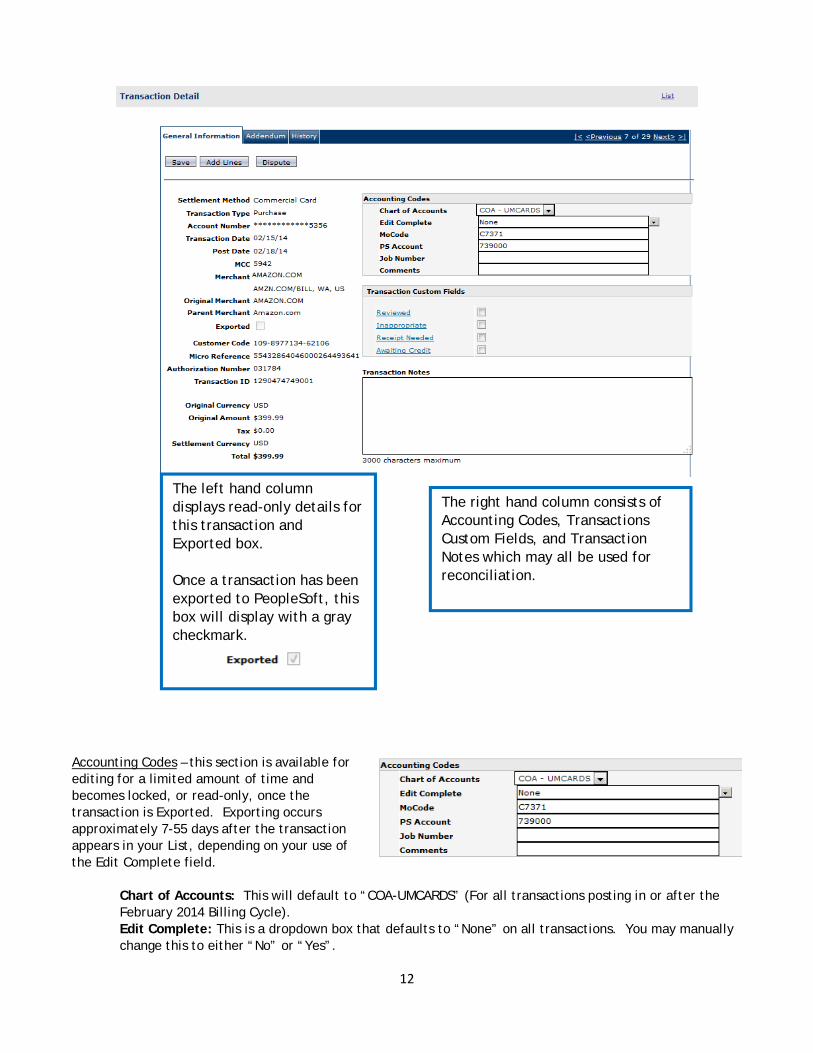
Accounting Codes – this section is available for editing for a limited amount of time and becomes locked, or read-only, once the transaction is Exported. Exporting occurs approximately 7-55 days after the transaction appears in your List, depending on your use of the Edit Complete field.
Chart of Accounts: This will default to “COA-UMCARDS” (For all transactions posting in or after the February 2014 Billing Cycle). Edit Complete: This is a dropdown box that defaults to “None” on all transactions. You may manually change this to either “No” or “Yes”.
The left hand column displays read-only details for this transaction and Exported box. Once a transaction has been exported to PeopleSoft, this box will display with a gray checkmark.
The right hand column consists of Accounting Codes, Transactions Custom Fields, and Transaction Notes which may all be used for reconciliation.

13
MoCode: This is the MoCode that will be assigned when the transaction is Exported. PS Account: This is the PeopleSoft Account that will be assigned when the transaction is Exported. Job Number: This is one of three fields available for documentation.
Accepts letters, numbers, and special characters other than comma (,) and vertical bar (|) Maximum of 15 characters Prints on the Statement of Account - PeopleSoft Locked when Exported
Comments: This is one of three fields available for documentation. Accepts letters , numbers, and special characters other than comma (,) and vertical bar (|) Maximum of 50 characters Prints on the Statement of Account - PeopleSoft Locked when Exported
Transaction Custom Fields - this section is available for editing for two (2) years (the total time a transaction is viewable in PaymentNet). These boxes may be checked and unchecked even after the transaction has been Exported.
Reviewed: This box may be used to indicate the transaction has been reviewed or edited. Inappropriate: This box may be used to indicate a prohibited or personal transaction on the purchasing card. Receipt Needed: This box may be used to indicate when a receipt is missing or has been lost and a duplicate receipt is needed. Awaiting Credit: This box may be used to indicate when a credit, partial or full, is pending on the transaction.
Using Edit Complete to Control Export If you have transactions that, for any reason, you would like to Export to PeopleSoft early, choose Yes on the Edit Complete dropdown.
Transactions that have Edit Complete = Yes will be picked up every week and Exported. Transactions that have Edit Complete = None (or No) will be picked up for Export
between the 15th and 20th of the month following the end of the Billing Cycle.
Notes: This is an optional field and may be used when a department wishes to see card transaction data in the General Ledger sooner than the monthly export. It is not required to change this field to Yes. See Messages on the Home page (See Topic 2, page 8) for information on when these Exports will take place.

14
Transaction Notes - this field is available for editing for two (2) years (the total time a transactions is viewable in PaymentNet). This is one of three fields available for documentation.
Accepts letters, numbers, and all special characters Maximum of 3000 characters (countdown of remaining characters displays under field) Does not print on the Statement of Account - PeopleSoft Available for editing for two (2) years
o Note: if changes are made to this field AFTER transactions are exported, the revised Notes are not reflected in the Data Warehouse in WebApps.
Remember: before navigating to another tab, transaction, or back to the List. Access the Addendum tab to view the additional information passed electronically by some merchants.
Examples of information that may be displayed here: Airline - view the name of the traveler (passenger). The origin and destination cities for the flight will be included as well. Car Rental – view the name of the driver Fuel – view the price per gallon and number of gallons purchased Purchase - view an electronic list of purchases Shipping – view the tracking number

15
Note that ALL Transaction Detail pages will include the Addendum tab. If the merchant does not pass this information, the Product Code, Item Description, etc., will be blank. Access the History tab on the Transaction Detail page to view a log of changes made to the transaction. PaymentNet displays a log of the last twenty (20) changes performed on this transaction including:
Date of change Time of change What field was changed The previous, or starting, value for that field The new, or ending, value for that field Who made the change
Changes you make today may not appear
on this list until the following day.

16
5. Adding Lines (Split-funding) There may be certain transactions that need to have multiple funding lines assigned to them
Same MoCode but different PS Accounts Different MoCodes but same PS Accounts MoCode and PS Account may be unique to each line of the split
To initiate a split, click at the top of the Transaction Detail page. You will immediately be prompted to select the number of lines. Enter the desired number and click
Note: There is no limit to the number of lines that may be added. Keep in mind, however, that higher numbers of lines may create a performance delay (i.e. it will take some time for PaymentNet to create the lines on the screen).
The chosen number of lines will appear at the bottom of the page. The Transaction Notes field shifts to the upper right of the page.

17
Add Lines (Split-funding) Basics
Use the triangle by the Item number to edit the Chart of Accounts o Each field may be edited independently by line o The MoCode and PS Account values will be whatever was on the Transaction before
initiating the split. You may split lines by Quantity (# of Units), Cost (Unit Price), or Percent (%) Start with Item 1 and edit from top to bottom for the best results. As you move from one line to
the next, PaymentNet will automatically make calculations. When you reach the final Item, Payment has already calculated the remainder and applied it to the line.
To remove a line, click To create additional lines, go to the last Item line and click
When finished, click
To undo the Add Line (or Split-funding), click This can be done even after the Transaction has been split, so long as the transaction has not been Exported.

18
6. Disputing
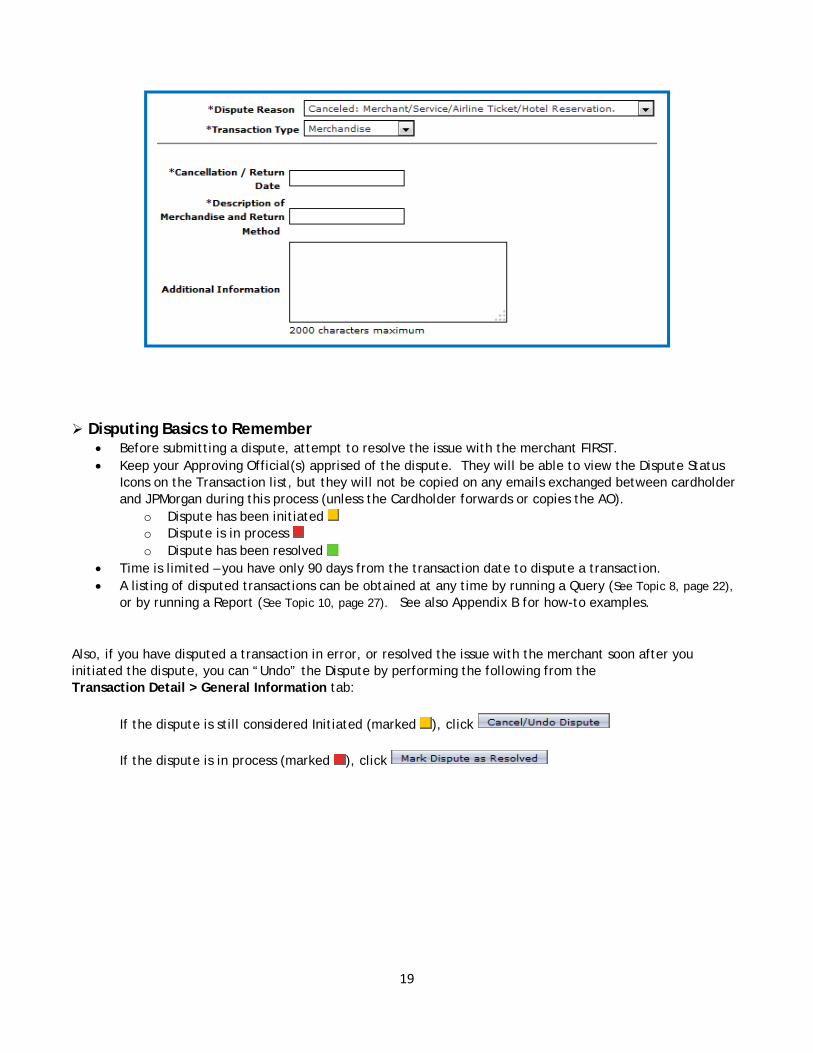
Click at the top of the Transaction Detail page. Confirm that your email address is correct. This will default to your email automatically so that JPMorgan has a record of who submitted the dispute. During the dispute process, JPMorgan will always communicate directly with the cardholder should they have questions or need additional information. Click the dropdown on Dispute Reason and choose from the list of available reasons.
If none of the reasons matches the given situation, choose Other at the bottom of the list. There will be additional fields, required, that will appear after you have selected a Dispute Reason. These will vary with the reason chosen. Examples:
19
Disputing Basics to Remember
Before submitting a dispute, attempt to resolve the issue with the merchant FIRST. Keep your Approving Official(s) apprised of the dispute. They will be able to view the Dispute Status
Icons on the Transaction list, but they will not be copied on any emails exchanged between cardholder and JPMorgan during this process (unless the Cardholder forwards or copies the AO).
o Dispute has been initiated o Dispute is in process o Dispute has been resolved
Time is limited – you have only 90 days from the transaction date to dispute a transaction. A listing of disputed transactions can be obtained at any time by running a Query (See Topic 8, page 22),
or by running a Report (See Topic 10, page 27). See also Appendix B for how-to examples. Also, if you have disputed a transaction in error, or resolved the issue with the merchant soon after you initiated the dispute, you can “Undo” the Dispute by performing the following from the Transaction Detail > General Information tab:
If the dispute is still considered Initiated (marked ), click
If the dispute is in process (marked ), click
20
7. Mass Update Requests If you have multiple transactions that need the same kind of edit applied to all – same change in MoCode or Account, checking the Reviewed box, etc – you may use the Mass Update process instead of editing one transaction at a time on the Transaction Detail page. To use this feature, start at the Transaction List
This may be from Transactions > Manage, or the list may be the results of a query for specific transactions from Transactions > Query (See Topic 8, page 22) Understand that the Mass Update process should only be used on transactions contained within a single page of the List. Your list defaults to 20 transactions, but may be increased to 100 transactions. (See Topic 11, page 32) Therefore a maximum of 100 transactions can be Mass Updated at one time. If you have more than 100 transactions, you can submit them in batches of up to 100 transactions each.
Additionally, you do not have to wait for one Mass Update batch to finish updating before submitting the next batch. You may submit one, and as soon as you receive confirmation that it has been submitted, initiate the process on your next Mass Update.
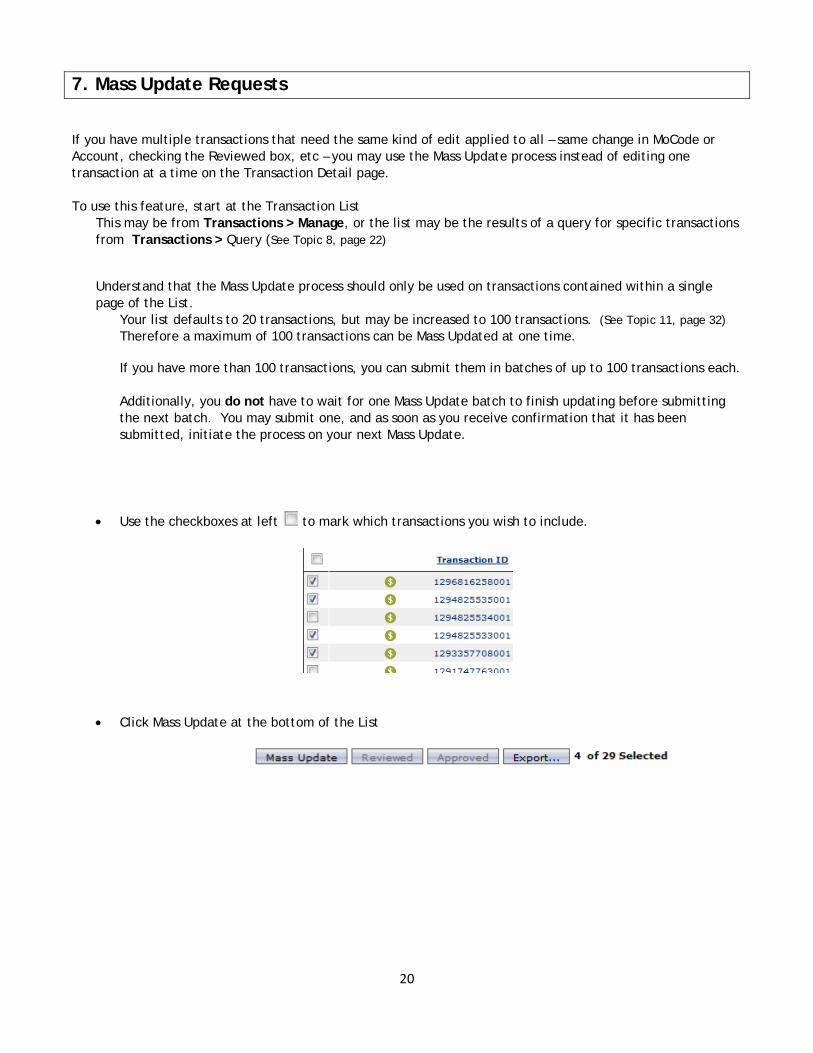
Use the checkboxes at left to mark which transactions you wish to include.
Click Mass Update at the bottom of the List
21
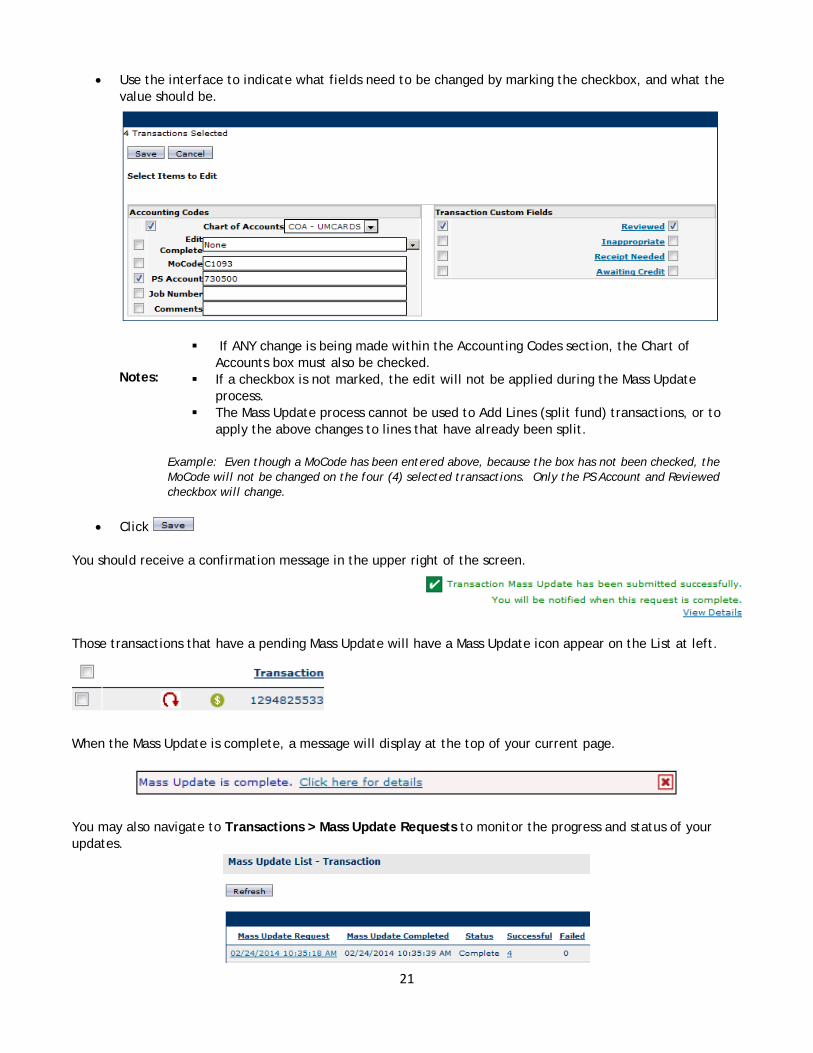
Use the interface to indicate what fields need to be changed by marking the checkbox, and what the value should be.
If ANY change is being made within the Accounting Codes section, the Chart of
Accounts box must also be checked. If a checkbox is not marked, the edit will not be applied during the Mass Update
process. The Mass Update process cannot be used to Add Lines (split fund) transactions, or to
apply the above changes to lines that have already been split.
Example: Even though a MoCode has been entered above, because the box has not been checked, the MoCode will not be changed on the four (4) selected transactions. Only the PS Account and Reviewed checkbox will change.
Click You should receive a confirmation message in the upper right of the screen. Those transactions that have a pending Mass Update will have a Mass Update icon appear on the List at left.
When the Mass Update is complete, a message will display at the top of your current page. You may also navigate to Transactions > Mass Update Requests to monitor the progress and status of your updates.
Notes:

22
8. Creating Queries Queries can be used to find a single transaction, or set of transactions, that match certain criteria. To create a query in PaymentNet, choose Transactions > Query.
For each section:
This section is required on all queries.
Choose a Field o Transaction Date – the date the transaction was authorized
Card physically swiped through a machine Card submitted in a web based form or shopping cart checkout Card keyed into machine by the merchant (phone or faxed orders)
o Post Date – the date the transaction appeared in your Transaction List, or “posted” to PaymentNet. (See Figure 1, page 26)
Choose an Operation o Cycle Is – use to search a specific Billing Cycle. Always be sure to use Post Date with this
Operation, as transactions that appear within a cycle are determined by Post Date, never Transaction Date.
o Is Between – use to search a specific range of dates. o Is Equal To – use to find transactions on one specific date. o Is Relative – use to search a set of transactions as they relate to “today”
Choose a Value – options are dependent on what has been chosen for Operation

23
Examples:
This section is optional on all queries.
Choose a Field o Contains a long list of options including transaction columns, flags, checkboxes, and statuses. o Listed in alphabetical order o Includes some criteria that do not apply to purchasing cards (but which we cannot remove from
the list). Choose an Operation – options are dependent on what has been chosen for Field
o Most fields offer Operations of: Begins With, Contains, Is Equal To, Is Not Equal To o Fields such as Transaction Amount and Transaction ID include Operations such as: Is Greater
Than, Is Greater Than or Equal To, Is Between, etc. Choose a Value – options are dependent on what has been chosen for Field and Operation
o Most Field/Operator combinations provide a freeform text box o Some combinations provide a checkbox to mark/unmark o Some combination provide a dropdown selection
To add additional criteria lines, click
There is no limit to the number of lines you may add. As you add lines, you will see options for “And” versus “Or” to the left of each line, giving you
additional control to refine your search. To remove existing criteria lines, click
This section is optional on all queries. Further, because cardholders have access ONLY to their own cards, the section does not need to be used in queries.
“Is Relative” (Query Default)
The “Period” is defined as Billing Cycle. When choosing Last Days, which is the Query default, you will have an additional field to indicate how many days.
“Is Equal”
“Is Between”
“Cycle Is”

24
This section is optional on all queries. It may be used, at the beginning of the process, to control how the query results will be sorted.
Advantages include: Sorting by multiple columns - remember sorting from the List is limited to one column at a time Sorting by columns that cannot otherwise be chosen from the List (such as Exported status)
When all sections have been set as desired, click to run the Query. The Transaction List will display the transactions that match your Query criteria. If no matching transactions were found, a blank list will appear. Note: If your Date Range includes a date range greater than 90 days, the following warning will appear as a pop-up warning:
Click OK to continue with your criteria, or Cancel to edit your criteria. Example:
Here is a query to find Amazon purchases of $100 or more that posted in the last 90 days. Results will be organized first by whether or not they have been Exported, and then from highest amount to lowest.
25
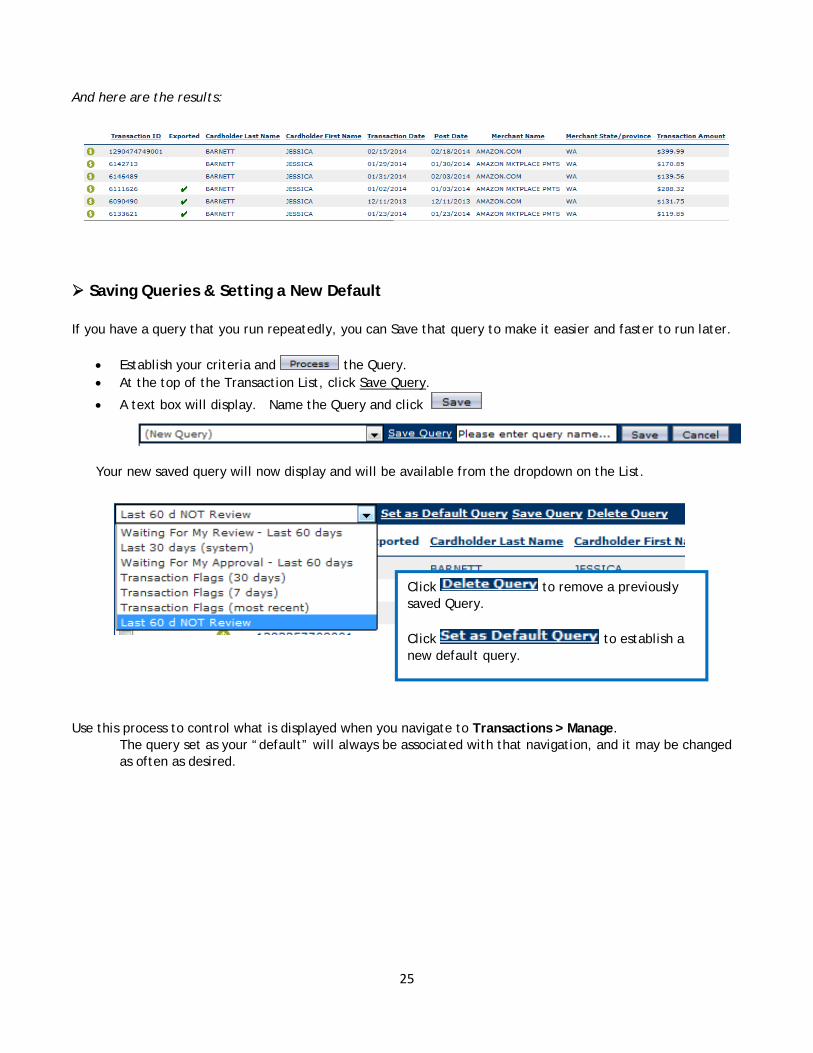
And here are the results:
Saving Queries & Setting a New Default If you have a query that you run repeatedly, you can Save that query to make it easier and faster to run later.
Establish your criteria and the Query. At the top of the Transaction List, click Save Query.
A text box will display. Name the Query and click
Your new saved query will now display and will be available from the dropdown on the List.
Use this process to control what is displayed when you navigate to Transactions > Manage.
The query set as your “default” will always be associated with that navigation, and it may be changed as often as desired.
Click to remove a previously saved Query. Click to establish a new default query.

26
9. Authorizations and Declines Cardholders may view their real-time authorizations and declines by navigating to Transactions > Authorizations/Declines. Details such as Amount, Date/Time, and Merchant Name/MCC will appear in a table format on this page.
A Type of “Authorization” indicates a successful transaction. The Number column includes the Authorization number assigned by MasterCard and the Reason will be “Approve”.
A Type of “Decline” indicates an unsuccessful transaction. Notice Number is blank because an Authorization was not granted. Reasons vary – contact the Hotline or p-card consultants if additional information is needed.
Note: JPMorgan is in the process of changing the way these reasons, and their numerical codes, display. When this information has been finalized and received from the bank, they will be included in a revision of this manual.
Transactions, whether Authorized or Declined, will typically be visible on this page for no more than five (5) business days. The Post Date is the date an authorized transaction moves from this page to the Transaction List. Half of all transactions post the following business day (See Figure 1 below).
To view the history of older declines, run the report “Declines” (See Appendix B, page 41)
Figure 1.
Approximately 95% of Transactions
post within 1‐4 business days after
authorization.
A small percentage post the same day
and a small percentage post 5 or more
days later. Keep this in mind when
making purchases mid‐June as we
approach Fiscal Year end.

27
10. Reports JPMorgan provides many reports that can be used to find certain transactions or summaries. To view or run these reports, navigate to Reports > Create. By default, ALL available report types will be displayed and are listed alphabetically.
If you wish to view only ONE type of report, make a selection from the Report Type dropdown. Cardholders have access to a select number of Account and Transaction based reports only.
To run a report, click on the Name of the report, which will appear as a hyperlink.
This will launch the Criteria page where you can select Dates and other fields, as well as choose the Report Format (Adobe PDF, MS Excel, CSV).
Note: Each report has its own “default” format, but this can be overridden by making a selection from the dropdown that appears in the upper right corner of the page.
Any report with the “- MS EXCEL” name tag will default to Excel since it has been optimized for that program.
Another option is for Comma Separated Value (CSV)
Navigate to additional pages by using the page dropdown or arrows that appear in the top and bottom right of the Report List. Use the scroll bar at right to view additional reports on the current page.

28
Example: Statement of Account - PeopleSoft
Locate the Report by scrolling down to Statement of Account - PeopleSoft Launch the report by clicking on
Click This will take you to the Available Downloads page automatically. You may also navigate to this page at any time by choosing Reports > Download
Click to update this page, or you may also use the browser’s refresh option.
Criteria Field = Post Date Operation = Cycle Is Value = Billing Cycle, then
Select the cycle from the available dropdown.
Some Reports will include preset lines for this section. Hierarchy Do Not Use Order By Optional – Some Reports will include preset lines for this section.
The Statement of Account - PeopleSoft will default to PDF and should always be run in PDF.

29
New reports will show a status of Submitted. As you refresh the page, this will change to Processing, and then Successful. Alternatively, you may opt to simply return to this page at a later time (you do not have to refresh the page and wait for the report to process) or enable email notifications for Reports (See topic 11, page 32). Once Successful, the Name becomes a link (See above). Click on the link to launch the file. Reports will automatically drop off this page after 35 days. If desired, you may manually remove a report from the Downloads page by checking the box at left and clicking . Saving Reports and Accessing Them Later If you have a report that you run on a regular basis, you may save it as a “Favorite” to make it easier to access later. Choose your report and set the criteria as desired (criteria can always be altered later with each processing of the report). Name your report. This name MUST be different than the system report. Example: Here the Statement of Account – PeopleSoft is being saved.
You will receive an error message if you forget to change the name.
Click To access Saved reports at a later time, choose My Saved Reports from the Report Type dropdown. They will be listed in alphabetical order.
To remove a Saved report, launch the report and then
click at the top of the Report’s Criteria page.

30
Scheduling Reports to Run Automatically In addition to Saving reports, you may also schedule a report to run automatically. Choose your report and set the criteria as desired. Check the box to Schedule to Run Automatically Select a Frequency (Weekly, Monthly, Daily, Cycle)
Options for Day or Cycle are dependent on the Frequency chosen.
Access Scheduled Reports from Reports > Download.
You may also access them from the Home page
Scheduled criteria will display on the Report List.
31
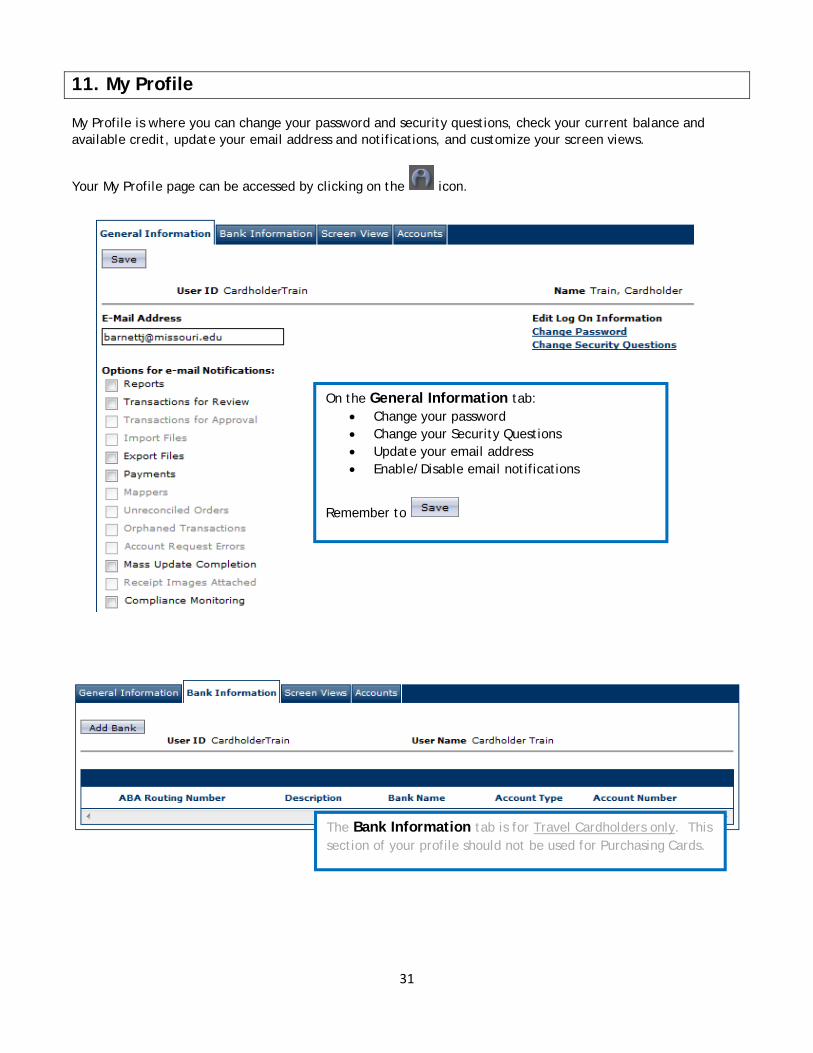
11. My Profile My Profile is where you can change your password and security questions, check your current balance and available credit, update your email address and notifications, and customize your screen views.
Your My Profile page can be accessed by clicking on the icon.
On the General Information tab: Change your password Change your Security Questions Update your email address Enable/Disable email notifications
Remember to
The Bank Information tab is for Travel Cardholders only. This section of your profile should not be used for Purchasing Cards.

32
On the Screen Views tab: Change the number of transactions viewed on the Transaction List
o This defaults to 20 but can be changed from 1-100 lines Add additional columns to your List by selecting a column from Available Columns and
clicking Columns may be removed from the List by selecting a column from Selected Columns and
clicking o Note that only cardholder-added columns may be removed. Information
designated by Procurement as a required column is marked with (Required) and cannot be removed from this list.
Change the display order of the Selected Columns by highlighting a column and using the navigation arrows at right to move up and down within the list.
Remember to
On the Accounts tab: View a list of your accounts View Account status (Active, Lost/Stolen, Closed) and Open Date
Click on the Account Number link to view additional details of the account.
Note: The Payment and Statement icons are for Travel Cards, not Purchasing Cards

33
This page will display: Account Number: masked, last 4 digits will display Current Balance: for the current Billing Cycle Available Credit: how much of your Credit Limit remains for the
current Billing Cycle) Hierarchy ID: where your card resides and who are your
Approving Officials Status Open Date Second Row of Embossing: your department Phone number and Addresses on record Dollar Limits - Single Amount (Transaction), Credit (Monthly,
Cycle) Transaction Limits – number of transactions allowed per day or
per month
34
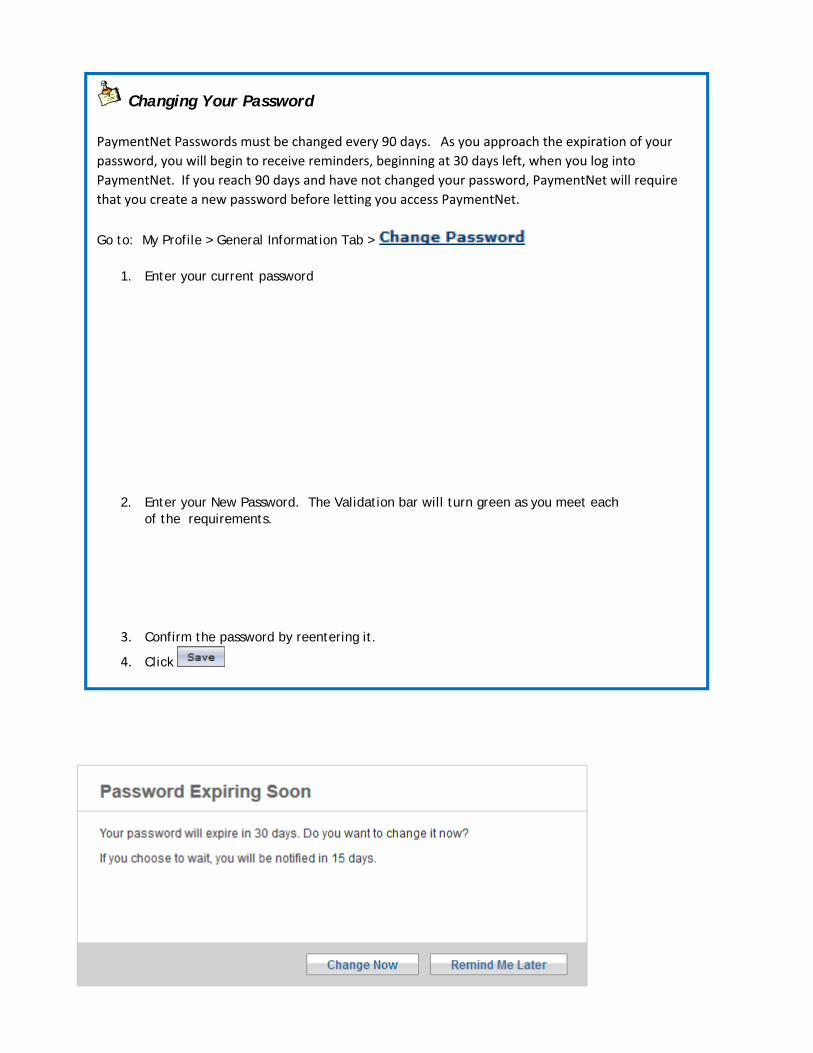
Changing Your Password PaymentNet Passwords must be changed every 90 days. As you approach the expiration of your
password, you will begin to receive reminders, beginning at 30 days left, when you log into
PaymentNet. If you reach 90 days and have not changed your password, PaymentNet will require
that you create a new password before letting you access PaymentNet.
Go to: My Profile > General Information Tab >
1. Enter your current password
2. Enter your New Password. The Validation bar will turn green as you meet each
of the requirements.
3. Confirm the password by reentering it.
4. Click

35

36
Glossary of Terms Addendum The small icons to the left of the Transaction ID in the Transaction list alert users that a merchant may be passing enhanced transaction detail. Formerly known as Third Tier or Level 3 Reporting detail, it is passed by approximately 20% of merchants. PaymentNet 4 displays this icon for almost all transactions, even though they may not actually pass the information. Adding Lines The process of dividing a transaction into multiple parts and allocating the parts to different MoCodes and/or PS Accounts. Also known as splits, splitting, or split-funding. Approving Official An Approving Officials, or AO, is responsible for monitoring card activity and ensuring procedures are followed, reporting misuse or abuse to Procurement Operations, approving transactions by signing the Statement of Account - PeopleSoft, authorizing new applications or changes to existing accounts, and ensuring Statements are submitted to ImageNow. Approving Officials may reconcile transactions in PaymentNet (with the Editor role), or may not have PaymentNet access (and are described as having “Signature Only Authority”). A department MUST have at least one (1) Approving Official and may designate up to three (3) per hierarchy, based on the number of active accounts or the need for backup Approving Officials. If an Approving Official is also a cardholder, there MUST be a second Approving Official to reconcile and approve charges. An Approving Official cannot approve his/her own transactions. Authorization The state of a transaction when it was between the point that it was approved at the point-of-sale by the merchant, but has not yet posted to the cardholder’s account. The exchange of goods/services has already occurred, but the merchant does not receive payment until they submit the authorization for payment or post the transaction. This authorization date becomes the Transaction Date in PaymentNet. Billing Cycle The period of time between billings based on organization accounting needs. Cycles begin on the 25th of the month and end on the 24th of the following month. These dates are adjusted as needed if they occur on weekends or holidays. For specific dates throughout the current fiscal year, visit: http://www.umsystem.edu/ums/fa/procurement/card/billing Chart of Accounts (COA) A predefined accounting system used by an organization that is compatible with its financial structure. It is made up of segments where a user enters values. A COA is the structure of the account codes, and the accounting codes are the actual values. Children Sub-groups within a hierarchy defined by the parent and child relationship. Multiple children can report up to a single parent, and in turn, parents can roll-up and report to a parent above them. Comma-Separated Values (CSV) A simple file format available in Reports to move tabular data (text and numbers) between programs.
37
Compliance Monitoring This is a program enabled in PaymentNet to ensure transactions adhere to the University’s card policy. The program will flag transactions that are split (see Stringing), exceed certain thresholds (limits), or that originate from questionable merchants (or types of merchants). Dispute To call into question a transaction on an account. Disputes can be submitted online through PaymentNet. Editor An Editor has access to reconcile transactions in PaymentNet. Access is given by Hierarchy (or Hierarchy and Children) so that an Editor can see the transactions for a department. An Editor may sign the Statement of Account - PeopleSoft monthly report as the Editor and forwards that Statement to the Approving Official for final signature. The Editor may also be responsible for submitting Statements of Account to ImageNow, if assigned that duty by the AO. A department may assign Editors as needed to assist the Approving Official -they are not required, but this role is available if the department wishes to separate certain duties, or if all Approving Officials are Signature Only Authority. A maximum of three (3) Editors are allowed per hierarchy. If an Editor is also a cardholder, the Editor may reconcile his/her own transactions in PaymentNet, but those transactions MUST be approved by a separate Approving Official. Employees Any PaymentNet user role, such as Cardholder, Editor, or Auditor. These roles are used in conjunction with Scope to determine what an Employee can see when he/she accesses PaymentNet. Exported A process performed by Procurement Operations on a weekly and monthly basis that electronically feeds transaction data from PaymentNet into PeopleSoft. Once this feed occurs, departments will see purchasing card data in the Income Statement of WebApps, and all segments of the Chart of Accounts become locked (read-only) in PaymentNet. Hierarchy A pyramid-like group structure within PaymentNet that organizes divisions and departments into parent-child relationships for access and reporting purposes. A hierarchy consists of a group of Approving Officials and the cardholders for which they approve. Each hierarchy is allowed a maximum of three (3) Approving Officials and three (3) Editors. Merchant Category Code (MCC) A four-digit number assigned to a merchant by their bank which classifies the type of goods or services provided by the merchant.
Examples: 5271 = Mobile Home Dealer Closed 5411 = Grocery Stores, Supermarkets Open
5812 = Eating Places, Restaurants Open 5942 = Bookstores Open 5933 = Pawn Shops Closed
Merchant Category Code Groups (MCCG) A group of MCCs used by the University to help determine what is allowed and what is prohibited on the purchasing card. Attempting a transaction outside of the group assigned to an individual’s card will result in a declined transaction.

38
Reconcile The process of reconciling transactions includes:
Reviewing the appropriateness of purchases Reviewing/editing MoCodes and PS Accounts (including split-funding) Add transaction specific documentation Confirming possession of receipts Verifying no sales tax was charged Disputing transactions when needed
Scope Determines how much an Employee can see when in PaymentNet. Options include Self (being able to see your own transactions or your own access), Hierarchy, and Children in various combinations. Splits (Split-funding) See Adding Lines Splitting See Stringing Statement of Account - PeopleSoft A chronological summary by billing cycle of all transactions by cardholder, including funding (MoCode, PS Account) and documentation (Job Number, Comments), that has been signed by the cardholder and the department Approving Official. Completed Statements of Account must be submitted to ImageNow by the 10th of the month following the end of the billing cycle. For specific dates throughout the current fiscal year, visit: http://www.umsystem.edu/ums/fa/procurement/card/billing Stringing Splitting or stringing is the practice of committing multiple purchasing card transactions to circumvent delegated
authority levels, bypass University competitive bidding requirements, or avoid maximum delegated authority
levels. The splitting or stringing of purchases with the University purchasing card is prohibited and may result in
suspension or cancellation of accounts.
Single transactions and monthly spending limits may be adjusted by contacting Procurement. For more
information on the Purchasing Card Change Form, visit:
http://www.umsystem.edu/ums/fa/procurement/outlook_forms

39
Appendix A: Transactions Requiring Special Documentation
There are eleven (11) types of transactions that are considered valid business purchases on the purchasing card, but must have additional documentation recorded. This documentation must be recorded electronically in PaymentNet, using the Job Number, Comments, or Transaction Notes fields.
Alcoholic Beverages - At times there are legitimate expenditures for alcohol related to the promotion of the University's interests. A statement explaining how this expenditure benefits the University must be provided in the PaymentNet system for each purchase of alcohol products.
Dues - Use of University funds for organizational memberships and dues may be permitted for institutional memberships in organizations that provide educational or professional service of value to the institution or to one of its component parts. Generally, University funds may not be used to pay individual personal membership dues, unless needed to discharge University responsibilities, or which provide educational, professional and other services of value to the institution. The purpose of the membership, the complete name of the organization and the name of the member should be clearly described in the PaymentNet System.
Food for Human Consumption - If food is purchased for a University sponsored event/meeting and less than 10 people are attending, the names of those people must be listed in PaymentNet. If 10 or more are in attendance only the group name is necessary. The purpose of the event/meeting must also be provided. If the Approving Official attends the event/meeting, his/her supervisor must also sign the statement for approval.
Food for Non-Human Consumption- If food is purchased for non-human consumption the purpose must be provided in the PaymentNet system.
Fuel - Whenever possible fuel should be purchased from the University Gas Station using a University issued fuel card. (University gas station is located on the Columbia campus) The Kansas City, Missouri S&T and Columbia campuses utilize the JP Morgan fleet card. The St. Louis campus allows the use of the purchasing card to outside vendors to purchase gasoline for a University vehicle. The license number of the vehicle for which gas was purchased must be entered in the PaymentNet system. If fuel is purchased for other reasons it must be documented in the PaymentNet system.
Hazardous or Radioactive Materials - Items which may be flammable, corrosive, reactive, explosive, toxic or radioactive are considered hazardous and may be purchased with the Purchasing Card, but only by or on behalf of a person who is authorized or approved. These purchases must be reported and documented in the PaymentNet System and in accordance with the appropriate campus requirements.
Incidental Expenses - Certain exceptions to incidental expenses can be made including, for example, flowers, personal convenience items, holiday decorations, and greeting cards. (See UM Business Policy Manual, Section 217). Unusual items that do not have an obvious University purpose must have a statement in the PaymentNet system explaining how the items will benefit the University.
Third Party Payment Providers - If a third party payment provider is being used, including for example PayPal, provide documentation as to what the item was and whom the actual item was purchased from in the PaymentNet system.
Logo/Licensed Items - Any item bearing one or more of the University designs, seals, trade names and symbols that have come to be associated with the University of Missouri, University of Missouri-Columbia, University of Missouri-Kansas City, University of Missouri-Rolla, or the University of Missouri-St. Louis. Items that are to be printed may be purchased with prior approval of the appropriate campus licensing and trademark office. Items that are pre-printed can be purchased without prior approval from the appropriate campus licensing and trademark office and must be documented in the PaymentNet System.

40
Transportation - Business purpose of the trip, which is required for tax purposes as an accountable plan, should be recorded in PaymentNet in Transaction Notes including the complete spelling of any acronyms (this information is available through drilldown in web financial reports after the monthly upload to PeopleSoft). Additionally, it is recommended the cardholder also record business purpose in Comments in abbreviated form because this information prints on the monthly Statement of Account (PeopleSoft). For rental cars include the number of days the vehicle was rented. Approval is required by the traveler's administrative superior or designee as determined by each campus.
Gift Cards - Must be in compliance with Section 216 Awards, Gifts, & Prizes of the UM System Business Policy & Procedure Manual. In addition, Columbia campus departments purchasing gift cards for Research and or Subject Participant Payments must have prior approval from the campus Accounting Office. Gift cards may not be purchased as a means to pay for goods or services to be utilized by the University. The business purpose of the gift card must be documented in the PaymentNet system. For further information on Awards go to http://www.umsystem.edu/ums/rules/bpm/bpm200/manual_216/.

41
Appendix B: Useful Queries & Reports Query 1: Reconcile by One Cycle and One Cardholder at a Time Query 2: Find Accounting Code Specific Info (Edit Complete status, MoCode, Account, Job Number, or Comments): Query 3: View Summary of All Disputed Transactions Query 4: Find Transportation Based Transactions Report 1: Detailed List of Charges by Billing Cycle Report 2: History of Declined Transactions Report 3: Alternate Listing of All Disputed Transactions Query 1: Reconcile by One Cycle and One Cardholder at a Time
Field: Post Date Operation: Cycle Is Value: Billing Cycle <Choose from dropdown>
Field: Cardholder Last Name Operation: Is Equal To Value: <enter last name> Or Contains (Add a second Criteria line for Cardholder First Name if needed)
Query 2: Find Accounting Code Specific Info (Edit Complete, MoCode, Account, Job Number, or Comments)
Field: Accounting Code Values Operation: choose according to need Chart Name: COA – UMCARDS
(Wait several seconds for Segment Name to populate) Segment Name: <choose from dropdown> Segment Value: <enter value>
42
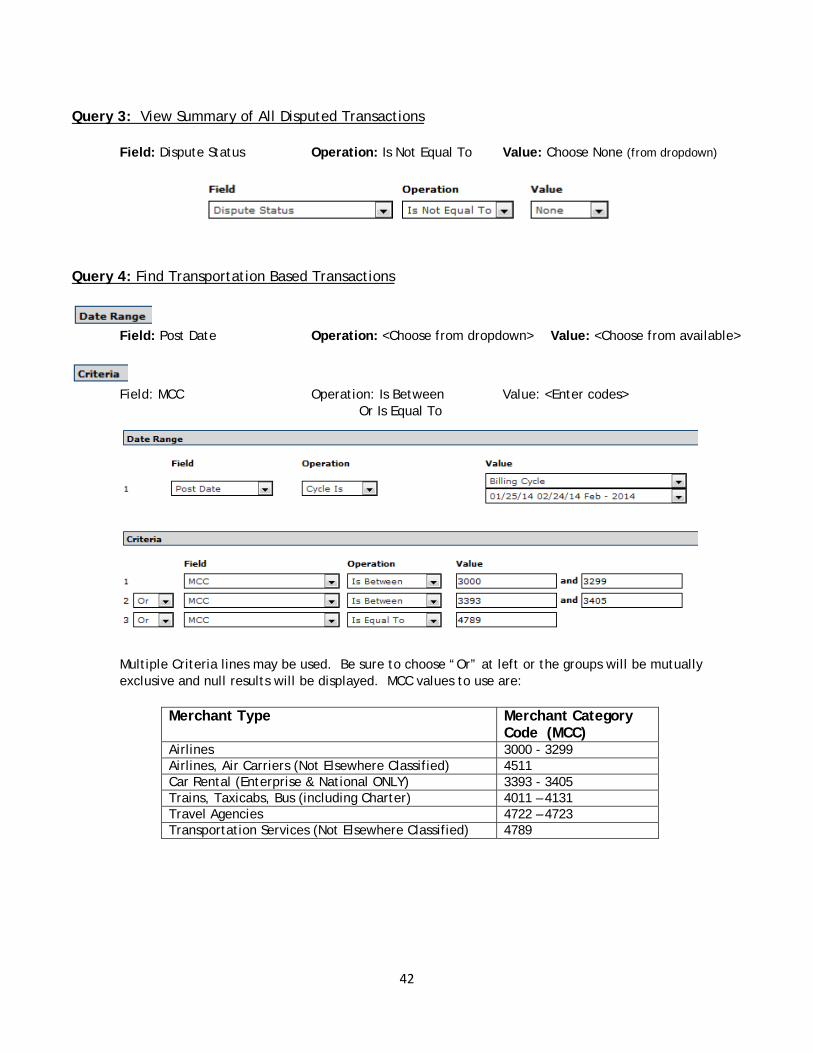
Query 3: View Summary of All Disputed Transactions Field: Dispute Status Operation: Is Not Equal To Value: Choose None (from dropdown) Query 4: Find Transportation Based Transactions
Field: Post Date Operation: <Choose from dropdown> Value: <Choose from available>
Field: MCC Operation: Is Between Value: <Enter codes> Or Is Equal To
Multiple Criteria lines may be used. Be sure to choose “Or” at left or the groups will be mutually exclusive and null results will be displayed. MCC values to use are:
Merchant Type Merchant Category Code (MCC)
Airlines 3000 - 3299 Airlines, Air Carriers (Not Elsewhere Classified) 4511 Car Rental (Enterprise & National ONLY) 3393 - 3405 Trains, Taxicabs, Bus (including Charter) 4011 – 4131 Travel Agencies 4722 – 4723 Transportation Services (Not Elsewhere Classified) 4789

43
Report 1: Detailed List of Charges by Billing Cycle Users will no longer receive an email at the close of the billing cycle notifying cardholders that transactions are available for reconciliation. The following report may serve as a substitute list which can be distributed to cardholders. Report Type = Transaction Report Name = Transaction Detail with Page Breaks
Choose format based on how you want to distribute to cardholders. The default is PDF for this report, but Excel may be chosen if desired.
Field: Post Date Operation: Cycle Is Value: Billing Cycle Choose from dropdown Criteria and Order By sections can remain as they default.
Report 2: History of Declined Transactions Report Type = Transactions Report Name = Declines Field: Decline Date Operation: Is Relative Value: Last Days Enter number of days desired
Order By section can remain it they defaults
Suggestion: If you would like a regular report of Declined transactions, try scheduling this report to run every week, biweekly, monthly, etc. Once scheduled, it will run automatically and appear in Reports > Download when ready. (See Topic 10, page 30)
44
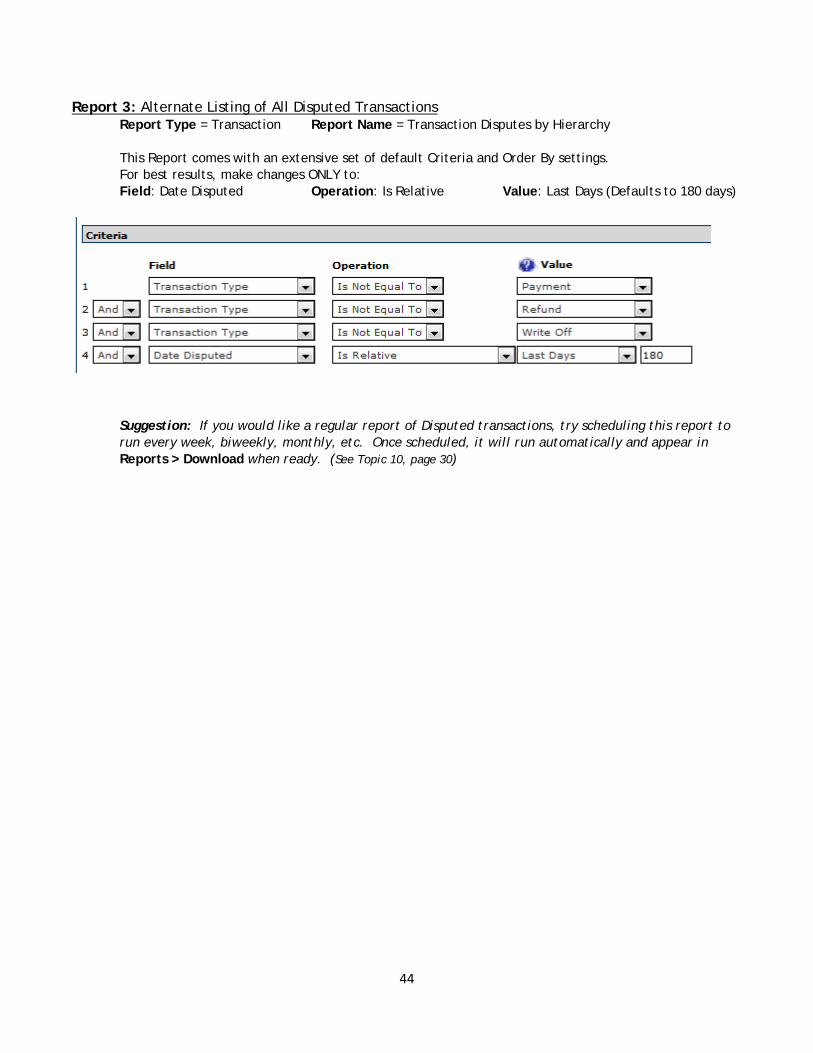
Report 3: Alternate Listing of All Disputed Transactions Report Type = Transaction Report Name = Transaction Disputes by Hierarchy
This Report comes with an extensive set of default Criteria and Order By settings. For best results, make changes ONLY to: Field: Date Disputed Operation: Is Relative Value: Last Days (Defaults to 180 days)
Suggestion: If you would like a regular report of Disputed transactions, try scheduling this report to run every week, biweekly, monthly, etc. Once scheduled, it will run automatically and appear in Reports > Download when ready. (See Topic 10, page 30)
45
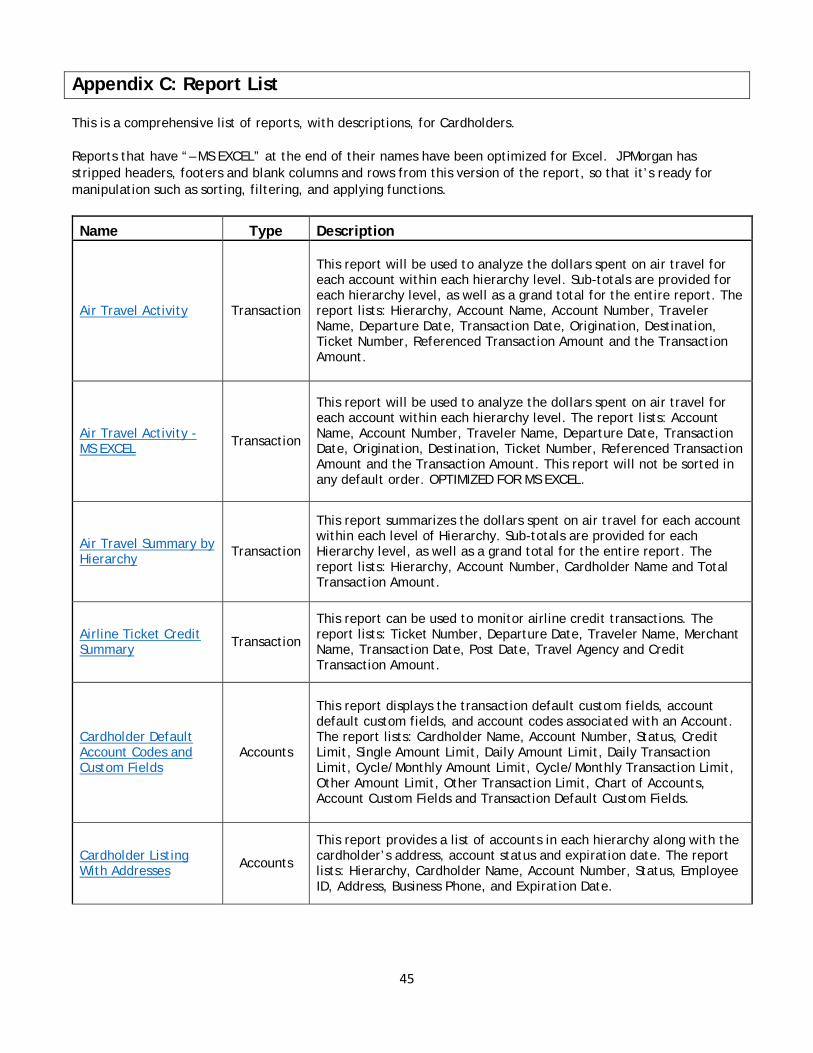
Appendix C: Report List This is a comprehensive list of reports, with descriptions, for Cardholders. Reports that have “– MS EXCEL” at the end of their names have been optimized for Excel. JPMorgan has stripped headers, footers and blank columns and rows from this version of the report, so that it’s ready for manipulation such as sorting, filtering, and applying functions.
Name Type Description
Air Travel Activity Transaction
This report will be used to analyze the dollars spent on air travel for each account within each hierarchy level. Sub-totals are provided for each hierarchy level, as well as a grand total for the entire report. The report lists: Hierarchy, Account Name, Account Number, Traveler Name, Departure Date, Transaction Date, Origination, Destination, Ticket Number, Referenced Transaction Amount and the Transaction Amount.
Air Travel Activity - MS EXCEL
Transaction
This report will be used to analyze the dollars spent on air travel for each account within each hierarchy level. The report lists: Account Name, Account Number, Traveler Name, Departure Date, Transaction Date, Origination, Destination, Ticket Number, Referenced Transaction Amount and the Transaction Amount. This report will not be sorted in any default order. OPTIMIZED FOR MS EXCEL.
Air Travel Summary by Hierarchy
Transaction
This report summarizes the dollars spent on air travel for each account within each level of Hierarchy. Sub-totals are provided for each Hierarchy level, as well as a grand total for the entire report. The report lists: Hierarchy, Account Number, Cardholder Name and Total Transaction Amount.
Airline Ticket Credit Summary
Transaction
This report can be used to monitor airline credit transactions. The report lists: Ticket Number, Departure Date, Traveler Name, Merchant Name, Transaction Date, Post Date, Travel Agency and Credit Transaction Amount.
Cardholder Default Account Codes and Custom Fields
Accounts
This report displays the transaction default custom fields, account default custom fields, and account codes associated with an Account. The report lists: Cardholder Name, Account Number, Status, Credit Limit, Single Amount Limit, Daily Amount Limit, Daily Transaction Limit, Cycle/Monthly Amount Limit, Cycle/Monthly Transaction Limit, Other Amount Limit, Other Transaction Limit, Chart of Accounts, Account Custom Fields and Transaction Default Custom Fields.
Cardholder Listing With Addresses
Accounts
This report provides a list of accounts in each hierarchy along with the cardholder’s address, account status and expiration date. The report lists: Hierarchy, Cardholder Name, Account Number, Status, Employee ID, Address, Business Phone, and Expiration Date.
46
Name Type Description
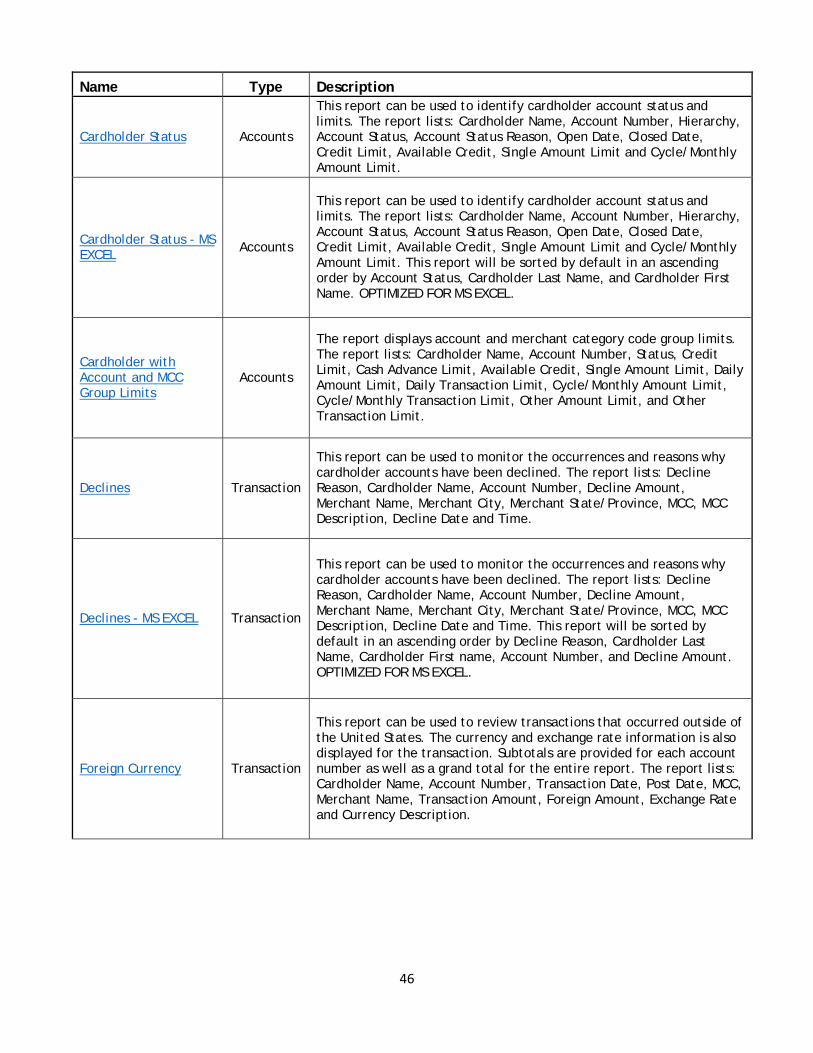
Cardholder Status Accounts
This report can be used to identify cardholder account status and limits. The report lists: Cardholder Name, Account Number, Hierarchy, Account Status, Account Status Reason, Open Date, Closed Date, Credit Limit, Available Credit, Single Amount Limit and Cycle/Monthly Amount Limit.
Cardholder Status - MS EXCEL
Accounts
This report can be used to identify cardholder account status and limits. The report lists: Cardholder Name, Account Number, Hierarchy, Account Status, Account Status Reason, Open Date, Closed Date, Credit Limit, Available Credit, Single Amount Limit and Cycle/Monthly Amount Limit. This report will be sorted by default in an ascending order by Account Status, Cardholder Last Name, and Cardholder First Name. OPTIMIZED FOR MS EXCEL.
Cardholder with Account and MCC Group Limits
Accounts
The report displays account and merchant category code group limits. The report lists: Cardholder Name, Account Number, Status, Credit Limit, Cash Advance Limit, Available Credit, Single Amount Limit, Daily Amount Limit, Daily Transaction Limit, Cycle/Monthly Amount Limit, Cycle/Monthly Transaction Limit, Other Amount Limit, and Other Transaction Limit.
Declines Transaction
This report can be used to monitor the occurrences and reasons why cardholder accounts have been declined. The report lists: Decline Reason, Cardholder Name, Account Number, Decline Amount, Merchant Name, Merchant City, Merchant State/Province, MCC, MCC Description, Decline Date and Time.
Declines - MS EXCEL Transaction
This report can be used to monitor the occurrences and reasons why cardholder accounts have been declined. The report lists: Decline Reason, Cardholder Name, Account Number, Decline Amount, Merchant Name, Merchant City, Merchant State/Province, MCC, MCC Description, Decline Date and Time. This report will be sorted by default in an ascending order by Decline Reason, Cardholder Last Name, Cardholder First name, Account Number, and Decline Amount. OPTIMIZED FOR MS EXCEL.
Foreign Currency Transaction
This report can be used to review transactions that occurred outside of the United States. The currency and exchange rate information is also displayed for the transaction. Subtotals are provided for each account number as well as a grand total for the entire report. The report lists: Cardholder Name, Account Number, Transaction Date, Post Date, MCC, Merchant Name, Transaction Amount, Foreign Amount, Exchange Rate and Currency Description.

47
Name Type Description
Level III Temporary Services
Transaction
This report can be used to analyze information from temporary services. Total transactions are provided for each supervisor as well as a grand total for the entire report. The report lists: Transaction ID, Transaction Date, Post Date, Merchant Name, Merchant City, Merchant State/Province and Transaction Amount. It also includes Source ID, Job Description, Temporary Employee Name and Social Security Number, Requestor, Job Code and Supervisor Name. Finally, time sheet information is displayed on the report such as Start Date, Week Ending, Hours, Overtime, Rate, Subtotal, Message ID, and Customer Code. Contents of this report are best viewed in PDF format.
List of Purchases by PeopleSoft Chart Field String
Transaction
(Custom report) This report groups transactions by PeopleSoft Chart Field String and may be used when reconciling an account with FRS/PeopleSoft and purchasing card transactions. A subtotal is given for each Chart Field String and a grand total is given for the entire report.
Statement of Account - PeopleSoft
Transaction
The Statement of Account - PeopleSoft Report shows transaction information including PeopleSoft MoCode and Account Allocation. This report must be printed every billing cycle for each Purchasing and Fleet Card. It must be signed and forwarded to the proper campus Procurement office no later than the 10th of the month following the end of billing cycle.
Statement of Account Landscape
Transaction
This report provides a listing of the previous cycle transaction information and when available; Accounting Code Allocations, Transaction Notes, Custom Fields and Transaction Addendum Detail. The report lists: Account Name, Account Number, Account Address, Custom Field Name/Values, Transaction ID, Transaction Date, Post Date, Merchant Name, Original Merchant Name, Merchant City, Merchant State/Province, MCC, Original Amount, Sales Tax, and Transaction Amount. The report includes signature lines at the bottom of the statement for the cardholder and supervisor, to assist in the review and reconciliation process. This statement is not an official bank billing statement and cannot be used for remittance. File prints in landscape orientation.
Transaction Detail Transaction
This report can be used to monitor the purchases for each account. Transactions as well as line items are included and payments are excluded from this report. Sub-totals are provided for each cardholder and central bill account, as well as a grand total for the entire report. The report lists: Cardholder Name, Transaction ID, Transaction Date, Post Date, Merchant Name, Merchant City, Merchant State/Province, MCC, Debit Amount, Credit Amount, Sales Tax and Transaction Type.

48
Name Type Description
Transaction Detail - MS EXCEL
Transaction
This report can be used to monitor the purchases for each account. Transactions as well as line items are included and payments are excluded from this report. The report lists: Cardholder Last Name, Cardholder First Name, Account Number, Transaction ID, Transaction Date, Post Date, Merchant Name, Original Merchant Name, Merchant City, Merchant State/Province, MCC, Debit Amount, Credit Amount, Sales Tax and Transaction Type and additional fields important to transaction analysis. Additional fields are included to provide complete transaction detail data. This report will be sorted by default in an ascending order by Transaction ID. OPTIMIZED FOR MS EXCEL.
Transaction Detail with Accounting Codes and Notes
Transaction
The report displays transactions with their account codes, notes and custom fields. Transactions as well as line items are included and payments are excluded from this report. The report lists: Transaction ID, Cardholder Name, Account Number, Merchant Name, Merchant City, Merchant State/Province, MCC, Transaction and Post Dates, Transaction Amount, Transaction Type, Sales Tax, Transaction Notes, an unlimited number of Account Codes, and Transaction Custom Fields. Contents of this report are best viewed in PDF format.
Transaction Detail with Level III Airline Data - MS EXCEL
Transaction
This report will display transaction details and the associated airline addendum data (Level III). When viewing Level III airline data, columns for all Level III airline data will be visible but data will only be populated for the addendum information provided by the processor. This report will be sorted by default in a descending order by Hierarchy ID, Post Date, and Transaction ID. OPTIMIZED FOR MS EXCEL.